

Evaluation Board User Guide
UG-047
One Technology Way • P. O . Box 9106 • Norwood, MA 02062-9106, U.S.A. • Tel : 781.329.4700 • Fax : 781.461.3113 • www.analog.com
Evaluating the ADT7310/ADT7410 Temperature Sensors
FEATURES
Easy access to the ADT7310/ADT7410
Connects to any PC USB port
Self-contained evaluation system
Test points for access to interface signals
Secondary evaluation board allows remote temperature testing
PACKAGE CONTENTS
ADT7310/ADT7410 evaluation board
Secondary ADT7310/ADT7410 evaluation board
USB cable
CD including
Evaluation software
UG-047 user guide
PRODUCT DESCRIPTION
The ADT7310/ADT7410 evaluation board allows you to evaluate
all features of the ADT7310/ADT7410 high accuracy temperature
sensors. There are two boards—the main evaluation board and
the secondary evaluation board—within the evaluation kit that
have both the ADT7410 and ADT7310 on board.
The secondary board connects to the main board and can be
used to measure temperatures that are remote from the main
board while still using the evaluation software.
EVALUATION BOARD BLOCK DIAGRAMS
ADP3303AR-3.3
J1
D+, D–
ADP3303AR-3.3
3.3V
MICRO-
CONTROLLER
3V
D4
CSE
D1
2
C
I
SPI
CS
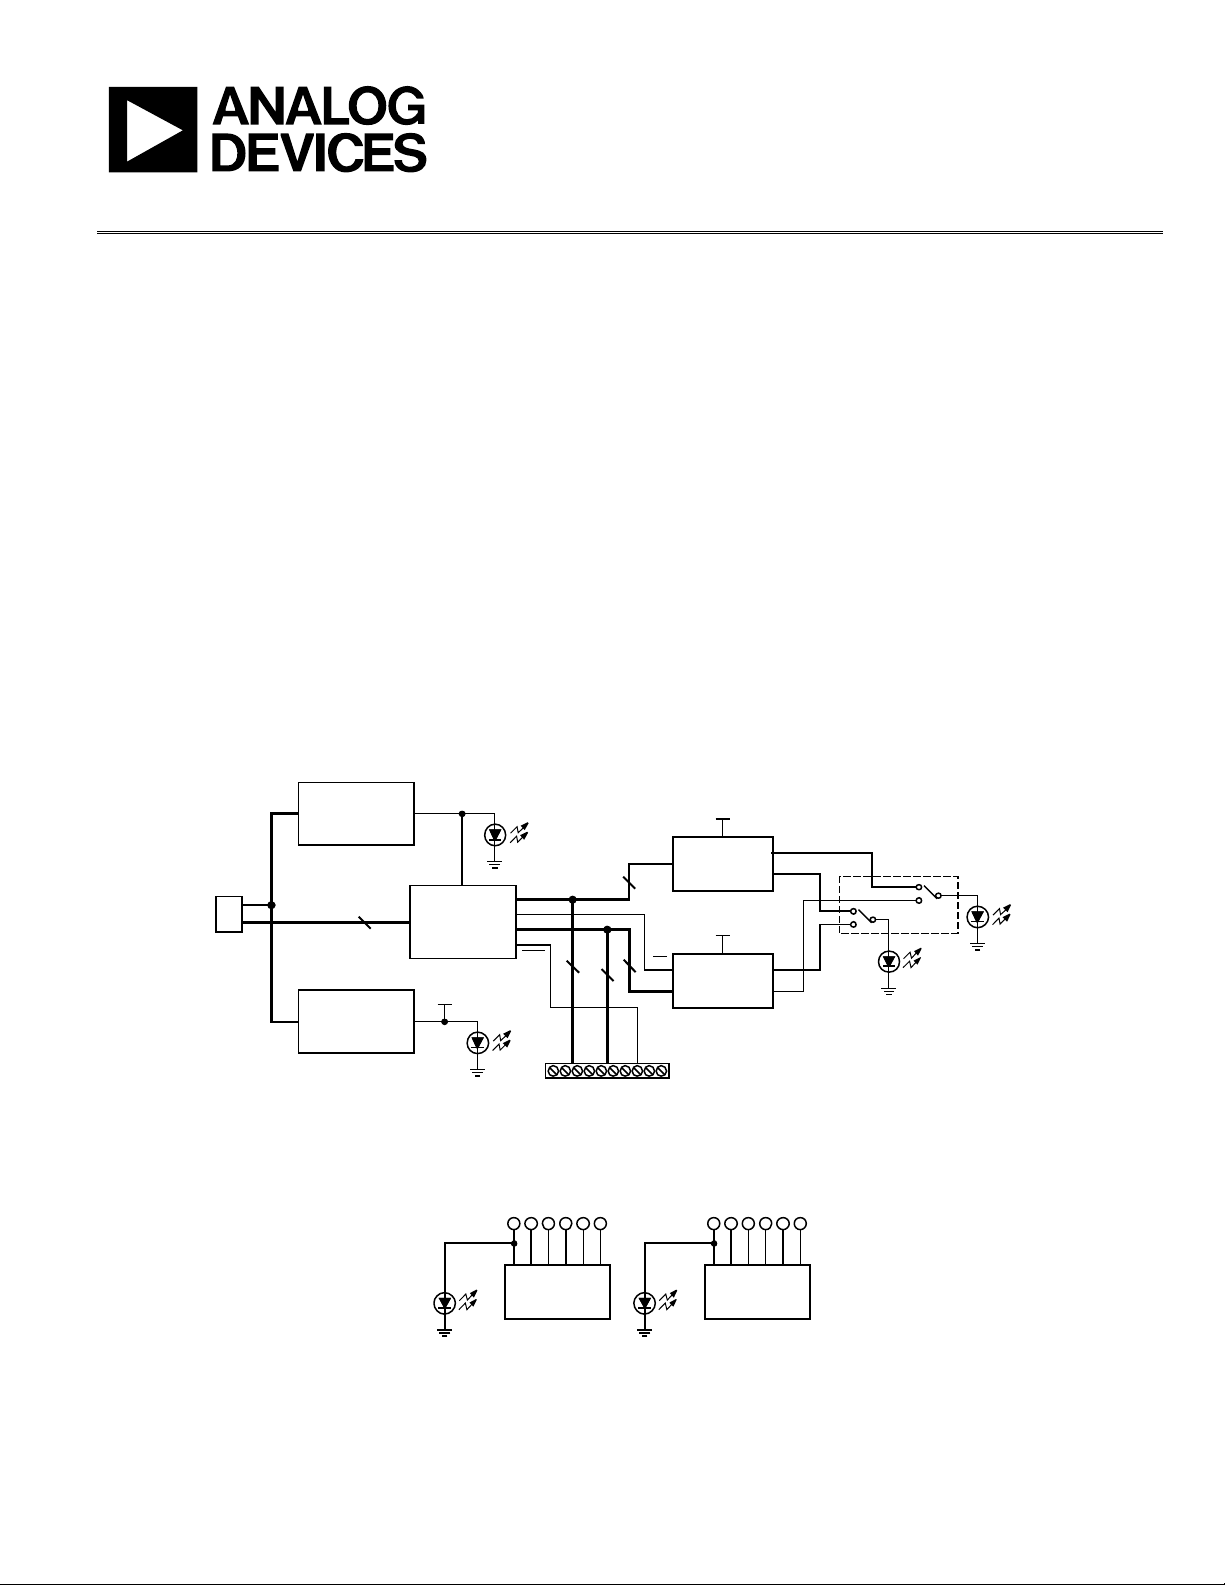
Figure 1. Main Evaluation Board
VCC
GND
SCL
SDAA0A1
ADT7410
D1
Figure 2. Secondary Evaluation Board
ADT7410
ADT7310
J2
D1
3V
3V
VCC
GND
SCLK
ADT7310
CT
INT
CT
ADG787
INT
CT
DOUT
DIN
INT
CSE
08429-002
D2
D3
08429-001
See the last page for an important warning and disclaimers. Rev. 0 | Page 1 of 12

UG-047 Evaluation Board User Guide
TABLE OF CONTENTS
Features .............................................................................................. 1
Package Contents .............................................................................. 1
Product Description ......................................................................... 1
Evaluation Board Block Diagrams ................................................. 1
Revision History ............................................................................... 2
Evaluation Board .............................................................................. 3
Setting Up the Evaluation Board ................................................ 3
Evaluation Board Description .................................................... 3
Evaluation Board Hardware ............................................................ 4
Connectors on the Main Board .................................................. 4
Connectors on the Secondary Board ......................................... 4
Indicator LEDs .............................................................................. 4
REVISION HISTORY
9/09—Revision 0: Initial Version
Connecting the Secondary Board
to the Main Evaluation Board ......................................................4
Evaluation Board Software ...............................................................5
Installing and Running the Software ..........................................5
Selecting the Device to Evaluate ..................................................5
Evaluating the ADT7310/ADT7410 ...............................................6
Configuration Register Tab ..........................................................6
Temperature Monitor Tab ............................................................7
ADT7310/ADT7410 Registers Tab .............................................8
Easy Setup.......................................................................................8
Evaluation Board Schematics and Artwork ...................................9
ESD Caution................................................................................ 12
Rev. 0 | Page 2 of 12

Evaluation Board User Guide UG-047
EVALUATION BOARD
SETTING UP THE EVALUATION BOARD
Follow these steps to set up the ADT7310/ADT7410 evaluation board:
1. Install the evaluation software from the evaluation kit CD
before connecting the evaluation board to your computer.
Run the file AD7x10 Evaluation Software Install.exe, and
follow all on-screen installation instructions.
2. Plug the USB connector from the USB port on your PC into
the mini-USB socket (J3) on the evaluation board. The
power indicator LED on the board should illuminate.
3. Your computer will automatically associate the evaluation
software with the board. The evaluation software is not
digitally signed. If a message window appears during the
association process, click Continue Anyway.
4. Ensure that all switches and links are in their default positions;
Switch 3 and Switch 4 should be set to the on position.
5. Start the ADT7310/ADT7410 evaluation software.
EVALUATION BOARD DESCRIPTION
The ADT7310/ADT7410 evaluation board allows you to evaluate
all features of the ADT7310/ADT7410. The board is powered
via the USB connection to the host PC. The evaluation software
allows data to be read from and written to the ADT7310/ADT7410.
The evaluation software should be installed on your PC before
the board is plugged in.
Figure 1 is a block diagram of the ADT7310/ADT7410 evaluation
board, showing all the main components and how they are
connected. Figure 12 and Figure 13 show the silkscreens for the
evaluation board to aid in locating components on the board.
The main components on the board are the ADT7310/ADT7410
high accuracy temperature sensors, U1 and U2.
Also on the main evaluation board is a microcontroller. This
microcontroller sets up and controls the ADT7310/ADT7410
over an SPI or I
to and from the PC.
The ADT7310/ADT7410 main evaluation board is powered via
the USB connection. The V
voltage regulator (3.3 V output) before being distributed around
the board. The LEDs illuminate when the board is powered.
The secondary board can be connected to the main board via
Connector J2. There is one ADT7310 and one ADT7410 on the
secondary board. The secondary board can be placed at some
distance from the main board to easily measure the temperature
of interest. There are also LEDs on the secondary board, which
illuminate to indicate that the secondary board is powered.
There are connectors and test points available on all signals of
interest to ensure easy accessibility.
2
C interface and takes care of the USB protocol
signal goes through an ADP3303
DD
Rev. 0 | Page 3 of 12

UG-047 Evaluation Board User Guide
EVALUATION BOARD HARDWARE
CONNECTORS ON THE MAIN BOARD
J1
J1 is a mini-USB socket. Connect the USB cable to this socket.
The USB signals, D+ and D−, along with power and ground for
the evaluation board, are connected to this socket.
J2
This connector is a 10-pin terminal block connector. It provides
access to the ADT7310/ADT7410 serial interface, interrupt, and
GPIO signals, as well as to the power and ground signals.
Table 1. J2 Connector Signals
J2 Pin Signal
1 VCC
2 GND
3 SDA
4 SCL
5 A0
6 A1
7 SCLK
8 DOUT
9 DIN
10
CSE
Note that Pin 3 and Pin 4 are labeled incorrectly on the PCB;
the correct pinout is listed in Tab le 1 .
CONNECTORS ON THE SECONDARY BOARD
J1
There is no connector mounted, but connections can be made
to the ADT7410 on the secondary board at this location.
Table 2. J1 Connector Signals
J1 Pin Signal
1 VCC
2 GND
3 SCL
4 SDA
5 A0
6 A1
J3
There is no connector mounted, but connections can be made
to the ADT7310 on the secondary board at this location.
Table 3. J3 Connector Signals
J3 Pin Signal
1 VCC
2 GND
3 SCLK
4 DOUT
5 DIN
6
CSE
INDICATOR LEDS
There are four indicator LEDs on the ADT7310/ADT7410 main
evaluation board and two LEDs on the secondary board. If an
LED is illuminated, the corresponding signal is active.
Table 4. Indicator LEDs—Main Board
LED Signal Color
D1 3.3 V Green
D2 INT Red
D3 CT Red
D4 3 V Green
Table 5. Indicator LEDs—Secondary Board
LED Signal Color
D1 ADT7410 VDD Green
D2 ADT7310 VDD Green
CONNECTING THE SECONDARY BOARD TO THE MAIN EVALUATION BOARD
You can use the evaluation board software to evaluate the
sensors on the secondary board. Connect the interfaces on
Connector J1 (for the ADT7410) and Connector J3 (for the
ADT7310) of the secondary interface to Connector J2 on the
main evaluation board. Ensure that all communication wires are
connected securely from J1 and J3 to J2 on the main board.
For the ADT7410, the A0 and A1 pins are address pins. The
evaluation software assumes that the external ADT7410 has A0
connected high and A1 connected low. A0 on the secondary
board must be connected directly to V
board. Do not connect A0 from the secondary board to the
main board because doing so would prevent communications
between the two boards.
Note that on the main board SDA and SCL are labeled incorrectly.
See Tab le 1 for the correct pinout of the Main Board Connector J2.
on the secondary
DD
Rev. 0 | Page 4 of 12

Evaluation Board User Guide UG-047
EVALUATION BOARD SOFTWARE
The evaluation software is operated in conjunction with the
evaluation hardware and allows you to investigate the properties
of the ADT7310/ADT7410.
INSTALLING AND RUNNING THE SOFTWARE
The software should be installed before the evaluation board is
plugged into the host computer.
To install the evaluation software, run the AD7x10 Evaluation
Software Install.exe program from the evaluation kit CD, and
follow all on-screen installation instructions. The software installs
by default into the ADT7x10 Evaluation Software directory within
the Analog Devices folder, accessible from your Programs menu.
Before running the software, ensure that the evaluation board is
plugged into the USB port of the host computer. Run the software
from the ADT7x10 Evaluation Software directory.
SELECTING THE DEVICE TO EVALUATE
Select to evaluate the ADT7410 or ADT7310 (see Figure 3). The
ADT7410 uses I
SPI communication with the on-board host microcontroller.
Selecting an External Part or an On-Board Part
It is possible to evaluate the on-board ADT7310/ADT7410 or to
evaluate ADT7310/ADT7410 devices that are external to the main
board. A secondary board is included in the evaluation kit to enable
temperature testing of parts that are remote from the main board.
The secondary evaluation board, or any other external ADT7310
or ADT7410 device, should be connected to the main board
through Connector J2.
Click the relevant button (On Board or External) to select an
on-board device or an external device to evaluate (see Figure 4).
2
C communication, whereas the ADT7310 uses
08429-003
Figure 3. ADT7x10 Evaluation Software Start-Up Window
Figure 4. Select On Board or External Part Window
08429-004
Rev. 0 | Page 5 of 12

UG-047 Evaluation Board User Guide
EVALUATING THE ADT7310/ADT7410
The evaluation software is tailored for the ADT7310 or the
ADT7410, depending on which device you select in the
ADT7x10 Evaluation Software Start-Up window.
CONFIGURATION REGISTER TAB
The Configuration Register tab, as shown in Figure 5, allows
you to change the ADC resolution from 13 bits to 16 bits, to set
the operational and interrupt modes of the part, to define the
number of faults in the fault queue, and to set the polarity of the
CT and INT pins. See the ADT7310 or ADT7410 data sheet for
more information on the effect of the configuration settings on
the behavior of the part.
8429-005
Figure 5. ADT7310 Configuration Register Tab
Rev. 0 | Page 6 of 12

Evaluation Board User Guide UG-047
TEMPERATURE MONITOR TAB
The Temperature Monitor tab is shown in Figure 6. The
current temperature from the part being evaluated is plotted in
this window. Both the ADC temperature reading and the current
temperature, displayed in degrees Celsius, are plotted. The high
and low temperature limits are also displayed on the plots.
The Temperature Threshold area is labeled 1 in Figure 6. If the
measured temperature goes above or below the programmed high
and low limits, or above the programmed critical threshold, the
corresponding button turns green.
The Temperature Value area, labeled 2 in Figure 6, shows the
measured ADC value and the temperature value converted into
degrees Celsius.
The Set Temperature Limits area, labeled 3 in Figure 6, allows
you to update the high, low, critical, and hysteresis temperature
limits. These values are displayed as decimal ADC values. Because
the conversion format from ADC code to temperature is twos
complement, any value greater than 4095 corresponds to a negative
temperature value. Use the arrow keys or type a number in the
box to update the limits.
The Log Data button is labeled 4 in Figure 6. Click this button
to open the window shown in Figure 7. You can log data to an
Excel or text file and select whether to log the temperature as an
ADC value or as a degree Celsius value, or both. The Logging
window also allows you to set a longer logging interval than the
default 50 ms.
The Temperature Values area, labeled 5 in Figure 6, displays
the temperature and limit values in degrees Celsius. These
values update automatically when you change any of the ADC
values in the Set Temperature Limits area.
08429-006
Figure 6. Temperature Monitor Tab
08429-007
Figure 7. Logging Window
Rev. 0 | Page 7 of 12

UG-047 Evaluation Board User Guide
ADT7310/ADT7410 REGISTERS TAB
The ADT7310 Registers tab is shown in Figure 8. When evaluating
the ADT7410, this tab is labeled ADT7410 Registers. This window
displays the contents of all the on-chip registers and allows you
to read to and write from these registers.
EASY SETUP
Clicking Easy Setup at the bottom of the ADT7310/ADT7410
Evaluation Software window returns the part to its original
power-on state.
8429-008
Figure 8. ADT7310 Registers
Rev. 0 | Page 8 of 12

Evaluation Board User Guide UG-047
EVALUATION BOARD SCHEMATICS AND ARTWORK
08429-009
C Addres s is s e t through software
2
I
Figure 9. ADT7310/ADT7410 Main Evaluation Board Schematic, ADT7310/ADT7410 Section
Rev. 0 | Page 9 of 12

UG-047 Evaluation Board User Guide
08429-010
Figure 10. ADT7310/ADT7410 Main Evaluation Board Schematic, USB Section
Rev. 0 | Page 10 of 12

Evaluation Board User Guide UG-047
I2C Address is s e t through software
08429-011
Figure 11. ADT7310/ADT7410 Secondary Evaluation Board Schematic
A
Figure 12. ADT7310/ADT7410 Main Evaluation Board Silkscreen
08429-012
AA
Figure 13. ADT7310/ADT7410 Secondary Evaluation Board Silkscreen
Rev. 0 | Page 11 of 12
08429-013

UG-047 Evaluation Board User Guide
NOTES
ESD CAUTION
Evaluation boards are only intended for device evaluation and not for production purposes. Evaluation boards are supplied “as is” and without warranties of any kind, express,
implied, or statutory including, but not limited to, any implied warranty of merchantability or fitness for a particular purpose. No license is granted by implication or otherwise under
any patents or other intellectual property by application or use of evaluation boards. Information furnished by Analog Devices is believed to be accurate and reliable. However, no
responsibility is assumed by Analog Devices for its use, nor for any infringements of patents or other rights of third parties that may result from its use. Analog Devices reserves the
right to change devices or specifications at any time without notice. Trademarks and registered trademarks are the property of their respective owners. Evaluation boards are not
authorized to be used in life support devices or systems.
©2009 Analog Devices, Inc. All rights reserved. Trademarks and
registered trademarks are the property of their respective owners.
UG08429-0-9/09(0)
Rev. 0 | Page 12 of 12
 Loading...