


AN-911
One Technology Way • P. O . Box 9106 • Norwood, MA 02062-9106, U.S.A. • Tel : 781.329.4700 • Fax: 781.461.3113 • www.analog.com
APPLICATION NOTE
A Detailed Guide to Powering the TigerSHARC Processors
by Mark Malaeb
INTRODUCTION
As technology constantly evolves and silicon geometry shrinks,
different supply requirements for powering these processors
emerge. Typically the core is powered with a lower voltage than
the I/Os. The I/Os are generally at a higher voltage to maintain
a compatible interface with other system devices. Also, as clock
speeds of 600 MHz are reached, these processors become more
power hungry. Thus, an efficient power management scheme
becomes critical.
This application note, in conjunction with the technical note
EE-170, (available from Analog Devices, Inc.), provides a guide
that can be used as a reference design for powering those
processors. EE-170 provides the detailed equations and
derivations for the power needs of the processors. This
application note discusses the voltage regulators/switchers
that are suitable for those processors running at 600 MHz.
The Tiger SHARC® processor requires three different supply
voltages, the core voltage of 1.2 V, the internal DRAM voltage
at 1.6 V, and the I/O voltage of 2.5 V. These three voltages are
discussed in details in the following sections.
Rev. 0 | Page 1 of 12

AN-911
TABLE OF CONTENTS
Introduction ...................................................................................... 1
Core Voltage (VDD = 1.2 V) ............................................................. 3
Component Value Derivations and ADP1821 Analysis .......... 3
Internal DRAM Voltage (V
Component Value Derivations and the ADP2105 Analysis ... 8
= 1.6 V) ................................. 7
DD_DRAM
I/O Voltage (V
The External Port Current ...........................................................9
The Link Port Current ..................................................................9
Component Value Derivations ....................................................9
Bill of Materials ............................................................................... 10
= 2.5 V) ............................................................9
DD_I/O
Rev. 0 | Page 2 of 12

AN-911
CORE VOLTAGE (VDD = 1.2 V)
The current requirement (IDD), on this voltage, consists of three
components: dynamic current, static current, and analog current.
These currents are defined in Equation 1.
I
DD
= I
DD_DYNAMIC
+ I
DD_STATIC
+ I
DD_ANALOG
(1)
where:
I
is the static portion of the current that is operating-
DD_STATIC
temperature dependent.
I
DD_ANALOG
is the current needed to power the on-board PLL and
its circuitry.
I
DD_DYNAMIC
I
DD_IDLE
= I
DD_CLU
+ I
DD_FFT
+ I
DD_COMPUTE
+ I
DD_CTRL
+ I
DD_DMA
+
(2)
where:
I
is the communications logic unit current.
DD_CLU
I
is the current consumption related to high activity
DD_FFT
floating-point operations.
I
DD_COMPUTE
is the current consumed by the activity operations of
the computational units.
I
is the current consumption due to continuous decision-
DD_CTRL
making sequence of instructions and predicted branches.
I
is the current consumed by a single DMA channel
DD_DMA
moving data from external to internal memory.
I
is the current consumption due to idle instructions with
DD_IDLE
no DMA or interrupts.
Using Equation 1 and assuming the worst-case maximum
dynamic current consumption; I
DD_DYNAMIC
The static current consumption at 55
characteristic curve, is I
DD_STATIC
= 0.32 A.
The maximum analog current consumption is I
= 4.99 A.
o
C, from the static current
DD_ANALOG
= 0.055 A.
Summing up all these currents using Equation 1 results in
I
= 4.99 A+ 0.32 A+ 0.055 A = 5.365 A (3)
DD
This is the total current needed at 1.2 V for each individual
Tiger SHARC processor. So a switching regulator, capable of
supplying 6 A at 1.2 V does the job. However, since the majority
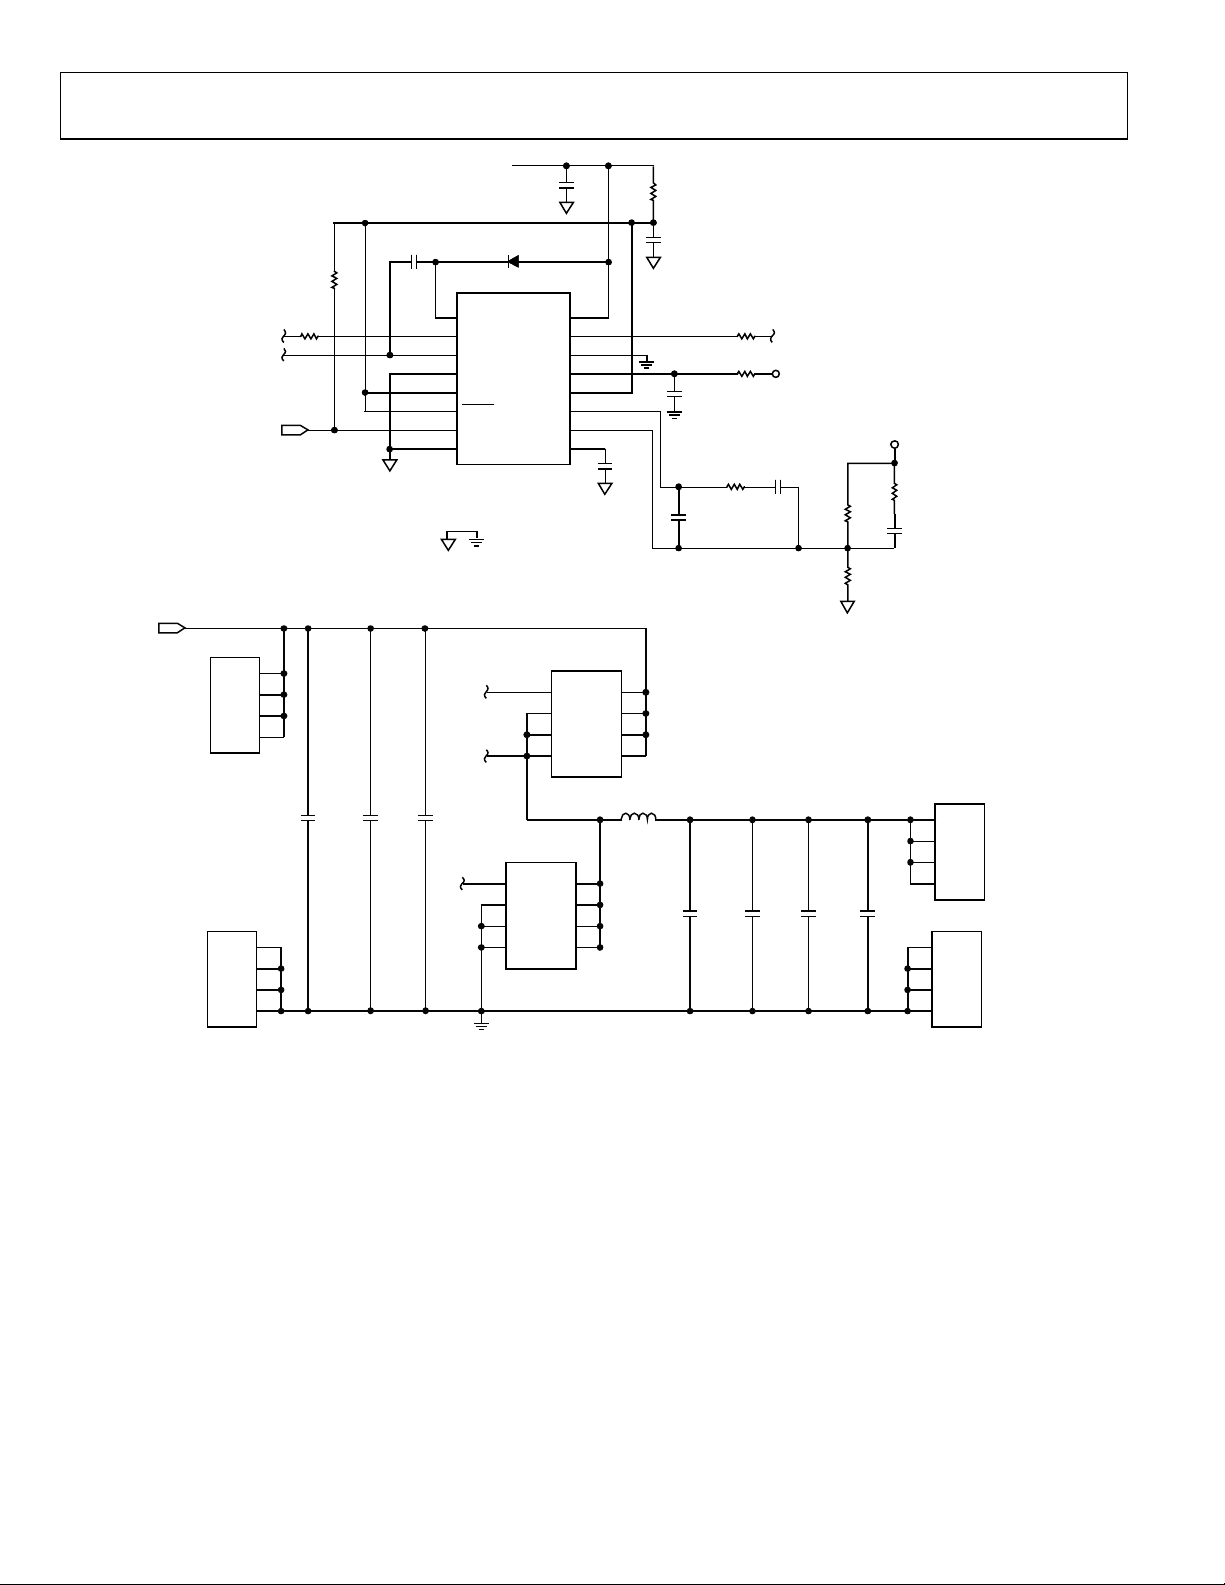
of Tig erSHARC applications implement two Tige rSHARC processors, a circuit to power such applications, using the ADP1821, is
discussed. This means that the current requirements doubled to
12 A at 1.2 V. The circuit is shown in Figure 1. This circuit has
been implemented and prototypes built and tested. This circuit
is usable with single Tige rSHARC processor applications as well.
COMPONENT VALUE DERIVATIONS AND ADP1821 ANALYSIS
The ADP1821 is a versatile, synchronous, step-down PWM
controller and is designed to drive all N-type channel power
FETs. Its output can be set as low as 0.6 V. It can also supply
currents as high as 20 A with the appropriate FET. The IC
input voltage range is from 3 V to 5.5 V and the power stage
voltage range is from 1 V to 24 V. The IC supply range can be
extended to 20 V with a simple Zener network to power the
device (as shown in Figure 2). This device can be synchronized
at any frequency between 300 kHz and 1.2 MHz by the external
frequency or by working at 300 kHz or 600 kHz by setting the
FREQ pin to either low or high, respectively. The high frequency
operation allows for smaller magnetic components. For this
application, the 600 kHz switching frequency is selected. The
soft start function allows quick startup while limiting the
inrush current. Soft start time can be adjusted by selecting the
appropriate C
(depending on input/output voltages). The component values
for this design were derived using Analog Devices power
spreadsheets (contact your local Analog Devices sales
representative to access the spreadsheets). The spreadsheet
employs more accurate equations that produce better results.
However, the data sheet equations put the user within the range
of results and provide a better understanding of the results.
capacitor. Its efficiency can be as high as 96%
SS
Rev. 0 | Page 3 of 12
AN-911
V
V
IN
1
2
3
4
5
6
7
8
U1
BST
DH
SW
SYNC
FREQ
SHDN
PWGD
GND
D1 BAT54
2
3
DH
SW
POK 1.2V
10kΩ
R3
0Ω
C5
R2
0.1µF
ADP1821
IN
GND
J1
4
V
IN
3
2
1
++
E4
330µF
J2
330µF
4
3
2
1
C1
E1
1µF
DH
SW
M2 IRF7834
4
DL
G
3
S
2
S
1
S
1
PVCC
DL
PGND
CSL
VCC
COMP
FB
SS
M1 IRF7821
4
G
3
S
2
S
1
S
D
D
D
D
16
15
14
13
12
11
10
C4
1µF
9
R1
10Ω
C6
1µF
R4
DL
0Ω
R5
SW
2.2kΩ
C7
2.2pF
VO 1.2V
C8
22nF
C10
39pF
5
D
6
D
7
D
8
D
L1
0.7µH
5
6
7
8
++
E2
470µF
470µF
R8
33kΩ
E3
C9
3.3nF
10µF
R6
2kΩ
R7
10kΩ,
1%
R9
10kΩ,
1%
V
O
C2
C3
10µF
1.2V
C11
2.2nF
1
2
3
4
J3
1
2
3
4
V
1.2V
O
J4
GND
VIN = 5V
V
= 1.2V AT IO = 12A
O
06716-001
Figure 1. Core Supply Voltage Circuit
Rev. 0 | Page 4 of 12

AN-911
Choosing the Input Capacitor Value
The input capacitor is used to ensure a smooth input supply
current. It should be chosen such that its impedance, at the
switching frequency, is lower than the impedance of the supply
upstream. The current rating for the input capacitor should be
higher than the rms input ripple current defined in EE-170.
Assuming an input voltage of 5.0 V and an output voltage of
1.2 V at 12 A, the current rating on the capacitors should be
at least about 5.125 A. With higher input voltages, the rating
requirements on the input capacitor current is lower. Thus,
these capacitor values still work at higher input voltages.
Also, a relatively large capacitance is used at the input to keep
the ripple voltage on the supply line low. This is especially
important where the supply line is high impedance. It is
recommended that the supply line be kept at low impedance.
Usually, a 100 µF to 1000 µF capacitor is used at the input
depending on the output impedance of the upstream supply.
In this application, two capacitors are paralleled to meet the
ripple current requirement and also provide a larger capacitance
(660 µF).
Setting the Output Voltage
The regulation output voltage is set using the following
equation:
−
OUT
VV
⎞
FB
⎟
V
⎟
FB
⎠
(4)
⎛
⎜
=
RR
BOTTOP
⎜
⎝
where:
R
is R7 (the high-side voltage divider resistance).
TOP
is R9 (the low-side voltage divider resistance (10,000 typ)).
R
BOT
V
is the desired output voltage (1.2 V).
OUT
is the feedback threshold voltage (0.6 V).
V
FB
Solve for R
R
by
TOP
= 10 × (1.2 − 0.6 )/0.6 = 10,000 (5)
TOP
Choosing the Compensating Loop Components
The buck converter is a second-order system (the LC output
filter generates two poles). To get a stable and good system
transient response, the compensation needs to be well designed.
The loop can be compensated using the zero generated by the
ESR of the output capacitor (Type II compensator). However,
because the ESR of the output capacitor is generally not well
characterized, one way of reducing the dependency on ESR is
to have multiple capacitors parallel with and lower than the
ESR value as was done for this design. A compensating scheme
called feedforward compensation (Type III compensator) was
used. The compensating loop elements for this circuit are shown
in Figure 1, which are R8, C9, C10, C11, and R6. These values
were derived from the following equations:
R8 = 0.0705 × R7 (f
)2 × LC/VIN (6)
SW
R8 is 34,000 and a 33,000 nF capacitor was used.
C9 = 1.6 nF (7)
A 3.3 nF capacitor was used.
C10 = 2/(2π × f
× R8) (8)
SW
C10 is 16 pF; the spreadsheet value was 39 pF.
C11 = 11.14/(R7 × f
)
SW
= 11.14/(10,000 × 600 kHz) (9)
C11 is 1.86 nF and a 2.2 nF capacitor was chosen.
R6 = 0.227/(C11 × f
SW
)
= 0.227/(1.86 × 600 kHz) (10)
R6 is 203 Ω; the spreadsheet value was 2000 .
These values are very sensitive to the ESR values of the output
capacitor and vary dramatically. Any combination of values will
work as long as the loop is stable.
Choosing the Output LC Filter Components
The LC filter is chosen to achieve a desired output voltage
ripple. This paragraph shows how the inductor value is derived.
L = V
OUT
[1 − V
]/(fSW × IL) (11)
OUT/VIN
where:
V
is the desired output voltage (1.2 V).
OUT
is the input voltage (5 V).
V
IN
f
is the converter switching frequency (600 kHz).
SW
is the inductor ripple current (typically 20% to 30% of the
I
L
maximum output current, in this design 20% is chosen).
Thus,
L = 1.2 [1 − 1.2/5]/(600 kHz × 12/5)
= 0.63 µH (12)
A standard inductor with value of 0.7 µH was chosen. Then the
inductor ripple current becomes:
I
= V
L
× [1 − V
OUT
OUT/VIN
]/(fSW × L)
= 2.17 A (13)
Rev. 0 | Page 5 of 12

AN-911
V
Next, the inductor’s current rating needs to be chosen based on
the following:
The I
SATURATION
current should be greater than IO + IL/2 = 12 +
2.17/2 = 13.08 A, and the I rms current value should be larger
than (I
2
O
+ I
2
L
/12)
1/2
= 12.02 A.
For the chosen output capacitor, the most important factor to
consider is the ESR. The ESR was chosen to meet the output
ripple specification. In this design, the ESR of the output
capacitor is chosen to be smaller than V
is the output voltage ripple, typically VO = 1% × VO is
(V
O
/IL = 5.5 mΩ
O
required). Thus, two capacitors, with ESR = 10 mΩ, were used
in parallel.
Choosing the MOSFETs
Typically, the MOSFETs must have low on resistance to minim-
2
ize power dissipation due to I
R and low gate charge to lower
gate losses and transition losses. However, the lower the on
resistance, the higher the gate charge (and transition losses).
Choose a MOSFET to balance those losses. For more details,
see the ADP1821 data sheet.
A switcher typically has two field effect transistors (FET): a
high-side FET and a low-side FET. For the high-side FET
selection, gate charge and on resistance should both be
considered. For a lower duty cycle application, the main loss
IN
R
IN
on the high-side FET is the transition loss, thus gate charge is
the first factor to be considered.
Because the low-side FET does not carry transition losses,
the main factor in its selection is low on resistance. The
following equation governs the behavior of the power loss
in the lower FET:
⎛
⎞
2
()
≅
V
OUT
⎜
RIP
DSONLOADC
⎟
⎜
⎟
V
IN
⎝
⎠
(14)
Choosing the Soft Start Capacitor, C8
The soft start feature is designed to minimize input inrush
current and prevent output voltage overshoot during startup.
The ADP1821 charges the external capacitor (C8) to 0.8 V
through a 100 kΩ internal resistor and regulates the voltage at
the FB pin to the lower value of either SS or the internal 0.6 V.
When the voltage at FB is between 0.55 V and 0.75 V, the
power-good output (PWGD) is asserted.
In Figure 1, the input voltage range is 3.3 V to 5.5 V. This range
can be adjusted to support input voltages up to 20 V by using a
simple Zener network circuit (see Figure 2). Choose R
to
IN
correspond to the desired input voltage while maintaining
about 5.6 V across the Zener.
PVCC
+
C4
1µF
CMOZ5V6
Figure 2. Zener Network Circuit
CMST2222A
R1
10Ω
1µF
VCC
+
C6
06716-002
Rev. 0 | Page 6 of 12

AN-911
V
V
INTERNAL DRAM VOLTAGE (V
DD_DRAM
= 1.6 V)
The DRAM on the TS processors requires an external supply. Although the current needed is not as large as the core current, it can go as
high as 430 mA. This current is supplied by the ADP2105 (see Figure 3).
1.6
O
C15
OPEN
R15
OPEN
2.5V
V
O
100kΩ
C22
10nF
R18
R14
47kΩ
R17
47kΩ
U3
1
EN
2
GND
3
GND
4
GND
5 6 7 8
R20
316kΩ
C28
39pF
C18
R16
0.1µF
10Ω
16 15 14 13
FB PWIN1INGND
ADP2105
PWIN2
SS
AGNDCOMP
C27
1nF
LX2
PGND
LX1
J7
C24
22µF
1
2
3
4
1
2
3
4
V
1.6V
O
VO 1.6V
J8
GND
L3
3.3µH
VIN
C23
22µF
VIN
C19
10µF
12
11
10
9
NCPADDLE
C26
10µF
NC = NO CONNECT
VIN = 5V
V
= 1.6V AT IO = 1A
O
Figure 3. Internal DRAM Supply Voltage Circuit
06716-003
Rev. 0 | Page 7 of 12

AN-911
COMPONENT VALUE DERIVATIONS AND THE ADP2105 ANALYSIS
The ADP2105 is a synchronous step-down converter with peak
current mode control. It integrates the high-side switch FET
and the low-side synchronous rectifier. The ADP2105 operates
at a fixed frequency of 1.2 MHz. It has two modes of operation,
full pulse-width modulation mode (PWM) and pulse frequency
modulation mode (PFM). At lighter loads the ADP2105 resorts
to PFM mode where bursts of energy are delivered to the load
as needed (see the ADP2105 for details). The input range for
this device is 2.7 V to 5.5 V. Its output voltage can be as low as
0.8 V and its output current as high as 1 A.
Choosing the Input Capacitor Value (Input Filter)
An input filter is needed to make sure that the supply to the
device is clean. As described in the ADP1821 the recommended
values for the input capacitor, C18, is 0.1 µF and a resistor, R16,
is 10 Ω as shown in Figure 3. This combination forms a lowpass filter at about 150 kHz. The recommended values for C19
is 10 µF and C26 is 10 µF (see the ADP1821 for more details).
Setting the Output Voltage
To limit output accuracy degradation, (due to FB bias current),
to less than 0.5%, the divider string current should be greater
than 15 µA. The bottom resistor, R16, can be determined by:
R16 = V
= 47 k (15)
where:
V
= 0.8 V (internal reference voltage).
FB
I
STRING
The top resistor, R14, can be determined by:
R14 = R16 (V
= 47 (1.6 − 0.8)/0.8
= 47 Kω (16)
FB/ISTRING
= 17 µA.
− VFB)/VFB
OUT
Choosing the Output LC Filter Components
The minimum inductor value is defined as in the ADP2105
data sheet:
L > (1.12 µH/V) × V
= 1.12 × 1.6 = 1.792 µH (17)
OUT
The ideal inductor value is found as:
L
IDEAL
= 2.5 × V
(VIN − V
OUT
)/(VIN × I
OUT
LOAD(MAX)
)
= 2.5 × 1.6(5 × 1.6)/5 × 1
= 2.72 µH (18)
Thus, an inductor, L3, of 3.3 µH is chosen.
The output capacitor is chosen based on the transient response
requirements. For an overshoot of less than 4%, see Figure 4.
18
17
16
15
14
13
12
11
10
9
8
7
6
5
4
3
% OVERSHOOT OF OUTPUT VOLTAGE
2
1
0
15 70
20 25 30 35 40 45 50 55 60 65
OUTPUT CAPACI TOR × O UTPUT VOLTAGE ( μC)
Figure 4. % Overshoot for a 1 A Load Transient Response vs. Output
C
= 60/1.6 = 37.5 µF. (19)
OUT
Capacitor × Output Voltage
06716-005
To make sure that capacitance is above dc, a total of 44 µF
should be used.
Choosing the Compensating Loop Components
These values can be found as
R20 = 0.8 (2π × F
C28 = 2/(π × F
) (C
× V
CROSS
CROSS
OUT
× R20) (21)
)/Gm GCS × V
OUT
(20)
REF
Plug in the values to get
R20 = (2π × 80 kHz) (37.5 × 1.6)/50 ×1.875 × 0.8 = 324 k (22)
C28 = 2/(π × 80 kHz × 324 k) = 25 pF (23)
Some adjustments to these components were needed due to
layout; R20 is 316 k and C28 is 39 pF were chosen instead.
Rev. 0 | Page 8 of 12

AN-911
V
V
I/O VOLTAGE (V
DD_I/O
= 2.5 V)
This voltage is used to supply power to the external port, and
the link ports and the associated circuitry for the external pins,
output drivers, and control logic.
The total I/O current is the sum of the external port current and
the link port current given by Equation 2.
I
DD_IO
= I
DD_IO_EP
+ I
(24)
DD_IO_LP
where:
I
DD_IO_EP
I
DD_IO_LP
= I
DD_IO_EP_DYN
= I
_LP0
+ I
_LP1
+ I
DD_IO_EP_STATIC
+ I
_LP2
(25)
+ I
(26)
_LP3
THE EXTERNAL PORT CURRENT
Referring to Equation 3, the external port current has two
components: a dynamic current and a static current.
See the EE-170 for an external port current calculation example
and assume a maximum SCLK is 500 MHz.
I
DD_IO_EP_DYN
= 46 mA (27)
And according to the EE-170
I
DD_IO_EP_STATIC
The total maximum external port current needed (using
Equation 3) is:
= (170 mA + 13.75 mA + 0.28 mA)/4
= 7 mA (28)
THE LINK PORT CURRENT
Using Equation 4, the link port current is the sum of the
currents from all four links. Each of these links can be one- to
four-bits wide. The maximum current required by each link is
about 50 mA (see the EE-170 for samples of link port current
consumption per link port).
I
= 4 × 50.5
DD_IO_LP
= 202 mA (30)
Using Equation 2, the total current required for the I/O is:
I
DD_IO
= I
DD_IO_EP
+ I
DD_IO_LP
= 53 + 202
= 255 mA (31)
This current is supplied by the ADP2105 as shown in Figure 5.
COMPONENT VALUE DERIVATIONS
The analysis for this circuit (Figure 5) is identical to the derivation used in the Internal DRAM Voltage (V
section. The two circuits are identical with this voltage being at
2.5 V instead of the 1.6 V as previously calculated.
DD_DRAM
= 1.6 V)
I
= 46 + 7
DD_IO_EP
= 53 mA (29)
2.5
O
C12
OPEN
R11
OPEN
R13
POK 1.2V
NC = NO CONNECT
VIN = 5V
V
= 2.5V AT IO = 1A
O
47kΩ
R10
100kΩ
U2
1
EN
2
GND
3
GND
4
GND
5 6 7 8
R19
220kΩ
C25
56pF
C13
R12
0.1µF
10Ω
16 15 14 13
FB PWIN1INGND
LX2
PGND
ADP2105
LX1
PWIN2
SS
AGNDCOMP
C21
1nF
Figure 5. The I/O Supply Voltage Circuit
J5
C17
10µF
1
2
3
4
1
2
3
4
V
2.5V
O
VO 2.5V
J6
GND
06716-004
L2
3.3µH
VIN
C16
22µF
VIN
C14
10µF
12
11
10
9
NCPADDL E
C20
10µF
Rev. 0 | Page 9 of 12

AN-911
BILL OF MATERIALS
Table 1.
Part Reference Type Parameter PCB Footprint Supplier/Manufacturer No.1
C1 Ceramic capacitor 1 F, 10 V C0805 *
C2 Ceramic capacitor 10 µF, 6.3 V C1206 Murata
C3 Ceramic capacitor 10 µF, 6.3 V C1206 Murata
C4 Ceramic capacitor 1 µF, 10 V C0603 *
C5 Ceramic capacitor 0.1 µF, 10 V C0603 *
C6 Ceramic capacitor 1 µF, 10 V C0603 *
C7 Ceramic capacitor 2.2 pF C0603 *
C8 Ceramic capacitor 22 nF C0603 *
C9 Ceramic capacitor 3.3 nF C0603 *
C10 Ceramic capacitor 39 pF C0603 *
C11 Ceramic capacitor 2.2 nF C0603 *
C12 Ceramic capacitor Open C0603 *
C13 Ceramic capacitor 0.1 µF, 10 V C0603 *
C14 Ceramic capacitor 10 µF, 6.3 V C0805 Murata
C15 Ceramic capacitor Open C0603 *
C16 Ceramic capacitor 22 µF, 6.3 V C0805 Murata
C17 Ceramic capacitor 10 µF, 6.3 V C0805 Murata
C18 Ceramic capacitor 0.1 µF, 10 V C0603 *
C19 Ceramic capacitor 10 µF, 6.3 V C0805 Murata
C20 Ceramic capacitor 10 µF, 6.3 V C0805 Murata
C21 Ceramic capacitor 1 nF C0603 *
C22 Ceramic capacitor 10 nF C0603 *
C23 Ceramic capacitor 22 µF, 6.3 V C0805 Murata
C24 Ceramic capacitor 22 µF, 6.3 V C0805 Murata
C25 Ceramic capacitor 56 p C0603 *
C26 Ceramic capacitor 10 µF, 6.3 V C0805 Murata
C27 Ceramic capacitor 1 nF C0603 *
C28 Ceramic capacitor 39 p C0603 *
D1 Diode 30 V, 200 mA SOT-23 FairChild BAT54
E1 POSCAP™ 10 V, 330 µF, 35 mΩ Sanyo_TPB_D4 Sanyo 10TPB330M
E2 POSCAP 2.5 V, 470 µF, 10 mΩ Sanyo_TPD_D4D Sanyo 2R5TPD470M
E3 POSCAP 2.5 V, 470 µF, 10 mΩ Sanyo_TPD_D4D Sanyo 2R5TPD470M
E4 POSCAP 10 V, 330 µF, 35 mΩ Sanyo_TPB_D4 Sanyo 10TPB330M
J1 sip4_dual
J2 sip4_dual
J3 sip4_dual
J4 sip4_dual
J5 sip4_dual
J6 sip4_dual
J7 sip4_dual
J8 sip4_dual
L1 Inductor
L2 Inductor L = 3.3 µH, I
L3 Inductor L = 3.3 µH, I
M1 MOSFET * SO8 International Rectifier IRF7821
M2 Mosfet * SO8 International Rectifier IRF7834
R1 Resistor 10 Ω R0603 *
R2 Resistor 10 kΩ R0603 *
R3 Resistor 0 Ω R0603 *
0.7 µH, I
I rms = 17.3 A
=26 A,
SAT
= 2.2 A CoilCraft_LPS4012 CoilCraft LPS4018-332ML
SAT
= 2.2 A CoilCraft_LPS4012 CoilCraft LPS4018-332ML
SAT
Cooper_HC7 CoilCraft MLC1265-701ML
Rev. 0 | Page 10 of 12

AN-911
Part Reference Type Parameter PCB Footprint Supplier/Manufacturer No.1
R4 Resistor 0 Ω R0603 *
R5 Resistor 2.2 kΩ R0603 *
R6 Resistor 2 kΩ R0603 *
R7 Resistor 10 kΩ,1% R0603 *
R8 Resistor 33 kΩ R0603 *
R9 Resistor 10 kΩ,1% R0603 *
R10 Resistor 100 kΩ R0603 *
R11 Resistor Open R0603 *
R12 Resistor 10 Ω R0603 *
R13 Resistor 47 kΩ R0603 *
R14 Resistor 47 kΩ R0603 *
R15 Resistor Open R0603 *
R16 Resistor 10 Ω R0603 *
R17 Resistor 47 kΩ R0603 *
R18 Resistor 100 kΩ R0603 *
R19 Resistor 220 kΩ R0603 *
R20 Resistor 316 kΩ R0603 *
U1 Controller * 16-Lead QSOP Analog Devices, Inc. ADP1821
U2 IC * 16-Lead, 4 × 4 LFCSP Analog Devices, Inc. ADP2105
U3 IC * 16-Lead, 4 × 4 LFCSP Analog Devices, Inc. ADP2105
1
* = parts that are available from most manufacturers.
Rev. 0 | Page 11 of 12

AN-911
NOTES
©2007 Analog Devices, Inc. All rights reserved. Trademarks and
registered trademarks are the property of their respective owners.
AN06716-0-10/07(0)
Rev. 0 | Page 12 of 12
 Loading...