

Page 1
AN-561
AD7416
PIC16F84
SDA
SCL
RA0
RA1
RB2
RB1
RB0
*PC
INTERFACE
*OPTIONAL
a
APPLICATION NOTE
One Technology Way • P.O. Box 9106 • Norwood, MA 02062-9106 • 781/329-4700 • World Wide Web Site: http://www.analog.com
AD7416 Connects to the PIC16F84 via Emulated I2C® Interface
by Ken Kavanagh
INTRODUCTION
This application note describes the requirements to control the AD7416 via a PIC microcontroller by emulating
2
an I
C bus interface. It will provide code examples and
descriptions of both hardware and software. Although
this application uses the PIC16F84, it is possible to
modify the code to use other microcontrollers from
Microchip and other suppliers. Additional information
about the AD7416 is available from Analog Devices
(www.analog.com) and information about the PIC microcontroller is available from Microchip (www.microchip.com).
Both should be consulted in conjunction with this application note.
HARDWARE OVERVIEW
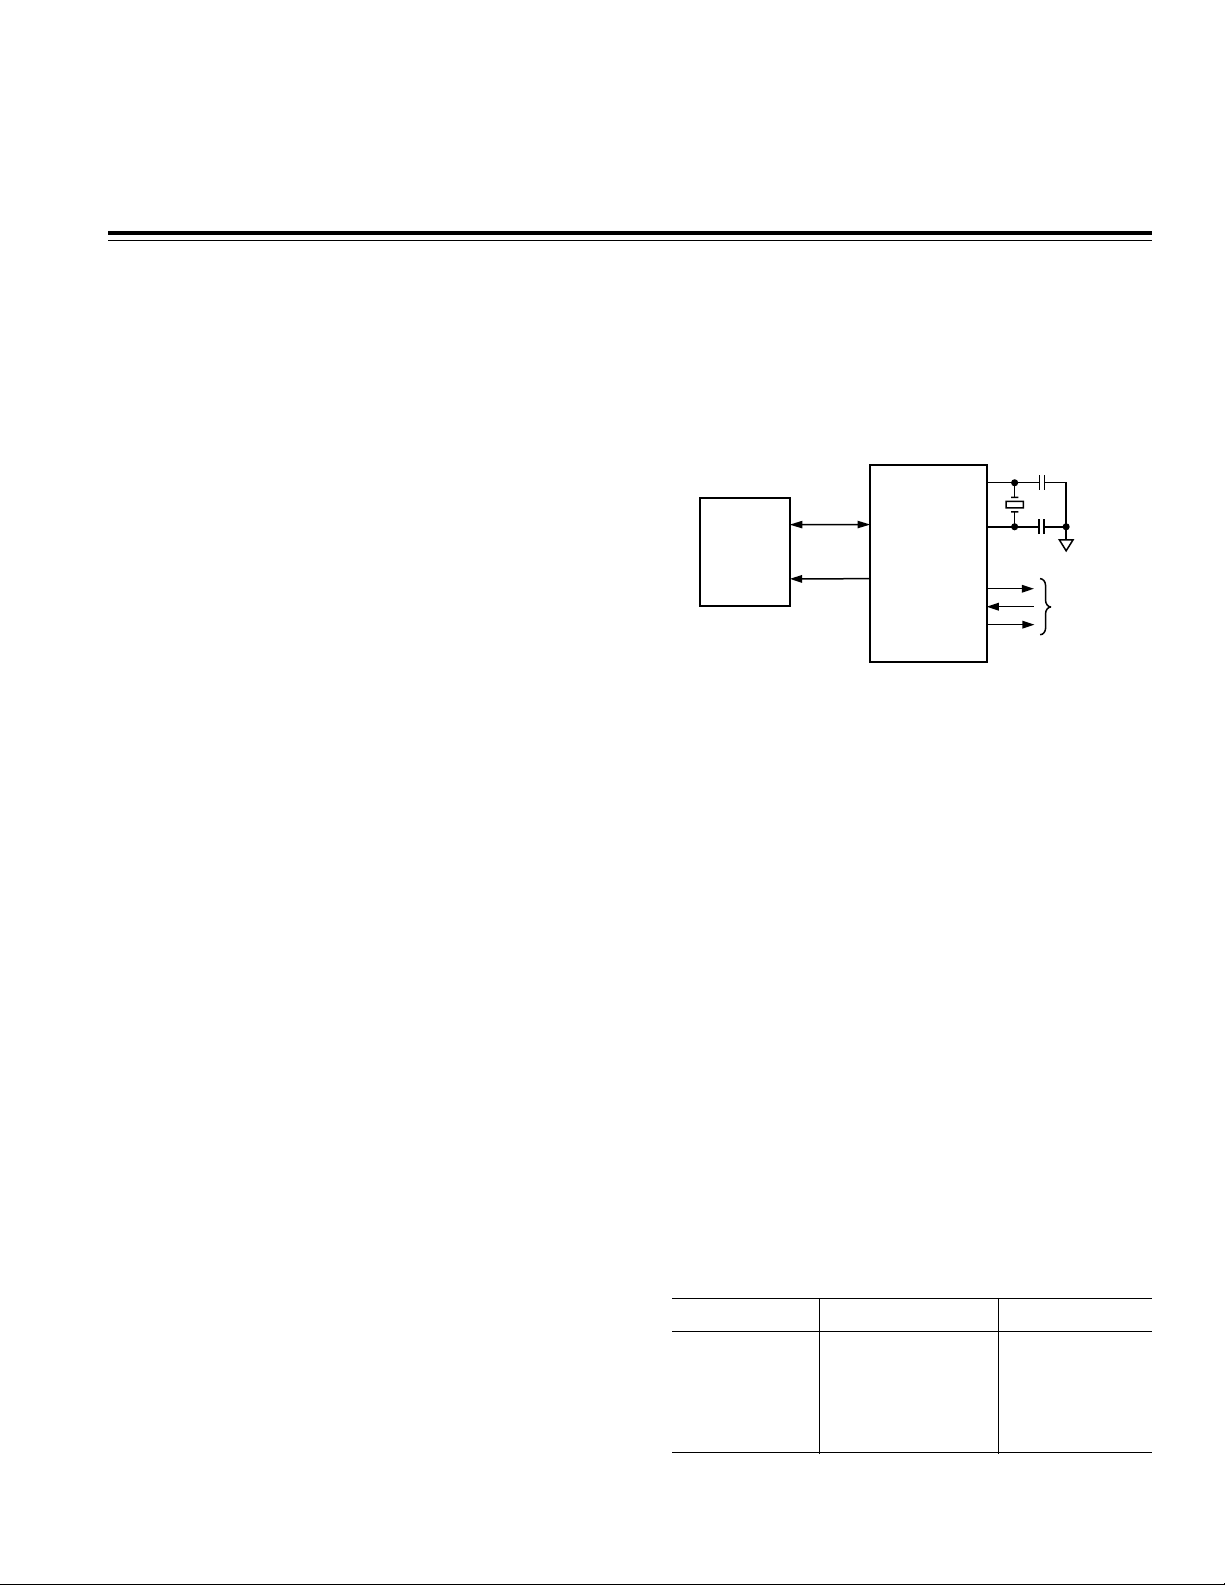
Figure 1 shows the basic circuit diagram of the application. The application consists primarily of the AD7416
10-bit Temperature Sensor and the PIC16F84 microcontroller. An optional PC interface is also shown which
allows the temperature reading to be uploaded to a PC
for logging or monitoring.
AD7416 General Description
The AD7416 is a 10-bit temperature monitoring device
that is supplied in an 8-lead SOIC or µSOIC package. The
temperature can be calculated by reading the data register of the device. Additional registers allow programming of high and low temperature limits and an
over-temperature indicator (OTI), which becomes active
when a programmed limit is exceeded, is provided. The
AD7416 uses an I
a selectable serial bus address that allows up to eight
devices to be connected to a single bus.
PIC16F84 General Description
The PIC16F84 is an 18-lead CMOS EEPROM microcontroller. It contains 1K × 14 on-chip program memory
locations, 36 × 8 general-purpose registers and a 64 × 8
EEPROM data memory. The part contains 13 I/O pins,
each of which is capable of sinking 25 mA and sourcing
20 mA. The PIC16F84 also contains an 8-bit timer/
counter with an 8-bit programmable prescaler.
I2C is a registered trademark of Philips Corporation.
REV. 0
2
C-compatible serial interface and has
SOFTWARE OVERVIEW
The software routines developed throughout the course
of this application can be used to program the on-board
registers of the AD7416, as well as read data from the
temperature/data register. The communications routines
concerned with the AD7416 will emulate an I
serial interface on a parallel I/O port such as that of the
PIC16F84. These routines could be modified to work
with any microcontroller with similar capabilities. The
hardware/software application takes the form of a temperature monitor that will take a temperature reading at
regular intervals and will upload the results to a PC
through the PC’s printer port (if connected).
Hardware Pin Associations
Table I shows the pin assignments used in this application. For simplicity, Port A of the PIC16F84 is reserved
for communication with the AD7416. Port B has three
lines dedicated to transferring the information from
the application board to the PC (if required) or, alternatively, it could be used to output the data to a latch/
LED display, etc.
PIC16F84 AD7416 PC Interface
PORT A, 0 SDA
PORT A, 1 SCL
PORT B, 0 SDATA
PORT B, 1 SCLK
PORT B, 2 SYNC
Figure 1. Basic Circuit Diagram
Table I. Pin Assignments
2
C
Page 2

AN-561
SOFTWARE DESCRIPTION
This section will deal with the specific routines developed for the PIC16F84 to communicate with the AD7416
by emulating the I
2
C serial bus. The routines discussed
here are not intended as a definitive programming structure but, rather, as a guide to users who wish to develop
their own routines. This section will discuss the initialization of the PIC processor, the configuration of the
ports, and the subroutines required to communicate
with the AD7416. As with many programming languages, labels will be used to identify particular registers used in the PIC16F84. The use of labels makes
programs easier to read and, if necessary, debug. Labels
are represented in bold italic format (e.g.,
LABELS
). A list of
all labels used in the program is given in Appendix A.
PIC16F84 Initialization Routine
When power is first applied to the PIC16F84 a number
of initialization routines need to be done. These are
required to set the configuration (input or output) and
state (high or low) of the I/O ports, as well as setting up
the timer to generate interrupts at regular intervals,
allowing the temperature to be read periodically. The
listing for the initialization routine is given below.
Listing 1. Port Initialization
PORTINIT
MOVLW 0xFF
MOVWF PORTA ;set port lines high
MOVLW 0x4 ;set sclk,sdata low
MOVWF PORTB ;& sync high (PC interface)
BSF STATUS,RP0 ;point to the OPTION
;and TRIS registers
MOVLW 0x00
MOVWF TRISA ;make portA output
MOVLW 2 ;setup portB
MOVWF TRISB ;sclk=i/p,
;sync & sdata=o/p
MOVLW b’10000111' ;set the timer
;prescaler to 256
MOVWF OPTREG ;and copy to OPTREG
BCF STATUS,RP0 ;point to port registers
RETURN ;exit subroutine
Start and Stop Frame Routines
In the I2C protocol, all transfers of information must begin
with a Start Frame and end with a Stop Frame. In the idle
state both SDA and SCL lines will be high. A Start Frame
is generated by bringing SDA low while SCL is high.
This is shown in Figure 2. Similarly a Stop Frame is generated by bringing the SDA line high while SCL is high.
This is shown in Figure 3.
SCL
SDA
2
I
C PROTOCOL
PORT = 0x3
PORT = 0x2
PORT = 0x0
SCL
SDA
PIC16F84
EQUIVALENT
Figure 2. Start Frame
Listing 2. Generating Start Frame Signal
STARTFR
;generates a start signal
;assumes both lines are
;outputs and both are high
MOVLW 0x2 ;Bring SDA Low
MOVWF PORTA
MOVLW 0x0 ;SDA and SCL both low
MOVWF PORTA ;Start Frame Generated
RETURN ;exit subroutine
SCL
SDA
2
C PROTOCOL
I
SCL
SDA
PORT = 0x0
PORT = 0x2
PORT = 0x3
PIC16F84
EQUIVALENT
Figure 3. Stop Frame
Listing 3. Generating a Stop Frame Signal
STOPFR
;generate a stop frame
;assmumes both lines are output
;and both are low
MOVLW 2 ;bring SCL high
MOVWF PORTA
MOVLW 3 ;SCL and SDA both high
MOVWF PORTA ;Stop Frame generated
RETURN ;exit subroutine
With routines for generating Start and Stop Frames generated, it is now necessary to develop routines that will
allow the user to write to the registers of the AD7416.
Figure 7 in the AD7416 data sheet shows a timing diagram for such an operation. After a Start Frame signal
has been issued the microcontroller must transmit
seven bits containing the address of the device it wishes
to communicate with. The eighth bit tells the AD7416
that the next operation will be a write or a read operation, and the ninth bit allows the AD7416 to issue an
acknowledgment. For simplicity, the seven address bits
and the R/W bit will be combined into one byte and the
status of the ACK pulse will be read but not acted upon.
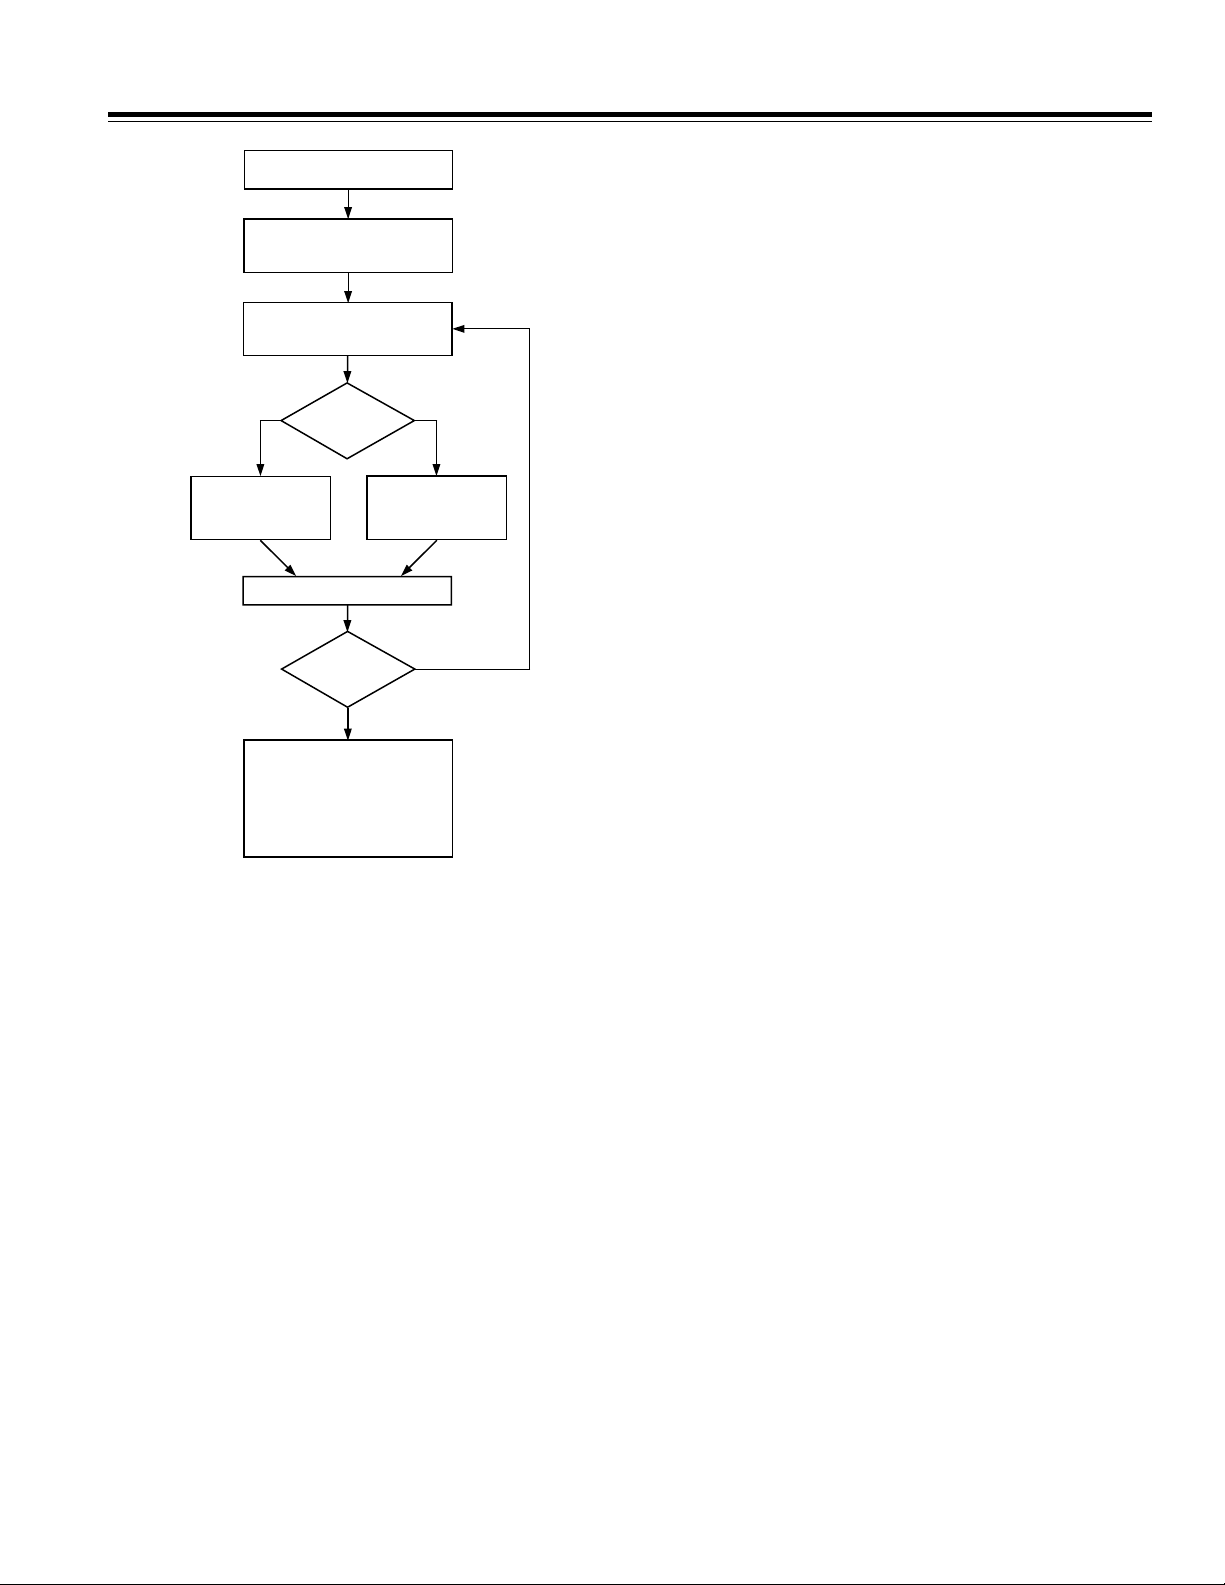
Figure 4 shows a flowchart of the write operation and
Listing 4 shows the code.
–2–
REV. 0
Page 3
AN-561
BYTE TO BE TRANSMITTED
LOCATED IN TXVAL REGISTER
LOAD COUNT WITH
NUMBER OF BITS
TO SEND (=8)
ROTATE TXVAL SO THAT
MSB MOVES INTO
CARRY BIT
IS THE
CARRY
BIT SET?
NO
BRING SDA AND
SCL LOW
BRING SCL HIGH
BRING SCL LOW
DECREASE COUNT
COUNT
REACHED
ZERO?
CHANGE SDA LINE TO INPUT
BRING SCL HIGH TEST SDA BIT
BRING SCL LOW
CHANGE SDA LINE TO OUTPUT
EXIT SUBROUTINE
HAS
YES
YES
BRING SCL LOW
AND SDA HIGH
BRING BOTH HIGH
BRING SCL LOW
NO
BITHIGH
;send logic 1
MOVLW 0 ;scl, sda low
MOVWF PORTA
MOVLW 1 ;sda high, scl low
MOVWF PORTA
MOVLW 3 ;scl, sda high
MOVWF PORTA
NOP ;let bit settle
MOVLW 1 ;scl low, sda high
MOVWF PORTA
MOVLW 0
MOVWF PORTA ;both low
BITDONE
DECFSZ COUNT,1;decrease count by 1 and
;repeat if not zero
GOTO LOOP
CHECKACK
;look for ACK pulse
;Change sda line to input for ACK
BSF STATUS,RP0;point to TRIS registers
MOVLW 1
MOVWF TRISA ;make sda line an input
BCF STATUS,RP0;point to PORT register
MOVLW 2 ;scl high
MOVWF PORTA
NOP ;let bit settle
MOVF PORTA,W;read the port
BTFSS PORTA,0;check status of ACK bit and
;store in ACKSTATUS register
GOTO ACK0
BSF ACKSTATUS,0;positive ACK received
GOTO NEXT
Figure 4. SENDBYTE Flowchart
Listing 4. The SENDBYTE Routine
SENDBYTE
;subroutine to send 8 bits to
;AD7416
MOVLW 8 ;holds the number of bits to
;transmit
MOVWF COUNT ;store in memory location
LOOP
RLF TXVAL ;rotate the msb into carry bit
BC BITHIGH;branch if bit is high?
BITLOW
;send logic 0
MOVLW 0 ;scl, sda low
MOVWF PORTA
MOVLW 2 ;scl high, sda low
MOVWF PORTA
NOP ;let bit settle
MOVLW 0 ;scl,sda low
MOVWF PORTA
GOTO BITDONE;this bit has been
;transmitted
ACK0
BCF ACKSTATUS,0;negative ACK received
NEXT
MOVLW 0 ;scl low
MOVWF PORTA
;Change port back to output
MOVLW 0 ;preload output register with 0’s
MOVWF PORTA
BSF STATUS,RP0
MOVLW 0
MOVWF TRISA ;make all port line outputs
BCF STATUS,RP0
RETURN ;exit subroutine
The subroutine listed above needs to be called twice in
order to set up the AD7416 for reading the temperature.
The first instance tells a particular device that it is being
addressed and the second instance is used to send the
Address Register Pointer Byte. In the case of the AD7416
this means sending 0hex to the device to select the temperature. Of course, different registers can be selected
by sending different address values. The user should
consult the AD7416 data sheet for more information.
REV. 0
–3–
Page 4

AN-561
Reading Temperature Data
After the above routines have been called, the AD7416 is
set up to supply temperature data. The temperature data
can be read from the AD7416 in either a 1- or 2-byte read
operation, the latter being the more accurate. For this
application, the 2-byte read operation is used. The two
bytes are stored in the HIGHBYTE and LOWBYTE registers upon completion and the user can then latch them
to an external device, analyze them further, etc. The
READBYTE function is similar to the SENDBYTE function, but this time the state of the SDA pin is checked
and the LOWBYTE register is modified accordingly. The
2-byte read operation requires the master device (i.e.,
the PIC16F84) to output a different ACK on each read. In
order to allow the same read routine to provide both
types of ACK pulse, it looks at Bit 1 of the ACKSTATUS
register. The state of this bit will determine what type of
ACK pulse is needed. The listing and basic flowchart are
shown below.
CHANGE SDA LINE
TO INPUT
LOAD COUNT WITH
NUMBER OF BITS
TO SEND (=8)
ROTATE LOWBYTE LEFT
1 BIT AND BRING
SCL HIGH
IS SDA
HIGH?
YESNO
HAS
YES
BRING SCL LOW
LSB OF LOWBYTE
SET TO 1
NO
BRING SCL LOW
DECREASE COUNT
CHANGE SDA TO OUTPUT
GENERATE ACK PULSE
COUNT
REACHED
ZERO?
EXIT SUBROUTINE
Figure 5. READBYTE Flowchart
Listing 5. READBYTE Routine
READBYTE
;reads 8 bits from port
;result is stored in LOWBYTE
;change the sda line to input
BSF STATUS,RP0
MOVLW 1
MOVWF TRISA ;make sda line an input
BCF STATUS,RP0
MOVLW 8
MOVWF COUNT
BITLOOP
MOVLW 2 ;SCL high
MOVWF PORTA ;
NOP
NOP; ;small delay
RLF LOWBYTE;rotate - 0 moves into LSB
BTFSS PORTA,0; test the SDA line
GOTO LOGIC0 ; bit is 0
LOGIC1
BSF LOWBYTE,0 ;set the LSB to 1
GOTO NEXTBIT
LOGIC0
BCF LOWBYTE,0; clear the LSB to 0
NOP ;small delay
NEXTBIT
MOVLW 0
MOVWF PORTA ; scl low
DECFSZ COUNT,1; decrease the count
GOTO BITLOOP; repeat if not zero
;now generate master ACK
;Change port back to output
MOVLW 0;preload output register
MOVWF PORTA
BSF STATUS,RP0
MOVLW 0
MOVWF TRISA ;make all port line outputs
BCF STATUS,RP0
BTFSS ACKSTATUS,1 ;what type of ACK req’d?
GOTO MASTERACKLOW ;ACK required
;master NACK
MOVLW 1 ;sda high
MOVWF PORTA
MOVLW 3 ;sda,scl high
MOVWF PORTA
MOVLW 1
MOVWF PORTA ;sda high, scl low
MOVLW 0
MOVWF PORTA ;both low
GOTO ENDOFACK
MASTERACKLOW
MOVLW 2 ;scl high
MOVWF PORTA
MOVLW 0 ;scl low
MOVWF PORTA
–4–
ENDOFACK
RETURN
;leave the port as an output
REV. 0
Page 5

AN-561
When the program returns from this function the result
is stored in the LOWBYTE register. Since the temperature data is transmitted MSB first the result needs to be
moved into the HIGHBYTE register before the routine is
called a second time to get the last eight bits of temperature data. The compete read operation is shown below.
Listing 6. The READTEMPERATURE Routine
READTEMPERATURE
CALL STARTFR ;send start signal
;send address byte
MOVLW 0x91 ;ADDRESS byte - read op
MOVWF TXVAL
CALL SENDBYTE ;transmit the byte
BCF ACKSTATUS,1 ;ACK Req’d for first byte
CALL READBYTE
;move the data into the high result register
MOVF LOWBYTE,0
MOVWF HIGHBYTE
;store the type of ack req’d from master
BSF ACKSTATUS,1 ;NACK Req’d for 2nd byte
CALL READBYTE
CALL STOPFR
The routines described above are all that is required to
configure the PIC16F84 and read temperature data from
the AD7416. Additional routines can be developed that
use the Timer/Counter of the PIC to read temperature
data periodically. Such routines will not be discussed
here but information on how this can be achieved is
available on the PIC16F84 data sheet and in examples on
the Microchip web site. A complete listing of a sample
program, which includes the code sections described
above, is also available from Analog Devices.
Uploading Data to the PC via the Printer Port
The printer port of a PC provides an easy way to transfer
the temperature data from the PIC to the PC where it
may be logged or monitored. A discussion on the functionality of the printer port is beyond the scope of this
application note, so only essential details will be mentioned. What follows is a brief example of how the
temperature data can be sent to a PC using a minimum
wire count, thus preserving I/O lines for other uses. The
temperature data will be sent to the PC one bit at a time
(if a PC is connected to the PIC) starting with the MSB.
The interface uses only three wires (designated SYNC,
SDATA, and SCLK). Figure 6 shows the timing diagram
of the Transmit routine. When the PIC16F84 has read a
temperature result from the AD7416, it will bring the
SYNC line low. It starts decreasing a counter and if it
does not detect a rising clock edge before the counter
reaches zero, it will bring SYNC back high and abort the
transmission of data. This allows the PIC16F84 to continue reading temperature data if PC is not connected or
the PC software is not running.
When the PIC16F84 detects a rising SCLK edge it sets
RB0 to the same logic level as the MSB of the temperature data result. The routine continues to monitor SCLK
and when it goes low the bit count is decreased and the
program will wait for another rising edge to transmit the
next bit of data, unless all bits have been transmitted.
After all bits have been transmitted, the program brings
SYNC high to indicate the end of the transfer. Figure 6
shows the timing diagram for the data transfer. Table II
shows the connections between the PIC16F84 and the
appropriate printer port pins.
Table II.
PIC16F84 Printer Port
Name Pin Name Pin
RB0 6 SLCT 13 SDATA
RB1 7 INIT 16
1
2
Function
SCLK
RB2 8 ACK 10 SYNC
NOTES
1
Printer Port Pin Numbers Refer to a 25-pin D-type connector.
2
INIT is Pin 31 on a 36-pin Centronic connector.
REV. 0
SYNC
SCLK
SDATA
D15 D14 D13 D12 D11 D10 D09 D08 D07 D06 D05 D04 D03 D02 D01 D00
Figure 6. PIC16F84 to PC Printer Port Timing Diagram
–5–
Page 6

AN-561
Listing 7. Serial Transmission Routine
SERIALTX
;this routine transmits the HIGHBYTE
;and then the LOWBYTE
MOVLW 8 ;number of bits in HIGHBYTE
MOVWF COUNT
MOVLW 0xFF ;length of TIMEOUT wait
MOVWF TEMP
MOVLW 0
MOVWF PORTB ;sync, sdata low
CLKLOOP
DECFSZ TEMP,1 ;reduce timeout count
GOTO NOTIMEOUT; no need for timeout yet
GOTO DONE ; timeout reached- exit routine
NOTIMEOUT
BTFSS PORTB,1
GOTO CLKLOOP;no edge yet
RLF HIGHBYTE ;move msb into carry bit
BC HILOOP ;branch if bit is 1
MOVLW 0 ;put out 0 on sdata
MOVWF PORTB
LOWLOOP
BTFSC PORTB,1;wait until sclk goes low
GOTO LOWLOOP;sclk still high
GOTO DECLOOP;sclk has gone high
HILOOP
MOVLW 1 ;put out 1 on sdata
MOVWF PORTB
LOLOOP
BTFSC PORTB,1;wait until sclk goes low
GOTO LOLOOP ;repeat as necessary
DECLOOP
DECFSZ COUNT,1;decrease bit count
GOTO BITRXD ;repeat as necessary
GOTO STARTLOWBYTE
BITRXD
INCF TEMP ;bit sent so stop
GOTO CLKLOOP;timeout from decrementing
;wait for rising clock edge
;HIGHBYTE has been transmitted
MOVLW 8 ;reset the count to
MOVWF COUNT ;transmit LOWBYTE
SCLKTST
BTFSS PORTB,1
GOTO SCLKTST;no edge yet
RLF LOWBYTE;move msb into carry bit
BC HILOOP2;branch if bit is 1
MOVLW 0
MOVWF PORTB ;put out 0 on sdata
LOWLOOP2
BTFSC PORTB,1;wait until sclk goes low
GOTO LOWLOOP2 ;sclk still high
GOTO DECLOOP2
HILOOP2
MOVLW 1 ;put out 1 on sdata
MOVWF PORTB
LOLOOP2
BTFSC PORTB,1;wait until sclk goes low
GOTO LOLOOP2 ;repeat as necessary
DECLOOP2
DECFSZ COUNT,1;decrease bit count and
GOTO SCLKTST;repeat if necessary
DONE MOVLW 4 ;bring sync high
MOVWF PORTB
RETURN ;exit subroutine
;wait for rising clock edge
–6–
REV. 0
Page 7

AN-561
The corresponding program for the PC is written in Ccode and can easily be adapted for other languages. The
PC program monitors the SYNC line (ACK in the Status
Register of the printer port), waiting for it to go low.
When it does, the program brings the SCLK pin high
(INIT in the Control Register). Since the PC operates considerably faster than the microcontroller, a delay is used
to allow the microcontroller to put out a data bit before
the PC reads it. The length of delay required will depend
Listing 8. C-Code Program to Allow a PC to Read Temperature from AD7416/PIC16F84
#include<stdio.h>
#include<conio.h>
void main()
{
int StatusPort=0x379;
int ControlPort=0x37a;
int BitCount;
int ControlReg;
int value;
unsigned int Result;
unsigned int Delay;
ControlReg=inportb(ControlPort);
ControlReg=ControlReg & 0xfb; //bring INIT low
outportb(ControlPort,ControlReg);
while((inportb(StatusPort) & 0x40)!=0);//loop until SYNC goes low
Result=0;
for (BitCount=0;BitCount<=15;BitCount++)
{
Result=Result<<1; //shift data one bit left
outportb(ControlPort,(ControlReg |4)); //bring INIT high
for(Delay=0;Delay<500;Delay++); //small delay
value=inportb(StatusPort);
if((value & 0x10)>0)
outportb(ControlPort,(ControlReg )); //bring INIT low
for(Delay=0;Delay<500;Delay++); //small delay
} //end of FOR loop
//Result contains temperature data value from AD7416}
on both the speed of the PC and that of the microcontroller. When the delay has expired, the state of the SDATA
bit is tested (SLCT in the Status Register). If the bit is 1,
then a Logic 1 is OR’ed to the Result. If the bit is 0, nothing is done. As the sequence repeats for the next bit, the
result is left-shifted by one bit so that when all bits have
been tested, Result will contain the 16-bit temperature
data value from the AD7416. The 10 MSBs store the temperature reading in twos complement format.
{ //if bit is 1
Result=Result |1; //OR a 1 into LSB position
}
REV. 0
–7–
Page 8

AN-561
ACK
113
14
INIT
GND
SLCT
25
Figure 7. 25-Way Male D-Type Connector
ACK
SLCT
18
36
INIT
GND
1
19
Figure 8. 36-Way Centronics Connector
5V
MCLR
RA0
RA1
V
DD
PIC16F84
GND
OSC1
OSC2
RB2
RB1
RB0
*OPTIONAL
*PC
INTERFACE
AD7416
A0
A1
A2
V
GND
10k⍀
DD
SDA
SCL
0.1F
APPENDIX A – PIC16F84 EQUATES
TMR0 EQU 1
PCL EQU 2
STATUS EQU 3
FSR EQU 4
PORTA EQU 5
PORTB EQU 6
EEDATA EQU 8
EEADR EQU 9
PCLATH EQU 0x0A
INTCON EQU 0x0B
TRISA EQU 5
TRISB EQU 6
RP0 EQU 5
RP1 EQU 6
COUNT EQU 0x0C
TEMP EQU 0x0F
TXVAL EQU 0x11
RW EQU 0x12
ACK EQU 0x13
HIGHBYTE EQU 0x14
LOWBYTE EQU 0x15
ACKSTATUS EQU 0x16
TIME1 EQU 0x17
INTCON EQU 0x0B
GIE EQU 0x7
T0IE EQU 0x5
T0IF EQU 0x2
OPTREG EQU 0x81
E3781–2–4/00 (rev. 0)
Figure 9. Application Circuit Diagram
PRINTED IN U.S.A.
–8–
REV. 0
 Loading...