

Page 1
AN-395
a
ONE TECHNOLOGY WAY • P.O. BOX 9106
Interfacing the AD22100 Temperature Sensor to a Low Cost
The AD22100 is a new monolithic silicon temperature
sensor with several unique attributes. These attributes
make it easier to interface the AD22100 to microcontrollers than other temperature sensor ICs. Available in
both TO-92 and SOIC packages, the AD22100 features
single-supply operation, the ability to measure negative
temperatures without requiring a negative power supply, and a voltage output that is ratiometric to its power
supply, rather than to an absolute voltage.
Other IC temperature sensors rely on the physics of certain silicon circuit topologies to measure temperature. In
particular, the AD590, and its successors, make use of
the temperature coefficient of the differential voltage
between two silicon junctions (operating at different
current densities) to produce an output that is proportional to absolute temperature. This kind of circuit, often
called a PTAT circuit, is the basis of all IC temperature
sensors prior to the AD22100.
•
Single-Chip Microcontroller
APPLICATION NOTE
NORWOOD, MASSACHUSETTS 02062-9106
by Norm Bernstein
measure temperatures in the device’s operating range.
More importantly, the output is ratiometric to the power
supply, which eliminates the requirement for a precision
calibrated reference voltage in the measurement chain.
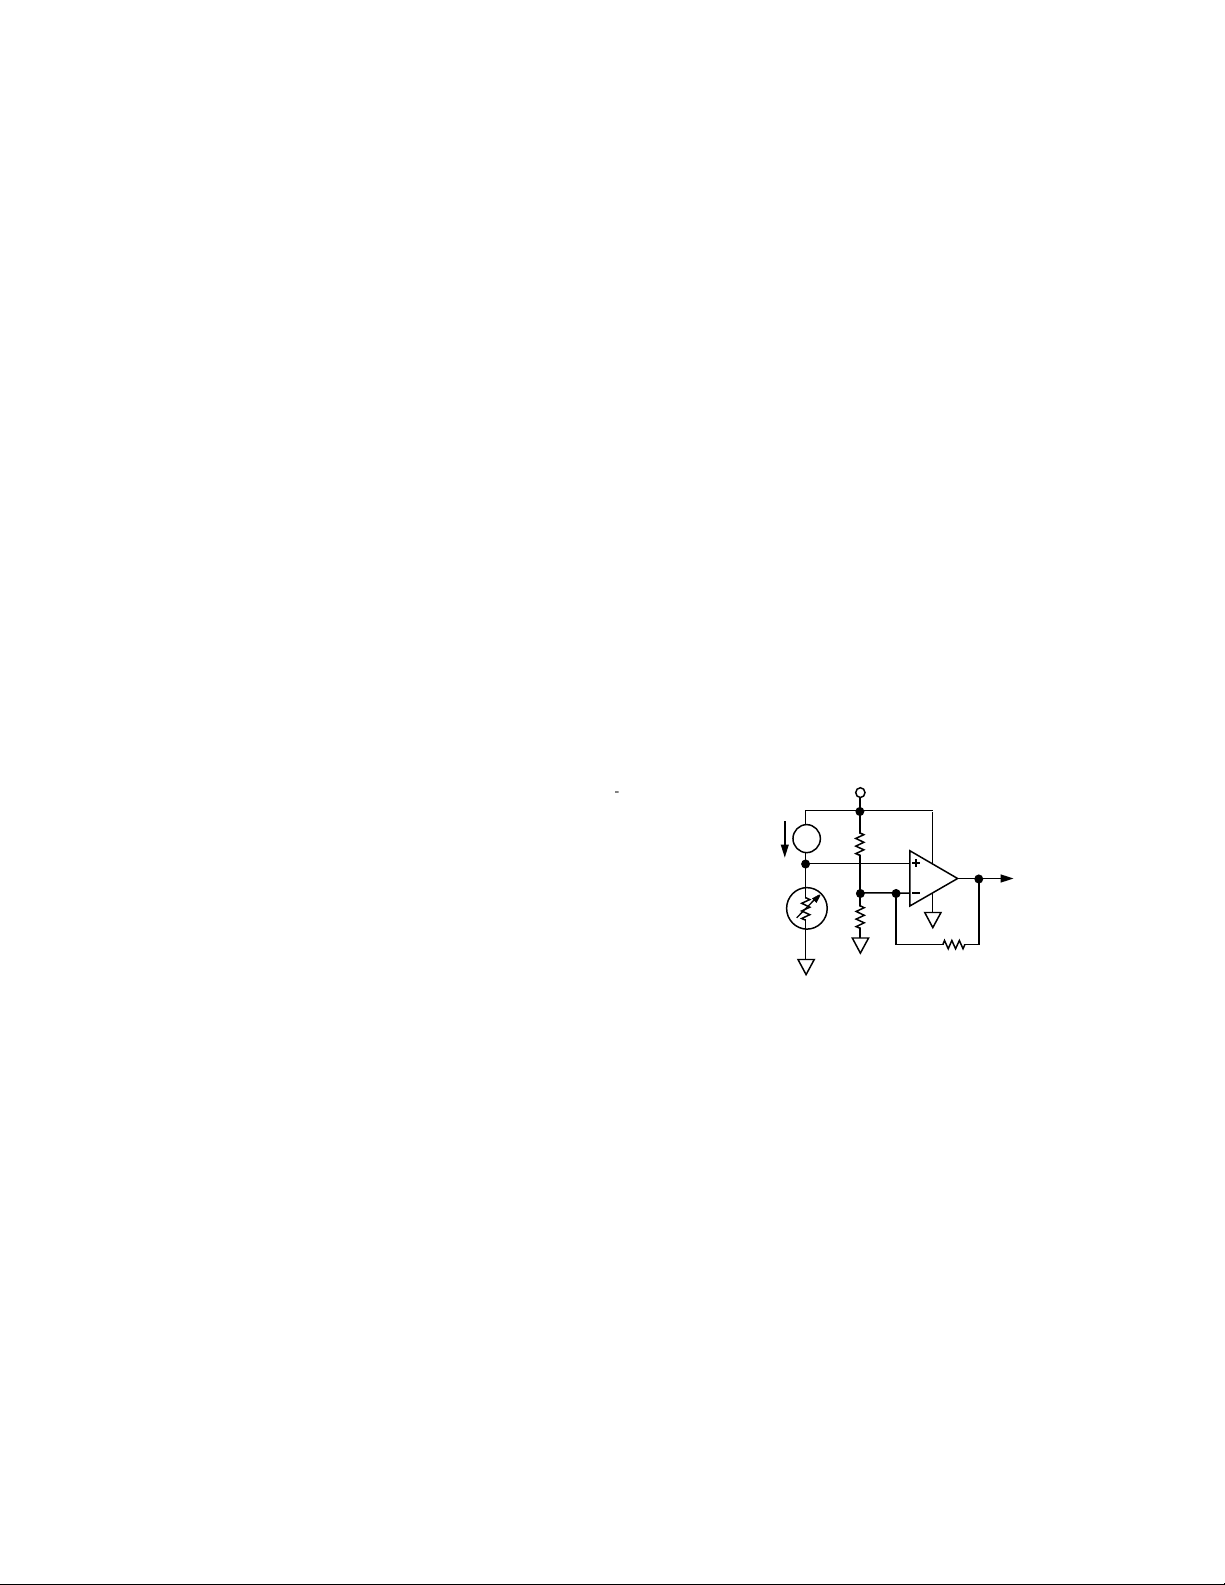
A simplified schematic of the AD22100 is shown in Figure 1. The temperature sensing resistor is excited by a
stable current source; since the temperature coefficient
of the sensing resistor is linear, the output is therefore a
voltage that is linear with respect to temperature.
V+
Ι
R
T
•
617/329-4700
V
OUT
The PTAT circuit, however, suffers from several liabilities. Since the circuit “pivots” at absolute zero, it is necessary to suppress an offset term of 273 °C in order to
make measurements at 0 °C. More importantly, PTAT
circuits are calibrated in
output voltages or currents that require a precision
measurement with respect to a calibrated reference.
The AD22100 does not use a PTAT circuit as the basis of
its measurement technique. Instead, the AD22100 uses
the temperature coefficient of a carefully deposited thin
film resistance, much like an RTD (Resistance Temperature Detector), as the measuring element. By using this
technique, the output of the circuit can be arranged such
that there is no need to suppress a large offset term to
absolute
units, and produce
Figure 1. Simplified Schematic
The other resistors in the circuit serve to establish a
particular output offset at a specified temperature and
power supply voltage (+1.375 V at 0 °C with V+ = 5 V),
and provide for a specified gain versus temperature at
the output (22.5 mV per °C). Most importantly, the circuit
configuration provides for ratiometricity; as the power
supply voltage changes, the output will remain at the
same ratio to the power supply voltage (assuming temperature is constant). This important attribute will be utilized in the interface example described in this
applications note.
Page 2

Interfacing the AD22100 to a Microcontroller
Since the output of an AD22100 is a voltage between
0 V and 5 V, an easy interface can be achieved by using a
microcontroller with a built in A/D circuit. There are a
number of such microcontrollers available on the market today, often with 8- or 10-bit resolution.
However, this approach, while certainly simple, is not
without liabilities. Microcontrollers with built-in A/D
capability are more expensive than the more ordinary
varieties. They usually do not allow for true ratiometric
operation (although a few provide for an external reference input, allowing at least limited ratiometric operation). Since they are usually based upon successive
approximation architectures, they don’t provide integration or normal mode rejection. Most importantly, 8 or 10
bits of A/D resolution is insufficient if the application
requires 0.1 °C resolution at the output.
The A/D architecture described in this application note is
well suited for extracting the best possible performance
from the AD22100. Based largely on firmware within the
microcontroller, this A/D offers the following attributes:
• true integrating A/D, fully ratiometric
• 14-bit resolution, produces 0.1°C resolution after
scaling and calibration
• requires only 2 microcontroller I/O pins, and does
not consume any counter-timer or interrupt
resources
• uses digital calibration
V
IN
V
FB
C1
COMP
+V
Q1
R1
Q2
IN
MICRO-
CONTROLLER
OUT
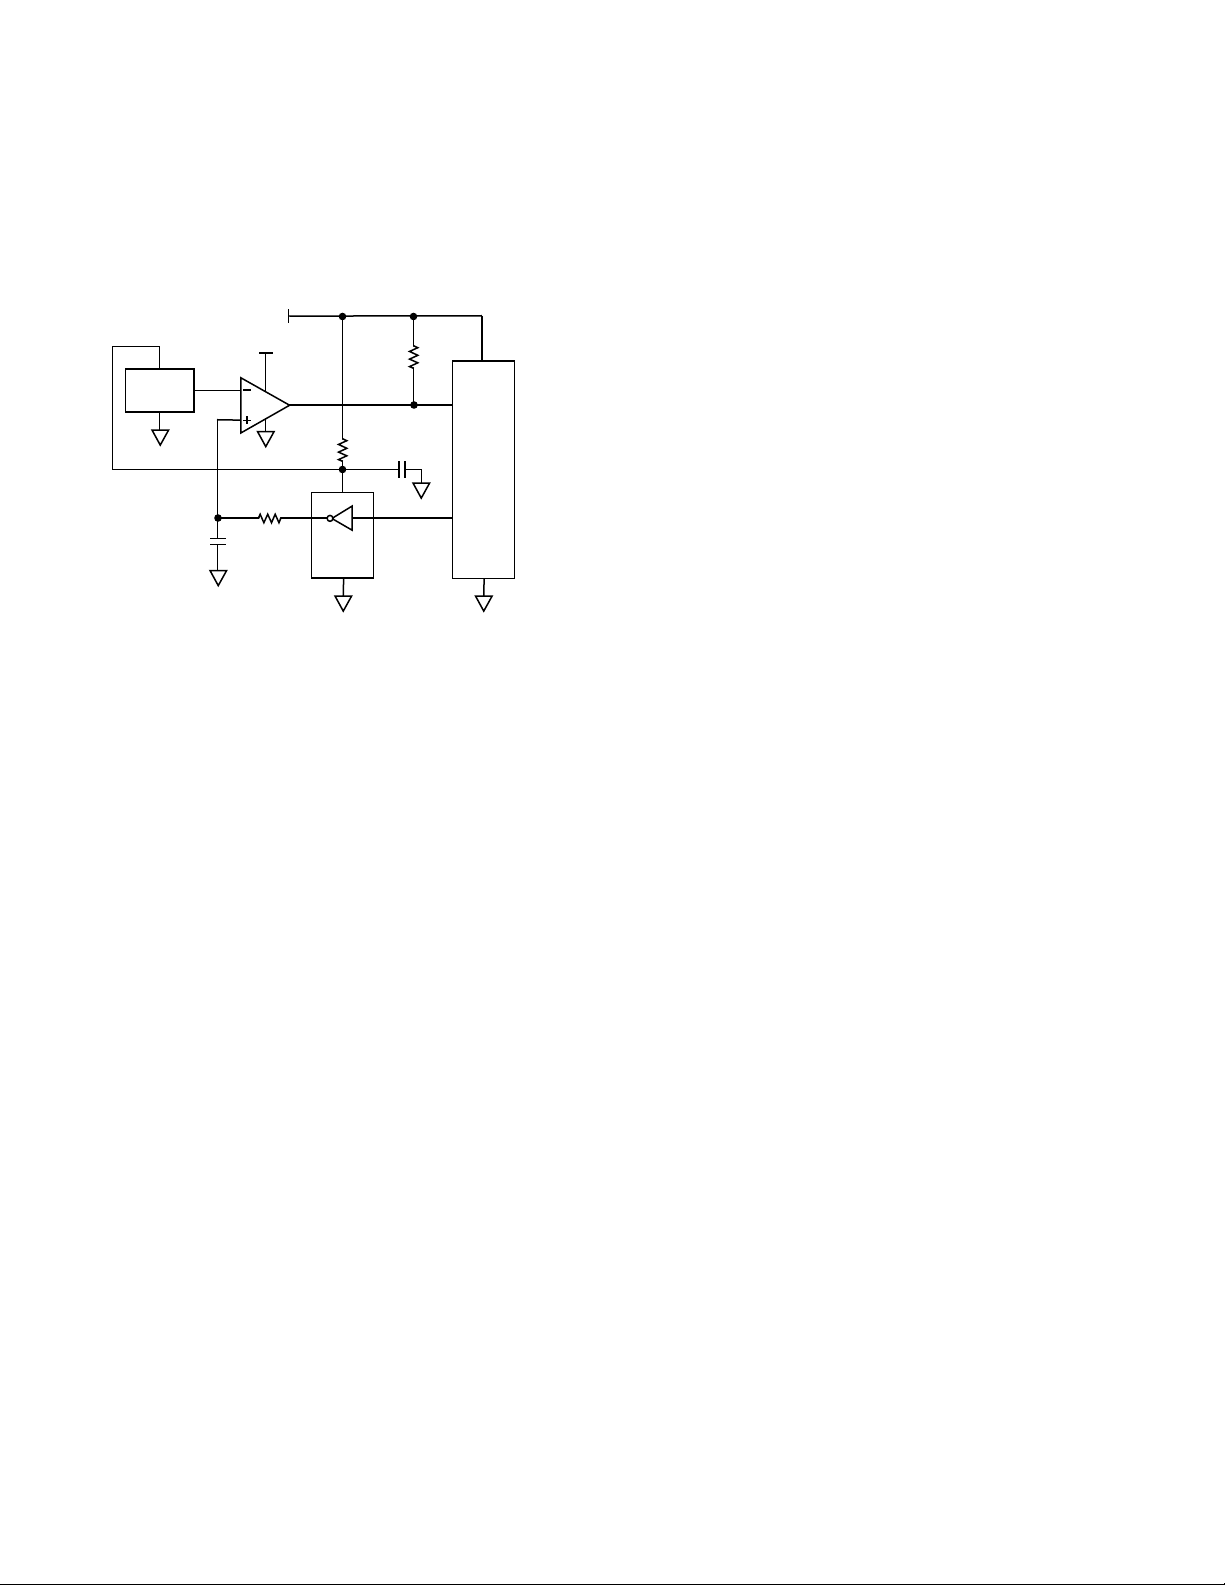
Figure 2. Simplified A/D Schematic
In addition to modulating the pulse train density according to the comparator output signal, the microcontroller
also keeps track of the density of the pulse train, as well
as the total time duration of the conversion cycle, via the
use of counter registers. The ratio of the pulse train density to the total conversion time is proportional to the
input voltage.
The A/D Conversion Firmware Loop
The A/D conversion process is controlled by a carefully
designed firmware loop. The loop is described in the
flowchart of Figure 3 below.
START
TOTAL –COUNT, OUTPUT–COUNT
INITIALIZE
REGISTERS
• extremely low cost
Furthermore, this A/D architecture can be adapted to a
wide variety of microcontroller types, including the very
low cost OTP (One Time Programmable) types. For the
purposes of this application note, we will illustrate the
circuit as implemented on an 80C51 Microcontroller
(available from Intel Corporation as well as others).
The A/D Circuit
The A/D circuit employed for this application note is an
integrating type that utilizes a very small kernel of code
(44 bytes) to control the conversion process. A
simplified schematic is shown in Figure 2. The input
signal is continuously compared to a feedback voltage
signal, which is generated by the microcontroller. The
microcontroller creates this feedback signal by generating a pulse train at the output pin whose density is proportional to the input signal. This pulse train is buffered
by Q1 and Q2, and filtered by R1 and C1 to produce a
linear voltage (the feedback voltage mentioned above).
Whenever the microcontroller senses that the feedback
voltage is less than the signal voltage, it increases the
density of the output pulse train. In this fashion, the
pulse train density is proportional to the input signal.
NO
CLEAR
DAC BIT
TOTAL–COUNT =
TOTAL–COUNT+1
(DELAY TO
EQUALIZE BRANCH
LENGTHS)
NO
IS SIGNAL
VOLTAGE >
FEEDBACK
VOLTAGE?
TERMINAL
COUNT
REACHED?
STOP
YES
SET
DAC BIT
TOTAL–COUNT =
TOTAL–COUNT+1
OUTPUT–COUNT =
OUTPUT–COUNT+1
YES
Figure 3. A/D Conversion Loop Flowchart
Referring to the flowchart in Figure 3, the conversion is
started by initializing the registers storing the total count
(used to count the total number of loop iterations) and
the registers storing the output count, to zero. Each time
–2–
Page 3

the loop is entered, the comparator output is tested: if it
indicates that the signal voltage is less than the feedback
voltage, the output bit (called the “DAC” bit, since it is
essentially a one-bit DAC) is set so that the feedback voltage will rise. If the comparator signal indicates that the
signal voltage is greater than the feedback voltage, the
DAC bit is cleared so that the feedback voltage will fall.
Whenever the DAC bit is set, the output count register is
incremented. Regardless of whether the DAC bit is set or
CONVERT:
MOV DPH,#0 ;the DPTR will be used to keep track
MOV DPL,#0 ;of the total loop count, so clear it
CLR A ;the ACC and B regs will store the raw
MOV B,A ;data, so clear them as well
;
;
; CVLOOP is the inner conversion loop, where the measurement actually
; takes place. In this example, we will loop 16384 times, for a 14 bit
; raw data result. The minimum loop time is 13 cycles, or 13 µs when
; running a 12 MHz clock, resulting in a conversion time of 212.992
; milliseconds.
;
CVLOOP:
JNB CVCMP,CVLOOP_UP ;test the comparator.. if it 2 cyc
CVLOOP_DOWN:
SETB CVFB ;going down, so set the bit... 1 cyc
NOP ; 1 cyc
NOP ;NOP’s equalize the time delays 1 cyc
INC DPTR ;increment the total loop count 2 cyc
SJMP CVLOOP_TEST ;now test for terminal count 2 cyc
;
CVLOOP_UP:
CLR CVFB ;going up, so clear the bit.. 1 cyc
ADD A,#1 ;increment the raw data 1 cyc
XCH A,B ;overflow to the B register 1 cyc
ADDC A,#0 ; 1 cyc
XC A,B ;and restore them 1 cyc
INC DPTR ;increment the total loop count 2 cyc
;
CVLOOP_TEST:
MOV BITTEST,DPH ;grab the upper byte of the dptr 2 cyc
JNB BITTEST.6,CVLOOP ;repeat until we overflow 14 bits 2 cyc
;
; The conversion is done; let’s leave the state of the feedback
; bit consistent to simplify the precharge process
;
CLR CVFB
;
; At this point, the B|A register pair has the raw data, scaled to
; 12 bits, and it is ratiometric to the power supply.
;
MOV RAWDAT,B ;store the result in RAWDAT
MOV RAWDAT+1,A
cleared, the total count is incremented, thereby keeping
track of the number of iterations of the loop. The conversion cycle is complete when the loop has executed the
desired number of iterations; in our example, the loop is
iterated 16,384 times to achieve a 14-bit result.
The loop is carefully constructed so that, regardless of
the result of the comparator test, it takes a fixed amount
of time to execute. Figure 4 is a listing of the actual code
;is low, we need to go up
Figure 4. The Inner Conversion Loop Firmware
–3–
Page 4
for the conversion loop, as used in the example project.
The loop takes just 13 microseconds to execute (a
12 MHz crystal is used in this example, which results in
1 microsecond instruction cycles). If the terminal count
criteria is set for 16,384 iterations, then the output count
will be equivalent to a 14-bit conversion. Using these
parameters, the total conversion cycle is 212.992 milliseconds, which is more than fast enough for the vast
majority of temperature measurement applications.
The choice of comparator can also affect circuit performance. In this architecture, the inputs of the comparator
are operated in common mode over nearly the entire
power supply range of the part. The limited CMRR
(Common-Mode Rejection Ratio) of the comparator
therefore affects the A/D converter linearity. In this example, the integral linearity error measured approximately 0.03%; a comparator with better CMRR would
reduce this error considerably.
+5V
AD22100
SENSOR
0.22µF
(MYLAR)
LM393P
2
3
+9V
330k
8
4,5,6
1
100
14
2
74HC04
3,5,7,9,
11,13
10k
1µF/35V
+
1
1
8
P1.0
87C51
P1.7
Figure 5. Schematic
With this type of converter architecture, it is easy to adjust the parameters to trade off resolution for conversion speed. This can be done by changing the loop
termination criteria. In our example, the loop terminates
when there is an overflow out of 14 bits on the total
count register, but we could easily modify this for any
binary resolution.
Breadboard Circuit Description
The actual schematic of the breadboard constructed for
this application note is shown in Figure 5. In place of the
discrete FETs shown in the simplified schematic, we
chose to use a 74HC04 Hex Inverter, which is quite
inexpensive, is widely available, and works well in this
application. The comparator used was an LM393 dual
comparator (only one half was used), which is also quite
inexpensive and widely available. Unfortunately, the
LM393 requires a positive supply at least +1.5 volts
higher than the highest input signal, forcing the use of a
+9 volt power supply. It is possible to substitute a CMOS
comparator with rail-to-rail input swing capability,
thereby allowing the entire circuit to operate off +5 volts,
but at a slightly greater expense. If the LM393 is chosen,
the +9 volt supply could possibly be “stolen” from other
portions of the actual application circuit, such as the
charge pumps commonly used in TTL-to-RS232 converter chips.
The low-pass filter for the feedback circuit has a pole at
approximately 2 Hz. This setting was chosen so that the
ripple of the feedback voltage would be less than 1 LSB
at the comparator input. This filter limits the bandwidth
of the converter, and requires time to settle before the
conversion cycle starts. Because of this, a “precharge”
function is required (see “Precharging the Feedback
Voltage”).
The power supply for the DAC buffer (the 74HC04) and
the AD22100 is separately decoupled from the
microcontroller power supply via the 100 Ω series resistor and 1 µF shunt capacitor. This is done to minimize
noise generated from the microcontroller clock and I/O
functions.
Precharging the Feedback Voltage
This A/D converter design has a disadvantage in that the
conversion only works properly if the feedback voltage
is at (or at least very near) the input voltage at the start
of the conversion cycle. When the conversion process is
first started, this may not be the case.
There are a number of solutions to this problem, including the use of a hardware switch between the comparator inputs. The switch could be closed briefly to
“precharge” the filter capacitor before the conversion
cycle starts. This particular solution can’t be used with
an AD22100 sensor, because the sensor output structure
is configured as a current source with a weak pull-down
resistor; “precharging” to a lower voltage would be
very slow.
Another solution (and the one that was used in the
breadboard for this applications article) is the use of a
short “precharge” software loop which balances the
comparator inputs just before starting the conversion
cycle.
In an actual application, the precharge loop is necessary
if the conversion rate is continuous.
–4–
Page 5

A/D Converter Performance
4
3
2
1
0
–3
–4
–50
TEMPERATURE – °C
–25 0 25 50 75 100 125 150
ERROR – °C
–1
–2
MAXIMUM ERROR
TYPICAL ERROR
MAXIMUM ERROR
As measured on the bench (using a precision reference
voltage generator in place of the AD22100), this A/D
circuit delivered 14-bit resolution, less than 1 LSB of
“flicker,” and approximately 0.03% integral linearity
error. The integral linearity could be improved via the
use of a comparator with better CMRR, but this level of
performance was judged adequate for this application.
The converter’s worst nonlinearities occur at the
extreme ends of the input range where the pulse train
density is either very high or very low. This happens because the ripple caused by the pulse train cannot be adequately suppressed by the fixed pole of the RC filter. In
this particular application, this nonlinearity results in errors of a few tenths of a degree when the input is near
–50°C or +150°C (the specified operating range for the
AD22100).
Calibration and Scaling
Despite the ratiometric characteristic of both the A/D
converter and the AD22100 sensor, this circuit requires
calibration. An ideal implementation of this A/D architecture
shouldn’t
require calibration; for example, an
input of exactly one-half the supply voltage should result in a perfect 50% pulse train density, which should
result in an output of 8096 counts (one half of 16,384 iterations of the conversion loop).
The side benefit of electronic calibration is a significant
improvement of accuracy in temperature measurement.
Without electronic calibration, the accuracy of the
AD22100 is fairly good. The error of the least expensive
grade is typically ±0.5°C at 25°C, rising to ±0.75 over its
specified temperature range. However, an examination
of the typical maximum performance plot of the
AD22100 (see Figure 6) reveals that most of the errors
are caused by simple gain and offset errors, not by sensor nonlinearity. If we could correct for these terms, the
resulting accuracy would be significantly improved. Examination of actual AD22100 factory evaluation data
shows that the nonlinearity of the sensor between 0 °C
and 100 ° C is just a few tenths of a degree; if the sensor
were actually calibrated at 0 °C and 100 °C,
the overall
accuracy could be considerably improved over the data
sheet specifications!
Unfortunately, in the real world there are error sources
that result in a less than perfect transfer function. The
input offset voltage of the comparator causes a corresponding offset error at the output. Slew rate limitations
and other error sources in the hex inverter circuit can
also cause gain errors. Consequently, it is necessary to
calibrate the A/D for accurate operation.
The A/D output must also be scaled for use in most applications. We must compensate for the 0 °C offset term
(1.375 volts, or 27.5% of the power supply voltage), as
well as deal with the gain of the sensor (22.5 mV/ °C).
In this application, we are assuming that the user requires a signed binary integer output with a resolution
of 0.1°C; this implies that the output must be 03E8H
(1000 counts) when the sensor is at 100 °C, and 0 counts
when the sensor is at 0 °C.
The normal method of calibration for analog circuits is
the use of trim potentiometers. Since this circuit already
includes a microcontroller, we can eliminate trim potentiometers in favor of electronic digital calibration. Furthermore, we can combine the scaling and calibration
into a pair of simple procedures.
Calibration at 0 °C and 100 °C is convenient, as well. If no
controlled temperature chamber is available, a fairly
close approximation to these temperatures can be
achieved with ice water and boiling water (although
altitude and contaminants might degrade the accuracy
somewhat).
The mathematics of calibration and scaling are most
easily understood by referring to the graph in Figure 7.
Prior to calibration and scaling, the natural output of the
converter is an unsigned 14-bit integer (represented by
the trace labeled “A” on the graph). If we were to assume a perfect converter, operating at 5 volts, then the
numerical values for this trace would be 11,878 counts
at 100 °C (3.625 V/5 V times 16,384), and 4,506 counts at
0°C (1.375 V/5 V times 16,384). The theoretical zero
crossing of this trace occurs at –61.111 °C.
Figure 6. Typical AD22100 Performance
–5–
Page 6

A/D TRANSFER
FUNCTION BEFORE
OFFSET CORRECTION
N(span)
A/D TRANSFER
FUNCTION AFTER
OFFSET CORRECTION
N(fs)
A/D TRANSFER
FUNCTION AFTER
SPAN CORRECTION
TEMPERATURE
+100°C
(3.625V)
–50°C
(0.25V)
N(ofs)
OFFSET
DIGITAL OUTPUT
0°C
(1.375V)
A
B
C
Figure 7. Scaling/Calibration Graph
The desired final output should be 0 for 0 °C, so the easiest way to deal with the offset term is to simply save the
output value observed when the sensor is at zero
(denoted N(ofs) on the graph of Figure 7), and use this
value (by subtraction) to compensate for offset error on
subsequent conversions. Correcting for offset in this
fashion corrects not only for the intrinsic offset term
(i.e., the 1.375 volt bias), but also for any additional offset terms, such as comparator offset, which may exist.
To perform this offset calibration, a firmware routine
was written that can be triggered by a command via a
serial link, an interrupt, or even a simple push-button
(which we used on the breadboard) to perform a conversion on the input and save the value. Prior to activating
this routine, the sensor must be stabilized at 0 °C. The
code for the offset calibration procedure is shown in
Figure 8.
After this calibration takes place, the A/D transfer function is now like line B in Figure 7 where a 0 °C input
produces a binary output of 0.
Note that the routine computes the twos complement of
the conversion data before storing it in the OFSVAL
holding register. This is done because, in all subsequent
applications, we will be using this value as a subtraction
from an A/D reading. Since subtraction is the same as
the addition of the twos complement of a number, it is
convenient to take the twos complement right now, and
store the value that way. Later, when this particular
coefficient is applied, it will simply need to be added.
; ZERO_CAL: The zero calibration procedure simply takes a
; sample of t he A/D reading at conditions of i nput = 0°C (1.375
; volts). This sample is stored in RAM (or EEPROM) and will
; be used in the scaling procedure. To apply this value, we
; simply subtract it from the current reading, which should
; result in an output of 0 for a 0 °C input.
;
; Since we will always apply this value by subtraction, we
; might as well take the twos complement of this number
; right now, and store it that way. When we need to apply it,
; all we’ll have to do is add.
;
;
ZERO_CAL:
ACALL CONVERT ;take a sample of the input
MOV B,RAWDAT+1 ;load RAWDAT into B|A (in reve rse
MOV A,RAWDAT ;order to save an instruction)
CPL A ;complement it
XCH A,B ;as well as the other byte
CPL A
ADD A,#1 ;now add 1
XCH A ,B
ADDC A,#0
MOV OFSVAL,A ;save it (it’s in reverse order)
MOV OFSVAL+1,B
RET
Figure 8. Offset Calibration Routine
Calibration and scaling of the span term is slightly more
complicated. Once the offset has been calibrated, the
converter output transfer function ranges from 0 at 0 °C,
to N(span) at 100 °C, as shown in Figure 7. It is necessary
to scale each conversion such that the converter produces N(f
), which would be 1000 at 100 °C. This could be
S
done by computing 1000/N(span), and using this quotient as a multiplicative calibration factor, to be applied
to each A/D conversion after compensating for offset.
This would produce line C in Figure 7, which is the desired output transfer function.
Unfortunately, since N(span) is significantly larger than
1000; the ratio is less than unity, and can’t be easily represented in integer math. If floating-point routines were
available, the process would be simple; however, many
small microcontroller applications can’t afford the
memory space and execution speed penalty of true
floating-point math, and for the sake of simplicity this
application is restricted to integer mathematics.
Therefore, a simple trick will be employed; the ratio will
be scaled up so that the calibration factor is in the integer range. After the span calibration factor has been
multiplied with the offset compensated data, it will be a
simple matter to divide the result by the scale factor to
return to the desired units.
–6–
Page 7

To perform this operation, a pair of extended integer
math routines will be used. MULT32R multiplies two
16-bit numbers to produce a 32-bit result, and DIV32R
divides a 32-bit number by a 16-bit number to produce a
16-bit quotient, rounded up to the next integer by the
remainder. The routines themselves are not reproduced
here, but are available on request from the author.
;
;
; SPAN_CAL : the span calibration procedure takes a sample of
; the A/D value at conditions of 100 °C (3.625 V) and from that
; computes a multiplicative calibration coefficient that will
; be used to both calibrate as well as scale each A/D
; reading.
;
;
SPAN_CAL:
;
ACALL CONVERT ;grab a fresh sample
;
; first, retrieve the raw data, and subtract the offset
; calibration value.
;
MOV B,OFSVAL ;load OFSVAL into B|A
MOV A,OFSVAL+1
;
; Now add it to RAWDAT (it was already in 2s comp form)
;
ADD A,RAWDAT+1
XCH A, B
ADDC A,RAWDAT
XCH A, B
;
; Now move this into the denominator
;
MOV DEN,B
MOV DEN+1,A
;
; And preload the numerator with 65,536,000 (03E80000H)
;
MOV NUM,#03H
MOV NUM+1,#00E8H
MOV NUM+2,#00H
MOV NUM+3,#00H
;
; Finally, divide to produce the span calibration factor
;
LCALL DIV32R
;
; The quotient now has the span calibration factor;
; let’s store it
;
MOV SPNVAL,NUM+2
MOV SPNVAL+1,NUM+3
;
RET
;
Figure 9. Span Calibration Routine
A/D Output Data Scaling
Once the calibration routines have been performed, the
registers SPNVAL and OFSVAL contain the data necessary to both calibrate and scale each A/D conversion.
Each time an A/D conversion is made, the DATA_SCALE
routine is called. This routine subtracts the previously
established offset count OFSVAL, multiplies the A/D
reading with SPNVAL, and then divides the product by
65,536 to restore the 0.1 °C/LSB scale we desire. The
DATA_SCALE routine is illustrated in Figure 10.
;
; DATA_SCALE: a routine which applies the span and offset
; compensation values to the raw A/D reading, and produces an
; integer output with units of 0.1 °C. From this point, the
; user application can transmit or display the results
; easily.
;
DATA_SCALE:
;
; The first order of business is to subtract off the offset
; compensation value from the reading
;
MOV B,OFSVAL ;load OFSVAL into B|A
MOV A,OFSVAL+1
;
; Now add it to RAWDAT
;
ADD A,RAWDAT+1
XCH A ,B
ADDC A,RAWDAT
; (XCH A,B) ;no point in actually doing this,
;we’ll switch the order in the
;next two instructions
;
; Now we want to move this into the multiplicand
; i n preparation for multiplying with the calibration factor
;
MOV MCAND,A
MOV MCAND+1,B
;
; Load the multiplier with the span calibration factor
;
MOV MPLIER,SPNVAL
MOV MPLIER+1,SPNVAL+1
;
; OK, multiply them!
;
LCALL MULT32
;
; The result must be divided by 65,536 to produce an output
; scaled to 0.1 °C. The product of the previous multiply is
; already in the denominator registers, and it is a 32 bit
; result, so we can effectively divide by 65,536 simply by
; taking the upper 2 bytes as our output
;
; The result is our finished data, and we want to place it
; into the SCALEDAT register
;
MOV SCALEDAT,NUM
MOV SCALEDAT+1,NUM+1
;
RET
;
–7–
Figure 10. Output Data Scaling Routine
Page 8
Circuit Performance
The circuit for this applications note was bench tested
by substituting a precision reference voltage generator
in the place of the AD22100. This test was performed to
reveal the underlying accuracy of the circuit, complete
with all mathematics (i.e., calibration and scaling).
The circuit was found to be nearly perfectly accurate to
within the resolution of the scaling parameters over the
majority of the operating range. The error rises very
slightly at the low end of the range; this is probably due
to limitations of the CMRR of the comparator, along
with errors in the feedback voltage generator (i.e., the
74HC04 and the RC filter). Performance could undoubtedly be improved with additional circuit refinement, but
the existing performance is more than adequate for applications requiring 0.1 °C resolution.
Nonvolatile Calibration Storage
As has been shown, the digital calibration procedures
and routines are excellent replacements for trim potentiometers. They simply require a means of producing
the proper input (0 °C and 100°C) to create an accurate
two point calibration of the circuit.
However, this calibration technique lacks one of the fundamental attributes of potentiometers: nonvolatility.
When circuit power is lost, the contents of random access memory are lost, and with it, the calibration factors. Fortunately, nonvolatility can be achieved quite
easily by the inclusion of an EEPROM (Electrically Erasable Programmable Read Only Memory). There are a
number of these devices available on the market that
are quite inexpensive, easily interfaced via just a few
serial lines, and easy to program.
The EEPROM is organized as 64 separate 16-bit registers. Accordingly, a pair of bytes are established in RAM,
labeled NVDLO and NVDHI, to serve as a buffer for
writes and reads to/from the EEPROM. To write to
EEPROM, first load NVDHI and NVDLO with the desired
data, then load the accumulator with the address (within
EEPROM) that the data will be written to. Finally, call
NVWR to write the data.
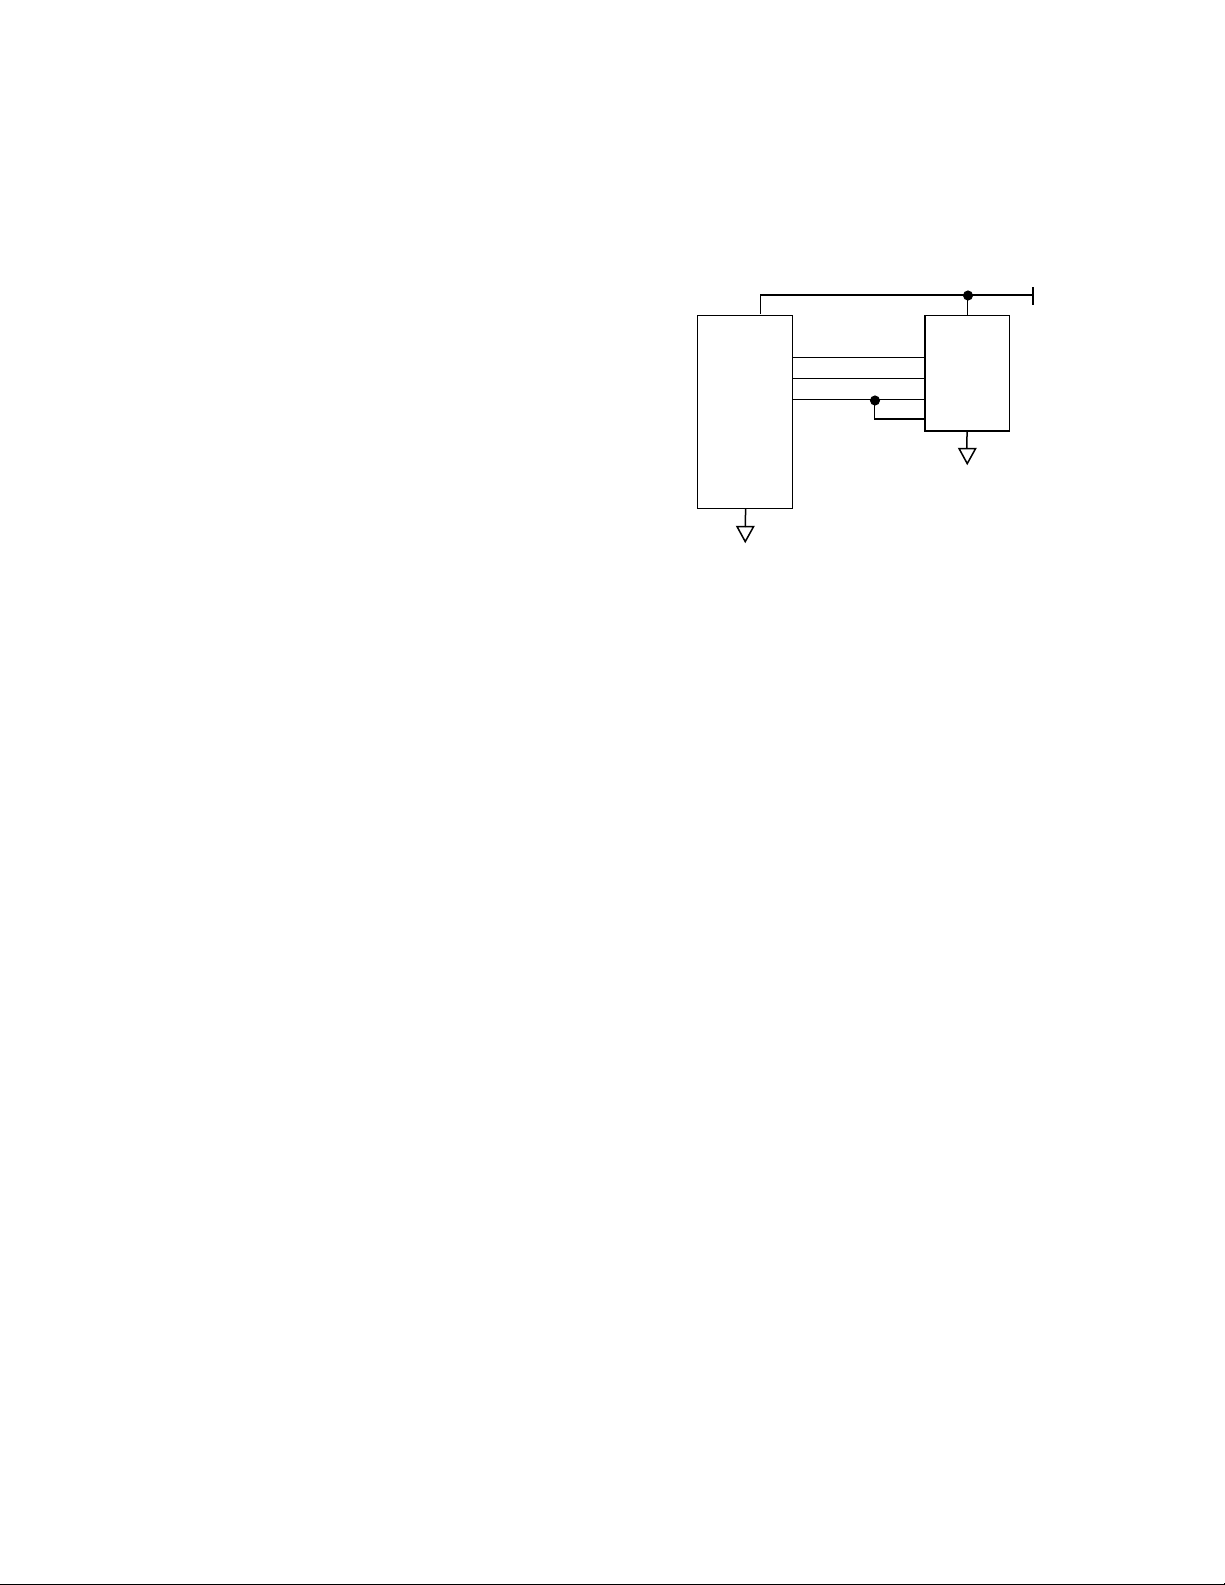
+5V
80C51
NVSK
NVCS
NVDIO
NSC93C06
SK
CS
DI
DO
Figure 11. Interface to a 93C06 EEPROM
Reading data from EEPROM is accomplished by loading
the accumulator with the address (within EEPROM) to
be retrieved, and then calling the NVRD routine. The desired data will be loaded to the NVDHI and NVDLO registers when the routine returns.
Reading from EEPROM is relatively fast (approximately
70 microseconds per byte), but writing to EEPROM is
much slower; this is because the EEPROM location must
first be erased before it can be written. Erasure takes
approximately 10 milliseconds per location. The firmware
routines for accessing this EEPROM are shown below.
For this applications circuit, the component chosen was
the NMC93C06 (from National Semiconductor), which
is a 256-bit CMOS EEPROM, available in either an 8-pin
DIP package, or in an 8-pin SOIC package. The calibration factors require only 4 bytes (32 bits) of storage, so
the device will be left with plenty of capacity for other
functions. This part uses a simple three-wire serial interface, and can be driven by any three available I/O
pins on our 80C51 microcontroller. The schematic of
this interface is shown in Figure 11. The software required to access this device uses a technique commonly
known as “bit-banging,” where we use microcontroller
instructions to actually clock the EEPROM.
–8–
Page 9

;
; NVWR — Write to NV memory. This is accomplished by
; first enabling writes, then erasing the target register,
; then writing to the target register, then disabling writes.
;
NVWR:
PUSH A
LCALL NSWRE ;first enable write
POP A
PUSH A
LCALL NSEREG ;erase the register
POP A
LCALL NSWR ;now write the register
LCALL NSWRD ;and disable write
RET
;
;
; NVRD — read a register pair
;
;
NVRD: ORL A,#080H ;ready to read a reg
LCALL NSTART ;start bit
LCALL SHFOUT ;send the command
SETB NVDIO ;set bit hi to read data
LCALL SHFTIN ;read the hi byte
MOV NVDHI,A
LCALL SHFTIN ;read the low byte
MOV NVDLO,A
CLR NVCS ;all done
RET
;
;
; support routines for NVRD and NVWR
;
;
; SHFTIN — shift in eight bits from the NV memory
;
;
SHFTIN: MOV R2,#8 ;eight bits
SETB NVDIO ;input routine; set NVDIO to “1”
;
IN10: SETB NVSK ;raise the clock
NOP ;delay for NSC parts
RL A ;make room for the data
MOV C,NVDIO ;get the data
MOV ACC.0,C ;place it in the accum
CLR NVSK ;and clear the clock
;
DJNZ R2,IN10 ;do this eight times
RET
;
;
; SHFOUT — send eight bits to NV memory
;
;
SHFOUT: MOV R2,#8 ;eight times
OUT10:
RL A ;get the top bit into the carry
MOV C,ACC.0 ;via the LSB
MOV NVDIO,C ;set the data line
;
SETB NVSK ;now strobe it in
NOP
CLR NVSK
;
DJNZ R2,OUT10 ;do it again
RET
;
;
NSEREG: ORL A,#0C0H ;Ready to erase a register
LCALL NSTART ;start bit
LCALL SHFOUT ;send the command
NS200:
CLR NVCS ;start the timeout
LCALL NSDLY
LCALL CKEVNT ;finish with a clock event
RET
;
NSWR: ORL A,#040H ;ready to write a register
LCALL NSTART ;start bit
LCALL SHFOUT ;send the command
MOV A,NVDHI ;send the hi byte
LCALL SHFOUT
MOV A,NVDLO ;send the low byte
LCALL SHFOUT
SJMP NS200 ;finish with the timeout cycle
;
;
NSWRE: MOV A,#30H ;write enable
LCALL NSTART
SJMP NS100
;
NSWRD: CLR A ;write disable
LCALL NSTART
SJMP NS100
;
NSTART: CLR NVDIO ;start bit for NSC parts
NOP
SETB NVCS
NOP
SETB NVSK
NOP
NOP
CLR NVSK
NOP
SETB NVDIO
NOP
SETB NVSK
NOP
NOP
CLR NVSK
RET
;
; CKEVNT — performs a single clock cycle to signal the
; end of a programming sequence for the NSC part
;
CKEVNT: SETB NVCS
SETB NVSK
NOP
NOP
CLR NVSK
CLR NVCS
RET
;
; NSDLY — provides the minimum 10 ms delay to the
; EEPROM
;
;
NSDLY: MOV R2,#5
NSDL05: MOV R3,#230
;
NSDL10: NO P ;the NSDL10 loop contains eight
NO P ; in struction cycles. At 1 1.0592 MHz,
SETB NVSK ;the loop takes 8 * 1.085 us; do
NOP ;this 230 times for a total of 2
; ms.
NOP ;5 iterations of the loop gives 10
;ms.
CLR NVSK
DJNZ R3,NSDL10
;
DJNZ R2,NSDL05
RET
;
; NS100 — common ending sequence for several routines
;
NS100:
SETB NVCS
LCALL SHFOUT
CLR NVCS
RET
;
–9–
Page 10

Using the EEPROM in the Applications Circuit
The best way to employ the EEPROM capability to the
circuit is to save the calibration factors (SPNVAL and
OFSVAL) whenever the ZERO_CAL and SPAN_CAL procedures are executed (although not shown in the code
examples contained in this applications note, the
EEPROM writes would occur at the end of each of these
routines, when the SPNVAL and OFSVAL registers are
updated).
The initialization procedure for the application would
typically contain routines which, after power-up, read
the calibration values from EEPROM and load the
SPNVAL and OFSVAL registers. In this way, the circuit
would start with the calibration parameters that were
last saved in EEPROM.
About Ratiometric Circuits
Ratiometric circuits are ones in which the critical output
or parameter is specified as a
ence voltage or power supply, instead of as an
ratio
to either the refer-
absolute
value. The ratiometric property is very useful, because it
sometimes allows the designer to ignore the effects of
changing power supply or reference voltages on the desired output or input signal.
An example of an explicitly
non
-ratiometric circuit is a
Zener diode, biased by a resistor to a positive power
supply. As the power supply varies, the voltage across
the Zener remains constant in
absolute
units (volts in
this particular case). When building reference circuits,
nonratiometricity is certainly a useful attribute, since we
don’t want the reference voltage varying with the supply.
Previous generation silicon temperature sensors were
decidedly nonratiometric; their outputs were scaled to
absolute volts or absolute current. The AD590, for example, produces an output current of 1 microamp per
degree Kelvin. To use these sensors, it is necessary to
connect them to an A/D converter that is calibrated in
absolute
volts (which implies that the A/D converter
needed a precision stable reference of some kind). The
AD22100, conversely, produces an output that can be
described as a ratio of its own power supply. The graph
of Figure 12 illustrates this behavior.
As shown in the graph, the output of the AD22100 (at a
constant temperature) remains the same percentage of
the supply voltage. At 0 °C, the output is nominally 27.5%
of the supply voltage, and that ratio is maintained over a
wide supply voltage range.
+1.5125
AD22100 OUTPUT
+1.375
OUTPUT – Volts
+1.2375
+4.5
+5 +5.5
SUPPLY – Volts
Figure 12. Output Voltage vs. Supply Voltage
This characteristic is particularly advantageous if the
AD22100 output is being fed to an A/D converter (which
is ratiometric by nature). By using the same voltage for
the A/D reference as that being used for the AD22100
supply, the A/D output will remain constant regardless
of changes in the supply voltage. Therefore, no precision reference is needed, and supply drift is not a
concern.
In actual practice, no device is completely ratiometric;
various factors usually result in a slight shift in the ratio
as the supply voltage is varied. In the AD22100, the
change in ratio (relative to indicated temperature) is approximately 0.08 °C for a 5 volt to 5.5 volt change in supply voltage. This error is small enough to be neglected in
most applications.
In the breadboard constructed for this application note,
the change in indicated temperature for a power supply
change of 4.5 volts to 5.5 volts was less than 0.2 °C, indicating that the A/D converter is behaving ratiometrically,
as expected.
Conclusion
This application note has described the unique features
and attributes of the AD22100 Temperature Sensor, and
has also described a novel method of interfacing the
AD22100 Temperature Sensor to a low cost, single-chip
microcontroller. We have demonstrated the principle of
ratiometricity and have shown how that attribute can be
used to good advantage. The ideas, circuits, and concepts presented in this application note may serve as a
springboard for other kinds of applications, as well.
–10–
Page 11

–11–
Page 12

E2029–12–5/95
–12–
PRINTED IN U.S.A.
 Loading...