

Page 1
Owner’s Manual
用戶手冊
用戶手冊
用戶手冊用戶手冊
Innovations Basic
AT5220/ AT5220T
1.8 GHz DECT Telephone
1.8 GHz數碼室內無線電話
數碼室內無線電話
數碼室內無線電話數碼室內無線電話
Table of Contents
1
Environment.............................................................................................................................2
2
Safety.........................................................................................................................................3
3
What’s in the Box?..................................................................................................................4
4
General Features.....................................................................................................................5
5
Welcome....................................................................................................................................5
6
About your phone....................................................................................................................6
7
Getting Started.........................................................................................................................8
8
Call...........................................................................................................................................11
9
Intercom and Conference Calls..........................................................................................14
10
Text and Numbers.................................................................................................................15
11
Phonebook..............................................................................................................................16
12
Call Log...................................................................................................................................18
13
Custom Options.....................................................................................................................19
14
Calling Features.....................................................................................................................20
15
Extra Features........................................................................................................................21
16
The System.............................................................................................................................22
17
Appendix.................................................................................................................................24
18
Chinese Manual (中文說明書由此頁開始
19
Wanrranty Card....................................................................................................................48
中文說明書由此頁開始)......................................................................25
中文說明書由此頁開始中文說明書由此頁開始
Environment
Environmental
Remember to observe the local regulations regarding the disposal of your packaging materials, exhausted
batteries, and old equipments. Promote their recycling where possible.
Recycling & disposal (applicable to EU and countries with relevant Legal requirements)
Disposal instructions for old products: The purpose of WEEE directive (Waste Electrical and Electronic
Equipment; 2002/96/EC) is to ensure that products are recycled using best available treatment, recovery and
recycling techniques to ensure human health and high environmental protection. You product is designed
and manufactured with high quality materials and components, which can be recycled and reused.
•
Do not dispose of your old product in your general household waste bin.
•
Inform yourself about the local separate collection system for electrical and
electronic products marked by this symbol.
CAUTION 注意
隨機均附送充電式電池
切勿使用非充電式電池! 使用不適當的電池會失去原廠保用, 並且有爆炸的危險.
Rechargeable batteries are included with this DECT phone
Never use non-rechargeable batteries! Use of improper batteries will void the warranty and risk
the danger of explosion.
注意:
注意注意
Use one of the following disposal options:
•
Dispose of the complete product (including its cables, plugs and accessories) in the designated WEEE
collection facilities.
•
If you purchase a replacement product, hand your complete old product back to the retailer. He should
accept it as required by the WEEE directive.
Disposal instructions for batteries:
Batteries should not be disposed of with general household waste.
1
2
Page 2
Safety
WARNING:
RISK OF EXPLOSION IF BATTERY IS REPLACED BY AN INCORRECT TYPE. Never
waste disposal regulations.
CAUTION:
Use only the mains adapter supplied with this equipment. Incorrect
CAUTION:
The electrical network is classified as dangerous according to criteria
Safety
IMPORTANT
This product is not designed for making emergency telephone calls when the power fails. Alternative
arrangements should be made for access to emergency services.
Power requirements
This product requires an electrical supply of 220-240 volts, single-phase alternating current, excluding IT
installations defined in standard EN 60950.
in the standard EN 60950. The only way to power down this product is by
unplugging the power supply from the electrical outlet. Ensure the electrical outlet
is located close to the apparatus and is always easily accessible.
adapter polarity or voltage can seriously damage the unit.
Handset Charger Adapter
Input: 230VAC 50Hz
Output: 6VDC 150mA
Battery requirements
The handset requires power source of two rechargeable NiMH batteries, size AAA 1.2V 550 mAh (HR10/44).
use non-rechargeable batteries. Use recommended type supplied with this
product. NiMH batteries must be disposed of in accordance with the applicable
Telephone connections
The voltage on the network is classified as TNV-3 (Telecommunication Network Voltages, as defined in the
standard EN 60950). Following a power cut, the call in progress as well as the date and time settings is lost.
Hearing aid
Please note that this telephone works by sending radio signals between the base unit and the handset. These
signals may interfere with some hearing aids, causing a humming noise.
Safety precautions
•
Do not allow the handset to come into contact with liquids or moisture.
•
Do not open the handset, base unit or charger. This could expose you to high voltages.
•
Do not allow the charging contacts or the battery to come into contact with conductive materials.
•
There is a slight chance that your product could be damaged by an electrical storm. We recommend that
you unplug the product from the power supply and telephone socket during a storm.
•
Do not use the handset in an explosive hazard area such as where there is gas leaking.
•
It is recommended that this product is not used near intensive care medical equipments or by persons
with pacemakers.
• This product can interfere with electrical equipment such as answering machine, television, radio, and computers if
placed too close. We recommend that you position the base unit at least one meter from such appliances.
Base Unit Adapter
Input: 230VAC 50Hz
Output: 6VDC 250mA
What’s in the Box?
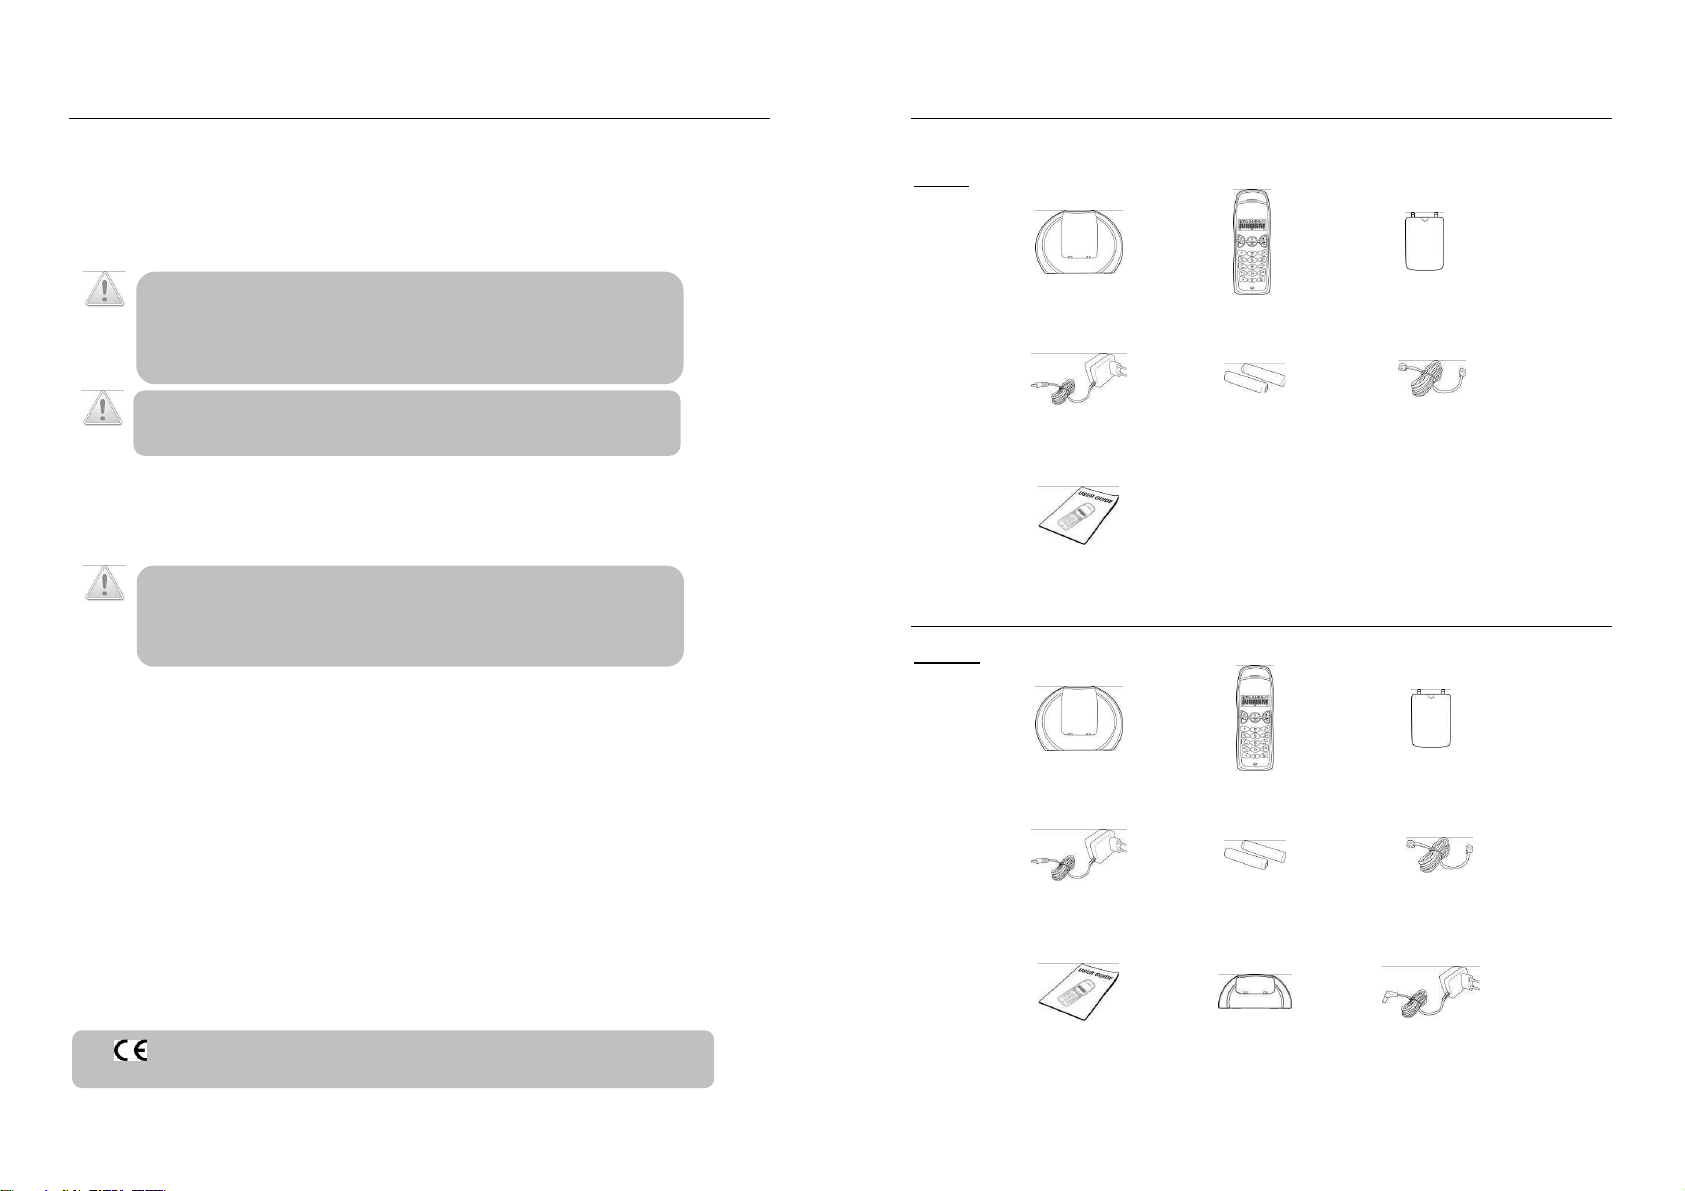
Make sure you have all these items in the box. For missing item(s), contact your dealer.
AT5220
AT5220T
Base Unit Handset Handset Battery Cover
Base Power Adapter NiMH AAA Battery x 2 Telephone Line Cord
User Guide
Base Unit Handset x 2 Handset Battery Cover x 2
Base Power Adapter NiMH AAA Battery x 4 Telephone Line Cord
The marking certifies the compliance with technical regulations in accordance with the Directive
3
User Guide Charger Charger Power
4
Adapter
Page 3
General Features
Range: up to 300m (Open Field), 50m (Indoor)
*Call Waiting / Type I & Type II Caller ID Support
Low radiation
Crystal clear voice quality
120 Duplex Channels
3-Line LCD
Amber LCD backlit
20 Number Phone Book Memory (Name & Numbers)
10 Ringing Melodies on Handset
Ring On / Off Shortcut Key
Range Out & Low Battery Warning (Visual & Audio)
Up to 120 hrs Standby time
Up to 12 hrs Talk Time
Rechargeable Battery cells (2x AAA)
Multi-Handset Registration at a Single Base Station (Up to 4)
Multi-way conference (1 EXT, 2 INT)
Call Transfer, Intercom between Handset
*Requires Subscription To Service Provider
Welcome
This user guide provides you with information and instruction you need to get the most from your phone.
HOW TO USE THIS USER GUIDE?
The following symbols are used to alert you on important information.
•
Warning::::
Critical information for preventing
personal injury.
•
Caution:
Caution:
Critical information for preventing
Caution:Caution:
damage on the product.
•
Tip:
Tip:
Information for easier operation.
Tip:Tip:
•
Note:
Note:
Explanatory or critical information for
Note:Note:
carrying out an operation correctly.
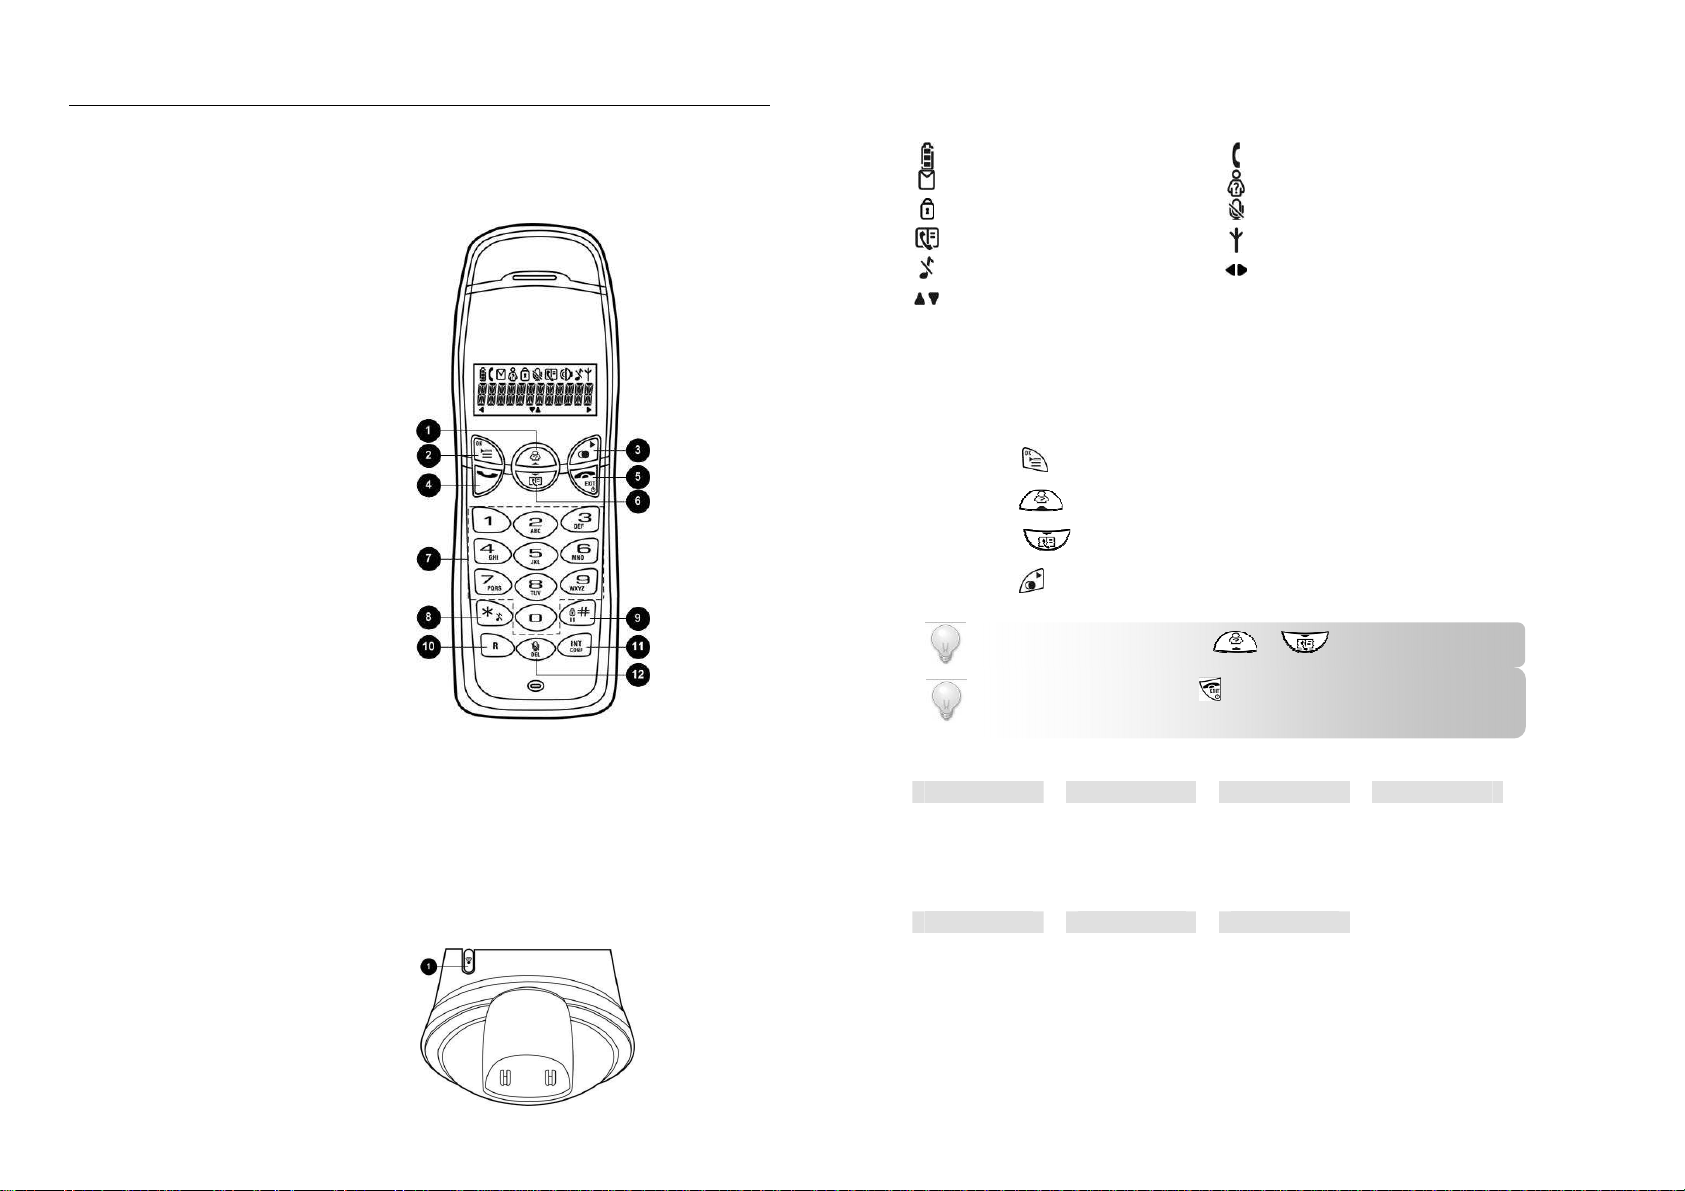
About your phone
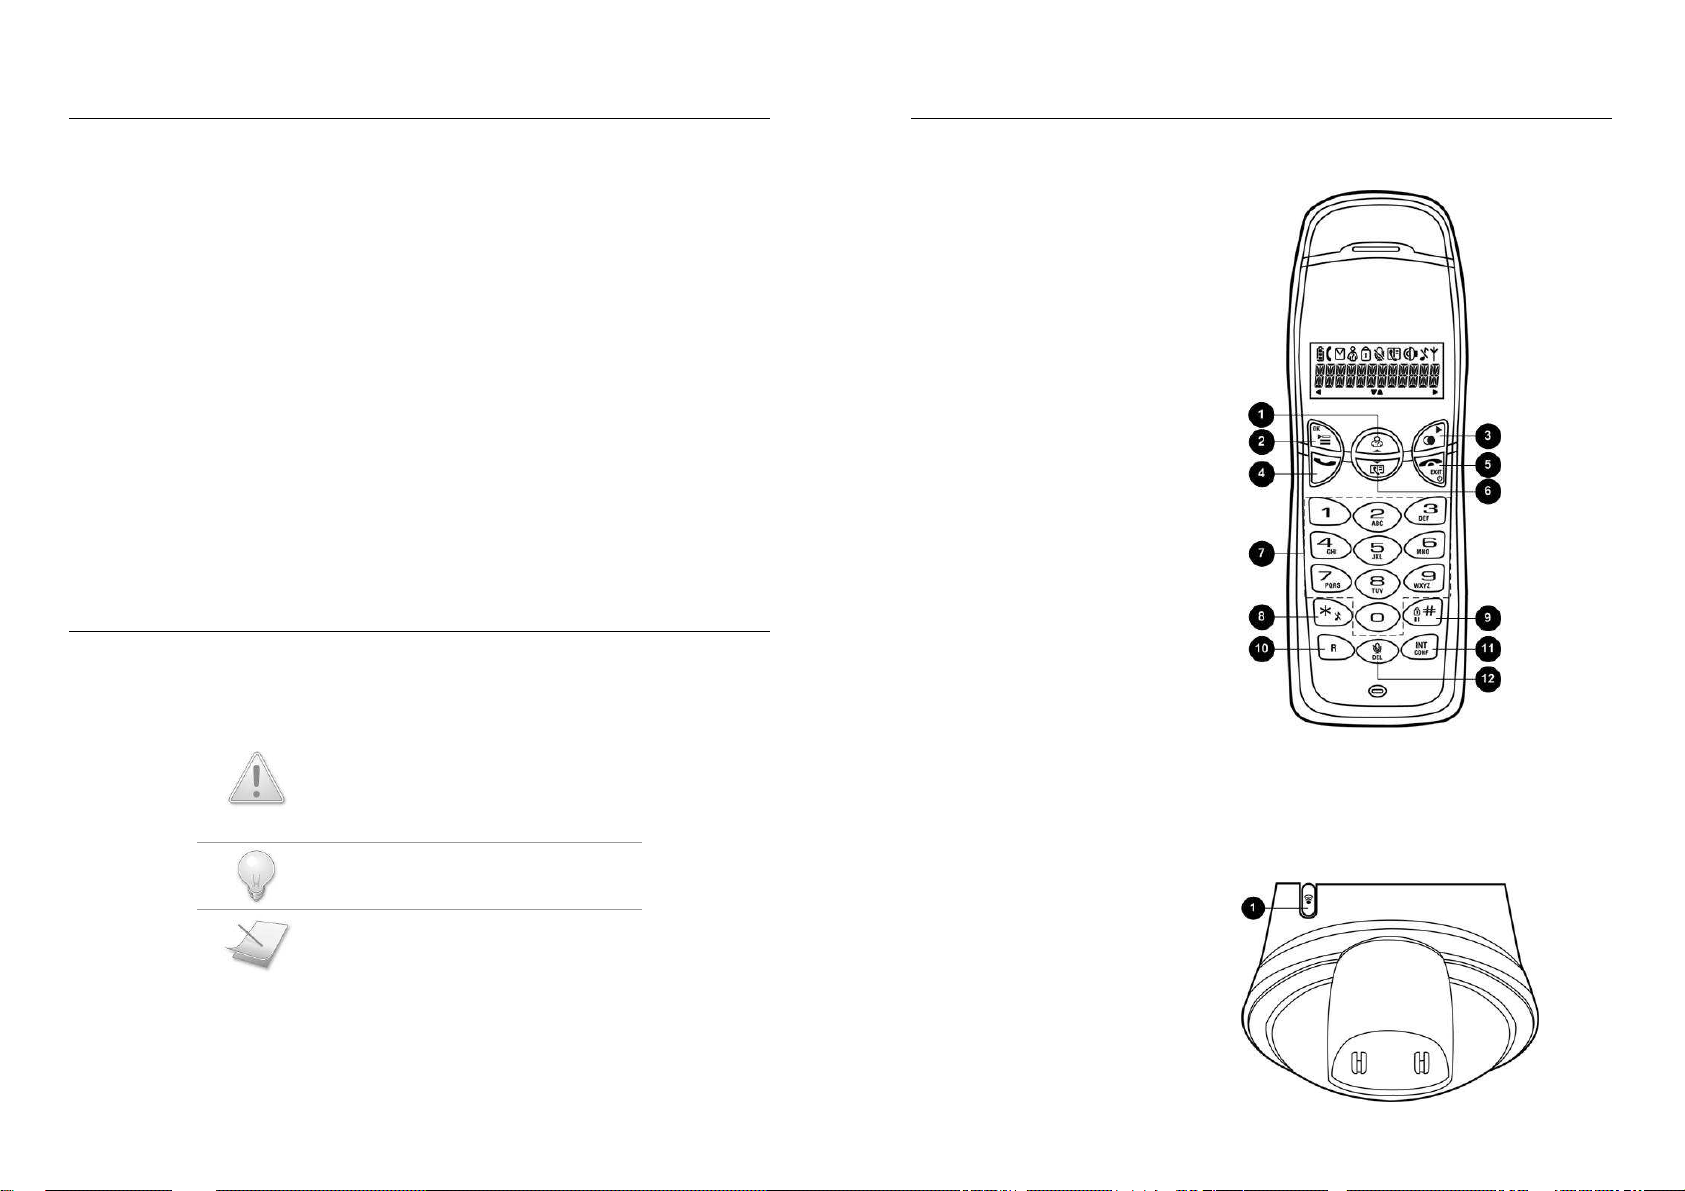
THE HANDSET
1 Up Navigation & Call Log key
Scroll up menu items
Increase ringer and receiver volume
Enter incoming call log
2 Menu & OK key
Access main menu
Confirm selection / operation
3 Redial & More key
Enter redial log
View more record information
4 Talk key
Make and receive calls
5 End & On/Off key
End current call
Exit menu / operation
Turn handset on/ off
6 Down Navigation & Phonebook key
Scroll down menu items
Reduce ringer and receiver volume.
Enter phonebook record review
7 Digit keys
Dial digits
Enter characters
8 Star & Ringer Off key
Dial *
Turn ringer on / off
9 Pound, Keylock, & Pause key
Dial #
Enter a pause
Lock / unlock keypad
10 Recall key
Send a flash signal
11 Intercom key
Make intercom call
Start conference call
THE BASE
1 Page key
Find handset(s)
Enter registration mode
12 Mute & Delete key
Mute / un-mute microphone
Delete character or digit
NEED MORE HELP?
•
See the Troubleshooting section in this user guide on page 24.
•
Call the Helpline at AMYTEL’s local distributors
•
Visit our online help www.amytel.net
5
6
Page 4
Getting Started
CAUTION:
Check the batteries polarity when inserting the batteries. Incorrect
WARNING:
RISK OF EXPLOSION IF BATTERY IS REPLACED BY AN INCORRECT TYPE. Never
waste disposal regulations.
NOTE:
Charge the handset(s) for 14 hours before initial use
or after
replacement
NOTE:
Low Radiation Mode.
Your phone is designed with a low
-
radiation
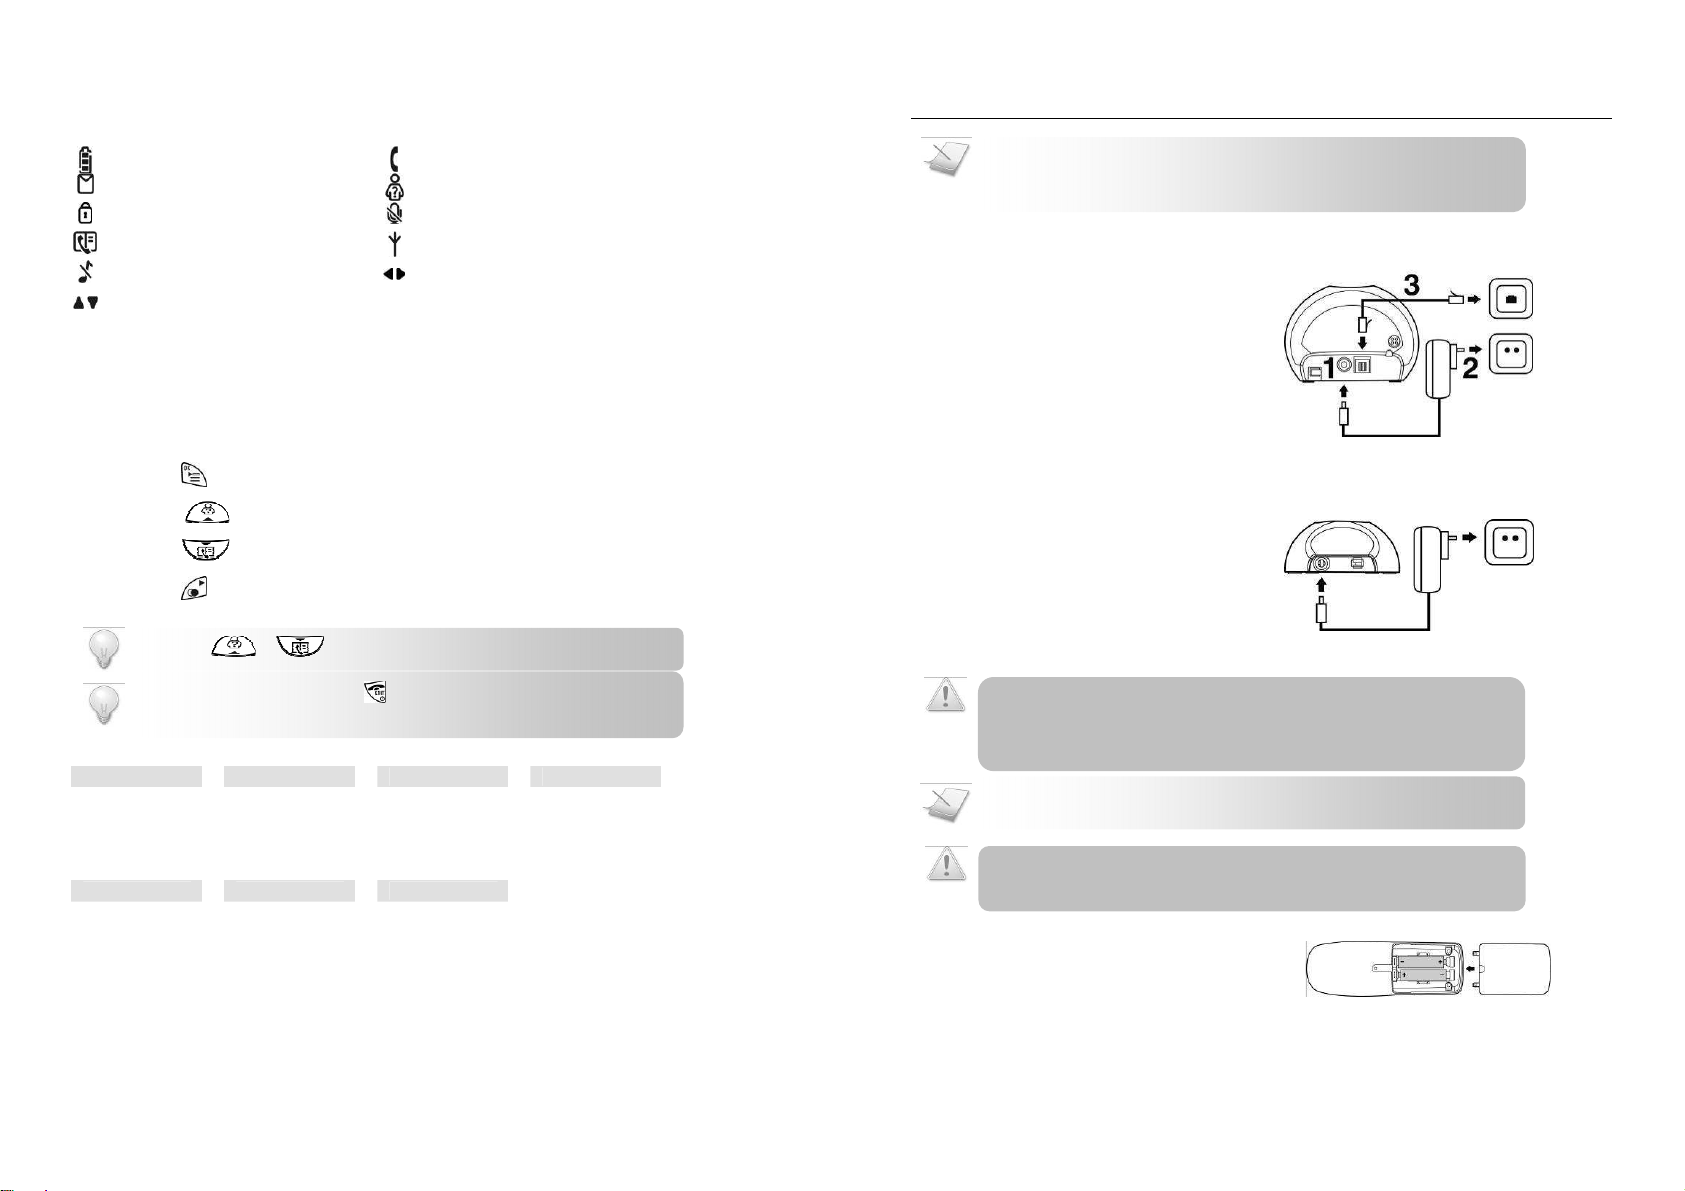
THE ICONS
Each icon gives you a visual message of what is happening on your handset.
Battery level
Voicemail indicator
Key lock
Phonebook
Ringer off
Up/Down arrows
Call in progress
Caller ID indicator
Microphone Mute
Signal strength
Left/Right arrows
THE MENUS
Your phone offers a variety of features and functions grouped in the menus.
Browsing the menus
The main menu includes the Phonebook, Display, Sound, Settings, and System menus.
Press to enter the main menu.
Press to enter the incoming call log.
Press to enter the phonebook.
Press to enter the redial log
TIP:
Use or to navigate the menus.
.
Getting Started
mechanism; therefore the antenna switches off automatically in standby mode
and will not emit any radiation. To turn on this feature, see page 23.
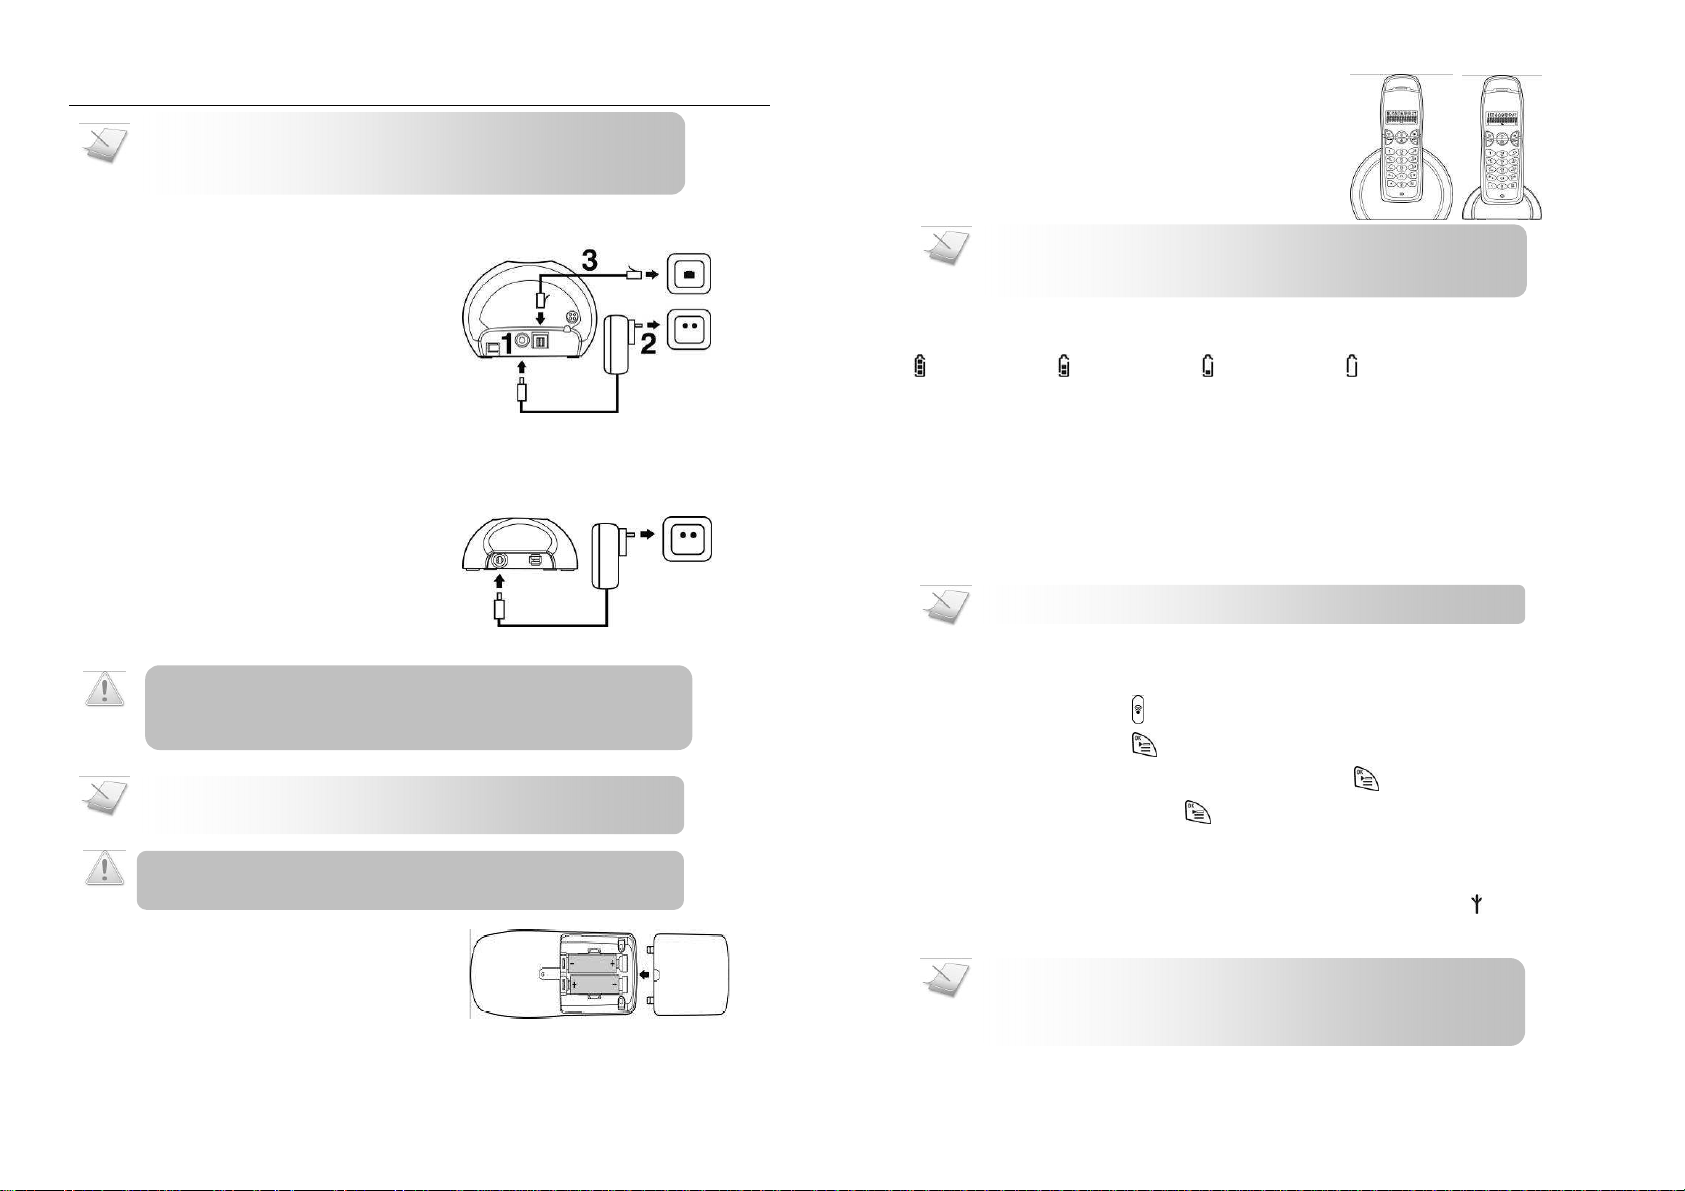
CONNECTING YOUR PHONE
1.
Connect the output plug of the mains
adapter to the bottom of the base unit.
2.
Connect the mains adapter to a
standard wall outlet.
3.
Connect the telephone line cord to the
phone socket at the bottom of the
base unit and the wall phone socket.
CONNECTING YOUR CHARGER
* For multi-pack customer only
CHARGING YOUR HANDSET
1.
Connect the power adapter of the
charger to a standard wall outlet.
TIP:
Quick Exit. Press and hold to exit from any menu instantly. All
unconfirmed changes will not be saved.
Taking a glance at the menus
PHONEBOOK
Add Record
Edit Record
Delete
Delete All
SYSTEM
Register
Select Base
Delete HS
Change PIN
Low RF Power
Reset
DISPLAY
Handset Name
Backlit
INCOMING
Save
Delete
Delete All
SOUND
Handset
Key Tones
Tones
REDIAL
Save
Delete
7
SETTINGS
Auto Answer
Dial Mode
Recall
use non-rechargeable batteries. Use recommended type supplied with this
product. NiMH batteries must be disposed of in accordance with the applicable
of new rechargeable batteries.
polarity may damage the product.
1.
Place the 2 rechargeable batteries
(included) into the battery compartment.
2.
Slide the battery door firmly into place.
8
Page 5
Getting Started
NOTE:
Your base can register up to 4 handsets. After registering 4 handsets,
additional handset, registration will not be successful.
NOTE:
Your handset shall be already registered in the box.
NOTE:
Handset may get warm durin
g initial charge. This is normal. The handset
NOTE:
If your handset has lost li
nk, you will not be able to make or receive any
features.
NOTE:
Your handset cannot receive any call if the power is switched off.
3.
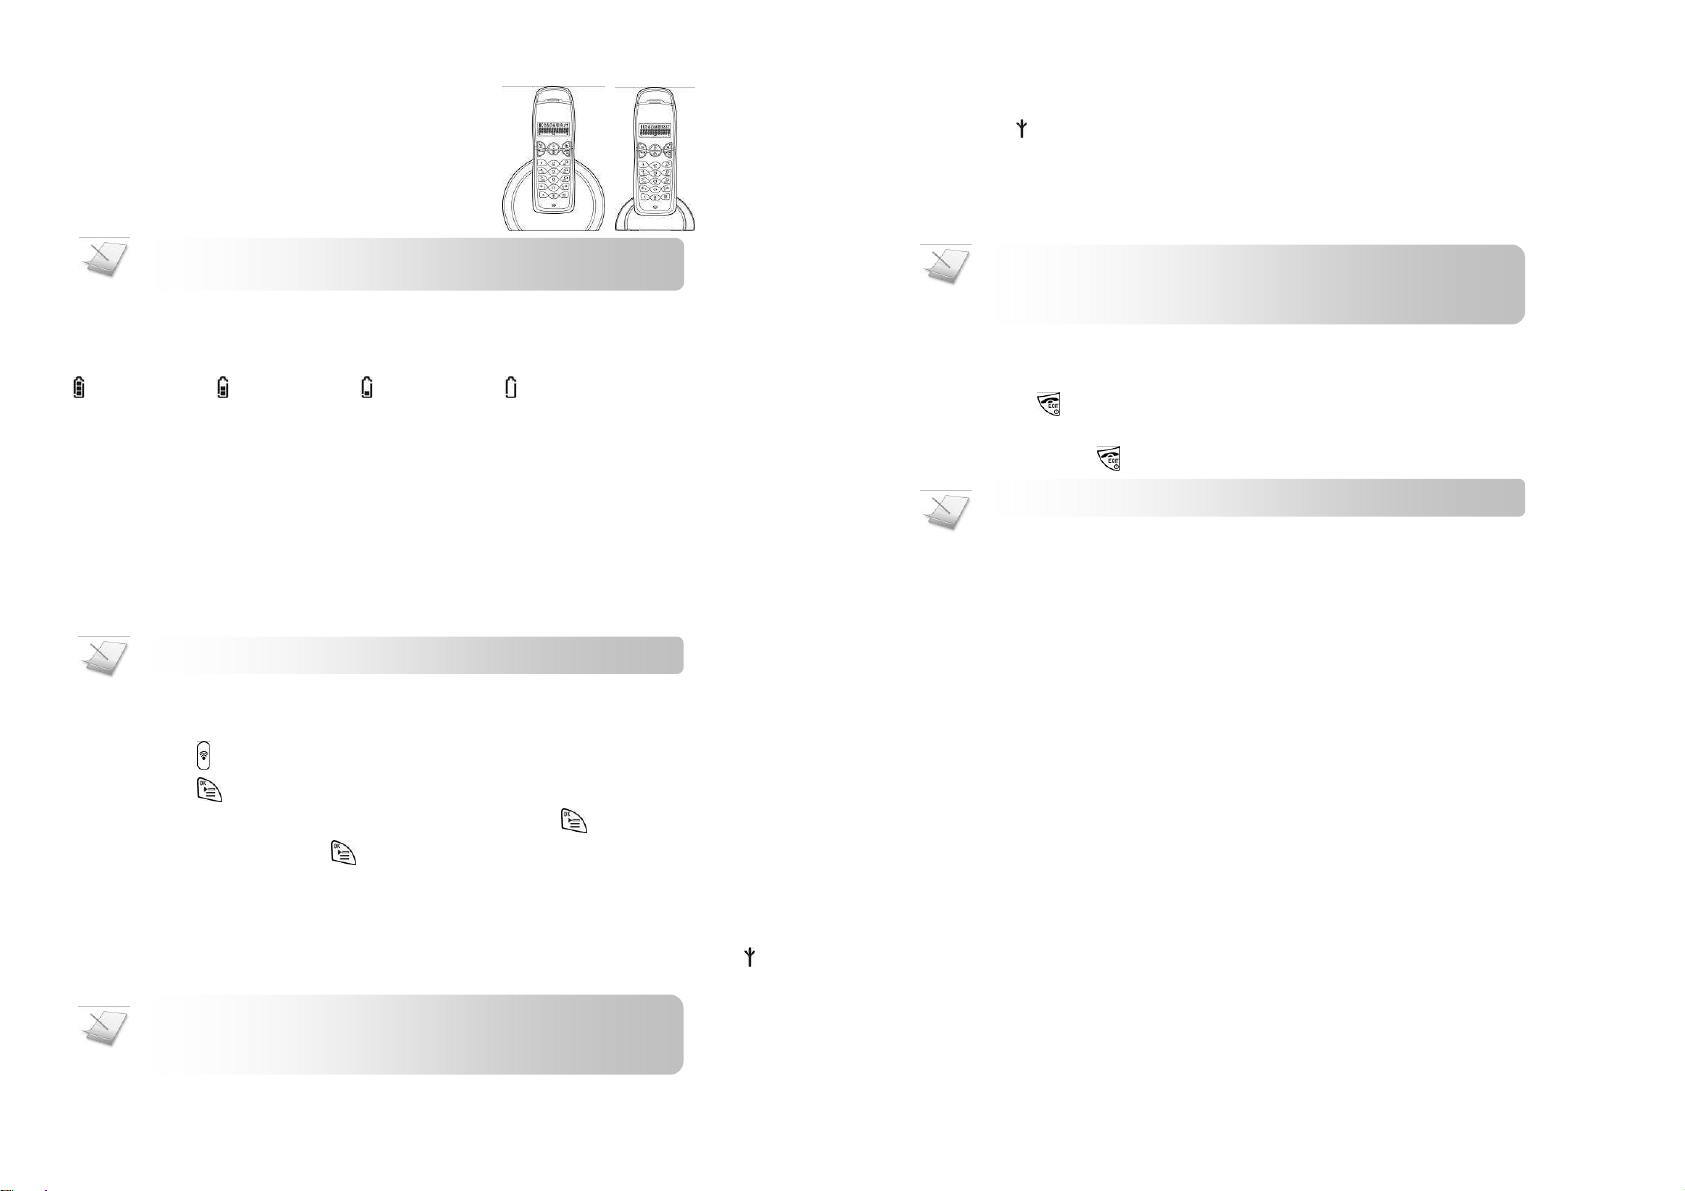
Place the handset on the base unit or
charger for charging.
may take a few seconds to power up.
CHECKING THE BATTERY LEVEL
The battery icon displays the current battery level.
= 100% full = 60% full = 30% full = Empty. Require charging.
Your handset may power down shortly if it is not charged after the battery is empty. If you are on the phone while
the battery is nearly empty, you will hear warning tones. Your call may be cut off shortly after the warning.
WHAT IS STANDBY MODE?
Your phone is in standby mode when it is idle. The standby screen displays the handset name, the signal
icon, and the battery icon.
REGISTERING YOUR HANDSET
Registration allows communication between your base unit and handset(s). If your handset is not registered,
you will not be able to make a call or use some of the functions and features on the phone.
Getting Started
CHECKING THE SIGNAL STRENGTH
The signal icon displays the link status between your handset and the base unit. A steady icon means your
handset and the base unit are linked. A flashing icon means your handset and the base unit are not linked.
If you move too far away from the base unit while you are on the phone, you will hear warning tones
notifying you that your handset is almost out of range – lost link. Take your handset closer to the base unit
or your call may be cut off shortly after the warning.
call. You will also not be able to carry out many of the phone functions and
SWITCHING YOUR HANDSET ON/OFF
Switching on your handset
1.
Press . The handset may take a few seconds to power up.
Switching off your handset
1.
Press and hold . The handset’s screen turns off.
To register your handset to an additional base unit, see Registering your handset with additional base on page
22. If your handset displays
1.
Press on the base unit for 4 seconds.
2.
Press on the handset.
3.
Press Up or Down Navigation keys to select
4.
Select
5.
Enter the system
6.
Press 1, 2, 3, or 4 to select the base number you want. Your handset starts searching for the
UNREGISTERED
REGISTER
PIN
. Press .
(Pre-set:
, follow the steps below to register your handset.
0000
).
base.
Registration shall be completed within 30 seconds. If registration is successful, the signal icon
displays steadily. If registration failed, repeat the above procedure.
your base unit registration memory is full. If you attempt to register an
9
SYSTEM
. Press
10
Page 6
NOTE:
NOTE:
Low Battery.
During a call, you will hear warning tones if your
NOTE:
Emergency Call.
This telephone is not designed for making emergency
NOTE:
Call Timer.
During a call, the call timer displays the talk time of your
NOTE:
2nd Call Service.
Consult and subscribe from your service provider.
NOTE:
Caller ID Service.
Consult and subscribe from your service provider.
Call
telephone calls when the power fails. Alternative arrangements should be made
for access to emergency services.
TIP:
Use or to navigate the menus.
MAKING A CALL
This section describes the different ways to make a call.
Signal Strength. Check the signal strength before making a call and during a call.
For details, see Checking the signal strength on page 10.
1.
Press .
2.
Dial the phone number. The number displays on the screen and is dialed out.
current call.
handset is almost out of battery. Charge your handset as soon as possible or
your call will be cut off. Placing the handset on the base cradle or charger will
end the call. For details, see Checking the battery level on page 9.
Pre-dialing
Pre-dialing lets you view and make changes to the number before making the call.
1.
dialing out. Maximum 20 digits can be entered for the phone number.
TIP:
Press and hold to enter a pause. P displays on the screen.
Press to dial out the call.
Redialing the last number
1.
2.
Enter the phone number. The number displays on the screen. You can make changes before
Press to erase a digit.
Press .
Press . The last dialed number displays on the screen and is dialed out.
Calling from your phonebook
For details on the phonebook, see Phonebook on page 16.
1.
Press .
2.
Select the phonebook record you want.
3.
Press to dial out the call.
Calling from the incoming call log
You can return a call from the incoming (received or missed) call log. For details, see Call Log on page 18.
1.
Press .
2.
Select the record you want.
3.
Press to dial out the call.
ENDING A CALL
1.
Press OR place the handset on the base cradle or charger.
ANSWERING A CALL
When you receive a call, your phone rings. Press to answer the call.
TIP:
Silent Ringer. When the phone is ringing, press to turn off the ringer.
TIP:
Missed Call Alert. When a call is missed, your phone displays . Press
to view the missed calls.
Turning off the ringer
You can turn off the ringer for all incoming calls.
1.
Press and hold during standby. displays on the screen. For details on the ringer setting,
see Personalizing your handset’s sounds on page 19.
DURING A CALL
This section describes the features that are available during a call.
Making a second call
1.
Press during a call. R displays on the screen.
2.
Dial the number you want. The number displays on the screen and is dialed out.
11
12
Page 7

NOTE:
2nd Call Service.
Consult and subscribe from your s
ervice provider.
NOTE:
A 3-way conference call requires 2 handsets that share the same base unit.
NOTE:
An intercom call ca
n only involve 2 handsets that share the same base unit
Answering a second call
During a call, your phone sounds a short beep periodically to notify you of an incoming call.
1.
Press to answer the call. You have put the first call on hold, and you are now connected
to the second call.
Toggling between two calls
1.
Press to put the current call on hold and connect to the other call.
Adjusting the earpiece volume
1.
Press or to adjust the volume during a call. Press to confirm.
Muting the microphone
The mute feature allows you to speak to someone in the house privately.
1.
Press during a call. The caller cannot hear you, but you can still hear his voice.
Press again to un-mute the microphone. You can now communicate with the caller.
Intercom and Conference Calls
An intercom call is a call to another handset that shares the same base unit. A conference call involves
conversation between another handset and outside caller(s).
CALLING ANOTHER HANDSET
1.
Press .
2.
Press the target handset number.
3.
Wait for the other party to answer your call.
4.
Press to cancel or end the intercom call.
While you are on the phone of an outside call
While talking on an outside call, you can call another handset.
1.
Press during the call.
2.
Press the target handset number. Wait for the other party to answer your call.
To toggle between the calls
1.
Press to switch between the outside call and the intercom call.
TRANSFERRING A CALL
1.
Press during a call.
2.
Press the target handset number.
3.
Press after the other party answers your call. The outside call is now transferred to the
other handset.
.
13
MAKING A CONFERENCE CALL
A 3-way conference call is a call between you, an outside caller, and another handset user in your house.
You are talking on the phone with an outside caller, and you want to involve another handset user in this
conversation.
1.
Press during your call with the outside caller.
2.
Press the target handset number. Wait for the other party to answer your call.
3.
Press and hold for 2 seconds. You are now on a 3-way conference call.
4.
Press to end the conference call.
14
Page 8
NOTE:
2nd Call Service.
Consult and subscribe from your service provider.
TIP:
Text and Numbers
You can enter text and numbers for handset name, phonebook record, and others.
ENTERING TEXT AND NUMBERS
1.
Find the key with the character you want.
2.
Press it as many times as needed for the character to display on the scree
Figure 1: Input table
Key Characters
0
1 space
2
3
4
5
6
7
8
9
0
1
A B C 2
D E F 3
G H I 4
J K L 5
M N O 6
P Q R S 7
T U V 8
W X Y Z 9
ERASING TEXT AND NUMBERS
Erasing a single character
1.
Press to delete the character left of the cursor.
Erasing all characters
1.
Press and hold to delete all the characters on screen.
Phonebook
Each handset has a phonebook that can store up to 20 records. Each phonebook record can have a name of
up to 12 characters long and a number of up to 20 digits long.
Use or to navigate the menus.
n.
VIEWING THE PHONEBOOK
1.
Press .
2.
If you want to view the details of the record, press .
Searching a record
You can search the phonebook by scrolling or by searching the first character.
Searching by scrolling
1.
While at the phonebook, press or to scroll.
Searching by the first character
1.
While at the phonebook, press the digit key that contains the character that you want to search.
CALLING FROM THE PHONEBOOK
You can make a call directly from the phonebook while you are viewing it.
Calling directly from the phonebook
See Calling from your phonebook on page 12.
During a call
You can access the phonebook during a call and make another call.
1.
Press to put the current call on hold.
2.
Press and hold to access the phonebook.
3.
Select the record you want.
4.
Press to make a call on the other line.
5.
Press to toggle between two lines.
15
16
Page 9
Phonebook
NOTE:
Duplicate Number.
Phonebook records with identical name and/or
NOTE:
Text and Number Editing.
See
Text and Numbers
on page
15.
NOTE:
Memory Full.
If your phonebook is full, a notification displays. Delete
TIP:
New
Call Icon.
When you are viewing the incoming call log, you will see
the new call icon
flashing if the call record you selected is a new missed call.
ADDING A RECORD
unnecessary records before adding new ones.
1.
Press .
2.
Select
PHONEBOOK ADD RECORD
3.
Enter the name. Press .
Enter the number.
number cannot be saved.
TIP:
Pause. Press and hold to insert a pause.
Press to confirm. Your new record is saved.
EDITING A RECORD
1.
Press .
2.
Select
PHONEBOOK EDIT RECORD
3.
Select the record you want to edit. Press .
4.
Edit the name if necessary. Press .
5.
Edit the number if necessary.
6.
Press to confirm. Your record is saved.
DELETING A RECORD
1.
Press .
2.
Select
PHONEBOOK DELETE
3.
Select the record you want to delete. Press . The handset displays a confirmation request.
4.
Press to confirm. The record is deleted.
DELETING ALL RECORDS
1.
Press .
2.
Select
PHONEBOOK DELETE ALL
request.
3.
Press to confirm. All records are deleted.
. Press .
. Press .
. Press .
. Press . The handset displays a confirmation
Call Log
The call log stores the call history of all the incoming (missed or received), and dialed calls.
Calls What is this? Stored records
Incoming Calls that you received. Up to 20
The call history includes information of the caller name, number, call time, and date.
VIEWING THE CALL RECORDS
MAKING A CALL
Returning a call
To return a call from the incoming call log, see Calling from the incoming call log on page 12.
Redialing a call
To make a call that you have made previously, see Redialing the last number on page 11.
SAVING A CALL RECORD TO YOUR PHONEBOOK
DELETING A CALL RECORD
Deleting all incoming call records
Dialed Calls that you have made. 1
TIP:
Use or to navigate the menus.
1.
Press to view the incoming call log OR
Press to view the dialed call log.
2.
Select the record you want. If you want to view the details of the record, press for more
information.
1.
Press after selecting a call record.
2.
Select
SAVE
. Press .
3.
Edit the name if necessary. Press .
4.
Edit the number if necessary.
5.
Press . Your record is saved.
1.
Press after selecting a call record.
2.
Select
DELETE
3.
Press to confirm. The record is deleted.
1.
Press after entering the incoming call log.
2.
Select
DELETE ALL
3.
Press to confirm. All records are deleted.
. Press . The handset displays a confirmation request.
. Press . The handset displays a confirmation request.
17
18
Page 10
TIP:
Custom Options
Make this your handset – change the look and sound to suit your needs and tastes.
PERSONALIZING YOUR PHONE’S DISPLAY
Naming your handset
Every handset can have its own name (maximum 10 characters). It displays on the screen during standby.
1.
Press .
2.
Select
DISPLAY HANDSET NAME
3.
Edit the name. Use to make correction.
4.
Press to confirm. The new setting is saved.
PERSONALIZING YOUR HANDSET’S SOUNDS
Setting your handset’s ringer melody
1.
Press .
2.
Select
SOUND HANDSET MELODY
3.
Select the melody you want. Press to confirm. The new setting is saved.
Setting your handset’s ringer volume
1.
Press .
2.
Select
SOUND HANDSET VOLUME
3.
Select the volume level. Press to confirm. The new setting is saved.
Setting the key tone
Key tone is the sound you hear when you press a key on your handset.
1.
Press .
2.
Select
SOUND KEY TONES
3.
Select the new setting. Press to confirm. The new setting is saved.
Setting the handset tones
Handset tones will sound upon a successful or unsuccessful operation.
1.
Press .
2.
Select
SOUND TONES
3.
Select the new setting. Press to confirm. The new setting is saved.
. Press .
. Press .
. Press .
. Press .
. Press .
Calling Features
Your phone supports a number of call-related features to help you handle and manage your calls.
AUTO ANSWER
Auto answer enables you to answer an incoming call by simply picking up the handset from the charging
cradle. You do not need to press a key to answer the call.
Activating/Deactivating auto answer
1.
Press .
2.
Select
SETTINGS AUTO ANSWER
3.
Select the new setting. Press to confirm. The new setting is saved.
DIAL MODE
Dial mode is the telephone signal used in your country. Your phone supports tone (DTMF) and pulse (rotary)
dialing. Your phone shall already be set up for use in your country. For details, consult your service provider.
Selecting dial mode
1.
Press .
2.
Select
SETTINGS DIAL MODE
3.
Select the new setting. Press to confirm. The new setting is saved.
Temporary Tone. If your phone is in pulse dialing, press and hold during a
call for tem-porary tone mode. ‘d’ displays. Digits entered after ‘d’ are sent out as tone
signal (on this call only).
RECALL SELECTION
Recall is a signal that needs to be sent to the network when making or answering a second call. Your phone
shall already be set up for use in your country. For details, consult your service provider.
Selecting recall duration
1.
Press .
2.
Select
SETTINGS RECALL
3.
Select the new setting. Press to confirm. The new setting is saved.
Setting 1= Short Recall Duration
Setting 2= Long Recall Duration
. Press .
. Press .
. Press .
19
20
Page 11
NOTE:
Vo
icemail Indication Service.
Consult and subscribe from your service
NOT
E:
Making Calls.
You
will not
be able to make any calls including
TIP:
TIP:
Handset Number.
The handset number displays beside the handset name
during standby.
NOTE:
Each handset can register up to 4 base units. After registering to 4 base
Extra Features
Discover and explore the additional features your phone offers! Find out how these features can benefit you
and help you make the most from your phone.
Use or to navigate the menus.
KEYPAD LOCK
You can lock the keypad to prevent accidental presses on the handset while you are carrying it around.
Locking the keypad
1.
Press and hold . The keypad is locked.
emergency calls when the keypad is locked.
Unlocking the keypad
1.
Press and hold . The keypad is unlocked.
MISSING HANDSET(S)
1.
Press on the base unit. All the handsets connected to this base unit ring.
2.
Press on the base unit again to stop paging. All the handsets stop ringing OR
Press any key on the handset to stop the paging.
VOICEMAIL INDICATION
provider.
Voicemail indication is a visual voicemail alert. On this phone, you see an envelope icon when there is a
voicemail waiting in your mailbox(es).
Retrieving voicemail(s)
To retrieve your voicemail(s), consult your service provider.
Clearing the voicemail indicator
After checking your voicemail(s), the voicemail indicator will be cleared automatically after receiving a
signal from the network. If you want to, you can also clear the voicemail indicator manually.
1.
Reset the power of the base unit (Unplug the power adapter of the base u
Plug in the power adapter again.) The voicemail indicator shall be cleared.
KEY LOCKED
is displayed.
nit. Wait for 30 seconds.
The System
TIP:
Use or to navigate the menus.
REGISTERING YOUR HANDSET WITH ADDITIONAL BASE
This section shows you how to register your handset to additional base unit(s). If your handset displays
UNREGISTERED
model is used, one can follow instructions given below.
1.
2.
3.
4.
5.
SELECTING A BASE UNIT
You can switch your handset between different registered base units. You can program the handset to
automatically connect to the closest base unit or only connect to a fixed base unit you have specified.
1.
2.
3.
4.
DELETING A HANDSET
Use one handset to delete (de-register) another handset that shares the same base unit.
1.
2.
3.
, refer to Registering your handset on page 9. Assuming an additional base of same
Press on the base unit for 4 seconds.
Press on the handset.
Select
REGISTER
Enter the system
. Press .
PIN
(Pre-set:
0000
). Use to make correction.
Press [1], [2], [3], or [4] to select the base number you want. This base number will be
assigned to the base unit you are about to register to. Your handset starts searching for the
base.
Registration shall be completed within 30 seconds.
units, your handset registration memory is full. If you attempt to register to
additional base units, registration will not be successful.
Press .
Select
SYSTEM SELECT BASE
Select the base unit you want or select
. Press .
AUTO
if you want your handset to automatically
connect to the closet base unit.
Press . The new setting is saved.
Press .
Select
SYSTEM DELETE HS
. Press .
Select the handset (number) you want to delete. Press .
21
4.
Enter the system
5.
Press . The handset is deleted.
PIN
. Use to make correction.
22
Page 12

The System
NOTE:
Forgotten
PIN
. Write down your
PIN
and save it for future use. If you
PIN
NOTE:
After reset, your handset’s power switches off. It will switch back on in
Changing the system
The system
other menus. The pre-set system
1.
2.
3.
4.
5.
6.
PIN
PIN
is used for registering, deleting handsets, and protecting the access rights to some of the
PIN
is
0000
. You can personalize the
PIN
for greater security.
Press .
Select
SYSTEM CHANGE PIN
Enter the system
PIN
Enter the new system
Enter the new system
. Press to confirm. Use to make correction.
PIN
(maximum 8 digits). Press .
PIN
again for verification.
. Press .
Press . The new setting is saved.
have forgotten the
, call your manufacturer for assistance.
SETTING LOW RADIATION MODE
You can set your phone to emit lower radiation power when the phone is inactive. Your phone will return to
normal power when you are using it again.
1.
Press .
2.
Select
SYSTEM LOW RF POWER
3.
Select ON to activate low radiation mode or
. Press .
OFF
to deactivate. Press to confirm. The
new setting is saved.
RESETTING TO DEFAULT SETTINGS
The default settings are the original factory settings of your phone. You can reset your phone settings to
factory default.
1.
Press .
2.
Select
SYSTEM RESET
3.
Enter the system
4.
Press to confirm. All settings have reset.
PIN
. Press .
. Press to confirm. The handset displays a confirmation request.
a few seconds after updating all the settings.
To find out what settings are being reset, see Default (pre-programmed) settings on page 24.
Appendix
DEFAULT (PRE-PROGRAMMED) SETTINGS
General Setting
Language English Handset Name Reset
Auto Answer On Dial Mode Tone
Recall Duration Recall 1
Sounds Setting
Handset Melody Melody 1 Handset Ringer Volume Level 3
Handset Key Tones On Receiver Volume Level 2
Handset Tones On
Call Log Setting
Incoming Call Log Unchanged Dialed Call Log Unchanged
Message Waiting Indicator Reset
System Setting
Base Selection Auto PIN Code 0000
TROUBLESHOOTING
Problem(s) Tip(s)
No dialing tone
Signal icon flashing
Registration fails
continuously
No parking tone
Handset on the charger
does not charge
No display
Bad audio (crackles,
echo, etc.)
Handset does not ring
Caller ID does not
display
Cannot make/answer a
2nd call
•
Check your phone connections.
•
The handset may be out of range. Move closer.
•
The battery capacity may be low. Charge battery.
•
The handset may be out of range. Move closer.
•
If the handset displays UNREGISTERED, register the handset. See page 9.
•
Turn off Low Radiation mode. See page 23.
•
Your base memory may be full. Delete an un-used handset and try again. See
page 22.
•
The handset may not be placed properly on the cradle. Try again.
•
Charging contacts may be dirty. Disconnect the power supply first and then clean
contacts with a damp cloth.
•
Turn on the handset tone. See page 19.
•
The batteries may be defective. Purchase new batteries from your dealer.
•
Check that the batteries are inserted correctly.
•
Make sure the handset is placed properly on the charger. The battery icon
animates while charging.
•
Check that the batteries are charged.
•
Check the power and phone connections.
•
The handset may be nearly out of range. Move closer to the base unit.
•
The phone may be interfered by nearby electrical appliances. Move the base unit.
•
The phone may be at a location with thick walls. Move the base unit.
•
Turn off Low Radiation mode. See page 23.
•
Check that the handset ringer is turned on. See page 19.
•
Caller ID service may not be activated. Check with your service provider.
•
The caller’s information may be withheld or is unavailable.
•
2nd call service may not be activated. Check with your service provider.
•
Check that the recall selection is correct. See page 20.
23
24
Page 13
安全
建議的電池種類
。
請根據廢物棄置條例適當棄置
NiMH電池
並可輕易找到
並可輕易找到並可輕易找到
並可輕易找到
。。。。
目錄
目錄
目錄目錄
20
目錄
目錄..........................................................................................................................................25
目錄目錄
21
環境保護
環境保護.................................................................................................................................25
環境保護環境保護
22
安全
安全..........................................................................................................................................26
安全安全
23
包裝盒
包裝盒內內內內的標準配件
包裝盒包裝盒
24
一般功能
一般功能.................................................................................................................................28
一般功能一般功能
25
歡迎
歡迎..........................................................................................................................................28
歡迎歡迎
26
電話的功能
電話的功能.............................................................................................................................29
電話的功能電話的功能
27
開始操作
開始操作.................................................................................................................................31
開始操作開始操作
28
撥打電話
撥打電話.................................................................................................................................34
撥打電話撥打電話
29
手機之間的通話和進行會議
手機之間的通話和進行會議...............................................................................................37
手機之間的通話和進行會議手機之間的通話和進行會議
30
文字與數字
文字與數字.............................................................................................................................38
文字與數字文字與數字
31
電話簿
電話簿.....................................................................................................................................39
電話簿電話簿
32
通話紀錄
通話紀錄.................................................................................................................................41
通話紀錄通話紀錄
33
個人化設定
個人化設定.............................................................................................................................42
個人化設定個人化設定
34
通話功能
通話功能.................................................................................................................................43
通話功能通話功能
35
額外功能
額外功能.................................................................................................................................44
額外功能額外功能
36
手機系統
手機系統.................................................................................................................................45
手機系統手機系統
37
附錄
附錄..........................................................................................................................................47
附錄附錄
38
保用証
保用証.....................................................................................................................................48
保用証保用証
環境保護
環境保護
環境保護環境保護
環保
環保
環保環保
在棄置包裝物料、舊電池及其它舊器材時,切記要遵守當地的環保法例。請盡量協助物料循環
再用。
循環再用及棄置方法
循環再用及棄置方法 (適用於歐盟及有相關環保法令的地方
循環再用及棄置方法循環再用及棄置方法
棄置舊產品的指示︰WEEE指令(廢舊的電器及電子產品;2002/96/EC)之目的,是要用最佳的
處理方法、使用恢復和循環再造的技術,確保產品可循還再用,從而確保對人體健康及令環境
得到更好的保護。我們的產品使用高質素的物料和配件設計和生產,它們可以循環再造和再次
使用。
使用下列其中一項棄置方法︰
•
將整套產品(包括電線,插頭和配件)棄置在指定的WEEE收集中心。
•
購買新的產品後,請將舊的產品送回零售商,零售商須根據 WEEE指令有責任回收這些產
品。
的標準配件............................................................................................................27
的標準配件的標準配件
適用於歐盟及有相關環保法令的地方)
適用於歐盟及有相關環保法令的地方適用於歐盟及有相關環保法令的地方
•
切勿將舊產品棄置在一般的家居垃圾箱中。
•
請將電器和電子產品棄置在有出示此標誌的收集中心。
棄置舊電池的指示﹕
切勿將舊電池與一般家居廢物一起棄置。
環境和安全
安全
安全
安全安全
重要
重要
重要重要
若電源供應出了問題,本產品將不能撥打緊急求助電話。請預作安排,以便緊急時可循其它途
徑求助。
電源要求
電源要求
電源要求電源要求
本產品需要的電源供應為220-240伏特的單相交流電,但不包括EN 60950標準所界定的 IT安裝
規定。
小心
小心﹕﹕﹕﹕根據
根據 EN 60950 標準
小心小心
根據根據
的的的的唯一方法
唯一方法,,,,便是從電源插座拔出插頭
唯一方法唯一方法
小心
小心﹕﹕﹕﹕只可使用隨產品附送的電源適配器
只可使用隨產品附送的電源適配器。。。。如電源適配器的極性或電
小心小心
只可使用隨產品附送的電源適配器只可使用隨產品附送的電源適配器
壓不正確
壓不正確,,,,會嚴重損毀本產品
壓不正確壓不正確
手機充電座的電源適配器
輸入: 230VAC 50Hz
輸出: 6VDC 150mA
電池要求
電池要求
電池要求電池要求
手機需要兩枚可充電的NiMH電池, AAA尺寸 1.2V 550 mAh (HR10/44)。
警告
警告︰︰︰︰若安裝不適當類型的電池,可能有爆炸的危險,請使用生產商
警告警告
電話連接
電話連接
電話連接電話連接
電話網絡的電壓被分類為TNV-3(電訊網絡電壓按照 EN 60950標準的界定)。若電源中斷,進行
中的通話、手機上的日期和時間設定等資料,會全部掉失。
聽覺輔助器
聽覺輔助器
聽覺輔助器聽覺輔助器
使用本產品時會有無線電訊號於機座與手機間傳遞,這些訊號可能對一些聽覺輔助器造成干擾
並產生蜂鳴聲響。
安全預防措施
安全預防措施
安全預防措施安全預防措施
•
切勿將手機接觸液體或水氣。
•
切勿自行打開手機、機座或充電器的蓋子,因內存有極高電壓。
•
切勿讓充電接觸點或電池接觸易導電物料。
•
本產品有輕微的機會給風暴中的雷電所損毀,所以,在風暴期間,我們建議你從電源和電話線
插座拔出所有插頭。
•
切勿在容易有爆炸危險的地方使用手機,如洩漏煤氣的地點。
•
使用本產品時不應靠近敏感的醫學儀器。裝有心臟起搏器的人士不宜使用本產品。
•
若本產品太接近一些電器如電話留言機、電視、收音機、電腦等,可能對它們造成干擾。我
們建議機座應距離這些設備最少一米。
標記證明本產品符合1999/5/EC指令的技術規格,對用戶安全,並符合有關電磁波和無線
電訊號的規格。
標準,,,,供電網絡屬危險類別
供電網絡屬危險類別。。。。中斷本產品電源供應
標準標準
供電網絡屬危險類別供電網絡屬危險類別
便是從電源插座拔出插頭。。。。請確保電源插座是靠近本產品
便是從電源插座拔出插頭便是從電源插座拔出插頭
會嚴重損毀本產品。。。。
會嚴重損毀本產品會嚴重損毀本產品
請確保電源插座是靠近本產品
請確保電源插座是靠近本產品請確保電源插座是靠近本產品
中斷本產品電源供應
中斷本產品電源供應中斷本產品電源供應
如電源適配器的極性或電
如電源適配器的極性或電如電源適配器的極性或電
機座的電源適配器
輸入: 230VAC 50Hz
輸出: 6VDC 250mA
25
26
Page 14
包裝盒
正確操作本機的解釋或重要資
包裝盒內內內內的標準配件
包裝盒包裝盒
的標準配件
的標準配件的標準配件
一般功能
一般功能
一般功能一般功能
請確保包裝盒內有下列各項,如有缺失,請聯絡零售商。
AT5220
機座 手機 手機電池蓋
機座電源適配器 NiMH AAA 電池 x 2
用戶手冊
AT5220T
機座 手機 x 2 手機電池蓋 x 2
機座電源適配器 NiMH AAA 電池 x 4
用戶手冊 充電器 充電器電源適配器
電話線
電話線
訊號範圍︰達300 米 (室外)、50米(室內)
*來電待接/來電顯示及待接電話顯示
低輻射
清晰語音質素
120個雙向頻道
3-行液晶顯示屏
淡黃色顯示屏背燈
電話簿可存 20 個項目(姓名和電話號碼)
手機具備 10種美妙鈴聲供選擇
啟動/關閉鈴聲快捷鍵
超出訊號範圍和低電量警示(圖標和音訊)
長達 120個小時備用時間
長達 12 個小時的通話時間
可充電電池(2×AAA)
在單一的機座可同時登記數個手機(多達 4 個)
多方會議 (1條外線加 2條內線)
來電轉駁及內線通話
*須要向服務供應商訂購有關服務
歡迎
歡迎
歡迎歡迎
本用戶手冊提供使用本電話的重要資料和指引,請仔細閱讀。
如何使用本用戶手冊?
下列的圖標是提醒閣下使用本電話時需要留意的地方。
•
警告
警告︰︰︰︰此重要資訊有助防止人身傷害。
警告警告
•
小心
小心︰︰︰︰此重要資訊有助防止產品損毀。
小心小心
•
提示
提示︰
︰有助更容易操作本機的資訊。
提示提示
︰︰
•
注意
注意︰︰︰︰有助
注意注意
訊。
需需需需要求助
要求助????
要求助要求助
•
請參閱本用戶手冊的第47 頁”疑難排除”一節。
•
向 AMYTEL當地經銷商的熱線求助。
•
瀏覽我們的網址www.amytel.net。
27
28
Page 15
電話
電話的功能
的功能
電話電話
的功能的功能
手機
手機
手機手機
1
向上瀏覽及通話紀錄鍵
向上瀏覽及通話紀錄鍵
向上瀏覽及通話紀錄鍵向上瀏覽及通話紀錄鍵
向上翻看功能表項目
增加來電鈴聲和接收器音量
進入來電顯示記錄
2
功能表和
功能表和OK 鍵鍵鍵鍵
功能表和功能表和
進入主功能表
確認選擇/操作
3
重撥和更多選擇鍵
重撥和更多選擇鍵
重撥和更多選擇鍵重撥和更多選擇鍵
進入重撥記錄
查看記錄中更多的資料
4
通話鍵
通話鍵
通話鍵通話鍵
撥打電話和接聽來電
5
結束通話和啟動
結束通話和啟動/關閉鍵
結束通話和啟動結束通話和啟動
結束現時的通話
退出功能表/操作
啟動/關閉手機
6
向下瀏覽和電話簿鍵
向下瀏覽和電話簿鍵
向下瀏覽和電話簿鍵向下瀏覽和電話簿鍵
向下翻看功能表項目
減低來電鈴聲和接收器音量
進入及查閱電話簿記錄
7
數字鍵
數字鍵
數字鍵數字鍵
撥打電話號碼
輸入字母
8
星形符號和鈴聲關閉鍵
星形符號和鈴聲關閉鍵
星形符號和鈴聲關閉鍵星形符號和鈴聲關閉鍵
撥打 *號
啟動/關閉鈴聲
9
#號
、鎖鍵和暫停鍵
鎖鍵和暫停鍵
號號號、、、
鎖鍵和暫停鍵鎖鍵和暫停鍵
撥打#號
輸入暫停號
鎖定/解鎖鍵盤
10
插撥
插撥鍵
鍵
插撥插撥
鍵鍵
傳送閃斷的訊號
11
內內內內線電
線電話話話話鍵
鍵
線電線電
鍵鍵
進行內線通話
開始會議通話
機座
機座
機座機座
1
傳呼鍵
傳呼鍵
傳呼鍵傳呼鍵
找尋手機
進入登記模式
關閉鍵
關閉鍵關閉鍵
12
靜音和刪除鍵
靜音和刪除鍵
靜音和刪除鍵靜音和刪除鍵
啟動/取消咪高峰的靜音功能
刪除字母或數字
開始操作
圖標
圖標
圖標圖標
每個圖標皆是顯示屏上的可見訊息,讓你知道手機的操作情況。
電池電量
留言信箱提示
鍵盤已上鎖
電話簿
關閉鈴聲
上/ 下箭頭
功能表
功能表
功能表功能表
本電話的各種先進功能及模式在功能表中已作分類。
瀏覽功能表
瀏覽功能表
瀏覽功能表瀏覽功能表
主功能表包括電話簿、顯示屏、聲音、設定和系統功能表。
按下 進入主功能表。
按下 進入來電紀錄。
按下 進入電話簿。
按下 進入重撥紀錄。
提示
提示﹕﹕﹕﹕進入各功能表後,使用 或 瀏覽表內各項目。
提示提示
提示
提示﹕﹕﹕﹕快速退出
快速退出。。。。持續按下 可立即退出任何功能表,所有未經確定
提示提示
快速退出快速退出
的改變,都不會被儲存。
各各各各功能表的內容
功能表的內容一覽
功能表的內容功能表的內容
電話簿
電話簿
電話簿電話簿
加入紀錄
編輯紀錄
刪除
全部刪除
系統
系統
系統系統
登記
選擇機座
刪除手機
更改 PIN碼
低輻射
重設
一覽
一覽一覽
顯示屏
顯示屏
顯示屏顯示屏
手機名稱
背燈
來電
來電紀錄
紀錄
來電來電
紀錄紀錄
儲存
刪除
全部刪除
正在通話
來電顯示
靜音
信號接收強度
左/ 右箭頭
聲音
聲音
聲音聲音
手機
鍵盤音調
音調
重撥
重撥
重撥重撥
儲存
刪除
設定
設定
設定設定
自動應答
撥號模式
插撥
29
30
Page 16
開始操
開始操作
作
開始操開始操
作作
注意
注意︰︰︰︰低輻射模式
低輻射模式。。。。本手機設計先進,包含低輻射程式,因此在備用
注意注意
低輻射模式低輻射模式
狀態時,天線可自動關閉而不會發出任何輻射能量,如要啟動此功
能,請參看第46 頁。
開始操作
3.
將手機插在機座或充電器進行充電。
連接電話
連接電話
連接電話連接電話
1.
將電源適配器的輸出插頭連接至機座
的底部。
2.
將電源適配器連接至電源插座。
3.
將電話線插入機座底部的電話插孔,
另一端插入牆上電話線插孔。
連接充電器
連接充電器
連接充電器連接充電器
*只適用於包含兩部手機或以上的型號
只適用於包含兩部手機或以上的型號
只適用於包含兩部手機或以上的型號只適用於包含兩部手機或以上的型號
1.
將充電器的電源適配器連接至標準的
電源插座。
替替替替手機
手機充電
充電
手機手機
充電充電
警告
警告︰︰︰︰若將不同類型的電池安裝在一起
若將不同類型的電池安裝在一起,,,,可能有爆炸的危險
警告警告
若將不同類型的電池安裝在一起若將不同類型的電池安裝在一起
用非充電的電池
用非充電的電池,,,,請使用生產商建議或隨機附送的電池
用非充電的電池用非充電的電池
的廢物處理法規適當棄置舊的
的廢物處理法規適當棄置舊的 NiMH 電池
的廢物處理法規適當棄置舊的的廢物處理法規適當棄置舊的
注意
注意 ﹕﹕﹕﹕ 首次使用本產品或更換新的充電池後,要替手機充電 14小時以
注意注意
上。
小心
小心 ﹕﹕﹕﹕ 當安裝電池時
當安裝電池時,,,,請檢查電池的正負極方向
小心小心
當安裝電池時當安裝電池時
方向安裝電池
方向安裝電池,,,,可能會損毀本產品
方向安裝電池方向安裝電池
1.
將隨機附送的×2 枚電池放入電池格。
2.
將電池蓋滑入並穩固地蓋好。
可能會損毀本產品。
可能會損毀本產品可能會損毀本產品
可能有爆炸的危險。。。。切勿使
可能有爆炸的危險可能有爆炸的危險
請使用生產商建議或隨機附送的電池,,,,並根據適用
請使用生產商建議或隨機附送的電池請使用生產商建議或隨機附送的電池
電池。
。
電池電池
。。
請檢查電池的正負極方向。。。。若以不正確的極性
請檢查電池的正負極方向請檢查電池的正負極方向
。
。。
若以不正確的極性
若以不正確的極性若以不正確的極性
切勿使
切勿使切勿使
並根據適用
並根據適用並根據適用
注意
注意︰︰︰︰在初次充電期間,手機會變得和暖,這屬正常現象,手機可能
注意注意
須要幾秒時間才起動。
檢查電池電量
檢查電池電量
檢查電池電量檢查電池電量
電池圖標顯示當時的電量情況。
= 100% 電量 = 60% 電量 = 30% 電量 =沒有電量 需要充電
當電池將快耗盡時,若還未替電池充電,手機很快便沒有電源進行操作。當你正在通話時,而
電量又將近用完,你會聽見警告聲響。在警告響聲後,通話可能會隨時中斷。
甚麼是備用
甚麼是備用狀態
甚麼是備用甚麼是備用
狀態?
?
狀態狀態
??
當手機閒置時便進入備用狀態,這時屏幕會顯示手機的名稱、訊號圖標和電池圖標。
登記
登記手機
手機
登記登記
手機手機
進行登記後,機座和手機便可進行通訊,若手機還未登記,便不能通話,也無法使用電話上的
一些功能和特性。
注意
注意︰︰︰︰你的手機出廠時已完成登記。
注意注意
如要替手機在額外的機座進行登記,請參閱第 45頁的“將手機登記到額外的機座上”一節。
若你的手機顯示
UNREGISTERED
1.
按下在機座上的 鍵4 秒。
2.
按下在手機上的 鍵。
3.
按下向上或向下瀏覽鍵,選擇
4.
選擇
REGISTER
5.
輸入系統
6.
按下 1、2、3或 4選擇你想要的機座號碼,你的手機開始搜尋機座。
PIN
(未登記)字樣,請跟從以下步驟替手機進行登記。
SYSTEM
。按下
,按下 。
碼(預設為﹕
0000
)。
登記須在 30秒內完成,若登記成功,你會在顯示屏看見穩定的 圖標出現。若登
記不成功,請重複上述步驟。
注意
注意︰︰︰︰你的機座可與多達 4部手機登記,當完成 4部手機登記後,機
注意注意
座的記憶體便告滿載,若你仍然希望替額外的一部手機登記,操作是
不會成功的。
31
32
Page 17
檢查信號強度
檢查信號強度
檢查信號強度檢查信號強度
信號圖標 是顯示手機與機座的信號聯接狀態。一個穩定的圖標,表示手機與機座已完成連接。
若出現閃動的圖標,表示手機與機座尚未連接成功。
通話時若離機座太遠,你將會聽到警告聲調,表示手機將近要離開接收範圍──中斷連接。請
將手機靠近機座,否則閣下的通話在聽到警告音調後,很快便會中斷。
注意
注意︰︰︰︰若手機與機座中斷連接,你便無法撥電通話或接收任何來電,
注意注意
甚至不能使用手機的其他功能。
啟動
啟動////關閉手機
關閉手機
啟動啟動
關閉手機關閉手機
啟動手機
啟動手機
啟動手機啟動手機
1.
按下 。手機或須要幾秒時間才啟動。
關閉手機
關閉手機
關閉手機關閉手機
1.
持續按下 。手機的屏幕便會關閉。
注意
注意︰︰︰︰若你的手機已關閉,便不能接收任何來電﹗
注意注意
撥打電話
撥打電話
撥打電話撥打電話
注意
注意︰︰︰︰緊急撥電
緊急撥電。。。。本機設計非作緊急通話用,斷電時將無法撥號。請
注意注意
緊急撥電緊急撥電
預早作其他安排,以便緊急時可有其他途徑求助。
提示︰進入功能表後,使用 或 瀏覽其中項目。
撥打電話
撥打電話
撥打電話撥打電話
本節說明撥打電話的不同方法。
注意
注意︰︰︰︰信號強度
信號強度。。。。在撥打電話和通話期間,請檢查訊號強度,詳情請
注意注意
信號強度信號強度
參閱第33 頁的”檢查訊號強度”一節。
1.
按下 。
2.
撥打號碼,該電話號碼會在屏幕上顯示,並撥打出去。
注意
注意︰︰︰︰通話計時器
通話計時器。。。。在通話期間,通話計時器會顯示當時的通話時間。
注意注意
通話計時器通話計時器
注意
注意︰︰︰︰低電量
低電量。。。。在通話期間,若手機的電量將近耗盡,你會聽到手機
注意注意
低電量低電量
發出警告聲調,請盡快替手機充電。當手機放在機座或充電器上時,
通話即中斷。請參閱第32 頁的“檢查電量”一節。
先按後
先按後撥
撥
先按後先按後
撥撥
先按後撥讓你在真正撥打電話之前,先檢視所按號碼,有需要時可以更改。
1.
輸入電話號碼,在屏幕會顯示該電話號碼,在打出電話前,你可預先看見該號碼
並作出修改。最多可以輸入 20個數字的電話號碼。
提示
提示︰︰︰︰按下 刪除一個數位。
提示提示
持續按下 可輸入暫停號。屏幕會出現“p”字樣。
2.
按下 打出電話。
重撥最
重撥最近打出
近打出的電話號碼
重撥最重撥最
33
的電話號碼
近打出近打出
的電話號碼的電話號碼
1.
按下 。
2.
按下 。最近撥打的號碼會顯示在屏幕上,然後撥打出去。
34
Page 18
使用
使用電話簿
電話簿直接撥號
電話簿電話簿
直接撥號
直接撥號直接撥號
使用使用
關於電話簿的詳情,請參閱第 39頁的“電話簿”一節
1.
按下 。
2.
選擇你想要的電話簿記錄。
3.
按下 ,打出號碼。
從來電記錄撥
從來電記錄撥號
從來電記錄撥從來電記錄撥
號
號號
你可回覆來電(已接聽或未曾接聽)記錄中的電話號碼。請參閱第 41頁的“來電記錄”一節。
1.
按下 。
2.
選擇所須的電話記錄。
3.
按下 打出電話。
結束通話
結束通話
結束通話結束通話
1.
按下 或或或或將手機放在機座或充電器上。
接聽電話
接聽電話
接聽電話接聽電話
當有來電時,電話會響起,按下 便可接聽電話。
提示
提示︰︰︰︰關閉鈴聲
關閉鈴聲。。。。當電話鈴聲響起,按下 便可關閉鈴聲。
提示提示
關閉鈴聲關閉鈴聲
注意
注意︰︰︰︰來電顯示服務
來電顯示服務。。。。請諮詢服務供應商並訂購有關服務。
注意注意
來電顯示服務來電顯示服務
接聽第二個來電
接聽第二個來電
接聽第二個來電接聽第二個來電
注意
注意︰︰︰︰關於同時連接兩通電話的服務
關於同時連接兩通電話的服務,,,,請向服務供應商查詢及訂購。
注意注意
關於同時連接兩通電話的服務關於同時連接兩通電話的服務
在通話期間,當聽到手機定時發出短的咇咇聲時,表示有另一來電待接。
1.
按下 接聽來電,這樣將暫時掛起第一個來電,現在你便和第二個來電接通。
在兩通電話之間往來通話
1.
按下 會暫時掛起進行中的一通電話,然後接通等候中的另一方。
調節耳機音量
調節耳機音量
調節耳機音量調節耳機音量
1.
在通話期間按下 或 調校音量,再按 確認。
關閉咪高峰
關閉咪高峰
關閉咪高峰關閉咪高峰
靜音功能可讓你與屋內其他人作私人交談。
1.
在通話期間,按下 。來電者將聽不到你的聲音,但你仍然可聽見對方的說
話。
再次按下 ,啟動咪高峰功能,便可以恢復和來電者進行通話。
提示
提示︰︰︰︰未接來電警示
未接來電警示。。。。當錯失接聽來電時,屏幕會顯示 圖標,按下
提示提示
未接來電警示未接來電警示
,查看未接來電的資料。
關閉鈴聲
關閉鈴聲
關閉鈴聲關閉鈴聲
你可關閉所有來電的鈴聲。
1.
在備用狀態下,持續按下 ,屏幕出現 圖標。有關” 鈴聲設定” 的詳情,請參
閱第 42 頁的“將你的手機鈴聲個人化”一節。
通話期間
通話期間
通話期間通話期間
本節會講解在通話期間可使用的功能。
撥打第二
撥打第二通通通通電話
撥打第二撥打第二
電話
電話電話
注意
注意︰︰︰︰關於同時連接兩通電話的服務
關於同時連接兩通電話的服務,,,,請向服務供應商查詢及訂購。
注意注意
關於同時連接兩通電話的服務關於同時連接兩通電話的服務
1.
在通話期間,按下 ,在屏幕會出現R 字樣。
2.
撥打所須的電話號碼,該電話號碼會在屏幕上顯示,並同時撥打出去。
35
36
Page 19
手機之間的通話和進行
手機之間的通話和進行會議
手機之間的通話和進行手機之間的通話和進行
會議
會議會議
文字與數字
文字與數字
文字與數字文字與數字
內線通話是手機之間通過共用的機座,進行通話的功能,會議通話是與另一部手機及外界來電
者同時通話。
撥打另一部手機號碼
撥打另一部手機號碼
撥打另一部手機號碼撥打另一部手機號碼
注意
注意︰︰︰︰內線通話只適用於共用同一部機座的 2部手機。
注意注意
1.
按下 。
2.
按下你須要通話的手機號碼。
3.
等待對方接聽你的電話。
4.
按下 取消或結束內部通話。
當你
當你與外線
與外線通話期間
與外線與外線
通話期間
通話期間通話期間
當你當你
當你與外線通話期間,你可與另外一部手機進行通話。
1.
在與外線通話期間,按下 。
2.
按下你要通話的手機號碼,等待對方接聽電話。
在兩個電話之間往來通話
在兩個電話之間往來通話
在兩個電話之間往來通話在兩個電話之間往來通話
1.
按下 在外線和內線之間往來切換。
來電轉駁
來電轉駁
來電轉駁來電轉駁
1.
在通話期間按下 。
2.
按下須要通話的手機號碼。
3.
當對方接聽你的電話後,按下 ,外來的通話便轉駁到另一部手機去。
三人會議
三人會議
三人會議三人會議
3人會議是指你本人、外界來電和另一部內線手機之間的通話
手機名稱、電話紀錄及其他事項,均可使用字母及數字進行輸入。
輸入字母與數字
輸入字母與數字
輸入字母與數字輸入字母與數字
1. 尋找你所需字母的按鍵位置。
2. 按鍵數次直至所需字母在屏幕上出現。
圖圖圖圖 2: 輸入表
輸入表
輸入表輸入表
鍵盤
鍵盤 字母
鍵盤鍵盤
0
1 space
2
3
4
5
6
7
8
9
0
A B C 2
D E F 3
G H I 4
J K L 5
M N O 6
P Q R S 7
T U V 8
W X Y Z 9
字母
字母字母
1
刪除字母與數字
刪除單一字母
刪除單一字母
刪除單一字母刪除單一字母
1.
按下 以刪除浮標左面的字母。
刪除全部字母
刪除全部字母
刪除全部字母刪除全部字母
1.
持續按下 以刪除屏幕上所有字母。
注意
注意︰︰︰︰如果進行 3人會議,需要有2 部手機共用同一部機座
注意注意
當你與外來致電者通話時,你又想將另一部手機加入對話中。
1.
在你與外來致電者通話時,按下 。
2.
按下所需的手機號碼,等待對方接聽電話。
3.
持續按下 2秒,現在便可進行3 人會議通話。
4.
按下 便可結束三人會議通話。
37
38
Page 20
電話簿
電話簿
電話簿電話簿
每個手機都設有電話簿功能,可以儲存多達20 個紀錄。每個電話紀錄可以輸入一個長達12個字
母的姓名及 20 位長的號碼。
提示
提示﹕﹕﹕﹕進入要查詢的功能表後,使用 或 瀏覽其中項目。
提示提示
查看電話簿
查看電話簿
查看電話簿查看電話簿
1.
按下 。
2.
如果想查看所選紀錄中的詳細資料,請按下 。
搜尋紀錄
搜尋紀錄
搜尋紀錄搜尋紀錄
你可以翻閱或以姓名首個字母來搜尋電話簿紀錄。
用用用用翻閱
翻閱搜尋
搜尋
翻閱翻閱
1.
以姓名首個字母搜
以姓名首個字母搜尋尋尋尋
以姓名首個字母搜以姓名首個字母搜
1.
從電話簿直接撥號
從電話簿直接撥號
從電話簿直接撥號從電話簿直接撥號
搜尋搜尋
進入電話簿後,按下 或 翻閱紀錄。
進入電話簿後,按下相應的數字鍵以輸入要搜尋的字母。
當你在查看電話簿時,可直接從當中撥出號碼。
直接由電話簿撥出號
直接由電話簿撥出號碼
直接由電話簿撥出號直接由電話簿撥出號
碼
碼碼
請參閱第 35頁的” 使用電話簿直接撥號” 一節。
通話期間
通話期間
通話期間通話期間
在通話期間,你可以進入電話簿,然後撥出另一個號碼。
1.
按下 暫時掛斷當時的通話。
2.
持續按下 ,進入電話簿。
3.
選擇你需要撥出的電話紀錄。
4.
按下 ,撥出另一通電話。
5.
按下 ,可在兩通電話間往來通話。
注注注注﹕﹕﹕﹕關於同時連接兩通電話的服務
關於同時連接兩通電話的服務,,,,請向服務供應商查詢及訂購。
關於同時連接兩通電話的服務關於同時連接兩通電話的服務
電話簿
新增紀錄
新增紀錄
新增紀錄新增紀錄
注意
注意﹕﹕﹕﹕記憶體已滿
記憶體已滿。。。。如果你的電話簿已滿,屏幕會出現提示。在新增
注意注意
記憶體已滿記憶體已滿
電話紀錄前,請先刪除不必要的電話紀錄。
1.
按下 。
2.
選擇
3.
注意
注意﹕﹕﹕﹕編輯文字與數字
注意注意
4.
注意
注意﹕﹕﹕﹕號碼重複
注意注意
提示
提示﹕﹕﹕﹕暫停號
提示提示
5.
編輯紀錄
編輯紀錄
編輯紀錄編輯紀錄
1.
2.
3.
4.
5.
6.
刪除紀錄
刪除紀錄
刪除紀錄刪除紀錄
1.
2.
3.
4.
刪除所有紀錄
刪除所有紀錄
刪除所有紀錄刪除所有紀錄
1.
2.
3.
PHONEBOOK ADD RECORD
輸入姓名。按下 。
編輯文字與數字。。。。請參閱第 38 頁的”文字與數字”一節。
編輯文字與數字編輯文字與數字
輸入號碼。
號碼重複。。。。電話簿中已有的姓名及/或號碼不能重複儲存。
號碼重複號碼重複
暫停號,,,,持續按下 以插入暫停號。
暫停號暫停號
按下 確認,新紀錄即時被儲存。
按下 。
選擇
PHONEBOOK EDIT RECORD
選擇需要編輯的紀錄,按下 。
按需要編輯姓名,按下 。
按需要編輯號碼。
按下 確認,紀錄即時被儲存。
按下 。
選擇
PHONEBOOK DELETE
選擇需要刪除的紀錄。按下 ,手機將顯示確認刪除的要求。
按下 確認,紀錄即時被刪除。
按下 。
選擇
PHONEBOOK DELETE ALL
按下 確認,所有紀錄即時被刪除。
。按下 。
。按下 。
。按下 。
。 按下 。 手機將顯示確認刪除的要求。
39
40
Page 21
通話紀錄
通話紀錄
通話紀錄通話紀錄
通話紀錄儲存所有來電(未接來電及已接來電)及己撥電話的紀錄。
電話種類
電話種類 內容
電話種類電話種類
內容 儲存數目
內容內容
儲存數目
儲存數目儲存數目
來電 打進來的電話 達 20個
通話紀錄包括來電者姓名、號碼、來電時間及日期。
查看通話
查看通話紀錄
查看通話查看通話
撥出 最近撥出的電話
提示
提示﹕﹕﹕﹕進入要查閱的功能表後,按下 或 以瀏覽其中項目。
提示提示
紀錄
紀錄紀錄
提示
提示﹕﹕﹕﹕新來電圖標
新來電圖標。。。。當你查看來電紀錄時,如果你所選擇的通訊紀
提示提示
新來電圖標新來電圖標
1
錄,是新的未接來電,你會看見新來電圖標 在閃動。
1.
按下 查看來電紀錄或或或或
按下 查看撥出號碼紀錄。
2.
選擇你想查看的紀錄。如果你想查看紀錄中的詳細資料,請按下 鍵。
撥打電話
撥打電話
撥打電話撥打電話
回覆來電
回覆來電
回覆來電回覆來電
如希望在來電紀錄中直接回覆來電,請參閱35 頁的”從來電紀錄撥號”一節。
重撥號碼
重撥號碼
重撥號碼重撥號碼
如想重撥你先前撥出的號碼,請參閱 34頁的”重撥最近打出的號碼”一節。
儲存通話紀錄到電話簿中
儲存通話紀錄到電話簿中
儲存通話紀錄到電話簿中儲存通話紀錄到電話簿中
1.
選擇通話紀錄後,按下 。
2.
選擇
SAVE
,按下 。
3.
按需要編輯姓名。按下 。
4.
按需要編輯號碼。
5.
按下 ,紀錄即時被儲存。
刪除通話紀錄
刪除通話紀錄
刪除通話紀錄刪除通話紀錄
1.
選擇通話紀錄後,請按下 。
2.
選擇
刪除
刪除所有
所有來電紀錄
刪除刪除
所有所有
DELETE
3.
按下 確認。紀錄即時被刪除。
來電紀錄
來電紀錄來電紀錄
1.
進入來電紀錄後,請按下 。
2.
選擇
DELETE ALL
3.
按下 確認。所有紀錄即時被刪除。
,按下 。屏幕將顯示確定刪除的要求。
。 按下 。屏幕將顯示確認刪除的要求。
個人化設
個人化設定
個人化設個人化設
定
定定
此功能讓你因應個人喜好及品味,轉換手機的顯示及聲音。
將你的手機顯示個人化
為手機命名
為手機命名
為手機命名為手機命名
每部手機能擁有自己的名字(最多10 個字母)。名字將在備用狀態時顯示出來。
1.
按下 。
2.
選擇
DISPLAY HANDSET NAME
3.
編輯名稱。有需要時按下 作出修改。
4.
按下 確認,新設定即時被儲存。
。 按下 。
將你的手機聆聲個人化
設定手機音樂鈴聲
設定手機音樂鈴聲
設定手機音樂鈴聲設定手機音樂鈴聲
1.
按下 。
2.
選擇
3.
選擇你需要的音樂鈴聲 。按下 確認,新設定即時被儲存。
設定手機
設定手機鈴鈴鈴鈴聲音量
設定手機設定手機
設定按鍵聲調
設定按鍵聲調
設定按鍵聲調設定按鍵聲調
聲音量
聲音量聲音量
1.
按下 。
2.
選擇
3.
選擇音量大小。 按下 確認,新設定即時被儲存。
SOUND HANDSET MELODY
SOUND HANDSET VOLUME
。 按下 。
。 按下 。
按鍵聲調是當你按下手機鍵盤時所發出的聲調。
1.
按下 。
2.
選擇
3.
設定手機聲調
設定手機聲調
設定手機聲調設定手機聲調
SOUND KEY TONES
選擇新的設定。 按下 確認, 新設定即時被儲存。
。 按下 。
手機聲調是指完成一項操作時所發出的聲調。
1.
按下 。
2.
選擇
SOUND TONES
3.
選擇新的設定。 按下 以確認,新設定即時被儲存。
。 按下 。
41
42
Page 22
通話功能
通話功能
通話功能通話功能
Extra Features
額外功能
額外功能
額外功能額外功能
本手機提供一系列的先進功能,滿足不同性質的通話需要。
自動應答
自動應答
自動應答自動應答
自動應答功能是當你將手機從充電機座拿起時,不需按下任何鍵,便可接聽來電。
啟動
啟動/ 關
關閉自動應答功能
閉自動應答功能
啟動啟動
關關
閉自動應答功能閉自動應答功能
1.
按下 。
2.
選擇
撥號模式
撥號模式
撥號模式撥號模式
SETTINGS AUTO ANSWER
3.
選擇新的設定。按下 確認,新的設定即時被儲存。
。 按下 。
撥號模式須配合你身處國家的電話訊號。本手機支援音頻及脈衝式撥號。閣下的手機出廠時已
進行設定,可在你身處的國家使用。詳情請向服務供應商查詢。
選擇撥號模式
選擇撥號模式
選擇撥號模式選擇撥號模式
1.
按下 。
2.
選擇
SETTINGS DIAL MODE
3.
選擇新的設定。 按下 確認,新的設定即時被儲存。
提示
提示﹕﹕﹕﹕臨時音頻模式
臨時音頻模式。。。。如果你的手機正使用脈衝模式,在通話期
提示提示
臨時音頻模式臨時音頻模式
。 按下 。
間,可持續按下 切換到臨時音頻模式。屏幕會顯示”d”。在”d”字
後輸入的數字,將以音頻訊號輸出。(只限此次通話。)
插撥號的
插撥號的選擇
插撥號的插撥號的
選擇
選擇選擇
插撥號是指當你接聽或撥出第二通電話時,需要發送到網絡的訊號。閣下的手機出廠時應已進
行設定,可在你身處的國家使用。詳情請向服務供應商查詢。
選擇
選擇插撥號的
插撥號的時段
選擇選擇
插撥號的插撥號的
時段
時段時段
1.
按下 。
2.
選擇
SETTINGS RECALL
3.
選擇新的設定。 按下 確認,新的設定已被儲存。
。 按下 。
設定 1 = 短的插撥號時段
設定 2 = 長的插撥號時段
此手機還有更多額外功能,當你探索過這些功能後,將更能發揮此手機的效用並得益。
提示
提示﹕﹕﹕﹕在功能表中可使用 或 瀏覽其中項目。
提示提示
按鍵鎖
按鍵鎖
按鍵鎖按鍵鎖
當你把手機帶在身邊時,可啟動按鍵鎖以防止意外觸動手機鍵盤。
啟動按鍵鎖
啟動按鍵鎖
啟動按鍵鎖啟動按鍵鎖
1.
解除按鍵鎖
解除按鍵鎖
解除按鍵鎖解除按鍵鎖
1.
持續按下 。鎖上鍵盤。屏幕將顯示
注意
注意﹕﹕﹕﹕撥打電話
撥打電話。當鍵盤鎖上時,你將無法
注意注意
撥打電話撥打電話
電話
電話。
電話電話
持續按下 。 按鍵鎖即時解除。
KEY LOCKED
無法撥出任何號碼,包括緊急
無法無法
字樣。
緊急
緊急緊急
尋找手機
1.
按下機座上的 鍵。所有連接機座的手機將會發出鈴聲。
2.
再次按動機座上的 鍵以停止呼叫,所有手機鈴聲會即時停止;
或按下手機的任何鍵也可停止呼叫及鈴聲。
留言
留言信箱顯示
信箱顯示
留言留言
信箱顯示信箱顯示
注意
注意﹕﹕﹕﹕留言信箱顯示服務
留言信箱顯示服務。。。。請向你的服務供應商查詢及訂購。
注意注意
留言信箱顯示服務留言信箱顯示服務
留言信箱顯示將以圖標作出警示。當信箱有留言等待收聽時,在手機上會顯示一個信封 圖
像。
聽取留言
聽取留言
聽取留言聽取留言
若要聽取留言,請向你的服務供應商查詢有關操作程序。
清除
清除留言信箱
留言信箱顯示
清除清除
留言信箱留言信箱
顯示
顯示顯示
檢查過留言後,圖標 在收到網絡訊號後會自動消除。你也可以人手清除留言訊息的圖標 。
1.
重設機座電源。(拔除機座電源適配器。等待 30秒,重新插回電源適配器。)留言
訊息圖標應已被清除。
43
44
Page 23

手機系統
手機系統
手機系統手機系統
提示
提示﹕﹕﹕﹕在功能表中可使用 或 瀏覽其中項目。
提示提示
將手機登記到額外的機座上
將手機登記到額外的機座上。
將手機登記到額外的機座上將手機登記到額外的機座上
本節將顯示如何將手機登記到額外的機座上。如果你的手機顯示
。
。。
UNREGISTERED
(未登記),請
參閱第32 頁的”登記手機”一節。假如使用同一型號的額外機座,便可以跟從以下指示﹕
1.
按下機座上的 4 秒。
2.
按下手機上的 鍵。
3.
選擇
REGISTER
4.
輸入系統
5.
按下[1]、[2]、[3] 、或[4]選擇機座的號碼。而此機座號碼,將會成為手機即將登記
PIN
碼(預設﹕
。 按下 。
0000
)。按下 可修改輸入。
的額外機座編號。你的手機將開始搜索這個機座。
選擇機座
選擇機座
選擇機座選擇機座
登記程序須在30 秒內完成。
注意
注意﹕﹕﹕﹕每個手機最多可登記4 部機座。登記 4部機座後,由於登
注意注意
記額已滿,將不能再登記額外的機座。
手機可在已登記的機座間切換。你可以將手機編程,使它自動連接最就近的機座,或只連接一
個固定的機座。
1.
按下 。
2.
選擇
刪除手機
刪除手機
刪除手機刪除手機
SYSTEM SELECT BASE
3.
選擇你所需的機座,或如果你想手機能自動連接最就近的機座,請選擇
4.
按下 。新的設定即時被儲存。
。 按下 。
AUTO
使用一部手機刪除(或註銷)使用相同機座的另一部手機。
1.
按下 。
2.
選擇
SYSTEM DELETE HS
3.
選擇你想刪除的手機(號碼)。按下 。
提示
提示﹕﹕﹕﹕手機號碼
手機號碼。。。。在備用狀態時,手機號碼將顯示在手機名字旁邊。
提示提示
手機號碼手機號碼
4.
輸入系統的
5.
按下 ,手機即時被刪除。
PIN
碼,按下 可修改輸入。
。 按下 。
。
更改系統的
更改系統的 PIN碼碼碼碼
更改系統的更改系統的
系統
PIN
碼是用作登記和刪除手機,以及保護存取其它功能表資料的措施。預設的系統
是
0000
: 你可自設
1.
2.
3.
4.
5.
6.
設定低輻射模式
設定低輻射模式。
設定低輻射模式設定低輻射模式
PIN
碼以便獲得更好的保障。
按下 。
選擇
SYSTEM CHANGE PIN
輸入系 統
輸入新的系統
再次輸入新系統
PIN
碼。按下 確認。輸入 PIN 碼時如需修改,可按 。
PIN
碼 (最多 8個數字)。按下 。
PIN
碼進行核實。
按下 。新的設定即時被儲存。
注意
注意︰︰︰︰忘記
忘記
PIN
注意注意
忘記忘記
若你真的忘記
。
。。
碼碼碼碼。。。。請寫下
PIN
碼,請致電生產商,尋求協助。
PIN
。按下 。
碼並保存在適當地方以備將來使用,
PIN
碼
你可設定本電話在閒置時放出較低的輻射能量。當你再次使用電話時,它便會恢復正常能量。
1.
按下 。
2.
選擇
SYSTEM LOW RF POWER
3.
選擇
ON
啟動低輻射模式或選擇
。 按下 。
OFF
取消此功能,按下 確認,新的設定即時
被儲存。
重設至
重設至默認
默認設定
默認默認
設定
設定設定
重設至重設至
默認設定是本電話的出廠時的設定。你可重設你的電話至出廠時的默認設定。
1.
按下 。
2.
選擇
SYSTEM RESET
3.
輸入系統
4.
按下 確認,所有設定便會重設。
注意
注意︰︰︰︰重設手機後,手機的電源會先關閉,設定被更新,幾秒鐘後手
注意注意
PIN
碼。 按下 確認,手機會顯示確認要求。
。 按下 。
機便會恢復正常操作。
要知道重設了甚麼設定,請參閱第47 頁的” 默認(預編程)設定”一節。
45
46
Page 24
附錄
附錄
附錄附錄
默認(預編程)設定
一般設定
語言
自動應答
插撥時段
聲音設定
聲音設定
聲音設定聲音設定
手機音樂鈴聲
手機鍵盤音調
手機音調
通話紀錄設定
通話紀錄設定
通話紀錄設定通話紀錄設定
來電紀錄
留言信箱顯示圖像
系統設定
系統設定
系統設定系統設定
機座選擇
疑難排除
疑難排除
疑難排除疑難排除
問題 提示
沒有撥號聲調
訊號圖標閃動
登記持續失敗
安放手機時沒有確認聲
調
手機在充電器上但未有
充電
沒有顯示
不良音訊(爆裂聲,回
音等)
手機未有鈴聲
來電顯示未有出現
不能撥出/接聽第二通
電話
英語
手機名稱
啟動
撥號模式
插撥
1
音樂
1 手機鈴聲音量 第三級
啟動
接收器音量 第二級
啟動
沒有改變
重設
自動
提示
提示提示
•
檢查電話連線。
•
手機可能在接收範圍以外,請將它移近機座。
•
電量也許太低,請替電池充電。
•
手機可能在接收範圍以外,請將它移近機座。
•
若手機屏幕顯示UNREGISTER,請替手機登記,詳情請參閱第 32頁。
•
關閉低輻射模式,請參閱第 46 頁。
•
機座的記憶體已滿,請刪除已不再使用的手機並再次嘗試,請參閱第 45頁。
•
手機放在機座或充電器時可能放得不好,請重新放置。
•
充電接觸點可能骯髒,請先中斷電源供應,然後用濕布/清潔接觸點。
•
啟動手機音調,請參閱第42頁。
•
電池可能損毀,請從零售商購買新的電池。
•
請檢查電池是否按極性正確放入。
•
請確保手機正確放在充電器上,在充電期間,電池的圖標會變動。
•
請檢查電池是否已充電。
•
請檢查電話是否已接上電源。
•
手機可能離開接收範圍,請將手機靠近機座。
•
電話可能受附近的電器所干擾,請將機座移離受干擾的位置。
•
電話可能在厚牆附近使用,請將機座移離該位置。
•
關閉低輻射模式,詳情請參閱第46頁。
•
請檢查手機鈴聲是否開啟,詳情請參閱第42頁。
•
並未啟動來電顯示服務,請聯絡服務供應商。
•
來電者資料被阻擋或沒有提供。
•
未啟動有關服務,請聯絡服務供應商。
•
請檢查插撥號的設定是否正確,詳情請參閱第 43 頁。
撥電通話紀錄
PIN編碼
重設
音頻
沒有改變
0000
系統
保用証
保用証
保用証保用証
Warranty Card
閣下購入之“奧美達”產品將於購買日起享有一年免費維修保用(如需維
修,請自攜到本公司維修中心),唯外殼不在保用範圍之內。此維修保用
不適用於產品曾因意外、人為損毀及不適當使用等情況。維修後換出之零
件仍屬“奧美達”所擁有。顧客請妥存此保用証及發票正本,當需此項服
務時出示給本公司維修部。此保用証一經塗改可引至此証失效。此保用証
只適用於香港區域。
This AMYTEL product except housings is covered by 1 year guarantee as from
the date of purchase. This guarantee becomes invalid if the product is damaged by
accident, abuse or improper operation. All parts replaced after repair remain the
property of AMYTEL. Please present this warranty card, the official purchase
invoice, together with this product to AMYTEL Service Centre whenever service
is required.
This Warranty Card is only applicable in Hong Kong. Any unauthorized alteration
may void this warranty card.
型號 編 號
Model AT5220/ AT5220T Serial number ____________________
注意: 此保用証須連同購貨發票正本或禮品換領證明書,方可生效。
REMARKS: This warranty card is valid only when presented together with
original invoice or redemption program certificate.
奧美達
奧美達(亞洲
奧美達奧美達
九龍觀塘開源道 77 號業發工業大廈1 期9 樓 A、B室
Flat A & B, 9/F., Block 1, Yip Fat Factory Building,
Website: http://www.amytel.net E-mail: [email protected]
亞洲)有限
有限公司
亞洲亞洲
公司 AMYTEL ASIA LTD.
有限有限
公司公司
客戶服務中心 Customer Service Centre
77, Hoi Yuen Road, Kwun Tong, Kowloon
Tel: 2870 2058
47
48
 Loading...