

Page 1
WinMAX
MAX Server Control Software
v3.10 or higher
instruction manual
(NEED PHASE II PHOTOS)
Page 2

Software License and Warranty Agreement
LICENSE GRANT.
AMX grants to Licensee the non-exclusive right to use the AMX Software in the manner described in this License. The AMX Software
is licensed, not sold. The AMX Software consists of generally available programming and development software, product
documentation, sample applications, tools and utilities, and miscellaneous technical information. Please refer to the README.TXT
file on the compact disc or download for further information regarding the components of the AMX Software. The AMX Software is
subject to restrictions on distribution described in this License Agreement. YOU MAY NOT LICENSE, RENT, OR LEASE THE AMX
SOFTWARE. You may not reverse engineer, decompile, or disassemble the AMX Software.
INTELLECTUAL PROPERTY.
The AMX Software is owned by AMX and is protected by United States copyright laws, patent laws, international treaty provisions,
and/or state of Texas trade secret laws. Licensee may make copies of the AMX Software solely for backup or archival purposes.
Licensee may not copy the written materials accompanying the AMX Software.
TERMINATION. AMX RESERVES THE RIGHT, IN ITS SOLE DISCRETION, TO TERMINATE THIS LICENSE FOR ANY REASON
AND UPON WRITTEN NOTICE TO LICENSEE.
In the event that AMX terminates this License, the Licensee shall return or destroy all originals and copies of the AMX Software to
AMX and certify in writing that all originals and copies have been returned or destroyed.
PRE-RELEASE CODE.
Portions of the AMX Software may, from time to time, as identified in the AMX Software, include PRE-RELEASE CODE and such
code may not be at the level of performance, compatibility and functionality of the final code. The PRE-RELEASE CODE may not
operate correctly and may be substantially modified prior to final release or certain features may not be generally released. AMX is
not obligated to make or support any PRE-RELEASE CODE. ALL PRE-RELEASE CODE IS PROVIDED "AS IS" WITH NO
WARRANTIES.
LIMITED WARRANTY.
AMX warrants that the AMX Software will perform substantially in accordance with the accompanying written materials for a period of
ninety (90) days from the date of receipt. AMX DISCLAIMS ALL OTHER WARRANTIES, EITHER EXPRESS OR IMPLIED,
INCLUDING, BUT NOT LIMITED TO IMPLIED WARRANTIES OF MERCHANTABILITY AND FITNESS FOR A PARTICULAR
PURPOSE, WITH REGARD TO THE AMX SOFTWARE. THIS LIMITED WARRANTY GIVES YOU SPECIFIC LEGAL RIGHTS.
Any supplements or updates to the AMX SOFTWARE, including without limitation, any (if any) service packs or hot fixes provided to
you after the expiration of the ninety (90) day Limited Warranty period are not covered by any warranty or condition, express, implied
or statutory.
LICENSEE REMEDIES.
AMX's entire liability and your exclusive remedy shall be repair or replacement of the AMX Software that does not meet AMX's
Limited Warranty and which is returned to AMX. This Limited Warranty is void if failure of the AMX Software has resulted from
accident, abuse, or misapplication. Any replacement AMX Software will be warranted for the remainder of the original warranty period
or thirty (30) days, whichever is longer. Outside the United States, these remedies may not available.
NO LIABILITY FOR CONSEQUENTIAL DAMAGES. IN NO EVENT SHALL AMX BE LIABLE FOR ANY DAMAGES
WHATSOEVER (INCLUDING, WITHOUT LIMITATION, DAMAGES FOR LOSS OF BUSINESS PROFITS, BUSINESS
INTERRUPTION, LOSS OF BUSINESS INFORMATION, OR ANY OTHER PECUNIARY LOSS) ARISING OUT OF THE USE OF OR
INABILITY TO USE THIS AMX SOFTWARE, EVEN IF AMX HAS BEEN ADVISED OF THE POSSIBILITY OF SUCH DAMAGES.
BECAUSE SOME STATES/COUNTRIES DO NOT ALLOW THE EXCLUSION OR LIMITATION OF LIABILITY FOR
CONSEQUENTIAL OR INCIDENTAL DAMAGES, THE ABOVE LIMITATION MAY NOT APPLY TO YOU.
U.S. GOVERNMENT RESTRICTED RIGHTS. The AMX Software is provided with RESTRICTED RIGHTS. Use, duplication, or
disclosure by the Government is subject to restrictions as set forth in subparagraph (c)(1)(ii) of The Rights in Technical Data and
Computer Software clause at DFARS 252.227-7013 or subparagraphs (c)(1) and (2) of the Commercial Computer Software
Restricted Rights at 48 CFR 52.227-19, as applicable.
This Agreement replaces and supercedes all previous AMX Software License Agreements and is governed by the laws of the State of
Texas, and all disputes will be resolved in the courts in Collin County, Texas, USA. Should you have any questions concerning this
Agreement, or if you desire to contact AMX for any reason, please write: AMX Corporation, 3000 Research Drive, Richardson, TX
75082.
Page 3

Table of Contents
Table of Contents
WinMAX - Overview and Installation ......................................................................1
Installation and Configuration............................................................................................ 1
Supported Operating Systems ................................................................................................. 1
Downloading the WinMAX Application ..................................................................................... 1
Connecting Your PC to the MAX Server .................................................................................. 2
Determining the IP Address of Your MAX Server .................................................................... 2
Troubleshooting Ethernet Communications Problems............................................................. 3
Changing the IP Address of Your PC....................................................................................... 3
The WinMAX User Interface.............................................................................................. 4
Playback Controls ............................................................................................................. 5
Music Tab................................................................................................................................. 5
Movies Tab............................................................................................................................... 5
Output Zone Selection ............................................................................................................. 5
Transport Control Bar............................................................................................................... 5
Play Options (Random/Repeat) ............................................................................................... 6
Bookmark (Movies tab only)..................................................................................................... 6
Remote (Movies tab only) ........................................................................................................ 6
Status Bar ................................................................................................................................ 6
Generating a Print-Out of the MAX Music and Movies Libraries....................................... 7
Printing a List of all CD or DVD Titles ...................................................................................... 7
Printing a Search Results List .................................................................................................. 7
Other Printing Options.............................................................................................................. 8
Music Tab ..................................................................................................................9
Overview ........................................................................................................................... 9
Listening To Music .......................................................................................................... 10
Playback Zone Selection................................................................................................. 10
Selecting and Playing Back Music .................................................................................. 10
Browsing For Music................................................................................................................ 11
Searching For Music .............................................................................................................. 11
Show All Music option ............................................................................................................ 12
Playing an Entire CD.............................................................................................................. 12
Playing an Individual Track .................................................................................................... 13
CD Details dialog............................................................................................................. 14
Uploading CD Cover Art......................................................................................................... 14
CD Titles context menu .......................................................................................................... 15
Track Titles context menu ...................................................................................................... 15
inMAX MAX Server Control Software
i
Page 4

Table of Contents
MultiSelect and Edit Mode .............................................................................................. 16
MultiSelect.............................................................................................................................. 16
Edit Mode ............................................................................................................................... 16
Deleting a CD or Track From the Server......................................................................... 16
Downloading Music From the MAX Server to Your PC................................................... 17
Working With Artists and Genres .................................................................................... 17
Playing All CD Titles by a Selected Artist............................................................................... 18
Playing All CD Tiles in a Selected Genre ............................................................................... 18
Playing Individual Tracks Within a Genre or Artist List .......................................................... 18
Artist/Genre List Window Context Menu ................................................................................ 18
Working with Playlists ............................................................................................................ 18
Movies Tab ..............................................................................................................19
Overview ......................................................................................................................... 19
Playing Movies ................................................................................................................ 20
Playback Zone Selection................................................................................................. 20
Selecting and Playing Back Movies ................................................................................ 20
Searching For Movies ............................................................................................................ 21
Show All Movies option .......................................................................................................... 21
Playing an Entire DVD ........................................................................................................... 21
Playing an Individual Chapter ................................................................................................ 22
WinMAX Remote............................................................................................................. 23
DVD Titles context menu ....................................................................................................... 24
Chapter Titles context menu .................................................................................................. 24
Editing DVD Information.................................................................................................. 25
Edit Movie Description dialog.......................................................................................... 25
Movie Details tab.................................................................................................................... 25
Uploading DVD Cover Art ...................................................................................................... 26
User Defined Fields tab.......................................................................................................... 27
Working With Bookmarks................................................................................................ 27
Adding a Bookmark to a Movie .............................................................................................. 27
Removing Bookmarks ............................................................................................................ 28
Deleting a DVD From the Server .................................................................................... 28
Working With Playlists ...........................................................................................29
Overview ......................................................................................................................... 29
Creating a New Custom Playlist...................................................................................... 29
Adding Content To a Playlist........................................................................................... 30
Refreshing the Playlist Window.............................................................................................. 30
Playing a Custom Playlist................................................................................................ 30
Playlist Context Menu ............................................................................................................ 30
ii
WinMAX MAX Server Control Software
Page 5

Table of Contents
Downloading a Playlist to Your PC.................................................................................. 31
Removing Content From a Playlist.................................................................................. 31
Re-ordering Tracks/Chapters in a Playlist....................................................................... 32
Adding Video Segments to a Playlist .............................................................................. 34
Monitor Tab .............................................................................................................35
Overview ......................................................................................................................... 35
Record Tab ..............................................................................................................37
Overview ......................................................................................................................... 37
Selecting a Recording Method ........................................................................................ 37
Loading a CD or DVD...................................................................................................... 38
Using the DVD Disc Type Options ......................................................................................... 41
Playback of Different DVD Disc Types................................................................................... 42
Searching For a CD or DVD by Title or by UPC Code .................................................... 42
Duplicate entries .................................................................................................................... 44
Specify a Local CD/DVD-ROM Drive To Use ....................................................................... 44
Uploading Music Files From Your PC ............................................................................. 45
Parental Control Tab ..............................................................................................47
Overview ......................................................................................................................... 47
Applying Parental Control To a Ratings Level................................................................. 49
Applying Parental Control To Playlists ............................................................................ 49
Changing the Rating for a DVD....................................................................................... 50
User Data Tab .........................................................................................................51
Overview ......................................................................................................................... 51
Creating a New User-Defined Field For Movies.............................................................. 52
System Information Tab .........................................................................................53
Overview ......................................................................................................................... 53
Server Storage Data .............................................................................................................. 54
Server IP Address or URL...................................................................................................... 54
Changing the Server’s IP Address or URL...................................................................... 54
Viewing/Editing Output Zone Names .............................................................................. 54
Server Configuration (MAX Admin Menu) ....................................................................... 55
Software/Firmware Version and RAID Status Information ..................................................... 56
Web Update ........................................................................................................................... 56
Application Settings................................................................................................................ 56
inMAX MAX Server Control Software
iii
Page 6

Table of Contents
iv
WinMAX MAX Server Control Software
Page 7

WinMAX - Overview and Installation
WinMAX - Overview and Installation
WinMAX is a free software program provided by AMX to enable control of MAX servers from any
Windows PC. The PC must be connected to the MAX Server directly or via a network. Multiple
PCs running WinMAX may control the Server simultaneously. It is recommended that WinMAX
be used to establish initial communications with the MAX Server.
NOTICE: MAX Products are not designed or intended to, and may not be used to, violate anyone’s
copyright or other intellectual property rights. Each user of the MAX Products may only use the
Products in connection with materials legally owned or licensed by such user and only to the extent
such ownership or license rights permit such use.
Installation and Configuration
Supported Operating Systems
Windows 2000® (Service Pack 4 or greater)
Windows XP® Professional (Service Pack 1 or greater)
Downloading the WinMAX Application
The WinMAX software can be downloaded from www.amx.com as a self-extracting executable. It
automatically searches for and replaces older versions of WinMAX.
1. Go to www.amx.com and log in. You must be logged in to download AMX applications.
2. Go to Dealers > Tech Center > Downloadable Files > Application Files.
3. Scroll down in the list to select WinMAX.
4. Read the AMX License Agreement and click I Accept to continue.
5. In the File Download dialog:
Click Save to save the WinMAX installation .EXE file to a local drive (or LAN).
Click Open to begin the installation immediately.
Once installed, by default the program resides in your Program Files\AMX Control Disc\WinMAX
directory.
For WinMAX to be viewed properly, the resolution of your PC must be set to a
minimum of 1024 x 768.
inMAX MAX Server Control Software
1
Page 8
WinMAX - Overview and Installation
Connecting Your PC to the MAX Server
The first step in launching the WinMAX application is establishing a connection with the MAX
server.
The PC running WinMAX must be connected to the same LAN as the MAX Server
that you want to connect to.
The first time you launch WinMAX, you should expect to receive an error message indicating that
you have not connected to the MAX server. Click OK to close the error message dialog, and
WinMAX will launch. By default, the application opens to the System Information tab, where you
will specify the IP Address of the MAX server.
Type the IP Address of the MAX Server into the field labeled Server’s IP Address or URL. Then
click on the disk icon next to the text-entry field to save this configuration. The blank fields should
fill in momentarily, indicating that the Server has been recognized.
Determining the IP Address of Your MAX Server
In the event that you do not know the IP Address assigned to the target MAX Server, you will need
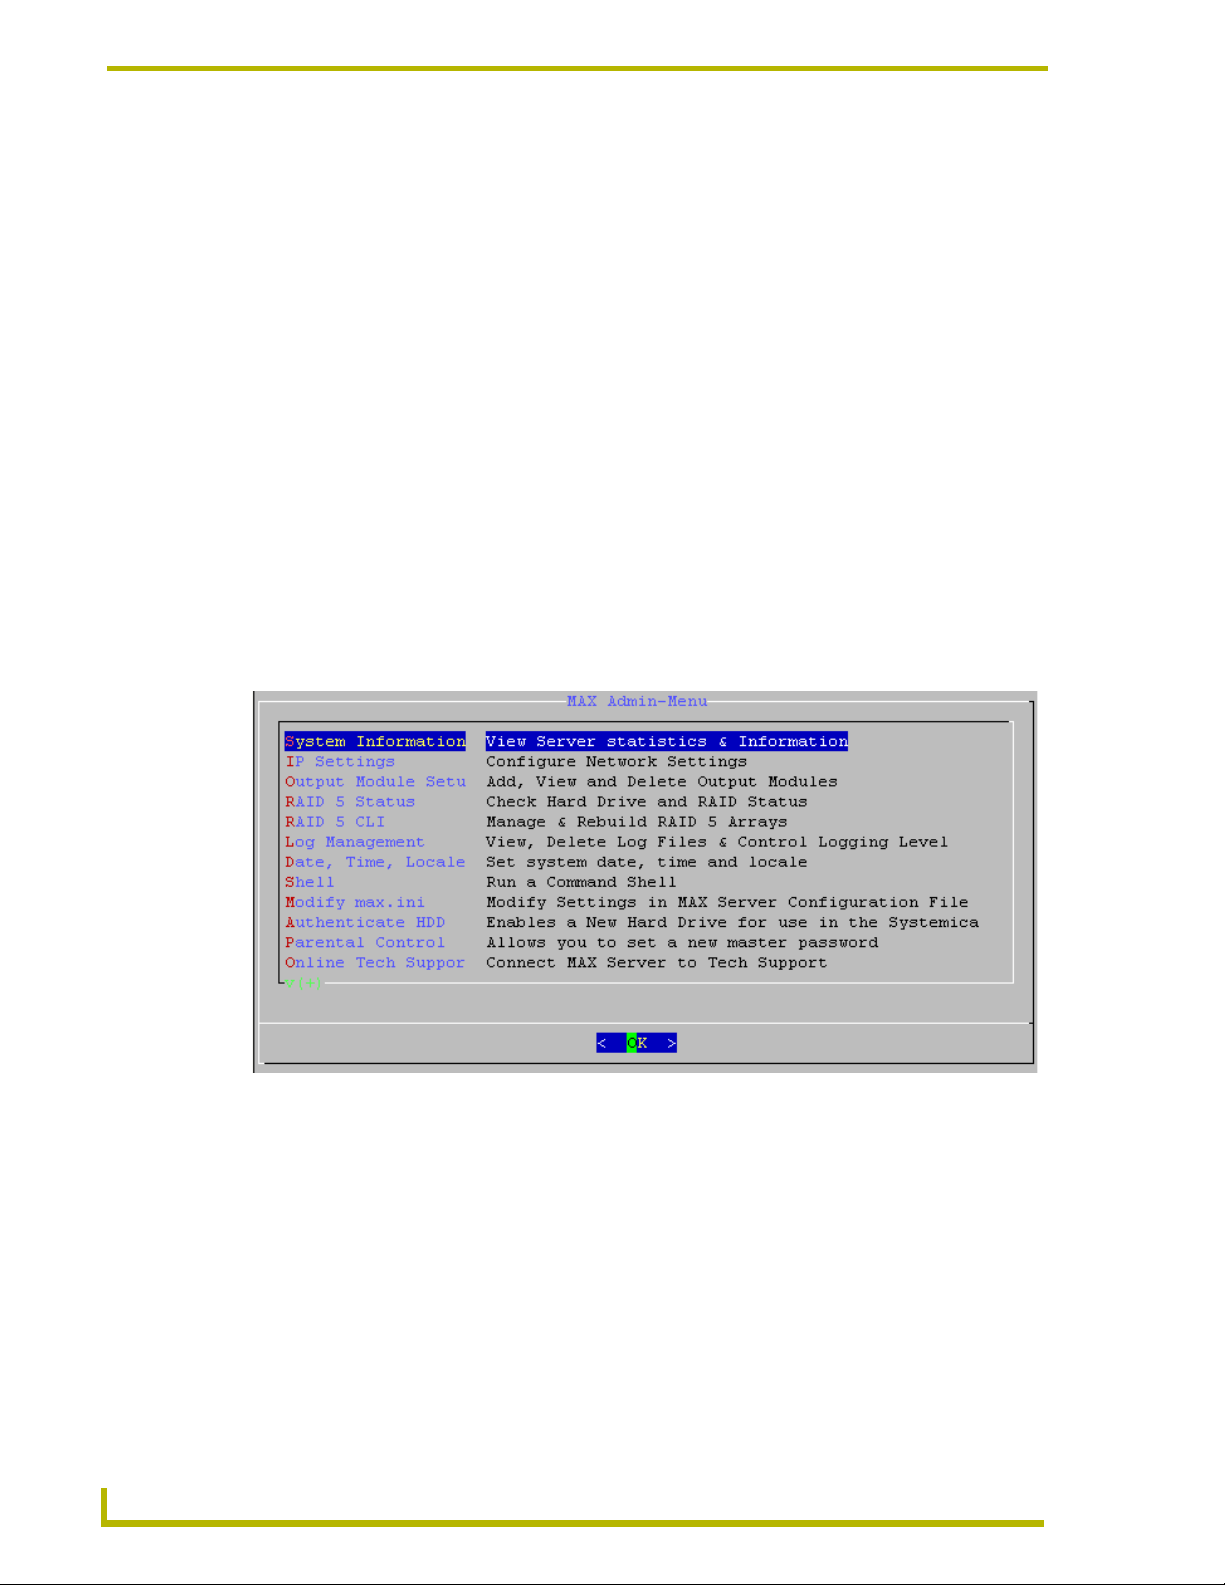
to access the MAX Admin Menu (FIG. 1) on the target server. This requires connecting a PS/2
mouse and keyboard, and VGA monitor directly to the server:
FIG. 1 MAX Admin Menu
Use the arrow keys on the keyboard to highlight the desired option, and press Enter to
make a selection. Do not use the arrow keys on your keyboard’s numeric keypad.
Beyond this menu, press the TAB button to navigate through the elements on the pages
until an asterisk appears next to the desired selection.
Press the spacebar to make a selection (press again to de-select).
Select IP Settings to view the server’s IP Address. Write it down and close the IP Settings window.
When the system prompts you to save any changes, select No.
2
WinMAX MAX Server Control Software
Page 9

WinMAX - Overview and Installation
Troubleshooting Ethernet Communications Problems
The Link (L) LED next to the Ethernet port should be on (FIG. 2). If not, check your
cables and connectors.
A - Activity LED
lights when receiving
Ethernet data packets
FIG. 2 Ethernet port LEDs
Verify that the IP address and Subnet Mask settings are appropriate for your network
AL
L - Link LED
lights (full-on) when the
Ethernet cables are
connected and terminated
correctly
configuration.
If you are connecting to the server via a direct connection with a PC (using a crossover
Ethernet cable), be sure that the IP Address of the Network card in your PC is in the same
range as the server, but not the same address as the server.
For example, a network card setting of 192.168.1.31 will work with the default server IP
address of 192.168.1.30.
Changing the IP Address of Your PC
1. Go to the Control Panel, Network Connections.
2. Double-click the Network Connection that applies to the network card you are using to connect
to the server.
3. Double-click on Internet Protocol (TCP/IP).
4. Select Use the Following IP Address and type in the IP Address of the MAX Server, plus one.
For example, if the server’s IP Address is XXX.XXX.1.30, then set the PCs IP Address to
XXX.XXX.1.31.
5. Set the Subnet Mask to 255.255.255.0.
6. Click OK and try to establish communications with the server.
If you are connecting to the server via a PC network, be sure that the IP address and
Subnet Mask settings are appropriate for your network configuration. Consult your
network administrator for help with this.
inMAX MAX Server Control Software
3
Page 10

WinMAX - Overview and Installation
The WinMAX User Interface
The functionality of WinMAX is separated into several tabs: Music, Movies, Monitor, Record,
Parental Control, User Data and System Information (FIG. 3).
FIG. 3 WinMAX User Interface (Music tab)
The Music tab (FIG. 8 on page 9) provides music search and playback capabilities, as
well as custom play-list management and music database management functionality. This
is the default view when the program is launched, assuming that communication has been
established between the server and your PC. If your PC is not able to communicate with
the server, the System Information tab is the default view.
The Movies tab (FIG. 19 on page 19) contains controls that provide movie search and
play functionality, including the ability to manage keywords.
The Monitor tab (FIG. 36 on page 35) provides a real-time status display for each
currently active output zone in your system.
The Record tab (FIG. 37 on page 37) contains controls that allow you to load music or
movies and add them to your media library on the MAX server.
The Parental Control tab (FIG. 51 on page 47) contains options that allow you to apply
parental control to DVDs and playlists, based on MPAA ratings (G, PG, PG-13, R,
NC-17) and user-defined ratings.
The User Data tab (FIG. 55 on page 51) provides the ability to add user-defined fields to
the detailed descriptions for movies (as viewed in the User tab of the Edit Movie
Description dialog).
4
WinMAX MAX Server Control Software
Page 11

WinMAX - Overview and Installation
The System Information tab (FIG. 57 on page 53) provides a quick view of system
status, as well as access to several troubleshooting tools. This tab becomes the default
view if the PC is unable to establish communication with the server when the application
is launched. In this case, refer to the Troubleshooting Ethernet Communications
Problems section on page 3 for troubleshooting information.
Playback Controls
Music Tab
At the bottom of the Music tabs are the following playback controls and options:
Prev Next Play Pause Stop
Output Zone Selection Play Options (Random/Repeat)
FIG. 4 Playback Controls (Music tab)
Transport Control Bar
Movies Tab
At the bottom of the Movies tab are the following playback controls and options:
Bookmark: click to add a bookmark to this point in the movie
(see the Working With Bookmarks section on page 27 for details)
Remote
(see the WinMAX Remote section on page 23 for details)
Output Zone Selection Play Options (Random/Repeat)
FIG. 5 Playback Controls (Movies tab)
: click to access the WinMAX DVD remote
Prev Next Play Pause Stop
Transport Control Bar
Output Zone Selection
Click the down arrow in the Zone area to display a list of audio or video output zones that exist in
your system (FIG. 5). This selection determines which of the available audio or video outputs will
broadcast the media content you select.
For music playback, refer to the Playback Zone Selection section on page 10 for details.
For movie playback, refer to the Playback Zone Selection section on page 20 for details.
Transport Control Bar
The Transport Control Bar provides standard CD/DVD transport controls: Previous track, Next
track, Play, Pause and Stop (FIG. 6).
Alternatively, you can right-click on a selection and select Play from the context
menu.
inMAX MAX Server Control Software
5
Page 12

WinMAX - Overview and Installation
Play Options (Random/Repeat)
To the right of the Transport Control bar are the Play Options checkboxes: Random and Repeat.
Check to enable either or both of the following modes:
• Random: The current selection (CD, individual track/chapter or Playlist) will play its tracks in
• Repeat: The current selection (CD, DVD, individual track/chapter or Playlist) will automatically
random order. By default, this option disabled (unchecked).
repeat when it reaches the end. Use the up/down arrows to adjust the number of
repeat plays, indicated in the text box to the right of the Repeat checkbox
(default = 1, 0 = infinite loop). By default, this option disabled (unchecked).
Bookmark (Movies tab only)
Click the Bookmark button (available in the Movies tab only) to add a bookmark at this point in
the movie. Refer to the Working With Bookmarks section on page 27 for details.
Remote (Movies tab only)
Click the Remote button (available in the Movies tab only)) to access the WinMAX remote, which
is a virtual remote control for DVD playback. Refer to the WinMAX Remote section on page 23 for
details.
Status Bar
The Status bar gives information about the selection currently being played (Music and Movies tabs
only):
For Music (CD) selections, it indicates the Artist Name, the CD Title that the track is
from and the Title of the track that is currently playing.
For Movies (DVD) selections, it indicates the Movie Title and Chapter Number/Title.
The progress bar indicates the current percentage of the track that has played.
Now Playing information
FIG. 6 Now Playing and Transport Control bar (Music and Movies tab)
Progress bar
6
WinMAX MAX Server Control Software
Page 13

WinMAX - Overview and Installation
Generating a Print-Out of the MAX Music and Movies Libraries
The Music and Movies tabs both have a Print button in the upper-right corner of the dialog
(FIG. 7). Use this option to generate a hard-copy printout of either your music collection or movies
collection, depending on which tab you access the Print button from (assuming that your PC is
connected to a printer).
Click to open the Print dialog
Print dialog - Music Print dialog - Movies
FIG. 7 Print button and dialog
Printing a List of all CD or DVD Titles
1. Click the Print button in either the Music or Movies tab to open the Print dialog specific to the
active tab.
2. Under Content, select All CD’s (for Music) or All DVD’s (for Movies).
3. Under Sort, select a sorting option for the printed list (By Genre - default setting or By Artist).
4. Click on Print to send the CD or DVD titles list to your printer.
When printing CD lists, you can enable the Print Tracks checkbox (in the Print
dialog) to include listings of individual tracks for each CD title in the printout. By
default, this option is disabled.
Printing a Search Results List
1. Click the Print button in either the Music or Movies tab to open the Print dialog specific to the
active tab.
2. Under Content, select Search Results.
3. Under Sort, select a sorting option for the printed list (By Genre - default setting or By Artist).
4. Click on Print to send the current list of search results (Music or Movies, depending on which
tab is active) to your printer.
inMAX MAX Server Control Software
7
Page 14

WinMAX - Overview and Installation
Other Printing Options
Additional options available via the Print dialog include:
•Preview: Click to open the Print Preview dialog.
•Print: Click to print immediately (no preview).
•Page Setup: Click to specify page setup options for the printout.
• Cancel: Click to cancel the print job.
8
WinMAX MAX Server Control Software
Page 15
Music Tab
Overview
The Music tab (FIG. 8) provides music search and playback functionality, as well as custom
playlist management and music database management.
To view the music options for the connected server, click on this tab and select the desired output
Zone from the drop-down list at the lower-left of the screen.
Window
Genre/Artist List
Genre/Artist selection
Refresh view
Search window
Show All Music option
MultiSelect option
Edit Mode option
Music Tab
Print
option
Search Results Track List
Window Window
Window
Playlists
Output Zone selection
Now Playing info
FIG. 8 WinMAX - Music tab
Transport Control Bar
Play Options (Random, Repeat)
Playback Status
While a CD is playing, you can use the buttons in the Transport Control Bar at the bottom of the
dialog to control basic playback functionality (Skip to Previous track, Skip to Next Track, Play,
Pause and Stop).
To add new music to the server, use the options in the Record tab. See the Record
Ta b section on page 37 for details.
inMAX MAX Server Control Software
9
Page 16

Music Tab
Listening To Music
There are two simple steps involved to playback music from the MAX server’s music library:
1. Select a playback zone - If you have multiple playback zones for audio, you should first select
which zone(s) you want your music to played in. See the Playback Zone Selection section
(below) for details.
2. Select music for playback - Once you have specified the zone(s) that you want to play your
music in, you can select the music you want to play.
Use the Search functions to select an individual track, an entire CD or a custom playlist for
playback. See the Selecting and Playing Back Music section (below) for details.
Playback Zone Selection
Before you begin selecting music for playback, you should first select the desired output Zone. This
selection determines which of the available audio outputs will broadcast the music you select. The
number of Zones available to select from depends on the amount of audio outputs that exist in your
MAX system. Click the down-arrow next to the Zone field (FIG. 9), and select the desired output
zone.
Click to display a listing of available audio output zones
FIG. 9 Zone selection
Selecting and Playing Back Music
There are several different approaches to playing back music from the music library on the MAX
server. You can select to play an entire CD, an individual track from any CD, or you can load a
custom playlist containing any number of tracks from any CDs in the collection.
The first step in playing back music is to select the CD, track or playlist that you want to play back.
Use the Search For field at the top of the Music tab to perform a search, and once you have located
and selected the desired CD or track(s), use the Transport Control Bar to initiate and control
playback, as described in the following sections.
10
WinMAX MAX Server Control Software
Page 17

Music Tab
Browsing For Music
One approach to selecting music to play is to browse the music library by Artist, by Genre or by
title. Use the drop-down menu in the upper-left corner of this tab (FIG. 10) to select a browse
method:
Artist list Genre listGenre/Artist drop-down menu
FIG. 10 Browse selection drop-down menu
All - This option will list every item in the server’s library (including all CD and DVD
titles) in the Search Results window (FIG. 8), sorted alphabetically.
Genre - This option lists the Genres that exist in the server’s library in the Genre/Artist
window. Click on a Genre in this list to view a list of all titles in that genre in the Search
Results window.
Artist - This option lists the Artists that exist in the server’s library in the Genre/Artist
window. Click on an Artist in this list to view a list of all titles by that artist in the Search
Results window.
Searching For Music
Use the Search For field at the top of the Music tab (FIG. 11) to perform a search for music based
on an Artist’s name, a CD Title or a Song Title. When the Search For field is empty, the entire CD
collection is listed alphabetically in the Search Results window.
The columns labeled Title, Song, Artist and Genre indicate why a particular CD
was displayed as a result of a search. A check mark in the Title and Artist
columns, for example, signifies that the text string typed into the Search For field
is included in both the CD title, and in the Artist name associated with the CD.
FIG. 11 Search For field (with an example results)
inMAX MAX Server Control Software
11
Page 18
Music Tab
1. Type the first few letters of the selection you wish to find into the Search For field. You can
type any portion of the Song or CD title, the Artist’s name or a Genre name. All matching
selections are displayed in the Search Results window (FIG. 11).
2. When the search results appear in the Search Results window, click to highlight a CD title for
playback. The track list for this CD is then displayed in the Track List window (FIG. 14).
Show All Music option
CD and DVD search operations return only the first 50 results (to minimize demands on the
system). The Show All Music option (FIG. 12) allows you to display all of the results of a music
search, regardless of the number of results.
FIG. 12 Show All Music checkbox
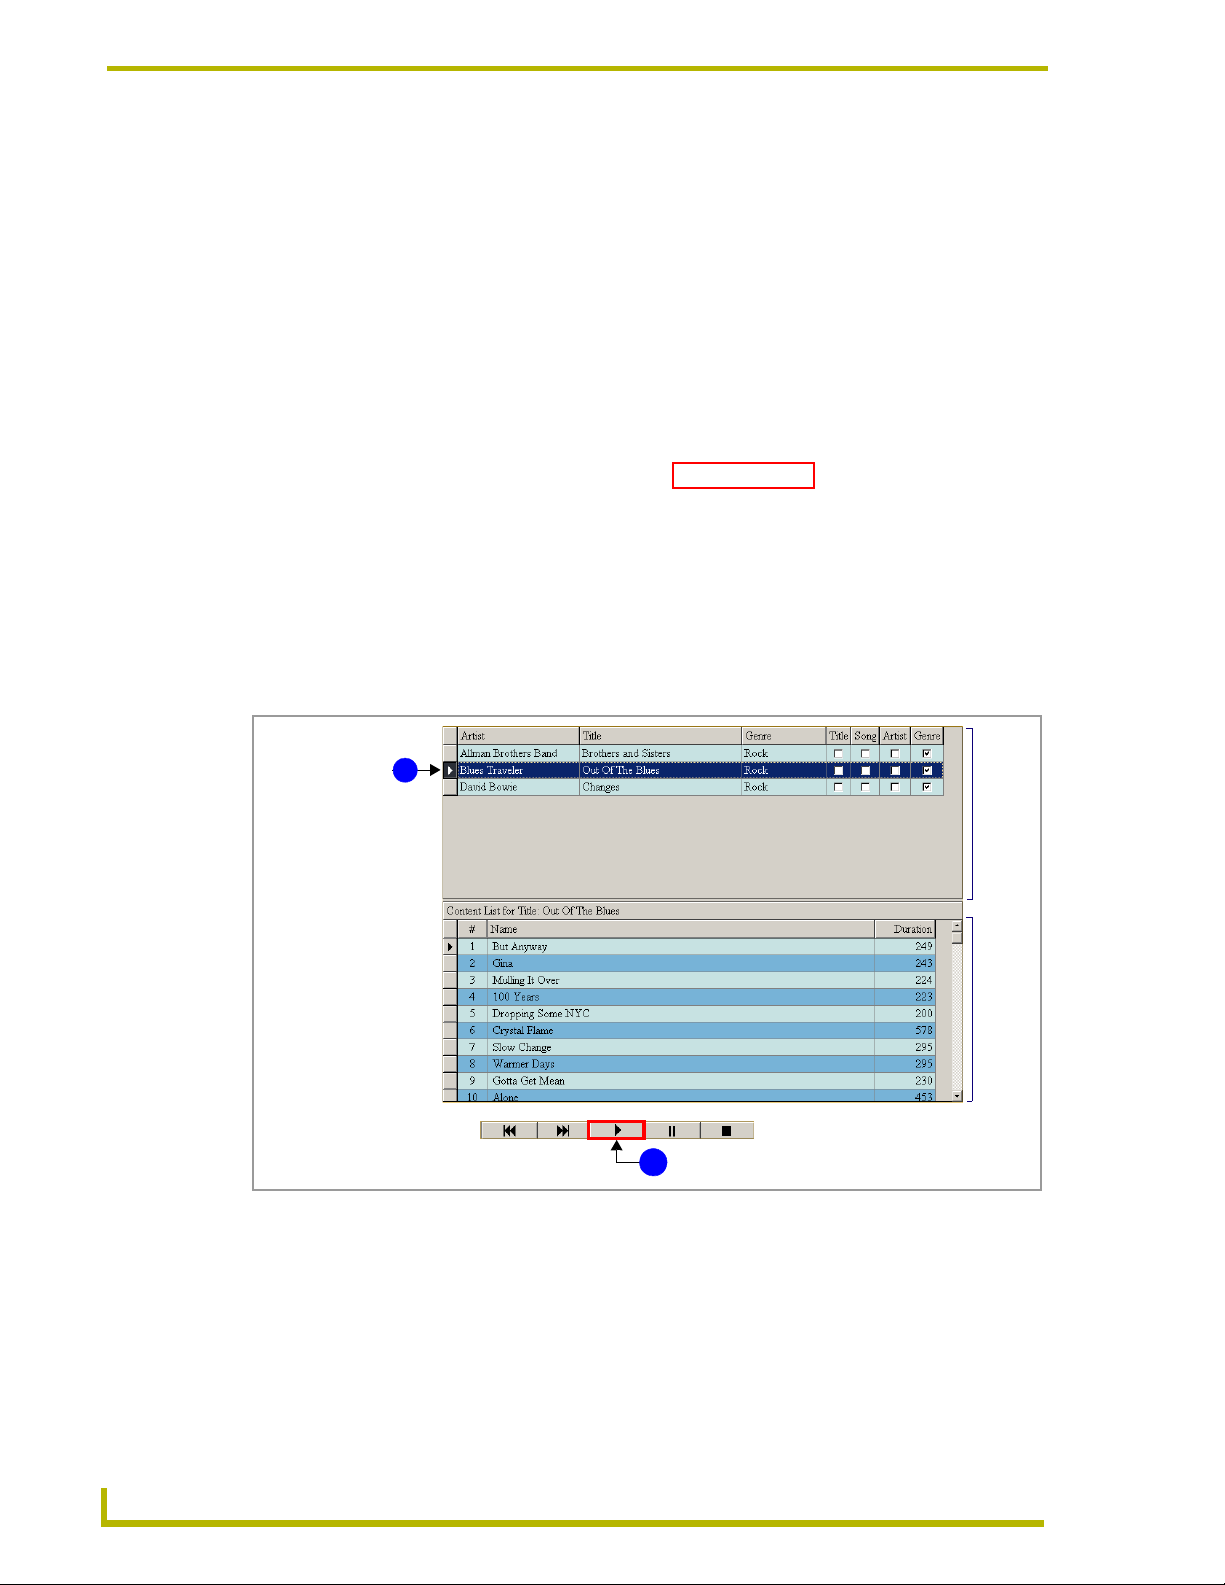
Playing an Entire CD
1. Click to select a CD title in the Search Results window. Note that when a CD is selected, the
Track List window is populated with track information for the selected disc.
2. Click the Play button in the Transport Control Bar at the bottom of the tab (FIG. 13).
To select a CD
for playback,
click to select a CD
title in the Search
Results window
Transport Control Bar
FIG. 13 Selecting an entire CD for playback
1
Click to play the selected CD or track(s)
2
Search Results window Tra ck List window
12
WinMAX MAX Server Control Software
Page 19
Music Tab
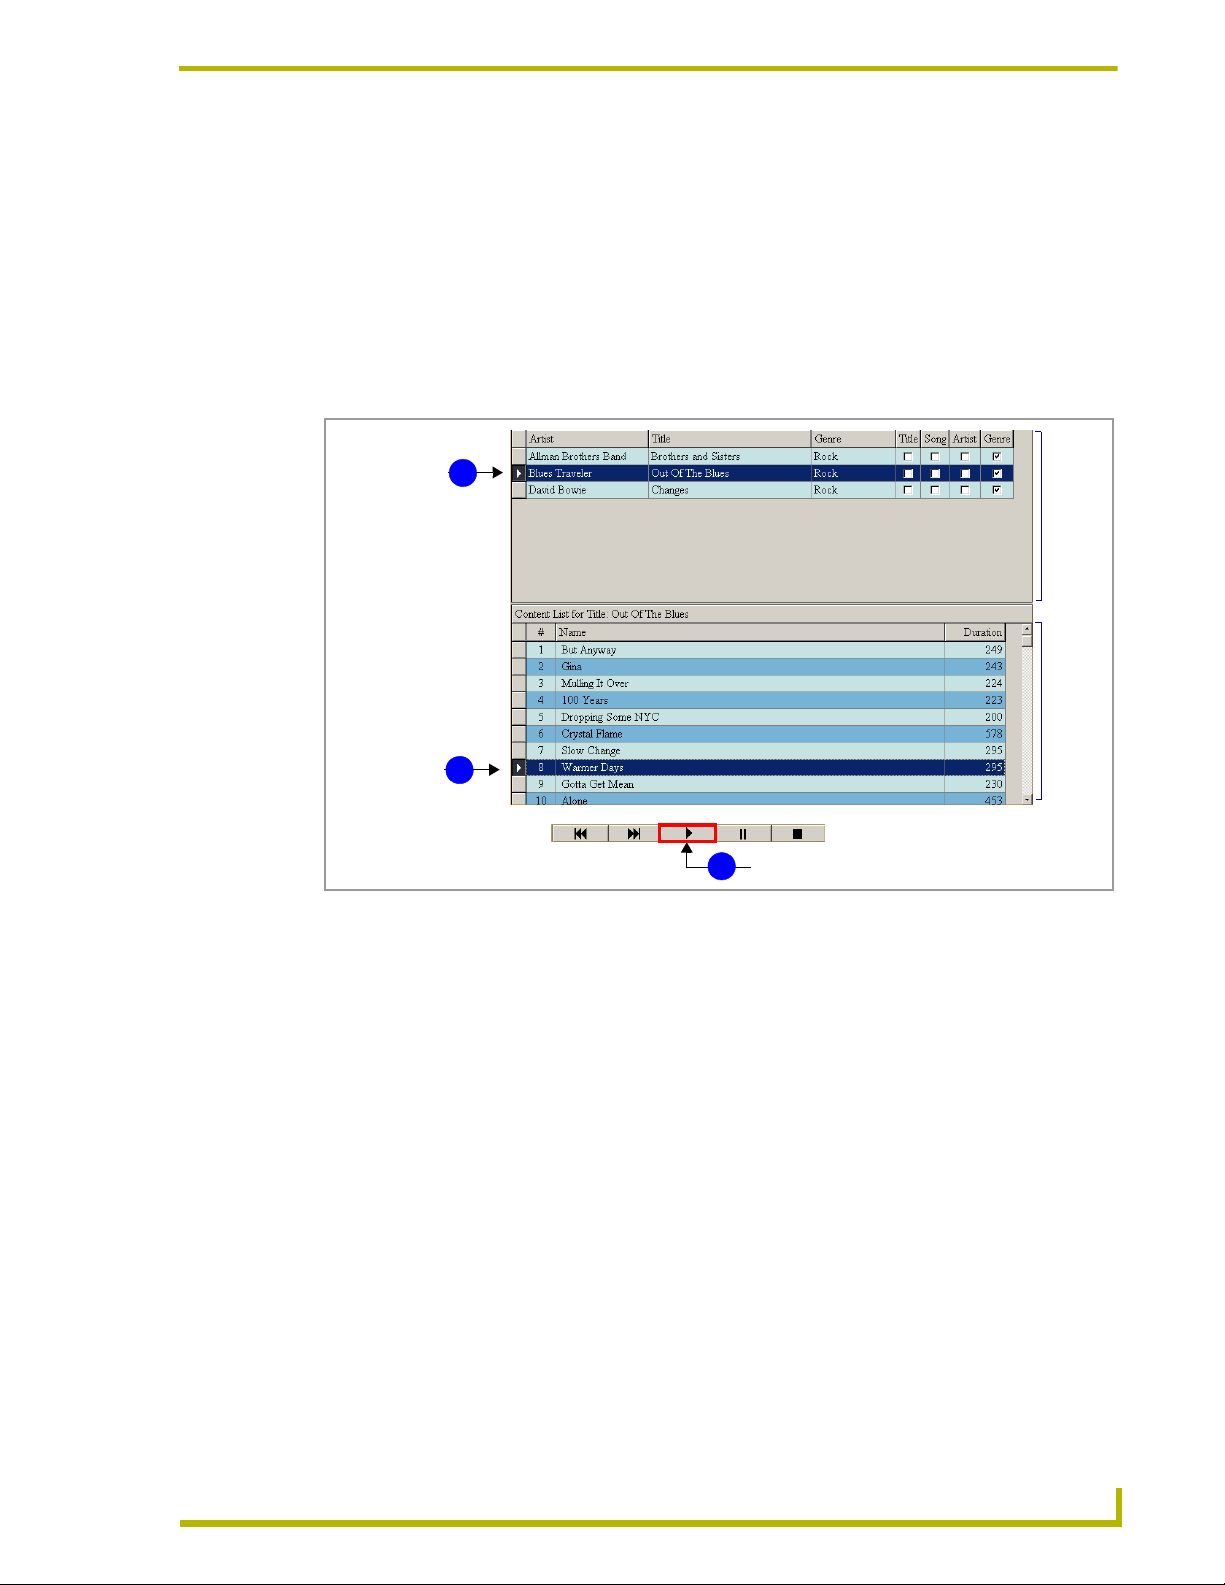
Playing an Individual Track
1. Click to select the CD that contains the track you want to play (in the Search Results window).
2. Select a track in the Track List window.
3. Press the Play button from the transport control bar on the bottom of the screen (FIG. 14).
To select an
individual
track for
playback, first select
the CD that the track is
on in the Search
Results window.
Then select the
desired track
in the Track
List window.
Transport Control Bar
FIG. 14 Selecting an individual track for playback
1
2
Click to play the selected track(s)
3
Search Results window Trac k List window
inMAX MAX Server Control Software
13
Page 20

Music Tab
CD Details dialog
Double-click on any CD title (in the Search Results window) to access the CD Details dialog
(FIG. 15).
FIG. 15 CD Details dialog
This dialog displays the CD cover art and provides read-only information about the selected CD.
You can manually edit some of this info, as indicated below:
• Title: Displays the title of the CD. Click and type to edit.
• Genre: Displays the genre associated with this CD. To change genres, click on the
down-arrow and select from the list of possible genre choices.
• Artist: Displays the artist name. Click and type to edit.
• Release Date: Displays the CD’s release date (read-only).
• RunTime: Displays the total run time of this CD (read-only).
• UPC Code: Displays the UPC code for this CD (read-only).
• Explicit Lyrics: This checkbox indicates wether this CD contains explicit lyrical content (that
may not me suitable for children). Check or uncheck this box to override this setting.
• Upload Image: Opens the File Open dialog, where you can select an image to associate with
this CD (see below).
Uploading CD Cover Art
In order for the cover art to be displayed for CDs (in the CD Details dialog), the cover art must be
uploaded from your PC to the MAX database:
1. In the Music tab, double-click on a CD tile to access the CD Details dialog.
14
2. Click the Upload Image button to open the Choose A File dialog.
WinMAX MAX Server Control Software
Page 21

Music Tab
3. Locate and select a JPG image file to be used as the cover art image for the selected DVD.
The image file must have the extension *.JPG.
The maximum size for cover art images is 225 x 225 pixels. The cover art window is
151 x 200 pixels, so to avoid distortion and to fit the image in the cover art window, try to
match those dimensions as closely as possible.
CD Titles context menu
Right-click on a CD title (in the Search Results window) to open the CD Titles context menu
(FIG. 16).
FIG. 16 CD Titles context menu
The options in the CD Titles context menu include:
• Play: This option plays the selection (same as the Play transport control button).
• Download: This option downloads the selected CD to a specified folder in the PC as a WAV
file.
• Delete: This option deletes the selected CD from the MAX Server. The program will ask
you to verify this action before the CD is deleted.
• Reidentify: Select this option to re-identify the selected disc. Note that if you choose to reiden-
tify a disc, any custom information (such as track titles that have been manually
renamed for example) will be lost.
Track Titles context menu
Right-clicking on a Track title (in the Track List window) opens a context menu containing the
same options that are in the CD Titles context menu (described above) with one additional item: the
Print option, which allows you to print the track list for the selected CD.
See the Generating a Print-Out of the MAX Music and Movies Libraries section on page 7 for
details.
inMAX MAX Server Control Software
15
Page 22

Music Tab
MultiSelect and Edit Mode
The MultiSelect and Edit Mode checkboxes are located to the right of the Search For text box (in
the Music tab):
MultiSelect
The MultiSelect option checkbox located to the right of the Search For window (FIG. 17) allows
you to select multiple items at a time (without holding down the Shift key).
MultiSelect is only used for selecting tracks for downloading. See the Downloading
Music From the MAX Server to Your PC section on page 17 for details.
By default, this option is disabled (unchecked).
When MultiSelect is enabled, you must click a selection a second time to deselect it.
Edit Mode
When the Edit Mode option located below the MultiSelect option (FIG. 17) is checked, Title, Track
Title, Playlist and Genre info may be manually edited, using standard text editing procedures (click
and type):
1. Click in the Edit Mode checkbox.
2. Move the mouse cursor over any text within an editable field (i.e. Title, track/chapter Title,
Playlist or Genre), and click to place a text cursor in the text field.
3. Edit the text as desired, using your PC keyboard.
FIG. 17 MultiSelect and Edit Mode checkboxes
Deleting a CD or Track From the Server
1. Highlight the CD or track to be deleted from the MAX Server:
To delete an entire CD from the server, select a CD title in the Search Results window.
To delete individual tracks from the selected CD, select a track in the Track List window.
2. Press the Delete button on your PC keyboard. Alternatively, you can right-click on the CD or
track, and select Delete from the context menu.
3. A dialog will appear prompting you to verify this action - click Ye s to delete the selection.
16
WinMAX MAX Server Control Software
Page 23

Music Tab
Downloading Music From the MAX Server to Your PC
WinMAX supports downloading selected tracks from the MAX Server to your PC as WAV files,
via the Download option in the context menu. When you download tracks to your PC, you must
specify a target directory for the files.
1. Select one or more tracks in the Track List window (to select multiple tracks, check the
MultiSelect option in the lower-left corner of the dialog).
2. Right-click on the selected track(s) to open the context menu.
3. Select Download. This invokes the Browse For Folder dialog.
4. In the Browse For Folder dialog, select a target directory for the WAV file(s), and click OK.
5. The Transfer Progress dialog indicates the target directory, and the progress of the download
operation.
WinMAX automatically organizes the resulting WAV files by creating a new directory (within the
specified target directory), named after the CD Title and Artist Name. The new WAV files will be
placed inside this new folder.
Working With Artists and Genres
WinMAX supports Artist and Genre as search criteria for music. All CDs are classified by Artist as
well as by Genre at the time that the disc is recorded and identified (see the Record Tab section on
page 37 for details).
Use the Artist/Genre List Window in the lower left area of the Music tab (FIG. 18) to view a listing
of:
All Titles (albums) associated with a selected Artist
All Titles contained within a selected Genre
All CD Titles (including all Artists and Genres)
Select Genre to view a listing of Genres (DVDs and CDs)
Select Artist to view a listing of Artists (CDs only)
Select All to view a complete listing of all CDs
Right-click on a Genre to access the Genre context menu
FIG. 18 Artist/Genre List Window (displaying an example of a Genre list)
You can choose to playback all CD titles contained within a selected Artist or Genre list by simply
selecting a Genre or Artist, and clicking the Play button (in the Transport Control bar):
inMAX MAX Server Control Software
17
Page 24

Music Tab
Playing All CD Titles by a Selected Artist
1. Click the down-arrow in the title bar of the Artist/Genre List Window and select Artist.
2. Click to select an Artist. All CD Titles associated with the selected artist are then listed in the
Disc list window.
3. Click the Play button on the Transport Control bar (or right-click on a Artist and select Play
from the context menu) to play all of CDs by the selected Artist (in random order).
Playing All CD Tiles in a Selected Genre
1. Click the down-arrow in the title bar of the Artist/Genre List Window and select Genre.
2. Click to select an Genre. All CD Titles associated with the selected genre are then listed in the
Disc list window.
3. Click the Play button on the Transport Control bar (or right-click on a Genre and select Play
from the context menu) to play all of CDs contained in the selected genre (in random order).
Genre and Artist lists are always played back in random order.
Playing Individual Tracks Within a Genre or Artist List
Alternatively, you can select one or more individual tracks (in the Track List window) to play only
the selection(s):
1. Click the down-arrow in the title bar of the Artist/Genre List Window and select Artist, Genre
(or All).
2. Click to select an Artist or Genre (in the Artist/Genre List Window). All CD titles associated
with the selected genre/artist are then listed in the Search Results window.
3. Select a Track in the Track Listing Window and press Play.
You can also generate a printout of a selected Genre or Artist list via the Print option
in the Genre/Artist Window Context Menu (see below).
Artist/Genre List Window Context Menu
Right-click on a Genre or Artist (in the Genre/Artist Window) to access the context menu
containing shortcuts to the following options:
• Play: This option plays the tracks in the selected genre (same as the Play transport control
button).
• Print: Generates a hardcopy print-out of the tracks included in the selected genre.
18
Working with Playlists
Custom playlists can contain CDs, DVDs, Bookmarks, audio tracks, DVD chapters, or any
combination thereof. Refer to the Working With Playlists section on page 29 for details.
WinMAX MAX Server Control Software
Page 25

Movies Tab
Overview
The Movies tab (FIG. 19) contains controls that provide search and play functionality, as well as
custom playlist management and movie database management.
To view the movie options for the connected server, click on this tab and select the desired output
Zone from the drop-down list at the lower-left of the screen.
Movies Tab
Window
Genre/Artist List
Window
Playlists
Output Zone selection
Now Playing info
FIG. 19 WinMAX - Movies tab
Search window
Transport Control Bar
Play Options (Random, Repeat)
Playback Status
Add a bookmark
Open WinMAX remote (DVD controls)
Show All Movies option
Print
option
Search Results Chapter List
Window Window
While a DVD is playing, you can use the buttons in the Transport Control Bar at the bottom of the
dialog to control basic playback functionality (Skip to Previous chapter, Skip to Next chapter, Play,
Pause and Stop).
To add new movies to the server, use the options in the Record tab. See the Record
Ta b section on page 37 for details.
inMAX MAX Server Control Software
19
Page 26

Movies Tab
Playing Movies
There are two simple steps involved to playback movies from the MAX library:
1. Select a playback zone - If you have multiple playback zones for audio/video, you should first
select which zone(s) you want your movie to played in. See the Playback Zone Selection
section below for details.
2. Select movie for playback - Once you have specified the zone(s) that you want to play your
movie in, you can select the movie you want to play.
Use the Search functions to select an individual chapter, an entire DVD or a custom playlist for
playback. See the Selecting and Playing Back Movies section on page 20 for details.
Playback Zone Selection
Before you begin selecting a movie for playback, you should first select the desired output zone.
This selection determines which of the available A/V outputs will broadcast the movie you select.
The number of zones available to select from depends on the amount of A/V outputs that exist in
your MAX system. Click the down-arrow next to the Zone field (lower-left corner of the window)
and select the desired output zone (FIG. 20).
Click to display a listing of available A/V output zones
FIG. 20 Zone selection
Selecting and Playing Back Movies
There are several different approaches to playing back movies from the movie library on the MAX
server. You can select to play an entire DVD, an individual chapter from any DVD, or you can load
a custom playlist containing any number of chapters from any DVDs in the collection.
The first step in playing back a movie is to select the DVD, chapter or playlist that you want to play
back. Use the Search For field at the top of the Movies tab to perform a search, and once you have
located and selected the desired DVD or chapter(s), use the Transport Control Bar to initiate and
control playback, as described in the following sections.
20
WinMAX MAX Server Control Software
Page 27

Movies Tab
Searching For Movies
Use the Search For field at the top of the Movies tab (FIG. 19) to perform a search for movies
based on an DVD Title, Genre or Keywords. When the Search For field is empty, the entire DVD
collection is listed alphabetically in the Search Results window.
The columns labeled Title, Genre, and Keywords indicate why a particular DVD
was displayed as a result of a search. A check mark in the Title and Keywords
columns, for example, signifies that the text string typed into the Search For field
is included in both the DVD title, and in the Keywords associated with the DVD.
FIG. 21 Search For field (with example results)
1. Type the first few letters of the selection you wish to find into the Search For field. You can
type any portion of the chapter or DVD title, the Genre name or a Keyword. All matching
selections are displayed in the Search Results window.
2. When the search results appear in the Search Results window, click to highlight a DVD title for
playback. The chapter list for this DVD is then displayed in the Chapter List window
(FIG. 22).
Show All Movies option
CD and DVD search operations return only the first 50 results (to minimize demands on the
system).
The Show All Movies option (see FIG. 21) allows you to display all of the results of a Movie
search, regardless of the number of results.
Playing an Entire DVD
To play a DVD in it’s entirety, select the desired DVD (in the Search Results window) and press
Play on the transport bar to initiate playback:
1. Click to select a DVD title in the Search Results window. Note that when a DVD is selected,
the chapter List window is populated with chapter information for the selected disc.
2. Click the Play button in the Transport Control Bar at the bottom of the tab (FIG. 22).
inMAX MAX Server Control Software
21
Page 28

Movies Tab
To select a DVD for
playback, click
to select a CD
title in the
Search Results
window
FIG. 22 Selecting an entire DVD for playback
1
Click to play the selected DVD or chapter(s)
2
Search Results window Chapter List window
Playing an Individual Chapter
1. Click to select the DVD that contains the chapter you want to play (in the Search Results
window).
2. Select a chapter in the Chapter List window.
3. Press the Play button from the transport control bar on the bottom of the screen (FIG. 23).
To select an individual
chapter for
playback, first
select the DVD
that the chapter is on in
the Search Results
window.
Then select the
desired track
in the Track List
window.
FIG. 23 Selecting an individual chapter for playback
1
2
Click to play the selected DVD or chapter(s)
3
Search Results window Chapter List window
22
WinMAX MAX Server Control Software
Page 29

Movies Tab
WinMAX Remote
Press the Remote button (beneath the Chapter List window) to open the WinMAX Remote
(FIG. 24), which allows access to additional DVD functions. WinMAX Remote works like most
physical DVD remote controls.
Current Output Zone is indicated here
DVD Title currently playing
Select button
Arrow buttons for navigating
through options on the DVD
Menu Screen
Go to DVD Menu Screen
Access the Audio, Angle, Subtitle
or DVD Title options
1/2 speed
2x speed
Normal speed
These buttons set the
default startup options
Click to close the WinMAX remote
FIG. 24 WinMAX Remote
The functions available via the WinMAX remote are described below:
• Current Zone: This read-only field indicates which output is currently being controlled.
• Now Playing: This read-only field indicates which DVD is being played.
• DVD Control: Use the up, down, left and right arrow buttons to navigate through the options
on the DVD Menu Screen. Use the center button to make selections. The other
buttons in this section include:
• DVD Menu: Opens the DVD Menu Screen. Use the arrow button to navigate
through the options that appear in this screen.
• Audio: Toggles through the audio options available on the DVD.
• Angle: Toggles through any multi-angle options available on the DVD.
• Subtitle: Toggles through the subtitles options available on the DVD.
• Title: Accesses the DVD’s menu screen.
• Play Speed: These controls support different playback speeds (Slower = 1/2
speed, Faster = 2x speed).
Multiple clicks on the Slower and Faster buttons change the playback speed
by increasing degrees.
Click the Normal button to return to normal playback speed.
inMAX MAX Server Control Software
23
Page 30

Movies Tab
• Play Options: These buttons allow you to set three parameters affecting the playback of the
selected DVD:
• Display: Toggles the default aspect ratio between 4 x 3 (fullscreen) and
16 x 9 (widescreen).
• Audio: Toggles the default audio output between Digital and Analog.
• Start At: Toggles the default startup between DVD Men u (Menu Screen) and
Skip Menu (play movie immediately).
DVD Titles context menu
Right-clicking on a DVD Title in the Search Results window opens a context menu (FIG. 25) with
shortcuts to the following DVD commands:
FIG. 25 DVD Titles context menu
The options in the DVD Titles context menu include:
• Play: This option plays the selection (same as the Play transport control button).
• Delete: This option deletes the selected CD from the MAX Server. The program will ask
• Details: Select this option to open the Edit Movie Description dialog, where you can view
• Reidentify: Select this option to re-identify the selected disc. Note that if you choose to reiden-
you to verify this action before the CD is deleted.
and edit various types of detailed information, and a listing of Bookmarks saved for
this selection (see the Editing DVD Information section on page 25 for details).
tify a disc, any custom information (such as chapter titles that have been manually
renamed for example) will be lost.
Chapter Titles context menu
Right-clicking on a chapter Title (in the Chapter List window) opens a context menu containing the
same options that are in the DVD Titles context menu (described above) with the following
exceptions: it does not include the Details option (since it is not applicable to individual chapters),
and it offers the Print option, which allows to generate a printout of the chapter list for the selected
DVD.
24
WinMAX MAX Server Control Software
Page 31

Movies Tab
Editing DVD Information
Use the options in the Movie Details tab of the Edit Movie Description dialog to view/edit various
details for a selected DVD:
1. Double-click on the DVD title in the Search Results window (or select Details from the DVD
Titles context menu) to invoke the Edit Movie Description dialog, open to the Movie Details
tab (FIG. 26).
2. Click in any of the editable fields (Title, Genre, Keywords, etc.) to activate that field for manual
text editing. Use your PC keyboard to manually edit the detailed information associated with
this DVD as desired.
Note that the UPC Code and MPAA Rating fields are read-only. The User Rating field is also
read-only, as the Master Password is required to change the user rating for any DVD (see
Parental Control Tab section on page 47 for details).
3. Click OK to save your changes and close this dialog.
Edit Movie Description dialog
The Edit Movie Description dialog (FIG. 26) consists of two tabs: Movie Details and User Defined
Fields, as described below.
Movie Details tab
The Movie Details tab (FIG. 26) displays various media details for the selected DVD.
FIG. 26 Edit Movie Description dialog (Movie Details tab)
inMAX MAX Server Control Software
25
Page 32

Movies Tab
With the exception of the Credits, Awards, UPC Code and MPAA Rating fields, all of the
information in this tab is editable. To change the information for any of the other fields (Title,
Director, Genre, etc.), just click inside the text field and type.
To change the Genre for this DVD, click the down arrow next to the Genre field and select from the
list of Genres.
The User Rating field refers to any user-specified content rating (G, PG, PG-13, R or NC-17) for
this movie, if one exists. To add or change the User Rating, click on the Change button. This
invokes the Parental Rating Override dialog (FIG. 27). Enter the Master password, then select a
rating from the drop-down list. Refer to the Changing the Rating for a DVD section on page 50 for
more details.
Enter the Master Password
1
Select the new rating from the drop-down menu
2
Click OK to associate the new with the selected DVD
3
FIG. 27 Parental Rating Override dialog
Uploading DVD Cover Art
In order for the cover art to be displayed for DVDs (in the Movie Details tab of the Edit Movie
Description dialog), the cover art must be uploaded from your PC to the MAX database:
1. In the Movies tab, double-click on a DVD tile to access the Edit Movie Description dialog.
2. Click the Upload Image button to open the Choose A File dialog.
3. Locate and select a JPG image file to be used as the cover art image for the selected DVD.
The image file must have the extension *.JPG.
The maximum size for cover art images is 225 x 225 pixels. The cover art window is
151 x 200 pixels, so to avoid distortion and to fit the image in the cover art window, try to
match those dimensions as closely as possible.
26
WinMAX MAX Server Control Software
Page 33

Movies Tab
User Defined Fields tab
The User Defined Fields tab (FIG. 28) contains any user-defined descriptive fields that have been
set up via the options in the User Data tab. See the User Data Tab section on page 51 for details.
FIG. 28 Edit Movie Description dialog (User Defined Fields tab)
Working With Bookmarks
WinMAX allows you to Bookmark your movies. A Bookmark is a marker that is placed at a
particular point in the running time of a movie. Typically bookmarks are used to mark one or more
points of special interest in a movie. For example, you might decide to bookmark the beginnings of
your two favorite car chase scenes in an action movie. This way, even if they occur somewhere in
the mid-point of different chapters of the movie, you can jump right to them by opening the
bookmarks.
Bookmarks can also be used to define the start and end points for video segments, when used with
Playlists. Refer to the Adding Video Segments to a Playlist section on page 34 for details.
Adding a Bookmark to a Movie
While the DVD is playing, click the Add Bookmark command button (located in the lower-right
hand corner of the Movies tab) at the point of the movie that you want to bookmark.
inMAX MAX Server Control Software
27
Page 34

Movies Tab
Removing Bookmarks
Right-click on a bookmark (in the Bookmarks window of the Movies tab), and select Delete from
the context menu. Note that you must click inside the grey box to the left of the Title column to
select a bookmark for deletion. The program will require you to verify this action before the
bookmark is deleted.
Deleting a DVD From the Server
1. Highlight the DVD to be deleted from the MAX Server (select a DVD title in the Search
Results window).
2. Press the Delete button on your PC keyboard.
Alternatively, you can right-click on the DVD, and select Delete from the context
menu.
3. A dialog will appear prompting you to verify this action - click Ye s to delete the selection.
28
WinMAX MAX Server Control Software
Page 35

Working With Playlists
Overview
WinMAX allows you to create and maintain an unlimited number of custom playlists. Custom
playlists can contain music (entire CDs or individual tracks), movies (entire DVDs or individual
chapters), or any combination of both.
The Playlist window in the Music and Movies tabs (FIG. 29) lists each custom Playlist by name (in
the Title column), number of tracks/chapters (in the Items column) and total playing time (in the
Tim e column).
Working With Playlists
Title - Displays the title of each Playlist
Tr ac k s - Displays the number of tracks/chapters in each Playlist
Time - Displays the total running time for each Playlist
Click here to refresh the list of custom play lists
Indicates that this Playlist ("Electronica")
has 10 tracks, and is 1 hour and 23 minutes long
Click on a Playlist to view its contents (track listing)
in the Track List window.
Create new playlists here (click to place the cursor in the cell,
then type a name for the new Playlist and press the Tab key)
FIG. 29 PlayList window
Creating a New Custom Playlist
To create a new custom Playlist, you’ll create a new empty Playlist in the Playlist window and
assign a name, then you’ll go back and add the content that you want to include:
1. Scroll to the bottom of the Playlist window, until you reach the last row (indicated by an
asterisk in the row heading).
2. Type the name for the new Playlist in the blank line at the bottom of the list and press the Enter
(or Tab) key.
3. Once you confirm this action, the new (empty) Playlist is added to the list (automatically sorted
alphabetically).
inMAX MAX Server Control Software
29
Page 36

Working With Playlists
Adding Content To a Playlist
Click and drag selections from the Search Results and/or Track windows into the Playlist window
to add them to a custom Playlist.
Refreshing the Playlist Window
To refresh the list of custom playlists, press the Play Lists button at the top of the Playlist window.
This can be particularly useful in cases where custom playlists have been created with other PCs or
control systems on the network.
Playing a Custom Playlist
Select (highlight) a Playlist and press the Play button in the transport control bar. Alternatively, you
can right-click on a Playlist and select Play from the Playlist context menu (FIG. 30).
To add an entire CD or DVD to a Playlist - click on a CD or DVD in the Search Results
window, drag it to the Playlist window and drop it on the particular Playlist to which you
want to add the selection.
To add an individual track or chapter to a Playlist - click on a CD or DVD in the Search
Results window to view its track listing in the Track List window. Click and drag an
individual track or chapter to the desired target Playlist (in the Playlist window).
Playlist Context Menu
Right-click on a Playlist (in the Playlist window) to open the Playlist context menu:
FIG. 30 Playlist context menu
The options in the Playlist context menu include:
• Play: This option plays the selected Playlist (same as the Play transport control button).
• Download: This option downloads the selected Playlist to a specified folder on the PC as a set
of WAV files.
• Reorder: This option allows you to rearrange the order of the items in a Playlist via the Reorder Playlists dialog.
• Delete: This option deletes the selected Playlist from the MAX Server. The program will ask
you to verify this action before the Playlist is deleted.
• Print: Generates a hardcopy print-out of the tracks included in the selected Playlist.
30
WinMAX MAX Server Control Software
Page 37

Working With Playlists
Downloading a Playlist to Your PC
You can download the contents of a (music-only) Playlist to your PC as a set of WAV files, using
the Download option in the Playlist context menu:
1. Right-click on a Playlist and select Download from the context menu.
2. Specify a target directory for the WAV files in the Browse For Folders dialog.
3. Click OK in the Browse For Folder dialog to begin transferring the files to the specified target
directory. The progress of transfer operation is indicated in the Transfer Progress dialog
(FIG. 31).
FIG. 31 Transfer Progress dialog
When the transfer is complete this dialog will close and the WAV files will reside in the target
directory, each one named with a numeric prefix (i.e. "001-Songtitle.WAV", "002-Songtitle.WAV"
etc.) to maintain the order of the playlist.
Removing Content From a Playlist
1. Select the Playlist containing the CD/DVD or track/chapter you want to delete.
2. Select the track(s) or chapter(s) to be removed. To select multiple tracks for removal from the
Playlist, enable the MultiSelect mode option checkbox in the lower-left corner of the dialog.
3. Press the Delete key on your PC keyboard (or select Delete from the Playlist context menu).
inMAX MAX Server Control Software
31
Page 38

Working With Playlists
Re-ordering Tracks/Chapters in a Playlist
You change the order of the items in a Playlist via the Reorder option in the Playlist context menu.
To reorder a Playlist:
1. Click to select a Playlist (in the Play List window).
2. Right-click and select Reorder from the context menu. This opens the Re-order Playlists
dialog (FIG. 32).
FIG. 32 Re-order Playlists dialog
3. In the left window, select and highlight the items in the order that you want to be occur in the
reordered Playlist. Note that you must click inside the box (to the left of the # column) to
highlight the item (FIG. 33).
Click on these boxes to make
your selections
Select and highlight these items in the order that you want them to occur in the Playlist
FIG. 33 Click to select one or more items in the list
Once you’ve made your selections,
click the right-arrow button to move
the items into the Reordered Playlist
window.
32
WinMAX MAX Server Control Software
Page 39

4. Click OK to save your changes to this Playlist.
Working With Playlists
FIG. 34 Re-order Playlists dialog (showing the results of reordering a Playlist)
Click the left-arrow button to remove a selected item from the Reordered Playlist
window.
Click Reset to clear the Reordered Playlist window and start over.
Click Cancel to close the Re-order Playlists dialog without saving any changes.
inMAX MAX Server Control Software
33
Page 40

Working With Playlists
Adding Video Segments to a Playlist
WinMAX allows you to add movie bookmarks (created via the Movies tab) to a Playlist. Typically,
within the context of Playlists, movie bookmarks are used to define a segment of a DVD to be
included for playback.
To Use Bookmarks To Add a Video Segment To a Playlist
1. Create a bookmark at the point that you want to start the segment (as represented by B1 in
2. Create a second bookmark at the point that you want to end the segment (represented by B2).
3. Click and drag only the first bookmark (B1) onto a Playlist in the Play Lists window (don’t add
4. To add another video segment, repeat the process - create a new bookmark at the desired
FIG. 35 below).
the second bookmark). The time between the first and second bookmarks is the segment of
video that will be played back when the Playlist reaches the bookmark during playback.
starting point for the segment, and create a second bookmark at the desired end point.
segment 1 segment 2
(30 min.)
Start of Movie End of Movie
B1 B2 B3 B4
1 2
Create a bookmark at the point in the
movie that you want the video
segment to start (B1).
Create a second bookmark at the point
that you want the segment to end (B2).
FIG. 35 Adding Video Segments To a Playlist
If only one bookmark exists in the movie, and you add that bookmark to a playlist, the
Add B1 to a Playlist (click and drag bookmark B1 from the
Bookmarks window to a Playlist in the Play Lists window).
3
The time between B1 and B2 is the segment that
will be played when B1 is reached in the Playlist.
(45 min.)
Repeat the process
at different points in
the movie to create
additional segments.
movie will play from the bookmark to the end of the movie.
If you create a set of bookmarks as described above to define a video segment, then add
the segment to a Playlist, and then you delete the second (end-of-segment) bookmark in
the set (B2 in the illustration above), the segment will stay intact within the Playlist.
However, if you delete the first (start-of-segment) bookmark, the segment will be
removed from the Playlist.
34
WinMAX MAX Server Control Software
Page 41

Monitor Tab
Overview
The Monitor tab (FIG. 36) provides real-time status display for each output zone in your system.
Each column lists various information and status for each active output zone
Monitor Tab
FIG. 36 WinMAX - Monitor tab
Each output zone is represented by a row in the table displayed in this tab. Each row displays the
following status information:
Zone: This column indicates which output Zone is being represented in this row, by
output zone number.
Typ e: This column indicates the device type (AV M or AOM) that is currently being played
on this output.
Media Details: This column displays Chapter or Track info for the selection currently
playing on this output. Note that this information matches the status information
displayed in the main Status Bar.
Status: This column indicates the percentage complete for the selection playing on this
output.
Display: This column indicates the default output setting for AVM on this output (16 x 9
- widescreen or 4 x 3 - full screen).
Audio: This column indicates the default audio output being used with this zone (Digital
or Analog).
inMAX MAX Server Control Software
35
Page 42

Monitor Tab
36
WinMAX MAX Server Control Software
Page 43

Record Tab
Overview
The options in the Record tab (FIG. 37) allow you to load music or movies to the MAX Server.
Additionally, the Upload Files option in this tab allows you to uploading MP3 or WAV files from
your PC to the MAX Server.
Record Tab
Disc Title information
(Local CD ROM, Server CD-ROM or Upload Files) from this drop-down list
Select a method of recording movies or music
Record command buttons
Track/Chapter list
FIG. 37 WinMAX - Record tab showing a music CD loaded in the local (PC) CD-ROM drive
Selecting a Recording Method
The first step in loading movies or music to the MAX Server is to select the desired recording
method (Local CD ROM, Server CDROM or Upload Files) using the drop-down menu at the top
right of the dialog (FIG. 38):
Local CD ROM uses the CD or DVD-ROM drive in your PC.
Server CDROM uses the DVD-ROM drive built into the MAX Server.
Upload Files is for uploading MP3 or WAV files resident on your PC to the MAX Server.
inMAX MAX Server Control Software
37
Page 44

Record Tab
Loading a CD or DVD
1. Select either Local CD/DVD-ROM (to use the CD or DVD-ROM drive on your PC), or Server
CD/DVD-ROM (to use the CD or DVD-ROM drive on the MAX server) from the Method drop
down at the top right of the dialog (FIG. 38).
Select to use the CD or DVD-ROM on your PC
Select to use the CD or DVD-ROM on the MAX Server
Select to upload files from your PC to the MAX Server
FIG. 38 Select a recording method
If you select Local CD/DVD ROM, you may need to point WinMAX to the appropriate
CD or DVD-ROM drive on your PC (if the program doesn’t seem to respond to the
disc). This setting is made via the Application Settings dialog. See the Specify a Local
CD/DVD-ROM Drive To Use section on page 44 for details.
2. Click the Eject button at the top right of the screen (FIG. 39). This will eject the tray in the
appropriate device (some notebook PCs require the tray to be opened manually).
Ejects the tray on the device selected in the Method drop-down list
Retrieves disc information and populates the Title field accordingly
Start recording the CD or DVD
Cancel the recording process (only enabled during recording)
FIG. 39 Record tab command buttons
3. Place the CD or DVD disc in the tray (of either the MAX Server or the local PC, depending on
the Method selected - see FIG. 38).
4. Press the Identify Disc button to invoke the Multiple Matches dialog (FIG. 40). If you loaded a
DVD disc, the DVD Disc Type options are displayed (see the Using the DVD Disc Type
Options section on page 41 for details).
38
WinMAX MAX Server Control Software
Page 45

Click to display details about the
selected CD or DVD (requires an active
internet connection).
Record Tab
FIG. 40 Multiple Matches dialog (with detailed view)
5. Select the title from the Title list that matches the CD or DVD. Note that in the detailed view,
the cover art is displayed (if available) along with detailed information about this title:
Detailed CD information includes: Detailed DVD information includes:
• Release Date (year) • Running Time
• Artist • Release Date (year)
• Genre • Director
• Explicit Lyrics (Ye s / N o ) • Genre
• UPC • MPAA Rating
• Studio • Production
• Running Time • UPC
•Cover Art
• Plot Synopsis
• Cast Credits
Click the Detailed button to show, click the Hide button to hide the detailed view.
Refer to the Uploading DVD Cover Art section on page 26 for instructions on associating
cover art with a DVD title.
Verify that the disc information is correct. Corrections can be made in any field by
clicking in the field and typing as desired.
If the disc cannot be identified, use the Multiple Matches dialog to perform a search for
an appropriate match, either by Title or by UPC code. If no match can be found, you will
inMAX MAX Server Control Software
39
Page 46

Record Tab
need to manually enter the disc information, by clicking and typing directly into the disc
information fields in this tab.
6. Select or deselect individual tracks to specify which tracks/chapters to include in the recording
process as desired. By default, all tracks are selected and will be included.
7. Click the Start Recording button.
Legal Notice: By pressing the Start Recording button you understand and agree
that the Products are not designed or intended to, and may not be used to, violate
anyone’s copyright or other intellectual property rights. Each user of the Products
may only use the Products in connection with materials legally owned or licensed by
such user and only to the extent such ownership or license rights permit such use.
The Recording Progress bar indicates the amount of the recording process already complete
(FIG. 41).
Progress bar indicates how much
of the recording process is complete
Disc informationTrack List (CDs only)
FIG. 41 Recording a CD
Press to cancel the recording process
(only enabled during recording)
40
For DVDs there is no individual track listing indicated as there is for CDs. While you
can specify which music tracks to record from CD, DVDs can only be recorded in their
entirety.
During the recording process, the Cancel Recording button is available. Pressing this button
will abort the recording process immediately.
8. When completed, the disc tray will automatically open. Remove the CD or DVD and gently
push the tray in.
WinMAX MAX Server Control Software
Page 47

Record Tab
You can use the search and play features without interrupting the recording process.
However, the recording process may cause some sluggishness and hesitation in the
search and play performance.
Using the DVD Disc Type Options
If you load a DVD disc, a set of additional options specific to the different types of DVDs is made
available at the top of the screen. As indicated in FIG. 42, the program will attempt to select the
best match for the disc type, and the current selection is highlighted in green.
FIG. 42 DVD Disc Type options (only displayed for DVDs)
Use these options to specify the particular type of DVD you are recording:
Single Movie: Use this option if the DVD simply contains a single movie title (no
multiple versions on the disc).
For single movie discs, the chapters of the movie will be listed in the Chapter List
window of the Movies tab (see FIG. 19 on page 19).
Multi-Movie Disc: Use this option if the DVD contains multiple titles, or multiple
versions of the same title. For example, some DVDs offer both 16:9 (widescreen) and 4:3
(full screen) versions of the same movie.
For multi-movie discs, there will not be chapters listed in the Movies tab for this disc, but
the program will automatically create a Bookmark for each of the main sections of the
disc (which typically relate to each title on the DVD).
Special Features: Use this option if you have loaded a "Special Features" disc. These are
often packaged as a second disc with the feature DVD, and contain material other than
the feature itself. Note that "special features" DVDs can include unrated material.
For special features discs (as with multi-movie discs), there will not be chapters listed in
the Movies tab, but the program will automatically create a Bookmark for each of the
main sections of the disc.
Unknown/Custom DVD: Use this option if the DVD is a custom (home-made) disc.
For unknown/custom DVD discs, there will not be chapters listed, but the program will
automatically create a Bookmark for each title on the disc.
Episodes or Sitcoms: Use this option if the disc is one of a set of multiple DVDs, as is
often the case with TV show season collections. Note that if you select this option, the
Disc field is enabled. Use this field to specify which disc of the set you are currently
inMAX MAX Server Control Software
41
Page 48

Record Tab
recording (use the up/down arrows to adjust this value). For example, if you are recording
the second disc in a set, set this field to "2".
Note that WinMAX will automatically create a bookmark for each episode. By default
they are named "Bookmark 1", "Bookmark 2", etc. Note that this scenario also does not
support a listing of disc chapters in the Movies tab.
If you change the DVD Disc Type option for a disc, any custom information (such as
chapter titles that were manually renamed for example), will be lost.
Playback of Different DVD Disc Types
The DVD Disc Type assigned to each DVD will affect how it behaves when it is selected for
playback:
DVDs that were tagged as Single Movie will immediately begin playing the movie when
it is selected.
DVDs that were tagged as any DVD Disc Type other than Single Movie will open the
DVD menu when the movie is selected, so that the user can select which of the features
on the disc to play.
Searching For a CD or DVD by Title or by UPC Code
If the CD or DVD cannot be positively identified by the on-line database (via the Identify Disc
command button), the Search options in the Multiple Matches dialog (FIG. 43) can be used to
search for a match, either by disc title or by UPC code.
FIG. 43 Multiple Matches dialog
To search for a CD or DVD:
1. In the Search By section, select either the Title or UPC radio button.
2. In the Search field:
42
If you selected to search by Title, enter part of the title of the desired CD or DVD. For
best results, enter a single word and let the program return a list of all titles that contain
that word. Use a multi-word search to refine the results if necessary.
If you selected to search by UPC, enter the UPC code as it appears on the disc packaging.
WinMAX MAX Server Control Software
Page 49

Record Tab
For either search method, avoid using asterisks or other wild-card characters to achieve
the best results.
3. Click the Search button.
A list of titles matching the search criteria are listed (FIG. 44). Use the scroll buttons to scroll
through this list and select the appropriate match for the CD or DVD.
FIG. 44 Multiple Matches dialog - Title search results
Click the Details button to view cover art and detailed information about the selected title
(FIG. 45). To view cover art, you must have an active internet connection.
FIG. 45 Multiple Matches dialog - Detailed view (internet connection required to view cover art image)
inMAX MAX Server Control Software
43
Page 50

Record Tab
Duplicate entries
If the system suspects that the disc has already been recorded to the MAX Server, the Possible
Duplicate field will display Ye s (FIG. 46).
Indicates that the disc loaded has possibly
already been recorded to the MAX Server.
Search the Music or Movies tabs to verify
that you want to add this title to the collection
before recording.
FIG. 46 Possible duplicate disc
In this case, perform a search in either the Music or Movies tab to verify whether or not this title
already exists on the MAX Server.
If the disc has in fact already been recorded, press the Eject button. Otherwise, proceed with the
recording process.
Some discs cannot be identified at all, in which case the program will prompt you to
manually enter the necessary information in order to properly catalog the disc.
Specify a Local CD/DVD-ROM Drive To Use
To load DVD movies using your PC, you must have a DVD-ROM (as opposed to a
CD-ROM) drive installed on the PC.
If the program doesn’t respond when you load a disc, verify that WinMAX is looking at the right
CD or DVD-ROM drive on your PC. This setting is made in the Application Settings dialog
(FIG. 47):
DriveNum Value (on local PC):
0 = First CD-ROM drive
1 = Second CD-ROM drive
44
FIG. 47 Application Settings dialog - Specify a CD-ROM drive to watch
1. Click the Application Settings button (in the System Information tab) to open the Application
Settings dialog.
2. Select config from the Section drop-down menu.
3. Select DriveNum from the Keys list.
WinMAX MAX Server Control Software
Page 51

Record Tab
4. Enter the value representing the CD-ROM drive on your PC that you want to use for reading:
0 = The first CD-ROM drive on your PC
1 = The second CD-ROM drive on your PC
Uploading Music Files From Your PC
To upload MP3 or WAV files resident from your PC to the MAX Server:
1. Select Upload Files from the Method drop down menu at the top right of the Record tab.
2. Click on the small square button (...) to the right of the first row of the list (FIG. 48) to invoke
the Select Music File dialog.
Upload Files
Select
Type in Title, Artist and Genre
information in these fields
Click here to open the Select Music File dialog, where you can locate and select music files
FIG. 48 Uploading music files from your PC
Click to upload the selected music files from your PC
3
(WAV or MP3) that you want to upload to the MAX Server
from the Method drop-down menu
to the MAX Server
4
1
2
3. In the Select Music File dialog (FIG. 49), click to select the file(s) (WAV or MP3) you wish to
upload to the MAX Server.
FIG. 49 Select Music File dialog
To select multiple files, hold down the Shift (or Ctrl) key while you click.
Press Ctrl+A to select all of the files in the directory.
4. Click Open to close the dialog, and populate the Track List based on your selection(s), as
shown in FIG. 50.
inMAX MAX Server Control Software
45
Page 52

Record Tab
Manually enter album Title, Artist and Genre info
Title informationTrack List
FIG. 50 Uploading files from your PC to the MAX Server
Click to start transferring the files
5. Click and type in the Title, Artist and Genre text fields to enter this information as you want it
to appear in the MAX music library.
6. When complete, click the Upload button at the top right of the screen. The files will be
uploaded and categorized according to the information entered. The screen may be cleared and
this process restarted by clicking the Clear button.
46
WinMAX MAX Server Control Software
Page 53
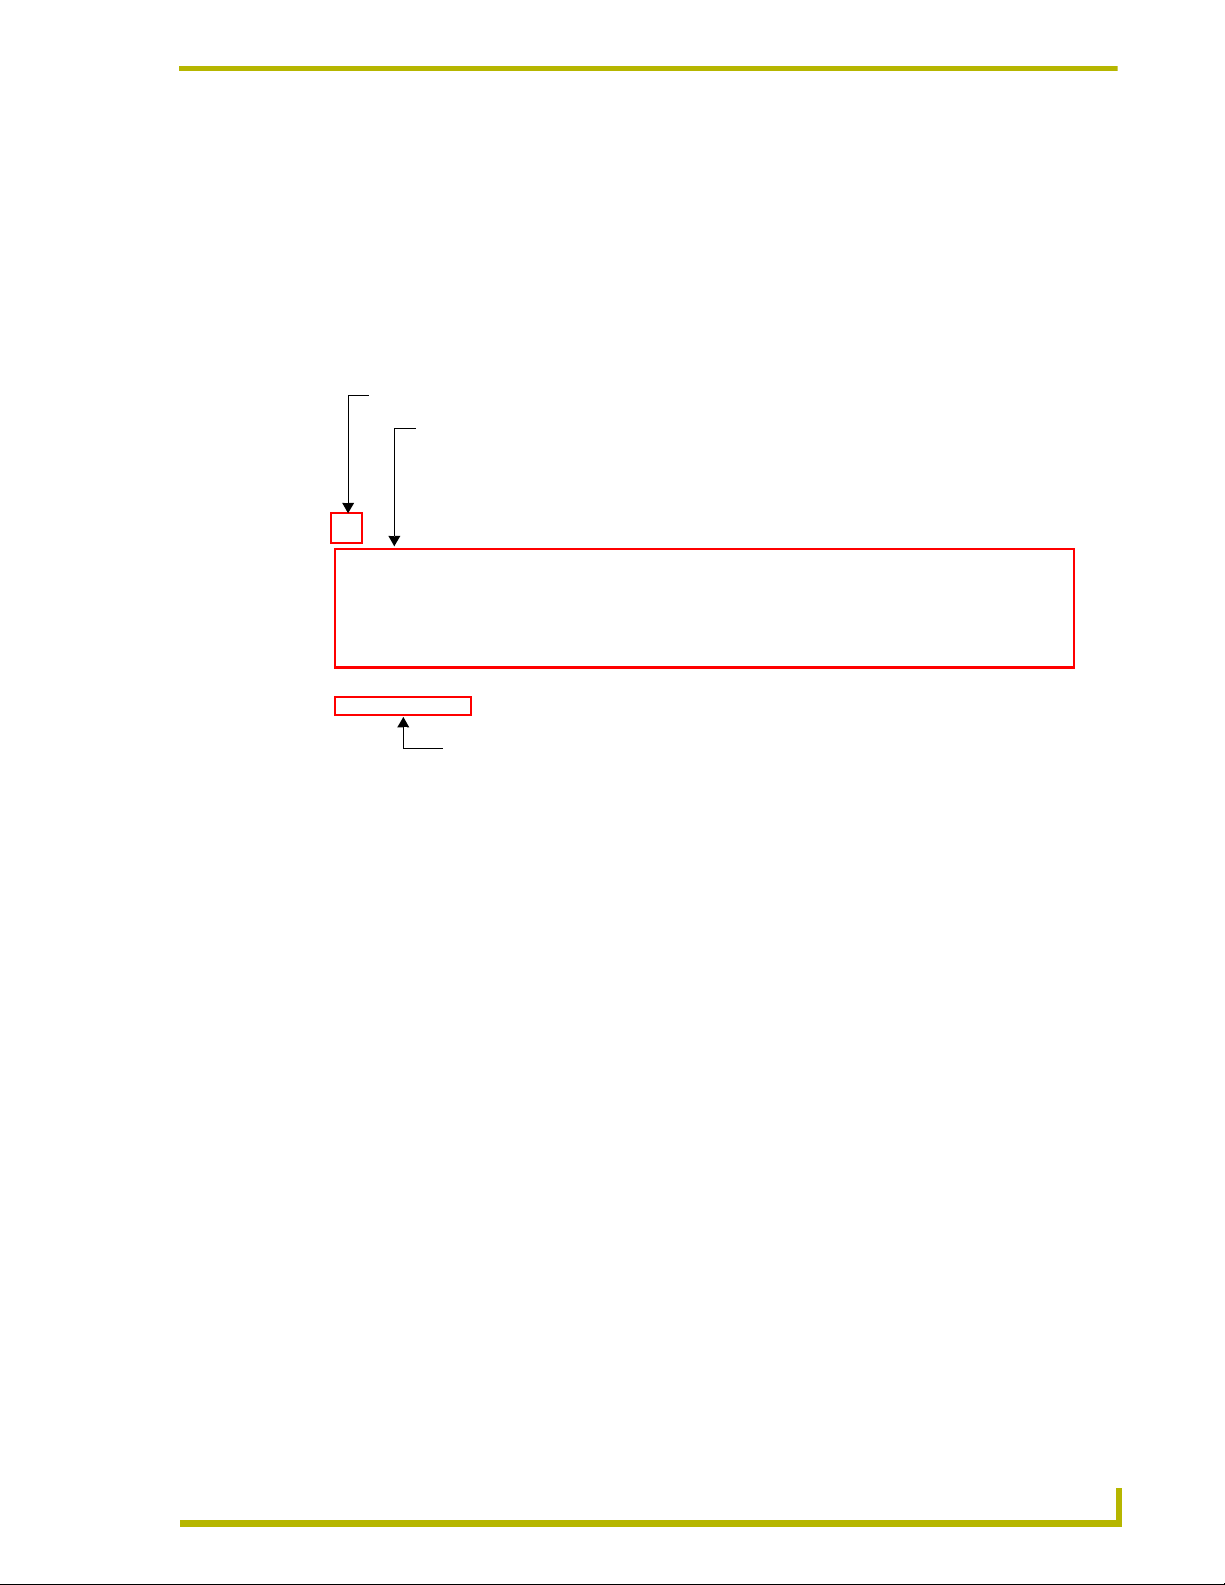
Parental Control Tab
Overview
The Parental Control tab (FIG. 51) provides parental control of DVD content. By default parental
control is disabled. The Master password is required to enable or disable parental control, and a
Parental Control password is applied to each rating level (G, PG, PG-13, R and NC-17).
This button enables the parental control functions (default = disabled - unlocked)
MPAA ratings list. The black arrow in the left column indicates the rating level of
the selection currently playing (default = "G" - disabled)
Parental Control Tab
Click to set a password for the selected rating category
FIG. 51 WinMAX - Parental Control tab
Password protected content can be enabled or disabled only on a global basis. At the point where
playback is about to begin, the system checks to see if parental control is enabled. If it is, then the
rating category is displayed and the system prompts you to enter the password.
If the password provided matches the password for that rating category (or any lower rating
category) then playback will begin.
The password can be reset via the Administration Menu on the MAX server. The
password can contain any combination of alpha-numeric characters, but cannot contain
the pipe character ( | ).
If content has been paused for a set number of minutes, the system will require you to
enter the password again to continue playback.
inMAX MAX Server Control Software
47
Page 54

Parental Control Tab
The MPAA rating given in the content meta-data will be used to determine the level of access
required to view the content. Viewing content is defined to include viewing any details about the
content as well playback of the content. For each of the five rating levels a separate password will
exists. The content protection is hierarchical, so that anyone with a password for a particular level
will automatically be allowed to use that same password for any content that is protected by a lower
level rating.
You can override the category to which any DVD content belongs (or clear an existing
override) via options on the Details page. This action requires using the Master
password. Changing categories does not change the MPAA rating displayed on the
Details page, but the system will notify you that the category has been overridden.
Movies without a rating will not be accessible while Parental Control is enabled. You
have an opportunity to apply a rating to non-rated content when it is loaded into the
system.
Playlists are password protected at the highest category rating of any content in that
playlist. If no password is supplied, then playback of the whole playlist is skipped and the
system returns an error.
The MPAA rating levels are described in the table below, from the lowest protection level (G) to the
highest (NC-17):
•[G] -
General Audience
•[PG] -
Parental Guidance
Suggested
• [PG-13] -
Parents Strongly
Cautioned
•[R] -
Restricted
• [NC-17] -
No One 17 and
Under Admitted
All ages admitted. This signifies that the film rated contains nothing most
parents will consider offensive for even their youngest children to see or
hear. Nudity, sex scenes, and scenes of drug use are absent; violence is
minimal; snippets of dialogue may go beyond polite conversation but do
not go beyond common everyday expressions.
Some material may not be suitable for children. This signifies that the
film rated may contain some material parents might not like to expose to
their young children - material that will clearly need to be examined or
inquired about before children are allowed to attend the film. Explicit sex
scenes and scenes of drug use are absent; nudity, if present, is seen
only briefly, horror and violence do not exceed moderate levels.
Some material may be inappropriate for children under 13. This signifies
that the film rated may be inappropriate for pre-teens. Parents should be
especially careful about letting their younger children attend. Rough or
persistent violence is absent; sexually-oriented nudity is generally
absent; some scenes of drug use may be seen; one use of the harsher
sexually derived words may be heard.
Under 17 requires accompanying parent or adult guardian (age varies in
some locations). This signifies that the rating board has concluded that
the film rated contains some adult material. Parents are urged to learn
more about the film before taking their children to see it. An R may be
assigned due to, among other things, a film's use of language, theme,
violence, sex or its portrayal of drug use.
This signifies that the rating board believes that most American parents
would feel that the film is patently adult and that children age 17 and
under should not be admitted to it. The film may contain explicit sex
scenes, an accumulation of sexually-oriented language, or scenes of
excessive violence. The NC-17 designation does not, however, signify
that the rated film is obscene or pornographic.
48
WinMAX MAX Server Control Software
Page 55

Parental Control Tab
Applying Parental Control To a Ratings Level
To apply parental control to a particular rating level (G, PG, PG-13, R, or NC-17), you will set the
password for that level. This action requires using the Master password. Once parental control is
applied and enabled, a password will required in order to play back any media with that rating.
For example, if you apply a password to the "R" rating level, that password must be entered before
any R-rated media can be played.
1. Click on the Enable Parental Control icon (if it’s not already selected).
2. Click to select a rating category from the Ratings List (FIG. 51).
3. Click the Set Password command button to open the New Password dialog (FIG. 52).
Enter the Master Password here
Enter a password for the selected rating category here
FIG. 52 New Password dialog
4. Enter the Master Password.
5. Enter the new password that you want to apply to the selected rating category and click OK to
save.
From now on, when Parental Control is enabled, the password you assigned here will be required
before any content with the selected rating can be played.
Applying Parental Control To Playlists
You can also apply parental control to a playlist. The important thing to remember here is that the
playlist will be password protected according to the highest rating of any content that occurs in the
playlist.
For example, if a mixed-media playlist containing 10 items includes just one item that is rated
"NC-17", then the password assigned to the NC-17 rating category is required to play that playlist
(regardless of the other ratings that may be included in the playlist).
inMAX MAX Server Control Software
49
Page 56

Parental Control Tab
Changing the Rating for a DVD
In some cases, you may want to change (override) the MPAA rating associated with a DVD so that
parental control can be applied. This action also requires using the Master password.
For example, perhaps a DVD with a MPAA rating of PG contains some violent scenes that you
don’t want your children to watch. In this case, you may wish to override the PG rating so that this
DVD will be password-protected as a R-rated film.
1. Double-click on a DVD title in the Movies tab to open the Edit Movie Description dialog. The
MPAA Rating is indicated at the bottom of the Details tab.
2. Click on the Change Rating command button to open the Parental Rating Override dialog
(FIG. 53).
Enter the Master Password here
Select the new rating here
FIG. 53 Parental Rating Override dialog
3. Enter the Master Password.
4. Select the new rating category that you want to apply to this DVD from the New Rating drop-
down list.
5. Click OK to save the change and close the Parental Rating Override dialog.
Note that changing categories does not change the MPAA rating displayed on the Details page, but
the new rating is indicated in the User Rating field (FIG. 54).
50
MPAA rating indicated here
Click to open the Parental
Rating Override dialog
User-assigned rating is
indicated here (if one exists)
FIG. 54 Edit Movie Description dialog - Details tab with User Rating (R) indicated
WinMAX MAX Server Control Software
Page 57

User Data Tab
Overview
The User Data tab (FIG. 55) allows you to add user-defined fields to the detailed movie
information (accessible via the Edit Movie Description dialog - User tab).
User Data Tab
List of all user-defined fields
FIG. 55 WinMAX - User Data tab
As an example, you might want to add your own ratings to each movie in your collection. In this
case, you could create a new field called "My Ratings" (via the options in this tab, as described
below). Once created, this field will be listed in the User tab of the Edit Movie Description dialog
(accessible via a double-click on any movie title in the Movies tab).
Then, you can use this field to enter your personal rating to each film, via the User tab of the Edit
Movie Description dialog.
Furthermore, you can then perform a search on this new field. In this example, you would then be
able to perform a search for movies that you have rated as "3/5 stars" or "4/5 stars", etc., assuming
that you entered the data in the "My Ratings" field this way.
inMAX MAX Server Control Software
Type a name for the new user-defined field here
51
Page 58

User Data Tab
Creating a New User-Defined Field For Movies
1. Type the name of the new field in the text box at the bottom of this tab (in our example, "My
Ratings").
2. Click the Add command button to add the new field. Note that the new field is added to the list
in this tab. The new field is also added to the User tab of the Edit Movie Description dialog
(FIG. 56).
52
FIG. 56 Edit Movie Description dialog - User tab, showing user-defined fields
WinMAX MAX Server Control Software
Page 59

System Information Tab
Overview
The System Information tab (FIG. 57) provides a quick view of system health and status. A
number of troubleshooting tools are also available through this tab, as described below.
Server Storage data Software/Firmware version and RAID status information
System Information Tab
View/edit the MAX server’s
IP Address (or URL) here
Click Connect to attempt
a connection to the
specified IP address
Click Zone Names to access the
Update Output Zone Names dialog,
where you can view/edit the names
assigned to the Output Zones defined
FIG. 57 WinMAX - System Information tab
inMAX MAX Server Control Software
Click to open the
Application Settings dialog
Click to start the
Web Update process
Click Server Configuration
to open a telnet session
with the server, to access
the MAX Admin Menu
on the target MAX Server
53
Page 60

System Information Tab
Server Storage Data
The read-only fields and graphic in the upper-left corner of this dialog indicate the following
content storage statistics for the MAX server:
Server IP Address or URL
This editable text field displays the IP Address or URL of the MAX server that the PC is currently
connected to.
Changing the Server’s IP Address or URL
1. Click in the Server IP Address or URL text field, and type in the new information.
• DVD Movies: Indicates the number of DVDs currently stored in the server.
• CD Titles: Indicates the number of CDs currently stored in the server.
• Number of Play Lists: Indicates the number of Playlists currently stored in the server.
• Total Stored Content Time: Indicates the total amount of time it would take to play all of the
content (music and movies) currently stored on the server.
• Disc Storage Capacity graph: The pie chart indicates the total amount of storage space (blue)
relative to the amount of space currently being used (red).
2. Click the Connect button to connect to the specified IP or URL (FIG. 58).
Enter the MAX server’s IP address or URL here
Click to save changes to the server’s IP Address
and attempt to connect to the specified IP Address
FIG. 58 Server’s IP Address or URL text field
If you lose your connection, click the Connect button to reconnect to the server.
Viewing/Editing Output Zone Names
The Zone Names option on the System Information tab allows you to edit the names assigned to
the Output Zones defined on the target MAX server, via the Update Output Zone Names dialog.
The names that are entered/displayed in this dialog are displayed in the Output Zone drop-down
menu in the Music and Movies tabs.
The names that you assign here are saved to the target server, so they will appear consistently in the
server’s system information displays.
54
WinMAX MAX Server Control Software
Page 61

System Information Tab
Server Configuration (MAX Admin Menu)
Click the Server Configuration button (see FIG. 57) to launch a telnet session with the MAX server
in order to access the MAX Admin Menu.
Use the options in the MAX Admin Menu to view and/or configure various aspects of the server.
The main options in the MAX Admin Menu include:
• System Information: This page displays the following system hardware and status information
(read-only).
• IP Settings: These options allow you to view and configure the IP settings of the
server for compatibility with your network.
• Output Module Setup: This set of options allows you to add, view and delete MAX-AVM
audio/video modules and/or MAX-AOM audio-only modules.
• RAID 5 Status: This page displays (read-only) status information for the servers RAID 5
array, including individual status for each of the disc drives.
• RAID 5 CLI: This set of options rebuilds the server’s RAID array. This option is only
for use by AMX Technical Support.
• Log Management: MAX Servers have the ability to log various internal activities, primarily
for troubleshooting purposes. The options on this page allow you to view
and delete log files, and control the logging level for the server.
• Date, Time Locale: This set of options allows you to specify/adjust the system’s date, time
and location settings.
• Shell: This option opens an MS-DOS window for sending specific commands
directly to the server.
• Modify max.ini: These options on this page are only for use by AMX Technical Support.
• Authenticate HDD: The set of options on this page allow you to add, remove and view hard
• Parental Control: This page allows you to enable parental control functionality. To enable
• Online Tech Support: This option allows you to establish a connection between the MAX
• Cover Art: This option retrieves updated cover art for discs in the MAX server’s
• Change Region: This option allows you to change the encoding region for the MAX
• Update Firmware: This set of options allows you to schedule when the server should auto-
• Restart MAX deamon: This option restarts the MAX daemon. Restart the daemon to activate
• Shutdown: This set of options allows you to either Reboot or Shutdown the MAX
• Exit: This option exits the MAX Admin menu.
• Exit and Disconnect: This option exits the MAX Admin menu and terminates the connection to
disc drives (HDDs) in the MAX server.
parental control, enter a new parental control password and select OK.
server and AMX Technical Support, for remote troubleshooting and support operations.
media library.
server’s DVD-ROM.
matically check for firmware updates (day of week and time), and to
manually update the system immediately (if updated firmware is
detected).
any configuration changes made via the options in the MAX Admin
menu.
server.
AMX Support (established via the Online Tech Support option).
For descriptions of the options in the Admin Menu, and instructions on configuring the MAX
server, refer to the MAX by AMX Reference Guide (MAX Servers section).
inMAX MAX Server Control Software
55
Page 62

System Information Tab
Software/Firmware Version and RAID Status Information
The area directly beneath the AMX logo contains read-only information regarding the current
software and firmware versions in use, as well as RAID status and copyright information (see
FIG. 57):
Web Update
Click the Web U p d a t e button to open the Application Files page of www.amx.com in your web
browser, to check for any available updates for WinMAX. When the page is opened, scroll to the
bottom of the list of applications, and check to see the latest version of WinMAX. To download and
install a new version, click on the WinMAX Installation link and follow the instruction on your
screen. Your PC must be connected to the Internet to use this feature.
Application Settings
Click the Application Settings button to open the Application Settings dialog (FIG. 59). This
dialog is for making various application-level settings for WinMAX.
• WinMAX version: Displays the version of the WinMAX software currently in use.
• MAX Server Version: Displays the version of the firmware currently loaded in the MAX server.
• Raid Status: Displays the current status of the MAX server’s Raid disk drive system.
56
FIG. 59 Application Settings dialog
The items that are accessible via this dialog are intended only for use by AMX Technical Support.
The only exception is the DriveNum Key/Value setting which determines which CD-ROM drive
on your PC will be used by WinMAX for recording:
0 = The first CD-ROM drive on your PC (default setting)
1 = The second CD-ROM drive on your PC
Refer to the Specify a Local CD/DVD-ROM Drive To Use section on page 44 for
details.
WinMAX MAX Server Control Software
Page 63

System Information Tab
inMAX MAX Server Control Software
57
Page 64

AMX reserves the right to alter specifications without notice at any time.
ARGENTI NA • AUST RALIA • B ELGIUM • BRAZIL • CANADA • CHINA • E NGLAND • FRANCE • GERMANY • GREECE • HONG K ONG • INDI A • INDON ESIA • ITALY • JAPAN
LEBANON • MALAYSIA • MEXICO • NETHERLANDS • NEW ZEALAND • PHILIPPINES • PORTUGAL • RUSSIA • SINGAPORE • SPAIN • SWITZERLAND • THAILAND • TURKEY • USA
ATLANTA • BOSTON • CHICAGO • CLE VELAND • DALLAS • DE NVER • INDIANAPOLIS • LOS ANGELES • MINNEAPOLIS • PHILADELPHIA • PHOENIX • PORTLAND • SPOKANE • TAMPA
3000 RESEARCH DRIVE, RICHARDSON, TX 75082 USA • 800.222.0193 • 469.624.8000 • 469-624-7153 fax • 800.932.6993 technical support • www.amx.com
2006 AMX Corporation. All rights reserved. AMX, the AMX logo, the building icon, the home icon, and the light bulb icon are all trademarks of AMX Corporation.
©
065-004-2797 4/06
*In Canada doing business as Panja Inc.
 Loading...