

Page 1

User’s Guide
RMS
Resource Management Suite 3.0
Software
Page 2

AMX Limited Warranty and Disclaimer
AMX Corporation warrants its products to be free of defects in material and workmanship under normal use for three (3) years from the date of purchase from AMX Corporation, with the following
exceptions:
• Electroluminescent and LCD Control Panels are warranted for three (3) years, except for the display and
touch overlay components that are warranted for a period of one (1) year.
• Disk drive mechanisms, pan/tilt heads, power supplies, and MX Series products are warranted for a period of
one (1) year.
• AMX Lighting products are guaranteed to switch on and off any load that is properly connected to our lighting products, as long as the AMX Lighting products are under warranty. AMX Corporation does guarantee
the
control of dimmable loads that are properly connected to our lighting products. The dimming performance or
quality cannot be guaranteed due to the random combinations of dimmers, lamps and ballasts or transformers.
• Unless otherwise specified, OEM and custom products are warranted for a period of one (1) year.
• AMX Software is warranted for a period of ninety (90) days.
• Batteries and incandescent lamps are not covered under the warranty.
This warranty extends only to products purchased directly from AMX Corporation or an Authorized
AMX Dealer.
All products returned to AMX require a Return Material Authorization (RMA) number. The RMA
number is obtained from the AMX RMA Department. The RMA number must be clearly marked on
the outside of each box. The RMA is valid for a 30-day period. After the 30-day period the RMA will
be cancelled. Any shipments received not consistent with the RMA, or after the RMA is cancelled,
will be refused. AMX is not responsible for products returned without a valid RMA number.
AMX Corporation is not liable for any damages caused by its products or for the failure of its products to perform. This includes any lost profits, lost savings, incidental damages, or consequential
damages. AMX Corporation is not liable for any claim made by a third party or by an AMX Dealer
for a third party.
This limitation of liability applies whether damages are sought, or a claim is made, under this warranty or as a tort claim (including negligence and strict product liability), a contract claim, or any
other claim. This limitation of
liability cannot be waived or amended by any person. This limitation of liability will be effective even
if AMX Corporation or an authorized representative of AMX Corporation has been advised of the
possibility of any such damages. This limitation of liability, however, will not apply to claims for personal injury.
Some states do not allow a limitation of how long an implied warranty last. Some states do not allow
the limitation or exclusion of incidental or consequential damages for consumer products. In such
states, the limitation or exclusion of the Limited Warranty may not apply. This Limited Warranty
gives the owner specific legal rights. The owner may also have other rights that vary from state to
state. The owner is advised to consult applicable state laws for full
determination of rights.
EXCEPT AS EXPRESSLY SET FORTH IN THIS WARRANTY, AMX CORPORATION
MAKES NO OTHER WARRANTIES, EXPRESSED OR IMPLIED, INCLUDING ANY
IMPLIED WARRANTIES OF MERCHANTABILITY OR FITNESS FOR A PARTICULAR
PURPOSE. AMX CORPORATION EXPRESSLY DISCLAIMS ALL WARRANTIES NOT
STATED IN THIS LIMITED WARRANTY. ANY IMPLIED WARRANTIES THAT MAY BE
IMPOSED BY LAW ARE LIMITED TO THE TERMS OF THIS LIMITED WARRANTY.
Page 3

Software License and Warranty Agreement
LICENSE GRANT.
AMX grants to Licensee the non-exclusive right to use the AMX Software in the manner described in this
License. The AMX Software is licensed, not sold. The AMX Software consists of generally available programming and development software, product documentation, sample applications, tools and utilities, and miscellaneous technical information. Please refer to the README.TXT file on the compact disc or download for further
information regarding the components of the AMX Software. The AMX Software is subject to restrictions on
distribution described in this License Agreement. YOU MAY NOT LICENSE, RENT, OR LEASE THE AMX
SOFTWARE. You may not reverse engineer, decompile, or disassemble the AMX Software.
INTELLECTUAL PROPERTY.
The AMX Software is owned by AMX and is protected by United States copyright laws, patent laws, international treaty provisions, and/or state of Texas trade secret laws. Licensee may make copies of the AMX Software solely for backup or archival purposes. Licensee may not copy the written materials accompanying the
AMX Software.
TERMINATION. AMX RESERVES THE RIGHT, IN ITS SOLE DISCRETION, TO TERMINATE THIS
LICENSE FOR ANY REASON AND UPON WRITTEN NOTICE TO LICENSEE.
In the event that AMX terminates this License, the Licensee shall return or destroy all originals and copies of
the AMX Software to AMX and certify in writing that all originals and copies have been returned or destroyed.
PRE-RELEASE CODE.
Portions of the AMX Software may, from time to time, as identified in the AMX Software, include PRERELEASE CODE and such code may not be at the level of performance, compatibility and functionality of the
final code. The PRE-RELEASE CODE may not operate correctly and may be substantially modified prior to
final release or certain features may not be generally released. AMX is not obligated to make or support any
PRE-RELEASE CODE. ALL PRE-RELEASE CODE IS PROVIDED "AS IS" WITH NO WARRANTIES.
LIMITED WARRANTY.
AMX warrants that the AMX Software will perform substantially in accordance with the accompanying written
materials for a period of ninety (90) days from the date of receipt. AMX DISCLAIMS ALL OTHER WARRANTIES, EITHER EXPRESS OR IMPLIED, INCLUDING, BUT NOT LIMITED TO IMPLIED WARRANTIES OF
MERCHANTABILITY AND FITNESS FOR A PARTICULAR PURPOSE, WITH REGARD TO THE AMX SOFTWARE. THIS LIMITED WARRANTY GIVES YOU SPECIFIC LEGAL RIGHTS. Any supplements or updates to
the AMX SOFTWARE, including without limitation, any (if any) service packs or hot fixes provided to you after
the expiration of the ninety (90) day Limited Warranty period are not covered by any warranty or condition,
express, implied or statutory.
LICENSEE REMEDIES.
AMX's entire liability and your exclusive remedy shall be repair or replacement of the AMX Software that does
not meet AMX's Limited Warranty and which is returned to AMX. This Limited Warranty is void if failure of the
AMX Software has resulted from accident, abuse, or misapplication. Any replacement AMX Software will be
warranted for the remainder of the original warranty period or thirty (30) days, whichever is longer. Outside the
United States, these remedies may not available.
NO LIABILITY FOR CONSEQUENTIAL DAMAGES. IN NO EVENT SHALL AMX BE LIABLE FOR ANY DAMAGES WHATSOEVER (INCLUDING, WITHOUT LIMITATION, DAMAGES FOR LOSS OF BUSINESS PROFITS, BUSINESS INTERRUPTION, LOSS OF BUSINESS INFORMATION, OR ANY OTHER PECUNIARY
LOSS) ARISING OUT OF THE USE OF OR INABILITY TO USE THIS AMX SOFTWARE, EVEN IF AMX HAS
BEEN ADVISED OF THE POSSIBILITY OF SUCH DAMAGES. BECAUSE SOME STATES/COUNTRIES DO
NOT ALLOW THE EXCLUSION OR LIMITATION OF LIABILITY FOR CONSEQUENTIAL OR INCIDENTAL
DAMAGES, THE ABOVE LIMITATION MAY NOT APPLY TO YOU.
U.S. GOVERNMENT RESTRICTED RIGHTS. The AMX Software is provided with RESTRICTED RIGHTS.
Use, duplication, or disclosure by the Government is subject to restrictions as set forth in subparagraph
(c)(1)(ii) of The Rights in Technical Data and Computer Software clause at DFARS 252.227-7013 or subparagraphs (c)(1) and (2) of the Commercial Computer Software Restricted Rights at 48 CFR 52.227-19, as applicable.
This Agreement replaces and supercedes all previous AMX Software License Agreements and is governed by
the laws of the State of Texas, and all disputes will be resolved in the courts in Collin County, Texas, USA.
Should you have any questions concerning this Agreement, or if you desire to contact AMX for any reason,
please write: AMX Corporation, 3000 Research Drive, Richardson, TX 75082.
Page 4

Page 5

Table of Contents
ClassroomManager ........................................................... 1
ClassroomManager Scheduling Page..................................... 1
View Schedule Page ............................................................... 1
Day View Page........................................................................ 1
Opening Day view ...................................................................... 2
Week View Page..................................................................... 3
Opening Week view.................................................................... 3
Month View Page .................................................................... 4
Opening Month view ................................................................... 4
Add Session Page................................................................... 5
Creating a Session ..................................................................... 7
Classroom Search Page............................................................. 8
Conducting a classroom search ................................................. 9
Help......................................................................................... 9
ClassroomManager User Page....................................... 11
Sign in Page.......................................................................... 11
How do you sign in to RMS? .................................................... 11
Preferences Page ................................................................. 11
Setting the default language ..................................................... 12
Setting the home page ............................................................. 12
Resetting column sorting .......................................................... 12
Setting scheduling view hours .................................................. 12
User Profile Page .................................................................. 13
Editing your User Profile ........................................................... 14
Changing your User Password ................................................. 14
Setting User Notification Time Span......................................... 14
User Notifications Page......................................................... 14
RMS User’s Guide
i
Page 6

Create New Notification Page ................................................... 15
Creating new User Notifications ................................................ 17
Sign Out Page....................................................................... 17
Signing Out of RMS .................................................................. 17
ExhibitManager................................................................. 19
ExhibitManager Scheduling Page ......................................... 19
View Schedule Page ............................................................. 19
Day View Page...................................................................... 19
Opening Day view ..................................................................... 20
Week View Page................................................................... 21
Opening Week view .................................................................. 21
Month View Page .................................................................. 22
Opening Month view ................................................................. 22
Add Event Page .................................................................... 23
Creating an Event ..................................................................... 25
Exhibit Search Page.................................................................. 26
Conducting an exhibit search .................................................... 27
Help....................................................................................... 27
ExhibitManager User Page.............................................. 29
Sign in Page.......................................................................... 29
How do you sign in to RMS?..................................................... 29
Preferences Page ................................................................. 29
Setting the default language ..................................................... 30
Setting the home page .............................................................. 30
Resetting column sorting........................................................... 30
Setting scheduling view hours................................................... 30
User Profile Page .................................................................. 31
Editing your User Profile ........................................................... 32
Changing your User Password ................................................. 32
Setting User Notification Time Span ......................................... 32
ii
RMS User’s Guide
Page 7

User Notifications Page......................................................... 33
Create New Notification Page .................................................. 33
Creating new User Notifications ............................................... 35
Sign Out Page....................................................................... 35
Signing Out of RMS .................................................................. 35
HomeManager .................................................................. 37
HomeManager Scheduling Page .......................................... 37
View Schedule Page ............................................................. 37
Day View Page...................................................................... 37
Opening Day view .................................................................... 38
Week View Page................................................................... 39
Opening Week view.................................................................. 39
Month View Page .................................................................. 40
Opening Month view ................................................................. 40
Add Activity Page .................................................................. 41
Creating an Activity................................................................... 43
Residence Search Page ........................................................... 44
Conducting a residence search ................................................ 45
Help....................................................................................... 45
HomeManager User Page ............................................... 47
Sign in Page.......................................................................... 47
How do you sign in to RMS? .................................................... 47
Preferences Page ................................................................. 47
Setting the default language ..................................................... 48
Setting the home page ............................................................. 48
Resetting column sorting .......................................................... 48
Setting scheduling view hours .................................................. 48
User Profile Page .................................................................. 49
Editing your User Profile ........................................................... 50
Changing your User Password ................................................. 50
RMS User’s Guide
iii
Page 8

Setting User Notification Time Span ......................................... 50
User Notifications Page......................................................... 51
Create New Notification Page ................................................... 51
Creating new User Notifications ................................................ 53
Sign Out Page....................................................................... 53
Signing Out of RMS .................................................................. 53
IntelligentManager............................................................ 55
IntelligentManager Scheduling Page .................................... 55
View Schedule Page ............................................................. 55
Day View Page...................................................................... 55
Opening Day view ..................................................................... 56
Week View Page................................................................... 57
Opening Week view .................................................................. 57
Month View Page .................................................................. 58
Opening Month view ................................................................. 58
Add Meeting Page................................................................. 59
Creating a Meeting.................................................................... 61
Room Search Page................................................................... 62
Conducting a room search ........................................................ 63
Help....................................................................................... 63
IntelligentManager User Page......................................... 65
Sign in Page.......................................................................... 65
How do you sign in to RMS?..................................................... 65
Preferences Page ................................................................. 65
Setting the default language ..................................................... 66
Setting the home page .............................................................. 66
Resetting column sorting........................................................... 66
Setting scheduling view hours................................................... 66
User Profile Page .................................................................. 67
Editing your User Profile ........................................................... 68
iv
RMS User’s Guide
Page 9

Changing your User Password ................................................. 68
Setting User Notification Time Span......................................... 68
User Notifications Page......................................................... 69
Create New Notification Page .................................................. 69
Creating new User Notifications ............................................... 71
Sign Out Page....................................................................... 71
Signing Out of RMS .................................................................. 71
MeetingManager .............................................................. 73
MeetingManager Scheduling Page....................................... 73
View Schedule Page ............................................................. 73
Day View Page...................................................................... 73
Opening Day view .................................................................... 74
Week View Page................................................................... 75
Opening Week view.................................................................. 75
Month View Page .................................................................. 76
Opening Month view ................................................................. 76
Add Appointment Page ......................................................... 77
Creating an Appointment .......................................................... 79
Room Search Page .................................................................. 80
Conducting a room search ....................................................... 81
Help....................................................................................... 81
MeetingManager User Page............................................ 83
Sign in Page.......................................................................... 83
How do you sign in to RMS? .................................................... 83
Preferences Page ................................................................. 83
Setting the default language ..................................................... 84
Setting the home page ............................................................. 84
Resetting column sorting .......................................................... 84
Setting scheduling view hours .................................................. 84
User Profile Page .................................................................. 85
RMS User’s Guide
v
Page 10

Editing your User Profile ........................................................... 86
Changing your User Password ................................................. 86
Setting User Notification Time Span ......................................... 86
User Notifications Page......................................................... 87
Create New Notification Page ................................................... 87
Creating new User Notifications ................................................ 89
Sign Out Page....................................................................... 89
Signing Out of RMS .................................................................. 89
VenueManager.................................................................. 91
VenueManager Scheduling Page ......................................... 91
View Schedule Page ............................................................. 91
Day View Page...................................................................... 91
Opening Day view ..................................................................... 92
Week View Page................................................................... 93
Opening Week view .................................................................. 93
Month View Page .................................................................. 94
Opening Month view ................................................................. 94
Add Event Page .................................................................... 95
Creating an Event ..................................................................... 97
Venue Search Page .................................................................. 98
Conducting a venue search ...................................................... 99
Help....................................................................................... 99
VenueManager User Page ............................................. 101
Sign in Page........................................................................ 101
How do you sign in to RMS?................................................... 101
Preferences Page ............................................................... 101
Setting the default language ................................................... 102
Setting the home page ............................................................ 102
Resetting column sorting......................................................... 102
Setting scheduling view hours................................................. 102
vi
RMS User’s Guide
Page 11

User Profile Page ................................................................ 103
Editing your User Profile ......................................................... 104
Changing your User Password ............................................... 104
Setting User Notification Time Span....................................... 104
User Notifications Page....................................................... 105
Create New Notification Page ................................................ 105
Creating new User Notifications ............................................. 107
Sign Out Page..................................................................... 107
Signing Out of RMS ................................................................ 107
WorshipManager............................................................ 109
WorshipManager Scheduling Page..................................... 109
View Schedule Page ........................................................... 109
Day View Page.................................................................... 109
Opening Day view .................................................................. 110
Week View Page................................................................. 111
Opening Week view................................................................ 111
Month View Page ................................................................ 112
Opening Month view ............................................................... 112
Add Session Page............................................................... 113
Creating a Session ................................................................. 115
Room Search Page ................................................................ 116
Conducting a room search ..................................................... 117
Help..................................................................................... 117
WorshipManager User Page ......................................... 119
Sign in Page........................................................................ 119
How do you sign in to RMS? .................................................. 119
Preferences Page ............................................................... 119
Setting the default language ................................................... 120
Setting the home page ........................................................... 120
Resetting column sorting ........................................................ 120
RMS User’s Guide
vii
Page 12

Setting scheduling view hours................................................. 120
User Profile Page ................................................................ 121
Editing your User Profile ......................................................... 122
Changing your User Password ............................................... 122
Setting User Notification Time Span ....................................... 122
User Notifications Page....................................................... 123
Create New Notification Page ................................................. 123
Creating new User Notifications .............................................. 125
Sign Out Page..................................................................... 125
Signing Out of RMS ................................................................ 125
viii
RMS User’s Guide
Page 13
ClassroomManager
ClassroomManager
ClassroomManager Scheduling Page
The ClassroomManager Scheduling page provides links to viewing the
application schedule, creating an entry to the schedul,e and access to the PDF
version of the User’s Guide.
View Schedule Page
The ClassroomManager Scheduling page provides links to viewing the schedule
in either Day, Week or Month view.
Day View Page
The Day view lists all sessions for the selected classroom on a particular date.
Double clicking within the hour launches the Add Session Page section on
page 5.
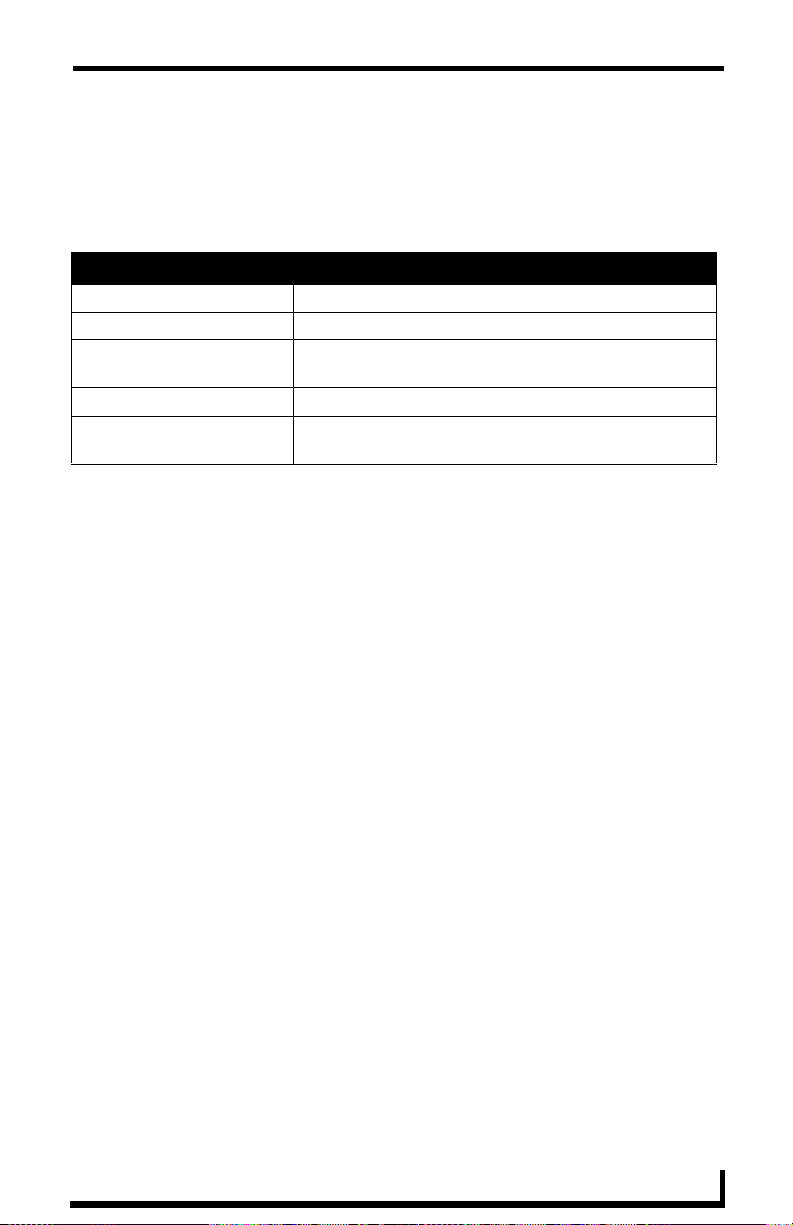
Day View
Select a classroom A drop down list for all classrooms available for schedule.
Select Date A navigation calendar that indicates the current date and
Classroom Information:
Name
Location
Occupancy
Timezone
Equipment
allows you to select other dates by clicking.
Sessions with a "lock" icon indicate that you do not have
the proper permissions to access that session. Sessions
with a "key" icon indicate password protection, and you
must provide the correct password to access the session.
Today brings you back to the current date.
The name of the classroom.
The location of the classroom.
The maximum number of individuals held in this
classroom.
This is the time zone setting for the classroom.
This is the equipment list for the classroom.
RMS User’s Guide
1
Page 14

ClassroomManager
Opening Day view
1. Select View Schedule > Day View in the menu on the left side of the RMS
application. This launches the Day View Page section on page 1.
2. You can change classrooms by selecting them from the drop down menu,
Select a classroom.
3. You can change the day in view by clicking on another day in the calendar
under Select Date. Navigate back to the current day by clicking Today.
4. In the event there is a session for that classroom you will see the Classroom
Details.
5. Mouse over the session to display Duration, End Time, Start Time,
Recurring, Scheduled By, Classroom Details, Location and Session Details.
Sessions with a lock indicate you do not have proper permissions to view;
sessions with a key require a password.
6. Double click the session to edit.
2
RMS User’s Guide
Page 15
ClassroomManager
Week View Page
The Week view lists all sessions for the selected classroom for a particular 7 day
period. Double-clicking on any day in the week will open the Day View
Page section on page 1.
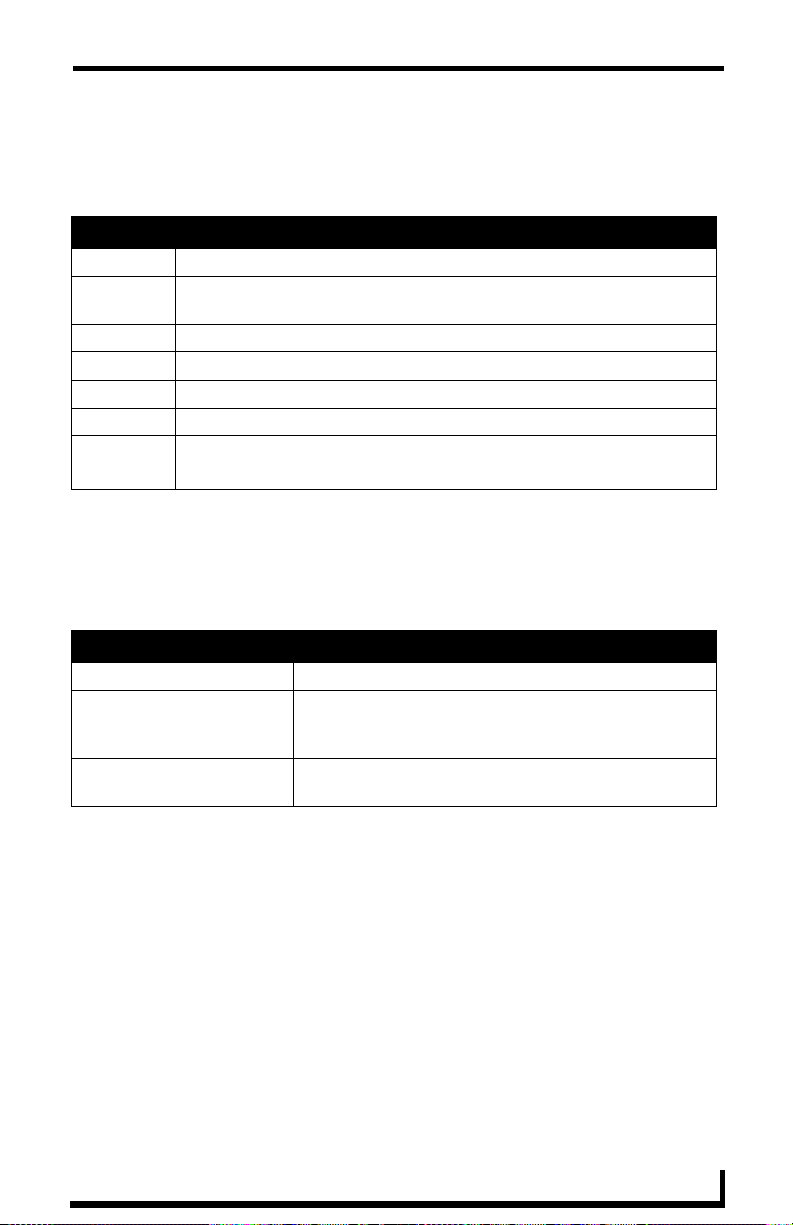
Week View
Select a classroom A drop down list for all classrooms available for schedule.
Select Date A navigation calendar that indicates the current date and
allows you to select other dates by clicking.
Sessions with a "lock" icon indicate that you do not have
the proper permissions to access that session. Sessions
with a "key" icon indicate password protection, and you
must provide the correct password to access the session.
This Week brings you back to the current week.
Classroom Information:
Name
Location
Occupancy
Timezone
Equipment
The name of the classroom.
The location of the classroom.
The maximum number of individuals held in this
classroom.
This is the time zone setting for the classroom.
This is the equipment list for the classroom.
Opening Week view
1. Select View Schedule > Week View in the menu on the left side of the RMS
application. This launches the Week View Page section on page 3.
2. You can change classrooms by selecting them from the drop down menu,
Select a classroom.
3. You can change the week in view by clicking on another day in the calendar
under Select Date. Navigate back to the current day by clicking This Week.
4. In the event there is a session for that classroom you will see the Classroom
Details.
5. Mouse over the session to display Duration, End Time, Start Time,
Recurring, Scheduled By, Classroom Details, Location and Session Details.
Sessions with a lock indicate you do not have proper permissions to view;
sessions with a key require a password.
RMS User’s Guide
3
Page 16
ClassroomManager
6. Double click the session to edit.
Month View Page
The Month view lists all sessions for the selected classroom for a particular 6
week period. Double-clicking on any day in the month will open the Day View
Page section on page 1.
Month View
Select a classroom A drop down list for all classrooms available for schedule.
Select Date A navigation calendar that indicates the current date and
Classroom Information:
Name
Location
Occupancy
Timezone
Equipment
allows you to select other dates by clicking.
Sessions with a "lock" icon indicate that you do not have
the proper permissions to access that session. Sessions
with a "key" icon indicate password protection, and you
must provide the correct password to access the session.
This Month brings you back to the current month.
The name of the classroom.
The location of the classroom.
The maximum number of individuals held in this classroom.
This is the time zone setting for the classroom.
This is the equipment list for the classroom.
Opening Month view
1. Select View Schedule > Month View in the menu on the left side of the RMS
application. This launches the Month View Page section on page 4.
2. You can change classrooms by selecting them from the drop down menu,
Select a classroom.
3. You can change the month in view by clicking on another day in the calendar
under Select Date. Navigate back to the current day by clicking This Month.
4. Double click any day to change to Day View Page section on page 1.
4
RMS User’s Guide
Page 17

ClassroomManager
Add Session Page
The Add Session page allows you to create and schedule your own event.
ClassroomManager will allocate the classroom for the designated time, execute
any predefined Control Functions if available, and provide welcome text to your
participants.
Add Session
Classroom A drop down list of classrooms available for scheduling
within the RMS application. Search allows you to find a
classroom base on your needs. See the Classroom
Search Page section on page 8.
Scheduled By: A text field to provide the name of the meeting scheduler;
this field is populated by the RMS application.
Subject The subject line for the meeting purpose.
Message A larger text field for any additional information pertaining
to the meeting.
Start Time: A text field for the date (mm/dd/yyyy) the meeting has
been scheduled to start. You can click on the calendar
icon to select the date. The three following drop down
menus represent hour, minute, and designation for
ante-meridiem vs. post-meridiem (AM/PM), in that order.
End Time: A text field for the date (mm/dd/yyyy) the meeting has
been scheduled to end. You can click on the calendar icon
to select the date. The three following drop down menus
represent hour, minute, and designation for ante-meridiem
vs. post-meridiem (AM/PM), in that order.
Recurring: When checked, this option makes the meeting a recurring
event.
Pattern:
Daily
Weekly
Makes the recurring scheduled meeting a daily pattern.
• Every __ days(s) - text field for number of days between
daily recurring meeting
• Every weekday - executes the daily meeting only
Monday - Friday
Makes the recurring scheduled meeting a weekly pattern.
• Every __ week(s) on - text field for number of weeks
between weekly recurring meeting
Select the day the weekly scheduled meeting is to occur; more
than one day can be selected.
RMS User’s Guide
5
Page 18

ClassroomManager
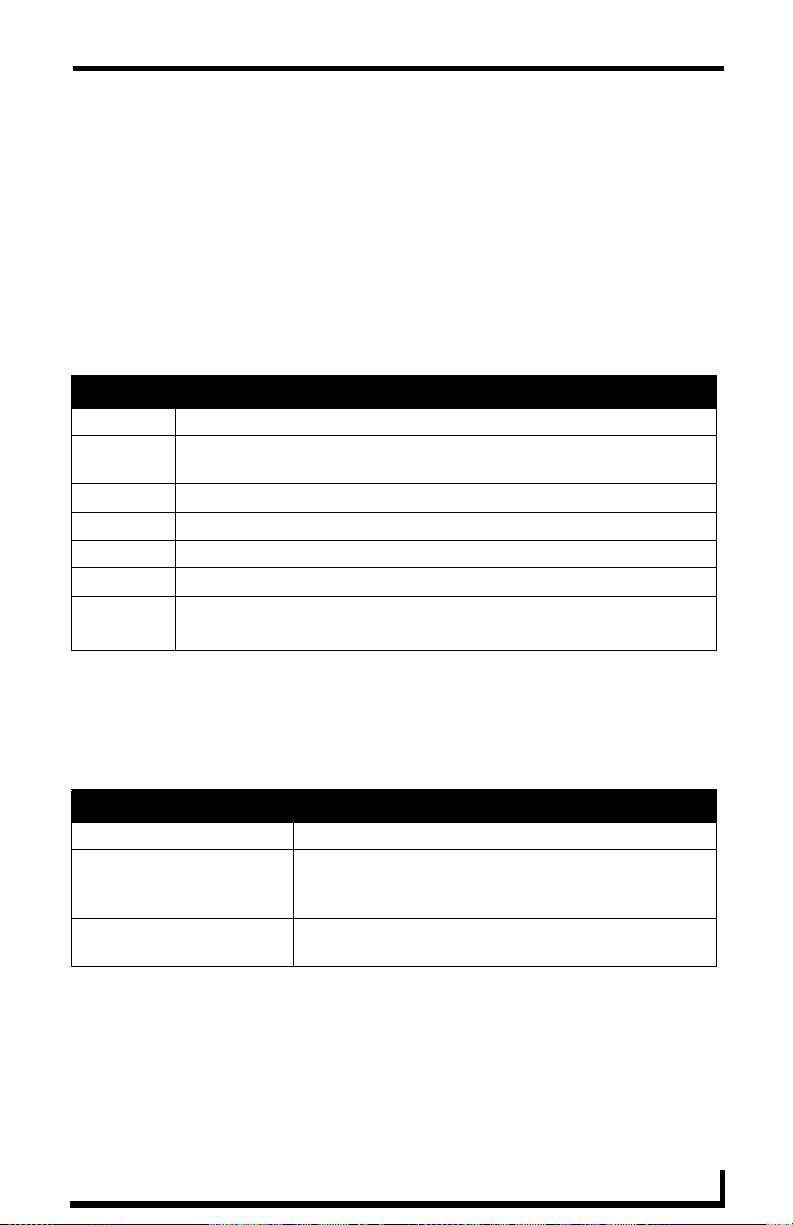
Add Session (Cont.)
Monthly
Yearly
Lifetime:
No end date
End after __ occurrences
End by:
Automation Control
Execution
Control Event
<< / >> Moves a selected control function to the left and right
Panel Setup Up to 5 lines of text. Type a welcome message as it is to
Makes the recurring scheduled meeting a monthly pattern.
• Day __ of every __ month(s) - the drop down menus
allow you to set what day of the month the recurring
meeting executes and how many months between each
occurrence.
• The __ __ of every __ month(s) - this setting allows you
to pick either the first, second, third, fourth, or last day of
each week, and the number of months between each
occurrence.
Makes the recurring scheduled meeting a yearly pattern.
• Every __ __ - the drop down menus allow you to set the
month and day the recurring meeting occurs.
• The __ __ of __ - this setting allows you to pick either
the first, second, third, fourth, or last of each week of a
specified month.
The scheduled recurring meeting does not end.
The scheduled recurring meeting ceases to run upon
reaching the user defined parameter.
Either type the date the scheduled recurring meeting is to
end or select the date from the calendar icon.
• Upon user confirmation at start of session - The
meeting coordinator must select to run preset at the time
of the meeting from within the classroom.
• Automatically executes at the start of the session The preset runs at the Start Time of the meeting.
Drop down menu list of available control function macros
in your selected classroom. This event executes based on
the Execution designation.
adding or removing it from the preset list.
be displayed on the pane in the meeting classroom.
6
RMS User’s Guide
Page 19

ClassroomManager
Creating a Session
1. Select Add Session in the menu on the left side of the RMS application. This
launches the Add Session Page section on page 5.
2. In the drop down menu, Classroom, select the classroom that will host the
session or search for a classroom by clicking Search (See Conducting a
classroom search section on page 9).
3. Type a Subject for the session in the space provided.
4. Type a Message providing more information about the session in the larger
text field.
5. Set the Session Times, start, end and if it is a recurring session. If the session
is recurring, set the Pattern and Lifetime of the session.
6. Set the Automation Control if applicable; will the preset execute manually or
automatically? Select the Control Event from the drop down menu.
7. Type Welcome Text in the lines provided; these lines are displayed on the
panels in the classroom at the time of the session.
8. Select a Touch Panel Image from the drop down menu or click Upload
Image. If you selected Upload Image, either type the path or browse to the
file you wish to use. Click Upload to load the file.
9. Click Save to save, Cancel to cancel.
RMS User’s Guide
7
Page 20
ClassroomManager
Classroom Search Page
The Classroom Search page allows you to search for a specific classroom or find
one based on your session needs.
Classroom Search
Classroom Name The name of the classroom.
Location The location of the classroom
Number of Seats Needed This is the number of seats for the classroom.
Prestige Level Select the level from the drop down list. This is the
prestige level for the classroom.
Equipment Needed This is the equipment listed for any classroom. All
equipment items should be separated by a comma.
Search for specific Date/Time When checked, RMS will search for a classroom that
Date Needed Type the date the classroom is needed or click the
Duration The time in hours and minutes the classroom is needed.
Search for specific time or
search in a range of times
Start Time
Search By Range
meets your parameters within a window of time.
calendar icnon to select a date.
The desired start time for the session.The three
following drop down menus represent hour, minute and
designation for ante-meridiem vs. post-meridiem, in that
order.
RMS searches the availability of a classroom based
between the Start and End time range. The three following
drop down menus represent hour, minute and designation
for ante-meridiem vs. post-meridiem, in that order.
8
RMS User’s Guide
Page 21
ClassroomManager
Classroom Search Results Page
Based on the criteria used in the Classroom Search Page section on page 8,
choose the classroom to use from the list displayed on this page.
Classroom Search Results
Classroom The name of the classroom.
Location The location of the classroom
Prestige Level Select the level from the drop down list. This is the
prestige level for the classroom.
Num of Seats Needed This is the number of seats for the classroom.
Option Select - Selects the classroom for use within the
session.
Conducting a classroom search
1. Select Add Session in the menu on the left side of the RMS application. This
launches the Add Session Page section on page 5.
2. Click the link Search to launch the Classroom Search Page section on
page 8.
3. Enter the classroom criteria in the spaces provided.
4. Click Search.
5. Find a classroom that fits your needs and allocate it to your session by
clicking Select.
Help
This link launches the User’s Guide.
RMS User’s Guide
9
Page 22

ClassroomManager
10
RMS User’s Guide
Page 23

ClassroomManager User Page
ClassroomManager User Page
Sign in Page
The Sign in page is the access page for ClassroomManager. Username and
Password are unique to each user. Remember Me will store an authentication
cookie on the user's computer and will automatically re-logon to the RMS web
pages if a new browser session is opened. This authentication cookie does have a
time limit and will expire based on a configured expiry time. If the authentication
cookie has expired, the user will be required to re-logon by entering their
username and password.
How do you sign in to RMS?
1. Type the URL of your RMS server into your web browser.
2. Type your username in the field provided.
3. Type your password in the field provided.
4. If desired, place a check in the box next to Remember Me to have RMS
remember your sign in information in future visits.
5. Click Sign In.
Preferences Page
The Preferences page allows each user to customize aspects of their
ClassroomManager experience.
Preferences
Language A drop down list of available translations for the
ClassroomManager application. ClassroomManager detects the
language of your browser and uses that unless otherwise
specified.
Your language preference is stored at the RMS server level and
it is no longer necessary to enable cookies on your browser.
Home Page: A drop down list of available ClassroomManager application
web pages that can be designated as the home page; this will
be the first page loaded upon a successful login.
Column Sorting: Clicking Reset All Data Grids returns each table within
ClassroomManager to the default sort method.
RMS User’s Guide
11
Page 24

ClassroomManager User Page
Preferences (Cont.)
Scheduling View Hours: A drop down list for the number of hours displayed in the
scheduling view of ClassroomManager.
Setting the default language
1. Select Settings > Preferences in the menu on the left side of the RMS
application. This launches the Preferences Page section on page 11.
2. Select your language from the drop down menu, Language. Auto Detect will
use the language settings of your web browser.
3. Click Save to save the setting.
Setting the home page
1. Select Settings > Preferences in the menu on the left side of the RMS
application. This launches the Preferences Page section on page 11.
2. Select your home page from the drop down menu, Language. The home
page is your default page upon sign in and any time you select Home on any
RMS page.
3. Click Save to save the setting.
Resetting column sorting
1. Select Settings > Preferences in the menu on the left side of the RMS
application. This launches the Preferences Page section on page 11.
2. Click Reset All Data Grids.
3. Click Save to save the setting.
Setting scheduling view hours
1. Select Settings > Preferences in the menu on the left side of the RMS
application. This launches the Preferences Page section on page 11.
2. Select the block of hours from the drop down menu,
3. Click Save to save the setting.
12
RMS User’s Guide
Page 25

ClassroomManager User Page
User Profile Page
The User Profile page allows the user to change personal information and
designate how the RMS application interacts with them.
User Profile
Username: This is your username in relation to logging into
Account Enabled: When this box is checked, a user is valid and can log into
Password: This is the password associated with your user account, used
Confirm Password: Retype password for confirmation. This value is required.
First Name: The first name of the user assigned to this account. This value
Last Name: The last name of the user assigned to this account. This value
Phone User’s phone number.
Mobile Phone: User’s mobile phone number.
Fax: User’s fax number.
Email 1,Email 2, Email 3,
Email 4:
Pager Provider: A drop down list of pager providers. This option is only
Pager Number: The number for contacting the pager with notifications.
Notification Time Span:
Disable Notifications
Always Send Notifications
Only Send Notifications On:
ClassroomManager. This value is required.
ClassroomManager.
at the time of login. This value is required.
is required.
is required.
User’s email address. The following drop down menu allows
you designate the email address as the default account, send
a plain text message, HTML message, or Pager Message.
Tes t sends a message to the email address. When
established, RMS will use the account to send notifications.
available if the RMS server has been configured to use Simple
Network Paging Protocol (SNPP).
When selected, notifications are not sent to this user.
When selected, all notifications are sent to this user.
The RMS server will send notification only within the
designated parameters. Place a check in the box next to the
days of the week you would like to receive notifications. Start
Time/End Time - The three drop down menus represent hour,
minute and designation for ante-meridiem vs. post-meridiem
(AM/PM), in that order. Notifications are only sent between the
start and end times.
RMS User’s Guide
13
Page 26

ClassroomManager User Page
Editing your User Profile
1. Select Settings > Profile in the menu on the left side of the RMS application.
This launches the User Profile Page section on page 13.
2. Change any of the fields but be sure to include all of the required
information.
3. Click Save to save the setting.
Changing your User Password
1. Select Settings > Profile in the menu on the left side of the RMS application.
This launches the User Profile Page section on page 13.
2. Click the Profile tab at the top of the page.
3. Enter your new Password in the provided field.
4. Confirm Password in the provided field.
5. Click Save to save the setting.
Setting User Notification Time Span
1. Select Settings > Profile in the menu on the left side of the RMS application.
This launches the User Profile Page section on page 13.
2. Click the Profile tab at the top of the page.
3. In the section, Notification Time Span, select either Disable Notifications,
Always Send Notifications, or Only Send Notification On. If you selected
Disable Notifications or Always Send Notifications, no more information is
needed and you can click Save.
4. If you selected Only Send Notifications On, set the sending parameters of the
notification.
5. Click Save to save the setting.
User Notifications Page
The User Notifications page is a listing of all notifications you are designated to
receive. Additionally, you can create new notifications for yourself.
If the user is receiving notifications because they are a member of a user role that
has been assigned a notification, they will see this in the notifications listing, but
14
RMS User’s Guide
Page 27
ClassroomManager User Page
will not be able to edit it. This can only be changed by a user administrator via
the Manage Notifications Page section on page 92 of the Administrator’s Guide.
User Notifications
Group Name The name of the group or groups receiving the selected notification.
Classroom
Name
Status Type The type of status monitored for the notification.
User The username receiving the notification.
Email User’s email address.
Pager The pager number for the user.
Options Edit - Launches the Create New Notification Page.
The name of the classroom being monitored for the notification.
Delete - Deletes the selected notification.
Create New Notification Page
You can assign RMS to track status types for classrooms and groups and then
provide you with notifications.
Create New Notification
Enabled When checked, the notification is active.
Groups/Classrooms A drop down list of groups and classrooms in the RMS
system. Selecting one tracks it for the purposes of the notification. This field is required.
Users The username receiving the notification. This field is
required.
RMS User’s Guide
15
Page 28

ClassroomManager User Page
Create New Notification (Cont.)
Status Type The type of status monitored for the notification.
• Control System Error
This status type is triggered when the RMS server
detects an error within the NetLinx master control
system.
• Equipment Usage
This status type is triggered when any monitored
equipment is used.
• Help Request
This status type is triggered when the RMS server
reports receiving a help request.
• Maintenance
This status type is triggered when the RMS server
reports receiving a request for maintenance.
• Modified Session
This status type is triggered when an existing session is
modified for a classroom either through the internal
scheduler or as detected by the RMS Scheduling
manager for an external scheduling system.
• Network
This status type is triggered when the network creates
an error.
• New Session
This status type is triggered when a new session is
added for a classroom either through the internal
scheduler or as detected by the RMS Scheduling
manager for an external scheduling system.
• New NetLinx System
This status type is triggered when a new NetLinx system
connects to the RMS server.
• Not Assigned
This status type is triggered when a detected NetLinx
system has not been assigned.
• Classroom Communication Error
This status type is triggered when the RMS server
software encounters a problem communicating with a
classroom within the RMS system.
16
RMS User’s Guide
Page 29

ClassroomManager User Page
Create New Notification (Cont.)
• Security
This status type is triggered when the RMS server
reports a security parameter has been met.
• Server Status
This status type is trigger when the RMS server
software starts up.
• System Communication Error
This status type is triggered when the RMS server
software encounters a problem communicating with an
external communication system, such as SMTP or
SNPP.
This field is required.
Emails & Pager User’s email addresses. The pager number for the user.
Creating new User Notifications
1. Select Settings > Notifications in the menu on the left side of the RMS
application. This launches the User Notifications Page section on page 14.
2. Click Create New Template to launch the Create New Notification
Page section on page 15.
3. Place a check in the box, Enabled.
4. Select a classroom or group from the drop down list Groups/Classrooms.
5. Select a Status Type to monitor from the drop down list.
6. Select the email and/or pager accounts the notification will use by placing a
check in the box.
7. Click Save to save, Cancel to cancel.
Sign Out Page
The Sign Out page confirms your selection to exit the ClassroomManager
application; select Ye s or No.
Signing Out of RMS
1. Select Sign Out in the menu on the left side of the RMS application.
2. Click Ye s to confirm.
RMS User’s Guide
17
Page 30

ClassroomManager User Page
18
RMS User’s Guide
Page 31

ExhibitManager
ExhibitManager
ExhibitManager Scheduling Page
The ExhibitManager Scheduling page provides links to viewing the application
schedule, creating an entry to the schedule, and access to the PDF version of the
User’s Guide.
View Schedule Page
The ExhibitManager Scheduling page provides links to viewing the schedule in
either Day, Week or Month view.
Day View Page
The Day view lists all events for the selected exhibit on a particular date. Double
clicking within the hour launches the Add Event Page section on page 23.
Day View
Select an exhibit A drop down list for all exhibits available for schedule.
Select Date A navigation calendar that indicates the current date and
allows you to select other dates by clicking.
Events with a "lock" icon indicate that you do not have the
proper permissions to access that event. Events with a
"key" icon indicate password protection, and you must
provide the correct password to access the event.
Today brings you back to the current date.
Exhibit Information:
Name
Location
Occupancy
Timezone
Equipment
The name of the exhibit.
The location of the exhibit.
The maximum number of individuals held in this exhibit.
This is the time zone setting for the exhibit.
This is the equipment list for the exhibit.
RMS User’s Guide
19
Page 32

ExhibitManager
Opening Day view
1. Select View Schedule > Day View in the menu on the left side of the RMS
application. This launches the Day View Page section on page 19.
2. You can change exhibits by selecting them from the drop down menu, Select
an exhibit.
3. You can change the day in view by clicking on another day in the calendar
under Select Date. Navigate back to the current day by clicking Today.
4. In the event there is an event for that exhibit you will see the Exhibit Details.
5. Mouse over the event to display Duration, End Time, Start Time, Recurring,
Scheduled By, Exhibit Details, Location and Event Details. Events with a
lock indicate you do not have proper permissions to view; events with a key
require a password.
6. Double click the event to edit.
20
RMS User’s Guide
Page 33

ExhibitManager
Week View Page
The Week view lists all events for the selected exhibit for a particular 7 day
period. Double-clicking on any day in the week will open the Day View
Page section on page 19.
Week View
Select an exhibit A drop down list for all exhibits available for schedule.
Select Date A navigation calendar that indicates the current date and
allows you to select other dates by clicking.
Events with a "lock" icon indicate that you do not have the
proper permissions to access that event. Events with a
"key" icon indicate password protection, and you must
provide the correct password to access the event.
This Week brings you back to the current week.
Exhibit Information:
Name
Location
Occupancy
Timezone
Equipment
The name of the exhibit.
The location of the exhibit.
The maximum number of individuals held in this exhibit.
This is the time zone setting for the exhibit.
This is the equipment list for the exhibit.
Opening Week view
1. Select View Schedule > Week View in the menu on the left side of the RMS
application. This launches the Week View Page section on page 21.
2. You can change exhibits by selecting them from the drop down menu, Select
an exhibit.
3. You can change the week in view by clicking on another day in the calendar
under Select Date. Navigate back to the current day by clicking This Week.
4. In the event there is an event for that exhibit you will see the Exhibit Details.
5. Mouse over the event to display Duration, End Time, Start Time, Recurring,
Scheduled By, Exhibit Details, Location and Event Details. Events with a
lock indicate you do not have proper permissions to view; events with a key
require a password.
6. Double click the event to edit.
RMS User’s Guide
21
Page 34
ExhibitManager
Month View Page
The Month view lists all events for the selected exhibit for a particular 6 week
period. Double-clicking on any day in the month will open the Day View
Page section on page 19.
Month View
Select an exhibit A drop down list for all exhibits available for schedule.
Select Date A navigation calendar that indicates the current date and
allows you to select other dates by clicking.
Events with a "lock" icon indicate that you do not have the
proper permissions to access that event. Events with a
"key" icon indicate password protection, and you must
provide the correct password to access the event.
This Month brings you back to the current month.
Exhibit Information:
Name
Location
Occupancy
Timezone
Equipment
The name of the exhibit.
The location of the exhibit.
The maximum number of individuals held in this exhibit.
This is the time zone setting for the exhibit.
This is the equipment list for the exhibit.
Opening Month view
1. Select View Schedule > Month View in the menu on the left side of the RMS
application. This launches the Month View Page section on page 22.
2. You can change exhibits by selecting them from the drop down menu, Select
an exhibit.
3. You can change the month in view by clicking on another day in the calendar
under Select Date. Navigate back to the current day by clicking This Month.
4. Double click any day to change to Day View Page section on page 19.
22
RMS User’s Guide
Page 35

ExhibitManager
Add Event Page
The Add Event page allows you to create and schedule your own event.
ExhibitManager will allocate the exhibit for the designated time, execute any
predefined Control Functions if available, and provide welcome text to your
visitors.
Add Event
Exhibit A drop down list of exhibits available for scheduling within
the RMS application. Search allows you to find an exhibit
base on your needs. See the Exhibit Search Page section
on page 26.
Scheduled By: A text field to provide the name of the meeting scheduler;
this field is populated by the RMS application.
Subject The subject line for the meeting purpose.
Message A larger text field for any additional information pertaining
to the meeting.
Start Time: A text field for the date (mm/dd/yyyy) the meeting has
been scheduled to start. You can click on the calendar
icon to select the date. The three following drop down
menus represent hour, minute, and designation for
ante-meridiem vs. post-meridiem (AM/PM), in that order.
End Time: A text field for the date (mm/dd/yyyy) the meeting has
been scheduled to end. You can click on the calendar icon
to select the date. The three following drop down menus
represent hour, minute, and designation for ante-meridiem
vs. post-meridiem (AM/PM), in that order.
Recurring: When checked, this option makes the meeting a recurring
event.
Pattern:
Daily
Weekly
Makes the recurring scheduled meeting a daily pattern.
• Every __ days(s) - text field for number of days between
daily recurring meeting
• Every weekday - executes the daily meeting only
Monday - Friday
Makes the recurring scheduled meeting a weekly pattern.
• Every __ week(s) on - text field for number of weeks
between weekly recurring meeting
Select the day the weekly scheduled meeting is to occur; more
than one day can be selected.
RMS User’s Guide
23
Page 36

ExhibitManager
Add Event (Cont.)
Monthly
Yearly
Lifetime:
No end date
End after __ occurrences
End by:
Automation Control
Execution
Control Event
<< / >> Moves a selected control function to the left and right
Panel Setup Up to 5 lines of text. Type a welcome message as it is to
Makes the recurring scheduled meeting a monthly pattern.
• Day __ of every __ month(s) - the drop down menus
allow you to set what day of the month the recurring
meeting executes and how many months between each
occurrence.
• The __ __ of every __ month(s) - this setting allows you
to pick either the first, second, third, fourth, or last day of
each week, and the number of months between each
occurrence.
Makes the recurring scheduled meeting a yearly pattern.
• Every __ __ - the drop down menus allow you to set the
month and day the recurring meeting occurs.
• The __ __ of __ - this setting allows you to pick either
the first, second, third, fourth, or last of each week of a
specified month.
The scheduled recurring meeting does not end.
The scheduled recurring meeting ceases to run upon
reaching the user defined parameter.
Either type the date the scheduled recurring meeting is to
end or select the date from the calendar icon.
• Upon user confirmation at start of event - The
meeting coordinator must select to run sequence at the
time of the meeting from within the exhibit.
• Automatically executes at the start of the event - The
sequence runs at the Start Time of the meeting.
Drop down menu list of available control function macros
in your selected exhibit. This event executes based on the
Execution designation.
adding or removing it from the sequence list.
be displayed on the pane in the meeting exhibit.
24
RMS User’s Guide
Page 37

ExhibitManager
Creating an Event
1. Select Add Event in the menu on the left side of the RMS application. This
launches the Add Event Page section on page 23.
2. In the drop down menu, Exhibit, select the exhibit that will host the event or
search for an exhibit by clicking Search (See Conducting an exhibit
search section on page 27).
3. Type a Subject for the event in the space provided.
4. Type a Message providing more information about the event in the larger
text field.
5. Set the Event Times, start, end and if it is a recurring event. If the event is
recurring, set the Pattern and Lifetime of the event.
6. Set the Automation Control if applicable; will the sequence execute
manually or automatically? Select the Control Event from the drop down
menu.
7. Type Welcome Text in the lines provided; these lines are displayed on the
panels in the exhibit at the time of the event.
8. Select a Touch Panel Image from the drop down menu or click Upload
Image. If you selected Upload Image, either type the path or browse to the
file you wish to use. Click Upload to load the file.
9. Click Save to save, Cancel to cancel.
RMS User’s Guide
25
Page 38

ExhibitManager
Exhibit Search Page
The Exhibit Search page allows you to search for a specific exhibit or find one
based on your event needs.
Exhibit Search
Exhibit Name The name of the exhibit.
Location The location of the exhibit
Number of Seats Needed This is the number of seats for the exhibit.
Prestige Level Select the level from the drop down list. This is the
prestige level for the exhibit.
Equipment Needed This is the equipment listed for any exhibit. All equipment
items should be separated by a comma.
Search for specific Date/Time When checked, RMS will search for an exhibit that meets
Date Needed Type the date the exhibit is needed or click the calendar
Duration The time in hours and minutes the exhibit is needed.
Search for specific time or
search in a range of times
Start Time
Search By Range
your parameters within a window of time.
icnon to select a date.
The desired start time for the event.The three
following drop down menus represent hour, minute and
designation for ante-meridiem vs. post-meridiem, in that
order.
RMS searches the availability of an exhibit based between
the Start and End time range. The three following drop
down menus represent hour, minute and designation for
ante-meridiem vs. post-meridiem, in that order.
Exhibit Search Results Page
Based on the criteria used in the Exhibit Search Page section on page 26, choose
the exhibit to use from the list displayed on this page.
Exhibit Search Results
Exhibit The name of the exhibit.
Location The location of the exhibit
Prestige Level Select the level from the drop down list. This is the
Num of Seats Needed This is the number of seats for the exhibit.
Option Select - Selects the exhibit for use within the event.
26
prestige level for the exhibit.
RMS User’s Guide
Page 39

ExhibitManager
Conducting an exhibit search
1. Select Add Event in the menu on the left side of the RMS application. This
launches the Add Event Page section on page 23.
2. Click the link Search to launch the Exhibit Search Page section on page 26.
3. Enter the exhibit criteria in the spaces provided.
4. Click Search.
5. Find an exhibit that fits your needs and allocate it to your event by clicking
Select.
Help
This link launches the User’s Guide.
RMS User’s Guide
27
Page 40

ExhibitManager
28
RMS User’s Guide
Page 41

ExhibitManager User Page
ExhibitManager User Page
Sign in Page
The Sign in page is the access page for ExhibitManager. Username and Password
are unique to each user. Remember Me will store an authentication cookie on the
user's computer and will automatically re-logon to the RMS web pages if a new
browser session is opened. This authentication cookie does have a time limit and
will expire based on a configured expiry time. If the authentication cookie has
expired, the user will be required to re-logon by entering their username and
password.
How do you sign in to RMS?
1. Type the URL of your RMS server into your web browser.
2. Type your username in the field provided.
3. Type your password in the field provided.
4. If desired, place a check in the box next to Remember Me to have RMS
remember your sign in information in future visits.
5. Click Sign In.
Preferences Page
The Preferences page allows each user to customize aspects of their
ExhibitManager experience.
Preferences
Language A drop down list of available translations for the
ExhibitManager application. ExhibitManager detects the
language of your browser and uses that unless otherwise
specified.
Your language preference is stored at the RMS server level and
it is no longer necessary to enable cookies on your browser.
Home Page: A drop down list of available ExhibitManager application web
pages that can be designated as the home page; this will be the
first page loaded upon a successful login.
Column Sorting: Clicking Reset All Data Grids returns each table within
ExhibitManager to the default sort method.
RMS User’s Guide
29
Page 42

ExhibitManager User Page
Preferences (Cont.)
Scheduling View Hours: A drop down list for the number of hours displayed in the
scheduling view of ExhibitManager.
Setting the default language
1. Select Settings > Preferences in the menu on the left side of the RMS
application. This launches the Preferences Page section on page 29.
2. Select your language from the drop down menu, Language. Auto Detect will
use the language settings of your web browser.
3. Click Save to save the setting.
Setting the home page
1. Select Settings > Preferences in the menu on the left side of the RMS
application. This launches the Preferences Page section on page 29.
2. Select your home page from the drop down menu, Language. The home
page is your default page upon sign in and any time you select Home on any
RMS page.
3. Click Save to save the setting.
Resetting column sorting
1. Select Settings > Preferences in the menu on the left side of the RMS
application. This launches the Preferences Page section on page 29.
2. Click Reset All Data Grids.
3. Click Save to save the setting.
Setting scheduling view hours
1. Select Settings > Preferences in the menu on the left side of the RMS
application. This launches the Preferences Page section on page 29.
2. Select the block of hours from the drop down menu,
3. Click Save to save the setting.
30
RMS User’s Guide
Page 43

ExhibitManager User Page
User Profile Page
The User Profile page allows the user to change personal information and
designate how the RMS application interacts with them.
User Profile
Username: This is your username in relation to logging into
Account Enabled: When this box is checked, a user is valid and can log into
Password: This is the password associated with your user account, used
Confirm Password: Retype password for confirmation. This value is required.
First Name: The first name of the user assigned to this account. This value
Last Name: The last name of the user assigned to this account. This value
Phone User’s phone number.
Mobile Phone: User’s mobile phone number.
Fax: User’s fax number.
Email 1,Email 2, Email 3,
Email 4:
Pager Provider: A drop down list of pager providers. This option is only
Pager Number: The number for contacting the pager with notifications.
Notification Time Span:
Disable Notifications
Always Send Notifications
Only Send Notifications On:
ExhibitManager. This value is required.
ExhibitManager.
at the time of login. This value is required.
is required.
is required.
User’s email address. The following drop down menu allows
you designate the email address as the default account, send
a plain text message, HTML message, or Pager Message.
Tes t sends a message to the email address. When
established, RMS will use the account to send notifications.
available if the RMS server has been configured to use Simple
Network Paging Protocol (SNPP).
When selected, notifications are not sent to this user.
When selected, all notifications are sent to this user.
The RMS server will send notification only within the
designated parameters. Place a check in the box next to the
days of the week you would like to receive notifications. Start
Time/End Time - The three drop down menus represent hour,
minute and designation for ante-meridiem vs. post-meridiem
(AM/PM), in that order. Notifications are only sent between the
start and end times.
RMS User’s Guide
31
Page 44

ExhibitManager User Page
Editing your User Profile
1. Select Settings > Profile in the menu on the left side of the RMS application.
This launches the User Profile Page section on page 31.
2. Change any of the fields but be sure to include all of the required
information.
3. Click Save to save the setting.
Changing your User Password
1. Select Settings > Profile in the menu on the left side of the RMS application.
This launches the User Profile Page section on page 31.
2. Click the Profile tab at the top of the page.
3. Enter your new Password in the provided field.
4. Confirm Password in the provided field.
5. Click Save to save the setting.
Setting User Notification Time Span
1. Select Settings > Profile in the menu on the left side of the RMS application.
This launches the User Profile Page section on page 31.
2. Click the Profile tab at the top of the page.
3. In the section, Notification Time Span, select either Disable Notifications,
Always Send Notifications, or Only Send Notification On. If you selected
Disable Notifications or Always Send Notifications, no more information is
needed and you can click Save.
4. If you selected Only Send Notifications On, set the sending parameters of the
notification.
5. Click Save to save the setting.
32
RMS User’s Guide
Page 45
ExhibitManager User Page
User Notifications Page
The User Notifications page is a listing of all notifications you are designated to
receive. Additionally, you can create new notifications for yourself.
If the user is receiving notifications because they are a member of a user role that
has been assigned a notification, they will see this in the notifications listing, but
will not be able to edit it. This can only be changed by a user administrator via
the Manage Notifications Page section on page 92 of the Administrator’s Guide.
User Notifications
Group Name The name of the group or groups receiving the selected notification.
Exhibit
Name
Status Type The type of status monitored for the notification.
User The username receiving the notification.
Email User’s email address.
Pager The pager number for the user.
Options Edit - Launches the Create New Notification Page.
The name of the exhibit being monitored for the notification.
Delete - Deletes the selected notification.
Create New Notification Page
You can assign RMS to track status types for exhibits and groups and then
provide you with notifications.
Create New Notification
Enabled When checked, the notification is active.
Groups/Exhibits A drop down list of groups and exhibits in the RMS
system. Selecting one tracks it for the purposes of the
notification. This field is required.
Users The username receiving the notification. This field is
required.
RMS User’s Guide
33
Page 46

ExhibitManager User Page
Create New Notification (Cont.)
Status Type The type of status monitored for the notification.
• Control System Error
This status type is triggered when the RMS server
detects an error within the NetLinx master control
system.
• Equipment Usage
This status type is triggered when any monitored
equipment is used.
• Help Request
This status type is triggered when the RMS server
reports receiving a help request.
• Maintenance
This status type is triggered when the RMS server
reports receiving a request for maintenance.
• Modified Event
This status type is triggered when an existing event is
modified for an exhibit either through the internal
scheduler or as detected by the RMS Scheduling
manager for an external scheduling system.
• Network
This status type is triggered when the network creates
an error.
• New Event
This status type is triggered when a new event is added
for an exhibit either through the internal scheduler or as
detected by the RMS Scheduling manager for an
external scheduling system.
• New NetLinx System
This status type is triggered when a new NetLinx system
connects to the RMS server.
• Not Assigned
This status type is triggered when a detected NetLinx
system has not been assigned.
• Exhibit Communication Error
This status type is triggered when the RMS server
software encounters a problem communicating with an
exhibit within the RMS system.
34
RMS User’s Guide
Page 47
ExhibitManager User Page
Create New Notification (Cont.)
• Security
This status type is triggered when the RMS server
reports a security parameter has been met.
• Server Status
This status type is trigger when the RMS server
software starts up.
• System Communication Error
This status type is triggered when the RMS server
software encounters a problem communicating with an
external communication system, such as SMTP or
SNPP.
This field is required.
Emails & Pager User’s email addresses. The pager number for the user.
Creating new User Notifications
1. Select Settings > Notifications in the menu on the left side of the RMS
application. This launches the User Notifications Page section on page 33.
2. Click Create New Template to launch the Create New Notification
Page section on page 33.
3. Place a check in the box, Enabled.
4. Select an exhibit or group from the drop down list Groups/Exhibits.
5. Select a Status Type to monitor from the drop down list.
6. Select the email and/or pager accounts the notification will use by placing a
check in the box.
7. Click Save to save, Cancel to cancel.
Sign Out Page
The Sign Out page confirms your selection to exit the ExhibitManager
application; select Ye s or No.
Signing Out of RMS
1. Select Sign Out in the menu on the left side of the RMS application.
2. Click Ye s to confirm.
RMS User’s Guide
35
Page 48

ExhibitManager User Page
36
RMS User’s Guide
Page 49

HomeManager
HomeManager
HomeManager Scheduling Page
The HomeManager Scheduling page provides links to viewing the application
schedule, creating an entry to the schedule, and access to the PDF version of the
User’s Guide.
View Schedule Page
The HomeManager Scheduling page provides links to viewing the schedule in
either Day, Week or Month view.
Day View Page
The Day view lists all activitys for the selected residence on a particular date.
Double clicking within the hour launches the Add Activity Page section on
page 41.
Day View
Select a residence A drop down list for all residences available for schedule.
Select Date A navigation calendar that indicates the current date and
Residence Information:
Name
Location
Occupancy
Timezone
Equipment
allows you to select other dates by clicking.
Activitys with a "lock" icon indicate you that you do not
have the proper permissions to access that activity.
Activitys with a "key" icon indicate password protection,
and you must provide the correct password to access the
activity.
Today brings you back to the current date.
The name of the residence.
The location of the residence.
The maximum number of individuals held in this
residence.
This is the time zone setting for the residence.
This is the equipment list for the residence.
RMS User’s Guide
37
Page 50

HomeManager
Opening Day view
1. Select View Schedule > Day View in the menu on the left side of the RMS
application. This launches the Day View Page section on page 37.
2. You can change residences by selecting them from the drop down menu,
Select a residence.
3. You can change the day in view by clicking on another day in the calendar
under Select Date. Navigate back to the current day by clicking Today.
4. In the event there is an activity for that residence you will see the Residence
Details.
5. Mouse over the activity to display Duration, End Time, Start Time,
Recurring, Scheduled By, Residence Details, Location and Activity Details.
Activitys with a lock indicate you do not have proper permissions to view;
activitys with a key require a password.
6. Double click the activity to edit.
38
RMS User’s Guide
Page 51

HomeManager
Week View Page
The Week view lists all activitys for the selected residence for a particular 7 day
period. Double-clicking on any day in the week will open the Day View
Page section on page 37.
Week View
Select a residence A drop down list for all residences available for schedule.
Select Date A navigation calendar that indicates the current date and
allows you to select other dates by clicking.
Activitys with a "lock" icon indicate you that you do not
have the proper permissions to access that activity.
Activitys with a "key" icon indicate password protection,
and you must provide the correct password to access the
activity.
This Week brings you back to the current week.
Residence Information:
Name
Location
Occupancy
Timezone
Equipment
The name of the residence.
The location of the residence.
The maximum number of individuals held in this
residence.
This is the time zone setting for the residence.
This is the equipment list for the residence.
Opening Week view
1. Select View Schedule > Week View in the menu on the left side of the RMS
application. This launches the Week View Page section on page 39.
2. You can change residences by selecting them from the drop down menu,
Select a residence.
3. You can change the week in view by clicking on another day in the calendar
under Select Date. Navigate back to the current day by clicking This Week.
4. In the event there is an activity for that residence you will see the Residence
Details.
5. Mouse over the activity to display Duration, End Time, Start Time,
Recurring, Scheduled By, Residence Details, Location and Activity Details.
Activitys with a lock indicate you do not have proper permissions to view;
activitys with a key require a password.
RMS User’s Guide
39
Page 52

HomeManager
6. Double click the activity to edit.
Month View Page
The Month view lists all activitys for the selected residence for a particular 6
week period. Double-clicking on any day in the month will open the Day View
Page section on page 37.
Month View
Select a residence A drop down list for all residences available for schedule.
Select Date A navigation calendar that indicates the current date and
Residence Information:
Name
Location
Occupancy
Timezone
Equipment
allows you to select other dates by clicking.
Activitys with a "lock" icon indicate you that you do not
have the proper permissions to access that activity.
Activitys with a "key" icon indicate password protection,
and you must provide the correct password to access the
activity.
This Month brings you back to the current month.
The name of the residence.
The location of the residence.
The maximum number of individuals held in this
residence.
This is the time zone setting for the residence.
This is the equipment list for the residence.
Opening Month view
1. Select View Schedule > Month View in the menu on the left side of the RMS
application. This launches the Month View Page section on page 40.
2. You can change residences by selecting them from the drop down menu,
Select a residence.
3. You can change the month in view by clicking on another day in the calendar
under Select Date. Navigate back to the current day by clicking This Month.
4. Double click any day to change to Day View Page section on page 37.
40
RMS User’s Guide
Page 53

HomeManager
Add Activity Page
The Add Activity page allows you to create and schedule your own event.
HomeManager will allocate the residence for the designated time, execute any
predefined Control Functions if available, and provide welcome text to your
guests.
Add Activity
Residence A drop down list of residences available for scheduling
within the RMS application. Search allows you to find a
residence base on your needs. See the Residence Search
Page section on page 44.
Scheduled By: A text field to provide the name of the meeting scheduler;
this field is populated by the RMS application.
Subject The subject line for the meeting purpose.
Message A larger text field for any additional information pertaining
to the meeting.
Start Time: A text field for the date (mm/dd/yyyy) the meeting has
been scheduled to start. You can click on the calendar
icon to select the date. The three following drop down
menus represent hour, minute, and designation for
ante-meridiem vs. post-meridiem (AM/PM), in that order.
End Time: A text field for the date (mm/dd/yyyy) the meeting has
been scheduled to end. You can click on the calendar icon
to select the date. The three following drop down menus
represent hour, minute, and designation for ante-meridiem
vs. post-meridiem (AM/PM), in that order.
Recurring: When checked, this option makes the meeting a recurring
event.
Pattern:
Daily
Weekly
Makes the recurring scheduled meeting a daily pattern.
• Every __ days(s) - text field for number of days between
daily recurring meeting
• Every weekday - executes the daily meeting only
Monday - Friday
Makes the recurring scheduled meeting a weekly pattern.
• Every __ week(s) on - text field for number of weeks
between weekly recurring meeting
Select the day the weekly scheduled meeting is to occur; more
than one day can be selected.
RMS User’s Guide
41
Page 54

HomeManager
Add Activity (Cont.)
Monthly
Yearly
Lifetime:
No end date
End after __ occurrences
End by:
Automation Control
Execution
Control Event
<< / >> Moves a selected control function to the left and right
Panel Setup Up to 5 lines of text. Type a welcome message as it is to
Makes the recurring scheduled meeting a monthly pattern.
• Day __ of every __ month(s) - the drop down menus
allow you to set what day of the month the recurring
meeting executes and how many months between each
occurrence.
• The __ __ of every __ month(s) - this setting allows you
to pick either the first, second, third, fourth, or last day of
each week, and the number of months between each
occurrence.
Makes the recurring scheduled meeting a yearly pattern.
• Every __ __ - the drop down menus allow you to set the
month and day the recurring meeting occurs.
• The __ __ of __ - this setting allows you to pick either
the first, second, third, fourth, or last of each week of a
specified month.
The scheduled recurring meeting does not end.
The scheduled recurring meeting ceases to run upon
reaching the user defined parameter.
Either type the date the scheduled recurring meeting is to
end or select the date from the calendar icon.
• Upon user confirmation at start of activity - The
meeting coordinator must select to run preset at the time
of the meeting from within the residence.
• Automatically executes at the start of the activity The preset runs at the Start Time of the meeting.
Drop down menu list of available control function macros
in your selected residence. This event executes based on
the Execution designation.
adding or removing it from the preset list.
be displayed on the pane in the meeting residence.
42
RMS User’s Guide
Page 55

HomeManager
Creating an Activity
1. Select Add Activity in the menu on the left side of the RMS application. This
launches the Add Activity Page section on page 41.
2. In the drop down menu, Residence, select the residence that will host the
activity or search for a residence by clicking Search (See Conducting a
residence search section on page 45).
3. Type a Subject for the activity in the space provided.
4. Type a Message providing more information about the activity in the larger
text field.
5. Set the Activity Times, start, end and if it is a recurring activity. If the activity
is recurring, set the Pattern and Lifetime of the activity.
6. Set the Automation Control if applicable; will the preset execute manually or
automatically? Select the Control Event from the drop down menu.
7. Type Welcome Text in the lines provided; these lines are displayed on the
panels in the residence at the time of the activity.
8. Select a Touch Panel Image from the drop down menu or click Upload
Image. If you selected Upload Image, either type the path or browse to the
file you wish to use. Click Upload to load the file.
9. Click Save to save, Cancel to cancel.
RMS User’s Guide
43
Page 56

HomeManager
Residence Search Page
The Residence Search page allows you to search for a specific residence or find
one based on your activity needs.
Residence Search
Residence Name The name of the residence.
Location The location of the residence
Number of Seats Needed This is the number of seats for the residence.
Prestige Level Select the level from the drop down list. This is the
prestige level for the residence.
Equipment Needed This is the equipment listed for any residence. All
equipment items should be separated by a comma.
Search for specific Date/Time When checked, RMS will search for a residence that
Date Needed Type the date the residence is needed or click the
Duration The time in hours and minutes the residence is needed.
Search for specific time or
search in a range of times
Start Time
Search By Range
meets your parameters within a window of time.
calendar icnon to select a date.
The desired start time for the activity.The three
following drop down menus represent hour, minute and
designation for ante-meridiem vs. post-meridiem, in that
order.
RMS searches the availability of a residence based
between the Start and End time range. The three following
drop down menus represent hour, minute and designation
for ante-meridiem vs. post-meridiem, in that order.
44
RMS User’s Guide
Page 57

HomeManager
Residence Search Results Page
Based on the criteria used in the Residence Search Page section on page 44,
choose the residence to use from the list displayed on this page.
Residence Search Results
Residence The name of the residence.
Location The location of the residence
Prestige Level Select the level from the drop down list. This is the
prestige level for the residence.
Num of Seats Needed This is the number of seats for the residence.
Option Select - Selects the residence for use within the
activity.
Conducting a residence search
1. Select Add Activity in the menu on the left side of the RMS application. This
launches the Add Activity Page section on page 41.
2. Click the link Search to launch the Residence Search Page section on
page 44.
3. Enter the residence criteria in the spaces provided.
4. Click Search.
5. Find a residence that fits your needs and allocate it to your activity by
clicking Select.
Help
This link launches the User’s Guide.
RMS User’s Guide
45
Page 58

HomeManager
46
RMS User’s Guide
Page 59

HomeManager User Page
HomeManager User Page
Sign in Page
The Sign in page is the access page for HomeManager. Username and Password
are unique to each user. Remember Me will store an authentication cookie on the
user's computer and will automatically re-logon to the RMS web pages if a new
browser session is opened. This authentication cookie does have a time limit and
will expire based on a configured expiry time. If the authentication cookie has
expired, the user will be required to re-logon by entering their username and
password.
How do you sign in to RMS?
1. Type the URL of your RMS server into your web browser.
2. Type your username in the field provided.
3. Type your password in the field provided.
4. If desired, place a check in the box next to Remember Me to have RMS
remember your sign in information in future visits.
5. Click Sign In.
Preferences Page
The Preferences page allows each user to customize aspects of their
HomeManager experience.
Preferences
Language A drop down list of available translations for the
HomeManager application. HomeManager detects the
language of your browser and uses that unless otherwise
specified.
Your language preference is stored at the RMS server level and
it is no longer necessary to enable cookies on your browser.
Home Page: A drop down list of available HomeManager application web
pages that can be designated as the home page; this will be the
first page loaded upon a successful login.
Column Sorting: Clicking Reset All Data Grids returns each table within
HomeManager to the default sort method.
RMS User’s Guide
47
Page 60

HomeManager User Page
Preferences (Cont.)
Scheduling View Hours: A drop down list for the number of hours displayed in the
scheduling view of HomeManager.
Setting the default language
1. Select Settings > Preferences in the menu on the left side of the RMS
application. This launches the Preferences Page section on page 47.
2. Select your language from the drop down menu, Language. Auto Detect will
use the language settings of your web browser.
3. Click Save to save the setting.
Setting the home page
1. Select Settings > Preferences in the menu on the left side of the RMS
application. This launches the Preferences Page section on page 47.
2. Select your home page from the drop down menu, Language. The home
page is your default page upon sign in and any time you select Home on any
RMS page.
3. Click Save to save the setting.
Resetting column sorting
1. Select Settings > Preferences in the menu on the left side of the RMS
application. This launches the Preferences Page section on page 47.
2. Click Reset All Data Grids.
3. Click Save to save the setting.
Setting scheduling view hours
1. Select Settings > Preferences in the menu on the left side of the RMS
application. This launches the Preferences Page section on page 47.
2. Select the block of hours from the drop down menu,
3. Click Save to save the setting.
48
RMS User’s Guide
Page 61

HomeManager User Page
User Profile Page
The User Profile page allows the user to change personal information and
designate how the RMS application interacts with them.
User Profile
Username: This is your username in relation to logging into
Account Enabled: When this box is checked, a user is valid and can log into
Password: This is the password associated with your user account, used
Confirm Password: Retype password for confirmation. This value is required.
First Name: The first name of the user assigned to this account. This value
Last Name: The last name of the user assigned to this account. This value
Phone User’s phone number.
Mobile Phone: User’s mobile phone number.
Fax: User’s fax number.
Email 1,Email 2, Email 3,
Email 4:
Pager Provider: A drop down list of pager providers. This option is only
Pager Number: The number for contacting the pager with notifications.
Notification Time Span:
Disable Notifications
Always Send Notifications
Only Send Notifications On:
HomeManager. This value is required.
HomeManager.
at the time of login. This value is required.
is required.
is required.
User’s email address. The following drop down menu allows
you designate the email address as the default account, send
a plain text message, HTML message, or Pager Message.
Tes t sends a message to the email address. When
established, RMS will use the account to send notifications.
available if the RMS server has been configured to use Simple
Network Paging Protocol (SNPP).
When selected, notifications are not sent to this user.
When selected, all notifications are sent to this user.
The RMS server will send notification only within the
designated parameters. Place a check in the box next to the
days of the week you would like to receive notifications. Start
Time/End Time - The three drop down menus represent hour,
minute and designation for ante-meridiem vs. post-meridiem
(AM/PM), in that order. Notifications are only sent between the
start and end times.
RMS User’s Guide
49
Page 62

HomeManager User Page
Editing your User Profile
1. Select Settings > Profile in the menu on the left side of the RMS application.
This launches the User Profile Page section on page 49.
2. Change any of the fields but be sure to include all of the required
information.
3. Click Save to save the setting.
Changing your User Password
1. Select Settings > Profile in the menu on the left side of the RMS application.
This launches the User Profile Page section on page 49.
2. Click the Profile tab at the top of the page.
3. Enter your new Password in the provided field.
4. Confirm Password in the provided field.
5. Click Save to save the setting.
Setting User Notification Time Span
1. Select Settings > Profile in the menu on the left side of the RMS application.
This launches the User Profile Page section on page 49.
2. Click the Profile tab at the top of the page.
3. In the section, Notification Time Span, select either Disable Notifications,
Always Send Notifications, or Only Send Notification On. If you selected
Disable Notifications or Always Send Notifications, no more information is
needed and you can click Save.
4. If you selected Only Send Notifications On, set the sending parameters of the
notification.
5. Click Save to save the setting.
50
RMS User’s Guide
Page 63

HomeManager User Page
User Notifications Page
The User Notifications page is a listing of all notifications you are designated to
receive. Additionally, you can create new notifications for yourself.
If the user is receiving notifications because they are a member of a user role that
has been assigned a notification, they will see this in the notifications listing, but
will not be able to edit it. This can only be changed by a user administrator via
the Manage Notifications Page section on page 92 of the Administrator’s Guide.
User Notifications
Group Name The name of the group or groups receiving the selected notification.
Residence
Name
Status Type The type of status monitored for the notification.
User The username receiving the notification.
Email User’s email address.
Pager The pager number for the user.
Options Edit - Launches the Create New Notification Page.
The name of the residence being monitored for the notification.
Delete - Deletes the selected notification.
Create New Notification Page
You can assign RMS to track status types for residences and groups and then
provide you with notifications.
Create New Notification
Enabled When checked, the notification is active.
Groups/Residences A drop down list of groups and residences in the RMS
system. Selecting one tracks it for the purposes of the
notification. This field is required.
Users The username receiving the notification. This field is
required.
RMS User’s Guide
51
Page 64

HomeManager User Page
Create New Notification (Cont.)
Status Type The type of status monitored for the notification.
• Control System Error
This status type is triggered when the RMS server
detects an error within the NetLinx master control
system.
• Equipment Usage
This status type is triggered when any monitored
equipment is used.
• Help Request
This status type is triggered when the RMS server
reports receiving a help request.
• Maintenance
This status type is triggered when the RMS server
reports receiving a request for maintenance.
• Modified Activity
This status type is triggered when an existing activity is
modified for a residence either through the internal
scheduler or as detected by the RMS Scheduling
manager for an external scheduling system.
• Network
This status type is triggered when the network creates
an error.
• New Activity
This status type is triggered when a new activity is
added for a residence either through the internal
scheduler or as detected by the RMS Scheduling
manager for an external scheduling system.
• New NetLinx System
This status type is triggered when a new NetLinx system
connects to the RMS server.
• Not Assigned
This status type is triggered when a detected NetLinx
system has not been assigned.
• Residence Communication Error
This status type is triggered when the RMS server
software encounters a problem communicating with a
residence within the RMS system.
52
RMS User’s Guide
Page 65

HomeManager User Page
Create New Notification (Cont.)
• Security
This status type is triggered when the RMS server
reports a security parameter has been met.
• Server Status
This status type is trigger when the RMS server
software starts up.
• System Communication Error
This status type is triggered when the RMS server
software encounters a problem communicating with an
external communication system, such as SMTP or
SNPP.
This field is required.
Emails & Pager User’s email addresses. The pager number for the user.
Creating new User Notifications
1. Select Settings > Notifications in the menu on the left side of the RMS
application. This launches the User Notifications Page section on page 51.
2. Click Create New Template to launch the Create New Notification
Page section on page 51.
3. Place a check in the box, Enabled.
4. Select a residence or group from the drop down list Groups/Residences.
5. Select a Status Type to monitor from the drop down list.
6. Select the email and/or pager accounts the notification will use by placing a
check in the box.
7. Click Save to save, Cancel to cancel.
Sign Out Page
The Sign Out page confirms your selection to exit the HomeManager application;
select Ye s or No.
Signing Out of RMS
1. Select Sign Out in the menu on the left side of the RMS application.
2. Click Ye s to confirm.
RMS User’s Guide
53
Page 66

HomeManager User Page
54
RMS User’s Guide
Page 67

IntelligentManager
IntelligentManager
IntelligentManager Scheduling Page
The IntelligentManager Scheduling page provides links to viewing the
application schedule, creating an entry to the schedule, and access to the PDF
version of the User’s Guide.
View Schedule Page
The IntelligentManager Scheduling page provides links to viewing the schedule
in either Day, Week or Month view.
Day View Page
The Day view lists all meetings for the selected room on a particular date. Double
clicking within the hour launches the Add Meeting Page section on page 59.
Day View
Select a room A drop down list for all rooms available for schedule.
Select Date A navigation calendar that indicates the current date and
allows you to select other dates by clicking.
Meetings with a "lock" icon indicate that you do not have
the proper permissions to access that meeting. Meetings
with a "key" icon indicate password protection, and you
must provide the correct password to access the meeting.
Today brings you back to the current date.
Room Information:
Name
Location
Occupancy
Timezone
Equipment
The name of the room.
The location of the room.
The maximum number of individuals held in this room.
This is the time zone setting for the room.
This is the equipment list for the room.
RMS User’s Guide
55
Page 68

IntelligentManager
Opening Day view
1. Select View Schedule > Day View in the menu on the left side of the RMS
application. This launches the Day View Page section on page 55.
2. You can change rooms by selecting them from the drop down menu, Select a
room.
3. You can change the day in view by clicking on another day in the calendar
under Select Date. Navigate back to the current day by clicking Today.
4. In the event there is a meeting for that room you will see the Room Details.
5. Mouse over the meeting to display Duration, End Time, Start Time,
Recurring, Scheduled By, Room Details, Location and Meeting Details.
Meetings with a lock indicate you do not have proper permissions to view;
meetings with a key require a password.
6. Double click the meeting to edit.
56
RMS User’s Guide
Page 69

IntelligentManager
Week View Page
The Week view lists all meetings for the selected room for a particular 7 day
period. Double-clicking on any day in the week will open the Day View
Page section on page 55.
Week View
Select a room A drop down list for all rooms available for schedule.
Select Date A navigation calendar that indicates the current date and
allows you to select other dates by clicking.
Meetings with a "lock" icon indicate that you do not have
the proper permissions to access that meeting. Meetings
with a "key" icon indicate password protection, and you
must provide the correct password to access the meeting.
This Week brings you back to the current week.
Room Information:
Name
Location
Occupancy
Timezone
Equipment
The name of the room.
The location of the room.
The maximum number of individuals held in this room.
This is the time zone setting for the room.
This is the equipment list for the room.
Opening Week view
1. Select View Schedule > Week View in the menu on the left side of the RMS
application. This launches the Week View Page section on page 57.
2. You can change rooms by selecting them from the drop down menu, Select a
room.
3. You can change the week in view by clicking on another day in the calendar
under Select Date. Navigate back to the current day by clicking This Week.
4. In the event there is a meeting for that room you will see the Room Details.
5. Mouse over the meeting to display Duration, End Time, Start Time,
Recurring, Scheduled By, Room Details, Location and Meeting Details.
Meetings with a lock indicate you do not have proper permissions to view;
meetings with a key require a password.
6. Double click the meeting to edit.
RMS User’s Guide
57
Page 70

IntelligentManager
Month View Page
The Month view lists all meetings for the selected room for a particular 6 week
period. Double-clicking on any day in the month will open the Day View
Page section on page 55.
Month View
Select a room A drop down list for all rooms available for schedule.
Select Date A navigation calendar that indicates the current date and
allows you to select other dates by clicking.
Meetings with a "lock" icon indicate that you do not have
the proper permissions to access that meeting. Meetings
with a "key" icon indicate password protection, and you
must provide the correct password to access the meeting.
This Month brings you back to the current month.
Room Information:
Name
Location
Occupancy
Timezone
Equipment
The name of the room.
The location of the room.
The maximum number of individuals held in this room.
This is the time zone setting for the room.
This is the equipment list for the room.
Opening Month view
1. Select View Schedule > Month View in the menu on the left side of the RMS
application. This launches the Month View Page section on page 58.
2. You can change rooms by selecting them from the drop down menu, Select a
room.
3. You can change the month in view by clicking on another day in the calendar
under Select Date. Navigate back to the current day by clicking This Month.
4. Double click any day to change to Day View Page section on page 55.
58
RMS User’s Guide
Page 71
IntelligentManager
Add Meeting Page
The Add Meeting page allows you to create and schedule your own event.
IntelligentManager will allocate the room for the designated time, execute any
predefined Control Functions if available, and provide welcome text to your
attendees.
Add Meeting
Room A drop down list of rooms available for scheduling within
the RMS application. Search allows you to find a room
base on your needs. See the Room Search Page section
on page 62.
Scheduled By: A text field to provide the name of the meeting scheduler;
this field is populated by the RMS application.
Subject The subject line for the meeting purpose.
Message A larger text field for any additional information pertaining
to the meeting.
Start Time: A text field for the date (mm/dd/yyyy) the meeting has
been scheduled to start. You can click on the calendar
icon to select the date. The three following drop down
menus represent hour, minute, and designation for
ante-meridiem vs. post-meridiem (AM/PM), in that order.
End Time: A text field for the date (mm/dd/yyyy) the meeting has
been scheduled to end. You can click on the calendar icon
to select the date. The three following drop down menus
represent hour, minute, and designation for ante-meridiem
vs. post-meridiem (AM/PM), in that order.
Recurring: When checked, this option makes the meeting a recurring
event.
Pattern:
Daily
Weekly
Makes the recurring scheduled meeting a daily pattern.
• Every __ days(s) - text field for number of days between
daily recurring meeting
• Every weekday - executes the daily meeting only
Monday - Friday
Makes the recurring scheduled meeting a weekly pattern.
• Every __ week(s) on - text field for number of weeks
between weekly recurring meeting
Select the day the weekly scheduled meeting is to occur; more
than one day can be selected.
RMS User’s Guide
59
Page 72

IntelligentManager
Add Meeting (Cont.)
Monthly
Yearly
Lifetime:
No end date
End after __ occurrences
End by:
Automation Control
Execution
Control Event
<< / >> Moves a selected control function to the left and right
Panel Setup Up to 5 lines of text. Type a welcome message as it is to
Makes the recurring scheduled meeting a monthly pattern.
• Day __ of every __ month(s) - the drop down menus
allow you to set what day of the month the recurring
meeting executes and how many months between each
occurrence.
• The __ __ of every __ month(s) - this setting allows you
to pick either the first, second, third, fourth, or last day of
each week, and the number of months between each
occurrence.
Makes the recurring scheduled meeting a yearly pattern.
• Every __ __ - the drop down menus allow you to set the
month and day the recurring meeting occurs.
• The __ __ of __ - this setting allows you to pick either
the first, second, third, fourth, or last of each week of a
specified month.
The scheduled recurring meeting does not end.
The scheduled recurring meeting ceases to run upon
reaching the user defined parameter.
Either type the date the scheduled recurring meeting is to
end or select the date from the calendar icon.
• Upon user confirmation at start of meeting - The
meeting coordinator must select to run preset at the time
of the meeting from within the room.
• Automatically executes at the start of the meeting The preset runs at the Start Time of the meeting.
Drop down menu list of available control function macros
in your selected room. This event executes based on the
Execution designation.
adding or removing it from the preset list.
be displayed on the pane in the meeting room.
60
RMS User’s Guide
Page 73

IntelligentManager
Creating a Meeting
1. Select Add Meeting in the menu on the left side of the RMS application. This
launches the Add Meeting Page section on page 59.
2. In the drop down menu, Room, select the room that will host the meeting or
search for a room by clicking Search (See Conducting a room search section
on page 63).
3. Type a Subject for the meeting in the space provided.
4. Type a Message providing more information about the meeting in the larger
text field.
5. Set the Meeting Times, start, end and if it is a recurring meeting. If the
meeting is recurring, set the Pat te rn and Lifetime of the meeting.
6. Set the Automation Control if applicable; will the preset execute manually or
automatically? Select the Control Event from the drop down menu.
7. Type Welcome Text in the lines provided; these lines are displayed on the
panels in the room at the time of the meeting.
8. Select a Touch Panel Image from the drop down menu or click Upload
Image. If you selected Upload Image, either type the path or browse to the
file you wish to use. Click Upload to load the file.
9. Click Save to save, Cancel to cancel.
RMS User’s Guide
61
Page 74

IntelligentManager
Room Search Page
The Room Search page allows you to search for a specific room or find one based
on your meeting needs.
Room Search
Room Name The name of the room.
Location The location of the room
Number of Seats Needed This is the number of seats for the room.
Prestige Level Select the level from the drop down list. This is the
prestige level for the room.
Equipment Needed This is the equipment listed for any room. All equipment
items should be separated by a comma.
Search for specific Date/Time When checked, RMS will search for a room that meets
Date Needed Type the date the room is needed or click the calendar
Duration The time in hours and minutes the room is needed.
Search for specific time or
search in a range of times
Start Time
Search By Range
your parameters within a window of time.
icnon to select a date.
The desired start time for the meeting.The three
following drop down menus represent hour, minute and
designation for ante-meridiem vs. post-meridiem, in that
order.
RMS searches the availability of a room based between
the Start and End time range. The three following drop
down menus represent hour, minute and designation for
ante-meridiem vs. post-meridiem, in that order.
Room Search Results Page
Based on the criteria used in the Room Search Page section on page 62, choose
the room to use from the list displayed on this page.
Room Search Results
Room The name of the room.
Location The location of the room
Prestige Level Select the level from the drop down list. This is the
Num of Seats Needed This is the number of seats for the room.
Option Select - Selects the room for use within the meeting.
62
prestige level for the room.
RMS User’s Guide
Page 75

IntelligentManager
Conducting a room search
1. Select Add Meeting in the menu on the left side of the RMS application. This
launches the Add Meeting Page section on page 59.
2. Click the link Search to launch the Room Search Page section on page 62.
3. Enter the room criteria in the spaces provided.
4. Click Search.
5. Find a room that fits your needs and allocate it to your meeting by clicking
Select.
Help
This link launches the User’s Guide.
RMS User’s Guide
63
Page 76

IntelligentManager
64
RMS User’s Guide
Page 77

IntelligentManager User Page
IntelligentManager User Page
Sign in Page
The Sign in page is the access page for IntelligentManager. Username and
Password are unique to each user. Remember Me will store an authentication
cookie on the user's computer and will automatically re-logon to the RMS web
pages if a new browser session is opened. This authentication cookie does have a
time limit and will expire based on a configured expiry time. If the authentication
cookie has expired, the user will be required to re-logon by entering their
username and password.
How do you sign in to RMS?
1. Type the URL of your RMS server into your web browser.
2. Type your username in the field provided.
3. Type your password in the field provided.
4. If desired, place a check in the box next to Remember Me to have RMS
remember your sign in information in future visits.
5. Click Sign In.
Preferences Page
The Preferences page allows each user to customize aspects of their
IntelligentManager experience.
Preferences
Language A drop down list of available translations for the
IntelligentManager application. IntelligentManager detects the
language of your browser and uses that unless otherwise
specified.
Your language preference is stored at the RMS server level and
it is no longer necessary to enable cookies on your browser.
Home Page: A drop down list of available IntelligentManager application web
pages that can be designated as the home page; this will be the
first page loaded upon a successful login.
Column Sorting: Clicking Reset All Data Grids returns each table within
IntelligentManager to the default sort method.
RMS User’s Guide
65
Page 78

IntelligentManager User Page
Preferences (Cont.)
Scheduling View Hours: A drop down list for the number of hours displayed in the
scheduling view of IntelligentManager.
Setting the default language
1. Select Settings > Preferences in the menu on the left side of the RMS
application. This launches the Preferences Page section on page 65.
2. Select your language from the drop down menu, Language. Auto Detect will
use the language settings of your web browser.
3. Click Save to save the setting.
Setting the home page
1. Select Settings > Preferences in the menu on the left side of the RMS
application. This launches the Preferences Page section on page 65.
2. Select your home page from the drop down menu, Language. The home
page is your default page upon sign in and any time you select Home on any
RMS page.
3. Click Save to save the setting.
Resetting column sorting
1. Select Settings > Preferences in the menu on the left side of the RMS
application. This launches the Preferences Page section on page 65.
2. Click Reset All Data Grids.
3. Click Save to save the setting.
Setting scheduling view hours
1. Select Settings > Preferences in the menu on the left side of the RMS
application. This launches the Preferences Page section on page 65.
2. Select the block of hours from the drop down menu,
3. Click Save to save the setting.
66
RMS User’s Guide
Page 79

IntelligentManager User Page
User Profile Page
The User Profile page allows the user to change personal information and
designate how the RMS application interacts with them.
User Profile
Username: This is your username in relation to logging into
Account Enabled: When this box is checked, a user is valid and can log into
Password: This is the password associated with your user account, used
Confirm Password: Retype password for confirmation. This value is required.
First Name: The first name of the user assigned to this account. This value
Last Name: The last name of the user assigned to this account. This value
Phone User’s phone number.
Mobile Phone: User’s mobile phone number.
Fax: User’s fax number.
Email 1,Email 2, Email 3,
Email 4:
Pager Provider: A drop down list of pager providers. This option is only
Pager Number: The number for contacting the pager with notifications.
Notification Time Span:
Disable Notifications
Always Send Notifications
Only Send Notifications On:
IntelligentManager. This value is required.
IntelligentManager.
at the time of login. This value is required.
is required.
is required.
User’s email address. The following drop down menu allows
you designate the email address as the default account, send
a plain text message, HTML message, or Pager Message.
Tes t sends a message to the email address. When
established, RMS will use the account to send notifications.
available if the RMS server has been configured to use Simple
Network Paging Protocol (SNPP).
When selected, notifications are not sent to this user.
When selected, all notifications are sent to this user.
The RMS server will send notification only within the
designated parameters. Place a check in the box next to the
days of the week you would like to receive notifications. Start
Time/End Time - The three drop down menus represent hour,
minute and designation for ante-meridiem vs. post-meridiem
(AM/PM), in that order. Notifications are only sent between the
start and end times.
RMS User’s Guide
67
Page 80

IntelligentManager User Page
Editing your User Profile
1. Select Settings > Profile in the menu on the left side of the RMS application.
This launches the User Profile Page section on page 67.
2. Change any of the fields but be sure to include all of the required
information.
3. Click Save to save the setting.
Changing your User Password
1. Select Settings > Profile in the menu on the left side of the RMS application.
This launches the User Profile Page section on page 67.
2. Click the Profile tab at the top of the page.
3. Enter your new Password in the provided field.
4. Confirm Password in the provided field.
5. Click Save to save the setting.
Setting User Notification Time Span
1. Select Settings > Profile in the menu on the left side of the RMS application.
This launches the User Profile Page section on page 67.
2. Click the Profile tab at the top of the page.
3. In the section, Notification Time Span, select either Disable Notifications,
Always Send Notifications, or Only Send Notification On. If you selected
Disable Notifications or Always Send Notifications, no more information is
needed and you can click Save.
4. If you selected Only Send Notifications On, set the sending parameters of the
notification.
5. Click Save to save the setting.
68
RMS User’s Guide
Page 81

IntelligentManager User Page
User Notifications Page
The User Notifications page is a listing of all notifications you are designated to
receive. Additionally, you can create new notifications for yourself.
If the user is receiving notifications because they are a member of a user role that
has been assigned a notification, they will see this in the notifications listing, but
will not be able to edit it. This can only be changed by a user administrator via
the Manage Notifications Page section on page 92 of the Administrator’s Guide.
User Notifications
Group Name The name of the group or groups receiving the selected notification.
Room Name The name of the room being monitored for the notification.
Status Type The type of status monitored for the notification.
User The username receiving the notification.
Email User’s email address.
Pager The pager number for the user.
Options Edit - Launches the Create New Notification Page.
Delete - Deletes the selected notification.
Create New Notification Page
You can assign RMS to track status types for rooms and groups and then provide
you with notifications.
Create New Notification
Enabled When checked, the notification is active.
Groups/Rooms A drop down list of groups and rooms in the RMS system.
Users The username receiving the notification. This field is
RMS User’s Guide
Selecting one tracks it for the purposes of the notification.
This field is required.
required.
69
Page 82

IntelligentManager User Page
Create New Notification (Cont.)
Status Type The type of status monitored for the notification.
• Control System Error
This status type is triggered when the RMS server
detects an error within the NetLinx master control
system.
• Equipment Usage
This status type is triggered when any monitored
equipment is used.
• Help Request
This status type is triggered when the RMS server
reports receiving a help request.
• Maintenance
This status type is triggered when the RMS server
reports receiving a request for maintenance.
• Modified Meeting
This status type is triggered when an existing meeting is
modified for a room either through the internal scheduler
or as detected by the RMS Scheduling manager for an
external scheduling system.
• Network
This status type is triggered when the network creates
an error.
• New Meeting
This status type is triggered when a new meeting is
added for a room either through the internal scheduler
or as detected by the RMS Scheduling manager for an
external scheduling system.
• New NetLinx System
This status type is triggered when a new NetLinx system
connects to the RMS server.
• Not Assigned
This status type is triggered when a detected NetLinx
system has not been assigned.
• Room Communication Error
This status type is triggered when the RMS server
software encounters a problem communicating with a
room within the RMS system.
70
RMS User’s Guide
Page 83

IntelligentManager User Page
Create New Notification (Cont.)
• Security
This status type is triggered when the RMS server
reports a security parameter has been met.
• Server Status
This status type is trigger when the RMS server
software starts up.
• System Communication Error
This status type is triggered when the RMS server
software encounters a problem communicating with an
external communication system, such as SMTP or
SNPP.
This field is required.
Emails & Pager User’s email addresses. The pager number for the user.
Creating new User Notifications
1. Select Settings > Notifications in the menu on the left side of the RMS
application. This launches the User Notifications Page section on page 69.
2. Click Create New Template to launch the Create New Notification
Page section on page 69.
3. Place a check in the box, Enabled.
4. Select a room or group from the drop down list Groups/Rooms.
5. Select a Status Type to monitor from the drop down list.
6. Select the email and/or pager accounts the notification will use by placing a
check in the box.
7. Click Save to save, Cancel to cancel.
Sign Out Page
The Sign Out page confirms your selection to exit the IntelligentManager
application; select Ye s or No.
Signing Out of RMS
1. Select Sign Out in the menu on the left side of the RMS application.
2. Click Ye s to confirm.
RMS User’s Guide
71
Page 84

IntelligentManager User Page
72
RMS User’s Guide
Page 85

MeetingManager
MeetingManager
MeetingManager Scheduling Page
The MeetingManager Scheduling page provides links to viewing the application
schedule, creating an entry to the schedule, and access to the PDF version of the
User’s Guide.
View Schedule Page
The MeetingManager Scheduling page provides links to viewing the schedule in
either Day, Week or Month view.
Day View Page
The Day view lists all appointments for the selected room on a particular date.
Double clicking within the hour launches the Add Appointment Page section on
page 77.
Day View
Select a room A drop down list for all rooms available for schedule.
Select Date A navigation calendar that indicates the current date and
Room Information:
Name
Location
Occupancy
Timezone
Equipment
allows you to select other dates by clicking.
Appointments with a "lock" icon indicate that you do not
have the proper permissions to access that appointment.
Appointments with a "key" icon indicate password
protection, and you must provide the correct password to
access the appointment.
Today brings you back to the current date.
The name of the room.
The location of the room.
The maximum number of individuals held in this room.
This is the time zone setting for the room.
This is the equipment list for the room.
RMS User’s Guide
73
Page 86

MeetingManager
Opening Day view
1. Select View Schedule > Day View in the menu on the left side of the RMS
application. This launches the Day View Page section on page 73.
2. You can change rooms by selecting them from the drop down menu, Select a
room.
3. You can change the day in view by clicking on another day in the calendar
under Select Date. Navigate back to the current day by clicking Today.
4. In the event there is an appointment for that room you will see the Room
Details.
5. Mouse over the appointment to display Duration, End Time, Start Time,
Recurring, Scheduled By, Room Details, Location and Appointment Details.
Appointments with a lock indicate you do not have proper permissions to
view; appointments with a key require a password.
6. Double click the appointment to edit.
74
RMS User’s Guide
Page 87

MeetingManager
Week View Page
The Week view lists all appointments for the selected room for a particular 7 day
period. Double-clicking on any day in the week will open the Day View
Page section on page 73.
Week View
Select a room A drop down list for all rooms available for schedule.
Select Date A navigation calendar that indicates the current date and
allows you to select other dates by clicking.
Appointments with a "lock" icon indicate that you do not
have the proper permissions to access that appointment.
Appointments with a "key" icon indicate password
protection, and you must provide the correct password to
access the appointment.
This Week brings you back to the current week.
Room Information:
Name
Location
Occupancy
Timezone
Equipment
The name of the room.
The location of the room.
The maximum number of individuals held in this room.
This is the time zone setting for the room.
This is the equipment list for the room.
Opening Week view
1. Select View Schedule > Week View in the menu on the left side of the RMS
application. This launches the Week View Page section on page 75.
2. You can change rooms by selecting them from the drop down menu, Select a
room.
3. You can change the week in view by clicking on another day in the calendar
under Select Date. Navigate back to the current day by clicking This Week.
4. In the event there is an appointment for that room you will see the Room
Details.
5. Mouse over the appointment to display Duration, End Time, Start Time,
Recurring, Scheduled By, Room Details, Location and Appointment Details.
Appointments with a lock indicate you do not have proper permissions to
view; appointments with a key require a password.
RMS User’s Guide
75
Page 88

MeetingManager
6. Double click the appointment to edit.
Month View Page
The Month view lists all appointments for the selected room for a particular 6
week period. Double-clicking on any day in the month will open the Day View
Page section on page 73.
Month View
Select a room A drop down list for all rooms available for schedule.
Select Date A navigation calendar that indicates the current date and
Room Information:
Name
Location
Occupancy
Timezone
Equipment
allows you to select other dates by clicking.
Appointments with a "lock" icon indicate that you do not
have the proper permissions to access that appointment.
Appointments with a "key" icon indicate password
protection, and you must provide the correct password to
access the appointment.
This Month brings you back to the current month.
The name of the room.
The location of the room.
The maximum number of individuals held in this room.
This is the time zone setting for the room.
This is the equipment list for the room.
Opening Month view
1. Select View Schedule > Month View in the menu on the left side of the RMS
application. This launches the Month View Page section on page 76.
2. You can change rooms by selecting them from the drop down menu, Select a
room.
3. You can change the month in view by clicking on another day in the calendar
under Select Date. Navigate back to the current day by clicking This Month.
4. Double click any day to change to Day View Page section on page 73.
76
RMS User’s Guide
Page 89

MeetingManager
Add Appointment Page
The Add Appointment page allows you to create and schedule your own event.
MeetingManager will allocate the room for the designated time, execute any
predefined Control Functions if available, and provide welcome text to your
attendees.
Add Appointment
Room A drop down list of rooms available for scheduling within
the RMS application. Search allows you to find a room
base on your needs. See the Room Search Page section
on page 80.
Scheduled By: A text field to provide the name of the meeting scheduler;
this field is populated by the RMS application.
Subject The subject line for the meeting purpose.
Message A larger text field for any additional information pertaining
to the meeting.
Start Time: A text field for the date (mm/dd/yyyy) the meeting has
been scheduled to start. You can click on the calendar
icon to select the date. The three following drop down
menus represent hour, minute, and designation for
ante-meridiem vs. post-meridiem (AM/PM), in that order.
End Time: A text field for the date (mm/dd/yyyy) the meeting has
been scheduled to end. You can click on the calendar icon
to select the date. The three following drop down menus
represent hour, minute, and designation for ante-meridiem
vs. post-meridiem (AM/PM), in that order.
Recurring: When checked, this option makes the meeting a recurring
event.
Pattern:
Daily
Weekly
Makes the recurring scheduled meeting a daily pattern.
• Every __ days(s) - text field for number of days between
daily recurring meeting
• Every weekday - executes the daily meeting only
Monday - Friday
Makes the recurring scheduled meeting a weekly pattern.
• Every __ week(s) on - text field for number of weeks
between weekly recurring meeting
Select the day the weekly scheduled meeting is to occur; more
than one day can be selected.
RMS User’s Guide
77
Page 90

MeetingManager
Add Appointment (Cont.)
Monthly
Yearly
Lifetime:
No end date
End after __ occurrences
End by:
Automation Control
Execution
Control Event
<< / >> Moves a selected control function to the left and right
Panel Setup Up to 5 lines of text. Type a welcome message as it is to
Makes the recurring scheduled meeting a monthly pattern.
• Day __ of every __ month(s) - the drop down menus
allow you to set what day of the month the recurring
meeting executes and how many months between each
occurrence.
• The __ __ of every __ month(s) - this setting allows you
to pick either the first, second, third, fourth, or last day of
each week, and the number of months between each
occurrence.
Makes the recurring scheduled meeting a yearly pattern.
• Every __ __ - the drop down menus allow you to set the
month and day the recurring meeting occurs.
• The __ __ of __ - this setting allows you to pick either
the first, second, third, fourth, or last of each week of a
specified month.
The scheduled recurring meeting does not end.
The scheduled recurring meeting ceases to run upon
reaching the user defined parameter.
Either type the date the scheduled recurring meeting is to
end or select the date from the calendar icon.
• Upon user confirmation at start of appointment - The
meeting coordinator must select to run preset at the time
of the meeting from within the room.
• Automatically executes at the start of the
appointment - The preset runs at the Start Time of the
meeting.
Drop down menu list of available control function macros
in your selected room. This event executes based on the
Execution designation.
adding or removing it from the preset list.
be displayed on the pane in the meeting room.
78
RMS User’s Guide
Page 91

MeetingManager
Creating an Appointment
1. Select Add Appointment in the menu on the left side of the RMS application.
This launches the Add Appointment Page section on page 77.
2. In the drop down menu, Room, select the room that will host the
appointment or search for a room by clicking Search (See Conducting a
room search section on page 81).
3. Type a Subject for the appointment in the space provided.
4. Type a Message providing more information about the appointment in the
larger text field.
5. Set the Appointment Times, start, end and if it is a recurring appointment. If
the appointment is recurring, set the Pattern and Lifetime of the appointment.
6. Set the Automation Control if applicable; will the preset execute manually or
automatically? Select the Control Event from the drop down menu.
7. Type Welcome Text in the lines provided; these lines are displayed on the
panels in the room at the time of the appointment.
8. Select a Touch Panel Image from the drop down menu or click Upload
Image. If you selected Upload Image, either type the path or browse to the
file you wish to use. Click Upload to load the file.
9. Click Save to save, Cancel to cancel.
RMS User’s Guide
79
Page 92
MeetingManager
Room Search Page
The Room Search page allows you to search for a specific room or find one based
on your appointment needs.
Room Search
Room Name The name of the room.
Location The location of the room
Number of Seats Needed This is the number of seats for the room.
Prestige Level Select the level from the drop down list. This is the
prestige level for the room.
Equipment Needed This is the equipment listed for any room. All equipment
items should be separated by a comma.
Search for specific Date/Time When checked, RMS will search for a room that meets
Date Needed Type the date the room is needed or click the calendar
Duration The time in hours and minutes the room is needed.
Search for specific time or
search in a range of times
Start Time
Search By Range
your parameters within a window of time.
icnon to select a date.
The desired start time for the appointment.The three
following drop down menus represent hour, minute and
designation for ante-meridiem vs. post-meridiem, in that
order.
RMS searches the availability of a room based between
the Start and End time range. The three following drop
down menus represent hour, minute and designation for
ante-meridiem vs. post-meridiem, in that order.
Room Search Results Page
Based on the criteria used in the Room Search Page section on page 80, choose
the room to use from the list displayed on this page.
Room Search Results
Room The name of the room.
Location The location of the room
Prestige Level Select the level from the drop down list. This is the
Num of Seats Needed This is the number of seats for the room.
Option Select - Selects the room for use within the appointment.
80
prestige level for the room.
RMS User’s Guide
Page 93

MeetingManager
Conducting a room search
1. Select Add Appointment in the menu on the left side of the RMS application.
This launches the Add Appointment Page section on page 77.
2. Click the link Search to launch the Room Search Page section on page 80.
3. Enter the room criteria in the spaces provided.
4. Click Search.
5. Find a room that fits your needs and allocate it to your appointment by
clicking Select.
Help
This link launches the User’s Guide.
RMS User’s Guide
81
Page 94

MeetingManager
82
RMS User’s Guide
Page 95

MeetingManager User Page
MeetingManager User Page
Sign in Page
The Sign in page is the access page for MeetingManager. Username and
Password are unique to each user. Remember Me will store an authentication
cookie on the user's computer and will automatically re-logon to the RMS web
pages if a new browser session is opened. This authentication cookie does have a
time limit and will expire based on a configured expiry time. If the authentication
cookie has expired, the user will be required to re-logon by entering their
username and password.
How do you sign in to RMS?
1. Type the URL of your RMS server into your web browser.
2. Type your username in the field provided.
3. Type your password in the field provided.
4. If desired, place a check in the box next to Remember Me to have RMS
remember your sign in information in future visits.
5. Click Sign In.
Preferences Page
The Preferences page allows each user to customize aspects of their
MeetingManager experience.
Preferences
Language A drop down list of available translations for the
MeetingManager application. MeetingManager detects the
language of your browser and uses that unless otherwise
specified.
Your language preference is stored at the RMS server level and
it is no longer necessary to enable cookies on your browser.
Home Page: A drop down list of available MeetingManager application web
pages that can be designated as the home page; this will be the
first page loaded upon a successful login.
Column Sorting: Clicking Reset All Data Grids returns each table within
MeetingManager to the default sort method.
RMS User’s Guide
83
Page 96

MeetingManager User Page
Preferences (Cont.)
Scheduling View Hours: A drop down list for the number of hours displayed in the
scheduling view of MeetingManager.
Setting the default language
1. Select Settings > Preferences in the menu on the left side of the RMS
application. This launches the Preferences Page section on page 83.
2. Select your language from the drop down menu, Language. Auto Detect will
use the language settings of your web browser.
3. Click Save to save the setting.
Setting the home page
1. Select Settings > Preferences in the menu on the left side of the RMS
application. This launches the Preferences Page section on page 83.
2. Select your home page from the drop down menu, Language. The home
page is your default page upon sign in and any time you select Home on any
RMS page.
3. Click Save to save the setting.
Resetting column sorting
1. Select Settings > Preferences in the menu on the left side of the RMS
application. This launches the Preferences Page section on page 83.
2. Click Reset All Data Grids.
3. Click Save to save the setting.
Setting scheduling view hours
1. Select Settings > Preferences in the menu on the left side of the RMS
application. This launches the Preferences Page section on page 83.
2. Select the block of hours from the drop down menu,
3. Click Save to save the setting.
84
RMS User’s Guide
Page 97

MeetingManager User Page
User Profile Page
The User Profile page allows the user to change personal information and
designate how the RMS application interacts with them.
User Profile
Username: This is your username in relation to logging into
Account Enabled: When this box is checked, a user is valid and can log into
Password: This is the password associated with your user account, used
Confirm Password: Retype password for confirmation. This value is required.
First Name: The first name of the user assigned to this account. This value
Last Name: The last name of the user assigned to this account. This value
Phone User’s phone number.
Mobile Phone: User’s mobile phone number.
Fax: User’s fax number.
Email 1,Email 2, Email 3,
Email 4:
Pager Provider: A drop down list of pager providers. This option is only
Pager Number: The number for contacting the pager with notifications.
Notification Time Span:
Disable Notifications
Always Send Notifications
Only Send Notifications On:
MeetingManager. This value is required.
MeetingManager.
at the time of login. This value is required.
is required.
is required.
User’s email address. The following drop down menu allows
you designate the email address as the default account, send
a plain text message, HTML message, or Pager Message.
Tes t sends a message to the email address. When
established, RMS will use the account to send notifications.
available if the RMS server has been configured to use Simple
Network Paging Protocol (SNPP).
When selected, notifications are not sent to this user.
When selected, all notifications are sent to this user.
The RMS server will send notification only within the
designated parameters. Place a check in the box next to the
days of the week you would like to receive notifications. Start
Time/End Time - The three drop down menus represent hour,
minute and designation for ante-meridiem vs. post-meridiem
(AM/PM), in that order. Notifications are only sent between the
start and end times.
RMS User’s Guide
85
Page 98

MeetingManager User Page
Editing your User Profile
1. Select Settings > Profile in the menu on the left side of the RMS application.
This launches the User Profile Page section on page 85.
2. Change any of the fields but be sure to include all of the required
information.
3. Click Save to save the setting.
Changing your User Password
1. Select Settings > Profile in the menu on the left side of the RMS application.
This launches the User Profile Page section on page 85.
2. Click the Profile tab at the top of the page.
3. Enter your new Password in the provided field.
4. Confirm Password in the provided field.
5. Click Save to save the setting.
Setting User Notification Time Span
1. Select Settings > Profile in the menu on the left side of the RMS application.
This launches the User Profile Page section on page 85.
2. Click the Profile tab at the top of the page.
3. In the section, Notification Time Span, select either Disable Notifications,
Always Send Notifications, or Only Send Notification On. If you selected
Disable Notifications or Always Send Notifications, no more information is
needed and you can click Save.
4. If you selected Only Send Notifications On, set the sending parameters of the
notification.
5. Click Save to save the setting.
86
RMS User’s Guide
Page 99

MeetingManager User Page
User Notifications Page
The User Notifications page is a listing of all notifications you are designated to
receive. Additionally, you can create new notifications for yourself.
If the user is receiving notifications because they are a member of a user role that
has been assigned a notification, they will see this in the notifications listing, but
will not be able to edit it. This can only be changed by a user administrator via
the Manage Notifications Page section on page 92 of the Administrator’s Guide.
User Notifications
Group Name The name of the group or groups receiving the selected notification.
Room Name The name of the room being monitored for the notification.
Status Type The type of status monitored for the notification.
User The username receiving the notification.
Email User’s email address.
Pager The pager number for the user.
Options Edit - Launches the Create New Notification Page.
Delete - Deletes the selected notification.
Create New Notification Page
You can assign RMS to track status types for rooms and groups and then provide
you with notifications.
Create New Notification
Enabled When checked, the notification is active.
Groups/Rooms A drop down list of groups and rooms in the RMS system.
Users The username receiving the notification. This field is
RMS User’s Guide
Selecting one tracks it for the purposes of the notification.
This field is required.
required.
87
Page 100

MeetingManager User Page
Create New Notification (Cont.)
Status Type The type of status monitored for the notification.
• Control System Error
This status type is triggered when the RMS server
detects an error within the NetLinx master control
system.
• Equipment Usage
This status type is triggered when any monitored
equipment is used.
• Help Request
This status type is triggered when the RMS server
reports receiving a help request.
• Maintenance
This status type is triggered when the RMS server
reports receiving a request for maintenance.
• Modified Appointment
This status type is triggered when an existing
appointment is modified for a room either through the
internal scheduler or as detected by the RMS
Scheduling manager for an external scheduling system.
• Network
This status type is triggered when the network creates
an error.
• New Appointment
This status type is triggered when a new appointment is
added for a room either through the internal scheduler
or as detected by the RMS Scheduling manager for an
external scheduling system.
• New NetLinx System
This status type is triggered when a new NetLinx system
connects to the RMS server.
• Not Assigned
This status type is triggered when a detected NetLinx
system has not been assigned.
• Room Communication Error
This status type is triggered when the RMS server
software encounters a problem communicating with a
room within the RMS system.
88
RMS User’s Guide
 Loading...