

Page 1

instruction manual
i!-VotingManager
integration!Solutions
Page 2

Software Warranty Agreement
GRANT OF LICENSE. AMX Corporation grants to you the right to use the enclosed i!-VotingManager software pro-
gram (the SOFTWARE) on a single central processing unit (CPU). This license is for object code only and does not
convey any rights to use of the source code.
This Agreement does not authorize you to distribute the SOFTWARE.
COPYRIGHT. The SOFTWARE is owned by AMX Corporation, and is protected by United States copyright laws and
international treaty provisions. Therefore, you must treat the SOFTWARE like any other copyrighted material (e.g., a
book or musical recording) except
val purposes, or (b) transfer the SOFTWARE to a single hard disk provided you keep the original solely for backup or
archival purposes. You may not copy the written materials accompanying the SOFTWARE.
OTHER RESTRICTIONS. You may not rent or lease the SOFTWARE, but you may transfer the SOFTWARE and
accompanying written materials on a permanent basis provided you retain no copies and the recipient agrees to the
terms of this Agreement. You may not reverse engineer, decompile, or disassemble the SOFTWARE. If the SOFTWARE is an update or has been updated, any transfer must include the most recent update and all prior versions.
You may use only one version of the SOFTWARE at any time. You may not use the version of the SOFTWARE not
being run on your CPU on any other CPU or loan, rent, lease or transfer them to another user whether with or without
consideration.
LIMITED WARRANTY
LIMITED WARRANTY. AMX Corporation warrants that the SOFTWARE will perform substantially in accordance with
the accompanying written materials for a period of ninety (90) days from the date of receipt. Any implied warranties on
the SOFTWARE and hardware are limited to ninety (90) days and one (1) year, respectively. Some states/countries do
not allow limitations on duration of an implied warranty, so the above limitation may not apply to you.
CUSTOMER REMEDIES. AMX Corporation’s entire liability and your exclusive remedy shall be, at AMX Corporation's
option, either (a) return of the price paid, or (b) repair or replacement of the SOFTWARE that does not meet AMX Corporation's Limited Warranty and which is returned to AMX Corporation. This Limited Warranty is void if failure of the
SOFTWARE or hardware has resulted from accident, abuse, or misapplication. Any replacement SOFTWARE will be
warranted for the remainder of the original warranty period or thirty (30) days, whichever is longer.
NO OTHER WARRANTIES.
not limited to implied warranties of merchantability and fitness for a particular purpose, with regard to the SOFTWARE,
the accompanying written materials, and any accompanying hardware. This limited warranty gives you specific legal
rights. You may have others which vary from state/country to state/country.
NO LIABILITY FOR CONSEQUENTIAL DAMAGES
whatsoever (including, without limitation, damages for loss of business profits, business interruption, loss of business
information, or any other pecuniary loss) arising out of the use of or inability to use this AMX Corporation product, even
if AMX Corporation has been advised of the possibility of such damages. Because some states/countries do not allow
the exclusion or limitation of liability for consequential or incidental damages, the above limitation may not apply to you.
that you may either (a) make one copy of the SOFTWARE solely for backup or archi-
AMX Corporation disclaims all other warranties, either expressed or implied, including, but
. In no event shall AMX Corporation be liable for any damages
U.S. GOVERNMENT RESTRICTED RIGHTS
The SOFTWARE and documentation are provided with RESTRICTED RIGHTS. Use, duplication, or disclosure by the
Government is subject to restrictions as set forth in subparagraph (c)(1)(ii) of The Rights in Technical Data and Computer Software clause at DFARS 252.227-7013 or subparagraphs (c)(1) and (2) of the Commercial Computer Software--Restricted Rights at 48 CFR 52.227-19, as applicable. Manufacturer is AMX Corporation, 3000 Research Drive,
Richardson, TX 75082.
If you acquired this product in the United States, this Agreement is governed by the laws of the State of Texas.
Should you have any questions concerning this Agreement, or if you desire to contact AMX for any reason, please
write: AMX Corporation, 3000 Research Drive, Richardson, TX 75082.
Page 3

Table of Contents
Table of Contents
Introduction ...............................................................................................................1
Supported Operating Systems .......................................................................................... 1
Minimum PC Requirements .............................................................................................. 2
Installing i!-VotingManager................................................................................................ 2
User Interface Layout ........................................................................................................ 3
Using i!-VotingManager ...........................................................................................9
Program Preferences ........................................................................................................ 9
NetLinx Connection ......................................................................................................... 10
Connection ............................................................................................................................. 10
Advanced ............................................................................................................................... 11
i!-Voting Agenda Editor ................................................................................................... 12
Topic Options ......................................................................................................................... 13
Agenda Editor Components ................................................................................................... 15
i!-Voting Agenda Results Viewer..................................................................................... 17
Appendix .................................................................................................................19
!-VotingManager
i
Page 4

Table of Contents
ii
i!-VotingManager
Page 5

Introduction
i!-VotingManager™ is a PC based software for use with the Platinum Solution NSS-VOTE™.
i!-VotingManager is designed to create and edit i!-Voting voting topic agendas. It is also designed
to view, export, and archive i!-Voting agenda results.
i!-VotingManager is comprised of two main components: the i!-Voting Agenda Editor and the
i!-Voting Agenda Results Viewer.
i!-Voting Agenda Editor: This component allows you to easily create and manage
multiple agenda files and download these agendas to your i!-Voting system. You can
create or edit these files offline, and then simply connect to your i!-Voting NetLinx
system and download the new or updated agenda files to the system. You can also retrieve
existing i!-Voting agenda files from the i!-Voting system back to your PC.
i!-Voting Agenda Results Viewer: This component allows you to view, export and
archive i!-Voting agenda results from the i!-Voting system. After a voting session is
completed, the results of the session are recorded to an i!-Voting agenda result file. To
view the file:
Introduction
1. Connect to the i!-Voting NetLinx system.
2. Select from the existing result files.
3. Retrieve the file.
After retrieving the file, you can print the results, save them to the PC for archival purposes, or
export the results to one of the supported formats from i!-VotingManager.
Supported Operating Systems
Windows 95
Windows NT 4.0
64 MB of installed memory)
Windows 2000
(minimum requirement); 300 MHZ or faster recommended, with 96 MB of installed
memory.)
Windows ME
300 MHZ or faster recommended, with 96 MB of installed memory.)
Windows XP
300 MHZ or faster recommended, with 128 MB of installed memory.)
®
/98® (with at least 48 MB of installed memory)
®
Workstation or Server (service pack 6 B or greater, with at least
®
Professional or Server (running on a Pentium 266 MHZ processor
®
(running on a Pentium 266 MHZ processor (minimum requirement);
®
(running on a Pentium 266 MHZ processor (minimum requirement);
i!-VotingManager
1
Page 6

Introduction
Minimum PC Requirements
Windows-compatible mouse (or other pointing device)
At least 15 MB of free disk space (150 MB recommended)
SVGA monitor, with a minimum screen resolution of 800 x 600
A Network adapter
A Sound Card
Installing i!-VotingManager
1. In Explorer, double-click i!-VotingManagerSetup.exe from the directory window where you
downloaded the i!-VotingManager install program.
2. After reading the License Agreement, select I Agree and Next to proceed.
3. The Welcome To i!-VotingManager Setup dialog opens, reminding you to close all Windows
programs before going any further. Click Next to proceed.
4. In the i!-VotingManager Select Components dialog, select which example programs you would
like to install.
5. In the Select i!-VotingManager Install Location dialog, use the Browse button to navigate to a
directory other than the default install directory, if desired. Click Next.
6. In the i!-VotingManager Shortcut Creation dialog, select Install Shortcut Icons for the
installed components on your desktop, if desired.
7. Click Next in the Start i!-VotingManager Installation dialog to install the selected components.
8. The program prompts you to restart your system to complete the installation.
Continued
2
i!-VotingManager
Page 7
User Interface Layout
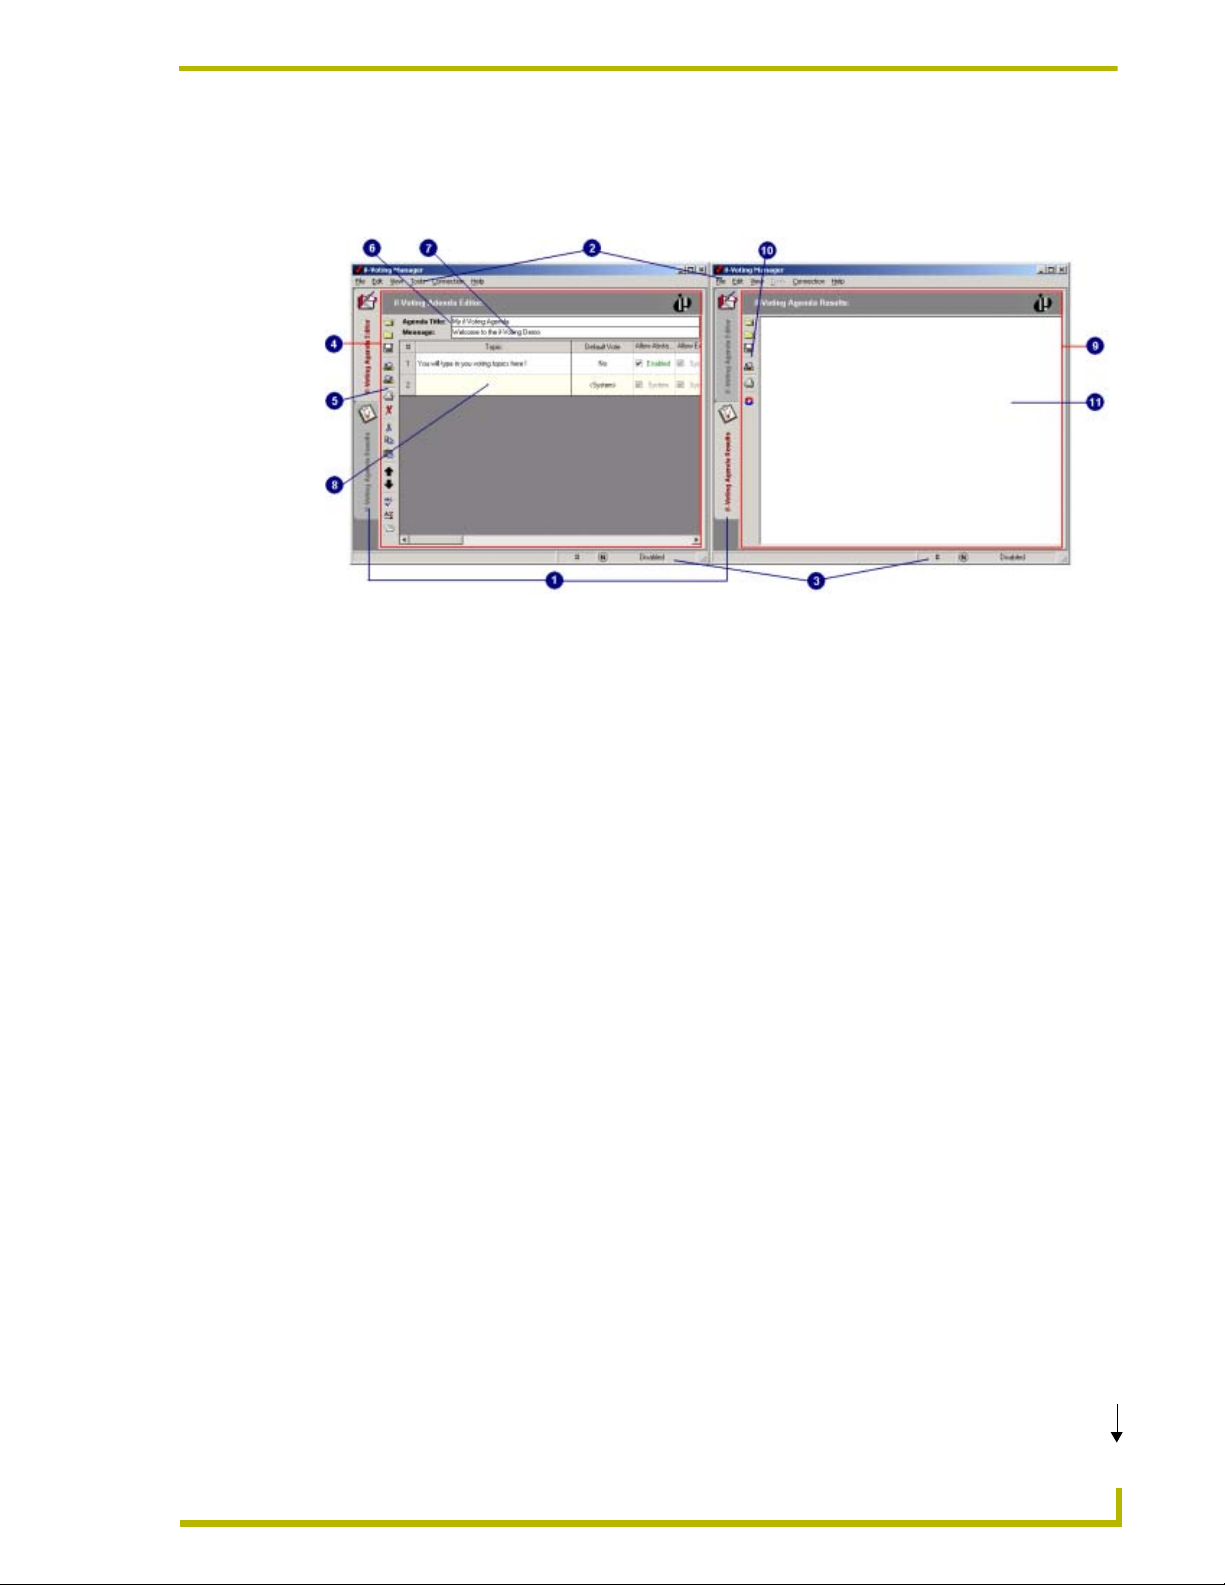
FIG. 1 displays the the graphical user interface (GUI) for i!-VotingManager.
FIG. 1 i!-VotingManager User Interface
Introduction
1. i!-VotingManager Components Selection: Click the tab of the component you wish to use
(i!-Voting Agenda Editor or i!-Voting Agenda Results Viewer).
2. i!-VotingManager Menu:
FILE
Open i!-Voting Agenda File – Opens existing agenda file.
Open i!-Voting Results File – Opens existing results file.
Close – Closes open file.
Append i!-Voting Agenda File – Appends topics from an existing agenda file to
current open agenda.
Save – Saves open file.
Print – Prints current file.
Recent i!-Voting Agenda Files – Opens agenda file from recent list.
Recent i!-Voting Results Files – Opens results file from recent list.
Minimize i!-VotingManger – Minimizes i!-VotingManager program window.
Exit i!-Voting Manager – Exits i!-VotingManager software.
EDIT
i!-VotingManager
Cut – Cuts current selection.
Copy – Copies current selection.
Paste – Pastes clipboard contents.
Program Preferences – Opens program preferences dialog.
Continued
3
Page 8
Introduction
VIEW
i!-Voting Agenda Editor – Views Agenda Editor.
i!-Voting Agenda Result – Views Agenda Results Viewer.
TOOLS
Spell Check – Launches spell check utility.
Thesaurus – Launches thesaurus utility.
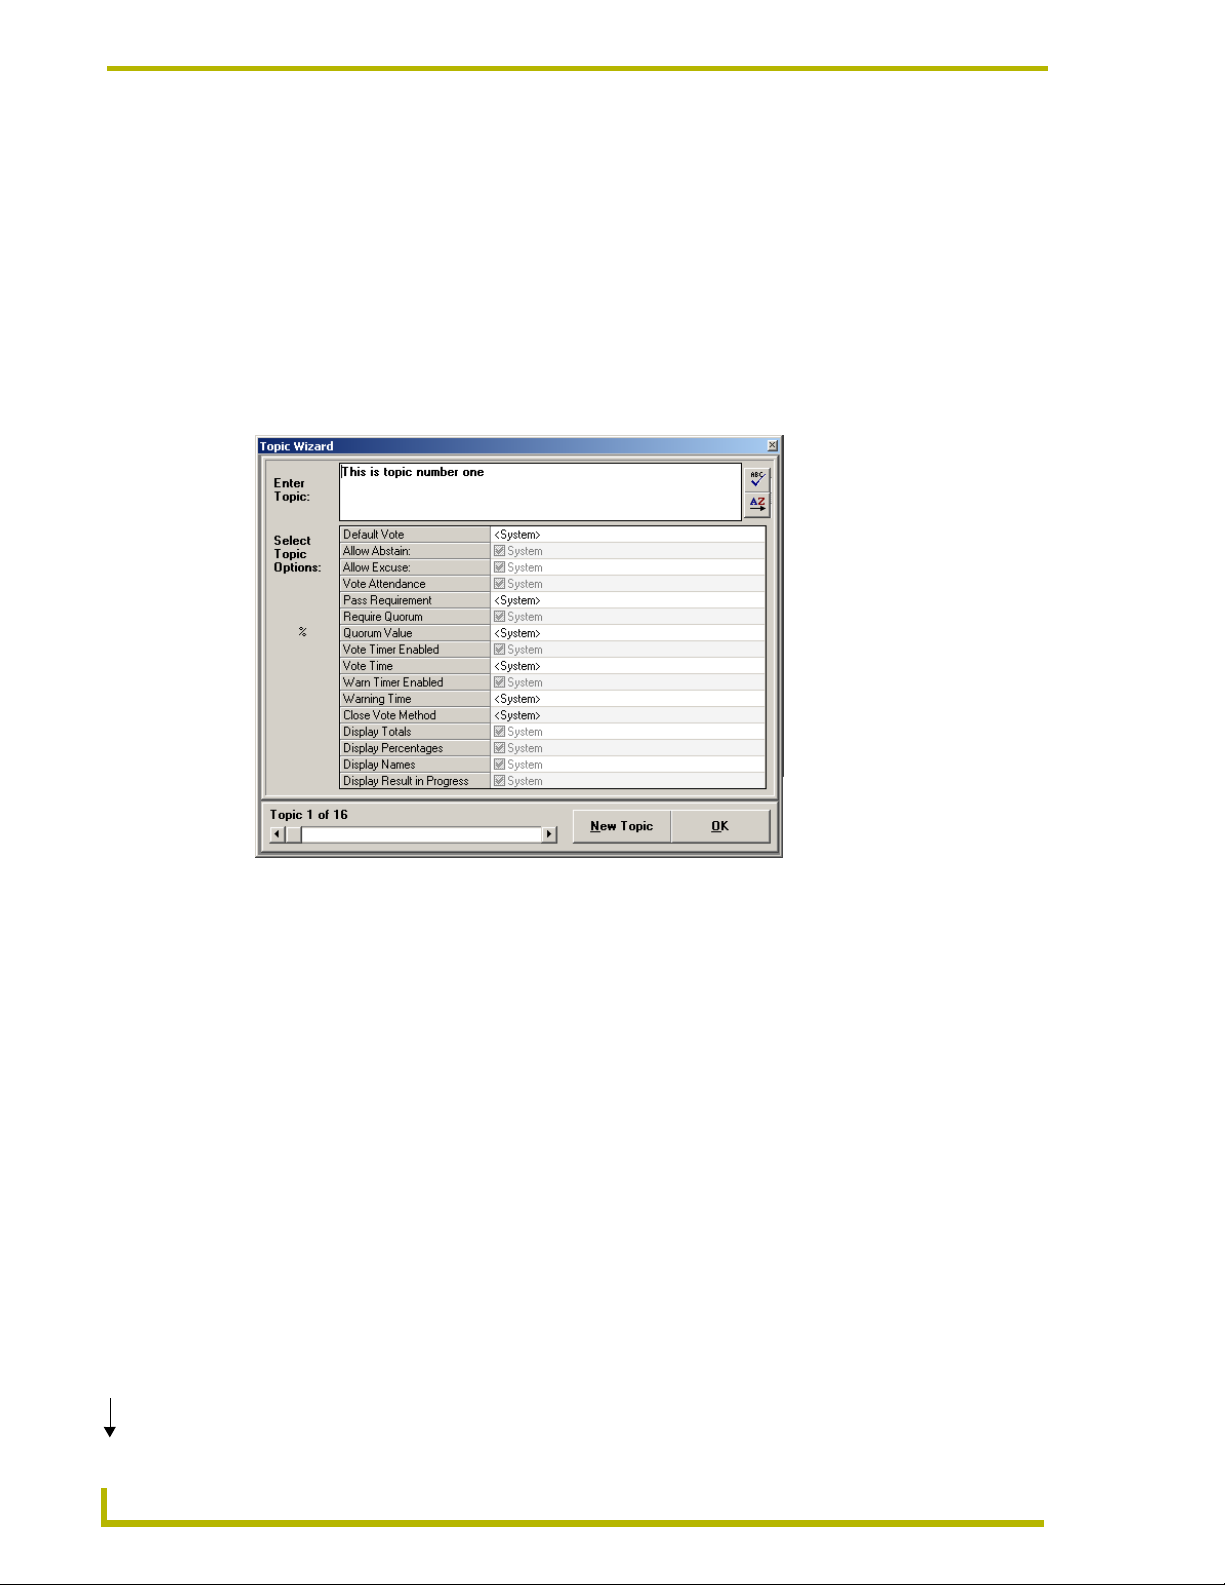
Topic Wizard – Launches the Topic Wizard dialog.
Continued
FIG. 2 Topic Wizard
Percentages in Quorum Value – Switches quorum value method to percentage.
Numbers in Quorum Value – Switches quorum value method to numbers.
4
i!-VotingManager
Page 9

CONNECTION
Connect to NetLinx – Connects to the i!-Voting NetLinx System.
Disconnect from NetLinx – Disconnects from the i!-Voting NetLinx System.
NetLinx Connection Settings – Opens NetLinx connection settings dialog.
Retrieve Agenda/Results File from i!-Voting – Uploads an existing agenda or results
file from the i!-Voting System.
Introduction
FIG. 3 Retrieve Agenda
FIG. 4 Retrieve Results
i!-VotingManager
5
Page 10

Introduction
Send Agenda/Results File to i!-Voting – Downloads an agenda or results file to the
i!-Voting System.
FIG. 5 Send Agenda
Launch Web Browser to i!-Voting System – Launches a Web browser to the
i!-Voting NetLinx Master.
HELP
i!-VotingManager Help – Opens i!-VotingManager help file.
About i!-VotingManager – Views the i!-VotingManager About dialog.
FIG. 6 About i!-VotingManager
3. i!-VotingManager Status Bar:
Status Message – Display of program status messages.
Quorum Value Method Status – Display of current quorum value method.
NetLinx Connection Status – Current NetLinx connection status.
6
i!-VotingManager
Page 11

4. i!-Voting Agenda Editor:
User interface to edit/create voting agenda files
5. Agenda Editor Toolbar:
Introduction
Open
Close
Save
Export
Send to NetLinx
Download from NetLinx
Print
Delete Selected Topic(s)
Cut
Copy
Paste
Opens Agenda file.
Closes Agenda file.
Saves Agenda file.
Exports Agenda to File.
Sends Agenda file to NetLinx.
Downloads Agenda file from NetLinx.
Prints Agenda topics.
Deletes selected Agenda topics.
Cuts selected Agenda topic cells.
Copies selected Agenda topic cells.
Pastes selected Agenda topic cells.
Move Selected Topic(s) Up
Move Selected Topic(s) Down
Spell Check
Thesaurus
Topic Wizard
6. Agenda Title:
Enter/edits Agenda title.
7. Agenda Message:
Enter/edits Agenda welcome message.
8. Top i c Gr i d:
Grid view to edit/create/manage vote topics.
Moves selected Agenda topic Up.
Moves selected Agenda topic Down.
Spell checks selected Agenda topics.
Looks up word in Thesaurus.
Launches Topic Wizard.
i!-VotingManager
7
Page 12

Introduction
9. i!-Voting Agenda Results:
User interface to view Agenda results file.
10. i!-Voting Agenda Results Toolbar:
Open
Close
Save
Retrieve from NetLinx
Export
11. i!-Voting Results: Rich Text Viewer:
Formatted rich text view of results file.
Opens Agenda file.
Closes Agenda file.
Saves Agenda file.
Retrieves Agenda file from NetLinx.
Exports Results file.
8
i!-VotingManager
Page 13

Using i!-VotingManager
Program Preferences
The program preferences dialog is divided in to three sections:
GENERAL tab: Changes the agenda editor grid colors and font settings. Also, you can
define the maximum number of voting stations in your i!-Voting system.
Using i!-VotingManager
FIG. 7 General
VISIBLE OPTIONS tab: Selects or de-selects which topic options you want to be
available on the main agenda editor grid interface.
FIG. 8 Visible Options
i!-VotingManager
9
Page 14

Using i!-VotingManager
DEFAULT OPTIONS tab: Specifies the default topic options that are applied when a
new topic is created from the main agenda editor grid interface. If the value of the topic
option is set to “SYSTEM”, when the topic is loaded in the i!-Voting system, the default
body topic option will be applied to that topic option.
FIG. 9 Default Options
NetLinx Connection
The NetLinx Connection dialog is divided into two sections:
Connection
Advanced
Connection
Continued
10
FIG. 10 NetLinx Connection
The Connection tab of the NetLinx Connection dialog contains the Connection Mode and
Connection Settings.
i!-VotingManager
Page 15

Using i!-VotingManager
The NetLinx Connection Mode selects the desired connection method to connect to your i!-Voting
system.
NetLinx Connection Modes
NETLINX TO HOST (Listen) The i!-Voting NetLinx Master initiates the connection to your PC. To use this
mode, the IP address of your PC needs to be in the NetLinx Master’s URL
list. (Please see the Appendix section on page 19)
HOST TO NETLINX (Connect) Your PC initiates the connection to the i!-Voting NetLinx Master. In this mode
you need to enter the IP address of host name of the NetLinx Master. This is
the recommended method for use with the i!-Voting system.
NO CONNECTION This mode does not allow i!-VotingManager to communicate with the
i!-Voting NetLinx Master.
The NetLinx System Settings are listed in the following table.
NetLinx System Settings
IP Address IP Address or host name of the i!-Voting NetLinx Master.
IP Port IP port for ICSP communications (Default: 1319).
Device i!-VotingManager PCLink device (Default: 8001).
Port i!-VotingManager PCLink port (read only).
System i!-VotingManager PCLink system (read only)
If the authentication requirement is enabled on the NetLinx master, you need to set I!-
VotingManager to look for and use authentication. If you do not provide authentication to a security
enabled master the connection will fail. To set the authentication:
1. Place a check next to Authentication Required. This enables the username password fields.
2. Enter a username and corresponding password already established with the target master.
The username and password fields remain populated.
For more information on setting authentication at the master level, consult the documentation for
your NetLinx master.
Advanced
The NetLinx Advanced dialog is divided into two sections:
Auto Connect – This option is visible when the NetLinx connection mode is set to
HOST TO NETLINX. i!-VotingManager attempts to auto connect to the i!-Voting
NetLinx system when this option is selected.
NetLinx Connection Log File – This option is visible when the NetLinx connection
mode is Not set to NO CONNECTION. i!-VotingManager creates a log file on the PC
with PCLink connection details when this option is enabled.
i!-VotingManager
Continued
11
Page 16

Using i!-VotingManager
FIG. 11 NetLinx Advanced
i!-Voting Agenda Editor
The i!-Voting Agenda Editor is designed to quickly and easily create and edit voting agendas for
use with the i!-Voting system. These files can be created and edited offline. The actual connection
to the i!-Voting NetLinx Master is only required to send or retrieve the files. The user interface is
designed as a spreadsheet to easily view, edit, move, or delete agenda vote topics.
Each vote topic is created on a new row of the grid interface.
Each column of the grid interface specifies the specific topic options per topic.
Continued
12
FIG. 12 i!-Voting Agenda Editor
i!-VotingManager
Page 17

Using i!-VotingManager
Topic Options that are set to the value “<System>” inherit the i!-Voting default body
options of the voting body that executes this agenda.
Topic Options
The Topic Options are listed in the following table.
Topic Options
Topic Text The actual vote topic presented to the voting members.
Default Vote This option specifies the default-selected vote for each voting station.
HOTKEY
Allow Abstain This option allows voting stations to submit an abstain vote.
HOTKEY
Allow Excuse This option allows voting stations to submit an excuse vote.
HOTKEY
Vote Attendance This option allows voting stations to submit an excuse vote.
HOTKEY
Pass Requirement The vote tally must meet the selected requirement to pass the topic.
HOTKEY
Require Quorum This vote requires quorum rules to be applied to this vote topic.
HOTKEY
AVAILABLE OPTIONS
S
<System>
N
None
Y
Ye s
O
No
A
Abstain
AVAILABLE OPTIONS
S
<System>
E
Enabled
D
Disabled
AVAILABLE OPTIONS
S
<System>
E
Enabled
D
Disabled
AVAILABLE OPTIONS
S
<System>
E
Enabled
D
Disabled
AVAILABLE OPTIONS
S
<System>
M
Majority
2
2/3 Majority
U
Unanimous
AVAILABLE OPTIONS
S
<System>
E
Enabled
D
Disabled
i!-VotingManager
13
Page 18

Using i!-VotingManager
Topic Options (Cont.)
Quorum Value This option specifies the quorum value or percentage required to pass a
Vote Time Enabled This option enable/disables the voting timer for this vote topic.
Vote Timer Time This option specifies the voting timer start time for this topic, and is only used if
Warning Timer Enabled Enable/disables the voting timer warning time option for this topic.
Warning Timer Time This option specifies the time at which the warning takes effect, and is only
Close Vote Method This option selects the method for closing the vote session for this topic.
Display Totals This option displays the totals of the vote results. As each vote is locked, the
Display Percentages This option displays the calculated percentages of the vote results. As each
quorum enabled topic. This option is only used if the Require Quorum option
is enabled.
HOTKEY
HOTKEY
the voting timer is enabled.
HOTKEY
N/A
HOTKEY
used if the voting timer and vote warning timer are enabled.
HOTKEY
N/A
HOTKEY
totals are displayed if the Display Results in Progress is enabled.
HOTKEY
vote is locked, the updated percentages are displayed if the Display Results in
Progress is enabled
HOTKEY
AVAILABLE OPTIONS
S
<System>
E
Enabled
D
Disabled
AVAILABLE OPTIONS
S
<System>
E
Enabled
D
Disabled
AVAILABLE OPTIONS
S
<System>
Enter the Time in MM:SS
AVAILABLE OPTIONS
S
<System>
E
Enabled
D
Disabled
AVAILABLE OPTIONS
S
<System>
Enter the Time in MM:SS
AVAILABLE OPTIONS
S
<System>
M
Manual
L
Last Vote
T
Timer
AVAILABLE OPTIONS
S
<System>
E
Enabled
D
Disabled
AVAILABLE OPTIONS
S
<System>
E
Enabled
D
Disabled
14
i!-VotingManager
Page 19

Using i!-VotingManager
Topic Options (Cont.)
Display Names This option displays the vote cast be each member to the i!-Voting console. As
each vote is locked, the totals are displayed if the Display Results in Progress
is enabled.
HOTKEY
Display Results in Progress This option displays the voting results as each station vote is locked.
HOTKEY
AVAILABLE OPTIONS
S
<System>
E
Enabled
D
Disabled
AVAILABLE OPTIONS
S
<System>
E
Enabled
D
Disabled
Agenda Editor Components
The following table lists the Agenda Editor components:
Agenda Editor Components
AGENDA T ITLE Specifies the Agenda title, or name displayed in the i!-Voting system.
AGENDA MESSAGE Specifies the Agenda welcome message displayed in the i!-Voting system. If
this field is left blank, then the i!-Voting body default message is used.
OPEN Opens an existing i!-Voting agenda file (*.vaf).
CLOSE Closes any open agenda files.
SAVE Saves the current listed topics to a voting agenda file (*.vaf).
EXPORT Export the current i!-Voting Agenda topics to one of the following formats:
.RTF - Rich Text Format, enhanced formatted text file.
.TXT - Text File, basic text file
.LOG - same as text file.
.XML - Extensible Markup Language file
SEND Sends the current voting agenda file to the i!-Voting NetLinx system. If the
selected voting body is password protected, you are prompted to enter the
correct password. i!-VotingManager saves each entered voting body password
until disconnecting from the i!-Voting System.
RETRIEVE Retrieves an existing voting agenda file from the i!-Voting NetLinx system. If the
selected voting body is password protected, you are prompted to enter the correct password. i!-VotingManager saves each entered voting body password
until disconnecting from the i!-Voting System.
PRINT Prints the current listed voting topics from the grid interface. If no cells are
DELETE TOPIC(S) To delete a topic the entire row must be selected. You can delete multiple
CUT Upon selecting CUT, if 1 or more cells in the grid interface are selected, then
selected in the grid interface, then the all of the visible cells are printed. If cells,
columns, and/or rows are selected, then i!-VotingManager only prints the
selected cells.
topics by selecting multiple rows before selecting delete.
Note: Pressing the DELETE key on the keyboard can also preform this
function.
the current selected cells are copied to the topic clipboard, and the existing
values are returned to default values. If no cells are selected, then the current
selected text is cut and placed in the Windows
®
clipboard.
i!-VotingManager
15
Page 20

Using i!-VotingManager
Agenda Editor Components (Cont.)
COPY Upon selecting COPY, if 1 or more cells in the grid interface are selected, then
PA ST E Upon selecting PAS TE , if 1 or more cells in the grid interface are selected and
MOVE TOPIC(S) UP You can select 1 or more topic rows and move them up in the grid interface.
MOVE TOPIC(S) DOWN You can select 1 or more topic rows and move them down in the grid interface.
SPELL CHECK A utility to check spelling is provided. If topic rows are selected, then the spell
THESAURUS A utility to check for synonyms is provided. If a particular word is highlighted in
TOPIC W IZARD The topic wizard is a tool that allows you to add/edit topics in a simple
the current selected cells are copied to the topic clipboard, and the existing
values remain intact. If no cells are selected, then the current selected text is
copied to the Windows clipboard.
data is currently in the topic clipboard, then the topic clipboard attempts to copy
itself to the grid interface. If order to PASTE the topic clipboard, the starting cell
(top left) must be in the same column position as where the data was copied or
cut from. The topic clipboard cannot paste if the columns do no line up. If no
cells are selected then the current Windows clipboard attempts to paste to any
text field.
This tool is used to re-order the position of topic in the agenda.
This tool is used to re-order the position of topic in the agenda.
check attempts to check the selected topics only. If no topic rows are selected,
the spell check utility starts at the top of the grid interface and continues over
each topic until it reaches the last topic in the grid interface.
a topic cell, then the thesaurus looks up that word. If one of the suggested
replacements is selected, it replaces the selected word. However, if no word is
highlighted then the thesaurus prompts for a word to be manually entered.
After a replacement is selected, it places it in the Windows clipboard.
one-topic view interface. The topic text and each of the topic options can be
modified in this wizard. The wizard also has a scroll bar allowing you to
navigate through each of the topics without having to use the grid interface.
16
i!-VotingManager
Page 21

i!-Voting Agenda Results Viewer
Using i!-VotingManager
FIG. 13 i!-Voting Agenda Results Main
The following table lists the Agenda Results Viewer components:
Agenda Results Viewer
OPEN Opens an existing voting result file (*.vrf).
CLOSE Closes any open voting result files.
SAVE Saves the current voting results file. (*.vrf)
RETRIEVE Retrieves an existing voting results file from the i!-Voting NetLinx system. If the
selected voting body is password protected, you are prompted to enter the
correct password. i!-VotingManager saves each entered voting body password
until disconnecting from the i!-Voting System.
PRINT Prints the current voting result file.
EXPORT Exports the current voting result file to one of the following formats:
• RTF – Rich Text File, enhanced formatted text file.
• TXT – Text File, basic text file.
• LOG – same as text file.
• XML – Extensible Markup Language file.
i!-VotingManager
17
Page 22

Using i!-VotingManager
FIG. 14 Retrieve Results
Upon attempting to RETRIEVE a voting result file, the software prompts you to delete
the file from the i!-Voting NetLinx Master. It is a good idea to remove the file from the
i!-Voting system, as i!-VotingManager is intended to retrieve these files for archival
purposes. Keeping the file system of the i!-Voting NetLinx Master clean of unessential
files aids in system performance and ease of use.
18
i!-VotingManager
Page 23

Appendix
To add host entries to the NetLinx URL list:
1. Open a terminal session (via TELNET or SERIAL) to the NetLinx Master.
2. Type “echo on”, and press the ENTER button.
3. Type “url list” , and press the ENTER button.
If no URL’s are in your NetLinx Master, it returns the following response:
“No URLs in the URL connection list”
To add a URL:
1. Type “set url”, and press the ENTER button.
The NetLinx Master should return:
No URLs in the URL connection list
"Type A and Enter to Add a URL or Enter to exit. ->”
2. Type “A”, and press the ENTER button.
The NetLinx Master should return:
“Enter URL ->”
This is where you enter the IP Address of the i!-PCLink/Media Player Host Computer.
Appendix
3. Type “192.168.1.1”, and press the ENTER button. (Replace 192.168.1.1 with your IP
Address).
The NetLinx Master should return:
“192.168.1.1” (Your IP Address)
“Enter Port or hit Enter to accept default (1319) ->”
4. Press the ENTER button to accept the default port (1319).
The NetLinx Master should return:
“Enter Type (Enter for permanent or T for temporary) ->“
5. Press the ENTER button to make the entry permanent.
The NetLinx Master should return:
“URL Added successfully.”
“Type A and Enter to Add a URL or Enter to exit. -> “
6. Press the ENTER button to exit.
To make sure the entry was made, or to check the status of the link:
Type “url list”, and press the ENTER button.
The NetLinx Master should return:
“The following URLs exist in the URL connection list”
“->Entry 0-192.168.1.1:1319 IP=192.168.1.1 State=Issue Connect”
!-VotingManager
The URL list can also be managed in NetLinx Studio™, under “NetLinx Diagnostics”.
19
Page 24

AMX reserves the right to alter specifications without notice at any time.
2005 AMX Corporation. All rights reserved. AMX, the AMX logo, the building icon, the home icon, and the light bulb icon are all trademarks of AMX Corporation.
©
brussels • dallas • los angeles • mexico city • philadelphia • shanghai • singapore • tampa • toronto* • york
3000 research drive, richardson, TX 75082 USA • 469.624.8000 • 800.222.0193 • fax 469.624.7153 • technical support 800.932.6993
033-004-2636 1/05
AMX reserves the right to alter specifications without notice at any time. *In Canada doing business as Panja Inc.
 Loading...