

Page 1
PictureFrame
instruction manual
Software
Page 2

AMX Limited Warranty and Disclaimer
AMX Corporation warrants its products to be free of defects in material and workmanship under normal use for three
(3) years from the date of purchase from AMX Corporation, with the following exceptions:
• Electroluminescent and LCD Control Panels are warranted for three (3) years, except for the display and touch
overlay components that are warranted for a period of one (1) year.
• Disk drive mechanisms, pan/tilt heads, power supplies, and MX Series products are warranted for a period of one
(1) year.
• AMX Lighting products are guaranteed to switch on and off any load that is properly connected to our lighting
products, as long as the AMX Lighting products are under warranty. AMX Corporation does guarantee the
control of dimmable loads that are properly connected to our lighting products. The dimming performance or
quality cannot be guaranteed due to the random combinations of dimmers, lamps and ballasts or transformers.
• Unless otherwise specified, OEM and custom products are warranted for a period of one (1) year.
• AMX Software is warranted for a period of ninety (90) days.
• Batteries and incandescent lamps are not covered under the warranty.
This warranty extends only to products purchased directly from AMX Corporation or an Authorized AMX Dealer.
All products returned to AMX require a Return Material Authorization (RMA) number. The RMA number is
obtained from the AMX RMA Department. The RMA number must be clearly marked on the outside of each box.
The RMA is valid for a 30-day period. After the 30-day period the RMA will be cancelled. Any shipments received
not consistent with the RMA, or after the RMA is cancelled, will be refused. AMX is not responsible for products
returned without a valid RMA number.
AMX Corporation is not liable for any damages caused by its products or for the failure of its products to perform.
This includes any lost profits, lost savings, incidental damages, or consequential damages. AMX Corporation is not
liable for any claim made by a third party or by an AMX Dealer for a third party.
This limitation of liability applies whether damages are sought, or a claim is made, under this warranty or as a tort
claim (including negligence and strict product liability), a contract claim, or any other claim. This limitation of
liability cannot be waived or amended by any person. This limitation of liability will be effective even if AMX Corporation or an authorized representative of AMX Corporation has been advised of the possibility of any such damages.
This limitation of liability, however, will not apply to claims for personal injury.
Some states do not allow a limitation of how long an implied warranty last. Some states do not allow the limitation or
exclusion of incidental or consequential damages for consumer products. In such states, the limitation or exclusion of
the Limited Warranty may not apply. This Limited Warranty gives the owner specific legal rights. The owner may
also have other rights that vary from state to state. The owner is advised to consult applicable state laws for full
determination of rights.
EXCEPT AS EXPRESSLY SET FORTH IN THIS WARRANTY, AMX CORPORATION MAKES NO
OTHER WARRANTIES, EXPRESSED OR IMPLIED, INCLUDING ANY IMPLIED WARRANTIES OF
MERCHANTABILITY OR FITNESS FOR A PARTICULAR PURPOSE. AMX CORPORATION
EXPRESSLY DISCLAIMS ALL WARRANTIES NOT STATED IN THIS LIMITED WARRANTY. ANY
IMPLIED WARRANTIES THAT MAY BE IMPOSED BY LAW ARE LIMITED TO THE TERMS OF THIS
LIMITED WARRANTY.
Page 3

Software License and Warranty Agreement
LICENSE GRANT.
AMX grants to Licensee the non-exclusive right to use the AMX Software in the manner described in this License. The AMX Software
is licensed, not sold. The AMX Software consists of generally available programming and development software, product
documentation, sample applications, tools and utilities, and miscellaneous technical information. Please refer to the README.TXT
file on the compact disc or download for further information regarding the components of the AMX Software. The AMX Software is
subject to restrictions on distribution described in this License Agreement. YOU MAY NOT LICENSE, RENT, OR LEASE THE AMX
SOFTWARE. You may not reverse engineer, decompile, or disassemble the AMX Software.
INTELLECTUAL PROPERTY.
The AMX Software is owned by AMX and is protected by United States copyright laws, patent laws, international treaty provisions,
and/or state of Texas trade secret laws. Licensee may make copies of the AMX Software solely for backup or archival purposes.
Licensee may not copy the written materials accompanying the AMX Software.
TERMINATION. AMX RESERVES THE RIGHT, IN ITS SOLE DISCRETION, TO TERMINATE THIS LICENSE FOR
ANY REASON AND UPON WRITTEN NOTICE TO LICENSEE.
In the event that AMX terminates this License, the Licensee shall return or destroy all originals and copies of the AMX Software to
AMX and certify in writing that all originals and copies have been returned or destroyed.
PRE-RELEASE CODE.
Portions of the AMX Software may, from time to time, as identified in the AMX Software, include PRE-RELEASE CODE and such
code may not be at the level of performance, compatibility and functionality of the final code. The PRE-RELEASE CODE may not
operate correctly and may be substantially modified prior to final release or certain features may not be generally released. AMX is
not obligated to make or support any PRE-RELEASE CODE. ALL PRE-RELEASE CODE IS PROVIDED "AS IS" WITH NO
WARRANTIES.
LIMITED WARRANTY.
AMX warrants that the AMX Software will perform substantially in accordance with the accompanying written materials for a period of
ninety (90) days from the date of receipt. AMX DISCLAIMS ALL OTHER WARRANTIES, EITHER EXPRESS OR IMPLIED,
INCLUDING, BUT NOT LIMITED TO IMPLIED WARRANTIES OF MERCHANTABILITY AND FITNESS FOR A PARTICULAR
PURPOSE, WITH REGARD TO THE AMX SOFTWARE. THIS LIMITED WARRANTY GIVES YOU SPECIFIC LEGAL RIGHTS.
Any supplements or updates to the AMX SOFTWARE, including without limitation, any (if any) service packs or hot fixes provided to
you after the expiration of the ninety (90) day Limited Warranty period are not covered by any warranty or condition, express, implied
or statutory.
LICENSEE REMEDIES.
AMX's entire liability and your exclusive remedy shall be repair or replacement of the AMX Software that does not meet AMX's
Limited Warranty and which is returned to AMX. This Limited Warranty is void if failure of the AMX Software has resulted from
accident, abuse, or misapplication. Any replacement AMX Software will be warranted for the remainder of the original warranty period
or thirty (30) days, whichever is longer. Outside the United States, these remedies may not available.
NO LIABILITY FOR CONSEQUENTIAL DAMAGES. IN NO EVENT SHALL AMX BE LIABLE FOR ANY DAMAGES
WHATSOEVER (INCLUDING, WITHOUT LIMITATION, DAMAGES FOR LOSS OF BUSINESS PROFITS, BUSINESS
INTERRUPTION, LOSS OF BUSINESS INFORMATION, OR ANY OTHER PECUNIARY LOSS) ARISING OUT OF THE USE OF OR
INABILITY TO USE THIS AMX SOFTWARE, EVEN IF AMX HAS BEEN ADVISED OF THE POSSIBILITY OF SUCH DAMAGES.
BECAUSE SOME STATES/COUNTRIES DO NOT ALLOW THE EXCLUSION OR LIMITATION OF LIABILITY FOR
CONSEQUENTIAL OR INCIDENTAL DAMAGES, THE ABOVE LIMITATION MAY NOT APPLY TO YOU.
U.S. GOVERNMENT RESTRICTED RIGHTS. The AMX Software is provided with RESTRICTED RIGHTS. Use, duplication, or
disclosure by the Government is subject to restrictions as set forth in subparagraph (c)(1)(ii) of The Rights in Technical Data and
Computer Software clause at DFARS 252.227-7013 or subparagraphs (c)(1) and (2) of the Commercial Computer Software
Restricted Rights at 48 CFR 52.227-19, as applicable.
This Agreement replaces and supercedes all previous AMX Software License Agreements and is governed by the laws
of the State of Texas, and all disputes will be resolved in the courts in Collin County, Texas, USA. Should you have any
questions concerning this Agreement, or if you desire to contact AMX for any reason, please write: AMX Corporation,
3000 Research Drive, Richardson, TX 75082.
Page 4

Page 5

Table of Contents
Table of Contents
Overview ....................................................................................................................1
Supported Platforms.......................................................................................................... 2
The PictureFrame Work Area............................................................................................ 2
Menu Bar.................................................................................................................................. 2
Tool Bar.................................................................................................................................... 3
Album Information Window ...................................................................................................... 3
Album Information Window ............................................................................................... 3
Images for Album: Window ............................................................................................... 4
Panel Management Window ............................................................................................. 4
Image Interface Window.................................................................................................... 4
HTTP Server Status Window ............................................................................................ 4
Web Server Status ............................................................................................................ 4
The Menu Bar.................................................................................................................... 5
File Menu ................................................................................................................................. 5
Server Menu............................................................................................................................. 5
Albums Menu ........................................................................................................................... 5
Images Menu ........................................................................................................................... 5
Panel Links Menu..................................................................................................................... 6
View Menu ............................................................................................................................... 6
Help Menu................................................................................................................................ 6
Tool Bar............................................................................................................................. 6
Basic Operations ......................................................................................................7
Image Management .......................................................................................................... 7
Adding A Local Image .............................................................................................................. 7
Adding An Internet Image ........................................................................................................ 7
Removing An Image................................................................................................................. 7
Enabling An Image................................................................................................................... 7
Disabling An Image .................................................................................................................. 7
Moving Images......................................................................................................................... 8
Changing Image Durations ...................................................................................................... 8
Getting Image Properties ......................................................................................................... 8
Panel Management ........................................................................................................... 9
Adding A Panel Link................................................................................................................. 9
Device:Port:System (D:P:S) ..................................................................................................... 9
Removing A Panel Link.......................................................................................................... 10
Enabling A Panel Link ............................................................................................................ 10
ictureFrame
i
Page 6

Table of Contents
Disabling A Panel Link ........................................................................................................... 10
Album Management........................................................................................................ 11
Adding A New Album ............................................................................................................. 11
Removing An Album .............................................................................................................. 11
Changing Default Image Duration.......................................................................................... 11
Setting A Default Album ......................................................................................................... 11
Toggling Random Order......................................................................................................... 11
Server Management........................................................................................................ 12
Using The HTTP Server......................................................................................................... 12
Changing Views .............................................................................................................. 12
Creating A Dynamic Image for Use in PictureFrame ...................................................... 12
Command Line Options .................................................................................................. 13
Saving Albums ................................................................................................................ 13
Using WebUpdate ........................................................................................................... 13
Exiting PictureFrame....................................................................................................... 13
Program Reference ................................................................................................15
Dialogs ............................................................................................................................ 15
Add Album Dialog .................................................................................................................. 15
Change Default Duration Dialog ............................................................................................ 15
Exiting PictureFrame Warning Dialog .................................................................................... 15
Image Properties Dialog......................................................................................................... 15
Internet Image Dialog............................................................................................................. 16
Open Image Dialog ................................................................................................................ 16
Panel Link Entry Dialog.......................................................................................................... 16
Reset Image Dialog................................................................................................................ 16
Save Changes Warning Dialog .............................................................................................. 17
Context Menus ................................................................................................................ 17
Image Context Menu.............................................................................................................. 17
Panel Context Menu............................................................................................................... 17
ii
PictureFrame
Page 7

Overview
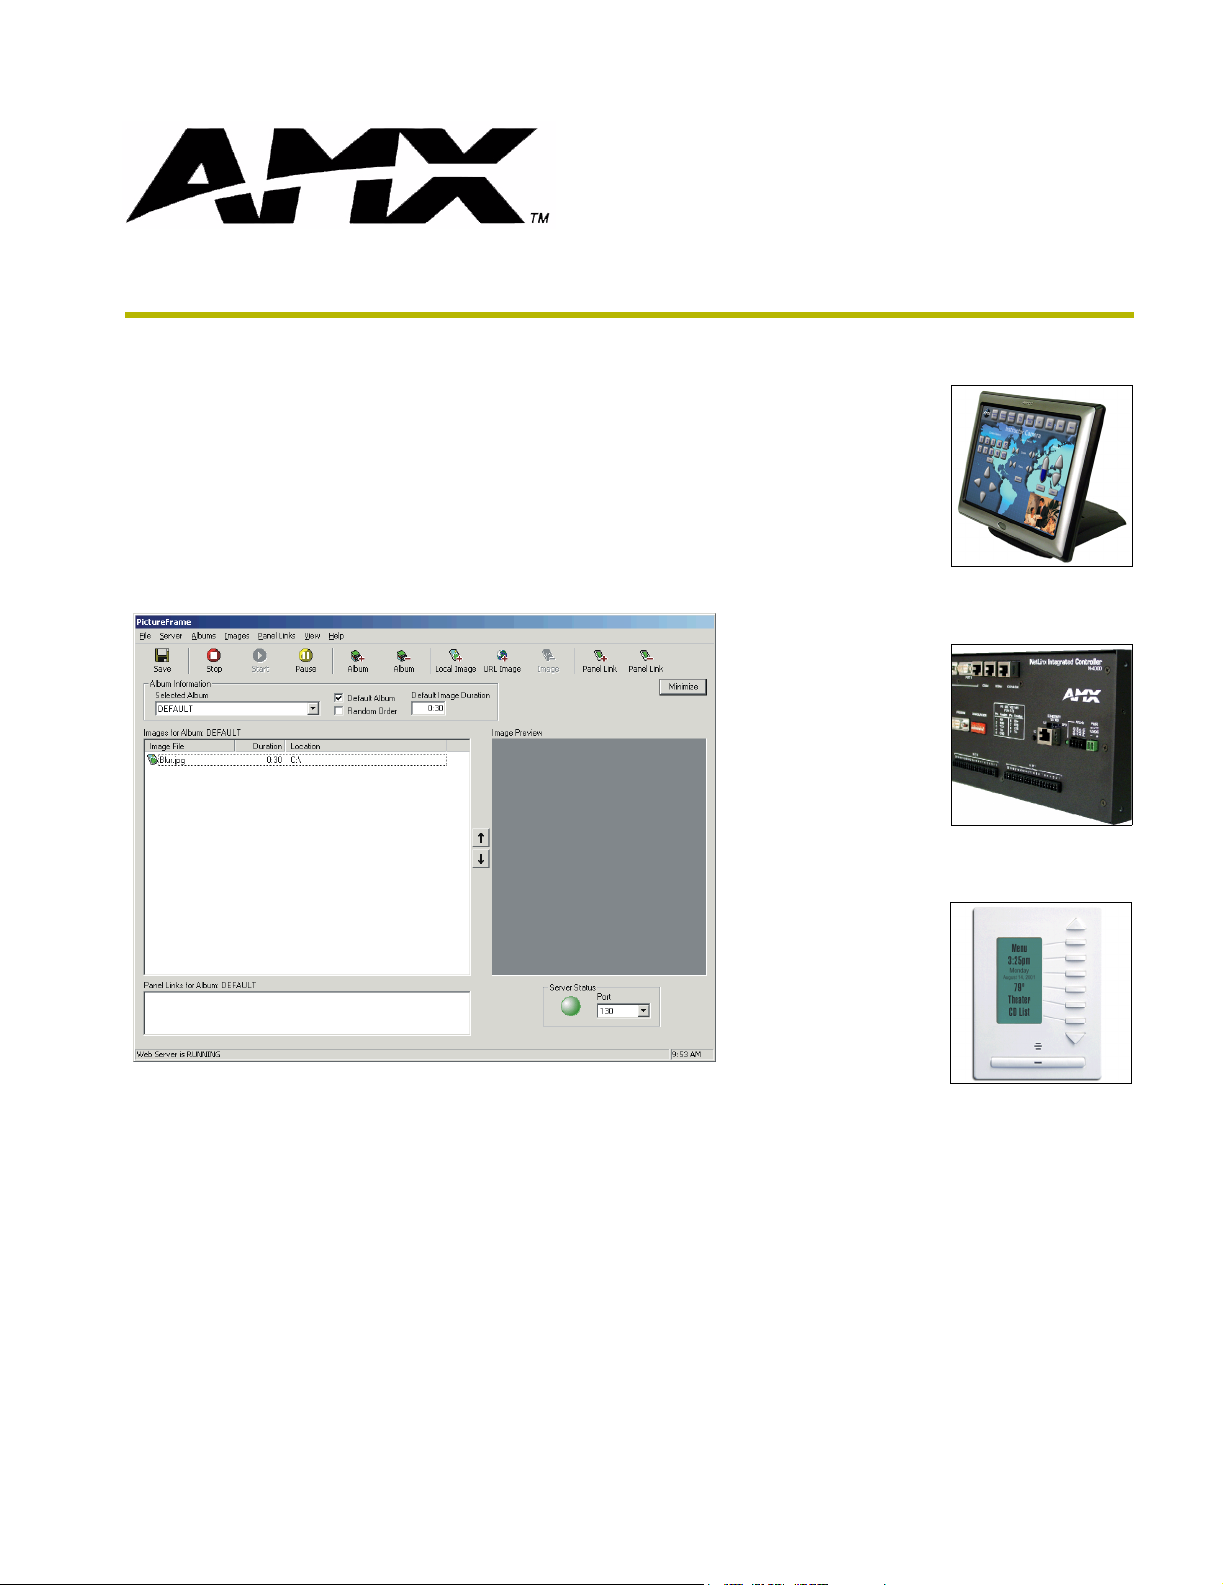
PictureFrame allows for the management of images displayed on G4 panels. Images located on a
local server or the internet are displayed on panels, made possible with dynamic images.
Key functionality of PictureFrame includes:
Overview
HTTP Local Server - The server acts as an HTTP host where it receives requests from
the panels, determines which album and picture to use, resizes the picture and streams it
back to the panels.
Album Management - Album information is stored in an XML file that is loaded with
PictureFrame. Images can be added/removed, enabled/disabled and moved to associated
albums. Panels are then tied to albums via their device and port/code numbers. The album
arrangement allows different panels to access specific albums or individual buttons on the
same panel.
Image Interface - The image interface displays the albums and their associated images
and panels. Images can be viewed by either thumbnail or detail list. Additionally, there is
the ability to stop, start and pause the HTTP server.
Image serving is controlled by the parameters sent from the panel to PictureFrame. The HTTP
server listens on its port and when an argument is made, parses the arguments to determine how to
proceed. The Device is used to determine which album the request is for and uses the default album
if no match is made. PictureFrame then determines the time allowance for each image in the album
and sizes each image according to width and height parameters. If no parameters are present the
image's height and width are used. A temporary file is created from the resized image and is sent to
the panels. PictureFrame will continue to send the temporary files to the panels until the application
is shutdown.
This does not apply to Internet Images, these images are fetched each time they are
served.
ictureFrame
1
Page 8
Overview
Supported Platforms
PictureFrame operates on:
Windows 98® SE (with at least 48 MB of installed memory).
Windows NT 4.0® Workstation (service pack 6A or greater, with at least 64 MB of
installed memory).
Windows 2000® (service pack 3 or greater) Professional (running on a Pentium 233
MHZ processor (minimum requirement); 300 MHZ or faster recommended, with at least
96 MB of installed memory).
If you are installing on a Windows NT or Window 2000 machine, you must have
Administrator rights to install and run all required System files.
Windows XP® Professional (service pack 1 or greater, running on a Pentium 233 MHZ
processor (minimum requirement); 300 MHZ or faster recommended, at least 96 MB of
installed memory).
Other PC requirements:
Windows-compatible CD-ROM drive.
Windows-compatible mouse (or other pointing device).
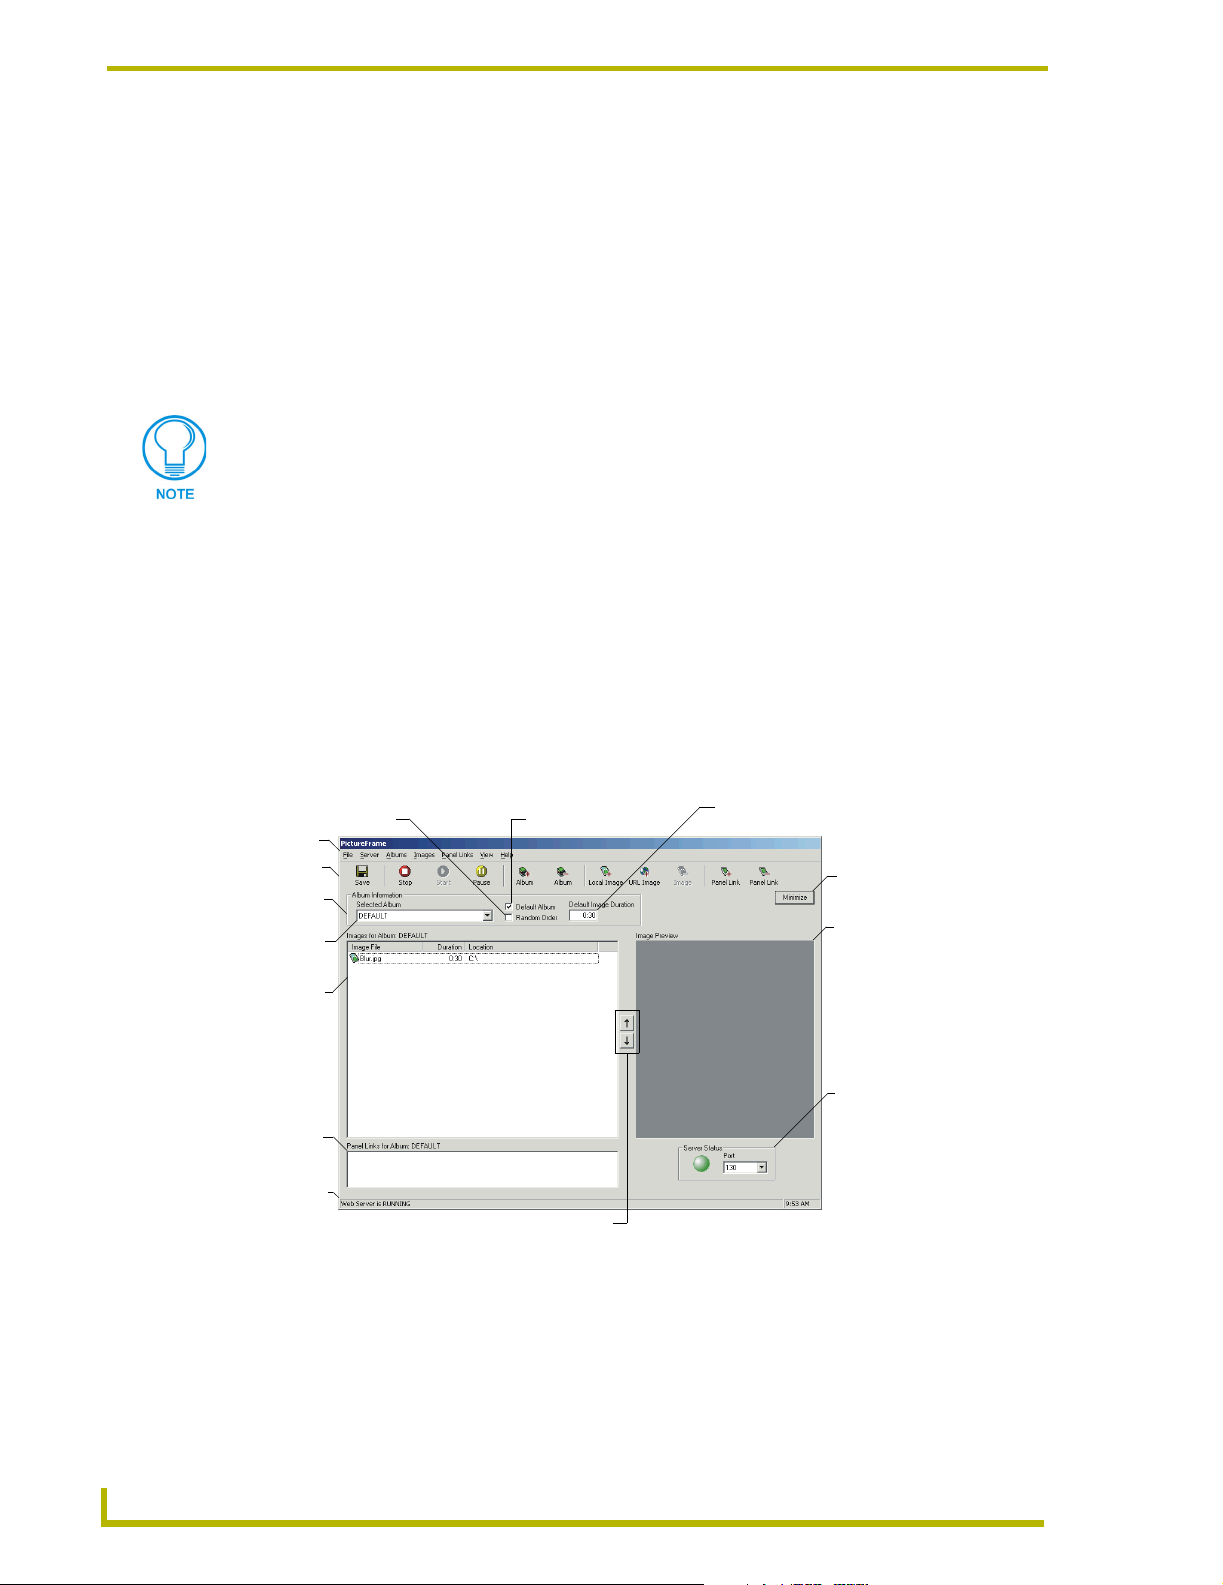
The PictureFrame Work Area
Random Order Check Box
Menu Bar
Tool Bar
Album
Information
Window
Album Drop
Down List
Images
for Album:
Window
Panel
Management
Window
Web Server
Status
Move Image Up/Move Image Down
FIG. 1 The PictureFrame Work Area
Default Album Check Box
Default Image Duration Field
Minimize
Button
Image
Interface
Window
HTTP
Server
Status
Window
Menu Bar
Click on any of the main menu items to open the associated drop down menu. The menu bar
consists of File, Server, Albums, Images, Panel Links, View and Help.
2
PictureFrame
Page 9

Overview
Tool Bar
The tool bar is a collection of commonly used PictureFrame functions.
Album Information Window
The Selected Album drop down list is a collection of created albums associated with
PictureFrame.
When checked, Default Album designates the album selected in the Album Drop Down
List as default.
Enabling Random Order will serve images, in the selected album, in a random manner.
Default Image Duration is the amount of time each image within the album will display at
the panels by default. PictureFrame default is 30 seconds.
Minimize accepts the changes and closes the work area, but does not exit PictureFrame.
Based on what the server is currently doing, Web Server Status will read Web Server is RUNNING,
...STOPPED or ...PAU SE D.
The PictureFrame work area divides up into main windows:
Images for Album: window - All images associated with the album that appears in the
Album Drop Down List. The up and down arrows move a selected image up or down
within the list.
Panel Management window - All panels associated with the album that appears in the
Album Drop Down List.
Image Interface window - A preview of images selected in the Album Management
window.
HTTP Server Status window - Displays the sever's current status and port location.
Album Information Window - Quick album management.
Album Information Window
The Album Information window offers quick management of albums.
A drop down list of all albums within PictureFrame.
A check in the box next to Default Album will make the currently selected album the
default.
A check in the box next to Random Order will make the currently selected album serve
the images in a random order.
The length of time each image will display appears in the field under Default Image
Duration. Changing the time in this field will change the default for the album.
ictureFrame
3
Page 10

Overview
Images for Album: Window
Once an album is selected from the drop down list, associated images are displayed in the Images
for Album: window.
Images can be viewed by either thumbnail or detail. This feature is toggled in the View
menu.
The up/down arrows move images up or down the service order.
Image Status
Local Image, enabled for serving
Local Image, disabled from serving
Local Image, could not find
Internet Image, enabled for serving
Internet Image, disabled for serving
Panel Management Window
All panels associated with the album that appears in the Album Drop Down List are located in the
Panel Management window.
Right-click within the Panel Management window to access the panel context menu.
Image Interface Window
The Image Interface window provides an enlarged view of images selected in the Album
Management window.
HTTP Server Status Window
The status of the HTTP server is indicated as following:
Green - The server is runnnig.
Ye ll ow - The server is paused.
Red - The server is stopped.
Additionally, the port location for PictureFrame can be changed with the drop down list. Choose
from 80, 83, 130 (default), 140 and 1318.
The status of the HTTP server is also shown in the Web Server status.
Web Server Status
PictureFrame displays the current HTTP server status in the lower left hand side of the work area.
The comments are:
Web Server is RUNNING
Web Serve r i s PAUS E D
Web Server is STOPPED
4
PictureFrame
Page 11

Overview
The Menu Bar
File Menu
The File menu contains options relating to management of file changes and exiting PictureFrame.
The options in this menu include:
Save Albums - saves album data to XML file.
Exit - exits PictureFrame application.
Server Menu
The Server menu contains options relating to HTTP server options.
Start Server - starts HTTP server if it is not already running.
Pause Server - pauses HTTP server and continues with the next image upon restart.
Stop Server - stops HTTP server, restarts with first image in albums.
Albums Menu
The Albums menu contains options relating to album management and:
Add Album - adds a new album to the application.
Remove Album - removes selected album from PictureFrame.
Set As Default Album - sets current album as new default album.
Toggle Random Order - when selected, serves the images to the panels in a random
order.
Change Default Image Duration - changes default image duration.
Images Menu
Add Local Image - adds local image to the selected album via the Open Image Dialog.
Add Internet Image - adds internet image to the selected album via the Internet Image
Dialog.
Remove Image(s) - removes selected image from the album.
Enable Image(s) - enables selected image for server.
Disable Image(s) - disables selected image (not served).
Move Up - moves the selected image up by one (1) in the display list.
Move Down - moves the selected image down by one (1) in the display list.
ictureFrame
Reset All Image Durations - resets all image durations for the album.
Image Properties - opens the Image Properties Dialog.
5
Page 12
Overview
Panel Links Menu
The Panel Links menu contains options relating to panel management and link creation:
Add Panel Link - adds panel link to the selected album via the Panel Link Entry Dialog.
Remove Panel Link(s) - removes selected panel link from the album.
Enable Panel Link(s) - enables link from panel to album.
Disable Panel Link(s) - disables link from panel to album.
View Menu
The View menu contains options relating to Image appearance within the albums.
Details - shows image list in detail format.
Thumbnails - shows image list in thumbnail format.
Help Menu
The Help menu contains options relating to Information for PictureFrame and access to application
updates:
About - version and © information.
WebUpdate - when installed, launches WebUpdate utility.
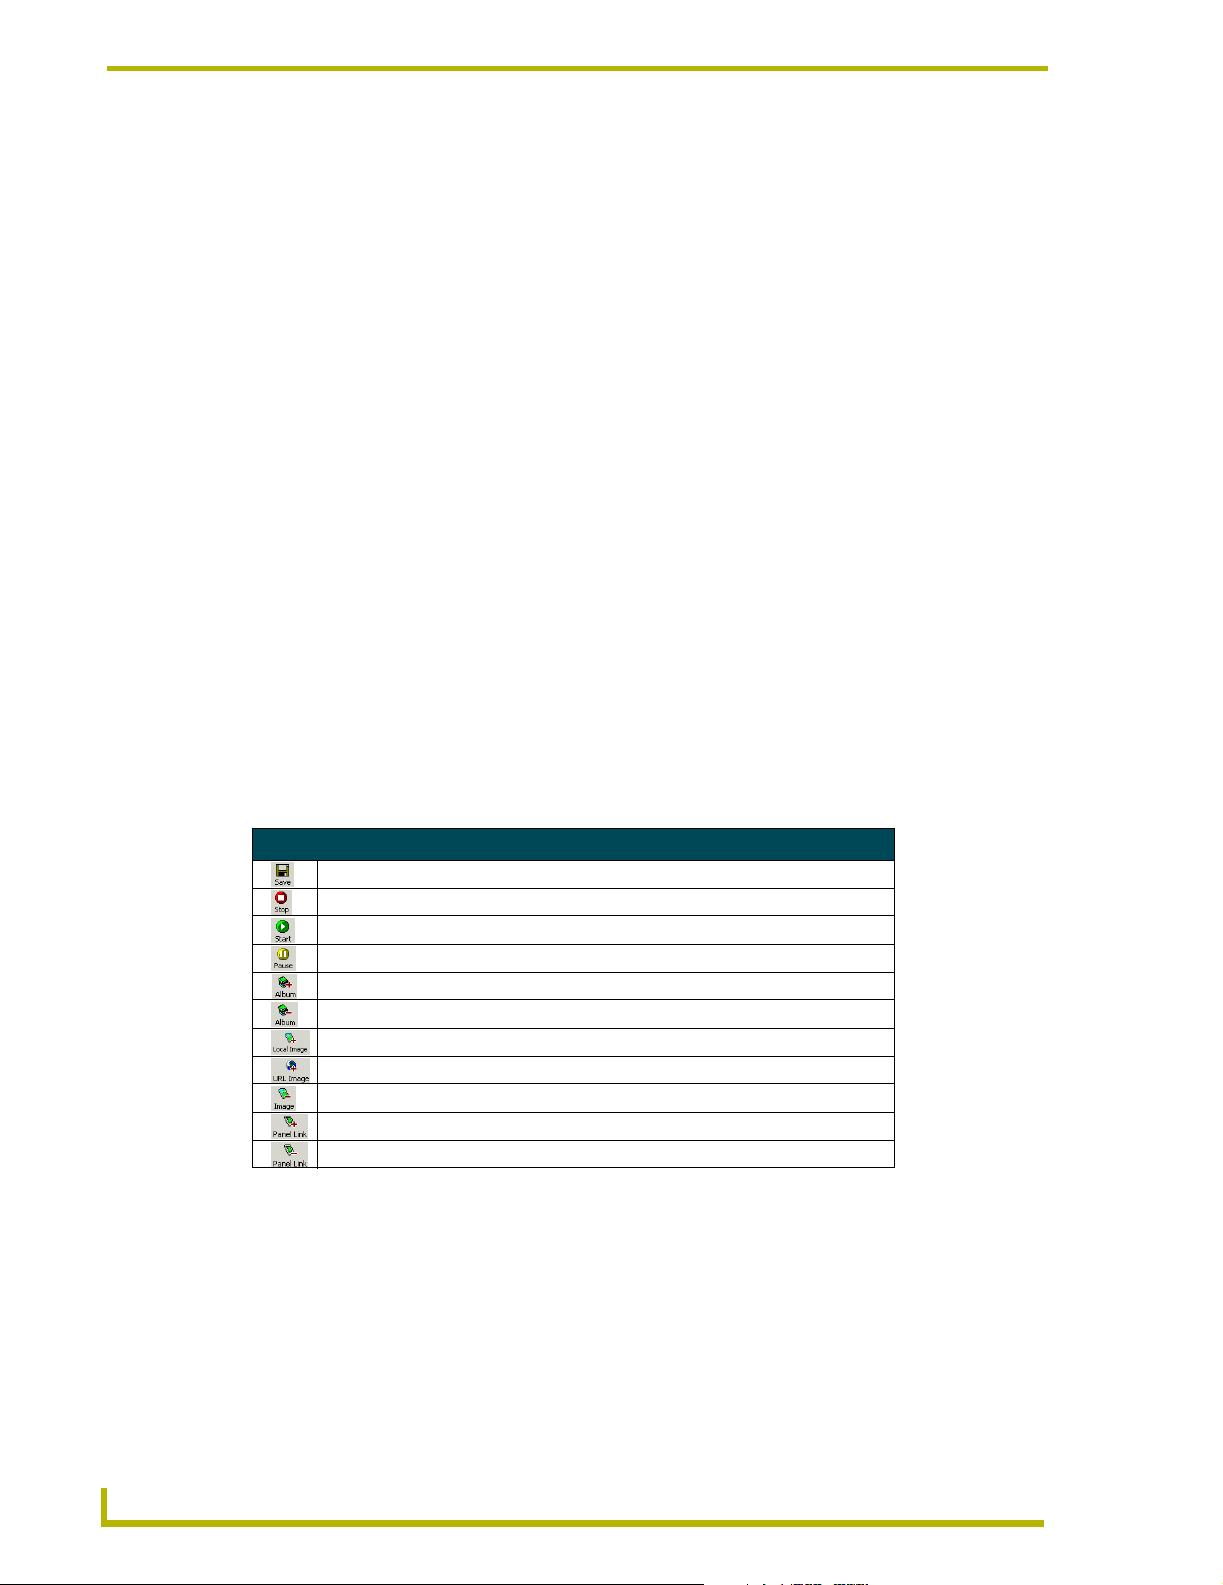
Tool Ba r
The tool bar is a collection of commonly used functions within PictureFrame.
PictureFrame Tool Bar
Saves changes made to albums, images and panel links.
Stops HTTP server, restarts with first image in albums.
Starts HTTP server if it is not already running.
Pauses HTTP server and continues with the next image upon restart.
Adds a new album via the Add Album Dialog.
Removes the entire album from PictureFrame.
Adds a local image via the Open Image Dialog.
Adds a URL image via the Internet Image Dialog.
Removes an image from the selected album.
Adds a panel link to an album via the Panel Link Entry Dialog.
Removes a panel link from the selected album.
6
PictureFrame
Page 13

Basic Operations
Image Management
Adding A Local Image
Images located on a local drive can be added to an album for service to a panel.
1. Go to Images > Add Local Image to open the Open Image Dialog.
2. Navigate to and select the desired image file.
3. Click Open.
Adding An Internet Image
Images located on the internet can be pulled through PictureFrame and displayed at the panels.
1. Select the album from the drop down menu.
2. Go to Images > Add Internet Image to open the Internet Image Dialog.
3. Type or paste the URL into the field.
Basic Operations
4. Click OK.
Removing An Image
Selected images can be removed from a selected album:
1. Select the album from the drop down list.
2. Select the image to be removed. Hold down the Ctrl key to select multiple images from an
album.
3. Go to Images > Remove Image(s).
Enabling An Image
Images that have been disabled (reside in an album but are not served to a panel) must be enabled to
display on a panel.
1. Select the album from the drop down list.
2. Select the disabled image within the album.
3. Go to Images > Enable Image(s).
Disabling An Image
To cease a particular image from serving to a panel it must be disabled.
1. Select the album from the drop down list.
ictureFrame
2. Select the image within the album.
3. Go to Images > Disable Image(s).
7
Page 14

Basic Operations
Moving Images
PictureFrame displays images in a linear fashion by default. The images can be moved up or down
the display list.
To move an image up by one (1):
1. Select the album from the drop down list.
2. Select the image within the Images for Album: window.
3. Go to Images > Move Up.
To move an image down by one (1):
1. Select the album from the drop down list.
2. Select the image within the Images for Album: window.
3. Go to Images > Move Down.
Changing Image Durations
The duration each image displays can be set either individually or all images within an album can
be set to the default time.
To set individual durations:
1. Select the album from the drop down list.
2. Select the image within the album.
3. Go to Images > Image Properties to open the Image Properties Dialog.
4. Set the time, in seconds or minutes, within the Time Duration field.
Click OK.
To reset all images to the default duration:
1. Select the album from the drop down list.
2. Select the image within the album.
3. Go to Images > Reset All Image Durations to open the Reset Image Dialog.
4. Click Ye s.
Getting Image Properties
Image properties can be altered and changed individually. To change the file location, image file or
file duration the image properties must be edited:
1. Select the album containing the desired image from the drop down list.
2. Select the image within the Album Management window.
3. Go to Images > Image Properties to open the Image Properties Dialog.
4. Select and change any or all fields, i.e. Location, Image File or Duration.
5. Click OK.
The Duration field is in seconds or minutes (range = 5 to 1800 seconds).
8
PictureFrame
Page 15

Basic Operations
Panel Management
PictureFrame has two different formats for resolving Panel Links to albums:
Device:System
This option allows for any button on the panel to use that link. Device:System is a more
general option and is sufficient if there is only one dynamic image on the page.
Device:Port:System:Code
This option allows for more specific linking and is the correct way of handling multiple
dynamic buttons on the same page.
In order of request handling, the request built in TPD4 is parsed and put into a key string. An
example if the request arguments were:
device=10001&system=1&port=5&code=100
The key string would be 10001:5:1:100 and PictureFrame would try to find a Panel Link that
matches it. If no Panel Link was found, PictureFrame then drops back to try a link that matches the
device and system, in this example, 10001:1. If a link is still not found, PictureFrame will serve an
image from the Default Album.
Adding A Panel Link
Images are served from PictureFrame to a panel via a panel link. To link an album to a selected
panel:
1. Select the album from the drop down list.
2. Go to Panel Links > Add Panel Link to open the Panel Link Entry Dialog.
3. Enter the Device number in the corresponding field. If certain buttons on a panel are intended
to have specific images it is necessary to provide port and code number for a more specific
Panel Link.
The Panel Link must either be Device:System or Device:Port:System:Code.
4. Click OK.
Device:Port:System (D:P:S)
A device is any hardware component that can be connected to the NetLinx bus. Each device must
be assigned a unique number to locate that device on the bus. The Axcess language allows physical
device numbers in the range 0-255. The NetLinx language allows numbers in the range 0-32767.
Device 0 refers to the master; numbers above 32767 are reserved for internal use.
NetLinx requires a Device:Port:System (D:P:S) specification where Axcess expected only a device
number. This D:P:S triplet can be expressed as series of constants, variables separated by colons, or
as a DEV structure, to explicitly represent a device number, port and system.
ictureFrame
Here’s the syntax:
DEVICE:PORT:SYSTEM
where:
Device: 16-bit integer representing the device number
9
Page 16

Basic Operations
Port: 16-bit integer representing the port number (in the range 1 through the number of ports on the
device)
System: 16-bit integer representing the system number (0 = this system) that the device belongs to.
For example, 128:1:0 represents the first port on device 128 on this system.
DEV structure example:
STRUCTURE DEV
{
INTEGER Number // device number
INTEGER Port // port on device
INTEGER System // system device belongs to}
In Axcess, Master Source Code files are always mapped to the Master Controller
(device = 0), and cannot be mapped to any other device. This does not apply to
NetLinx Master Source Code files.
Removing A Panel Link
Images are served from PictureFrame to a panel via a panel link. To remove the panel link from a
selected album:
1. Select the album from the drop down list.
2. Select the panel in the Panel Management window.
3. Go to Panel Links > Remove Panel Link(s).
Enabling A Panel Link
If a panel link has been established but is currently disabled, it must be enabled to resume serving
images to the panel.
1. Select the album from the drop down list.
2. Select the disabled panel within the Panel Management window.
3. Go to Panel Links > Enable Panel Link(s).
Disabling A Panel Link
Disabling a panel link stops PictureFrame's service of images to a selected panel without removing
the link completely.
1. Select the album from the drop down list.
2. Select the enabled panel within the Panel Management window.
3. Go to Panel Links > Disable Panel Link(s).
10
PictureFrame
Page 17

Basic Operations
Album Management
Adding A New Album
New albums can be added to PictureFrame:
1. Go to Albums > Add Album to open the Add Album Dialog.
2. Type the album's name in the Album Name field.
3. Set the default image duration (in seconds or minutes) in the Image Duration field. (range = 5
to 1800 seconds)
4. Click OK.
To make the album the default, check the Default Album option.
Removing An Album
Albums can be removed from PictureFrame:
1. Select the album from the drop down list.
2. Go to Albums > Remove Album.
Changing Default Image Duration
The amount of time (in seconds or minutes) each image is displays is located in the Default Image
Duration field. To change the default time:
1. Select the album from the drop down list.
2. Go to Albums > Change Default Image Duration to open the Change Default Duration
Dialog.
3. Confirm the correct album is listed in the Album Name field.
4. Enter then new time value in the Default Image Duration field.
5. Click OK.
Setting A Default Album
An album can be set as the default image server.
1. Select an album from the drop down list.
2. Go to Albums > Set As Default Album.
Toggling Random Order
PictureFrame will serve the images in either a linear fashion from top to bottom (by default) or in
random order. To toggle random order:
1. Select the album from the drop down list.
ictureFrame
2. Go to Albums > Toggle Random Order.
11
Page 18

Basic Operations
Server Management
Using The HTTP Server
PictureFrame can stop, pause and resume serving images to the panels via the HTTP server.
To Stop the server, select:
Server > Stop Server.
To Pause the server, select:
Server > Pause Server.
To Start the server, select:
Server > Start Server.
Changing Views
The Album Management window toggles between a detail list and a thumbnail view of the images
within the albums. Select View and either Details or Thumbnails.
Creating A Dynamic Image for Use in PictureFrame
There are a few basic steps when creating a dynamic image for use with PictureFrame.
Enter any name for the Name field but it is suggested to use names that make sense when
buttons are used.
The Protocol must be set to HTTP.
The Host can be either the IP Address of machine or the machine name.
The Host must have the “:PORT” attached to it. PictureFrame operates on a different
port than the standard port 80 used by HTTP servers. The default port is 130 but that
can be changed, as long as the PictureFrame server and the dynamic images are
using the same port.
No Path is needed.
For the File, any name should be acceptable (use something that makes sense, or
default.htm), the arguments are what is important. PictureFrame accepts the following
arguments:
device, port, code, width, height and system
These arguments can be parameterized so that the panel and/or button can identify itself.
Example:
pfserver.htm?device=$DV&system=$SY&width=$BX&height=$BY
12
$DV is the device number provided by the panel.
$SY is the system number provided by the panel.
$BX is the button X resolution.
$BY is the button Y resolution.
PictureFrame
Page 19

Additionally, port= and code= can be specified with the port and code parameters
available to the button as defined in the G4 documentation.
$ parameters can be directly stated:
pfserver.htm?device=10001&system=1&width=200&height=200
User, Password and Confirm are also unused.
Refresh Rate indicates how often the panel asks for an image, not how often the image
changes.
Command Line Options
There is a command line option for PictureFrame.
Command Line Options
/HONORALL Forces the server to send images with each request by a panel rather
than sending with the first request after the images duration expires.
Saving Albums
Basic Operations
Once changes have been made to albums they must be saved to keep them.
Go to File > Save Albums.
Using WebUpdate
To acquire WebUpdate go to www.amx.com and look under Downloadable Applications.
To initiate WebUpdate go to Help > WebUpdate.
Exiting PictureFrame
To end the PictureFrame session and cease serving images go to File > Exit.
PictureFrame must be running to serve images to panels.
ictureFrame
13
Page 20

Basic Operations
14
PictureFrame
Page 21

Program Reference
Dialogs
Add Album Dialog
The add album dialog contains two fields for creating a new album:
Album Name - Text field for naming the album. This name will appear in the Album Drop
Down List.
Default Image Duration - The length of time, in seconds or minutes, the image will
display on the panels.
Cancel - Cancels adding a new album to PictureFrame.
OK - Accepts the new album into PictureFrame.
Change Default Duration Dialog
The Change Default Duration Dialog only allows for changing the time of a selected album.
Album Name - A read-only field confirming the name of the selected album.
Program Reference
Default Image Duration - Field for time duration, in seconds or minutes, default each
image within the selected album will display.
Cancel - Cancels changing the default duration for the selected album.
OK - Accepts changes made to the default duration of the selected album.
Exiting PictureFrame Warning Dialog
Exiting PictureFrame will cease the service of images to all panels. A prompt to confirm before
exiting appears.
Ye s - Exits PictureFrame and stops the service of images to the panels.
No - Does not exit from PictureFrame and returns to the PictureFrame work area.
Image Properties Dialog
The following properties can be edited for selected images:
Location - Both local and URL locations for the image appear here.
Image File - The file name of the selected image.
Protocol - When the image is a URL location the drop down list of protocols appears
here.
Image Duration - Length of time, in seconds or minutes, the image displays on the
panels.
ictureFrame
Cancel - Cancels any changes made to the selected image.
OK - Accepts changes made to the selected image.
15
Page 22

Program Reference
Internet Image Dialog
When adding an image that is not located locally it is necessary to provide the URL.
Enter Image URL - The URL location of the image being added to the PictureFrame
album.
Protocol - Protocol for transfer of the image to PictureFrame. The default is HTTP.
Cancel - Cancels the addition of the URL image to PictureFrame.
OK - Accepts the addition of the URL image to the PictureFrame album.
Open Image Dialog
The Open Image Dialog allows for the browsing of local directories. The images can then be added
to a selected PictureFrame album.
Look in - navigate through directories.
File name - the name of the selected image.
File Type - a drop down list of supported file types.
Open as read-only - when the check box is selected PictureFrame imports images as a
read-only format.
Open - associates the image into the selected PictureFrame album.
Cancel - ceases the addition of a local image into PictureFrame.
Panel Link Entry Dialog
When adding a new link to a panel it is necessary to provide PictureFrame with the location of the
panel.
Device - The device number of the intended panel.
Port - The port number location for the panel.
System - The system number to which the panel belongs.
Channel Code - The Channel location for specific locations on a panel.
Cancel - Discontinues adding a new panel link to a selected album.
OK - Confirms the addition of a new panel link to a selected album.
Reset Image Dialog
Before resetting the image durations PictureFrame will confirm the decision.
Ye s - proceeds with the change and returns all images to the default duration of the
album.
No - cancels the decision and does not change any image durations.
16
PictureFrame
Page 23

Program Reference
Save Changes Warning Dialog
When exiting PictureFrame and changes have been made without saving, a prompt to save will
appear.
Ye s - Changes are saved and PictureFrame will continue exiting.
No - Changes are not saved and PictureFrame will continue exiting.
Context Menus
Image Context Menu
Right-click within the Album Management window to open the Image Context menu.
Add Image - adds local image to the selected album via the Open Image Dialog.
Add Internet Image URL - adds internet image to the selected album via the Internet
Image Dialog.
Remove Image - removes selected image from the album.
Enable Image - enables selected image for server.
Disable Image - disables selected image (not served).
Move Up - sort the selected image up the ordered list.
Move Down - sort the selected image down the ordered list.
Reset All Image Durations - resets all image durations for the album.
Switch Views - toggles the album between details and thumbnails view..
Image Properties - opens the Image Properties Dialog.
Panel Context Menu
Right-click within the Panel Management window to open the menu.
Add Panel Link - adds panel link to the selected album via the Panel Link Entry Dialog.
Remove Panel Link - removes selected panel link from the album.
Enable Panel Link - enables link from panel to album.
Disable Panel Link - disables link from panel to album.
ictureFrame
17
Page 24

AMX reserves the right to alter specifications without notice at any time.
ARGENTI NA • AUST RALIA • BELGIUM • BRAZIL • CANADA • CHINA • ENGLAN D • FRANC E • GERMA NY • GRE ECE • HO NG KONG • INDIA • I NDONES IA • ITALY • JAPAN
LEBANON • MALAYSIA • MEXICO • NETHERLANDS • NEW ZEALAND • PHILIPPINES • PORTUGAL • RUSSIA • SINGAPORE • SPAIN • SWITZERLAND • THAILAND • TURKEY • USA
ATLANTA • BOSTON • CHICAG O • CLEVELAND • DAL LAS • DENVER • INDIANAPOLIS • LOS ANGELES • MINNEAPOLIS • PHILADELPHIA • PHOENIX • PORTLAND • SPOKANE • TAMPA
3000 RESEARCH DRIVE, RICHARDSON, TX 75082 USA • 800.222.0913 • 469.624.8000 • 469-624-7153 fax • 800.932.6993 technical support • www.amx.com
2004 AMX Corporation. All rights reserved. AMX, the AMX logo, the building icon, the home icon, and the light bulb icon are all trademarks of AMX Corporation.
©
033-004-2775 09/04
AMX reserves the right to alter specifications without notice at any time. *In Canada doing business as Panja Inc.
Last Revision: 14/09/04
 Loading...