

Page 1
Overview
The NMX-PRS-N7142 Video Presentation Switcher incorporates low-latency
networked AV video distribution. The unit has six local inputs and two
independent outputs (both of the outputs are mirrored).
There are two models of the N7142. The NMX-PRS-N7142 is the base
presentation switcher, with two available Networked AV slots that can be
populated with Encoder and Decoder cards as required by the application.
The NMX-PRS-N7142-23 is an identical presentation switcher, prepopulated with one N2312 Encoder card and one N2322 Decoder card.
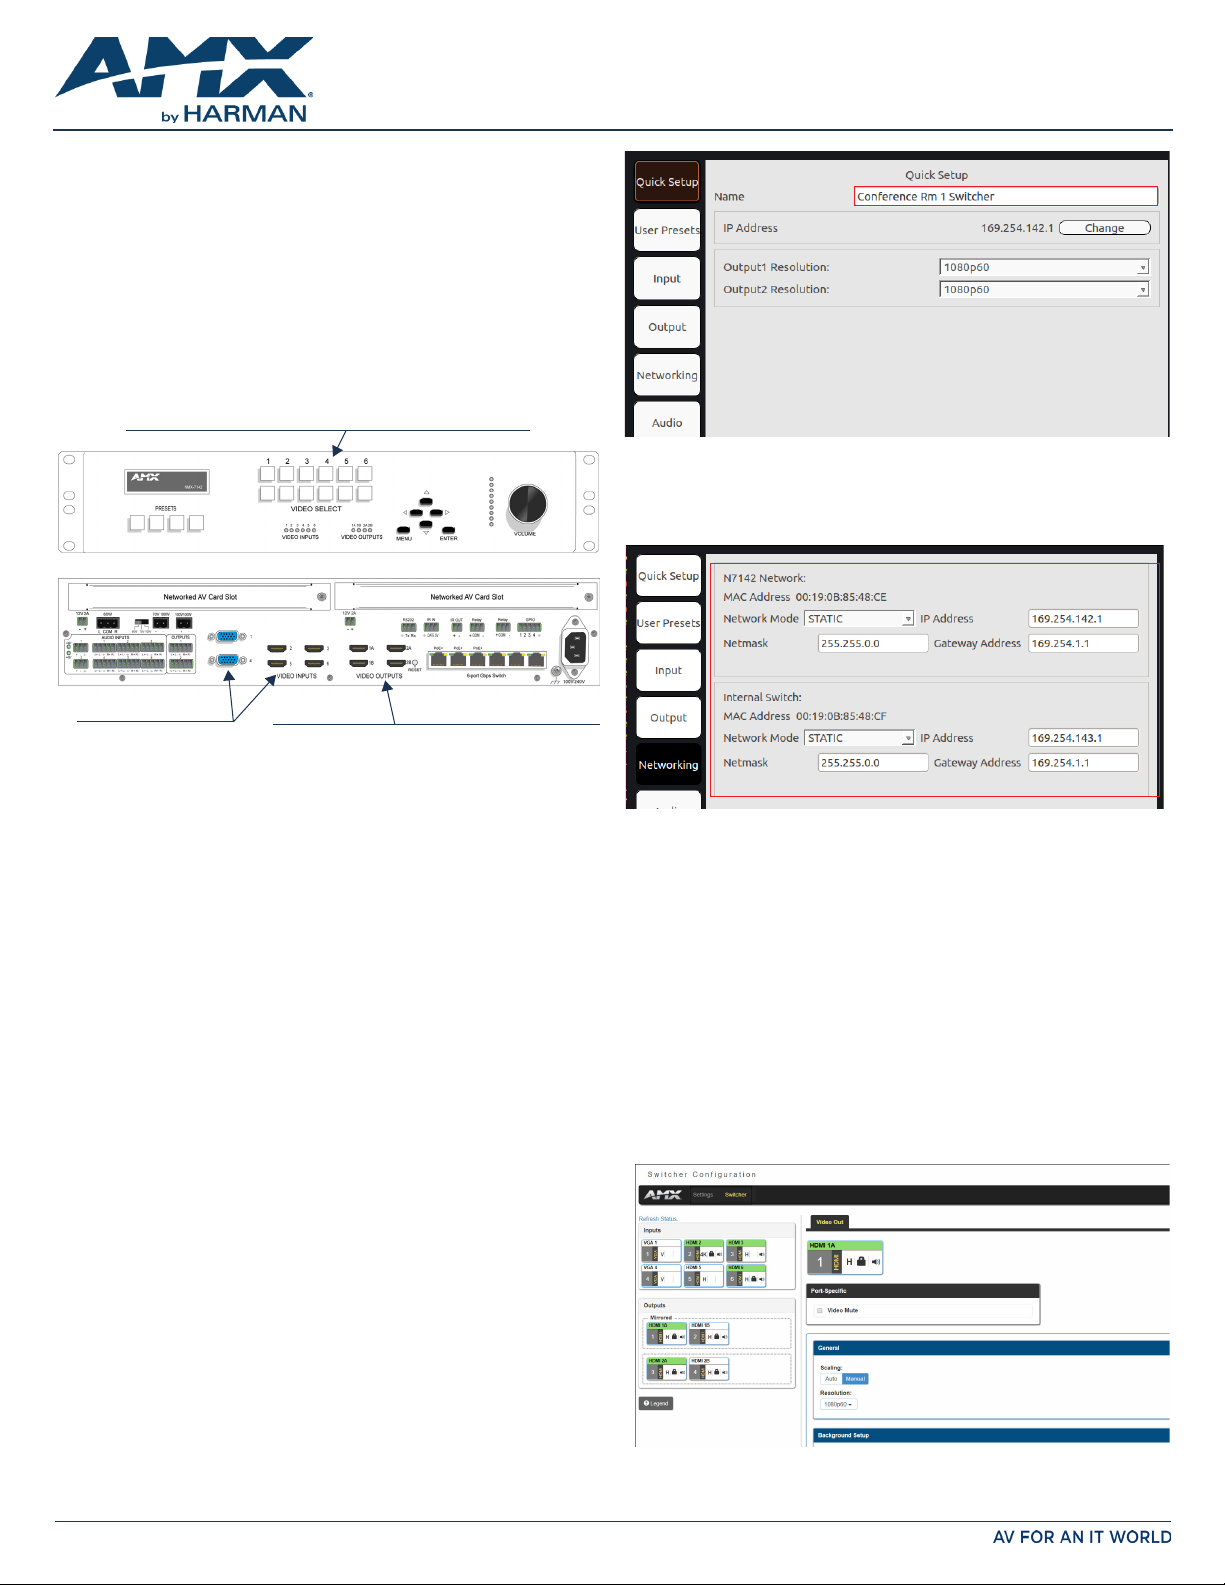
Use the VIDEO SELECT buttons to choose which video
input (1-6) is displayed. The top row of buttons sends
the video to VIDEO OUTPUT 1. The bottom row sends
the video to VIDEO OUTPUT 2.
QUICK START GUIDE
N7142 Video Presentation Switcher
FIG. 2 SET A NAME FOR THE UNIT
7. Navigate to the Networking page (see FIG. 3). For both the N7142 and
the Internal Switch, select AUTOIP (N7142 only), DHCP, or STATIC
from the Network Mode drop-down menu and then configure the other
network settings as appropriate.
Six video inputs: two
VGA and four HDMI
FIG. 1 N7142 VIDEO SWITCHER
Four video outputs: two HDMI mirrored pairs.
Channels 1A and 1B are a mirrored pair.
Channels 2A and 2B are a mirrored pair.
Installing the N7142 Video Switcher
Follow the steps below for initial setup of the N7142.
1. Connect a monitor (that supports 1080p60) to one of the VIDEO
OUTPUT connectors on the rear of the unit.
2. If networked AV cards are installed:
• Connect the network cables from the cards to the built-in switch.
• Connect the HDMI output on the installed Decoder to an N7142 HDMI
input.
• Connect the HDMI input on the installed Encoder to an N7142 HDMI
output.
NOTE: If the AV card is connected to one of the three PoE+ ports, it will be
powered automatically once the network connection is established. If not,
then connect the two-pin phoenix adapter from the 12VDC output connector
of the N7142 to the 12VDC input connector on the card.
CAUTION: Do not run wiring that is connected to a PoE PSE port outside of
the building where the PSE resides. It is for intra-building use only.
3. Connect all other video sources, displays, etc. as necessary for your
application.
4. Apply power to the N7142 unit using the power cable provided.
5. Once the unit completes the boot up process and the attached monitor
displays the AMX logo, press the MENU button to access the On-Screen
Display (OSD) setup menu. The Quick Setup page displays (see FIG. 2).
6. Use the corresponding arrow and ENTER keys (on the front panel) to
assign the N7142 a Name.
FIG. 3 CONFIGURE NETWORK SETTINGS
Internal Switch Configuration
Once the switch’s IP address has been configured, you can access all switch
settings via your web browser. Enter the switch’s IP address into your
browser window. When the login screen appears, enter admin as the
username.
Note: No password is required initially, but you should create one immediately for security purposes.
Advanced Configuration
For more advanced configuration options, enter the unit’s IP address into
your web browser. When prompted, enter the default username and
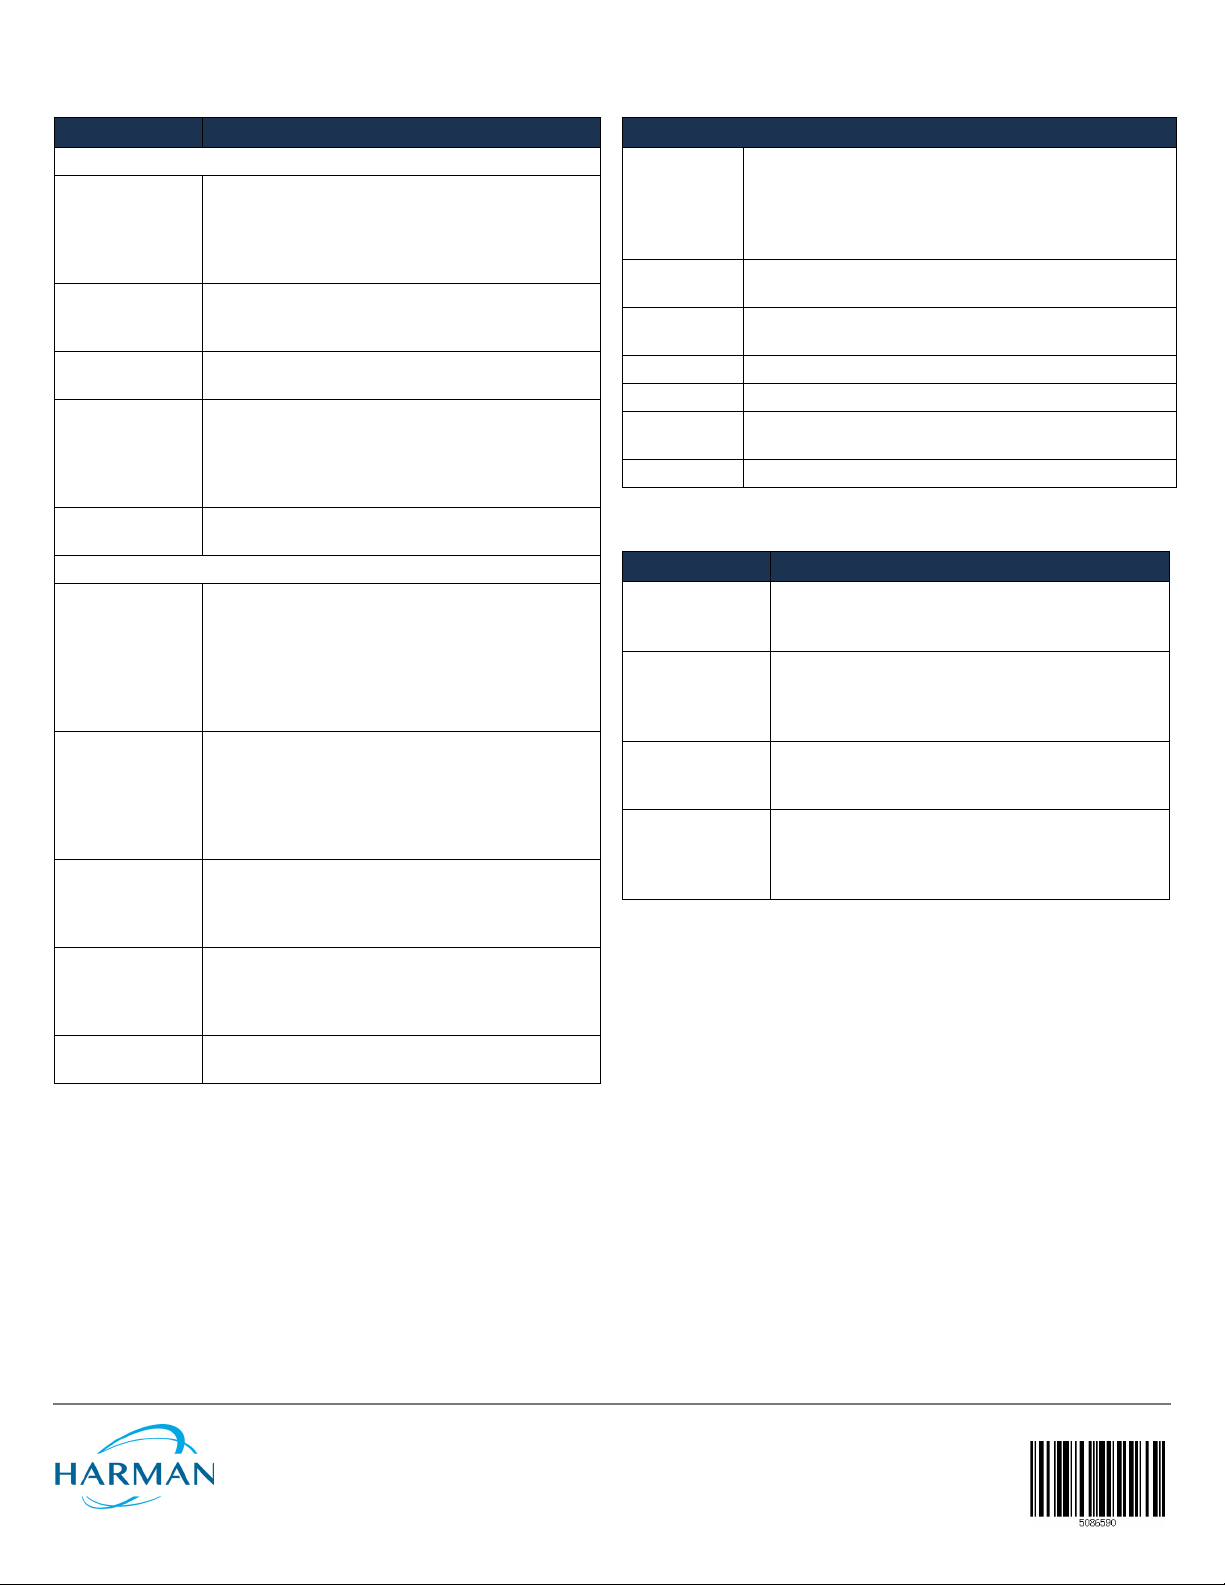
password (admin and password). The Switcher Configuration page
displays (see FIG. 4). From here, you can view the status of N7142 Inputs
and Outputs as well as make minor configuration adjustments. Click the
Settings link at the top of this page to access more detailed configuration
options (Settings, Audio, IR, etc.) and configure your unit.
FIG. 4 SWITCHER CONFIGURATION SCREEN
Page 2
Front and Rear Panel Highlights
Connector Description
Front Panel
PRESETS buttons Press and hold (30 seconds) to save the current
system configuration, including the resolutions of the
output ports and the video selection. This button
lights up (flashes) when save is successful. Press (no
hold) to recall a saved configuration.
VIDEO SELECT
buttons
VIDEO INPUT/
OUTPUT LEDs
MENU buttons Press MENU to access the quick setup menu options
VOLUME control Controls the volume of the selected audio output sent
Rear Panel
Networked AV
Card Slots
AUDIO INPUTS/
OUTPUTS
VIDEO INPUTS Four 4K60 HDMI inputs and two VGA inputs. These
VIDEO OUTPUTS Two 4K60 HDMI outputs, each with its own mirrored
6-port Gbps
Switch ports
Choose which video input (1-6) is displayed. The top
row of buttons sends the video to VIDEO OUTPUT 1.
The bottom row sends the video to VIDEO OUTPUT 2.
On solid green when there is an active connection.
for basic configuration. The menu will display on the
screen connected to a VIDEO OUTPUT. Use the
corresponding arrow and ENTER buttons to navigate
the quick setup menu and make selections.
through the amplifier.
Dependent on model type.
NMX-PRS-N7142: Slots can be populated with
Encoder and Decoder cards as required by the
application.
NMX-PRS-N7142-23: Slots are pre-populated with
one N2312 Encoder card and one N2322 Decoder
card.
Extensive audio selections are supported including a
built-in DSP and 60W stereo amplifier capable of
operating in 4Ω/8Ω, 70V, or 100V modes. In addition
to audio from the HDMI inputs, the unit has six
independent balanced stereo inputs and two
independent microphone inputs with phantom power.
can be independently switched between the two
independently scaled HDMI outputs using the VIDEO
SELECT buttons on the front panel.
HDMI port. This allows the output to be sent to an
Encoder card, a second display, or other video
distribution equipment.
Six-port Gbps switch with PoE+ on three ports. Used
for interconnection of AV cards and the main network.
Product Specifications
Models
Available:
Power
Requirements:
Dimensions
(HWD):
Weight: 19.5 lbs (8.85 kg)
Certifications: FCC/CE/ICES-003/UL
Environmental: Temperature: 32° to 104°F (0° to 40°C)
Installation Standalone or rack-mount (mounting ears included)
NMX-PRS-N7142: Card slots are available for appropriate
N-Series Encoder/Decoder cards to be installed (not
included).
NMX-PRS-N7142-23: Card slots are pre-populated with
N2312 Encoder and N2322 Decoder cards.
Input: 2.4 Amp @ 120V AC
Output: Supports up to three PoE+ network devices.
3.5” x 17.5” x 13” (8.9 x 44.5 x 33 cm)
With mounting wings, width is 19”.
Humidity: 10% to 90% RH (non-condensing)
Troubleshooting Guidelines
Problem Possible Solution
No video displayed
on monitor.
Video displays
gray or static local
play image.
Unit is not
properly providing
PoE+.
Installed card is
not operating
correctly.
Please contact technical support at svsisupport@harman.com or
256.461.7143 (x9900) for assistance with any installation issues.
• Verify proper monitor connection to one of the video
outputs.
• Verify monitor supports the requested resolution.
• Verify the video source is connected to an HDMI or
analog input.
• Verify input is selected to the output using the
VIDEO SELECT buttons on the front of the N7142.
• Verify that the network cable is plugged into one of
the three left-most ports (labeled POE+) of the
6-port Gbps Switch.
• Verify proper network and video connections.
• Refer to the Quick Start Guide for the installed
Encoder/Decoder card (included in its shipment) for
more information.
Last Revised: 2/2018
© 2018 Harman. All rights reserved. Modero, AMX, AV FOR AN IT WORLD, HARMAN, and their respective logos are registered trademarks of
HARMAN. Oracle, Java and any other company or brand name referenced may be trademarks/registered trademarks of their respective companies.
AMX does not assume responsibility for errors or omissions. AMX also reserves the right to alter specifications without prior notice at any time.
The AMX Warranty and Return Policy and related documents can be viewed/downloaded at www.amx.com.
3000 RESEARCH DRIVE, RICHARDSON, TX 75082 AMX.com | 800.222.0193 | 469.624.8000 | +1.469.624.7400 | fax 469.624.7153
AMX (UK) LTD, AMX by HARMAN - Unit C, Auster Road, Clifton Moor, York, YO30 4GD United Kingdom • +44 1904-343-100 • www.amx.com/eu/
5086590 REV: A
 Loading...