

AMX MAX-MMS-02SB, MAX-MMS-04S, MAX-MMS-12S, MAX-MMS-400, MAX-MMS-900 Instruction Manual
...Page 1

Design XPress Professional
version 1.1
instruction manual
User-Interface Guide
Software
Page 2

Software License and Warranty Agreement
LICENSE GRANT.
AMX grants to Licensee the non-exclusive right to use the AMX Software in the manner described in this License. The AMX Software
is licensed, not sold. The AMX Software consists of generally available programming and development software, product
documentation, sample applications, tools and utilities, and miscellaneous technical information. Please refer to the README.TXT
file on the compact disc or download for further information regarding the components of the AMX Software. The AMX Software is
subject to restrictions on distribution described in this License Agreement. YOU MAY NOT LICENSE, RENT, OR LEASE THE AMX
SOFTWARE. You may not reverse engineer, decompile, or disassemble the AMX Software.
INTELLECTUAL PROPERTY.
The AMX Software is owned by AMX and is protected by United States copyright laws, patent laws, international treaty provisions,
and/or state of Texas trade secret laws. Licensee may make copies of the AMX Software solely for backup or archival purposes.
Licensee may not copy the written materials accompanying the AMX Software.
TERMINATION. AMX RESERVES THE RIGHT, IN ITS SOLE DISCRETION, TO TERMINATE THIS LICENSE FOR
ANY REASON AND UPON WRITTEN NOTICE TO LICENSEE.
In the event that AMX terminates this License, the Licensee shall return or destroy all originals and copies of the AMX Software to
AMX and certify in writing that all originals and copies have been returned or destroyed.
PRE-RELEASE CODE.
Portions of the AMX Software may, from time to time, as identified in the AMX Software, include PRE-RELEASE CODE and such
code may not be at the level of performance, compatibility and functionality of the final code. The PRE-RELEASE CODE may not
operate correctly and may be substantially modified prior to final release or certain features may not be generally released. AMX is
not obligated to make or support any PRE-RELEASE CODE. ALL PRE-RELEASE CODE IS PROVIDED "AS IS" WITH NO
WARRANTIES.
LIMITED WARRANTY.
AMX warrants that the AMX Software will perform substantially in accordance with the accompanying written materials for a period of
ninety (90) days from the date of receipt. AMX DISCLAIMS ALL OTHER WARRANTIES, EITHER EXPRESS OR IMPLIED,
INCLUDING, BUT NOT LIMITED TO IMPLIED WARRANTIES OF MERCHANTABILITY AND FITNESS FOR A PARTICULAR
PURPOSE, WITH REGARD TO THE AMX SOFTWARE. THIS LIMITED WARRANTY GIVES YOU SPECIFIC LEGAL RIGHTS.
Any supplements or updates to the AMX SOFTWARE, including without limitation, any (if any) service packs or hot fixes provided to
you after the expiration of the ninety (90) day Limited Warranty period are not covered by any warranty or condition, express, implied
or statutory.
LICENSEE REMEDIES.
AMX's entire liability and your exclusive remedy shall be repair or replacement of the AMX Software that does not meet AMX's
Limited Warranty and which is returned to AMX. This Limited Warranty is void if failure of the AMX Software has resulted from
accident, abuse, or misapplication. Any replacement AMX Software will be warranted for the remainder of the original warranty period
or thirty (30) days, whichever is longer. Outside the United States, these remedies may not available.
NO LIABILITY FOR CONSEQUENTIAL DAMAGES. IN NO EVENT SHALL AMX BE LIABLE FOR ANY DAMAGES
WHATSOEVER (INCLUDING, WITHOUT LIMITATION, DAMAGES FOR LOSS OF BUSINESS PROFITS, BUSINESS
INTERRUPTION, LOSS OF BUSINESS INFORMATION, OR ANY OTHER PECUNIARY LOSS) ARISING OUT OF THE USE OF
OR INABILITY TO USE THIS AMX SOFTWARE, EVEN IF AMX HAS BEEN ADVISED OF THE POSSIBILITY OF SUCH DAMAGES.
BECAUSE SOME STATES/COUNTRIES DO NOT ALLOW THE EXCLUSION OR LIMITATION OF LIABILITY FOR
CONSEQUENTIAL OR INCIDENTAL DAMAGES, THE ABOVE LIMITATION MAY NOT APPLY TO YOU.
U.S. GOVERNMENT RESTRICTED RIGHTS. The AMX Software is provided with RESTRICTED RIGHTS. Use, duplication, or
disclosure by the Government is subject to restrictions as set forth in subparagraph (c)(1)(ii) of The Rights in Technical Data and
Computer Software clause at DFARS 252.227-7013 or subparagraphs (c)(1) and (2) of the Commercial Computer Software
Restricted Rights at 48 CFR 52.227-19, as applicable.
This Agreement replaces and supercedes all previous AMX Software License Agreements and is governed by the
laws of the State of Texas, and all disputes will be resolved in the courts in Collin County, Texas, USA. Should you
have any questions concerning this Agreement, or if you desire to contact AMX for any reason, please write: AMX
Corporation, 3000 Research Drive, Richardson, TX 75082.
Page 3

Table of Contents
Table of Contents
Touch Panel Screens ...............................................................................................1
Introduction........................................................................................................................ 1
Main Page Menu Bar - Scrolling vs. Static............................................................................... 1
Touch Panel User Interface - Logo Page.......................................................................... 2
Touch Panel User Interface - Main Page .......................................................................... 3
Scrolling Lists in the Panel Pages............................................................................................ 3
System Information Page .................................................................................................. 4
Project Information - SETUP (Touch Panel Setup Page) ........................................................ 5
Project Information - TelNet/Terminal Debugging and Diagnostics Page................................ 5
Project Information - Initialize IR .............................................................................................. 6
Clean Page .............................................................................................................................. 6
Picture Page............................................................................................................................. 6
Display Pages ................................................................................................................... 7
Display - Advanced Page ......................................................................................................... 8
Channel Presets Page - Categories and Presets .................................................................... 8
Multiple Device Types .............................................................................................................. 9
Switcher Page (Audio/Video) .......................................................................................... 10
Audio Conferencing Pages.............................................................................................. 10
Audio Conference - Dialing Page ........................................................................................... 10
Audio Conference - Mixer Page ............................................................................................. 11
Audio Conference - Presets Page.......................................................................................... 12
PC/AUX (Computer Control) ........................................................................................... 12
Cable Pages.................................................................................................................... 13
Cable Menu Page .................................................................................................................. 14
Camera Pages ................................................................................................................ 14
CD Player/Changer Pages .............................................................................................. 15
CD List Page .......................................................................................................................... 16
CD Player Advanced Page .................................................................................................... 16
DSS Pages...................................................................................................................... 17
DSS Menu Page .................................................................................................................... 17
DVD Player/Changer Pages............................................................................................ 18
DVD Menu Page .................................................................................................................... 18
DVD Changer Advanced Page .............................................................................................. 19
DVD List Page........................................................................................................................ 19
DXP-PRO v1.1 - User Interface Guide
i
Page 4

Table of Contents
G4 Computer Control (G4CC) Page ............................................................................... 20
Weather Page ................................................................................................................. 21
Obtaining a subscription......................................................................................................... 22
Updating weather locations.................................................................................................... 22
Choosing different weather locations ..................................................................................... 23
Choosing a new weather location .......................................................................................... 24
MAX Pages ..................................................................................................................... 24
MAX Audio Page.................................................................................................................... 24
MAX Media Search Page....................................................................................................... 25
MAX Tracklist Page................................................................................................................ 26
MAX Playlist Page.................................................................................................................. 26
MAX Genre Page ................................................................................................................... 27
MAX Recording (CD and DVD) .............................................................................................. 27
MAX Video Page (MAX-MMS only) ....................................................................................... 27
MAX Movie Search Page ....................................................................................................... 29
MP3 Player Pages .......................................................................................................... 29
MP3 Keyboard Page .............................................................................................................. 30
MP3 Player Page ................................................................................................................... 31
PVR Pages...................................................................................................................... 31
PVR Tuner Page .................................................................................................................... 32
PVR Menu Page .................................................................................................................... 32
VCR Pages ..................................................................................................................... 33
VCR Tuner Page.................................................................................................................... 33
VCR Menu Page .................................................................................................................... 34
Video Conferencing Pages ............................................................................................. 34
Video Conference - Main Page .............................................................................................. 34
Video Conference - Camera Control Page ............................................................................ 35
Lights Page ..................................................................................................................... 35
Relays Page.................................................................................................................... 36
Macro Pages ................................................................................................................... 36
RMS Page....................................................................................................................... 37
ii
DXP-PRO v1.1 - User Interface Guide
Page 5
Touch Panel Screens
Introduction
Design XPress Professional™ (DXP-PRO) is a software package created by AMX to provide
dealers with the ability to quickly install a system that can control many of the common devices
found in today’s business/media environment including: display devices, A/V switchers, DVD and
CD players/changers, personal video recorders, VCRs, lighting, relay controlled devices, and
Ethernet-controlled devices. DXP-PRO v1.1 (or higher) also supports AMX MAX-IMS and
MAX-MMS Ethernet-controlled media servers.
The touch panel pages are created by the DXP-PRO application upon completion of the project file.
The DXP-PRO panel pages can be divided into two main areas: the Menu Bar and the Main
Display. While there may be some minor differences in the layouts of these pages, depending on the
type of panel being used, they all contain these two areas (FIG. 1).
Touch Panel Screens
Menu Bar
Main Display
FIG. 1 Design XPress - Professional touch panel layout
Main Page Menu Bar - Scrolling vs. Static
There are two different styles available for the Menu Bar: Scrolling and Static (FIG. 2). The menu
style is specified in the DXP-PRO Wizard (Touch Panel Interface dialog). The Scrolling menu style
allows you to scroll through all available device/source selections using the arrow buttons found at
either end of the Menu Bar. The Static menu style includes a Sources button in the Menu Bar that
takes you to a page where all available sources are displayed. When using the Static Menu, the
scroll arrow buttons are omitted.
When using either menu type, once a selection is made, the relevant page is displayed within the
Main Display area. Both an image and text description of the selected device/source are shown
within the area on the right side of the Main Menu.
XP-PRO v1.1 - User Interface Guide
1
Page 6

Touch Panel Screens
There is no major functional difference between the two main menu types. This choice is made
available simply to accommodate user preferences.
Scroll (left/right) buttons - scroll to select from all available sources.
Scrolling menu
Static menu
Sources button - opens the Sources Page,
where you can select from all
available sources.
FIG. 2 Main Page Scrolling and Static Menu Styles
The pages represented in this document use the Scrolling menu style.
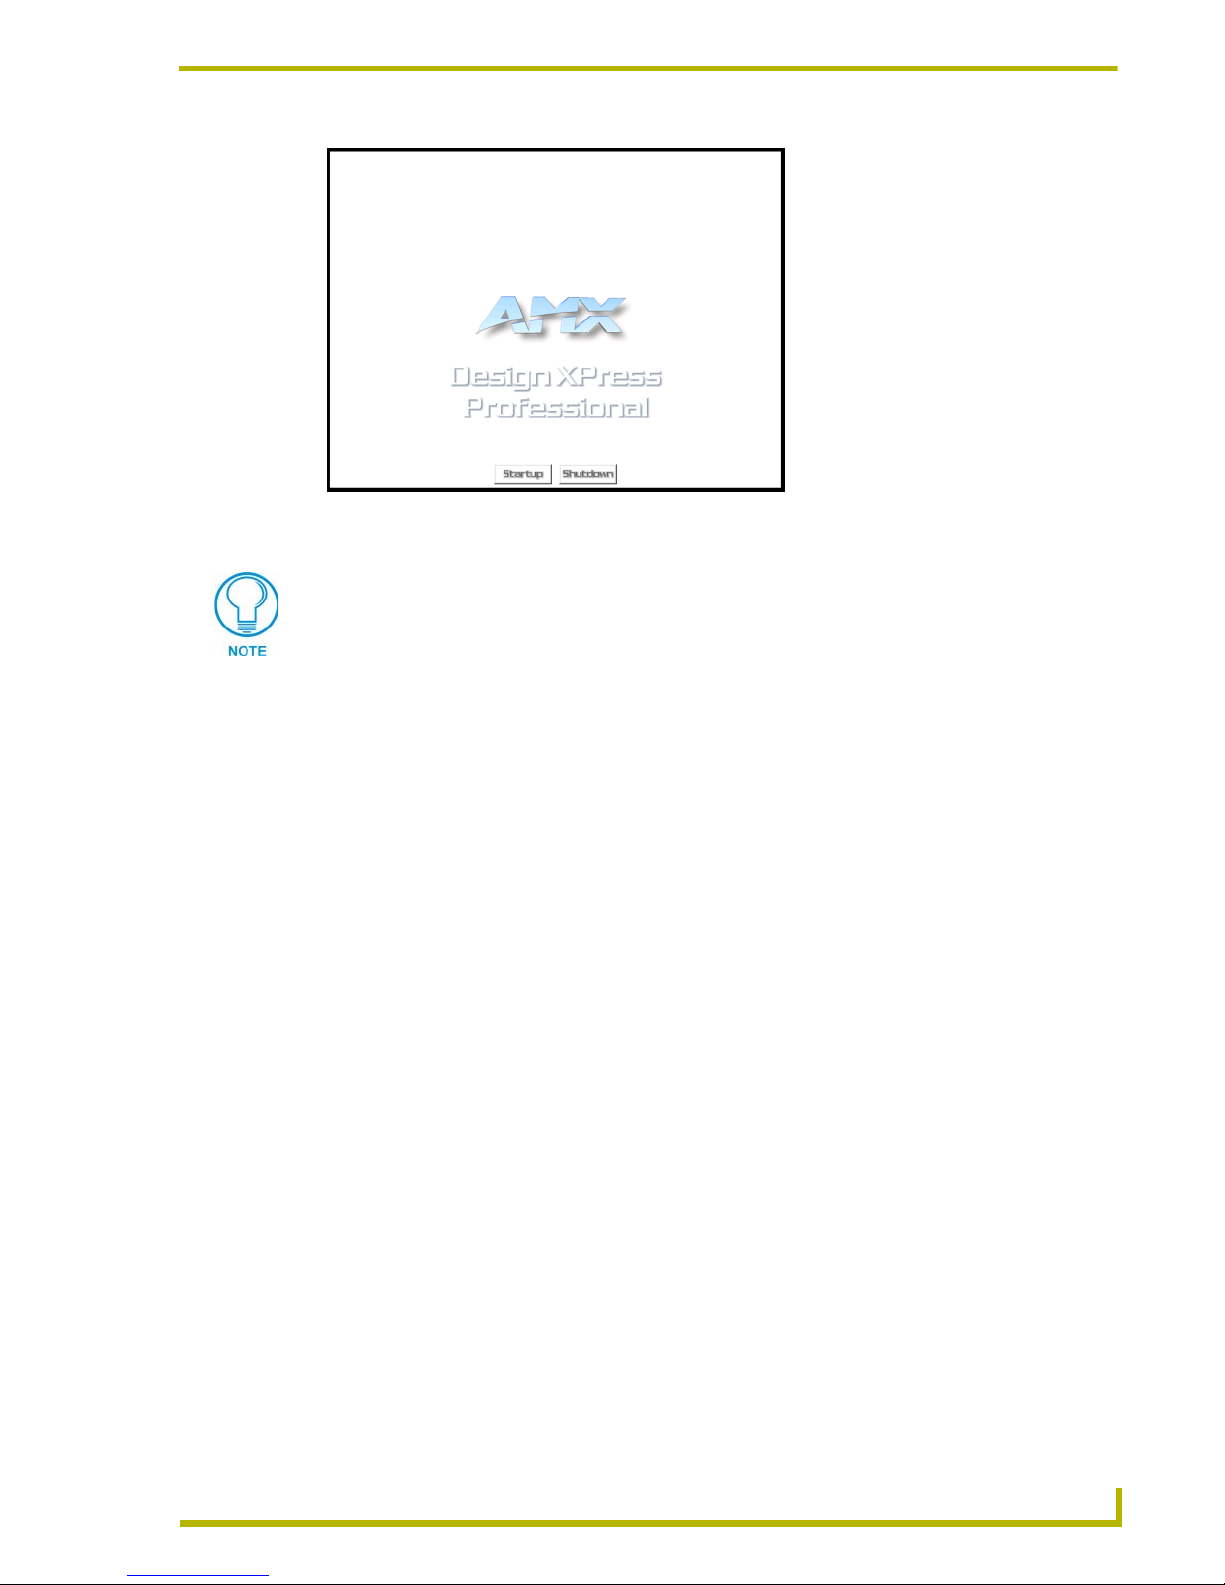
Touch Panel User Interface - Logo Page
After the DXP-PRO touch panel file is loaded to a panel which then reboots; the first page
displayed is the Logo page (FIG. 3). It allows access to the Main page where users can select and
control their configured equipment. The default graphic (animated on G4 panels) can be replaced
with a logo that better represents the installation location. The Logo page is a great place to send the
panel when not in use, to showcase a graphic, logo, or animation of the conference room it controls.
You can also access the Logo page by pressing the Logo Page button from the About splash page.
New to this version is the addition of Startup/Shutdown macros that can be configured to execute a
series of actions associated with startup and shutdown procedures.
2
DXP-PRO v1.1 - User Interface Guide
Page 7
Touch Panel Screens
FIG. 3 Logo page (showing both the Startup and Shutdown macros)
If after pressing the Logo page the panel does not display the DXP panel pages, refer
to the report file. Make sure the panel Device Number matches the value assigned to
the target panel within the project (this value is reflected within the Device Addressing
section of the Report file).
Touch Panel User Interface - Main Page
To access the Main page, touch anywhere on the LCD screen (during the display of the Logo page).
The Main page (FIG. 2) allows access to all of the available device and utility pages in the system.
This page consists of the Menu Bar (either Scrolling or Static), and the Main Display (as described
in the previous section).
Scrolling Lists in the Panel Pages
Several of the DXP-PRO panel pages include lists from where you can make selections (for
example, if there are more than 10 inputs in the system, pressing the arrow buttons scrolls through
the list of available inputs).
XP-PRO v1.1 - User Interface Guide
3
Page 8
Touch Panel Screens
System Information Page
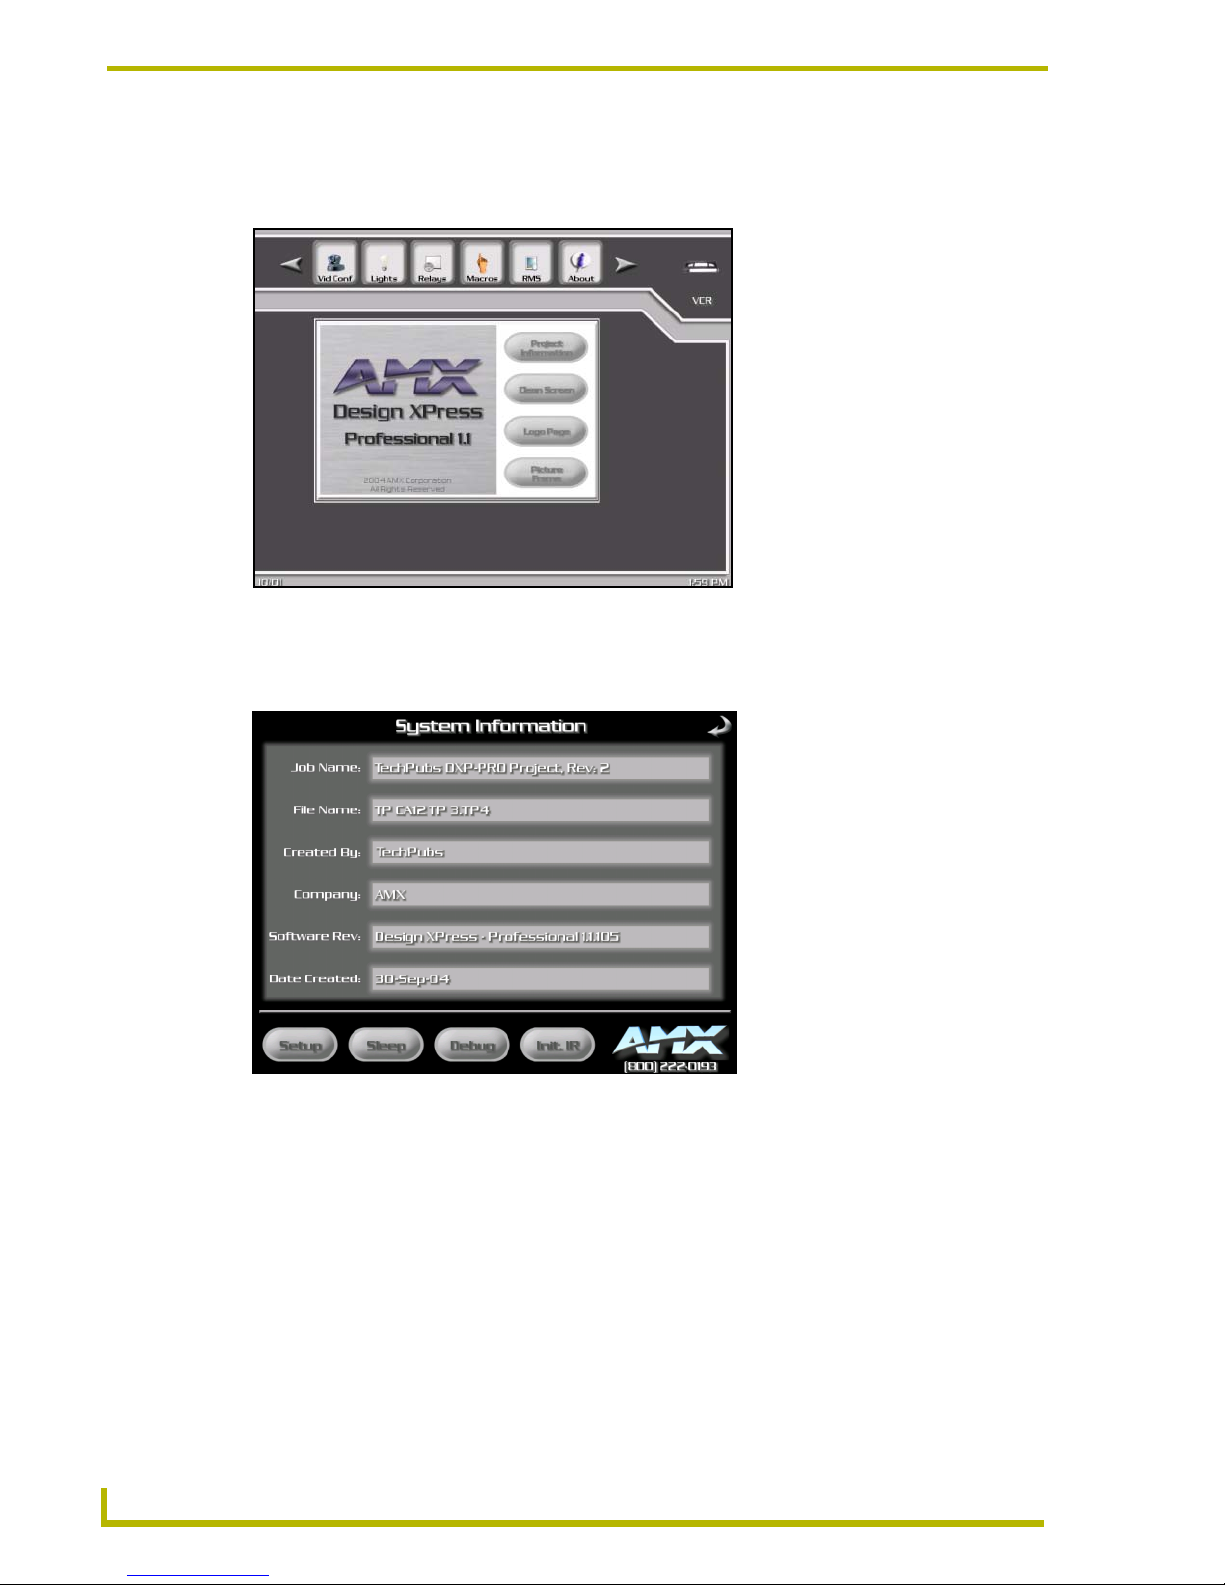
Press the About menu bar button to display the Splash page (FIG. 4).
FIG. 4 Splash page
From the above Splash page, press the Project Information button to access the System
Information page (FIG. 5).
FIG. 5 System Information page
The information on this page is gathered by the GUI and built into the panel file. There are four
command buttons located along the bottom of this screen:
Setup: Opens the Touch Panel Setup page (FIG. 6).
Sleep: Immediately puts the touch panel into sleep mode. Pressing the screen again
returns the panel to an active state.
Debug: Opens the TelNet/Terminal Debugging & Diagnostics page (FIG. 7), which is
designed to be used in conjunction with AMX Tech Support for diagnostics and
troubleshooting purposes.
4
DXP-PRO v1.1 - User Interface Guide
Page 9

Touch Panel Screens
Init. IR: Sends initialization commands to the Master for infrared (IR) controlled devices
in the system. To return to the previous page, press the arrow located in the upper-right
corner of this page.
Project Information - SETUP (Touch Panel Setup Page)
The touch panel Setup page (FIG. 6) is accessed via the Setup button on the System Information
page. This page allows the dealer to modify various touch panel configuration items including
Display Timeout (for Sleep mode), Page Flip settings, Date & Time settings, Brightness, and Beep
length. Refer to the Firmware Pages section of the panel’s instruction manual (depending on the
type of touch panel being used) for details. These manuals are available to view or download from
the www.amx.com website (Dealers > Tech Center > Tech Docs > Instruction Manuals).
FIG. 6 Touch Panel Setup page
Project Information - TelNet/Terminal Debugging and Diagnostics Page
The TelNet/Terminal Debugging & Diagnostics page (FIG. 7) is accessed via the Debug button on
the System Information page. This page is only intended for use by the dealer in conjunction with
AMX Technical Support and only for troubleshooting purposes. To return to the previous page,
press the arrow located in the upper-right corner of this page.
FIG. 7 TelNet/Terminal Debugging & Diagnostics page
XP-PRO v1.1 - User Interface Guide
5
Page 10

Touch Panel Screens
Project Information - Initialize IR
Sends initialization commands to the Master for infrared (IR) controlled devices in the system
(FIG. 8). To return to the previous page, press the on-screen OK button and then press the arrow
located in the upper-right corner of this page.
FIG. 8 System Information page (showing a complete initialization of IR devices)
Clean Page
To access the Clean page (FIG. 9), press the About menu bar button to display the Splash page
(FIG. 4) and then press the Clean Screen button. The Clean page is displayed for one minute,
allowing you to clean the touch panel screen without activating any buttons or having to take the
panel offline.
FIG. 9 Clean page
Picture Page
Pressing the PictureFrame button will page flip you to a full screen that displays the image being
displayed by the PictureFrame application. The PictureFrame application is serving-up a series of
images from the PC to the touch panels configured to run PictureFrame during the panel inactivity.
6
DXP-PRO v1.1 - User Interface Guide
Page 11
Touch Panel Screens
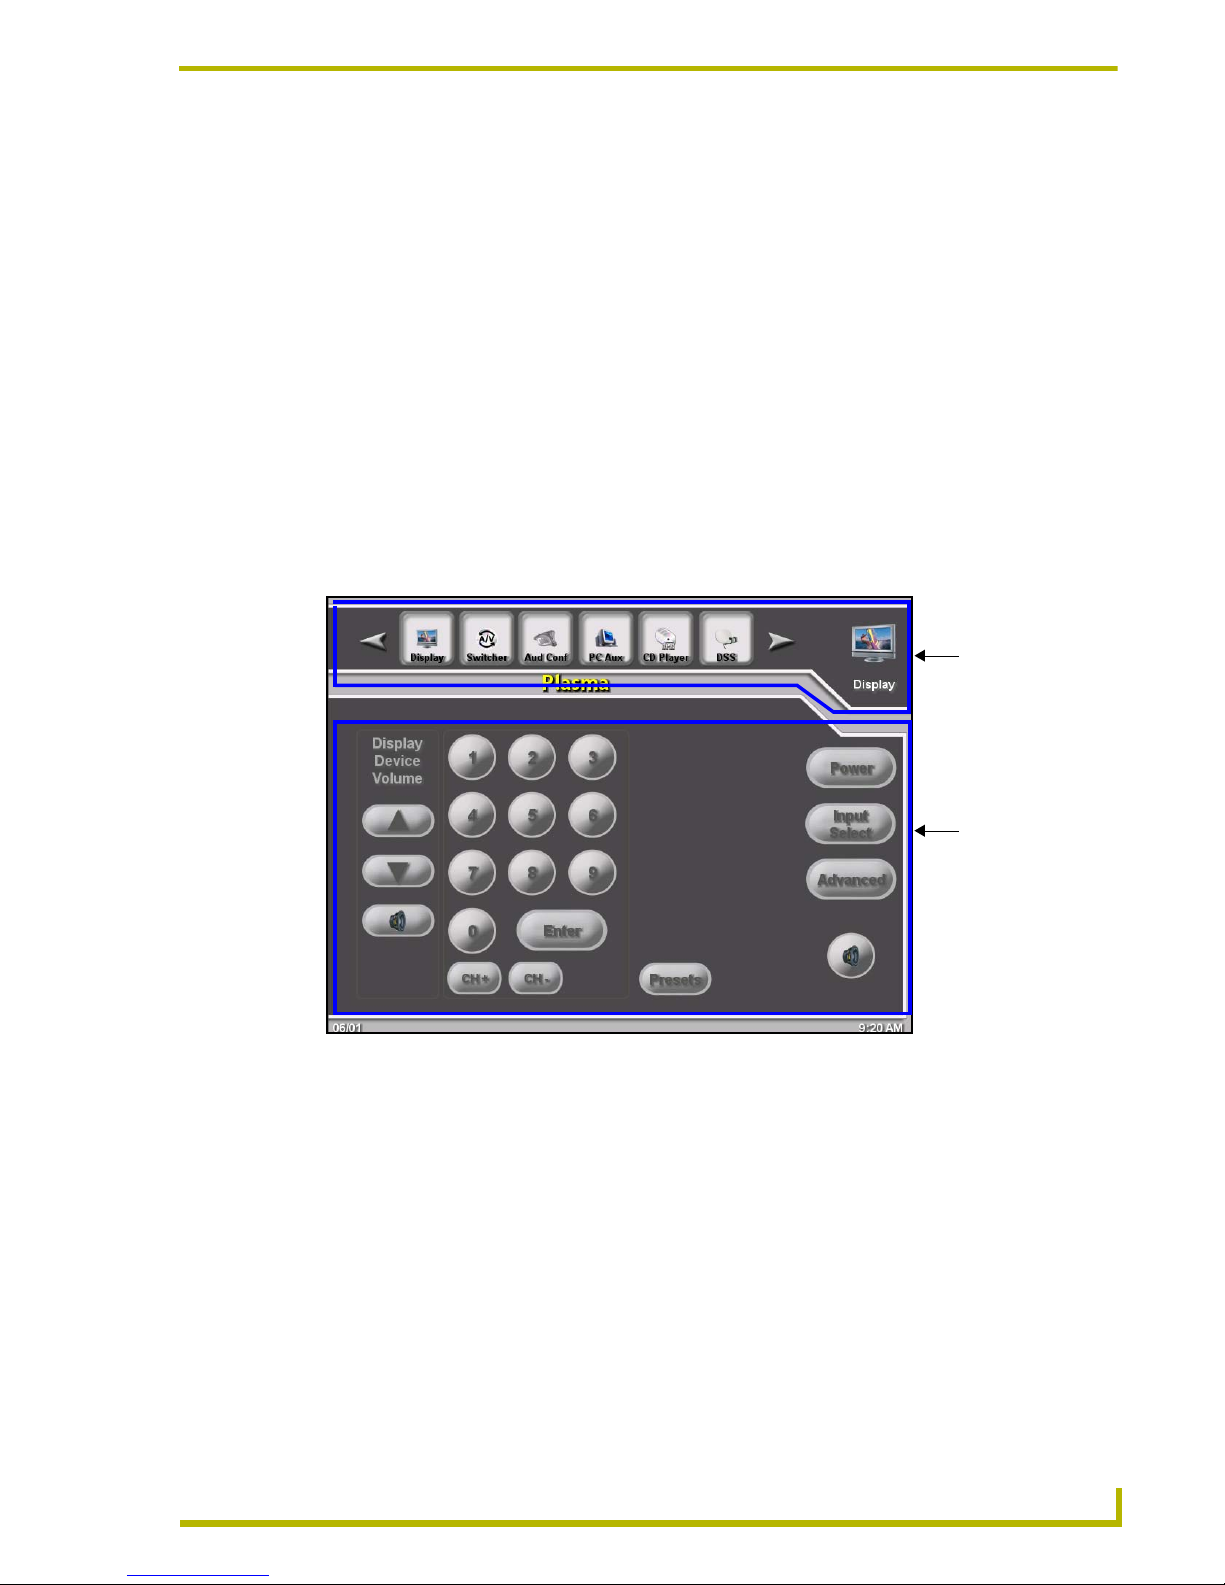
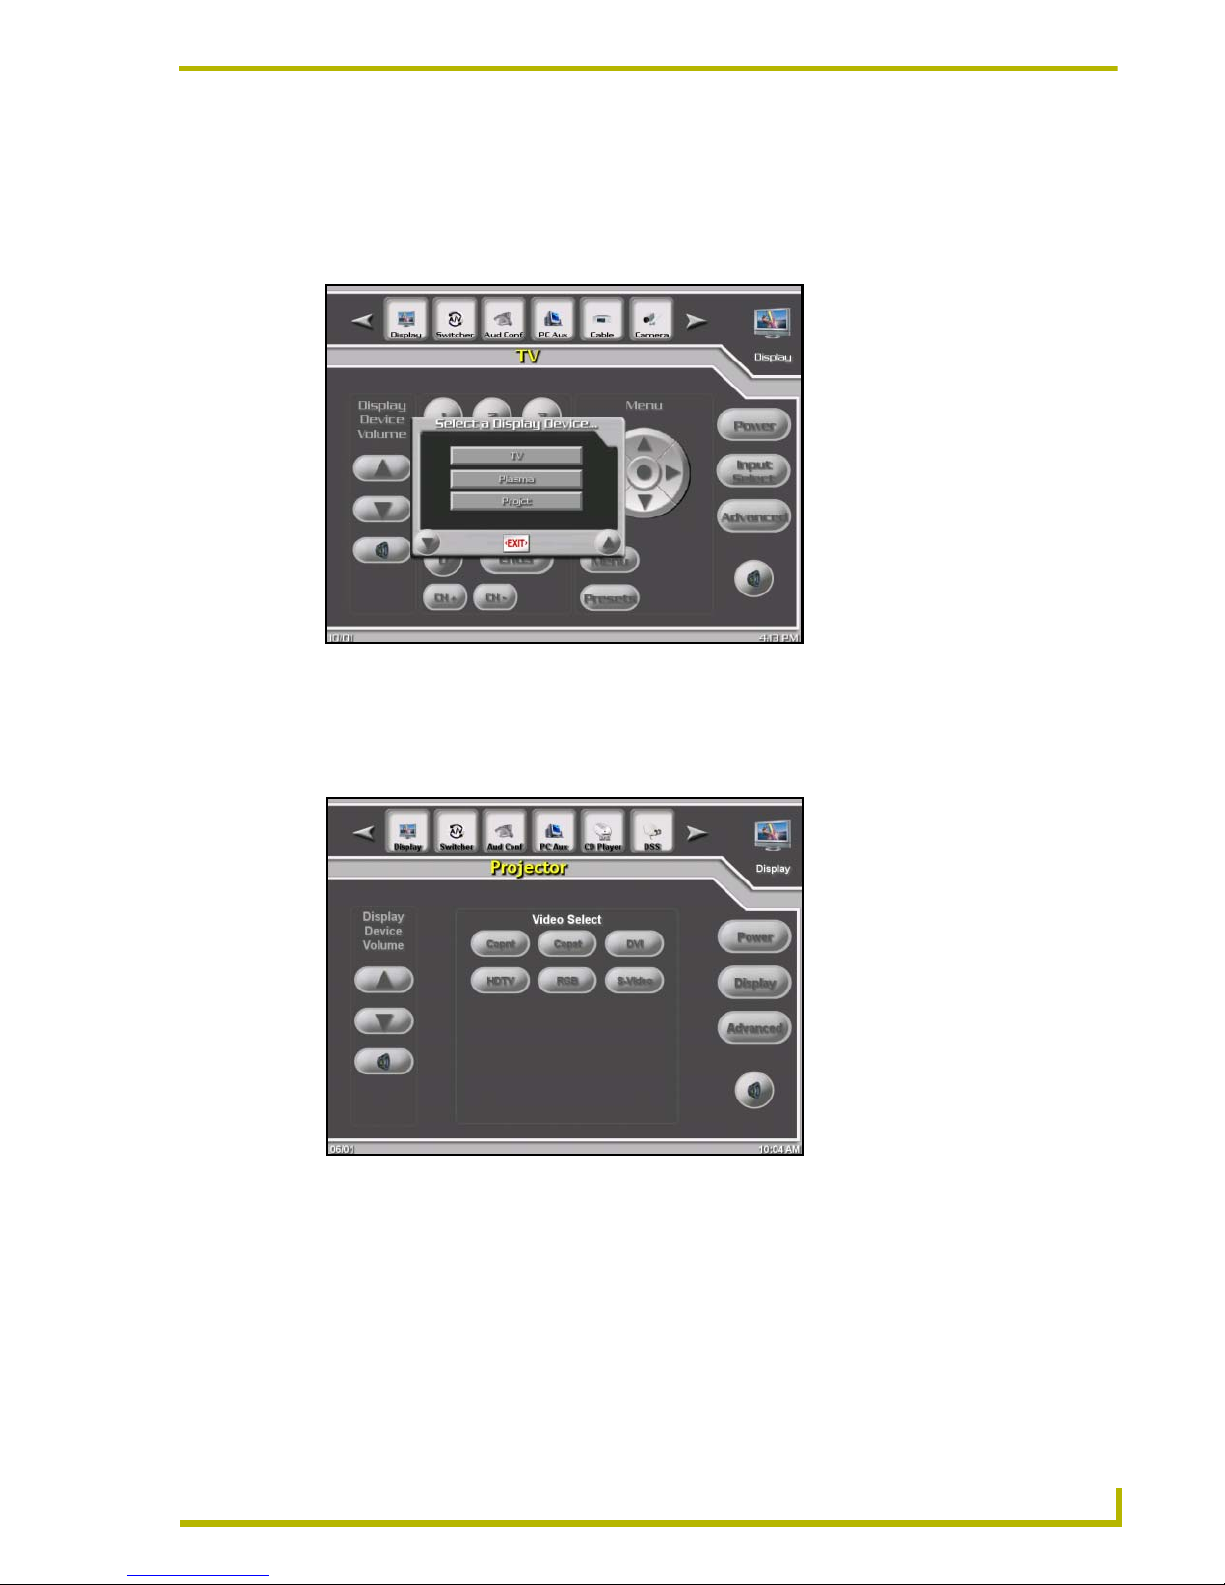
Display Pages
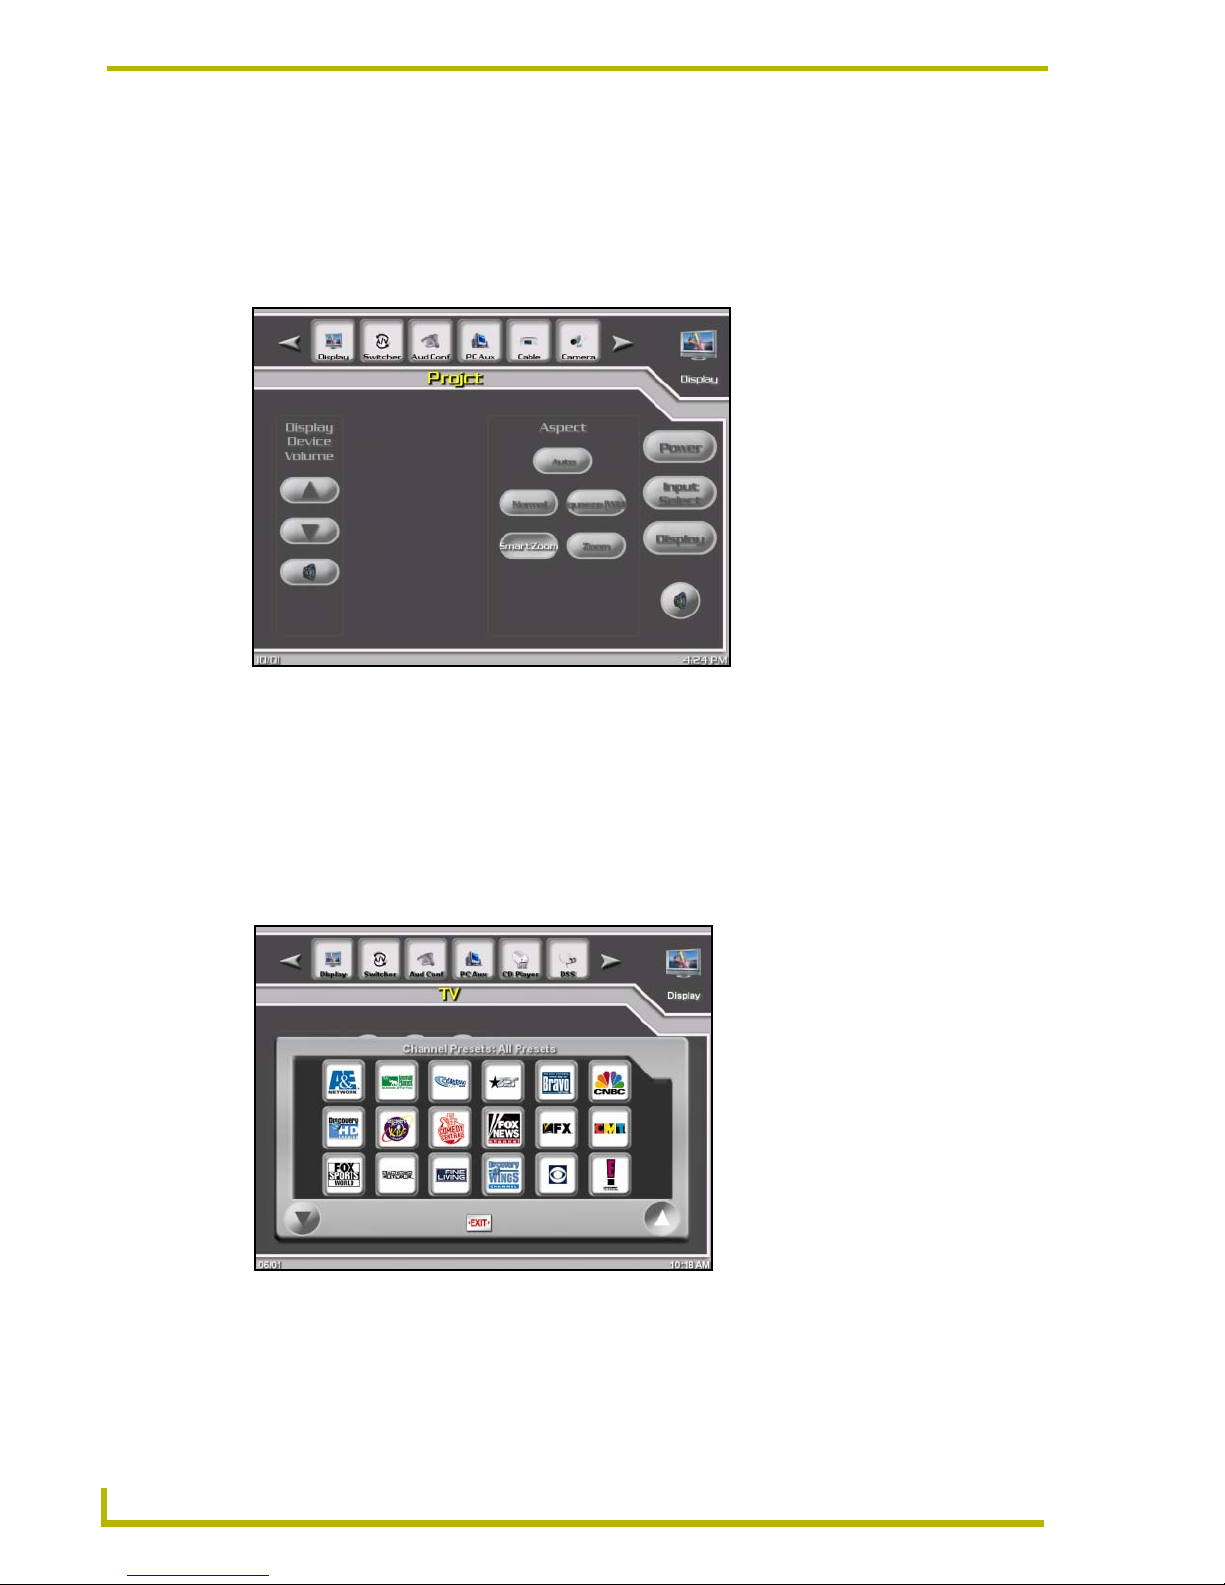
These Display pages provide control of the system’s display devices (including the Display page,
Display - Input Select page, and Display - Advanced page). When you press the Display menu bar
button, the Display page is shown with the option to select the specific Display Device (FIG. 10).
FIG. 10 Display page
If the display device is a Plasma/TV, this page contains buttons that control the display power,
volume, aspect, tuner capabilities, and menu commands. Pressing the Input Select button opens the
Display Inputs page (FIG. 11) which allows you to select a video input and control power.
FIG. 11 Display Inputs page
Additionally, there are buttons that provide page flips to the Display - Advanced and Channel
Presets pages.
XP-PRO v1.1 - User Interface Guide
7
Page 12
Touch Panel Screens
Display - Advanced Page
The Display - Advanced page (FIG. 12), is accessed by pressing the Advanced button on the
Display page. This page contains buttons that control the video input and PIP functions of the
display device. Also included are display power, volume, and page flip buttons to both the Channel
Presets and Display pages.
FIG. 12 Display Advanced page (sample)
Pressing the Display button returns you to the previously active display page.
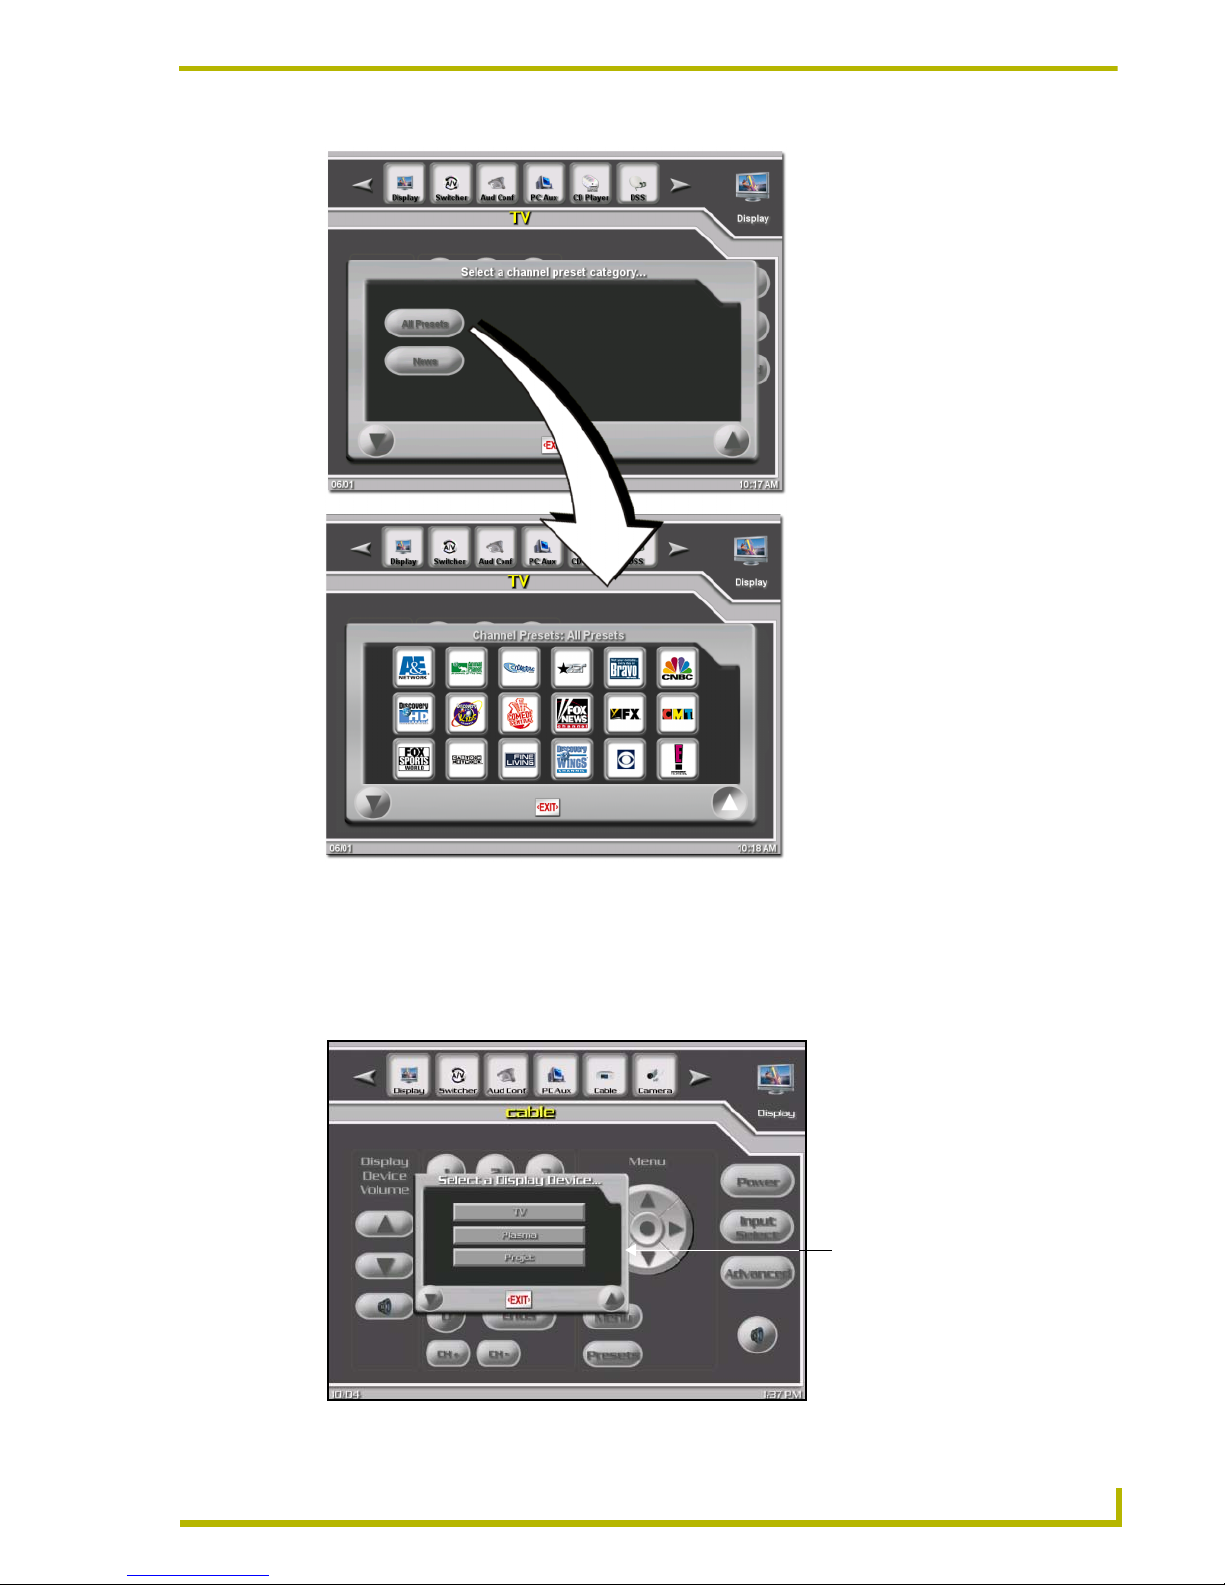
Channel Presets Page - Categories and Presets
The Channel Presets page (FIG. 13) is accessed by pressing the Presets button on the Display page
(FIG. 10). If Channel Preset Categories were chosen in the wizard, the Select a channel preset
category popup (FIG. 14) gives you the option to refine your search for a channel preset by
category and allows you to choose a preset category for display on the Channel Preset page.
FIG. 13 Channel Presets page
8
DXP-PRO v1.1 - User Interface Guide
Page 13
Touch Panel Screens
FIG. 14 Channel Preset Categories Page (showing the selection process)
Multiple Device Types
If there are multiple instances of the same device type in the system (i.e. VCR1, VCR2...) the Select
dialog (FIG. 15) appears when the device type is selected, prompting you to choose which instance
to control. The panel then loads the device control page for the selected device.
Select dialog
FIG. 15 Select dialog
XP-PRO v1.1 - User Interface Guide
9
Page 14
Touch Panel Screens
Switcher Page (Audio/Video)
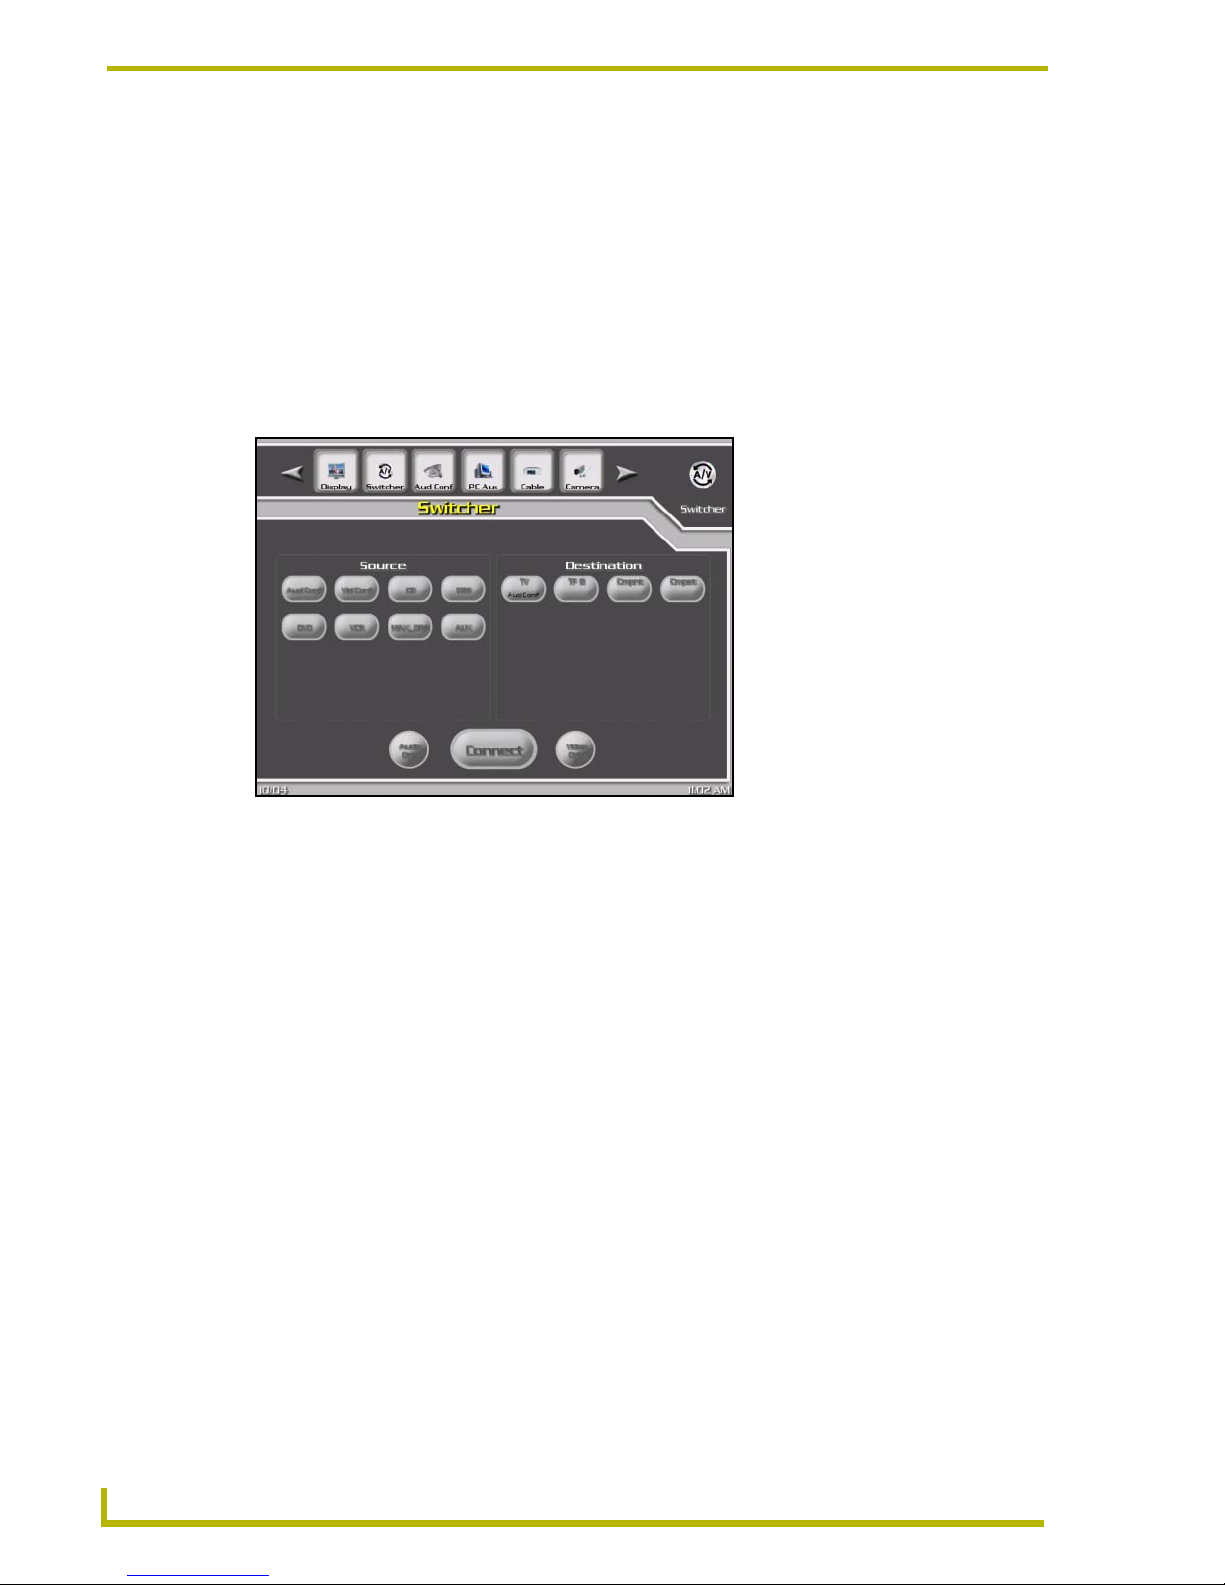
The Switcher page is where the system's A/V Switchers are controlled.
Press the Switcher menu bar button to open the Switcher page (FIG. 16). This page contains
buttons for both selecting and connecting the inputs and outputs. You can also connect either Audio
only or Video only (break-away switching). If multiple switchers are used in the system, the inputs
and outputs for both switchers are displayed on the Switcher page. When using multiple switchers,
once an input is selected only the valid outputs are dynamically displayed. This is done to prevent a
user from attempting to switch sources to destinations that are unroutable to one another. The
Switcher page also displays text on each output button indicating the currently connected source.
FIG. 16 Switcher page
Audio Conferencing Pages
These pages vary based on which supported conference device is selected within the DXP-PRO
wizard. These pages were created in this manner to match (as closely as possible) the functionality
of the selected device. The main pages used for Audio Conferencing are described below.
Audio Conference - Dialing Page
If the Audio Conference device was configured in the DXP-PRO wizard to include dialing
capabilities, the Audio Conference Dialing page (FIG. 17) can be accessed by pressing the Audio
Conf menu bar button. This page contains the buttons necessary to dial numbers, redial, connect or
disconnect a call, etc.
10
DXP-PRO v1.1 - User Interface Guide
Page 15

Touch Panel Screens
Mixer button
FIG. 17 Audio Conference Dialing page
Audio Conference - Mixer Page
If the Audio Conference device was configured in the DXP-PRO wizard to only include mixing
capabilities, the Audio Conference Mixer page (FIG. 18) can be accessed by pressing the Audio
Conf menu bar button. Otherwise, this page can be accessed by pressing the Mixer button from the
bottom of the Audio Conference Dialing page (FIG. 17). This page contains buttons used to select
inputs/outputs and adjust their gain and/or mute settings.
FIG. 18 Audio Conference Mixer page
XP-PRO v1.1 - User Interface Guide
Presets button
11
Page 16

Touch Panel Screens
Audio Conference - Presets Page
When you press the Presets button from the bottom of the Mixer page (FIG. 18), the Audio
Conference Presets page is displayed (FIG. 19). This page contains buttons to recall and/or set
presets in the audio conference device.
FIG. 19 Audio Conference Presets page
PC/AUX (Computer Control)
Press the PC/AUX menu bar button to open the PC/AUX page (FIG. 20). This page allows you to
switch between auxiliary source inputs from a switcher. The Computer Control button appears on
this page if a G4CC source type has been added to the project.
Computer Control button
appears on this page when
G4CC is part of the project
FIG. 20 PC/AUX page (with Computer Control button)
If the computer control application is running on the target PC, pressing the Computer Control
button opens a page similar to FIG. 21. If TakeNote was not enabled for the target panel (within the
Touch Panel Interface dialog of the wizard), the Ta k eN o te Co n tr o ls button will not be present. To
return to the previously active PC/AUX page, press the arrow on the upper-right of the Computer
Control page (FIG. 21).
12
DXP-PRO v1.1 - User Interface Guide
Page 17

Touch Panel Screens
FIG. 21 PC/AUX -Computer Control (showing some features)
For more information on the G4CC panel page, refer to the G4 Computer Control (G4CC)
Page section on page 20.
Cable Pages
This set of pages provide control of the cable systems (added within the wizard). The Cable Tuner
page (FIG. 22) is displayed after pressing the Cable menu bar button. This page contains buttons
that control cable power, tuning, previous channel, and enter functionality. There are also page flip
buttons that allow menu functions, and preset channel selection.
FIG. 22 Cable Tuner page
XP-PRO v1.1 - User Interface Guide
13
Page 18

Touch Panel Screens
Cable Menu Page
The Cable Menu page (FIG. 23) is accessed by pressing the Menu button on the Cable Tuner page.
This page contains buttons that control menu navigation and selection functions, in addition to
guide, favorites, info, select, and exit commands. There are also page flip buttons to the Cable
Tuner, and Channel Presets pages.
FIG. 23 Cable Menu page
Camera Pages
This set of pages provide control for the stand-alone cameras (added within the DXP-PRO wizard).
Stand-alone refers to the external nature of the cameras in regards to the video conferencer. The
Camera page (FIG. 24) is displayed after pressing the Camera menu bar button. This page
contains the various buttons used to control camera pan, tilt, and zoom, as well as both preset
settings and recall information. The feedback for these buttons is momentary and based on which
button is currently being pressed.
If there are multiple cameras devices available for selection within the project, the Select a Camera
Control dialog (FIG. 15) appears when this device type is selected. This action then prompts you to
choose which camera to control and then loads the corresponding device control page for the
selected camera.
14
DXP-PRO v1.1 - User Interface Guide
Page 19

Touch Panel Screens
FIG. 24 Camera page
CD Player/Changer Pages
This set of pages provide control of the CD player/changer (specified in the wizard). The CD Player
page (FIG. 25) is displayed after pressing the CD Player menu bar button. This page contains
buttons that control CD power, transports, disc +/-, player modes (shuffle, continue, repeat), and
page flips (these buttons allow both advanced functionality and disc selection from a CD list).
XP-PRO v1.1 - User Interface Guide
15
Page 20

Touch Panel Screens
FIG. 25 CD Player page
CD List Page
The CD List page (FIG. 26) is accessed by pressing the CD List button on the CD Player, or CD
Player Advanced pages. This page contains buttons that display disc information entered via the
wizard, allowing direct disc selection.
In addition, there are buttons that sort discs based on Disc ID number, Artist, Title, or Title only.
The ability to add new disc information from the touch panel is also available. If there are more
than 7 discs in the system, pressing the arrow buttons will scroll through the available discs. When
these buttons are pressed while at the beginning, or end of a list, an appropriate system message
will be displayed to notify you that there are presently no scrolling capabilities. The Close button
takes you back to the CD Player page.
FIG. 26 CD List page
CD Player Advanced Page
The CD Player Advanced page (FIG. 27) is accessed by pressing the Advanced button on the CD
Player page (FIG. 25). This page contains buttons that issue CD power, digit entry, select, enter,
clear, and +100 commands. There are also page flip buttons to the CD Player page (via the
Transport Control button) and CD List pages (via the CD List button).
16
DXP-PRO v1.1 - User Interface Guide
Page 21

Touch Panel Screens
FIG. 27 CD Player Advanced page
DSS Pages
This set of pages provide control of the DSS devices (added within the wizard). The DSS Tuner
page (FIG. 28) is displayed after pressing the DSS menu bar button. This page contains buttons that
control DSS power, tuning, previous channel, and enter functionality. There are also page flip
buttons providing both menu functions and preset channel selections.
FIG. 28 DSS Tuner page
DSS Menu Page
The DSS Menu page (FIG. 29) is accessed by pressing the Menu button on the DSS Tuner page.
This page contains buttons that control menu navigation and selection functions. This page also
provides additional button commands such as: Guide, Favorites, Info, Select, and Exit commands.
There are also page flip buttons to the DSS Keypad and Channel Presets pages.
XP-PRO v1.1 - User Interface Guide
17
Page 22

Touch Panel Screens
FIG. 29 DSS Menu page
DVD Player/Changer Pages
This set of pages provide control of the DVD player/changer (added within the wizard). The DVD
page (FIG. 30) is displayed after pressing the DVD menu bar button. This page contains buttons
that control DVD power and transports. Also available are page flip buttons that allow advanced
functions and disc selection from a DVD list.
FIG. 30 DVD page
DVD Menu Page
The DVD Menu page (FIG. 31) is accessed by pressing the Menu button on the DVD or DVD
Changer Advanced page. This page contains buttons that control menu navigation and selection
functions, in addition to subtitle and top menu commands. There are also page flip buttons to the
DVD, DVD Changer Advanced, and DVD List pages.
18
DXP-PRO v1.1 - User Interface Guide
Page 23

Touch Panel Screens
FIG. 31 DVD Menu page
DVD Changer Advanced Page
The DVD Changer Advanced page (FIG. 32) is accessed by pressing the Advanced button on the
DVD or DVD Menu page. This page contains buttons that issue DVD power, digit entry, select,
enter, exit, and +10 commands. There are also page flip buttons to the DVD, DVD Menu, and DVD
List pages.
FIG. 32 DVD Changer Advanced page
DVD List Page
The DVD List page is accessed by pressing the DVD List button on the DVD, DVD Menu, or DVD
Changer Advanced pages. This is the same page accessed by pressing CD List, and is covered in
the CD Player/Changer Pages section on page 15.
XP-PRO v1.1 - User Interface Guide
19
Page 24

Touch Panel Screens
G4 Computer Control (G4CC) Page
This set of pages provide you with the ability to take control over a specified computer running the
G4CC application. When enabled from within the DXP-PRO wizard, this page is also were you can
perform TakeNote screen annotation tasks (as seen in FIG. 35). When you press the G4CC menu
bar button, the G4CC page (FIG. 33) is displayed.
FIG. 33 G4CC-Computer Control (showing both buttons)
Pressing the G4 Computer Control button launches an on-screen menu bar (FIG. 34) that provides
both mouse and keyboard functionality.
FIG. 34 G4CC-Computer Control (showing some Computer Control features)
If TakeNote was not enabled for the target panel (within the Touch Panel Interface dialog of the
DXP-PRO wizard), the Take N ote C on t rol s button will not be present. To return to the previously
active PC/AUX page, press the upper-right arrow on the Computer Control page (FIG. 34).
Pressing the TakeNote Controls button launches a vertical popup (FIG. 35) containing several key
annotation control and configuration buttons used by the TakeNote application.
20
DXP-PRO v1.1 - User Interface Guide
Page 25
Touch Panel Screens
FIG. 35 G4CC -TakeNote (showing draw popup menu)
If TakeNote is available on the G4CC page above (FIG. 35), by default it is active.
TakeNote is enabled within the G4CC panel page even before the application is
selected.
To disable TakeNote, you must first press the TakeNote Controls button, toggle the
Activate Annotation button (FIG. 35) to the Off state, and press Close.
To re-establish the TakeNote feature, return to the TakeNote popup menu, toggle the
Activate Annotation button back to the On state, and press Close.
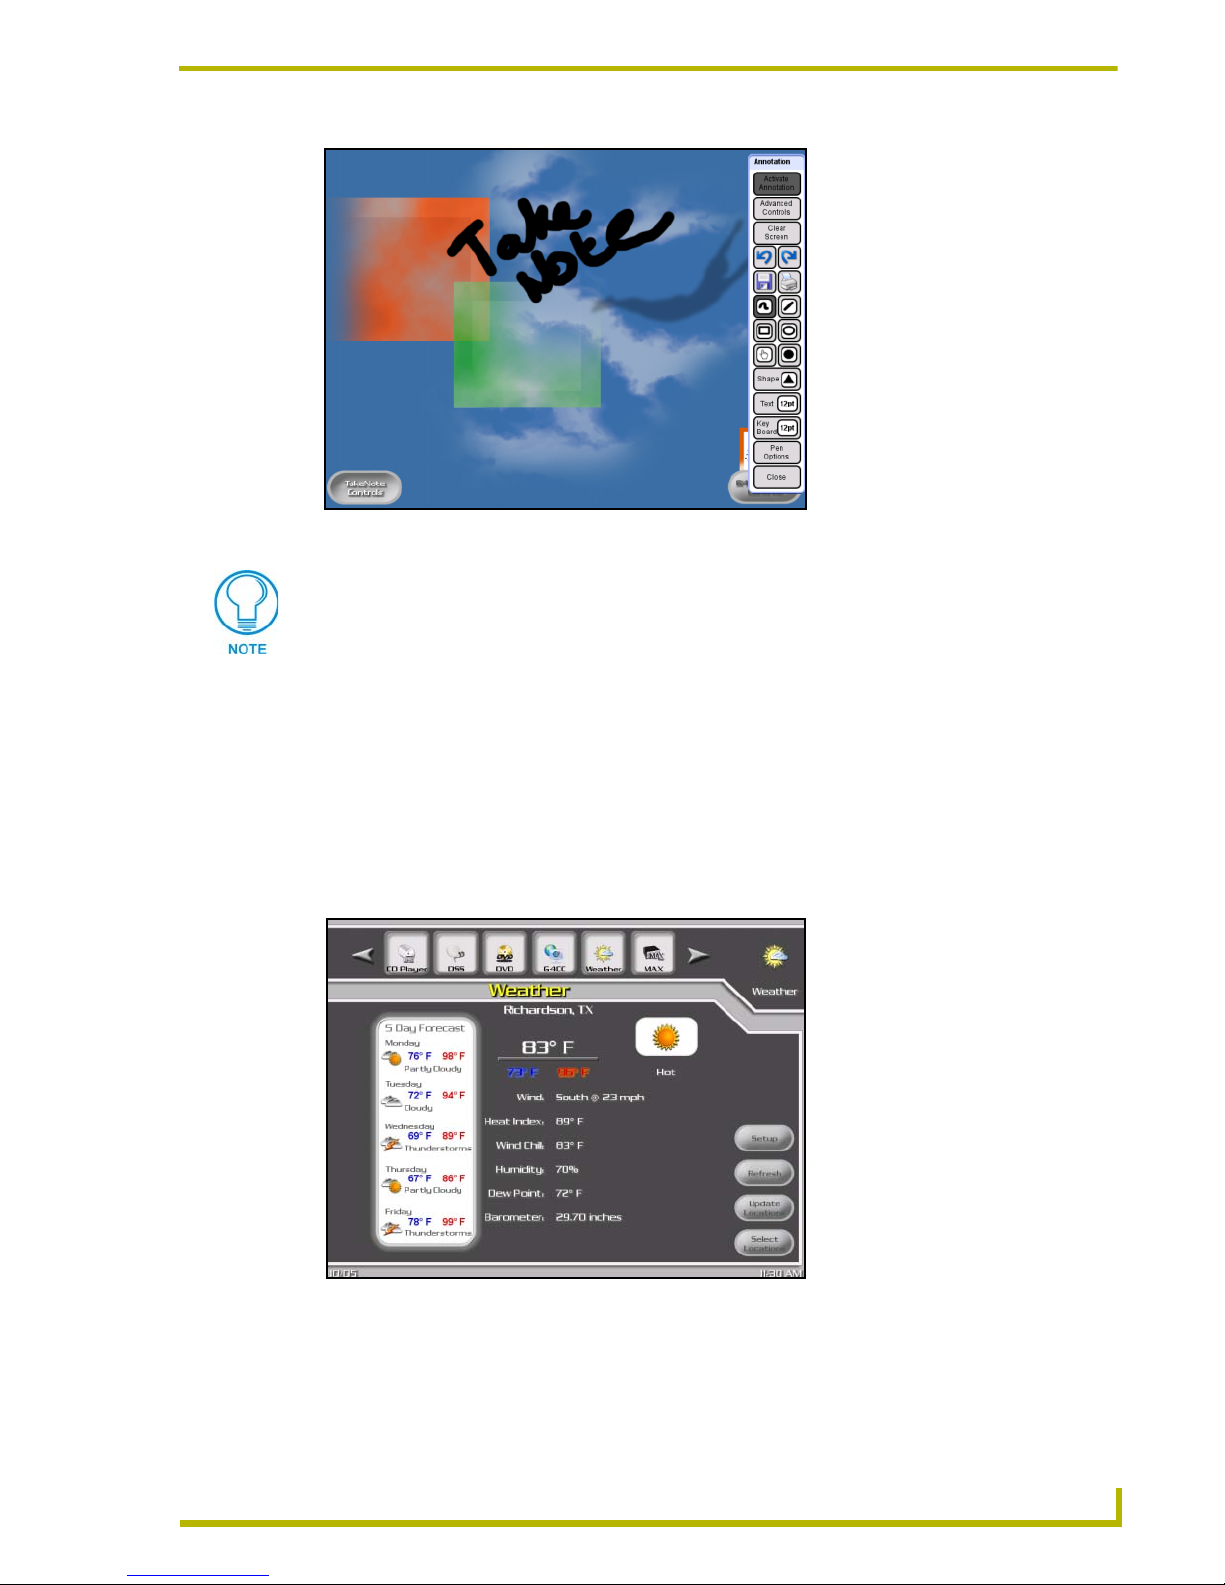
Weather Page
The Weather page is where you can obtain and view a 5-day forecast (with associated weather
conditions) of a selected area. On-screen buttons also allow you to view the current temperature for
various locations around the world. The Weather page (FIG. 36) is displayed after pressing the
Weather menu bar button.
FIG. 36 Weather page
XP-PRO v1.1 - User Interface Guide
21
Page 26

Touch Panel Screens
Obtaining a subscription
Pressing the Setup button launches the Setup page which displays the serial number of the target
Master and provides information regarding your i!-Weather subscription. To obtain a subscription,
you must provide this serial number to your AMX representative.
FIG. 37 Weather -Setup page
Updating weather locations
Pressing the Update Locations button launches the Update Locations page (FIG. 38) where you
can update your panel with new location information provided by a centralized AMX weather
application server.
FIG. 38 Weather -Update Locations page
Once the information has been successfully updated, press the Done button to return to the main
Weather page.
22
DXP-PRO v1.1 - User Interface Guide
Page 27

Touch Panel Screens
Choosing different weather locations
Once you have updated your location information, press the Select Locations button (on the main
Weather page) to launch the Browse Locations page (FIG. 39). On this page, you can save up to
4 preset locations for quick access. To obtain the forecast from the list of available locations, you
can either type in a zip code or press the Browse International button.
FIG. 39 Weather -Browse Locations page
By default, the Browse International Locations page begins with a listing for AMX in Richardson
Tex a s ( this is also the default weather conditions that are displayed on the main Weather page).
Until you have obtained a subscription, you are limited to displaying weather conditions from a
select list of AMX provided locations.
FIG. 40 Weather -Browse International Locations page
i-Weather is subscription-based. Until a subscription is requested, you will only be
able to view the weather conditions at AMX provided sites. These subscriptions are
available from AMX.
XP-PRO v1.1 - User Interface Guide
23
Page 28

Touch Panel Screens
Choosing a new weather location
1. From the main Weather page, press the Select Locations button to open the Browse
International Locations page.
2. Choose the field containing the word AMX.
3. Press the Select button. This action populates the previously empty fields with all available
AMX provided locations.
4. Pressing any of these locations will display that area’s current weather conditions within the
main Weather page.
5. Press the Exit button to accept your new selection and return to the main Weather page.
MAX Pages
If you have a MAX-IMS or -MMS media server in the system, the following set of touch panel
pages allow you to control your MAX server.
Only G4 touch panels support control of MAX servers. You can only use the
WinMax application to record media content onto a MAX server.
MAX Audio Page
The MAX Audio page (FIG. 41) is accessed by pressing the MAX menu bar button. This page
contains audio transport controls for the MAX server and displays track, playlist, genre and
surround mode information.
MAX audio
transport controls
FIG. 41 MAX Audio page
Use the MAX-audio transport controls to play, stop, pause, skip (previous and next track).
Press the Search button to access the MAX Media Search page (FIG. 42), where you can
perform a search for music by Artist, Disc Title, Track Title or Genre).
Press the Modes button to select a playback mode (Random or Sequential).
Press the Playlist button to access the MAX Playlist page (FIG. 44), where you can select
a playlist to listen to.
24
DXP-PRO v1.1 - User Interface Guide
Page 29

Touch Panel Screens
Press the Genres button to access the MAX Genres page (FIG. 45), where you can select
a music genre to listen to.
Press the MAX Video button to access the MAX Video page (FIG. 46), where you can
select a movie to watch.
MAX Media Search Page
The MAX Media Search page (FIG. 42) is accessed by pressing the Search button on the MAX
Audio page (FIG. 41). Use the controls on this page to perform a search for audio media by several
criteria (Artist, Disc Title, Track Title or Genre). Use the Search All button to perform a search
across all of the above mentioned criteria.
FIG. 42 MAX Media Search page
Press one of the search buttons to open an on-screen keyboard and enter a search string. Once the
text string is entered, press the Search button (right of Keyboard page) to perform the specified
type of search.
The search results are displayed in a two-column list (Artist and Disc Title).
Press Search Genres to perform a search for Genres. Genre-based searches open the
MAX Genre page (FIG. 45).
Use the Up and Down arrows to scroll through the results of your search, if necessary.
Select a Disc Title from the list then press the Play Disc button to play the selection.
Select a Disc Title, then press View Tracks to access the MAX Tracklist page (FIG. 43),
where you can view a listing of the tracks on the selected disc, and play a selected track
or the entire disc).
Press Cancel to return to the previously active MAX page.
MAX Tracklist Page
The MAX Tracklist page (FIG. 43) is accessed by pressing the View Tracks button on the MAX
Media Search page (FIG. 42). Use the options in this page to view the tracklist for a selected CD, as
well as play either a selected track, or the entire CD.
XP-PRO v1.1 - User Interface Guide
25
Page 30

Touch Panel Screens
FIG. 43 MAX Tracklist (view tracks) page
Use the Up and Down arrows to scroll through tracklist, if necessary.
Press Play Track to listen to the selected track.
Press Play Disc to play the entire CD.
Press Cancel to return to the previously active MAX page.
MAX Playlist Page
The MAX Playlist page (FIG. 44) is accessed by pressing the Playlist button on the MAX Audio
page (FIG. 41). Use the options on this page to scroll through a list of Playlists and select a Playlist
for listening.
FIG. 44 MAX Playlist page
Use the Up and Down arrows to scroll through the Playlist list, if necessary.
Use the Play (right-arrow) button to play all tracks included in the selected Playlist.
Press Cancel to return to the previously active MAX page.
26
DXP-PRO v1.1 - User Interface Guide
Page 31

Touch Panel Screens
MAX Genre Page
The MAX Genre page (FIG. 45) is accessed by pressing the Genre button on the MAX Audio page
(FIG. 41). Use the options on this page to scroll through a list of Genres and play the playlist of any
selected Genre.
FIG. 45 MAX Genre page
Use the Up and Down arrows to scroll through the Genres list, if necessary.
Use the Play (right-arrow) button to play all tracks included in the selected Genre.
Press Cancel to return to the previously active MAX page.
MAX Recording (CD and DVD)
You can only use the WinMAX application to record media content to the MAX servers (such as
the MAX-MMS).
MAX Video Page (MAX-MMS only)
The MAX Video page (FIG. 46) is accessed by first pressing the MAX menu bar button and then
pressing the Max Video button. This page contains video transport controls for the MAX-MMS
server and displays Title, Chapter and playback Mode information (only available on systems
equipped with an MAX-MMS Multimedia Server).
XP-PRO v1.1 - User Interface Guide
27
Page 32

Touch Panel Screens
MAX-MMS
transport controls
Mute
DVD Navigation Controls
(center button is "Select")
FIG. 46 MAX Video page
Use the MAX-MMS transport controls to play, stop, pause, and skip (previous and next chapter)
DVDs. The DVD navigation controls on this page work just like any standard DVD remote control
(up, down, left, right and Select is in the center).
Press the Search button to access the MAX Movie Search page (FIG. 47), where you can
perform a search for movies by movie titles.
Press the Modes button to select a playback mode (Random or Sequential).
Press the DVD Menu button to access the DVD menu screen for the currently loaded
movie.
Press the MAX Audio button to access the MAX Audio page (FIG. 41), where you can
select a CD, audio track, playlist or genre to listen to.
Press the Mute button to mute the audio without stopping the movie.
28
DXP-PRO v1.1 - User Interface Guide
Page 33

Touch Panel Screens
MAX Movie Search Page
The MAX Movie Search page (FIG. 47) is accessed by pressing the Search button on the MAX
Video page (FIG. 46). Use the controls on this page to perform a search movies by Title.
FIG. 47 MAX Movie Search page
Press the Search Movie button to open an on-screen keyboard to enter a search string, then press
the appropriate command button to perform the specified type of search.
The search results are displayed in a two-column list on the MAX Movie Search page.
Use the Up and Down arrows to scroll through the results of your search, if necessary.
Select a Title from the list then press the Play Movie button to play the selection.
Press Cancel to return to the previously active MAX page.
MP3 Player Pages
This set of pages provide control of the MP3 player (added within the wizard). The MP3 Navigator
page (FIG. 48) is displayed after pressing the MP3 menu bar button. This page contains buttons
that control play list navigation and selection, play modes, and sorting functionality. There are also
page flip buttons that allow search functions, and player transport control.
XP-PRO v1.1 - User Interface Guide
29
Page 34

Touch Panel Screens
FIG. 48 MP3 Navigator page
MP3 Keyboard Page
The MP3 Keyboard page (FIG. 49) is accessed by pressing the Search button on the MP3
Navigator page. This page contains an on-screen keyboard that allows you enter a search string.
Pressing any button on the keyboard will launch a search based on the selected character, and return
you to the MP3 Navigator page.
FIG. 49 MP3 Keyboard Page
30
DXP-PRO v1.1 - User Interface Guide
Page 35

Touch Panel Screens
MP3 Player Page
The MP3 Player page (FIG. 50) is accessed by pressing the Player button on the MP3 Navigator
page. This page contains buttons that control transports, song selection, and play modes. In
addition, there is a page flip button to the MP3 Navigator page.
FIG. 50 MP3 Player page
PVR Pages
This set of pages provide control of the PVRs (added within the wizard). The PVR page (FIG. 51) is
displayed after pressing the PVR menu bar button. This page contains buttons that control PVR
power, transports, and rating functionality. There are also page flip buttons that allow tuning and
menu functions, and preset channel selections.
FIG. 51 PVR page
XP-PRO v1.1 - User Interface Guide
31
Page 36

Touch Panel Screens
PVR Tuner Page
The PVR Tuner page (FIG. 52) is accessed by pressing the Keypad button on the PVR, or PVR
Menu pages. This page contains buttons that control PVR power, tuning, previous channel, clear,
and enter functionality. There are also page flip buttons to the PVR, PVR Menu, and Channel
Presets pages.
FIG. 52 PVR Tuner Page
PVR Menu Page
The PVR Menu page (FIG. 53) is accessed by pressing the Menu button on the PVR, or PVR Tuner
pages. This page contains buttons that control menu navigation and selection functions, in addition
to the guide, live TV, info, select, and exit commands. There are also page flip buttons to the PVR,
PVR Tuner, and Channel Presets pages.
FIG. 53 PVR Menu Page
32
DXP-PRO v1.1 - User Interface Guide
Page 37

Touch Panel Screens
VCR Pages
This set of pages provide control of the VCRs (added within the wizard). The VCR page (FIG. 54)
is displayed after pressing the VCR menu bar button. This page contains buttons that control VCR
power, transports, TV/VCR, input, and menu functionality. There are also page flip buttons that
allow tuner functions, and preset channel selection.
FIG. 54 VCR page
VCR Tuner Page
The VCR Tuner page (FIG. 55) is accessed by pressing the Keypad button (shown above) on the
VCR, or VCR Menu pages. This page contains buttons that control tuning functions including digit,
channel +/-, and enter commands. There are also page flip buttons to the VCR and VCR Menu
pages.
FIG. 55 VCR Tuner page
XP-PRO v1.1 - User Interface Guide
33
Page 38

Touch Panel Screens
VCR Menu Page
The VCR Menu page (FIG. 56) is accessed by pressing the Menu button on the VCR, or VCR Tuner
pages. This page contains buttons that control menu navigation and selection functions, and input
+/- commands. There are also page flip buttons to the VCR and VCR Menu pages.
FIG. 56 VCR Menu page
Video Conferencing Pages
These pages vary based on which supported conference device is selected within the DXP-PRO
wizard. The pages were created in this manner to match (as closely as possible) the functionality of
the selected device. The main pages used for Video Conferencing are described below.
Video Conference - Main Page
The Video Conference Main page (FIG. 57) is accessed by pressing the Vid Conf menu bar button.
This page contains buttons used to set the auto answer status, select inputs, answer or hang up calls.
Additionally, this page has page flips to the various Video Conference pages, including camera
control and call information pages.
FIG. 57 Video Conference page
34
DXP-PRO v1.1 - User Interface Guide
Page 39

Touch Panel Screens
Video Conference - Camera Control Page
The Video Conference Camera Control page (FIG. 58) is accessed by pressing any of the available
Camera buttons on the Video Conference Main page. This page contains buttons used in the
selection of camera control features such as pan/tilt/zoom, and the setting and recalling of camera
presets.
FIG. 58 Video Conference - Camera Control page
Lights Page
This pages provides control of the Lighting system (added within the wizard). The Lights page
(FIG. 59) is displayed after pressing the Lights menu bar button. This page contains buttons that
recall presets configured in the lighting system, status of the presets are also displayed.
FIG. 59 Lighting page
XP-PRO v1.1 - User Interface Guide
35
Page 40
Touch Panel Screens
Relays Page
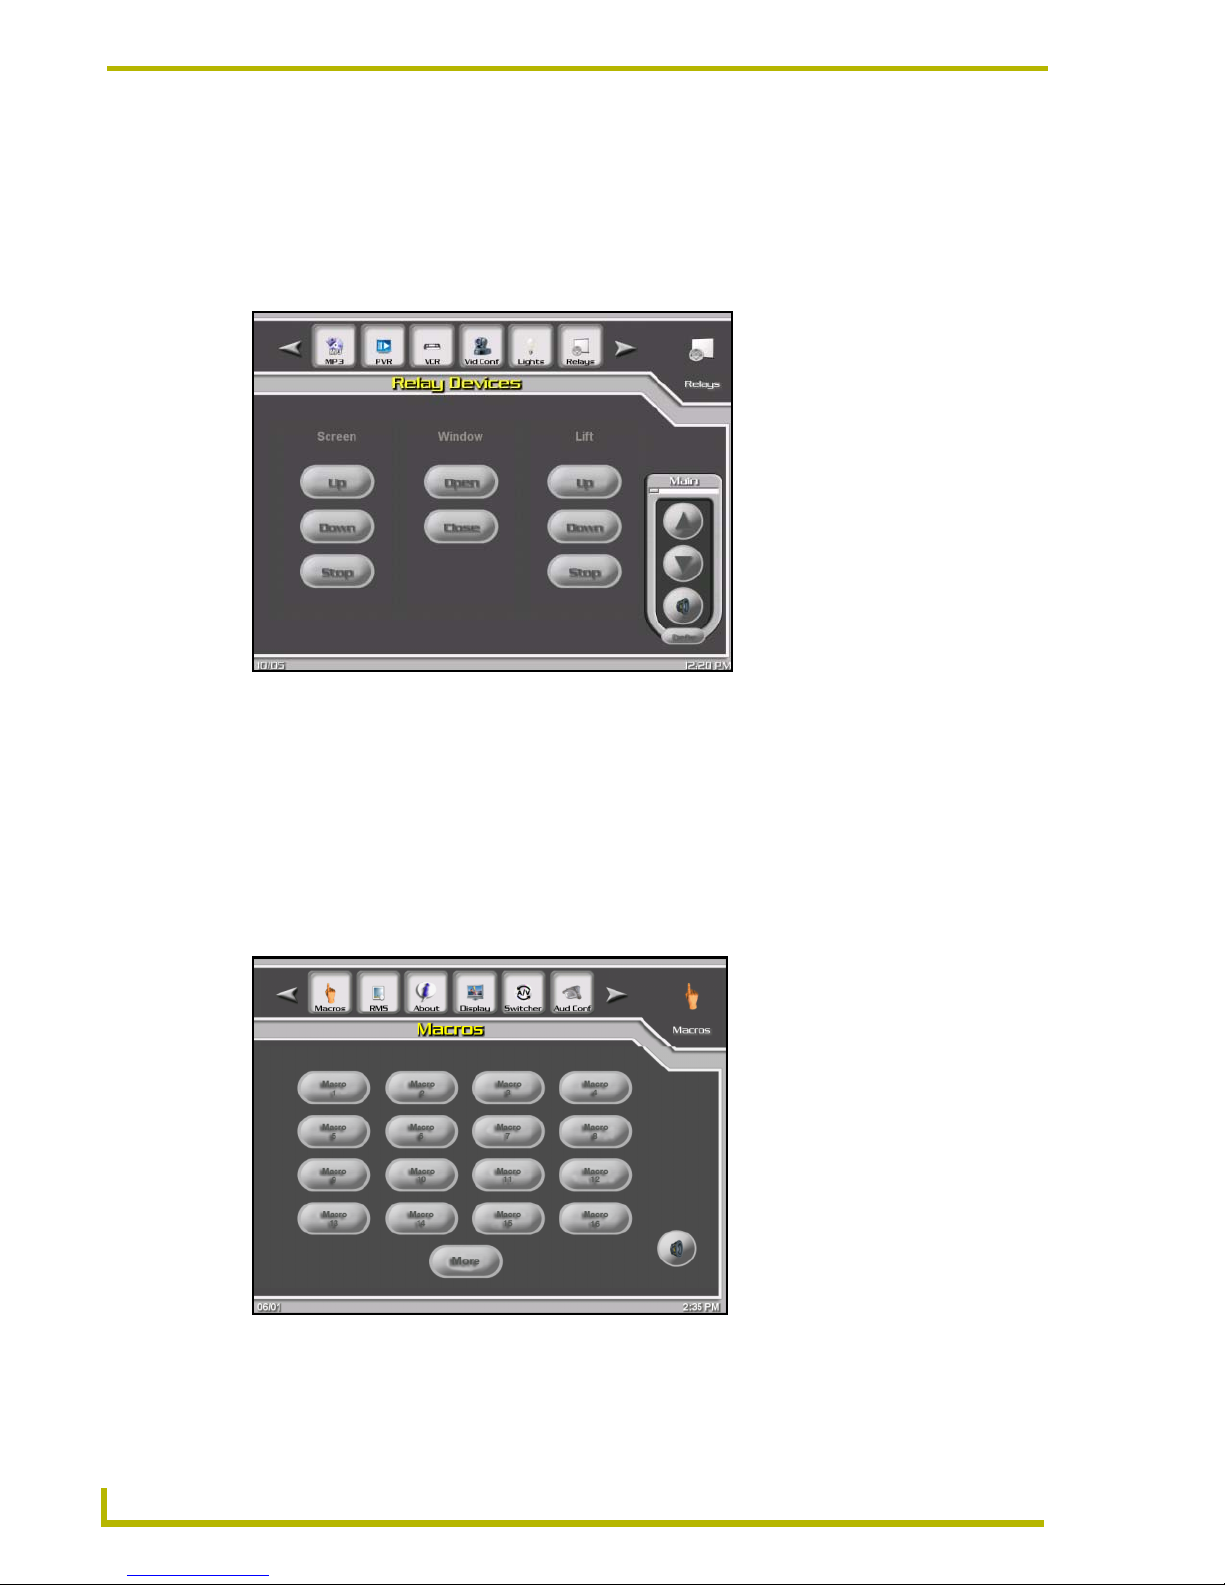
This pages provides control of the Relay-controlled devices (added within the wizard) (FIG. 60).
The Relays page is displayed after pressing the Relays menu bar button. This page contains buttons
that control the relays as they were configured in the wizard. The status of the relays are also
displayed.
FIG. 60 Relay page
Macro Pages
This set of pages is where the Macros (defined within the wizard) are displayed and executed. The
Macros page (FIG. 61) is displayed after pressing the Macros menu bar button. When a macro
button is selected, it will change to it's on state until the macro has finished executing. If, however,
the same button is pressed while running the macro, the remaining execution will be terminated,
and the button's status will return to the off state. If there are more than sixteen macros defined in
the system there is also a page flip button to access the remaining macros (FIG. 62).
FIG. 61 Macros page
36
DXP-PRO v1.1 - User Interface Guide
Page 41

Touch Panel Screens
FIG. 62 Macros2 page
RMS Page
The Resource Manager Suite pages are where you can see what meetings are scheduled for a
particular room and the length of those meetings. You can also extend existing meetings, if none are
scheduled immediately after the selected meeting. The RMS page (FIG. 63) is displayed after
pressing the RMS menu bar button.
FIG. 63 RMS (Resource Manager Suite) page
XP-PRO v1.1 - User Interface Guide
37
Page 42

Touch Panel Screens
From the Meeting Control page (FIG. 64), you can also request Help or submit a maintenance
message to the tech monitoring the system (via the text message keyboard).
FIG. 64 RMS (Resource Manager Suite) Meeting Control page
The tech can then in turn provide you with multiple choice questions from which you can select the
most appropriate answer.
FIG. 65 RMS (Resource Manager Suite) Message Keyboard pages
38
DXP-PRO v1.1 - User Interface Guide
Page 43

Touch Panel Screens
XP-PRO v1.1 - User Interface Guide
39
Page 44

AMX reserves the right to alter specifications without notice at any time.
ARGENTI NA • AUST RALIA • B ELGIUM • BRAZIL • CANADA • CHINA • E NGLAND • FRANCE • GERMANY • GREECE • HONG K ONG • INDI A • INDON ESIA • ITALY • JAPAN
LEBANON • MALAYSIA • MEXICO • NETHERLANDS • NEW ZEALAND • PHILIPPINES • PORTUGAL • RUSSIA • SINGAPORE • SPAIN • SWITZERLAND • THAILAND • TURKEY • USA
ATLANTA • BOSTON • CHICAGO • CLEV ELAND • DALLAS • DENV ER • INDIANAPOLIS • LOS ANGELES • MINNEAPOLIS • PHILADELPHIA • PHOENIX • PORTLAND • SPOKANE • TAMPA
3000 RESEARCH DRIVE, RICHARDSON, TX 75082 USA • 800.222.0193 • 469.624.8000 • 469-624-7153 fax • 800.932.6993 technical support • www.amx.com
2004 AMX Corporation. All rights reserved. AMX, the AMX logo, the building icon, the home icon, and the light bulb icon are all trademarks of AMX Corporation.
©
033-004-2813 10/04
*In Canada doing business as Panja Inc.
Last Revision: 08/11/04
 Loading...