

Page 1

Operation/Reference Guide
MAX-CSE/MAX-CSD10
MAX Video Encoder & Video Decoder
MAX by AMX
Last Revised: 6/19/2007
Page 2

AMX Limited Warranty and Disclaimer
All products returned to AMX require a Return Material Authorization (RMA) number. The RMA number is
obtained from the AMX RMA Department. The RMA number must be clearly marked on the outside of each
box. The RMA is valid for a 30-day period. After the 30-day period the RMA will be cancelled. Any shipments
received not consistent with the RMA, or after the RMA is cancelled, will be refused. AMX is not responsible
for products returned without a valid RMA number.
Warranty Repair Policy
• AMX will repair any defect due to material or workmanship issues during the applicable warranty period at no cost to the AMX
Authorized Partner., provided that the AMX Authorized Partner is responsible for in-bound freight and AMX is responsible for
out-bound ground freight expenses.
• The AMX Authorized Partner must contact AMX Technical Support to validate the failure before pursuing this service.
• AMX will complete the repair and ship the product within five (5) business days after receipt of the product by AMX. The AMX
Authorized Partner will be notified if repair cannot be completed within five (5) business days.
• Products repaired will carry a ninety (90) day warranty or the balance of the remaining warranty, whichever is greater.
• Products that are returned and exhibit signs of damage or unauthorized use will be processed under the Non-Warranty Repair
Policy.
• AMX will continue to provide Warranty Repair Services for products discontinued or replaced by a Product Discontinuance
Notice.
Non-Warranty Repair Policy
• Products that do not qualify to be repaired under the Warranty Repair Policy due to age of the product or Condition of the product may be repaired utilizing this service.
• The AMX Authorized Partner must contact AMX Technical Support to validate the failure before pursuing this service.
• Non-warranty repair is a billable service.
• Products repaired under this policy will carry a ninety (90) day warranty on material and labor.
• AMX will notify the AMX Authorized Partner with the cost of repair, if cost is greater than the Standard Repair Fee, within five (5)
days of receipt.
• The AMX Authorized Partner must provide a Purchase Order or credit card number within five (5) days of notification, or the
product will be returned to the AMX Authorized Partner.
• The AMX Authorized Partner will be responsible for in-bound and out-bound freight expenses.
• Products will be repaired within ten (10) business days after AMX Authorized Partner approval is obtained.
• Non-repairable products will be returned to the AMX Authorized Partner with an explanation.
• See AMX Non-Warranty Repair Price List for minimum and Standard Repair Fees and policies.
This product includes the GoAhead Web Server.
Copyright (c) 2006 GoAhead Software, Inc. All Rights Reserved.
Page 3

Table of Contents
Table of Contents
MAX-CSE Video Encoder ....................................................................................1
Overview .................................................................................................................. 1
MAX-CSE Product Specifications .............................................................................. 2
MAX-CSD10 Video Decoder ...............................................................................5
Overview .................................................................................................................. 5
MAX-CSD10 Product Specifications.......................................................................... 5
MAX-CSE and MAX-CSD10 Installation ..............................................................9
MAX-CSE and MAX-CSD10 Connections and Wiring................................................ 9
Port Assignments and Functionality ................................................................................ 9
Wiring Guidelines - Direct Power .................................................................................... 9
Wiring length guidelines ............................................................................................... 10
Preparing captive wires................................................................................................. 10
Wiring a power connection ........................................................................................... 10
Wiring Guidelines - Indirect Power (via PoE) ................................................................. 10
PoE - Special wiring instructions ................................................................................... 11
Wiring the MAX-CSE connectors and cables................................................................. 12
Ethernet/RJ-45 Port: Connections and Wiring .............................................................. 13
Power over Ethernet (PoE) wiring ................................................................................. 14
Ethernet LEDs ............................................................................................................... 14
DB9 Device Port: Connections and Wiring.................................................................... 14
IR/Serial Port: Connections and Wiring ......................................................................... 15
Input/Output (I/O) Port: Connections and Wiring ......................................................... 15
Wiring the MAX-CSD10 connectors and cables ...................................................... 16
Installing Into an Equipment Rack........................................................................... 17
MAX-CSE Web Interface ..................................................................................19
Overview ................................................................................................................ 19
Security Terms ........................................................................................................ 19
Default Security Configuration ............................................................................... 19
Communicating with the unit via the browser-based UI................................................ 20
Browser-based UI Application Overview ................................................................ 21
MAX-CSE User Interface Overview and Features ......................................................... 21
Administration Page ............................................................................................... 23
Changing the Program Description ............................................................................... 24
Upgrading New Firmware ............................................................................................. 25
Stream Profiles Page .............................................................................................. 26
Changing the Encoder Profile ....................................................................................... 31
MAX-CSE/MAX-CSD10 Operation/Reference Guide
i
Page 4

Table of Contents
A/V Set up Page ..................................................................................................... 32
Changing Video and Audio Settings ............................................................................. 33
NetLinx Settings Page ............................................................................................ 33
Changing the NetLinx Master Connection .................................................................... 35
IP Settings Page...................................................................................................... 35
Changing the IP Settings ............................................................................................... 36
User Page ............................................................................................................... 37
Changing User Settings ................................................................................................. 38
MAX-CSD10 Web Interface ..............................................................................39
Communicating With The Unit Via the Browser-based UI ....................................... 41
Administration Page ............................................................................................... 41
Updating Firmware ....................................................................................................... 41
Stream Selector Page ............................................................................................. 42
Stream Set-up Page ................................................................................................ 43
Changing the stream configuration ............................................................................... 44
Setting up an SAP stream configuration ....................................................................... 44
Setting up an RTSP stream configuration ...................................................................... 44
Setting up a Manual stream configuration .................................................................... 45
Audio/Video Page................................................................................................... 46
NetLinx Page .......................................................................................................... 46
IP Settings Page...................................................................................................... 47
User Page ............................................................................................................... 48
Configuring Communication .............................................................................49
Reading the Front Panel LCD.................................................................................. 49
Configuring the MAX Communication Parameters ................................................. 50
Obtaining the unit’s initial DHCP Address..................................................................... 50
Communicating with the unit via the browser-based UI................................................ 50
Assigning a Static IP Address to the MAX-CSE via the browser-based UI..................... 51
Communicating with the Target Master via an IP ................................................... 52
Associating the MAX unit to a Target Master......................................................... 54
Associating a MAX-CSE to a Target Master .................................................................. 54
Changing the MAX’s Device Number ..................................................................... 56
Changing the MAX-CSE device number via the UI ........................................................ 56
Changing the MAX-CSE device number via Studio ....................................................... 56
Recommended NetLinx Device numbers....................................................................... 57
Using the ID button to change the MAX-CSE’s Device Value........................................ 57
Resetting a MAX-CSE or MAX-CSD10 Unit to a Factory Default State ......................... 58
ii
MAX-CSE/MAX-CSD10 Operation/Reference Guide
Page 5

Table of Contents
Configuration and Firmware Update ................................................................59
Before You Begin.................................................................................................... 59
MAX vs. NetLinx Master - Functional Overlap ........................................................ 59
Verifying the MAX’s current version of Firmware - via the UI ....................................... 59
Verifying the MAX’s current version of Firmware - via Studio ...................................... 60
Upgrading MAX Firmware...................................................................................... 60
Upgrading MAX-CSE Firmware - via the UI ................................................................... 60
Upgrading MAX-CSD10 Firmware - via the UI .............................................................. 61
Upgrading the MAX’s Firmware - via NetLinx Studio.................................................... 61
Displaying Stream Content ............................................................................... 63
Overview ................................................................................................................ 63
Requirements for Receiving Streamed Content...................................................... 63
Setting up a Modero Panel to Receive and Display a Stream................................. 64
Obtaining the IP Address of the target panel ............................................................... 64
Configuring the MAX-CSE for communication .............................................................. 65
Configuring the MAX-CSE audio/video inputs .............................................................. 67
Setting up a streaming page within TPDesign4 ............................................................ 68
Establishing the final connection between the two units .............................................. 70
Setting up a Computer to Receive and Display a Stream ....................................... 71
Obtaining the IP Address of the target computer ........................................................ 71
Configure the MAX-CSE for communication to a computer.......................................... 71
Establishing the final connection between the CSE and computer ............................... 72
NetLinx Programming ......................................................................................75
Device:Port:System (D:P:S) ..................................................................................... 75
Port Assignments.................................................................................................... 75
MAX-CSE: Streaming Commands (Port 1)............................................................... 76
MAX-CSD: Streaming Commands (Port 1) .............................................................. 83
RS-232/422/485 Send_Commands (Port 2)............................................................. 89
RS232/422/485 Ports Channels .............................................................................. 92
RS-232/422/485 Send_String Escape Sequences (Port 2) ....................................... 93
IR / Serial Ports Channels........................................................................................ 94
IR/Serial Port (Port 3) Commands ........................................................................... 94
I/O Port Commands (Port 4) ................................................................................. 100
IR RX Port Channels (Port 5) ................................................................................. 100
LCD Commands (Port 6) ....................................................................................... 101
MAX-CSE/MAX-CSD10 Operation/Reference Guide
iii
Page 6

Table of Contents
iv
MAX-CSE/MAX-CSD10 Operation/Reference Guide
Page 7

MAX-CSE Video Encoder
Overview
The MAX-CSE (Commercial Solutions Encoder) allows audio and video signals to be delivered in realtime across any IP network for broadcast to a virtually limitless number of destinations – classrooms,
boardrooms, training facilities, retail store branches, and other commercial settings. The MAX-CSE also
provides real-time encoding of both analog audio or video content into both MPEG-2 and MPEG-4
formats for delivery across these same IP networks directly to a MAX-CSD10 Decoder, Modero VGSeries Touch Panel, or computer (playback is enabled via a third-party streaming MPEG player).
The MAX Encoder features a rear Ethernet port which provides 10/100 Ethernet connectivity as well as
IEEE 802.3af Power-over-Ethernet (PoE) functionality. This feature enables DC power to be supplied to
this device over the unused pairs of wires on the connected Ethernet cable.
The following table gives a quick overview of this unit’s features.
MAX Encoder Features
Components:
Front Panel LCD Display
10/100 Ethernet Connectivity
On-Board Web Server
NetLinx Connectivity
RS-232/485/422 (Serial) Connectivity
IR Control
I/O Control (2 ports)
IR Receiver
NTSC / PAL Compatible
A/V Inputs:
Composite Video In
S-Video In
Microphone In
Stereo Audio In
MAX-CSE Video Encoder
MAX-CSE (FG2178-70)
MAX-CSE/MAX-CSD10 Operation/Reference Guide
1
Page 8
MAX-CSE Video Encoder
MAX-CSE Product Specifications
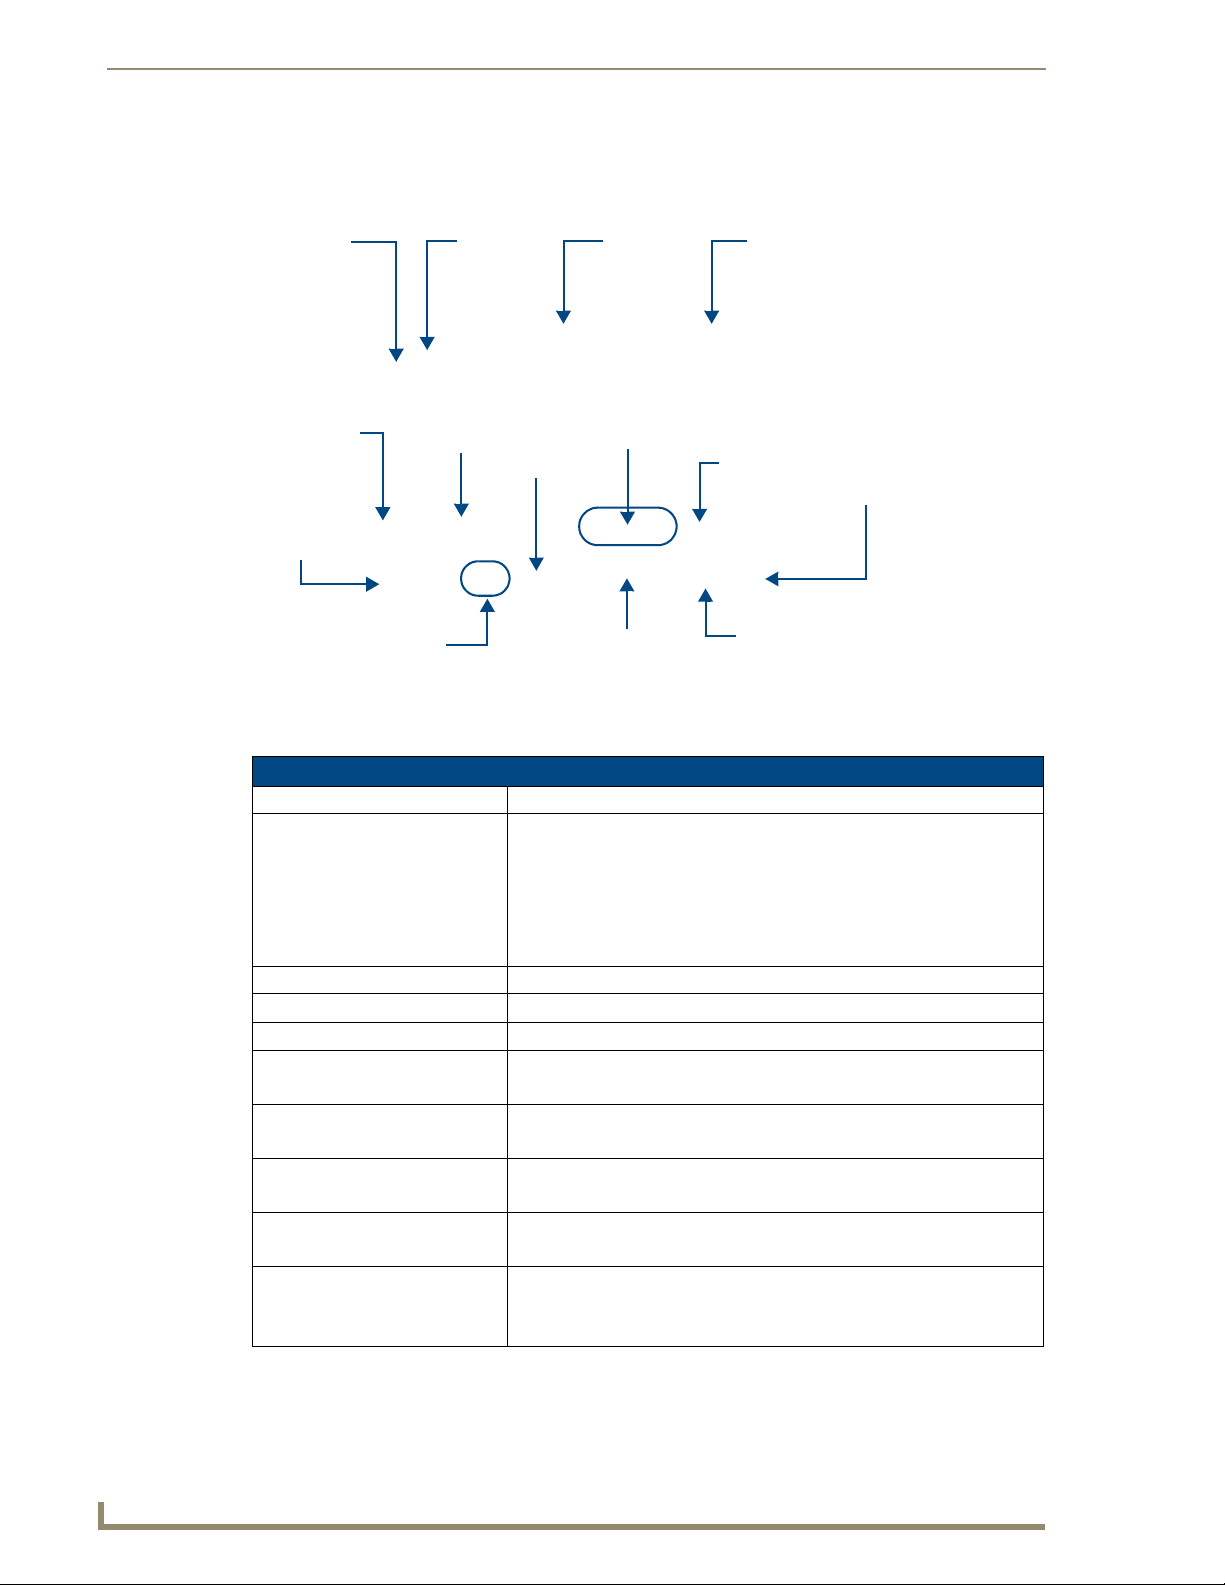
FIG. 1 shows the front and rear views of the MAX-CSE.
ID button
Composite IN
(BNC)
12 VDC
Power
Ethernet Speed and
Link Activity LEDs
FIG. 1 MAX-CSE Video Encoder (front and rear views)
Status LED
S-Video IN
Analog stereo audio
Ethernet
RS232/422/485
LCD Display IR Receiver
Microphone
IR/Serial port
port
(front)
Input/Output
port
(rear)
The following table outlines the specifications for the MAX-CSE Video Encoder.
MAX-CSE Specifications
Dimensions (HWD): 1.58" x 5.54" x 6.95" (4.01cm x 14.07cm x 17.65cm)
Power Requirements: • 500mA @ 12VDC (6W)
• Optional 12VDC power input overrides PoE when used.
• Power requirements are usage-dependent.
• Power Over Ethernet (PoE) is available.
• This product is intended to be supplied by a Listed external power supply
rated from 10 to 18 VDC, minimum 500 mA or equivalent.
Weight: • 2.02 lbs (0.92 kg)
Enclosure: • Metal with black matte finish
Certifications: • FCC Part 15, Class B, CE, and UL listed
Supported Transport Protocols: • RTP (MPEG-2/MPEG-4 Transport Stream)
• UDP (MPEG-2 Transport Stream)
Video Inputs: • Composite Video (via BNC).
• S-Video (via female S-Video connector)
Audio Inputs: • Analog Stereo RCA connectors
• Microphone (1/8” stereo)
Supported Resolutions: • NTSC (480i)
• PAL (576i)
Supported Video Codecs: • MPEG-2 (2 Mbps - 6 Mbps)
• MPEG-4 (500Kbps - 3 Mbps)
• Adjustable Bit Rate: up to 6 Mbps
2
MAX-CSE/MAX-CSD10 Operation/Reference Guide
Page 9
MAX-CSE Video Encoder
MAX-CSE Specifications (Cont.)
Supported Audio Codecs: • MPEG Audio Level 2 (MP2)
• MPEG Audio Level 3 (MP3)
Front Panel Components:
• ID pushbutton: Used to set the NetLinx ID (Device only) assignment and reset the unit to
factory defaults. Press and hold this button for at least 10 seconds to set
the unit back to its default settings.
• Status LED: Green LED provides an indication of both the system status and communi-
• LCD Display: Provides system information such as the currently used IP Address.
• IR Receiver: Receives 38KHz AMX IR codes.
Rear Panel Connectors:
• COMPOSITE IN: BNC connector (female) supports Composite Video Input (NTSC/PAL).
• 12VDC PWR: 2-pin 3.5mm mini-Phoenix (male) captive-wire connector for power from
• S-VIDEO IN: Mini-Din4 port for composite S-Video input.
• ETHERNET 10/100: RJ-45 port provides 10/100 Mbps network communication and POE. LEDs
• AUDIO R/L: • Two RCA connectors support line-level stereo input for analog stereo
• RS-232/422/485: 9-pin (DB9) port supports RS-232/RS-422/RS-485 data output including:
• MIC: 1/8” mini-stereo input jack.
• IR/Serial: 2-pin 3.5mm mini-Phoenix (male) captive-wire connector provides
cation status with the target Master.
1 blink every 5 seconds indicates there is currently active communication
between the CSE and a target Master.
an optional 12 VDC-compliant power supply (overrides POE).
show communication activity, connection status, speeds, and mode information:
• SPD (speed) - Yellow LED lights On when the connection speed is 100
Mbps and turns Off when the speed is 10 Mbps.
• L/A (link/activity) - Green LED lights On when the Ethernet cables are
connected/terminated correctly, and then blinks when receiving Ethernet
data packets.
This port automatically negotiates the connection speed (10 Mbps or 100
Mbps), and whether to use half or full duplex mode.
signals.
300, 600, 1,200, 2,400, 4,800, 9,600, 19,200, 38,400, and 115,200 Baud
rates
• 8 or 9 Data bits
• 1 or 2 Stop bits
• Even, Odd, Mark, Space, and None parity settings
• CTS and RTS handshaking
• XON/XOFF handshaking
IR/Serial control output by generating IR with the use of an IR Emitter
(while in IR mode).
This port supports high-frequency carriers of up to 1.142 MHz and can
also generate IR with no carrier frequency.
MAX-CSE/MAX-CSD10 Operation/Reference Guide
3
Page 10

MAX-CSE Video Encoder
MAX-CSE Specifications (Cont.)
Rear Panel Connectors (Cont.):
• I/O: Two digital 4-channel binary I/O ports for contact closure (accepts a 4-pin
Operating / Storage
Environment:
Included Accessories: • 2-pin 3.5mm mini-Phoenix female PWR connector (41-5025)
Other AMX Equipment: • AC-RK Accessory Rack Kit (FG515)
3.5mm mini-Phoenix captive-wire connector). Each input is capable of
voltage sensing. Input format is software selectable with interactive power
sensing for IR ports.
• Operating Temperature: 0° to 45° C (32° to 113° F)
• Storage Temperature: -30º to 70º C (-22º to 158° F)
• Operating Relative Humidity: 5% to 85% (non-condensing)
• Operation intended for indoor use only.
• 4-pin 3.5mm mini-Phoenix female I/O connector (41-5047)
• BNC to RCA Adapter (41-1074)
• CC-NIRC IR Emitter cable
• MAX-CSE Quick Start Guide
• CSB Cable Support Bracket (FG517)
• PMB Pole Mount Bracket (FG531)
• STS, Serial To Screw Terminal (FG959)
• Surface Mount Bracket Accessory (FG525)
4
MAX-CSE/MAX-CSD10 Operation/Reference Guide
Page 11
MAX-CSD10 Video Decoder
Overview
The MAX-CSD10 is engineered to provide real-time decoding of streamed digital video content out as
Composite and S-Video signals for distribution onto external display devices such as a television, plasma
screen, and projector, and MPEG-streaming capable devices such as AMX Modero Touch Panels.
The rear Ethernet port supports IEEE 802.3af Power-over-Ethernet (POE) which enables DC power to be
supplied to this device over the unused pairs of wires on the connected Ethernet cable.
MAX Decoder Features
MAX-CSD10 (FG2178-72)
Components:
Front Panel LCD Display
10/100 Ethernet Connectivity
On-Board Web Server
NetLinx Connectivity
RS-232/485/422 (Serial) Connectivity
IR Control
I/O Control (2 ports)
IR Receiver
NTSC / PAL Compatible
A/V Outputs:
Composite Video Out
S-Video Out
Analog Stereo Audio Out
MAX-CSD10 Video Decoder
MAX-CSD10 Product Specifications
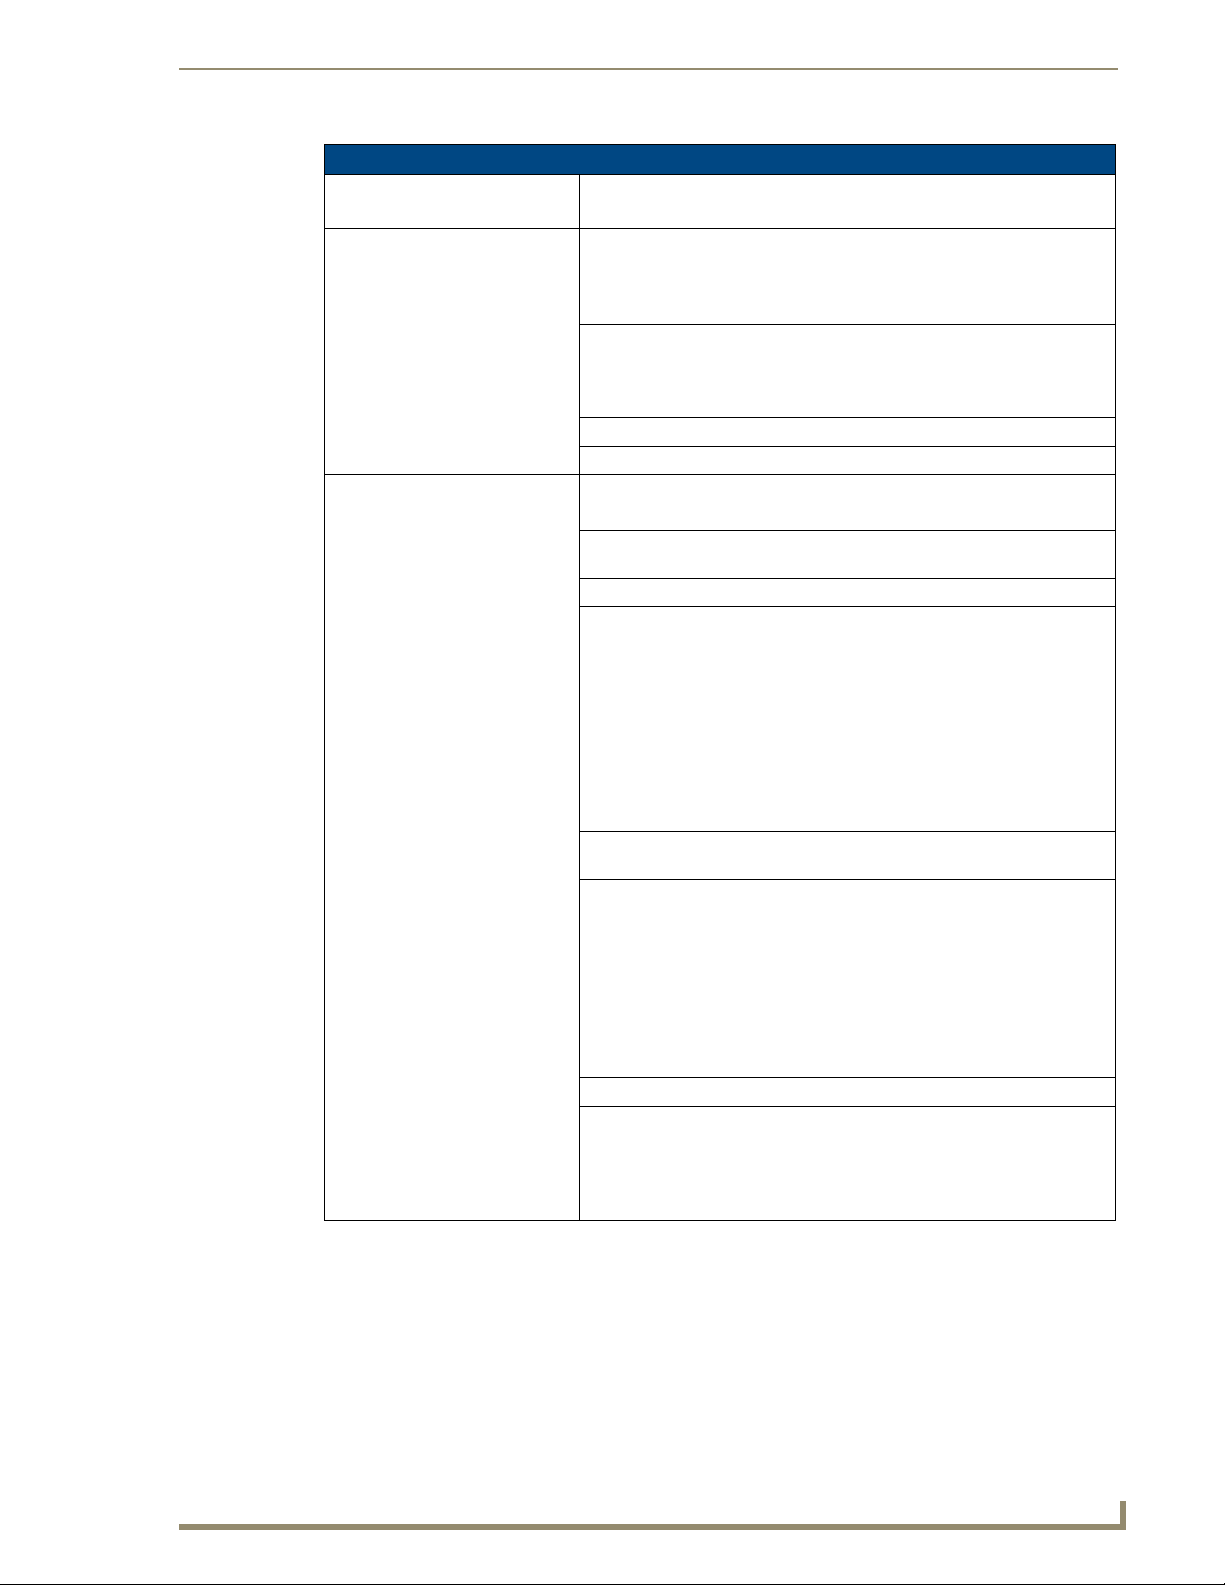
FIG. 2 shows the front and rear views of the MAX-CSD10 unit.
ID button
Composite
OUT
(BNC)
12 VDC
Power
Ethernet Speed and
Link Activity LEDs
FIG. 2 MAX-CSD10 Video Decoder (front and rear views)
MAX-CSE/MAX-CSD10 Operation/Reference Guide
Status LED
S-Video OUT
Analog stereo audio
Ethernet
RS232/422/485
LCD Display
LCD Display IR Receiver
Input/Output
port
IR/Serial port
(front)
port
(rear)
5
Page 12

MAX-CSD10 Video Decoder
The following table outlines the specifications for the MAX-CSD10 Video Decoder.
MAX-CSD10 (FG2178-72) Specifications
Dimensions (HWD): 1.58" x 5.54" x 6.95" (4.01 cm x 14.07 cm x 17.65 cm)
Power Requirements: • 500mA @ 12VDC (6W)
Weight: 2.02 lbs (0.92 kg)
Enclosure: Metal with black matte finish
Certifications: FCC Part 15 Class B, CE, and UL listed
Video Outputs: Composite Video (via BNC)
Audio Outputs: Analog Stereo (RCA connectors - Red/White)
Supported Resolutions: • NTSC (480i)
Supported Video Codecs: • MPEG2 (2 Mbps - 6 Mbps)
Supported Audio Codecs: • MPEG Audio Level 2 (MP2)
Front Panel Components:
• ID Pushbutton: Used to both set the NetLinx ID (Device only) assignment and reset the unit
• Status LED: Green LED blinks to indicate both the system and communication status with
• LCD Display: Provides system information such as the currently used IP Address.
• IR Receiver: • Receives 38KHz AMX IR codes.
Rear Panel Connectors:
• S-VIDEO OUT: Mini-Din4 port for composite S-Video output.
• ETHERNET 10/100: Single RJ-45 port provides 10/100 Mbps network communication and
• AUDIO R/L: Two RCA connectors (Red and White) support line-level stereo output for ana-
• 12VDC PWR: Single 2-pin 3.5mm mini-Phoenix (male) captive-wire connector from an
• COMPOSITE OUT: Composite Video Output (NTSC or PAL) via a female BNC connector.
• IR/Serial: Single 2-pin 3.5mm mini-Phoenix (male) captive-wire connector is used for IR/
• Power Over Ethernet (
• Optional 12VDC power input overrides
POE) is available.
POE when used.
• Power requirements are usage dependant.
• This product is intended to be supplied by a Listed external power supply
rated from 10 to 18 VDC, minimum 500 mA or equivalent.
S-Video (via standard female S-Video connector)
• PAL (576i)
• MPEG4 (500Kbps - 3 Mbps)
• MPEG Audio Level 3 (MP3)
• AAC
back to its factory defaults.
the target Master.
LEDs show communication activity, connections, speeds, and mode informa-
POE.
tion.
log stereo signals.
optional 12 VDC power supply (overrides
POE).
Serial control output by generating IR with the use of an IR emitter (while in IR
mode).
This port can support high-frequency carriers of up to 1.142 MHz and can also
generate IR with no carrier frequency.
6
MAX-CSE/MAX-CSD10 Operation/Reference Guide
Page 13

MAX-CSD10 Video Decoder
MAX-CSD10 Specifications (Cont.)
• RS-232/422/485: Single 9-pin (DB9) port supports RS-232/422/485 data output including:
• 300, 600, 1,200, 2,400, 4,800, 9,600, 19,200, 38,400, and 115,200 Baud
rates
• 7 or 8 Data bits
• 1 or 2 Stop bits
• Even, Odd, Mark, Space, and None parity settings
• CTS and RTS handshaking
• XON/XOFF handshaking
• I/O: Two digital binary Input/Output ports for contact closure (accepts a 4-pin
Operating/Storage
Environment:
Included Accessories: 2-pin 3.5mm mini-Phoenix female PWR connector
Other AMX Equipment: AC-RK Accessory Rack Kit (FG515)
3.5mm mini-Phoenix (male) captive-wire connector). Each input is capable of
voltage sensing. Input format is software selectable with interactive power
sensing for IR ports.
Operating Temperature: 0° to 45° C (32° to 113° F)
Storage Temperature: -30º to 70º C (-22º to 158° F)
Operating Relative Humidity: 5% to 85% (non-condensing)
Operation intended for indoor use only.
4-pin 3.5mm mini-Phoenix female I/O connector
Audio Stereo Cable (Red/White RCA)
BNC to RCA Adapter
CC-NIRC IR Emitter cable
MAX-CSD10 Quick Start Guide
CSB Cable Support Bracket (FG517)
PMB Pole Mount Bracket (FG531)
STS, Serial To Screw Terminal (FG959)
Surface Mount Bracket Accessory (FG525)
MAX-CSE/MAX-CSD10 Operation/Reference Guide
7
Page 14

MAX-CSD10 Video Decoder
8
MAX-CSE/MAX-CSD10 Operation/Reference Guide
Page 15
MAX-CSE and MAX-CSD10 Installation
MAX-CSE and MAX-CSD10 Installation
MAX-CSE and MAX-CSD10 Connections and Wiring
The MAX CSE and MAX-CSD10 are configured to be used as standalone units
running on a network capable of supporting the up to a 6Mbps data rate. It is
recommended that you set up the unit locally prior to installing it within an AC-RK
19-inch rack unit, as described on page 17.
Port Assignments and Functionality
The rear Port Assignments are as follows:
MAX-CSE Port Assignments
Description ICSP Port #
Video Encoder 1
RS-232/422/485 (DB9) Serial Port 2
IR/Serial Port 3
I/O Port 4
IR RX Port 5
LCD Display 6
MAX-CSD10 Port Assignments
Description ICSP Port #
Video Decoder 1
RS-232/422/485 (DB9) Serial Port 2
IR/Serial Port 3
I/O Port 4
IR RX Port 5
LCD Display 6
Wiring Guidelines - Direct Power
The MAX-CSE and MAX-CSD10 units require the use of either an external 12 VDC-compliant power
supply or an 802.3af-compliant device to provide DC power. Power can be fed to the unit through either
the rear 2-pin 3.5mm mini-Phoenix PWR connector or the rear Ethernet connector (PoE).
Use the power requirements from the Specifications table on page 2 to determine the unit’s power draw.
This unit should only have one source of incoming power.
Although the unit can be connected to two separate power sources, the
12 VDC-compliant power input overrides the PoE. Refer to the Wiring Guidelines Indirect Power (via PoE) section on page 10 for specific PoE wiring procedures and
restrictions.
MAX-CSE/MAX-CSD10 Operation/Reference Guide
9
Page 16
MAX-CSE and MAX-CSD10 Installation
Wiring length guidelines
Refer to the following table for the wiring length information related to the target MAX unit:
MAX-CSE and MAX-CSD10 @ 500 mA
Wire size Maximum wiring length
18 AWG 216.76 feet (66.07 meters)
20 AWG 137.61 feet (41.94 meters)
22 AWG 88.78 feet (27.06 meters)
24 AWG 54.15 feet (16.50 meters)
Preparing captive wires
You will need a wire stripper and flat-blade screwdriver to prepare and connect the captive wires.
Never pre-tin wires for compression-type connections.
1. Strip 0.25 inch (6.35mm) of insulation off all wires.
2. Insert each wire into the appropriate opening on the connector (according to the wiring diagrams
and connector types described in this section).
3. Tighten the screws to secure the wire in the connector. Do not tighten the screws excessively, as
doing so may strip the threads and damage the connector.
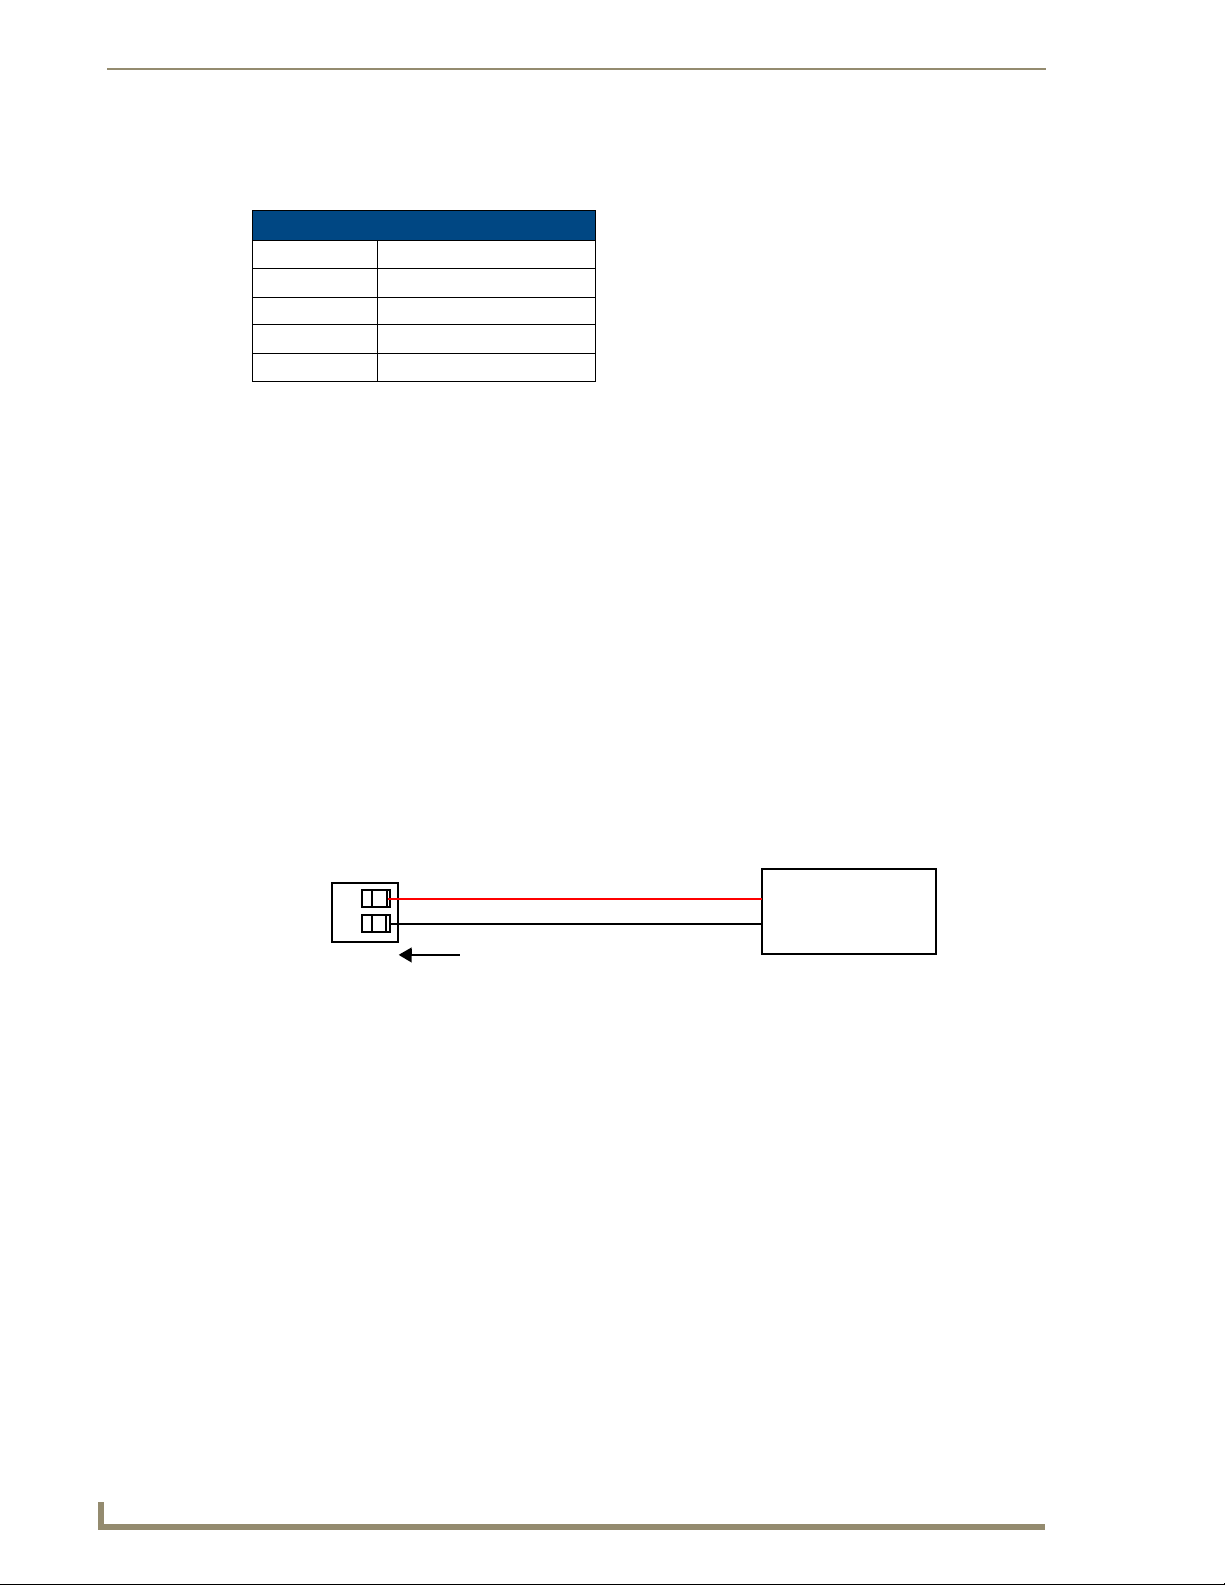
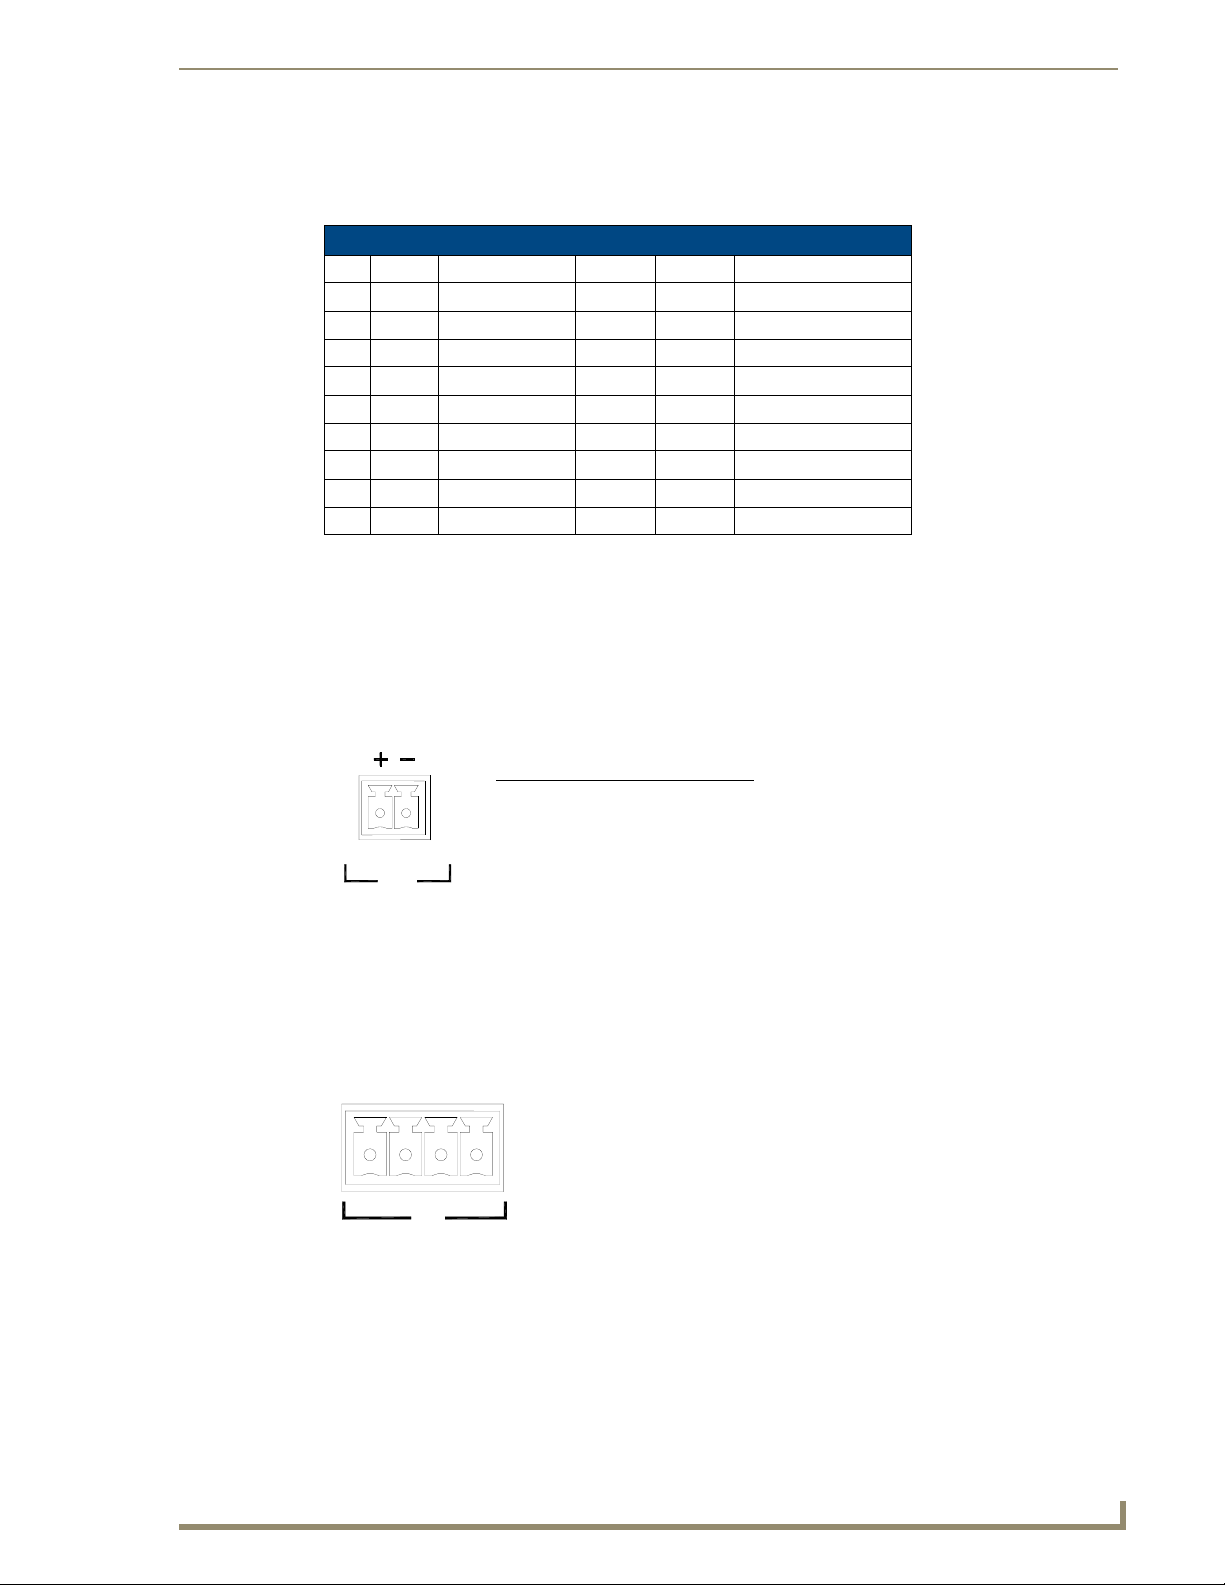
Wiring a power connection
To use the 2-pin 3.5mm mini-Phoenix connector with a 12 VDC-compliant power supply, the incoming
PWR and GND cables from the external source must be connected to their corresponding locations on
the connector (FIG. 3).
PWR +
GND -
To the rear of the MAX unit
FIG. 3 2-pin mini-Phoenix connector wiring diagram (direct power)
Power Supply
Wiring Guidelines - Indirect Power (via PoE)
Power-over-Ethernet (PoE) can be used to indirectly provide DC power to this 802.3af-compliant device
via the unused wire pairs in the UTP or STP Ethernet cable (RJ-45 pins 4, 5, 7, and 8). PoE power is
overridden if a direct power feed (via the rear 2-pin PWR connector) is detected.
Any 802.3af-compliant PoE switch (such as the NXA-ENET24 PoE) can automatically detect the MAX
device by its authenticated PoE signature and sense its required load before applying power to the PoE
Ethernet port on a target device.
PoE connections work with all existing Category (CAT) 3, 4, 5, 5e or 6 network
cabling (including patch cables and patch-panels, outlets, and other connecting
hardware) without requiring modification.
10
MAX-CSE/MAX-CSD10 Operation/Reference Guide
Page 17
MAX-CSE and MAX-CSD10 Installation
CS
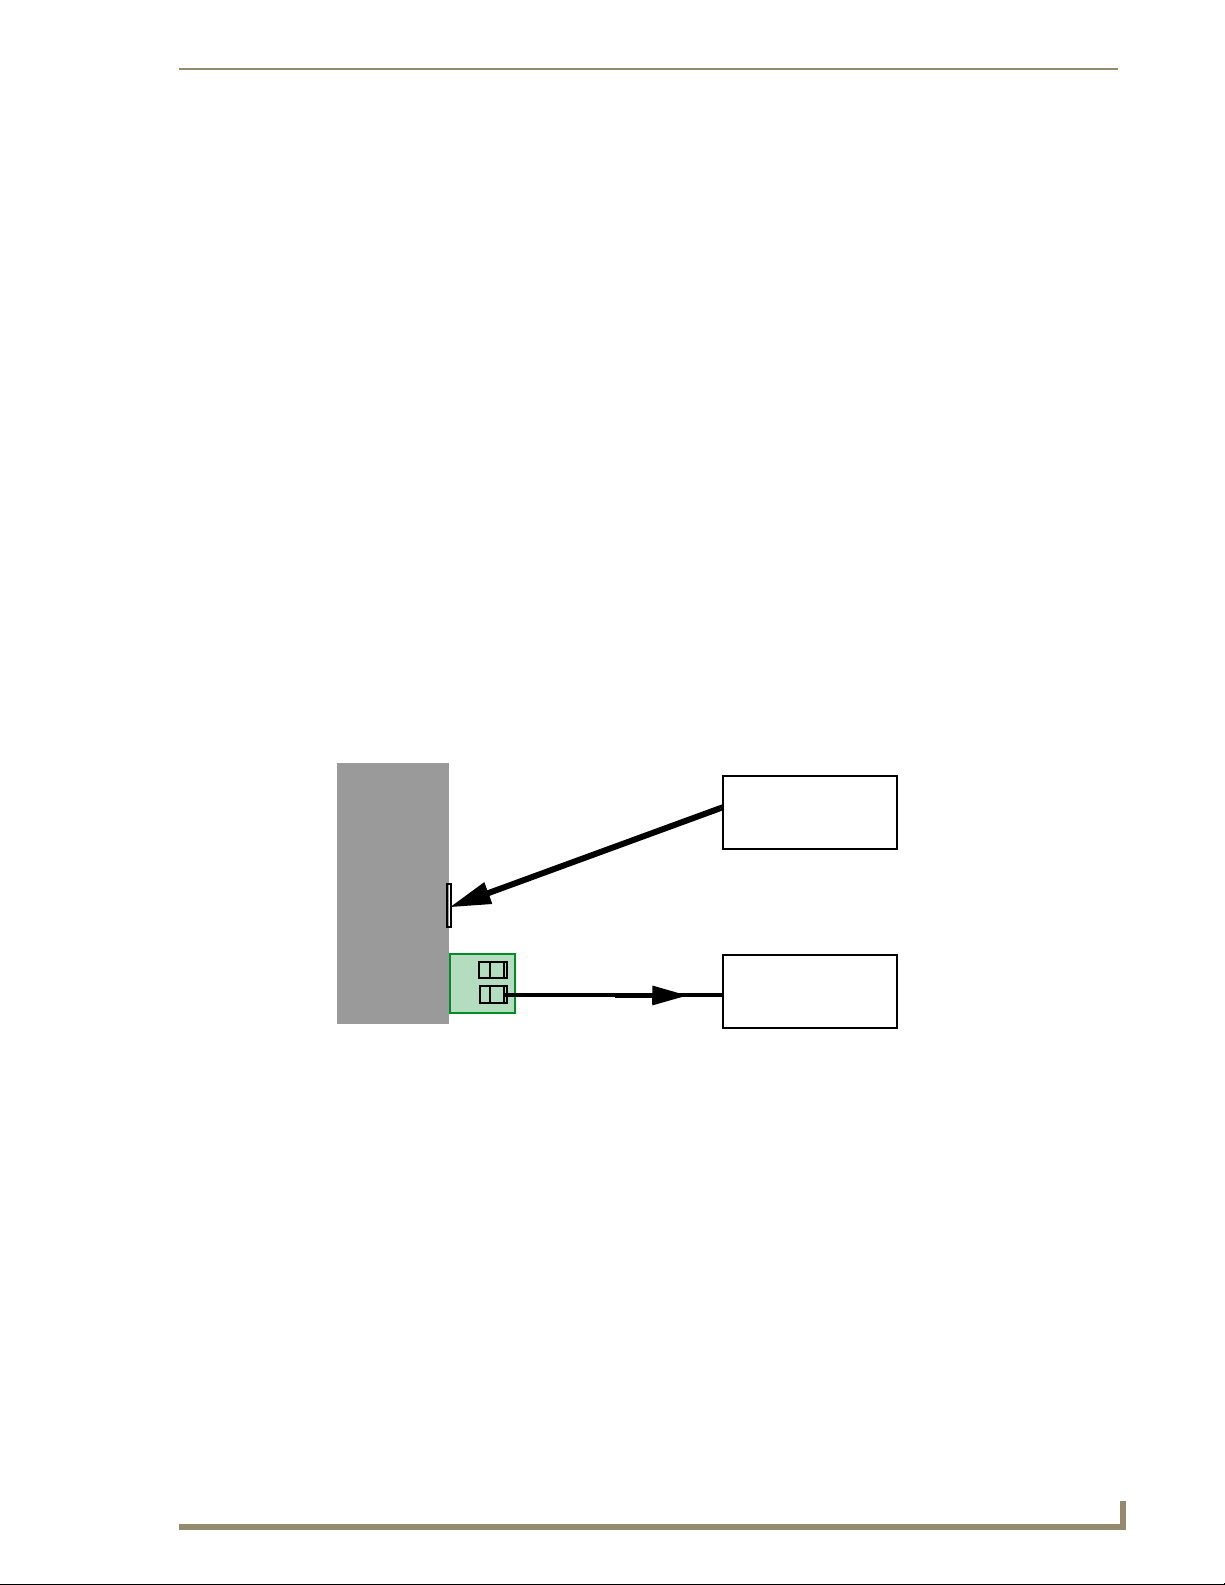
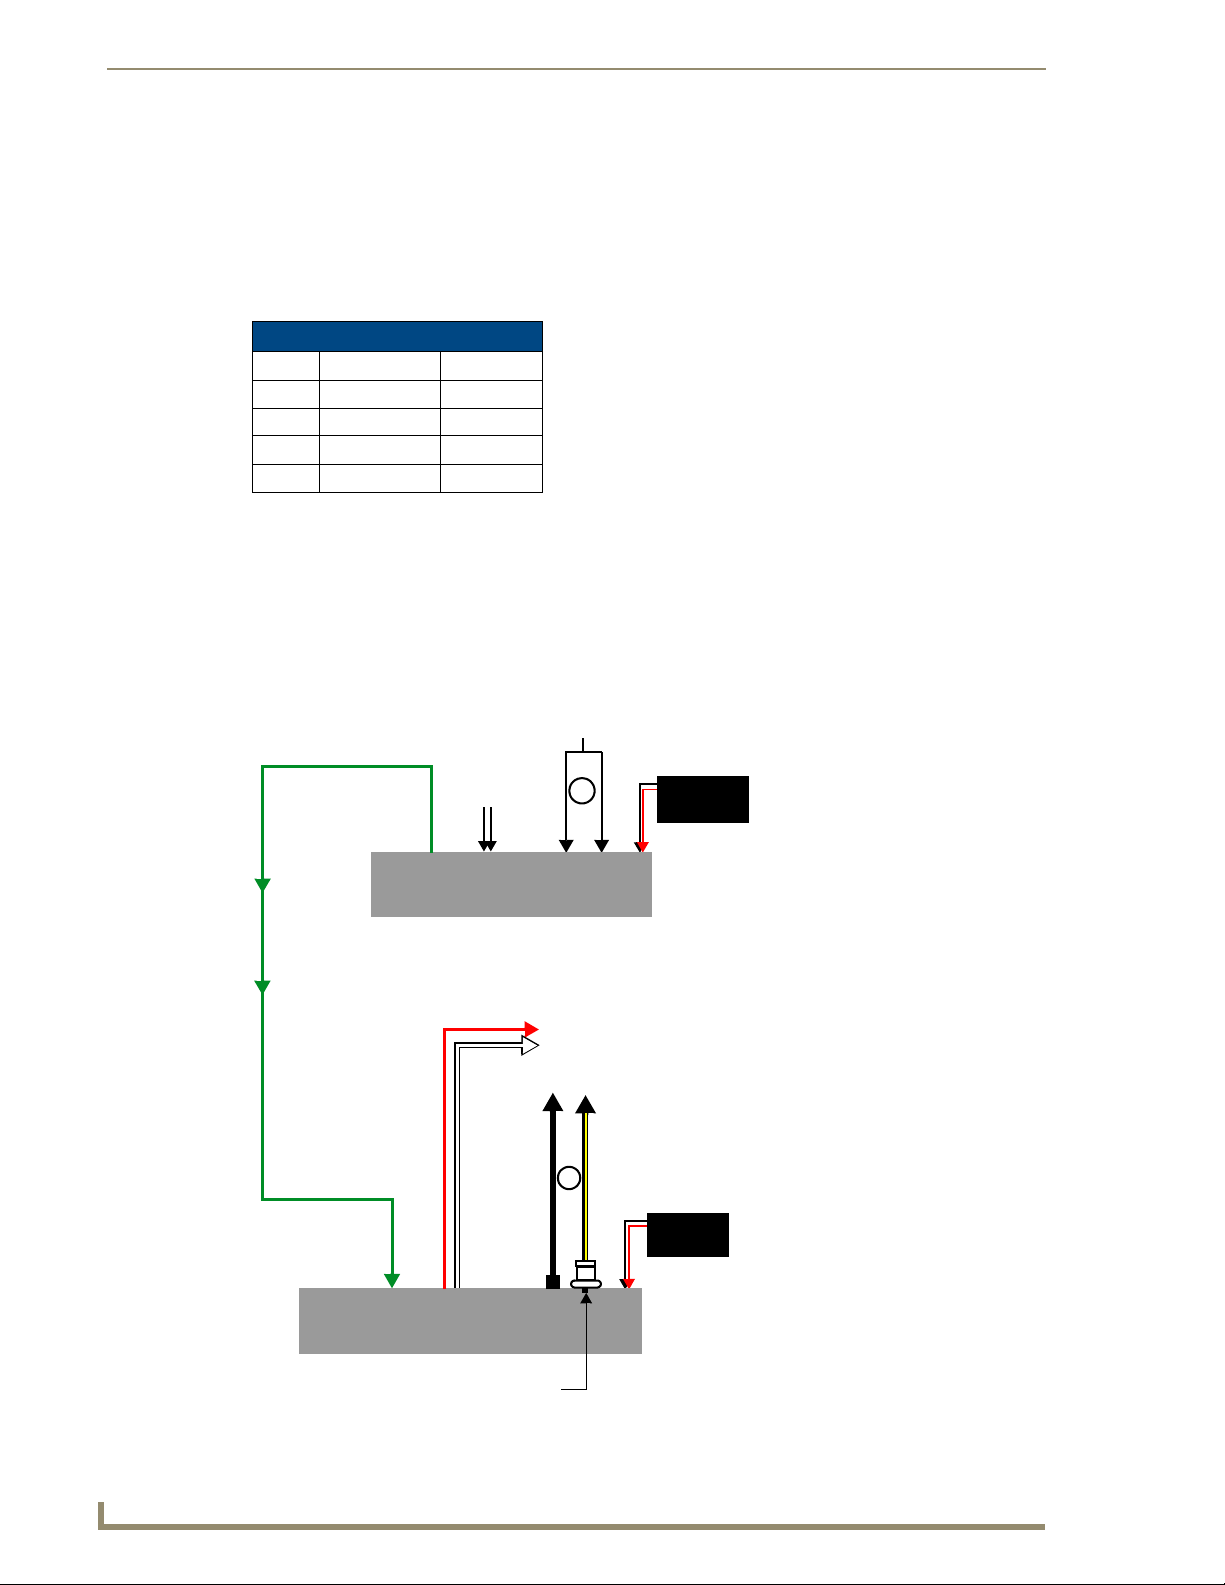
PoE - Special wiring instructions
Before beginning the connection from the PoE switch to the target MAX unit, follow these instructions
carefully:
When using PoE, you must FIRST ground the unit to provide ESD protection.
Refer to the procedures outlined within the previous Preparing captive wires section on
page 10.
Install a single wire into the (-) GND side of the rear green 2-pin mini-Phoenix connector
(FIG. 4).
Connect this wire to a grounded source (FIG. 4). This GND wire provides the necessary ESD
protection to the unit. Only after this step has been completed can you continue on to the
wiring of the PoE connection.
The length of the GND wire should not exceed 6 feet (1.83 meters).
Pre-configure the 802.3af-compliant PoE switch (such as the NXA-ENET24 PoE) and prepare
it for power transmission to the target MAX unit. Refer to the PoE’s product documentation
for more details.
R
MAX-
MAX-CSE
E
A
R
802.3af-compliant
PoE switch
E
EthernetPWR
PWR +
GND -
FIG. 4 ESD grounding and PoE connection of a MAX unit
Connect a CAT5/CAT6 Ethernet cable from the RJ-45 PoE connector on the PoE switch to the
Grounded Metal
plate or object
rear RJ-45 (Ethernet) connector on the target MAX unit (FIG. 4).
MAX-CSE/MAX-CSD10 Operation/Reference Guide
11
Page 18
MAX-CSE and MAX-CSD10 Installation
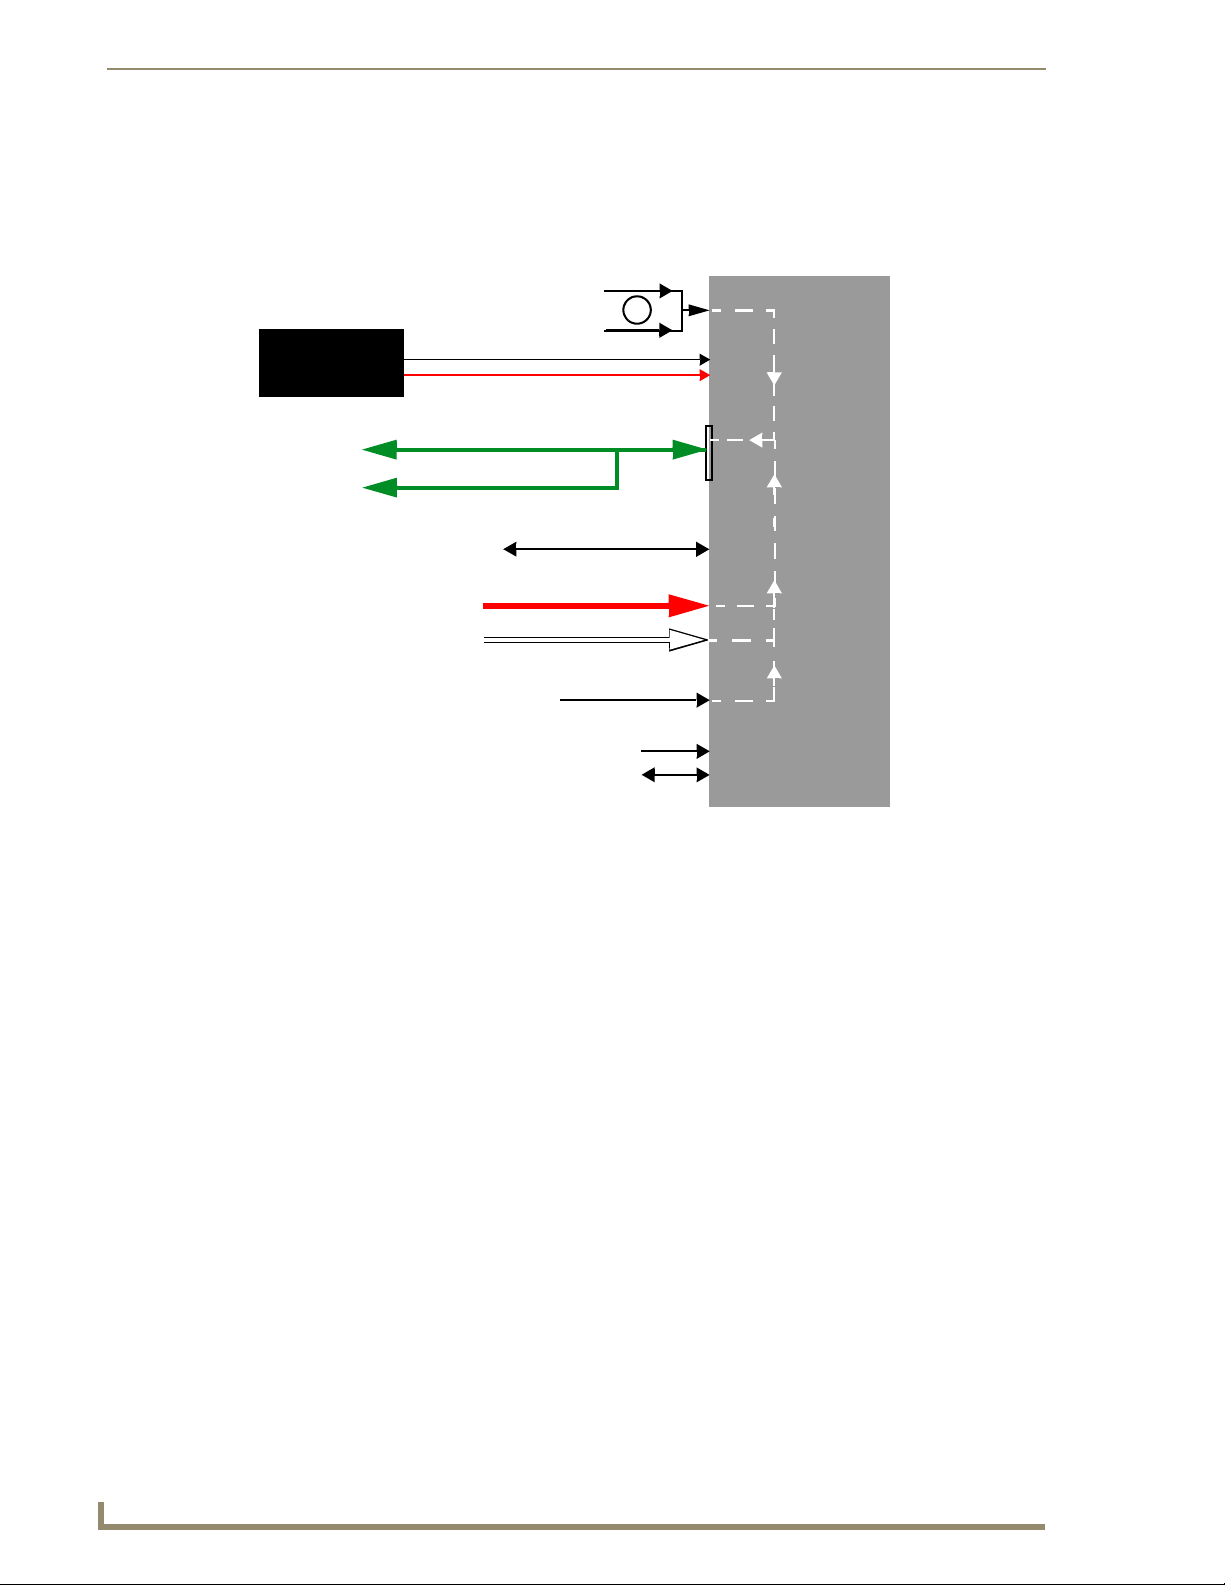
Wiring the MAX-CSE connectors and cables
The rear connectors on the MAX-CSE (FIG. 5) are used to input external multimedia signals and then
stream them to the network/web. This stream can be displayed through either a MAX-CSD10 Decoder,
VG-Series Modero Touch Panel or through a third-party player such as VLC
®
.
COMPOSITE IN (BNC)
S-VIDEO IN (MiniDin4)
12 VDC power
supply
Outbound Audio/Video/Data (RJ-45)
Ethernet - Data (RJ-45)
Right Audio Channel IN
Left Audio Channel IN
Microphone IN
FIG. 5 MAX-CSE connector wiring diagram
or
RS232/422/485
IR/Serial
I/O
F
R
O
N
T
MAX-CSE
Encoder
Box
R
E
A
R
The rear-panel wiring connections are described below (from left to right):
• COMPOSITE IN: Uses a BNC connector to feed a Composite video signal in from an
outside video source and then out to an external streaming media
display or device via the Ethernet port.
The BNC connector can be modified to receive signals from an RCA
connector by using the included BNC to RCA Adapter (41-1074).
This signal can also be fed from a DB15 connector by using an
optional NXA-RGBCBL (15-pin to 5X BNC) RGB Breakout cable
(FG2250-80).
Note: Although the MAX-CSE can accept either a Composite or
S-Video input signal type. If both signal types are detected, the unit (in
its default state) will use the Composite signal. This selection can be
later changed by the user via the A/V Setup UI page.
• S-VIDEO IN: Uses a female S-Video connector to feed a video signal in from an
•PWR 2-pin 3.5 mm mini-Phoenix connector connects to a direct
external video source and then out to an external streaming media
display or device via the rear Ethernet port.
Note: Although the MAX-CSE can accept either a Composite or
S-Video input signal type. If both signal types are detected, the unit (in
its default state) will use the Composite signal. This selection can be
later changed by the user via the A/V Setup UI page.
12 VDC-compatible power supply.
12
MAX-CSE/MAX-CSD10 Operation/Reference Guide
Page 19

MAX-CSE and MAX-CSD10 Installation
•ETHERNET: RJ-45 connector routes streamed Audio/Video and Data out to an
• AUDIO IN: Stereo line-level input via two rear RCA connectors (R/L).
• MIC IN: Stereo line-level input via a rear 1/8” mini-stereo jack.
•IR: 2-pin 3.5 mm mini-Phoenix connector accepts a single IR Emitter
• I/O: 4-pin 3.5 mm mini-Phoenix connector allows for the connection of up
external device capable of receiving the streamed media content
(including a MAX-CSD10, VG-Series touch panel, or computer).
The Power-over-Ethernet (PoE) feature of the Ethernet port can be
used to provide indirect DC power to this 802.3af-compliant device
over the unused wire pairs in the UTP or STP Ethernet cable
(RJ-45 pins 4, 5, 7, and 8).
(CC-NIRC) and can connect one IR- or Serial-controllable device.
to two devices. The I/O port responds to either switch closures,
voltage level (high/low) changes, or can be used for logic-level
outputs. When used for outputs, the I/O port acts as a switch to GND.
Ethernet/RJ-45 Port: Connections and Wiring
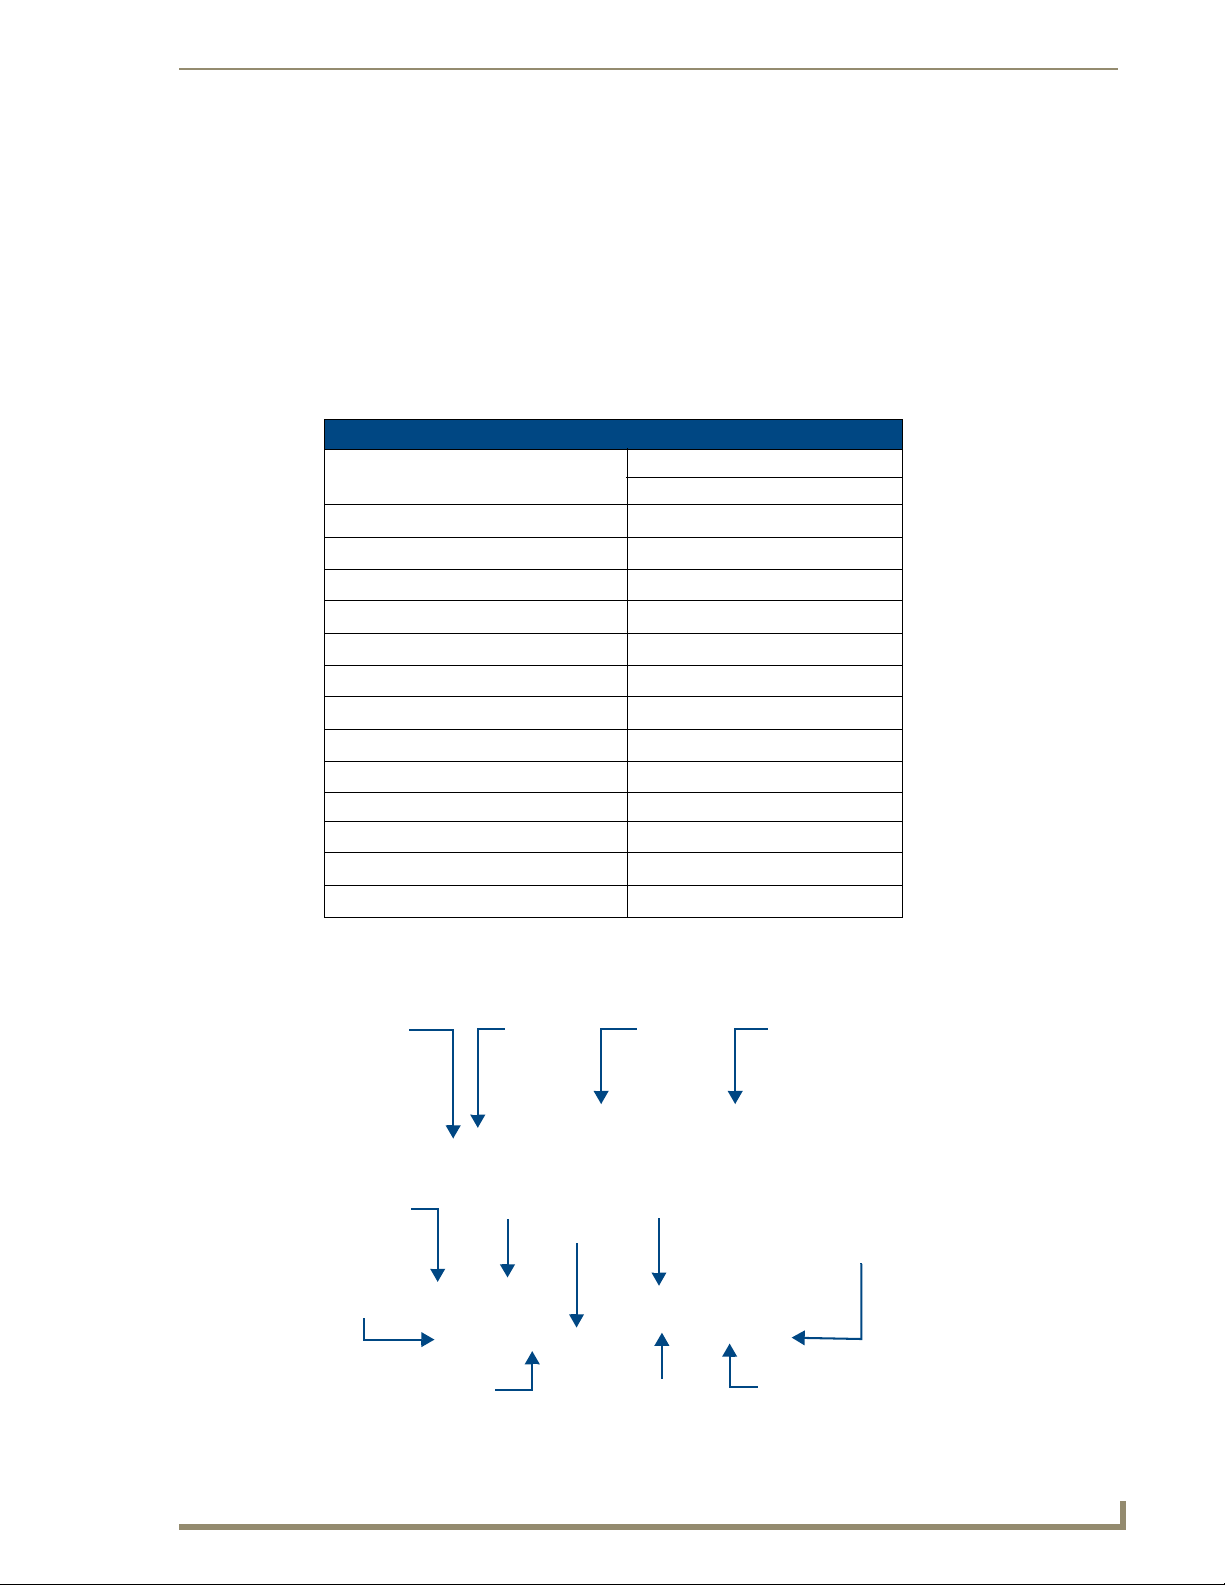
The following table lists the pinouts, signals, and pairing for the Ethernet connector.
Ethernet RJ-45 Pinouts and Signals
Pin Signals ConnectionsPairing Color
1 TX + 1 --------- 1 1 --------- 2 Orange-White
2 TX - 2 --------- 2 Orange
3 RX + 3 --------- 3 3 --------- 6 Green-White
4 no connection 4 --------- 4 Blue
5 no connection 5 --------- 5 Blue-White
6 RX - 6 --------- 6 Green
7 no connection 7 --------- 7 Brown-White
8 no connection 8 --------- 8 Brown
FIG. 6 diagrams the RJ-45 pinouts and signals for the Ethernet RJ-45 connector and cable.
RJ-45 wiring diagram
FIG. 6
MAX-CSE/MAX-CSD10 Operation/Reference Guide
13
Page 20
MAX-CSE and MAX-CSD10 Installation
Power over Ethernet (PoE) wiring
PoE can be used to indirectly provide DC power to this 802.3af-compliant device via the unused wire
pairs in the UTP or STP Ethernet cable (RJ-45 pins 4, 5, 7, and 8).
PoE power is overridden if a direct power feed (via the rear 2-pin PWR connector) is detected.
Any 802.3af-compliant PoE switch (such as the NXA-ENET24 PoE) can automatically detect the MAX
device by its authenticated PoE signature and sense its required load before applying power to the PoE
Ethernet port on a target device.
Ethernet LEDs
MAX-CSE and MAX-CSD10 units use a standard CAT5 Ethernet cable to provide 10/100 network
connectivity to the network. LEDs indicate communication activity, connection status, speeds, and mode
information as described in FIG. 7.
SPD
- Speed LED lights (yellow) when
the connection speed is 100 Mbps
and turns Off when the speed
L/A
- Link/Activity LED lights
(green) when the Ethernet
cables are connected and
is 10 Mbps.
terminated correctly.
SPD
L/A
ETHERNET 10/100
FIG. 7 Ethernet LEDs
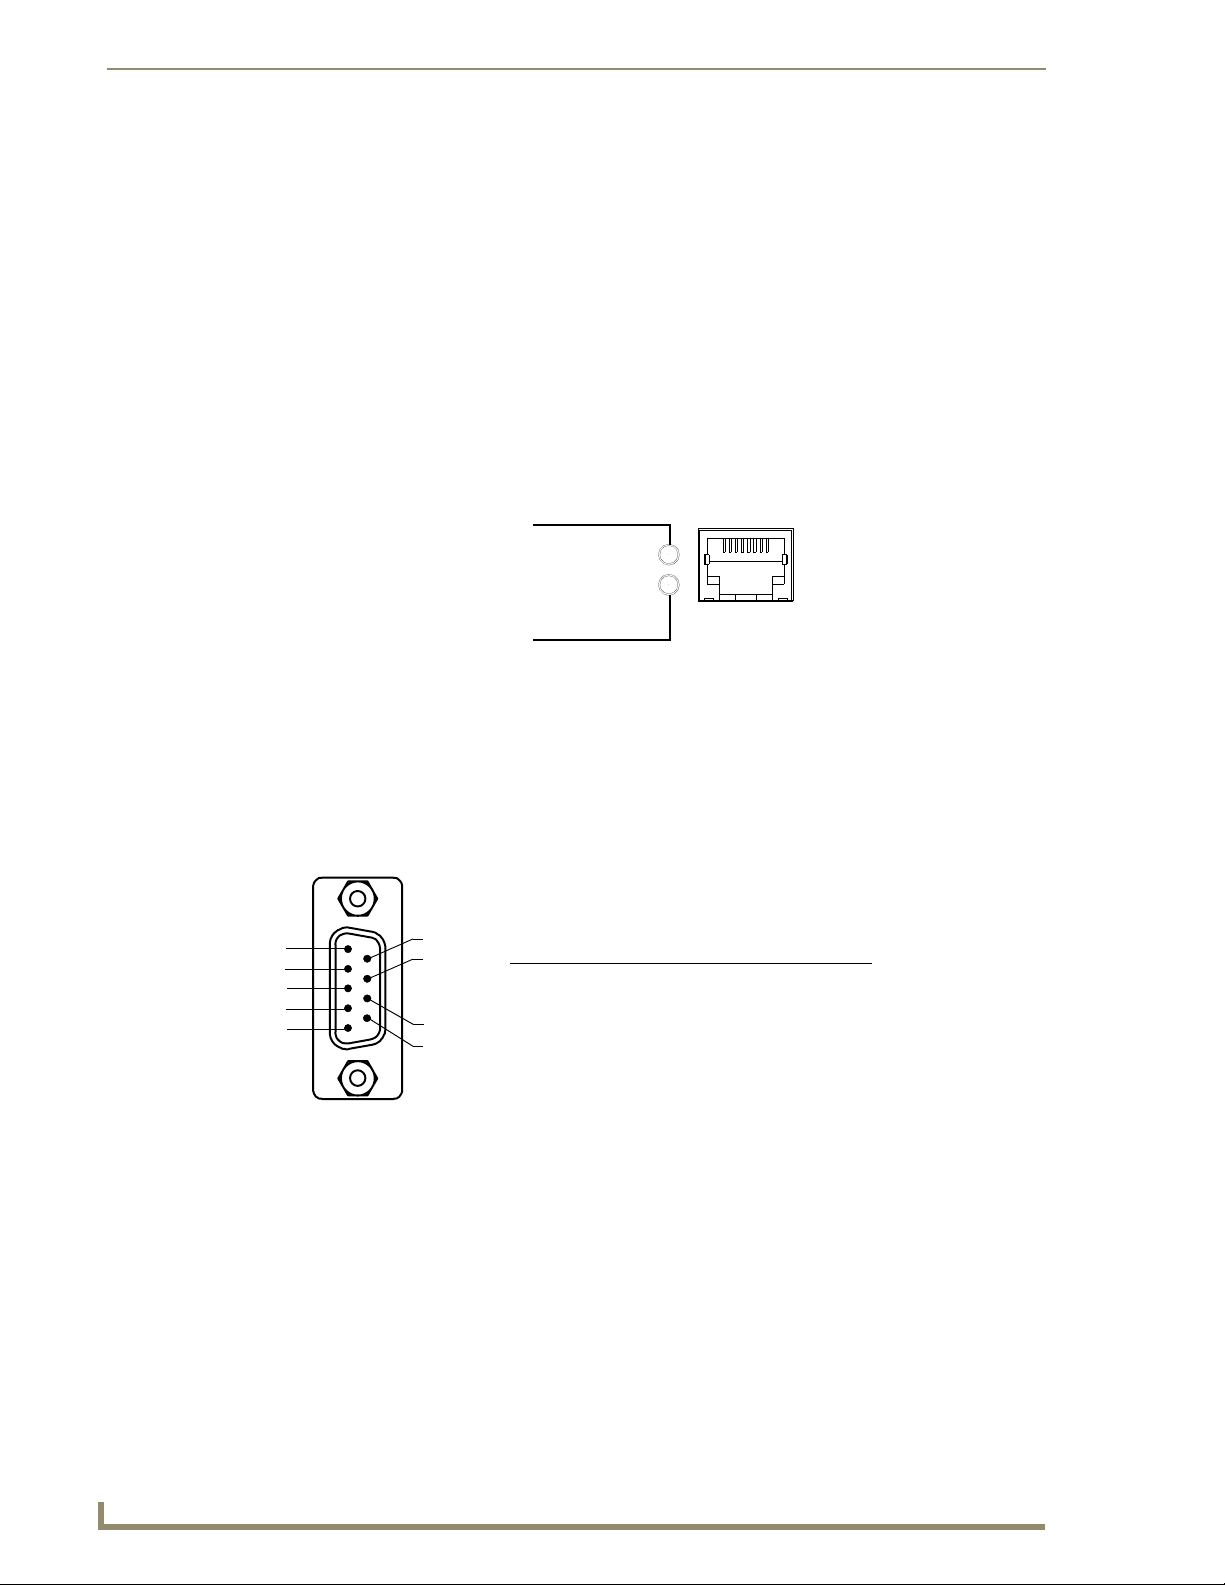
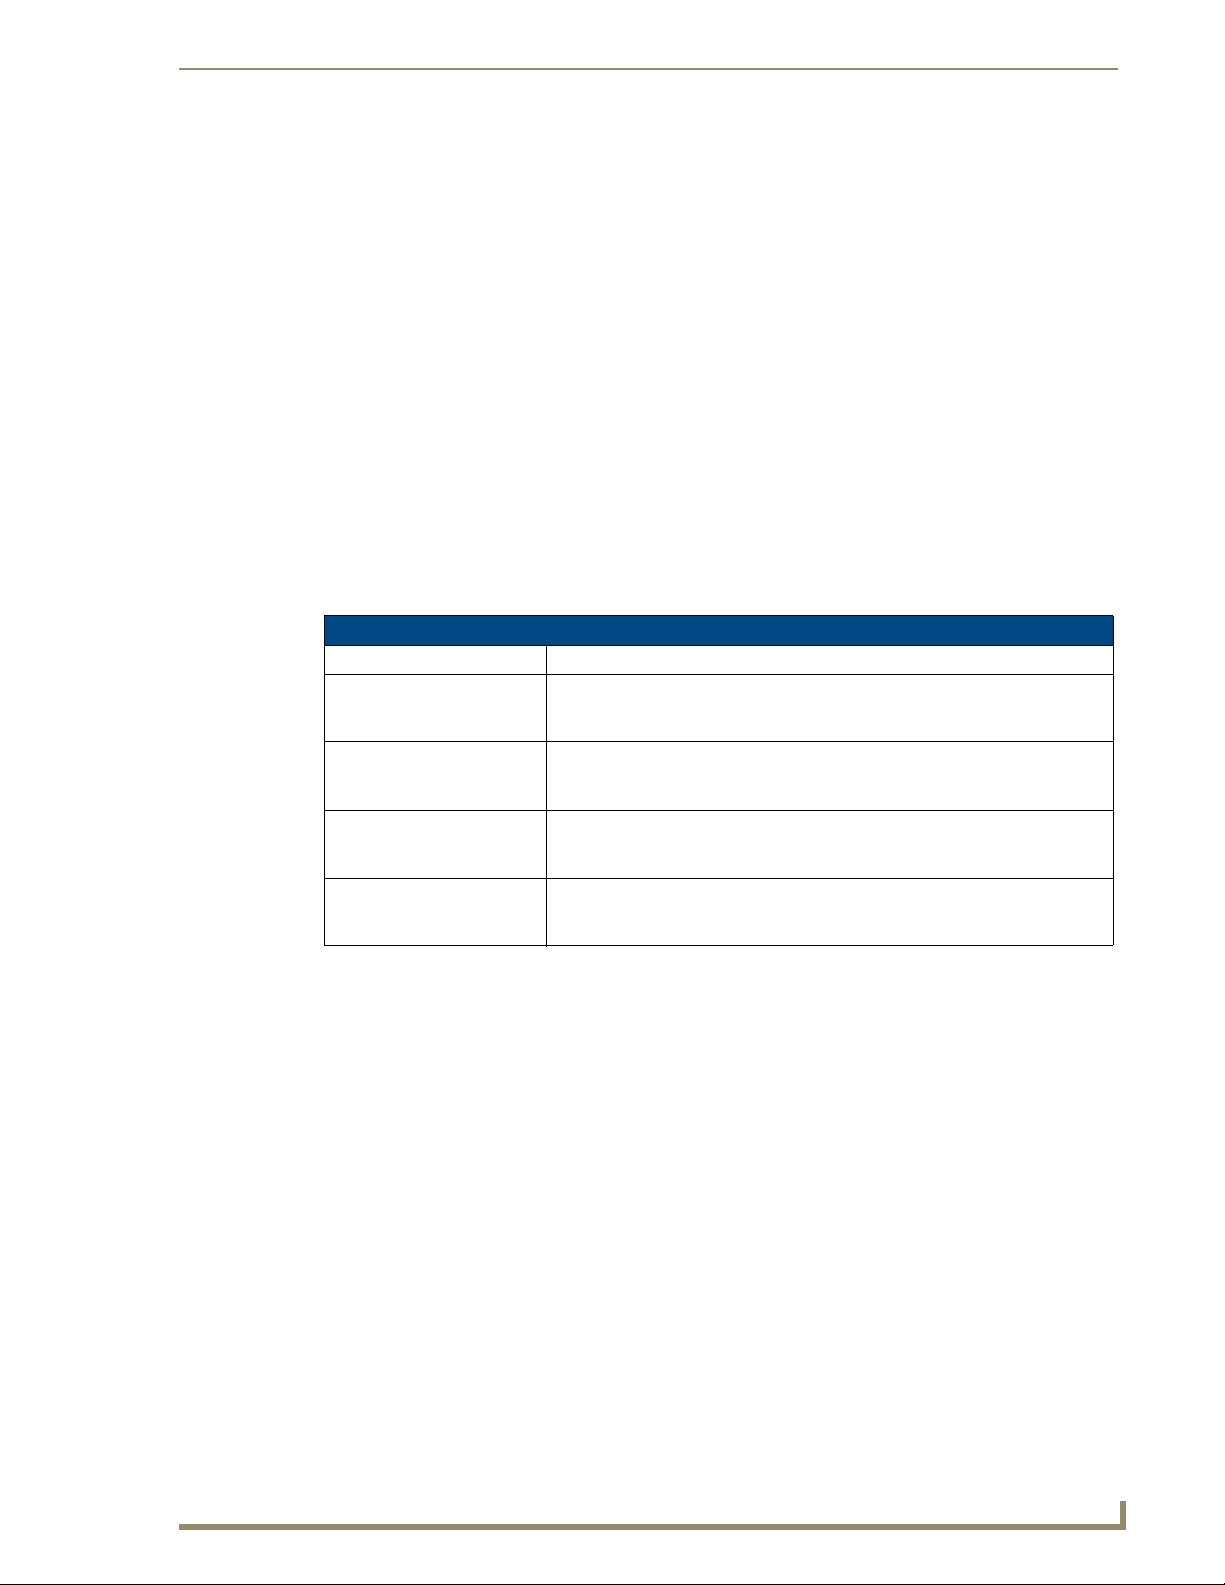
DB9 Device Port: Connections and Wiring
FIG. 8 shows the connector pinouts for the rear RS-232/RS-422/RS-485 (DB9) Device Port on both the
MAX-CSE and MAX-CSD10 units. This port supports most standard RS-232 communication protocols
for data transmission.
DB9 Device Port pinouts (male connector)
5
4
3
2
1
Male
FIG. 8 RS-232/422/485 DB9 (male) connector pinouts for the rear Device Port
9
8
7
6
RS-232
Pin 2: RX signal
Pin 3: TX signal
Pin 5: GND
Pin 7: RTS
Pin 8: CTS
RS-422
Pin 1: RX Pin 4: TX +
Pin 5: GND
Pin 6: RX +
Pin 9: TX -
RS-485
Pin 1: A (strap to 9)
Pin 4: B (strap to 6)
Pin 5: GND
Pin 6: B (strap to 4)
Pin 9: A (strap to 1)
14
MAX-CSE/MAX-CSD10 Operation/Reference Guide
Page 21
MAX-CSE and MAX-CSD10 Installation
The DB9 Device Port connector supports RS-232 communication protocols for PC data transmission.
This table’s wiring specifications are applicable to the rear RS-232/422/485 Device Port connectors on
the MAX-CSE.
RS-232/422/485 Device Port Wiring Specifications
Pin Signal Function RS-232 RS-422 RS-485
1 RX- Receive data X X (strap to pin 9)
2 RXD Receive data X
3 TXD Transmit data X
4 TX+ Transmit data X X (strap to pin 6)
5 GND Signal ground X X
6 RX+ Receive data X X (strap to pin 4)
7 RTS Request to send X
8 CTS Clear to send X
9 TX- Transmit data X X (strap to pin 1)
IR/Serial Port: Connections and Wiring
You can connect one IR- or Serial-controllable device to the IR/Serial connector on the rear of the MAXCSE and MAX-CSD10 units.
This connector (FIG. 9) accepts the included IR Emitter (CC-NIRC) that mounts onto the device's IR
window, or an optional mini-plug (CC-NSER) that connects to the device's control jack. You can also
connect a data 0 - 5 VDC device.
Signal: Function:
GND (-) Signal GND
Signal (+) IR/SERIAL data
IR
IR/SERIAL connector
FIG. 9
Input/Output (I/O) Port: Connections and Wiring
The I/O port responds to either switch closures, voltage level (high/low) changes, or it can be used for
logic-level outputs. You can connect up to two devices each on MAX-CSE and MAX-CSD10 units.
I/O
I/O
+12V
I/O
FIG. 10 INPUT/OUTPUT connector
A contact closure between the GND and an I/O port is detected as a Push.
When used for voltage inputs, the I/O port detects a low (0 - 1.5 VDC) as a Push, and a high
(2.0 - 3.3 VDC) signal as a Release (this IO port uses 3.3V logic but can handle up to 5V
without harm).
GND
MAX-CSE/MAX-CSD10 Operation/Reference Guide
15
Page 22
MAX-CSE and MAX-CSD10 Installation
When used for outputs, the I/O port acts as a switch to GND and is rated at 200 mA @
12 VDC. This device can utilize up to 2 I/O ports (see table below).
The PWR pin provides +12 VDC @ 200 mA and is designed as a power output for the PCS2
or VSS2 (or equivalent).
The GND connector is a common ground and is shared by all I/O ports. A common ground is
shared with I/O ports 1 & 2 (see table below)
I/O Port Wiring Specifications
Pin Signal Function
1 GND Signal GND
2 I/O 1 Input/Output
3 I/O 2 Input/Output
4 12 VDC PWR
Wiring the MAX-CSD10 connectors and cables
The rear connectors on the MAX-CSD10 are used to take an incoming media stream and then output it
as an RGB video signal (with audio). FIG. 11 shows a sample wiring configuration where a MAXCSD10 receives a video stream from a remote MAX-CSE and then distributing the content to its
connected media device.
S-Video or COMP Video In
Outbound Audio/Video/Data
via Ethernet
MAX-CSD10
Video Decoder
Inbound
Audio/Video/Data
via Ethernet (RJ-45)
(DVD, VCR, etc.)
Audio In
(Stereo RCA)
MAX-CSE
Video Encoder
Audio In
(Stereo RCA)
Red - Right Channel
White - Left Channel
MAX-CSD10
Video Decoder
or
(S-Video)
or
(S-Video)
(BNC)
RGB Video Out
(to target device)
(BNC)
Power
supply
Direct PWR
Connection
Power
supply
Direct PWR
Connection
16
FIG. 11
The BNC connector can be adapted
to use an RCA plug by using the
INCLUDED BNC to RCA Adapter.
Sample wiring configuration using a CSD10 and a target device
MAX-CSE/MAX-CSD10 Operation/Reference Guide
Page 23

MAX-CSE and MAX-CSD10 Installation
Installing Into an Equipment Rack
Both the MAX-CSE Encoder and the MAX-CSD10 Decoder are designed to be tabletop units, but they
may also be fitted for use into equipment racks. Should you choose to do so, use the optional AC-RK
Accessory Rack Kit (FG515) to mount the MAX unit into a standard 19-inch equipment rack.
1. Discharge the static electricity from your body by touching a grounded object.
2. Align the front of the MAX unit through any of the three rectangular openings on the AC-RK.
3. Use the included mounting screws to secure the MAX unit’s faceplate to the AC-RK.
4. Thread the cables through the opening in the equipment rack. Allow for enough slack in the cables
to accommodate for movement during the installation process.
5. Reconnect all cables to their source/terminal locations.
Verify that the terminal end of the power cable is not connected to the a power supply before
plugging in the 2-pin power connector.
If using indirect PoE to feed power into the unit, verify that the terminal end of the RJ-45 is
not connected to an 802.3af-compliant PoE switch.
To prevent repetition of the installation, test the incoming wiring by connecting the
MAX’s connectors to their terminal locations and applying power. Verify that the unit
is receiving power and functioning properly. Disconnect the terminal end of either the
power cable from the connected 12 VDC-compliant power supply or Ethernet
connector from the PoE switch.
6. Align the ends of the AC-RK with the screw openings along the sides of the equipment rack.
7. Secure the AC-RK to the rack by using the four #10-32 screws (80-0186) and four #10 washers (80-
0342) supplied in the kit.
8. Verify the terminal audio/video source is properly configured and connected properly.
9. Apply power to the unit to complete the installation process.
MAX-CSE/MAX-CSD10 Operation/Reference Guide
17
Page 24

MAX-CSE and MAX-CSD10 Installation
18
MAX-CSE/MAX-CSD10 Operation/Reference Guide
Page 25
MAX-CSE Web Interface
Overview
The MAX-CSE and the MAX-CSD10 incorporate built-in security verification capabilities. By using a
secured HTTP access, both devices provide users with a convenient browser-based method for securing
each MAX unit, and a means of configuring the parameters of the outgoing A/V stream.
The browser-based User Interface (UI), used to set up the MAX unit’s configuration parameters, also
enables an authorized user to configure either their own Username/Password, or utilize the factory
default login profile. This layer of security uses an on-screen HTTP Login dialog which requires a user
to provide a correct Username/Password before gaining access to the MAX unit’s UI pages.
Although initially, the factory default login profile must be used to gain access to the UI pages, a custom
profile can later be created via the on-screen User page (see the User Page section on page 37).
Security Terms
The following table lists some commonly used Security terms:
Security Terms
User A user is a single potential client of the MAX unit or NetLinx Master.
Administrator An administrator has privileges to modify existing access rights and unit
parameters. For the purposes of the MAX units, both the Administrator and
User have the same level of rights once they gain access to the UI pages.
Username A username is a valid character string (4 - 27 alpha-numeric characters) used
to both define a valid user and establish a Login profile. This string is case
sensitive and each username must be unique.
Password A password is a valid character string (4 - 27 alpha-numeric characters) used
to supplement the username in defining a valid Login profile. This string is also
case sensitive.
Access Rights Every MAX unit has an associated security profile which is necessary to grant
a user sufficient access privileges to the browser-based UI pages and therein,
the ability to delete or modify a particular parameter.
MAX-CSE Web Interface
Characters such as # (pound) & (ampersand) and ’ " (single and double quotes) are
invalid and should not be used in usernames or passwords.
Default Security Configuration
The Username/Password fields have been pre-populated with Admin/1988 as the factory default
security login entries.
MAX units are shipped in a secured configuration which requires the user to enter a username
and password into the on-screen security dialog before gaining access to the UI pages. This
information can later be changed.
If attempting to access the UI, the users are prompted to log into the MAX unit via the on-screen Enter
Network Password security dialog (FIG. 12). After the user’s information and rights are confirmed, the
login process is completed and the user is then granted access to the UI pages.
MAX-CSE/MAX-CSD10 Operation/Reference Guide
19
Page 26
MAX-CSE Web Interface
FIG. 12 Enter Network Password security dialog
There is no limit to the number of concurrent logins allowed on the target MAX unit. By default, the
MAX unit is shipped with the following account and access rights:
Default Security Configuration (case-sensitive)
Administrator account:
Username: Admin
Password: 1988
Rights: All
Save login profile
selection box
Although the Administrator account can be modified numerous times to alter the username
and password required for access, only one login profile can exist on the MAX unit at any
given time. The privileges for that single account will always be that of an Administrator.
All login profiles (with associated Username and Pas sw ord) are each required to have a
minimum of four characters and a maximum of 27 characters.
Characters such as # (pound) & (ampersand) and ’ " (single and double quotes) are
invalid and should not be used in usernames, group names, or passwords.
Communicating with the unit via the browser-based UI
Launch your web browser.
1.
2. Enter the IP Address of the target unit (as seen on the unit’s LCD display) into the web browser’s
Address field (FIG. 12).
3. Press the Enter key on your keyboard to initiate communication with the MAX unit and launch the
initial on-screen security dialog (FIG. 12).
The MAX unit is shipped in a secured configuration which requires the user to enter a
username and password into the on-screen security dialog before gaining access to the UI
pages.
4. Enter the words administrator and password into the corresponding User Name/Password fields.
This is the factory default security login information. This information can later be changed.
5. Click OK to enter the information and proceed to the first UI page.
20
MAX-CSE/MAX-CSD10 Operation/Reference Guide
Page 27
MAX-CSE Web Interface
Browser-based UI Application Overview
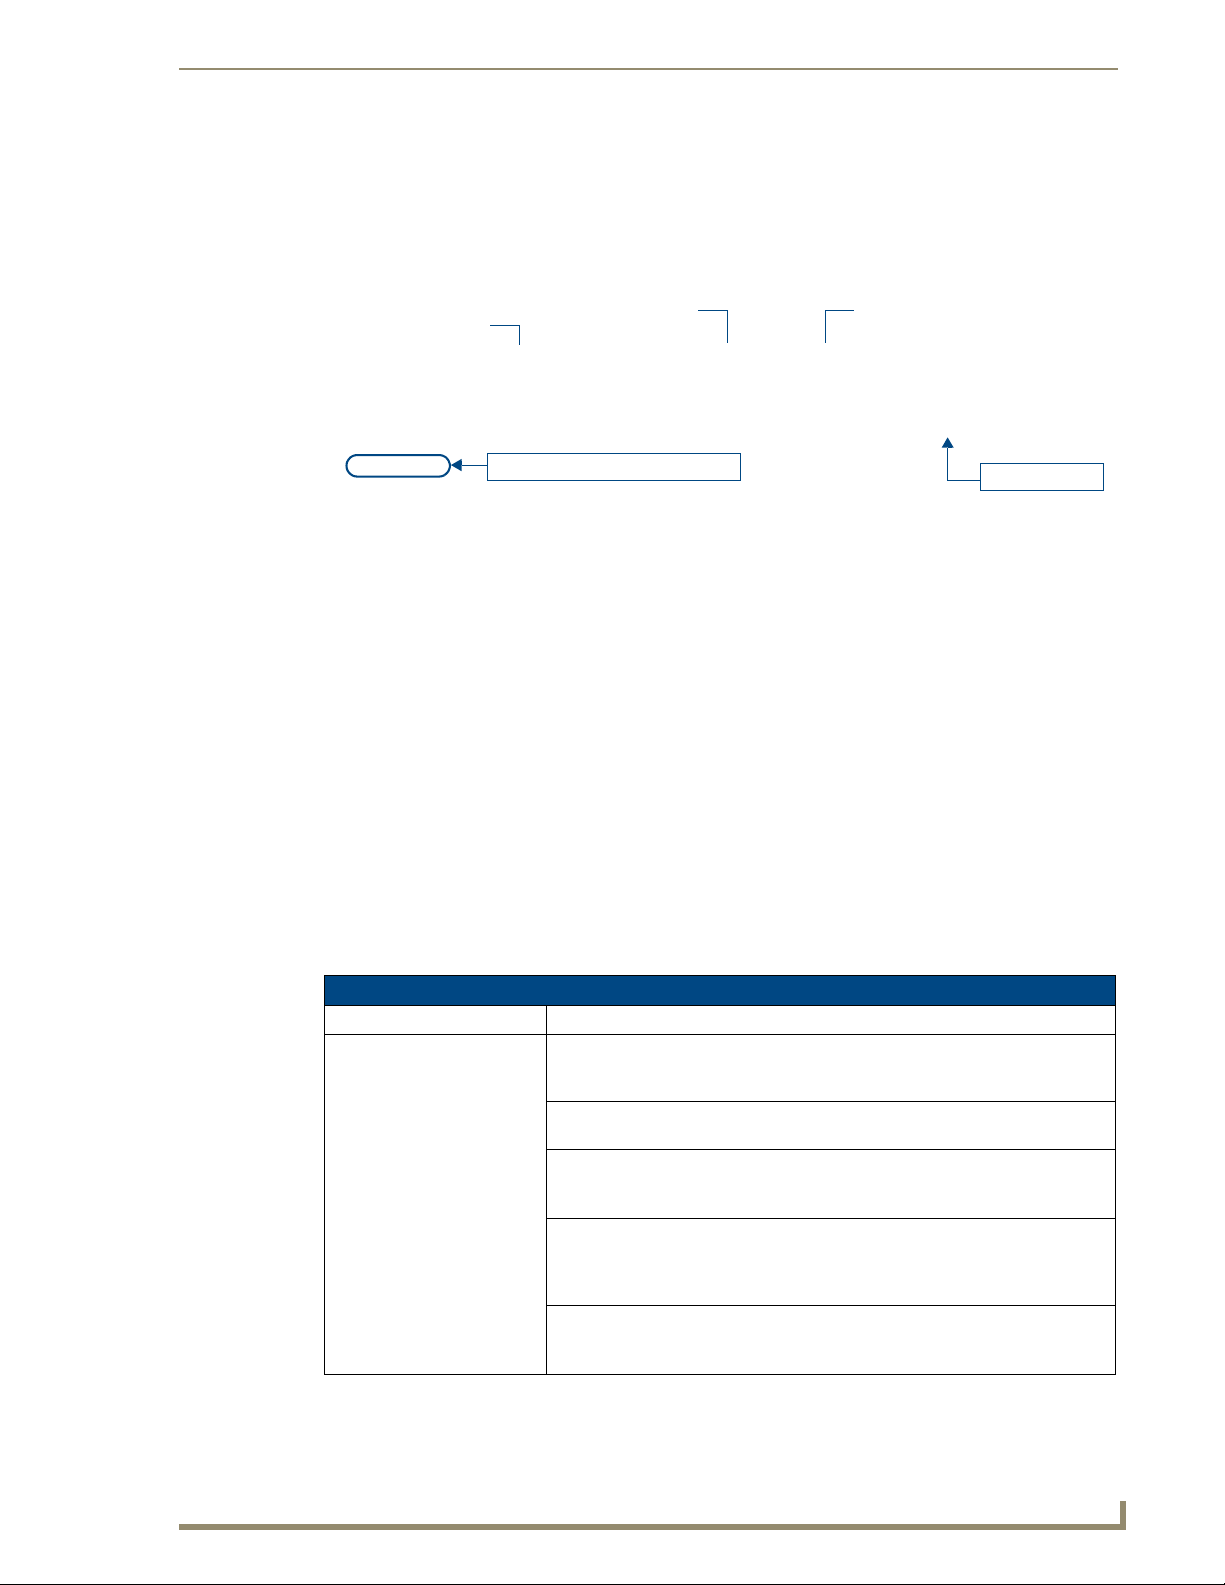
The UI web page (FIG. 13) can be divided into separate sections or frames, some of which are
independent of the current selection and can both display their own information and contain their own
functionality. The first page displayed upon login is the Administration page, but any page within the UI
may be reached via the Navigation frame.
Stop the media stream
Log out of the web portal
Name of the currently active page
Current status of media stream
Navigation Bar
FIG. 13 Browser Application frames for the MAX-CSE (showing the initial screen)
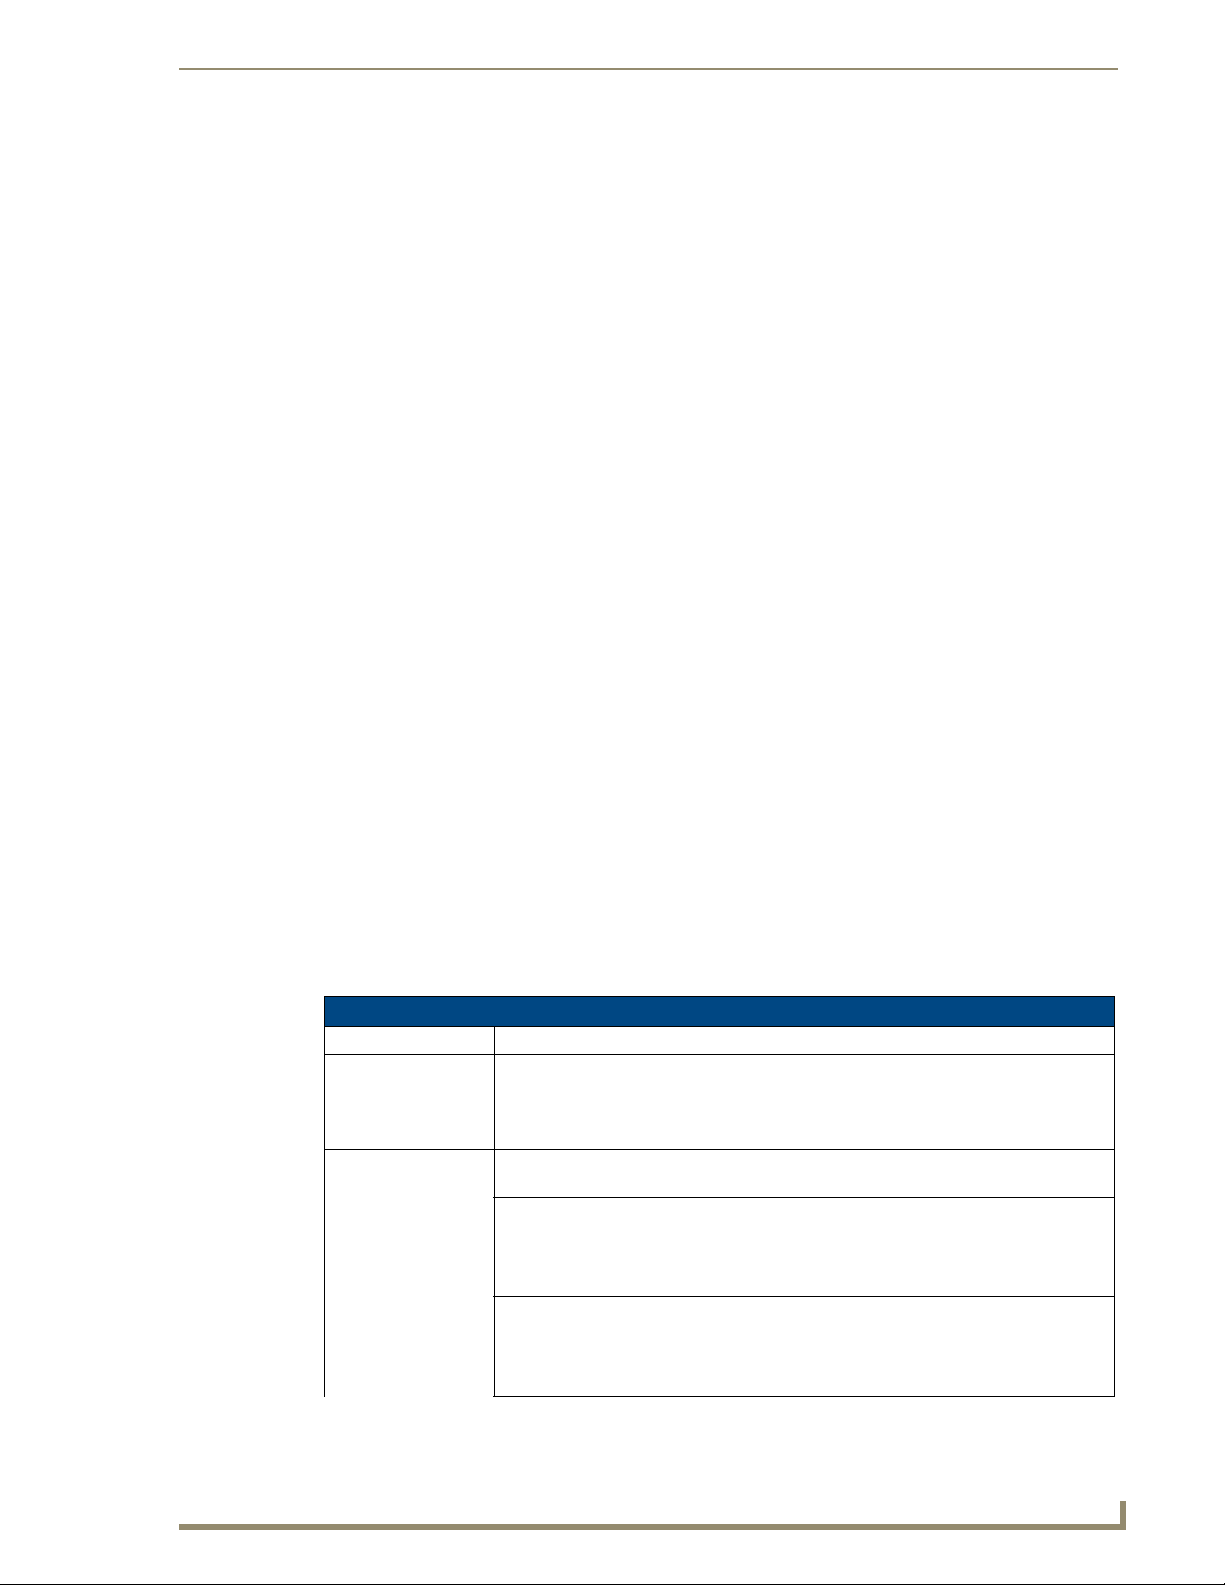
MAX-CSE User Interface Overview and Features
User Interface Features
Feature Description
Navigation Bar: Use the Navigation Bar to access the different configuration pages found within
the UI. Since this frame is static, it appears on-screen no matter what page is
currently active. Each of the buttons in the Navigation Bar are described below:
• Admin This button launches the Administration page, which displays an overview of the
MAX firmware and project information.
• Stream Set-Up This button launches the Stream Profiles page, which provides the user with the
ability either to choose from a list of Audio/Video encoding presets or to develop
a custom setting.
• Audio Video This button launches the A/V Setup page, which provides the user with the ability to select the source of the incoming video signal (from either the rear Composite or S-Video port), the format of the incoming video (NTSC/PAL), and the
microphone gain level given to the incoming audio signal.
• NetLinx This button launches the NetLinx Settings page, which provides the user with
the ability to enter the communication parameters necessary to connect a MAXCSE with a target Master.
MAX-CSE/MAX-CSD10 Operation/Reference Guide
21
Page 28

MAX-CSE Web Interface
Administration Page Features (Cont.)
Feature Description
• IP Settings This button launches the IP Settings page, which provides the user with the abil-
• User This button launches the User page, which provides the user with the ability to
Stream Status: Located on the lower-left side of the browser window, this static frame allows a
• Play/Stop There are two buttons which reflect the condition of the outgoing media content:
• Status Indicates the status of the outgoing stream.
• Video Sync Indicates whether the unit is detecting an incoming A/V signal through its rear
• Refresh This button causes the unit to re-verify the condition/state of both the stream
• Mic Off Click to toggle the audio state of the incoming microphone signal between active
ity to assign the method of communication used by the target MAX unit, along
with its associated IP parameters.
alter the current Username/Password information required to gain entry to the
UI pages and make modifications.
user to not only Start and Stop an encoding stream, but also view whether the
MAX-CSE is detecting an A/V signal.
Since this frame is static, it appears on-screen no matter what page is currently
active. This frame can be very useful for a remote administrator when trying to
troubleshooting most streaming issues.
• Play begins to sync-up the media signals and then stream them out from the
device.
- This play state is shown as active when both the Stop button is displayed
and the green Streaming message is displayed within the Status field.
- No changes can be made to both the communication parameters and
stream profiles while the unit is in this mode.
• Stop halts the outgoing media stream from the device.
- This stop state is shown as active when both the Play button is displayed
and the blue Idle message is displayed within the Status field.
- Changes can be made to both the communication parameters and stream
profiles while the unit is in this mode.
• Streaming indicates that the Play button has been activated and the process
of converting A/V content into an outgoing media stream has begun.
Streaming does not require that content be provided to the unit, it is only the
conversion process which has been initiated. This is why it is important to
make sure that the unit is also detecting an incoming A/V feed.
• Idle indicates that the Stop button has been activated and the stream process
has been halted.
connectors.
• SYNC indicates that the incoming A/V signals have been detected and then
synchronized prior to being streamed out from the MAX-CSE.
• LOS (Loss Of Signal) indicates there is no incoming signal being detected by
the unit and therefore, the outgoing stream contains no data. Remember, a
stream can be initiated and maintained without there being any signal fed into
the unit. It is important to verify the status of the incoming signal.
Status and Video Sync.
If you have already initiated a stream and get a LOS message, you can try to
correct the problem and click the Refresh button to try and verify the condition
of the incoming A/V signal without needing to Stop the stream process.
and muted.
22
MAX-CSE/MAX-CSD10 Operation/Reference Guide
Page 29
MAX-CSE Web Interface
Administration Page
The Administration page (FIG. 14) is the first page displayed in the Active frame after a successful login.
It can also be accessed by clicking on the Admin button in the Navigation Bar.
This page displays an overview of the MAX firmware and project information. Also provides the user
with the ability to both start/stop the outgoing A/V stream from the CSE and directly upload firmware to
the target MAX unit without having to use NetLinx Studio.
FIG. 14 Administration page
The following table lists the features on the Administration page, that an administrator or other
authorized user can configure.
Administration Page
Feature Description
Resources: Displays the version of the currently installed product firmware in a major.minor.micro
format. This field is read-only.
Note: The displayed firmware is the same as version displayed adjacent to the MAX
entry within NetLinx Studio’s Online Tree tab.
Program Description: This section allows the user/administrator to enter descriptions for the currently
• Program Name A unique title associated to the currently streamed media. This title should be some-
• Program Description A unique description of the currently streamed content. This should be a brief descrip-
streamed content.
thing recognizable to both the administrator and the target audience.
• This string must be 1 - 20 alpha-numeric characters.
•Example: Computer Course.
tion of the specific content. Do not confuse this entry with a media category.
• This string must be 1 - 31 alpha-numeric characters.
•Example: Session 1 - Internet.
MAX-CSE/MAX-CSD10 Operation/Reference Guide
23
Page 30

MAX-CSE Web Interface
Administration Page Features (Cont.)
Feature Description
• Information URL A unique web address identifying the source of the media stream.
• E-Mail Provides a contact E-mail address for the streaming media content provider.
• Phone Number Provides a contact phone number for the streaming media content provider.
• Genre Provides a drop-down list from which the user can associate a genre to the media
Mode: This section provides the user with both a Play and Stop button which affects the status
Upload Firmware: Allows a user to upload a Kit file from a known location directly onto the currently active
• This can be either a Resolvable Name (such as myschool.com) or an IP Address
(such as 199.99.99.99).
• This string must be in the form: someone@example.com.
• If this format is not entered properly, a red dialog appears below the field to notify the
user of the improper format usage.
• This string should ONLY use digits, but it will also accept a phone number with or
without hyphens between the digits.
• If this format is not entered properly, a red dialog appears below the field to notify the
user that only digits must be used.
stream.
• Although the default selection is Business, the user can choose from over 40 precreated entries.
•Example: Education.
of the current media stream.
• Pressing Play causes a previously halted content stream to begin again. Refreshing
the page shows the button size reduced when in an active play mode.
• Pressing Stop causes the unit to stop encoding and streaming the current media
feed. The source of the stream is not affected and will continue to feed its signal into
the MAX unit regardless of the stream state.
- Before being able to alter any encoding settings or SET Video commands, the
stream must first be stopped. Once the settings are changed and applied, the stream
can then be restarted via the Play button.
• As an example: If the stream was halted for 30 minutes and then begun again (via
Play), the streaming media would be 30 minutes further along in the content and
would not pick up from where it left off.
MAX unit (shown via the UI page).
• Pressing the Browse button opens a Choose File dialog which allows a user to
navigate through the directory structure on the source computer and locate the new
firmware Kit file.
• Pressing the Submit button begins the process of uploading and incorporating the
new firmware. At this point, the UI expands to display a message indicating the
progress of the firmware upload.
24
Changing the Program Description
From the Administration page, enter new information in the Program Name, Program Description,
1.
Information URL, E-Mail, and Phone Number fields.
2. If you wish to change the genre of program selected, choose the appropriate entry from the Genre
drop-down menu. If you do not know or do not care to list the genre, select Unknown.
3. To save the changes, click the Accept button. To return to the previously saved information, click
Cancel.
MAX-CSE/MAX-CSD10 Operation/Reference Guide
Page 31

MAX-CSE Web Interface
Upgrading New Firmware
The UI presents the following dialog to remind you that the device must be rebooted before new
firmware can be loaded (FIG. 15).
FIG. 15 Attention - Reboot the device before attempting to upload new firmware
Before you upload any firmware file, you MUST reboot this device:
a. Reboot system by clicking Reboot.
b. After this device reboots, return to or refresh this page.
c. Click Upload a File.
d. Click Reboot done. Upload a File.
To Upgrade the Firmware
1. From the Administration page (Upload Firmware field), enter the file path for the new firmware to
be uploaded. If you do not know the path, click the Browse button to open the Choose File dialog
which allows you to locate the new firmware Kit file.
2. When finished, click Submit to begin the process of uploading and incorporating the new firmware.
At this point, the UI expands to display a message indicating the progress of the firmware upload.
If you attempt to move to a different page within the browser-based UI without saving any
changes made, the UI will ask "Are you sure you want to navigate away from this page?
Changes have not been saved and will be lost." Click OK to continue with moving to a
different page, and click Cancel to stay on the current page.
If the Upload process timer is interrupted with a Timeout error message, wait approximately
10 minutes to allow the unit time to complete the upload process. It is recommended that you
then use NetLinx Studio to both confirm the online status of the MAX unit and see if the
firmware version has properly updated.
Even if the screen goes blank, allow the unit time to complete the upload process.
The blank screen may be a result of your browser having temporarily lost it’s
connection with the MAX unit.
If the unit does not appear in the Online Tree, a manual reboot (cycling power) is
recommended, after which Studio can then be used to detect the MAX unit and upload
the firmware.
MAX-CSE/MAX-CSD10 Operation/Reference Guide
25
Page 32

MAX-CSE Web Interface
Stream Profiles Page
The Stream Profiles page (FIG. 16) is accessed by clicking on the Stream Set-Up button in the
Navigation Bar. The Stream Profiles page allows users (with the proper access rights) both to configure
the properties of the outgoing media stream and set up the properties associated with communicating that
stream to an external IP-enabled device capable of receiving and processing the data.
26
FIG. 16 Stream Profiles page
IP Multicasting is supported under both the UPD and RTP communication protocols.
UDP (User Datagram Protocol) is a connectionless protocol, much like TCP, that runs on top
of IP networks. Unlike TCP/IP, UDP/IP provides a direct way to send and receive datagrams
over an IP network. It's primarily used for broadcasting messages over a network. Data is sent
as a Transport Stream by using only the MPEG-2 codec.
MAX-CSE/MAX-CSD10 Operation/Reference Guide
Page 33

MAX-CSE Web Interface
In a UDP stream, only a Target (video) Port is needed since both the audio and video
information are transported together to the same port on the destination device.
RTP (Real-Time Transport Protocol) is an Internet protocol used for transmitting
real-time data such as audio and video as separate entities. Data is sent as an Elementary
Stream which can use both the MPEG-2 and MPEG-4 codecs.
In an RTP stream, both a Target (video) Port and Target Audio Port are required because
the audio and video are delivered to a destination as separate data elements. These
elements are then directed to two separate ports where they are then
"synced-up" by target device/application.
If using RTP, both the Target Port and Target Audio Port must be different.
When the a lower quality Encoder Profile is used (such as Standard Quality or lower),
the Stream parameters default to using RTP as a Transport Protocol. This is because
lower quality video uses MPEG-4 compression which must be sent via RTP.
IP Multicasting is a method of sending out large amounts of data. IP Multicast allows a server
to broadcast a message to many recipients simultaneously. Unlike traditional Internet
communication, that requires separate connections for each source-destination pair, IP
Multicasting allows several recipients to share data from the same source. This means that just
one set of packets is transmitted to all the destinations.
An ideal method of sharing a single stream to several destinations.
One of the best uses for this method would be if an educator (or institution) wanted to
stream (via either UDP or RTP) its lecture series to a variety of students simultaneously
around the world. Every student could connect and receive the stream without having to
wait their turn to view the content or see a severe drop in transmission quality.
The following table lists the Stream Profiles page features that an administrator or other authorized user
can configure. Refer to FIG. 16 as an example.
Stream Profiles Page Features
Feature Description
Encoder Profile: A drop-down list of preset encoding profile names which the user can choose from
when assigning a particular set of audio/video encoding settings.
• Although the default selection is Home Theater (Max), the user can choose from up
to 6 pre-created entries and one Custom entry which makes every field userdefinable.
• Refer to the Encoder Profiles and Parameters table on page 31 to view the details of
these pre-defined audio/video encoding parameters.
Video: This section allows the user/administrator to define the encoding parameters for the
Codec A drop-down list of codecs from which the user can choose the type of MPEG video
video portion of the outgoing stream.
compression used for the outgoing video stream.
• Available MPEG codecs: MPEG-2 (default) or MPEG-4
• MPEG-2 is typically used to encode audio and video for broadcast quality signals.
The MPEG-2 is enhanced by using MPEG-1's audio (MP2) component to allow the
coding of audio programs with more than two channels. Video quality is noticeably
higher with MPEG-2 vs. MPEG-4.
• MPEG-4 is currently used as a standard for the web (streaming media) and CD
distribution, conversational (videophone), and broadcast television. The biggest
difference between these two encoding types is that MPEG-4 uses about 1/3 to 1/2
less bandwidth for the same quality of video.
MAX-CSE/MAX-CSD10 Operation/Reference Guide
27
Page 34

MAX-CSE Web Interface
Stream Profiles Page Features (Cont.)
Feature Description
• Video In Rate A drop-down list of data rates which allows the user to choose the amount of incoming
• Resolution A drop-down list of resolution settings which allow the user to choose from two preset
• Mode These two radio boxes refer to the mode assigned to the bit rate encoding quality of the
Audio: This section allows the user/administrator to define the encoding parameters for the
• Codec A drop-down list of audio codecs from which the user can choose the type of MPEG
video data throughput available for use by the MAX-CSE.
• The larger the amount of available video data coming through the unit for encoding,
the better the outgoing video quality to the target IP device.
• Available video data rates: 6Mbps - 500Kbps
resolution types. These options relate to the display size/resolution used by the outgoing video stream.
• Available resolutions: D1 (default) or SIF:
• D1 is a resolution standard. In the NTSC system, "Full D1" means 720x480 pixels @
30 fps, and in PAL systems, full D1 is 720x576 @ 24 fps.
• SIF (Source Interchange Format) is a resolution standard defined as 352x240 @
30fps for NTSC and 352x288 @ 24 fps for PAL.
outgoing A/V stream.
Available bit rate encoding modes: CBR (default) or VBR
• CBR (Constant bit rate) relates to the bit rate quality used by the outgoing streamed
video data. Constant bit rate encoding means that the rate at which a codec's output
data should be consumed is constant. CBR is useful for streaming multimedia
content on limited capacity channels since it is the maximum bit rate that matters, not
the average, CBR would be used to take advantage of all of the capacity.
• VBR (Variable bit rate) relates to the bit rate quality used by the outgoing streamed
video data. Variable bit rate encoding varies the amount of output data in each time
segment based on the complexity of the input data in that segment. The goal is to
maintain constant quality instead of maintaining a constant data rate.
audio portion of the outgoing stream.
audio compression used for the audio portion of the outgoing stream.
Available audio codecs: MP2 or MP3
• MP2 (MPEG Audio Layer-2) is used as a file extension for files containing audio data
of this type. It remains a dominant standard for audio broadcasting. This file type
allows the coding of audio programs with more than two channels. The main
difference between these two types is that MP2 audio files are generally larger than
their MP3 counterparts and are mostly used with MPEG-2 video streams.
Note: MP2 is recommended for use with a high bandwidth video stream (ex: MPEG-4
or 6 Mbps - 3 Mbps).
• MP3 (MPEG Audio Layer-3) is a popular digital audio encoding and lossy
compression format. It was designed to greatly reduce the amount of data required to
represent the original audio data, yet still sound like a faithful reproduction of the
original uncompressed audio to most listeners.
Note: MP3 is recommended for use with a low bandwidth video stream (ex: MPEG-2
or < 3 Mbps).
28
MAX-CSE/MAX-CSD10 Operation/Reference Guide
Page 35

MAX-CSE Web Interface
Stream Profiles Page Features (Cont.)
Feature Description
• Sampling Rate A drop-down list from which the user can choose the sampling rate used on the audio
source.
• Sampling rate defines the number of samples per second taken from a continuous
signal to make it a discrete signal.
• Rate is measured in KHz (KiloHertz).
• Available audio sampling rates: 32KHz, 44.1KHz, and 48KHz.
• Some of the common uses for these rates include:
- 32,000 KHz - miniDV digital video camcorder
- 44,100 KHz - compact disc, also most commonly used with MPEG-1 audio (VCD,
SVCD, MP3)
- 48,000 KHz - digital sound used for digital TV, DVD, DAT, films and professional
audio
• At this time, 32KHz is not supported within the Modero firmware.
• Effective Rate A drop-down list from which the user can choose the amount of incoming audio data
throughput available for use by the MAX-CSE.
• The larger the amount of available audio data coming through the unit for encoding,
the better the outgoing audio quality to the target IP device.
• Available effective data rates: 96Kbps or 192Kbps
Stream: This section allows the user/administrator to define the transport protocols and destina-
tion parameters for the outgoing stream content (such as IP Address and Audio/Video
Ports).
• Transport Protocol A drop-down list from which the user can choose between the two types of available
data transfer/handling protocols.
Available transport protocols: UDP (default) or RTP
• UDP (User Datagram Protocol) allows the transport of both MPEG-2 video and audio
inside a single stream that is encapsulated as part of a standard MPEG-2 Transport
Stream. If UDP is selected as the protocol type, the Target Audio Port field becomes
greyed-out and unused. In this case, both the audio and video streams are combined
and sent to a single target port.
• RTP (Real-time Transport Protocol) defines a standardized packet format for
delivering audio and video over the Internet. By transferring video and audio over
separate streams, RTP allows audio only players to receive this separated content as
would their audio/video player counterparts. If RTP is selected as the protocol type,
the Target Audio Port field becomes enabled. In this case, the audio and video
streams are sent as separate entities to two separate target ports.
Note: The UDP Transport Protocol only supports the use of the MPEG-2 codec,
whereas the RTP Transport Protocol can support using both MPEG-2 and MPEG-4
codecs.
MAX-CSE/MAX-CSD10 Operation/Reference Guide
29
Page 36

MAX-CSE Web Interface
Stream Profiles Page Features (Cont.)
Feature Description
• Target Address The IP Address of the target IP-capable device that will receive the encoded outgoing
• Target Port (video) The port on the destination device where the outgoing video stream is being directed to.
• Target Audio Port The port on the destination device where the audio only portion of the stream is being
SAP Settings: In SAP mode, the user selects a video stream from a list. Once selected the decoder
• SAP Mode Use these radio button to enable/disable SAP mode (default = enabled).
• IP Configuration Select an IP Configuration from the drop-down menu (Default or Other). By default,
• Alternate IP Address Enter the alternative Multicast IP address that will be used to send the SAP packets.
• Alternate IP Port Enter the alternative Multicast IP port that will be used to send the SAP packets.
media stream. This is the IP of the target device such as the VG-Series Modero panel,
MAX-CSD10, or computer which will display the stream.
• Target Address must be in IPv4 dot notation (ex: X.X.X.X).
• Default IP Address is: 239.168.42.108 (a multicast address).
Obtaining the IP information for a target Modero:
1) Press the grey Front Setup Access button for 3 seconds to open the Setup page.
2) Press the Protected Setup button (located on the lower-left of the panel page) to
open the Protected Setup page and display an on-screen keypad.
3) Enter 1988 into the Keypad’s password field and press Done when finished.
4) Press the NetLinx Settings button to open the NetLinx Settings page and obtain IP
from the IP Settings section of this page.
Obtaining the IP information for a target PC:
1) On your PC, click Start > Run to open the Run dialog.
2) Enter cmd into the Open field and click OK to open the command DOS prompt.
3) From the C:\> command line, enter ipconfig to display the current IP Address of the
PC.
This value can be from 0001 - 9999 (default is 5000).
If using UDP as a Transport Protocol, this is also the port where the combined audio/
video stream is sent.
Note: If using RTP it is strongly recommended that this port number be an even value.
Using odd numbered port values will cause the stream to not be properly recognized
by the target Modero panel.
Note: It is recommended that the following ports not be used: 21, 22, 23, 80, 443, and
1319.
directed to. This value can be from 0001 - 9999 (default is 5002).
• If using UDP as a Transport Protocol, this field becomes greyed-out and unused since
the both the audio and video content is being combined into a single stream.
Note: If using RTP (split streams) it is strongly recommended that this port number be
an even value.
• If the target is a Modero VG-Series panel, the Target Audio Port field must always
increment the value of the Target video port by 2. Example: Target Port = 5000,
Target Audio Port = 5002.
will automatically connect to the stream server and begin decoding.
Default is selected (the default multicast IP address will be used). Note that if you select
Other, the following two additional fields are enabled:
(Only available if Other is selected as the IP Configuration for SAP Mode).
(Only available if Other is selected as the IP Configuration for SAP Mode).
30
These profiles take effect on the MAX-CSE only after pressing the on-screen Apply button.
The UDP Transport Protocol only supports the use of the MPEG-2 codec, whereas
the RTP Transport Protocol can support using both MPEG-2 and MPEG-4 codecs.
MAX-CSE/MAX-CSD10 Operation/Reference Guide
Page 37

MAX-CSE Web Interface
If a stream is currently in effect while these parameters are altered, clicking the Apply button will cause
the outgoing stream to stop and then incorporate the new settings without restarting.
Encoder Profiles and Parameters
Profiles: Stream Quality: Video Defaults: Audio Defaults: Protocol
Home Theater Maximum • Codec: MPEG-2
• Video In Rate: 6Mbps
• Resolution: D1
• Mode (encoding): CBR
High Quality High • Codec: MPEG-2
• Video In Rate: 4Mbps
• Resolution: D1
• Mode (encoding): CBR
Good Quality Medium • Codec: MPEG-4
• Video In Rate: 3Mbps
• Resolution: D1
• Mode (encoding): CBR
Standard Quality Low • Codec: MPEG-4
• Video In Rate: 2Mbps
• Resolution: D1
• Mode (encoding): CBR
VCR Lower • Codec: MPEG-4
• Video In Rate: 1Mbps
• Resolution: SIF
• Mode (encoding): VBR
Security Camera Min • Codec: MPEG-4
• Video In Rate: 500 Kbps
• Resolution: SIF
• Mode (encoding): VBR
Custom User Dependant • User Selectable:
UDP = MPEG-2 only
RTP = MPEG-2/4
• Codec: MP2
• Sampling Rate: 48 KHz
• Effective Rate: 192 Kbps
• Codec: MP2
• Sampling Rate: 48 KHz
• Effective Rate: 192 Kbps
• Codec: MP2
• Sampling Rate: 48 KHz
• Effective Rate: 192 Kbps
• Codec: MP2
• Sampling Rate: 48 KHz
• Effective Rate: 192 Kbps
• Codec: MP3
• Sampling Rate: 32 KHz
• Effective Rate: 96 Kbps
• Codec: MP3
• Sampling Rate: 32 KHz
• Effective Rate: 96 Kbps
• User Selectable • UDP/RTP
• UDP
• UDP
•RTP
•RTP
•RTP
•RTP
When the a lower quality Encoder Profile is used (Good Quality or lower), the Stream
parameters default to using RTP as a Transport Protocol.
Changing the Encoder Profile
From the Stream Profiles page, select an option from the Profile drop-down menu. All but the
1.
Custom option contain preset parameters.
2. If you selected the Custom option, select the appropriate options from the Video and Audio
sections.
3. If you wish to change the Stream profile, select between RTP and UDP in the Transport Protocol
drop-down menu.
4. Change the Target Address, Targe t Por t , and Target Audio Port information, if necessary.
5. Set the SAP Settings:
6. To save your changes, click the Accept button. To return to the previously saved settings, click
Cancel.
MAX-CSE/MAX-CSD10 Operation/Reference Guide
31
Page 38

MAX-CSE Web Interface
A/V Set up Page
The A/V Set up page (FIG. 17) is accessed by clicking on the Audio/Video button in the Navigation Bar.
This page allows a user (with the proper access rights) to configure the properties associated with both
the incoming video and audio content.
FIG. 17 A/V Set up page
The following table lists the A/V Setup page features that can be configured by an administrator or other
authorized user.
A/V Set up Page Features
Feature Description
Video: This section allows the user/administrator to define the detection and format parameters for
• Video In These two radio boxes provide the option to select from either Composite or S-Video as the
• Video Port These two radio boxes provide the option to select from either NTSC or PAL as the format
Audio: This section allows the user/administrator to define the gain used by the current microphone
• Mic Gain This field allows the user to enter a value (from 0-99) associated with the gain used by the
the incoming video signal.
incoming video source type. The selected type determines which rear connector is used as
the video input connector.
This selection instructs the MAX-CSE to use/expect video from a specified rear video connector. As an example: setting the Video In option to Composite, tells the MAX-CSE to begin
detecting a video signal from the rear Composite connector.
type of the incoming video signal.
This selection instructs the MAX-CSE to use/expect a particular video format.
input.
rear microphone input.
The incoming microphone audio signal can be muted either by toggling the state of the
Microphone icon located at the top of each UI page or entering a value of zero into this field.
32
MAX-CSE/MAX-CSD10 Operation/Reference Guide
Page 39

MAX-CSE Web Interface
Changing Video and Audio Settings
From the A/V Setup page, select from Composite or S-Video from the Video In radio buttons.
1.
2. Select from NTSC or PAL from the Video Port radio buttons.
3. Enter the appropriate value in the Mic Gain field. Click Set to lock the entry.
4. To save the changes, click the Apply button on the top of the page. To return to the previously saved
settings, click Cancel.
NetLinx Settings Page
The NetLinx Settings page (FIG. 18) is accessed by clicking on the NetLinx button in the Navigation
Bar. This page allows a user (with the proper access rights) to specify which Master is to be used for
communication, query, and firmware updating.
FIG. 18 NetLinx Settings page
The Encryption fields on a MAX-CSE are not enabled. To establish a connection to a target Master, both
the ICSP Connectivity and Encryption requirements should be disabled from within the Master’s System
Security Details page (FIG. 19).
FIG. 19 NetLinx Master UI: System Security Details Page
MAX-CSE/MAX-CSD10 Operation/Reference Guide
These options must not be
selected if the MAX unit
is trying to establish a
connection to a target
NetLinx Master.
33
Page 40

MAX-CSE Web Interface
The following table lists the NetLinx Settings page features that an administrator or other authorized user
can configure.
NetLinx Settings Page Features
Feature Description
NetLinx Master: This section allows the user/administrator to define the communication and encryption
• Connection • A status field which indicates whether a Master has been detected and
• Mode • A drop-down list from which the user can choose which NetLinx connection Mode
• System Number Allows a user to enter a system number.
• Device Number Allows a user to enter a current device value (non-duplicated). You must use a value
• Master IP/URL Allows a user to enter the IP Address or URL used by the target Master.
• Master Port Number Allows the user to enter the port number used by the NetLinx Master.
• Encryption Based on the Master’s security status.
• Username/Password If the target Master has been previously secured, enter an alpha-numeric string (into
parameters of the target Master.
communicating with the MAX-CSE.
• During the initial setup, this field reads Not Connected.
• After a successful connection to a target Master, this fields reads Connected.
will be used to communicate with the target Master.
• Available modes: Listen, Auto (default), URL
• Listen sets the MAX unit to "listen" for broadcasts from the Master. In this system,
the MAX unit acts as a "Server" (in that Clients attach to it) and the Master acts as a
"Client".
• Auto is used to instruct the MAX unit to search for a Master that both uses the same
System Number (assigned within this page’s System Number field) and resides on
the same Subnet as itself. In this case, the Master has its UDP feature enabled.
• URL is the address that defines the route to a file on the Web or any other Internet
facility. This setting is used when the IP Address of the target NetLinx Master is
known. In this system, the MAX unit acts as a "Client" and the Master acts as a
Server (in that Clients attach to it). In URL mode, you can only enter the IP/URL of
the target Master. The System Number is 0 (for an unknown System Number) and
the Master Port Number is defaulted to 1319.
• Default value is 3701.
• Only in the Auto Mode will the System field be user-definable.
which is not currently being used by another device currently communicating with the
target Master.
• Within NetLinx Studio, use the Online Tree tab to review what device values are
already being used.
• Default value is 32001.
Note: This is the same IP Address used by NetLinx Studio to communicate with the
Master.
• Target Master IP Address must be in IPv4 dot notation (ex: X.X.X.X).
• Default value is 1319.
• Default value is Disabled (fields are greyed-out).
• These radio boxes either enable or disable data encryption of the data transferred
between the Master and the MAX over the ICSP connection. Note that this is
optional. If this is enabled, this setting requires more processor cycles to maintain.
• This selection determines if a username and password is required prior to
communication between the MAX unit and the target NetLinx Master via an ICSP
connection using a transport method such as TCP/IP or UDP/IP.
each field) which conforms to a pre-configured user profile on the Master. This profile
must have sufficient access rights.
Requiring the encryption of any data being transmitted or received via an ICSP connection (via the previous radio box) also mandates that a valid username and password be provided within the Username and Password fields.
34
MAX-CSE/MAX-CSD10 Operation/Reference Guide
Page 41

MAX-CSE Web Interface
Changing the NetLinx Master Connection
From the NetLinx Settings page, select between Listen, Auto, and URL in the Mode drop-down
1.
menu.
2. If you selected Auto as your Mode, enter the new system number in the System Number field, if
necessary.
3. Enter the new Device number in the Device Number field, if necessary.
4. If you selected URL as your Mode, enter the Master’s IP address or URL in the Master IP/URL
field, if necessary.
5. Enter the Master port number in the Master Port Number field, if necessary.
6. If you already allowed encryption with the Master, select Enabled or Disabled from the Encryption
radio buttons. If you did not, these fields will be greyed out and automatically set to Disabled.
7. If the unit is already connected to the Master, enter your username and password in the Username
and Password fields.
8. To save your changes, click the Apply button. If you wish to return to the previously saved settings.
click Cancel.
9. Click Refresh to update your changes on the NetLinx Settings page.
IP Settings Page
The IP Settings page (FIG. 20) is accessed by clicking on the NetLinx button in the Navigation Bar. This
page allows a user (with the proper access rights) to configure the IP communication parameters used by
the MAX-CSE to effect a proper IP connection.
FIG. 20 IP Settings page
MAX-CSE/MAX-CSD10 Operation/Reference Guide
35
Page 42

MAX-CSE Web Interface
The following table lists the IP Settings page features that an administrator or other authorized user can
configure.
IP Settings Page Features
Feature Description
IP Address: This section allows the user/administrator to define the
• IP These radio boxes provide the option to select from either a DHCP or Static communication
• Host • Allows the user to set the host name of the MAX-CSE.
• IP Address Allows a user to enter the IP Address or URL used by the current MAX-CSE.
• Subnet Mask Allows the user to set a subnetwork address to the MAX-CSE.
• Gateway Allows the user to set a gateway value to the MAX-CSE.
DNS Address: This section allows the user/administrator to define the communication and encryption
• Domain Suffix Allows the user to set the unique name on the Internet to the MAX-CSE for DNS look-up.
• Primary DNS Allows the user to set the address of the primary DNS server used for host name lookups.
• Secondary DNS • Allows the user to set the address of the secondary DNS server used for host name
communication and encryption parameters of the target Master.
mode on the MAX-CSE.
• DHCP (Dynamic Host Configuration Protocol) assigns IP Addresses from client stations
logging onto a TCP/IP network via a DHCP server.
• Static IP is a permanent IP Address that is assigned to a node in a TCP/IP network.
Note: This is the same IP Address used by NetLinx Studio to communicate with the Master.
Target Master IP Address must be in IPv4 dot notation (ex: X.X.X.X).
• Subnetwork mask is the technique used by the IP protocol to filter messages into a
particular network segment (Subnet).
• Gateway is a computer that either performs protocol conversion between different types of
networks/applications or acts as a go-between two or more networks that use the same
protocols.
parameters of the target Master.
• The unit belongs to the DNS domain.
• DNS information must be in IPv4 dot notation (ex: X.X.X.X).
• DNS (Domain Name System) is software that lets users locate computers on a local
network or the Internet (TCP/IP network) by host and domain. The DNS server maintains
a database of host names for its domain and their corresponding IP Addresses.
lookups.
• DNS information must be in IPv4 dot notation (ex: X.X.X.X).
36
Changing the IP Settings
From the IP Settings page and in the IP Address section, select between Dynamic and Static on the
1.
IP radio button.
2. If you selected Static, enter the new IP Address and Subnet Mask settings, if necessary.
3. Enter the new Gateway setting, if necessary.
4. In the DNS Address section, enter the new Domain Suffix, Primary DNS, and Secondary DNS
settings in the appropriate fields, if necessary.
5. To save your changes, click the Accept button. To return to the previously saved entries, click
Cancel.
6. To submit the changes to the Master, click Reboot to reboot the MAX-CSE.
MAX-CSE/MAX-CSD10 Operation/Reference Guide
Page 43

MAX-CSE Web Interface
User Page
The User page (FIG. 21) is accessed by clicking on the User button in the Navigation Bar. This page
allows a user (with the proper access rights) to change the current access Username/Password
information required for UI access.
FIG. 21 User page
The following table lists the User page features that an administrator or other authorized user can
configure.
User Page Features
Feature Description
User: This section allows the user/administrator to define the detection and format parameters for
the incoming video signal.
• New Username Allows the user to enter an alpha-numeric string assigned to the user/administrator profile.
This field must use a valid character string consisting of 4 - 27 alpha-numeric characters.
The default Username is Admin.
• New Password Allows the user to enter an alpha-numeric string assigned to the user/administrator profile.
This field must use a valid character string consisting of 4 - 27 alpha-numeric characters.
The default Password is 1988.
• Retype Password Allows the user to re-enter an alpha-numeric string assigned to the user/administrator profile.
This field must use a valid character string consisting of 4 - 27 alpha-numeric characters.
Although there is no error message which appears to inform the user of an incorrect reentry, the screen will maintain the previous Username if the passwords did not match.
MAX-CSE/MAX-CSD10 Operation/Reference Guide
37
Page 44

MAX-CSE Web Interface
Changing User Settings
1.
2. Enter your new password in the New Password field. Enter it again in the Re-type Password field to
3. To save the new username and password, click the Accept button at the top of the page. To return to
4. Click the Logout button for the changes to take effect on the MAX-CSE.
The unit can only store one Username/Password profile. Once altered, the factory set
administrator/password entries are deleted unless later re-entered or the unit is reset
to its factory default parameters by pressing the front ID button for 5 seconds.
From the User page, enter the new username in the New Username field.
verify it.
the original saved information, click Cancel.
38
MAX-CSE/MAX-CSD10 Operation/Reference Guide
Page 45

MAX-CSD10 Web Interface
The browser-based UI for the MAX-CSD10 Decoder, known as the Decoder Manager (FIG. 22), is
significantly different from the interface for the MAX-CSE Encoder. However, many of the same
functions are available to the MAX-CSD10 from the Decoder Manager.
FIG. 22 Decoder Manager for the MAX-CSD10 (showing the initial screen)
MAX-CSD10 Web Interface
As with the MAX-CSE browser-based UI, the default page for the MAX-CSD10 is the Administration
page.
MAX-CSD10 User Interface Overview and Features
User Interface Features
Feature Description
Browser Address field Typically located at the top of the browser window, this dynamic
frame reflects the current IP Address being used by the
communicating MAX device and the currently active XML UI
page.
Navigation frame: Located at the top of the browser window, this static frame allows
a user to navigate to any of the different configuration pages
found within the UI. Since this frame is static, it appears
on-screen no matter what page is currently active.
Admin • This link launches the Administration page, which displays an
Stream Selector • This link launches the Stream Selector page, which provides
Stream Set-up • This link launches the Stream Set-up page, which provides the
Audio/Video • This link launches the Audio/Video page, which provides the
NetLinx • This link launches the NetLinx Settings page which provides the
IP Settings • This link launches the IP Settings page which provides the user
User • This link launches the User page which provides the user with
overview of the MAX firmware and project information.
the user with the ability to choose from a list of available input
streams.
user with the ability to select the Run Mode of the incoming
stream and the server to which the decoded stream will go.
user with the ability to select the video port to be used.
user with the ability to enter the communication parameters
necessary to connect a MAX-CSD10 with a target Master.
with the ability to assign the method of communication used by
the target MAX unit, along with its associated IP parameters.
the ability to alter the current Username/Password information
required to gain entry to the UI pages and make modifications.
MAX-CSE/MAX-CSD10 Operation/Reference Guide
39
Page 46

MAX-CSD10 Web Interface
Administration Page Features (Cont.)
Feature Description
Stream Status frame: Located on the upper-right side of the browser window, this static
Play/Stop The button at the top of the window reflects the condition of the
Status • Indicates the status of the outgoing stream.
Refresh This button causes the unit to re-verify the condition/state of the
Logoff This button logs off the Decoder Manager. The user will then
Active Page frame: Located on the right side of the browser window, this dynamic
frame allows a user to not only Start and Stop an encoding
stream, but also view whether the MAX-CSD10 is detecting an
A/V signal.
• Since this frame is static, it appears on-screen no matter what
page is currently active. This frame can be very useful for a
remote administrator when trying to troubleshooting most
streaming issues.
outgoing media content:
• Play begins to sync-up the media signals and then stream them
out from the device.
- This play state is shown as active when both the Stop button
is displayed and the green Streaming message is
displayed within the Status field.
- No changes can be made to both the communication
parameters and stream profiles while the unit is in this mode.
• Stop halts the outgoing media stream from the device.
- This stop state is shown as active when both the Play button
is displayed and the blue Idle message is displayed within
the Status field.
- Changes can be made to both the communication
parameters and stream profiles while the unit is in this mode.
• Streaming indicates that the Play button has been activated
and the process of receiving a media stream has begun.
Streaming does not require that content be provided to the unit,
it is only the conversion process which has been initiated. This
is why it is important to make sure that the unit is also detecting
an incoming A/V feed.
• Idle indicates that the Stop button has been activated and the
stream process has been halted.
stream Status.
have to log back in with the correct userid and password to
access the Decoder Manager.
frame displays the pages corresponding to the currently selected
option from within the Navigation frame. The top of these pages
also provide the user with some common application buttons
such as Apply and Refresh.
• Since this frame is dynamically populated, its contents will
depend on which Navigation link was currently selected.
40
MAX-CSE/MAX-CSD10 Operation/Reference Guide
Page 47

MAX-CSD10 Web Interface
Communicating With The Unit Via the Browser-based UI
To facilitate communicate with the MAX-CSD10, it is necessary for the unit to first obtain a DHCP
Address (page 49). Once that address is known, you can then use your web browser to access the
browser-based User Interface (UI) pages and then configure the project, video, and IP connection
parameters.
1. Launch your web browser.
2. Enter the IP Address of the target unit (example: http://192.199.99.99) into the web browser’s
Address field.
3. Press the Enter key on your keyboard to initiate communication and launch the initial on-screen
Enter Network Password security dialog.
4. The MAX unit is shipped in a secured configuration which requires the user to enter a username and
password into the on-screen security dialog before gaining access to the UI pages.
5. Enter the words administrator and password into their corresponding case-sensitive User Name/
Password fields. This profile can later be changed.
6. Click OK to enter the information and proceed to the first UI page.
Administration Page
The Administration Page (FIG. 22) is the default page upon opening the Decoder Manager. From here,
the user may reach any of the other Decoder Manager pages or check or update the existing device
firmware.
Administration Page Features
Resources This entry lists the latest version of the decoder firmware
uploaded to the device.
Update Firmware This button allows the user to upload new firmware updates to
the device.
Updating Firmware
To update the current firmware being used by the MAX-CSD10:
1. Click the Update Firmware button on the Administration Page.
2. A new window will open to warn you that you must reboot the device before uploading any
firmware file (see FIG. 15 on page 25).
3. If you have not previously rebooted the device, click the Reboot button. After it reboots, either
return to or refresh the Administration Page.
4. If you already rebooted the device, click the Reboot Done. Upload a File. button. This closes the
warning window and enables the Browse and Submit buttons next to the Upload Firmware field.
5. Enter the directory path in the Upload Firmware field or click the Browse button to locate the file.
When the file is selected, click the Submit button to upload the file to the device.
If any Ethernet connectivity issues happen while uploading the firmware, the firmware
may not be installed completely. Please reboot the device and then attempt to reload
the firmware should you have any problems with connectivity.
MAX-CSE/MAX-CSD10 Operation/Reference Guide
41
Page 48

MAX-CSD10 Web Interface
Stream Selector Page
The Stream Selector page (FIG. 23) allows the user to select the data stream being processed in SAP
session by the MAX-CSD10. This page lists both all of the available data streams and the stream
currently being accessed.
FIG. 23 Stream Selector page
Stream Selector Page Features
Select The currently selected stream.
Title The source of the available stream.
Description The current description or nickname of the stream source
Contact Info The contact telephone number of the individual managing the
stream source.
To select a new stream:
1. From the Stream Selector page, click the radio button next to the stream you wish to use.
2. To start streaming, click Accept. To leave access to the current stream, click Cancel.
42
MAX-CSE/MAX-CSD10 Operation/Reference Guide
Page 49

MAX-CSD10 Web Interface
Stream Set-up Page
The Stream Set-up page (FIG. 24) allows you to control the stream configuration, including the mode
used and the individual server being accessed.
FIG. 24 Stream Set-up Page
Stream Set-up Page Features
Run Mode This menu selects the mode in which the stream is run:
• SAP
•RSTP
• Manual
SAP:
Servers Selects between the default server already chosen for a stream
or another server.
Other Address The address of the server used other than the Default.
Other Port The port for the server used other than the Default.
RTSP:
Server The number ranking of the stream server being selected.
IP The IP address of the stream server.
URL The URL for the stream source.
Port The video port being used for that stream.
Manual:
Transports The transport mode being used:
•RTP
• UDP
Server Address The IP address for the stream server.
Server Video Port The video port being used by the server.
Server Video Types The type of video file being used:
• MPEG-2
• MPEG-4
Server Audio Port The audio port being used by the server.
Server Audio Types The type of audio file being used:
•MP3
• AAC
MAX-CSE/MAX-CSD10 Operation/Reference Guide
43
Page 50

MAX-CSD10 Web Interface
Changing the stream configuration
At this time, the Stream Set-up page supports three modes for data streams:
Each mode has different procedures for setting up the stream configuration, as detailed below.
Setting up an SAP stream configuration
1.
From the Stream Set-up page, choose SAP from the Run Mode drop-down menu. (See FIG. 24.)
2. Select the server from which the stream originates. If you wish to use the default stream server,
leave the Servers list on Default. If you wish to use a different server, select Other.
3. If you selected Other on the Servers list, enter the IP address for the new server in the Other Address
field.
4. Again, if you selected Other on the Servers list, enter the port number in the Other Port field.
5. If you wish to save the entered information, click the Accept button. If you wish to return to the
previous settings, click Cancel.
Setting up an RTSP stream configuration
SAP
RSTP
Manual
From the Stream Set-up page, choose RTSP from the Run Mode drop-down menu. (See FIG. 25)
1.
FIG. 25 Stream Configuration Page - RTSP Mode
2. Select the server out of the servers listed by clicking on the radio button to the left of the server
number.
3. Enter a new IP addresses, URL, or port number for the selected server in the appropriate field, if
necessary.
4. To save any changes, click the Accept button on the bottom of the page. To return to the previously
saved information, click Cancel.
5. After clicking Accept, click the Stream Selector link at the top of the page to open the Stream
Selector page (page 42).
6. Select the stream you wish to use and then click the Accept button.
44
MAX-CSE/MAX-CSD10 Operation/Reference Guide
Page 51

MAX-CSD10 Web Interface
Setting up a Manual stream configuration
From the Stream Set-up page, choose Manual from the Run Mode drop-down menu. (See FIG. 26.)
1.
FIG. 26 Stream Configuration Page - Manual Mode
2. Select between UDP and RTP in the Transports drop-down menu.
3. Enter a new IP address in the Server Address field, if necessary.
4. Enter a new value in the Server Video Port field, if necessary.
5. Select between MPEG-2 and MPEG-4 in the Server Video Types drop-down menu.
6. If you chose RTP in the Transports drop-down menu, enter a new port number in the Server Audio
Port field. If you chose UDP, this field will already be filled and disabled.
7. Select between MP3 and AAC in the Server Audio Types drop-down menu.
8. To save your changes, click the Accept button at the bottom of the page. To return to the previously
saved information, click Cancel.
MAX-CSE/MAX-CSD10 Operation/Reference Guide
45
Page 52

MAX-CSD10 Web Interface
Audio/Video Page
The Audio/Video page (FIG. 27) allows the user to set up the video port used by the MAX-CSD10.
FIG. 27 Audio/Video Page
Audio/Video Page Features
Video Port The video port used by the MAX-CSD10
To change the A/V setup:
1. From the Audio/Video page, select the video port to be used by the MAX-CSD10.
2. To save any changes to the port settings, click Accept. To keep the original settings, click Cancel.
NetLinx Page
The NetLinx page (FIG. 28) allows the user to check or modify the connection to the NetLinx Master.
FIG. 28
NetLinx Page
NetLinx Page Features
Status The current status of the NetLinx Master connection.
Connection Mode The method used to establish the connection:
•Listen
•Auto
•URL
System Number The number assigned to the particular system within a NetLinx network, if appli-
Device Number The number assigned to the MAX-CSD10 by the NetLinx Master.
Master IP/URL If the Connection Mode is set to "URL", this field contains the NetLinx Master IP
Master Port Number If the Connection Mode is set to "URL", this field contains the number for the
Encryption If the NetLinx Master allows signal encryption, this Enabled/Disabled radio but-
cable
address.
NetLinx Master port being used.
ton will be fully functional.
46
MAX-CSE/MAX-CSD10 Operation/Reference Guide
Page 53

MAX-CSD10 Web Interface
NetLinx Page Features (Cont.)
Username The selected username of the NetLinx Master administrator.
Password The password for access to the NetLinx Master.
To change NetLinx settings for the MAX-CSD10:
1. From the NetLinx page, select the Connection Mode to be used from the drop-down menu.
2. If you selected Auto from the Connection Mode drop-down menu, enter the new System Number, if
applicable.
3. Enter a new Device Number, if necessary.
4. If you selected URL from the Connection Mode drop-down menu, enter a new Master IP/URL, if
necessary.
5. Enter a new Master Port Number, if necessary.
6. If encryption is allowed on the NetLinx Master, select whether to Enable or Disable encryption.
7. Enter your Netlinx Master Username and password.
8. If you wish to make the changes to the NetLinx settings, click the Accept button. If you wish to
keep the original settings, click Cancel.
IP Settings Page
The IP Settings page (FIG. 29) allows you to view or modify the IP and DNS settings for the MAXCSD10.
FIG. 29
IP Settings Page
IP Settings Page Features
• IP Selects whether the IP access is dynamic or static
• Host Contains the name of the host machine referred to by the IP address.
• IP Address The IP address reserved for the MAX-CSD10.
• Subnet Mask The subnet mask address reserved for the MAX-CSD10.
• Gateway The gateway address reserved for the MAX-CSD10.
• Domain Suffix The domain name suffix for the URL being used by the MAX-CSD10.
• Primary DNS The primary DNS number for the MAX-CSD10.
• Secondary DNS The secondary DNS number for the MAX-CSD10.
• Reboot Reboots the MAX-CSD10 after making and saving changes.
To make changes to the IP Settings page:
MAX-CSE/MAX-CSD10 Operation/Reference Guide
47
Page 54

MAX-CSD10 Web Interface
1. From the IP Settings page and in the IP Address section, select whether the IP will be dynamic or
static.
2. If you selected the IP to be static, change the information in the IP Address field, if necessary.
3. If you selected the IP to be static, change the information in the Subnet Mask field, if necessary
4. Change the information in the Gateway field, if necessary.
5. In the DNS Address section, change the information in the Domain Suffix field, if necessary.
6. Change the information in the Primary DNS and Secondary DNS fields, if necessary.
7. To reboot the system after a change, click the Reboot button. Click OK to confirm the reboot or
Cancel to return to the IP Settings page.
8. To save changes without rebooting the system, click Accept. If you wish to keep the original
settings, click Cancel.
User Page
The User page (FIG. 30) allows the user to make remote changes to passwords.
FIG. 30 User Page
User Page Details
• Username The administrator’s registered username.
• New Password The new password to be used with the MAX-CSD10.
• Re-type Password Confirmation of the new password.
To change the User Login Settings:
1. From the User page, enter your username in the Username field.
2. Enter your new password.
3. Re-enter the password to confirm that this is the correct one.
4. To save your changes, click the Accept button. To keep the current password, click Cancel.
48
MAX-CSE/MAX-CSD10 Operation/Reference Guide
Page 55

Configuring Communication
This section refers to steps necessary to both communicate and upgrade components for the MAX-CSE
and MAX-CSD10. Both MAX units are configured to be used as standalone units running on a network
capable of supporting the up to a 6Mbps data rate.
Before beginning:
1. Setup and configure your MAX unit. Make sure your cables are working properly and are
securely connected. Refer to the previous section on page 9.
2. Verify you have installed the latest version of NetLinx Studio on your PC.
3. If an update is necessary, download the latest Studio software by first logging in to www.amx.com
and then navigate to Tech Center > Downloadable Files > Application Files >
NetLinx Studio 2.4. This program is used to setup a System number, obtain/assign the IP/URL for
the connected NetLinx Master, and transfer firmware Kit files to the Master.
4. Verify you have download the latest version of your target’s firmware (MAX-CSD10/Modero
panel) or software (third-party computer streaming application).
5. Verify the NetLinx Master is receiving power and is turned On.
Configuring Communication
Reading the Front Panel LCD
The LCD not only displays the currently used IP Address information, but can also provide the user with
current device status messages such as those given below in FIG. 31.
Currently used IP Address
Firmware upload in progress
Device is idle, no stream
in progress
Device is currently streaming
Device is currently rebooting
FIG. 31 LCD status messages
MAX-CSE/MAX-CSD10 Operation/Reference Guide
Device is being reset to its factory
default settings and then rebooting
49
Page 56

Configuring Communication
Configuring the MAX Communication Parameters
Although the unit is initially configured to obtain the first available DHCP Address, it is recommended
that after the initial connection, the unit be setup to use a Static IP Address. Using a Static IP Address for
both the source and destination devices can be beneficial for both diagnostic and direct access purposes.
MAX Products are not designed or intended to, and may not be used to, violate
anyone’s copyright or other intellectual property rights. Each user of the MAX
Products may only use the products in connection with materials legally owned or
licensed by such user and only to the extent such ownership or license rights permit
such use.
Obtaining the unit’s initial DHCP Address
1.
Connect an Ethernet cable to the unit’s rear Ethernet connector.
2. Connect the 2-pin 3.5mm mini-Phoenix PWR connector to the rear power connector and then apply
power.
The MAX-CSE uses the active Ethernet connection to communicate with the DHCP
Server and obtain a valid DHCP Address.
3. After the unit has successfully obtained an IP Address from the DHCP Server, it then displays this
obtained DHCP Address across the front LCD (FIG. 32).
FIG. 32 Example of the current IP Address
4. Write down the newly obtained DHCP Address displayed on the front panel LCD.
Communicating with the unit via the browser-based UI
To facilitate communication with the MAX-CSE and MAX-CSD10, it is necessary for the unit to obtain
a DHCP Address. Once that address is known, you can then use your web browser to access the browserbased User Interface (UI) pages and then configure the project, video, and IP connection parameters.
1. Launch your web browser.
2. Enter the IP Address of the target unit (ex: http://192.199.99.99) into the web browser’s Address
field.
3. Press the Enter key on your keyboard to initiate the communication process and launch the initial
on-screen Enter Network Password security dialog. (FIG. 33).
4. Enter the words administrator and password into the corresponding User Name/Password fields
(case-sensitive). This is the factory default security login information. This login profile can later be
changed.
5. Place a checkmark in the Use the Save this password in your password list selection box to save
both the username and password to the MAX unit and use them as your defaults during the next new
login to the target unit.
Unchecking this "save login profile" option causes a user to have to re-enter both the username
and password upon every consecutive login. Leaving this box unchecked helps add to the
security feature of the unit by requiring the user to have the proper information.
50
MAX-CSE/MAX-CSD10 Operation/Reference Guide
Page 57

Configuring Communication
Save login profile
selection box
FIG. 33 Enter Network Password security dialog
6. Click OK to enter the information and proceed to the first UI page.
Assigning a Static IP Address to the MAX-CSE via the browser-based UI
Although the initial communication to the unit is done via a DHCP connection and since this is your
source device, it is recommended that for streaming and programming purposes, you assign a Static IP
Address to the unit via the browser-based UI.
Located on the left side of the populated browser window is the Navigation frame which allows a user to
navigate throughout the application. Located on the right side of the browser window is the Active frame
which displays the pages corresponding to the currently selected option from within the Navigation
frame.
1. Access the IP Settings page (FIG. 20 on page 35) by clicking the IP Settings button in the
Navigation Bar.
This page is used to assign the method of communication used by the target MAX unit.
Note that both the default IP Configuration setting is DHCP and the corresponding read-only
fields display the MAX unit’s communication parameters obtained from the DHCP Server
during the initial setup.
2. Click on the Static radio box to begin entering the previously obtained Static IP Address
information (typically provided by your Network Administrator).
3. Enter the corresponding Static IP Address, Subnet Mask, Gateway, and DNS parameters into their
corresponding fields on this page.
4. Click the Apply button to refresh the screen and save your new communication parameters.
5. Once the browser’s progress bar indicates it has completed the temporary acceptance of the new
parameters, click the Reboot button to restart the unit and incorporate these changes.
6. Once the unit powers-up, the new Static IP Address is then displayed on the LCD after the
appearance of AMX logo (which can take several minutes).
7. Confirm the new communication parameters by launching your browser and entering the MAX’s
new Static IP Address into the browser’s Address field.
8. Press the Enter key on your keyboard to regain communication with the target MAX device and
launch the initial on-screen Enter Network Password security dialog.
9. Re-enter the words administrator and password into the corresponding User Name/Password
fields.
10. Click OK to enter the information and proceed to the Administration page which provides both a
descriptive overview of the program stream and lists the currently used firmware.
MAX-CSE/MAX-CSD10 Operation/Reference Guide
51
Page 58

Configuring Communication
11. The next step in the communication process is to prepare a NetLinx Master for communication to
the target MAX unit. Refer to the following sections for detailed Master communication setup
instructions.
Assigning a Static IP Address to the MAX-CSD10 via the browser-based UI
Although the initial communication to the unit is done via a DHCP connection and since this is your
source device, it is recommended that for streaming and programming purposes, you assign a Static IP
Address to the unit via the browser-based Decoder Manager UI (FIG. 22). Before starting, you will need
a Static IP address and Subnet Mask to enter into the Decoder Manager; these may be provided by your
Network Administrator.
1. From the Decoder Manager, click on the IP Settings tab to open the IP Settings page (FIG. 29).
2. In the IP Address section, select the Static radio button.
3. Enter the Static IP address and Subnet Mask information provided by your Network Administrator
into the fields provided.
4. To save the new changes, click the Accept button at the bottom of the page. If you wish to return to
the previously saved information, click Cancel.
5. To make sure that the new information is recognized by the MAX-CSD10, click Reboot to reboot
your MAX unit.
Communicating with the Target Master via an IP
Whether the Master’s IP Address was Static or Dynamically obtained (DHCP), use the IP Address
information from the Network Addresses dialog to establish communication via the Ethernet-connected
Master.
1. Launch NetLinx Studio 2.4 (default location is Start > Programs > AMX Control Disc >
NetLinx Studio > NetLinx Studio 2.4).
2. Obtain the IP Address of the Master from your System Administrator or if you still do not have an
IP Address:
3. Select Settings > Master Communication Settings from the Main menu to open the Master
Communication Settings dialog (FIG. 34).
4. Click the Communications Settings button to open the Communications Settings dialog.
5. Click on the NetLinx Master radio button (from the Platform Selection section) to indicate you are
working with a NetLinx Master (such as the NXC-ME260/64 or NI-Series of Integrated
Controllers).
6. Click on the TCP/IP radio button (from the Transport Connection Option section) to indicate you
are connecting to the Master via an IP Address.
7. Click the Edit Settings button (on the Communications Settings dialog) to open the TCP/IP
Settings dialog (FIG. 34). This dialog contains a series of previously entered IP Address/URLs and
their associated names, all of which are stored within Studio and are user-editable.
8. Click the New button to open the New TCP/IP Settings dialog, where you will enter both a
previously obtained DHCP or Static IP Address and an associated description for the connection
into their respective fields.
9. Click the Automatically Ping the Master Controller to ensure availability radio box.
10. Click OK to close the current New TCP/IP Settings dialog and return to the previous TCP/IP
Settings dialog.
11. Locate the new entry within the List of Addresses section and click the Select button.
52
MAX-CSE/MAX-CSD10 Operation/Reference Guide
Page 59

FIG. 34 Assigning Master Communication Settings and TCP/IP Settings
Configuring Communication
12. Click OK to return to the Communications Settings dialog and place a checkmark within the
Authentication Required radio box if your Master has been previously secured with a username/
password. This opens up a Master Controller User Name and Password dialog.
13. Within this dialog, you must enter a previously configured username and password (with sufficient
rights) before being able to successfully connect to the Master.
14. Click OK to save your newly entered information and return to the previous Communication
Settings dialog.
15. Click OK to begin the communication process to your Master.
If you are currently connected to the assigned Master, a popup asks whether you
would want to temporarily stop communication to the Master and apply the new
settings.
16. Click Yes to interrupt the current communication from the Master and apply the new settings.
17. Once the particular System Master is configured for communication via an IP Address, remove the
DB9 connector from the Program port on the NI on-board Master.
18. Click Reboot (from the Tools > Reboot the Master Controller dialog) and wait for the System
Master to reboot. The STATUS and OUTPUT LEDs should begin to alternately blink during the
incorporation. Wait until the STATUS LED is the only LED to blink.
19. Press Done once until the Master Reboot Status field reads *Reboot of System Complete*.
20. Click the OnLine Tree tab in the Workspace window and right-click the associated System number
and select Refresh System. This establishes a new connection to the specified System and
populates the list with devices on that system. The communication method is then highlighted in
green on the bottom of the NetLinx Studio window.
MAX-CSE/MAX-CSD10 Operation/Reference Guide
53
Page 60

Configuring Communication
If the connection fails to establish, a Connection Failed dialog appears.
Try selecting a different IP Address if communication fails.
Press the Retry button to reconnect using the same communication parameters.
Press the Change button to alter your communication parameters and repeat
steps 4 thru 18.
Associating the MAX unit to a Target Master
Although the MAX-CSE and MAX-CSD10 units can function independently of a NetLinx Master, the
NetLinx Settings page allows a user (with proper access rights) to specify which Master is to be used for
communication, query, and firmware updating.
Associating a MAX-CSE to a Target Master
From the Browser-based UI Administration page, click the NetLinx Settings button to access the
1.
NetLinx Settings page (FIG. 18 on page 33).
2. From within the Mode field, click on the drop-down arrow to reveal a listing of available NetLinx
connection Modes which can be used when communicating with the target Master. For the purposes
of these procedures, select URL.
In the URL mode, you can only enter the IP/URL of the target Master. The System Number
field becomes greyed-out and left at zero (for an unknown System Number) and the Master
Port Nu m b e r field is defaulted to 1319.
NetLinx Master Connection Mode options:
• LISTEN sets the MAX unit to "listen" for broadcasts from the Master. In this system, the MAX unit
acts as a "Server" (in that Clients attach to it) and the Master acts as a "Client".
• AUTO is used to instruct the MAX unit to search for a Master that both uses the same System
Number (assigned within this page’s System Number field) and resides on the same Subnet as
itself. In this case, the Master has its UDP feature enabled.
This UDP (User Datagram Protocol) is a protocol within the TCP/IP protocol suite that is used in
place of TCP when a reliable delivery is not required.
• This UDP enabling is done through a Telnet session on the Master. Refer to the particular NetLinx
Master manual for more detailed information.
• URL (Uniform Resource Locator) is the address that defines the route to a file on the Web or any
other Internet facility. This setting is used when the IP Address of the target NetLinx Master
is known. In this system, the MAX unit acts as a "Client" and the Master acts as a Server (in that
Clients attach to it).
For more detailed information on communicating with a target Master, refer to the procedures outlined
within the previous Communicating with the Target Master via an IP section on page 52.
The Encryption fields on a MAX-CSE are not enabled. Therefore, to establish a
connection to a target Master, both the ICSP Connectivity and Encryption
requirements should be disabled from within the Master’s System Security Settings
page (see FIG. 19 on page 33).
3. Only in the Auto Mode will the System field be user-definable.
Default value is 3701.
Having previously selected URL, this field is greyed-out (read-only).
If the System field is user-editable (when in the Aut o Mode), enter the system number being
used by a Master on your same Subnet.
4. Within the Device Number field, enter the MAX unit’s currently used device value
(non-duplicated).
54
MAX-CSE/MAX-CSD10 Operation/Reference Guide
Page 61

Configuring Communication
You must use a value which is not currently being used by another device currently
communicating with the target Master.
The Default value is 32001.
Within Studio, connect to the target Master, click on the Online Tree tab to review what
device values are already being used (FIG. 35).
5. Within the Master IP/URL field, enter the IP Address or URL used by the target Master. This is the
same IP Address used by NetLinx Studio to communicate with the Master.
6. Unless otherwise necessary, do not alter the default value entered within the Master Port field. This
field allows you to enter the port number used by the NetLinx Master.
The Default value is 1319.
7. Click the Apply button to complete the configuration process and save the parameters to the MAX
unit.
8. Confirm that the target Master is not configured for require encryption and communicate via a
secured ICSP connection. It is not necessary to remove all security from a target Master to establish
a connection.
Use a second instance of your browser to navigate to the UI pages of the target Master (via the
device’s IP Address).
After successfully logging into the Master, locate the Security section of the left Navigation
frame and click on the System Level link to open the System Security Settings page.
Uncheck the ICSP Connectivity and Require Encryption options (see FIG. 19 on page 33).
This allows an unencrypted device using ICSP to communicate with the target NetLinx
Master.
Click the on-screen Update button to save this new configuration to the target Master.
9. Confirm the MAX unit is properly communicating with the target Master by using NetLinx Studio
to confirm the presence of the new device within the Master’s System listing (FIG. 35).
FIG. 35 Studio Online Tree tab showing the communicating MAX unit
This listing of devices recognized by the target Master can be found by refreshing the System
listing within the Online Tree tab.
Refer to the Communicating with the Target Master via an IP section on page 52 for detailed
procedures.
MAX-CSE/MAX-CSD10 Operation/Reference Guide
Communicating MAX unit
(showing current installed firmware version)
55
Page 62

Configuring Communication
Associating a MAX-CSD10 Unit to a Target Master
1.
From the Decoder Manager, click the NetLinx link to open the Netlinx Master page.
2. In the Connection Mode drop-down menu, select URL.
3. Enter the new Master IP/URL number.
For more detailed information on communicating with a target Master, refer to the procedures outlined
within the Communicating with the Target Master via an IP section on page 52.
Changing the MAX’s Device Number
The MAX-CSE and MAX-CSD10 units can have its Device Address changed via either the browserbased UI, from within NetLinx Studio, or by using the front panel ID pushbutton.
Changing the MAX-CSE device number via the UI
Refer to step 4 of the previous Associating the MAX unit to a Target Master section on page 54 to
1.
locate the Device Number field.
2. Enter a new non-repeating device value for the MAX unit and click the Apply button.
3. After the new connection to the target NetLinx Master is established, the MAX unit is displayed
within the current System’s Online Tree tab using the new device value (FIG. 35).
Changing the MAX-CSE device number via Studio
Establish a valid connection between the target Master and the source MAX unit. Refer to the
1.
previous section for more detailed information.
2. Access the Device Addressing dialog (FIG. 36) by either one of these two methods:
Right-click on any system device (such as a Modero panel) listed in the OnLine Tree tab of
the Workspace and select Device Addressing (from the popup list).
Select Diagnostics > Device Addressing from the Main menu.
Device Address
(original device
FIG. 36 Device Addressing dialog (changing the device value)
value)
Check-Off to
verify change
Enter new
device value
3. Select the Change Device checkbox from the Device to Change section.
4. Ver i f y t h e Current value and enter the New Device value for the source MAX device.
5. Click the Change Device/System Number button. This configures the specified MAX unit to
accept the new value and incorporate the information (the system information in the Workspace
window refreshes and then displays the new information).
6. Click Done to close the Device Addressing dialog.
7. Navigate back to the IP Settings page on the UI and click the Reboot button to cycle power to the
unit and save the new information.
56
MAX-CSE/MAX-CSD10 Operation/Reference Guide
Page 63

Configuring Communication
8. On the target Master, click Reboot (from the Tools > Reboot the Master Controller dialog) and wait
for the System Master to reboot. The STATUS and OUTPUT LEDs should begin to alternately blink
during the incorporation. Wait until the STATUS LED is the only LED to blink.
9. Press Done once until the Master Reboot Status field reads *Reboot of System Complete*.
10. Click the OnLine Tree tab in the Workspace window to view the devices on the System.
The default System value is one (1).
11. Right-click the associated System number (or anywhere within the tab itself) and select Refresh
System. This establishes a new connection to the specified System and populates the list with
devices on that system.
12. Use Ctrl+S to save your existing NetLinx Project with the new changes.
Recommended NetLinx Device numbers
• 1 - 255 • Axcess Devices use Axcess standards
• 301 - 3072 • NetLinx CardFrames start at frame number 25 - (frame# * 12) + Card #
• 5001 - 5999 • ICSNet and IP NetLinx devices: NXI, NXM-COM2, NXM-IRS4, etc.
• 6001 - 6999 • ICSNet and IP Landmark devices: PLH-VS8, PLH-AS16, PLB-AS16
• 7001 - 7999 • InConcert Devices
• 8001 - 8999 • PCLink Device: PCLink devices are PC programs
• 10000 - 31999 • ICSNet Panels: DMS, IMS, and future panels
• 33001 - 36863 • Virtual devices: these start at 33001
• 32001 - 32767 • Dynamic devices: the actual range used by Master
• 32768 - 36863 • Virtual devices: the actual range used by Master
Using the ID button to change the MAX-CSE’s Device Value
1.
Access the Device Addressing dialog (FIG. 37) by selecting Diagnostics > Device Addressing
from NetLinx Studio’s main menu.
Enter the new Controller value
Assign the
new value to
the MAX unit
FIG. 37
A
Device Addressing dialog (using the ID mode to set the MAX device value)
B
The ID button on the front of the MAX unit can also be used to reset the unit back to
its factory-default parameters. Press and hold the button for 10 seconds to reset the
parameters and reboot the MAX unit.
2. Locate the Device field (A in FIG. 37) and enter the new value for the MAX unit.
This value must fall within a range of 0 - 32767.
3. Press the on-screen Start Identify Mode button.
MAX-CSE/MAX-CSD10 Operation/Reference Guide
57
Page 64

Configuring Communication
4. Press the MAX unit’s ID button to begin process of reading the current device value of the device
and then assigning it to the new value entered in step 2.
Changing the MAX-CSD10 device number via the UI
1.
From the Decoder Manager page, click the NetLinx link to open the NetLinx Settings page.
2. Enter the new device number in the Device Number field.
3. To save your changes, click the Accept button at the bottom of the page. To return to the previously
saved information, click Cancel.
Resetting a MAX-CSE or MAX-CSD10 Unit to a Factory Default State
Locate the ID button on the front panel of the MAX unit.
1.
2. Press and hold this button for 10 seconds to reset the parameters and reboot the MAX unit.
All modified information, such as the Static IP Address settings and modified Username/Password,
will be wiped from the unit.
This action causes a previously red *Not Active* field to now display a green Waiting...Press
Cancel to Quit.field.
This green field indicates that Studio is waiting to detect the device value of the MAX
associated with the ID button.
Once the swap has been successfully made, a red Successful Identification Made field appears.
The previous Device value is then displayed below the red field.
58
MAX-CSE/MAX-CSD10 Operation/Reference Guide
Page 65

Configuration and Firmware Update
Configuration and Firmware Update
This section refers to steps necessary to both communicate and upgrade the components for both a
MAX-CSE and MAX-CSD10 unit.
Verify you are using the latest version of NetLinx Studio (available online at
www.amx.com).
Before You Begin
1. Setup and configure your MAX unit.
2. Complete the procedures in the previous Configuring the MAX Communication Parameters section
on page 50 to establish a valid connection between the MAX unit and the web.
3. Complete the procedures in the previous Communicating with the Target Master via an IP section
on page 52 to establish web connection to the target Master.
4. Verify you have installed the latest version of NetLinx Studio on your PC.
5. If an update is necessary, download the latest Studio software by first logging in to www.amx.com
and then navigate to Tech Center > Downloadable Files > Application Files > NetLinx Studio
2.4. This program is used to setup a System number, obtain/assign the IP/URL for the connected
NetLinx Master, and transfer firmware Kit files to the Master.
6. Verify that all cables are securely and properly connected.
7. Verify that the NetLinx Master is receiving power and is turned On.
If you have previously setup communication with your Controller via an IP Address,
continue with the firmware update procedures outlined in the Upgrading MAX
Firmware section on page 60.
MAX vs. NetLinx Master - Functional Overlap
Two of the main support procedures can now be done either via NetLinx Studio or directly from the
MAX unit itself:
Querying the unit for a description of its current firmware version
Subsequent firmware Kit file upload and incorporation to a specific MAX unit
Verifying the MAX’s current version of Firmware - via the UI
1.
Launch your web browser.
2. Enter the IP Address of the target unit into the web browser’s Address field.
3. Press the Enter key on your keyboard to initiate the communication process and launch the initial
on-screen Enter Network Password security dialog.
4. Enter the current username/password string into the corresponding User name/Password fields.
5. Click OK to enter the information and proceed to the first UI page.
6. Although its the first page displayed in the Active frame after a successful login, the Administration
page can also be accessed by clicking on the Admin button in the Navigation Bar.
7. Locate the Resources section of this page to read the currently installed firmware version.
MAX-CSE/MAX-CSD10 Operation/Reference Guide
59
Page 66

Configuration and Firmware Update
Verifying the MAX’s current version of Firmware - via Studio
After Studio has establish a connection to the target Master, click on the OnLine Tree tab in the
1.
Workspace window to view the devices on the System. The default System value is one (1).
2. Right-click the associated System number and select Refresh System. This establishes a new
connection to the specified System and populates the list with devices on that system. The
communication method is highlighted in green on the bottom of the NetLinx Studio window.
3. After the Communication Verification dialog window indicates active communication between the
PC and the Master, verify the target MAX unit appears within the OnLine Tree tab of the
Workspace window (FIG. 38).
Communicating MAX unit
(showing current installed firmware version)
FIG. 38 Studio Online Tree tab showing the communicating MAX unit
4. If the MAX unit is not using the latest firmware version, follow the procedures outlined in the
following sections to obtain the Kit file from www.amx.com and then transfer it to the target MAX
device.
Upgrading MAX Firmware
MAX can be uploaded either directly from either the MAX itself (via the UI Administrator page) or via
NetLinx Studio (which has established a connection between the current Master and the target MAX).
Upgrading MAX-CSE Firmware - via the UI
1.
Establish an active connection to the target MAX unit and log into the unit. Although its the first
page displayed in the Active frame after a successful login, the Administration page can also be
accessed by clicking on the Admin button in the Navigation Bar.
2. Navigate down the page to the Upload Firmware section and verify you have downloaded the latest
MAX firmware file by first logging into ww.amx.com > Tec h C en t e r > Firmware Files and from
within the MAX section of the web page locate the Encoder entry.
3. Click on the desired Kit file link and after you’ve accepted the Licensing Agreement, verify you
have downloaded the firmware (Kit) file to a known location.
4. Press the Browse button to launch the Choose File dialog and navigate through the directory
structure on your source computer to locate the new firmware.
5. Highlight the new firmware by selecting it and press Open to return to the Upload Firmware section
of the Administration page. The directory path and filename are now entered into the corresponding
field.
60
MAX-CSE/MAX-CSD10 Operation/Reference Guide
Page 67

Configuration and Firmware Update
6. Press the Submit button to begin the process of uploading and incorporating the new firmware
component to the target MAX unit.
7. Once the browser’s progress bar indicates it’s completed the upload and incorporation of the new
firmware, click the IP Settings button in the Navigation Bar.
8. From the top of the IP Settings page, click the Reboot button to restart the unit and incorporate the
new firmware.
9. After the unit completes its reboot process, connect back to MAX unit via the browser-based UI and
confirm the new firmware has been successfully installed.
Upgrading MAX-CSD10 Firmware - via the UI
Download the latest MAX Decoder firmware file from ww.amx.com > Tech C ent e r > Firmware
1.
Files.
2. From the Decoder Manager UI, click on the Admin link to open the Administration page if it is not
already open.
3. Click the Upload a File button to select the firmware file.
For the specific procedures for uploading a firmware file for the MAX-CSD10, refer to
the Updating Firmware section on page 42.
Upgrading the MAX’s Firmware - via NetLinx Studio
Follow the procedures outlined within the Communicating with the Target Master via an IP section
1.
on page 52 to connect to the target NI device via the web.
2. Navigate to the NetLinx Settings page of the UI and complete the steps necessary to "point" the
MAX unit to a particular target Master. Refer to the Associating the MAX unit to a Target
Master section on page 54 for the detailed procedures.
3. After Studio has established a connection to the target Master, click the OnLine Tree tab of the
Workspace window to view the devices on the System. The default System value is one (1).
4. Right-click the associated System number and select Refresh System. This establishes a new
connection to the specified System and populates the list with devices on that system. The
communication method is highlighted in green on the bottom of the NetLinx Studio window.
5. After the Communication Verification dialog window verifies active communication between the
PC and the target Master, verify the MAX unit appears in the OnLine Tree tab (FIG. 38) of the
Workspace window.
6. Verify you have downloaded the latest MAX firmware file by first logging into ww.amx.com >
Tech Center > Firmware Files. From within the MAX section of the web page, locate the Encoder
entry.
7. Click on the desired Kit file link and after you’ve accepted the Licensing Agreement, verify you
have downloaded the MAX firmware Kit file to a known location.
8. From within Studio, select Tools > Firmware Transfers > Send to NetLinx Device from the Main
menu to open the Send to NetLinx Device dialog (FIG. 39). Verify the target’s System number
matches the value listed within the active System folder in the OnLine Tree tab of the Workspace.
9. Select the particular MAX unit’s kit file from the Files section (FIG. 39).
10. Enter the System and Device numbers associated with the target MAX unit (listed in the Workspace
window). The Port field is greyed-out.
MAX-CSE/MAX-CSD10 Operation/Reference Guide
61
Page 68

Configuration and Firmware Update
Selected MAX firmware file
FIG. 39 Send to NetLinx Device dialog (showing MAX unit’s firmware updated via IP)
Description field for selected Kit file
Firmware download
status
Device and System Number
must match the Device and System
values listed in the Workspace window
11. Click the Reboot Device checkbox to reboot the MAX unit after the firmware update process is
complete.
12. Click Send to begin the transfer. The file transfer progress is indicated on the bottom-right of the
dialog (FIG. 39).
Download of the last Kit file component can take a few minutes to complete. DO NOT
terminate this upload process until all components have completely been installed
and the device reboots. During this process, the LCD will show FW LOADING.
13. Click Close once the download process is complete.
14. Right-click the System number and select Refresh System. This establishes a new connection to the
System and populates the list with the current devices (and their firmware versions) on your system.
If the connection fails to establish, a Connection Failed dialog appears.
Try selecting a different IP Address if communication fails.
Press the Retry button to reconnect using the same communication parameters.
Press the Change button to alter your communication parameters and repeat
steps 2 thru 12.
62
MAX-CSE/MAX-CSD10 Operation/Reference Guide
Page 69

Displaying Stream Content
Overview
The MAX-CSE Media Encoder can currently stream A/V signals and direct them to IP-enabled devices
capable of interpreting and displaying the incoming MPEG data using either RTP or UDP Transport
Protocols. These outgoing signals can be displayed by:
A VG-Series Modero Touch Panel (supporting MPEG-2/MPEG-4 streams)
A computer running third-party multi-media player capable of supporting UDP/RTP
streaming protocols.
At this time, we are recommending using the open-source VLC Media Player® (version
0.8 or higher).
Requirements for Receiving Streamed Content
To receive and display content via a Modero panel:
Verify you have installed the latest version of TPDesign4 version 2.6 or higher on your PC.
Updates are available from the www.amx.com > Tech Center > Application Files > Touch
Panel Design Tools section of the website. This application is needed to create the necessary
page (popup page) used to display the incoming MPEG audio/video stream, identify the IP of
the source MAX-CSE, and define the target audio/video ports on the panel.
Verify you have installed the latest firmware on your target Modero panel. Updates are
available from the www.amx.com > Te ch C e nte r > Firmware Files > Modero Panels
section of the website. Modero VG-Series firmware version 2.55.12 or earlier only supports
MPEG-2 streaming media (using UDP).
MPEG-4 is only supported by the latest VG-Series Modero panel firmware.
Displaying Stream Content
If using RTP (as both the Target Port and the Target Audio Port for the split stream) it
is strongly recommended that this port number be an even value.
Using odd numbered port values will cause the stream to not be properly recognized
by the target Modero panel.
It is necessary to understand that Modero firmware is configured to look for audio on a port
whose value is two greater than that set for the video port. When configuring the Target Video
and Target Audio ports within the MAX-CSE’s UI Stream Profiles page, the value entered
into the Targ e t Aud i o field must be exactly 2 above the value entered into the Targ et Po rt
(video) field.
If you enter a Targ e t Po r t value of 5000, when using RTP, you must enter a value
of 5002 into the Target Audio Port field.
If using UDP, only the Targe t Po r t (video) field is user-definable because both the video
and audio are sent out by the CSE as one stream and therefore there is no reason to define
a separate audio port. Entering a value of 5000 into this field will, by default, cause the
target Modero panel to look for the incoming audio portion of the stream on the same
port as the video (port 5000).
Obtain the IP Address being used by the target Modero panel by locating the IP Address field
on the firmware’s System Settings page.
Determine what is the available data rate for the network on which the encoder currently
resides. This information will determine what encoder profile can be used on the outgoing
MAX-CSE/MAX-CSD10 Operation/Reference Guide
63
Page 70

Displaying Stream Content
To receive and display content via a third-party media player (such as the VLC media player):
Setting up a Modero Panel to Receive and Display a Stream
The MAX-CSE must first be prepared to stream to the target Modero panel prior to creating the
necessary TPDesign4 panel pages (later be uploaded to the panel).
media content. If the network can only handle a throughput of 4 Mbps from the encoder, it is
recommended that you use something less than or equal to the High Quality encoder profile.
Verify you are using the latest VLC Player application available at:
http://www.videolan.org/vlc/.
UDP transmission of a stream only requires one instance of the VLC Player to display the
combined A/V content.
Note that if you are going to try to stream both audio and video to a target computer as
separate streams, you will need to open two separate instances of this same application.
One window will display the video portion of the stream (provided by the Targ e t Por t
field on the Streaming Profiles page), whereas the second window provides the audio
portion of the stream (provided by the Target Audio Port field on the Streaming Profiles
page).
Obtain the IP Address of the target computer by using the ipconfig command. This process is
described in greater detail later in this section.
Obtaining the IP Address of the target panel
1.
Press the grey Front Setup Access button for 3 seconds to open the Setup page (FIG. 40).
Connection Status
Red Connection Status icon -
indicates no connection to a Master
Green Connection Status icon -
indicates communication to a Master
FIG. 40 Setup page
2. Press the Protected Setup button (located on the lower-left of the panel page) to open the Protected
Setup page and display an on-screen keypad.
3. Enter 1988 into the Keypad’s password field and press Done when finished.
4. Press the System Settings button (located on the Protected Setup page) to open the System Settings
page and obtain the IP information from the IP Address field (FIG. 41).
64
MAX-CSE/MAX-CSD10 Operation/Reference Guide
Page 71

Displaying Stream Content
Modero
IP Address
information
FIG. 41 System Settings page
Configuring the MAX-CSE for communication
1.
Complete the procedures outlined within the Configuring the MAX Communication
Parame ters section on page 50 to establish an active connection to the source MAX-CSE.
2. Confirm the MAX-CSE is properly configured to use the newly established Static IP Address by
launching your browser and entering the MAX’s new Static IP Address into the browser’s Address
field.
3. Press the Enter key on your keyboard to initiate the communication process and launch the initial
on-screen Enter Network Password security dialog.
4. Enter the words administrator and password (if using the default login profile) into the
corresponding User Name/Password fields. This is the factory default security login information.
5. Click OK to enter the information and proceed to the Administration page which provides both a
descriptive overview of the program stream and lists the currently used firmware.
6. Determine the data throughput available on the network being used by the source encoder. This
information determines which Encoder Profile and Transport Protocol will be used to encode the
outgoing media stream.
7. Access Stream Profiles page (FIG. 42) by clicking the Stream Profiles button in the Navigation
Bar. This page allows a user to both configure the properties of the outgoing media stream and setup
the properties associated with communicating the stream to an external IP-enabled device capable
of receiving and processing the data.
MAX-CSE/MAX-CSD10 Operation/Reference Guide
65
Page 72

Displaying Stream Content
FIG. 42 Stream Profiles page
8. From the Profile field, click on the drop-down arrow and from the available list, choose the desired
encoder setting which conforms to the available data throughput on your network. Although the
default selection is Home Theater (Max), the user can choose from up to 6 pre-created entries and
one Custom entry which makes every field user-definable.
For the purpose of these procedures, we’ve been informed that our network can handle the full
6 Mbps data throughput, so we’ll select Home Theater (Max).
9. Click the Apply button to save the encoding profiles to the MAX.
10. From the Stream section of the page, locate the Transport Protocol field and use the drop-down
arrow to select a desired protocol. For the purposes of these procedures, select UDP as the protocol.
An UDP protocol is typically used with higher-bandwidth streams and only requires the entry
of a single Target Port because both the video and audio are combined into a single media
stream. With this method, the Modero panel always utilizes an audio port value of two greater
than that used by the Target Port.
An RTP protocol is typically used both with lower-bandwidth streams and when user wants to
purposely separate the video and audio information into two distinct streams. With this
method, the Target Audio Port must be manually entered and cannot be the same value as the
Target Port used for video.
11. Enter the previously obtained IP Address of the target Modero panel (FIG. 41) into the Ta rg et
Address field.
66
MAX-CSE/MAX-CSD10 Operation/Reference Guide
Page 73

Displaying Stream Content
12. Enter a numeric value into the Ta rg et Po rt field. This field corresponds to the port on the destination
device to which the outgoing video (audio/video) stream is being directed.
It is recommended that this value not currently be used by another port on the target device.
It is recommended that the following ports also not be used: 21, 22, 23, 80, 443, and 1319.
For the purposes of these procedures, we’ve chosen to use 5000 as the video Target Port.
13. If using RTP as a Transport Protocol, enter a value into the Target Audio Port field. This field
corresponds to the port on the destination device where the audio only portion of the stream is being
directed to. This value cannot match the value entered into the Targ e t Po r t field above. If using
UDP as a Transport Protocol, this field becomes greyed-out and unused since the both the audio and
video content is being combined into a single stream.
For the purposes of these procedures, we are not required to enter a Target Audio Port value
because the A/V content is not begin streamed separately.
14. Click the Apply button to save the encoding profiles to the MAX-CSE.
If using RTP, both the Target Port and Target Audio Port must be different and
should use even numbers.
Configuring the MAX-CSE audio/video inputs
1.
Complete the MAX-CSE connection and wiring procedures outlined within the Wiring the MAXCSE connectors and cables section on page 12.
2. Access the A/V Setup page (FIG. 43) by clicking the Audio/Video button in the Navigation Bar.
This page provides the user with the ability to select the source of the incoming video signal (from
either the rear Composite or S-Video port), the format of the incoming video (NTSC/PAL), and the
gain given to the incoming audio signal.
FIG. 43 A/V Setup page
3. From within the Video section of this page, check off the appropriate Video In and Video Port radio
boxes which correspond to both the type of video signal being used and its associated format.
For the purpose of these procedures, we’ve chosen to feed an NTSC signal into the rear
Composite video connector. As a result, a user should "check-off"/select both the Composite
and NTSC radio boxes.
MAX-CSE/MAX-CSD10 Operation/Reference Guide
67
Page 74

Displaying Stream Content
4. If you are feeding a microphone audio signal into the rear MAX-CSE microphone connector, you
At any time, the user can choose to mute the incoming microphone signal by either
toggling the state of the Microphone icon located at the top of the page or entering a
value of zero into the Mic Gain field.
5. Click the Apply button to save the encoding profiles to the MAX-CSE.
Setting up a streaming page within TPDesign4
1.
2. From the menu bar, select File > New (or click the New Project toolbar button).
3. From within the Step 1 dialog, enter a generic Job name and use the Panel Type drop-down arrow to
4. Fill in the fields within the remaining New Project Wizard dialogs and click Next at the end of each
5. Click the Finish button in the last dialog to close the wizard and proceed to the first generic page
6. Add a new page to the project by selecting Page > Add Page (or click the toolbar icon) which opens
7. Press the Button Draw Tool (CTRL+U) to draw a square button.
8. Press the Selection Tool (CTRL+L) to grab the new button and stretch it to fill a desired area of the
9. With the button currently selected and active, navigate to the left section of the Workspace and find
10. Click the States tab of the Button Properties Control window to show a list of all states associated
11. Double-click the All States + symbol to expand this folder (FIG. 45) and locate the Video Fill field.
12. Use the Video Fill drop-down arrow to select the Streaming Video option (A in FIG. 45).
13. Within the newly added Streaming Source field, enter the Transport Protocol, IP Address of the
could use the Microphone Gain field to enter an audio level (0 - 99) associated with the gain used by
the rear microphone input.
Launch TPDesign4 (default location is Start > Programs > AMX Control Disc > TPDesign4 >
TPDesign4). Refer to the TPDesign4 Instruction Manual for more detailed instructions of these
procedures.
choose a VG-Series panel (1200VG, 1500VG, or 1700GVG).
For the purpose of these procedures, we’ve chosen to use a Job Name of Tes t and selected an
NXD-1700VG touch panel.
dialog to proceed final dialog.
which is ready for you to start adding pages, popup pages, and buttons.
the Add Page dialog, where you can then enter a descriptive name for the new page in the Name
field such as Full Screen Video (UDP).
Note that although a page cannot directly be setup to display a video stream, a user can create
a full-screen button on that same page which can be configured to fill its contents with a video
stream.
page. For our procedures, we stretched the new button to fill the entire available are of the newly
created page (FIG. 44).
the Button Properties Control window (FIG. 44).
with the selected button. Each state represented in the States tab is a collapsed folder containing the
state properties for that particular state (On/Off/All).
MAX-CSE, and Target Video Port (B in FIG. 45).
When using a UDP Transport Protocol, enter the following into the Streaming Source field:
udp://IP Address of MAX-CSE:Target Video Port set on the UI page.
68
MAX-CSE/MAX-CSD10 Operation/Reference Guide
Page 75

FIG. 44 Button Properties tab
Displaying Stream Content
Button Draw and Selection
tools
Currently active button
Button Properties Control window
(displays information for the
currently active/selected button)
A B
FIG. 45 Video Fill - Button Properties setting
Our example uses: udp://192.199.99.99:5000
Refer to Configuring the MAX-CSE for communication section on page 65. The MAX-CSE is
available from either the front LCD (FIG. 46) or from the IP Settings page of the UI.
FIG. 46 Example of the current display
When using an RTP Transport Protocol, determine whether you are using an MPEG-2 or
MPEG-4 stream and enter the following into the Streaming Source field:
rtpmpeg#://IP Address of MAX-CSE:Target Video Port
Although our example doesn’t use RTP, you could enter the following:
for MPEG-2 rtpmpeg2://192.199.99.99:5000
for MPEG-4 rtpmpeg4://192.199.99.99:5000
MAX-CSE/MAX-CSD10 Operation/Reference Guide
69
Page 76

Displaying Stream Content
Modero doesn’t require that an audio port be entered within the Streaming Source
field because the firmware already assumes the audio port value to be 2 greater than
the value set for the video port.
14. Create buttons on both this project’s main page and within this Video page which can allow the user
15. Save these pages, and after establishing a connection, upload this project to the target Modero panel.
Establishing the final connection between the two units
1.
2. While in the UI pages (log back in if not already connected), navigate to the Administration page by
3. Locate the Mode section of this page and click the Play button to begin streaming the incoming
4. With the panel now loaded with the new TPD4 project containing the streaming media
to navigate between both pages.
Start playing the media at its source (DVD, VCR, camera, etc.).
clicking on the Admin link from the left Navigation frame.
media content to the targeted Modero panel. For these procedures, the Program information is
optional and not "picked-up" by the panel.
page/popup/button, navigate from the initially displayed (main) page to the page containing the
Streaming Video Fill button which we created in the previous step. It should now be displaying the
audio and video from the incoming stream.
If the audio level is not sufficient, you can either go back and create a volume control button or
go to the Modero’s Audio firmware page and adjust the value assigned to the Master Volume
for the panel.
If no video is being displayed on the page:
Navigate to the firmware pages by pressing the grey Front Setup Access button for
3 seconds to open the Setup page and then press the on-screen Video Adjustment
button, causing an option bar to slide outwards from the Navigation buttons.
Click on the Streaming Adjustment button to launch the Streaming Video Adjustment
page and confirm that the panel is at least receiving the signal (FIG. 47).
70
Incoming Video signal
Once done making your screen
adjustments, SAVE THE SETTINGS.
FIG. 47 Video Adjustment page (showing default values)
MAX-CSE/MAX-CSD10 Operation/Reference Guide
Page 77

Displaying Stream Content
If there is no signal displayed, return to the MAX-CSE UI pages and from the Encoder
Profiles page, confirm that the correct panel IP Address and target port where entered
into the Streaming Source field within the TPDesign4 project.
If this still doesn’t produce a displayed signal, cycle the Play/Stop buttons and verify that
both the encoding Status says Streaming (verifying that the process of encoding is
underway) and that the unit is detecting an incoming signal (shown by the word SYNC
appearing in the Video Sync section of the UI).
The most common error can result from a bad cable not being detected and therefore no
signal becomes available for the unit to encode. The encoding process can continue on a
MAX-CSE even without an actual signal being detected.
Setting up a Computer to Receive and Display a Stream
The MAX-CSE must first be configured to target a specific computer and a specific set of ports on that
target machine so that the third-party player has content to receive and display on-screen.
Obtaining the IP Address of the target computer
1.
On your PC, click Start > Run to open the Run dialog.
2. Enter cmd into the Open field and click OK to open the command DOS prompt.
3. From the C:\> command line, enter ipconfig to display the current IP Address of the PC. The
information displayed includes the DNS Suffix, IP Address, Subnet Mask, and Default gateway.
Configure the MAX-CSE for communication to a computer
1.
Complete the first 10 steps described in the previous Configuring the MAX-CSE for
communication section on page 65.
2. From the Stream section of the page, locate the Transport Protocol field and use the drop-down
arrow to select a desired protocol. For the purposes of these procedures, select UDP as the protocol.
An UDP protocol is typically used with higher-bandwidth streams and only requires the entry
of a single Target Port because both the video and audio are combined into a single media
stream. With this method, the user will only need to launch one instance of the third-party
player because BOTH signals are fed into the application as part of the same stream.
An RTP protocol is typically used both with lower-bandwidth streams and when user wants to
purposely separate the video and audio information into two distinct streams. With this
method, the user will only need to launch two instances of the third-party player because
EACH signal is fed to the target computer as its own separate stream. Once instance will
display the video whereas the second instance will provide the corresponding audio.
3. Enter the previously obtained IP Address of the target computer into the Target Address field.
4. Enter a numeric value into the Targ e t Po r t field. This field corresponds to the port on the destination
device where the outgoing video (audio/video) stream is being directed to. It is recommended that
the value being entered is not currently in use by another port on the target device.
It is recommended that the following ports not be used: 21, 22, 23, 80, 443, and 1319.
For the purposes of these procedures, we’ve chosen to use 5000 as the video Target Port.
5. If using RTP as a Transport Protocol, enter a value into the Target Audio Port field. This field
corresponds to the port on the destination device where the audio only portion of the stream is being
directed to. This value can not match the value entered into the Targ e t Po r t field above. If using
UDP as a Transport Protocol, this field becomes greyed-out and unused since the both the audio and
video content is being combined into a single stream.
MAX-CSE/MAX-CSD10 Operation/Reference Guide
71
Page 78

Displaying Stream Content
6. Click the Apply button to save the encoding profiles to the MAX-CSE.
If using RTP, both the Target Port and Target Audio Port must be different.
7. Complete the media configuration procedures outlined within the previous Configuring the MAX-
Establishing the final connection between the CSE and computer
1.
2. While in the UI pages (log back in if not already connected), navigate to the Administration page by
3. Locate the Mode section of this page and click the Play button to begin streaming the incoming
4. Double-click on the desktop icon to launch the pre-installed VLC player (A in FIG. 48).
For the purposes of these procedures, we are not required to enter a Target Audio Port value
because the A/V content is not begin streamed separately.
CSE audio/video inputs section on page 67.
Start playing the media at its source (DVD, VCR, camera, etc.).
clicking on the Admin link from the left Navigation frame.
media content to the targeted Modero panel. For these procedures, the Program information is
optional and not "picked-up" by the application.
A
B
FIG. 48 VLC Player Adjustments (using a sample UDP stream to display both A/V in one window)
5. Click File > Open Network Stream to launch the Open dialog where you can configure the
properties of the incoming media stream (B in FIG. 48).
6. Click on the Network tab and select the UDP/RTP radio box from the left side of this dialog.
7. Use the Port field to enter the value used with in the Ta rg e t Po r t field in the MAX’s Encoder Profiles
page.
8. Click the OK button to accept the parameters and maximize the window to begin displaying the
incoming stream. There might be a delay of a few seconds while the unit attempts to synchronize
itself with the incoming stream.
If there is no video being displayed within the player, confirm that the information which was
previously entered into the Stream section of the MAX’s Encoder Profiles page matches the
parameters for both the target computer and target port.
If this still doesn’t produce a displayed signal, cycle the Play/Stop buttons and verify that both
the encoding Status says Streaming (verifying that the process of encoding is underway) and
72
MAX-CSE/MAX-CSD10 Operation/Reference Guide
Page 79

Displaying Stream Content
that the unit is detecting an incoming signal (shown by the word SYNC appearing in the
Video Sync section of the UI).
The most common error found is when a bad cable is not detected and therefore no signal is
available for the unit to encode. The encoding process can continue on a MAX-CSE even
without an actual signal being detected.
9. To complete the setup when using an RTP Transport Protocol on the MAX-CSE, repeat steps 5 and
6 to open another instance of the same application.
10. Within the Port field of the Network tab (in the second player window - B in FIG. 49), enter the
value used with in the Target Audio Port field in the MAX’s Encoder Profiles page. This value can
not match the value used for the previously entered Target Port.
RTP Video Stream Component RTP Audio Stream Component
A
FIG. 49 VLC Player Adjustments (using a sample RTP stream to display each component separately)
B
MAX-CSE/MAX-CSD10 Operation/Reference Guide
73
Page 80

Displaying Stream Content
74
MAX-CSE/MAX-CSD10 Operation/Reference Guide
Page 81

NetLinx Programming
You can program the MAX unit by using the commands in this section to perform a wide variety of
operations using Send_Commands and variable text commands. A device must first be defined in the
NetLinx programming language with values for the Device: Port: System.
In these programming examples, <DEV> = Device. The term <D:P:S> = Device:Port:System.
Device:Port:System (D:P:S)
NetLinx requires a Device:Port:System (D:P:S) specification. This D:P:S triplet can be expressed as a
series of constants, variables separated by colons, or a DEV structure.
For example:
STRUCTURE DEV
{
INTEGER Number // Device number
INTEGER Port // Port on device
INTEGER System // System the device belongs to
}
The D:P:S notation is used to explicitly represent a device number, port and system. For example,
128:1:0 represents the first port on device 128 on this system. If the system and Port specifications are
omitted, (e.g. 128), system 0 (indicating this system) and port 1 (the first port) is assumed. Here's the
syntax:
NUMBER:PORT:SYSTEM
where:
NetLinx Programming
NUMBER: 16-bit integer represents the device number
PORT: 16-bit integer represents the port number (in the range 1 through the number of
ports on the device)
SYSTEM: 16-bit integer represents the system number (0 = this system)
Port Assignments
The following table outlines the Ports used by the MAX-CSE and MAX-CSD10 by referencing their
Port # assignments:
MAX-CSE Port Assignments
Port/Description ICSP Port #
Video Encoder 1
RS-232/422/485 Serial Port 2
IR/Serial Port 3
I/O Port 4
IR RX Port 5
LCD Display 6
ALL Commands used on the MAX-CSE are case sensitive and must be entered as
shown within this section.
MAX-CSE/MAX-CSD10 Operation/Reference Guide
75
Page 82

NetLinx Programming
MAX-CSE: Streaming Commands (Port 1)
For programming purposes, do not use a hyphen when specifying MPEG
functionality. Use MPEG2 and MPEG4 (no dash), do not use MPEG-2 or MPEG-4.
In order for the SET commands (Set Video, Set URL, etc.) to take effect, any active
stream MUST FIRST BE HALTED using the STOP command. Once these
commands are executed, you can then the PLAY command to restart the stream.
The only exception to this procedure is the SET AUDIO, which while during a stream
can on the fly be toggled between Microphone and Line.
The streaming system on the MAX-CSE is located at Port 1 in NetLinx D:P:S nomenclature. The
MAX-CSE supports the following streaming commands.
MAX-CSE Streaming Send_Commands
Command Description
GET ASOURCE
Get a description of the
current incoming audio
source.
GET AUDIO
Get a description of the
current audio system
configuration.
Syntax:
SEND_COMMAND <DEV>,"'GET ASOURCE'"
Variable:
format = LINE (from the rear Stereo RCA connectors) or
MIC (from the rear Microphone port).
Example:
SEND_COMMAND ENCODER,"'GET ASOURCE'"
System response:
ASOURCE = LINE
Indicates that the MAX-CSE is using/expecting to encode incoming audio from
the rear Line-In Stereo RCA connectors.
Requests the configuration of the current audio system. The returned
information includes: codec, sampling rate, and bit rate.
Syntax:
SEND_COMMAND <DEV>,"'GET AUDIO'"
Variables:
codec = Off, MP2, or MP3.
sampling rate = 32 KHz, 44.1 KHz, and 48 KHz. Rate given in KHz
(KiloHertz).
bit rate = 96 Kbps and 192 Kbps. Effective bit rate in Kbps (kilobits
per second).
Example:
SEND_COMMAND ENCODER,"'GET AUDIO'"
System response:
AUDIO = MP2 48 10
Indicates that the audio system is configured to use an MP2 audio stream, with
a sampling rate of 48 KHz, and a bit rate of 10 Kbps.
76
MAX-CSE/MAX-CSD10 Operation/Reference Guide
Page 83

MAX-CSE Streaming Send_Commands (Cont.)
Command Description
GET FORMAT
Get a description of the
format used by the current
incoming video signal.
GET GAIN
Get a description of the
current gain used by the
microphone input.
GET SAP
Gets the mode of SAP
Server/Listener
GET SAP IP MODE
Get the current SAP
Server/Listener IP address
mode.
GET SAP IP ALT
Gets the SAP Server/Listener
IP Alternative multicast
address.
Syntax:
SEND_COMMAND <DEV>,"'GET FORMAT'"
Variable:
format = NTSC or PAL.
Example:
SEND_COMMAND ENCODER,"'GET FORMAT'"
System response:
FORMAT = NTSC
Indicates that the MAX-CSE is using/expecting an incoming NTSC video
format.
Syntax:
SEND_COMMAND <DEV>,"'GET GAIN'"
Variable:
gain = 0 - 99.
Example:
SEND_COMMAND ENCODER,"'GET GAIN'"
System response:
GAIN = 50
Indicates that the current gain on the microphone input is approximately 50%
of its’ maximum value.
Syntax:
SEND_COMMAND <DEV>,'GET SAP'
Example:
SEND_COMMAND ENCODER, 'GET SAP'
System response:
SAP=ENABLED or SAP=DISABLED
Syntax:
SEND_COMMAND <DEV>, 'GET SAP IP MODE'
Example:
SEND_COMMAND ENCODER, 'GET SAP IP MODE'
System response:
SAP IP MODE=ALT
Syntax:
SEND_COMMAND <DEV>, 'GET SAP IP ALT'
Example:
SEND_COMMAND ENCODER, 'GET SAP IP ALT'
System response:
SAP IP ALT=224.3.127.254:1234
NetLinx Programming
MAX-CSE/MAX-CSD10 Operation/Reference Guide
77
Page 84

NetLinx Programming
MAX-CSE Streaming Send_Commands (Cont.)
Command Description
GET SESSION INFO
Retrieves the selected session details.
GET SESSION LIST
Updates the session list and
return the number of sessions
available.
GET STREAM STATUS
Returns the stream status.
Session information is extracted from the SAP Listener or RTSP depending on
system configuration.
Syntax:
SEND_COMMAND <DEV>, 'GET SESSION INFO <num> <Field>'
Variables:
Num = 1 to N where N is the number of current sessions.
Field = TITLE - returns the title of the media
Field = DESC - short description of media
Field = IPADDR - ip address of streaming source
Field = URI - URL to media web pages
Field = CONTACT - Name of responsible party
Field = EMAIL - Email address of owner of stream
Field = PHONE - Phone number of contact
Field = MEDIACNT - Number of streams
Field = MEDIA1 - 1st stream info line
Field = MEDIA2 - 2nd stream info line
Field = MEDIA3 - 3rd stream info line
Field = MEDIA4 - 4th stream info line
Field = MEDIAN - Nth stream info line where N is the number of streams
returned in the MEDIACNT Field.
Example:
SEND_COMMAND ENCODER, 'GET SESSION INFO 1 NAME'
SEND_COMMAND ENCODER, 'GET SESSION INFO 2 NAME'
SEND_COMMAND ENCODER, 'GET SESSION INFO 2 MEDIA1'
SEND_COMMAND ENCODER, 'GET SESSION INFO 2 MEDIA2'
System response:
SESSION INFO 1 NAME=TERMINATOR
SESSION INFO 2 NAME=BAMBI
SESSION INFO 2 MEDIA1=MPEG4-VIDEO
SESSION INFO 2 MEDIA2=AAC-AUDIO
The session list can be populated by SAP or RTSP. If the system is configured
for SAP then the number sessions available will range from 0 to N. If the system is configured for RTSP then the number of sessions available will range
from 0 to 1.
Syntax:
SEND_COMMAND <DEV>, 'GET SESSION LIST'
Example:
SEND_COMMAND ENCODER, 'GET SESSION LIST'
System response:
SESSION LIST=16
The system will either return 'IDLE' or 'STREAMING'
Syntax:
SEND_COMMAND <DEV>, 'GET STREAM STATUS'
Example:
SEND_COMMAND ENCODER, 'GET STREAM STATUS'
System response:
STREAM STATUS=STREAMING
78
MAX-CSE/MAX-CSD10 Operation/Reference Guide
Page 85

MAX-CSE Streaming Send_Commands (Cont.)
Command Description
GET URL
Get a description of the
URL parameters being used
by the current audio/video
stream.
GET VIDEO
Get a description of the
current video codec
configuration.
GET VIDEO PORT STATUS
Returns the Video In Port Status.
Requests the current configuration of the URL communication parameters. The
returned information includes: communication protocol, IP Address, and port
used.
Syntax:
SEND_COMMAND <DEV>,"'GET URL'"
Variables:
protocol = RTP or UDP.
address = Address of stream in IPv4 dot notation (ex: X.X.X.X).
port = Primary port for audio/video transport.
audio port = Port for audio stream (RTP only).
Example:
SEND_COMMAND ENCODER,"'GET URL'"
System response for UDP:
URL = UDP 239.168.42.10 5000
Indicates that the UDP audio/video stream has previously been configured to
use a multicast session (UDP) at an IP Address of 239.168.42.10 where it uses
port 5000.
System response for RTP:
URL = RTP 239.168.42.10 5000 5002
Indicates that the individual RTP audio/video streams has previously been
configured to use an IP Address of 224.168.42.10 where it uses port 5000 for
the video stream and port 5002 for the audio stream.
Requests the current configuration of the video system. The returned
information includes: codec, resolution, bit rate, and mode.
Syntax:
SEND_COMMAND <DEV>,"'GET VIDEO'"
Variables:
codec = Off, MPEG2, or MPEG4.
resolution = D1, or SIF, or <width>X<height> (up to a D1 resolution).
bit rate = Returned in Kbps (kilobits per second).
mode = CBR (constant Bit rate) or VBR (variable Bit rate).
Example:
SEND_COMMAND ENCODER,"'GET VIDEO'"
System response:
VIDEO = MPEG2 D1 4000 CBR
Indicates that the video codec is configured to use an MPEG-2 stream, with a
D1 resolution at 4000 Kbps using a constant bit rate (CBR).
The system will either return 'SYNC' or 'LOS'.
Syntax:
SEND_COMMAND <DEV>, 'GET VIDEO PORT STATUS'
Example:
SEND_COMMAND ENCODER, 'GET VIDEO PORT STATUS'
System response:
VIDEO PORT STATUS=SYNC
NetLinx Programming
MAX-CSE/MAX-CSD10 Operation/Reference Guide
79
Page 86

NetLinx Programming
MAX-CSE Streaming Send_Commands (Cont.)
Command Description
GET VSOURCE
Get a description of the
source type used by the
current video stream.
PLAY
Start the transmission of the
audio and/or video stream.
SET ASOURCE
Set the input source for the
encoded audio stream.
SET AUDIO
Set the configuration
parameters for the audio
system.
Requests the a description of the current video source type. This video type
indicates which rear connector is being used as the video input.
Syntax:
SEND_COMMAND <DEV>,"'GET VSOURCE'"
Variable:
source = SVID (S-Video) or COMP (Composite).
Example:
SEND_COMMAND ENCODER,"'GET VSOURCE'"
System response:
VSOURCE = COMP
Indicates that the MAX unit is being supplied with a Composite video type.
Starts the streaming of either the audio and/or video based on current
configuration. A stream can also be started via the browser-based UI pages.
Syntax:
SEND_COMMAND <DEV>,"'PLAY'"
Example:
SEND_COMMAND ENCODER,"'PLAY'"
Assigns the source for the audio signals being fed into the MAX unit and then
encoded.
Syntax:
SEND_COMMAND <DEV>,"'SET ASOURCE'"
Variable:
format = LINE (from the rear Stereo RCA connectors) or
MIC (from the rear Microphone port).
Example:
SEND_COMMAND ENCODER,"'SET ASOURCE MIC'"
Instructs the MAX-CSE to use the rear Microphone port as the audio source for
the encoded audio stream.
The configuration parameters include: codec, sampling rate, and bit rate.
Note: Setting the audio configuration during the 'play' state has undefined
results.
Syntax:
SEND_COMMAND <DEV>,"'SET AUDIO <codec> <sampling>
<rate>'"
Variables:
codec = Off, MP2, or MP3.
sampling rate = 32 KHz, 44.1 KHz, and 48 KHz. Sampling rate given in
KHz (KiloHertz).
Note: A sampling rate of 44.1 KHz MUST be entered as 44, using
44.1 will not work properly.
bit rate = 96 Kbps and 192 Kbps. Effective bit rate in Kbps (kilobits per
second).
Example:
SEND_COMMAND ENCODER,"'SET AUDIO MP2 48 10'"
Sets the audio configuration to use an MP2 audio codec sampling at 48KHz,
while transmitting at 10 Kbps.
80
MAX-CSE/MAX-CSD10 Operation/Reference Guide
Page 87

MAX-CSE Streaming Send_Commands (Cont.)
Command Description
SET FORMAT
Set the video format of the
incoming video signal.
SET GAIN
Set a gain value for the
incoming microphone input.
SET SAP
Set the mode of SAP Server/
Listener.
SET SAP IP MODE
Sets the SAP
Server/Listener IP address
mode.
SET SAP IP ALT
Set the SAP Server/Listener
IP Alternative multicast
address.
Syntax:
SEND_COMMAND <DEV>,"'SET FORMAT'"
Variable:
format = NTSC or PAL.
Example:
SEND_COMMAND ENCODER,"'SET FORMAT PAL'"
Instructs the MAX-CSE to use PAL video format for the incoming video signal.
Syntax:
SEND_COMMAND <DEV>,"'SET GAIN'"
Variable:
gain = 0 - 99.
Example:
SEND_COMMAND ENCODER,"'SET GAIN 0'"
Sets the gain level to 0, which mutes the microphone. This corresponds to the
value seen within the MIC GAIN field on the A/V Setup UI page.
• 'ENABLE' starts the SAP Server/Listener services.
• 'DISABLE' stops the SAP Server/Listener services.
Syntax:
SEND_COMMAND <DEV>,'SET SAP <Mode>'
Variable:
Mode = ENABLE or DISABLE
Example:
SEND_COMMAND ENCODER, 'SET SAP ENABLE'
• 'DEFAULT' mode tells SAP Server/Listener to use the well known multicast
address:port of 224.2.127.254:9875.
• 'ALT' modes tells the SAP Server/Listener to use the alternative multicast
address:port. The alternative multi-cast address:port is configured by
another NetLinx command (see SET SAP IP ALT below).
Syntax:
SEND_COMMAND <DEV>, 'SET SAP IP MODE <Mode>'
Variable:
Mode=DEFAULT or ALT
Example:
SEND_COMMAND ENCODER, 'SET SAP IP MODE ALT'
Syntax:
SEND_COMMAND <DEV>, 'SET SAP IP ALT <Addr>:<Port>'
Variable:
Addr = multicast IP address
Port = port number
Example:
SEND_COMMAND ENCODER, 'SET SAP IP ALT 224.3.127.254:1234'
NetLinx Programming
MAX-CSE/MAX-CSD10 Operation/Reference Guide
81
Page 88

NetLinx Programming
MAX-CSE Streaming Send_Commands (Cont.)
Command Description
SET URL
Set the URL parameters for
the current audio/video
stream.
SET VIDEO
Set the configuration
parameters for the video
codec.
The communication parameters must include: communication protocol,
IP Address, and port used.
Syntax:
SEND_COMMAND <DEV>,"'SET URL <protocol> <addr> <port>
[<audio port>]'"
Variables:
protocol = RTP or UDP.
address = Address of stream in IPv4 dot notation (ex: X.X.X.X).
port = Primary port for audio/video transport.
audio port = Port for audio stream (RTP only).
Example:
SEND_COMMAND ENCODER,"'SET URL UDP 239.168.42.10 5000'"
Sets the URL to a multicast session (UDP) where it will use port 5000 at an
IP Address of 239.168.42.10. Since the protocol is UDP, a second audio port is
not needed.
Example 2:
SEND_COMMAND ENCODER,"'SET URL RTP 239.168.42.10 5000
5002'"
Sets the URL to an IP Address of 239.168.42.10. Since the protocol is RTP,
two ports are needed; port 5000 is used for the video stream and port 5002 is
used for the audio stream.
The configuration parameters include: codec, resolution, and bit rate.
Note: Setting the video configuration during 'play' state has undefined results.
Syntax:
SEND_COMMAND <DEV>,"'SET VIDEO <codec> <res> <rate>
<mode>'"
Variables:
codec = Off, MPEG2, or MPEG4.
res = D1, or SIF, or <width>X<height> (up to a D1 resolution).
rate = Bit rate specified in Kbps (kilobits per second).
- range of 2000 - 6000 used for an MPEG2 stream
- range of 500 - 3000 used for an MPEG4 stream
mode = CBR (constant Bit rate) or VBR (variable Bit rate).
Example:
SEND_COMMAND ENCODER,"'SET VIDEO MPEG2 D1 6000 CBR'"
Sets the video configuration to use a very high quality video stream set at
MPEG2, with a D1 resolution at constant bit rate of 6000 Kbps.
82
MAX-CSE/MAX-CSD10 Operation/Reference Guide
Page 89

MAX-CSE Streaming Send_Commands (Cont.)
Command Description
SET VSOURCE
Set the source type needed
for the video stream.
STOP
Stop transmission of both the
audio and video stream.
Sets the current video source type for the outgoing (encoded) video stream.
Changing this source type redirects the video detection on the MAX unit’s rear
video ports.
Note: If both signal types are detected, the unit defaults to using the
Composite signal type unless otherwise specified via this command.
Syntax:
SEND_COMMAND <DEV>,"'SET VSOURCE <source>'"
Variable:
source = SVID (S-Video) or COMP (Composite).
Example:
SEND_COMMAND ENCODER,"'SET VSOURCE SVID'"
Switches the encoded video stream to take video from the S-Video port.
A stream can also be halted via the browser-based UI pages.
Syntax:
SEND_COMMAND <DEV>,"'STOP'"
Example:
SEND_COMMAND ENCODER,"'STOP'"
NetLinx Programming
MAX-CSD: Streaming Commands (Port 1)
For programming purposes, do not use a hyphen when specifying MPEG
functionality. Use MPEG2 and MPEG4 (no dash), do not use MPEG-2 or MPEG-4.
In order for the SET commands (Set Video, Set URL, etc.) to take effect, any active
stream must first be halted using the STOP command. Once these commands are
executed, you can then the PLAY command to restart the stream.
The only exception to this procedure is the SET AUDIO, which while during a stream
can on the fly be toggled between Microphone and Line.
The streaming system on the MAX-CSE is located at Port 1 in NetLinx D:P:S nomenclature. The
MAX-CSE supports the following streaming commands.
MAX-CSD Streaming Send_Commands
Command Description
GET AUDIO
Get a description of the
current audio system
configuration.
Requests the configuration of the current audio system. The returned
information includes: codec, sampling rate, and bit rate.
Syntax:
SEND_COMMAND <DEV>,'GET AUDIO'
Example:
SEND_COMMAND DECODER,'GET AUDIO'
System response:
AUDIO = MP2 48 10
MAX-CSE/MAX-CSD10 Operation/Reference Guide
83
Page 90

NetLinx Programming
MAX-CSD Streaming Send_Commands (Cont.)
Command Description
GET CONTROL MODE
Gets the control mode of the
stream.
GET FORMAT
Get a description of the
format used by the current
incoming video signal.
GET RTSP SERVER
Gets an RTSP SERVER
entry from the list of 10.
GET SAP IP MODE
Get the current SAP Listener
ip address mode.
GET SAP IP ALT
Gets the SAP Listener IP
Alternative multicast address.
GET SESSION CURSOR
Queries the current session
that is selected for streaming.
Syntax:
SEND_COMMAND <DEV>,'GET CONTROL MODE'
Variable:
Mode = MANUAL or SAP or RTSP
Example:
SEND_COMMAND DECODER, 'GET CONTROL MODE'
System response:
CONTROL MODE=SAP
Gets the current video format.
Syntax:
SEND_COMMAND <DEV>,'GET FORMAT'
Example:
SEND_COMMAND DECODER,'GET FORMAT'
System response:
FORMAT = NTSC
Syntax:
SEND_COMMAND <DEV>, 'GET RTSP SERVER <num>'
Variables:
num = 1 to 10 entries that the user may use.
Example:
SEND_COMMAND DECODER, 'GET RTSP SERVER 1'
System response:
RTSP LIST= rtsp://www.foo.com/myvideo.sdp 10.0.0.101 1234
Syntax:
SEND_COMMAND <DEV>, 'GET SAP IP MODE'
Example:
SEND_COMMAND DECODER, 'GET SAP IP MODE'
System response:
SAP IP MODE=ALT
Syntax:
SEND_COMMAND <DEV>, 'GET SAP IP ALT'
Example:
SEND_COMMAND DECODER, 'GET SAP IP ALT'
System response:
SAP IP ALT=224.3.127.254:1234
This command allows the user to query the current session that is selected for
streaming.
This value will not be valid until GET SESSION LIST command is issued. It is
possible for the value of the SESSION CURSOR to be set or invalidated by a
web interface selection. It will considered invalidated if it returns 0.
Syntax:
SEND_COMMAND <DEV>, 'GET SESSION CURSOR'
Example:
SEND_COMMAND DECODER, 'GET SESSION CURSOR'
System response:
SESSION CURSOR=2
84
MAX-CSE/MAX-CSD10 Operation/Reference Guide
Page 91

MAX-CSD Streaming Send_Commands (Cont.)
Command Description
GET SESSION INFO
This command will retrieve
the selected session details.
GET SESSION LIST
Updates the session list and
return the number of sessions
available.
GET STREAM STATUS
Returns the stream status.
Session information is extracted from the SAP Listener or RTSP depending on
system configuration.
Syntax:
SEND_COMMAND <DEV>, 'GET SESSION INFO <num> <Field>'
Variables:
Num = 1 to N where N is the number of current sessions.
Field = TITLE - returns the title of the media
Field = DESC - short description of media
Field = IPADDR - ip address of streaming source
Field = URI - URL to media web pages
Field = CONTACT - Name of responsible party
Field = EMAIL - Email address of owner of stream
Field = PHONE - Phone number of contact
Field = MEDIACNT - Number of streams
Field = MEDIA1 - 1st stream info line
Field = MEDIA2 - 2nd stream info line
Field = MEDIA3 - 3rd stream info line
Field = MEDIA4 = 4th stream info line
Field = MEDIAN = Nth stream info line where N is the number of streams
returned in the MEDIACNT Field.
Example:
SEND_COMMAND DECODER, 'GET SESSION INFO 1 TITLE'
SEND_COMMAND DECODER, 'GET SESSION INFO 2 TITLE'
SEND_COMMAND DECODER, 'GET SESSION INFO 2 MEDIA1'
SEND_COMMAND DECODER, 'GET SESSION INFO 2 MEDIA2'
System response:
SESSION INFO 1 TITLE=TERMINATOR
SESSION INFO 2 TITLE=BAMBI
SESSION INFO 2 MEDIA1=MPEG4-VIDEO
SESSION INFO 2 MEDIA2=AAC-AUDIO
The session list can be populated by SAP or RTSP. If the system is configured
for SAP then the number sessions available will range from 0 to N. If the system is configured for RTSP then the number of sessions available will range
from 0 to 1.
Syntax:
SEND_COMMAND <DEV>, 'GET SESSION LIST'
Example:
SEND_COMMAND DECODER, 'GET SESSION LIST'
System response:
SESSION LIST=16
The system will either return 'IDLE' or 'STREAMING'
Syntax:
SEND_COMMAND <DEV>, 'GET STREAM STATUS'
Example:
SEND_COMMAND DECODER, 'GET STREAM STATUS'
System response:
STREAM STATUS=STREAMING
NetLinx Programming
MAX-CSE/MAX-CSD10 Operation/Reference Guide
85
Page 92

NetLinx Programming
MAX-CSD Streaming Send_Commands (Cont.)
Command Description
GET URL
Get a description of the
URL parameters being used
by the current audio/video
stream.
GET VIDEO
Get a description of the
current video codec
configuration.
PLAY
Starts reception of audio and/
or video.
SET AUDIO
Set the configuration
parameters for the audio
system.
Requests the current configuration of the URL communication parameters. The
returned information includes: communication protocol, IP Address, and port
used.
Syntax:
SEND_COMMAND <DEV>,'GET URL'
Example:
SEND_COMMAND DECODER,'GET URL'
System response:
URL = UDP 224.0.0.1 5000
URL = RTP 224.0.0.1 5000 5002
Requests the current configuration of the video system. The returned
information includes: codec, resolution, bit rate, and mode.
Syntax:
SEND_COMMAND <DEV>,"'GET VIDEO'"
Variables:
codec = Off, MPEG2, or MPEG4.
resolution = D1, or SIF, or <width>X<height> (up to a D1 resolution).
bit rate = Returned in Kbps (kilobits per second).
mode = CBR (constant Bit rate) or VBR (variable Bit rate).
Example:
SEND_COMMAND DECODER,"'GET VIDEO'"
System response:
VIDEO = MPEG-2 D1 4000
VIDEO = NONE
Indicates that the video codec is configured to use an MPEG-2 stream, with a
D1 resolution at 4000 Kbps.
Starts receiving of audio and/or video based on current configuration.
If system is in manual mode then this command will use parameters that are
set manually.
If system is in SAP mode or RTSP mode then this command will use parameters referenced by the session cursor.
Syntax:
SEND_COMMAND <DEV>,'PLAY'
Example:
SEND_COMMAND DECODER, 'PLAY'
The configuration parameters include: codec, sampling rate, and bit rate.
Note: Setting the audio configuration during the 'play' state has undefined
results.
Syntax:
SEND_COMMAND <DEV>,'SET AUDIO <Codec>'
Variable:
Codec =MP3 or AAC
Example:
SEND_COMMAND DECODER,'SET AUDIO MP3'
Sets the audio configuration to MP3. The MP3 decoder also will decode MP2.
86
MAX-CSE/MAX-CSD10 Operation/Reference Guide
Page 93

MAX-CSD Streaming Send_Commands (Cont.)
Command Description
SET CONTROL MODE
Set the control mode of the
stream.
SET FORMAT
Set the video format of the
incoming video stream.
SET RTSP SERVER
Sets an RTSP Server entry
into a list.
SET SAP IP MODE
Sets the SAP Listener ip
address mode.
'MANUAL' mode lets the user to specify all parameters such as video decoder,
audio decoder, transport type, and video and audio ports.
'SAP' mode allows the user to select a stream based on a SAP list. Streaming
will begin when the user chooses the stream from the SAP list and then send
the PLAY command
'RTSP' mode allows the user to specify the URL to a RTSP server. Streaming
will begin when the user enters the URL and then sends the PLAY command.
Syntax:
SEND_COMMAND <DEV>,'SET CONTROL MODE <Mode>'
Variable:
Mode = MANUAL or SAP or RTSP
Example:
SEND_COMMAND DECODER, 'SET CONTROL MODE SAP'
Syntax:
SEND_COMMAND <DEV>,'SET FORMAT <Format>'
Variable:
Format = NTSC or PAL
Example:
SEND_COMMAND DECODER,'SET FORMAT PAL'
Tells the decoder to expect PAL video format.
The list is limited to a total of 10 entries.
Syntax:
SEND_COMMAND <DEV>, 'SET RTSP SERVER <num> <url> <ipaddr>
<port>'
Variables:
num = 1 to 10 entries that the user may use
url = universal resource locator specifying the RTSP Server
ipaddr = ip address of RTSP Server. This value will be used if DNS is not
available. Otherwise DNS will be used with www.foo.com as the example
specifies.
port = ip port of the RTSP server. Set to 0 to contact RTSP server with the
'default' port (RTSP default port is 554).
Example:
SEND_COMMAND DECODER, 'SET RTSP SERVER 1 rtsp://
www.foo.com/myvideo.sdp 10.0.0.101 0'
'DEFAULT' mode tells SAP Listener to use the well known multicast
address:port of 224.2.127.254:9875
'ALT' modes tells the SAP Listener to use the alternative multicast
address:port. The alternative multicast address:port is configured via another
NetLinx command (see SET SAP IP ALT below).
Syntax:
SEND_COMMAND <DEV>, 'SET SAP IP MODE <Mode>'
Variable:
Mode=DEFAULT or ALT
Example:
SEND_COMMAND DECODER, 'SET SAP IP MODE ALT'
NetLinx Programming
MAX-CSE/MAX-CSD10 Operation/Reference Guide
87
Page 94

NetLinx Programming
MAX-CSD Streaming Send_Commands (Cont.)
Command Description
SET SAP IP ALT
Set the SAP Listener IP Alternative multicast address.
SET SESSION CURSOR
Selects the session for
streaming later.
SET URL
Set the URL description of
the audio/video stream.
SET VIDEO
Set the configuration
parameters for the video
codec.
Syntax:
SEND_COMMAND <DEV>, 'SET SAP IP ALT <Addr>:<Port>'
Variable:
Addr = multicast IP address
Port = port number
Example:
SEND_COMMAND DECODER, 'SET SAP IP ALT 224.3.127.254:1234'
This command allows the user to select the session for later streaming when
the user sends the play command.
Syntax:
SEND_COMMAND <DEV>, 'SET SESSION CURSOR <num>'
Variable:
Num = 1 to "SESSION LIST="
Example:
SEND_COMMAND DECODER, 'SET SESSON CURSOR 1'
The 'UDP' protocol represents MPEG-2 Transport Stream layered directly onto
UDP. This protocol is only available for MPEG-2. Audio is multiplexed with the
video, so no audio port is needed.
The 'RTP' protocol represents MPEG-2/4 Elementary Streams encoded as
MPV (33) data as defined by RFC 3550 and 3551. If no audio port is given, it is
assumed to be the video port plus 2.
Syntax:
SEND_COMMAND <DEV>,'SET URL <Protocol> <Addr> <Port>
[<Audio Port>]'
Variables:
Protocol = RTP or UDP
Address = Address of stream in IPv4 dot notation
Port = Primary port for audio/video transport.
Audio Port = Port for audio stream (RTP only)
Example:
SEND_COMMAND DECODER,'SET URL UDP 224.0.0.1 5000'
Sets the URL for a multicast session at 24.0.0.1 and port 5000. Since the
protocol is UDP, a second audio port is not needed.
Sets the current configuration of the video system. Configuration includes
codec and resolution. Setting the video configuration during 'play' state has
undefined results.
Syntax:
SEND_COMMAND <DEV>,'SET VIDEO <Codec>'
Variable:
Codec = OFF or MPEG2 or MPEG4
Example:
SEND_COMMAND DECODER,'SET VIDEO MPEG2 '
88
MAX-CSE/MAX-CSD10 Operation/Reference Guide
Page 95

NetLinx Programming
MAX-CSD Streaming Send_Commands (Cont.)
Command Description
START RTSP SERVER
Attempts to START the RTSP
SERVER and will retrieve
and update the session list
info.
STOP
Stops transmission of audio
and video.
If the RTSP SERVER started properly the 'GET SESSION LIST' table will
return with a 1. Otherwise it will return 0. This command is not accessible if
system mode is not set to RTSP
Syntax:
SEND_COMMAND <DEV>, 'START RTSP SERVER <num>'
Variables:
num = 1 to 10: One of the ten RTSP SERVER Entries.
Example:
SEND_COMMAND <DEV>, 'START RTSP SERVER 2'
Stops reception of audio and video.
Syntax:
SEND_COMMAND <DEV>,'STOP'
Example:
SEND_COMMAND DECODER, 'STOP'
RS-232/422/485 Send_Commands (Port 2)
The serial port is located at Port 2 in NetLinx D:P:S nomenclature. The serial port supports the
following commands and escape sequences. In these examples: <DEV> = device.
RS-232/422/485 Send_Commands
Command Description
B9MOFF
Set the port's communication
parameters for stop and data
bits according to the software
settings on the RS-232 port
(default).
B9MON
Override and set the current
communication settings and
parameters on the RS-232
port to 9 data bits with one
stop bit.
CHARD
Set the delay time between
all transmitted characters to
the value specified (in 100
Microsecond increments).
Disables 9-bit in 232/422/455 mode. By default, this returns the communication
settings on the serial/data port to the last programmed parameters. This
command works in conjunction with the 'B9MON' command.
Syntax:
SEND_COMMAND <DEV>,"'B9MOFF'"
Example:
SEND_COMMAND RS232_1,"'B9MOFF'"
Sets the RS-232 port settings to match the port's configuration settings.
Enables 9-bit in 232/422/455 mode. This command works in conjunction with
the 'B9MOFF' command.
Syntax:
SEND_COMMAND <DEV>,"'B9MON'"
Example:
SEND_COMMAND RS232_1,"'B9MON'"
Resets the RS-232 port's communication parameters to nine data bits, one
stop bit, and locks-in the baud rate.
Syntax:
SEND_COMMAND <DEV>,"'CHARD-<time>'"
Var iable :
time = 0 - 255. Measured in 100 microsecond increments.
Example:
SEND_COMMAND RS232_1,"'CHARD-10'"
Sets a 1-millisecond delay between all transmitted characters.
MAX-CSE/MAX-CSD10 Operation/Reference Guide
89
Page 96

NetLinx Programming
RS-232/422/485 Send_Commands (Cont.)
Command Description
CHARDM
Set the delay time between
all transmitted characters to
the value specified
(in 1 Millisecond increments).
CTSPSH
Enable Pushes, Releases,
and Status information to be
reported via channel 255
using the CTS hardware
handshake input.
CTSPSH OFF
Disable Pushes, Releases,
and Status information to be
reported via channel 255.
GET BAUD
Get the RS-232/422/485
port’s current communication
parameters.
HSOFF
Disable hardware
handshaking (default).
HSON
Enable RTS (ready-to-send)
and CTS (clear-to-send)
hardware handshaking.
RXCLR
Clear all characters in the
receive buffer waiting to be
sent to the Master.
Syntax:
SEND_COMMAND <DEV>,"'CHARDM-<time>'"
Var iable :
time = 0 - 255. Measured in 1 millisecond increments.
Example:
SEND_COMMAND RS232_1,"'CHARDM-10'"
Sets a 10-millisecond delay between all transmitted characters.
This command turns On (enables) channel tracking of the handshaking pins. If
Clear To Send (CTS) is set high, then channel 255 is On.
Syntax:
SEND_COMMAND <DEV>,"'CTSPSH'"
Example:
SEND_COMMAND RS232_1,"'CTSPSH'"
Sets the RS232_1 port to detect changes on the CTS input.
This command disables tracking. Turns CTSPSH Off.
Syntax:
SEND_COMMAND <DEV>,"'CTSPSH OFF'"
Example:
SEND_COMMAND RS232_1,"'CTSPSH OFF'"
Turns off CTSPSH for the specified device.
The port sends the parameters to the device that requested the information.
The port responds with:
<port #>,<baud>,<parity>,<data>,<stop> 485 <ENABLED | DISABLED>
Syntax:
SEND_COMMAND <DEV>,"'GET BAUD'"
Example:
SEND_COMMAND RS232_1,"'GET BAUD'"
System response example:
Device 1,38400,N,8,1 485 DISABLED
Syntax:
SEND_COMMAND <DEV>,"'HSOFF'"
Example:
SEND_COMMAND RS232_1,"'HSOFF'"
Disables hardware handshaking on the RS232_1 device.
Syntax:
SEND_COMMAND <DEV>,"'HSON'"
Example:
SEND_COMMAND RS232_1,"'HSON'"
Enables hardware handshaking on the RS232_1 device.
Syntax:
SEND_COMMAND <DEV>,"'RXCLR'"
Example:
SEND_COMMAND RS232_1,"'RXCLR'"
Clears all characters in the RS232_1 device's receive buffer waiting to be sent
to the Master.
90
MAX-CSE/MAX-CSD10 Operation/Reference Guide
Page 97

RS-232/422/485 Send_Commands (Cont.)
Command Description
RXOFF
Disable the transmission of
incoming received
characters to the Master
(default).
RXON
Start transmitting received
characters to the
Master (default).
SET BAUD
Set the RS-232/422/485
port's communication
parameters.
TSET BAUD
Temporarily set the RS-232/
422/485 port's
communication parameters
for a device.
Syntax:
SEND_COMMAND <DEV>,"'RXOFF'"
Example:
SEND_COMMAND RS232_1,"'RXOFF'"
Stops the RS232_1 device from transmitting received characters to the Master.
Enables sending incoming received characters to the Master. This command is
automatically sent by the Master when a 'CREATE_BUFFER' program
instruction is executed.
Syntax:
SEND_COMMAND <DEV>,"'RXON'"
Example:
SEND_COMMAND RS232_1,"'RXON'"
Sets the RS232_1 device to transmit received characters to the Master.
Syntax:
SEND_COMMAND <DEV>,"'SET BAUD
<baud>,<parity>,<data>,<stop> [485 <Enable | Disable>]'"
Var iable s:
baud = baud rates are: 115200, 76800, 57600, 38400, 19200, 9600, 4800,
2400, 1200, 600, 300, 150.
parity = N (none), O (odd), E (even), M (mark), S (space).
data = 7 or 8 data bits.
stop = 1 and 2 stop bits.
485 Disable = Disables RS-485 mode and enables RS-422.
485 Enable = Enables RS-485 mode and disables RS-422.
Note: The only valid 9 bit combination is (baud),N,9,1.
Example:
SEND_COMMAND RS232_1,"'SET BAUD 115200,N,8,1 485 ENABLE'"
Sets the RS232_1 port's communication parameters to 115,200 baud, no
parity, 8 data bits, 1 stop bit, and enables RS-485 mode.
TSET BAUD works the same as SET BAUD, except that the changes are not
permanent, and the previous values will be restored if the power is cycled on
the device.
Syntax:
SEND_COMMAND <DEV>,"'TSET BAUD
<baud>,<parity>,<data>,<stop> [485 <Enable | Disable>]'"
Var iable s:
baud = baud rates are: 115200, 57600, 38400, 19200, 9600, 4800, 2400,
1200, 600, 300.
parity = N (none), O (odd), E (even), M (mark), S (space).
data = 7, 8, or 9 data bits.
stop = 1 or 2 stop bits.
485 Disable = Disables RS-485 mode and enables RS-422.
485 Enable = Enables RS-485 mode and disables RS-422.
Note: The only valid 9 bit combination is (baud),N,9,1.
Example:
SEND_COMMAND RS232_1,"'TSET BAUD 115200,N,8,1 485
ENABLE'"
Sets the RS232_1 port's communication parameters to 115,200 baud, no
parity, 8 data bits, 1 stop bit, and enables RS-485 mode.
NetLinx Programming
MAX-CSE/MAX-CSD10 Operation/Reference Guide
91
Page 98

NetLinx Programming
RS-232/422/485 Send_Commands (Cont.)
Command Description
TXCLR
Stop and clear all characters
waiting in the transmit out
buffer and stops
transmission.
XOFF
Disable software
handshaking (default).
XON
Enable software
handshaking.
Syntax:
SEND_COMMAND <DEV>,"'TXCLR'"
Example:
SEND_COMMAND RS232_1,"'TXCLR'"
Clears and stops all characters waiting in the RS232_1 device's transmit buffer.
Syntax:
SEND_COMMAND <DEV>,"'XOFF'"
Example:
SEND_COMMAND RS232_1,"'XOFF'"
Disables software handshaking on the RS232_1 device.
Syntax:
SEND_COMMAND <DEV>,"'XON'"
Example:
SEND_COMMAND RS232_1,"'XON'"
Enables software handshaking on the RS232_1 device.
RS232/422/485 Ports Channels
RS232/422/485 ports are Port 2 on the MAX-CSE.
RS232/422/485 Ports Channels
255 - CTS push channel Reflects the state of the CTS input if a 'CTSPSH' command was sent to the
port.
92
MAX-CSE/MAX-CSD10 Operation/Reference Guide
Page 99

NetLinx Programming
RS-232/422/485 Send_String Escape Sequences (Port 2)
This device also has some special SEND_STRING escape sequences:
If any of the 3 character combinations below are found anywhere within a SEND_STRING program
instruction, they will be treated as a command and not the literal characters.
In these examples: <DEV> = device.
RS-232/422/485 Send_String Escape Sequences
Command Description
27,17,<time>
Send a break character for a
specified duration to a
specific device.
27,18,0
Clear the ninth data bit by
setting it to 0 on all character
transmissions.
27,18,1
Set the ninth data bit to 1 for
all subsequent characters to
be transmitted.
27,19,<time>
Insert a time delay before
transmitting the next
character.
27,20,0
Set the RTS hardware
handshake's output to high
(> 3V).
27,20,1
Set the RTS hardware
handshake's output to
low/inactive (< 3V).
Syntax:
SEND_STRING <DEV>,"27,17,<time>"
Variable:
time = 1 - 255. Measured in 100 microsecond increments.
Example:
SEND_STRING RS232_1,"27,17,10"
Sends a break character of 1 millisecond to the RS232_1 device.
Used in conjunction with the 'B9MON' command.
Syntax:
SEND_STRING <DEV>,"27,18,0"
Example:
SEND_STRING RS232_1,"27,18,0"
Sets the RS232_1 device's ninth data bit to 0 on all character transmissions.
Used in conjunction with the 'B9MON' command.
Syntax:
SEND_STRING <DEV>,"27,18,1"
Example:
SEND_STRING RS232_1,"27,18,1"
Sets the RS232_1 device's ninth data bit to 1 on all character transmissions.
Syntax:
SEND_STRING <DEV>,"27,19,<time>"
Variable:
time = 1 - 255. Measured in 1 millisecond increments.
Example:
SEND_STRING RS232_1,"27,19,10"
Inserts a 10 millisecond delay before transmitting characters to the RS232_1
device.
Syntax:
SEND_STRING <DEV>,"27,20,0"
Example:
SEND_STRING RS232_1,"27,20,0"
Sets the RTS hardware handshake's output to high on the RS232_1 device.
Syntax:
SEND_STRING <DEV>,"27,20,1"
Example:
SEND_STRING RS232_1,"27,20,1"
Sets the RTS hardware handshake's output to low on the RS232_1 device.
MAX-CSE/MAX-CSD10 Operation/Reference Guide
93
Page 100

NetLinx Programming
IR / Serial Ports Channels
IR / Serial Ports Channels
00001 - 00229 IR commands.
00229 - 00253 May be used for system call feedback.
00254 Power Fail. (Used with the 'PON' and 'POF' commands).
00255 Power status. (Shadows I/O Link channel status).
IR/Serial Port (Port 3) Commands
The IR port is located at Port 3 in NetLinx D:P:S nomenclature. The following IR and IR/Serial
Send_Commands generate control signals for external equipment.
In these examples: <DEV> = device. The IR port shall support the following commands.
IR/Serial Send_Commands
Command Description
CAROFF
Disable the IR carrier signal
until a 'CARON' command is
received.
CARON
Enable the IR carrier signals
(default).
CH
Send IR pulses for the
selected channel.
Syntax:
SEND_COMMAND <DEV>,"'CAROFF'"
Example:
SEND_COMMAND IR_1,"'CAROFF'"
Stops transmitting IR carrier signals to the IR_1 port.
Syntax:
SEND_COMMAND <DEV>,"'CARON'"
Example:
SEND_COMMAND IR_1,"'CARON'"
Starts transmitting IR carrier signals to the IR_1 port.
All channels below 100 are transmitted as two digits. If the IR code for ENTER
(function #21) is loaded, an Enter will follow the number. If the channel is
greater than or equal to (>=) 100, then IR function 127 or 20 (whichever exists)
is generated for the one hundred digit. Uses 'CTON' and 'CTOF' times for pulse
times.
Syntax:
SEND_COMMAND <DEV>,"'CH',<channel number>"
Variable:
channel number = 0 - 199.
Example:
SEND_COMMAND IR_1,"'CH',18"
This device performs the following:
• Transmits IR signals for 1 (IR code 11). The transmit time is set with the
CTON command.
• Waits until the time set with the CTOF command elapses.
• Transmits IR signals for 8 (IR code 18).
• Waits for the time set with the CTOF command elapses.
• If the IR code for Enter (IR code 21) is programmed, the device performs
steps 5 and 6.
• Transmits IR signals for Enter (IR code 21).
• Waits for the time set with the CTOF command elapses.
94
MAX-CSE/MAX-CSD10 Operation/Reference Guide
 Loading...