

Page 1
FileTransfer2
instruction manual
Software
Page 2

Software License and Warranty Agreement
LICENSE GRANT.
AMX grants to Licensee the non-exclusive right to use the AMX Software in the manner described in this License. The AMX Software is
licensed, not sold. This license does not grant Licensee the right to create derivative works of the AMX Software. The AMX Software consists
of generally available programming and development software, product documentation, sample applications, tools and utilities, and
miscellaneous technical information. Please refer to the README.TXT file on the compact disc or download for further information regarding
the components of the AMX Software. The AMX Software is subject to restrictions on distribution described in this License Agreement.
LICENSEE MAY NOT SUBLICENSE, RENT, OR LEASE THE AMX SOFTWARE. Licensee may not reverse engineer, decompile, or
disassemble the AMX Software.
INTELLECTUAL PROPERTY.
The AMX Software is owned by AMX and is protected by United States copyright laws, patent laws, international treaty provisions, and/or state
of Texas trade secret laws. Licensee may make copies of the AMX Software solely for backup or archival purposes. Licensee may not copy the
written materials accompanying the AMX Software.
TERMINATION.
AMX RESERVES THE RIGHT, IN ITS SOLE DISCRETION, TO TERMINATE THIS LICENSE FOR ANY REASON AND UPON WRITTEN
NOTICE TO LICENSEE. In the event that AMX terminates this License, the Licensee shall return or destroy all originals and copies of the AMX
Software to AMX and certify in writing that all originals and copies have been returned or destroyed.
PRE-RELEASE CODE.
Portions of the AMX Software may, from time to time, as identified in the AMX Software, include PRE-RELEASE CODE and such
code may not be at the level of performance, compatibility and functionality of the final code. The PRE-RELEASE CODE may not
operate correctly and may be substantially modified prior to final release or certain features may not be generally released. AMX is
not obligated to make or support any PRE-RELEASE CODE. ALL PRE-RELEASE CODE IS PROVIDED "AS IS" WITH NO
WARRANTIES.
LIMITED WARRANTY.
AMX warrants that the AMX Software will perform substantially in accordance with the accompanying written materials for a period of ninety
(90) days from the date of receipt. AMX DISCLAIMS ALL OTHER WARRANTIES, EITHER EXPRESS OR IMPLIED, INCLUDING, BUT NOT
LIMITED TO IMPLIED WARRANTIES OF MERCHANTABILITY AND FITNESS FOR A PARTICULAR PURPOSE, WITH REGARD TO THE
AMX SOFTWARE. THIS LIMITED WARRANTY GIVES LICENSEE SPECIFIC LEGAL RIGHTS. Any supplements or updates to the AMX
SOFTWARE, including without limitation, any (if any) service packs or hot fixes provided to Licensee after the expiration of the ninety (90) day
Limited Warranty period are not covered by any warranty or condition, express, implied or statutory.
LICENSEE REMEDIES.
AMX's entire liability and Licensee's exclusive remedy shall be repair or replacement of the AMX Software that does not meet AMX's Limited
Warranty and which is returned to AMX. This Limited Warranty is void if failure of the AMX Software has resulted from accident, abuse, or
misapplication. Any replacement AMX Software will be warranted for the remainder of the original warranty period or thirty (30) days,
whichever is longer. Outside the United States, these remedies may not available.
NO LIABILITY FOR CONSEQUENTIAL DAMAGES. IN NO EVENT SHALL AMX BE LIABLE FOR ANY DAMAGES WHATSOEVER
(INCLUDING, WITHOUT LIMITATION, DAMAGES FOR LOSS OF BUSINESS PROFITS, BUSINESS INTERRUPTION, LOSS OF BUSINESS
INFORMATION, OR ANY OTHER PECUNIARY LOSS) ARISING OUT OF THE USE OF OR INABILITY TO USE THIS AMX SOFTWARE,
EVEN IF AMX HAS BEEN ADVISED OF THE POSSIBILITY OF SUCH DAMAGES. BECAUSE SOME STATES/COUNTRIES DO NOT
ALLOW THE EXCLUSION OR LIMITATION OF LIABILITY FOR CONSEQUENTIAL OR INCIDENTAL DAMAGES, THE ABOVE LIMITATION
MAY NOT APPLY TO LICENSEE.
U.S. GOVERNMENT RESTRICTED RIGHTS.
The AMX Software is provided with RESTRICTED RIGHTS. Use, duplication, or disclosure by the Government is subject to
restrictions as set forth in subparagraph ©(1)(ii) of The Rights in Technical Data and Computer Software clause at DFARS 252.2277013 or subparagraphs ©(1) and (2) of the Commercial Computer Software Restricted Rights at 48 CFR 52.227-19, as applicable.
SOFTWARE AND OTHER MATERIALS FROM AMX.COM MAY BE SUBJECT TO EXPORT CONTROL.
The United States Export Control laws prohibit the export of certain technical data and software to certain territories. No software from this Site
may be downloaded or exported (i) into (or to a national or resident of) Cuba, Iraq, Libya, North Korea, Iran, Syria, or any other countr y to
which the United States has embargoed goods; or (ii) anyone on the United States Treasury Department's list of Specially Designated Nationals or the U.S. Commerce Department's Table of Deny Orders. AMX does not authorize the downloading or exporting of any software or technical data from this site to any jurisdiction prohibited by the United States Export Laws.
This Agreement replaces and supersedes all previous AMX Software License Agreements and is governed by the laws of the State of Texa s ,
and all disputes will be resolved in the courts in Collin County, Texas, USA. For any questions concerning this Agreement, or to contact AMX
for any reason, please write: AMX Corporation, 3000 Research Drive, Richardson, TX 75082.
Page 3

Table OF Contents
Table OF Contents
Welcome To FileTransfer2 .......................................................................................1
The FileTransfer2 User Interface ...................................................................................... 1
Send Tab.................................................................................................................................. 2
Receive Tab ............................................................................................................................. 3
File Transfer Context Menu...................................................................................................... 3
Transfer Command Buttons ..................................................................................................... 4
Edit Menu ................................................................................................................................. 4
Load Options............................................................................................................................ 5
Transfer Status Window ........................................................................................................... 6
Transfer Status Context Menu ................................................................................................. 6
Supported File Types ........................................................................................................ 7
Notes on supported file types:.................................................................................................. 7
Supported Operating Systems and Minimum PC Requirements ...................................... 7
Tested Modems List .......................................................................................................... 8
Using FileTransfer2 ................................................................................................11
Step 1: Adding Files To The Transfer Queue.................................................................. 11
Using the Quick Load Dialog.................................................................................................. 11
Workspace Files (*.APW)....................................................................................................... 12
Workspace-To-Go Files (*.AXW) ........................................................................................... 13
File Transfer List (*.FTL) Files................................................................................................ 14
NetLinx Master Security ......................................................................................................... 14
Adding Files To The Files To Send Queue ..................................................................... 15
Adding All Files Contained In an APW or AXW File............................................................... 15
Adding Files From a Specific Project/System ........................................................................ 16
Adding Individual System Files From the Open Workspace file ............................................ 16
Adding Orphan Files .............................................................................................................. 16
Adding Files To The Files To Receive Queue................................................................. 17
Step 2: Communication Settings ..................................................................................... 18
Listening for NetLinx Masters................................................................................................. 18
Virtual NetLinx Master ............................................................................................................ 18
Configuring Communications Settings ................................................................................... 19
Configuring TCP/IP Communication Settings (NetLinx only) ................................................. 19
Configuring Serial Communication Settings........................................................................... 20
Configuring Modem Communication Settings........................................................................ 20
Configuring Virtual NetLinx Master Communication Settings (NetLinx only) ......................... 21
Configuring the Touch Panel for Virtual NetLinx Master USB Transfers ............................... 21
ileTransfer2
i
Page 4

Table OF Contents
Configuring the Touch Panel for Virtual NetLinx Master TCP/IP Transfers ........................... 22
Step 3: Device Mapping .................................................................................................. 22
Editing Device Mapping Information ...................................................................................... 22
Device:Port:System (D:P:S)................................................................................................... 22
Step 4: Transferring The Files......................................................................................... 23
File Transfer Status Information ............................................................................................. 23
Transfer Errors and Definitions .............................................................................................. 24
Sending Files To System Devices ......................................................................................... 25
Receiving Files From System Devices................................................................................... 25
Virtual NetLinx Master (Masterless) Transfers................................................................ 25
AMX USB Driver Information for USB Enabled G4 Panels.................................................... 26
Virtual NetLinx Master Transfers via USB or TCP/IP Connection.......................................... 26
Virtual NetLinx Master TCP/IP Transfers ............................................................................... 27
Configuring the Touch Panel for Virtual NetLinx Master TCP/IP Transfers ........................... 27
Configuring FileTransfer2 for Virtual NetLinx Master TCP/IP Transfers ................................ 28
Transferring Files Using a Virtual NetLinx Master TCP/IP Connection.................................. 28
Virtual NetLinx Master USB Transfers ................................................................................... 29
Configuring the Touch Panel for Virtual NetLinx Master USB Transfers ............................... 29
Configuring FileTransfer2 for Virtual NetLinx Master USB Transfers .................................... 29
Transferring Files Using a Virtual NetLinx Master USB Connection ...................................... 30
Setting Program Preferences ................................................................................31
Overview ......................................................................................................................... 31
Preferences dialog .......................................................................................................... 31
File Transfer Options.............................................................................................................. 31
Workspace Options................................................................................................................ 31
General Options ..................................................................................................................... 31
NetLinx/Axcess Source Code Passwords.............................................................................. 32
Using the FTCon Console Program (Advanced Programmers Only) ................33
APW File Transfer Arguments ........................................................................................ 33
AXW File Transfer Arguments ........................................................................................ 34
FTL File Transfer Arguments .......................................................................................... 34
Single File Transfer Arguments....................................................................................... 34
ii
FileTransfer2
Page 5
Welcome To FileTransfer2
The FileTransfer2 application gives you the ability to queue a list of files to transfer to various
NetLinx and Axcess devices, without launching NetLinx Studio.
FileTransfer2 supports the following capabilities for file transfers:
Ability to select the Platform type (NetLinx or Axcess).
Ability to set the username and password for NetLinx masters that have security enabled.
Ability to send/receive via USB (for USB enabled) devices via a Virtual NetLinx Master
(VNM) connection.
Ability to send/receive files via TCP/IP and RS232 protocols.
FileTransfer2 recognizes the following file types for transfer:
APW (NetLinx Studio Workspace)
AXW (NetLinx Studio Export-to-Go)
FTL (File Transfer List)
Welcome To FileTransfer2
The FileTransfer2 User Interface
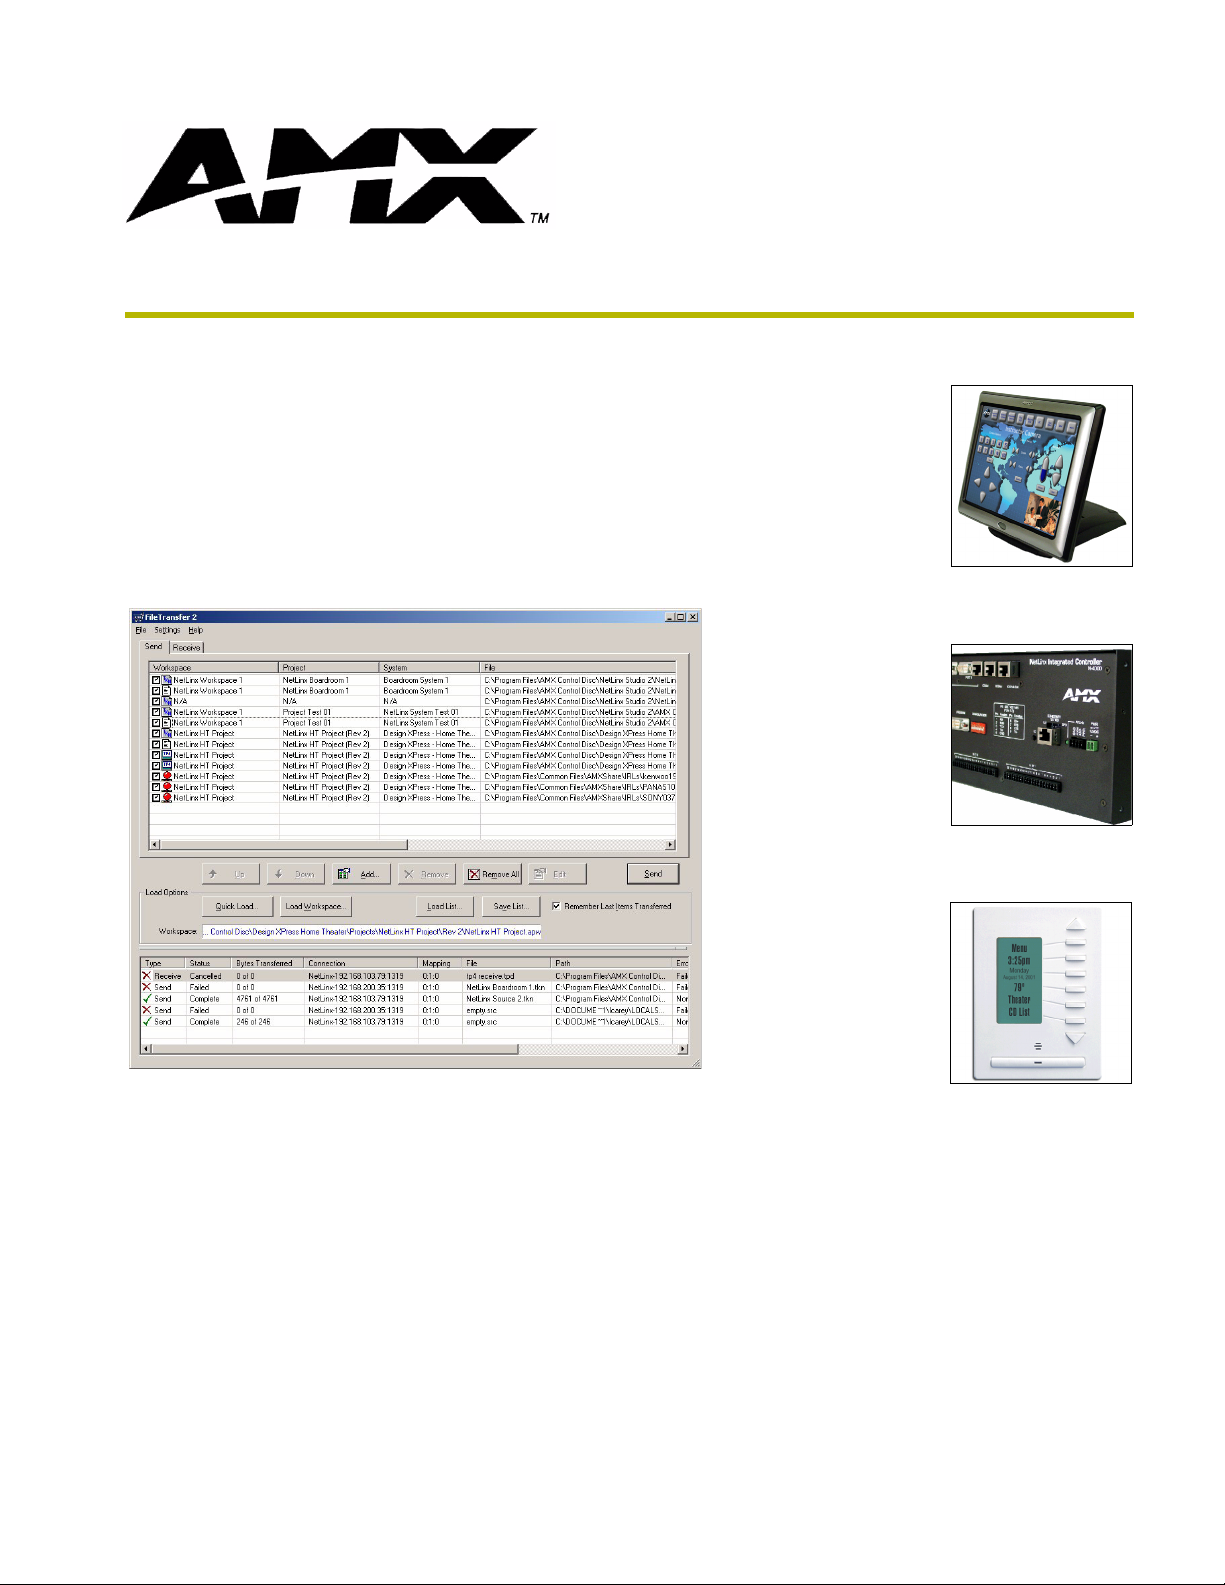
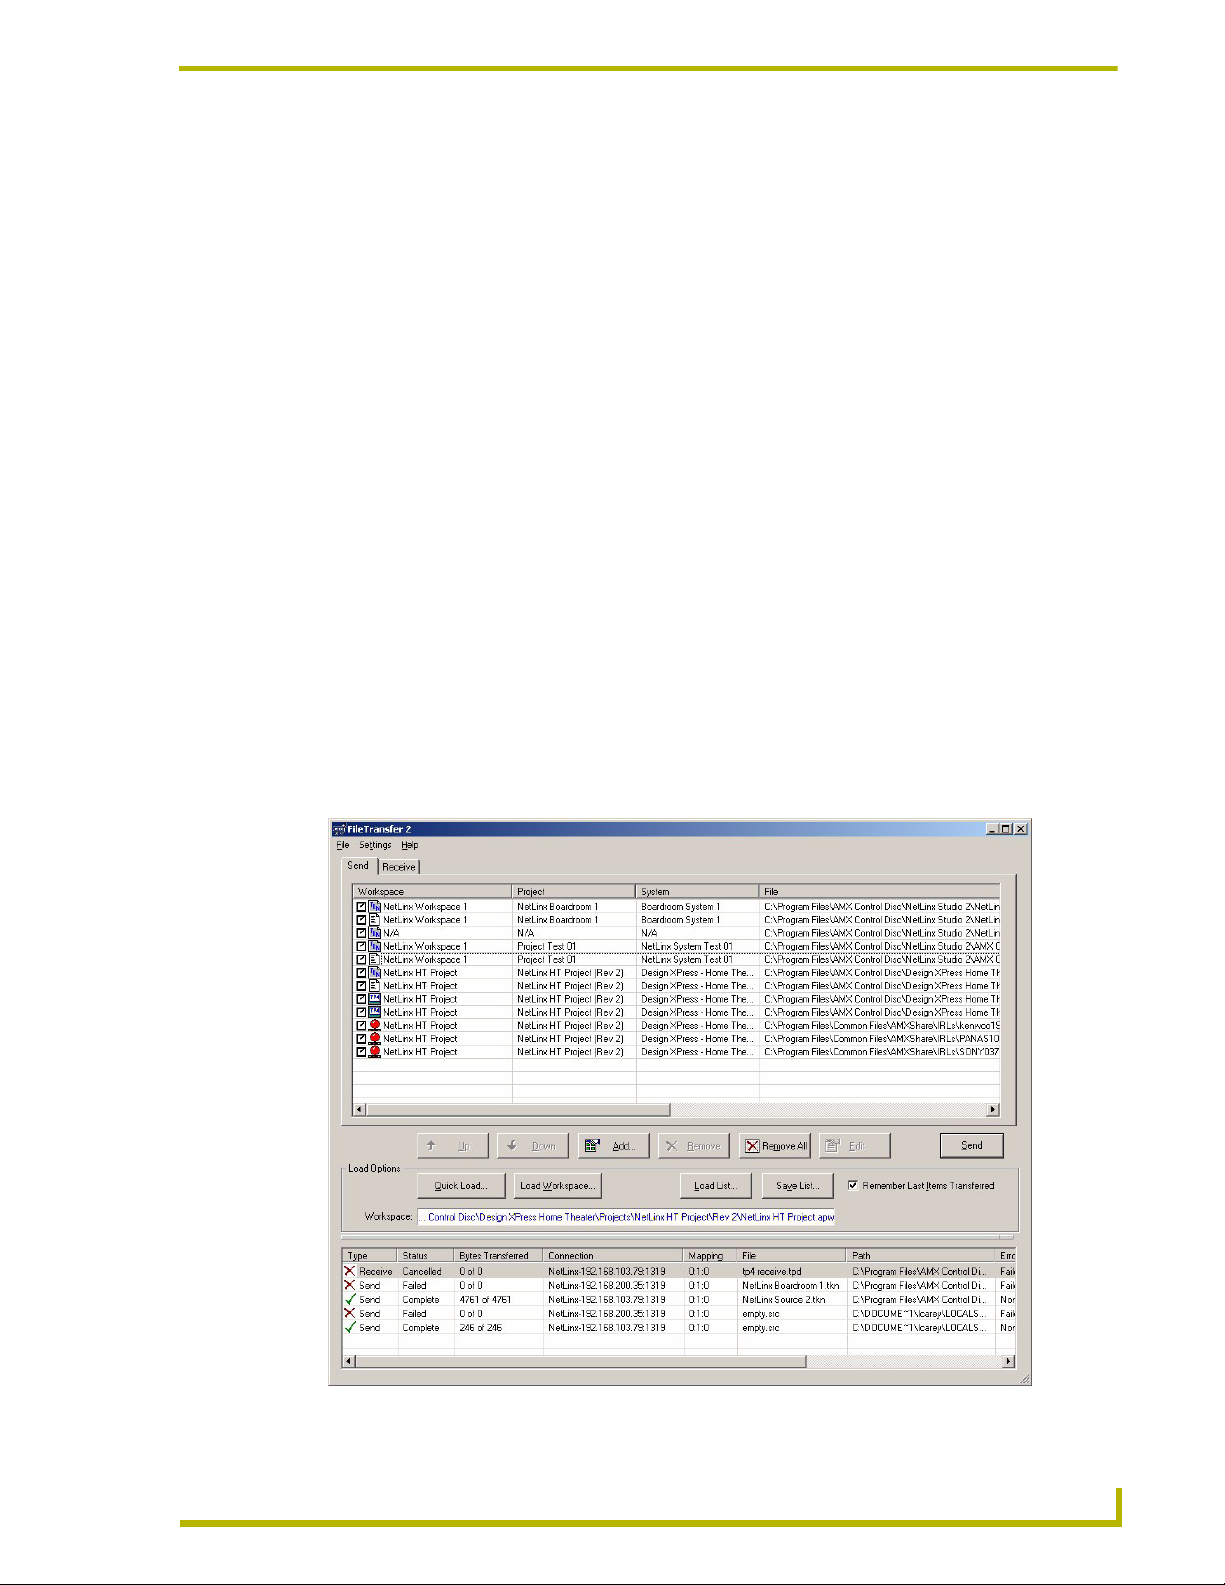
The FileTransfer2 user-interface consists of a single main window (FIG. 1), separated into two tabs
(Send and Receive) and a Transfer Status Window.
ileTransfer2
FIG. 1 FileTransfer2 User Interface
1
Page 6

Welcome To FileTransfer2
Use the Send tab for transferring files from the PC running FileTransfer2 and the target Master
Controller or System Device.
Send Tab
The Transfer List table in the Send tab indicates the files that are currently in the Files To Send
queue. Each row in the table represents a single System file, and could be any of the supported
system file types.
The columns in the table display the following file information for each file in the queue:
Use the Receive tab for transferring files from a Master Controller or System Device to
the PC.
The Menu bar provides access to the main functions of the program.
The Transfer Command Buttons allow you to control transfer functions.
The Load Options provide flexibility in how you can add files to the Transfer List.
The Transfer Status Window displays the status of each file transfer operation.
Workspace: displays the name of the currently open Workspace file
Project: displays the name of the active Project
System: displays the name of the active System
File: displays the name of the file in the Files To Send queue
Reboot: click the checkbox in this column to reboot the target device when the transfer is
complete
By default, the Reboot option is enabled (for Workspace files only), so that the System
Master will automatically reboot after the transfer is complete.
The Reboot option always reboots the Master, regardless of the device mapping
associated with the file itself. For example, TPD/TP4 files are transferred directly to
the panel, but the Reboot option will reboot the Master - not the panel that received
the file.
It is usually necessary to reboot a NetLinx master after a TKN file transfer. However, it is
not always desirable to have the reboot occur immediately after the file is transferred.
The Reboot checkbox allows you the flexibility of specifying when the reboot should
occur.
You are responsible for ordering your transfers correctly. If you choose to reboot after
a transfer and then immediately attempt to transfer to another device that is on the
bus of the master that is rebooting, the device will more than likely not be available
and the transfer will fail.
Connection: displays the communications settings associated with this file.
Mapping: displays the device-file mapping information (Device:Port:System) associated
with this file.
Options (TPD and TP4 files only): displays any optional file information associated with
the selected file (via either the TPD Transfer Options or TP4 Transfer Options dialog,
2
FileTransfer2
Page 7

Welcome To FileTransfer2
depending on the file type). Currently there are only options available when transferring
TPD and TP4 type files. This button is disabled for all other file types.
Receive Tab
The Transfer List table in the Receive tab indicates the files that are currently in the Files To
Receive queue. Each row in the table represents a single System file, and could be any of the
supported system file types.
The columns in the table display the following file information for each file in the queue:
File: displays the name of the file in the Files To Send queue
Connection: displays the communications settings associated with this file.
Mapping: displays the device-file mapping information (Device:Port:System) associated
with this file. The message "Direct to Device (No Master)" indicates that the source
device does not reside behind a master. Double-click this cell to access the Enter DPS
dialog, where you can view/edit the D:P:S assignment for the selected file.
Options (TPD and TP4 files only): displays any optional file information associated with
the selected file (via either the TPD Transfer Options or TP4 Transfer Options dialog,
depending on the file type). Currently there are only options available when transferring
TPD and TP4 type files. This button is disabled for all other file types.
File Transfer Context Menu
Right-click on any file listed in the Send or Receive tabs to access the File Transfer context menu:
Add — Adds a new file to the Send or Receive table (depending on which tab is open
when this option is selected). This option opens the Select Files For Transfer dialog,
where you can select to send all files contained in a Project or System, an individual
Project/System file (assuming the Project/System is contained within the currently open
Workspace), or any other file (not contained in the open Workspace).
Remove — Removes the selected file from the list.
Remove All — Removes all files from the list.
Select — Selects a file in the list.
Deselect — Deselects the selected file.
Select All — Selects all files in the list.
Deselect All — Deselects all files in the list.
Options — (Only enabled if a TPD or TP4 Touch Panel file is selected). Displays any
optional file information associated with the selected file (via either the TPD Transfer
Options or TP4 Transfer Options dialog, depending on the file type). This option is
disabled for all other file types.
ileTransfer2
Communication Settings — Opens the Communication Settings dialog, where you can
edit the Platform, Transport Connection type and Communication Settings for the
selected file.
3
Page 8

Welcome To FileTransfer2
Transfer Command Buttons
Both tabs (Send and Receive) contain the following set of command buttons:
Mapping — Opens the Enter DPS dialog, where you can view/edit the D:P:S assignment
of the source device for the selected file. If the file being transferred is a TPD file, and is
being sent via serial connection, then the Enter DPS dialog also offers a Connect Directly
To the Device - No Master option.
Up/Down — With a file selected in the Files To Send/Files to Receive tables, use these
buttons to move the file up and down in the list. The order in which the files are
represented in this table is the same order in which the files will be sent.
Add — Click to add a new file to the Files To Send/Files to Receive tables. This option
opens the Select Files For File Transfer dialog where you can select to send all files
contained in a Project or System, an individual Project/System file (assuming the Project/
System is contained within the currently open Workspace), or any other file (not
contained in the open Workspace).
Remove — Click to remove a selected file in the Files To Send/Files to Receive tables.
Remove All — Click to remove all files from the Files To Send/Files to Receive tables.
Edit — With a file selected in the Files To Send table, click the Edit command button to
open the Edit menu.
Send (Send tab only) — Click to send the file(s) in the Files To Send table to the
specified device(s).
Receive (Receive tab only) — Click to receive the file(s) in the Files To Receive table to
the specified device(s).
Exit — Click to exit the FileTransfer2 application.
Edit Menu
With a file selected in either the Send or Receive tab, click the Edit command button to open the
Edit menu, containing the following options:
Options — This option is only available if you have selected a TPD or TP4 touch panel
UI file.
If you have selected a TPD (TPdesign3) file, this option opens the TPD Transfer Options
dialog, where you can select which parts of the TPD file to include when the file is sent
(the options are Bitmaps, Fonts and Icons - by default they are all selected).
If you have selected a TP4 (TPDesign4) file, this option opens the TP4 Transfer Options
dialog, where you can select to enable Smart Transfer. Smart Transfer automatically
optimizes the transfer by identifying the various components (fonts, bitmaps, sound files,
even pages and popup pages) of the selected panel file, and comparing them to the
elements already present on the target panel. Any shared components are not sent,
resulting in a much faster transfer (assuming that there are shared components).
4
FileTransfer2
Page 9

Welcome To FileTransfer2
When sending a TP4 file to a G4 panel, verify that the NetLinx Master Firmware is
build 85 or later. Verify the TPDesign4 program being used is Version 1.01 or higher.
Earlier versions of the firmware and TPD4 software are incompatible with G4 panels.
Communication Settings — Opens the Communication Settings dialog, where you can
edit the Platform, Transport Connection type and Communication Settings for the
selected file.
Alternatively, you can double-click in the Connection column to access the
Communication Settings dialog.
Device Mapping — Opens the Enter DPS dialog, where you can view/edit the D:P:S
assignment of the target device for the selected file.
In Axcess, Master Source Code files are always mapped to the Master Controller
(device = 0). Master Source Code files cannot be mapped to any other device.
NetLinx Master Source Code files are mapped according to the System settings
when the Project was created. The only way to modify these settings is via the
System Properties dialog.
Also, when sending TPD files directly to a Touch Panel (i.e. via serial cable
connection), the device = 0.
Load Options
Both tabs share the following Load Options:
Quick Load — Click to open the Quick Load dialog, where you can specify particular
file types to load into the Send list.
Load Workspace — Click to open the Open Workspace/AXW File dialog.
Load List — This option allow you to select and open an .FTL file (see below), via the
Open dialog. When an .FTL file is opened, the Send list is populated with the files
specified in the .FTL file for transfer.
Save List — This option saves the list of files currently displayed in the Send list as an
.FTL file (specify a name and target directory to save the .FTL file in the Save As dialog).
Remember Last Items Transferred — When selected, this checkbox will cause the list
of transferred files to be automatically reloaded the next time the File Transfer dialog is
opened. This is useful if you transfer the same files repeatedly. That way, you don’t have
to re-add the items over and over again. De-selecting the checkbox clears the
remembered list of files and prevents file transfer from reloading the files the next time
the dialog is displayed.
Workspace display — This (read-only) field displays the currently open Workspace or
Workspace To-Go file.
ileTransfer2
5
Page 10

Welcome To FileTransfer2
Transfer Status Window
Once you have started a file transfer operation, the following types of status information are
displayed in the File Transfer Status tab of the Output Display window:
Typ e — The type of transfer (sending or receiving).
Status — The current state of the transfer (Pending, Transferring, Complete or Failed).
Connection — The communications settings used to establish communication with the
target device.
Mapping — The number(s) used to identify the target device on the bus or the message
"Direct to Device (No Master)" if the target device does not reside behind a master.
File — The name and extension of the file being transferred.
Path — The full path of the file being transferred.
Bytes Transferred — The number of bytes transferred, and the total number of bytes left
to transfer.
Error — An error message if an error has occurred.
Last Transfer — The time and date of the last transfer.
Transfer Status Context Menu
Right-click on any file listed in the Transfer Status List to access the Transfer Status context menu:
Copy All Items — Copies all items in the list to the clipboard.
Copy Selected Items — Copies only the selected items in the list to the clipboard.
Save All Items — Saves all items to a user-defined file. You will be prompted for a file
name to save the contents of the tab.
Save Selected Items — Saves only the selected items to a user-defined file. You will be
prompted for a file name to save the contents of the tab.
Clear — Clears all the items within the list.).
If the selected file is in progress, the following additional options are available:
Cancel Current Transfer — Cancels the selected transfer.
Cancel Selected Transfer Items — Cancels all selected transfer items (shift + click to
select multiple items in the Transfer Status List).
Cancel Remaining Transfer Items — Cancels all items in the Transfer Status List that
have not yet been transferred.
Cancel All Transfer Items — Cancels all items in the Transfer Status List.
6
FileTransfer2
Page 11

Welcome To FileTransfer2
Supported File Types
The following are the types of files this application can send to and receive from, various NetLinx
and Axcess devices:
TOK Files
TKN Files (including compiled Duet TKN Files)
TP4 Files
TPD Files
KPD Files
IRL/IRV Files
SRC Files
Notes on supported file types:
The selection of available file types depends on the selected platform, Send/Receive
selection and communication settings
All files must mapped to devices before they can be selected for transfer.
Source Code files cannot be sent until they have been successfully compiled.
While Touch Panel UI files are sent to the panels themselves, KPD files are sent to the
master and not directly to the keypad. Before sending a KPD (KPDesign) file to the target
keypad(s), be sure that you have successfully compiled the Source Code file that contains
the keypad module, and sent it to the Master (see Configuring NetLinx Source Code for
KPD Files).
Supported Operating Systems and Minimum PC Requirements
Supported operating systems:
Windows XP®
Windows 2000®
You must have Administrator rights to install and run all required System files.
PC Requirements:
Pentium 233 MHZ processor (minimum requirement); 300 MHZ or faster recommended.
Windows-compatible CD-ROM drive.
ileTransfer2
Windows-compatible mouse (or other pointing device).
If the mouse wheel on your Microsoft® IntelliMouse® doesn't’ work with NetLinx
Studio, try downloading the latest IntelliMouse drivers from Microsoft.
7
Page 12

Welcome To FileTransfer2
Tested Modems List
The following is a list of internal and external modems that have been tested with the program.
Manufacturer Model - Internal 95 98 ME NT 2000 XP
Diamond Supra 336i SP ASVD ? C ? ? ? ?
Diamond Supra 56i SP ? C ? ? ? ?
Lucent 56K LU PCI ? C ? C ? ?
US Robotics 56k Fax PCI #3CP5610A ? C ? C ? ?
US Robotics Sportster WinModem - #0467 ? X ? ? ? ?
Zoom Fax 28.8 v.341 #275 ? C ? ? ? ?
Note: Internal modes were tested only for calling capabilities.capabilities.
Manufacturer Model - External
Boca 14.4 V.32b #MV.34xx X X X X X X
Hayes Accura 56k #03328-A ? C C C C ?
Hayes Accura 144+Fax 144
MultiTech MultiModem 19.2k Data/Fax ? X ? A A ?
Practical Peripherals PM288MT II v.34 - 28K ? C< ? ? X ?
US Robotics 56k Fax v.90 #USR5686D ? CA ? CA CA ?
US Robotics Sportster56k Fax
US Robotics Sportster 33.6 - #0413 ? ? ? CA ? ?
US Robotics Sportster 14.4 Fax CJE-0235 ? ? ? ? ? ?
Zoom Fax 56kx Dualmode #2949L ? CA C CA C ?
Internal Modems --- Windows Operating System ---
External Modems --- Windows Operating System ---
XX X C X X
#5300AM
CA CA CA CA CA ?
#USR5686-03
C = Call - means that the FileTransfer2 program can get the modem to call another
modem and establish communications.
A = Answer - means that the FileTransfer2 program can get the modem to answer
inbound calls and establish communications with the master controller.
X = Not supported.
< = Less 100% reliable.
8
FileTransfer2
Page 13

Welcome To FileTransfer2
ileTransfer2
9
Page 14

Welcome To FileTransfer2
10
FileTransfer2
Page 15

Using FileTransfer2
The basic steps for using transferring files to and from system devices are:
Sending Files To System Devices:
1. Adding Files To The Files To Send Queue
2. Configuring Communications Settings for Transfers
3. Device Mapping
4. Transferring the Files
Receiving Files From System Devices:
1. Adding Files To The Files To Receive Queue
2. Configuring Communications Settings for Transfers
3. Device Mapping
4. Transferring the Files
Using FileTransfer2
Step 1: Adding Files To The Transfer Queue
Before files can be sent to or received from system devices, they must first be added to the Transfer
Queue in either the Send or Receive tab (select a help topic):
Adding Files To The Files To Send List
Adding Files To The Files To Receive List
Using the Quick Load Dialog
Use the options in the Quick Load dialog to specify which file types (of the files included in a
selected Workspace file) to add to the Files To Send queue.
The Quick Load dialog is not used for receiving files.
There are several possible ways to access the Quick Load dialog:
Click the Quick Load command button.
If there is not already a Workspace file open, then the Quick Load dialog will indicate
that no (zero) projects are open (no Project file/file path indicated in the top text field, and
"New Workspace: 0 Project(s)" indicated in the main window. You should first open a
Workspace file, then use the options in the Quick Start dialog to select the files within
that Workspace file to add to Files To Send queue. Without having a workspace file open,
you cannot select files for transfer via the Quick Start dialog.
ileTransfer2
By default, FileTransfer2 opens the Quick Load dialog when a Workspace file is opened
(via the Load Workspace button, or the File > Open Workspace/AXW/FTL File menu
option. With at least one Workspace file open, the options in the Quick Load dialog allow
you to specify which of the files contained in the Workspace file(s) to add to the Files To
Send queue:
11
Page 16

Using FileTransfer2
You can disable the Quick Load dialog from automatically opening by deselecting the
After opening a Workspace file...Visit the Quick Load dialog option in the Preferences
dialog.
1. Selection Options menu — Click the down arrow to access the following load options:
Active System — Loads only the files from the active System.
Entire Workspace — Loads all files from the Workspace.
Select System — Select an individual System from the Workspace to load.
2. File type checkboxes — The checkbox options in this dialog allow you to simplify the transfer
operation by only sending only specific file types (including TKN, TOK, SRC, IRL, KPD, TP4
and TPD files).
Use the Select All and Deselect All command buttons to streamline the selection process.
Note that there are additional options associated with TP4 and TPD files. If you select
TP4 Files, you also have the option of enabling Smart Transfer for those files. Similarly,
if you select TPD files, you have the additional options of including Bitmaps, Icons, and/
or Fonts for those files.
3. Remove Duplicates When Loading — Enable this option to prevent having any duplicate
entries in the Files To Send queue (default = enabled).
Workspace Files (*.APW)
Workspace Files (*.APW) are created in NetLinx Studio v2, and allow you to work with multiple
projects/files simultaneously. While the FileTransfer2 application supports reading NetLinx Studio
Workspace Files, Workspace Files can only be created, edited (and optionally exported as (*.AXW)
"To Go" files) using NetLinx Studio v2.
Refer to the NetLinx Studio on-line help for details on creating, editing and saving Workspace Files
and Workspace To Go files.
A Workspace File represents at least one Project (containing at least one System), however a
Workspace can contain multiple Projects. Each Project in turn can contain multiple Systems. At any
time, you can create a Workspace file (via the File > Save Workspace option in NetLinx Studio).
Once created, you can re-open that Workspace file to recall the NetLinx Studio workspace, exactly
as it was when the Workspace file was created.
All Workspace information is saved in an XML-formatted file with the .APW file extension.
The File > Save Workspace command only saves the Workspace (APW) file itself,
and does not save changes made to the System files contained in the Workspace.
Use the File > Save All command to save the Workspace file and all of the System
files it contains.
12
One advantage of the Workspace file is that it serves as a time-saver: Once you have saved a
Workspace file in NetLinx Studio, (containing a particular set of Projects, Systems and System
Files), the next time you open the application, you can simply open the single Workspace file (File
> Open Workspace) to load the Projects/Systems it contains. This way you bypass the need to open
each Project, System and System File individually.
FileTransfer2
Page 17

Using FileTransfer2
All Projects and associated Systems and System files are linked to the Workspace, so that you can
add and remove Projects and Systems without having to make copies of the files. NetLinx Studio
also allows you to copy and paste Projects within the Workspace; in the case that you need to create
several similar Projects you can quickly generate multiple Projects and modify each one as
necessary.
Since all System files are linked to the Workspace, when you open a file for editing,
you are opening and editing the actual file, not a local copy. It is important to
understand that in the event that the file is linked to multiple Systems, any changes
made to the file will be reflected in every instance that the file is used (not just the
System that you were in when the changes were made). Even if you don't have
multiple links to the same file, you should still be careful about altering the file. If you
are linking to a file that other people might use, they will be affected by the changes
you make to the file. So, if you intend to make changes to a System file, and you want
those changes to be specific to only one System in the Workspace, you should make
a copy of the original file (under a different name), make your changes, then remove
the original file from the System and link the new file to the System.
Workspace files also allow you to build (compile) multiple Projects/Systems. The Build Workspace
command (in NetLinx Studio) compiles every file contained in the Workspace.
It is important to note that in NetLinx Studio (v2.0 and later), there is no concept of Projects outside
the context of a Workspace. A Project can only be opened by adding it to a Workspace. This is to
support the file linking aspect of the program.
Other features of the Workspace file include:
You can import other Project or Systems folders from previously saved Workspace files.
You can copy and paste existing Projects and Systems within a Workspace.
You can edit the identifier that is used to display the workspace name in the tree display
along with the description for the Workspace file via the Workspace Properties dialog.
You can export all the files associated with the Workspace (including the Workspace file)
into a .ZIP file.
Workspace-To-Go Files (*.AXW)
The Export Workspace Files To Go option (in NetLinx Studio v2's Project menu) allows you to
export the currently open Workspace for distribution as a Workspace-To-Go (*.AXW) file.
AXW files preserve all relative file path information for the Projects, Systems and System files
contained in the Workspace, making them ideal for distribution to remote sites.
As is indicated in the Export Workspace Files To Go dialog (in NetLinx Studio v2), there are three
major points to understand when exporting your Workspace files:
All files will reside in the same directory as the APW file upon extraction of the AXW
file.
No directory/path information is required for the "To Go" APW File Name.
ileTransfer2
You may enter non-existing folders - NetLinx Studio will create them for you.
13
Page 18

Using FileTransfer2
File Transfer List (*.FTL) Files
File Transfer List (FTL) files are created in FileTransfer2, and allow you to save a list of files as
they appear in either the Files To Send or Files To Receive queues (with communications settings
and device mapping information).
Once saved as an FTL file, the file transfer list can be quickly reloaded without having to open and
configure each file.
To create a FTL file:
1. Add a list of files to the Files To Send or Files To Receive queues (in either the Send or Receive
tab).
2. Click the Save List command button. This opens the Save As dialog, with File Transfer List
Files (*.ftl) pre-selected as the Save as type selection.
3. Click Save to save the FTL file.
To open a FTL file:
1. Click the Load List command button (in either the Send or Receive tab) to open the Open
dialog, with File Transfer List Files (*.ftl) pre-selected as the Files of type selection.
2. Locate and select the desired FTL file, and click Open to add the files defined in the FTL list to
the Files to Send or Receive queue.
NetLinx Master Security
NetLinx Studio (v2.3 or higher) supports secure communication with NetLinx Masters, via the
Authentication Required option in the Communication Settings dialog.
Before you can enable/disable NetLinx security on a Master through NetLinx Studio, you must
verify the following:
The target Master has been loaded with firmware that supports security. This means that the Master
must have Master Firmware version 304 (or higher) to support this functionality. If your master
does not have firmware loaded that supports security, the Master will not be secured (although it
might appear to be in NetLinx Studio).
Security has been enabled on the target Master (via options in the Security tab of the Master's built-
in interface). Refer to the Master's documentation for details on enabling/disabling security.
With security enabled, users will be required to provide the correct User Name and Password in
order to establish communication with the Master.
The User Name and Password are case-sensitive.
If the correct User Name and Password are not entered, NetLinx Studio will display an
"Authentication Failure" message, and the connection to the Master will be denied.
This security option is not available for Axcess masters, or for NetLinx Virtual Master
connections.
14
FileTransfer2
Page 19

Using FileTransfer2
Adding Files To The Files To Send Queue
There are several possible approaches to adding files to the Files To Send List (Send tab).
Add some or all of the files contained in a Workspace file or a Workspace-To-Go file.
Add a set of files, defined in a File Transfer List file.
Add individual systems (see Supported File Types list).
Notes:
The file types that are available for selection depend on the selected Platform (Axcess or
NetLinx), Send/Receive selection and Communication settings.
All files must mapped to devices before they can be selected for transfer. You can edit the
file's mapping information via the Edit menu (Device Mapping option), but without any
mapping information associated with the file, it cannot be selected.
Source Code files cannot be sent until they have been successfully compiled.
While Touch Panel UI files are sent to the panels themselves, KPD files are sent to the
master and not directly to the keypad. Before sending a KPD (KPDesign) file to the target
keypad(s), be sure that you have successfully compiled the Source Code file that contains
the keypad module, and sent it to the Master.
Adding All Files Contained In an APW or AXW File
In the Send tab:
1. Select File > Open Workspace/AXW/FTL File or click the Load Workspace command button
to open the Open File dialog.
2. Select either NetLinx Studio Files (*.apw) or Export-To-Go Files (*axw) from the File of Type
drop-down menu (depending on which type of file contains the system files that you want to
transfer).
This dialog contains two tabs: Existing and Recent.
Use the Existing tab to locate and select the desired file, with the ability to navigate
through all available local and network drives.
The Recent tab contains a listing of the most recently used files (of all types).
3. Locate and select the Workspace file that you want to add, and click Open. This opens the
Quick Load dialog.
4. In the Selection Options section, select Entire Workspace.
5. Click Select All to add every file type in the Workspace, and enable the Remove Duplicates
when Loading option.
6. Click OK to close the Quick Load dialog and add the files to the File To Send queue.
ileTransfer2
15
Page 20

Using FileTransfer2
Adding Files From a Specific Project/System
In the Send tab:
1. Select File > Load Workspace/AXW/FTL File or click the Load Workspace command button
to open the Open File dialog.
2. Set the File of Type drop-down to NetLinx Studio Files (*.apw).
3. Locate and select the Workspace file that contains the Project/System with the file(s) you want
to add, and click Open. This opens the Quick Load dialog.
4. In the Selection Options section:
Select Active System to add files from the active System in the open Workspace.
Select a Project-System to add files from a specific Project/System in the open
Workspace.
5. Click in the checkboxes to specify which file types in the selected System to add.
6. Click OK to close the Quick Load dialog and add the files to the File To Send queue.
Adding Individual System Files From the Open Workspace file
With a Workspace (or Workspace To-Go) file open, use the Add command button (in the Send tab)
to select individual System files to add to the Files To Send queue:
1. Click the Add command button to open the Select Files For File Transfer dialog.
2. Open the Current Workspace tab.
This tab consists of a display of the (compiled) Source Code (.AXS), Token (.TKN),
User-Interface (.TPD/.TP4) and IR (.IRL) files contained in the currently open
Workspace.
Use the options in the Current Workspace tab to locate and select file(s) for transfer to the
Master or System devices on the bus. Use this tab if the file(s) you want to transfer are
included in the open Workspace.
3. Click OK to add the selected file(s).
Adding Orphan Files
In the Send tab:
1. Click the Add command button to open the Select Files For File Transfer dialog.
2. Open the Other tab. Use this tab if the file(s) you want to transfer are not included in the open
Workspace. This tab consists of a display of the different types of files that can be transferred
to the Master or System devices on the bus:
IR Codes (*.IRL/*.IRV)
NetLinx Source Code (*.SRC)
16
Compiled NetLinx Source Code (*.TKN)
Compiled Axcess Source Code (*.TOK)
Touch Panel Design File (*.TPD)
TP4 Touch Panel (*.TP4)
FileTransfer2
Page 21

Using FileTransfer2
KPD Keypad Touch File (*.KPD)
3. Select the type of file that you want to add to the Transfer List.
4. Click the Add button. This invokes the Open dialog, with the Files of Type selection already
set to the selected file type.
5. In the Open dialog, locate and select the file that you want to add.
6. Click Open to add the selected file to the Files To Send queue.
Adding Files To The Files To Receive Queue
IR files cannot be received from Axcess Master controllers.
To add files to the Files To Receive queue:
1. Open the Receive tab.
2. Click the Add command button to open the Select Files For Transfer dialog.
3. Select the type of file you want to receive from the system device (IRL/IRV, TPD, SRC, AXS
or TP4), and click Add (opens the Save As dialog).
The file types that are available for selection depend on the selected Platform
(Axcess or NetLinx), Send/Receive selection and Communication settings.
4. In the Save As dialog, specify a name and target directory for the retrieved file.
5. Click Save to close this dialog and open the Enter Device Mapping Information dialog.
6. Enter the Device, Port and System numbers for the source device, and click OK to close the
dialog and add the to the File list at the bottom of the Select Files To Transfer dialog.
7. Click Settings in the Communication Settings section at the bottom of the dialog to open the
Communication Settings dialog and specify the communication settings for the source device.
Note that in the Select Files For File Transfer dialog, communication settings apply to every
file in the File list (since in this case the communication settings are relating to a system device
that is the source for files you are receiving, not to individual files that may be sent to any of
several devices in the system).
8. Click OK to close the Select Files For File Transfer dialog. The files you added should now
appear in the Files To Receive queue of the Receive tab.
Repeat steps 2 - 7 to add files to retrieve from different system devices to the Files To Receive
queue.
ileTransfer2
17
Page 22

Using FileTransfer2
Step 2: Communication Settings
Communication settings for each file is established and saved with the files when they are created
in NetLinx Studio, but can be overwritten in FileTransfer2, via options in the Communication
Settings dialog (accessible via the Edit menu).
Files can be transferred to/from a NetLinx master via TCP/IP, Serial-RS232, Modem or
Virtual NetLinx Master connection.
Files can be transferred to/from a Axcess master via Serial-RS232 or Modem connection.
Listening for NetLinx Masters
Click the Listen button in either the TCP/IP Settings dialog to listen for "blink" (UDP) messages
from NetLinx Masters on the subnet, in the Listen For Masters dialog.
As NetLinx Masters are detected on the subnet, they are displayed in the Listen For Master dialog,
with the option of adding them to the List of Addresses in the TCP/IP Settings dialog:
1. Select a file in either the Send or Receive tab.
2. Select Communication Settings from either the File Transfer context menu or the Edit menu to
open the Communication Settings dialog.
3. Select TCP/IP as the Transport Connection Option.
4. Click Edit Settings to open the TCP/IP Settings dialog.
5. Click Listen to open the Listen For Masters dialog.
6. Click Start Listening to begin "listening" for UDP messages from active NetLinx Masters on
the subnet.
7. Click Stop Listening to stop listening for UDP packets.
All Masters that were detected on the subnet are listed by TCP.IP URL address in this dialog.
To Add NetLinx Masters to the List of Addresses in the TCP/IP Settings dialog:
1. Select one or more (Ctrl + click to multi-select) of the Masters in the List of Active NetLinx
Master Controllers (Listen For Masters dialog) that you want to add to the List of Address in
the TCP/IP Settings dialog.
2. Click Select To Add to open the New TCP/IP Setting dialog, where you can add a description
(optional) and specify wether to automatically ping the Master Controller to ensure
availability.
3. Click OK to save the new TCP/IP settings, close the dialog and add the new connection to the
List of Addresses. Note that if you selected multiple Masters (in the Listen for Masters dialog),
the New TCP/IP Settings dialog opens for each file individually to allow you to configure (or
verify) every Master connection.
18
Virtual NetLinx Master
FileTransfer2 supports direct connection to G4 panels via TCP/IP and USB, for situations where
the target panel is not connected to a NetLinx Master. In this situation, you can use your PC's
Ethernet or USB connectors to connect directly to the panel, using your PC as a Virtual NetLinx
Master.
Virtual NetLinx Master connections support both TCP/IP and USB.
FileTransfer2
Page 23

Using FileTransfer2
Virtual NetLinx Master connections can be used to transfer TPDesign4 panel (.TP4) file,
NetLinx Firmware (.KIT) files, or IR Files directly to G4 touch panels.
USB direct transfers require that you configure the Master Connection setting on the
panel itself to USB prior to attempting the transfer.
TCP/IP direct transfers require that you configure the Master Connection setting on the
panel itself to TCP/IP prior to attempting the transfer.
Configuring Communications Settings
FileTransfer2 allows you to specify and maintain separate communications settings for each file in
the Files To Send and Files To Receive queues:
1. Select a file (Send or Receive tabs).
2. Click the Edit command button and select Communication Settings from the Edit menu to
open the Communication Settings dialog.
a. Select a Platform for this transfer (Axcess or NetLinx).
b. Select a Transport Connection Option (TCP/IP, Serial, Modem or Virtual NetLinx
Master).
The TCP/IP and Virtual NetLinx Master options are only available if NetLinx is
selected as the platform.
c. Click Edit Settings to specify the communication settings for the selected connection
option (see list of topics below).
3. Click OK to close the Communication Settings dialog.
Configuring TCP/IP Communication Settings (NetLinx only)
With a Transfer selected in the Transfer List:
1. Click the Edit command button, and select Communication Settings to open the
Communication Settings dialog.
2. Select NetLinx Master as the Platform Selection.
3. Select TCP/IP as the Transport Connection Option.
4. Click Edit Settings to open the TCP/IP Settings dialog.
5. Enter the TCP/IP Address of the master:
a. Click New to open the New TCP/IP Setting dialog.
b. Enter the new TCP/IP Address and (optional) Description in the text fields provided.
c. By default, the program is set to automatically ping the master controller to ensure
availability. De-select this option if desired.
ileTransfer2
The Port should always be set to 1319 (default setting). Do not change the Port
assignment.
d. Click OK to return to the Communication Settings dialog.
19
Page 24

Using FileTransfer2
6. Click OK to save the new TCP/IP communication settings with the selected file.
Configuring Serial Communication Settings
With a Transfer selected in the Transfer List:
1. Click the Edit command button, and select Communication Settings to open the
Communication Settings dialog.
2. Specify the Platform Selection (NetLinx Master or Axcess Master).
3. Select Serial as the Transport Connection Option.
4. Click Edit Settings to open the Serial Settings dialog.
5. Select a COM port and specify the communication settings for serial port communications.
The default settings are:
Comm Port — COM1
Baud Rate — 38400
Data Bits — 8
Parity — None
Stop Bits — 1
Flow Control — None
6. Click OK to return to the Communication Settings dialog.
7. Click OK to save the new Serial communication settings with the selected file.
Configuring Modem Communication Settings
With a Transfer selected in the Transfer List:
1. Click the Edit command button, and select Communication Settings to open the
Communication Settings dialog.
2. Specify the Platform Selection (NetLinx Master or Axcess Master).
3. Select Modem as the Transport Connection Option.
4. Click Edit Settings to open the Modem Settings dialog.
5. Select a COM port and specify the communication settings for modem communications. The
default settings are:
Comm Port — COM1
Baud Rate — 38400
Data Bits — 8
20
Parity — None
Stop Bits — 1
Flow Control — None
Phone Number — Enter the telephone number of the master.
6. Click OK to return to the Communication Settings dialog.
FileTransfer2
Page 25

Using FileTransfer2
7. Click OK to save the new Modem communication settings with the selected file.
Configuring Virtual NetLinx Master Communication Settings (NetLinx only)
1. Click the Edit command button, and select Communication Settings to open the
Communication Settings dialog.
2. Select NetLinx Master as the Platform Selection.
3. Select Virtual NetLinx Master as the Transport Connection Option.
4. Click Edit Settings to access the Virtual NetLinx Master Settings dialog, which displays the
System number (and IP address) of the Virtual NetLinx Master (default = 1).
Assuming that the actual NetLinx Master is set to 0 (via the System Properties dialog - System
ID field), this default setting will work. However, if you have designated any other number as
the System ID, be sure to set this System Number to a different number than the System ID, to
avoid a conflict with the actual NetLinx Master (range = 1-65535).
As indicated in the Virtual NetLinx Master dialog, changes made to the system
number field will not take effect until all communications are stopped and restarted.
5. Click OK to return to the Communication Settings dialog.
6. Click OK to save the new VNM communication settings with the selected file.
Configuring the Touch Panel for Virtual NetLinx Master USB Transfers
If it is not already powered up and connected, apply power to the G4 panel and verify that it is
connected to the PC running NetLinx Studio via the USB connector on the rear (or side) of the
panel.
Connecting the Panel to your PC via USB:
1. Apply power to the panel by plugging in the power supply.
2. Wait for the splash screen to disappear, then use a (Type A) USB cable to connect the panel to
an available USB port on your PC. Plug the USB cable into the panel first, then connect to the
PC.
To configure the panel for Virtual NetLinx Master transfers via USB:
1. Press and hold the grey Front Setup Access button (below the touch screen) for 3 seconds to
access the Setup page.
2. Press the Protected Setup button to access the Protected Setup page.
3. Use the on-screen keyboard to enter the password (the default password is 1988).
4. Press the System Connection button to access the System Connection Setup page.
ileTransfer2
5. Select USB as the Master Connection.
6. Press the Back button to return to the Protected Setup page and press the Reboot button to
reboot the panel.
21
Page 26

Using FileTransfer2
Configuring the Touch Panel for Virtual NetLinx Master TCP/IP Transfers
If it is not already powered up and connected, apply power to the G4 panel and verify that it is
connected to the LAN via the TCP/IP connector on the rear (or side) of the panel.
1. Press and hold the grey Front Setup Access button (below the touch screen) for 3 seconds to
access the Setup page.
2. Press the Protected Setup button to access the Protected Setup page.
3. Use the on-screen keyboard to enter the password (the default password is 1988).
4. Press the System Connection button to access the System Connection Setup page.
5. Select Ethernet as the Master Connection.
6. Set the System Number to 0 (zero).
7. Select the Master URL / IP input box and enter the IP address of your PC.
To get your PC's IP address, select Start > Run and type cmd to open a DOS
window. Then, enter ipconfig to display the IP address of your PC.
8. Press the Back button to return to the Protected Setup page and press the Reboot button to
reboot the panel.
Step 3: Device Mapping
Every time you select a file (to send or receive) via the Select Files For File Transfer dialog (Other
tab), the program prompts you to enter (or verify) its device mapping information, in the Enter
Device Mapping Information dialog.
Use this dialog to define the Device:Port:System (D:P:S) address assignment for a target device.
Editing Device Mapping Information
Device-file mapping information for each file (which associates a device address with each file) is
established and saved with the files when they are created in NetLinx Studio, but can be overwritten
in FileTransfer2, via the Device Mapping options (accessible via the Edit menu):
1. Select a file in the Transfer List (Send or Receive tab).
2. Click Edit to open the Edit menu, and select Device Mapping. This opens the Enter DPS
dialog.
3. Enter the Device:Port:System (D:P:S) information for the selected file.
4. Click OK to save the D:P:S assignment and close the dialog.
Device:Port:System (D:P:S)
A device is any hardware component that can be connected to the NetLinx bus. Each device must
be assigned a unique number to locate that device on the bus. The Axcess language allows physical
device numbers in the range 0-255. The NetLinx language allows numbers in the range 0-32767.
Device 0 refers to the master; numbers above 32767 are reserved for internal use.
22
NetLinx requires a Device:Port:System (D:P:S) specification where Axcess expected only a device
number. This D:P:S triplet can be expressed as series of constants, variables separated by colons, or
as a DEV structure, to explicitly represent a device number, port and system.
FileTransfer2
Page 27

Using FileTransfer2
Here’s the syntax:
DEVICE:PORT:SYSTEM
where:
Device: 16-bit integer representing the device number
Port: 16-bit integer representing the port number (in the range 1 through the number of
ports on the device)
System: 16-bit integer representing the system number (0 = this system) that the device
belongs to.
For example, 128:1:0 represents the first port on device 128 on this system.
DEV structure example:
STRUCTURE DEV
{
INTEGER Number // device number
INTEGER Port // port on device
INTEGER System // system device belongs to
}
In Axcess, Master Source Code files are always mapped to the Master Controller
(device = 0), and cannot be mapped to any other device. This does not apply to
NetLinx Master Source Code files.
Step 4: Transferring The Files
FileTransfer2 supports asynchronous communications, which allows you send and receive to and
from the bus on all available communications ports. You can send and receive both Axcess and
NetLinx Source Code files to and from the appropriate Master Controller or bus device.
Axcess or NetLinx Source Code files (.AXS) can be sent to the Master Controller, or
other control devices on the bus. Source code files must be successfully compiled before
they can be sent.
Touch Panel UI files created in TPDesign3 (.TPD) are sent directly to wired Touch Panels
on the bus via an AXlink/serial connection where the Device ID = 0.
Touch Panel UI files created in TPDesign4 (.TP4) are sent to the Master, either serially or
over TCP/IP. G4 panels are connected to the Masters via TCP/IP and cannot be sent over
AXlink. You can choose to include buttons and pages only, or include fonts, bitmaps and/
or icons in the transfer.
KeyPad UI files (.KPD) are sent to a NetLinx Master.
IR library files (.IRL/.IRV) are sent to IR-controlled devices on the bus, or directly to a
System device (i.e. Touch Panels).
The Virtual NetLinx Master option allows you to transfer files directly to G4 devices,
without the need for an intermediate NetLinx Master.
ileTransfer2
File Transfer Status Information
Once you have started a file transfer operation, the status of each transfer item in the Files to Send
or Receive queue is indicated in the Transfer Status Window.
23
Page 28

Using FileTransfer2
Transfer Errors and Definitions
The following table describe the most common error messages that might be displayed in the Error
column of the Transfer Status Window.
Error String Meaning
• Failure generic/unclassified failure.
• Success generic success.
• File does not exist the file supplied on the cmdline doesn't exist.
• Failed to create temporary file couldn't create a required temporary file.
• Failed to connect with
FileTransfer application
• Invalid phone number supplied console parameter is invalid.
• Invalid flow control supplied console parameter is invalid.
• Invalid stopbits supplied console parameter is invalid.
• Invalid parity supplied console parameter is invalid.
• Invalid databits supplied console parameter is invalid.
• Invalid baudrate supplied console parameter is invalid.
• Invalid communications port supplied console parameter is invalid.
• Invalid VNM settings supplied console parameter is invalid.
• Invalid TCP/IP settings supplied console parameter is invalid.
• Invalid file type the file supplied on the cmdline is an unknown file type.
• Unknown Error generic/unknown error.
• Not enough arguments not enough console parameters supplied to do anything.
• Unable to install handler! Ctrl+C, Break console handler couldn't be installed.
• Invalid Option! Expected U=<user>:<password>
• <option> is an invalid option! invalid/unknown option passed to console.
• <option> is not a valid device
mapping or option!
• File: <filename> does not exist
and cannot be transferred!
• File: <filename> is currently
opened by another application
and cannot be transferred!
• Nothing to transfer!
• [Project Identifier invalid?]
• [System Identifier invalid?]
• Failed to open workspace! Failed to open workspace!
• No APW file AXW file does not contain an APW.
console app couldn't connect to running instance of
FileTransfer2 application.
console security option is incorrect.
console expected a device mapping or an option but found
something else.
file does not exist at location specified.
this can happen if another application has an exclusive lock on
a file.
After processing all supplied parameters and options, there
was nothing to transfer. That is, no files could be found or
nothing was specified for transfer. Additionally, if you specified
a project identifier and/or a system identifier, you may have
inadvertently requested an empty or nonexistent set of files.
24
FileTransfer2
Page 29

Using FileTransfer2
Sending Files To System Devices
Once you have:
Added the desired file(s) to the File To Send Queue,
Configured the communication settings for the files in the list, and
Specified the device-file mapping information for the files in the list,
you are ready to begin transferring the file(s) to devices in the system:
1. Click the Send command button. This initiates the transfer of every file listed in the Transfer
(Send) List, in the order in which they are listed (top to bottom).
2. The progress and status of each file transfer is indicated in the Transfer Status Window.
Receiving Files From System Devices
Once you have:
Added the desired file(s) to the File To Receive Queue,
Configured the communication settings for the files in the list, and
Specified the device-file mapping information for the files in the list,
you are ready to begin receiving the file(s) from devices in the system:
1. Click the Receive command button. This initiates the transfer of every file listed in the Files To
Send List, in the order in which they are listed (top to bottom).
2. The progress and status of each file transfer is indicated in the Transfer Status Window.
To receive files directly from a system device (Serial connections only):
1. In the Receive tab, click to select a file in the Files to Receive queue.
2. Click Edit to open the Edit menu and select Device Mapping. This opens the Enter DPS
dialog.
3. Enter the Device:Port:System (D:P:S) information for the selected file.
4. Check the Connect directly to the device - No Master... option.
5. Click OK.
Virtual NetLinx Master (Masterless) Transfers
File Transfer2 supports direct connection to G4 panels via TCP/IP and USB, for situations where
the target panel is not connected to a NetLinx Master. In this situation, you can use your PC's
Ethernet or USB connectors to connect directly to the panel, using your PC as a Virtual NetLinx
Master.
Virtual NetLinx Master supports both TCP/IP and USB connections.
ileTransfer2
Virtual NetLinx Master can be used to transfer TPDesign4 panel (.TP4) file, NetLinx
Firmware (.KIT) files, or IR Files directly to G4 touch panels.
Currently, the G4 touch panels that support USB connection are the MVP-8400, MVP-
7500 and NXD/T-CV7.
25
Page 30

Using FileTransfer2
USB direct transfers require that you configure the Master Connection setting on the
panel itself to USB prior to attempting the transfer.
TCP/IP direct transfers require that you configure the Master Connection setting on the
panel itself to TCP/IP prior to attempting the transfer.
AMX USB Driver Information for USB Enabled G4 Panels
The AMX USB driver (required to connect to USB-enabled G4 panels via USB) is included with
the NetLinx Studio (as well as TPDesign4) installation programs. Once you have installed the latest
version of either NetLinx Studio (v2.4 or higher) or TPD4 (v2.4 or higher), you should have the
required USB driver.
After having installed NetLinx Studio 2 (or TPDesign4), follow the steps below to ensure a valid
USB connection to the G4 panels:
1. Power up the Panel without the USB cable connected to the panel.
2. Plug in the USB cable into the G4 panel.
3. You should see an USB icon show up in the System Tray.
4. Double click on the icon to bring up the list of USB devices (you should see the "AMX USB
LAN LINK"" device in the list).
5. If the "Install Driver" dialog doesn't appear automatically, select the Properties button and
then the Update Driver button.
6. When the Install Driver dialog does appear, click on the Next buttons, accepting all the default
prompts.
7. The OS will complain about the fact that the driver you are installing/updating does not have a
digital signature. This is acceptable, so select to continue the installation.
8. After installation is complete, you are ready to connect to the USB port of the G4 panel.
a. Open the Communication Settings dialog (select a file in the Transfer List and select Edit >
Communication Settings).
b. Select Virtual NetLinx Master as the Transport Connection Option.
c. Click OK to close this dialog.
Virtual NetLinx Master Transfers via USB or TCP/IP Connection
To use Virtual NetLinx Master to transfer TPDesign4 panel (.TP4) files, NetLinx Firmware (.KIT)
files or IR files directly to a MVP-7500, MVP-8400 or NXD/T-CV7 panel:
1. In the Send tab, click the Add button to open the Select Files for File Transfer dialog.
2. Click the Other tab, and select the type of file you want to transfer (only IRL/IRV, TP4 or IRN
files can be transferred via USB connection).
3. Click the Add button. This invokes the Open dialog, where you can locate and select the file
you want to transfer.
26
4. Select the desired file and click OK to close this dialog and invoke the Enter Device Mapping
Information dialog.
5. Review the mapping information, and click OK to return to the Select Files for File Transfer
dialog.
FileTransfer2
Page 31

Using FileTransfer2
6. Click OK to return to the Send tab, where the new file should appear in the Files to Send
queue.
7. Click inside the checkbox to the left of the file you just added. Keep in mind that any files with
a checkmark will be included in this transfer.
Note that the Connection column indicates that the file you just added is using Virtual NetLinx
Master.
8. Click the Send button to begin the transfer.
The procedure for Virtual NetLinx Master transfers via TCP/IP connection is identical.
Virtual NetLinx Master TCP/IP Transfers
FileTransfer2 supports direct connection to G4 panels via TCP/IP (and USB), for situations where
the target panel is not connected to a NetLinx Master. In this situation, you can use your PC's
Ethernet connection to connect directly to the panel, using your PC as a Virtual NetLinx Master.
There are three basic steps to Virtual NetLinx Master TCP/IP file transfers:
1. Configuring the Touch Panel for Virtual NetLinx Master TCP/IP Transfers
2. Configuring FileTransfer2 for Virtual NetLinx Master TCP/IP Transfers
3. Transferring Files Using a Virtual NetLinx Master TCP/IP Connection
Configuring the Touch Panel for Virtual NetLinx Master TCP/IP Transfers
If it is not already powered up and connected, apply power to the G4 panel and verify that it is
connected to the LAN via the TCP/IP connector on the rear (or side) of the panel.
1. Press and hold the grey Front Setup Access button (below the touch screen) for 3 seconds to
access the Setup page.
2. Press the Protected Setup button to access the Protected Setup page.
3. Use the on-screen keyboard to enter the password (the default password is 1988).
4. Press the System Connection button to access the System Connection Setup page.
5. Select Ethernet as the Master Connection.
6. Set the System Number to 0 (zero).
7. Select the Master URL / IP input box and enter the IP address of your PC.
To get your PC's IP address, select Start > Run and type cmd to open a DOS
window. Then, enter ipconfig to display the IP address of your PC.
ileTransfer2
8. Press the Back button to return to the Protected Setup page and press the Reboot button to
reboot the panel.
27
Page 32

Using FileTransfer2
Configuring FileTransfer2 for Virtual NetLinx Master TCP/IP Transfers
1. Click Edit and select Communication Settings to open the Communication Settings dialog.
2. Select Virtual NetLinx Master as the Transport Connection Option.
3. Click the Edit Settings button to access the Virtual NetLinx Master Settings dialog, which
displays the System number of the Virtual NetLinx Master (default = 1).
Assuming that the actual NetLinx Master is set to 0 (via the System Properties dialog - System
ID field), this default setting will work. However, if you have designated any other number as
the System ID, be sure to set this System Number to a different number than the System ID, to
avoid a conflict with the actual NetLinx Master (range = 1-65535).
As indicated in the Virtual NetLinx Master dialog, changes made to the system
number field will not take effect until all communications are stopped and restarted.
4. Click OK to close the Virtual NetLinx Master Settings dialog.
5. Click OK to close the Communication Settings dialog.
Transferring Files Using a Virtual NetLinx Master TCP/IP Connection
Verify that Virtual NetLinx Master is selected as the Transport Connection Option in
the Communication Settings dialog.
To use Virtual NetLinx Master to transfer TPDesign4 panel (.TP4) files or IR files directly to a
MVP-7500, MVP-8400 or NXD/T-CV7 panel via TCP/IP:
1. Click the Add button to open the Select Files for File Transfer dialog.
2. Click the Other tab, and select the type of file you want to transfer (only IRL/IRV, TP4 or IRN
files can be transferred via a Virtual NetLinx Master connection).
3. Click the Add button. This invokes the Open dialog, where you can locate and select the file
you want to transfer.
4. Select the desired file and click OK to close this dialog and invoke the Enter Device Mapping
Information dialog.
5. Review the mapping information, and click OK to return to the Select Files for File Transfer
dialog.
6. Click OK to return to the Send tab, where the new file should appear in the Files to Send
queue.
7. Click inside the checkbox to the left of the file you just added. Keep in mind that any files with
a checkmark will be included in this transfer.
Note that the Connection column indicates that the file you just added is using Virtual NetLinx
Master.
28
8. Click the Send button to begin the transfer.
FileTransfer2
Page 33

Using FileTransfer2
Virtual NetLinx Master USB Transfers
FileTransfer2 supports direct connection to G4 panels via USB (and TCP/IP), for situations where
the target panel is not connected to a NetLinx Master. In this situation, you can use your PC's USB
connection to connect directly to the panel, using your PC as a Virtual NetLinx Master.
There are three basic steps to Virtual NetLinx Master USB file transfers:
1. Configuring the Touch Panel for Virtual NetLinx Master USB Transfers
2. Configuring NetLinx Studio for Virtual NetLinx Master USB Transfers
3. Transferring Files Using a Virtual NetLinx Master USB Connection
Configuring the Touch Panel for Virtual NetLinx Master USB Transfers
If it is not already powered up and connected, apply power to the G4 panel and verify that it is
connected to the PC running NetLinx Studio via the USB connector on the rear (or side) of the
panel.
Connecting the Panel to your PC via USB:
1. Apply power to the panel by plugging in the power supply.
2. Wait for the splash screen to disappear, then use a (Type A) USB cable to connect the panel to
an available USB port on your PC. Plug the USB cable into the panel first, then connect to the
PC.
To configure the panel for Virtual NetLinx Master transfers via USB:
1. Press and hold the grey Front Setup Access button (below the touch screen) for 3 seconds to
access the Setup page.
2. Press the Protected Setup button to access the Protected Setup page.
3. Use the on-screen keyboard to enter the password (the default password is 1988).
4. Press the System Connection button to access the System Connection Setup page.
5. Select USB as the Master Connection.
6. Press the Back button to return to the Protected Setup page and press the Reboot button to
reboot the panel.
Configuring FileTransfer2 for Virtual NetLinx Master USB Transfers
1. Click Edit and select Communication Settings to open the Communication Settings dialog.
2. Select Virtual NetLinx Master as the Transport Connection Option.
3. Click the Edit Settings button to access the Virtual NetLinx Master Settings dialog, which
displays the System number of the Virtual NetLinx Master (default = 1).
Assuming that the actual NetLinx Master is set to 0 (via the System Properties dialog - System
ID field), this default setting will work. However, if you have designated any other number as
the System ID, be sure to set this System Number to a different number than the System ID, to
avoid a conflict with the actual NetLinx Master (range = 1-65535).
ileTransfer2
As indicated in the Virtual NetLinx Master Settings dialog, changes made to the
system number field will not take effect until all communications are stopped and
restarted.
29
Page 34

Using FileTransfer2
4. Click OK to close the Virtual NetLinx Master Settings dialog.
5. Click OK to close the Communication Settings dialog.
Transferring Files Using a Virtual NetLinx Master USB Connection
Note: Verify that Virtual NetLinx Master is selected as the Transport Connection Option in the
Communication Settings dialog.
To use Virtual NetLinx Master to transfer TPDesign4 panel (.TP4) files or IR files directly to a
MVP-7500, MVP-8400 or NXD/T-CV7 panel via USB:
1. Click the Add button to open the Select Files for File Transfer dialog.
2. Click the Other tab, and select the type of file you want to transfer (only IRL/IRV, TP4 or IRN
files can be transferred via a Virtual NetLinx Master connection).
3. Click the Add button. This invokes the Open dialog, where you can locate and select the file
you want to transfer.
4. Select the desired file and click OK to close this dialog and invoke the Enter Device Mapping
Information dialog.
5. Review the mapping information, and click OK to return to the Select Files for File Transfer
dialog.
6. Click OK to return to the Send tab, where the new file should appear in the Files to Send
queue.
7. Click inside the checkbox to the left of the file you just added. Keep in mind that any files with
a checkmark will be included in this transfer.
Note that the Connection column indicates that the file you just added is using Virtual NetLinx
Master.
8. Click the Send button to begin the transfer.
30
FileTransfer2
Page 35

Setting Program Preferences
Overview
Select Settings > Preferences to access the Preferences dialog. Use the options in this dialog to set
various (global) default preferences for FileTransfer2.
Preferences dialog
Use the options in the Preferences dialog (Settings > Preferences) to set default preferences for file
transfer operations. The options on this tab include:
File Transfer Options
Automatically select reboot when sending a TKN file (default = enabled).
When sending a TKN, automatically send the associate SRC (default = enabled).
Automatically choose "Smart Transfer" when sending a TP4 file (default = disabled).
By default, select "Send Bitmaps" when sending a TPD file (default = enabled).
Setting Program Preferences
By default, select "Send Icons" when sending a TPD file (default = enabled).
By default, select "Send Fonts" when sending a TPD file (default = enabled).
By default, connect directly to a touch panel (no master) whenever transferring TPD files
(only available for Serial Connections) (default = disabled).
When started from a console, auto-close when all console file transfers are finished. Any
interaction with the GUI will prevent this (default = enabled).
Show "Load List" summary (default = enabled).
Workspace Options
Restore Workspace on Startup (default = enabled).
Display System Configuration Setting in the Identifier (default = enabled).
After opening a Workspace File: These options allow you to control how the application
behaves when a Workspace file (AXW) is opened:
Visit the "Quick Load" dialog (default)
Visit the "Add" dialog
Do nothing after opening a Workspace file
General Options
ileTransfer2
Recent File List size (default = 9).
31
Page 36

Setting Program Preferences
NetLinx/Axcess Source Code Passwords
These options allow you to supply the password that was applied to the source code files at the time
they were compiled in NetLinx Studio. Source Code Passwords are only applicable to source code
files that are received from a master, and allow you to open the received code file for viewing/
editing in NetLinx Studio. If the source code files were compiled with password protection (in
NetLinx Studio) and then retrieved from the master (via FileTransfer2) without supplying the
correct password (one for each platform - NetLinx and Axcess), the file will be received, but it will
appear to be empty if an attempt is made to open and view the file in NetLinx Studio.
Axcess source code passwords are limited to numbers only.
32
FileTransfer2
Page 37

Using the FTCon Console Program (Advanced Programmers Only)
Using the FTCon Console Program
(Advanced Programmers Only)
The FTCon.exe ("FTCon") program is provided with FileTransfer2 so that transfers may be made
from a normal windows console (DOS box). Command line arguments supplied to FTCon.exe are
passed along to the FileTransfer 2 program which then runs from the system tray.
FTCon is intended for use only by advanced programmers.
FTCon Command-line Arguments:
APW File Transfer Arguments
AXW File Transfer Arguments
FTL File Transfer Arguments
Single File Transfer Arguments
How to read the command line argument descriptions:
•"text" Quoted text indicates a double quoted argument.
•[ ] Brackets indicate the item is optional.
•-option
•--option
Options start with a dash or double-dash (GNU style).
The emboldened letter is the acceptable abbreviated form.
Case is not relevant.
Options are always optional so they are not bracketed (see above).
If the option takes an argument, then the keyword is immediately followed by an equals
sign (`=') and the argument's value.
A pipe ( | )between two or more options indicates a boolean OR relationship.
APW File Transfer Arguments
The following arguments specify how to launch the FTCon program with an APW file:
"FileName" ["Project Id"] [“System Id”]
"FileName" - Fully qualified file name of the APW within quotes.
"Project Id" – If not supplied, all files in the workspace are transferred. Otherwise, this
must be the identifier of a project. The first matching project is transferred.
"System Id" - If not supplied, all systems in the project are transferred. Otherwise, this
must be the identifier of a system. The first matching system is transferred.
Examples:
ileTransfer2
ftcon.exe "test.apw" Send the entire workspace contained in test.apw.
ftcon.exe "test.apw" "proj1" Sends the project named "proj1" contained in test.apw.
ftcon.exe "test.apw" “proj1” "sys1" Sends the system named "sys1" within “proj1”
33
Page 38

Using the FTCon Console Program (Advanced Programmers Only)
AXW File Transfer Arguments
The following arguments specify how to launch the FTCon program with an AXW file:
"FileName" ["Project Id"] [“System Id”]
"Project Id" – If not supplied, all files in the workspace are transferred. Otherwise, this
must be the identifier of a project. The first matching project is transferred.
"System Id" - If not supplied, all systems in the project are transferred. Otherwise, this
must be the identifier of a system. The first matching system is transferred.
FTL File Transfer Arguments
The following arguments specify how to launch the FTCon program with an FTL file:
"FileName" –Send | -Receive
"FileName" - Fully qualified file name of the FTL within quotes.
-Send |-Receive Indicates whether to load the specified FTL into the send or receive
queue.
Send is assumed by default.
Single File Transfer Arguments
The following arguments specify how to launch the FTCon program with a single file.
All arguments must be present on the command line, except where noted, for the specified file or
the file will not transfer.
The order of the arguments is important and will need to follow the order listed below.
"FileName" CommSettings [DeviceMapping] –Send|Receive -Boot
-Axcess -Optimize -Direct –Tpd=BIF –User="username:password"
"FileName" - Fully qualified file name of the file to transfer within quotes.
CommSettings - Specifies the communication protocol and settings used for transferring
the file.
For a TCP/IP transfer, the command would be:
ip/url:[port]:[ping-before-connect]
The IP/URL address can be either the IP address or an URL and the port specifies the port on the
master.
An example for a TCP/IP transfer would be:
192.168.221.3:1319:1
-or-
amx.boardroom.net:1319:0
The port is optional and defaults to 1319. Ping-before-connect is optional and the default is
1(enabled).
34
For serial transfer, the command would be:
commport,baud,[databits],[parity],[stopbits],[flow]
commport = specifies the comm. port for transfer (i.e. COM2).
baud = specifies baud rate (i.e. 9600 or 57600).
databits = specifies the number of data bits. This should be set to 8.
FileTransfer2
Page 39

Using the FTCon Console Program (Advanced Programmers Only)
parity = specifies the parity. This should be set to N for no. Other values are O for odd, E
for even, M for mark and S for space.
stopbits = specifies stop bit value. This should be set to 1.
flow = specifies flow control. This should be set to N for none. Other values are D for
DTR-DSR, X for XON-XOFF, and R for RTS-CTS.
An example of a serial transfer over COM3 port would be:
COM3,57600,8,N,1,N
For VNM/USB transfers, the command would be:
VNM=systemNumber
where V specifies the VNM and the system Number is the system number of the master that the
device is connected to.
An example for a VNM transfer would be:
VNM=1
For modem transfers, the command would be:
COM3,57600,8,N,1,N,555-123-4567
DeviceMapping - For NetLinx masters, the device mapping will be in the D:P:S form:
128:1:3455
For Axcess masters, the device mapping argument will contain a single device value:
128
For NetLinx masters, the default DPS is 0:1:0. For Axcess masters there is no default
and a device number (even zero) must be specified. This is because a single device
number is used to differentiate an Axcess transfer from a NetLinx transfer.
Send - This flag indicates that the specified file is to be sent to the device.
Receive - This flag indicates that the specified file is to be received from the device.
Axcess - This flag indicates that the specified transfer is an Axcess transfer
Boot - This flag indicates that the master should be rebooted after all transfers on the
connection are finished.
User - For NetLinx masters that have security enabled, the argument will need to contain
the username and password separated by a colon:
–User="fieldtech:mypassword"
Optimize - For TP4 transfers, this enables Smart Transfer. Smart Transfer automatically
optimizes the download by identifying the various components (fonts, bitmaps, sound
files, even pages and popup pages) of the panel file you have specified for download, and
comparing them to the elements already present on the target panel. Any shared
components are not downloaded, resulting in a much faster transfer (assuming that there
are shared components).
Direct - Indicates a "Direct To Device" connection. Any device mapping is ignored, and
this method is only valid for single-file transfers.
ileTransfer2
Tpd - For TPD transfers, this indicates whether to send bitmaps, icons, and fonts.
To not send bitmaps, icons, or fonts, do not specify the equal "=" sign.
35
Page 40

Using the FTCon Console Program (Advanced Programmers Only)
-t=B|I|F
B = Send bitmaps within the TPD file.
I = Send icons within the TPD file.
F = Send fonts within the TPD file.
You many use any combination. For example:
-t do not send bitmaps, fonts, or icons.
-t=B send bitmaps only.
-t=BI send bitmaps and icons only.
-t=BF send bitmaps and fonts only.
-t=BIF send bitmaps, icons, and fonts.
36
FileTransfer2
Page 41

Using the FTCon Console Program (Advanced Programmers Only)
ileTransfer2
37
Page 42

AMX reserves the right to alter specifications without notice at any time.
ARGENTI NA • AUST RALIA • BE LGIUM • B RAZIL • C ANADA • C HINA • EN GLAND • FR ANCE • GE RMANY • G REECE • H ONG KON G • INDIA • INDONE SIA • ITALY • JAPAN
LEBANON • MALAYSIA • MEXICO • NETHERLANDS • NEW ZEALAND • PHILIPPINES • PORTUGAL • RUSSIA • SINGAPORE • SPA IN • SWITZERLAND • THAILAND • TURKEY • USA
ATLANTA • BOSTON • CHICAGO • CLEVELAND • DALLA S • DENVER • INDIANAPOLIS • LOS ANGELES • MINNEAPOLIS • PHILADELPHIA • PHOENIX • PORTLAND • SPOKANE • TAMPA
3000 RESEARCH DRIVE, RICHARDSON, TX 75082 USA • 800.222.0193 • 469.624.8000 • 469-624-7153 fax • 800.932.6993 technical support • www.amx.com
2005 AMX Corporation. All rights reserved. AMX, the AMX logo, the building icon, th e home icon, and the light bulb icon are all trademarks of AMX Corporation.
©
033-004-2931 8/05
In Canada doing business as Panja Inc.
 Loading...