

Page 1
Axcess
Programming Language
instruction manual
Software
Page 2

AMX Limited Warranty and Disclaimer
AMX Corporation warrants its products to be free of defects in material and workmanship under normal use for
three (3) years from the date of purchase from AMX Corporation, with the following exceptions:
• Electroluminescent and LCD Control Panels are warranted for three (3) years, except for the display and touch
overlay components that are warranted for a period of one (1) year.
• Disk drive mechanisms, pan/tilt heads, power supplies, MX Series products, and KC Series products are
warranted for a period of one (1) year.
• Unless otherwise specified, OEM and custom products are warranted for a period of one (1) year.
• Software is warranted for a period of ninety (90) days.
• Batteries and incandescent lamps are not covered under the warranty.
This warranty extends only to products purchased directly from AMX Corporation or an Authorized AMX Dealer.
AMX Corporation is not liable for any damages caused by its products or for the failure of its products to perform.
This includes any lost profits, lost savings, incidental damages, or consequential damages. AMX Corporation is not
liable for any claim made by a third party or by an AMX Dealer for a third party.
This limitation of liability applies whether damages are sought, or a claim is made, under this warranty or as a tort
claim (including negligence and strict product liability), a contract claim, or any other claim. This limitation of
liability cannot be waived or amended by any person. This limitation of liability will be effective even if AMX
Corporation or an authorized representative of AMX Corporation has been advised of the possibility of any such
damages. This limitation of liability, however, will not apply to claims for personal injury.
Some states do not allow a limitation of how long an implied warranty last. Some states do not allow the limitation or
exclusion of incidental or consequential damages for consumer products. In such states, the limitation or exclusion of
the Limited Warranty may not apply. This Limited Warranty gives the owner specific legal rights. The owner may
also have other rights that vary from state to state. The owner is advised to consult applicable state laws for full
determination of rights.
EXCEPT AS EXPRESSLY SET FORTH IN THIS WARRANTY, AMX CORPORATION MAKES NO
OTHER WARRANTIES, EXPRESSED OR IMPLIED, INCLUDING ANY IMPLIED WARRANTIES OF
MERCHANTABILITY OR FITNESS FOR A PARTICULAR PURPOSE. AMX CORPORATION
EXPRESSLY DISCLAIMS ALL WARRANTIES NOT STATED IN THIS LIMITED WARRANTY. ANY
IMPLIED WARRANTIES THAT MAY BE IMPOSED BY LAW ARE LIMITED TO THE TERMS OF THIS
LIMITED WARRANTY.
Page 3

Table of Contents
Table of Contents
Introduction ...............................................................................................................1
Device Numbers................................................................................................................ 1
Video Monitors .................................................................................................................. 2
Connecting the System ..................................................................................................... 2
Blinking Light Status.......................................................................................................... 3
Axcess Basics ..........................................................................................................5
Format of the Programming Language ............................................................................. 5
Statements and Compound Statements ........................................................................... 5
Comments Within the Program ......................................................................................... 6
Identifiers........................................................................................................................... 7
Keywords........................................................................................................................... 7
Mainline ............................................................................................................................. 7
Definition Sections............................................................................................................. 9
Starting a new program ............................................................................................................ 9
DEFINE_DEVICE..................................................................................................................... 9
DEFINE_CONSTANT ............................................................................................................ 10
DEFINE_VARIABLE .............................................................................................................. 11
DEFINE_LATCHING.............................................................................................................. 11
DEFINE_MUTUALLY_EXCLUSIVE....................................................................................... 12
DEFINE_START .................................................................................................................... 12
DEFINE_PROGRAM ............................................................................................................. 12
PROGRAM_NAME ................................................................................................................ 13
Using Input and Output ..........................................................................................15
Channels ......................................................................................................................... 15
Input Change Keywords .................................................................................................. 15
Changing the State of a Channel .................................................................................... 16
Output Change Keywords ............................................................................................... 16
Direct Assignment ........................................................................................................... 18
Putting Input and Output Together .................................................................................. 18
Channel Characteristics ........................................................................................19
Parts of an Output Channel............................................................................................. 19
The Device-Channel Concept ......................................................................................... 19
Defining Latching............................................................................................................. 19
Mutually Exclusive........................................................................................................... 20
Defining momentary mutually exclusive................................................................................. 20
xcess Programming Language
i
Page 4

Table of Contents
Defining mutually exclusive latching ...................................................................................... 21
Defining mutually exclusive toggling ...................................................................................... 21
Putting it all to work ................................................................................................................ 22
Programming Feedback.................................................................................................. 23
Grouping feedback statements .............................................................................................. 23
Device and Channel Keywords....................................................................................... 24
Define_Combine .................................................................................................................... 25
Define_Latching ..................................................................................................................... 26
Define_Mutually_Exclusive .................................................................................................... 26
Define_Toggling ..................................................................................................................... 26
The Variable Assignment Method ................................................................................... 27
Sample Program .................................................................................................................... 28
Arrays and Strings ................................................................................................. 31
Defining Arrays................................................................................................................ 31
Accessing and Storing Array Values............................................................................... 31
Strings ............................................................................................................................. 33
String literals .......................................................................................................................... 33
String expressions................................................................................................................. 33
Arrays as Strings............................................................................................................. 34
String Lengths ................................................................................................................. 34
Array Manipulation Keywords ......................................................................................... 36
Uppercase vs. Lowercase............................................................................................... 38
Setting uppercase and lowercase .......................................................................................... 38
Sending Strings............................................................................................................... 39
Array Keywords............................................................................................................... 39
String Keywords .............................................................................................................. 40
Levels ......................................................................................................................41
Introduction to Levels...................................................................................................... 41
Creating Levels ............................................................................................................... 41
Level Keywords............................................................................................................... 43
Using Levels.................................................................................................................... 44
Reading Levels ...................................................................................................................... 44
Making a preset...................................................................................................................... 44
Using bargraphs..................................................................................................................... 44
Connecting levels................................................................................................................... 45
Operators ................................................................................................................47
Changing and Comparing Values ................................................................................... 47
Arithmetic Operators ....................................................................................................... 47
ii
Axcess Programming Language
Page 5

Table of Contents
Relational Operators ....................................................................................................... 47
True and false ........................................................................................................................ 48
Logical Operators ............................................................................................................ 49
Bitwise Operators ............................................................................................................ 50
Abbreviations................................................................................................................... 51
Precedence Among Operators........................................................................................ 51
Operator Keywords ......................................................................................................... 52
Bitwise Operator Keywords ............................................................................................. 53
Variable Types and Conversions ..........................................................................55
ASCII Codes.................................................................................................................... 55
Integer Arrays.................................................................................................................. 55
Conversion keywords............................................................................................................. 56
Two-Dimensional Arrays .......................................................................................59
Storing Values ................................................................................................................. 59
Retrieving values.................................................................................................................... 60
IF and the Boolean Expressions ...........................................................................63
Boolean Expressions....................................................................................................... 63
The IF Statement............................................................................................................. 64
The IF...ELSE Set of Statements ........................................................................................... 64
The IF...ELSE IF Set of Statements ....................................................................................... 64
Nesting ............................................................................................................................ 64
The SELECT...ACTIVE Statement.................................................................................. 65
More Boolean operators......................................................................................................... 66
Reading a Boolean expression table ..................................................................................... 66
Boolean Keywords .......................................................................................................... 67
While Keywords ......................................................................................................69
WHILE ............................................................................................................................. 69
MEDIUM_WHILE ............................................................................................................ 69
LONG_WHILE................................................................................................................. 69
While Keywords............................................................................................................... 70
Using Buffers ..........................................................................................................73
Communicating to the Outside World.............................................................................. 73
Receiving strings.................................................................................................................... 73
Creating buffers...................................................................................................................... 73
Storing characters .................................................................................................................. 73
Retrieving characters ............................................................................................................. 74
Buffer Keywords .............................................................................................................. 76
Waits and Timer Keywords ....................................................................................79
xcess Programming Language
iii
Page 6

Table of Contents
Controlling Time in Axcess.............................................................................................. 79
The Wait List ................................................................................................................... 79
Multiple Waits.................................................................................................................. 81
Naming Waits.................................................................................................................. 82
Canceling, Pausing, and Restarting Waits...................................................................... 82
Special Uses of Wait ....................................................................................................... 83
The Wait_Until Keyword.................................................................................................. 83
Misusing Wait_Until......................................................................................................... 83
Naming and Removing Wait_Untils ................................................................................ 84
Timer Keywords .............................................................................................................. 84
Using Time, Date, and Day ....................................................................................87
Time, Date, and Day Keywords ...................................................................................... 88
Using Subroutines .................................................................................................89
Defining a Subroutine...................................................................................................... 89
Calling subroutines................................................................................................................. 89
Local Variables and Parameters..................................................................................... 90
Local Variables....................................................................................................................... 90
Parameters............................................................................................................................. 90
Passing values back to the caller........................................................................................... 91
Local Variables and Parameter Keywords...................................................................... 93
Include Files and System_Calls ............................................................................95
Managing Large Programs.............................................................................................. 95
Include files ............................................................................................................................ 95
System_Calls and Library files........................................................................................ 96
Factory System_Calls ..................................................................................................... 97
Pre-Processor Statements ..................................................................................101
Debugging .............................................................................................................103
Types of Errors.............................................................................................................. 103
Compilation Errors and Warnings ................................................................................. 103
Run-Time Errors............................................................................................................ 105
Using AMX BUG .................................................................................................................. 105
Tracking down your errors ............................................................................................ 106
Tracing program flow ........................................................................................................... 106
Viewing Variables.......................................................................................................... 107
Compiler Error Messages ....................................................................................109
The External_Control Protocol ...........................................................................113
Controlling Axcess from the Outside............................................................................. 113
iv
Axcess Programming Language
Page 7

Table of Contents
Sending Commands...................................................................................................... 113
Responses from Axcess................................................................................................ 114
External_Control .................................................................................................................. 115
Appendix ...............................................................................................................117
Axcess Programming Standards................................................................................... 117
Axcess Keywords .......................................................................................................... 126
ASCII Code Chart.......................................................................................................... 127
Hexadecimal Chart Abbreviations ................................................................................. 128
Accessing the AMX BBS ......................................................................................129
About Worldgroup Manager .......................................................................................... 129
Installing Worldgroup Manager ..................................................................................... 129
Adding the AMX BBS to the Worldgroup Manager: ...................................................... 129
xcess Programming Language
v
Page 8

Table of Contents
vi
Axcess Programming Language
Page 9
Introduction
The Axcess system is a microprocessor-based control system capable of controlling both simple
and complex devices, giving you complete control of every device in any system. Through a
flexible language, Axcess can be programmed to handle almost any task. It can automatically dim
lights, increase volume controls to preset levels, turn on video projectors, and much more. An IBMcompatible computer is required to program the Axcess Control System, and not much memory is
needed. Even complex Axcess programs can be handled by an average laptop computer. Once the
system is programmed, the computer is needed only for diagnostic tests and for loading or saving
programs.
Axcess is designed to be user-friendly. Although there are more than 90 commands, many are selfexplanatory and take little time to master. If you make a mistake in your program, Axcess finds the
error and reports it to you. With this helpful aid, you can make both minor and major programming
changes quickly and easily in the field.
Device Numbers
One of the most fundamental concepts in Axcess programming is the device number. A device
number is a unique number from 1 to 255 designating each device connected to Axcess via AXlink.
Introduction
Each device on AXlink must have a unique device number. For Axcess CardFrames, the device
number of a card is set by the slot number and the DIP switch setting on the Server Card. For box
devices, the address is set with a DIP switch on the device itself. The DIP switch on the Server Card
sets the address of the card in slot 1. For example, if the DIP switch on the Server Card is 17, then
the device number of card slot 1 will also be 17. Card slot 2's device number will be 18 (17+1); card
slot 3's is 19 (17+2), and so on. Card slot 16's device number will be 32 (17+15).
Each AXlink device has its own DIP switch to select its device number. The Touch Panel has a
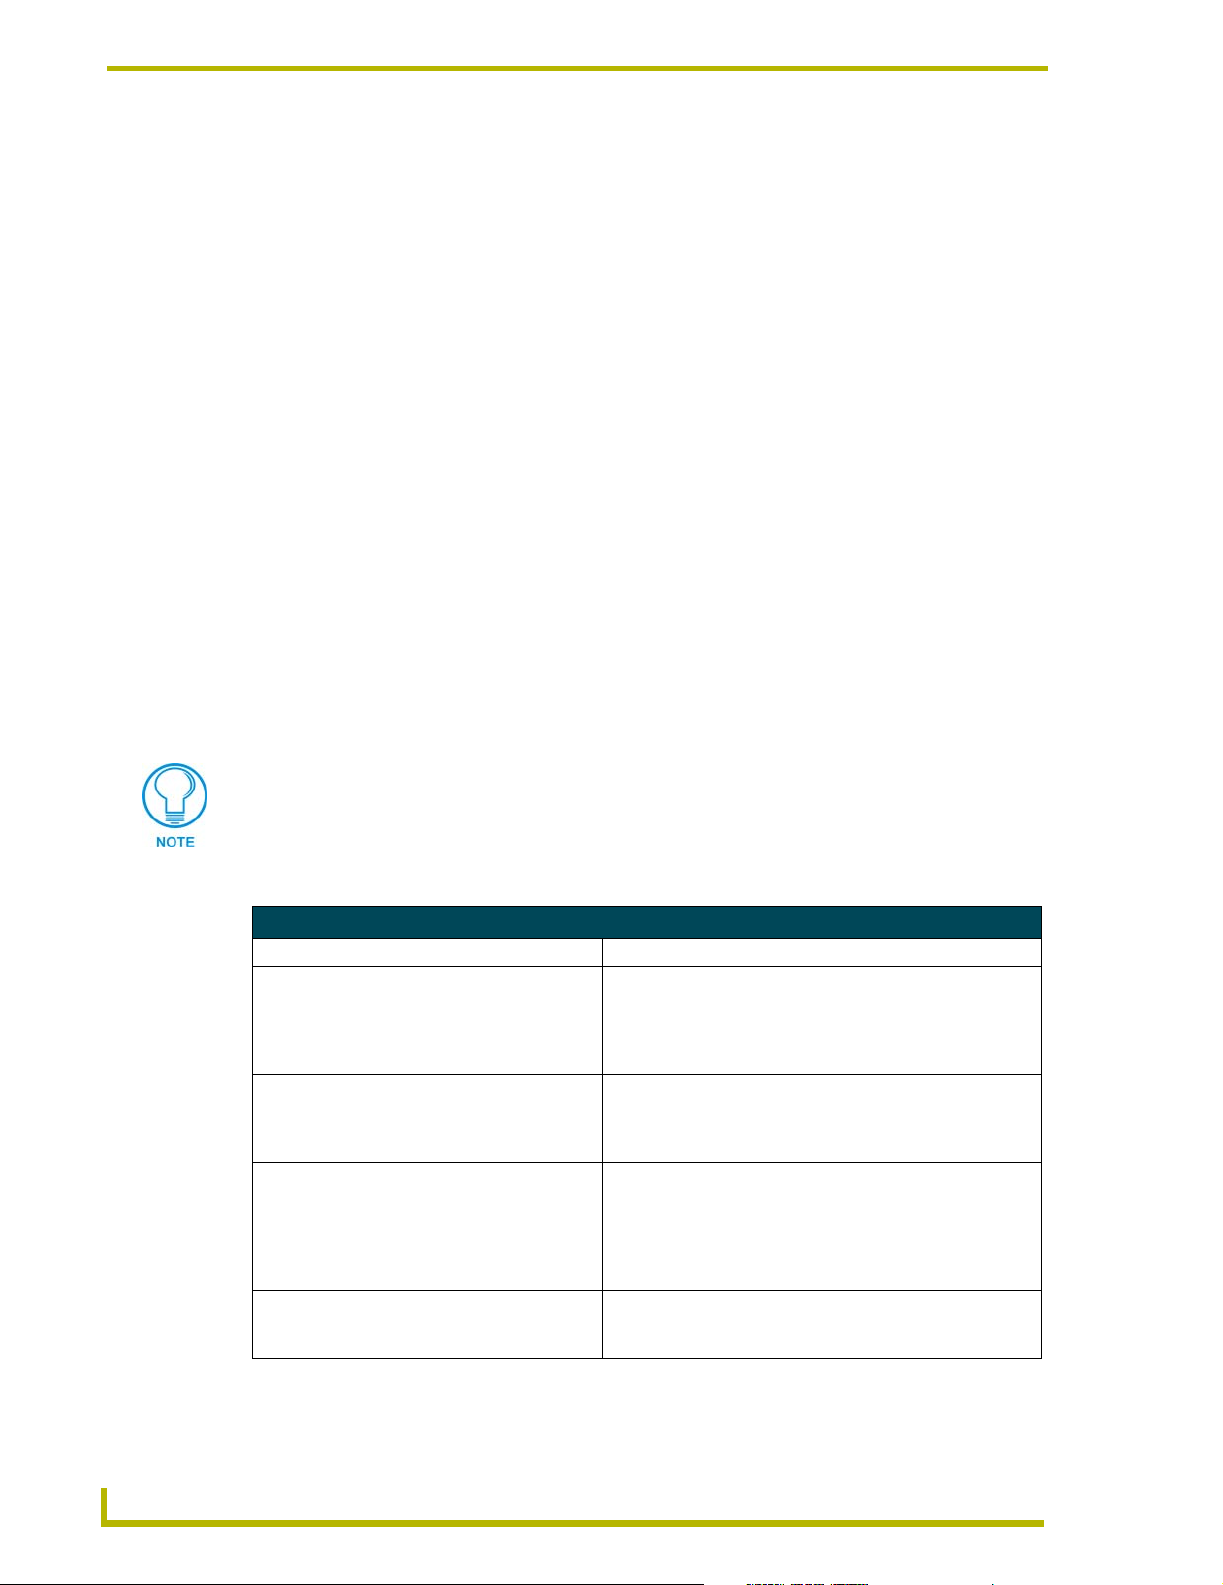
keypad to enter its device number on the protected setup page. The table below shows the
recommended device numbers for Axcess CardFrames and other Axcess devices. These numbers
are only for the card in slot 1 of each CardFrame; for each consecutive device, add one to the
appropriate number.
Recommended Device Numbers
DIP Switch Settings
CardFrame # or device type Device #12345678
1 1 10000000
2 17 10001000
3 33 10000100
4 49 10001100
5 65 10000010
6 81 10001010
Boxes (AXB-XXX) 96 00000110
AXB-FD 127 1 1 111110
Panels (AXT-XXX and AXM-XXX) 128 0 0 000001
Wave system (2-way RF) 192 00000001
Axcess Programming Language
1
Page 10
Introduction
As shown in the table above, AMX recommends that all panels, infrared (IR) receivers, and radio
frequency (RF) receivers start on device number 128, and that the number increase with each
device. All AXB-xxx (boxes) start at device number 96, and increase with each device. The AXBFD (floppy disk drive) starts at 127 and decreases with each AXB-FD. When numbering panels,
start with RF and IR, then SoftWire panels such as the AXU-MSP8 or AXU-SPL4, and then touch
panels. Two-way RF, wireless Wave systems should start at device number 192.
Video Monitors
The Axcess Control System automatically detects whether your monitor is color or monochrome.
However, if your monitor reports being a CGA monitor, but has no color (such as LCD or plasmatype monitors), you must force the Axcess Control System into monochrome mode. To do this,
launch Axcess by typing:
C:\AMX DOS TOOLS \AXCESS> AXCESS /B
Connecting the System
At this point, the Axcess program should be installed on your computer. The next step is to connect
the system. To supply power to the CardFrame, plug in the power supply from the power outlet to
the Axcess Control System. The green 2-pin Phoenix connector should be plugged into the lower
right corner on the back of the CardFrame. Next, the Axcess Programming Cable must be
connected from the communications port of the computer to the 9-pin connector on the Central
Controller.
If the Central Controller is in slot MC1, the 9-pin connector on the back of the CardFrame can be
used.
The following table lists solutions to some common communication problems.
Communications Problem Resolutions
Cause Resolution
The baud rate of the Axcess Control System is
different than that of the Central Controller.
The communications port number of the Axcess
Control System is different than that of the communications port in which the Central Controller
cable is plugged.
The communications settings of the Axcess
Control System are different than that of the
Central Controller.
The connecting cable is not made by AMX. Inspect the cable's pinout. The cable connection chart in the
The Axcess Control System baud rate can be found with the
Configure... option in the Communications menu, and an
explanation of setting the Central Controller baud rate is in
the AXC-EM Enhanced Master Card instruction manual. Set
both to the same setting.
The Axcess Control System com port number can be found
with the Configure... option in the Communications menu.
Make sure it matches the correct Central Controller communications port.
The Axcess Control System communications settings can be
found with the Configure... option in the Communications
menu, and an explanation of changing these settings for the
Central Controller is in the AXC-EM Enhanced Master Card
instruction manual. Both should be set to eight data bits, no
parity, and one stop bit.
AXC-EM Enhanced Master Card instruction manual should
help determine the solution.
2
Axcess Programming Language
Page 11

Introduction
Blinking Light Status
The green Status LED, on the front of the Central Controller, lights when the Central Controller is
plugged in, and power is supplied to the CardFrame. The AXlink LED uses a series of different
flash patterns to indicate the status of the control system:
• One blink per second: Indicates the system is operating normally.
• Two blinks per second: Indicates the devices specified in the program do not match the
• Three blinks per second: Indicates there is an AXlink communications error, probably due to a
• No blinks: If the AXlink LED is on but not flashing, there is no AXlink activity. The
devices found on AXlink. For a full description, refer to the Compare
current devices... option in the Diagnostics Menu section of this manual.
wiring problem. Check all the Axcess wiring, making sure each cable
is firmly connected.
Central Controller has no Axcess program loaded, or there is no Central Controller connected to the AXlink bus.
Axcess Programming Language
3
Page 12

Introduction
4
Axcess Programming Language
Page 13

Axcess Basics
Format of the Programming Language
The Axcess programming language is in a free format, meaning that the source code is independent
of tabs and carriage returns. Utilize tabs and carriage returns in a consistent method of code
placement to make the code readable. In this manual, the following outline format is used:
IF (X = 1)
{
PUSH[PANEL,1]
{
Y = 2
Z = 3
}
}
However, the above program statement executes the same even if it looks like this:
IF(X = 1) {PUSH[PANEL,1] {Y = 2 Z = 3}}
The syntax is identical, but the spacing is different. The first method is recommended because it is
easier to read, and adheres to Axcess programming conventions.
Axcess Basics
Statements and Compound Statements
In Axcess programming, most keywords and operators require a complete statement. A keyword is
a word or series of words signifying the operation for Axcess to execute; the keyword and all its
parameters form the statement. For example, the keyword to turn a channel on is ON, and the
statement to turn on a particular channel is ON [RELAY_CARD,RELAY].
Statements can also involve mathematical or logical operations when operators are used. An
operator is a character that performs a specific mathematical or relational function. For example,
the operator used to set a variable equal to a value is '='. For example, the statement used to set
variable X to the number 5 is X = 5. The following table lists special operators.
Special Operators
Operator Name Function
{ } Braces Combine several statements into a function.
[ ] Brackets • Enclose the device-channel: [device, channel].
• Enclose the location of a storage space in an array.
• Enclose the instance number for use with a SYSTEM_CALL.
( ) Parentheses • Enclose the expression after an IF statement.
• Enclose a mutually exclusive set in the Define section.
• Enclose DEFINE_CALL parameter list.
• Group a mathematical operation.
Several different statements grouped into one is called a compound statement. Braces are used to
enclose this type of statement. Compound statements are used if several statements are to be
executed in a situation where Axcess syntax will allow just one. The statements are executed in the
sequence they are programmed.
xcess Programming Language
5
Page 14

Axcess Basics
The number of open and closed braces must be the same in your program. After compiling, Axcess
will list an error if the numbers are different.
PUSH[DEVICE, CHANNEL] (*Input request*)
{
ON [DEVICE, CHANNEL] (*Output command*)
X = 5
}
In this example, when button 1 on PANEL is pressed, relay 5 on RELAY_CARD is turned on. Also,
the variable X is assigned the value of 5. The open brace indicates the beginning of the compound
statement, and the close brace ends it.
If you only need the relay to be turned on, the statement could have been written like this:
PUSH[PANEL,1]
ON [RELAY_CARD,5]
Since there is only one statement after the line PUSH[PANEL,1], braces are not necessary, but can
be used.
PUSH[PANEL,1]
{
ON [RELAY_CARD,5]
}
Comments Within the Program
Axcess allows you to place helpful comments inside your program. A comment is a description or
remark not considered part of the actual program. Comments are strictly for the benefit of the
programmer, to be used as navigational and organizational aids. Any text placed between an open
parenthesis and asterisk and the inverse, an asterisk and closed parenthesis will not be compiled,
even if the text is separated over several lines. For example:
(* This is a comment. *)
Comments are especially helpful in long programs, where you can label different sections for future
reference. You can place any number of comments in your program, the compiler will pass over
them. For example:
(* This section will define all the devices used. *)
DEFINE_DEVICE
VCR = 1 (* AXC-IR/S: VCR *)
CD = 2 (* AXC-IR/S: CD PLAYER *)
VPROJ = 3 (* AXC-IR/S: VIDEO PROJECTOR *)
RELAY = 7 (* AXC-IR/S: SCREEN *)
LIGHTS = 8 (* AXC-IR/S: LIGHTS *)
TP = 128 (* AXU-CA1Ø COLOR VIDEO PANEL *)
Comments can also be used to label statements or lines of code, for your reference. As illustrated in
the next example, descriptions of PUSH statements can be useful:
DEFINE_PROGRAM
PUSH[TP,33] (* SLIDE PRESET *)
{
PULSE[RELAY,SCREEN_DN]
PULSE[LIGHTS,LIGHT_LOW]
PULSE[VPROJ,VPROJ_IN_4]
}
6
Axcess Programming Language
Page 15

Axcess Basics
PUSH[TP,34] (* VCR PRESET *)
{
PULSE[RELAY,SCREEN_DN]
PULSE[LIGHTS,LIGHT_OFF]
PULSE[VPROJ,VPROJ_IN_1]
}
PUSH[TP,35] (* CD PRESET *)
{
PULSE[RELAY,SCREEN_UP]
PULSE[LIGHTS,LIGHT_FULL]
PULSE[VPROJ,VPROJ_IN_2]
}
These comments will help you find the SLIDE preset, VCR preset, and the CD preset of the Touch
Panel much more quickly.
Identifiers
Identifiers are used to denote a device, constant, or variable. For example, T_PANEL could
represent an AMX Touch Panel, PLAY could represent the first channel, and CD_SELECT could
represent the current compact disc player. There are certain guidelines for identifiers:
! Identifiers must begin with a letter followed by any combination of letters, numbers, or
underscores. No spaces are allowed.
! Valid identifiers: "CD3", "TOUCH_PANEL"
! Invalid identifiers: "3VHS", "CD PLAYER", "*RGB4"
! The identifier must have fewer than 26 characters.
! Identifiers are not case-sensitive.
! Each identifier must be unique. Once you define VHS3, do not choose the same name for
a different identifier.
Keywords
Keywords are certain words reserved for Axcess functions. These are integral to the system and
cannot be redefined or used as identifiers. For example, PUSH is a keyword, and cannot be used as
an identifier.
Mainline
An Axcess program typically consists of several definition sections, such as DEFINE_DEVICE,
DEFINE_VARIABLE, and DEFINE_PROGRAM. Each definition section has a different function.
Not all definition sections are required for a complete program. However, the
DEFINE_PROGRAM section is required because it contains the program code executed by the
Central Controller. This section of program code is also known as mainline. It is executed
continuously as long as the Central Controller has power.
1. When the Central Controller is powered up, it first executes the code in the DEFINE_START
section.
xcess Programming Language
7
Page 16
Axcess Basics
2. Then, it starts at the beginning of mainline, the first line of program code after the
DEFINE_PROGRAM header. While executing mainline, the Central Controller processes the
statements in the program, taking whatever actions are defined by the program.
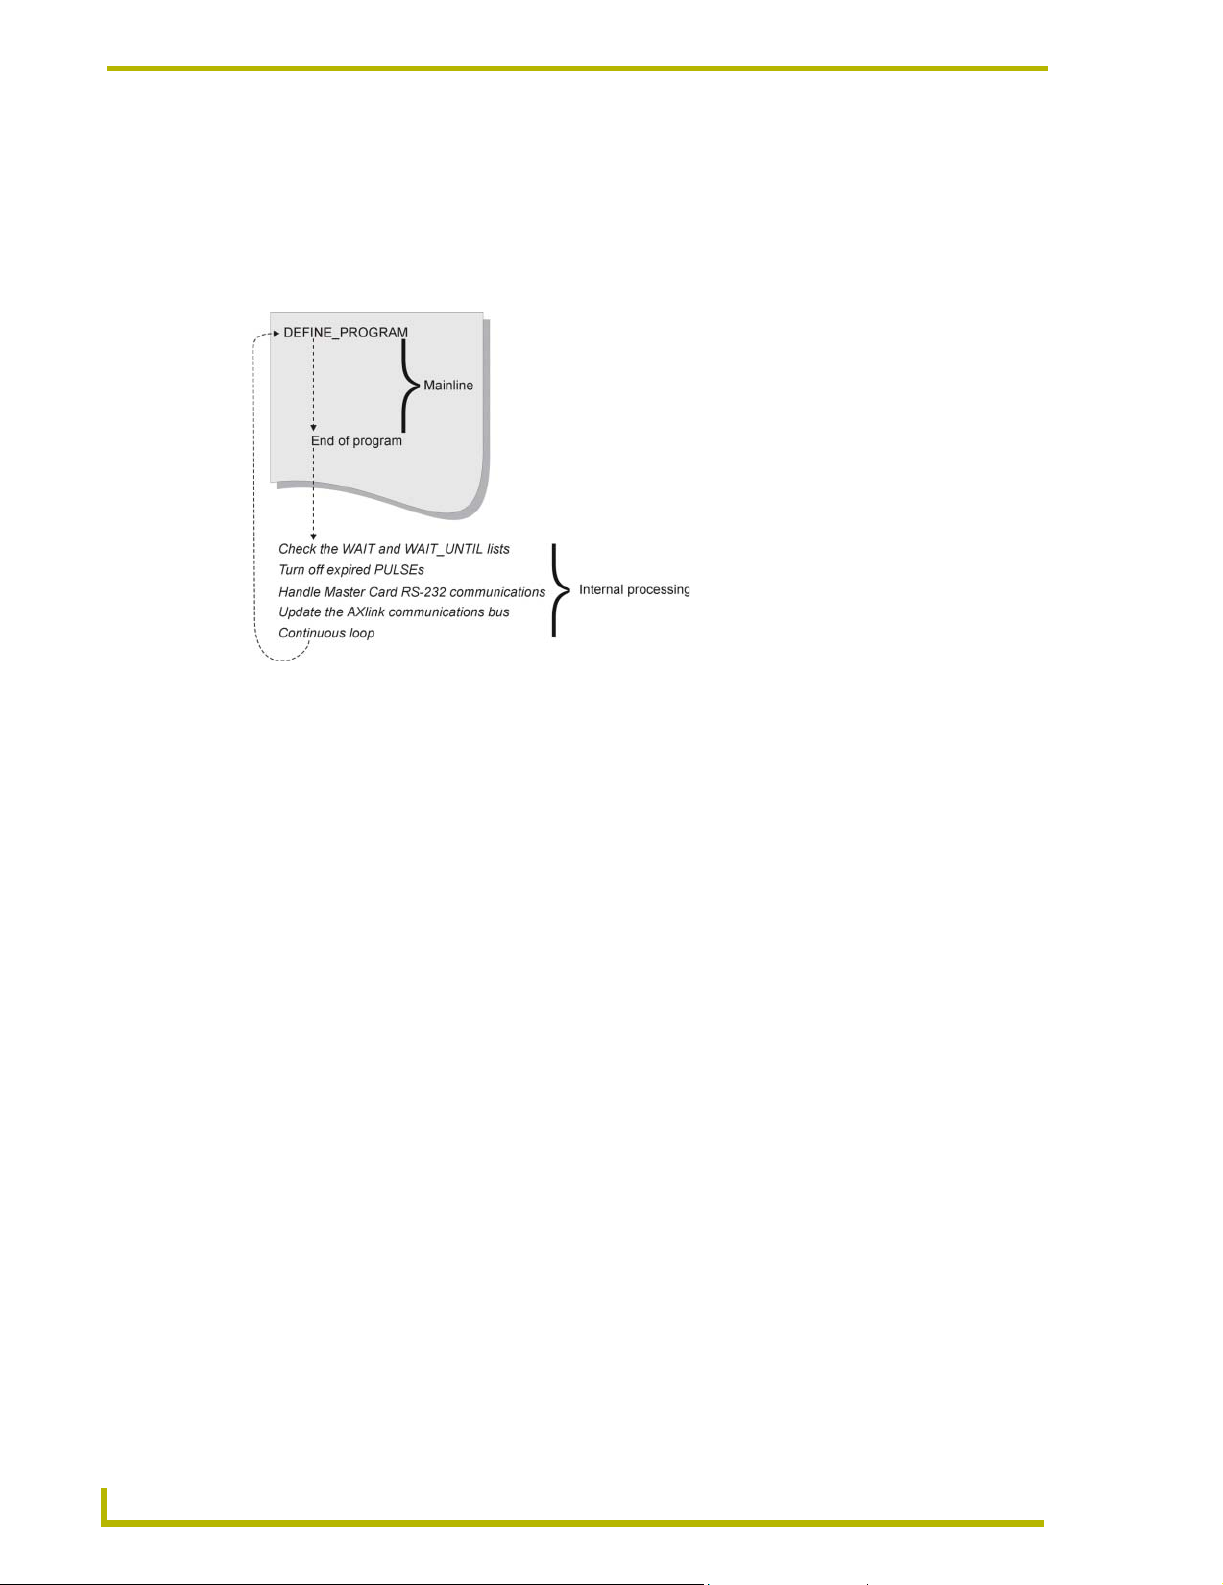
3. At the end of mainline, the Central Controller does some internal processing, then returns to
the top of mainline to start another loop (FIG. 1).
FIG. 1 Mainline execution and internal processing
During this time, the Central Controller operations include:
! Checking the WAIT and WAIT_UNTIL lists
! Turning off expired PULSEs
! Handling Central Controller RS-232 communications
! Updating the AXlink communications bus
After the Central Controller handles these tasks, it executes mainline again:
1. First, the Central Controller scans the wait list for any expired WAITs, then checks the
WAIT_UNTIL list for any WAIT_UNTIL statement whose conditions have become true. If
one of these events has occurred, the Central Controller immediately goes back into the
program and executes the statement or compound statement directly following the WAIT or
WAIT_UNTIL statement.
2. Next, the Central Controller checks to see if any channels activated by the PULSE keyword
need to be turned off. If so, the Central Controller turns them off.
3. Next, the Central Controller handles RS-232 communications. It checks for incoming
characters, executes valid commands typed by the user, and sends out any pending
information.
4. Finally, the Central Controller updates the AXlink bus. During this time, the Central Controller
blinks the green LEDs on all Axcess bus devices, reads pending input changes, and updates all
levels and bargraphs. This action must be done frequently or the AXlink bus will stop
operating, causing the system to stop working.
8
Axcess Programming Language
Page 17

Axcess Basics
Definition Sections
Starting a new program
When you begin a new program with the New option in the File menu, there are several definition
headings indicating what should be defined in each section:
! DEFINE_DEVICE
! DEFINE_CONSTANT
! DEFINE_VARIABLE
! DEFINE_LATCHING
! DEFINE_MUTUALLY_EXCLUSIVE
! DEFINE_START
! DEFINE_PROGRAM
The program will not operate differently if you do not have any statements under a heading.
However, you should keep the headings for reference.
Although the definition sections are not used in the main program, they create the materials the
main program needs to run. For example, devices and their channels are given names; channels are
given different characteristics, and variables are formed in the definition sections. Even the
immediate startup procedures of the Axcess Control System are contained in a definition section. If
you develop a good understanding of the DEFINE statements, you can build an excellent
foundation for the main part of your program.
DEFINE_DEVICE
When you start writing a program, label each device in the system. Each device on AXlink must
have a unique device number. For example, card 1 may have device number 1, and card 2 may have
device number 2. Whenever you use this device name in your program, Axcess will automatically
use the corresponding device number to reference the device. This is the function of the
DEFINE_DEVICE section. It is placed at the beginning of the program, and allows you to name the
devices.
However, with a long list of devices connected to AXlink, these numbers can be difficult to
remember. Assigning actual names to these devices is much easier.
The first step in writing a program is defining the devices in your system. For example, you have a
VCR, a CD player, and a cassette deck, and you are controlling them with the first three cards in
your CardFrame. These cards have device numbers 1, 2, and 3. You also need to control a
projection screen, some drapes, and lights. Two relay cards, one in slot 4 and one in slot 5, will
handle these (the first card handles both the screen and drapes). A Touch Panel will be used to
control all of these devices. Your DEFINE_DEVICE section should look like this:
The devices included in this code are used for example purposes only. It is not a
specific recommendation or endorsement.
xcess Programming Language
9
Page 18

Axcess Basics
DEFINE_DEVICE
VCR = 1 (* AXC-IR/S: VCR *)
CD = 2 (* AXC-IR/S: CD PLAYER *)
CASS = 3 (* AXC-REL8: VCR *)
RELAY = 4 (* AXC-REL8: SCREENS AND DRAPES *)
LIGHTS = 5 (* AXC-REL8: LOW VOLTAGE LIGHTING *)
VPROJ = 6 (* AXC-IR/S: PROJECTOR *)
TP = 128 (* AXU-CVA COLOR VIDEO PANEL *)
From this point on, you can reference device 1 with the name VCR, device 2 with the name CD,
and so on.
The Push window at the bottom of the screen is changed. If the devices in the previous example are
on AXlink, Axcess modifies the window to use the given device name instead of the device's
number. This provides a quick reference tool for future programming.
There is one more reason for using DEFINE_DEVICE. When you compare devices using the
Compare Current Devices... option in the Diagnostics menu, Axcess checks all the devices listed
under DEFINE_DEVICE. Next, it checks which devices are on AXlink. Axcess then tells you the
devices that you did not define in your program. These devices cannot be used or referenced until
they are defined, so check that all devices are under this heading.
AMX encourages the practice of starting control panel device numbers at device 128. This includes
radio frequency (RF) receivers, touch panels, softwire panels, and all other control panels and
receivers.
DEFINE_CONSTANT
Constants are identifiers whose values remain unchanged throughout the entire program. The
process of defining them is very similar to defining devices. Assigning a value to an identifier in
this section locks that value to the identifier for the entire program, making it possible to use
descriptive names instead of just numbers in your program.
In your system, the VCR, CD player, and cassette deck devices have channels that activate the
various transport functions, such as Play and Stop. As a general rule, Play is usually channel 1 and
Stop is channel 2. You could define these channel numbers as constants in your program to make it
more readable.
DEFINE_CONSTANT
PLAY = 1 (* VCR, CD AND CASS CONSTANTS *)
STOP = 2
PAUSE = 3
FFWD = 4
REW = 5
FSRCH = 6
RSRCH = 7
REC = 8
SCREEN_UP = 1 (* RELAY CONSTANTS *)
SCREEN_DN = 2
SYSTEM_POWER = 3
DRAPES_OPEN = 4
DRAPES_CLOSE = 5
DRAPES_STOP = 6
AMP_POWER = 7
10
Axcess Programming Language
Page 19

Axcess Basics
LIGHT_FULL = 1 (* LOW VOLTAGE LIGHTING PRESETS *)
LIGHT_MED = 2
LIGHT_LOW = 3
LIGHT_OFF = 4
VPROJ_IN_1 = 11
VPROJ_IN_2 = 12
VPROJ_IN_3 = 13
VPROJ_IN_4 = 14
The value of the constant PLAY is now set to 1. Also, STOP has a value of 2. Both of these values
cannot be changed anywhere in the program. With these constants set, if you need to activate the
play function of the VCR later in your program, use the constant PLAY, and Axcess knows to use
channel 1.
More than one constant can have the same number. For example, PLAY and FWD can both equal 1.
You may see this if two cards do not have the same channels for the same functions. For example,
PLAY on the VCR control card might be channel 1, and FWD on the slide control card could also
be channel 1.
By definition, the same constant cannot reference more than one number. This might seem obvious,
but this type of error could work its way into larger programs. If you make this mistake, Axcess
notifies you with a DUPLICATE SYMBOL error message upon compiling.
DEFINE_VARIABLE
Variables are places to store data that will change as the program is executed. Think of a variable as
a random container, nearly anything can be placed in it. For example, a variable can represent any
number from 0 to 65,535; variables cannot hold a negative number. If one variable is subtracted
from another, the result will always be positive. If you subtract a larger number from a smaller
number, the result wraps around at 65,535. For example, 10-20 = 65,525.
DEFINE_VARIABLE
TEMP (* Single variables *)
BUFFER[1Ø] (* Array variables *)
INTEGER CAM_PRESET[1Ø] (* Integers and variables *)
When the system is turned off, variables retain their values. Resetting varaiables must be done
manually in the DEFINE_START section.
In your first program, you will not be using variables, but keep the DEFINE_VARIABLE header
because you will be using them in the future.
DEFINE_LATCHING
A latching channel is a channel that only changes its state once per push. If a latching channel is
activated by a TO keyword, it changes its state; when the TO is stopped, by releasing the button that
started it, the channel does not go back to its previous state (like a momentary channel). The
channel stays either on or off. The status of a latching channel will reflect the on/off state of the
channel. Here is an example:
DEFINE_LATCHING
[RELAY,SYSTEM_POWER] (* defined as latching *)
[VCR,PLAY]..[VCR,REWIND] (* defines a range of device-channels as
latching *)
VAR1 (* defined as latching *)
xcess Programming Language
11
Page 20

Axcess Basics
DEFINE_MUTUALLY_EXCLUSIVE
When a channel is turned on in a mutually exclusive set, it activates its physical output as long as
the button is pressed. When the button is released, the physical output stops. The status, however,
does not work the same way. Even after the physical output stops, the status still indicates the
channel is on until another channel in the mutually exclusive set is activated. The status is left on to
indicate which channel in the set was last activated. This is sometimes called last button pressed
feedback. When a channel or variable in this set is activated, all the other members of the set are
turned off beforehand. This is called break before make logic. This prevents an accidental activation
of more than one channel at the same time, which could cause serious damage to some devices.
Members of a mutually exclusive set are placed in parentheses underneath the
DEFINE_MUTUALLY_EXCLUSIVE keyword. The double period (..) shortcut specifies a range
of device-channels to be defined as mutually exclusive. For example:
DEFINE_MUTUALLY_EXCLUSIVE
([RELAY,SCREEN_UP],[RELAY,SCREEN_DOWN]) (* defines two channels as
mutually exclusive *)
([RELAY,DRAPE_OPEN]..[RELAY,DRAPE_STOP]) (* defines a range of
channels as mutually exclusive *)
DEFINE_START
DEFINE_START marks the section of programming that will be executed only once immediately
following power-up or system reset. They cannot be executed again until another Axcess power-up.
The keyword TO cannot be used in the DEFINE_START section; instead, use ON, OFF, or PULSE.
For information on these keywords, refer to Changing the State of a Channel section on page 16.
When the Axcess Control System is turned on, the program that was last loaded into the Central
Controller is in operation, and is waiting for input from the user. However, you can tell Axcess to
run a series of statements immediately when the system is turned on.
In your program, you may want to reset all three decks to stop (using SYSTEM_CALLs), turn on
the lights, open the drapes, and raise the screen when Axcess is powered up. For example:
DEFINE_START
PULSE[LIGHTS,LIGHT_FULL]
PULSE[RELAY,DRAPES_OPEN]
PULSE[RELAY,SCREEN_UP]
SYSTEM_CALL 'FUNCTION' (VCR,STOP,Ø)
SYSTEM_CALL 'FUNCTION' (CD,STOP,Ø)
SYSTEM_CALL 'FUNCTION' (CASS,STOP,Ø)
Any resetting of variable values should be done in this section. Remember, variables retain their
values even if the system is powered down.
DEFINE_PROGRAM
Define_Program marks the beginning of mainline, telling the compiler that the following
statements make up the actual executing program. Before beginning the main program, you must
have the DEFINE_PROGRAM header. This header tells Axcess you are beginning the actual
program at this point. It is used like this:
DEFINE_PROGRAM (* Your program starts here *)
The most important feature of mainline is that it runs in a continuous loop. While most
programming languages have a beginning and an end, mainline is like a circle: when the Central
12
Axcess Programming Language
Page 21

Axcess Basics
Controller gets to the end, it loops back to the top and passes through it again, as shown in
FIG. 1 on page 8.
PROGRAM_NAME
Axcess uses a long file name to provide a more descriptive name for Axcess programs. Thre file
name gets embedded into the program the first time it is saved, and will appear in the first line of
the program. For example:
PROGRAM_NAME='long file name goes here'
This name is managed by Axcess and is automatically updated every time the file is saved.
xcess Programming Language
13
Page 22

Axcess Basics
14
Axcess Programming Language
Page 23
Using Input and Output
Channels
You define what happens when remote inputs occur in mainline. To get inputs into the program, and
generate an output, use channels.
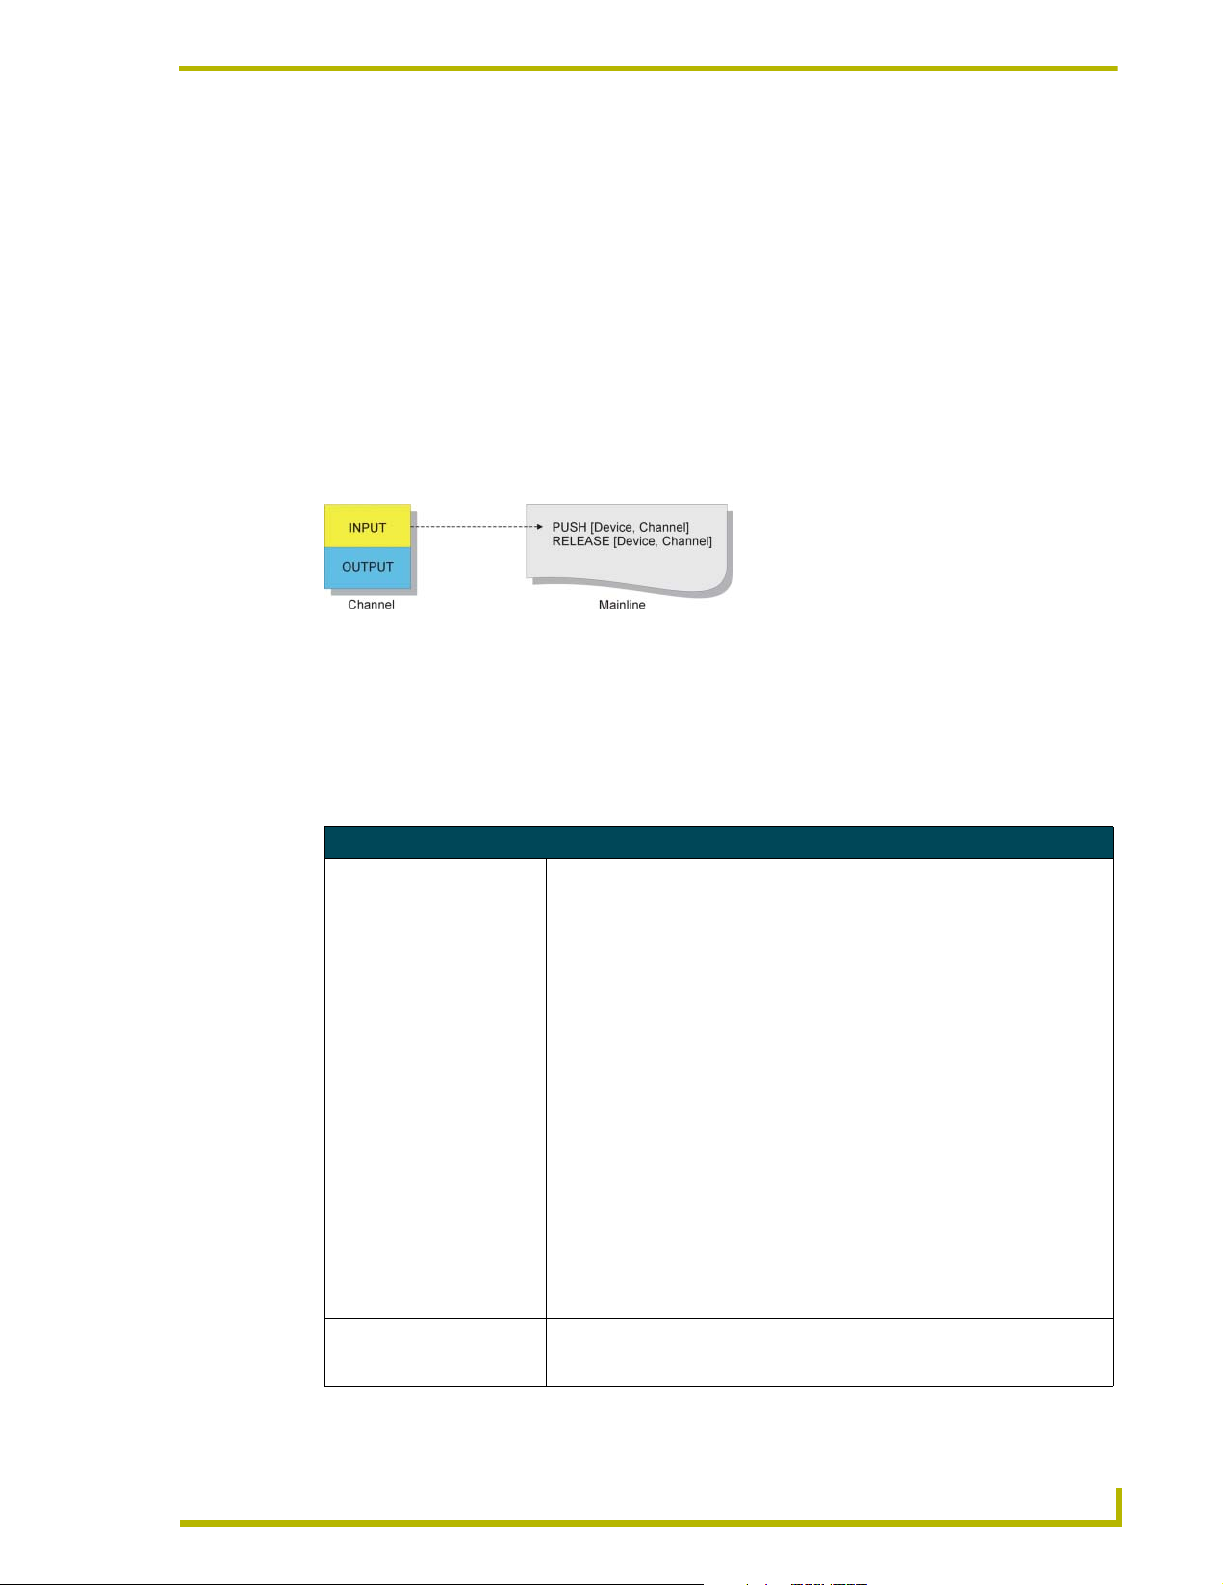
Almost all methods of control using an Axcess Control System require the use of channels on
devices, as shown in FIG. 2. Every channel has two aspects: the input function and output function.
When a button is pressed on a control panel, the input function of the button sends an input change
to your program. The input change alerts the Central Controller to scan your program for a
reference to that input.
FIG. 2 Input and output functions of a channel
Using Input and Output
Input Change Keywords
When there is an input change, Axcess passes through the entire program once to see if the change
is referenced. If so, Axcess executes the statements in the program associated with the input
change. The following six keywords are used in conjunction with input changes:
Input Change Keywords
PUSH The PUSH keyword is used to find out if a channel has had an input change
RELEASE The RELEASE keyword is used in the same way as PUSH, except the opera-
from off to on, such as when a button is pressed. If the channel has been
turned on, the corresponding PUSH statement is activated. The operation(s)
following this PUSH statement is executed once after the channel is turned on.
PUSH statements must be followed by a device number and a particular channel, and both are enclosed in brackets. Variables can be used in their places,
but this is done only in special circumstances. Following the PUSH statement
is the operation to be executed when the PUSH occurs. If more than one event
must happen, a compound statement must follow the PUSH. For example:
PUSH[device,channel]
{
(* Statement *)
}
Multiple PUSH statements can be specified to execute the same action. For
example:
PUSH[TOUCH_PANEL,1]
PUSH[RADIO,64]
{
(* Statement *)
}
tion underneath a RELEASE statement will be executed if the corresponding
button is released.
Axcess Programming Language
15
Page 24
Using Input and Output
Input Change Keywords (Cont.)
PUSH_DEVICE PUSH_DEVICE is a system variable containing the number of the device hav-
RELEASE_DEVICE RELEASE_DEVICE stores the number of the device containing the channel
PUSH_CHANNEL PUSH_CHANNEL is the same as PUSH_DEVICE, except that the channel
RELEASE_CHANNEL RELEASE_CHANNEL stores the channel whose button was most recently
ing the channel that was just turned on due to an input change.
If a button for device T_PANEL was pressed, PUSH_DEVICE would be equal
to the device number of T_PANEL. This variable is set when a channel is
turned on, and it remains constant for one pass through mainline. If no channel
has been turned on, PUSH_DEVICE will contain Ø.
PUSH_DEVICE and RELEASE_DEVICE cannot both have a non-zero value
during the same pass through mainline. At least one of them will always be
zero.
whose button was most recently released.
If a button for device T_PANEL was released, RELEASE_DEVICE would be
equal to the device number of T_PANEL. This system variable is used in a program in the same manner as PUSH_DEVICE. This variable will have the same
value for only one pass through the program.
PUSH_DEVICE and RELEASE_DEVICE cannot both have a non-zero value
during the same pass through mainline. At least one of them will always be
zero.
number that was most recently turned on is stored inside the variable.
PUSH_CHANNEL and RELEASE_CHANNEL cannot both have a non-zero
value during the same pass through mainline. At least one of them will always
be zero.
released.
This system variable is used in a program in the same manner as
PUSH_CHANNEL.
PUSH_CHANNEL and RELEASE_CHANNEL cannot both have a non-zero
value during the same pass through mainline. At least one of them will always
be zero.
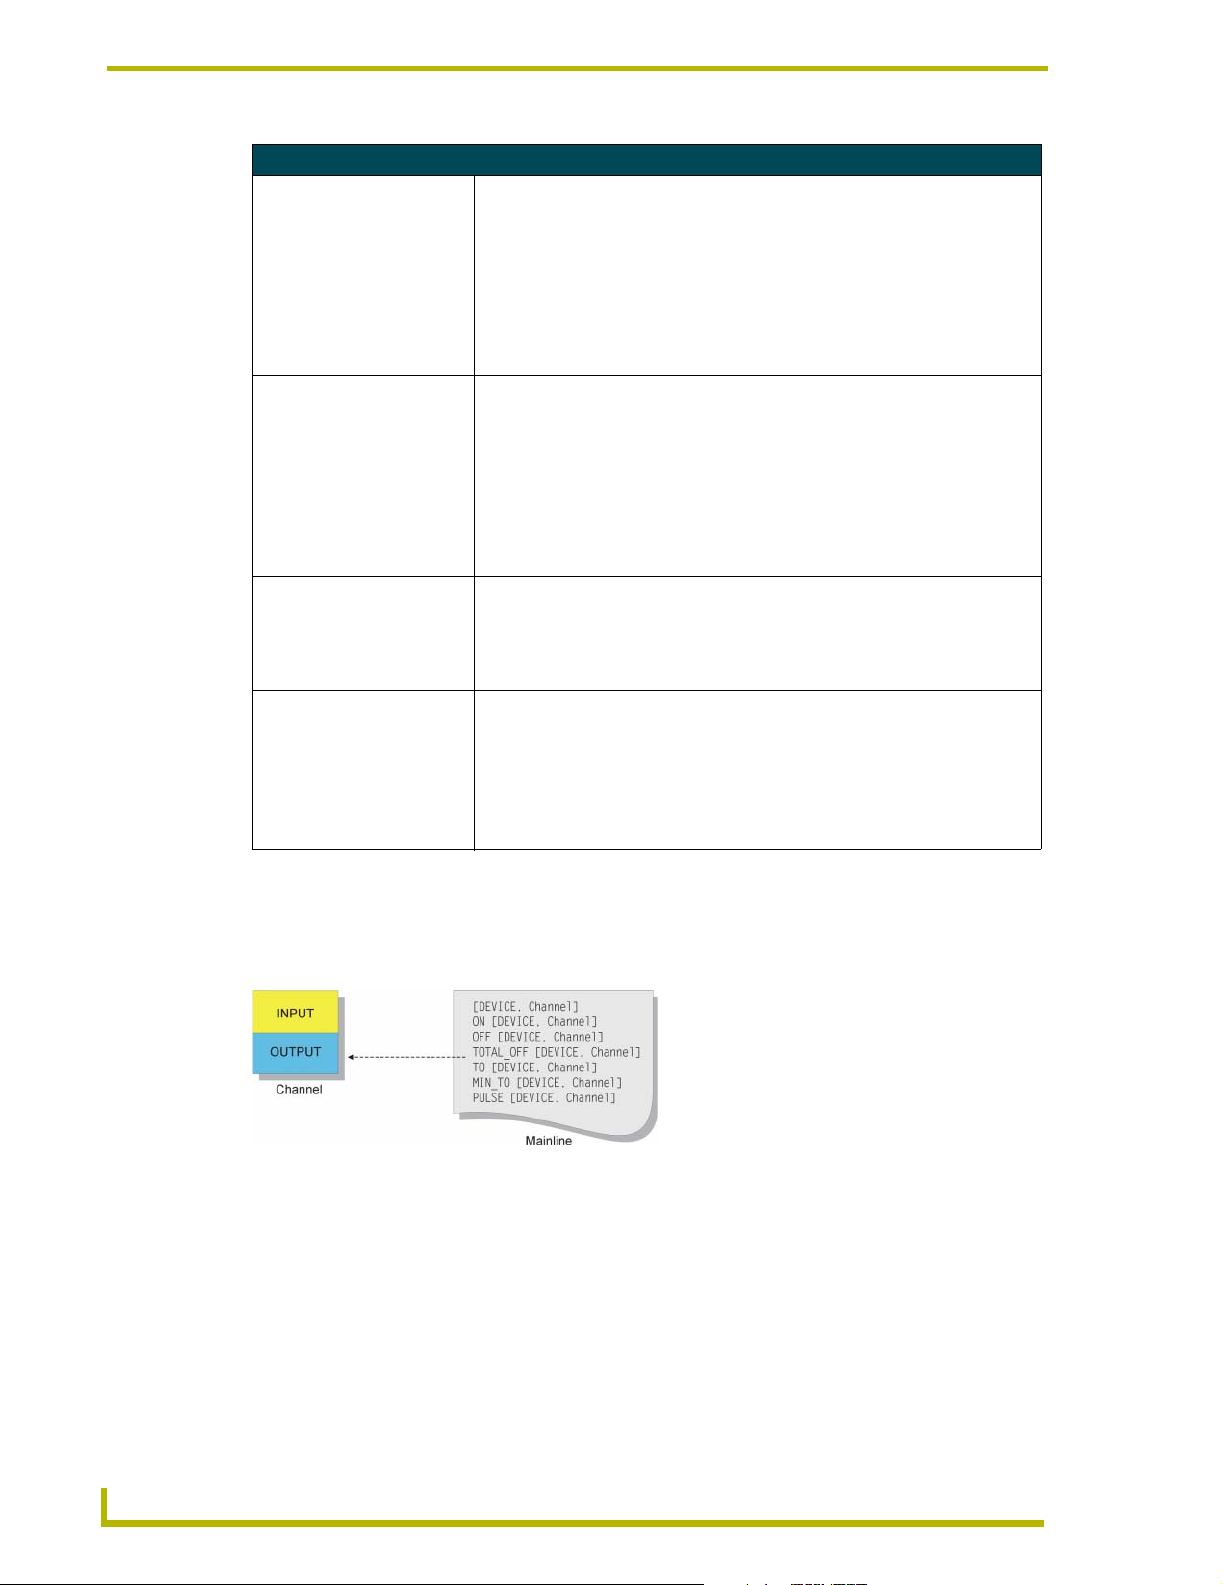
Changing the State of a Channel
The next series of keywords allows you to activate channels. This activation is called an output
change, which is a message to the output function of a channel. See FIG. 3.
FIG. 3 Keywords affecting output changes
Output Change Keywords
When you use an output change keyword to activate a channel in a device, the device starts the
operation associated with the channel. For instance, activating channel 5 on a relay card activates
relay number 5, whereas activating channel 5 on an infrared/serial card causes it to generate the
infrared pattern stored at location 5.
These keywords can be used in conjunction with variables. When a variable is activated with one of
these keywords, turning it ON gives it a value of 1, and turning it OFF gives it a value of Ø.
16
Axcess Programming Language
Page 25
Using Input and Output
The output change keywords are described in the table below:
Output Change Keywords
ON The ON keyword turns on a channel or variable.
If the channel or variable is already on, its status will remain unchanged. Here
are two examples:
ON [1,2] (* Turns on channel 2 of device 1 *)
ON [TEMP] (* Sets the value of the variable
TEMP to 1 *)
A variable is considered ON if it contains a non-zero number; in this case, the
value is 1. If a variable contains the value Ø, it is considered OFF.
OFF The OFF keyword turns off a channel or variable.
If the channel or variable is already off, its status will remain unchanged. Here
are two examples:
OFF [1,2] (* Turns off channel 2 of device 1 *)
OFF [TEMP] (* Sets the value of the variable
TEMP to 0 *)
TOTAL_O FF The TOTAL_OFF keyword acts in the same manner as OFF, except that it also
TO The TO keyword is used to activate a channel or variable for as long as the cor-
MIN_TO This keyword operates like the TO keyword, except that the specified channel
PULSE The PULSE keyword turns on a channel or variable for a certain amount of
turns off the status of a channel or variable that is in a mutually exclusive set.
For more information on mutually exclusive sets, refer to Mutually Exclusive on
page 20.
responding device-channel of its PUSH statement is activated.
When the device-channel referenced by the PUSH statement changes from off
to on, the TO activates the device-channel or variable in the brackets following
it. When the device-channel of its PUSH is released, the TO statement stops
activating its device- channel or variable. For this reason, TO must be placed
underneath a PUSH statement.
The TO keyword has several conditions:
• It must be used only below a PUSH statement.
• It cannot be used with the WAIT keyword. For detailed information, refer to
Multiple Waits in the Waits and Timer Keywords section.
• It cannot be placed in the DEFINE_START section.
The channel or variable will act under the rules set by DEFINE_LATCHING,
DEFINE_MUTUALLY_EXCLUSIVE, and DEFINE_TOGGLING. For more information, refer to the Channel Characteristics section. You will learn about these
definitions later, when you add more to your program.
or variable stays on for a minimum amount of time, even if the corresponding
device-channel is released.
The time duration is determined by SET_PULSE_TIME. MIN_TO follows the
same conditions of operation as the TO keyword.
time. Once the time elapses, the channel or variable is turned off.
As an example, refer back to the discussion on DEFINE_START, in the Defining Start section. The PULSE keyword was used to activate a lighting preset, a
drapes change, and a screen change. The duration of this PULSE is one halfsecond, but it can be changed if necessary with the SET_PULSE_TIME keyword. The PULSE time is measured in tenths of seconds, and the Axcess
default is one half-second. The PULSE time remains the same value until it is
changed in the program. For example:
SET_PULSE_TIME(12)
This sets the current duration of future PULSEs to 1.2 seconds. It is always a
good practice to return pulse time to the default setting of .5 seconds, as shown
in the following example:
SET_PULSE_TIME(5)
Axcess Programming Language
17
Page 26

Using Input and Output
Direct Assignment
Direct assignment is another method of generating an output change, that does not involve using
keywords. Any reference to a device-channel that does not have the keywords PUSH or RELEASE
preceding it is a reference to the output side of the channel. Thus, assigning a value directly to a
device-channel changes the output of the channel. For example:
[TP,1] = 1
This statement will send an output change to channel 1 of device TP, telling the channel to turn on
since Axcess interprets any non-zero number as ON. Putting this statement in mainline will set the
channel ON permanently. Using direct assignment is most appropriate in feedback statements. For
controlling devices, the keywords ON, OFF, and TO are more appropriate.
Putting Input and Output Together
Combining input and output changes into one statement is the basis of most Axcess programming.
Now you have the tools to write the code that will accomplish this. On your touch panel, you will
set buttons 1-5 to activate the screen and drape functions. Here is the first section of program code:
DEFINE_PROGRAM
PUSH[TP,1] (* SCREEN UP *)
TO[RELAY,SCREEN_UP]
PUSH[TP,2] (* SCREEN DOWN *)
TO[RELAY,SCREEN_DN]
PUSH[TP,3] (* DRAPES OPEN *)
TO[RELAY,DRAPES_OPEN]
PUSH[TP,4] (* DRAPES CLOSE *)
TO[RELAY,DRAPES_CLOSE]
PUSH[TP,5] (* DRAPES STOP *)
TO[RELAY,DRAPES_STOP]
In this code, there are actually five separate, but similar statements. In each statement, there is the
keyword PUSH followed by a device-channel reference, in this case [TP,1]. This tells Axcess to
look here if channel 1 on device 128 receives an input change from OFF to ON. If such an input
change occurs, the corresponding TO statement executes.
18
The TO statement tells Axcess that for as long as channel 1 on device 128 is activated, turn on
device 1, channel 1.
Remember, TP is a device definition for device 128, and RELAY is a constant with a value of 1, as
is SCREEN_UP. Always be precise with the syntax. Use numbers for input channels, and device
names for devices, as shown in the example above.
Axcess Programming Language
Page 27
Channel Characteristics
This section contains information on channel characteristics and how to change the way the status
of an output channel behaves. It includes explanations of channel concepts, and examples of
Axcess programming code. In this chapter, you will learn how to change the status behavior, which
in turn changes the way a channel reacts when it is activated by the output change keywords.
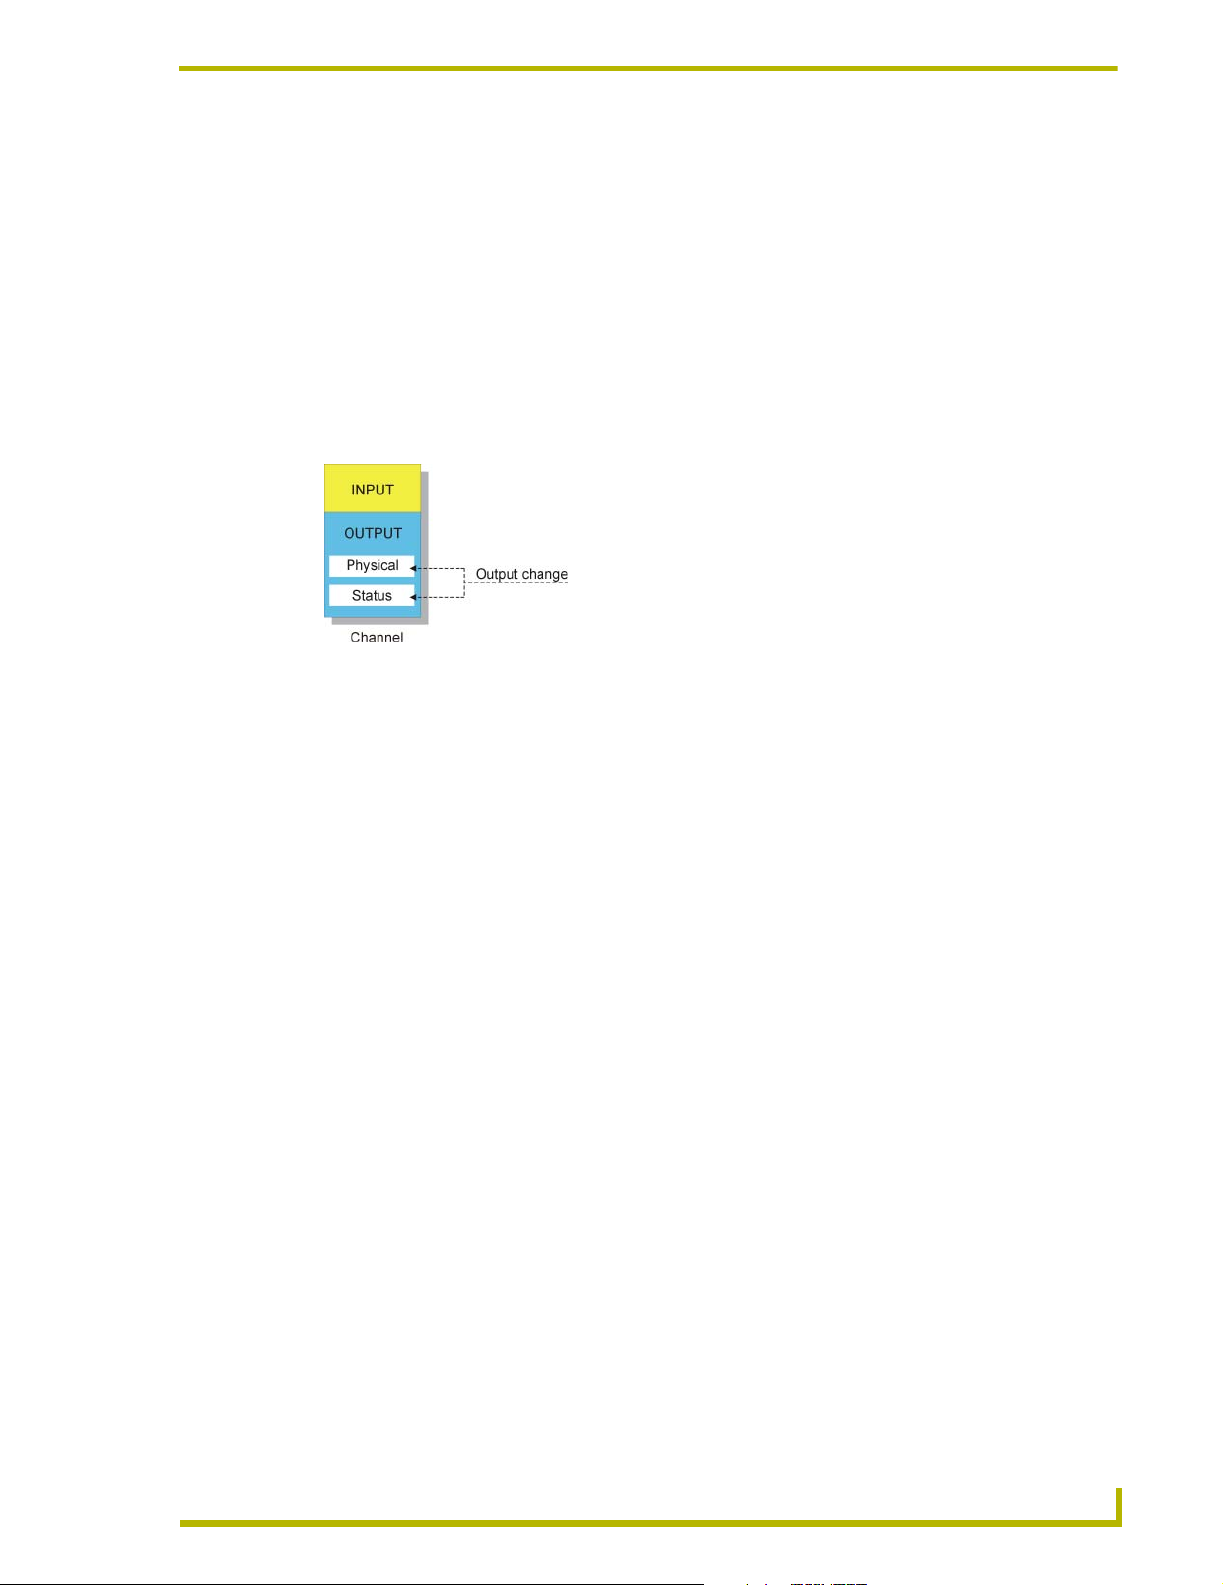
Parts of an Output Channel
An output channel actually has two parts: the physical part and the status part, as shown in FIG. 4.
Channel Characteristics
FIG. 4 Parts of an output channel.
The physical part is the physical device-dependent control, such as a relay on a relay card, a button
light (lamp) on a Touch Panel, or an infrared pattern in an infrared card. The status reports the state
of the physical part. Typically, these two parts act exactly the same; when one is on, so is the other.
The Device-Channel Concept
Everything that an Axcess Control System controls is controlled through a device in the system.
Each device communicates to the Central Controller through AXlink, the Axcess Control System's
communication bus. Most devices, such as a Touch Panel or a relay card, have channels which
either generate an input, accept an output, or both. These inputs and outputs are referred to in the
Axcess program as a device-channel, which is written like this:
TO[DEVICE,Channel]
This the device-channel is the most fundamental concept of the Axcess Control System, as it is the
most common way that Axcess communicates to the outside world.
Defining Latching
The default status of all channels is momentary. When a momentary channel is activated with a TO
keyword, it activates its output and status only as long as the button which activated the TO
keyword is pressed. For example, the Focus channel for slide projectors is momentary. When the
corresponding Focus button is pressed, the slide projector will focus. The projector will continue to
do so until the button is released.
However, some devices need their particular channel to stay ON to operate. If so, the channel can
be made latching by being placed in the DEFINE_LATCHING section. Once a latching channel is
activated by a TO keyword, the channel changes its state from OFF to ON (assuming it was
previously off). However, when the TO keyword stops activating the channel (its corresponding
Axcess Programming Language
19
Page 28

Channel Characteristics
button is released), the channel does not go back to OFF (like a momentary channel), it stays ON. It
only returns to OFF when the channel is reactivated by a TO keyword. As a result, the status of a
latching channel reflects the true ON/OFF state of the channel.
In your program, RELAY is already defined as device number 4 and SYS_POWER is defined as a
constant having the value 3. Using these two values together as device-channel
[RELAY,SYS_POWER] gives you a relay to use for your system's power control. You will need to
make this relay latching so that it stays on after you release the Touch Panel button. Also, your
drape motor needs latched relays to operate. Here are the definitions:
DEFINE_LATCHING
[RELAY,SYSTEM_POWER]
If you have a series of consecutive channels to be defined, you can use double periods (..) as a
shortcut. The use of double periods will specify a range of channels between the first and last
channel. For example, if the lights in your system need latched relays to operate, instead of defining
each one right after the other, follow this example:
[LIGHTS,LIGHT_FULL]..[LIGHTS,LIGHT_OFF]
In your DEFINE_CONSTANT section, you defined these constants as 1 through 4, so this will
make relays 1 through 4 on the LIGHTS card (card 5) latching.
Mutually Exclusive
Channels can also be defined as mutually exclusive. A mutually exclusive group is a set of channels
in which only one channel of the set can be turned on at a time. The three kinds of mutually
exclusive channels are momentary, latching, and toggling. They are each described below:
Defining momentary mutually exclusive
When a channel is turned on in a momentary mutually exclusive set, it activates its physical output
as long as the button is pressed. When the button is released, the physical output stops. The status,
however, does not work in the same manner. Even after the physical output stops, the status still
indicates that the channel is on until another channel in the mutually exclusive set is activated. The
status is on to let you know which channel in the set was last activated. This is sometimes called last
button pressed feedback.
Be sure to find out which devices need mutually exclusive channels. Do not wait until
you test the program, as you could damage some devices.
When a channel or variable in this set is activated, all the other members of the set are turned off
beforehand. This is called break before make logic. This prevents accidental activation of more than
one channel at the same time, which could cause serious damage to some devices.
For example, consider the drape and screen channels of the device RELAY. Since you cannot open
and close a drape all at once, and you cannot raise a screen and lower it at the same time, only one
channel can be turned on at any time. They must be defined as mutually exclusive. When
SCREEN_UP is activated, the SCREEN_DOWN channel is turned off and SCREEN_UP turns on.
The corresponding SCREEN_UP status stays on even though the relay is de-energized when the
button is released. When SCREEN_DOWN is activated, SCREEN_UP is turned off. The
SCREEN_DOWN status is now the only status turned on.
20
Axcess Programming Language
Page 29

Channel Characteristics
Once a channel has feedback in a mutually exclusive group, there will always be one
channel with its status on in that group, unless it is turned off with TOTAL_OFF.
You will also define the lighting relays as mutually exclusive so that you can utilize last button
pressed logic when you program the feedback for these buttons. This will allow the user to look at
the panel and know which lighting preset was activated last.
Members of a mutually exclusive set are placed in parentheses underneath the
DEFINE_MUTUALLY_EXCLUSIVE keyword. The double period (..) shortcut explained in the
latching section is also applicable here. For example:
DEFINE_MUTUALLY_EXCLUSIVE
([RELAY,SCREEN_UP],[RELAY,SCREEN_DN])
([RELAY,DRAPES_OPEN],[RELAY,DRAPES_CLOSE],[RELAY,DRAPES_STOP])
([LIGHTS,LIGHT_FULL]..[LIGHTS,LIGHT_OFF])
The first set defines the two screen channels as mutually exclusive. Using the shortcut, the second
set defines the three drape channels as mutually exclusive, and the third set defines the four lighting
relays as mutually exclusive.
Defining mutually exclusive latching
A mutually exclusive channel can have its physical output continually on if necessary. This is done
by defining a channel as both mutually exclusive and latching, resulting in the description mutually
exclusive latching. If you define a channel in this manner, the physical output remains on until
another button in its mutually exclusive set is pressed.
The status of a mutually exclusive latching channel behaves in the same manner as that for a
mutually exclusive momentary channel. Note that the physical part and the status of a mutually
exclusive latching channel operate in the same manner.
In your program, the lighting relays are already defined as latching. However, you also want them
to have the characteristics of a mutually exclusive set so that only one lighting mode can be on at
one time. Thus, you would also place the device-channels of these relays in the
DEFINE_MUTUALLY_EXCLUSIVE section:
DEFINE_MUTUALLY EXCLUSIVE
([LIGHTS,LIGHT_FULL]..[LIGHTS,LIGHT_OFF])
Defining mutually exclusive toggling
When a channel is defined as mutually exclusive latching, there is no way to turn off the channel
without activating another. Mutually exclusive toggling allows a channel to be turned on or off by
successive presses of the same button, just like a normal latching channel. Also, the channel is still
affected by its mutually exclusive characteristics; if the channel is on, it can be turned off by
another activated channel in its mutually exclusive set. The status of a mutually exclusive toggling
button operates in the same way as that for a mutually exclusive latching button.
To make a channel toggling, it must be defined as mutually exclusive and toggling in both the
DEFINE_MUTUALLY_EXCLUSIVE and DEFINE_TOGGLING sections. In your program, the
screen relays are both mutually exclusive and latching, so there is no way to turn off a screen relay
without turning on the other. You could fix this by defining the screen relays as mutually exclusive
toggling:
Axcess Programming Language
21
Page 30

Channel Characteristics
DEFINE_TOGGLING
[RELAY,SCREEN_UP]
[RELAY,SCREEN_DOWN]
Putting it all to work
Now that you know how all these different types of channels operate, proceed to the mainline
section of the program and add the following lines to activate your system power, screen, drape, and
lighting relays:
DEFINE_PROGRAM
PUSH[TP,8] (* POWER ON/OFF *)
TO[RELAY,SYSTEM_POWER]
PUSH[TP,1] (* SCREEN UP *)
TO[RELAY,SCREEN_UP]
PUSH[TP,2] (* SCREEN DOWN *)
TO[RELAY,SCREEN_DN]
PUSH[TP,3] (* DRAPES OPEN *)
TO[RELAY,DRAPES_OPEN]
PUSH[TP,4] (* DRAPES CLOSE *)
TO[RELAY,DRAPES_CLOSE]
PUSH[TP,5] (* DRAPES STOP *)
TO[RELAY,DRAPES_STOP]
PUSH[TP,9] (* LIGHTS FULL *)
TO[LIGHTS,LIGHT_FULL]
PUSH[TP,1Ø] (* LIGHTS MEDIUM *)
TO[LIGHTS,LIGHT_MED]
PUSH[TP,11] (* LIGHTS LOW *)
TO[LIGHTS,LIGHT_LOW]
PUSH[TP,12] (* LIGHTS OFF *)
TO[LIGHTS,LIGHT_OFF]
This section accomplishes several tasks:
! Pressing button number 8 on the Touch Panel alternately latches and unlatches the
SYSTEM_POWER channel (channel 1) on card RELAY.
! A press of the Screen Up button latches on the SCREEN_UP channel on device RELAY,
after unlatching SCREEN_DN. The Screen Down button acts the same way as the Screen
Up button, but with the opposite channels.
! Pressing Drapes Open or Drapes Close does several things. If it is off, it makes sure the
other drape channel is off (due to its mutually exclusive relationship), then it latches on.
If it was on, it turns off, but leaves its status on. To turn off the status of a channel in a
mutually exclusive group, use the TOTAL_OFF keyword.
! Since the LIGHTS channels are mutually exclusive latching, a press of the Lights Full
button latches on the LIGHT_FULL channel on the device LIGHTS, after unlatching any
LIGHTS channel that was previously on. The other LIGHTS channels operate in a
similar fashion.
22
! The DRAPES_STOP channel is momentary mutually exclusive, whereas the other drape
channels are mutually exclusive latching. When the Drapes Stop button is pressed,
Axcess makes sure the other drape channels are off, then engages the DRAPES_STOP
Axcess Programming Language
Page 31

Channel Characteristics
channel. Unlike the DRAPES_OPEN and DRAPES_CLOSE channels, however, the
DRAPES_STOP channel turns off when the button is released. Like the others, its status
stays on because it is in the mutually exclusive group with the other Drape channels.
Programming Feedback
This section describes how to assign feedback to a button. Feedback refers to the lighting of a
button during and after it is pressed. Axcess does not do this automatically; you must tell the system
how to light the button.
Feedback involves only one statement per button. The first part of the statement references the
device-channel of the button that is going to be lit. It is followed by an equal sign (=) and the
conditional feedback. For example:
DEFINE_PROGRAM
[TP,1] = [RELAY,SCREEN_UP]
When RELAY channel 1 (the constant value of SCREEN_UP) is on, the light of TP button 1 will
also be on. When the channel is off, the light will be off.
Any reference to a device-channel that does not have the keyword PUSH or RELEASE preceding it
is referring to the output side of the channel. This is a very important concept, because it is the basis
of how feedback works.
One way of creating an output change is to assign a value directly to the device-channel. If the
value that you are assigning is another device-channel reference it tells Axcess to take the output
status of channel SCREEN_UP on device RELAY, and send it as an output change to channel 1 of
device TP. Since the device-channel [RELAY,SCREEN_UP] is defined as being in a mutually
exclusive group, its status will be ON if it was the last channel activated in that set, and the
feedback assignment will light button 1 on the Touch Panel.
Grouping feedback statements
The feedback statement is sometimes found after the end of a PUSH statement. For example:
DEFINE_PROGRAM
PUSH[TP,1] (* SCREEN UP *)
TO[RELAY,SCREEN_UP]
[TP,1] = [RELAY,SCREEN_UP]
When TP button 1 (Screen Up) is pressed, RELAY channel 1 (SCREEN_UP) is turned on. Relay
channel 1 in turn causes the button's feedback to be turned on.
The feedback statements can also be grouped together in a feedback section at the end of the
program. as shown below:
[TP,3] = [RELAY,DRAPES_OPEN]
[TP,4] = [RELAY,DRAPES_CLOSE]
[TP,5] = [RELAY,DRAPES_STOP]
This feedback section will act no differently if each statement is placed under its corresponding
PUSH statement.
Feedback statements can be placed anywhere in the program. However, it is recommended that you
organize them in your program so that they can be easily located. While grouping all of the
feedback statements at the end of the program is acceptable, in larger programs it can be confusing
to skip from the top where the PUSH statement is located to the bottom where the feedback
statements are located. Smaller programs may be easier to manage if all the PUSHes are together
Axcess Programming Language
23
Page 32

Channel Characteristics
and all the feedback statements are together. A good compromise is to break your program into
sections of code where each section has a similar group of functions, and put the feedback
statements for each section right below it, as shown in FIG. 5.
FIG. 5 Different positions for feedback statements
Device and Channel Keywords
Device and Channel keywords that you can use in the Axcess program are described in the table
below.
Device and Channel Keywords
DEVICE_ID Every Axcess device has a unique device ID number identifying its device type,
such as an Infrared/Serial Card or a Touch Panel. The DEVICE_ID keyword
returns the ID number of a specified device. If the device does not exist in the
system, DEVICE_ID returns Ø. This keyword is usually used for determining
whether or not a device is present in the system. For example:
IF (DEVICE_ID(VCR)) (* If the card exists, these
statements are executed *)
{
SEND_STRING Ø, "'VCR is online', 13, 1Ø"
}
For a current list of device numbers for Axcess devices, refer to the Deviceid.TXT text file, included on the AMX Control Disc. Deviceid.TXT is located in
the AMXTools\AMXDOS\Software folder.
DO_PUSH This keyword causes an input change from off to on to occur on a specified
device-channel without the device-channel being activated by external means.
Here is the format:
DO_PUSH (device,channel)
The DO_PUSH keyword holds the PUSH for one half-second. It then releases
the channel by generating another input change for the device-channel from on
to off. The effect is the same as someone pressing a button on a panel for one
half-second. The release can be delayed by repeating the DO_PUSH before
the half-second time period elapses.
This keyword is useful only in limited situations, and its use is strongly discouraged.
24
Axcess Programming Language
Page 33

Channel Characteristics
Device and Channel Keywords (Cont.)
DO_RELEASE This keyword causes an input change from on to off to occur on a specified
device-channel without the device-channel being deactivated by external
means.
Here is the format:
DO_RELEASE (device,channel)
If a RELEASE statement corresponding to the device-channel is present in the
program, it will be executed. The DO_RELEASE keyword also forces the
release of a device-channel turned on by DO_PUSH.
GET_PULSE_TIME This system variable contains the current duration of PULSEs and MIN_TO, as
set by SET_PULSE_TIME.
Time is measured in tenths of seconds, and the default is one half-second.
For example:
SET_PULSE_TIME(12)
P_TIME = GET_PULSE_TIME
The variable P_TIME now contains 12, or 1.2 seconds.
This keyword is useful only in limited situations, and its use is strongly discouraged.
MASTER_SLOT This system variable returns a number which represents the slot in which the
Central Controller is plugged.
Ø represents slot 1, and 1 represents slot 2.
If this keyword is used in any system other than an AXF-BP (large CardFrame),
MASTER_SLOT will always return to Ø.
SET_PULSE_TIME To set the length of time for PULSE, use the keyword SET_PULSE_TIME.
Time is measured in tenths of seconds, and the default is one half-second. The
PULSE time remains the same value until it is changed in the program. Here is
an example of SET_PULSE_TIME:
SET_PULSE_TIME(12)
This sets the current duration of PULSEs to 1.2 seconds. It recommended that
you return pulse time to the default setting of .5 seconds, as in the following
example:
SET_PULSE_TIME(5)
Define_Combine
This definition section allows the combination of functionally identical devices, such as identically
programmed Touch Panels and Softwire Panels. When the program references one of these devices,
all other combined devices in the set are also referenced. The set of devices, called a combine list,
must be enclosed in parentheses. For example:
DEFINE_COMBINE (PANEL1,PANEL2,PANEL3)
This combines the three devices PANEL1, PANEL2, and PANEL3. If an input change occurs on
any of the three devices, Axcess sees the input as coming only from the first device in the list
(PANEL1). If button [PANEL2,12] is pressed, Axcess will see the input as coming from
[PANEL1,12] due to the combination. Likewise, any output change that is sent to any device in the
list will automatically be sent to all devices in the list. This includes level changes. For example, the
statement ON [PANEL3,5Ø] will turn on channel 50 for all three devices in the list.
DEFINE_COMBINE is typically located immediately after the DEFINE_DEVICE section of a
program.
Axcess Programming Language
25
Page 34

Channel Characteristics
Input and output changes occurring on non-combined panels will not affect combined panels, and
vice versa.
Define_Latching
In this definition section, latching channels and variables are defined. A latching channel is a
channel that only changes its state once per PUSH. That is, if a latching channel is activated by a
TO keyword, it changes its state; when the TO is stopped by releasing the button that started it, the
channel does not go back to its previous state (like a momentary channel). The channel stays either
on or off. The status of a latching channel will reflect the on/off state of the channel. For example:
DEFINE_LATCHING
[RELAY,SYSTEM_POWER]
[VCR,PLAY]..[VCR,REWIND]
VAR1
In this example, the device-channel [RELAY,SYSTEM_POWER] is defined as latching, and the
variable VAR1 is defined as latching.
Define_Mutually_Exclusive
Members of a mutually exclusive set are placed in parentheses underneath the
DEFINE_MUTUALLY_EXCLUSIVE keyword. The double period (..) shortcut specifies a range
of device-channels to be defined as mutually exclusive. For example:
DEFINE_MUTUALLY_EXCLUSIVE
([RELAY,SCREEN_UP],[RELAY,SCREEN_DOWN])
([RELAY,DRAPE_OPEN]..[RELAY,DRAPE_STOP])
The first set defines two channels as mutually exclusive. The second set defines a range of channels
as mutually exclusive.
Define_Toggling
To make a channel toggling, it must be defined as both mutually exclusive and toggling. The
DEFINE_TOGGLING section is usually located directly after the
DEFINE_MUTUALLY_EXCLUSIVE section. Here is an example:
DEFINE_TOGGLING
[RELAY,SCREEN_UP]
[RELAY,SCREEN_DOWN]
26
Axcess Programming Language
Page 35

Channel Characteristics
The Variable Assignment Method
Another method of programming select groups is to use one variable, assigning different values to
it depending on what is selected. This method is more powerful than the previous method,
providing more flexibility while using less code.
You will add just one variable, CUR_CAMERA. This will be the select variable. Then assign the
device number of the currently selected camera to this variable. Here is your Select buttons' code:
DEFINE_DEVICE
CAMERA_1 = 97 (* AXB-CAM: PAN/TILT *)
CAMERA_2 = 98 (* AXB-CAM: PAN/TILT *)
CAMERA_3 = 99 (* AXB-CAM: PAN/TILT *)
DEFINE_CONSTANT
PAN_RIGHT = 31
TILT_DN = 32
PAN_LEFT = 35
TILT_UP = 36
DEFINE_VARIABLE
CUR_CAMERA (* CURRENT CAMERA *)
DEFINE_PROGRAM
PUSH[TP,57] (* CAMERA 1 *)
CUR_CAMERA = CAMERA_1
PUSH[TP,58] (* CAMERA 2 *)
CUR_CAMERA = CAMERA_2
PUSH[TP,59] (* CAMERA 3 *)
CUR_CAMERA = CAMERA_3
Use variables to simplify your program. The following example shows how to reduce the number of
control sections from three to just one by using the variable CUR_CAMERA as the device number
in the TO statements, instead of using CAMERA 1, CAMERA 2, and CAMERA 3. Here's the
section of code:
PUSH[TP,6Ø] (* TILT UP *)
TO[CUR_CAMERA,TILT_UP]
PUSH[TP,61] (* TILT DOWN *)
TO[CUR_CAMERA,TILT_DN]
PUSH[TP,62] (* PAN RIGHT *)
TO[CUR_CAMERA,PAN_RIGHT]
PUSH[TP,63] (* PAN LEFT *)
TO[CUR_CAMERA,PAN_LEFT]
In the example above, no IF statement is required, and this is the only camera control section of
programming needed in the program. Using this method, to adjust CAMERA 2, first press the
Camera 2 Select button. This assigns the value 98 (the constant value of CAMERA 2) to the
variable CUR_CAMERA. Now the device-channel references of the TO control statements will
reference device number 98 (the CAMERA 2 device). Pressing button number 6Ø on the Touch
Panel will activate [CUR_CAMERA, TILT_UP], which Axcess will interpret as [98,36].
The feedback statements for the selection buttons are shown below:
[TP,57] = (CUR_CAMERA = CAMERA_1)
[TP,58] = (CUR_CAMERA = CAMERA_2)
[TP,59] = (CUR_CAMERA = CAMERA_3)
These statements, like all feedback statements, are direct assignment output changes. However, the
source of the assignment is a Boolean expression. In interpreting this kind of feedback statement,
Axcess Programming Language
27
Page 36

Channel Characteristics
Axcess first evaluates the Boolean expression. If the expression is evaluated as true, Axcess
replaces the expression with a 1; otherwise Axcess replaces it with a Ø. Only one of these will be
evaluated as true because a variable cannot have two different values at one time. Therefore, the
direct assignment will assign a 1 (On) to the Touch Panel button for which the expression is true,
and a Ø (Off) to those that are false. Assigning a 1 to a device-channel is the same as turning that
device-channel's output ON.
Sample Program
A complete example program using a subroutine is given below. Here are the basic requirements
for the program:
! The devices used are one infrared/serial card, three AXB-CAM boxes, and one AMX
Touch Panel. The device numbers are 6, 97, 98, 99, and 128, respectively. The IR/serial
cards will transmit infrared code to a video projector.
! The Touch Panel will have three buttons. Here are the functions to be associated with
each button:
! Button 57: Projector to input 5, recall Preset 1 on Camera 1.
! Button 58: Projector to input 6, recall Preset 1 on Camera 2.
! Button 59: Projector to input 7, recall Preset 1 on Camera 3.
Here is the actual program:
DEFINE_DEVICE
VPROJ = 6 (* AXC-IR/S: PROJECTOR *)
CAMERA_1 = 97 (* AXB-CAM: PAN/TILT *)
CAMERA_2 = 98 (* AXB-CAM: PAN/TILT *)
CAMERA_3 = 99 (* AXB-CAM: PAN/TILT *)
TP = 128 (* AXU-CVA: COLOR VIDEO PANEL *)
DEFINE_CALL 'CAMERA MACRO' (WHICH_CAM)
{
PULSE[VPROJ,WHICH_CAM-CAMERA_1+15] (* SELECT INPUT 5,6 OR 7 *)
PULSE[WHICH_CAM,1Ø1] (* RECALL PRESET 1 *)
}
DEFINE_PROGRAM
PUSH[TP,57] (* CAMERA 1 *)
{
CUR_CAMERA = CAMERA_1
CALL 'CAMERA MACRO' (CAMERA_1)
}
PUSH[TP,58] (* CAMERA 2 *)
{
CUR_CAMERA = CAMERA_2
CALL 'CAMERA MACRO' (CAMERA_2)
}
PUSH[TP,59] (* CAMERA 3 *)
{
CUR_CAMERA = CAMERA_3
CALL 'CAMERA MACRO' (CAMERA_3)
}
28
Axcess Programming Language
Page 37

Channel Characteristics
The program is explained step-by-step in the following section.
DEFINE_DEVICE
VPROJ = 6 (* AXC-IR/S: PROJECTOR *)
CAMERA_1 = 97 (* AXB-CAM: PAN/TILT *)
CAMERA_2 = 98 (* AXB-CAM: PAN/TILT *)
CAMERA_3 = 99 (* AXB-CAM: PAN/TILT *)
TP = 128 (* AXU-CVA: COLOR VIDEO PANEL *)
The section above defines the five devices used in the program.
DEFINE_CALL 'CAMERA MACRO' (WHICH_CAM)
{
The section above begins the subroutine. Notice that the sequence must begin with a brace,
regardless of the size of the subroutine.
PULSE[VPROJ,WHICH_CAM-CAMERA_1+15] (* SELECT INPUT 5,6 OR 7 *)
PULSE[WHICH_CAM,1Ø1] (* RECALL PRESET 1 *)
}
The section above is the heart of the DEFINE_CALL. The first statement PULSEs the function on
the video projector's controller card corresponding to the input desired on the projector. Since the
functions on IR cards for video projectors have the switcher inputs located at 11-20, you can add 10
to the desired input number to obtain the needed IR function number. For instance, if
WHICH_CAM contains 98 (you selected Camera number 2 and input number 6 on the projector)
the first PULSE statement will activate function 16, which is usually the input 6 Select function on
video projector cards. The next PULSE recalls PRESET 1 on the selected camera.
DEFINE_PROGRAM
PUSH[TP,57] (* CAMERA 1 *)
{
CUR_CAMERA = CAMERA_1
CALL 'CAMERA MACRO' (CAMERA_1)
}
PUSH[TP,58] (* CAMERA 2 *)
{
CUR_CAMERA = CAMERA_2
CALL 'CAMERA MACRO' (CAMERA_2)
}
PUSH[TP,59] (* CAMERA 3 *)
{
CUR_CAMERA = CAMERA_3
CALL 'CAMERA MACRO' (CAMERA_3)
}
The main program starts in the above section. The code inside each PUSH sets the current camera
variable, then calls the camera macro with the selected camera passed as the WHICH_CAM
parameter.
Axcess Programming Language
29
Page 38

Channel Characteristics
30
Axcess Programming Language
Page 39

Arrays and Strings
In this section arrays and strings will be introduced. Understanding these concepts and the
associated keywords will allow you to easily handle data, and will provide another means of
communicating with the outside world.
Defining Arrays
In the program developed in the previous sections, you used a variable. A variable can only hold
one value at a time. However, if you need a variable to hold several values at once, you can use an
array. An array is a single variable that has more than one storage location.
Arrays must be defined as variables in the DEFINE_VARIABLE section of your program. Its
definition has two parts: a unique identifier and its storage capacity. First, the variable must be
named by a valid identifier.
Second, the number of storage locations in the array must be indicated. A maximum of 255
locations can be specified, and each location holds a value from 0 to 255.
Arrays and Strings
For more information on identifiers, refer to Identifiers on page 7.
For your new program, you want to store several preset levels for the volume control card. You
could create several individual variables and use IF statements or SELECT...ACTIVE statements to
select the preset you want to use. Or even better, you could create an array and use the index value
(explained below) to pick the preset you want to use. Here is your array declaration:
DEFINE_VARIABLE
CAM_PRESETS[6]
This declares a new variable, PRESETS, which is shown in FIG. 6. The variable CAM_PRESETS
is an array which can hold six distinct values, as defined by the number 6 inside the brackets.
FIG. 6 The array CAM_PRESETS has six empty storage locations
Accessing and Storing Array Values
To access a particular value in an array, refer to the storage location inside the array you wish to
retrieve, as shown in the example below:
DEFINE_PROGRAM
CAM_PRESET_1 = CAM_PRESETS[3]
The number inside the brackets is called the index value. The index value is the number that tells
Axcess which location in the array to retrieve, and it must be a number from 1 to 255. This example
assigns the value in the third location of CAM_PRESETS to the variable CAM_PRESET_1.
Retrieving a value from an array does not change the array (see FIG. 7).
Axcess Programming Language
31
Page 40

Arrays and Strings
FIG. 7 The value in CAM_PRESETS[3] is assigned to the variable CAM_PRESET_1
You can place values into a storage location by setting the particular location equal to the needed
value. For example, CAM_PRESETS was previously defined as having six locations. If you want
the second location to hold a value of 6 you would type the following:
CAM PRESETS[2]=6
The number 6 is placed into the second location, as shown in FIG. 8.
FIG. 8 The storage location CAM_PRESET[2] is assigned a value of 6.
From now on, anytime CAM_PRESETS[2] is referenced, its value is 6. In the example program,
pressing a Preset button either stores or recalls a preset. Examine the section of code that
accomplishes this:
DEFINE_VARIABLE
STORE_VOL_PRESET (* 1 WHEN WE STORE VOLUME PRESET *)
VOL_PRESETS[1Ø] (* 1Ø VOLUME PRESETS *)
VOL_PSET (* INDEX FOR ABOVE ARRAY *)
DEFINE_PROGRAM
PUSH[TP,32] (* STORE *)
STORE_VOL_PRESET = NOT STORE_VOL_PRESET
[TP,32] = (STORE_VOL_PRESET)
PUSH[TP,25] (* PRESET 1 *)
PUSH[TP,26] (* PRESET 2 *)
PUSH[TP,27] (* PRESET 3 *)
PUSH[TP,28] (* PRESET 4 *)
PUSH[TP,29] (* PRESET 5 *)
PUSH[TP,3Ø] (* PRESET 6 *)
PUSH[TP,31] (* PRESET 7 *)
{
VOL_PSET = PUSH_CHANNEL - 24
IF (STORE_VOL_PRESET)
VOL_PRESETS[VOL_PSET] = VOL_LEVEL
ELSE
SEND_COMMAND VOLUME,"'PØL',ITOA(VOL_PRESETS[VOL_PSET])"
OFF[STORE_VOL_PRESET]
}
The first PUSH [TP,32] is the Store button, which toggles the STORE_VOL_PRESET variable
using the NOT operator. The NOT operator inverts the state of whatever follows it. The PUSH
statement is immediately followed by a feedback statement for the Store button. The next seven
32
Axcess Programming Language
Page 41

Arrays and Strings
pushes, PUSH [TP, 25] through PUSH [TP,31], are the buttons for PRESETS 1 through 7. Inside
the block is an IF statement; the IF statement uses the state of the variable STORE_VOL_PRESET
to determine whether to assign the volume card's level to a location in the VOL_PRESETS array, or
to send a command to the volume card telling it to go to a previously stored level. To place the
variable VOL_LEVEL into the array VOL_PRESETS at the correct location, 24 must be subtracted
from PUSH_CHANNEL to find the index value.
Strings
In many cases you may need to transfer a series of data values at once. You can do this by using
strings and string expressions. A string is a set of values grouped together with single and/or double
quotes. Strings enclosed in single quotes are called string literals. Examples of strings include
names and the actual command portion of SEND_COMMAND statements.
String literals
Single quotes can only enclose values ranging from decimal 32 (the space character) to decimal 126
(the tilde character '~'). These string literals are constant values that are set at compile time. Once
loaded into the Central Controller, these strings cannot be changed, except when a new program is
loaded into the Central Controller.
An index value is not given when strings are assigned to arrays. The first letter is automatically
placed into the first storage location; the second letter is placed into the second storage location,
and so on.
Here is an example of a string literal assigned to an array:
PRESETS='FOUR'
When Axcess processes this assignment, it places the F (ASCII value 70) in location 1 of
PRESETS, Ø (ASCII value 79) in location 2, and so on, as shown in FIG. 9. String FOUR is placed
in the array PRESETS.
FIG. 9 The string FOUR is assigned to the array PRESETS
String expressions
Single and double quotes are interpreted in two different ways by Axcess. Single quotes enclose
string literals, double quotes enclose string expressions. A string expression combines several types
of data into a single string. It can contain any ASCII value (Ø to 255), variables, string literals, and
arrays. The difference between a string literal and the string expression is that the string expression
is built at run time instead of compile time. As Axcess processes a string expression, it evaluates
each member of the expression from left to right; the result is a complete string. For example:
DEFINE_PROGRAM
TEMP = "SCREEN_UP,5,Ø,'NO',X"
Axcess Programming Language
33
Page 42

Arrays and Strings
A string expression cannot contain another string expression; i.e., a set of double quotes cannot
enclose another set of double quotes.
Assuming that SCREEN_UP is a constant with the value of 1, and X with the value of 10, the string
expression is evaluated as a string with values: 1, 5, Ø, 'N', 'O', 1Ø, as shown in FIG. 10. Since the
expression is evaluated at run time, whatever value is in the variable X when the expression is
evaluated is what is placed into the result.
FIG. 10 A string expression is assigned to the array TEMP.
Arrays as Strings
There are two ways of referencing array data in Axcess programs. Each location can be referenced
as an individual value; or, each array can be referenced as a group of values. An entire array can be
accessed as one unit. If you refer to an array without specifying an index value, the contents of the
entire array is referenced as a string, as shown in the following example:
DEFINE_VARIABLE
S1[1Ø]
DEFINE_PROGRAM
S1='TEST ONE'
SEND_STRING CARD,'TEST TWO'
SEND_STRING CARD,"S1"
This small section of code will send two strings to the card named CARD: first 'TEST TWO', then
'TEST ONE'. We assigned a string expression to S1 and then sent it to the card; the entire contents
of the string expression was sent.
34
Suppose that during power-up of the Axcess Control System you want to set all the presets to
default values. You could do this by assigning values to each individual location in the
CAM_PRESETS array. It is recommended, however, to use a string expression to set all six at once,
as shown below:
DEFINE_START
CAM_PRESETS = "Ø,3Ø,9Ø,128,191,255" (* set all preset values at power-up *)
String Lengths
Every array declared in the DEFINE_VARIABLE section has a string length value associated with
it. The string length of an array is an internal value set for arrays by string assignment operations.
This number is different than the storage capacity declared in the DEFINE_VARIABLE section.
You can get the length value of an array by using the LENGTH_STRING function. For example:
LENGTH = LENGTH_STRING (CAM_PRESETS)
Here are examples of some assignments, and what the above line of code would return to the
variable length in each case:
Axcess Programming Language
Page 43

Arrays and Strings
PRESETS = 'FOUR (* LENGTH = 4 *)
PRESETS = 'ONE' (* LENGTH = 3 *)
PRESETS = "12,5,'123'" (* LENGTH = 5 *)
PRESETS = "PLAY,5,Ø,'NO',X" (* LENGTH = 6 *)
The length of a string array cannot exceed the number of storage locations allocated to it in the
DEFINE_VARIABLE section. For example, if the string GOODBYE is placed in the
CAM_PRESETS variable, the array will only contain the string GOODBY, dropping the final E
because CAM_PRESETS was defined to hold a maximum of six locations. The length of
CAM_PRESETS would also be set to 6. If you attempt to assign an array that exceeds the storage
allocations, the system will generate a run time error message: BAD SET LENGTH.
When string literals and string expressions are assigned, the the length of the string array is
automatically set to the length of the string literal or string expression being assigned to it.
However, assigning values to individual elements of an array does not affect the length value of the
array. For instance, if the letters W, O, R, and D are assigned individually to elements of
CAM_PRESETS, as shown below, the length will not change; if the length was previously 3, it will
still be 3.
PRESETS[1] = 'W'
PRESETS[2] = 'O'
PRESETS[3] = 'R'
PRESETS[4] = 'D'
The SET_LENGTH string keyword explicitly sets the string length value of an array variable. For
instance, to set the length value of CAM_PRESETS to 4, you would use the statement:
SET_LENGTH_STRING(CAM_PRESETS,4)
String lengths play an important role in the handling of strings. The following string expression
contains an array:
NEW_STRING = "5,TEMP,'GO'"
As Axcess constructs a string from this expression, the number of characters from NEW_STRING
it adds will equal the TEMP string's length value. If TEMP contains 1, 2, 3, 4, 5, 6, but its string
length value is 3, the resulting string from the above string expression will look like the following
example:
TEMP[1] = 1
TEMP[2] = 2
TEMP[3] = 3
TEMP[4] = 4
TEMP[5] = 5
TEMP[6] = 6
SET_LENGTH_STRING(TEMP,3)
NEW_STRING = "5,TEMP,'GO'" (* NEW_STRING now equals "5,1,2,3,'G','O'" *)
The array string length is important to many Axcess string operations. This value determines how
much of the string is used when the entire array is referenced. Knowing this will prevent subtle
errors in your code. For instance, if you assign values to individual elements in an array, and then
assign that array to another, nothing is copied. For example:
Axcess Programming Language
35
Page 44

Arrays and Strings
DEFINE_PROGRAM
TEMP[1] = SCREEN_UP
TEMP[2] = 5
TEMP[3] = Ø
TEMP[4] = 'N'
TEMP[5] = 'O'
TEMP[6] = X
CAM_PRESETS = TEMP
The contents of the array CAM_PRESETS, after this code is executed, depend on the length value
of the TEMP variable. If this were the entire program, TEMP would have a default length of Ø, so
nothing would be copied into CAM_PRESETS. To assure that CAM_PRESETS holds a copy of
TEMP, you would first need to set the length value of the TEMP array with this line inserted before
the copy statement:
SET_LENGTH_STRING(TEMP,6)
The line above, when executed with the previous code example, renders the following result:
TEMP = "SCREEN_UP,5,Ø,'NO',X"
After this, the length value of TEMP is 6; so, the first 6 locations of TEMP will be used in all cases
where you refer to the entire array.
Array Manipulation Keywords
The following keywords allow you to manipulate arrays and retrieve certain portions of an array:
Array Manipulation Keywords
LEFT_STRING LEFT_STRING returns a string containing the number of characters specified
starting at the beginning of the string.
For this keyword, you must specify two parameters: the string or array you are
referencing and the number of characters you need.
Example:
STR = LEFT_STRING (PRESETS,3)
After execution of this line, the array STR will contain the first 3 characters of
the array PRESETS. If PRESETS contains the string 'HELLO', then STR will
contain 'HEL.' Also, the length value of STR will be set to 3.
RIGHT_STRING This keyword requires the same parameters as LEFT_STRING. However,
MID_STRING This keyword returns the specified amount of characters starting at a specified
RIGHT_STRING begins reading at the end of the string array for the specified
amount of characters.
Example:
STR = RIGHT_STRING (PRESETS,2)
Assuming PRESETS still contains 'HELLO', replacing LEFT_STRING in the
previous example with RIGHT_STRING will assign the string 'LLO' to STR.
This keyword also will set the length value of the array receiving the result.
location in the source string. Three parameters, rather than two, are needed for
its operation: the string to reference, the position at which to start, and the
number of characters to return.
Example:
STR = MID_STRING (PRESETS,2,3)
This line tells Axcess: "Place three characters from the array PRESETS, starting at location 2 and moving to the right, into the array variable STR." If PRESETS contains 'HELLO', this line will assign 'ELL' to the array STR. This
keyword also will set the length value of the array receiving the result.
36
Axcess Programming Language
Page 45

Arrays and Strings
Array Manipulation Keywords (Cont.)
FIND_STRING This keyword will search through a string for a specified sequence of charac-
ters. When a duplication of the sequence is found, it returns the beginning position of that sequence.
The keywords explained previously are helpful when you know where certain
parts of strings are located within a string array. However, there will be times
when you don't know where certain parts of strings are located. In these cases,
the FIND_STRING keyword is used.
For example, if you don't know the exact contents of the TEMP array, but you
want to find out if it contains the string LO, (assuming that TEMP contains
HELLO) the following line is executed.
Example:
X = FIND_STRING (TEMP,'LO',1)
When Axcess executes this statement, it will search the array TEMP from the
beginning, looking for the string LO. If Axcess finds the substring, it returns the
starting position of the substring in the TEMP array: in this case, 4. The third
parameter (in this example, 1) tells Axcess where (in the string) to start the
search.
REMOVE_STRING The REMOVE_STRING keyword is similar to the FIND_STRING keyword.
However, when Axcess finds the sequence it is looking for, it extracts every
character up to and including the sequence, starting from the number in the
third parameter. All other characters move up to fill in the space.
Example:
DEFINE_VARIABLE
SOURCE[2Ø]
DEST[2Ø]
DEFINE_PROGRAM
SOURCE = 'THIS IS A TEST'
DEST = REMOVE_STRING (SOURCE,'IS',1)
After the last line is executed, DEST will contain THIS, and SOURCE will contain IS A TEST. Notice that after the removal, the first location of the array
SOURCE contains a space. This is because REMOVE_STRING removed all
characters from the beginning of SOURCE up to and including the string IS. It
did not remove the space following the string IS in SOURCE. Also notice that
the first occurrence of IS is embedded in the word THIS. The length values of
both arrays are set according to the results of the operation. In this case, the
length value of SOURCE is set to 4; DEST is set to 10.
In FIND_STRING, each of the first two parameters can be a string literal, a
string expression, or an array. However, in the case of REMOVE_STRING,
having anything except an array as the first parameter is illogical because
Axcess cannot remove part of a string literal or string expression, only an array
variable. This is because string literals are constant values and string expressions may contain constant values. Once loaded into the Central Controller,
constant values cannot be changed, as shown in the following examples:
STR = REMOVE_STRING(TEMP,"12",1) (* OK *)
STR = REMOVE_STRING("2,'HELLO',1Ø,13",'HELLO',1) (* NO *)
REMOVE_STRING changes the first parameter after it removes whatever
characters it needs. Only variables can be changed at run time. Supply the
starting position of the search as the third parameter for both FIND_STRING
and REMOVE_STRING.
Axcess Programming Language
37
Page 46

Arrays and Strings
Uppercase vs. Lowercase
When using FIND_STRING and REMOVE_STRING, as well as when comparing two string
values, it is important to remember that such comparisons are case sensitive, which means that
uppercase and lowercase values are not evaluated the same. As you recall, the compiler is not case
sensitive when it comes to keywords and identifiers. However, the compiler is case sensitive when
it comes to values inside single quotes (string literals). Here are some examples:
DEFINE_PROGRAM
Identifier_1 = 'Fred'
Identifier_2 = 'FRED'
if (IDENTIFIER_1 = IDENTIFIER_2)
{
(* This will not be true because 'Fred' and 'FRED' are not the same. *)
}
When programming, you may use whatever capitalizing scheme you wish. As a standard at AMX,
we capitalize all keywords and identifiers in the program.
Notice that the string literals FRED and Fred are not the same. However, in the case of identifiers
Identifier_1 and Identifier_2, Axcess does not differentiate based on the case of the letters in the
identifier name. Also, notice that in this example the keyword "if" is not capitalized, making no
difference to the Axcess compiler.
Setting uppercase and lowercase
In Axcess, the lowercase letter "a" is not the same as the uppercase letter "A". Each has its own
decimal ASCII code (the code for "a" is 97, "A" is 65). This could become problematic when, for
example, your program compares the incoming string ABC against another, as shown below:
IF (ABC = 'YES')
{
(* statement(s) *)
}
If the incoming string is 'YES', there is no problem. The statements are executed as normal.
However, if ABC equals 'Yes', since 'YES' and 'Yes' do not have the same decimal ASCII value, the
statements below the IF statement would not be executed.
The solution is to change all incoming strings to either uppercase or lowercase. The keywords that
do this are UPPER_STRING and LOWER_STRING. For example, the following statement can be
added before the preceding program:
ABC2 = UPPER_STRING(ABC)
The IF statement can now compare ABC2 against 'YES', providing that the IF statement reads IF
(ABC2 = 'YES'). The string 'Yes' is accepted since it has been converted into uppercase.
Conversely, LOWER_STRING converts a string into lowercase.
38
Axcess Programming Language
Page 47

Arrays and Strings
Sending Strings
To send a string to the outside world, use the SEND_STRING keyword. The syntax is:
SEND_STRING device,<string, variable, or string expression>
The first value after the SEND_STRING keyword is the device number or identifier to which you
wish to send the string. Following that is a comma, then the string, variable (which can be either a
normal variable or an array), or string expression you wish to send. When an array variable is
specified, the number of transmitted array characters is determined by the array length value. Set
the length value for the array with the SET_LENGTH_STRING function.
For example, if you need to send the TEMP array to a card named RS232, you would write the
following line:
SEND_STRING RS232,"TEMP"
String literals and string expressions can also be sent using SEND_STRING. For example:
SEND_STRING RS232,'THIS IS A STRING LITERAL'
Sends the entire set of characters enclosed in the single quotes, from left to right, to the card
named RS232.
SEND_STRING RS232,"'EXPRESSION ', TEMP,$ØD,$ØA"
This statement first builds the string expression using a string literal, followed by the number
of characters from TEMP (defined by its length value), and then two numbers (expressed here
in hexadecimal). The hexadecimal numbers in the example represent the codes for carriage
return and line feed, respectively.
Array Keywords
Array keywords that you can use in the Axcess program are described in the table below
Array Keywords
FIND_STRING Tells Axcess to search through a string for a specified sequence of characters.
When Axcess finds the sequence, it returns to the beginning position of that
sequence.
Syntax:
result = FIND_STRING (string, sequence of characters,
starting position of search)
LEFT_STRING Returns a specified number of characters from a specified array starting from
the beginning of the array. If the length of the string is less than the number of
specified characters, LEFT_STRING will return the length of the string array.
This keyword requires that the length value of the array be greater than Ø.
Syntax:
result = LEFT_STRING (string array, number of characters)
LENGTH_STRING Returns the current length value of an array.
This number is different from the storage capacity of an array, which is defined
in the DEFINE_VARIABLE section. See DEFINE_VARIABLE on page 11.
The length value of an array is used by several of the Axcess string operation
keywords; this value can change during program execution.
Syntax:
result = LENGTH_STRING (string array)
Axcess Programming Language
39
Page 48

Arrays and Strings
Array Keywords (Cont.)
MID_STRING Returns the specified number of characters starting at a specified location in
the source string. The length value of the array must be greater than 0; the
returned value is an array.
Syntax:
result = MID_STRING (string array, starting position,
number of characters)
REMOVE_STRING Finds and removes a specified sequence of characters in a specified string
array. All characters up to and including the sequence are removed. The
remaining characters in the string array move up to fill in the space. If the string
is not found, a null string is returned. The returned value is an array.
Syntax:
result = REMOVE_STRING (string array, sequence of
characters, starting position of search)
For example:
Y = 'ABCDEF'
X = REMOVE_STRING (Y,'CD',1)
(* X is 'ABCD' *)
(* Y is 'EF' *)
RIGHT_STRING Returns a specified number of characters from a specified string array, starting
at the end. The length value of the array must be greater than Ø; the returned
value is an array.
Syntax:
result = RIGHT_STRING (string array, number of
characters)
SET_LENGTH_STRING Sets the length value of an array to a specified value. The length value of an
array is used by several of the Axcess string operation keywords.
Syntax:
SET_LENGTH_STRING (string array, number)
String Keywords
String keywords that you can use in the Axcess program are described below:
String Keywords
REDIRECT_STRING Tells the Central Controller to pass all strings from device 1 to device 2, and all
SEND_COMMAND Sends device-specific commands to an Axcess device.
SEND_STRING Sends a string to a specific Axcess device. In some cases, a sequence of
strings from device 2 to device 1. This is called a redirection, and you can
assign up to eight of them at one time.
Syntax:
REDIRECT_STRING (entry number 1-8, device 1, device 2)
The entry number references a particular redirection. To cancel a redirection,
use the corresponding entry number and place zeros in the device number
locations in the parameters. Redirections are lost if the system power is turned
off.
Syntax:
SEND_COMMAND card's device name, 'card command'
strings can be interpreted as a command by the device.
Syntax:
SEND_STRING device, 'string'
40
Axcess Programming Language
Page 49

Levels
Levels
Introduction to Levels
Devices such as volume control cards, voltage generator cards, and pan/tilt control cards use levels
to interface with the outside world. Levels are values related to an analog input or output on an
Axcess device. Several Axcess panels have bargraph displays capable of displaying a level.
An input/output (I/O) channel in Axcess is usually digital in nature; that is, it is always either in an
ON or OFF state. However, several Axcess devices, such as the volume control card and the pan/tilt
control card, have analog input and/or output capabilities. An analog input or output may have
many different states. Devices using analog I/O internally store the values relating to the state of
each of these analog inputs and outputs; these values are called levels. On a volume card, levels
relate to the volume levels of the card. Levels can be used to tell a pan/tilt control card where to
position a camera, or tell a voltage generator card the amount of voltage to generate.
For conceptual purposes, imagine that a volume control card has two volume knobs: one for the left
speaker and one for the right, as shown in FIG. 11. Each knob has a value range from Ø to 255.
These knobs represent the two levels present in the volume control card. When a level is discussed
in the text, it is usually referring to the value of one of these imaginary knobs.
FIG. 11 The imaginary knobs. The knob is the level, which can have a range of values.
Creating Levels
Most devices have level ranges of Ø to 255.
A few devices have level ranges larger than Ø to 255, but the programming principles
and examples in this section still apply.
Level values can be stored in a variable for later use. To read a level from an Axcess device that
supports levels, use the keyword CREATE_LEVEL. Here is the syntax:
CREATE_LEVEL device, level number, variable
CREATE_LEVEL requires three parameters:
! The device from which to read the level.
! Which level of the device to read (some devices have many different levels).
! The variable in which to store the level.
This keyword creates an association between the specified level of the device and the specified
variable. During the execution of your program, Axcess will continually update the variable to
Axcess Programming Language
41
Page 50

Levels
contain the value of the level with which it is associated. Since this association only needs to occur
once, this keyword is only allowed to appear in the DEFINE_START section of your program.
In this section, you will develop a new program that handles levels. This system contains a volume
control card to control a volume level, and a Touch Panel for the user to control the volume card.
On the Touch Panel there will be four buttons: Volume Up, Volume Down, Volume Mute, and
Volume Preset. There will also be a bargraph to display and control the volume level, as shown in
FIG. 12.
FIG. 12 The Touch Panel layout for this section.
Here are some code excerpts to get started:
DEFINE_DEVICE
VOLUME = 96 (* AXB-VOL3 *)
TP = 128 (* AXU-CVA COLOR VIDEO PANEL *)
DEFINE_CONSTANT
VOL_UP = 1 (* THESE CHANNELS AFFECT VOLUME LEVELS 1+2 *)
VOL_DN = 2
VOL_MUTE = 3
DEFINE_VARIABLE
VOL_LEVEL (* LEVEL OF VOLUME CHANNEL 1 *)
VOL_PRESET (* VOLUME PRESET *)
DEFINE_START
CREATE_LEVEL VOLUME,1,VOL_LEVEL
This code defines the devices you will use, a variable in which to store the volume level value, and
the statement in the startup code to create the association between level number 1 of the volume
card and the VOL_LEVEL variable. It also defines some constants which give names to the
different channels available in the volume control card. By turning these channels on and off, the
user can raise, lower, and mute the volume levels of the card. Here is the code for the Volume Up,
Volume Down, and Volume Mute buttons on the Touch Panel:
42
Axcess Programming Language
Page 51

Levels
DEFINE_PROGRAM
PUSH[TP,17] (* VOLUME UP *)
{
OFF[VOLUME,VOL_MUTE]
TO[VOLUME,VOL_UP]
}
PUSH[TP,18] (* VOLUME DOWN *)
{
OFF[VOLUME,VOL_MUTE]
TO[VOLUME,VOL_DN]
}
PUSH[TP,19] (* VOLUME MUTE *)
[VOLUME,VOL_MUTE] = NOT [VOLUME,VOL_MUTE]
[TP,17] = [VOLUME,VOL_UP]
[TP,18] = [VOLUME,VOL_DN]
[TP,19] = [VOLUME,VOL_MUTE]
Notice that the Volume Up and Volume Down buttons will automatically un-mute the volume
before starting to ramp the volume up or down. Also, these control channels affect both levels of the
volume card simultaneously. This code handles all the functions of your system except for the
bargraph and the Volume Preset button. These are discussed in Using Levels on page 44.
Level Keywords
Level keywords that you can use in the Axcess program are described below:
Level Keywords
SEND_LEVEL Sends a value to a specific level of a specific Axcess device.
Syntax:
SEND_LEVEL device, level number, variable
CREATE_LEVEL Reads a level from an Axcess device that supports levels.
Syntax:
CREATE_LEVEL device, level number, variable
CREATE_LEVEL requires three parameters:
• The device from which to read the level.
• The level of the device to read (some devices have many different levels).
• The variable in which to store the level.
This keyword creates an association between the specified level of the device
and the specified variable. During the execution of a program, Axcess continually updates the variable to contain the value of the level with which it is associated. Since this association only needs to be done once, CREATE_LEVEL is
only allowed to appear in the DEFINE_START section of a program.
DEFINE_CONNECT_LEVEL All level connections are listed underneath the DEFINE_CONNECT_LEVEL
header.
Syntax:
DEFINE_CONNECT_LEVEL (device 1, level number 1, device
2,level number 2, ... )
The section inside the parentheses represents a single connection. All levels
listed in the connection will follow each other. If any one level changes, all others will change to match it. Any number of levels may be supported per connection, and there is no limit to the number of connections. The best location
for this definition section is immediately following the DEFINE_VARIABLE section.
Axcess Programming Language
43
Page 52

Levels
Using Levels
Reading Levels
When a level is associated with a variable using CREATE_LEVEL, Axcess continually keeps the
variable updated with the value of that level. As the user ramps the volume level up, the value in
VOL_LEVEL increases. When the volume is ramped up to the maximum, VOL_LEVEL will
contain 255, and when the volume is muted, the variable will contain Ø.
The AXC-VOL volume card remembers the last level when it is muted so that it can un-mute to
that same level.
Making a preset
A preset is a level stored for later retrieval. In this section, you will give the Volume Preset button a
dual role. If the button is pressed and held for two seconds, the current level of the volume card is
stored in the variable PRESET. If the button is pressed for less than two seconds, it sends a
command to the volume card to set the level of the card to the previously saved level in
VOL_PRESET. Here is the code:
DEFINE_PROGRAM
PUSH[TP,2Ø] (* VOLUME PRESET *)
{
OFF[VOLUME,VOL_MUTE]
WAIT 2Ø 'STORE VOL PRESET'
VOL_PRESET = VOL_LEVEL
}
RELEASE[TP,2Ø] (* VOLUME PRESET *)
{
CANCEL_WAIT 'STORE VOL PRESET'
SEND_COMMAND VOLUME,"'PØL',ITOA(VOL_PRESET)"
}
[TP,2Ø] = (VOL_LEVEL = VOL_PRESET)
The PUSH of the Preset button turns off the mute and starts a two second wait. When the wait
expires, the current volume level (VOL_LEVEL) is stored in the variable VOL_PRESET. On the
release of the button, the WAIT to store the VOL_PRESET is canceled and the current value of the
Preset is sent to the volume card to be recalled.
44
The feedback for the Volume Preset button lights when the current volume level equals the value of
the PRESET variable.
Using bargraphs
To continuously display the current level of the volume card on the Touch Panel's bargraph, use the
SEND_LEVEL keyword. Here is the syntax:
SEND_LEVEL device, level number, value
The SEND_LEVEL keyword is used to update a level in a device. Assume your bargraph display
on the Touch Panel has level number 1. To keep the display updated continually, add the following
line to your program, on mainline:
SEND_LEVEL TP, 1, VOL_LEVEL
Axcess Programming Language
Page 53

Levels
Since this code resides in mainline, it will be executed continually, thus making sure that the
bargraph always reflects the value of level number 1 of the volume card. As the volume ramps up,
VOL_LEVEL increases and the bargraph fills. As the volume ramps down, VOL_LEVEL
decreases and the level indicated on the bargraph also decreases. Since both volume levels are
ramping together, you only have to track one of them for the bargraph.
Connecting levels
A unique feature of Touch Panel bar graphs is that you can touch and slide the TP bargraph to raise
or lower the level. The level tracks the movement of your finger. However, to do this you must set
up a connection between the bargraph and the volume level. This is the function of the
DEFINE_CONNECT_LEVEL keyword.
DEFINE_CONNECT_LEVEL is not a keyword used inside mainline, but a definition section, like
DEFINE_DEVICE or DEFINE_START. The best location to place it is immediately following the
DEFINE_VARIABLE section. Underneath the DEFINE_CONNECT_LEVEL header is where all
level connections are listed. Here is how DEFINE_CONNECT_LEVEL is used:
DEFINE_CONNECT_LEVEL
(device 1,level number 1,device 2,level number 2,...etc.)
The section inside the parentheses represents a single connection. All levels listed in the connection
will follow each other. If any one level changes, all others in the connection will change to match.
Any number of levels may be supported per connection, and there is no limit to the number of
connections.
Here is how you would use DEFINE_CONNECT_LEVEL in your program to connect the Touch
Panel bargraph to the volume card levels:
DEFINE_CONNECT_LEVEL
(TP, 1, VOLUME, 1, VOLUME, 2)
This connects level number 1 on the Touch Panel (the bargraph) and levels 1 and 2 on the volume
card. The reason that two levels on the volume card are included is because volume control cards
have two levels: the left audio channel and the right audio channel. These connections are a twoway street: anytime the bargraph is changed, both volume levels will follow, and anytime a volume
level is changed (for example, by the volume control buttons on the Touch Panel), the bargraph will
automatically follow. When using DEFINE_CONNECT_LEVEL, it is not necessary to use the
SEND_LEVEL keyword in your program, since the connection takes care of updating the
bargraph.
Axcess Programming Language
45
Page 54

Levels
46
Axcess Programming Language
Page 55

Operators
Changing and Comparing Values
In your Axcess program, you may need to increase the value of a variable, to see if that variable has
reached a certain value, or to compare different values to each other. The tools that you use to
perform these tasks are called operators. There are four types of operators in Axcess: arithmetic,
relational, logical, and bitwise.
Arithmetic Operators
Arithmetic operators create a numeric value from one or more operations, such as addition,
multiplication, and division. They are listed in the table below.
Arithmetic Operators
Symbol Function Symbol Function
+Add / Divide
- Subtract % Modulus
* Multiply
Operators
Here is an example of arithmetic operators in an Axcess program:
X = 7 + 5
Y = X * 3
In the example above, X = 12 and Y = 36. There is an order of precedence for arithmetic operators;
that is, some operations are performed first and others second. For example, multiplication
operations (*) are performed before addition operations (+).
Here is an example that illustrates this precedence:
X = 7 + 5 * 3
Reading this expression left to right, X = 36. However, since multiplication takes precedence,
X = 22 (5 * 3 = 15, and 7 + 15 = 22). For detailed information on precedence, refer to
the Precedence Among Operators section on page 51.
Relational Operators
Relational operators, compare two numeric values and produces a true or false result. These
operators are listed below.
Relational Operators
Symbol Function Symbol Function
< Less than <= Less than or equal to
> Greater than >= Greater than or equal to
= Equal to <> Not equal to
Here is an example of these operators in practice:
Axcess Programming Language
47
Page 56

Operators
X = 12
Y = 15
IF (X > Y)
(* Statement 1 *)
ELSE
(* Statement 2 *)
Notice that the result of the expression (X > Y) determines the path Axcess takes. Since X is less
than Y, Statement 1 is bypassed and Statement 2 is executed. You do not have to specify two paths.
However, if there is no ELSE present, Axcess will skip the statement or compound statement
underneath the false relational expression.
True and false
When a condition or expression is evaluated as true, it is given the value of 1; if the condition or
expression is false, it is given the value of Ø. When Axcess encounters an IF, it continues to the next
statement only when the result of the IF statement is a non-zero (true) value. Otherwise, Axcess
does not execute the statement directly under the IF statement.
It is possible, then, to assign a relational expression to a variable. For example:
DEFINE_PROGRAM
X = 9
Z = (X > 5)
IF (Z) (* X IS GREATER THAN 5 *)
{
SEND_STRING Ø,"'X IS GREATER THAN 5',$ØD,$ØA"
}
In this case, Z will be equal to 1 since the expression (X > 5) is true. As a result, the following IF
statement is also true and Axcess executes Statement 1.
Only one relational operator should appear within a set of parentheses; two or more of these
operators can produce unexpected results. For example:
X = 5
IF (1Ø > X > 3)
{
SEND_STRING Ø,"'THIS STATEMENT NEVER GETS EXECUTED',$ØD,$ØA"
}
In the example above, 10 > X is evaluated first. Axcess assigns this part a value of 1 (true). Finally,
1 > 3 is evaluated. Since this is false, Statement 1 is not executed.
Since you cannot compare X to two different values in this manner, you should use a logical
operator.
48
Axcess Programming Language
Page 57

Operators
Logical Operators
Logical operators, or Boolean operators, like relational operators produce either true or false result.
Instead of using greater or less than signs, logical operators use the following keywords:
AND Both conditions must be true for the result to be true.
OR At least one of the conditions must be true for the result to be true.
XOR Only one condition can be true for the result to be true.
NOT This keyword uses only one condition. If this condition is true, the result is false; if the condi-
tion is false, the result is true.
The following example demonstrates its use.
DEFINE_PROGRAM
X = 5
Y = 1
IF ((X = 5) AND (Y = 4))
{
SEND_STRING Ø,"'THIS STATEMENT NEVER GETS EXECUTED',$ØD,$ØA"
}
ELSE
{
SEND_STRING Ø,"'THIS STATEMENT DOES GET EXECUTED',$ØD,$ØA"
}
FIG. 13 provides a quick reference guide for the results of a logical expression.
FIG. 13 Sample logical expression truth tables
FIG. 14 provides a pictorial explanation of the AND table.
FIG. 14 Sample logical expression table of the operator AND
FIG. 15 shows a sample logical expression table comparing two conditions. Since both (X = 5) and
(Y = 4) are not true, the result of the expression is false and Statement 2 is executed. If both
conditions had been true, Statement 1 would be executed instead.
FIG. 15 Sample logical expression table to compare two conditions
NOT is used differently than the other logical operators since it only requires one condition. For
example:
Axcess Programming Language
49
Page 58

Operators
DEFINE_PROGRAM
IF (X < 5)
X = X + 1
ELSE
X = Ø
In this case, X acts like a counter. If X does not equal 5, its value is increased by one. Eventually X
will equal 5; the Else statement will set it back to 0.
Unlike relational operators, logical operators can appear more than once in an expression. For
example:
X = 2
Y = 7
Z = 12
IF ((X = 2) AND (Y > 4) OR (Z <= 8))
{
(* Statement 1 *)
}
Since the operators AND and OR have the same precedence, AND is evaluated first since it appears
first. Both (X = 2) and (Y > 4) are true, so the result of this part of the expression is true. If you treat
this part as one unit, you can see its result is actually the first condition of the OR operator.
Although the second condition (Z <= 8) is false, the entire expression is true since OR requires only
one condition to be true. As a result, Statement 1 is executed. Refer to the Precedence Among
Operators section on page 51 for more information.
Bitwise Operators
Bitwise operators perform the same logical operations mentioned earlier, but on a bit-by-bit basis.
These operators are BAND, BOR, BXOR, and BNOT. They are similar to logical operators. For
example, the keyword BAND performs a logical AND operation between two bytes on a bit-by-bit
basis. Instead of producing a true or false result, bitwise operations form a new byte. For example:
X = $A1 BAND $8A
The variable X now equals $8Ø (see FIG. 16). The AND operation is applied to the first bit of each
value (1 and 1), setting the first bit of the result to 1. This is done again for each bit of the values,
producing a new byte.
FIG. 16 BAND applies the logical operator And on a bit-by-bit basis. Since both bits are true in the first location,
the resulting bit is also true.
50
Axcess Programming Language
Page 59

Operators
Abbreviations
Instead of typing AND and BNOT in your programs, you can use some abbreviations for the logical
and bitwise operators. For example, the characters && can take the place of AND, and ~ can
replace BNOT. Use the method you are comfortable with; one way is easier to read; the other is
faster to type. The following table lists the supported logical and bitwise operators.
Logical and Bitwise Operator Abbreviations
Abbreviation Function Abbreviation Function
&& Logical And & Bitwise And (Band)
|| Logical Or | Bitwise Or (Bor)
^^ Logical Xor ^ Bitwise Xor (Bxor)
! Logical Not ~ Bitwise Not (Bnot)
Precedence Among Operators
There is an order of precedence among the operators, as shown below. Operators with higher
precedence are evaluated first. For example, multiplication operations (*) are performed before the
BAND bitwise operation.
Operator Precedence
Level Operators
1 (highest) Not, Bnot
2 * / %
3 + -
4 < <= > >= = <>
5 Band, Bor, Bxor
6 (lowest) And, Or, Xor
If the operators are in the same level of precedence, the equation is solved from left to right. For
example:
X = 12 / 3 * 5
Since multiplication and division are both in level 2, multiplication does not take higher precedence
over division, and X is equal to 20.
If you need to manually establish precedence for a certain operation, use parentheses to enclose the
operation. Multiple levels of precedence can be created with additional parentheses. For example:
X = ((4 + 6) / (2 + 3)) + 1
The first operations solved are (4 + 6) and (2 + 3), since these operations are enclosed by the
innermost parentheses. Next, 10 is divided by 5 in the second level of parentheses. Finally, 1 is
added, making X equal to 3.
Equations involving parentheses can become complex through many different levels of precedence.
Remember that the number of left parentheses must equal the number of right parentheses in order
for the expression to work.
Parentheses can be used to force the order of precedence. By adding parentheses around the OR
portion of the statement, as shown below, Axcess is forced to evaluate it first. In this example, the
Axcess Programming Language
51
Page 60

Operators
result of this part of the expression is true, becoming the second condition to the AND operator.
Since both portions of the AND statement are true, statement 1 executes.
X = 2
Y = 7
Z = 12
IF ((X = 2) AND ((Y > 4) OR (Z <= 8)))
(* Statement 1 *)
Operator Keywords
Operator keywords and abbreviations (logical and bitwise) supported in Axcess are listed below.
Operator Keywords
AND (&&) Evaluates two conditions. These conditions must be true for the entire expres-
sion to be true. AND is typically used in IF statements to check for multiple true
conditions.
Example:
IF((X = 1) AND (Y = 2))
{
(* These statements are executed if the
above And statement is true; that is,
if X = 1 is true and Y = 2 is true. *)
}
NOT (!) Use when the opposite of a condition makes the expression true.
Example:
IF (NOT (X = 2))
{
(* If X <> 2, these statements are executed *)
}
OR (||) Typically used in IF statements to check for a true condition. The logical opera-
tor OR is used to evaluate two conditions. At least one of the conditions must
be true for the entire expression to be true.
Example:
IF ((X = 1) OR (Y = 2))
{
(* These statements are executed if the above
OR statement is true *)
}
XOR (^^) Evaluates two conditions. Only one of the conditions can be true for the entire
expression to be true.XOR is typically used in IF statements to check for a single true condition.
Example:
IF ((X = 3) XOR (Y = 1))
{
(* These statements are executed if only one of
the above conditions is true *)
}
52
Axcess Programming Language
Page 61

Operators
Bitwise Operator Keywords
Bitwise operator keywords and abbreviations supported in Axcess are listed below:
Bitwise Operator Keywords
BAND (&) Performs a bitwise And operation between two bytes. Each of these bytes can
be a constant value, number, or variable. The result of the operation can be
tested with an IF statement or assigned to a variable.
Example:
X = 5 BAND 14 (* X is equal to 4 *)
BNOT (~) Performs a bitwise Not operation on a byte. Each bit of the byte is inverted; that
is, each "1" bit becomes "Ø," and vice versa. The result of the operation can be
tested with an IF statement or assigned to a variable.
Example:
X = BNOT 1ØØ (* X is equal to 155 *)
BOR (|) Performs a bitwise Or operation between two bytes. Each of these bytes can
be a constant value, number, or variable. The result of the operation can be
tested with an IF statement or assigned to a variable.
Example:
X = 1Ø BOR 6 (* X is equal to 14 *)
BXOR (^) Performs a bitwise exclusive Or operation between two bytes.Each of these
bytes can be a constant value, number, or variable. The result of the operation
can be tested with an IF statement, or assigned to a variable.
Example:
X = 1Ø BXOR 6 (* X is equal to 12 *)
Axcess Programming Language
53
Page 62

Operators
54
Axcess Programming Language
Page 63

Variable Types and Conversions
ASCII Codes
A string is broken up into single letters when placed into a string array. Each storage space returns
the letter it is holding when referenced. For the following example, assume that TEMP[3] holds the
letter R. There are actually three ways you can reference this array location, shown in this example
using IF statements:
DEFINE_PROGRAM
IF (TEMP[3] = 'R')
{
SEND_STRING Ø,"'TEMP[3] IS EQUAL TO "R"',$ØD,$ØA"
}
IF (TEMP[3] = $52)
{
SEND_STRING Ø,"'TEMP[3] IS EQUAL TO "R"',$ØD,$ØA"
}
IF (TEMP[3] = 82)
{
SEND_STRING Ø,"'TEMP[3] IS EQUAL TO "R"',$ØD,$ØA"
}
The letter R has an ASCII value of 82 decimal, which is equivalent to 52 in hexadecimal. In
Axcess, hexadecimal numbers begin with a dollar sign ($). Therefore, the 2nd IF statement above
shows $52, a hexadecimal number.
Variable Types and Conversions
All three methods (letters, decimal ASCII codes, and hexadecimal ASCII codes) can be used
interchangeably. Use whichever method is easiest for the task at hand.
Integer Arrays
All arrays discussed to this point have a range of values in each location of Ø to 255. The range of
values in a single variable is Ø to 65,535, and when a value greater than 255 is assigned to an array
location, the number is truncated above 255. For example, if the number 500 is assigned to a
location in an array, the actual number that is assigned is 244. The easiest way to find the actual
number is to subtract 256 from the number until the number is less than 256 (in this example, 500 256 = 244).
To create an array in which each location can contain values greater than 255, use an integer array.
An integer array is just like a normal array, except each location can hold values from Ø to 65,535.
Also, string keywords (i.e. FIND_STRING, REMOVE_STRING, MID_STRING, etc.) do not
work on integer arrays.
To declare an integer array, place the keyword INTEGER in front of the array definition in the
DEFINE_VARIABLE section. If you want your CAM_PRESETS array to be an integer array, you
would include the keyword INTEGER before the array identifier:
DEFINE_VARIABLE
INTEGER CAM_PRESETS[6] (* CAMERA PRESETS *)
This declares an integer array with six locations; each location can hold values from Ø to 65,535.
Axcess Programming Language
55
Page 64

Variable Types and Conversions
There are certain limitations of integer arrays. If an integer array is assigned to a normal array.
Values above 255 are truncated. For more information on truncating values, refer to Definition
Sections on page 9. This also happens if an integer array is sent to a device using the keywords
SEND_STRING or SEND_COMMAND. There is no problem, however, in assigning a normal
array to an integer array.
! An integer array takes up twice as much Axcess memory than would a normal array of
the same storage capacity.
! If your array is only going to hold alphanumeric values, it is not necessary to make it an
integer array.
Conversion keywords
The following keywords automatically set the length value of the resulting string.
Conversion Keywords
ATO I ATOI stands for "ASCII to integer". It takes a string literal, string expression, or
array as a parameter, and returns a single integer as the result.
Example:
DEFINE_CONSTANT
STR1 = '456'
STR2 = 'YES789GO19'
DEFINE_PROGRAM
NUM = ATOI('123') (* NUM = 123 *)
NUM = ATOI(STR1) (* NUM = 456 *)
NUM = ATOI(STR2) (* NUM = 789 *)
If the string contains all non-numeric characters (such as HELLO), ATOI
returns the integer Ø. However, if there are any numeric characters embedded
in the string, ATOI returns the first complete set it comes upon, as is the case
with STR2 above. Notice that only the first set of numbers from STR2 is
returned.
INTEGER This keyword is placed in front of the array name to denote the array as an inte-
ger array. For more information, see Integer Arrays on page 55.
It can only be used in the DEFINE_VARIABLE and LOCAL_VAR sections
when declaring arrays.
ITOA ITOA stands for "integer to ASCII". It creates a string that represents the deci-
mal value of a number.
Example:
DEFINE_CONSTANT
CONST = 456
DEFINE_VARIABLE
STR[5]
VAR
DEFINE_PROGRAM
VAR = 789
STR = ITOA(123) (* STR = '123' *)
STR = ITOA(CONST) (* STR = '456' *)
STR = ITOA(VAR) (* STR = '789' *)
The comment after each statement shows the value of the array STR after
each assignment. The length value of STR is set to 3 in each case.
56
Axcess Programming Language
Page 65

Variable Types and Conversions
Conversion Keywords (Cont.)
ITOHEX ITOHEX stands for "integer to hexadecimal". It works in the same manner as
ITOA, except that the integer is transformed into a hexadecimal ASCII string.
If you substitute the ITOA keywords in the previous example with ITOHEX keywords, this would be the result:
STR = ITOHEX(123) (* STR = '7B' *)
STR = ITOHEX(CONST) (* STR = '1C8' *)
STR = ITOHEX(VAR) (* STR = '315' *)
Notice there are no dollar signs ($) in the results. This is because the dollar
sign indicates a numerical value expressed in hexadecimal, and is only used
when telling Axcess that a number is hexadecimal.
Axcess Programming Language
57
Page 66

Variable Types and Conversions
58
Axcess Programming Language
Page 67

Two-Dimensional Arrays
The previous sections described how to group data into arrays and how to manipulate those arrays
as single units. This section describes how to group multiple arrays together into one twodimensional array. Two-dimensional arrays provide greater flexibility and power for more complex
applications. This section includes explanations of the concepts involved, and example Axcess
programming code.
To understand the structure of the two-dimensional array, refer to the basic single variable. A
variable holds only one value at a time. Using arrays, you can create a variable that can hold many
values. Reference the desired value in the array with an index value. This allows you to store
several related values, and access any particular one.
A two-dimensional array can be declared with the INTEGER keyword, like a one-dimensional array
can. This allows values in the range Ø to 65,535 to be assigned to locations within the twodimensional array.
The two-dimensional array expands on the one-dimensional array in the same way the onedimensional array expands on the simple variable: it holds multiple one-dimensional arrays which
can be referenced with an index value. To declare a two-dimensional array:
DEFINE_VARIABLE
NAMES[1Ø][3Ø]
While a one-dimensional array has a single storage capacity value, a two dimensional array has
two. NAMES is a two-dimensional array that can hold ten one-dimensional arrays, with a storage
capacity of 30 characters each. The total storage capacity of NAMES is 10 characters by 30
characters, for a total of 300 characters. The variable NAMES can be used to store up to 10 names,
with a maximum length of 30 characters each. FIG. 17 depicts the structure of the array NAMES.
Two-Dimensional Arrays
FIG. 17 The structure of a two-dimensional array
Storing Values
The method of storing values in a two-dimensional array is similar to that of a one-dimensional
array:
! Assign values to individual locations.
! Assign one-dimensional arrays, string literals, and string expressions to one of the one-
dimensional arrays inside the two-dimensional array.
! Assign entire two-dimensional arrays to other two-dimensional arrays.
Axcess Programming Language
59
Page 68

Two-Dimensional Arrays
For example:
DEFINE_VARIABLE
NAMES[1Ø][3Ø] (* two-dimensional array *)
PEOPLE[8][2Ø] (* another two-dimensional array *)
ONE_NAME[3Ø] (* one-dimensional array *)
A_VALUE (* single-value variable *)
DEFINE_PROGRAM
A_VALUE = 1Ø (* statement 1 *)
ONE_NAME = 'EMMITT SMITH' (* statement 2 *)
NAMES[1][1] = 6 (* statement 3 *)
NAMES[1][2] = A_VALUE (* statement 4 *)
NAMES[2] = 'TROY AIKMAN' (* statement 5 *)
NAMES[3] = "1,2,ONE_NAME,3" (* statement 6 *)
FIG. 18 shows what the two-dimensional array NAMES will look like after this code is executed.
FIG. 18 The two-dimensional array NAMES after the assignments
In this example, '6', '10', '1', '2', and '3' are decimal values; the letters are ASCII characters.
Each row in the two-dimensional array has a length value like a one-dimensional array. When a
string literal or expression is assigned to a row of a two-dimensional array (as shown in statements
5 and 6 in the above example), that row has its length value set in the same manner as a onedimensional array does. The LENGTH_STRING and SET_LENGTH_STRING functions operate
on rows in two-dimensional arrays in the same way as whole one-dimensional arrays. Once the
above example is executed, the LENGTH_STRING function returns the first three rows of
NAMES:
X = LENGTH_STRING (NAMES[1]) (* X will contain Ø *)
X = LENGTH_STRING (NAMES[2]) (* X will contain 11 *)
X = LENGTH_STRING (NAMES[3]) (* X will contain 15 *)
Retrieving values
There are three ways of referencing the contents:
! By cell (single values)
! By row (an array of values)
60
! As a whole
Single locations (or cells) are retrieved by using two index values. The first index value specifies
the row, the second the location in that row. For example:
A_VALUE = NAMES[3][6]
Axcess Programming Language
Page 69

Two-Dimensional Arrays
This line of code takes whatever value is in the sixth location of the third row in the twodimensional array NAMES, and assigns it to the variable VALUE. In the context of the previous
examples, VALUE will now contain an E.
Only the first index value is used when retrieving a whole row. The index value indicates the row to
be retrieved, and the length value for that row determines how many locations from the row are
actually retrieved. For instance:
ONE_NAME = NAMES[2]
After this line is executed, the array ONE_NAME will contain the string TROY AIKMAN, and its
length value will be 11. If you were to try to retrieve the entire first row, nothing would be returned
because its length value is Ø.
The third method of accessing a two-dimensional array is to assign it to another two-dimensional
array:
PEOPLE = NAMES
This will copy the entire contents of NAMES into PEOPLE, regardless of length values individual
rows. This method copies the entire contents of the two dimensional array, including length values
of the rows. PEOPLE[2] contains TROY AIKMAN and has a length value of 11, just like
NAMES[2].
In the original example, the two-dimensional array PEOPLE is defined with a size 8 by 20, and
NAMES is 10 by 30. When Axcess copies from a two-dimensional array into a smaller one, any
information outside the ranges of the smaller array is not copied.
Axcess Programming Language
61
Page 70

Two-Dimensional Arrays
62
Axcess Programming Language
Page 71

IF and the Boolean Expressions
While your first program may seem complicated, it doesn't show the real power of the Axcess
language. At this point, the program is button-for-button. This means that each button has only one
function, with no special conditions or considerations. The control panel has a separate section of
buttons for each piece of equipment.
In many cases, you may want the same number of functions with fewer buttons. A common
solution is to have several groups of buttons with similar functions reduced to one group, with a set
of buttons that selects which piece of equipment the buttons control. You could set one button for
each piece of equipment to select a camera, and one set of camera control buttons. Your panel could
now look like the one in FIG. 19.
IF and the Boolean Expressions
FIG. 19 Revised Touch Panel layout for your program.
This configuration has seven fewer buttons than before. In this configuration, the user selects the
camera with the Select button, then controls it with the camera control buttons. This will not be a
button-for-button program because the camera control buttons have three possible functions each.
In the program, you will use Boolean expressions to select the correct function of the camera
control buttons.
Boolean Expressions
A Boolean, or relational expression, is used to tell Axcess whether or not to execute a particular
function or functions in the program. When your program tells Axcess to branch off in a different
direction, the program can either continue the way it is going, or it can jump to a different section of
the program. In this case, Axcess must use a Boolean expression to judge certain conditions before
continuing.
Axcess Programming Language
63
Page 72

IF and the Boolean Expressions
A Boolean expression can have one of two results: true or false. In Axcess, any non-zero value is
true, while a zero value is false. When Axcess evaluates a Boolean expression, it assigns a 1 for a
true result, and a Ø for a false result.
The IF Statement
The most common keyword in Axcess that uses Boolean expressions is the IF keyword. Every IF
statement must be followed by a Boolean expression enclosed in parentheses. This provides the
beginning of a conditional execution of statements, as shown in this example:
IF (Boolean expression)
(Statement 1)
If the Boolean expression is true, Axcess executes Statement 1 and continues with whatever
statements follow. If the Boolean expression is false, Statement 1 is ignored. If Statement 1 is a
compound statement, it must be enclosed in braces.
The IF...ELSE Set of Statements
If the Boolean expression is false, Axcess executes a function independent of the True Boolean
expression. For example:
IF (Boolean expression)
(*Statement 1*)
ELSE
(*Statement 2*)
If the Boolean statement is true, then Statement 1 is executed and Statement 2, underneath the
ELSE statement, is ignored. If the Boolean statement is false, then Statement 2 is executed.
Statement 1 is automatically ignored if the expression is false.
The IF...ELSE IF Set of Statements
While IF and IF...ELSE allow two different paths, IF...ELSE IF allows an essentially unlimited
number of paths. Axcess stops at the first true Boolean expression and executes the following
function. After completion, it goes on to the rest of the program. For example:
IF (Boolean expression)
(*Statement 1*)
ELSE IF (Boolean expression)
(*Statement 2*)
ELSE IF (Boolean expression)
(*Statement 3*)
(* As many Else If statements as memory allows... *)
A last ELSE statement (not ELSE IF) can be placed at the end as a default statement. Then, if
Axcess does not find a true IF or ELSE IF statement, it executes the final ELSE statement. This last
statement is not necessary.
Nesting
Once Axcess is following a branch (for example, Statement 1 in the previous example), you can tell
it to branch off again with another IF statement. This branch within a branch is called nesting. An
IF can be nested within an IF within an IF, and so on.
When you are nesting IF...ELSE statements, be sure to use braces. Look at the following incorrect
example:
64
Axcess Programming Language
Page 73

IF and the Boolean Expressions
IF (X = 5)
IF (Y = 1Ø)
(*Statement 1*)
ELSE
(*Statement 2*)
The alignment of the ELSE statement with the IF (X = 5) suggests that they should be associated.
The second IF statement in this example is not intended to have an ELSE counterpart. However,
Axcess pairs the second IF statement with the ELSE, because the compiler associates the ELSE
with the closest IF statement.
Braces force the compiler to associate the ELSE with IF (X = 5). For example:
IF (X = 5)
{
IF (Y = 1Ø)
(*Statement 1*)
}
ELSE
(*Statement 2*)
By using braces, you isolate the IF (Y = 1Ø) statement from the IF...ELSE set of statements.
The SELECT...ACTIVE Statement
The SELECT...ACTIVE statement makes IF...ELSE IF nesting easier, by allowing placement of
several branches from one path. This is the format:
SELECT
{
ACTIVE (Boolean expression 1) : (*Statement 1*)
ACTIVE (Boolean expression 2) : (*Statement 2*)
ACTIVE (Boolean expression 3) : (*Statement 3*)
(* ...etc. *)
}
If too many IF...ELSE IF statements are chained together, a run-time error could occur.
Each one of the Boolean expressions is evaluated in order, until one is found to be true. The
statements associated with the true expression are then executed, and the path flows to the
statements following the closing brace. Using SELECT...ACTIVE is preferable to using multiple
IF...ELSE IF statements since it uses less memory, and runs faster.
When using the IF...ELSE set of statements, the code following the ELSE is the default statement.
If the condition of the IF is false, then the default statement following the ELSE is executed. If none
of the conditions in a SELECT...ACTIVE statement are true, no code of any ACTIVE statement
will be executed, since SELECT...ACTIVE has no default statement. The following example shows
how to create your own default statement for a SELECT...ACTIVE.
Axcess Programming Language
65
Page 74

IF and the Boolean Expressions
SELECT
{
ACTIVE (condition) : (*statement*)
ACTIVE (condition) : (*statement*)
ACTIVE (condition) : (*statement*)
ACTIVE (1) : (*default statement*)
}
Here, the last ACTIVE will always be true, and will execute only if all of the conditions of the
previous ACTIVES are false. This makes the last ACTIVE's statement the default statement.
More Boolean operators
The previously discussed IF and IF...ELSE statements could only base the program flow on one
condition. However, you can combine two of these conditions with a Boolean (or relational)
operator. The Boolean operator sets the conditions for the end result.
The Boolean operators used in the Axcess Control System are AND, OR, XOR, and NOT. For
information on Boolean operators, refer to Relational Operators on page 47.
If the end result of the Boolean expression is true, Axcess continues with Statement 1. If the end
result is false, Axcess ignores Statement 1.
Reading a Boolean expression table
In most Boolean expressions, the possible conditions of two statements are analyzed to achieve one
result. These results can be visualized using Boolean expression tables, as shown in FIG. 20.
FIG. 20 Pictorial explanation of the Boolean expression table for the operator AND.
The following text formula can also be followed to find that result:
If <STATEMENT 1> is <its condition (true or false)> <Boolean operator> <STATEMENT
2> is <its condition>, then the result of the expression is <result of statement
conditions>.
The result is found by basing the conditions of the statements against specific rules set by the
Boolean operator:
AND Both statements must be true for the result to be true.
OR At least one of the conditions must be true for the result to be true.
XOR Only one statement can be true for the result to be true.
NOT If the statement is true, the result is false. On the contrary, if the condition is false, the result
is true. This expression uses only one statement.
66
For example, assume that it has been previously defined that NUM1 = 5 and NUM2 = 3. Insert the
variables from the example into the text formula:
If NUM1 = 5 is true and NUM2 = 4 is false, then the result of the
expression is false.
The statement would have been true if NUM2 had been equal to 3, because in an AND expression
both statements must be true as shown in FIG. 21.
Axcess Programming Language
Page 75

IF and the Boolean Expressions
FIG. 21 An example of how a Boolean expression table is used to compare multiple conditions.
The Boolean expression tables in FIG. 22 are a quick reference guide for the result of a Boolean
expression.
FIG. 22 Sample Boolean truth table results
Boolean Keywords
The Boolean keywords supported by Axcess are described below:
Boolean Keywords
SELECT...ACTIVE The SELECT...ACTIVE statement allows easy placement of several branches
from one path.
Syntax:
SELECT
{
ACTIVE (expression 1) : (* Statement 1 *)
ACTIVE (expression 2) : (* Statement 2 *)
ACTIVE (expression 3) : (* Statement 3 *)
(* ...etc. *)
}
Each one of the expressions is evaluated in order, until one is found to be true.
The statements associated with that true expression are then executed, and
the path then flows to whatever statements follow the closing brace. Using a
SELECT...ACTIVE is much preferred to multiple IF...ELSE IF statements, as it
uses less memory and runs faster.
ELSE If the corresponding IF statement is false, the program will jump to this section
of the IF...ELSE set of statements.
See IF for details.
IF
The IF statement provides
conditional branching of program flow.
Every IF statement must be followed by an expression enclosed in parentheses. This provides the beginning of a conditional execution of statements. For
example:
IF (expression)
(* Statement 1 *)
If the expression is true, Axcess executes Statement 1 and then continues with
whatever statements follow. If the expression is false, Statement 1 is ignored. If
Statement 1 is a compound statement, it must be enclosed in braces.
Axcess Programming Language
67
Page 76

IF and the Boolean Expressions
Boolean Keywords (Cont.)
IF...ELSE The IF...ELSE statements are similar to the basic IF statement, with the addi-
IF...IF ELSE The IF...ELSE IF set of statements allow an essentially unlimited number of
tion of an alternative instruction. If the expression is false, Axcess executes a
statement independent of the true expression. For example:
IF (expression)
(* Statement 1 *)
ELSE
(* Statement 2 *)
If the expression is true, then Statement 1 is executed and Statement 2, underneath the ELSE statement, is ignored. If the expression is false, then Statement 2 is executed. Statement 1 is automatically ignored if the expression is
false.
paths. Axcess stops at the first true expression and executes the following
statement. Upon completion, it goes on to the rest of the program. For example:
IF (expression)
(* Statement 1 *)
ELSE IF (expression)
(* Statement 2 *)
ELSE IF (expression)
(* Statement 3 *)
(* As many Else If statements as memory
allows... *)
A last ELSE statement (not ELSE IF) can be placed at the end as a default
statement. In that case, if Axcess does not find a true IF or ELSE IF statement,
it executes the final ELSE statement. This last ELSE statement is not necessary.
68
Axcess Programming Language
Page 77

While Keywords
This section decribes the While keywords (WHILE, MEDIUM_WHILE, and LONG_WHILE).
WHILE
The WHILE family of keywords allow the program to loop through a certain section of a program
until a condition becomes true. If the condition is false, Axcess skips the statements immediately
following the WHILE. If the condition is true, Axcess executes the statements, and rechecks the
WHILE's conditional expression. If the condition is still true, the statements are executed again.
This sequence continues until the condition is evaluated as false.
The amount of time Axcess spends executing any WHILE cannot exceed 0.5 seconds. This is
because the Central Controller updates AXlink (the communications bus between all Axcess
devices) between each pass through mainline. If AXlink is not updated at certain time intervals,
problems could develop during bus communications. To prevent an Axcess program from stalling
mainline too long, there is a 0.5 second time-out on WHILE loops. Axcess will forcibly exit the
WHILE after 0.5 seconds, regardless of the operation it is executing.
While Keywords
MEDIUM_WHILE
During the execution of a LONG_WHILE, Axcess scans AXlink, as it does when running
mainline. It is during this scanning that Axcess receives information about input changes from
devices such as Softwire Panels and Touch Panels. This activity also takes place after each loop
through a LONG_WHILE. Therefore, if a user presses a button while Axcess is looping through a
LONG_WHILE, the input change is lost to any programming outside the LONG_WHILE loop.
If this becomes a problem, the MEDIUM_WHILE keyword can be used. This keyword operates
like a LONG_WHILE, but ignores input changes from Axcess devices. These input changes are not
lost, but remain pending until the Central Controller scans for them again-either before the next
pass through mainline, or after a pass through a MEDIUM_WHILE.
LONG_WHILE
Unlike WHILE, after each LONG_WHILE loop, the AXlink bus is updated. This makes the
statement or compound statement following a LONG_WHILE a mini-mainline, for as long as the
condition is true. Therefore, LONG_WHILE has no time-out period. You must provide a way out
of your LONG_WHILE (by allowing the condition to become false), otherwise the program will
become stuck inside the LONG_WHILE and code outside the loop will not be executed.
If the condition associated with one of these in your program can never become false, your
program could get stuck in an infinite loop, requiring a reset of the Central Controller or maybe
even reloading of the system's programming.
Axcess Programming Language
69
Page 78

While Keywords
While Keywords
While Keywords
WHILE Axcess checks to see if the condition following it is true, then either executes
statements within the WHILE statement, or continues to the next statements in
the code.
Example:
DEFINE_VARIABLE
RELAY_INDEX (* FOR TURNING ON RELAYS *)
DEFINE_PROGRAM
RELAY_INDEX = 1
WHILE (RELAY_INDEX <= 14)
{
ON[RELAY,RELAY_INDEX]
RELAY_INDEX = RELAY_INDEX + 1
}
In this example, the variable RELAY_INDEX is first set to 1. Next, the WHILE
statement checks to see if RELAY_INDEX is less than or equal to 14. Since it is
(making the statement true), Axcess executes the compound statement
directly following the WHILE. Since RELAY_INDEX equals 1, the device-channel referenced by [RELAY,1] is turned on, and RELAY_INDEX is incremented
by one. Then the program loops back to the WHILE statement. This loop continues until RELAY_INDEX becomes 15; in this case the compound statement
following the WHILE is not executed, and Axcess continues to the rest of the
program. This block of code effectively turns on the first 14 channels of device
RELAY.
MEDIUM_WHILE Operates like a LONG_WHILE, but it ignores input changes from Axcess
devices.
You must provide a way out of your MEDIUM_WHILE (by allowing the condition
to become false), the program will become stuck inside the MEDIUM_WHILE
and no other code outside of the loop will be executed.
Example:
DEFINE_VARIABLE
WHILE_TIMEOUT (* FOR MEDIUM_WHILE TIMEOUT *)
DEFINE_PROGRAM
RELAY_INDEX = 1
WHILE_TIMEOUT = Ø
WAIT 3Ø (* FORCE LONG_WHILE TO
TIMEOUT AFTER 3 SECONDS *)
WHILE_TIMEOUT = 1
MEDIUM_WHILE ((RELAY_INDEX <= 14) && (!WHILE_TIMEOUT))
{
ON[RELAY,RELAY_INDEX]
RELAY_INDEX = RELAY_INDEX + 1
}
70
Axcess Programming Language
Page 79

While Keywords
While Keywords (Cont.)
LONG_WHILE In cases where a WHILE loop takes longer than one half-second to execute,
change the WHILE keyword in question to a LONG_WHILE.
You must provide a way out of your LONG_WHILE (by allowing the condition to
become false), the program will become stuck inside the LONG_WHILE and no
other code outside of the loop will be executed.
Example:
DEFINE_VARIABLE
WHILE_TIMEOUT (* FOR LONG_WHILE TIMEOUT *)
DEFINE_PROGRAM
RELAY_INDEX = 1
WHILE_TIMEOUT = Ø
WAIT 3Ø (* FORCE LONG_WHILE TO
TIMEOUT AFTER 3 SECONDS *)
WHILE_TIMEOUT = 1
LONG_WHILE ((RELAY_INDEX <= 14) && (!WHILE_TIMEOUT))
{
ON[RELAY,RELAY_INDEX]
RELAY_INDEX = RELAY_INDEX + 1
}
In the example above, a variable called WHILE_TIMEOUT (a flag used to force
the program out of the LONG_WHILE) is added. Before starting the
LONG_WHILE loop, initialize the timeout flag to Ø, and set the RELAY_INDEX
(the relays that will turn on first) to 1. Then start a three-second wait to set
WHILE_TIMEOUT to 1. The WAIT keyword tells the Central Controller the following code needs to be executed at some later time. The time is specified
right after the WAIT keyword in tenths of a second. In this example, WAIT 3Ø is
three seconds. The Central Controller remembers that in three seconds it
should execute the line of code:
WHILE_TIMEOUT = 1.
Now start the LONG_WHILE. The statements inside the LONG_WHILE execute until the condition after the LONG_WHILE becomes false. This occurs
either when RELAY_INDEX reaches a value greater than 14, or the
WHILE_TIMEOUT variable becomes 1. Inside the LONG_WHILE, turn on the
relay RELAY_INDEX, and increment RELAY_INDEX. The LONG_WHILE will
turn on relays 1-14. If the master were to spend more than three seconds turning on these relays, it will exit the LONG_WHILE and execute the code following the LONG_WHILE.
Axcess Programming Language
71
Page 80

While Keywords
72
Axcess Programming Language
Page 81

Using Buffers
Communicating to the Outside World
One of the most powerful features of Axcess is its ability to send and receive any combination of
values using RS-232, RS-422, RS-485, PA-422, MIDI, and a variety of other formats. You have the
ability to construct any combination of numbers and characters with the string expression and send
it to an external device. In addition, you can receive strings from external devices and interpret
them to obtain useful information.
Receiving strings
Receiving strings requires several more steps than sending strings. You must first create a buffer for
device to receive strings from that device. A buffer is an array variable associated with a particular
device for the purpose of storing information received from the device.
Creating buffers
To create a buffer, use the CREATE_BUFFER keyword. This keyword can only appear in the
DEFINE_START section of your program; the syntax is:
CREATE_BUFFER device, array
Using Buffers
CREATE_BUFFER can only be used in the DEFINE_START section.
The CREATE_BUFFER keyword directs Axcess to place any data received from the specified
device into the specified array. When Axcess places the bytes into the array, it increments the length
value for the array and then places the bytes into the array at the current end of the array. See
FIG. 23 for a pictorial explanation.
Even though the array is acting as a buffer, it is still an array and can be treated as one. You can still
access the individual locations, send it to a device, assign it to other arrays, assign other arrays to it
and use the array manipulation keywords, discussed previously in Arrays and Strings on page 31.
FIG. 23 When data comes in from a device, it goes into the spot determined by the length value of the array.
Here, the length value was 3. So the 'Y' is put into location 4, and the length value is incremented to 4.
Storing characters
When a device sends string information to the Central Controller, the Central Controller places the
incoming information into the buffer created for that device, and updates the buffer's length value.
These actions are executed after the Central Controller has passed through mainline. Since all data
going in and out of these devices is serial, each byte is handled one at a time.
Axcess Programming Language
73
Page 82

Using Buffers
If the buffer is full when a character needs to be inserted into it, Axcess drops the first character and
shifts the contents of the buffer to the left, and inserts the new character at the end of the buffer, as
shown in FIG. 24.
FIG. 24 Inserting a character into a full buffer causes the first character to be dropped.
Retrieving characters
Use the keyword GET_BUFFER_CHAR to retrieve characters. This keyword has a two-part
operation:
! First, it retrieves the first character in the buffer for your own utilization. This creates the
same effect as if you retrieved the first storage location of a normal string array.
! Second, it removes that character from the buffer, causing all the other characters to shift
up one place. The second character is now the first, the third is now the second, and so on.
Here is the syntax:
string = GET_BUFFER_CHAR (array)
The parameter passed to GET_BUFFER_CHAR must be an array, but does not need to be a buffer.
Remember that all buffers are arrays, but not all arrays are buffers. The statement will operate
identically in either case. The result must be a simple variable (not an array), because only one
character will be returned.
These examples show how to create an array called SWT_BUFFER with a capacity of a hundred
characters, and how to make it a buffer associated with a device named SWT.
DEFINE_DEVICE
SWT = 1 (* AXC-232: AUTOPATCH 4YDM *)
DEFINE_VARIABLE
SWT_BUFFER[1ØØ] (* BUFFER FOR SWITCHER *)
TEMP_CHAR (* FOR PARSING ABOVE *)
DEFINE_START
CREATE_BUFFER SWT,SWT_BUFFER
Now all string data sent to the Central Controller from the device SWT will go into the array
SWT_BUFFER.
74
Axcess Programming Language
Page 83

Using Buffers
Getting the data out of the buffer as soon as it enters is usually a two-step process, as shown in this
example:
DEFINE_PROGRAM
IF (LENGTH_STRING(SWT_BUFFER))
{
TEMP_CHAR = GET_BUFFER_CHAR(SWT_BUFFER)
IF (TEMP_CHAR = 'T' || TEMP_CHAR = '.')
{
SEND_STRING Ø,"'SWITCH COMMAND COMPLETE',$ØD,$ØA"
}
}
These two lines of code are actually one IF statement. The condition of the IF is the result of the
LENGTH_STRING keyword. If there are not any characters in the buffer (the length value of
SWT_BUFFER is Ø), then Axcess will skip the second part of the statement.
The second part, which will be executed if there are one or more characters in SWT_BUFFER, tells
Axcess to retrieve the first character in SWT_BUFFER, and place it into the variable CHAR, as
shown in FIG. 25.
FIG. 25 Getting the next character out of a buffer with GET_BUFFER _CHAR.
Characters should be continuously retrieved and removed from the buffer so that incoming strings
have enough spaces to enter completely. Be sure to place a GET_BUFFER_CHAR statement in a
position to do this. Remember, Axcess is constantly running through the main program, and will
execute the GET_BUFFER_CHAR statement as long as it is in its path of execution.
To get the data of the SWT_BUFFER using REMOVE_STRING, use the following code:
IF (LENGTH_STRING(SWT_BUFFER) AND
(FIND_STRING(SWT_BUFFER,'T',1) OR FIND_STRING(SWT_BUFFER,'.',1)))
{
TRASH = REMOVE_STRING(SWT_BUFFER,'T',1)
IF (LENGTH_STRING(TRASH) = Ø)
TRASH = REMOVE_STRING(SWT_BUFFER,'.',1)
SEND_STRING Ø,"'SWT ACK',13,1Ø"
}
The code above is similar and has the same effect as the previous code. The IF condition is looking
to see if SWT_BUFFER has any characters in it with a FIND_STRING and then it looks to see if
the string contains either a 'T' or a '.', since this is the result it is looking for. Once these two
conditions are met, then we attempt to remove a 'T' from the buffer. If that attempt fails, then the
length of TRASH will be Ø. Only then will it attempt to remove the '.' since it did not find a 'T'. The
Axcess Programming Language
75
Page 84

Using Buffers
REMOVE_STRING will remove all characters up to and including the 'T' or the '.'. So if the
SWT_BUFFER contained a 'CI1O1T', then after the line of code:
TRASH = REMOVE_STRING(SWT_BUFFER,'T',1)
TRASH would be equal to 'CI1O1T'. Once the proper response from the switcher is verified, it
Axcess prints out the message SWT ACK to the terminal.
Buffer Keywords
The Buffer keywords supported by Axcess are described below:
Buffer Keywords
CLEAR_BUFFER BUFR
Clears a buffer.
CREATE_BUFFER
Use the CREATE_BUFFER keyword to create a buffer.
CREATE_MULTI_BUFFER
This keyword is similar to
CREATE_BUFFER, except it creates a multi-buffer that can
accept strings from a group of
cards.
This keyword effectively sets the length of the buffer to zero, so that subsequent GET_BUFFER_CHAR statements will not return anything. Using
CLEAR_BUFFER is preferable to other methods, such as assigning a null
string to the buffer, or using SET_LENGTH_STRING. The
CLEAR_BUFFER keyword actually compiles into smaller code and executes faster than the other methods, plus it is clearer to the reader as to
what the programmer is trying to accomplish.
This keyword can only appear in the DEFINE_START section of your program, and has the following syntax:
CREATE_BUFFER device, array
CREATE_BUFFER directs Axcess to place any strings received from the
specified device into the specified array. When Axcess places the byte into
the array, Axcess increments the length value for the array and then places
the byte at the end of the array. When the array is full, all bytes in the array
are shifted to make room for the new byte at the end.
Though the array is acting as a buffer, it is still an array and can be treated
as one. You can access its individual locations, send it to a device, assign it
to other arrays, assign other arrays to it, and use keywords to manipulate
the array.
This keyword can only appear in the DEFINE_START section of your program, and has the following syntax:
CREATE_MULTI_BUFFER starting device, ending device,
array
CREATE_MULTI_BUFFER directs Axcess to place any strings received
from the specified range of devices into the specified array.
Three header bytes are present before each string in a multi-buffer. The
first header byte is the hexadecimal value $FF, which marks the beginning
of a new string. The next byte is the number of the device that received the
string, and then the length of the string follows. For example, if the string
HELP is received by device 1, these are the contents of the corresponding
multi-buffer:
$FF, 1, 4, 'H', 'E', 'L', 'P'
These header bytes are used by the keyword
GET_MULTI_BUFFER_STRING which returns only HELP. The
GET_MULTI_BUFFER_STRING is discussed later in this section.
76
Axcess Programming Language
Page 85

Buffer Keywords (Cont.)
GET_BUFFER_CHAR
THIS keyword is used to remove
characters from a buffer.
GET_MULTI_BUFFER_STRING
To access characters coming into
a multi-buffer, you must first use
GET_MULTI_BUFFER_STRING
to transfer these characters into
another array.
Using Buffers
It has a two-part operation:
• First, it retrieves the first character in the buffer for your own utilization.
This creates the same effect as if you retrieved the first storage location
of a normal string array.
• Second, it removes that character from the buffer, causing all the other
characters to shift up one place. The second character is now the first,
the third is now the second, and so on.
Here is the syntax:
result = GET_BUFFER_CHAR (array)
The parameter passed to GET_BUFFER_CHAR must be an array, but
does not need to be a buffer. The keyword will operate identically in either
case. Only one byte (character) will be returned, and this value can be
assigned to a variable, array, or a cell in an array.
The syntax:
device = GET_MULTI_BUFFER_STRING (buffer, array)
The next string in the specified buffer is assigned to the specified array. All
three header bytes for the string are stripped before the string enters the
array.
The result of a GET_MULTI_BUFFER_STRING statement is the device
number of the card that received the string.
Axcess Programming Language
77
Page 86

Using Buffers
78
Axcess Programming Language
Page 87

Waits and Timer Keywords
Controlling Time in Axcess
There are several of timing keywords available in Axcess. Functions can be delayed for a few
seconds, or they can be delayed until certain conditions are right. The built-in stopwatch allows you
to measure time intervals between operations in your program. For example, you can program
Axcess to start playing a tape precisely on Saturday at 3:15 PM. This section describes the timing
keywords and how to apply them to your programs.
The Wait List
The most common keyword relating to time is WAIT. The WAIT keyword is used to activate
functions after a specified delay time has elapsed. When a WAIT is encountered, Axcess places the
WAIT statement into a list in memory and continues on with the rest of the program. After each
pass through mainline, the Central Controller scans this wait list, and if any WAITS have come due,
Axcess executes the statement or compound statement immediately following the expired WAIT
keyword. Up to 50 WAITS are allowed in the list at a time.
Waits and Timer Keywords
Time is measured in tenths of a second. A WAIT of 10 is one second, a WAIT of 15 is one and a
half seconds, a WAIT of 20 is two seconds, and so on.
An example application of a time delay would be if your system has two relays controlling system
power. One could be for the audio amplifier, and the other for the rest of the equipment (rack
power). In these cases, a time delay is desired between powering up the source equipment and
powering up the audio amplifier, to avoid noise.
In your program, you will first add a constant definition for your new relay and change the name of
the existing system power relay to RACK_POWER. If you use relay 7 (the next available relay on
the card), the line to add to the DEFINE_CONSTANT section looks like this:
DEFINE_CONSTANT
AMP_POWER = 7
You will also change the constant identifier SYS_POWER to RACK_POWER. When the System
Power button is activated, you want the rack power to come on first (relay 3). After a 1-second
delay, the amp power should turn on. When you turn the power off, you want the reverse to happen.
Here's the new code for the System Power button:
xcess Programmnig Language
79
Page 88

Waits and Timer Keywords
DEFINE_PROGRAM
PUSH[TP,8] (* POWER ON/OFF *)
{
IF ([RELAY,RACK_POWER])
{
CANCEL_WAIT 'AMPS ON'
OFF[RELAY,AMP_POWER]
WAIT 1Ø 'SYSTEM OFF'
OFF[RELAY, RACK_POWER]
}
ELSE
{
CANCEL_WAIT 'SYSTEM OFF'
ON[RELAY, RACK_POWER]
WAIT 1Ø 'AMPS ON'
ON[RELAY,AMP_POWER]
}
}
Notice the organization of the above set of statements. Here is a simplified outline of the structure
of this code:
PUSH[TP,8]
{
IF (device-channel)
compound statement
ELSE
compound statement
}
As shown in the outline, following the PUSH statement is a single IF...ELSE statement which has a
device-channel reference for its condition. In this case, Axcess checks that channel's status. If it is
on, Axcess evaluates the condition as true and executes the first compound statement. Otherwise
Axcess executes the compound statement following the ELSE.
80
The first compound statement, which is executed if the rack power is on, uses a WAIT to perform a
time-delayed power-down of the system. The first statement cancels the WAIT named AMPS ON
to stop any previous attempts to turn the amps on. The second statement inside the compound
statement turns off the amplifier relay. The next statement is a WAIT statement for 1 second,
followed by an OFF statement to the rack power relay. Axcess places this Wait, SYSTEM OFF, into
the wait list and continues with the program. Since these statements are part of an IF compound
statement, Axcess does not execute the ELSE's compound statement.
As Axcess continues to run, the WAIT is still in the wait list. After 1 second has elapsed, Axcess
will execute the statement immediately following the WAIT, which in this case turns off the rack
power. The corresponding WAIT is then taken out of the list.
The compound statement following the ELSE is similar to the one just described, but its functions
are slightly different. Axcess first turns on the rack power, waits 1 second, and then turns on the
amp power.
Axcess Programming Language
Page 89

Waits and Timer Keywords
Multiple Waits
At this point, the System Power button completes two events, with a delay in between. In many
cases, you may want to initiate a series of several events by pressing one button.
In this section, you will make the System Power button accomplish several more things when the
power is turned on and off. For example, when the power is turned on, you may want a series of
timed events to take place. First, the rack power comes on. Simultaneously, the screen starts to
come down and the drapes start to close. 1 second later, the amp power comes on, just like before.
After a 20 second delay, the Medium lighting scene is selected.
When the power is turned off, a different sequence happens. First, the amp power is turned off,
lights go to the Full setting, the screen is raised, and the drapes are opened. After a 1 second delay,
the rack power turns off. 2 minutes later, the lights go to the Off setting.
Here is the code for the System Power Push for the scenario described above:
DEFINE_PROGRAM
PUSH[TP,8] (* POWER ON/OFF *)
{
IF ([RELAY,SYSTEM_POWER])
{
CANCEL_WAIT 'AMPS ON'
CANCEL_WAIT 'LIGHTS TO MED'
OFF[RELAY,AMP_POWER]
PULSE[LIGHTS,LIGHT_FULL]
PULSE[RELAY,SCREEN_UP]
PULSE[RELAY,DRAPES_OPEN]
WAIT 1Ø 'SYSTEM OFF'
OFF[RELAY,SYSTEM_POWER]
WAIT 2ØØ 'LIGHTS OFF'
PULSE[LIGHTS,LIGHT_OFF]
}
ELSE
{
CANCEL_WAIT 'SYSTEM OFF'
CANCEL_WAIT 'LIGHTS OFF'
ON[RELAY,SYSTEM_POWER]
PULSE[RELAY,SCREEN_DN]
PULSE[RELAY,DRAPES_CLOSE]
WAIT 1Ø 'AMPS ON'
ON[RELAY,AMP_POWER]
WAIT 2ØØ 'LIGHTS TO MED'
PULSE[LIGHTS,LIGHT_MED]
}
}
Notice the use of the PULSE keyword. This is done, as you may recall, because TO cannot be used
inside a WAIT. Since the lighting buttons are momentary, you use a PULSE to actuate the relay for
just a moment.
xcess Programmnig Language
81
Page 90

Waits and Timer Keywords
Naming Waits
When a WAIT is given a unique name, it can be either canceled, paused, or restarted. To name a
WAIT, place a name in single quotes after the WAIT statement. For example:
WAIT 3Ø 'DELAY'
There are certain considerations in naming WAITs:
Canceling, Pausing, and Restarting Waits
Once a WAIT is named, it can be manipulated in the program with several keywords.
! They should not be previously defined constants or variables.
! They cannot be names that have already been assigned to buffers or subroutines. For
detailed information on buffers refer to Using Buffers. For detailed information on
subroutines refer to the next section, Using Subroutines.
! They can contain spaces, unlike other Axcess identifiers.
! PAUSE_WAIT places a WAIT on hold. The WAIT does not continue counting down until
it is resumed with RESTART_WAIT. The WAIT then continues from where it was
paused.
! CANCEL_WAIT completely nullifies a WAIT, removing it from the wait list.
! CANCEL_ALL_WAIT nullifies every WAIT currently in the list.
! The keywords PAUSE_ALL_WAIT and RESTART_ALL_WAIT act the same as
PAUSE_WAIT and RESTART_WAIT, except they affect all WAITs in the wait list,
named and unnamed.
You could use a named WAIT in your System Power Push routine, as shown in the example above.
For example, if the user just turned off the power, Axcess now has a 2-minute WAIT in the wait list
for the lights to go off. If the user turns the power back on before this WAIT executes, the power-on
sequence will start, but the events of the LIGHTS_OFF WAIT will still happen. In this case, the
lights will turn off even after the user has just turned them on. In this case, it would be advantageous
to name that WAIT and cancel it in the power-on section of the PUSH. To do this, add the WAIT
name to the WAIT in the power-off section.
WAITs can appear inside other WAITs. This is called nesting WAITs. It is not necessary to nest
WAITs in your program here, but here is how it is done:
DEFINE_PROGRAM
PUSH[TP,6] (* DELAYED SCREEN UP *)
{
WAIT 2ØØ 'SCREEN UP'
{
ON[RELAY,SCREEN_UP]
WAIT 2ØØ 'SCREEN UP TIMEOUT'
OFF[RELAY,SCREEN_UP]
}
}
82
Axcess Programming Language
Page 91

Waits and Timer Keywords
In this example, Axcess waits 20 seconds, turns on the Screen Up relay, waits 20 more seconds,
then turns off the Screen Up relay. Any timed sequence of events can be accomplished with or
without nested WAITs. In many cases, using nested WAITs is more readable than non-nested
WA I T s
Special Uses of Wait
A WAIT time of Ø is a special case. The code following the WAIT will be executed directly after
the current pass through mainline. This is because the WAIT goes into the wait list. At the end of
mainline when the Central Controller checks the list for expired WAITs, the WAIT Ø will execute.
Wait Ø is only used in special cases.
Any one WAIT can only be placed in the wait list once. If a particular WAIT is already in the wait
list, it cannot be placed into the list a second time until the first instance is canceled or expired. For
example, suppose the following line appears in mainline where it will be executed every pass
through mainline:
WAIT 5 FLASH = NOT FLASH
The first time this is executed, the WAIT is placed into the wait list. If this line is executed again
before the WAIT expires, the line is ignored, because the WAIT is already in the wait list. 1/2
second after the first execution of this statement, the value in variable FLASH is inverted. If
FLASH was Ø it will be changed to 1, and if it was non-zero it will be changed to Ø. On the next
pass through mainline, the WAIT will again be placed into the wait list, and the cycle will repeat for
the duration of the program. This, in effect, creates a variable whose state inverts every half-second.
The Wait_Until Keyword
The WAIT_UNTIL keyword is not a true timing keyword, in that Axcess does not wait for a certain
amount of time to elapse. Instead, Axcess checks to see if a condition is true. When the condition
becomes true, Axcess executes the statements listed directly below the WAIT_UNTIL statement.
All WAIT_UNTILs go into another list which is similar to the wait list, called the WAIT_UNTIL
list. Just as it does with WAITs, Axcess checks to see if any WAIT_UNTIL conditions have become
true with each pass through mainline. For each one that has, Axcess immediately executes the
sequence below the WAIT_UNTIL statement. If not, Axcess keeps the WAIT_UNTIL in the
WAIT_UNTIL list until its condition becomes true.
Misusing Wait_Until
Since Axcess only checks the status of pending WAIT_UNTILs after completely running mainline,
be sure that its condition has a chance to become true, or the purpose of the WAIT_UNTIL
statement will be defeated.
Axcess cannot detect this sort of logic error, so be sure that each WAIT_UNTIL
statement can become true.
xcess Programmnig Language
83
Page 92

Waits and Timer Keywords
It is not necessary to use WAIT_UNTIL in your program yet, but the following program segment
illustrates the possible misuse of WAIT_UNTIL:
DEFINE_PROGRAM
WAIT_UNTIL (Y = 4)
{
X = Ø
Y = Ø
}
Y = 4
Y = 3
In this example, Y will never equal 4 at the end of mainline. The WAIT_UNTIL in this case is
useless.
This problem could make its way into a large program. Axcess cannot detect this sort of logic error,
so be sure that each WAIT_UNTIL statement can become true.
Naming and Removing Wait_Untils
A WAIT_UNTIL can be named in the same manner as a WAIT. To do this, a name in single quotes
is placed at the end of the statement. Once a WAIT_UNTIL has a name, it can be canceled with the
CANCEL_WAIT_UNTIL keyword, which removes it from the WAIT_UNTIL list. The
CANCEL_ALL_WAIT_UNTIL keyword removes all WAIT_UNTILs from the WAIT_UNTIL list.
Timer Keywords
Several more timing features are contained in the timer keywords. The SET_TIMER and
GET_TIMER keywords allow you to have a stopwatch and the ability to measure time intervals
within the Axcess Control System. The Timer keywords are described below:
Timer Keywords
SET_TIMER
Sets the Axcess timer
Axcess provides a simple timer. It cannot be stopped or paused, only set. Like
a WAIT, time is measured in increments of tenths of seconds. There is only one
such timer available, and therefore has somewhat limited use.
To set the timer, the SET_TIMER keyword is used. You must specify a number
between Ø and 65,535, and the timer will start counting up from that point.
After the timer reaches 65,535, it wraps around to Ø and starts over.
84
Axcess Programming Language
Page 93

Timer Keywords (Cont.)
GET_TIMER
The GET_TIMER system
variable contains the current
status of the timer.
Waits and Timer Keywords
Usually this keyword is used in conjunction with an IF statement, as shown in
the following example:
DEFINE PROGRAM
IF (GET_TIMER >= 1ØØ)
{
SEND_STRING Ø,"'TIMER VALUE IS = 1ØØ',$ØD,$ØA"
}
In this example, a greater-than sign was combined with the equal sign (³).The
timer could reach the number 100 while the program is being executed elsewhere. When Axcess reaches the GET_TIMER section, the timer might be
103. If the condition was that GET_TIMER be equal to 100, the following statements will be skipped. Never use only an equal sign with the GET_TIMER system variable in an IF statement.
Unlike variables, the timer loses its value when the Axcess Control System is
turned off. When the system is reactivated, the timer is reset to Ø.
xcess Programmnig Language
85
Page 94

Waits and Timer Keywords
86
Axcess Programming Language
Page 95

Using Time, Date, and Day
The system variables TIME, DATE, and DAY can be used to create timing functions. TIME
contains the current time in the form of the string HH:MM:SS, in which HH equals hours, MM
equals minutes, and SS equals seconds. The time is given in a 24-hour format (military time).
DATE contains the current date in the form of the string MM/DD/YY, in which MM equals month,
DD equals day, and YY equals year. Finally, DAY contains the current day of the year in the form
of one of the strings MON, TUE, WED, THU, FRI, SAT, or SUN.
The time and date mechanism is year 2000 compliant. For more details, see Newcalls.TXT and the
system call LONGDATE in the Axcess Docs directory.
These variables have the following restrictions:
! They cannot be changed in the Axcess program. Instead, this is done with the terminal
emulator, or the SEND_COMMAND clock. For information on the terminal emulator,
refer to Terminal emulator in the Communications Menu section.
! Individual storage locations cannot be referenced.
Typically these variables are used with an IF statement. Once the condition is true, certain
statements are executed. For instance, suppose you wanted to turn off all of the lights at 11:00 PM
every night. The code would look like this:
DEFINE_VARIABLE
PULSING_LIGHTS (* 1 IF PULSING LIGHTS SO IT HAPPENS ONLY ONCE
*)
DEFINE_PROGRAM
IF ((TIME = '23:ØØ:ØØ') AND (NOT PULSING_LIGHTS))
{
PULSE[LIGHTS,LIGHT_OFF]
ON[PULSING_LIGHTS]
WAIT 2Ø 'PULSING TIMEOUT'
OFF[PULSING_LIGHTS]
}
The statements following the IF statement will be executed every day at 11:00 PM. To change the
code so that the lights turn off at every hour, the statement would be changed to read:
IF ((TIME = '??:ØØ:ØØ') AND (NOT PULSING_LIGHTS))
{
PULSE[LIGHTS,LIGHT_OFF]
ON[PULSING_LIGHTS]
WAIT 2Ø 'PULSING TIMEOUT'
OFF[PULSING_LIGHTS]
}
The question mark (?) acts like a wildcard character, allowing any character to be in its place. Since
question marks are used in place of the hour, the comparison will be true, once an hour, when the
minutes and seconds are Ø, causing the lights to turn off.
Using Time, Date, and Day
xcess Programming Language
87
Page 96

Using Time, Date, and Day
Time, Date, and Day Keywords
Time, Date, and Day Keywords
DATE
The system variable DATE
returns the current date in the
form of the string MM/DD/YY,
in which MM equals month,
DD equals day, and YY
equals year.
DAY
The system variable DAY
returns the current day of the
week in the form of one of the
strings MON, TUE, WED,
THU, FRI, SAT, or SUN.
TIME
The system variable TIME
returns the current time in the
form of the string HH:MM:SS,
in which HH equals hours,
MM equals minutes, and SS
equals seconds.
The wildcard character ? is allowed for string comparisons. For example:
IF (DATE = '12/25/??')
{
(* These statements are executed every Christmas *)
}
Example:
IF (DAY = 'MON')
{
(* These statements are executed every Monday *)
}
The time is given in a 24-hour (military time) format. For example:
IF (TIME = '12:ØØ:ØØ')
{
(* These statements are executed at noon *)
}
88
Axcess Programming Language
Page 97

Using Subroutines
In larger programs, you may want to break the program into smaller, more manageable parts called
subroutines. A subroutine is a section of code that stands alone and can be called from anywhere
else in the program. The most common usage of subroutines is to execute the same group of
instructions from different places in the program. Using a subroutine allows you to avoid having to
retype those instructions over and over in the program. Instead, you can just call the subroutine.
Defining a Subroutine
In Axcess, subroutines are created using the DEFINE_CALL statement. The subroutine name
follows the DEFINE_CALL keyword, enclosed in single quotes. There are certain restrictions for
subroutine names:
! They cannot be previously defined contents or variables.
! They cannot be names that have already been assigned to BUFFERs or WAITs.
! They are case-sensitive; Test and TEST are not the same.
Using Subroutines
Subroutines must be defined before they can be used. For this reason, DEFINE_CALLS are usually
found right before the DEFINE_START section of the program. For example:
DEFINE_VARIABLE
LIGHT_PRESET (* CURRENT LIGHTING PRESET *)
DEFINE_CALL 'PRESET LIGHTS' (CARD,PRESET)
{
PULSE[CARD,PRESET]
LIGHT_PRESET = PRESET
}
DEFINE_START
CALL 'PRESET LIGHTS' (LIGHTS,LIGHT_FULL)
DEFINE_PROGRAM
PUSH[TP,7] (* LIGHTS OFF *)
CALL 'PRESET LIGHTS' (LIGHTS,LIGHT_OFF)
[TP,7] = (LIGHT_PRESET = LIGHT_OFF)
Spaces in the subroutine name are allowed, since it is a string literal. The subroutine's code must be
enclosed in braces. Regardless of how long the subroutine is, it must be in this format.
Calling subroutines
To tell Axcess to execute a subroutine, use the CALL keyword and the name of the subroutine in
single quotes. For example, to execute the previous subroutine, type the following where you want
the CALL to occur.
CALL 'LIGHTS OFF'
When Axcess executes the CALL, program execution jumps to the first line inside the braces of the
DEFINE_CALL. The subroutine is executed only once, and then Axcess returns to the statement
directly following the CALL statement.
xcess Programming Language
89
Page 98

Using Subroutines
Local Variables and Parameters
Two features that expand on the functionality of subroutines are local variables and parameters.
Using these features can help simplify your programs, add more power to your code, and make
your program easier to read and understand.
Local Variables
The first of these two features is the local variable. A local variable is a variable which is declared
inside a DEFINE_CALL and can only be used inside that same DEFINE_CALL. Variables
declared in the main DEFINE_VARIABLE section are called global variables. The words local and
global refer to a variable's scope, which is the part of the program that can access the variable.
Global variables have global scope; that is, the entire program has access to them. A local variable
has local scope, and can only be accessed inside the DEFINE_CALL in which it is declared. Here
is an example of a local variable declaration:
DEFINE_CALL 'TEST CALL'
LOCAL_VAR
LOC_VAR
LOC_ARRAY[1Ø]
{
LOC_VAR = 1
LOC_ARRAY = 'TESTING'
}
This section of code defines the subroutine 'TEST CALL'. It then declares two local variables,
LOC_VAR (a simple variable) and LOC_ARRAY (an array with a storage capacity of 10). Local
variables are defined after the DEFINE_CALL and before the first open brace, with the keyword
LOCAL_VAR preceding the block of local variables defined. Nowhere else in the program can any
code access the two variables LOC_VAR and LOC_ARRAY, since they are local to the subroutine
'TEST CALL'.
90
A local variable can have the same name as a local variable in another subroutine. If another
subroutine declares a local variable LOC_VAR, that subroutine will use its LOC_VAR and 'TEST
CALL' will use its own LOC_VAR.
A local variable can also have the same name as a global variable. The local variable takes
precedence in its scope, and the global variable is hidden. For instance, if in the previous example
there was a global variable LOC_VAR, the reference in the subroutine still refers to the local
variable. In this case, the global LOC_VAR is hidden from the subroutine.
Local variables are best used in cases where a subroutine needs to use a variable, but no other piece
of code needs it. Local variables are usually temporary flags, loop counters, and other variables a
subroutine may need to do its work.
Parameters
Several Axcess keywords and functions use parameters, such as ATOI and MID_STRING. Your
DEFINE_CALL subroutines can also use parameters. Parameters are variables defined as part of
the DEFINE_CALL declaration that can receive values from and pass back values to the CALL
statement that called the subroutine. Here is an example subroutine declaration using parameters:
Axcess Programming Language
Page 99

Using Subroutines
DEFINE_CALL 'DO SWITCH' (CARD,INPUT,OUTPUT)
{
SEND_STRING CARD,"'CI',ITOA(INPUT),'O',ITOA(OUTPUT),'T'"
}
This subroutine is defined as having 3 parameters, CARD, INPUT and OUTPUT (enclosed in
parentheses), which are essentially local variables of the subroutine. These variables, however, have
their initial values set by the parameters in the CALL statement which called the routine. Here is a
CALL to this subroutine:
DEFINE_PROGRAM
PUSH[TP,49] (* SWITCHER 1 *)
CALL 'DO SWITCH' (SWT,3,7)
This calls the subroutine 'DO SWITCH' and assigns the value SWT to CARD, 3 to INPUT, and 7 to
OUTPUT. The 'DO SWITCH' subroutine uses a string expression to construct the string 'CI3ØTT'
and then sends the string to the card named SWT. The same subroutine can be used with different
parameters to produce different strings. Here are some examples:
DEFINE_PROGRAM
PUSH[TP,5Ø] (* SWITCHER 2 *)
CALL 'DO SWITCH' (SWT,1,2)
PUSH[TP,51] (* SWITCHER 3 *)
CALL 'DO SWITCH' (SWT,2,12)
PUSH[TP,52] (* SWITCHER 4 *)
CALL 'DO SWITCH' (SWT,1Ø,2Ø)
Passing values back to the caller
A parameter variable can be modified inside a subroutine, like any other type of variable. After the
code in the subroutine has been executed, and before Axcess returns to the caller, Axcess attempts
to copy the values in the parameter variables back into the caller's parameters. This is only
successful if the subroutine is called with variables in the CALL statement. For example:
DEFINE_CALL 'SQUARE' (NUMBER)
{
NUMBER = NUMBER * NUMBER
}
DEFINE_PROGRAM
PUSH[TP,65]
{
X = 5
CALL 'SQUARE' (X)
SEND_STRING Ø,"'X NO EQUALS 25',$ØD,$ØA"
}
PUSH[TP,66]
{
X = 25
CALL 'SQUARE' (X)
SEND_STRING Ø,"'X NO EQUALS 625',$ØD,$ØA"
}
xcess Programming Language
91
Page 100

Using Subroutines
When the subroutine SQUARE is called with a variable as a parameter (in this case, X), a series of
events occurs.
! The value of the variable (in this case, 5) is assigned to NUMBER.
! The subroutine takes the parameter, multiplies it by itself (squaring it) and assigns the
result back to itself.
! Axcess then reassigns NUMBER back to the variable X, so that upon return from the
subroutine, X will contain its previous value squared.
However, if a constant value is passed to the routine, a reassignment cannot be made. For example:
CALL 'SQUARE' (5)
This will assign the value 5 to the parameter variable NUMBER in the subroutine, and NUMBER
will be squared. However, Axcess cannot take the value in NUMBER and reassign it to the constant
value 5. A routine in which a parameter is expected to return a result should not be called with a
constant value as that parameter. To use a constant value as a parameter to this subroutine, and still
get a new value returned, rewrite the DEFINE_CALL to have two parameters, as shown below:
DEFINE_CALL 'SQUARE' (NUMBER,RESULT)
{
RESULT = NUMBER * NUMBER
}
Here are some examples of using this subroutine:
CALL 'SQUARE' (5,X)(* on return, X will contain 25 *)
CALL 'SQUARE' (X,Y)(* on return, X will contain 25, Y will contain 625 *)
It is important to note that the reassignment of the parameter variable to the caller's variable
happens after the subroutine is finished and before any other code is executed. This could lead to a
hard-to-find bug:
DEFINE_VARIABLE
GLOBAL
DEFINE_CALL 'BUGGY' (PARAM)
{
PARAM = 1Ø
GLOBAL = 2Ø
}
DEFINE_PROGRAM
GLOBAL = 5
CALL 'BUGGY' (GLOBAL)
(* What will GLOBAL contain here? *)
In this example, GLOBAL contains the value 1Ø at the comment statement. In the subroutine
BUGGY, after GLOBAL is set to 2Ø, Axcess reassigns the value in PARAM to the variable in the
CALL statement which called BUGGY-in this case, GLOBAL. The parameter variable PARAM
contains the value 1Ø at the end of the subroutine, and this value is reassigned to the variable in the
CALL statement GLOBAL.
92
Axcess Programming Language
 Loading...