

Page 1
AXC-EM
Enhanced Master Card
instruction manual
Axcess Central Controllers
Page 2

AMX Limited Warranty and Disclaimer
AMX Corporation warrants its products to be free of defects in material and workmanship under normal use for three
(3) years from the date of purchase from AMX Corporation, with the following exceptions:
• Electroluminescent and LCD Control Panels are warranted for three (3) years, except for the display and touch
overlay components that are warranted for a period of one (1) year.
• Disk drive mechanisms, pan/tilt heads, power supplies, and MX Series products are warranted for a period of one
(1) year.
• AMX Lighting products are guaranteed to switch on and off any load that is properly connected to our lighting
products, as long as the AMX Lighting products are under warranty. AMX Corporation does guarantee the
control of dimmable loads that are properly connected to our lighting products. The dimming performance or
quality cannot be guaranteed due to the random combinations of dimmers, lamps and ballasts or transformers.
• Unless otherwise specified, OEM and custom products are warranted for a period of one (1) year.
• AMX Software is warranted for a period of ninety (90) days.
• Batteries and incandescent lamps are not covered under the warranty.
This warranty extends only to products purchased directly from AMX Corporation or an Authorized AMX Dealer.
All products returned to AMX require a Return Material Authorization (RMA) number. The RMA number is
obtained from the AMX RMA Department. The RMA number must be clearly marked on the outside of each box.
The RMA is valid for a 30-day period. After the 30-day period the RMA will be cancelled. Any shipments received
not consistent with the RMA, or after the RMA is cancelled, will be refused. AMX is not responsible for products
returned without a valid RMA number.
AMX Corporation is not liable for any damages caused by its products or for the failure of its products to perform.
This includes any lost profits, lost savings, incidental damages, or consequential damages. AMX Corporation is not
liable for any claim made by a third party or by an AMX Dealer for a third party.
This limitation of liability applies whether damages are sought, or a claim is made, under this warranty or as a tort
claim (including negligence and strict product liability), a contract claim, or any other claim. This limitation of
liability cannot be waived or amended by any person. This limitation of liability will be effective even if AMX
Corporation or an authorized representative of AMX Corporation has been advised of the possibility of any such
damages. This limitation of liability, however, will not apply to claims for personal injury.
Some states do not allow a limitation of how long an implied warranty last. Some states do not allow the limitation or
exclusion of incidental or consequential damages for consumer products. In such states, the limitation or exclusion of
the Limited Warranty may not apply. This Limited Warranty gives the owner specific legal rights. The owner may
also have other rights that vary from state to state. The owner is advised to consult applicable state laws for full
determination of rights.
EXCEPT AS EXPRESSLY SET FORTH IN THIS WARRANTY, AMX CORPORATION MAKES NO
OTHER WARRANTIES, EXPRESSED OR IMPLIED, INCLUDING ANY IMPLIED WARRANTIES OF
MERCHANTABILITY OR FITNESS FOR A PARTICULAR PURPOSE. AMX CORPORATION
EXPRESSLY DISCLAIMS ALL WARRANTIES NOT STATED IN THIS LIMITED WARRANTY. ANY
IMPLIED WARRANTIES THAT MAY BE IMPOSED BY LAW ARE LIMITED TO THE TERMS OF THIS
LIMITED WARRANTY.
Page 3

Table of Contents
Table of Contents
Product Information .................................................................................................1
Specifications .................................................................................................................... 1
Setting the RS-232 Communications DIP Switch.............................................................. 2
Installation ......................................................................................................................... 3
AXLink Wiring.................................................................................................................... 3
RS-232 Connector Wiring ................................................................................................. 3
Replacing the Battery ........................................................................................................ 4
Upgrading the Memory Chips............................................................................................ 4
Programming..................................................................................................................... 5
XC-EM Enhanced Master Card
i
Page 4

Table of Contents
ii
AXC-EM Enhanced Master Card
Page 5

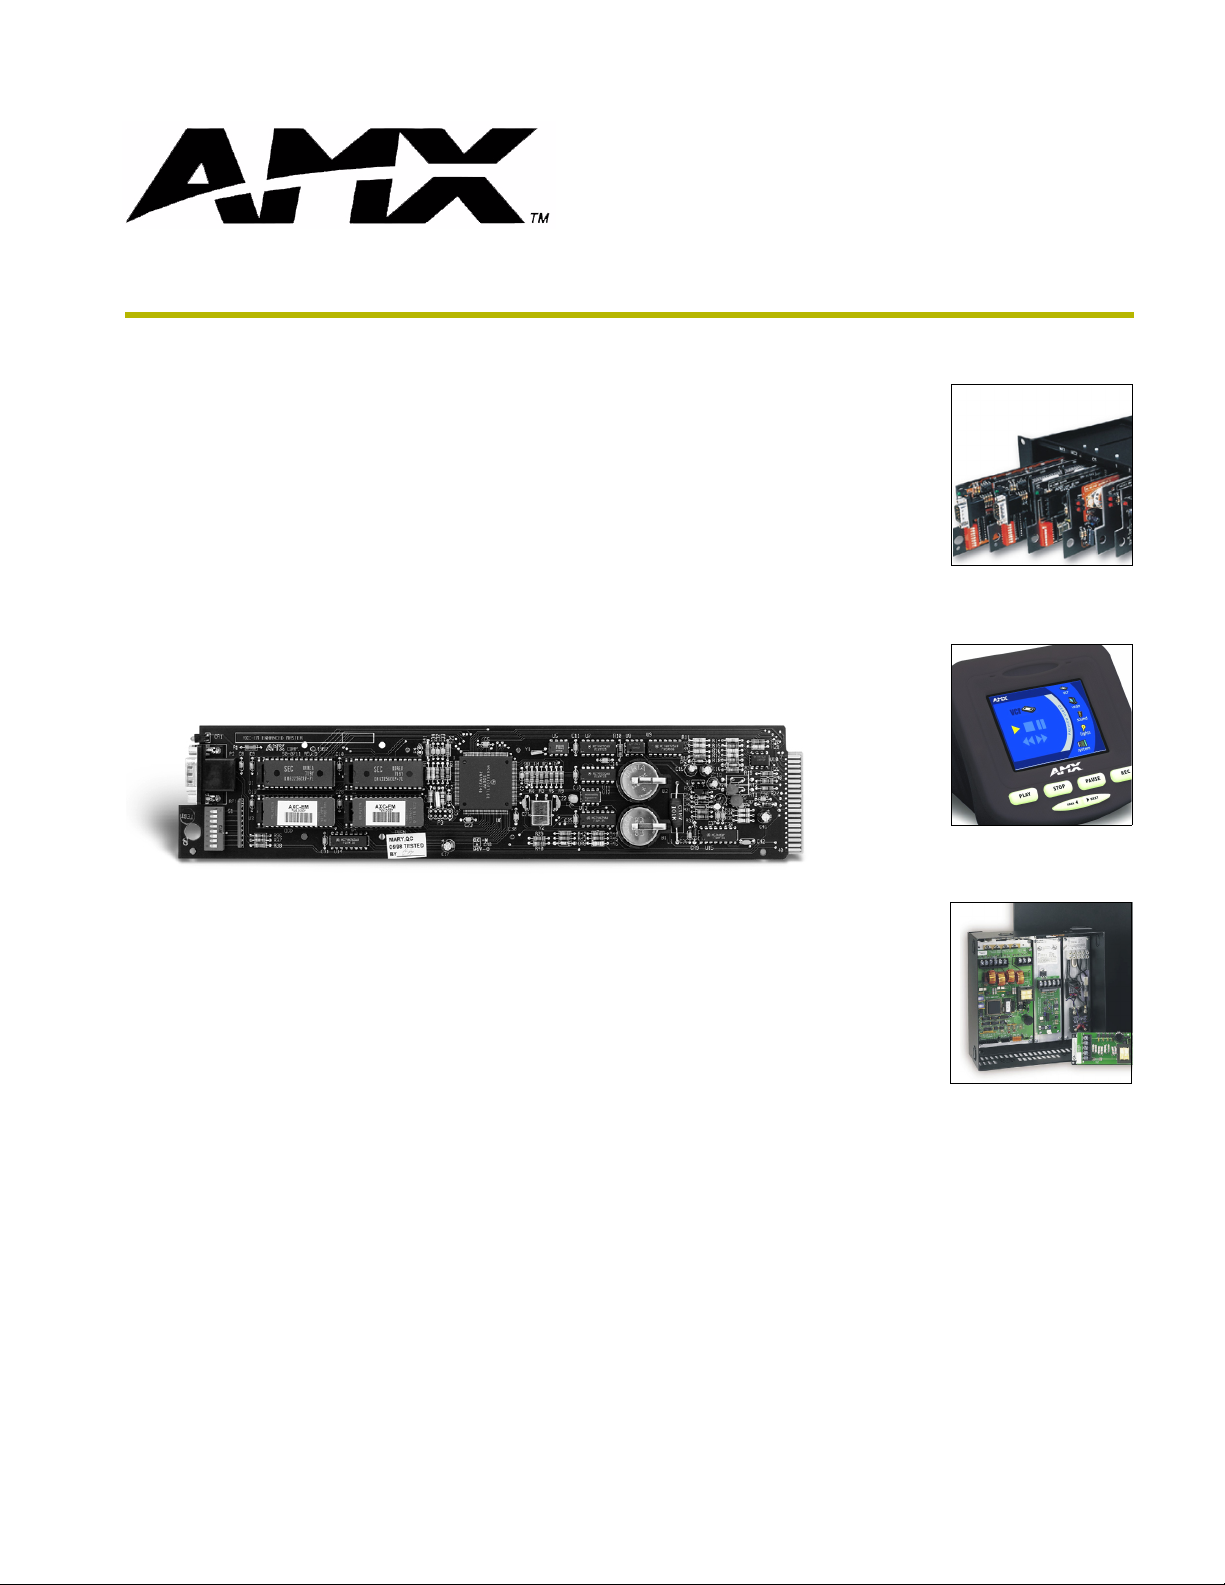
Product Information
The AXC-EM Enhanced Master Card (FIG. 1) controls system operation and executes Axcess
programs. It coordinates the activities of up to 255 devices. These include the following:
Control cards
Bus controllers
Various input devices, such as:
AMX TiltScreens
Touch Panels
Softwire Panels and Mini-Softwire Panels
Wireless receivers
Custom panel interfaces
Product Information
Lithium Batteries
Upgradeable SRAM
FIG. 1 AXC-EM Enhanced Master Card
Specifications
The following table lists the specifications for the AXC-EM.
AXC-EM Specifications
Processor 32 b
Memory 256 Kb battery-backed SRAM (expandable to 64 KB)
RAM sockets The RAM sockets on the AXC-EM are 32-pin sockets.
• The 256 Kb RAM chips are 28-pin chips.
• The 1 Mb chips are 32-pin chips.
Connection 9-pin RS-232 connector
RS-232 Communication
Por t DI P swi tch
RS-232 Connector
AXLink Status LED
XC-EM Enhanced Master Card
1
Page 6

Product Information
AXC-EM Specifications (Cont.)
AXlink Status LED The green LED (CR1) on the front end of the card indicates AXlink status, as follows:
• One blink per second indicates power is active and AXlink communication is
functioning.
• Two blinks per second indicate that the devices specified in the master program do
not match the devices found.
• Three blinks per second indicate an AXlink communication error.
• Full on indicates the following:
•There is no AXlink control or activity, but power is on. (For example, another
AXC-EM may have control of AXlink.)
•The Axcess program is not loaded.
To ensure the integrity of your Axcess program, you can use two AXC-EMs, each loaded with the
same program. Should the primary AXC-EM's control of AXlink be interrupted, the secondary
AXC-EM will automatically take control.
Setting the RS-232 Communications DIP Switch
Use the 8-position DIP switch to set the communication parameters. Set the parameters with the
combination of ON and OFF positions. The following table describes the communications DIP
switch settings:
Communication Parameters DIP Switch Settings
Switch1 2 3456 7 8
Function Stop Bits Data Bits Parity Baud Rates
Setting Off Off Off Off Off Off Off Off
Value 2 bits 7 bits Unused 300
On On On Off Off On Off Off
1 bit 8 bits Unused 600
Off On Off Off On Off
Unused 1,200
On On Off On On Off
Unused 2,400
Off Off On Off Off On
Mark 4,800
On Off On On Off On
Even 9,600
Off On On Off On On
Odd 19,200
On On On On On On
None 38,400
2
AXC-EM Enhanced Master Card
Page 7

Product Information
MGND
M
P
WR
M
P
WR
7
Installation
To install the AXC-EM:
Static electricity can damage electronic circuitry. Before handling the card, discharge any
accumulated static electricity from your body by touching a grounded metal object.
1. Hold the card by the tab end and slide the card into one of the first two slots of the frame.
If it is the primary card, insert it into slot MC1.
If it is the secondary (backup) card, insert it into slot MC2.
Make sure the card is correctly positioned in the guide slot.
2. Gently push the card in until it is firmly seated in the card connector slot. You do not have to
disconnect the power to the CardFrame when you install the card. When power is applied to
the card, the green LED lights.
3. Load the Axcess program.
AXLink Wiring
Connect the wiring from the CardFrame to the external AXlink devices, as shown in FIG. 2.
P
AX
AX
P
AX
AX
GND
SYSTE
FIG. 2 AXLink Wiring diagram
RS-232 Connector Wiring
The following table describes signal definitions for the 9-pin RS-232 communication port
connector (P2) on the front of the AXC-EM.
RS-232 Pinout Information
Pin Signal Function
1 N/A Not used
2 RX Receive data
3 TX Transmit data
4 +12 VDC Power
5 GND Signal ground
6 N/A Not used
7 +12 VDC Power
8 N/A Not used
9 N/A Not used
8
9
4
5
6
2
3 1
XC-EM Enhanced Master Card
3
Page 8

Product Information
Replacing the Battery
There are two lithium batteries on the AXC-EM. The batteries protect the memory on the
AXC-EM. While the DC power is on, the batteries are not used. The battery life is five years. At the
time of installation, record when you need to replace the batteries.
When you replace the batteries, you may do so one battery at a time without loss of data in memory.
All data in memory will be lost if you are not timely in replacing the batteries.
As a precaution, be sure you have access to a backup of your Axcess program. If your program
was loaded with the Source-Send option on, retrieve a copy of the source code from the AXC-EM.
If it was loaded with the Source-Send option off, be sure you obtain a copy of the program before
replacing the batteries.
To remove and replace the batteries:
1. Discharge static electricity from your body.
2. Remove the card from the CardFrame.
3. Lift the handle and remove one battery from its socket.
4. Carefully slide the new battery under the handle and into the socket.
5. Reset the card in the CardFrame to apply power to the card.
6. Follow steps 1 through 5 to replace the second battery.
Improper handling of a lithium battery can be hazardous.
• Never recharge, disassemble, or heat the battery above 212°F (100°C).
• Never solder directly to the battery or expose the contents of the battery to water.
• Dispose of used batteries according to the manufacturer's instructions.
• Replace the battery with a battery of the same type.
Upgrading the Memory Chips
The AXC-EM has two 256 Kb RAM chips. You can upgrade with two 1 Mb RAM chips (FG-072).
To install the RAM chips:
1. Remove the battery.
2. Remove the 256 Kb RAM chips currently in sockets U1 and U2 (FIG. 3).
FIG. 3 Removing the 256 Kb chip
Pin 1
Pin hole 3
3. Remove the 1 Mb RAM chips from their anti-static packaging. Save the packaging for storing
the 256 Kb RAM chips.
4. Align the notch end of one of the 1 Mb RAM chips with the notch on one of the sockets. Then,
align Pin 1 of the RAM chip with Pin 1 of the socket (FIG. 4).
4
AXC-EM Enhanced Master Card
Page 9

Product Information
FIG. 4 Installing the 1 Mb chip
Pin 1
Pin hole 1
5. Being careful not to bend the pins, press down on the RAM chip until it is fully inserted into
the socket.
6. Follow steps 3 and 4 to install the second 1 Mb RAM chip.
Programming
Refer to the Axcess Programming Manual for instructions on programming and communicating
with the AXC-EM and controlled devices. Refer to your PC user's guide for information about
communicating via the PC's RS-232 port.
The AXC-EM occupies address 0.
To communicate directly with the AXC-EM, use Terminal Emulation mode.
To display a list of the commands in the Terminal Emulation mode, type help or ? and
press ENTER.
For on-line help while in Axcess, press F6.
Use an AMX RS-232 cable (FG 10-726) to connect your PC to the AXC-EM to
download the Axcess program. Do not use a null modem cable, as Pin 7 on the AXC-EM
connector is reserved for the AMX Field Programming Unit (ALF).
Connect the cable to the RS-232 connector on the front of the card. If the card is in MC1,
you can use the RS-232 connector on the back of the CardFrame.
XC-EM Enhanced Master Card
5
Page 10

Product Information
6
AXC-EM Enhanced Master Card
Page 11

Product Information
XC-EM Enhanced Master Card
7
Page 12

AMX reserves the right to alter specifications without notice at any time.
ARGENTI NA • AUST RALIA • BELGIUM • BRAZIL • CANADA • CHINA • ENGLAN D • FRANC E • GERMA NY • GRE ECE • HO NG KONG • INDIA • I NDONES IA • ITALY • JAPAN
LEBANON • MALAYSIA • MEXICO • NETHERLANDS • NEW ZEALAND • PHILIPPINES • PORTUGAL • RUSSIA • SINGAPORE • SPAIN • SWITZERLAND • THAILAND • TURKEY • USA
ATLANTA • BOSTON • CHICAGO • CL EVELAND • DALLAS • DENVER • INDIANAPOLIS • LOS ANGELES • MINNEAPOLIS • PHILADELPHIA • PHOENIX • PORTLAND • SPOKANE • TAMPA
3000 RESEARCH DRIVE, RICHARDSON, TX 75082 USA • 800.222.0193 • 469.624.8000 • 469-624-7153 fax • 800.932.6993 technical support • www.amx.com
2005 AMX Corporation. All rights reserved. AMX, the AMX logo, the building icon, th e home icon, and the light bulb icon are all trademarks of AMX Corporation.
©
031-004-1025 7/05
In Canada doing business as Panja Inc.
 Loading...