

Page 1
Operation/Reference Guide
AVS-SL-PR-0401-0601
Solecis Presentation Switcher
4x1 RGBHV, 6x1 SVID, 10x1 Stereo, CP
Solecis Switchers
Last Updated: 10/23/2008
Page 2

AMX Limited Warranty and Disclaimer
This Limited Warranty and Disclaimer extends only to products purchased directly from AMX or an AMX Authorized Partner which
include AMX Dealers, Distributors, VIP’s or other AMX authorized entity.
AMX warrants its products to be free of defects in material and workmanship under normal use for three (3) years from the date of
purchase, with the following exceptions:
• Electroluminescent and LCD Control Panels are warranted for three (3) years, except for the display and touch overlay components are warranted for a period of one (1) year.
• Disk drive mechanisms, pan/tilt heads, power supplies, and MX Series products are warranted for a period of one (1) year.
• AMX lighting products are guaranteed to switch on and off any load that is properly connected to our lighting products, as long
as the AMX lighting products are under warranty. AMX also guarantees the control of dimmable loads that are properly connected to our lighting products. The dimming performance or quality there of is not guaranteed, impart due to the random combinations of dimmers, lamps and ballasts or transformers.
• AMX software is warranted for a period of ninety (90) days.
• Batteries and incandescent lamps are not covered under the warranty.
• AMX AutoPatch Epica, Modula, Modula Series4, Modula CatPro Series and 8Y-3000 product models will be free of defects in
materials and manufacture at the time of sale and will remain in good working order for a period of three (3) years following the
date of the original sales invoice from AMX. The three-year warranty period will be extended to the life of the product (Limited
Lifetime Warranty) if the warranty card is filled out by the dealer and/or end user and returned to AMX so that AMX receives it
within thirty (30) days of the installation of equipment but no later than six (6) months from original AMX sales invoice date. The
life of the product extends until five (5) years after AMX ceases manufacturing the product model. The Limited Lifetime Warranty
applies to products in their original installation only. If a product is moved to a different installation, the Limited Lifetime Warranty
will no longer apply, and the product warranty will instead be the three (3) year Limited Warranty.
All products returned to AMX require a Return Material Authorization (RMA) number. The RMA number is obtained from the AMX
RMA Department. The RMA number must be clearly marked on the outside of each box. The RMA is valid for a 30-day period. After
the 30-day period the RMA will be cancelled. Any shipments received not consistent with the RMA, or after the RMA is cancelled, will
be refused. AMX is not responsible for products returned without a valid RMA number.
AMX is not liable for any damages caused by its products or for the failure of its products to perform. This includes any lost profits, lost
savings, incidental damages, or consequential damages. AMX is not liable for any claim made by a third party or by an AMX Authorized Partner for a third party.
This Limited Warranty does not apply to (a) any AMX product that has been modified, altered or repaired by an unauthorized agent or
improperly transported, stored, installed, used, or maintained; (b) damage caused by acts of nature, including flood, erosion, or earthquake; (c) damage caused by a sustained low or high voltage situation or by a low or high voltage disturbance, including brownouts,
sags, spikes, or power outages; or (d) damage caused by war, vandalism, theft, depletion, or obsolescence.
This limitation of liability applies whether damages are sought, or a claim is made, under this warranty or as a tort claim (including
negligence and strict product liability), a contract claim, or any other claim. This limitation of liability cannot be waived or amended by
any person. This limitation of liability will be effective even if AMX or an authorized representative of AMX has been advised of the
possibility of any such damages. This limitation of liability, however, will not apply to claims for personal injury.
Some states do not allow a limitation of how long an implied warranty last. Some states do not allow the limitation or exclusion of incidental or consequential damages for consumer products. In such states, the limitation or exclusion of the Limited Warranty may not
apply. This Limited Warranty gives the owner specific legal rights. The owner may also have other rights that vary from state to state.
The owner is advised to consult applicable state laws for full determination of rights.
EXCEPT AS EXPRESSLY SET FORTH IN THIS WARRANTY, AMX MAKES NO OTHER WARRANTIES, EXPRESSED OR
IMPLIED, INCLUDING ANY IMPLIED WARRANTIES OF MERCHANTABILITY OR FITNESS FOR A PARTICULAR PURPOSE. AMX
EXPRESSLY DISCLAIMS ALL WARRANTIES NOT STATED IN THIS LIMITED WARRANTY. ANY IMPLIED WARRANTIES THAT
MAY BE IMPOSED BY LAW ARE LIMITED TO THE TERMS OF THIS LIMITED WARRANTY. EXCEPT AS OTHERWISE LIMITED
BY APPLICABLE LAW, AMX RESERVES THE RIGHT TO MODIFY OR DISCONTINUE DESIGNS, SPECIFICATIONS, WARRANTIES, PRICES, AND POLICIES WITHOUT NOTICE.
Page 3

A
Safety Instructions
Overview
Please read these instructions before using your Procon switcher. Failure to comply with these
instructions could result in fire, electrical shock, personal injury, death, or damage to the equipment.
Power Source
Use only a three-wire grounding type source. The power source should not exceed 264VAC. Do not
remove under any circumstances the ground wire.
Power Cord
Use only the cord shipped with the unit. Do not use the cord if it has become damaged or frayed. Contact
your Procon dealer or call Procon if you need to replace the power cord.
Grounding
The interface is grounded through the grounding conductor on the power cord. To avoid electric shock
plug the power cord into a properly wired receptacle. Do not defeat the purpose of the grounding-type
plug.
Safety Instructions
Fuse
For protection against the risk of fire use only a fuse of the same rating and type.
Liquid Spills
Do not set drinks on top of the unit or immerse the unit in liquid.
Do Not Disassemble
The switcher contains no user serviceable parts. All servicing must be performed by a qualified service
technician.
For Safety Reasons
Do not place the unit on an unstable surface.
Do not use near water or sources of heat.
Use only recommended attachments.
Use the correct power supply as indicated on the unit.
Unplug the unit from the mains before and refer to a qualified technician if:
the power cord has become damaged
liquid has been spilled or it has been exposed to rain or water
it does not operate correctly
it has been dropped or the cabinet damaged.
VS-SL-PR-0401-0601
Page 4

Safety Instructions
AVS-SL-PR-0401-0601
Page 5

Table of Contents
Table of Contents
Safety Instructions ..............................................................................................a
Overview .................................................................................................................. a
Power Source............................................................................................................ a
Power Cord............................................................................................................... a
Grounding................................................................................................................. a
Fuse .......................................................................................................................... a
Liquid Spills............................................................................................................... a
Do Not Disassemble ................................................................................................. a
For Safety Reasons ................................................................................................... a
Overview ............................................................................................................1
Product Specifications ............................................................................................. 1
Connections ........................................................................................................3
Typical Installation For Use With a Projector ............................................................ 3
Video Connections.................................................................................................... 3
Audio Connections.................................................................................................... 3
Power Up.................................................................................................................. 3
Operation ...........................................................................................................5
Front Panel ............................................................................................................... 5
Source Selection.............................................................................................................. 5
Blank / Mute.................................................................................................................... 5
Volume............................................................................................................................ 5
Attenuation..................................................................................................................... 5
Display Device Serial Output .......................................................................................... 5
Input mode only........................................................................................................ 6
Power On/Off mode ................................................................................................. 6
Display Connections........................................................................................................ 6
RS232 Control........................................................................................................... 6
Connection...................................................................................................................... 6
SET Commands ...................................................................................................7
Input Switching ......................................................................................................... 7
Bytes 3 and 4 .................................................................................................................. 7
Byte 5.............................................................................................................................. 7
Master Volume (Changes all Input Levels)....................................................................... 7
Absolute Volume Level ................................................................................................... 7
Attenuation (Changes Level on selected Input only) ....................................................... 8
Absolute Attenuation Level............................................................................................. 8
AVS-SL-PR-0401-0601
i
Page 6

Table of Contents
Mute ON ........................................................................................................................ 8
Mute OFF ....................................................................................................................... 8
Front Panel Disable ........................................................................................................ 8
Front Panel Enable ......................................................................................................... 8
Memory Reset (sets 2011 to Default Factory Settings) .................................................. 8
Change Address (Sets 2011 to New Address) ................................................................ 8
GET Commands ..................................................................................................9
Switch and Volume Status Feedback ........................................................................ 9
Transmit ......................................................................................................................... 9
Receive ........................................................................................................................... 9
Request Address....................................................................................................... 9
Transmit ......................................................................................................................... 9
Receive ........................................................................................................................... 9
Request Attenuation Levels ...................................................................................... 9
Transmit ......................................................................................................................... 9
Receive ........................................................................................................................... 9
Identity Command .................................................................................................. 10
Device Manager ................................................................................................11
Overview ................................................................................................................ 11
Connection.............................................................................................................. 11
Operation ............................................................................................................... 11
ii
AVS-SL-PR-0401-0601
Page 7

A
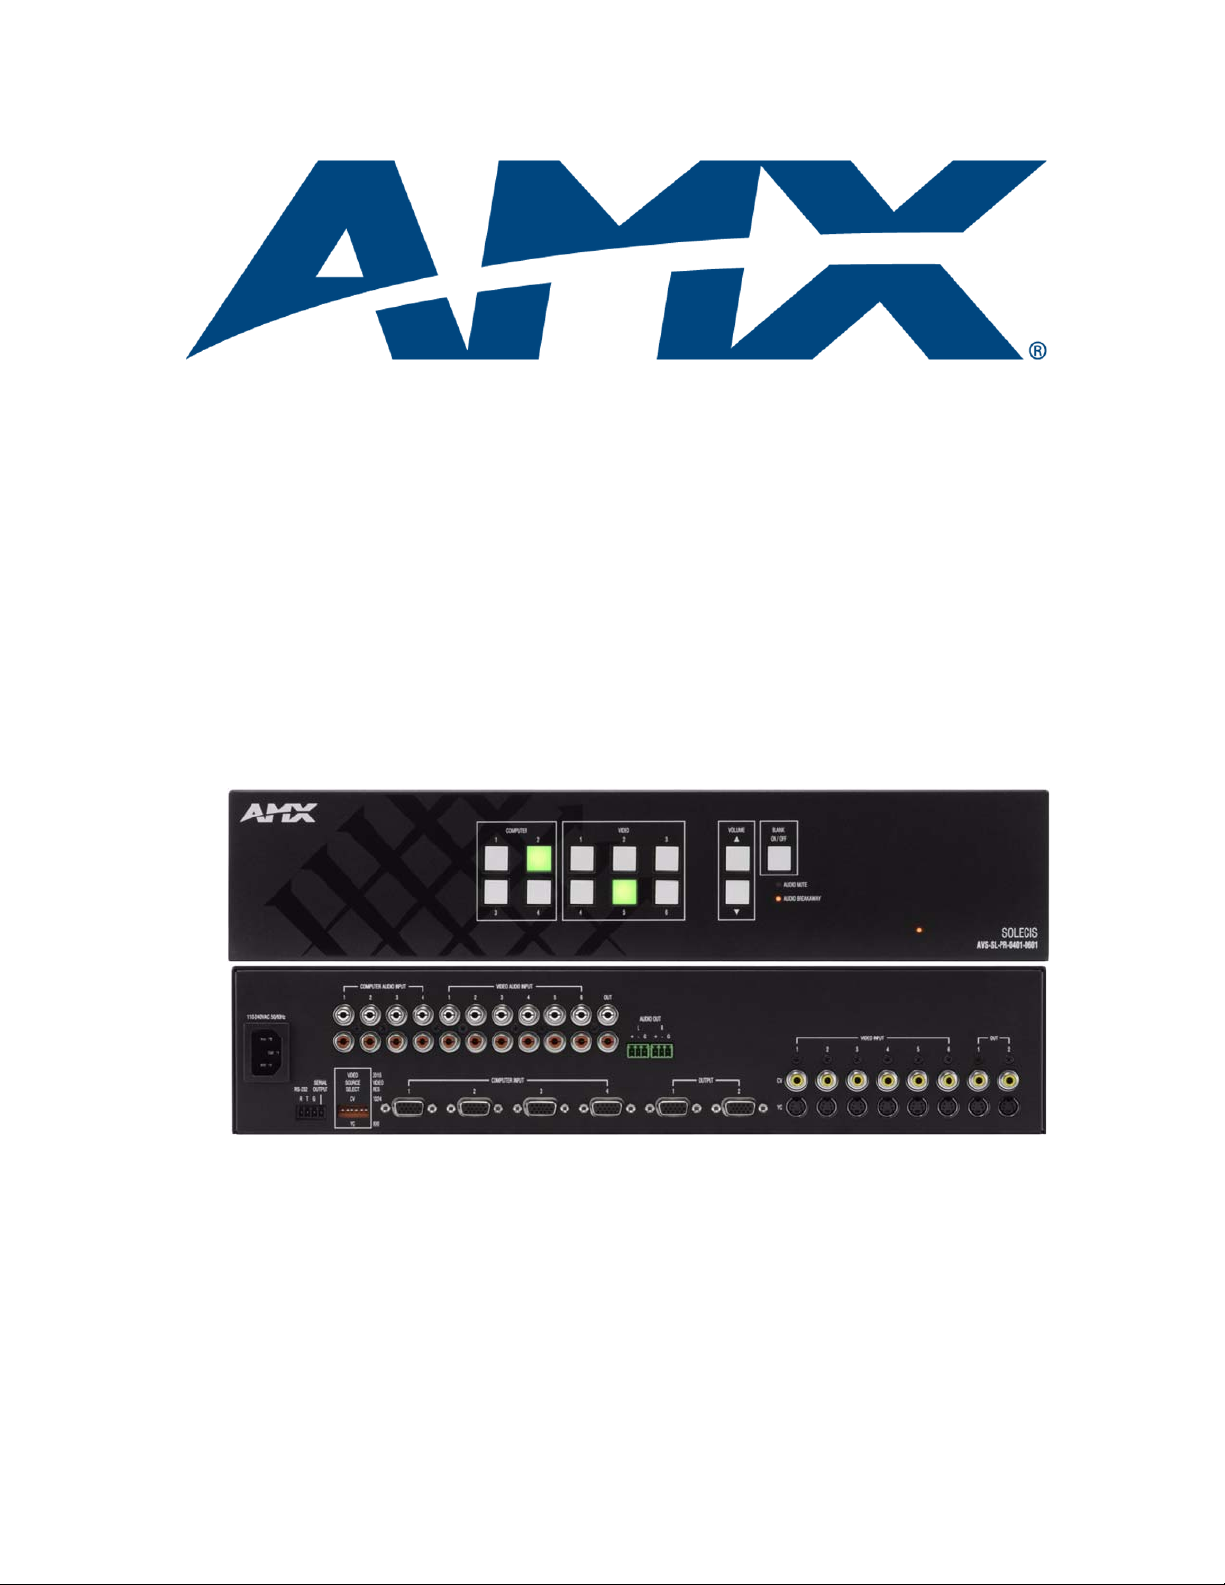
Overview
The Solecis AVS-SL-PR-0401-0601 Presentation Switcher (FG1330-2011-01) combines switching of
PC, computer, video and audio for presentation and conference rooms, home cinema, AV Rental
Companies and any environment where a number of mixed source types need to be displayed.
The AVS-SL-PR-0401-0601 features a total of ten inputs and a programmable serial output for
controlling projectors, plasma displays and other display devices.
Overview
FIG. 1 Solecis AVS-SL-PR-0401-0601 Presentation Switcher
Product Specifications
AVS-SL-PR-0401-0601 Specifications
RGB
RGB Inputs 4
Connector: HD D15 socket
Level: Analog
Max Level: 1V p-p
Impedance: 75 ohm
Sync Input
Type: Analogue or TTL
Max Level: 5V p-p
Impedance: 75 ohm
RGB Video Bandwidth: 250MHz -3dB
RGB Return Loss: -38dB@10MHz, -20dB@100MHz
Adjacent Input Crosstalk: -80dB@10MHz, -70dB@100MHz
RGB Outputs
Number: 2
Connectors: HD D15 socket
Level: Analog
Gain: Unity
Impedance: 75 ohm
VS-SL-PR-0401-0601
1
Page 8

Overview
AVS-SL-PR-0401-0601 Specifications (Cont.)
Sync Output
Level: TTL
Impedance: 75 ohm
Video
Video Inputs: 6 YC or Composite
Connector: Phono/RCA/Cinch 4Pin Din S-Video
Level: Analogue
Max Input: 1V P-P
Impedance: 75 Ohm
Bandwidth: 50MHz -3dB
Return Loss: -30dB@1MHz, -22dB@5MHz
Differential Phase Error: 0.05%
Differential Gain Error: 0.03%
Input Crosstalk: -60dB@1MHz
Video Output: 1-YC, 2-Composite
Connector: Phono/RCA/Cinch 4Pin Din S-Video
Level: Analogue
Gain: Unity
Audio
Audio Inputs: 10
Connector: Phono/RCA/Cinch Phoenix
Type: Stereo Unbalanced Analogue
Max Level: 2V P-P
Impedance: 47K
Frequency Response: 20-50 KHz
Audio Output: 2
Connector: Phono/RCA/Cinch
Type: Stereo Unbalanced and Balanced Analogue
Attenuation: 0 to -78dB
Impedance: 600 Ohm
Control
Type: RS232 Send and Receive, Front Panel
Connector: Rewirable
Protocol: Baud Rate-9600, Data Bits-8, No Parity, Stop Bits-1
Address: 00 – FF software programmable
Input: RS232
Serial Output: Programmable Protocol
Type: Power On/Off, RGB Input, Composite Input and YC Input
Audio Breakaway: Available through RS232 command
Power: 110 to 240V auto-switching
Connector: IEC
Case: 2U Rack Mounting x 160mm
Accessories: IEC Mains Lead, Programming Software
Approval: CE
2
AVS-SL-PR-0401-0601
Page 9

A
Connections
Typical Installation For Use With a Projector
Connect the RGB, Video and Audio sources to the Input sockets on the rear panel of the unit.
The RGB/Video inputs are 75 ohm terminated and the audio inputs 47Kohm terminated.
The RGB/Video and audio outputs are fully 75 ohm and 600 ohm driven respectively for
connection to long cable runs.
It is imperative that the input sources are fully compatible with the display and sound devices.
Video Connections
There are 4 PC inputs and 6 video inputs.
Two outputs are available for PC and two outputs for Composite Video and S-video. The Video Inputs
maybe either Composite Video, S-Video, or a combination of both.
Since the switcher now auto-senses between the Composite and S-Video inputs, the
dip switches have no effect unless you are using the Device Serial Output. If you are
using the Device Serial Output,dip switches 1 to 6 must be set to match the incoming
source type on their corresponding inputs.
The projector or display device should be switched to match the Source type
outputted.
If you are using the serial output, it is also necessary to configure the unit with Solecis
DCS. Consult the Solecis DCS Quick Start Guide for more information.
Connections
Audio Connections
One unbalanced output is available on Phono (RCA) connectors and one balanced output is available on
phoenix connectors.
Power Up
Connect a Mains Source (110 to 240V) to the 2010 switcher.
The Blank Button will illuminate.
If any Source is connected to Inputs 1 of the PC and Video groups then Sync only will be
present on the output.
VS-SL-PR-0401-0601
3
Page 10

Connections
4
AVS-SL-PR-0401-0601
Page 11

A
Operation
Front Panel
Source Selection
To select a Source press the Button corresponding to the numbered Input.
The button will illuminate. A PC input will be routed to the PC output sockets.
A selected Video Input will also be routed to its respective Composite or S-Video output.
If a PC input is selected then the last selected video input will remain on its respective output and vice
versa.
The Audio Channel will switch to the highlighted Input.
(Unless the Unit is controlled by RS232, then the Audio can be switched independently. The front panel
will always display the status of the PC / Video Inputs.)
Blank / Mute
To Blank and Mute the outputs press Blank button. The Button will illuminate and the Input buttons will
extinguish.
Operation
The Sync only of the last selected PC and Video Inputs will be present on the outputs.
The Blank and Mute will disable as soon as a source is selected.
Volume
This is a master volume control and will adjust the level of all inputs.
To increase volume press the arrow Up button.
To decrease volume press the arrow Down button.
The newly set volume level for the selected audio input will be permanently stored even after switch off.
Attenuation
The initial attenuation level of all the Inputs is set to 0dB.
If some sources are louder than others then they can be adjusted to match.
To change the attenuation level of an input, press and hold the input select button. Use the arrow up/
down buttons to set the level.
When set release the buttons and the level will be stored
Display Device Serial Output
This can be used for direct control of a projector or any device with RS232 control.
The 2011 can be programmed to transmit Power On/Off and RGB, Composite and S-vide mode
commands to a display device using Procon Device manager software (See programming section)
The commands are transmitted from the Display Serial terminal.
VS-SL-PR-0401-0601
5
Page 12

Operation
Input mode only
When the 2011 is powered up a mode command will be sent to a display on the first press of any Input
select button. The command will either be RGB, Composite or S-Video depending on the button pressed.
This will ensure a display device is set to the correct mode to display the input selected. Each time a
different source type is selected then a mode command will be sent to the display device.
For this function to work the Display must be ON
Power On/Off mode
When the 2011 is powered a Power On command will be sent to a display on the first press of any input
button. The button will flash for a programmed set time and the 2011 will disable.
This allows a projector to warm up. At the end of the warm up period an RGB, Composite or S-Video
command is sent to the display, the 2011 enables and the system is ready for use.
To turn the controlled projector off, press and hold the "Blank" button for 5 seconds.
The Programming cable connections are as follows:
PC Serial Port (D9) 2011
Pin2 TX
Pin3 RX
Pin5 GND
Display Connections
Display device 2 011
RX Display serial o/p
GND GND
RS232 Control
The unit may be controlled using an RS232 outputting system as follows.
Connection
Controller 2011
GND GND
TX RX
RX TX (if feedback information required)
Set the Protocol as follows:
Baud Rate = 9600
Data Bits = 8
Parity = None
Stop Bit = 1
The default address of the 2011 is 0.
All commands are hexadecimal.
6
AVS-SL-PR-0401-0601
Page 13

A
SET Commands
Input Switching
The following command switches input sources.
Byte 1 Byte 2 Byte 3 Byte 4 Byte 5(optional)
(Header) (Address) (Video Input) (Audio Input) RGB Delay (see note)
E8 00 to FF 00 to 0A 0 to OA 01 to FF
The Audio Inputs can be switched independently from the Video.
Bytes 3 and 4
01 to 04 correspond to PC inputs 1 to 4
05 to 0A correspond to video inputs 1 to 6
00 for Blank
1F no change
SET Commands
Byte 5
This switches the input sync but holds the RGB in blank for the time period set by the byte. This allows
for a clean switch between inputs.
The value is in seconds (e.g. 03 = 3 seconds).
If RGB delay is not required then ignore the 5th byte.
Master Volume (Changes all Input Levels)
The overall Volume level increases 0.5db each time the following command is sent:
Byte 1 Byte 2 Byte 3
(Header) (Address) (Increase)
E8 00 to FF 10
The overall Volume level decreases 0.5db each time the following command is sent:
Byte 1 Byte 2 Byte 3
(Header) (Address) (Decrease)
E8 00 to FF 20
Absolute Volume Level
A Volume value can be set directly using the following command:
Byte 1 Byte 2 Byte 3 Byte 4
(Header) (Address) (Volume Value)
E8 00 to FF 0F 00 to 5A
with 00 as the loudest (0dB)
VS-SL-PR-0401-0601
7
Page 14

SET Commands
Attenuation (Changes Level on selected Input only)
The Volume level increases 0.5db each time the following command is sent:
Byte 1 Byte 2 Byte 3
(Header) (Address) (Increase)
E8 00 to FF 0D
The Volume level decreases 0.5db each time the following command is sent:
Byte 1 Byte 2 Byte 3
(Header) (Address) (Decrease)
E8 00 to FF 0E
Absolute Attenuation Level
An attenuation value can be set directly using the following command:
Byte 1 Byte 2 Byte 3 Byte 4
(Header) (Address) (Volume Value)
E8 00 to FF 0F 00 to 1F
with 00 as (0dB)
Mute ON
Byte 1 Byte 2 Byte 3
(Header) (Address)
E8 00 to FF 0B
Mute OFF
Byte 1 Byte 2 Byte 3
(Header) (Address)
E8 00 to FF 0C
Front Panel Disable
Byte 1 Byte 2 Byte 3
(Header) (Address)
E8 00 to FF 40
Front Panel Enable
Byte 1 Byte 2 Byte 3
(Header) (Address)
E8 00 to FF 41
Memory Reset (sets 2011 to Default Factory Settings)
Byte 1 Byte 2 Byte 3
38 62 DC
Change Address (Sets 2011 to New Address)
Byte 1 Byte 2 Byte 3 Byte 4
(Address number)
38 62 D9 00 - FF
8
AVS-SL-PR-0401-0601
Page 15

A
GET Commands
Switch and Volume Status Feedback
Transmit
Byte 1 Byte 2 Byte 3
(Header) (Address)
EF 00 to FF 80
Receive
Byte 1 Byte 2 Byte 3 Byte 4 Byte 5
(Header) (Address)
C8 00 to FF PC or Video Input
The same string will be transmitted each time an input is selected.
Request Address
GET Commands
Audio input Input volume level
0= Blank
1 to 4 = PC I/P
5 to 0A= Vid I/P
Transmit
Byte 1 Byte 2 Byte 3
(Header) (Address)
38 62 DA
Receive
Byte 1 Byte 2
(Header) (Address)
C8 00 to FF
Request Attenuation Levels
Transmit
Byte 1 Byte 2 Byte 3
(Header) (Address)
EF 00 - FF 40
Receive
Byte 1 Byte 2 Byte 3456789101112
(Header) (Address)
C8 00 - FF 40 XXXXXXX X X
Where x is a value between 00 and 1F.
VS-SL-PR-0401-0601
9
Page 16

GET Commands
Identity Command
Sending this command:
Byte 1 Byte 2 Byte 3 Byte 4
F2 09 EA 80
The unit will return:
Byte 1 Byte 2
6E 04 =2010
10
AVS-SL-PR-0401-0601
Page 17

A
Device Manager
Overview
This software can be used for configuring the 2011 to control external display devices.
It is downloadable from our website www.procon.co.uk under support.
Connection
Connect the serial port of the PC as follows:
PC (D9) 2011
Pin 5 gnd
Pin 2 tx
Pin 3 rx
Run Device Manager. If the connection is correct the software will automatically detect the 2011.
Click on the 2011 and a virtual panel will appear (FIG. 2):
Device Manager
FIG. 2
Device Manager - Virtual Panel
Operation
Inputs can be selected and there respective attenuation levels can be set.
Master volume level can be adjusted and the front panel can be enabled/disabled.
If several units are to be externally controlled from one serial port then the address of each unit can be
changed.
To program the 2011 to control external display devices click on Setup Display
Click on Change and select the required manufacturer, display type and model (FIG. 3): .
FIG. 3 Device Manager - Setup Display
The protocol and command strings will appear in the relevant boxes:
If the required device is not in the library then this can be added to by clicking on library from the menu
bar and following the instructions (FIG. 4).
VS-SL-PR-0401-0601
11
Page 18

Device Manager
FIG. 4 Device Manager - Adding a Device to the Library
The manufacturer's data sheet will be required.
If the string needs to be transmitted more than once then select the number of times from the count
drop-down list and set a suitable interval period.
If the power on/off function is to be enabled then set a warm up/cool down time and click on Set/Enable.
Finally click on Program Device to download the information.
For operation see section on Display device serial output.
12
AVS-SL-PR-0401-0601
Page 19

Device Manager
VS-SL-PR-0401-0601
13
Page 20

It’s Your World - Take Control™
3000 RESEARCH DRIVE, RICHARDSON, TX 75082 USA • 800.222.0193 • 469.624.8000 • 469-624-7153 fax • 800.932.6993 technical support • www.amx.com
2008 AMX. All rights reserved. AMX and the AMX logo are registered trademarks of AMX. AMX reserves the right to alter specifications without notice at any time.
©
10/08
 Loading...