

Page 1

AMX™ 68000 Target Guide
First Printing: April 15, 1994
Last Printing: March 1, 2005
®
Copyright © 1994 - 2005
KADAK Products Ltd.
206 - 1847 West Broadway Avenue
Vancouver, BC, Canada, V6J 1Y5
Phone: (604) 734-2796
Fax: (604) 734-8114
Page 2

Page 3

TECHNICAL SUPPORT
KADAK Products Ltd. is committed to technical support for its software products. Our
programs are designed to be easily incorporated in your systems and every effort has
been made to eliminate errors.
Engineering Change Notices (ECNs) are provided periodically to repair faults or to
improve performance. You will automatically receive these updates during the product's
initial support period. For technical support beyond the initial period, you must purchase
a Technical Support Subscription. Contact KADAK for details. Please keep us inform ed
of the primary user in your company to whom update notices and other pertinent
information should be directed.
Should you require direct technical assistance in your use of this KADAK software
product, engineering support is available by telephone, fax or e-mail. KADAK reserves
the right to charge for technical support services which it deems to be beyond the normal
scope of technical support.
We would be pleased to receive your comments and suggestions concerning this produ ct
and its documentation. Your feedback helps in the continuing product evolution.
AMX 68000 Target Guide
KADAK Products Ltd.
206 - 1847 West Broadway Avenue
Vancouver, BC, Canada, V6J 1Y5
Phone: (604) 734-2796
Fax: (604) 734-8114
e-mail: amxtech@kadak.com
KADAK
i
Page 4

Copyright © 1994-2005 by KADAK Products Ltd.
All rights reserved.
No part of this publication may be reproduced, transmitted, transcribed,
stored in a retrieval system, or translated into any language or computer
language, in any form or by any means, electronic, mechanical,
magnetic, optical, chemical, manual or otherwise, without the prior
written permission of KADAK Products Ltd., Vancouver, B.C., CANADA.
DISCLAIMER
KADAK Products Ltd. makes no representations or warranties with
respect to the contents hereof and specifically disclaims any implied
warranties of merchantability and fitness for any particular purpose.
Further, KADAK Products Ltd. reserves the right to revise this
publication and to make changes from time to time in the content
hereof without obligation of KADAK Products Ltd. to notify any
person of such revision or changes.
TRADEMARKS
AMX in the stylized form and KwikNet are registered trademarks of KADAK Products Ltd.
AMX, AMX/FS, InSight,
Microsoft, MS-DOS and Windows are registered trademarks of Microsoft Corporation.
All other trademarked names are the property of their respective owners.
ii
KwikLook and KwikPeg are trademarks of KADAK Products Ltd.
KADAK
AMX 68000 Target Guide
Page 5

AMX 68000 TARGET GUIDE
Table of Contents
Page
1. Getting Started with AMX 68000 1
1.1 Introduction ........................................................................................ 1
1.2 AMX Files .......................................................................................... 2
1.3 AMX Nomenclature ........................................................................... 4
1.4 AMX 68000 Target Specifications ..................................................... 5
1.5 Launch Requirements ......................................................................... 6
2. Program Coding Specifications 9
2.1 Task Trap Handler .............................................................................. 9
2.2 Task Scheduling Hooks ...................................................................... 10
3. The Processor Interrupt System 11
3.1 Operation ............................................................................................ 11
3.2 AMX Vector Table ............................................................................ 13
3.3 AMX Interrupt Priority and NMI ....................................................... 15
3.4 Conforming ISPs ................................................................................ 16
3.5 Nonconforming ISPs .......................................................................... 18
3.6 Processor Vector Initialization ........................................................... 19
4. Target Configuration Module 21
4.1 The Target Configuration Process ...................................................... 21
4.2 Target Configuration Parameters ....................................................... 25
4.3 Interrupt Service Procedure (ISP) Definitions .................................... 29
4.4 Defining a Fast Clock ISP .................................................................. 32
4.5 Null Functions .................................................................................... 34
4.6 ROM Option Parameters .................................................................... 35
5. Clock Drivers 37
5.1 Clock Driver Operation ...................................................................... 37
5.2 Custom Clock Driver ......................................................................... 39
5.3 AMX Clock Drivers ........................................................................... 41
5.3.1 MC683xx TPU Clock Driver .......................................................... 41
5.3.2 MC68360 PIT Clock Driver ............................................................ 42
5.3.3 MC68230 Clock Driver ................................................................... 43
5.3.4 MC68901 Clock Driver ................................................................... 44
AMX 68000 Target Guide
KADAK
iii
Page 6

AMX 68000 TARGET GUIDE
Table of Contents (Cont'd)
Appendices
Page
Appendix A. Target Parameter File Specification A-1
A.1 Target Parameter File Structure ......................................................... A-1
A.2 Target Parameter File Directives ....................................................... A-3
A.3 Porting the Target Parameter File ......................................................A-11
Appendix B. AMX 68000 Service Procedures B-1
Appendix C. AMX 68000 ROM Option C-1
AMX 68000 TARGET GUIDE
Table of Figures
Page
Figure 1.2-1 AMX Include Files .............................................................. 2
Figure 1.2-2 AMX Assembler Source Files ............................................. 2
Figure 1.2-3 AMX C Source Files ........................................................... 3
Figure 1.4-1 AMX Design Constants ....................................................... 5
Figure 3.2-1 AMX Vector Table and Vector Numbers ............................ 14
Figure 4.1-1 Configuration Manager Screen Layout ................................ 22
Figure A.1-1 AMX Target Parameter File ............................................... A-1
iv rev9
KADAK
AMX 68000 Target Guide
Page 7

1. Getting Started with AMX 68000
1.1 Introduction
The AMX™ Multitasking Executive is described in the AMX User's Guide. This target
guide describes AMX 68000 which operates on the Motorola MC680xx, MC683xx and
all architecturally compatible processors.
Throughout this manual, the term M68000 refers specifically to the Motorola MC680xx
and MC683xx families of processors and all processors which are exact replic as. When
distinctions are not important, the term M68000 is used to reference any processor which
has the general characteristics of these families. When distinctions are important, the
processors are identified explicitly.
The purpose of this manual is to provide you with the information required to properly
configure and implement an AMX 68000 real-time system. It is assumed that you have
read the AMX User's Guide and are familiar with the architecture of the M68000
processor.
Installation
AMX 68000 is delivered ready for use on a PC or compatible running Microsoft
Windows®. To install AMX, follow the directions in the Installation Guide. All AMX
files required for developing an AMX application will be installed on disk in the
directory of your choice. All AMX source files will also be installed on your disk.
AMX Tool Guides
This manual describes the use of AMX in a tool set independent fashion. References to
specific assemblers, compilers, librarians, linkers, locators and debuggers a re purposely
omitted. For each tool set with which AMX 68000 has been tested by KADAK, a
separate chapter in the AMX Tool Guide is provided.
®
AMX 68000 Target Guide
KADAK
1
Page 8

1.2 AMX Files
AMX is provided in C source format to ensure that regardless of your development
environment, your ability to use and support AMX is uninhibited. AMX also includes a
small portion programmed in M68000 assembly language.
Figures 1.2-1, 2 and 3 summarize the AMX modules provided with AMX 68000. The
AMX product manifest (file MANIFEST.TXT) is a text file which indicates the current
AMX revision level and lists the AMX modules which are provided with the product.
File Name Module
CJ532 .H Generic include file
CJ532APP.H Custom application definitions
CJ532CC .H C dependent definitions
CJ532EC .H AMX error code definitions
CJ532IF .H C and target interface prototypes
CJ532KC .H Private AMX constants
CJ532KF .H AMX service procedure prototypes
CJ532KP .H Private AMX prototypes
CJ532KS .H Private AMX structure definitions
CJ532KT .H Target processor definitions
CJ532KV .H AMX version specification
CJ532SD .H AMX application structure definitions
CJ532TF .H Target dependent prototypes
CJZZZ .H Copy of generic include file CJ532.H
used for portability
CHxxxxx .H Definitions for common timer (PIT, TPU)
and serial I/O (UART) chips
Figure 1.2-1 AMX Include Files
File Name Module
CJ532K .DEF Private AMX assembly language definitions
CJ532KQ .ASM Private AMX math procedures
CJ532KR .ASM AMX Interrupt Supervisor
CJ532KS .ASM AMX Task Scheduler
CJ532MXA.ASM Message Exchange Manager constants
CJ532TDC.ASM Time/Date Manager constants
CJ532UA .ASM Target processor and C support (part 1)
CJ532UB .ASM Target processor and C support (part 2)
Figure 1.2-2 AMX Assembler Source Files
2
KADAK
AMX 68000 Target Guide
Page 9

File Name Module
CJ532KA .C Kernel task services
CJ532KB .C General task services
CJ532KBR.C
CJ532KC .C
CJ532KCR.C
CJ532KD .C
CJ532KDR.C
CJ532KE .C
CJ532KF .C Suspend/resume task
CJ532KG .C Time slice services
CJ532KH .C Task status
CJ532KI .C Enter and Exit AMX
CJ532KJ .C General object access
CJ532KK .C AMX Vector Table access
CJ532KL .C Private AMX list manipulation
CJ532KM .C AMX task scheduler hook services
CJ532KX .C AMX Kernel Task
CJ532CL .C Circular List Manager
CJ532LM .C Linked List Manager
CJ532BM .C Buffer Manager
CJ532BMR.C
CJ532EM .C
CJ532EMR.C
CJ532RM .C
CJ532SM .C Semaphore Manager
CJ532SMR.C
CJ532MB .C
CJ532MBR.C
CJ532MF .C
CJ532MM .C Memory Manager
CJ532MMR.C
CJ532MX .C
CJ532MXR.C
Timer Manager
Task management services
Task termination services
Event Manager
Semaphore Manager (resources)
Mailbox Manager
Flush mailbox and message exchange
Message Exchange Manager
CJ532TDA.C
CJ532TDB.C Time/Date formatter
CJ532UF .C Launch and leave AMX
CJ532XTA.C Message exchange task services
CJ532XTB.C Message exchange task termination
CHxxxxxT.C Clock drivers for common timer (PIT, TPU) chips
CHxxxxxS.C Sample drivers for common serial I/O (UART) chips
AMX 68000 Target Guide
Time/Date Manager
Figure 1.2-3 AMX C Source Files
KADAK
3
Page 10

1.3 AMX Nomenclature
The following nomenclature standards have been adopted throughout the AMX Target
Guide.
Numbers used in this manual are decimal unless otherwise indicated. Hexadecimal
numbers are indicated in the format 0xABCD or $ABCD.
The terminology A(Table XYZ) is used to define addresses. It is read as "the address of
Table XYZ".
Read/write memory is referred to as RAM. Read only memory (non-volatile storage) is
referred to as ROM.
AMX symbol names and reserved words are identified as follows:
cjkkpppp AMX C procedure name pppp for service of class kk
cjxtttt
xttttyyy
AMX structure name of type tttt
Member yyy of an AMX structure of type tttt
CJ_ID
CJ_ERRST Completion status returned by AMX service procedures
CJ_CCPP Procedures use C parameter passing conventions
CJ_ssssss Reserved symbols defined in AMX header files
CJ_ERxxxx AMX Error Code xxxx
CJ_WRxxxx
CJ_FExxxx
CJ532xxx.xxx
CJZZZ.H Generic AMX include file
AMX object identifier (handle)
AMX Warning Code xxxx
AMX Fatal Exit Code xxxx
AMX 68000 filenames
The generic include file CJZZZ.H is a copy of file CJ532.H which includes the subset of
the AMX 68000 header files needed for compilation of your AMX application C code.
By including the file CJZZZ.H in your source modules, your AMX application becomes
readily portable to other target processors.
Throughout this manual code examples are presented in lower case. File names are
shown in upper case. C code assumes that an
int is 32 bits as is common for most C
compilers for the M68000 processor.
Processor registers are referenced using the software names specified by Motorola.
D0, D1, D2, D3, D4, D5, D6, D7
A0, A1, A2, A3, A4, A5, A6, A7
PC, SP = A7
SR =
status register, CC = flags (condition code)
4
KADAK
AMX 68000 Target Guide
Page 11

1.4 AMX 68000 Target Specifications
AMX 68000 was initially developed and tested using the Motorola MC68020, MC68040
and MC68332 processors on a variety of Motorola evaluation boards. However, the
AMX 68000 design criteria fully encompass the Motorola M68000 processor family
requirements.
AMX uses a set of design constants which vary according to the constraints imposed by
each target processor. When operating on the M68000 processor, these design constants
assume the values listed in Figure 1.4-1.
Symbol Purpose
CJ_CCISIZE Size of integer is 4 bytes (32 bits)
Event group supports 32 event flags per group
CJ_ID AMX id (handle) is a 32 bit unsigned integer
CJ_ERRST AMX error codes are 32 bit signed integers
CJ_MINMSZ Minimum AMX message size is 12 bytes
CJ_MAXMSZ Default AMX message size is 12 bytes
CJ_MINKG Minimum number of AMX message envelopes is 10
CJ_MINKS Minimum Kernel Stack is 256 bytes
CJ_MINIS Minimum Interrupt Stack is 256 bytes
CJ_MINTKS Minimum task storage (including TCB) is 512 bytes
CJ_MINBFS Minimum AMX buffer size is 8 bytes
CJ_MINUMEM Minimum AMX memory block size is 16 bytes
CJ_MINSMEM Minimum AMX memory section size is 128 bytes
Figure 1.4-1 AMX Design Constants
AMX 68000 Target Guide
KADAK
5
Page 12

1.5 Launch Requirements
The M68000 must be properly configured for use before AMX is launched. The manner
in which this is accomplished will depend on your target hardware implementation and
on the startup code provided with your C compiler.
AMX does not include bootstrap code to initialize the M68000 processor. It is assumed
that you will have a boot ROM present which configures the M68000 for your specific
hardware configuration and begins program execution at the entry to your C startup code.
During development, you may be using a ROM monitor provided by the processor
vendor or by the toolset supplier. The ROM monitor automatically initializes the
processor at power on. The monitor is then used to download your AMX application and
start execution at the entry point to the C startup code. Eventuall y your main C program
is called and AMX can be launched by your call to cjkslaunch.
Once your application has been tested, you may choose to replace the ROM monitor and
the C startup code with your own initialization code. The manner in which you do this is
outside the scope of this manual.
Operating Mode
AMX requires that the processor be set to supervisor mode. The processor is in
supervisor mode when the supervisor/user state bit S is 1 in the status register (SR). This
is the default state when the processor is reset.
Interrupt State
Interrupts can be enabled or disabled on entry to AMX. Set the interrupt priority mask in
the status register to disable (0x0600) or enabl e (0x0000) external interrupts. AMX will
disable interrupts during its startup initialization. AMX will enable interrupts prior to
calling your application Restart Procedures.
If you launch AMX with interrupts enabled, be sure that all interrupt sources are either
disabled or externally masked off. You must not enable or unmask any interrupt source
until you have installed an AMX Interrupt Service Procedure to properly service the
device. This subject is described in more detail in Chapters 3 and 4.
For the MC68020, MC68030, MC68040, MC68060 and architecturally similar
processors, AMX requires that the processor be set to interrupt mode. The processor is
in interrupt mode when the master/interrupt state bit
M is 0 in the status register (SR). This
is the default state when the processor is reset.
Some M68000 processors include a Vector Base Register (VBR) which must be
initialized with the address of the Exception Vector Table. AMX can be configured to do
this initialization at launch time. Alternatively you can initialize the VBR prior to
launching AMX and allow AMX to read the VBR without modifying it.
6
KADAK
AMX 68000 Target Guide
Page 13

Trace Controls
AMX alters the state of the status re gister (SR) whenev er it enables or di sables interrupts.
When AMX disables interrupts, it also clears the trace control bits (T or T0 an d T1) to 0.
When AMX enables interrupts, the trace control bits remain unaltered. Consequently,
you may not be able to use your debugger to single step trace through private AMX code
sequences.
M68000 Stack Use
The M68000 begins execution in supervisor mode (and interrupt mode for the MC68020,
MC68030, MC68040, MC68060, et al) using the initial interrupt stack specified by
vector number 0 in the Exception Vector Table. Your bootstrap code or C startup code
may switch to an alternate stack. Once AMX is launched, it abandons the startup stack.
AMX only uses the stacks allocated by you in your AMX System Configuration Module.
To accomplish this feat on processors which support multiple stacks, AMX always
executes in the interrupt mode (M = 0 in SR).
Instruction and Data Caching
The MC68020 includes a 256-byte instruction cache but no data cache.
The MC68030 includes a 256-byte instruction cache and a 256-byte data cache.
The MC68040 includes a 4096-byte instruction cache and a 4096-byte data cache.
The MC68060 includes an 8192-byte instruction cache and an 8192-byte data cache.
If your AMX Target Parameter File (see Chapter 4) targets one of these processors, AMX
will automatically flush and enable both caches when AMX is launched. Alternatively,
you can configure AMX to ignore the caches during the launch. AMX provides
procedures which you can use to enable or disable the caches.
For example, if you disable both caches in your main program and configure AMX to
ignore the cache, you can simplify the initial testing of your application or overcome
caching problems which may be encountered if your debugger cannot properly handle
cached operation.
You must be aware that, on processors which utilize an M68000 Memory Mana gement
Unit (MMU), successful cache operation will depend on proper setup of the MMU. For
example, if the MMU does not properly control cach ed access to memory and devices,
you may find that device I/O reads and writes end up being cached, resulting in failure of
the device to operate as expected.
AMX does not manipulate the MMU. If you configure AMX to enable caching during
the launch, then you must ensure that the MMU is properly initialized to meet your
hardware memory addressing specifications prior to launching AMX. The AMX Sample
Program purposely leaves the caches unal tered to avoid possible cache related problems
during your initial use of AMX in your hardware environment.
AMX 68000 Target Guide
KADAK
rev6 7
Page 14

Memory Management Unit (MMU)
The MC68030, MC68040, MC68LC040 and MC68060 include a Memory Management
Unit (MMU) to support a demand-paged virtual memory environment. AMX does not
support the M68000 memory management unit.
If you are using AMX on the Motorola MC68000, MC68008, MC68010 or MC683xx
processors, this restriction does not apply. These processors do not implement the
M68000 memory management unit and allow direct access to the full 20, 24 or 32-bit
address space supported by the particular processor.
Your AMX application code and data must reside within the memory address ranges
allowed by the particular M68000 processor which you are using. Th e M68000 MMU, if
present, must be setup prior to launching AMX. In most cases, your boot ROM or C
startup code will configure the M68000 MMU for your spe cific hardware configuration
prior to entry to your
main() program.
Warning!
Do not enable the memory caches if the MMU has not been
initialized to provide proper cached access to memory.
Big or Little Endian
AMX 68000 adheres to the big endian model in which the most significant byte of a word
(long) is stored in the lowest byte address.
Be aware that AMX for other processors may be big or little endian. If you intend to port
your AMX application to other processors, then avoid using coding techniques which are
endian dependent.
8
KADAK
AMX 68000 Target Guide
Page 15

2. Program Coding Specific ations
2.1 Task T rap Handler
AMX 68000 supports task traps for the M68000 zero divide, bounds check and overflow
faults. A zero divide fault occurs if any M68000 instruction attempts an integer division
by zero. A bounds check fault occurs if the M68000
bound violation. An overflow fault occurs if the overflow flag (V) is set in the status
register (SR) at the time an M68000 TRAPV instruction is executed.
The Task Trap Handler can be written as a C procedure with formal parameters.
#include "CJZZZ.H" /* AMX Headers */
void CJ_CCPP traphandler(
struct cjxregs *regp, /* A(Register Structure) */
void *faultfp) /* A(Fault frame) */
{
:
Process the error
:
}
The zero divide, bounds check and overflow exceptions are serviced b y AMX. The state
of each register at the time of the fault is stored on the stack in an AMX register structure
cjxregs. Parameter regp is a pointer to that structure. Structure cjxregs is defined in
AMX header file CJ532KT.H.
CHK instruction detects an array
Interrupts are enabled upon entry to the task trap handler. Note that the SR register copy
in the register array reflects the state of the status register after the exception occurred.
A pointer to the M68000 fault frame is provided as parameter faultfp. This pointer is
the M68000 stack pointer (SP) after the fault has occurred. Fault frame members can be
referenced as described in Chapter 3.1.
The register values in structure
regs can be examined and, in rare circumstances,
modified. If necessary, the fault frame at *faultfp can be modified, with ex treme care,
to force resumption at some other location in the task code. If the task trap handler
returns to AMX, execution will resume at the location determined by the fault frame at
*faultfp with registers set according to the values i n the structure referenced by regp.
Note that the
SR register will be restored according to the value returned in the fault frame
referenced by faultfp.
Since the task trap handler executes in the context of the task in which the exception
occurred, it is free to use all AMX services normally available to tasks. In particular, the
handler can call
cjtkend to end task execution if so desired.
AMX 68000 Target Guide
KADAK
9
Page 16

2.2 Task Scheduling Hooks
There are four critical points within the AMX Task Scheduler. These critical points
occur when:
a task is started
a task ends
a task is suspended
a task is allowed to resume.
AMX allows a unique application procedure to be provided for each of these critical
points. Pointers to your procedures are installed with a call to procedure cjkshook. You
must provide a separate procedure for each of the four critical points. Since these
procedures execute as part of the AMX Task Sch eduler, their operati on is critical. Th ese
procedures must be coded in assembler using techniques designed to ensure that they
execute as fast as possible.
The AMX Task Scheduler calls each of your procedures with the same calling
conventions.
Upon entry to your scheduling procedures, the following conditions exist:
Interrupts are disabled and must remain so.
The Task Control Block address is in register A1.
The stack pointer in register SP references the task's stack.
The return address is on the stack at (SP).
Registers D0, D1, A0, A1, A2 and A3 are free for use.
Condition code flags in the status register (SR) can be altered.
All other registers must be preserved.
Your procedures receive a pointer to the Task Control Block (TCB) of the task which is
being started, ended, suspended or resumed. If you include AMX header file
CJ532K.DEF in your assembly language module, you can reference the private region
within the TCB reserved for your use as
XTCBUSER(A1).
Your procedures are free to temporarily use the task's stack.
10
KADAK
AMX 68000 Target Guide
Page 17

3. The Processor Interrupt System
3.1 Operation
The M68000 classifies all internal and external sources of interruption as exceptions.
The processor automatically determines the cause of the exception and then branches
indirectly through entries in the processor Exception Vector Table to an appropriate
exception specific procedure.
The particular procedures which service internal or ex ternal device interrupt requests are
called Interrup t Service Procedures. All other proc edures are referred to as exception
service procedures.
Upon entry to any Interrupt Service Procedure or exception service procedure the
processor state is determined by the particular exception.
Device Interrupt Service
A subset of the exception vectors are reserved for the control of d evices external to, or
embedded in, the processor. These vectors include:
Vector 15 Uninitialized interrupt vector
Vector 24 Spurious interrupt
Vectors 25 Interrupt priority level 1 (lowest)
to
Vector 30 Interrupt priority level 6 (highest)
Vector 31 Interrupt priority level 7 (Non-Maskable)
Vectors 64 User assignable interrupts
to 255
The external interrupt facility is enabled by setting the interrupt mask in the processor
status register (
SR) to 0 thereby enabling interrupts from priority levels 1 to 6. Note that
interrupt priority level 7 cannot be inhibited.
The external interrupt facility is disabled by setting the interrupt mask in the processor
status register (SR) to 6 thereby inhibiting interrupts from priority levels 1 to 6 inclusive.
AMX never sets the processor interrupt mask to 7.
When an interrupt occurs at priority level
n, the processor pushes zero or more words of
processor dependent information on the current stack. The return address (current
Program Counter) and the content of the processor status register are then pushed onto
the current stack. The processor interrupt mask is set to
n thereby disabling all external
interrupts of priority less than or equal to n.
The interrupting device then identifies the interrupt source. In most cases, the device lets
the processor use the interrupt priority level n vector. However, devices can be designed
to present the processor with their own vector number. Any vector number in the range 0
to 255 is possible, but vectors 64 to 255 are reserved for this purpose. Programmable
devices which have not been programmed with their particular vector number usually
respond with vector number 15 signifying an uninitialized interrupt. If no device
responds to the processor's demand for interrupt acknowledgment, the processor uses the
spurious interrupt vector number 24.
AMX 68000 Target Guide
KADAK
11
Page 18

Default Exception Service Procedures
AMX provides default service procedures for most exceptions. The zero divide, bounds
check and overflow exceptions are serviced by AMX using its Task Trap Handler
mechanism. All other exceptions handled by AMX are treated as fatal. AMX calls a
Fatal Exception Procedure cjksfatalexh in module CJ532UF.C identifying the
exception and the machine state at the time of the exception. If the Fatal Exception
Procedure returns, AMX calls the Fatal Exit Procedure cjksfatal in the same module
with one of the following fatal exit codes:
CJ_FETRAP Fatal exception trap
CJ_FEISPTRAP Task exception trap in ISP
CJ_FETKTRAP Task exception trap occurred:
in a Restart Procedure or
in a Timer Procedure or
in a task with no task trap handler
The Fatal Exception Procedure is written in C as follows. Prior to entry, interrupts are
in the state determined by the particular exception.
#include "CJZZZ.H" /* AMX Headers */
void CJ_CCPP cjksfatalexh(
struct cjxregs *regp, /* A(Register structure) */
int vnum, /* Vector number */
void *faultfp) /* A(Fault frame) */
{
:
Process the error
:
}
The state of each register at the time of the fault is stored on the stack in an AMX register
structure cjxregs. Parameter regp is a pointer to that st ructure. Structure cjxregs is
defined in AMX header file CJ532KT.H.
Note that the
SR register copy in the regist er array reflects the state of the status register
after the exception occurred.
A pointer to the M68000 fault frame is provided as parameter
the M68000 stack pointer (
SP) after the fault has occurred. Fault frame members can be
faultfp. This pointer is
referenced as follows:
*((CJ_T16U *)faultfp) is the SR saved in the fault frame
*((CJ_T32U *)((CJ_T16U *)faultfp + 1))
is the A(fault instruction)
*((CJ_T16U *)faultfp + 3) is the frame format type and vector offset
12
KADAK
AMX 68000 Target Guide
Page 19

3.2 AMX Vector Table
The M68000 processor provides an Exception Vector Table, often referred to as the
AMX Vector Table, through which device interrupts are vectored and processor faults are
trapped. The position of entries in the table and the vector numbers used to reference
them are dictated by Motorola.
AMX provides a set of cjksixxxx service procedur es t o all ow you to dynamically access
or modify entries in the AMX Vector Table. The Motorola vector numbers must be used
in all calls to these procedures to identify entries in the table.
Device Interrupts
AMX uses the AMX Vector Table to maintain pointers to Inter rupt Service Procedures
for all of the device interrupts to which the processor will respond. AMX does not
provide a default Interrupt Service Procedure for ever y device interrupt. However, AMX
does provide a default exception service procedure for the spurious interrupt (vector
number 24) and the uninitialized interrupt (vector number 15).
Processor Exceptions
AMX maintains entries in the AMX Vector Table for all of the processor exceptions for
which AMX assumes responsibility. These entries in the Vector Table are identified by
Motorola's exception vector numbers which are defined in AMX header file CJ532KT.H.
Figure 3.2-1 summarizes the exception vector mnemonics.
A 32-bit mask in your Target Parameter File is used to specify which of the possible
exceptions you wish AMX to service. The mask bits are defined in Figure 3.2-1. The
AMX Configuration Builder (see Chapter 4) puts a directive in your Target Parameter
File to specify the mask required to meet your configuration requirements.
If an enable mask bit is not defined in Figure 3.2-1 for a particular ex ception, then AMX
will not provide a default exception service procedure for that exception. For example,
AMX does not provide service for the
TRAP n vectors (vector numbers 32 to 47). Hence,
all software traps are available for use by your application.
AMX does not provide default exception service procedures for any of the entries which
Motorola has declared as undefined but reserved.
AMX 68000 Target Guide
KADAK
13
Page 20

Vector Vector Enable
Name Number Mask Exception
CJ_PRVNRES 0, 1 Reset
CJ_PRVNBE 2 $00000004 Bus error (access fault)
CJ_PRVNAE 3 $00000008 Address error
CJ_PRVNII 4 $00000010 Illegal instruction
CJ_PRVNZD 5 $00000020 Zero divide
CJ_PRVNCH 6 $00000040 CHK instruction trap
CJ_PRVNTV 7 $00000080 TRAPV instruction trap
CJ_PRVNPV 8 $00000100 Privilege violation
CJ_PRVNTR 9 $00000200 Trace
CJ_PRVNLA 10 $00000400 Line 1010 (A) emulator
CJ_PRVNLF 11 $00000800 Line 1111 (F) emulator
12 reserved
CJ_PRVNCP 13 $00002000 Coprocessor protocol violation
CJ_PRVNFE 14 $00004000 Format error (>= 68010)
CJ_PRVNUI 15 $00008000 Uninitialized interrupt
16 to 23 reserved
CJ_PRVNSI 24 $00000002 Spurious interrupt
25 to 31 Level 1 to 7 interrupt autovectors
CJ_PRVNTT 32 to 47 TRAP 0 to 15 Table
CJ_PRVNFPBS 48 $01000000 FP Branch or set on unordered condition
CJ_PRVNFPIN 49 $02000000 FP Inexact result
CJ_PRVNFPDZ 50 $04000000 FP Divide by zero
CJ_PRVNFPUN 51 $08000000 FP Underflow
CJ_PRVNFPOP 52 $10000000 FP Operand Error
CJ_PRVNFPOV 53 $20000000 FP Overflow
CJ_PRVNFPSN 54 $40000000 FP Signalling NAN
CJ_PRVNFPUD 55 $80000000 FP Unimplemented data type
CJ_PRVNMMCF 56 MMU Configuration error
CJ_PRVNMMOP 57 MMU Illegal operation
CJ_PRVNMMAV 58 MMU Access level violation
59 to 63 reserved
64 to 255 User defined
Figure 3.2-1 AMX Vector Table and Vector Numbers
14
KADAK
AMX 68000 Target Guide
Page 21

3.3 AMX Interrupt Priority and NMI
The M68000 family of processors offers inherent interrupt priority ordering. The AMX
Interrupt Supervisor supports this feature and allows the nesting of interrupts for fast
response to high priority events.
The M68000 interrupt priority mask in the status (SR) register establishes the current
interrupt priority. Tasks run at interrupt priority level 0 with all interrupt sources
enabled. Some interrupts may be specifically disabled by an external interrupt controller.
Tasks must NOT alter the interrupt priority level to any level other than 0 (enabled) or
6 (disabled). Doing so will interfere with the interrupt nesting support provided by
AMX.
Interrupt Service Procedures run at the interrupt priority level dictated by the interrupt
source. An ISP must NOT set the interrupt priority level to any level numerically lower
than the level of the interrupt which it is servicing.
Non-Maskable Interrupt
The Motorola M68000 processor provides a non-maskable priority level 7 interrupt
(NMI). This interrupt cannot be inhibited by software. The processor will respond to
any transition from interrupt request levels 0 to 6 to level 7 by generating a non-maskable
interrupt. When the non-maskable interrupt occurs, the processor automatically saves
zero or more processor dependent parameters, the return address and the processor status
register on the current stack. The processor then vectors to a memory address determined
by the level 7 interrupt autovector (vector number 31) in the Exception Vector Table.
You have complete control over the non-maskable interrupt ISP. Usually, the NMI
interrupt is used to signal a catastrophic event such as a pending loss of power. The NMI
ISP must not use any AMX services. The ISP must process the interrupt in an
application-dependent fashion, restore all registers and return to the point of interruption
if feasible. This ISP must assure that the interrupt facility is restored according to its
state at the time the non-maskable interrupt occurred.
Warning!
Because the occurrence of an NMI interrupt cannot be
controlled, the NMI interrupt can occur at any instant,
including within critical sections of AMX.
Consequently, the NMI ISP cannot use AMX service
procedures for task communication.
AMX 68000 Target Guide
KADAK
15
Page 22

3.4 Conforming ISP s
A conforming ISP consists of an ISP root and a device Interrupt Handler. The ISP root is
created in your Target Configuration Module by the AMX Configuration Generator using
the information provided in your Target Parameter File (see Chapter 4).
The address of the ISP root must be installed in the AMX Vector Table. You must
provide a Restart Procedure or task which calls AMX procedure cjksivtwr or cjksivtx
to install the ISP root pointer into the AMX Vector Table prior to enabling interrupt
generation by the device.
The ISP root is the actual Interrupt Service Procedure which is executed by the proc essor
when the interrupt occurs. The ISP root calls the AMX Interrupt Supervisor to indicate
that interrupt service has begun.
The ISP root then calls the device Interrupt Handler to dismiss the interrupt request and
service the device. Upon return from the Interrupt Handler, the ISP root informs the
Interrupt Supervisor that the interrupt service is complete. The Interrupt Supervisor
either resumes execution at the point of interruption or invokes the Task Scheduler to
suspend the interrupted task in preparation for a context switch. The path taken is
determined by the actions initiated by your Interrupt Handler.
Interrupt Handlers can be written as C procedures with or without a single 32-bit formal
parameter. The parameter, if needed, is identified in your definition of the ISP root in
your Target Parameter File (see Chapter 4.3).
Upon entry to your Interrupt Handler written in C, the following conditions exist:
Interrupts are enabled at priority n (0 to 6) where n is the priority at which
the interrupt occurred.
The stack pointer in register SP references the AMX Interrupt Stack.
The Interrupt Handler can also be written in assembly language. Use assembly language
if speed of execution is critical. Upon entry to an Interrupt Handler written in assembl y
language, the following conditions exist:
Your Interrupt Handler parameter is in register D1.
The stack pointer in register SP references the AMX Interrupt Stack.
The return address is on the stack at (
SP).
Registers D0, D1, A0 and A1 are free for use.
Condition code flags in the status register (
SR) can be altered.
All other registers must be preserved.
16 rev7
KADAK
AMX 68000 Target Guide
Page 23

The following examples illustrate how simple an Interrupt Handler can be.
/* The ISP root definition in the Target Parameter File is as follows:*/
/* ...ISPC deviceisp,deviceih,26,0,0 */
/* The ISP root is given the public name deviceisp */
/* The Interrupt Handler is named deviceih */
/* The device interrupts on vector number 26 (level 2) */
void CJ_CCPP deviceih(void)
{
local variables, if required
:
Clear the source of the interrupt request.
Perform all device service.
:
}
/* Assume dcbinfo is some application device control block structure. */
/* Assume deviceXdcb is a structure variable defined as */
/* "struct dcbinfo deviceXdcb;". */
/* */
/* The ISP root definition in the Target Parameter File is as follows:*/
/* ...ISPC dcb_isp,dcb_ih,30,deviceXdcb,1 */
/* The ISP root is given the public name dcb_isp */
/* The Interrupt Handler is named dcb_ih */
/* The device interrupts on vector number 30 (level 6) */
/* deviceXdcb is the name of the public structure variable which */
/* contains information about the specific device. */
void CJ_CCPP dcb_ih(struct dcbinfo *dcbp)
{
local variables, if required
:
Use device control block pointer dcbp to access structure variable
deviceXdcb to determine device addresses.
Clear the source of the interrupt request.
Perform all device service.
:
}
AMX 68000 Target Guide
KADAK
17
Page 24

3.5 Nonconforming ISPs
The M68000 family of processors provides an interrupt priority ordering mechanism
which permits the use of nonconforming ISPs within an AMX system. Since
nonconforming ISPs bypass the AMX Interrupt Supervisor, they cannot make use of any
AMX services.
Nonconforming ISPs run at the interrupt priority level dictated by the interrupt source. A
nonconforming ISP must NOT set the interrupt priority level to any level numerically
lower than the level of the interrupt which it is servicing. Higher priority interrupts are
only allowed if the corresponding ISPs are also nonconforming ISPs.
A nonconforming ISP must NOT allow an interrupt from ANY higher priority
conforming ISP. Remember that, in this context, the ISP for the device which generates
the AMX clock interrupt is considered to be a conforming ISP.
Upon entry to a nonconforming ISP the processor state matches its state at the time of the
interrupt. The processor is in supervisor mode with interrupts disabled at priorit y level n
(0 to 6) in the status register. No registers are free for use. All registers must be
preserved.
The nonconforming ISP executes on the stack in effect at the time of the interrupt.
Hence, the nonconforming ISP may execute on any task stack including the AMX Kernel
Task's stack. A nonconforming ISP will execute on the AMX Interrupt Stack if the
nonconforming ISP interrupts a conforming ISP.
The nonconforming ISP must service the device to remove the interrupt request and
dismiss the interrupt with an RTE instruction.
18
KADAK
AMX 68000 Target Guide
Page 25

3.6 Processor Vector Initialization
Whenever an internal or external device interrupt occurs, the M68000 processor
unconditionally vectors to a unique memory address determined by an entry in the
processor Exception Vector Table. The cod e located at that address is cal led an Interrupt
Service Procedure.
Whenever an exception occurs, the M68000 processor also unconditionall y vectors to a
unique memory address determined by an entry in the processor Exception Vector Table.
The code located at that address is called an exception handler.
Your Target Parameter File defines whether the Exception Vector Table is in ROM or
RAM. The Target Parameter File further qualifies whether or not AMX is allowed to
modify the table if it is in RAM.
If the table is declared to be alterable, AMX will allow you to dynamically install
pointers to ISPs and exception handlers into the Exception Vector Table.
If the Exception Vector Table is in RAM and the table is declared to be alterable, AMX
will install pointers to the AMX Exception Supervisor into selected exception vectors in
the Exception Vector Table.
If the Exception Vector Table is unalterable (in ROM or simply constant by design), then
it is your responsibility to initialize the vector table to meet your requirements. The
address of a unique AMX exception handler must be installed in each entry in the
Exception Vector Table for which AMX is to be responsible.
Each AMX exception handler is located at an offset from entry point cj_kdevt in your
Target Configuration Module. Each offset is a multiple of 8 bytes. The AMX exception
mask identifies the specific exceptions which AMX must handle. An exception is
supported if its mask bit (see Figure 3.2-1) is enabled in the AMX exception mask. The
AMX exception handler for the exception identified by mask bit j is located at byte
address cj_kdevt+(i*8) where i is one less than the sum of the enabled bits in the
AMX exception mask, counted from bit 0 to bit j inclusive.
For example, if vectors 2 (bus error) through 8 (privilege violation) inclusive are the only
vectors to be serviced by AMX, the AMX exception mask will have value 0x000001FC.
The AMX bus error exception handler will be found at entry point
cj_kdevt (enable
mask is 0x0004, j is 2, the bit sum is 1 and i is therefore 0). The AMX privilege
violation exception handler will be found at entry point cj_kdevt+(6*8) (enable mask is
0x0100, j is 8, the bit sum is 7 and i is therefore 6).
You must also initialize entries in the Exception Vector Table for each interrupt which
your application can generate. For each interrupting device, you must install the addr ess
of the device's Interrupt Service Procedure (ISP) into the device's entry in the vector
table. For each conforming ISP or clock ISP, the address is the pointer to the ISP root
named in your AMX Target Configuration Module. For prebuilt AMX clock drivers, you
can determine the ISP root name by examining the call to
chclockinit() in the clock driver source module.
cjksivtx() in procedure
AMX 68000 Target Guide
KADAK
rev7 19
Page 26

This page left blank intentionally.
20
KADAK
AMX 68000 Target Guide
Page 27

4. Target Configuration Module
4.1 The Target Configuration Proce ss
Every AMX application must include a Target Configuration Module which defines
the manner in which AMX is to be used in your target hardware environment. The
information in this file is derived from parameters which you must provide in your Target
Parameter File.
The Target Parameter File is a text file which is structured according to the
specification presented in Appendix A. You create and edit this file using the AMX
Configuration Builder following the general procedure outlined in Chapter 16 of the
AMX User's Guide. If you have not already done so, you should review that chapter
before proceeding.
Using the Builder
When AMX is installed on your hard disk, the AMX Configuration Manager for
Windows utility program and its related files are stored in directory
AMX installation directory. To start the Configuration Manager, double click on its
filename, CJ532CM.EXE. Alternatively, you can create a Windows shortcut to the
manager's filename and then simply double click the shortcut's icon.
To create a new Target Parameter File, select New Target Parameter File from the File
menu. The Configuration Manager will create a new, as yet unnamed, file using its
default AMX target parameters. When you have finished defining or editing your target
configuration, select Save As... from the File menu. The Configuration Manager will save
your Target Parameter File in the location which you identify using the filename which
you provide.
CFGBLDW in your
A good starting point is to copy one of the Sample Target Parameter Files CJSAMTCF.UP
provided with AMX into file HDWCFG.UP. Choose the file for the evaluation board which
most closely matches your hardware platform. Then edit the file to define the
requirements of your target hardware.
To open an existing Target Parameter File such as
HDWCFG.UP, select Open... from the File
menu and enter the file's name and location or browse to find the file. When you have
finished defining or editing your target configuration, select Save from the File menu.
The Configuration Manager will rename your original Target Parameter File to be
HDWCFG.BAK and create an updated version of the file called HDWCFG.UP.
To direct the Configuration Manager to use its Configuration Generator utilit y to produc e
an updated copy of your Target Configuration Module, say HDWCFG.ASM, select
Generate... from the File menu. If necessary, the path to the template file required by the
generator to create your Target Configuration Module can be defined using the
Templates... command on the File menu.
The assembly language Target Configuration Module must be assembled as described in
the toolset specific chapter of th e AMX Tool Guide for inclusion in your AMX system.
The assembler will generate error messages which exactly pin-point any inconsistencies
in the parameters in your Target Parameter File.
AMX 68000 Target Guide
KADAK
21
Page 28

Screen Layout
Figure 4.1-1 illustrates the Configuration Manager's screen layout once you have begun
to create or edit a Target Parameter File. The title bar identifies the Target Parameter File
being created or edited. Below the title bar is the menu bar from which the operations
you wish the Manager to perform can be selected. Below the menu bar is an optional
Toolbar with buttons for many of the most frequently used menu commands.
At the bottom of the screen is the status bar. As you select menu items, a brief
description of their purpose is displayed in the status bar. If the Configuration Man ager
encounters an error condition, it presents an error message on the status bar describing
the problem and, in many cases, the recommended solution.
Along the left margin of the screen are a set of one or more selector icons. Thes e icons
identify the type of output files which the Manager's Configuration Generator will
produce. The Target Configuration Module selector must be active to generate the Target
Configuration Module.
The center of the screen is used as an interactive viewing window through which you can
view and modify your target configuration parameters.
22
Figure 4.1-1 Configuration Manager Screen Layout
KADAK
AMX 68000 Target Guide
Page 29

Menus
All commands to the Configuration Manager are available as items on the menus present
on the menu bar. The File menu provides the conventional New, Open, Save and
Save As... commands for creating and editing your Target Parameter File. It also provides
Exit command.
the
When the Target Configuration Module selector icon is the curr ently active selector, the
Generate... command on the File menu can be used to generate your Target Configuration
Module. The path to the template file required by the generator to c reate this product can
be defined using the
The
Edit menu provides the conventional Cut, Copy, Paste and Undo editing commands.
Templates... command on the File menu.
It also includes an Undo Page command to restore the content of all fields on a property
page to undo a series of unwanted edits to the page. The Toolbar is hidden or made
visible using the View Toolbar command on the Edit menu.
The Help menu provides access to the complete AMX Configuration Manager reference
manual. Context sensitive help is also available by pressing the F1 function key or
clicking the ? button on the Toolbar.
Field Editing
When the Target Configuration Module selector icon is the curr ently active selector, the
Target Configuration Module's tabbed property sheet is displayed in the central region of
the screen. Each tab provides access to a particular propert y page through which your
target configuration parameters can be declared. For instance, if you select the ISP tab,
the Configuration Manager will present an ISP definition window (property page)
containing all of the parameters you must provide to completely define an Interrupt
Service Procedure.
Some fields are boolean options in which all you can do is turn the option on or off by
checking or unchecking the associated check box.
Some fields are option fields in which you must select one of a set of options identified
with radio buttons. Click on the option button which meets your preference.
Other fields may require numeric or text entry. Parameters are entered or edited in these
fields by typing new values or text to replace the current field content. Only displayable
characters can be entered. New characters which you enter are inserted at the current
cursor position in the field. Right and left arrow, backspace and delete keys ma y be used
to edit the field.
When you are altering a numeric or text field, you tell the Configuration Manager that
you are finished editing the field by striking the
Enter key. At that point, the
Configuration Manager checks the numeric value or text string that you have entered for
correctness in the context of the current field. If the value or text st ring that you have
entered is invalid, an error indication is provided on the status bar at the bottom of the
screen suggesting how the fault should be corrected.
The
Tab and Shift-Tab keys can also be used to complete the editing of a field and move to
the next or previous field.
AMX 68000 Target Guide
KADAK
23
Page 30

If you have modified some of the fields on a property page and then decide that these
modified values are not correct, use the Undo Page command on the Edit menu or Toolbar
to force the Configuration Manager to restore the content of all fields on the page to the
values which were in effect when you moved to that property page.
When you go to save your Target Parameter File or prepare to move to another property
page, the Configuration Manager will validate all parameters on the page which you are
leaving. If any parameters are incomplete or inconsistent with each other, you will be
forced to fix the problem before being allowed to proceed.
Add, Edit and Delete Objects
Separate property pages are provided to allow your definition of one or more objects such
as ISPs or null functions. Pages of this type include a list box at the left side of the
property page in which the currently defined objects are listed. At the bottom of the list
box there may be a counter showing the number of objects in the list and the allowable
maximum number of such objects.
Also below the list are two control buttons labeled Add and Delete. If the allowable
maximum number of objects is 0 or if all such objects have already been defined, the Add
button will be disabled. If there are no objects defined, the Delete button and all other
fields on the page will be disabled.
To add a new object, click on the Add button. A new object with a default identifier will
appear at the bottom of the list and will be opened ready for editing. When you enter a
valid identifier for the object, your identifier will replace the default in the object list.
To edit an existing object's definition, double click on the object's identifier in the object
list. The current values of all of that object's parameters will appear in the property page
and the object will be opened ready for editing.
To delete an existing object, click on the object's identifier in the object list. Then click
on the Delete button. Be careful because you cannot undo an object deletion.
The objects in the object list can b e rearranged by dragging an object 's identifier to the
desired position in the list. You cannot drag an object directly to the end of the list. To
do so, first drag the object to precede the last object on the list. Then drag the last object
on the list to precede its predecessor on the list.
24 rev8
KADAK
AMX 68000 Target Guide
Page 31

4.2 Target Configuration Parameters
General Parameters
The General Parameter window allows you to define the general operating characteristics
of your AMX system within your target hardware environment. The layout of the
window is shown in Figure 4.1-1 in Chapter 4.1.
CPU Type
Identify your processor architecture by selecting a processor from the available l ist. This
parameter is used to condition AMX to accommodate the operating characteristics of a
particular processor or architecture. The supported list of processors includ es but is not
limited to:
68000, 68008, 68302, 68306, 68328, {68000 core}
68010, 68020, 68030, 68040, 68060, {68020 core}
68330, 68331, 68332, 68340, 68341, 68360, {CPU32 core}
5102 {68040 core}
AMX Launch
Most AMX applications are such that once AMX is launched the application runs
forever. For such applications, check this box. If your AMX launch is to be temporary,
uncheck this box. In this case, you will be able to shut down your AMX application and
return to your main program from which AMX was launched.
Enable Cache at Launch
If the processor or architecture indicated by field CPU Type has cache control, then,
before launching AMX, you must initialize the Memory Management Unit (MMU) to
condition the memory subsystem to meet the caching requirements of your system.
When AMX is launched, if this box is checked, AMX will enable the processor
instruction and data caches by calling the AMX cache support function
cjcfhwbcache.
When AMX is launched, if this box is unchecked, AMX will not alter the state of the
processor instruction or data caches.
If the processor or architecture indicated by field
CPU Type has no cache control, leav e
this box unchecked.
AMX 68000 Target Guide
KADAK
25
Page 32

Vectors in RAM
In most cases, the processor Exception Vector Table will be located in alterable RAM at
address 0 or at some alternate address provided by you. Therefore check this box.
If your processor Exception Vector Table is in ROM, leave this box unchecked. In this
case, you must initialize the ROM vector table for AMX use as directed in Chapter 3.6.
Vectors Not Alterable
Even if the processor Exception Vector Table will be located in RAM, you can still
prevent AMX from altering it. To do so, check this box. In this case, be sure to initialize
the vectors for AMX use as directed in Chapter 3.6.
Vector Table Location
For most M68000 processors, the Exception Vector Table is located in RAM at memory
address 0. However, some processors include a Vector Base Re gister (VBR) which can
be used to relocate the base of the Exception Vector Table elsewhere in memory.
If you wish AMX to derive the address of the Exception Vector Table, select derived
from the pull down list. If your selected processor has a VBR, AMX will read the VBR
at launch time to derive the address of the Exception Vector Table. If you are using a
processor that does not have a VBR, AMX will assume that the Exception Vector Table
is at address 0 as is appropriate for such processors.
If you wish AMX to set the address of the Exception Vector Table, select adjustable from
the pull down list and enter the base address for the table. Specify the hexadecimal
memory address of the alternate table. If your selected processor h as a VBR, AMX will
install the specified base address into the VBR at launch time, thereby establishing that
address as the base address of the Exception Vector Table. If you are using a processor
that does not have a VBR, AMX will ignore the base address parameter and assume that
the Exception Vector Table is at address 0 as is appropriate for such processors.
In some cases, your Exception Vector Table may be in ROM with support for a shadow
vector table in RAM. For example, assume that you use an MC68000 with ROM located
at address 0. The processor does not have a Vector Base Register; it assumes that the
Exception Vector Table is located at address 0. Now, assume that the ROM at address 0
includes a monitor which intercepts all interrupts and exceptions and dispatches each
according to entries in a shadow vector tabl e located at address
$F0000. For such a case,
select shadowed from the pull down list and enter the base address of the shadow vector
table ($F0000 in this example). Specify the hexadecimal memory address of the shadow
vector table. AMX will ignore the VBR, if one exists, and assume that the processor
Exception Vector Table is at the specified base address.
26
KADAK
AMX 68000 Target Guide
Page 33

Software I/O Delay
AMX provides a device I/O delay procedure cjcfhwdelay which is used by AMX board
support modules and sample device drivers to provide the necessary delay between
sequential references to a device I/O port. Such delay is often required to accommodate
long device access times when operating at very high processor clock frequencies.
Check this box to adjust the AMX software delay loop to match your hardware
requirements. Enter your best estimate of the processor's effective instruction execution
frequency. AMX will use this parameter to derive the loop count needed to provide a one
microsecond delay.
For example, if your processor executes at 40 MHz with no wait states for instruction
fetches and one clock cycle per instruction, enter a CPU clock frequency of 40 MHz.
If you are able to detect the processor frequency at run time, then you can dynamically
adjust this I/O delay procedure to match your target hardwa re without reconfigurin g your
AMX application. To do so, enter a CPU frequency of 0 MHz. In this case, your main()
program must install the processor frequency value into long variable cjcfhwdelayf
prior to launching AMX.
Leave this box unchecked if you want the I/O delay procedur e cjcfhwdelay to produce
no delay beyond that inherent in the procedure call and return.
AMX 68000 Target Guide
KADAK
27
Page 34

Fatal Exceptions
The Target Configuration Module defines the processor exceptions which are to be
serviced by AMX and treated as fatal. These exceptions are specified by you by
checking the appropriate boxes in the Fatal Exception window. The layout of the
window is shown below.
This example allows AMX to service the bus error, address error, privilege violation,
format error, uninitialized interrupt and spurious interrupt exceptions as fatal exceptions.
Note that the BOUNDS, CHK and TRAPV exceptions are also servi ced by AMX in order to
allow the use of Task Trap Handlers by your applicati on tasks. If any of these exceptions
occur outside a task or in a task with no Task Trap Handler, AMX will treat the exception
as fatal.
This example leaves the illegal instruction, trace and line emulation exceptions free fo r
use by a debugger. It also leaves the floating point exceptions free for use by a software
emulation library.
28
KADAK
AMX 68000 Target Guide
Page 35

4.3 Interrupt Service Procedure (ISP) Definitions
Your Target Configuration Module must include a device ISP root for each conforming
ISP which you intend to use in your application. The ISP roots are constructed for you
by the AMX Configuration Builder from ISP descriptions which you enter in the ISP
Definition window. The layout of the window is shown below.
To add an ISP definition, click on the Add button. A new ISP with a default ISP root
name of ---New--- will appear at the bottom of the ISP list and will be opened ready for
editing. When you enter a name for the ISP root, it will replace the default name in the
ISP list.
To edit an existing ISP definition, click on the name of the ISP root in the ISP list. The
ISP definition will appear in the property page and will be opened ready for editing.
To delete an existing ISP definition, click on the name of the ISP root in the ISP list.
Then click on the Delete button. Be careful because you cannot undo an ISP deletion.
AMX 68000 Target Guide
KADAK
29
Page 36

ISP Type
At least one of your ISPs must service a clock interrupt which provides AMX with its
fundamental clock tick at the frequency and resolution defined in your AMX System
Configuration Module. To define your custom clock ISP, choose Clock Handler from the
pull down list. An alternate fast clock ISP can be provided by choosing
Handler
as described in Chapter 4.4. Other AMX clock drivers c an be selected from the
Fast Clock
list presented when you click the Prebuilt Clock ISPs... button.
All other application ISPs must be conforming AMX ISPs which you define by choosing
AMX Compliant from the pull down list.
ISP Root
Edit the default name
---New--- to provide the name you wish to give to the ISP root.
The ISP root name is used to identify ISPs in the ISP list.
The ISP root is a function created by the AMX Configuration Builder in your Target
Configuration Module. The function entry point is declared with a public symbol defined
with the name you provide. The name must be unique and must conform to the s ymbol
naming conventions of your assembler.
Interrupt Handler
Enter the name of your device Interrupt Handler which will clear the device interrupt
request and service the device. This is the name of the procedure which will be called
from the ISP root by the AMX Interrupt Supervisor once the interrupt source has been
identified and the machine state preserved according to the conditions which existed at
the time of the interrupt. Your Interrupt Handler must be coded as described in
Chapter 3.4.
If your Interrupt Handler is coded in C, you may have to add a leading or trailing
underscore to the Interrupt Handler name which you enter in order to meet the C function
naming conventions of your C compiler.
Handler Language
30
Your Interrupt Handler can be coded in C or assembly language. Identify the language in
which your Interrupt Handler is written by picking
KADAK
C or Assembly from the pull down list.
AMX 68000 Target Guide
Page 37

Interrupt Handler Parameter
Your Interrupt Handler can be coded to receive a 32-bit parameter every time it is called.
The Param eter Type field is a pull down list used to identify what kind of parameter, if
any, your Interrupt Handler expects. If your Interrupt Handler has no need for a
parameter, set the
Parameter Type to (none).
If your Interrupt Handler expects a numeric parameter, set the
Parameter Type to Value
and enter the required unsigned, 32-bit hexadecimal numeric value into the Parameter
field.
If your Interrupt Handler parameter must be a pointer to a variable o r function, set the
Parameter Type to Symbol and enter the name of the variable or function into the
Parameter field. The parameter must be a tex t string giving the name of a public s ymbol
(variable or function) defined in some module in your AMX application. The symbol's
32-bit value, as resolved by your linker, will be passed to your Interrupt Handler as its
parameter.
Prebuilt Clock ISPs
Clock drivers are provided with AMX for several common programmable interval timers.
In some cases, the AMX clock ISP can be prebuilt in your Target Configuration Module.
To select one of these clocks, click on the Prebuilt Cloc k ISPs... button. In the dialog box
which is presented, check the box for the particular clock driver which you wish to use.
If you do not wish to use a prebuilt clock ISP, leave all boxes unchecked.
AMX 68000 Target Guide
KADAK
31
Page 38

4.4 Defining a Fast Clock ISP
At least one of your ISPs must service a clock interrupt which provides AMX with its
fundamental clock tick at the frequency and resolution defined in your AMX System
Configuration Module. For many applications, your clock ISP will just be a standard
AMX conforming ISP defined in the ISP Definition window. It is distinguished from all
other ISPs by picking
Rarely does the Interrupt Handler for your AMX clock ISP have to do anything except
dismiss the clock interrupt request. This is frequently accomplished by simply writing a
command to a device I/O port. For such clocks, the AMX Configuration Builder lets you
create a fast clock ISP without having to write any code at all.
Clock Handler as its ISP Type.
To create a fast clock ISP, go to the ISP Definition window, click on the
select
Fast Clock Handler as the ISP Type. Then fill in the description of the operating
Add button and
characteristics of your clock device. The layout of the window is shown below.
32
KADAK
AMX 68000 Target Guide
Page 39

ISP Type
Your fast clock ISP is identified as such by selecting Fast Clock Handler from the pull
down list.
ISP Root
Edit the default name ---New--- to provide the name you wish to give to your fast clock
ISP root. The ISP root name is used to identify your fast clock ISP in the ISP list.
The ISP root is a function created by the AMX Configuration Builder in your Target
Configuration Module. The function entry point is declared with a public symbol defined
with the name you provide. The name must be unique and must conform to the s ymbol
naming conventions of your assembler.
Clock Service
Your clock device will be serviced as follows:
Write Value #1 to the device port at memory Address #1.
Delay for the number of µs defined as I/O Delay (µs).
Write Value #2 to the device port at memory Address #2.
Address and Value
Each address parameter specifies the 32-bit, hexadecimal value of an absolute memory
address which, when referenced as an n-bit value, is decoded b y your target hardware as
a reference to your clock device. Each value param eter is an n-bit, hexadecimal value
which must be written to the device port specified by the associated address in order to
dismiss the clock interrupt.
If your clock device only requires that one value be written to one device port, leave
fields Address #2 and Value #2 blank (empty).
I/O Delay (µs)
Your target hardware may not operate correctly if two sequential device I/O references
are issued at the processor's instruction execution speeds. If this is the case, you can
force the fast clock ISP to in ject a delay of
n µs between the I/O device references by
entering a non-zero value into this field.
If your clock device requires no delay or only requires that one value be written to one
device port, leave the
I/O Delay field blank (empty).
Write Size
From the pull down list, select the number of bits (8, 16 or 32) which must be written to
the clock device. The least significant n bits of each value will be written to the device.
AMX 68000 Target Guide
KADAK
33
Page 40
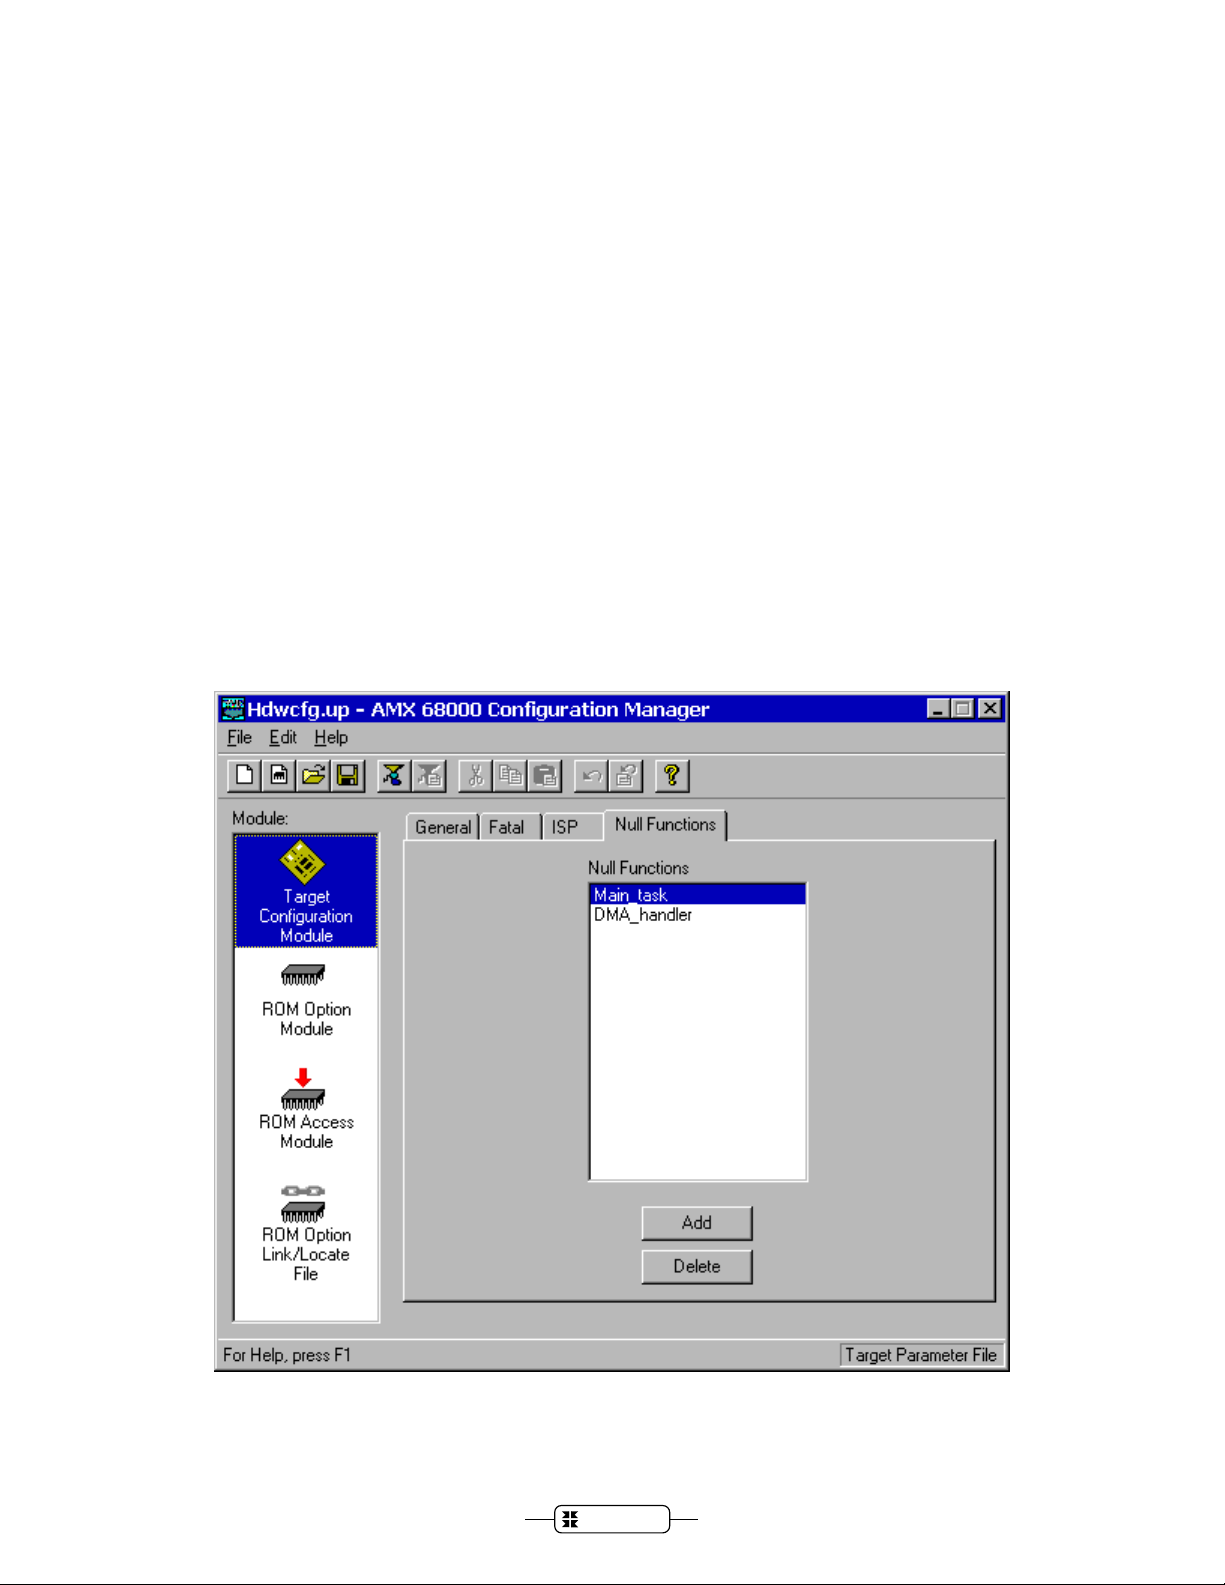
4.5 Null Function s
Occasionally, while developing an AMX application, it can be very convenient to be able
to create software functions to satisfy your program link requirements without having to
create the final version of these functions. For example, if your AMX System
Configuration Module references a Restart Procedure and a task pro cedure which do not
yet exist, you will have to create them in order to successfully link your system.
Such functions are called null functions because they do nothing. Such functions can be
specified by you in the Null Function window whose layout is shown below.
To add a null function, click on the Add button. A new function named ---New--- will
appear at the bottom of the list of functions. Click on the name in the list and edit it to
meet your needs.
To edit the name of a null function, double click on its name in the list and edit it to meet
your needs.
To delete a null function, click on its name in the list and then click on the Delete button.
34
KADAK
AMX 68000 Target Guide
Page 41
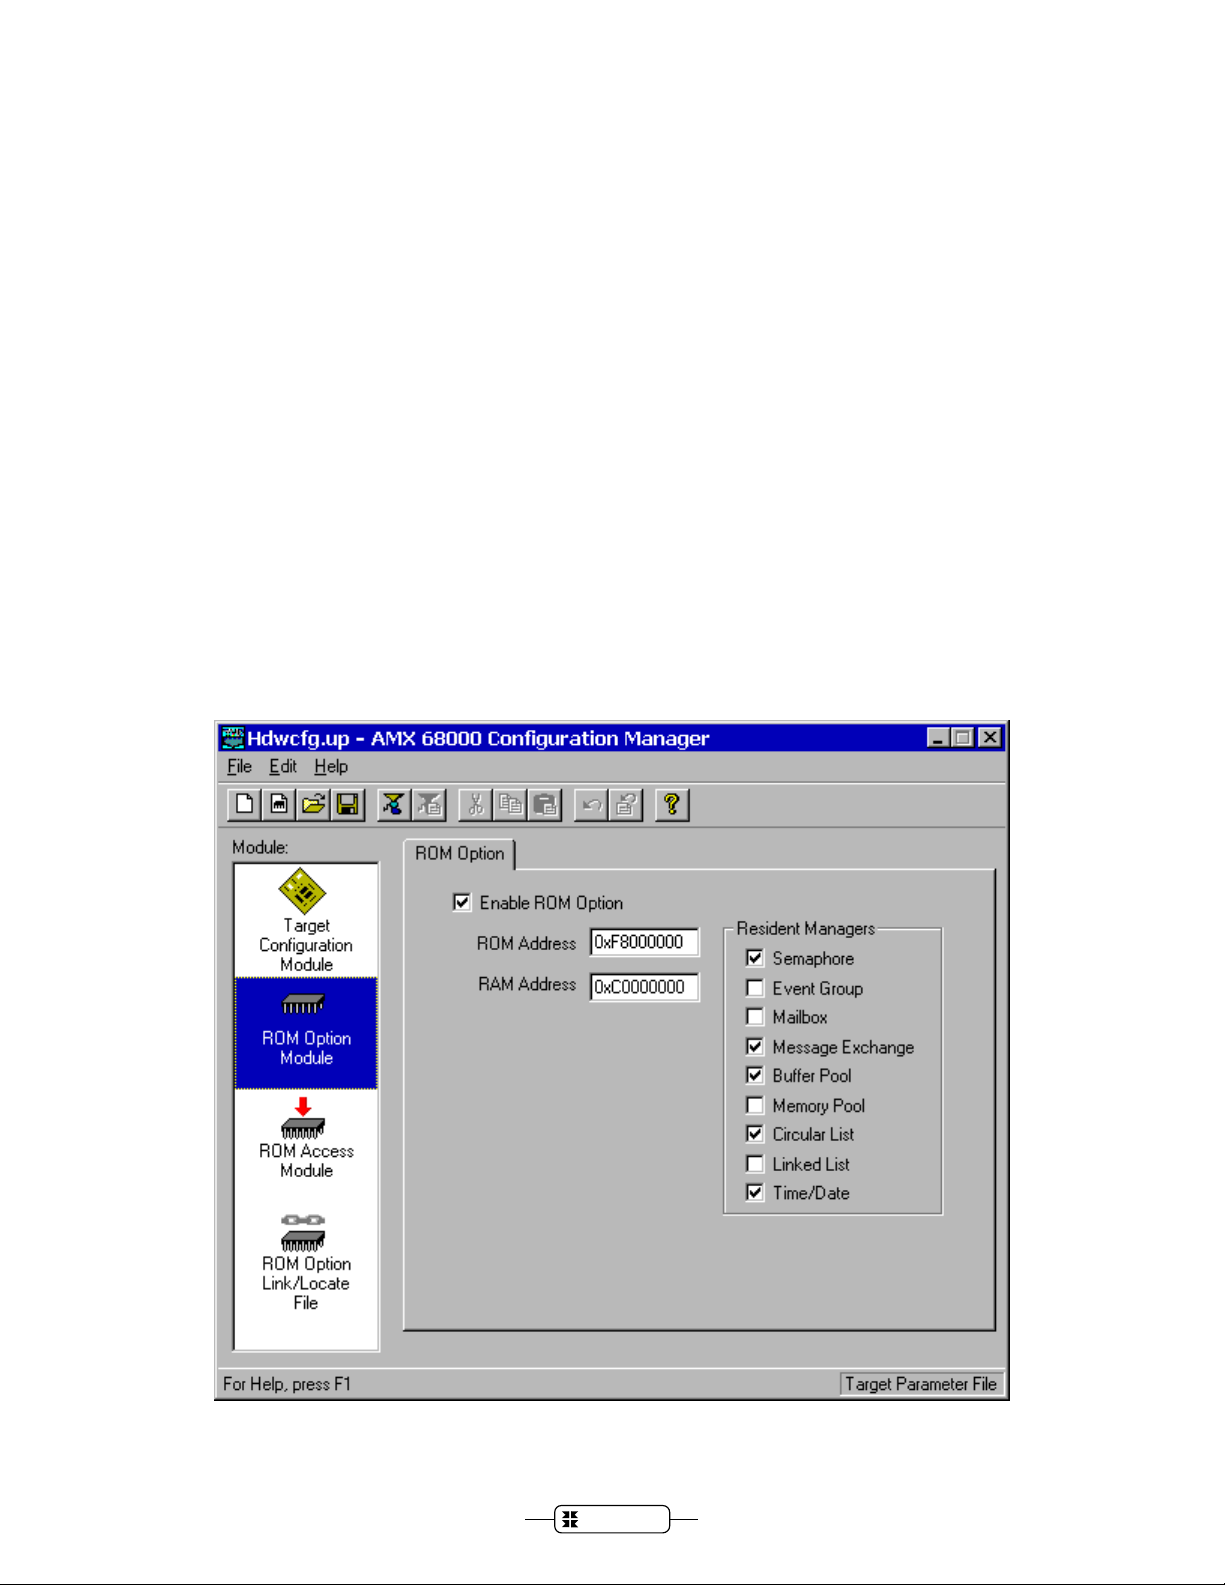
4.6 ROM Option Parameters
The AMX ROM Option allows the subset of AMX and its managers required by your
application to be linked together without any application code to form a sep arate AMX
ROM image. The resulting AMX ROM can be located anywhere in your memory
configuration. Your AMX application is then linked with a ROM Access Module which
provides access to AMX and its managers in the AMX ROM.
The AMX ROM Option Module defines the subset of AMX and its managers which you
wish to commit to the AMX ROM. This module is assembled and linked with the AMX
Library to create that ROM. The AMX ROM Option Link/Locate Specificat ion File is
used to link and locate the ROM image as described in the toolset dependent chapter of
the AMX Tool Guide.
The AMX ROM Access Module provides your AMX application with access to the
AMX ROM. This module is assembled and linked with your AMX application.
To access the ROM Option window, use the AMX Configuration Builder to open your
Target Parameter File. From the selector list, pick the ROM Option Module selector
making it the active selector. The layout of the window is shown below.
AMX 68000 Target Guide
KADAK
35
Page 42

Enable ROM Option
By default, the ROM Option feature is disabled. Check this box to enable the feature.
You can disable the feature by removing the check from the box.
ROM Address
You must define the absolute physical ROM address at which the AMX ROM image is to
be located. This address is dictated by you according to your hardware requirements.
Enter the address value as an unsigned 32-bit hexadecimal number. The ROM memory
address must be long aligned.
RAM Address
You must define the absolute physical RAM address of a block of 32 bytes rese rved for
use by AMX. This address is dictated by you according to your hardware requirements.
Enter the address value as an unsigned 32-bit hexadecimal number. The RAM memory
address must be long aligned.
Resident Managers
Check the boxes which identify the AMX managers which you wish to commit to the
AMX ROM. If you do not want a particular manager to be in the ROM, leave the
corresponding box unchecked.
Warning!
If your AMX ROM was created without a particular
manager, then an AMX fatal exit will occur if your system
attempts to access that manager.
36
KADAK
AMX 68000 Target Guide
Page 43

5. Clock Drivers
5.1 Clock Dr iver Operation
You must provide a clock driver as part of your AMX application so that AMX can
provide timing services. AMX clock drivers are provided with AMX for the timer chips
used on the boards with which AMX has been tested. These drivers are ready for use and
can be installed as described in Chapter 5.3.
An AMX clock driver consists of three parts: an initialization procedure, a clock Interrupt
Service Procedure (ISP) and an optional shutdown procedure.
Clock Startup
The clock initialization procedure must configure the real-time clock to operate at the
frequency defined in your AMX System Configuration Module. It can then install the
pointer to the clock ISP root into the AMX Vector Table and start the clock.
Care must be taken to ensure that clock interrupts do not occur until the clock is properly
configured and the pointer to the clock ISP root is present in the AMX Vector Table.
Your AMX application will not have any AMX timing services until your clock
initialization procedure, say
clockinit to execute occurs when AMX begins to execut e your Restart Procedures. It
is recommended that your clockinit procedure be inserted into your list of Restart
Procedures at the point at which you wish the clock to be enabled during the launch.
clockinit, has been executed. The first opportunity for
Although it is not recommended, there is nothing to prohibit you from deferring the
starting of your clock by having some application task call your clockinit procedure.
The clock drivers provided with AMX illustrate how to install and start several different
real-time clocks. You should be able to pattern your clock initialization procedure after
the chip support procedure chclockinit in one of the AMX clock driver source files
CHxxxxT.C.
AMX 68000 Target Guide
KADAK
37
Page 44

Clock Interrupts
A real-time clock used with the M68000 processor will interrupt either on one of the
interrupt autovectors or on a user defined vector. In either case, the processor will
automatically dispatch through its Vector Table to your clock ISP.
The clock ISP consists of an ISP root and an Interrupt Handler. The processor dispatches
to the ISP root in response to the clock interrupt request. The ISP root calls the clock
Interrupt Handler to dismiss the clock interrupt request. Your clock ISP must be defined
as a conforming ISP of type Clock Handler as described in Chapter 4.3.
In some cases you may be able to create a fast clock ISP which has an ISP root but no
Interrupt Handler. In this case, it is the ISP root which dismisses the clock interrupt
request. Such a clock ISP is defined to be a conforming ISP of type Fast Clock Handler as
described in Chapter 4.4.
In other cases you may be able to pick one of the prebuilt AMX clock ISPs which has an
ISP root but no Interrupt Handler. In this case, it is the ISP root which dismisses the
clock interrupt request. Such a clock ISP is selected from the list which is accessed via
the Prebuilt Clock ISPs... button.
It is the ISP root which informs AMX that a hardware clock tick has occurred. When you
define your clock ISP, your definition of the ISP as a Clock Handler (or Fast C lock Handler )
or your selection of a prebuilt clock ISP ensures that the ISP is recognized by AMX as
the source of its fundamental clock tick operating at the frequ enc y and resolution defined
in your AMX System Configuration Module.
Clock Shutdown
The clock shutdown procedure stops the clock in preparation for an AMX shutdown
following a temporary launch of AMX. If AMX is launched for permanent ex ecution,
there is no need for a clock shutdown procedure.
If you intend to launch AMX for temporary execution, insert your clock shutdown
procedure, say clockexit, into your list of Exit Procedures at the point at which you
wish the clock to be disabled during the shutdown. Usually that will require that
clockexit be the last Exit Procedure in the list because, once you stop your clock, AMX
timing services will no longer be available.
The clock drivers provided with AMX illustrate how to disable several different real-time
clocks. You should be able to pattern your clock shutdown procedure after the chip
support procedure chclockexit in one of the AMX clock driver source files CHxxxxT.C.
38
KADAK
AMX 68000 Target Guide
Page 45

5.2 Custom Clock Driver
The easiest way to create a custom clock driver is by example. Assume that the
counter/timer which you intend to use for your AMX clock is characterized as follows:
The I/O base address of the clock is at 0xFFA00100.
The clock interrupt is generated using vector number 25.
The clock interrupt is dismissed by writing bit pattern 0x08 to the clock register at its
base address plus 4.
The Interrupt Handler for an assembly language conforming clock ISP for such a device
could be coded as follows:
XDEF _clockih
_clockih EQU *
*
* receives D1 = ISP root parameter = A(clock base)
*
MOVEA.L D1,A0 * A0 = A(clock base)
MOVE.B #$08,4(A0) * Dismiss interrupt
RTS * Return
Create a clock ISP root for the clock as described in Chapter 4.3. Use the following
parameters in your definition of the clock ISP.
ISP Type: Clock Handler
ISP Root: clockroot
Interrupt Handler: clockih
Handler Language: Assembly
Parameter Type: Value
Parameter: 0xFFA00100
Note that you could just as easily create a fast clock ISP root for this simple clock as
described in Chapter 4.4 avoiding the need to create the Interrupt Handler clockih. Us e
the following parameters in your definition of the fast clock ISP.
ISP Type: Fast Clock Handler
ISP Root: clockroot
Address #1: 0xFFA00104
Value #1: 0x08
I/O Delay: leave blank
Address #2: leave blank
Value #2: leave blank
Write Size: 8-bit
AMX 68000 Target Guide
KADAK
39
Page 46

The clock initialization procedure for this custom clock driver could be coded in C as
follows. Insert procedure
clockinit into your list of Restart Procedures provided in
your System Configuration Module at the point at which you wish the clock to be
enabled during the launch.
void CJ_CCPP clockroot(void); /* External clock ISP root */
void CJ_CCPP clockinit(void)
{
/* Inhibit clock interrupts */
/* Configure clock for correct frequency */
/* Install pointer to clock ISP root into AMX Vector Table */
cjksivtwr(25, (CJ_ISPPROC)clockroot);
/* Start clock and enable clock interrupts */
}
40
KADAK
AMX 68000 Target Guide
Page 47

5.3 AMX Clock Drivers
AMX clock drivers are provided with AMX for the timer chips used on the boards with
which AMX has been tested. These drivers are ready for use as des cribed in t his chapte r.
The clock drivers are delive red in chip support source files having names of the form
CHnnnnT.C where nnnn identifies the particular clock chip. The clock chip support
procedures are named chxxxxxxx.
5.3.1 MC683xx TPU Clock Driver
The AMX clock driver for the Motorola MC683xx TPU is ready for use on either the
Motorola M68332EVK Evaluation Kit or the GreenSpring Platform332 board. It is
configured to use timer channel 0 operating at 1 KHz (1 ms period). Source code for this
AMX clock driver is provided in file
CH68332T.C.
You must compile clock source module
CH68332T.C and link the resulting object module
with the rest of your AMX application.
To use the AMX MC683xx TPU clock driver, you must create a clock ISP root as
described in Chapter 4.3. Simply check the box next to the MC683xx TPU clock ISP on
the list provided via the Prebuilt Clock ISPs... button.
Your Target Configuration Module will include a clock ISP root named _ch68tpuclk.
The clock driver's initialization procedure will install the pointer to this clock ISP into the
AMX Vector Table. On the Motorola M68332EVK board or GreenSpring Platform332
board, the pointer is installed into the entry for interrupt vector number 96+n ($60+n)
where n is the TPU timer channel number (0 to 15).
Clock driver module CH68332T.C includes the clock initialization procedure
chclockinit and the clock shutdown procedure chclockexit. Insert procedure
chclockinit into the list of Restart Procedures provided in your System Configuration
Module at the point at which you wish the clock to be enabled during the launch. If you
intend to launch AMX for temporary execution, insert chclockexit into the list of Exit
Procedures at the point at which you wish the clock to be disabled during the shutdown.
Porting the MC683xx TPU Clock Driver
If you wish to use a different MC683xx TPU timer channel, change the timer frequency
or use a different AMX vector number, you must edit the definitions in source file
CH68332T.C and recompile the module. Edit instructions are included in the file.
AMX 68000 Target Guide
KADAK
41
Page 48

5.3.2 MC68360 PIT Clock Driver
The AMX clock driver for the Motorola MC68360 Periodic Interval Timer (PIT) is ready
for use on the Motorola M68360QUADS Application Development System board. It is
configured to operate at approximately 1 KHz (1 ms period). Source cod e for this AMX
clock driver is provided in file CH68360T.C.
You must compile clock source module CH68360T.C and link the resulting object module
with the rest of your AMX application.
To use the AMX MC68360 PIT clock driver, you must create a clock ISP root as
described in Chapter 4.3. Simply check the box next to the MC68360 PIT clock ISP on
the list provided via the Prebuilt Clock ISPs... button.
Your Target Configuration Module will include a clock ISP root named _ch68360clk.
The clock driver's initialization procedure will install the pointer to this clock ISP into the
AMX Vector Table. On the Motorola M68360QUADS Application Development
System board, the pointer is installed into the entry for interrupt vector number 96 ($60).
Clock driver module CH68360T.C includes the clock initialization procedure
chclockinit and the clock shutdown procedure chclockexit. Insert procedure
chclockinit into the list of Restart Procedures provided in your System Configuration
Module at the point at which you wish the clock to be enabled during the launch. If you
intend to launch AMX for temporary execution, insert chclockexit into the list of Exit
Procedures at the point at which you wish the clock to be disabled during the shutdown.
Porting the MC68360 PIT Clock Driver
If you wish to change the MC68360 PIT timer frequency or use a different AMX vector
number, you must edit the definitions in source file CH68360T.C and recompile the
module. Edit instructions are included in the file.
42
KADAK
AMX 68000 Target Guide
Page 49

5.3.3 MC68230 Clock Driver
The AMX clock driver for the Motorola MC68230 Parallel Interface/Timer is ready for
use on the Motorola M68EC040 Integrated Development Platform (IDP). It is
configured to operate at approximately 1 KHz (1 ms period). Source cod e for this AMX
clock driver is provided in file CH68230T.C.
You must compile clock source module CH68230T.C and link the resulting object module
with the rest of your AMX application.
To use the AMX MC68230 clock driver, you must create a clock ISP root as des cribed in
Chapter 4.3. Simply check the box next to the MC68230 clock ISP on the list provided
via the Prebuilt Clock ISPs... button.
Your Target Configuration Module will include a clock ISP root named _ch68230clk.
The clock driver's initialization procedure will install the pointer to this clock ISP into the
AMX Vector Table. On the Motorola M68EC040 Integrated Development Platform
(IDP), the pointer is installed into the entry for interrupt vector number 96 ($60).
Clock driver module CH68230T.C includes the clock initialization procedure
chclockinit and the clock shutdown procedure chclockexit. Insert procedure
chclockinit into the list of Restart Procedures provided in your System Configuration
Module at the point at which you wish the clock to be enabled during the launch. If you
intend to launch AMX for temporary execution, insert chclockexit into the list of Exit
Procedures at the point at which you wish the clock to be disabled during the shutdown.
Porting the MC68230 Clock Driver
If you wish to change the MC68230 timer frequency or use a different AMX vector
number, you must edit the definitions in source file CH68230T.C and recompile the
module. Edit instructions are included in the file.
AMX 68000 Target Guide
KADAK
43
Page 50

5.3.4 MC68901 Clock Driver
The AMX clock driver for the Motorola MC68901 Multi-Function Peripheral is ready for
use on the Motorola MVME133 VMEmodule board. It is configured to use timer A
operating at 1 KHz (1 ms period). Source code for this AMX clock d river is provided in
file CH68901T.C.
You must compile clock source module CH68901T.C and link the resulting object module
with the rest of your AMX application.
To use the AMX MC68901 clock driver, you must create a clock ISP root as des cribed in
Chapter 4.3. Simply check the box next to the MC68901 clock ISP on the list provided
via the Prebuilt Clock ISPs... button.
Your Target Configuration Module will include a clock ISP root named _ch68901clk.
The clock driver's initialization procedure will install the pointer to this clock ISP into the
AMX Vector Table. On the Motorola MVME133 VMEmodule board, the pointer is
installed into the entry for interrupt vector number 96+n ($60+n) where n is $0D for timer
A (or 8 for timer B, 5 for timer C or 4 for timer D).
Clock driver module CH68901T.C includes the clock initialization procedure
chclockinit and the clock shutdown procedure chclockexit. Insert procedure
chclockinit into the list of Restart Procedures provided in your System Configuration
Module at the point at which you wish the clock to be enabled during the launch. If you
intend to launch AMX for temporary execution, insert chclockexit into the list of Exit
Procedures at the point at which you wish the clock to be disabled during the shutdown.
Porting the MC68901 Clock Driver
If you wish to use a different MC68901 timer, say B (or C or D), or change the timer
frequency or use a different AMX vector number, you must edit the definitions in source
file CH68901T.C and recompile the module. Edit instructions are included in the file.
44
KADAK
AMX 68000 Target Guide
Page 51

Appendix A. Target Parameter File Specification
A.1 Target Parameter File Structure
The Target Parameter File is a text file structured as illustrated in Figure A.1-1. This file
can be created and edited by the AMX Configuration Manager, a Windows
®
utility
provided with AMX.
; AMX Target Parameter File
:
...LAUNCH PERM,VNA
...HDW PROC,VMASK,VBR,EVTROM,CACHE
...VBASE VTABLE
...DELAY CPUFREQ
;
; Null Functions (optional; one line for each null function)
...NULLFN FNNAME
;
; Conforming ISP definitions (one line for each ISP)
...ISPA ISPROOT,HANDLER,VNUM,PARAM,PARTYPE
...ISPC ISPROOT,HANDLER,VNUM,PARAM,PARTYPE
;
; Conforming fast clock ISP (no user code required)
...CLKFAST CLKROOT,CLKADR,CLKCMD,CLKADR2,CLKCMD2,IODELAY,VNUM
...CLKFAST16 CLKROOT,CLKADR,CLKCMD,CLKADR2,CLKCMD2,IODELAY,VNUM
...CLKFAST32 CLKROOT,CLKADR,CLKCMD,CLKADR2,CLKCMD2,IODELAY,VNUM
; or Motorola MC683xx TPU prebuilt clock ISP
...CLK68TPU
; or Motorola MC68360 PIT prebuilt clock ISP
...CLK68360
; or Motorola MC68230 prebuilt clock ISP
...CLK68230
; or Motorola MC68901 prebuilt clock ISP
...CLK68901
; or conforming clock ISP (coded in assembly language)
...CLKA CLKROOT,CLKHAND,VNUM,PARAM,PARTYPE
; or conforming clock ISP (coded in C)
...CLKC CLKROOT,CLKHAND,VNUM,PARAM,PARTYPE
;
; AMX ROM Option (optional)
...ROMOPT ROMADR,RAMADR
...ROMSM ;Semaphore Manager
...ROMEM ;Event Manager
...ROMMB ;Mailbox Manager
...ROMMX ;Message Exchange Manager
...ROMBM ;Buffer Manager
...ROMMM ;Memory Manager
...ROMCL ;Circular List Manager
...ROMLL ;Linked List Manager
...ROMTD ;Time/Date Manager
AMX 68000 Target Guide
Figure A.1-1 AMX Target Parameter File
KADAK
A-1
Page 52

The Target Parameter File consists of a sequence of directives consisting of a keyword of
the form
...XXX beginning in column one which is usually followed by a parameter list.
Some directives require only a keyword with no parameters. Any line in the file which
does not begin with a valid keyword is considered a comment and is ignored.
It is the purpose of this appendix to specify all AMX 68000 directives b y defining their
keywords and the parameters, if any, which they require.
The example in Figure A.1-1 uses symbolic names for all of the parameters following
each of the keywords. The symbol names in the Ta rget Parameter File are replaced b y
the actual parameters needed in your system.
The order of keywords in the Target Parameter File is not critical. The order of the
keywords in Figure A.1-1 may not match their order in the sample Target Parameter File
provided with AMX.
It is expected that you will use the AMX Configuration Manager to create and edit your
Target Parameter File. The Configuration Manager creates the directives using the
parameters which you provide. Since these parameters are well described in Chapter 4,
the parameter definitions presented in this appendix will be limited to the detail needed to
form a working specification.
If you are unable to use AMX Configuration Manager utility, you should refer to the
porting directions provided in Appendix A.3.
A-2
KADAK
AMX 68000 Target Guide
Page 53

A.2 Target Parameter File Directives
The AMX Launch Parameters are defined as follows.
...LAUNCH PERM,VNA
PERM
0 if the AMX launch is temporary
1 if the AMX launch is permanent
VNA 0 if the AMX Vector Table entries are to be alterable
1 if the AMX Vector Table entries are NOT to be alterable
You must set VNA to 0 to allow AMX or your application to dynamically install exception
handlers into the AMX Vector Table at run time. If you set
EVTROM to 0 in the ...HDW keyword entry. If you set VNA to 1, you must initialize the
VNA to 0, you must also set
AMX Vector Table entries for AMX use as described in Chapter 3.6.
The Target Parameter File includes a set of hardware definitions.
...HDW PROC,VMASK,VBR,EVTROM,CACHE
PROC
VMASK = $MMMMMMMM = AMX exception vector mask
VBR = $xxxxxxxx = A(Exception Vector Table) for VBR
Processor identifier
= -1 if VBR is read only
EVTROM 0 if the AMX Vector Table is to be in RAM
1 if the AMX Vector Table is to be in ROM
CACHE 0 if cache is to be ignored by AMX at launch
1 if cache is to be enabled by AMX at launch
The PROC paramet er is a string used to id entify the processor archit ecture. PROC must be
one of:
68000, 68008, 68302, 68306, 68328, {68000 core}
68010, 68020, 68030, 68040, 68060, {68020 core}
68330, 68331, 68332, 68340, 68341, 68360, {CPU32 core}
5102 {68040 core}
Set bit N of the VMASK Exception Vector Mask for each of the except ions which are to be
serviced by AMX. For example, set this parameter to $FF00EFFE to allow AMX to
handle all exceptions. Bits in the mask are defined in Figure 3.2-1. When you are using
AMX with a debugger, do not set any of the mask bits for exceptions which the debu gger
services. For example, a mask of
The
CACHE parameter can be used to instruct AMX to enable the M68000 instruction and
data caches when AMX is launched. If the processor or architecture selected with
parameter
AMX 68000 Target Guide
$000041EC is commonly used with many debuggers.
PROC has no cache control, set parameter CACHE to 0.
KADAK
rev6 A-3
Page 54

Vector Base Register
The VBR parameter is used to specify the memory address at which the Exception Vector
Table is located. For most applicati ons, the Exception Vect or Table i s locate d at address
0. You can use the
VBR parameter to redefine the location of the Exception Vector Table
or to define its location in ROM.
At launch, AMX installs the address specified by parameter VBR into the processor's
Vector Base Register (VBR), if on e exists for t he processor specified b y parameter
PROC.
If parameter VBR is set to -1, AMX will leave the VBR unaltered and will read its content
at launch time to determine the address of the Exception Vector Table.
If you are using a processor that does not have a VBR, set parameter VBR to 0. AMX will
assume that the Exception Vector Table is at address 0 as is appropriate for such
processors.
Shadow Vector Table Location
In some cases, your Exception Vector Table may be in ROM with support for a shadow
vector table in RAM. For example, assume that you use an MC68000 with ROM located
at address 0. The processor does not have a Vector Base Register; it assumes that the
Exception Vector Table is located at address 0. Now, assume that the ROM at address 0
includes a monitor which intercepts all interrupts and exceptions and dispatches each
according to entries in a shadow vector table located at address $F0000.
To use AMX in this example, the ...HDW parameter VBR must be set to 0 and the
following directive must be present in the Target Parameter File.
...VBASE $F0000
AMX will assume that the Exception Vector Table is at address $F0000. If the processor
has a Vector Base Register, AMX will ignore its content and leave it unaltered.
A-4
KADAK
AMX 68000 Target Guide
Page 55

Device I/O Delay
The Target Parameter File includes a device I/O delay definition.
...DELAY CPUFREQ
CPUFREQ
M68000 processor instruction execution frequency (MHz)
The ...DELAY directive allows you to condition the delay loop of the AMX device I/O
delay procedure cjcfhwdelay to match your hardware requirements. This directive
allows AMX to use your estimate of the processor's instruction execution frequency
defined by parameter CPUFREQ to derive the loop count needed to provide a one
microsecond delay.
Null Function Declarations
To create a null function, a function that does nothing, include the following directive in
your Target Parameter File.
...NULLFN FNNAME
FNNAME
Name given to the null function
For every ...NULLFN directive, your Target Configuration Module will include a public
assembly language function with name given by your parameter FNNAME. The function
will do nothing but return to the caller.
AMX 68000 Target Guide
KADAK
A-5
Page 56

Conforming ISP Declarations
The Target Parameter File must include a definition of an ISP root for each conforming
Interrupt Service Procedure (ISP) which you intend to use in your application. The ISP
root definition is provided using one of the following directives. The ISP root is declared
using ...ISPC if its Interrupt Handler is coded in C or ...ISPA if its Interrupt Handler is
coded in assembly language.
...ISPC ISPROOT,HANDLER,VNUM,PARAM,PARTYPE
...ISPA ISPROOT,HANDLER,VNUM,PARAM,PARTYPE
ISPROOT
HANDLER Name of the public device Interrupt Handler
VNUM Interrupt vector number assigned to the device
PARAM Interrupt Handler parameter
PARTYPE Parameter PARAM type
Name of the ISP root entry point
If your Interrupt Handler does not require a parameter, leave field PARAM blank (empty)
and set PARTYPE to 0.
If your Interrupt Handler requires a numeric parameter, set PARAM to the 32-bit signed or
unsigned value and set PARTYPE to 0. The numeric value must be expressed in a form
acceptable to your assembler.
If your Interrupt Handler requires a pointer to a public variable as a parameter, let PARAM
be the name of that variable and set PARTYPE to 1.
VNUM defines the interrupt vector number which you have assigned to the d evice. VNUM is
25 to 31 or 64 to 255. Note that all other vector numbers in the range 0 to 255 are
reserved by Motorola.
If VNUM is 0 to 255, AMX will automatically install the pointer to the ISP root ISPROOT
into vector number VNUM in the AMX Vector Table when AMX is launched. The pointer
will be installed by AMX before any application Restart Procedures execute.
Consequently, you must ensure that interrupts from the device are not possible at the time
AMX is launched.
A-6
VNUM is -1, you must provide a Restart Procedure or task which installs the pointer to
If
the ISP root ISPROOT into the AMX Vector Table using AMX procedure cjksivtwr or
cjksivtx.
Note
Parameter VNUM cannot be adjusted using the AMX
Configuration Builder. This parameter is provided for
compatibility with other AMX implementations.
KADAK
AMX 68000 Target Guide
Page 57

AMX Clock Handler Declaration
The Target Parameter File must include a definition of an ISP root for your AMX clock
handler. The clock ISP root definition must be provided using one of the following
directives. The clock ISP root is declared usin g
in C or
...CLKA if its Interrupt Handler is coded in assembly language. The clock ISP
...CLKC if its Interrupt Handler is coded
root can be declared using ...CLKFAST if an Interrupt Handler is not required to service
the clock.
...CLK68TPU Prebuilt Motorola MC683xx TPU Clock ISP
...CLK68360 Prebuilt Motorola MC68360 PIT Clock ISP
...CLK68230 Prebuilt Motorola MC68230 Clock ISP
...CLK68901 Prebuilt Motorola MC68901 Clock ISP
...CLKC CLKROOT,CLKHAND,VNUM,PARAM,PARTYPE
...CLKA CLKROOT,CLKHAND,VNUM,PARAM,PARTYPE
...CLKFAST CLKROOT,CLKADR,CLKCMD,CLKADR2,CLKCMD2,IODELAY,VNUM
...CLKFAST16 CLKROOT,CLKADR,CLKCMD,CLKADR2,CLKCMD2,IODELAY,VNUM
...CLKFAST32 CLKROOT,CLKADR,CLKCMD,CLKADR2,CLKCMD2,IODELAY,VNUM
CLKROOT
CLKHAND Name of the public clock device Interrupt Handler
VNUM Interrupt vector number assigned to the clock device
PARAM Interrupt Handler parameter
PARTYPE Parameter PARAM type
Name of the clock ISP root entry point
If your clock Interrupt Handler does not require a parameter, leave field PARAM blank
(empty) and set PARTYPE to 0.
If your clock Interrupt Handler requires a numeric parameter, set PARAM to the 32-bit
signed or unsigned value and set PARTYPE to 0. The numeric value must be expressed in
a form acceptable to your assembler.
If your clock Interrupt Handler requires a pointer to a public variable as a p arameter, let
PARAM be the name of that variable and set PARTYPE to 1.
The definition of parameter VNUM is exactly the same as that described for conforming
ISPs declared using the
...ISPC or ...ISPA directives. However, unless warranted b y
exceptional circumstances, param eter VNUM should always be set to -1 in the declarati on
of your clock ISP root. It is the responsibility of your clock initialization procedure to
install the pointer to the ISP root
ISPROOT into the AMX Vector Table.
AMX 68000 Target Guide
Note
Parameter VNUM cannot be adjusted using the AMX
Configuration Builder. This parameter is provided for
compatibility with other AMX implementations.
KADAK
A-7
Page 58

If your clock can be serviced by writing one or two n-bit values to a device I/O port, you
can use the ...CLKFAST directive to create a very fast clock ISP root with no application
code required. The general form of the ...CLKFAST directive is as follows.
...CLKFAST CLKROOT,CLKADR,CLKCMD,CLKADR2,CLKCMD2,IODELAY,VNUM
CLKROOT
CLKADR 32-bit numeric device memory address
CLKCMD 8-bit numeric command
CLKADR2 32-bit numeric secondary device memory address
CLKCMD2 8-bit numeric secondary command
IODELAY Delay (µs) required between I/O commands
VNUM Interrupt vector number assigned to the clock device
Name of the clock ISP root entry point
The numeric parameters must be expressed in a form acceptable to your assembler.
Parameters CLKADR2, CLKCMD2, IODELAY and VNUM can be omitted if they are not required.
If a parameter is omitted, its field must be left blank (empty) and the comma to the left of
the field must be retained. If the resulting ...CLKFAST directive ends with a string of
commas because the intervening parameters have all been omitted, it is acceptable to
delete the trailing commas.
The clock ISP root will dismiss the clock interrupt by writing the 8-bit value CLKCMD to
the 32-bit device memory address CLKADR. If parameter CLKADR2 is present in the
...CLKFAST directive, the clock ISP root will then write the 8-bit value to the 32-bit
device memory address CLKADR2. If parameter CLKADR2 is present, parameter CLKCMD2
must also be present. If this second device I/O command is not required, leave both
CLKCMD2 and CLKADR2 blank (empty).
If two I/O commands are provided, parameter IODELAY can be used to define the delay, if
any, required after the first command before the second command can be issued. The
delay is provided by a call to AMX procedure cjcfhwdelay (see directive ...DELAY).
A-8
If there is no need for a delay or a second command is not required, leave the IODELAY
field blank (empty).
Parameter
VNUM has been described on the precedin g page. If parameter VNUM is omitted,
then a value of -1 is assumed for VNUM.
Use the ...CLKFAST16 directive if 16-bit values must be written to the clock.
Use the ...CLKFAST32 directive if 32-bit values must be written to the clock.
KADAK
AMX 68000 Target Guide
Page 59

AMX ROM Option
To use the AMX ROM option, the Target Parameter File must include the following
directives.
...ROMOPT ROMADR,RAMADR
...ROMSM ;Semaphore Manager
...ROMEM ;Event Manager
...ROMMB ;Mailbox Manager
...ROMMX ;Message Exchange Manager
...ROMBM ;Buffer Manager
...ROMMM ;Memory Manager
...ROMCL ;Circular List Manager
...ROMLL ;Linked List Manager
...ROMTD ;Time/Date Manager
Parameter ROMADR is the absolute physical ROM address at which the AMX ROM image
is to be located.
Parameter RAMADR is the absolute physical RAM address of a block of 32 bytes reserved
for use by AMX.
Both ROMADR and RAMADR must specify memory addresses which are long aligned.
Parameters ROMADR and RAMADR must be expressed as undecorated hexadecimal numbers.
An undecorated hexadecimal number is a hexadecimal number expressed without the
leading or trailing symbols used by programming languages to identify such numbers.
Language Hexadecimal Undecorated
C 0xABCDEF01 ABCDEF01
Assembler (Intel) 0ABCDEF01H ABCDEF01
Assembler (Motorola) $ABCDEF01 ABCDEF01
Keywords ...ROMxx are used to identify the AMX managers which you wish to commit
to the AMX ROM. If you do not want a particular manager to be in the ROM, omit the
corresponding keyword statement from the Target Parameter File or insert the comment
character
; in front of the keyword.
AMX 68000 Target Guide
KADAK
A-9
Page 60

This page left blank intentionally.
A-10
KADAK
AMX 68000 Target Guide
Page 61

A.3 Porting the Target Parameter File
It is expected that you will use the AMX Configuration Manager to create and edit your
Target Parameter File. If you are unable to use the AMX Configuration Manager utility,
you will have to create and edit your Target Parameter File using a text editor.
You should begin by choosing one of the sample Target Parameter Files provided with
AMX. Choose the Target Parameter File for the Sample Program which operates on the
evaluation board which most closely matches your target hardware. Edit the parameters
in all directives to meet your requirements. Follow the specifications provided in
Appendix A.2 and adhere to the detailed parameter definitions given in the presentation
of the AMX Configuration Manager screens in Chapter 4.
The AMX Configuration Manager includes its own copy of the AMX Configuration
Generator which it uses to produce your Target Configuration Module from the Target
Configuration Template File and the directives in your Target Parameter File. If you are
unable to use the Configuration Manager, you will have to use the stand alone version of
the AMX Configuration Generator.
The command line required to run the Configuration Generator and use it to produce a
Target Configuration Module HDWCFG.ASM from the AMX 68000 Target Configuration
Template File CJ532HDW.CT and a Target Parameter File called HDWCFG.UP is as follows:
CJ532CG HDWCFG.UP CJ532HDW.CT HDWCFG.ASM
If you are not doing your development on a PC or compatible, you may still be able to
port the Configuration Generator to your development system as described in
Appendix C of the AMX User's Guide.
AMX 68000 Target Guide
KADAK
A-11
Page 62

This page left blank intentionally.
A-12
KADAK
AMX 68000 Target Guide
Page 63

Appendix B. AMX 6800 0 Service Procedures
B.1 Summary of Services
AMX 68000 provides a collection of target dependent AMX service procedures for us e
with the M68000 processor and compatibles and the C compilers which support them.
These procedures are summarized below.
Interrupt Control (class
cjksitrap Install a task trap handler
cjksivtp Fetch pointer to the AMX Vector Table
cjksivtrd Read an entry from the AMX Vector Table
cjksivtwr Write an entry into the AMX Vector Table
cjksivtx Exchange an entry in the AMX Vector Table
Processor and C Interface Procedures (class
ksi)
cf)
In addition to the services provided by AMX and its managers, the AMX Library
includes several C procedures of a general nature which simplify application
programming in real-time systems on your target processor.
cjcfccsetup Setup C environment
cjcfdi Disable interrupts at priority level 6
cjcfei Enable interrupts at priority level 0
cjcfflagrd Read the processor status register (SR)
cjcfflagwr Write to the processor status register (SR)
cjcfhwdelay Delay n microseconds
cjcfhwbcache Flush and enable/disable data and instruction caches
cjcfhwdcache Flush and enable/disable data cache
cjcfhwicache Flush and enable/disable instruction cache
cjcfin8 Read an 8-bit input port
cjcfin16 Read a 16-bit input port
cjcfin32 Read a 32-bit input port
cjcfjlong Long jump to a mark set by cjcfjset
cjcfjset
cjcfmcopy
cjcfmset Set (fill) a block of memory
cjcfout8 Write an 8-bit value to an output port
cjcfout16 Write a 16-bit value to an output port
cjcfout32 Write a 32-bit value to an output port
cjcfstkjmp Switch stacks and jump to a new procedure
cjcftag Convert a string to an AMX tag value
cjcfvol8 Read a volatile 8-bit variable
cjcfvol16 Read a volatile 16-bit variable
cjcfvol32 Read a volatile 32-bit variable
cjcfvolpntr Read a volatile pointer variable
Set a mark for a subsequent long jump by cjcfjlong
Copy a block of memory
AMX 68000 Target Guide
KADAK
rev7 B-1
Page 64

The AMX Library also includes several C procedures which are used privately by
KADAK. These procedures, although available for your use, are not documented in this
manual and are subject to change at any time. The procedures are briefly described in
source file
structure cjxregs which they use is defined in file
cjcfregld Load M68000 registers from a register array
cjcfregst Store M68000 registers into a register array
cjcfsint Generate a software interrupt
CJZZZUB.ASM. Prototypes will be found in file CJZZZIF.H. The register array
CJZZZKT.H.
B-2
KADAK
AMX 68000 Target Guide
Page 65

B.2 Service Procedures
A description of all processor dependent AMX 68000 service proc edures is provided in
this appendix. The descriptions are ordered alphabetically for easy reference.
Italics are used to distinguish programming examples. Procedure names and variable
names which appear in narrative text are also displayed in italics. Occasionally a lower
case procedure name or variable name may appear capitalized if it occurs as the first
word in a sentence.
Vertical ellipses are used in program examples to indicate that a portion of the program
code is missing. Most frequently this will occur in examples where fragments of
application dependent code are missing.
:
: /* Dismiss device interrupt */
:
Capitals are used for all defined AMX filenames, constants and error codes. All AMX
procedure, structure and constant names can be readily identified according to the
nomenclature introduced in Chapter 1.3 of the AMX User's Guide.
A consistent style has been adopted for each description. The procedure name is
presented at the extreme top right and left as in a dictionary. This method of pr esentation
has been chosen to make it easy to find procedures since they are ordered alphabetically.
Purpose A one-line statement of purpose is always provided.
Used by n Task o ISP o Timer Procedure n Restart Procedure o Exit Procedure
This block is used to indicate which of your AMX application procedures
can call the AMX procedure. The term ISP refers t o th e Interrupt H andler
of a conforming ISP. A filled in box indicates that the procedure is
allowed to call the AMX procedure. In the above example, onl y tasks and
Restart Procedures would be allowed to call the procedure.
Setup The prototype of the AMX procedure is shown.
The AMX header file in which the prototype is located is identified.
Include AMX header file
CJZZZ.H for compilation.
File CJZZZ.H is a generic AMX include file which automatically includes
the correct subset of the AMX header files for a particular target
processor. If you include CJZZZ.H instead of its KADAK part numbered
counterpart (
CJnnn.H), your AMX application source modules will be
readily portable to other processors without editing.
Description Defines all input parameters to the procedure and expands upon the
purpose or method if required.
AMX 68000 Target Guide
KADAK
rev7 B-3
Page 66

Interrupts AMX procedures frequently must deal with the processor interrupt mask.
The effect of each AMX procedure on the interrupt state is defined
according to the following legend.
n Disabled n Enabled n Restored
(Not in ISP)
D E R Effect on Interrupts
ooo Untouched
noo Disabled and left disabled upon return
on o Enabled and left enabled upon return
nno Disabled and then enabled upon return
non Disabled and then, prior to return, restored to the state in
effect upon entry to the procedure
nnn Disabled, possibly briefly enabled and then, prior to return,
restored to the state in effect upon entry to the procedure
The warning (Not in ISP) will be present as a reminder that when the Interrupt
Handler of a conforming ISP calls the AMX procedure, interrupts will
NOT be explicitly enabled by the AMX procedure. If interrupts are
enabled when an Interrupt Handler calls the AMX procedure, they will be
enabled upon return.
Returns The outputs, if any, produced by the procedure are always defined.
Most AMX procedures return an integer error status identified as a
CJ_ERRST. Note that CJ_ERRST is not a C data type. CJ_ERRST is defined
(using #define) to be an int allowing error codes to be easily handled as
integers but readily identified as AMX error codes.
Restrictions If any restrictions on the use of the procedure exist, they are described.
Note Special notes, suggestions or warnings are offered where necessary.
Task Switch Task switching effects, if any, are described.
Example An example is provided for each of the more complex AMX procedures.
The examples are kept simple and are intended only to illustrate the
correct calling sequence.
See Also A cross reference to other related AMX procedures is alwa ys provided if
applicable.
B-4 rev7
KADAK
AMX 68000 Target Guide
Page 67

cjcfccsetup cjcfccsetup
Purpose Setup C Environment
Used by
Setup Prototype is in file
n Task n ISP n Timer Procedure n Restart Procedure n Exit Procedure
CJZZZIF.H.
#include "CJZZZ.H"
void CJ_CCPP cjcfccsetup(void);
Description Use cjcfccsetup to setup all low level processor registers to meet the
requirements of a particular C compiler. For example, the C compiler may
assume that some data variables can be accessed usin g a pa rticular register
which always points to the data. However, when mixing languages, you
may find that when a C procedure is called from assembly language, the
register assumptions are not valid. A call to cjcfccsetup on entry to the
C procedure will setup the correct register content.
Interrupts o Disabled o Enabled o Restored
Returns The registers, if an y, which are required by C are set to the values which
they contained when AMX was launched.
Restrictions Use cjcfccsetup with care. You may inadvertently cause a re gister to be
set which violates the register preservation rules of the other language.
AMX 68000 Target Guide
KADAK
B-5
Page 68

cjcfdi cjcfdi
cjcfei cjcfei
Purpose Disable or Enable Interrupts
Used by
Setup Prototype in file
n Task n ISP n Timer Procedure n Restart Procedure n Exit Procedure
#include "CJZZZ.H"
void CJ_CCPP cjcfdi(void);
void CJ_CCPP cjcfei(void);
(cjcfdi only)
CJZZZTF.H or macro in file CJZZZCC.H.
Description Tasks can use cjcfdi to briefly disable all sources of interrupt.
Immediately thereafter the task can use cjcfei to enable all sources of
interrupt again.
Interrupts n Disabled by cjcfdi n Enabled by cjcfei
Returns Nothing
The interrupt priority in the status register (SR) is set to 6 to disable
interrupts or reset to 0 to enable interrupts.
Restrictions ISPs must not use cjcfei. If nested interrupts are supported in your
application, ISPs must always use cjcfflagwr to restore interrupts to the
state determined by an earlier call to cjcfflagrd.
Interrupts should be enabled within a short time after they are disabled or
system performance will be degraded.
See Also cjcfflagrd, cjcfflagwr
B-6
KADAK
AMX 68000 Target Guide
Page 69

cjcfflagrd cjcfflagrd
cjcfflagwr cjcfflagwr
Purpose Read or Write Processor Status Register
Used by
Setup Prototype in file
n Task n ISP n Timer Procedure n Restart Procedure n Exit Procedure
CJZZZTF.H or macro in file CJZZZCC.H.
#include "CJZZZ.H"
CJ_TYFLAGS CJ_CCPP cjcfflagrd(void);
void CJ_CCPP cjcfflagwr(CJ_TYFLAGS flags);
Description Cjcfflagrd returns the actual state of the processor status register (SR).
Cjcfflagwr updates the processor status register (SR) by writing the
parameter flags to the register.
Use cjcfflagrd to read the state of the processor status register, th ereby
capturing the current interrupt state. Then use cjcfdi to briefly disable
all sources of interrupt. Immediately thereafter, use cjcfflagwr to restore
the state of the interrupt system.
Interrupts o Untouched by cjcfflagrd n Restored by cjcfflagwr
Returns Cjcfflagrd returns the actual state of the processor status register.
Cjcfflagwr returns nothing.
Cjcfflagwr unconditionally copies flags into the processor status
register, thereby enabling or disabling interrupts. Since no validation of
flags is performed, caution in the use of cjcfflagwr is advised.
See Also cjcfdi, cjcfei
AMX 68000 Target Guide
KADAK
B-7
Page 70

cjcfhwdelay cjcfhwdelay
Purpose Delay n Microseconds
Used by
Setup Prototype is in file
n Task n ISP n Timer Procedure n Restart Procedure n Exit Procedure
CJZZZIF.H.
#include "CJZZZ.H"
void CJ_CCPP cjcfhwdelay(int n);
Description n is the delay interval measured in microseconds.
Use cjcfhwdelay to generate a software delay loop of approximately n
microseconds. This procedure is intended for use in device drivers which
must introduce device access delays to avoid violating the minimum
timing delay needed between sequential references to a device I/O port.
The ...DELAY directive in your Target Parameter File is used by AMX to
derive the delay loop count needed to produce an n microsecond delay.
Interrupts o Disabled o Enabled o Restored
Returns Nothing
Note This procedure can be used at any time, even prior to launching AMX or
after exiting from AMX.
If the ...DELAY directive in your Target Parameter File indicates that the
processor frequency is 0, then you must install the frequency value into
the public long variable cjcfhwdelayf prior to launching AMX. If you
call procedure cjcfhwdelay() prior to launching AMX, be sure that
variable cjcfhwdelayf is initialized before making the call.
B-8
KADAK
AMX 68000 Target Guide
Page 71

cjcfhwbcache cjcfhwbcache
cjcfhwdcache cjcfhwdcache
cjcfhwicache cjcfhwicache
Purpose Flush and Enable/Disable Caches
Used by
Setup Prototype in file
n Task o ISP o Timer Procedure n Restart Procedure n Exit Procedure
CJZZZIF.H.
#include "CJZZZ.H"
void CJ_CCPP cjcfhwbcache(int operation);
void CJ_CCPP cjcfhwdcache(int operation);
void CJ_CCPP cjcfhwicache(int operation);
Description operation = 0 to force the caches to be flushed and disabled.
operation = 1 to force the caches to be flushed and enabled.
Interrupts
n Disabled o Enabled n Restored
Returns Nothing
Cjcfhwbcache flushes and disables (or enables) both the data and
instruction caches.
Cjcfhwdcache flushes and disables (or enables) only the data cache.
Cjcfhwicache flushes and disables (or enables) only the instruction
cache.
Note These procedures can be called even if your Target Parameter File
indicates that you are targeting an M68000 processor with no cache or
only one kind of cache. In such cases, the procedures only affect the
caches which exist.
Restrictions ISPs and Timer Procedures must not use these procedures. Since
AMX 68000 Target Guide
interrupts are disabled while the caches are flushed, use caution when
calling these procedures or system performance will be degraded,
especially if the cache sizes are large.
KADAK
B-9
Page 72

cjcfin8 cjcfin8
cjcfin16 cjcfin16
cjcfin32 cjcfin32
Purpose Read an 8, 16 or 32-Bit Input Port
Used by
Setup Prototype in file
n Task n ISP n Timer Procedure n Restart Procedure n Exit Procedure
CJZZZTF.H or macro in file CJZZZCC.H.
#include "CJZZZ.H"
CJ_T8 CJ_CCPP cjcfin8(void *port);
CJ_T16 CJ_CCPP cjcfin16(void *port);
CJ_T32 CJ_CCPP cjcfin32(void *port);
Description port is the address of an 8, 16 or 32-bit memory-mapped device input
port.
Interrupts
o Disabled o Enabled o Restored
Returns Cjcfin8 returns an 8-bit signed value.
Cjcfin16 returns a 16-bit signed value.
Cjcfin32 returns a 32-bit signed value.
Example #include "CJZZZ.H"
/* Console status register */
#define CONSTAT ((CJ_T8 *)0xFFFA002DL)
/* Console data register */
#define CONDATA ((CJ_T8 *)0xFFFA002FL)
void CJ_CCPP conout(char ch) {
while ( (cjcfin8(CONSTAT) & 0x80) == 0 )
;
cjcfout8(CONDATA, (CJ_T32)ch);
}
See Also cjcfout8, cjcfout16, cjcfout32
/* Wait for ready */
/* Write character */
B-10
KADAK
AMX 68000 Target Guide
Page 73

cjcfjlong cjcfjlong
cjcfjset cjcfjset
Purpose cjcfjset Sets a Mark for a Long Jump
cjcfjlong Long Jumps to that Mark
These procedures are provided for AMX portability. They are not
replacements for C library proc edures
function in a similar manner.
Used by n Task o ISP o Timer Procedure o Restart Procedure n Exit Procedure
longjmp or setjmp although they
Setup Prototype is in file
#include "CJZZZ.H"
void CJ_CCPP cjcfjlong(struct cjxjbuf *jbuf, int value);
int CJ_CCPP cjcfjset(struct cjxjbuf *jbuf);
CJZZZTF.H.
Description jbuf is a pointer to a jump buffer to be used to m ark the p rocessor state at
the time cjcfjset is called and to restore that state when cjcfjlong is
subsequently called.
The processor dependent structure cjxjbuf is defined in file
CJZZZCC.H.
value is an integer value to be returned to the cjcfjset caller when
cjcfjlong initiates the long jump return. Value cannot be 0. If value
, cjcfjlong will replace it with value = 1.
=0
Interrupts o Disabled o Enabled o Restored
Returns Cjcfjset returns 0 when initially called to establish the mark. Cjcfjset
returns value (non 0) when cjcfjlong is called to do the long jump to the
mark established by the initial cjcfjset call.
There is no return from cjcfjlong.
Restrictions
AMX 68000 Target Guide
Cjcfjset must be called prior to any call to cjcfjlong. Each call must
reference the same jump buffer. The jump buffer must remain unalte red
between the initial
cjcfjset call and the subsequent cjcfjlong long
jump return.
Under no circumstances should one task attempt a long jump using a jump
buffer set by another task.
KADAK
B-11
Page 74

Example #include "CJZZZ.H"
void CJ_CCPP dowork(struct cjxjbuf *jbp);
static struct cjxjbuf jumpbuffer;
#define STACKSIZE 512 /* Stack size (longs) */
#define STACKDIR 1 /* 0=grows up; 1=grows down */
static long newstack[STACKSIZE];
#if (STACKDIR == 1)
#define STACKP (&newstack[STACKSIZE - 1])
#else
#define STACKP newstack
#endif
void CJ_CCPP taskbody(void) {
if (cjcfjset(&jumpbuffer) == 0)
/* Switch to new stack and do work */
cjcfstkjmp(&jumpbuffer, STACKP,
/* Never returns to here */
/* Do work using original stack */
dowork(NULL);
}
(CJ_VPPROC)dowork);
void CJ_CCPP dowork(struct cjxjbuf *jbp) {
/* Do work */
/* If jump buffer provided, then use long jump to */
/* restore the original stack and return */
if (jbp != NULL)
}
See Also cjcfstkjmp
cjcfjlong(jbp, 1);
B-12
KADAK
AMX 68000 Target Guide
Page 75

cjcfmcopy cjcfmcopy
cjcfmset cjcfmset
Purpose Copy a Block of Memory
Set (Fill) a Block of Memory
These procedures are provided for AMX portability. They are not
replacements for C library procedures
memcpy or memset.
Used by
Setup Prototype is in file
n Task n ISP n Timer Procedure n Restart Procedure n Exit Procedure
CJZZZTF.H.
#include "CJZZZ.H"
void CJ_CCPP cjcfmcopy(int *sourcep, int *destp,
unsigned int size);
void CJ_CCPP cjcfmset(int *mempntr,
unsigned int size, int pattern);
Description sourcep is a pointer to the integer aligned block of memory which is to be
copied to the destination.
destp is a pointer to the integer aligned block of memory which is the
destination of the block being copied.
mempntr is a pointer to the integer aligned block of memory which is to be
filled with pattern.
size is the number of integers to be copied or set. The number of bytes
copied or set will therefore be size * sizeof(int).
Interrupts o Disabled o Enabled o Restored
Returns Nothing
Restrictions The source and destination blocks must not overlap unless destp is lower
Example #include "CJZZZ.H"
AMX 68000 Target Guide
in memory than
sourcep.
ISPs and Timer Procedures should not fill or copy large blocks of
memory. Failure to observe this restriction may impose serious
performance penalties on your application.
#define BLOCKSIZE 1024
static int srcarray[BLOCKSIZE];
static int dstarray[BLOCKSIZE];
void CJ_CCPP blocksetcopy(int pattern) {
cjcfmset(srcarray, sizeof(srcarray), pattern);
cjcfmcopy(srcarray, dstarray, sizeof(srcarray));
}
KADAK
B-13
Page 76

cjcfout8 cjcfout8
cjcfout16 cjcfout16
cjcfout32 cjcfout32
Purpose Write to an 8, 16 or 32-Bit Output Port
Used by
Setup Prototype in file
n Task n ISP n Timer Procedure n Restart Procedure n Exit Procedure
CJZZZTF.H or macro in file CJZZZCC.H.
#include "CJZZZ.H"
void CJ_CCPP cjcfout8(void *port, CJ_T32 data);
void CJ_CCPP cjcfout16(void *port, CJ_T32 data);
void CJ_CCPP cjcfout32(void *port, CJ_T32 data);
Description port is the address of an 8, 16 or 32-bit memor y-mapped device output
port.
data is the 8, 16 or 32-bit value to be output to the port.
Interrupts o Disabled o Enabled o Restored
Returns Nothing
Cjcfout8 outputs the least significant 8 bits of data to the port.
Cjcfout16 outputs the least significant 16 bits of data to the port.
Cjcfout32 outputs the full 32 bits of data to the port.
Example #include "CJZZZ.H"
/* Console status register */
#define CONSTAT ((CJ_T8 *)0xFFFA002DL)
/* Console data register */
#define CONDATA ((CJ_T8 *)0xFFFA002FL)
B-14
void CJ_CCPP conout(char ch) {
while ( (cjcfin8(CONSTAT) & 0x80) == 0 )
;
cjcfout8(CONDATA, (CJ_T32)ch);
}
See Also cjcfin8, cjcfin16, cjcfin32
KADAK
/* Wait for ready */
/* Write character */
AMX 68000 Target Guide
Page 77

cjcfstkjmp cjcfstkjmp
Purpose Switch Stacks and Jump to a New Procedure
This procedure is provided for AMX portability.
Used by
Setup Prototype is in file
n Task o ISP o Timer Procedure o Restart Procedure n Exit Procedure
CJZZZTF.H.
#include "CJZZZ.H"
void CJ_CCPP cjcfstkjmp(void *vp, void *stackp,
CJ_VPPROC procp);
Description vp is a pointer which is passed as a parameter to the new procedure.
stackp is a pointer to a properly aligned block of memory for use as a
stack. For the M68000 family, the stack must be 16-bit word aligned.
For some M68000 processors, performance will be improved if the
stack is 32-bit long word aligned.
Stackp must point to the top of the memory block since the processor
stack builds downward by popular convention.
procp is a pointer to the new procedure which is prototyped as follows:
void CJ_CCPP newfunc(void *vp);
For portability using different C compilers, cast your procedure pointer
as (CJ_VPPROC)newfunc in your call to cjcfstkjmp.
Interrupts o Disabled o Enabled o Restored
Returns There is no return from cjcfstkjmp. Use cjcfjset and cjcfjlong if
Restrictions The new procedure referenced by
Example See the example provided with
See Also cjcfjlong, cjcfjset, cjtkend
AMX 68000 Target Guide
there is a requirement to return to the original stack.
procp must never return. The
procedure can call cjtkend to end the calling task.
cjcfjset and cjcfjlong.
KADAK
B-15
Page 78

cjcftag cjcftag
Purpose Convert a String to an Object Name Tag
Used by
Setup Prototype is in file
n Task n ISP n Timer Procedure n Restart Procedure n Exit Procedure
CJZZZTF.H.
#include "CJZZZ.H"
CJ_TYTAG CJ_CCPP cjcftag(char *tag);
Description tag is a pointer to a string which is a one to four character name tag.
Interrupts
o Disabled o Enabled o Restored
Returns The name tag string is converted to a 32-bit name tag value of type
CJ_TYTAG which is returned to the caller.
If the name tag string is less than four characters, the returned name tag
value is 0 filled. If the name tag string is longer than four characters, the
returned name tag value is limited to the first four characters of the string.
Example See any of the cjXXbuild examples in which an object nam e tag string is
converted to a name tag value for insertion into the object definition
structure.
See Also cjksfind, cjksgbfind
B-16
KADAK
AMX 68000 Target Guide
Page 79

cjcfvol8 cjcfvol8
cjcfvol16 cjcfvol16
cjcfvol32 cjcfvol32
cjcfvolpntr cjcfvolpntr
Purpose Fetch a Volatile 8-Bit, 16-Bit, 32-Bit or Pointer Value
Use these procedures to fetch the content of a volatile variable if the C
compiler does not support the C keyword
macros) also guarantee that multiple byte fetches will be done in an
indivisible fashion.
Used by n Task n ISP n Timer Procedure n Restart Procedure n Exit Procedure
volatile. These procedures (or
Setup Prototype in file
#include "CJZZZ.H"
CJ_T8 CJ_CCPP cjcfvol8(void *varp);
CJ_T16 CJ_CCPP cjcfvol16(void *varp);
CJ_T32 CJ_CCPP cjcfvol32(void *varp);
void * CJ_CCPP cjcfvolpntr(void *pntrp);
CJZZZTF.H or macro in file CJZZZCC.H.
Description varp is a pointer to an 8, 16 or 32-bit variable.
pntrp is a pointer to a pointer variable.
Interrupts o Disabled o Enabled o Restored
Returns Cjcfvol8 returns an 8-bit signed value from *varp.
Cjcfvol16 returns a 16-bit signed value from *varp.
Cjcfvol32 returns a 32-bit signed value from *varp.
Cjcfvolpntr returns a pointer from *pntrp.
Example #include "CJZZZ.H"
extern CJ_T8 controlflag; /* Volatile control flag */
extern int *valuep; /* Volatile pointer */
int * CJ_CCPP readpntr(void) {
int *pntr;
AMX 68000 Target Guide
/* Wait until access allowed */
while (cjcfvol8(&controlflag) == 0)
;
/* Wait for valid pointer */
while ((pntr = (int *)cjcfvolpntr(&valuep)) == CJ_NULL)
;
controlflag = 0;
return (pntr);
}
KADAK
B-17
Page 80

This page left blank intentionally.
B-18
KADAK
AMX 68000 Target Guide
Page 81

cjksitrap cjksitrap
Purpose Install a Task Trap Handler
Used by
Setup Prototype is in file
n Task o ISP o Timer Procedure o Restart Procedure n Exit Procedure
CJZZZIF.H.
#include "CJZZZ.H"
CJ_ERRST CJ_CCPP cjksitrap(int trapid, CJ_TRAPPROC handler);
Description trapid is the processor vector number which identifies the particular error
trap.
CJ_PRVNZD Zero divide trap
CJ_PRVNCH CHK (bounds check) instruction trap
CJ_PRVNTV TRAPV (overflow test) instruction trap
handler is a pointer to the task's trap handler for the particular error trap.
Interrupts o Disabled o Enabled o Restored
Returns Error status is returned.
CJ_EROK Call successful.
Errors returned:
CJ_ERTKTRAP Trapid is not a vector number for which task traps
are allowed.
AMX 68000 Target Guide
KADAK
B-19
Page 82

cjksivtp cjksivtp
Purpose Fetch Pointer to the AMX Vector Table
Used by
Setup Prototype is in file
n Task n ISP n Timer Procedure n Restart Procedure n Exit Procedure
CJZZZIF.H.
#include "CJZZZ.H"
void * CJ_CCPP cjksivtp(void);
Interrupts o Disabled o Enabled o Restored
Returns A pointer to the AMX Vector Table.
See Also
cjksivtrd, cjksivtwr, cjksivtx
B-20
KADAK
AMX 68000 Target Guide
Page 83

cjksivtrd cjksivtrd
Purpose Read from the AMX Vector Table
Used by
Setup Prototype is in file
n Task n ISP n Timer Procedure n Restart Procedure n Exit Procedure
CJZZZIF.H.
#include "CJZZZ.H"
CJ_ERRST CJ_CCPP cjksivtrd(int vector, CJ_ISPPROC *oldproc);
Description vector is the processor vector number (0 to 255).
Vectors 12, 16 to 23 and 59 to 63 are reserved by Motorola.
oldproc is a pointer to storage for a copy of the Interrupt Service
Procedure pointer (or exception service procedure pointer) retrieved
from the specified entry in the AMX Vector Table.
Interrupts o Disabled o Enabled o Restored
Returns Error status is returned.
CJ_EROK Call successful.
*oldproc contains the Interrupt Service Procedure pointer (or
exception service procedure pointer) retrieved from AMX Vector Table
entry number vector.
Errors returned:
None
See Also cjksivtwr, cjksivtx
AMX 68000 Target Guide
KADAK
B-21
Page 84

cjksivtwr cjksivtwr
Purpose Write to the AMX Vector Table
Used by
Setup Prototype is in file
n Task n ISP n Timer Procedure n Restart Procedure n Exit Procedure
CJZZZIF.H.
#include "CJZZZ.H"
CJ_ERRST CJ_CCPP cjksivtwr(int vector, CJ_ISPPROC newproc);
Description vector is the processor vector number (0 to 255).
Vectors 12, 16 to 23 and 59 to 63 are reserved by Motorola.
newproc is a pointer to the new Interrupt Service Procedure.
Interrupts o Disabled o Enabled o Restored
Returns Error status is returned.
CJ_EROK Call successful.
Errors returned:
CJ_ERNOACCESS AMX Vector Table is not accessible.
AMX was launched with access to its
Vector Table denied.
Restrictions You must NOT use this procedure to alter the task trap vectors (vector =
CJ_PRVNZD
, CJ_PRVNCH or CJ_PRVNTV). Use cjksitrap for that purpose.
See Also cjksivtrd, cjksivtx
B-22
KADAK
AMX 68000 Target Guide
Page 85

cjksivtx cjksivtx
Purpose Exchange an Entry in the AMX Vector Table
Used by
Setup Prototype is in file
n Task n ISP n Timer Procedure n Restart Procedure n Exit Procedure
CJZZZIF.H.
#include "CJZZZ.H"
CJ_ERRST CJ_CCPP cjksivtx(int vector,
CJ_ISPPROC newproc,
CJ_ISPPROC *oldproc);
Description vector is the processor vector number (0 to 255).
Vectors 12, 16 to 23 and 59 to 63 are reserved by Motorola.
newproc is a pointer to the new Interrupt Service Procedure.
oldproc is a pointer to storage for the previous Interrupt Service
Procedure pointer (or exception service procedure pointer) retrieved
from the AMX Vector Table.
Interrupts o Disabled o Enabled o Restored
Returns Error status is returned.
CJ_EROK Call successful.
*oldproc contains the previous Interrupt Service Procedure pointer (or
exception service procedure pointer).
Errors returned:
For all errors, *oldproc is undefined on return.
CJ_ERNOACCESS AMX Vector Table is not accessible.
AMX was launched with access to its
Vector Table denied.
Restrictions You must NOT use this procedure to alter the task trap vectors (
CJ_PRVNZD
, CJ_PRVNCH or CJ_PRVNTV). Use cjksitrap for that purpose.
See Also cjksivtrd, cjksivtwr
vector =
AMX 68000 Target Guide
KADAK
B-23
Page 86

This page left blank intentionally.
B-24
KADAK
AMX 68000 Target Guide
Page 87

Appendix C. AMX 68000 ROM Option
An AMX system can be configured in two ways. The particular configu ration is chosen
to best meet your application needs.
Most AMX systems are linked. Your AMX application is linked with your System
Configuration Module, your Target Configuration Module and the AMX Library. The
resulting load module is then copied to memory for execution either by loading the image
into RAM or by committing the image to ROM. Such a ROM contains an image of your
application merged with AMX in an inseparable fashion.
The AMX ROM option offers an alternate method of committing AMX to ROM. The
ROM option allows the subset of AMX and its managers required by your application to
be linked together without any application code to form a separate AMX ROM image.
The resulting ROM can be located anywhere in your memory configuration. The penalty
paid for ROMing in this fashion is slightly slower access by application code to AMX
services.
Selecting AMX ROM Options
To support an AMX ROM system, the following files are provided.
CJ532ROP.LKT AMX ROM Option toolset dependent
Link Specification Template
CJ532ROP.CT AMX ROM Option Template
CJ532RAC.CT AMX ROM Access Template
To use the AMX ROM option, you must edit your Target Parameter File to identify the
AMX components which you wish to place in the AMX ROM and to specify where the
AMX ROM is to be located. You can use the AMX Configuration Builder to enter these
parameters as described in Chapter 4.6.
AMX 68000 Target Guide
KADAK
C-1
Page 88

Creating an AMX ROM
The AMX ROM is created by using the AMX Configuration Generator to produce a
ROM Option Module which is then linked with the AMX Library to form an AMX ROM
image.
The Configuration Generator combines the information in your Target Parameter File
with the ROM Option Template file CJ532ROP.CT to produce an assembly language
ROM Option Module CJ532ROP.ASM.
You can use the AMX Configuration Builder to generate the ROM Option Module. Use
the AMX Configuration Manager to open your Target Parameter File. Make the ROM
Option Module selector the active selector. The ROM Option window will become
visible allowing you to view your ROM option parameters. To generate the ROM Option
Module, select
Generate... from the File menu.
If you are unable to use the AMX Configuration Manager or are creating your ROM
Option Module from within a make file, you can use the stand alone version of the
Configuration Generator. If your Target Parameter File is named
HDWCFG.UP, the stand
alone version of the Configuration Generator utility is invoked as follows:
CJ532CG HDWCFG.UP CJ532ROP.CT CJ532ROP.ASM
The ROM Option Module CJ532ROP.ASM is then assembled in exactly the same manner
as your Target Configuration Module HDWCFG.ASM according to the directions in the
AMX Tool Guides.
The AMX ROM is linked according to the directions in the AMX Tool Guides.
The resulting AMX ROM image file is then committed to ROM using conventional
ROM burning tools. The manner in which this is accomplished will depend completely
upon your development environment. In general, the process involves the transfer of the
AMX ROM hex file to a PROM programmer.
Note that your toolset may require a filename extension other than
.ASM for assembly
language files.
C-2
KADAK
AMX 68000 Target Guide
Page 89

Linking for AMX ROM Access
The AMX Configuration Generator is used to produce a ROM Access Module which,
when linked with your application, provides access to AMX in the AMX ROM.
The Configuration Generator combines the information in your Target Parameter File
with the ROM Access Template file CJ532RAC.CT to produce an assembly language
ROM Access Module CJ532RAC.ASM.
You can use the AMX Configuration Builder to generate the ROM Access Module. Use
the AMX Configuration Manager to open your Target Parameter File. Make the ROM
Access Module selector the active selector. The ROM Option window will become
visible allowing you to view your ROM option parameters. To generate the ROM
Access Module, select Generate... from the File menu.
If you are unable to use the AMX Configuration Manager or are creating your ROM
Access Module from within a make file, you can use the stand alone version of the
Configuration Generator. If your Target Parameter File is named HDWCFG.UP, the stand
alone version of the Configuration Generator utility is invoked as follows:
CJ532CG HDWCFG.UP CJ532RAC.CT CJ532RAC.ASM
The ROM Access Module CJ532RAC.ASM is then assembled in exactly the same manner
as your Target Configuration Module HDWCFG.ASM according to the directions in the
AMX Tool Guides.
The AMX ROM Access Module provides access to all of the procedures of AMX and the
subset of AMX managers which you included in your AMX ROM. These ROM access
procedures make software jumps to the ROM resident procedures.
To create an AMX system which uses your AMX ROM, proceed just as thou gh you were
going to include AMX as part of a linked system. Your System Configuration Module
must indicate that AMX and its managers are in a separate ROM. To meet this
requirement, you may have to use the AMX Configuration Manager to edit your User
Parameter File accordingly and regenerate your System Configuration Module. If you do
so, do not forget to recompile the System Configuration Module.
Your AMX application is then linked as described in the AMX Tool Guides. However,
since AMX and a subset of its managers are in ROM, you must include the AMX ROM
Access Module
CJ532RAC.OBJ in your list of object modules to be linked. By so doing,
you will preclude the inclusion of AMX and its managers from the AMX Library
CJ532.LIB.
Note that you must still include the AMX Library
CJ532.LIB in your link in order to
have access to the small subset of AMX procedures which are never installed in your
AMX ROM.
Note that your toolset may require filename extensions other than
.OBJ and .LIB for
object and library files.
AMX 68000 Target Guide
KADAK
C-3
Page 90

Once linked, your AMX application can be downloaded into RAM memory in your target
hardware configuration. Alternatively, your application can be transferred to ROM using
the same techniques that were used to produce the AMX ROM. Regardless of the
manner in which your AMX system is loaded into your target hardware, access to the
AMX ROM via the ROM Access Module is now possible.
For simplicity, the complexities which you will encounter when trying to commit the C
Runtime Library to ROM have been ignored. Refer to your C compiler reference manual
for guidance in ROMing C code and data in embedded applications.
Warning!
If your AMX ROM was created without a particular
manager, then an AMX fatal exit will occur if your system
attempts to access that manager.
Moving the AMX ROM
The AMX ROM is not position independent. Nor is the location of the RAM used by
AMX.
To move either, you must edit the AMX ROM option parameters in your Target
Parameter File to define the new location of the AMX ROM and its RAM. Reconstruct a
new AMX ROM image and burn a new AMX ROM. Then rebuild the AMX ROM
Access Module and relink your AMX system with it.
C-4
KADAK
AMX 68000 Target Guide
 Loading...