

Page 1
T342 Users Manual
Page 2
Page 3
3
T able of Contents
Table of Contents
The Deluxe Home Theater Experience
T342 Features 8
T342 Specifications 9
G
etting Started
Make Sure You Have the Following Items 13
Front Panel Description 15
Rear Panel Description 16
Display Window Description 17
Remote Control Description 18
Prepare the Remote Control 19
What Type of Video Connection Do You Have? 20
Video Connection 22
What Type of Audio Connection Do You Have? 26
Audio Connection 28
Radio Tuner Antenna Connection 37
Page 4
4
Customer Service 1 626 968 6860
Basic Operations
Playing a DVD 40
Front Panel Buttons 41
Remote Control Buttons 43
Care for Your Discs 51
Setting Up the System Preferences
Navigating the Setup Menu 61
General Setup 62
Audio Setup 64
Video Setup 77
Preference Setup 80
Special Operations
Playing MP3's 55
Viewing Images (JPEG's) 57
Playing Progressive Scan 59
Password Setup
Exit Setup
83
85
Page 5

T able of Contents
5
Appendix (Definitions of Keywords) 87
Tr oubleshooting Guide 91
Safety Instructions 93
Legal Notifications
Copyright 99
FCC 100
Warranty Information 103
Page 6
Page 7

Getting Started
The Deluxe Home Theater Experience
7
The T342 Deluxe Home Theater Experience brings the clarity and quality of
the movie theater home to you. The picture quality of DVD combined with
the multi-channel surround sound of the T342 will enable you to fully enjoy
the Home Theater experience.
The T342 System gives you a complete Home Theater package, combining an
advanced DVD player with a Stereo receiver and tuner that can support the
most advanced Dolby Digital sound that is only available through DVD
technology.
Page 8
8
Customer Service 1 626 968 6860
T342 Features
DVD Player / Receiver with Expanded Functions
Blue Light VFD Display
Digital AM / FM Stereo Tuner with 40 Memory Presets
125 watts total system power
1 Auxiliary A/V Input for Additional Components
Advanced Surround Sound
Dolby Digital Surround Decoding
Digital Sound Processing
Diversified EQ Sound Effects
Expanded Video Features
Built-In Screensaver
3-Level DVD Zoom
Active Full-Screen Function of Widescreen DVDs
Composite, S-Video, and Component Video Outputs
Digital Audio Input & Output
Full-Function Remote Control
DVD Player-Palys DVDs, VCDs, CDs, CD-R/RWs, Mp3s, JPEGs
Page 9
9
The Deluxe Home Theater Experience
T342 Specifications
Built-in Dolby Digital
Dolby Digital Decoding
Dolby & DTS SPDIF DigitaI output
Dolby down-mix dual channel
Multi format Disk Supporting
CD, MP3
DVD,VCD,SVCD
CD-R,CD-RW
Kodak Picture CD (JPEG)
Audio Advantage
192K, 24bit
E.Q. Genie (7 modes to select)
Diversify Sound effect
Page 10
10
Customer Service 1 626 968 6860
Video Decompression
MPEG-2, MPEG-1
10-bit video decoding
PAL,NTSC TV system playback
Screen aspect ratio selectable (4:3 and 16:9)
Smart Content editor
Multi-angled view
8 Languages for OSD (8-bit On Screen Display)
Multilingual dialog up to 8 tracks and 32 subtitles
Advanced Progressive Scan
Video Inputs / Outputs
Composite video input / output (AV)
S-video output
Component output
Audio Inputs / Outputs
Optical SPDIF Output (1)
AUX Stereo Input / Output (1)
Page 11
11
The Deluxe Home Theater Experience
Amp
SUB (50 Watts)
CEN (15 Watts)
SATELLITE (15 Watts)
Driver
SUB: 6.5" Woofer
CEN: 3" Fullrange
SAT: 3" Fullrange
Other Features
Digital AM/FM Stereo Tuner with 40 preset
Full function remote control
Dimension DVD Receiver: 430mm X 60mm X 326mm
Speakers:
Subwoofer (1): 200mm X 330mm X 330mm
Center (1): 110mm X 90mm X 150mm
Satellite (4): 110mm X 90mm X 150mm
Page 12
Page 13
13
Getting Started
Congratulations on your purchase of the AMW T342 DVD player.
This user guide will assist you in setting up and enjoying your new
T342 DVD Player.
Make sure you have the following items:
These items should be included in your T342 DVD Home Theater System package:
T342 DVD Home Theater System
5.1 Surround Sound System Speakers (4 Satellite Stereo Speakers, 1 Center Speaker,
1 Subwoofer)
Composite-RCA A/V Cable (red, white, and yellow connection)
AM/FM Antenna
Remote Control and 2 AAA batteries
Users Manual & Quick Setup Guide & Reminder Card
Page 14
14
Customer Service 1 626 968 6860
You will also need speaker wire to connect your Surround Sound speakers to
the DVD Player / Receiver. Depending on the type of Video or Audio connection method you choose, the following items may also be required:
Component Video Cable (green, blue, and red connection)
Page 15
15
Getting Started
Getting Started
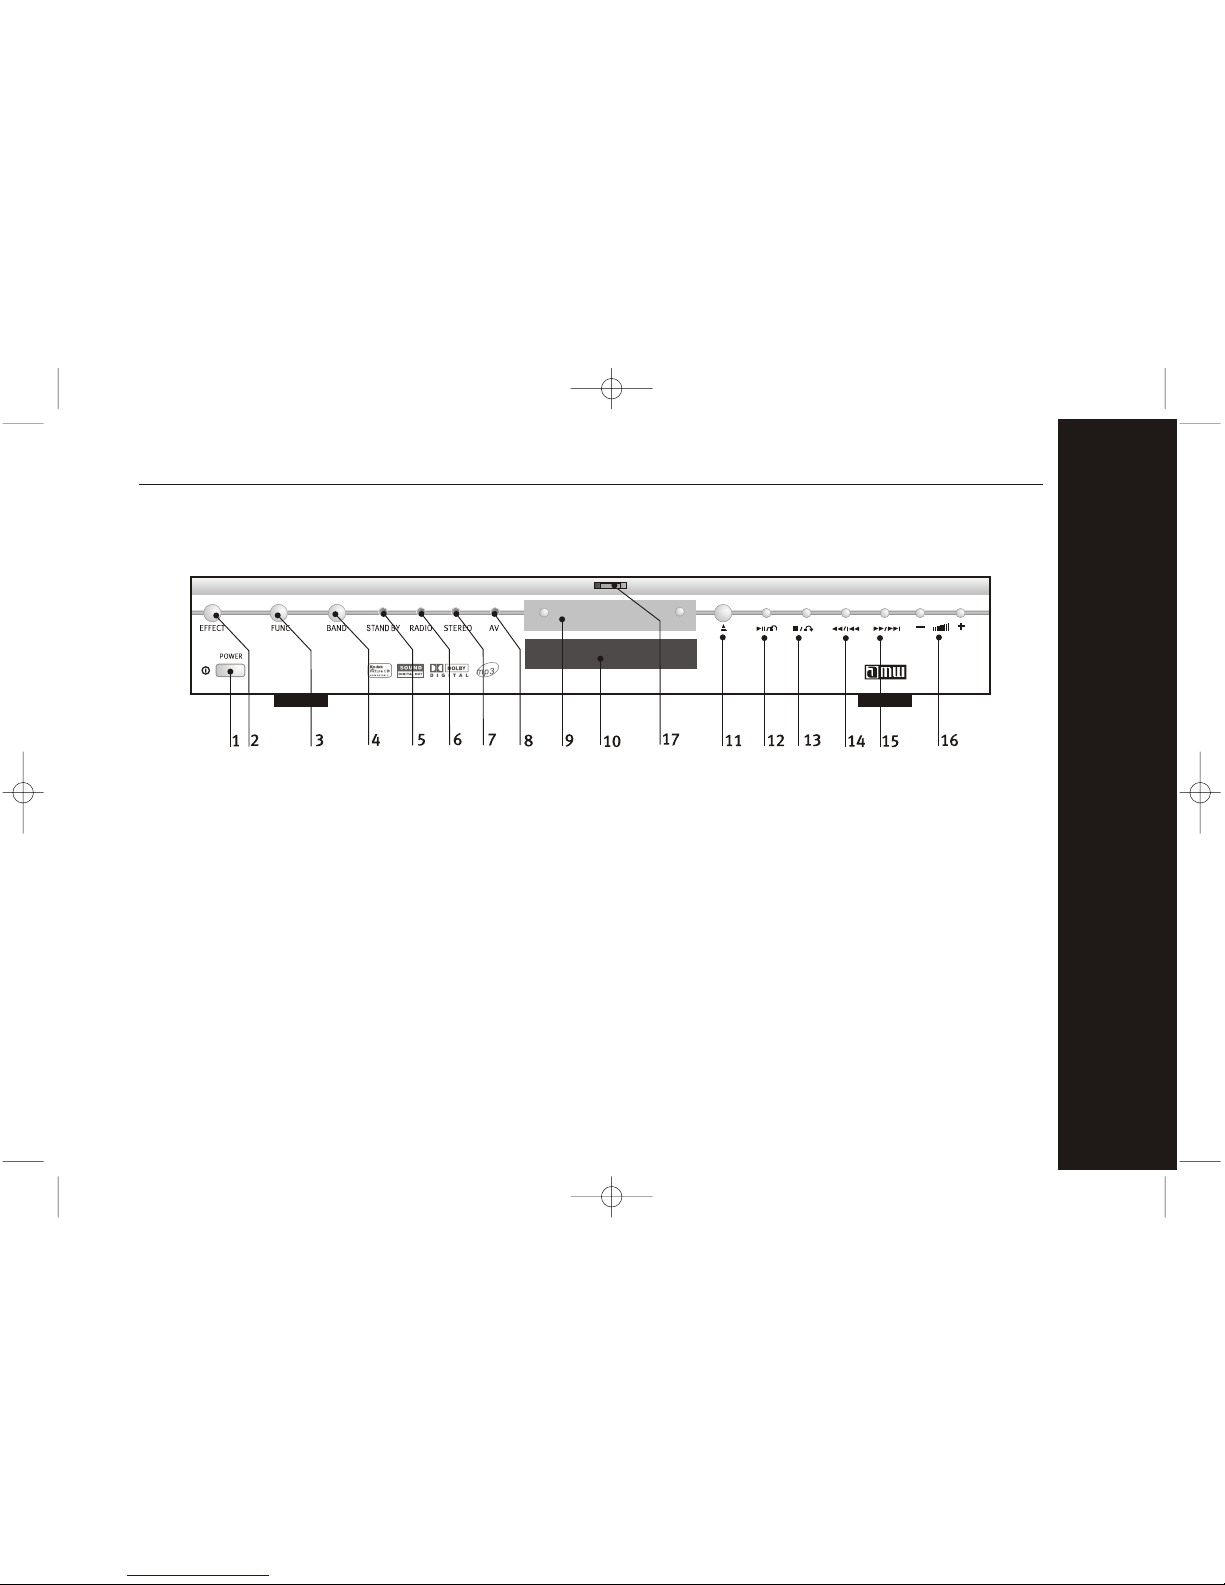
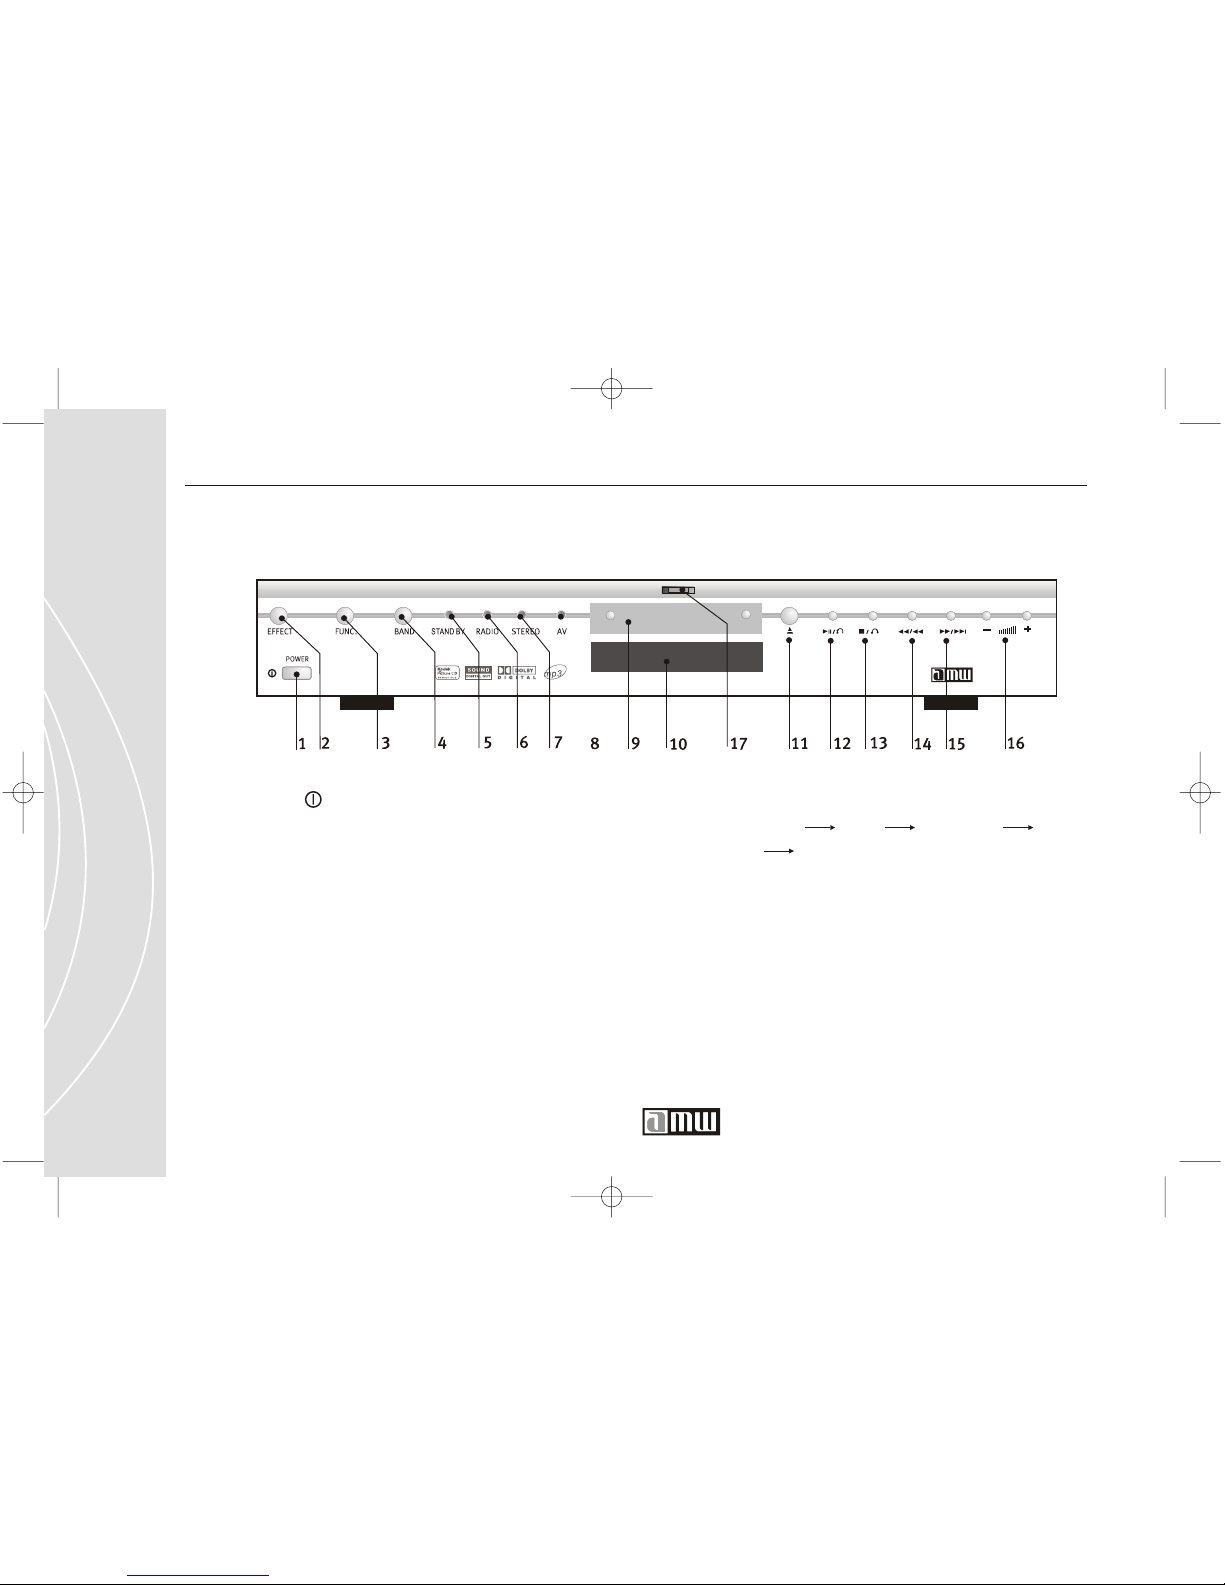
Front Panel Description
1 Power
2 Sound Effect
3 Function
4 Band
5 Stand By
6 Radio
7 Stereo
8 AV
9 Disc Tray
10 Display Window
11 Open / Close
12 Play / Pause / Memo
13 Stop / Recall
14 F. R ewind / Previous
15 F. F orward / Next
16 Volume
17 LED Indicator
Page 16
16
Customer Service 1 626 968 6860
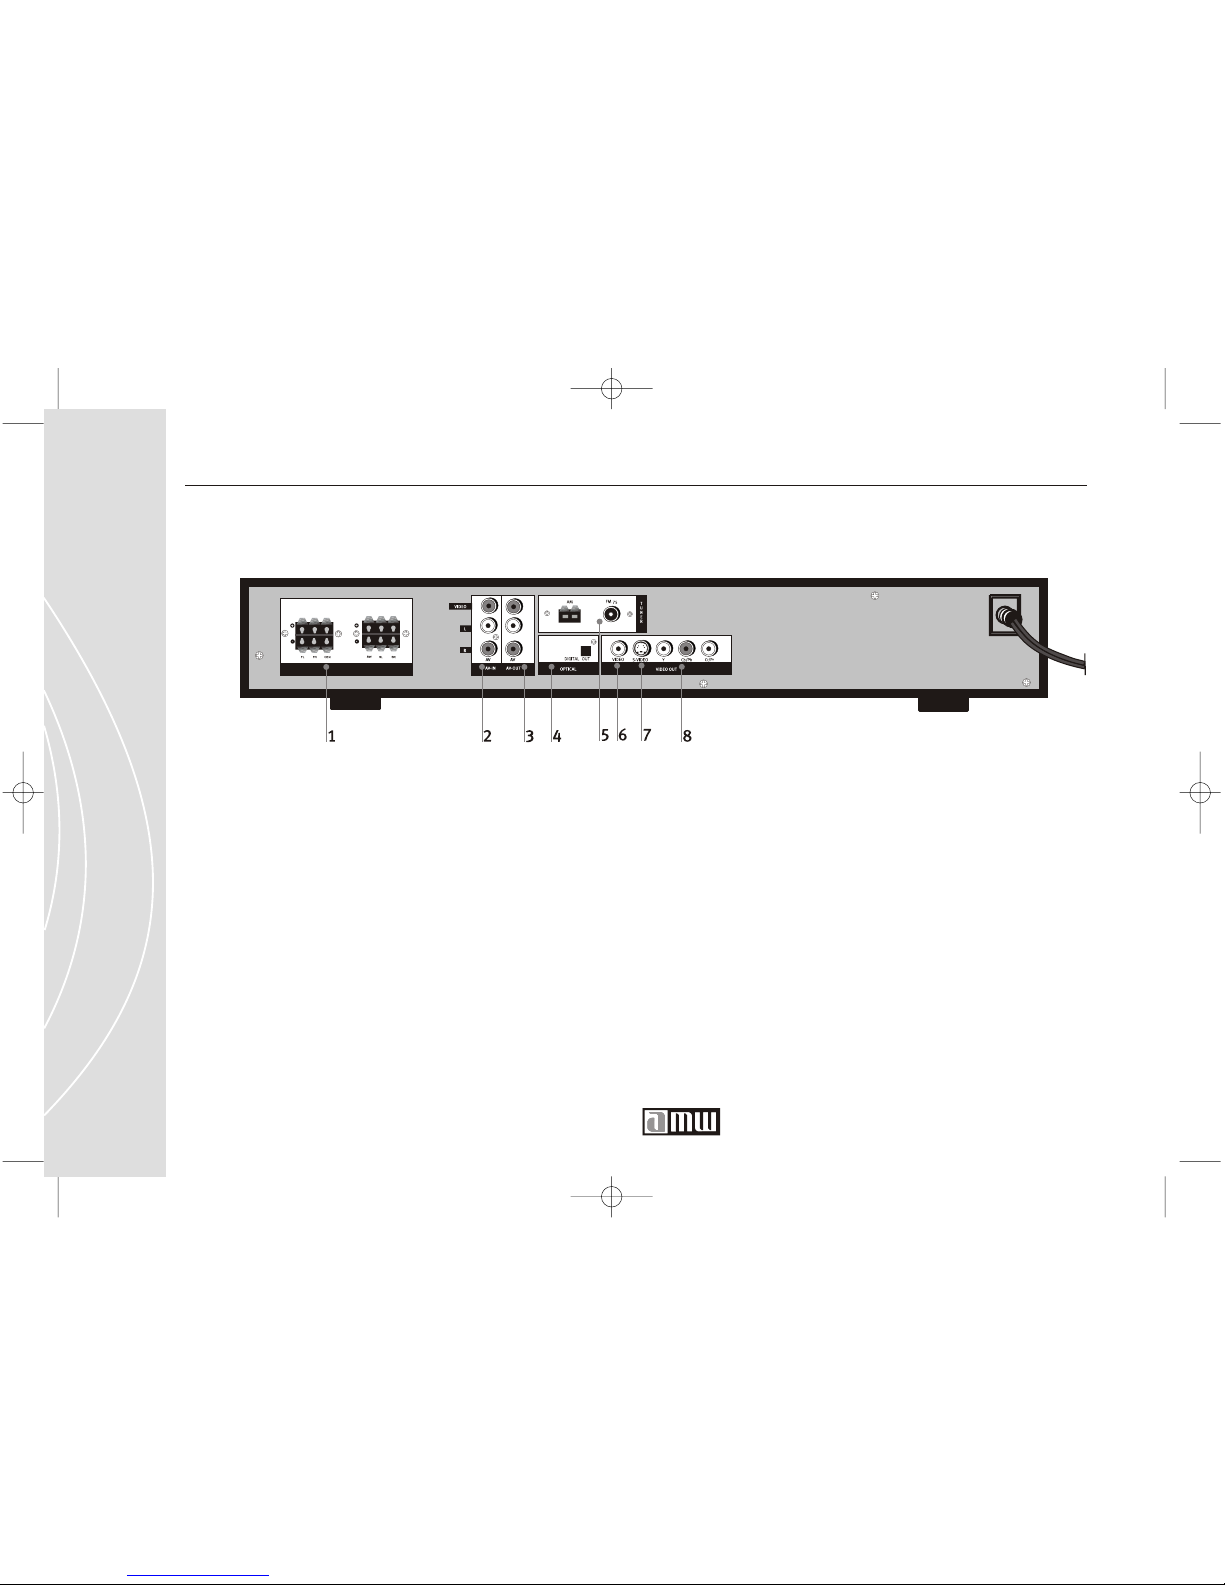
Rear Panel Description
1 5.1 Channels Audio Output Jacks
2 AV-IN input jacks
3 AV-OUT Output Jack
4 Optical Output Jack
5 Tuner Output Jacks
6 Video Output Jack
7 S-VIDEO Output Jack
8 Component Output Jack
SPEAKER
Page 17
17
Getting Started
1
2 3
4
5
6
7
8
9 10
12
11
13
15
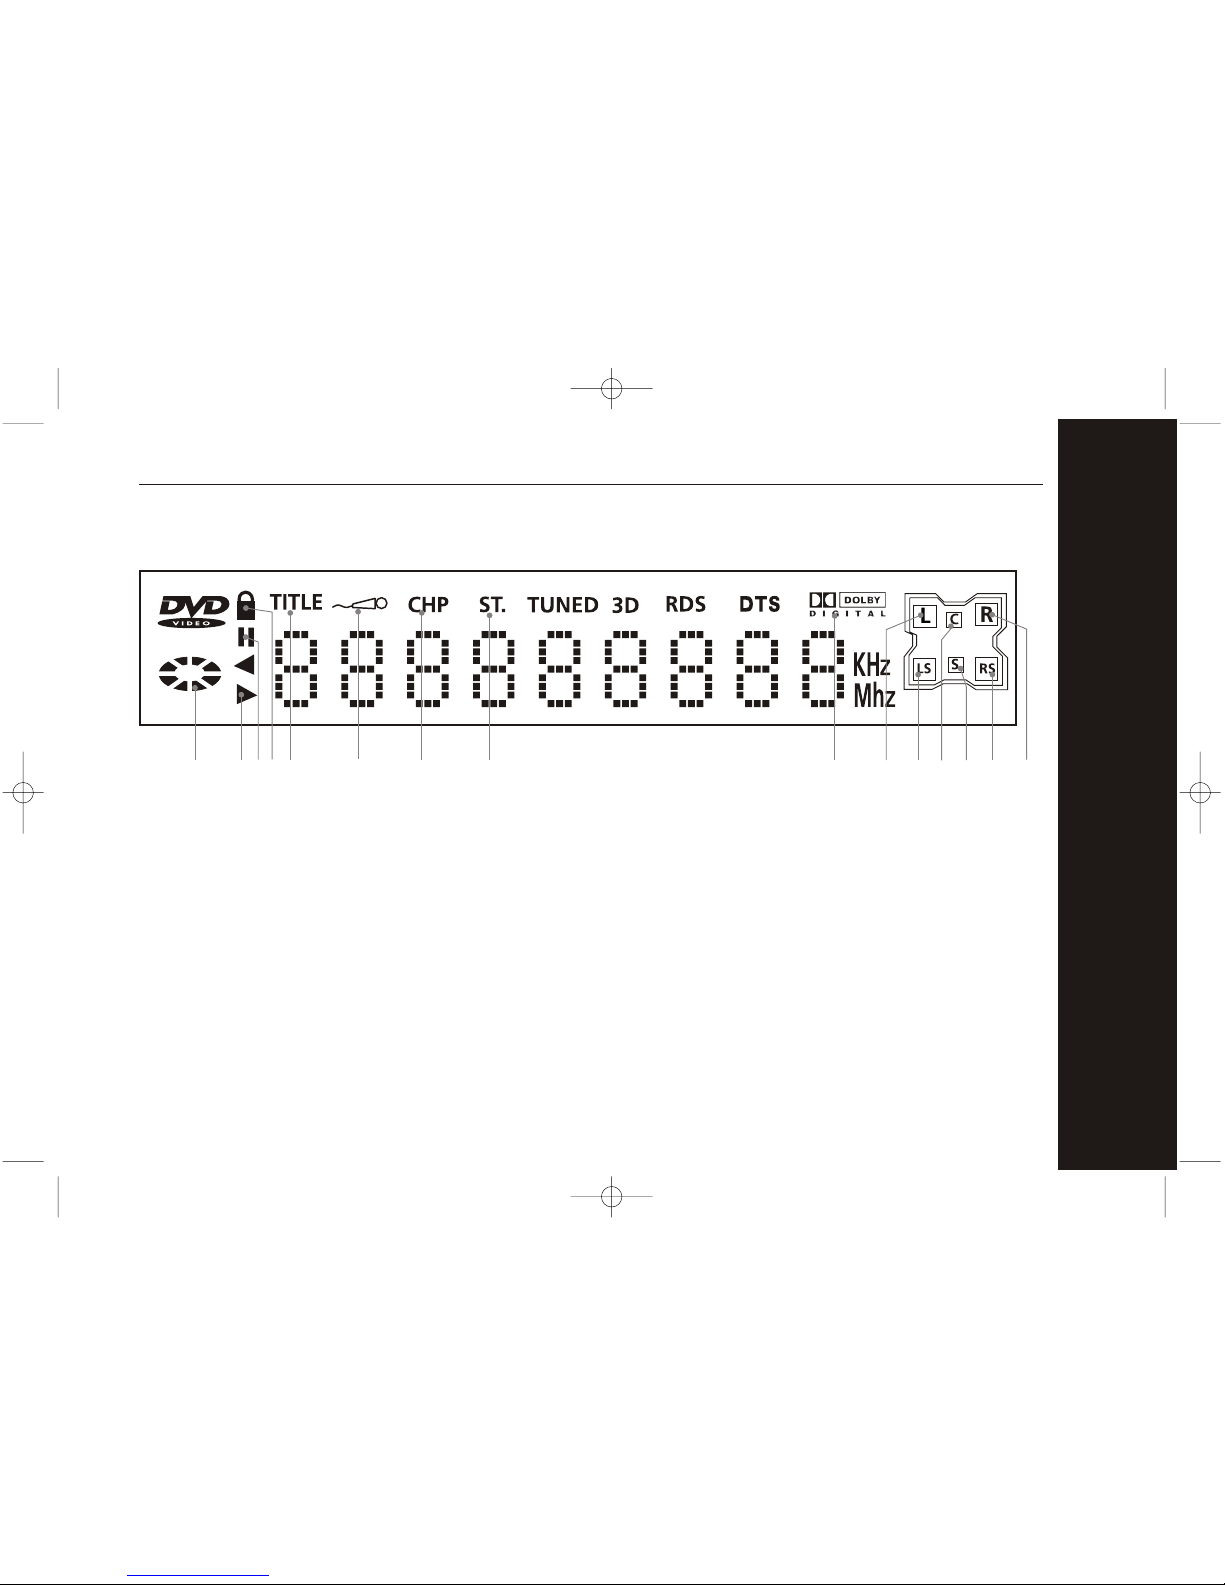
Display Panel Description
1 Playing
2 Play
3 Pause
4 Dividing Control
5 Title Number
6 Karaoke (option)
7 Chapter Number
8 Stereo
9 DOLBY DIGTIAL
10 Front Left Channel
11 Center Channel
12 Front Right Channel
13 Left Surround Channel
14 Subwoofer Channel
15 Right Surround Channel
14
Page 18
18
Customer Service 1 626 968 6860
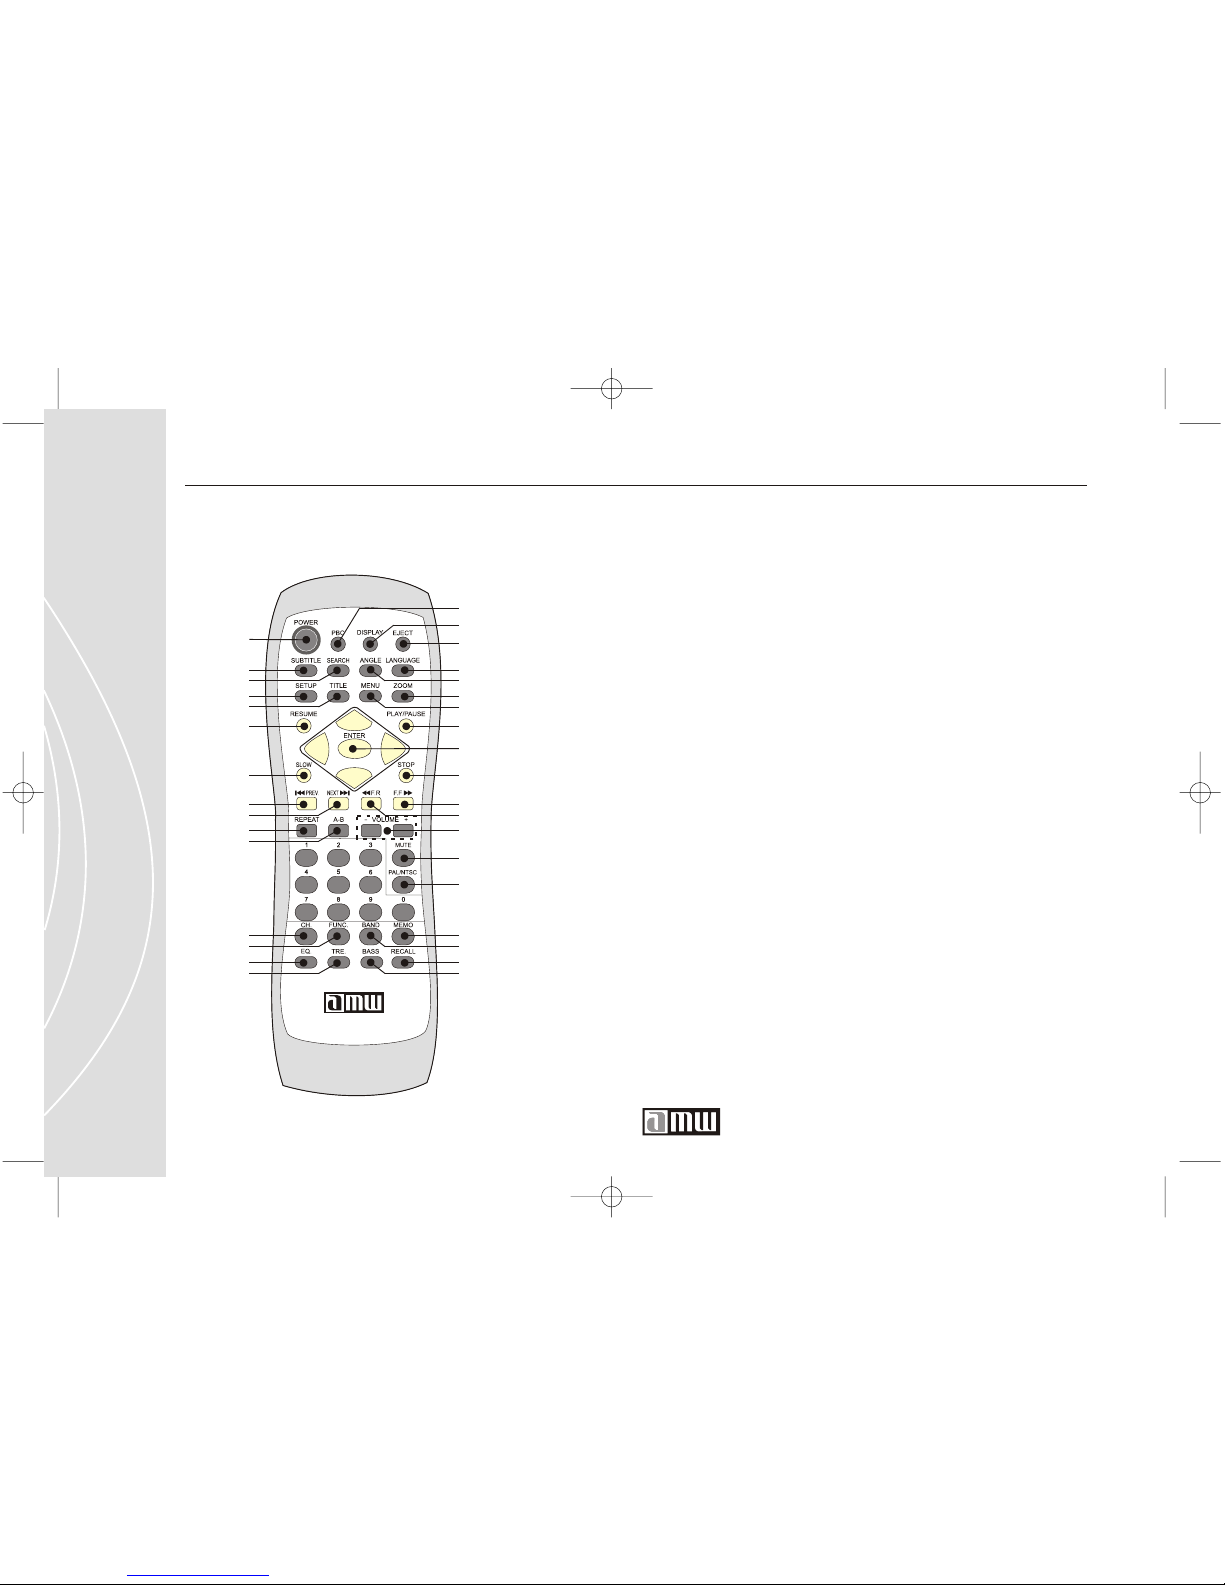
Remote Control
1 Power
2 PBC
3 Display
4 Eject
5 Subtitle
6 Search
7 Language
8 Angle
9 Setup
10 Title
11 Zoom
12 Menu
13 Resume
14 Play / Pause
15 Enter
16 Slow
17 Stop
18 Previous
19 Next
20 F. F.
21 F.R.
22 Repeat
23 A-B
24 Volume
25 Mute
26
Recall
27 Channel
28 Function
29 Memory
30 Band
31 EQ
32 Treble
33
PAL/ NTSC
1
2
3
4
8
13
14
15
16
17
25
5
6
7
9
10
11
12
21
18
19
20
22
23
24
26
30
27
28
29
34
31
32
33
34 Bass
Page 19

19
Getting Started
To operate the DVD player, you must first place batteries in the remote control.
1 Remove the battery cover on the back of the remote.
2 Insert 2 AAA batteries. Make sure the correct + and - on the batteries
match the marks inside the battery compartment.
3 Replace the battery cover.
Prepare the Remote Control
Page 20
20
Customer Service 1 626 968 6860
What Type of Video Connection Do You Have?
There are three ways that your DVD-Player can be connected to your TV or
other video display devices:
Composite- RCA-A/V Connection
S-Video (Super Video)
This type of connection is common with more recent models of TV s. S-Video
connections significantly increase the quality of the video signal compared to
an RCA A/V connection. This results in improved color reproduction and a
reduction in video noise that is common with other types of video
connections.
This type of connection is common with most TV s. An RCA A/V connector
cable is included with your T342 DVD Player. It provides less video and
sound quality than S-Video or Component Output connections, but it still
provides a good signal. The connectors on this cable are red/white (audio)
and yellow (video).
Page 21
Getting Started
21
An S-Video connector cable is not included with your DVD Player, but S-Video
connector cables are available in most home electronic stores.
Check your television or video display device to see which type of video
connection it supports. The following instructions will guide you in setting
up the type of video connection you choose.
Component Video Output
Component Video Output connections are for use with high quality TV s, such
as Plasma screen models, and other advanced video display devices. It
provides near-perfect digital picture.
Output connections can only be used when there is a dedicated Component
Input on the TV or video display device. A Component Video connector cable
is not included with your DVD Player, but Component Video Output cables are
available in most home electronic stores. The Component Video connector
cable has three separate video cables: green, blue, and red.
Page 22
22
Customer Service 1 626 968 6860
Video Connection
Always:
1.
Be sure to turn off the power and unplug all of the equipment from the
wall outlet before making any connections.
2. Refer to the instructions supplied with the TV or video display device to
be connected.
3. Do not connect this player to a video deck. If you do, noise may appear
in the picture.
Page 23
23
Getting Started
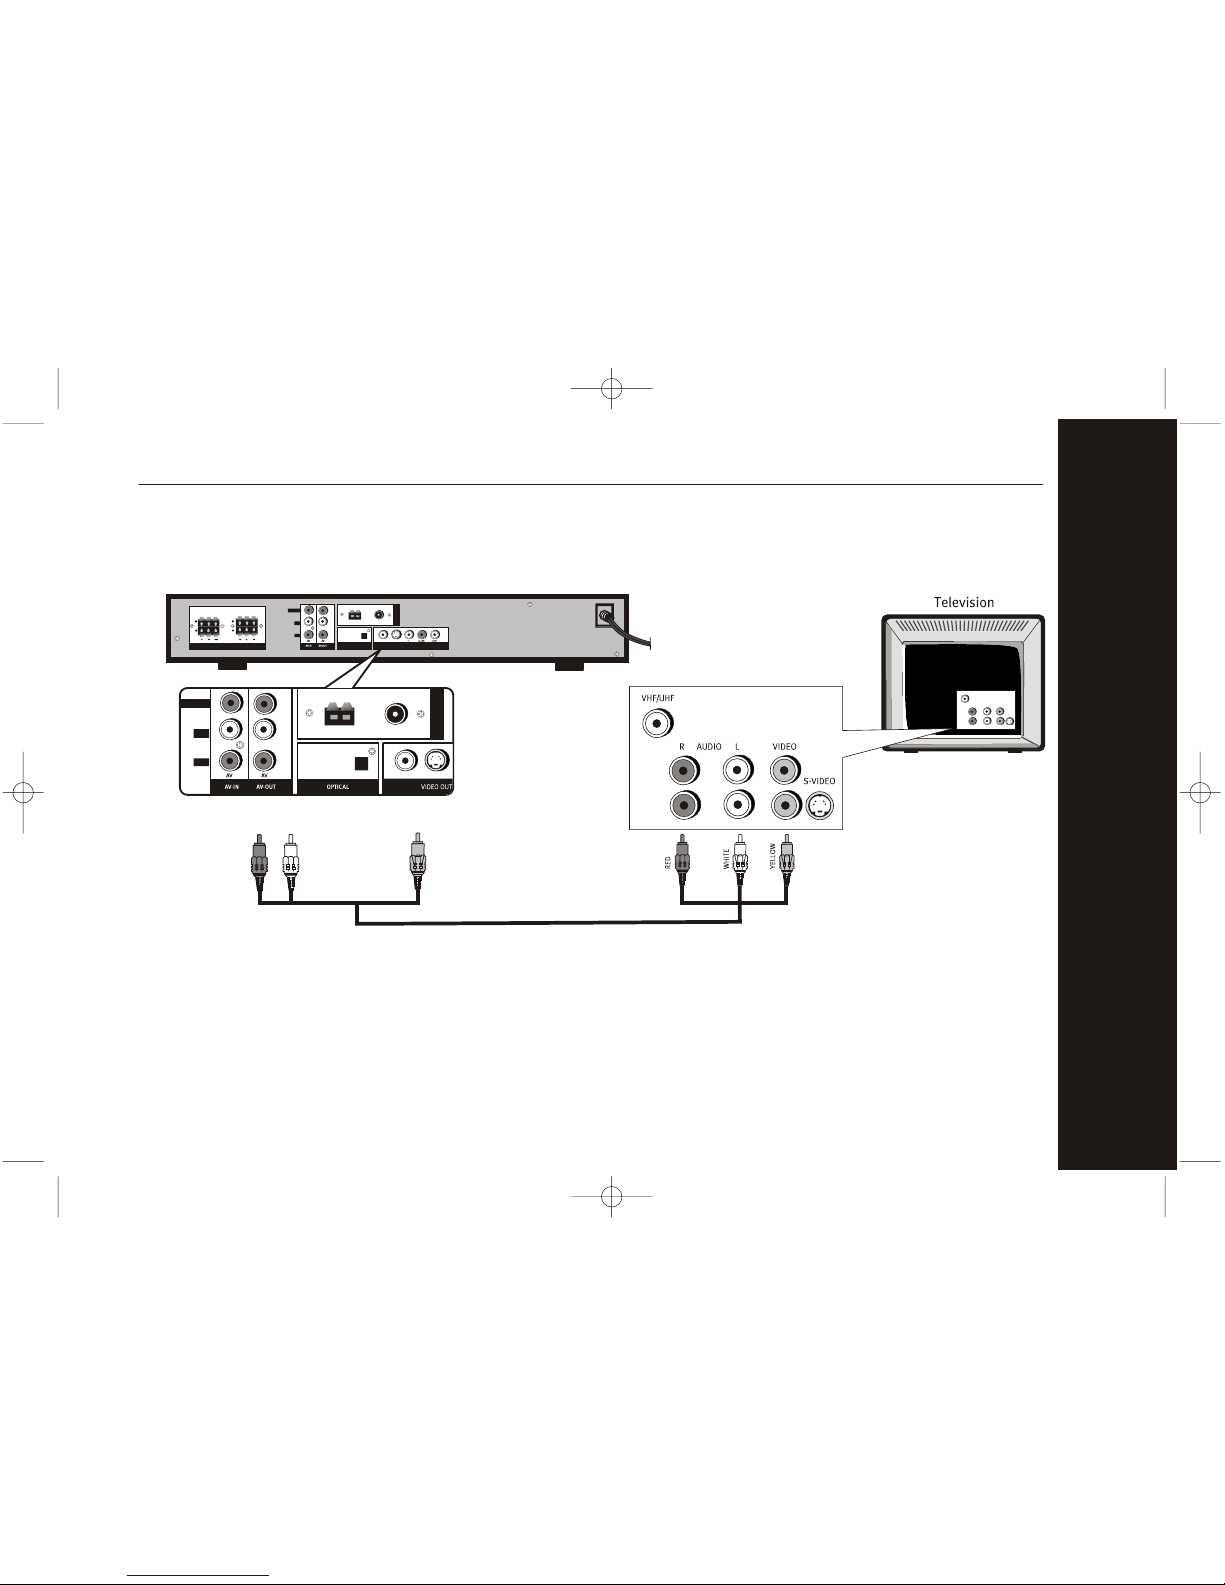
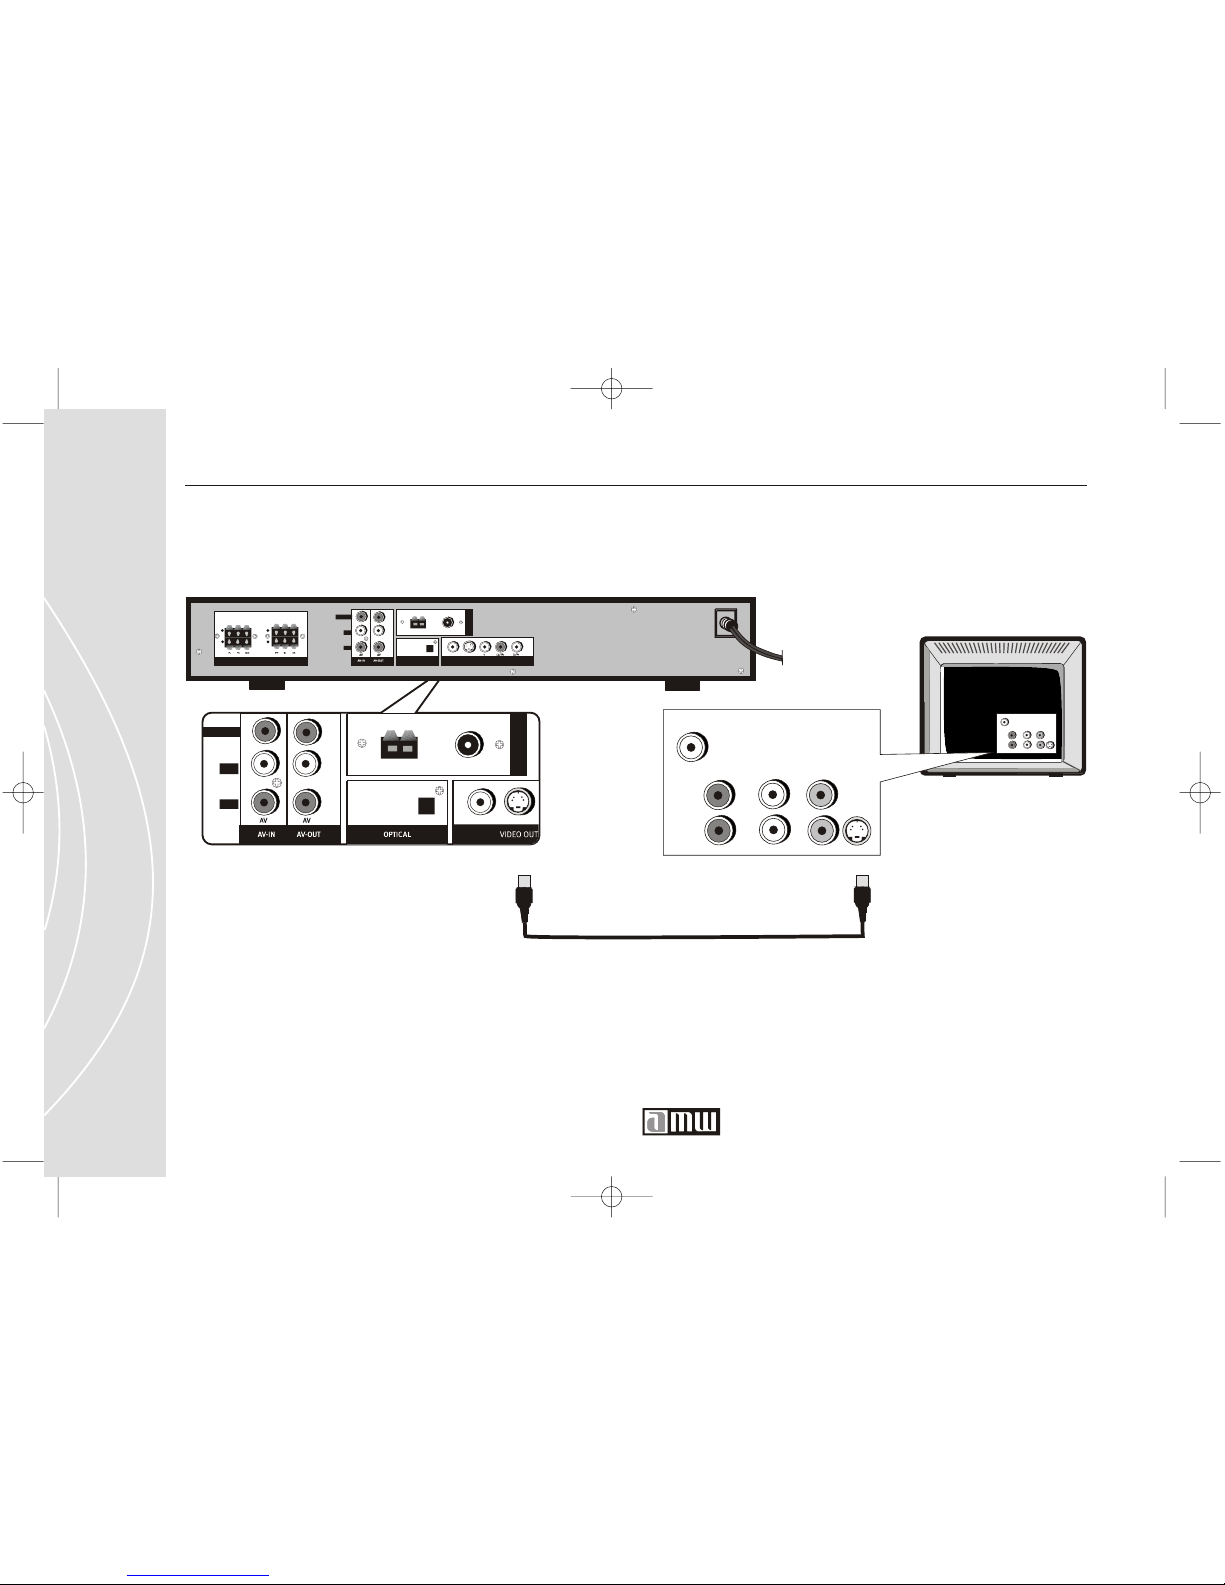
If your television has RCA A/V inputs, connect the A/V cable (supplied) from
these connectors to the A/V outputs from the DVD player as shown in the
above illustration.
Composite- RCA A/V Connection
VIDEO OUT
VIDEO
S-VIDEO
OPTICAL
OUT
DIGITA
L
T
U
N
E
R
FM 75
AM
VIDEO
L
R
+
-
+
-
VIDEO
S-VIDEO
OUT
DIGITAL
T
U
N
E
R
FM 7 5
AM
VIDEO
L
R
RED
WHITE
YELLOW
T342 DVD Player (back)
SPEAKER
Page 24
24
Customer Service 1 626 968 6860
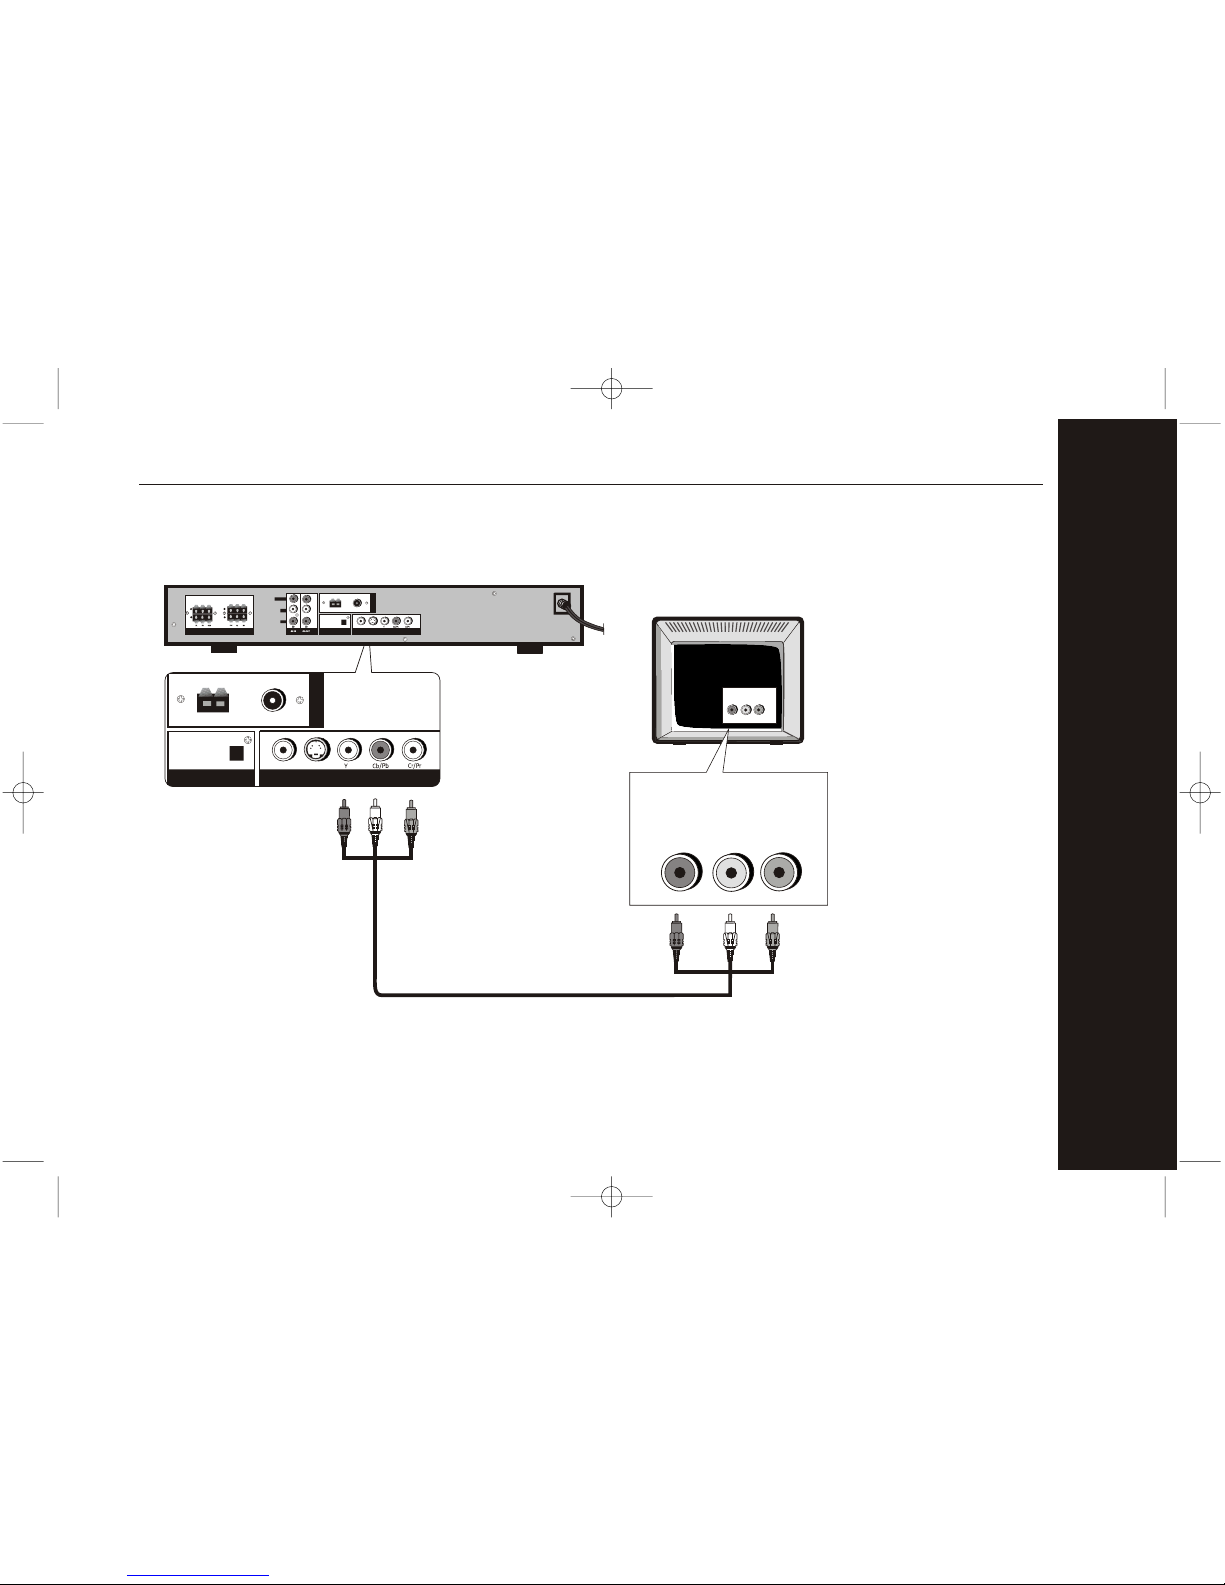
S-Video (Super Video) Connection
If your TV or video display device has an S-Video input, connect the S-Video
cable (not supplied) from the rear panel of the DVD player as shown in the
above illustration.
Television
VHF/UHF
R AUDIO L
VIDEO
S-VIDEO
BLACK
BLACK
VIDEO
S-VIDEO
OUT
DIGITAL
T
U
N
E
R
FM 75
AM
VIDEO
L
R
T342 DVD Player (back)
VIDEO OUT
VIDEO
S-VIDEO
OPTICAL
OUT
DIGITA
L
T
U
N
E
R
FM 75
AM
VIDEO
L
R
+
-
+
-
SPEAKER
Page 25
25
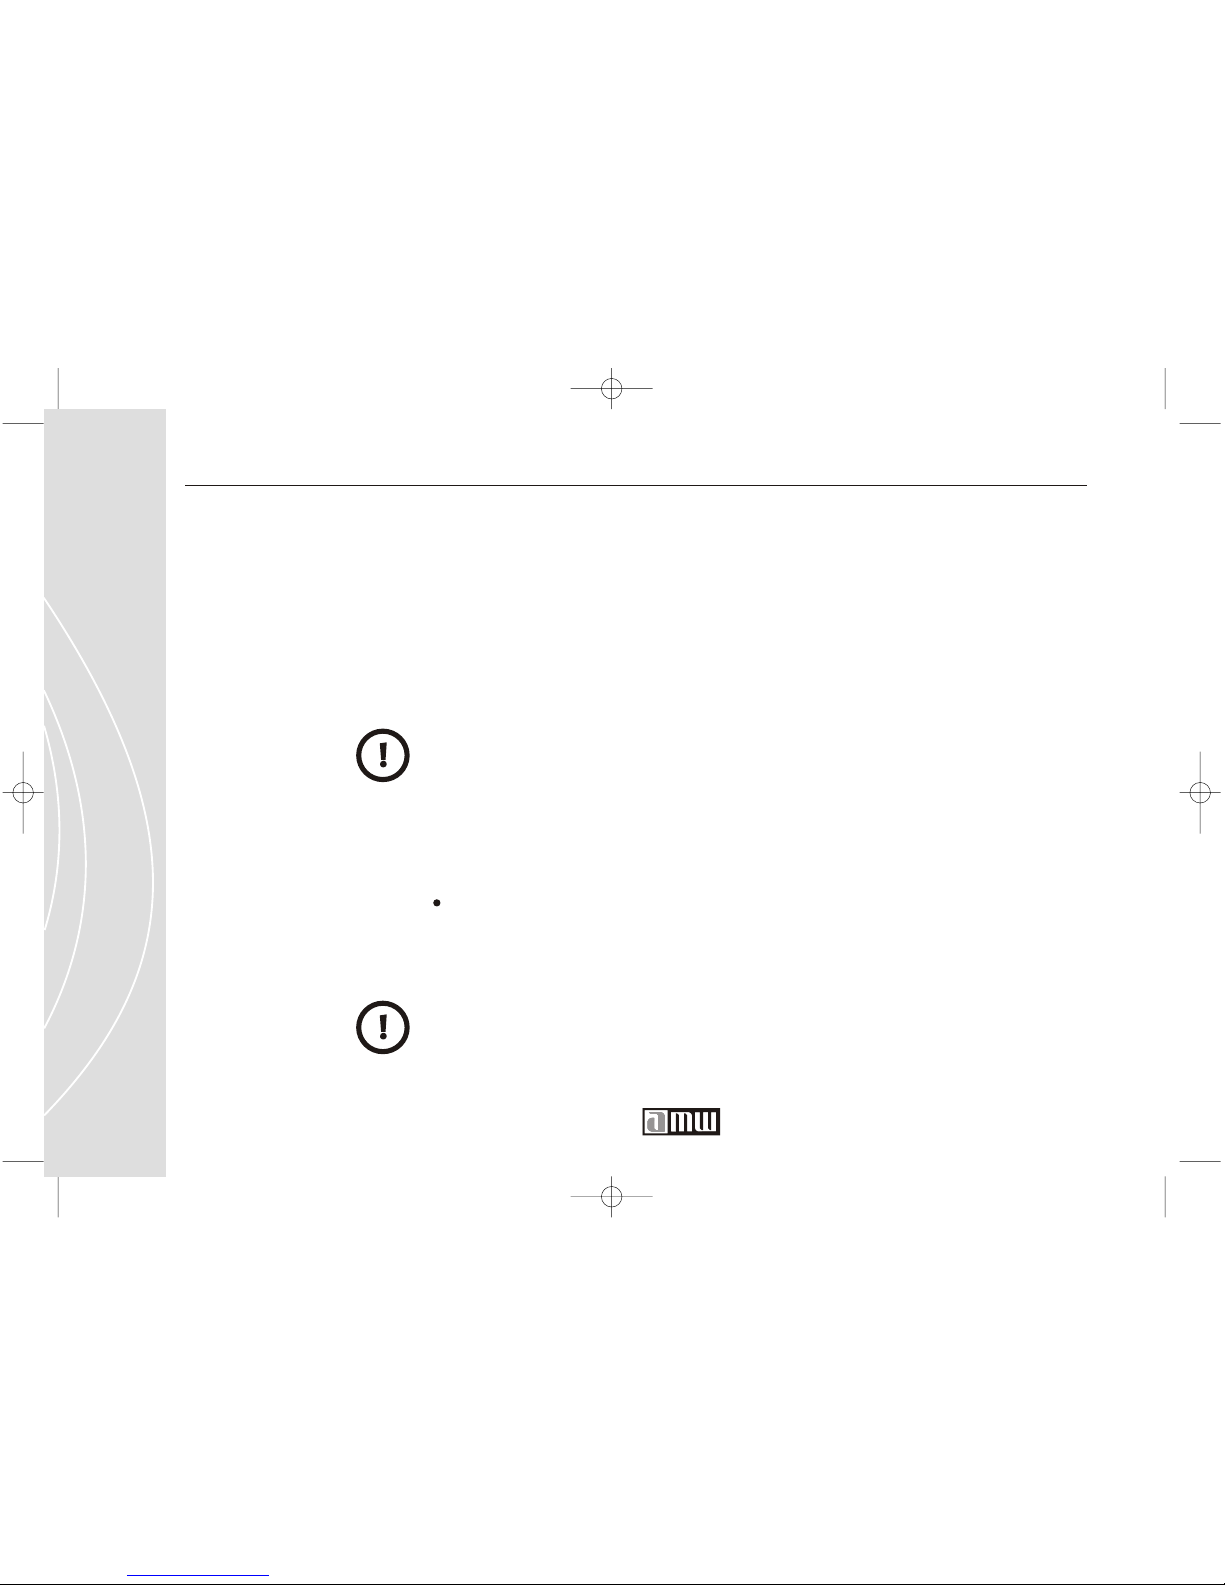
If your TV or display device supports a Component Video connection, connect
the Component Video Output cable (not included) from the rear panel of the
DVD player as shown in the above illustration.
Component Video Output
Getting Started
T342 DVD Player (back)
Television
RED
BLUE
GREEN
GREEN
BLUE
RED
Cr
Cb Y
Cr
Cb Y
VIDEO OUT
VIDEO
S-VIDEO
OPTICAL
OUT
DIGITAL
T
U
N
E
R
FM 75
AM
VIDEO OUT
VIDEO
S-VIDEO
OPTICAL
OUT
DIGITA
L
T
U
N
E
R
FM 75
AM
VIDEO
L
R
+
-
+
-
SPEAKER
Page 26
26
Customer Service 1 626 968 6860
What Type of Audio Connection Do You Have?
The T342 DVD Player provides multi-channel sound for a total home cinema
experience. If you own a home theater speaker system, this multi-channel
sound (front left and right, center, back left and right, and sub-woofer)
produces sound from 5 or more speakers spread around your room to
produce amazing sound effects.
There are three different types of audio connections available:
Direct Audio Connection to your TV
If your TV has RCA A/V inputs, the red (right) and white (left) cable inputs
provide the stereo sound to your TV. Refer to the RCA A/V Video connection
illustration on the previous page.
If your TV offers only one audio input, you would use only the white plug on
the RCA A/V cable to provide mono sound through both speakers.
If you don't own a home theater speaker system, you can still enjoy high
quality sound through your TV or stereo speakers, but the sound quality will
be in stereo (left and right audio signals only).
Page 27
27
Direct Audio Connection to your Stereo Receiver (Stereo Sound)
If your stereo receiver has an available RCA A/V input then you will be able to connect to the DVD
Player. If your stereo receiver is close enough to your TV then you can use the same RCA A/V cable
used to make the video connection from your DVD Player to your TV.
If you do not have sufficient length on the RCA A/V cable used to make the video connection from
your DVD Player to your TV, then you will need to use an additional cable.
Direct Audio Connection to your Stereo Receiver (Dolby Digital 2 / 5.1 Sound)
Dolby Digital 2 / 5.1 Sound provides higher clarity and expanded audio features because it supports
multiple audio channels (not just Right and Left as with Stereo signals) within a single digital signal.
This type of connection requires a stereo receiver with a built-in Dolby Digital decoder that will accept
the multi-channel digital signal. If your stereo receiver supports a Dolby Digital 2 or 5.1 connection,
then you will need to use a Coaxial Digital Connection cable (not included).
Check your television or stereo receiver to see which type of audio connection it supports.
The instructions below will guide you in setting up the type of audio connection you choose.
Getting Started
Page 28
28
Customer Service 1 626 968 6860
Audio Connection
Always:
1.
Be sure to turn off the power and unplug all of the equipment from the
wall outlet before making any connections.
2. Make sure to turn off the receiver before you connect or disconnect the
DVD player s power cord. If you leave the receiver power on, the speak
ers may be damaged.
3. The output sound of the DVD player has a wide dynamic range. Be sure
to adjust the receiver s volume to a moderate listening level. Otherwise,
the speakers may be damaged by a sudden high volume sound.
4. Refer to the instructions supplied with the TV or video display device to
be connected.
Page 29
29
VIDEO OUT
VIDEO
S-VIDEO
OPTICAL
OUT
DIGITA
L
T
U
N
E
R
FM 75
AM
VIDEO
L
R
+
-
+
-
SPEAKER
Getting Started
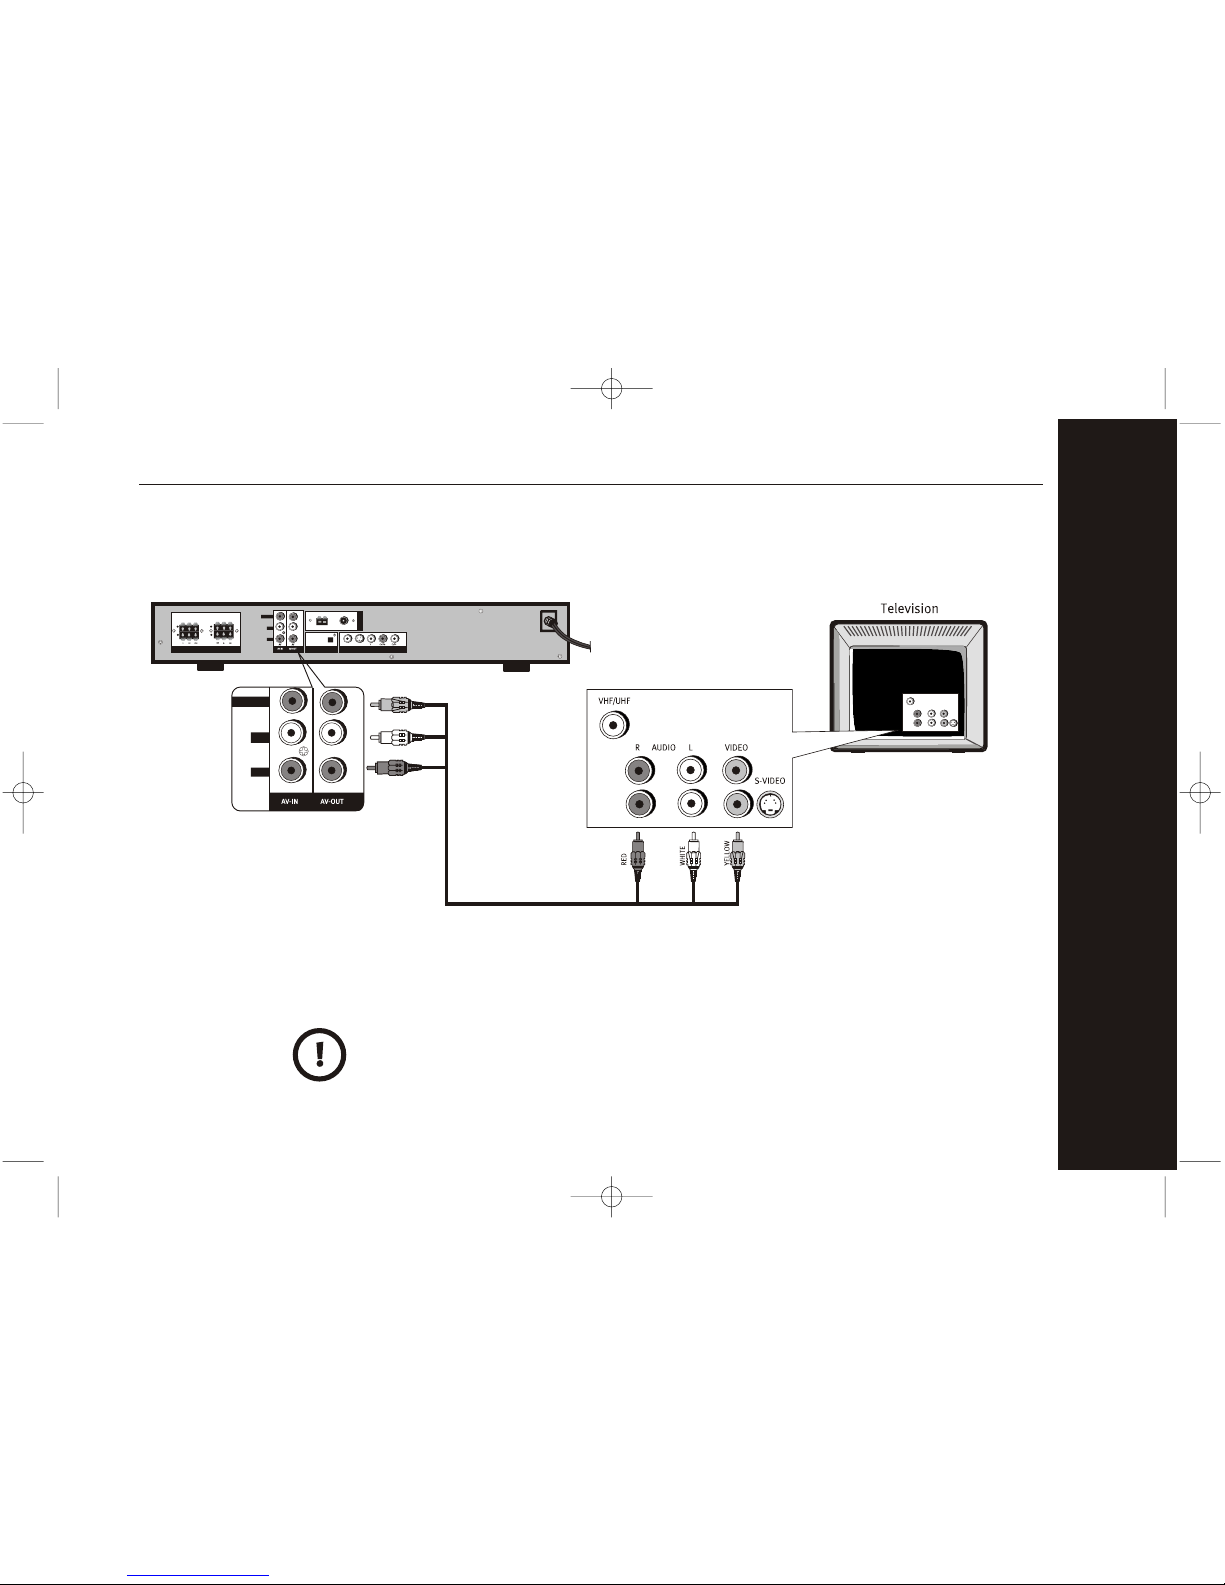
Direct Audio Connection to your TV
Connect the red (right) and white (left) plugs on the RCA A/V cable to the red
and white RCA A/V inputs on your TV.
If your TV offers only one audio input, you would use only the white plug on
the RCA A/V cable to provide mono sound through both speakers.
T342 DVD player (back)
RED
WHITE
YELLOW
VIDEO
L
R
AV AV
Page 30
30
VIDEO OUT
VIDEO
S-VIDEO
OPTICAL
OUT
DIGITA
L
T
U
N
E
R
FM 75
AM
VIDEO
L
R
+
-
+
-
SPEAKER
Customer Service 1 626 968 6860
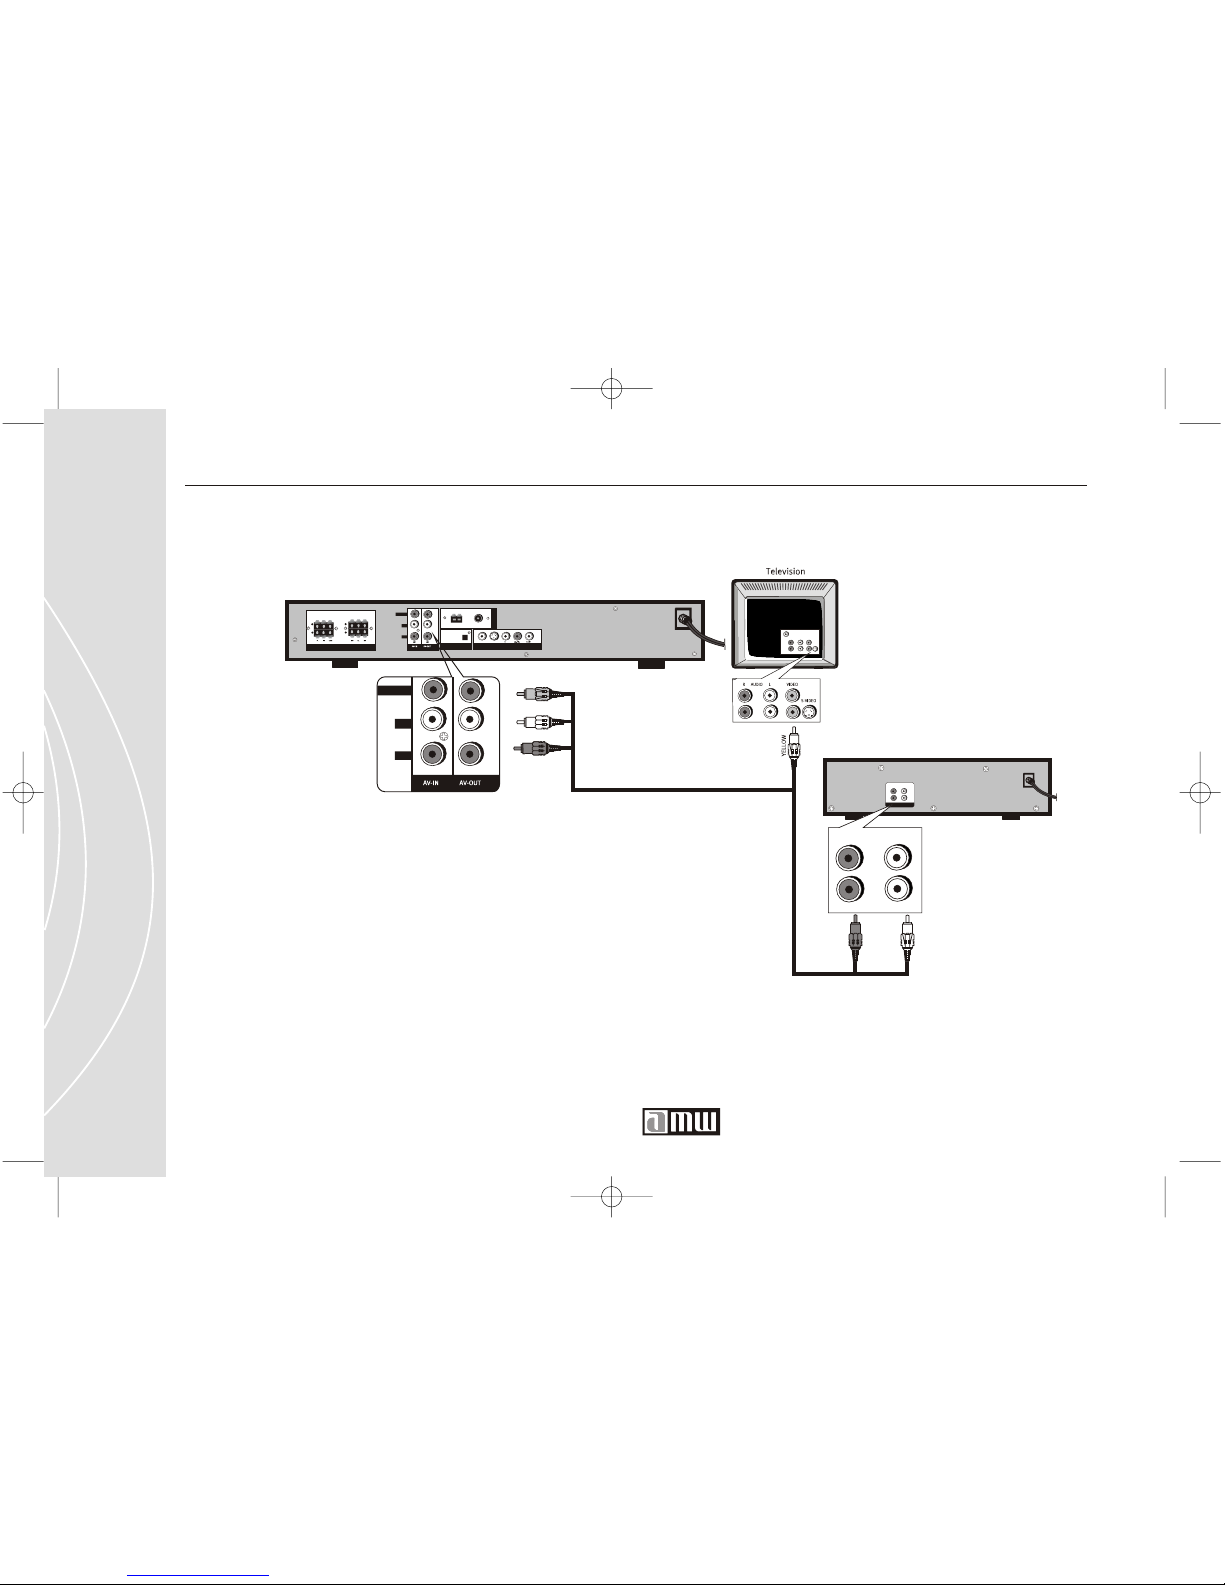
Direct Audio Connection to your Stereo Receiver (Stereo Sound)
If your stereo receiver is close enough to your TV then you can use the same
RCA A/V cable used to make the video connection from your DVD Player to
your TV. Connect the red (right) and white (left) cable plugs to the RCA A/V
inputs on your stereo receiver.
T342 DVD player (back)
RED
WHITE
YELLOW
Stereo Receiver (back)
RED
WHITE
Audio out
R AUDIO L
R AUDIO L
VIDEO
L
R
AV AV
Page 31
31
Getting Started
If you do not have sufficient length on the RCA A/V cable used to make the
video connection from your DVD Player to your TV, then you will need to use
an additional cable. Using the additional cable, just connect the red (right)
and white (left) cable plugs from your DVD Player to the RCA A/V inputs on
your stereo receiver.
Direct Audio Connection to your Stereo Receiver (Stereo Sound) (continued)
Page 32
32
VIDEO OUT
VIDEO
S-VIDEO
OPTICAL
OUT
DIGITA
L
T
U
N
E
R
FM 75
AM
VIDEO
L
R
+
-
+
-
SPEAKER
BLACK
VIDEO
S-VIDEO
OUT
DIGITAL
T
U
N
E
R
FM 75
AM
STEREO (back)
Audio out
R AUDIO L
VIDEO
Opticall
R AUDIO L
VIDEO
Optical
Customer Service 1 626 968 6860
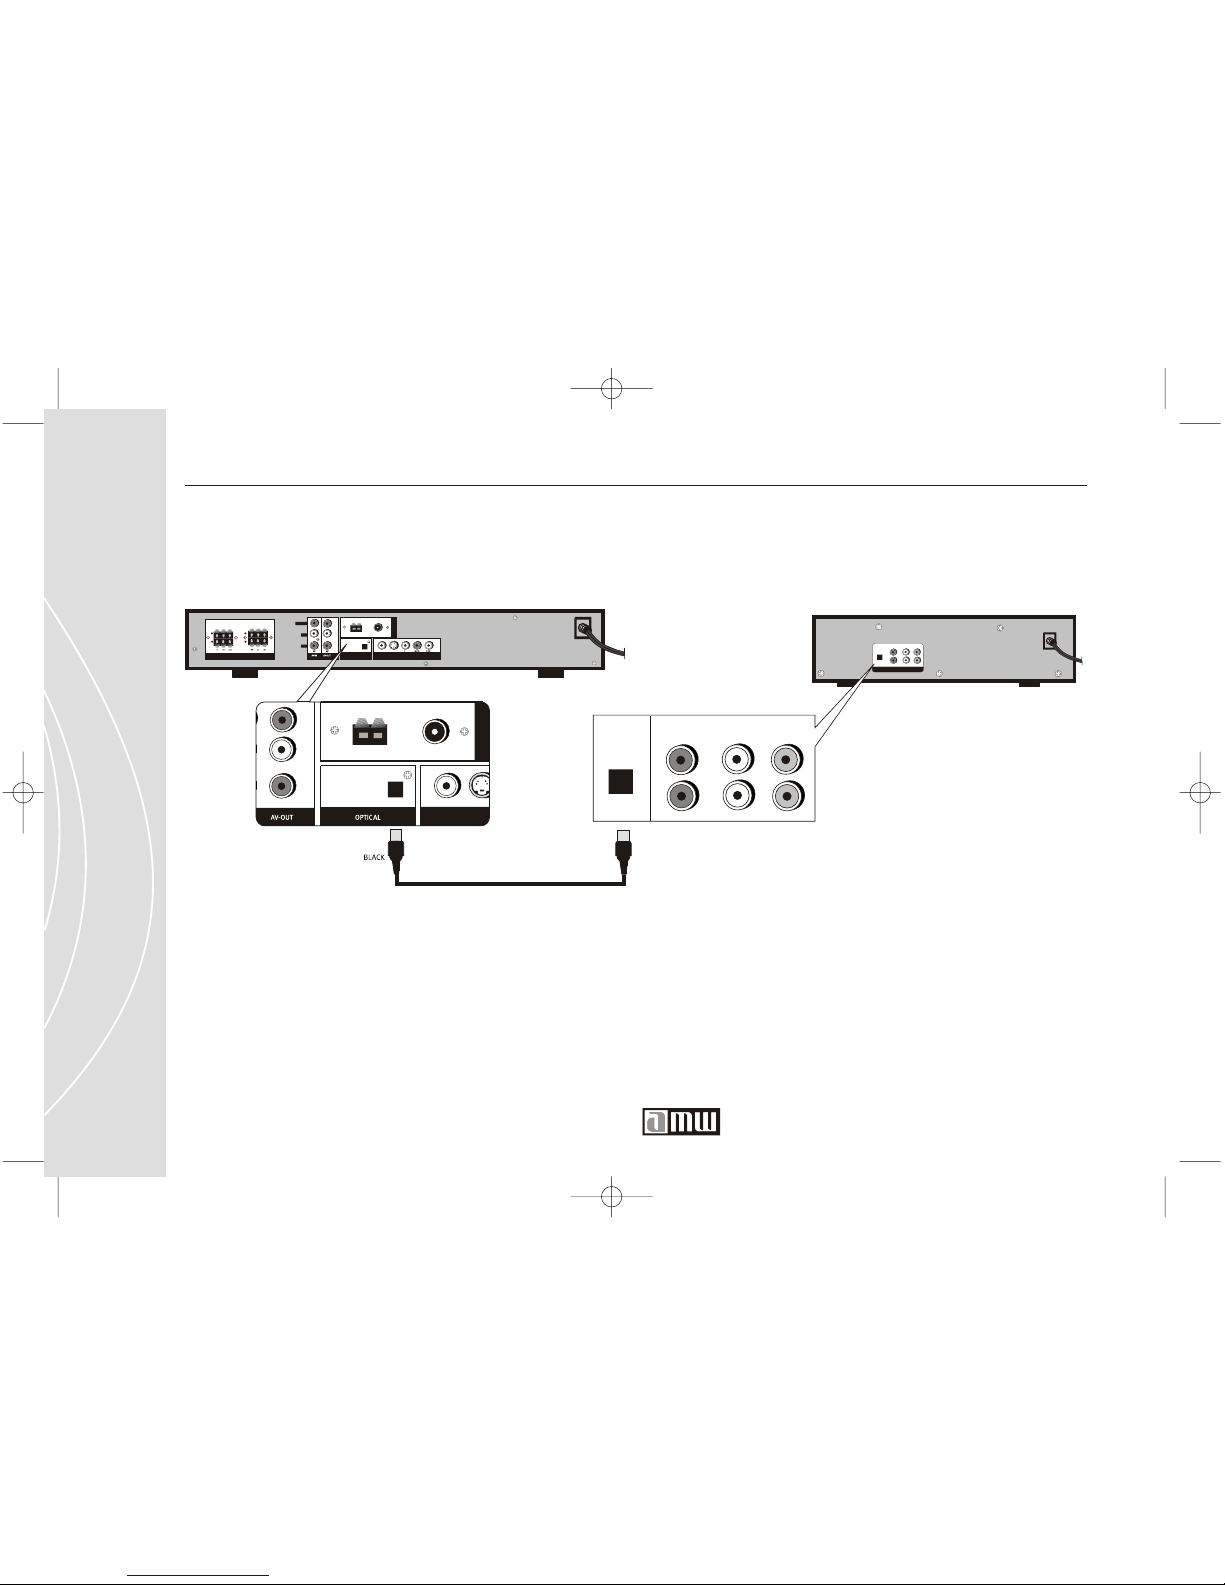
Direct Audio Conection to your Stereo Receiver (Dolby Digital 2 / 5.1)
If your stereo receiver allows a Dolby Digital 2 / 5.1 connection, you will need
a Optical cable (not included). Conect the digital Optical cable from the back
of the DVD player to the back panel of the stereo receiver. You will have to
go to the System Preferences Screen( page 68) and select Audio
configuration/ Audio out and finally SPDIF/SPDIF RAW.
T342 DVD player (back)
Stereo
Page 33

33
Getting Started
Page 34
34
Customer Service 1 626 968 6860
Audio Connection
The T342 Home Theater System provides Dolby Digital 2 / 5.1 Sound for a
total home cinema experience. Dolby Digital 2 / 5.1 Sound provides higher
clarity and expanded audio features because it supports multiple audio
channels (not just Right and Left as with Stereo signals) It's multi-channel
sound (front left and right, center, back left and right, and sub-woofer)
produces sound from its 5 speakers spread to produce amazing sound
effects.
Page 35
35
Getting Started
Before Connecting the DVD Player/Receiver
to the Speakers Always:
1. Be sure to turn off the power and unplug all of
the equipment from the wall outlet before
making any connections.
2. Make sure to turn off the receiver before you
connect or disconnect the DVD player's power
cord. If you leave the receiver power on, the
speakers may be damaged.
3. The output sound of the DVD player has a
wide dynamic range. Be sure to adjust the
receiver's volume to a moderate listening
level. Otherwise, the speakers may be
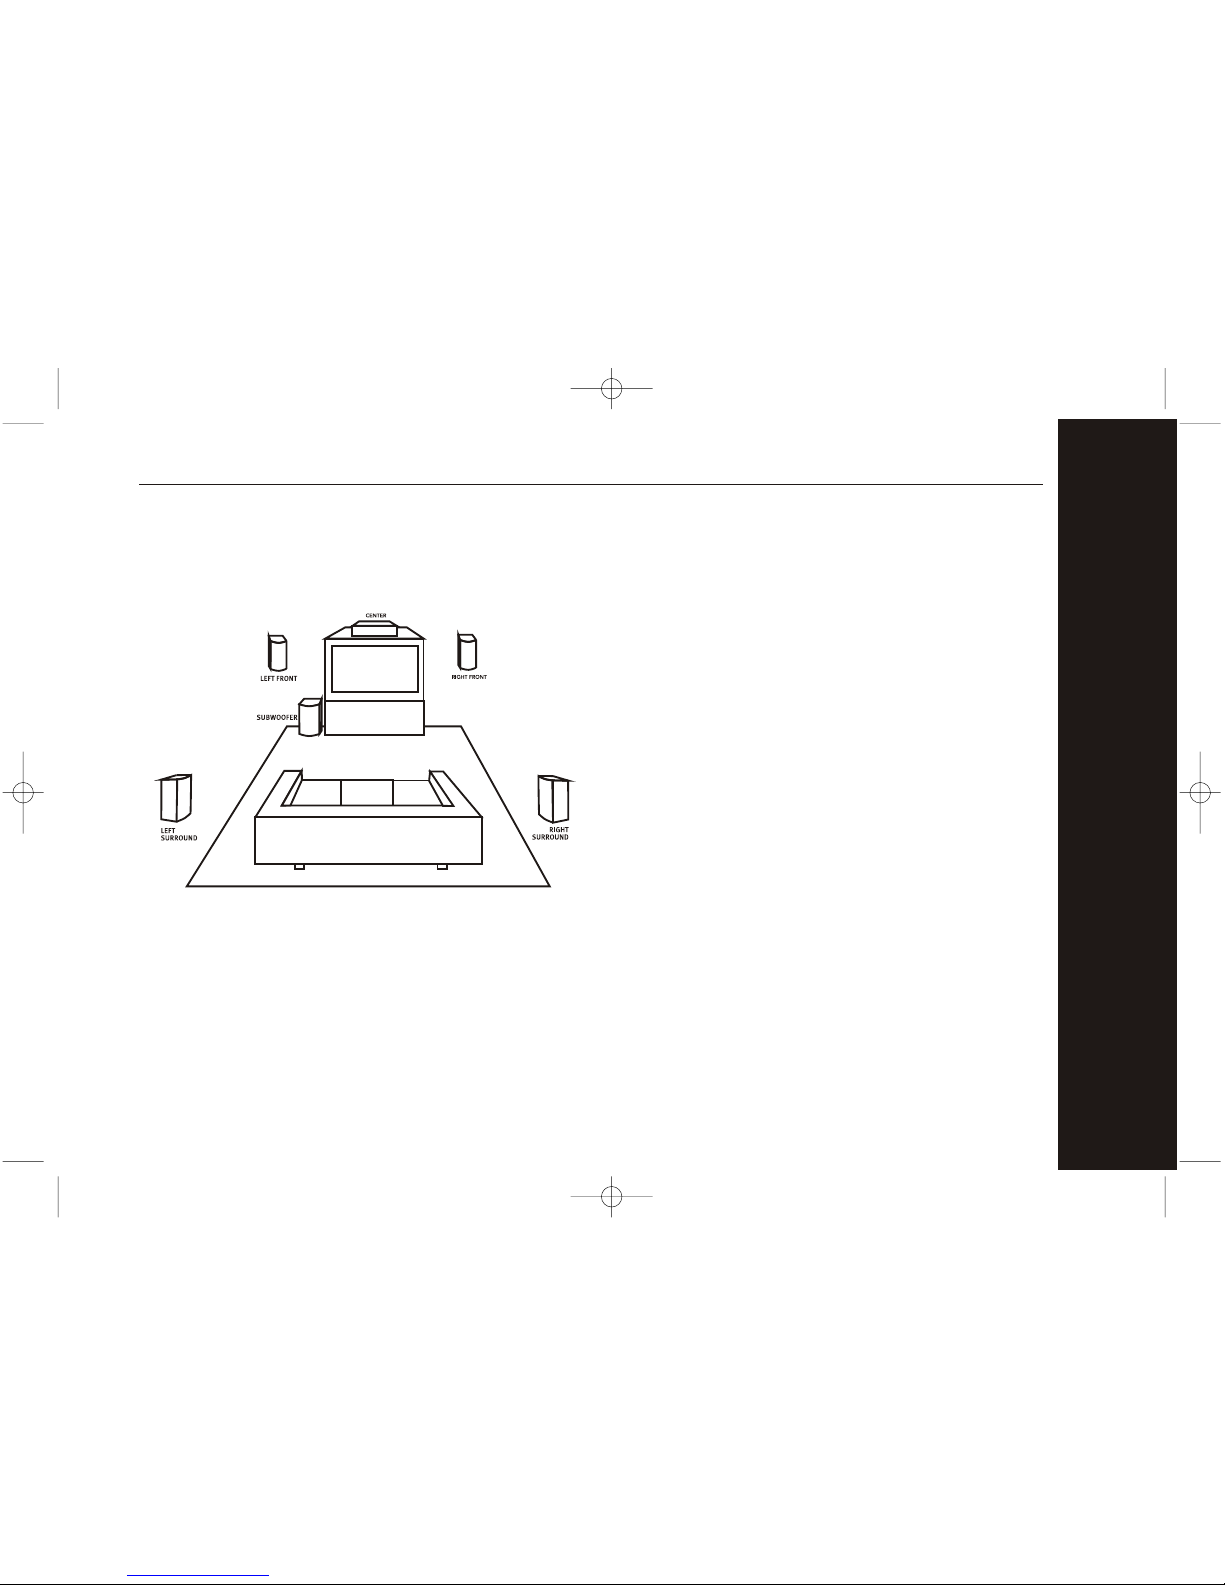
damaged by a sudden high volume sound. Placement of the Home Theater Speakers
Page 36
36
VIDEO OUT
VIDEO
S-VIDEO
OPTICAL
OUT
DIGITA
L
T
U
N
E
R
FM 75
AM
VIDEO
L
R
+
-
+
-
SPEAKER
Customer Service 1 626 968 6860
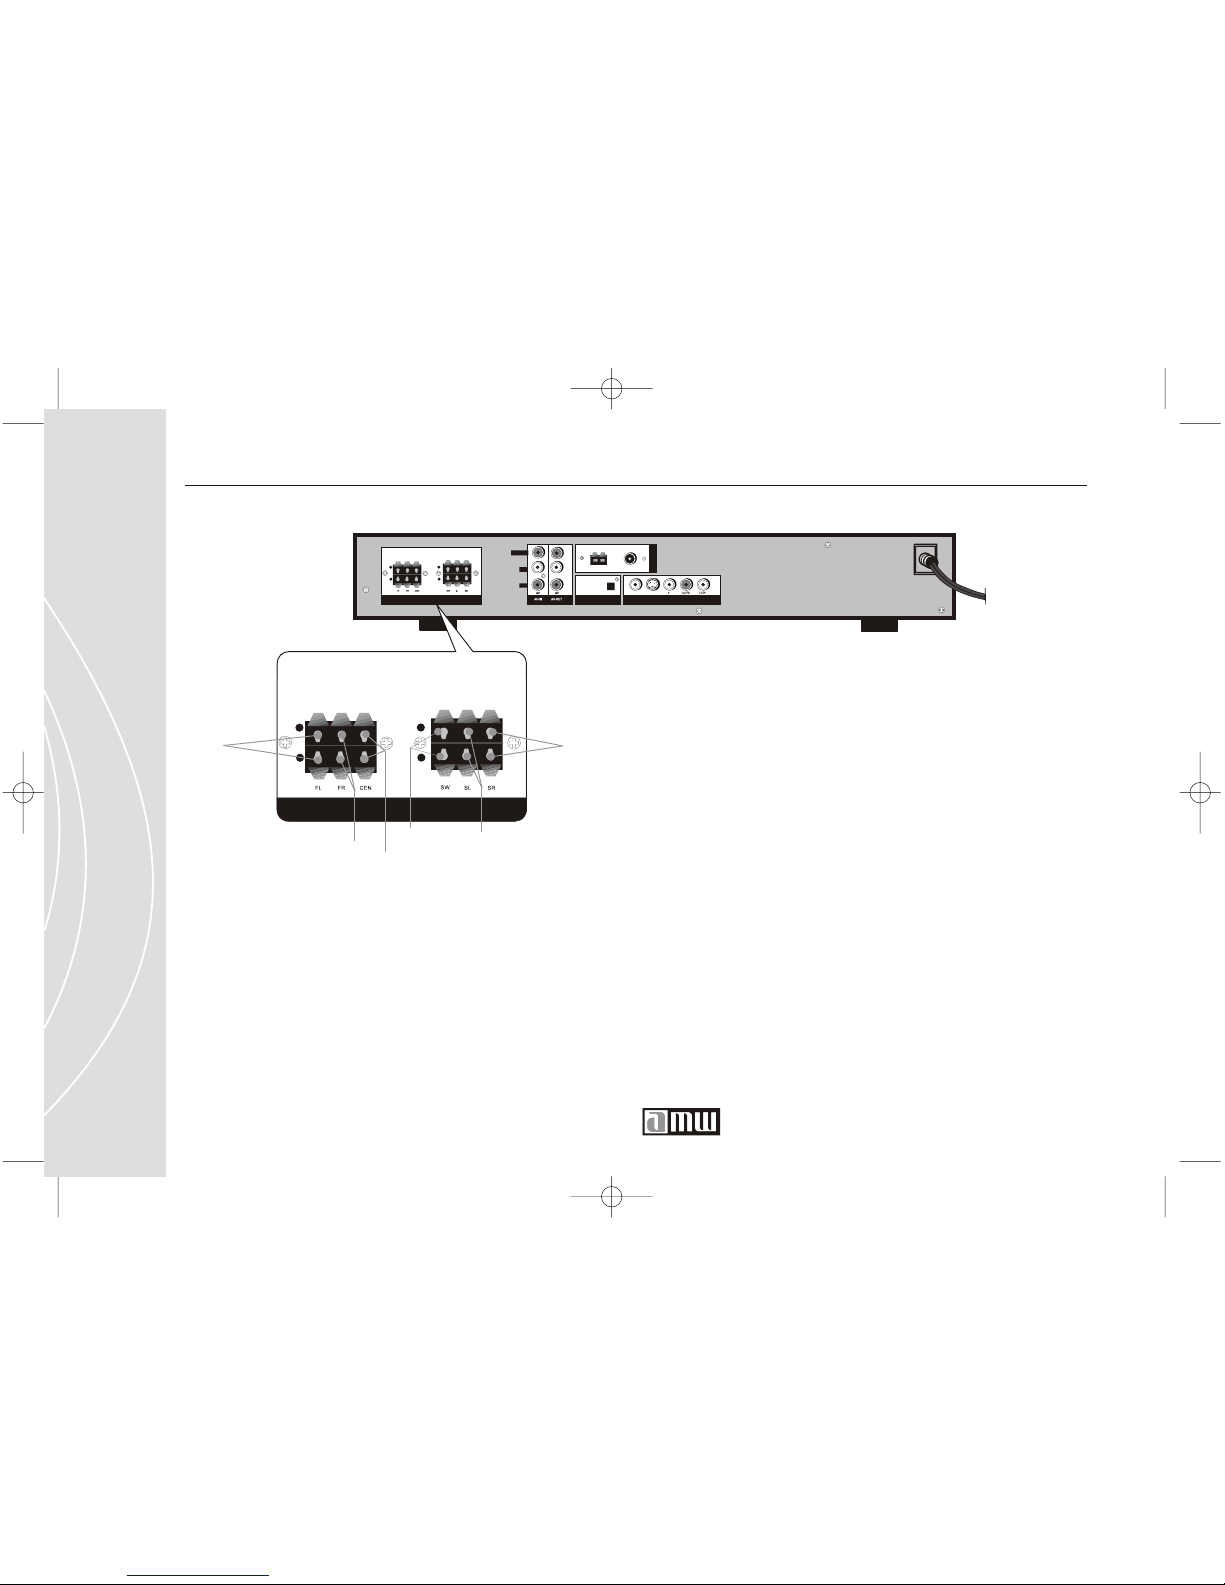
Connect the Home Theater speakers with the proper gauge of wire, cut to be
as short as possible. Press the speaker wire terminal tabs down, then insert
the bare wires and secure them by releasing the tabs. If these connections
are faulty, no sound will be heard from the speakers. Make sure that the
polarity of the speaker wires is correct, that is, that the + and - markings are
obsered. If these wires are released, the sound will be unnatural and will
lack bass. Do not coil up excess speaker wire or bundle the speaker cables
with the power cords.
SPEAKER
+
-
+
-
LEFT
FRONT
SPEAKER
RIGHT
FRONT
SPEAKER
CENTER
SPEAKER
SUBWOOFER
LEFT
SURROUND
RIGHT
SURROUND
Page 37
37
Getting Started
Your DVD Player/Receiver also has 1 A/V inputs
and 1 A/V output. You can connect up to two other
A/V devices using RCA A/V cables (not included).
Your DVD Player/Receiver also has one Digital
input and output for connection. Connect the DVD
Player/Receiver to another device through Digital
Out. When adding another source of Device to this
DVD Player, connect through Digital IN.
Your T342 DVD Player is also has a Radio Tuner
function. To enable this function, connect the FM
antenna (included) or AM antenna (included)
to the corresponding outlets in the rear of the DVD
Player unit.
Radio Tuner Antenna Connection
Page 38
Page 39

Basic Operations
39
Basic Operations
In this section you will become acquainted with the basic operations of your
AMW T342 DVD Player.
Playing a DVD Disc
1. Turn on the TV.
2. Put the disc you preferred into the disc tray and close the tray by press-
ing "OPEN/CLOSE" or "EJECT" for remote controller.
3. The DVD player will play the disc automatically.
Page 40
40
Customer Service 1 626 968 6860
1. POWER
Press this button to turn on Player, and press
again to turn off the power. Press the power
button on the remote controller to turn on
Player, and the power symbol will be shown
on the screen.
2. EFFECT: button that activates the sound
effects function. There are 7 types EQ
settings.
3. FUNC.: button that activates the
function
option. "AV1" "AV2" "SPDIF IN"
"TUNER" "DVD PLAYER". It's a recurring
operation.
Front Panel Buttons
4. BAND: button that activates the band
function.
5. STAND BY: light that shows player is on
standby mode.
6. RADIO: light that shows radio is selected.
Page 41
41
Basic Operations
10. Display Window
Window that projects any options selected
(for more info see page 17).
11. OPEN/CLOSE: Open or Close the Tray.
12. PLAY/PAUSE/MEMO: Starting to play
or momentarily stops the program on the disc.
13. STOP/RECALL: Stopping play.
MEMO:
Press the key for approximately 2.5 seconds to
acess the memo Station mode. Press again to
locate the desired memo station (from 1-20).
Select the desired radio station and press "memo"
to set the selected station. (Please see page 49
for detail operation.)
RECALL:
Recall (To Store Radio Station)
Press and hold the key (fro approximately 2.5
sec) and access the memo station mode. Keep
on pressing the recall key to see change of memo
station from (1-20) in each AM/FM mode. Release
the recall button when the desired station is
found to store it into the memory. Press and hold
the key again to search for next desired station to
be stored, and release the button when it's found
to save that station into the memory. Repeat the
Process until all desired station have been stored.
7. STEREO: Light that shows stereo is selected.
8. AV: Light that shows AV is selected.
9. DVD tray: used to load and unload DVD discs.
Page 42
42
Customer Service 1 626 968 6860
14. & 15. FAST FORWARD and FAST REWIND
The speed changes each time press " ", " "
during play as 2x 4x 8x 16x 32x for DVD.
Press again for each kind of discs to restore
normal play mode.
PREV. and NEXT
During play. A chapter is skipped
to next one each time the button is pressed.
PREVIOUS during play when the button
is pressed once midway through a chapter, play
returns to the start of that chapter. When it is
pressed again, skips to the start of the next
chapter.
Reverse Direction For ward Direction
16. VOLUME
Buttons to raise and lower the volume.
Press " "
Press " "
17. LED INDICATOR
The LED light will be flashing during of the
following conditions.
1). When the player is during "loading" state.
2). When the player is on "stand by" state and
a disc inside the player.
This function is to remind user that there is still
a disc inside the machine without the machine
being operated.
Page 43
43
Basic Operations
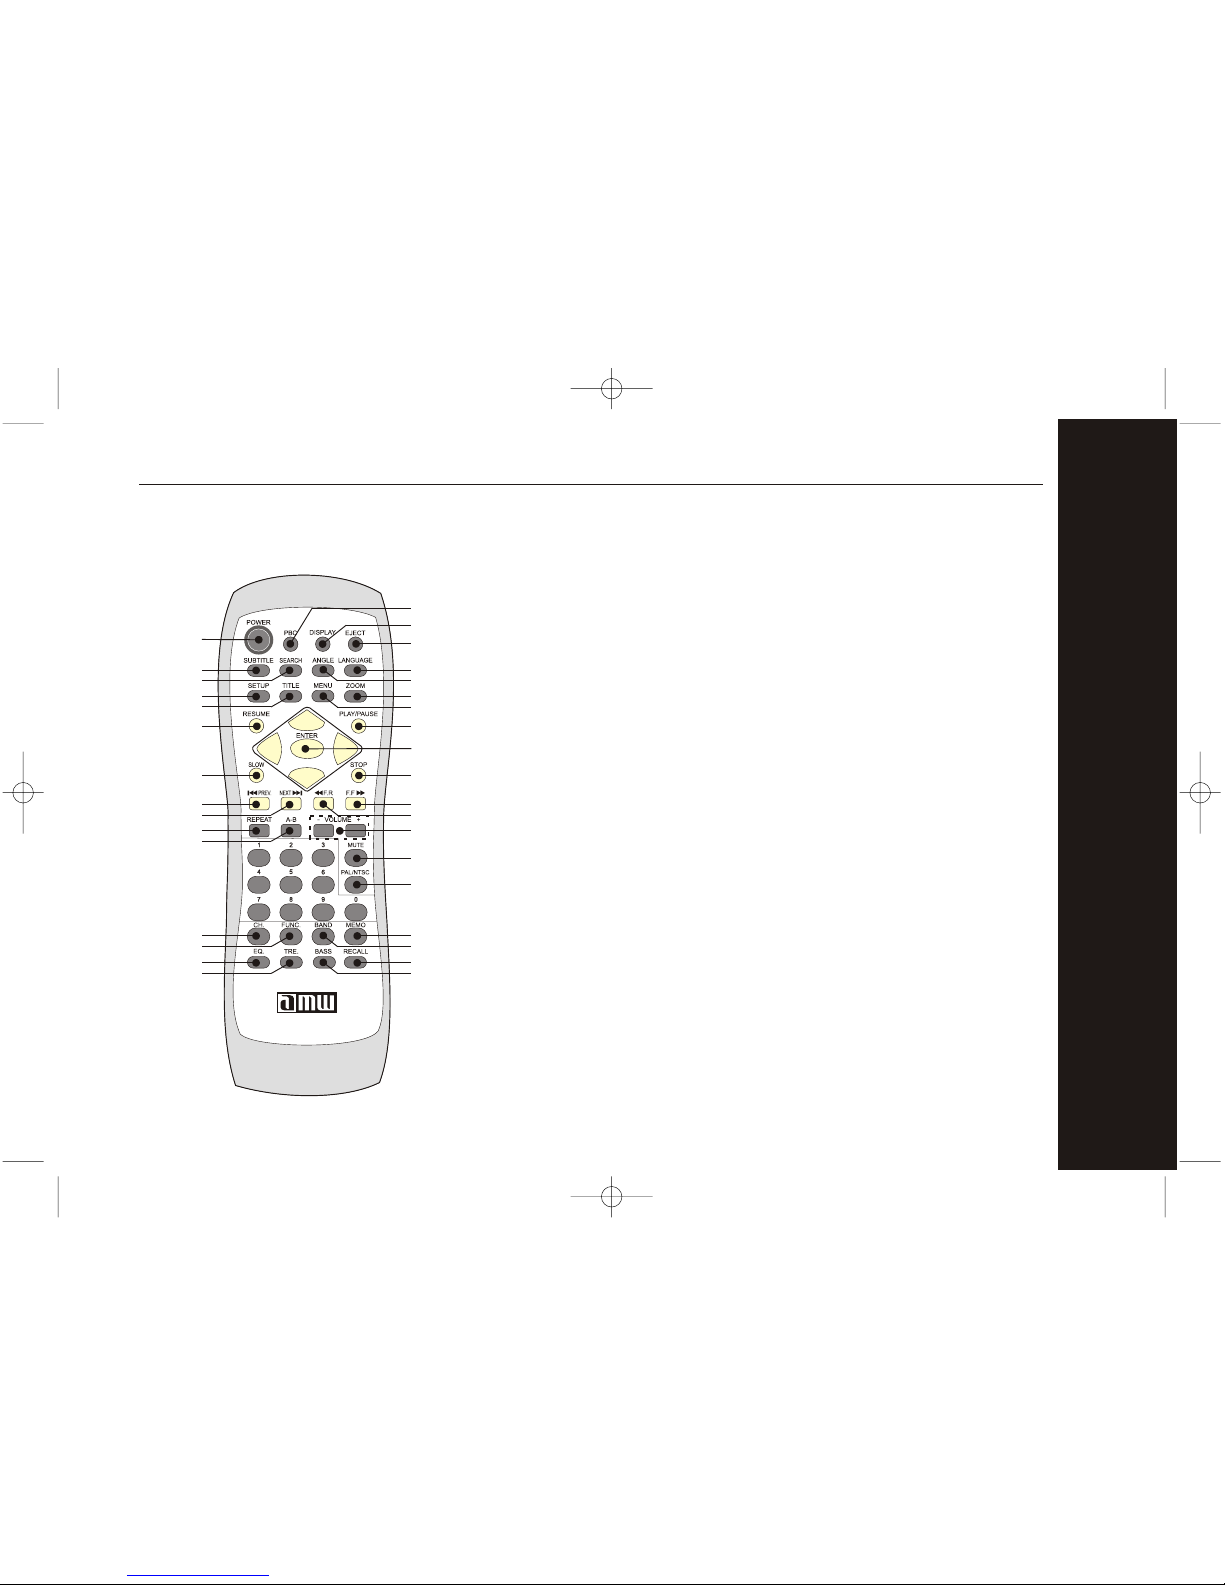
Remote Control Buttons
1. POWER
Press this button to turn on Player, and the logo
will be shown on the screen. Press again to turn
off the player.
2. PBC
program selected chapter. After this material is
completed, the root menu will appear. Press
(off) to play movie uninterrupted.
3. DISPLAY
Press this button once to display Title elapsed time.
Press this button twice to display Title remain time.
Press this button third time will display Chapter
elapsed time, fourth time will display Chapter
remain time, fifth time will display Displlay off.
1
2
3
4
8
13
14
15
16
17
25
5
6
7
9
10
11
12
21
18
19
20
22
23
24
26
30
27
28
29
34
31
32
33
Page 44
44
Customer Service 1 626 968 6860
5. SUBTITLE
If the disc has two or more subtitles recorded on
it, they can either be displayed or cleared on the
screen.
1.
Press "SUBTITLE" during play. It will show as
many subtitles as the disc has on the screen.
2. Subtitle will not be displayed while it shows
SUBT ITLE OFF on the TV screen.
In some cases, the subtitle language is not changed immediately to the selected one. When the
preferred language is not selected, even after
pressing the button several times, it means that
the language is not available on the disc. This
function is only for the DVD disc. When the power
is turned off or the disc is removed, subtitles
appear, even after pressing the button several
times, then that subtitle language has not been
programmed on your DVD disc and is not available.
4. EJECT
Press "EJECT" to open the disc tray. Place a disc on
the tray dish. Hold the disc without touching edge
of its surface, position it with the printed title side
facing up, align it with the guides, and place it in
its proper position. Press "EJECT" to start playing.
Then the disc tray will automatically close and
start playing if the disc does not have any menu
recorded on it. If the disc has one or more titles
recorded on it, the menu screen will appear on
the TV monitor.
Page 45

45
Setting Up the S yst em Pr ef er ence s
Basic Operations
6. SEARCH
This description is divided into 3 parts.
1. When you are playing a "DVD":
Press "SEARCH" while a disc is playing and
a menu will be shown on the screen.
There are 9 modes can be chosen, including:
"Title", "Chapter", "Audio", "Subtitle",
"Angle", "TT Time", "Ch Time", "Repeat"
and "Time Disp".
Press " " to select different modes,
Press "Enter" to select the detail information.
2.
When you are playing a "VCD":
Press "SEARCH" while a disc is playing and
a menu will be shown on the screen.
There are 5 modes can be chosen, including:
"Track", "Disc Time", "Track Time", "Repeat"
and "Time Disp".
Press " " to select different modes,
Press "Enter" to select the detail information.
3.
When you are playing a "CD":
Press "SEARCH" while a disc is playing.
There are 3 modes can be chosen, including:
"Disc Go To", "Track Go To", and "Select Track".
Page 46
46
Customer Service 1 626 968 6860
8. ANGLE
Some DVD discs may contain scenes that have
been filmed simultaneously from a number of
different angles. For these discs, the same scene
can be viewed from each of these different angles
using the "ANGLE" button.
9. SETUP
Press this button to access the System Setup Menu.
10. TITLE
Press TITLE for the preferred menu of title
options. Use the direction keys and press "PLAY"
to make the selection. Play of the selected item
now commences.
12. MENU
2. Press direction key to select the preferred
title.
3.
Press "PLAY" . The selected title now starts to
play.
Press "MENU" to go to menu screen. Play is
suspended, and the title menu is displayed.
Press "RESUME" to return to the previous screen.
1. Press "MENU" during play. A list of the titles
on the disc will be displayed.
7. LANGUAGE
It is possible to change the language of the audio
soundtrack. This operation works only with discs
on which multiple audio soundtrack languages are
recorded). Press "Language" to show the language
options on the screen. Continue pressing the
"Language"button untio your desired language is
displayed.
11. ZOOM
Each time this button is pressed, the image
enlarges. Each time you press the button, the
image enlarges as 2x 3x 4x 1/2x
1/3x 1/4x to restore image's normal size.
•
Page 47

47
Basic Operations
13. RESUME
Press to return to the beginning screen.
14. PLAY/PAUSE
Press PAUSE during play to freeze the picture.
Press PLAY again to return to normal play.
15. PLAY/ENTER
Press ENTER to select a Menu Option.
16. SLOW
Press LOW in the play mode. The slow motion
changes each time this button is pressed as
1/2x
1/4x 1/8x ...(DVD) restore normal
play mode.
17. STOP
Press the "STOP" button then the DVD video
player is stopped.
18. PREVIOUS
During play
Press " " NEXT during play. A chapter is skipped
to next one each time the button is pressed.
When the button is pressed once midway through
a chapter, play returns to the start of that chapter.
When it is pressed again, a chapter is skipped
each time the button is pressed.
19. NEXT
Press NEXT during Play
Press to go to the next chapter or track.
Page 48
48
Customer Service 1 626 968 6860
20. & 21. F.F. and F.R.
The speed changes each time press
during play as 2x 4x 6x 8x ...for DVD.
And press again for each kind of discs to restore
normal play mode.
( Reverse Direction For ward Direction)
22. REPEAT
Repeat Chapter
Press "REPEAT" once to repeat the chapter being
played.
Press "REPEAT" twice to repeat the title.
Press "REPEAT" a third time to repeat the entire
movie.
Repeat play works only with discs for which the
elapsed playing time appears in the units display
during playback. Repeat play does not work with
some DVDs. For MP3 discs, there are three modes
to repeat the contents, they are Folder (default
value), Rep-one and Folder Rep.
23. A-B
1.
Pr
ess " "
A-B During play at the point where
repeat play is to set point. Press A-B
again at the point where repeat play is to be
set point B. Repeat play of the selection
between points A and B status.
2. Press " "A-B again. (Standard playback
appears on the TV monitor.)
" ", " "
Page 49

49
Basic Operations
A-B repeat play works only with discs for which the
elapsed playing time appears on the unit s display
during playback. This function is not available for
the MP3 disc. Some subtitles recorded around
point A or B may fail to appear.
24. VOLUME
25. MUTE
Press this button once to mute sound. Press it
again to restore sound.
27. CH (Channel)
Press to select the following audio channels:
MasterFront Left - Front Right - Left Surround Right SurroundCenter-Subwoofer. Adjust the level
with the volume keys.
Use "Vol +" or "Vol -" button to adjust the output
volume.
26. PAL/NTSC
Select the following TV modes: "NTSC", "PAL"
,"MULTI" and "P-SCAN".
Each time your press, the output mode to TV
changes as follows:
Y Cb/Pb Cr/Pr: "NTSC" "PAL" "MULTI"
"P-SCAN (NTSC)" "P-SCAN (PAL)" "P-SCAN
(MULTI)" "NTSC".
28. FUNC (Function)
Push the Button and select the Function.
AV1 - AV2 - SPDIF IN - TUNER - DVD
29. MEMO
Press this button to memorize station in "TUNER"
mode. For example, press "MEMO" "0" "3"
means memorizing the frequency to the third
station.
Note:
1. " " and " " means searching the station down
and up in "TUNER" mode.
2. "F.F" and "F.R" means stepping down and up in
"TUNER" model
3. The treble and bass adjustment are not
available in "TUNER" mode.
Page 50
50
Customer Service 1 626 968 6860
31. EQ
Choose the desired sound effect from 7 default
mode: ROCK - POP- LIVE...etc. Press again to
restore.
32. TRE (Treble)
Adjust the Treble level with the volume keys.
34. BASS
Adjust the Bass level with the volume keys.
This function only works when "Treble Boost" is
on.
This function only works when "Bass Boost" is on.
30. BAND
Press the button to switch between AM/FM mode.
26. RECALL
Press this button to recall station in "TUNER" mode.
For example, press "RECALL" "1" "2" means
recalling the 12th memorized station.
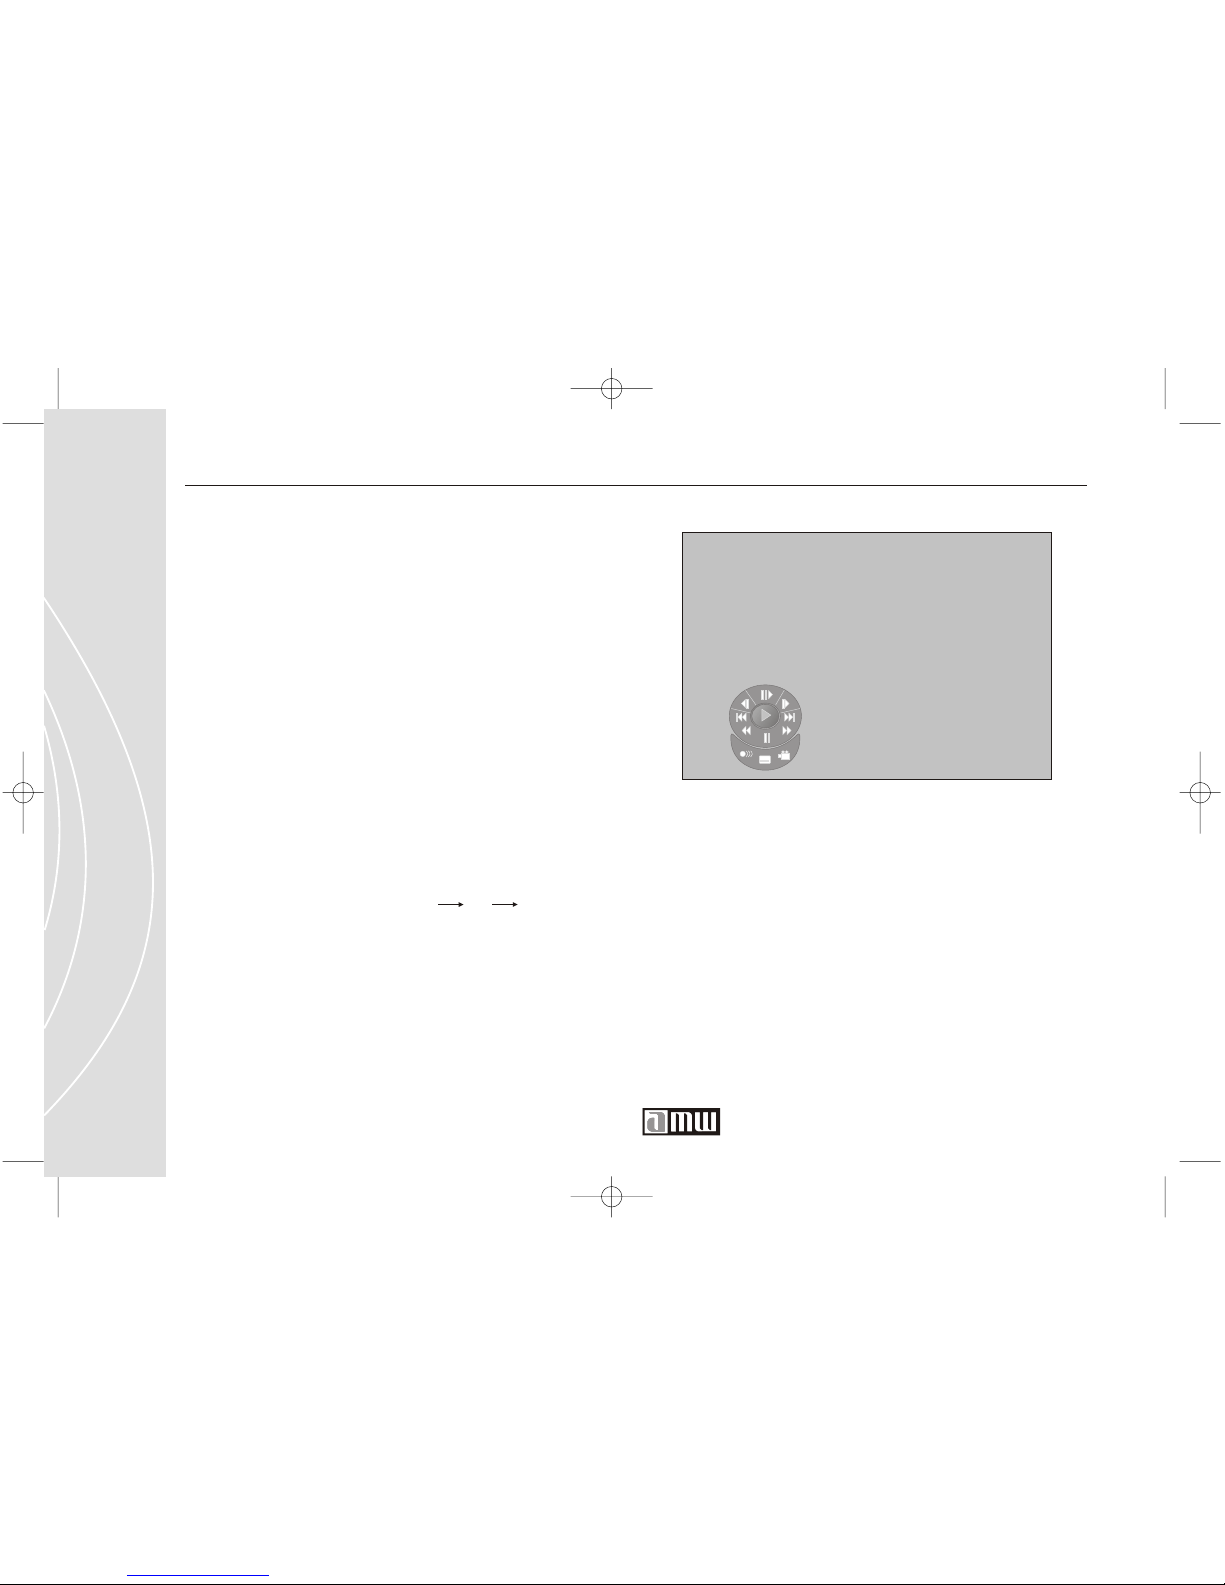
In "DVD Player" mode, you can press this button
to the "Virtual Remote Controller" mode. And press
the direction key first then press the "ENTER" key
to confirm the function you choose. Then Press
"RECALL" key again to normal operation.
Page 51
51
Basic Operations
Care for Your Discs
Handling precautions:
Hold the disc by the edges so the surface will not be soiled with
fingerprints. Fingerprints, dirt, and scratches can cause skipping and
distortion.
Do not write on the label side with a ball-point pen or other writing
tools.
Do not use record cleaning sprays, benzene, thinner, static electricity
prevention liquids or any other solvent.
Be careful not to drop or bend the disc.
Do not install more than 1 disc on the disc tray.
Do not try to close the disc tray when the disc is not installed properly.
Be sure to store the disc in its exclusive case.
Page 52
52
Customer Service 1 626 968 6860
If the Disc Surface is soiled:
Wipe gently with a soft, damp (water only) cloth.
When wiping discs, always move the cloth from the center hole toward
the outer edge.
If you wipe the discs using a circular motion, circular scratches are likely
to occur, which willcause noise.
on the disc.
Wipe this moisture off with a soft, dry, lint-free cloth before using the
disc. You can damage discs if you store them in the following places:
Areas exposed to direct sunlight.
Humid or dusty areas.
Areas directly exposed to a heat outlet or heating appliance.
If the disc is brought from cold to warm environment, moisture may form
Page 53

53
Basic Operations
Page 54
Page 55

Special Operations
In this section you will become acquainted with the special operations of
your AMW T342 DVD Player.
Playing Mp3's
What is MP3?
MP3 is a standard music format developed for use on the Internet. We Are
the first company to offer this function in a home DVD player that can play
MP3 files which recorded on CD-R discs.
Playing an MP3:
1. Turn on the TV and insert an MP3 CD. The MP3 MENU folder will be
shown on the screen when the tray is closed.
2. Select the desired folder from the left column and press ENTER/PLAY.
The contents of the folder will be listed on the right column.
3. Select PLAY MODE. Press UP/DOWN to select: FOLDER, SINGLE, REPEAT
ONE, REPEAT FOLDER or SHUFFLE.
4. Press or during playback to skip the tracks (only works when
FOLDER or R EPEAT FOLDER in the PLAY MODE is selected).
55
Special Operation
Page 56
56
Customer Service 1 626 968 6860
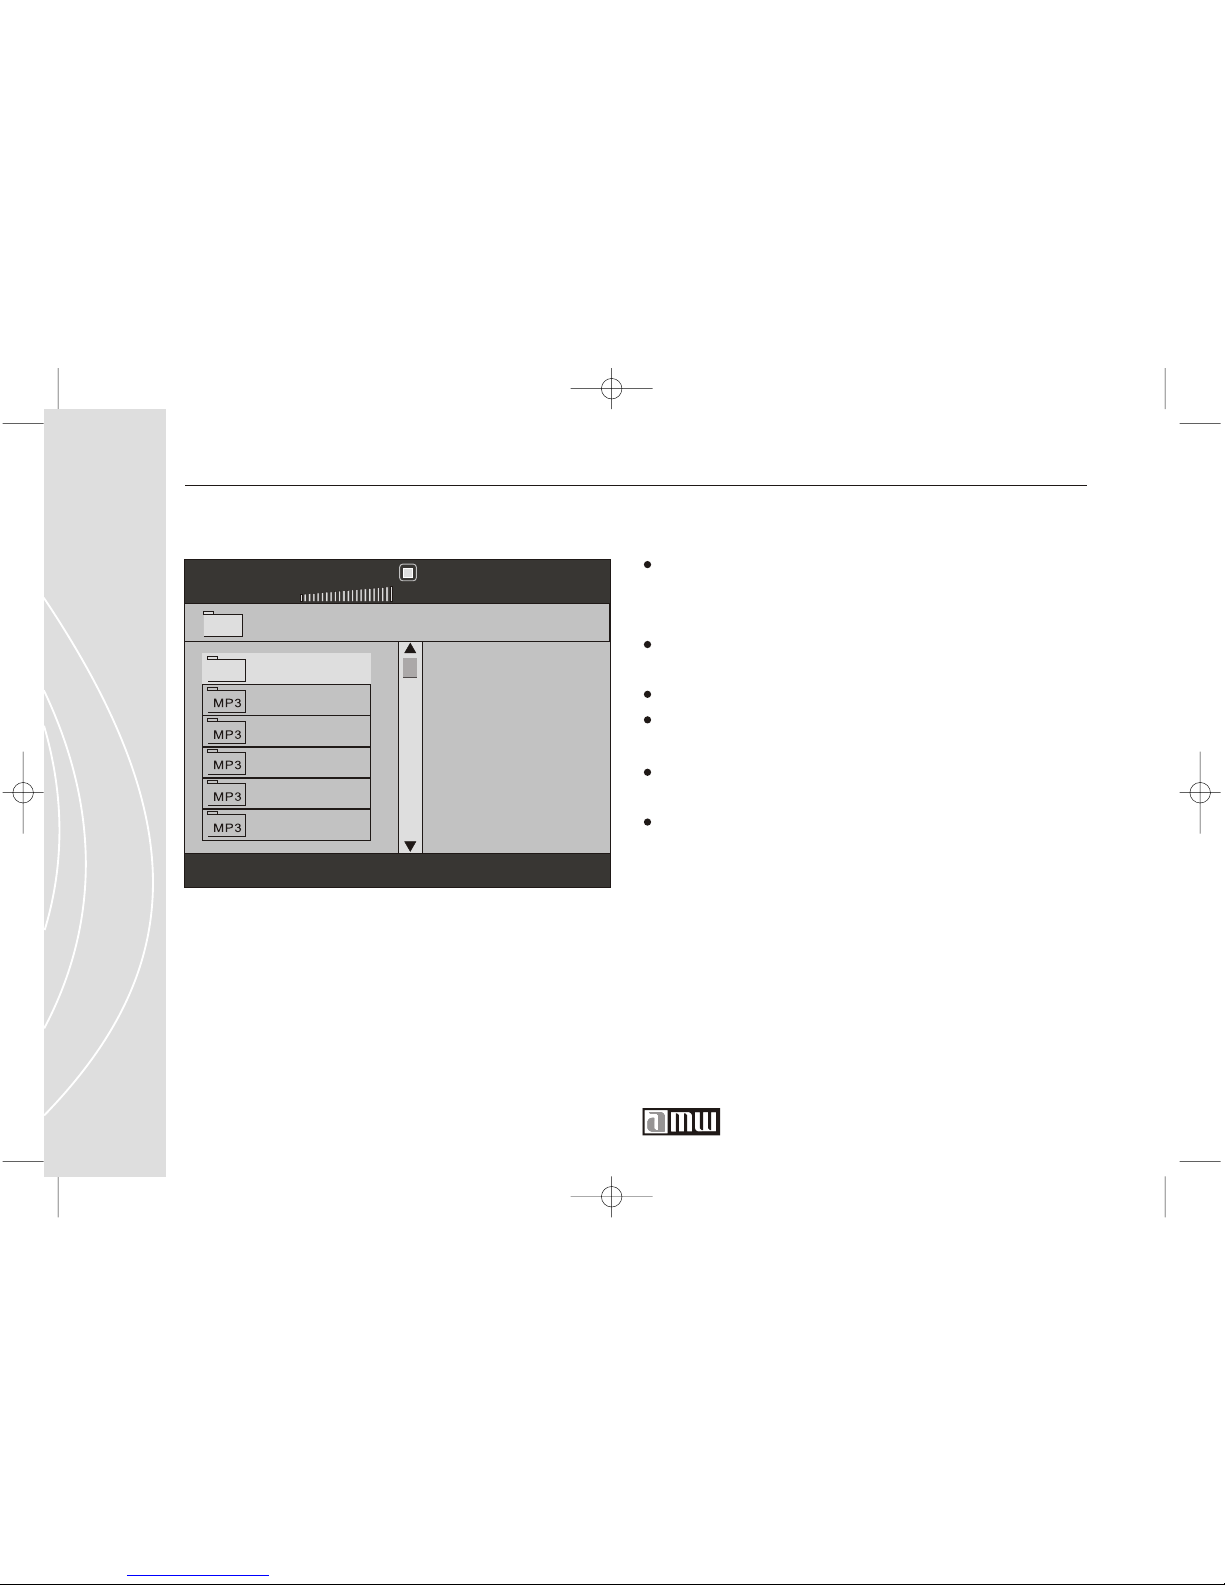
Notes about MP3 player interface:
The upper left column lists the names of
folders. The upper right column lists the
names of songs.
A folder symbol indicates a folder that
contains MP3's.
An MP3 symbol indicates an MP3 file.
During MP3 playback the PLAY MODE folder
and songs cannot be accessed.
A maximum of 11 characters are allowed for
each folder or song name.
SHUFFLE playback can only be used within a
single folder.
X X X X X X
X X X X
X X X X
X X
X X X
X X X X
X X X X X X
00:00 00:00
001/013
Page 57

57
Viewing Images
What is JPEG?
JPEG is a widely used file format for still image compression. Files such as
photographs, drawings, and most clip-art can be saved this way, greatly
reducing a files size (loss of quality varies). Most digital cameras record
images as JPEG files. JPEG files can be recorded onto a CD for viewing on this
DVD player, a computer, or the web.
Viewing an image:
NORMAL SLIDE SHOW PRESENTATION : When a JPEG disc is loaded into the
player, a menu will appear on screen. From the Play Mode shown on the
menu, select the FOLDER option using the direction keys. Each picture in the
current directory will be displayed consecutively in a slideshow presentation
and will be automatically displayed using the largest size that fits your
television screen. Sixteen slideshow "transition" modes are provided. Use
the program button to select one.
NOTE : FROM THE PLAYMODE SHOWN ON TH E MENU YOU MAY ALSO PRESS
THE "REPEAT" KEY TO ENTER SINGLE PICTURE VIEWING.
Special Operation
Page 58
58
IMAGE ROTATION : There are four modes used to rotate a picture: INVERT,
MIRROR, LEFT, and RIGHT. These operations are allowed only when a
picture is being displayed normally, and will be cancelled automatically when
the next picture is displayed (press NEXT or PR EV). The arrow keys are used
to select the different rotation modes:
UP- Mirror/Vertical
DOWN - Mirror/Horizontal
LEFT- Turn left
RIGHT - Turn right
ZOOM : This featur es allows you to view a picture at 50%-200% in several
increments. Press the ZOOM button. An on-screen message (" Zoom 100% ")
will verify your selection. Use and to control the amount of zoom. Press
the direction keys to move the picture in any direction. Press Zoom button
again to exit the zoom mode and back to normal operation.
NOTE : When in the ZOOM mode, the slideshow transition and image
transformation features are disabled.
MENU : When JPEG CD is played, the MENU key is used to display JPEG
folders and the corresponding files. During the playback, press STOP to
access thumbnail menu.
Page 59

59
Special Operation
What is Progressive Scan?
Progressive scanning, otherwise known as 480P (p=progressive), creates a picture
signal with double the scan lines of a conventional interlaced picture, 480I
(I=interlaced), to create a noticeably sharper image. The 480P image offers higher
picture resolution and eliminates virtually all motion artifacts. Even on large screens,
the progressive scan lines are barely noticeable and picture flickering is greatly
reduced, so you can enjoy extended viewing without eye fatigue. (Our deluxe DVD
model is progressive scan compatable.)
Page 60
Page 61
61
Setting Up the S yst em Pr ef er ence s
Setting Up the System Preferences
Navigating the SETUP Menu
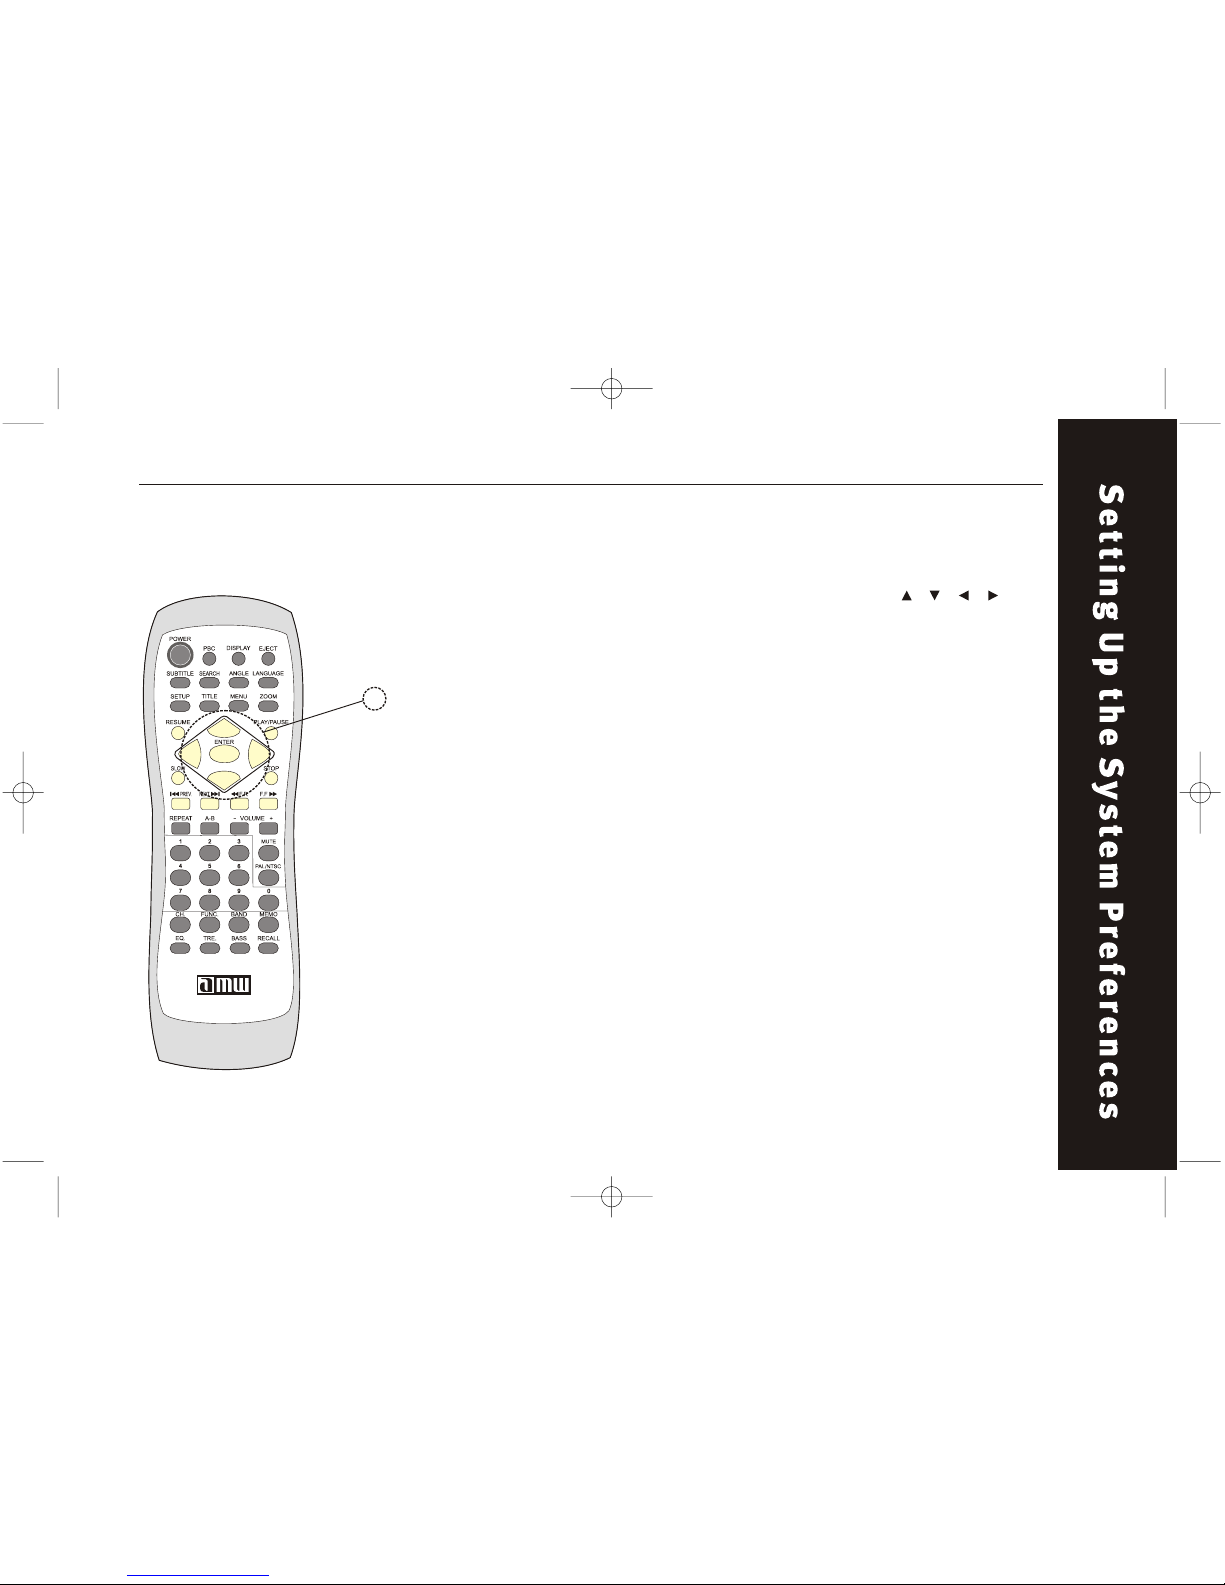
Use the remote to navigate the system SETUP Menu. Use the " / / / "
buttons to select the item you want and press "PLAY" button
to confirm.
Button area to be used throughout this section.
w the menu works:
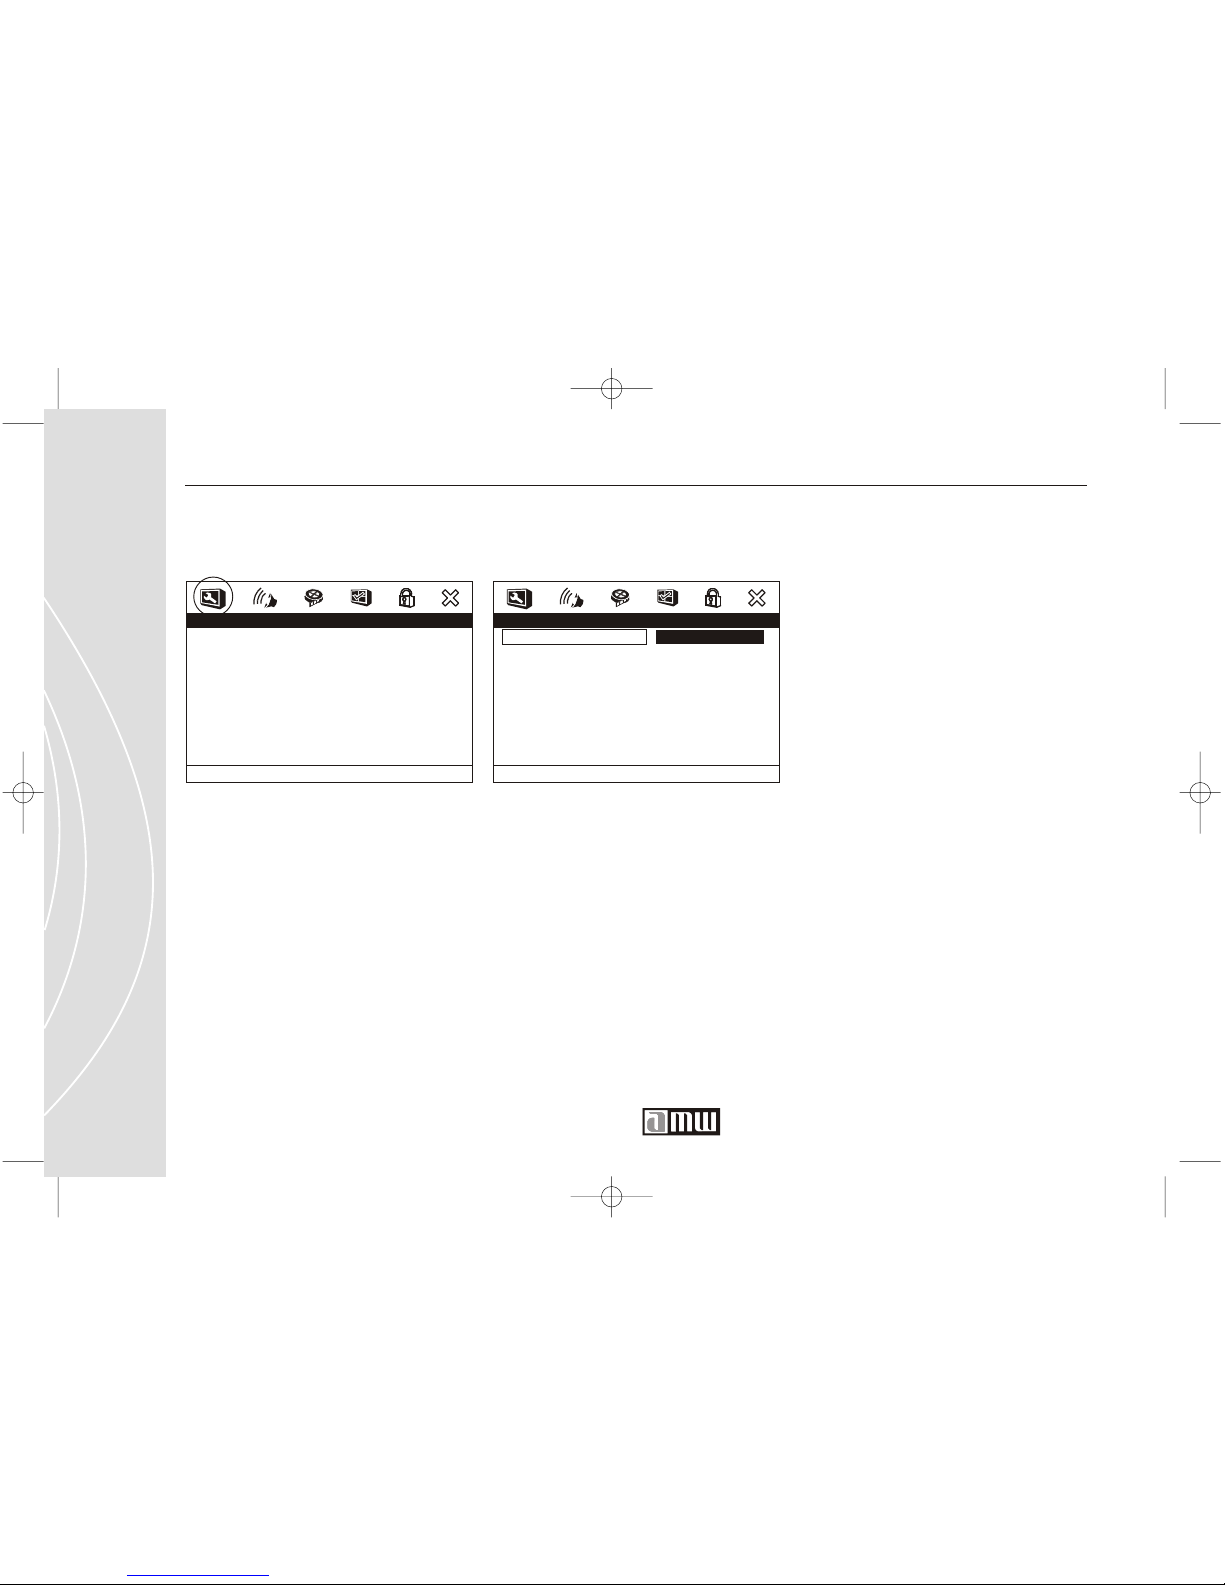
After pressing SETUP a menu should appear on your TV scr een. Four major
categories (General Setup, Audio Setup, Video Setup, and Preference Setup)
are all represented by icons at the top of the menu. Within each of these are
several specific features that affect your viewing/listening experience.
Use the arrow keys to first select one of the icons. Note that the features
bellow them change accordingly. Each feature in a list has a few options to
choose from. Those options are also accessed with the arrow keys on the
remote.
The following pages represent the options you'• ll see and provide brief
descriptions where necessary.
Ho
Page 62
62
Normal
Normal/LB
Wide
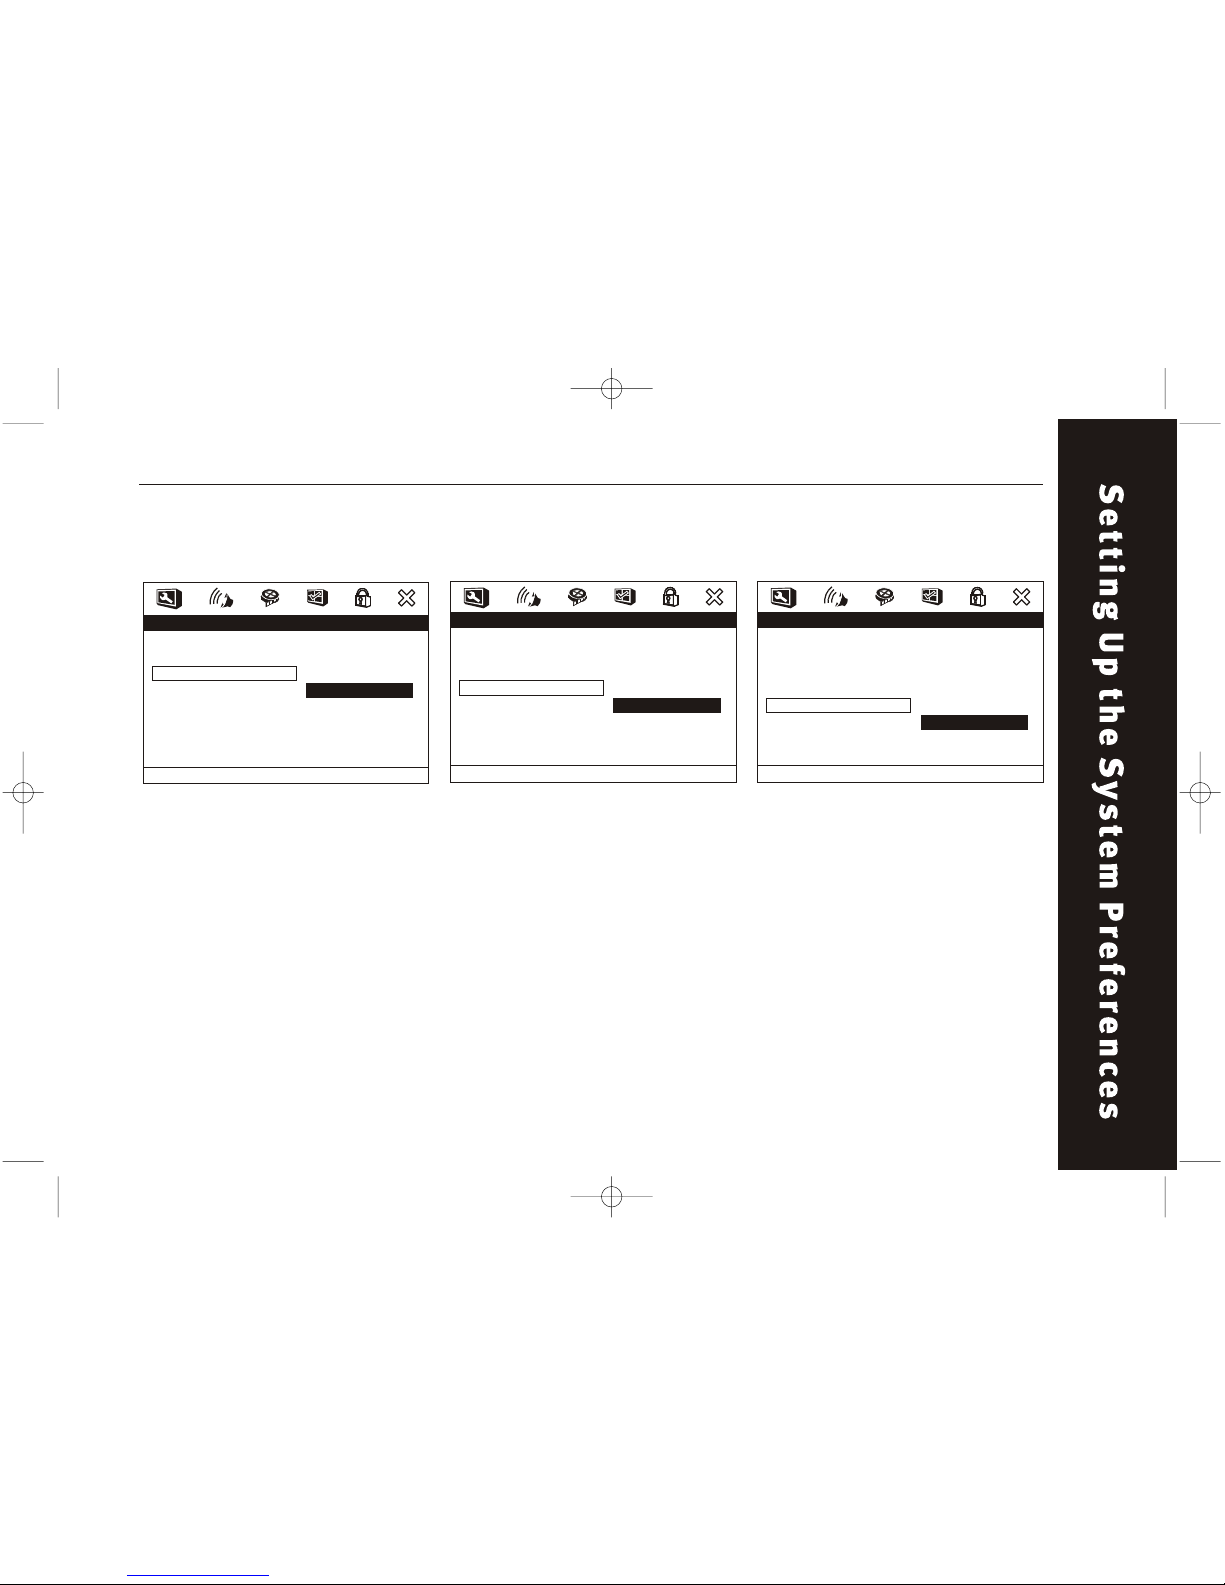
- - General Setup Page - -
TV Display
Angle Mark
OSD Lang
Captions
Screen Saver
Last Memory
PS
On
ENG
On
On
Of f
Set TV Display Mode
Customer Service 1 626 968 6860
- - General Setup Page - -
TV Display
Angle Mark
OSD Lang
Captions
Screen Saver
Last Memory
PS
On
ENG
On
On
Of f
Go To General Setup Page
General Setup
TV DISPLAY
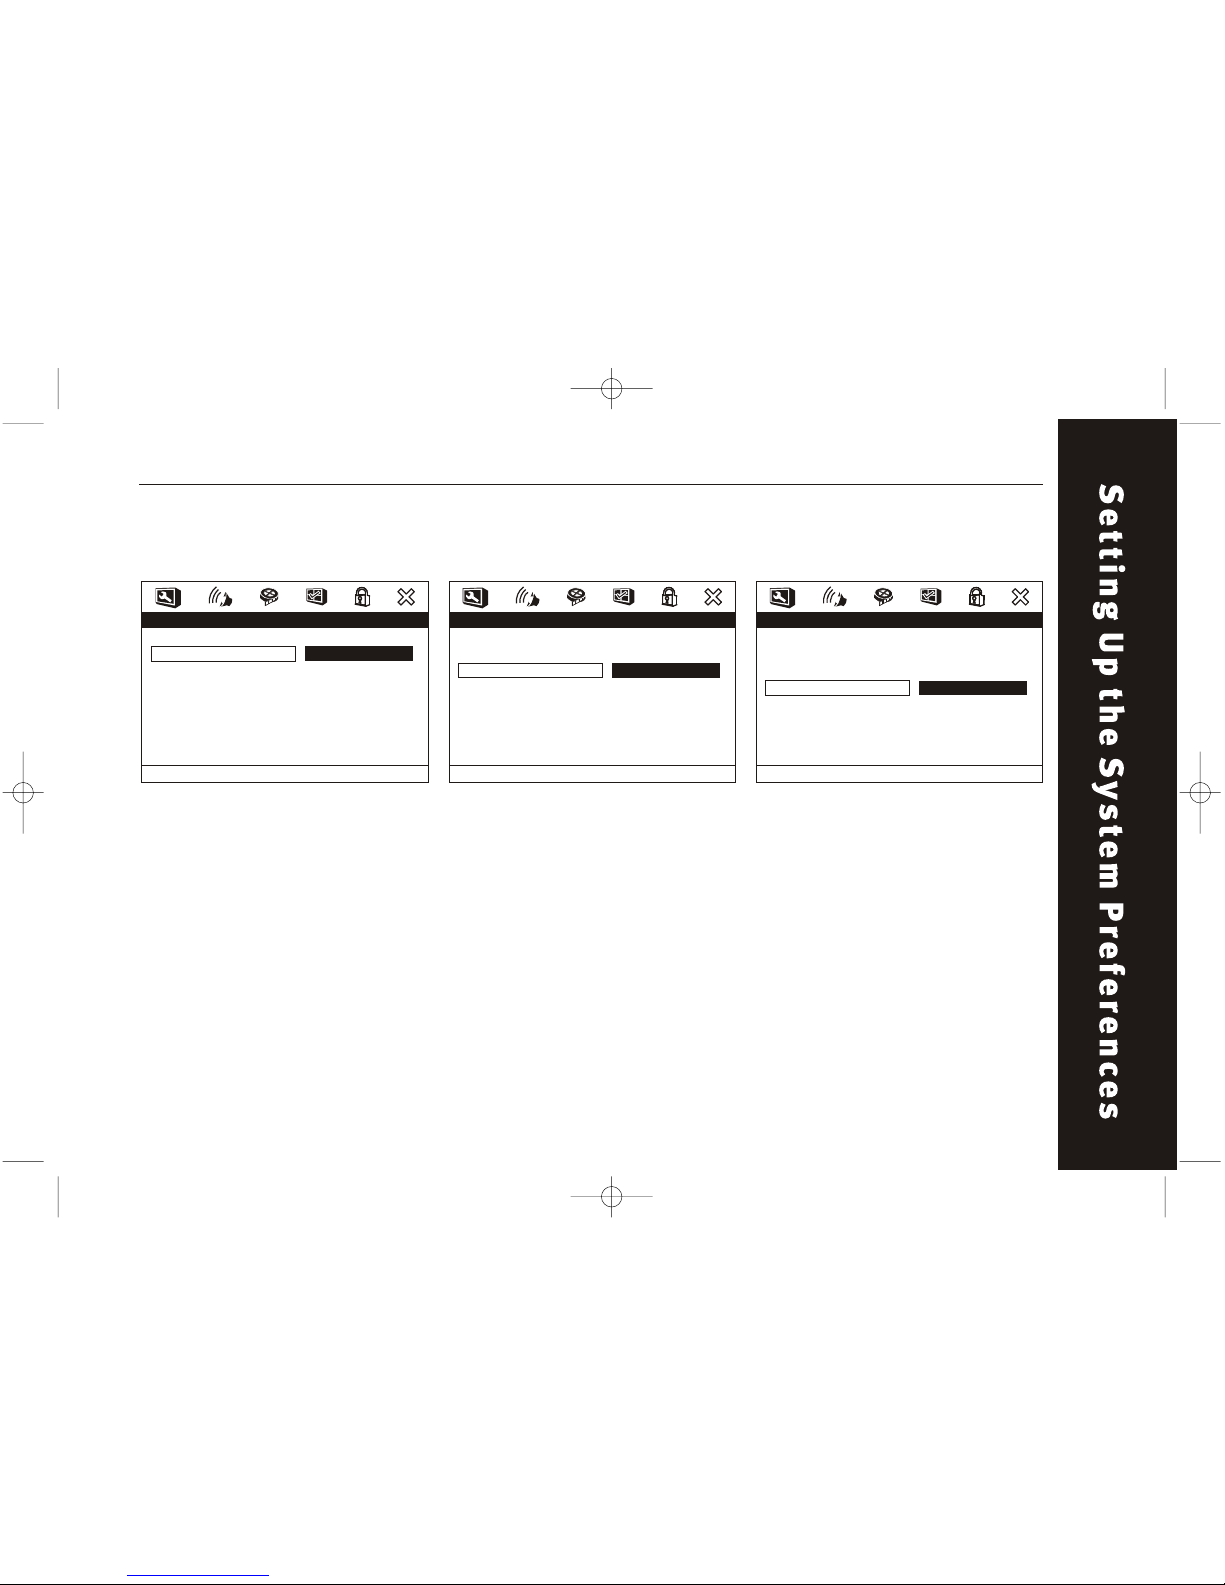
Determines what kind of TV is
attached to the player.
NORMAL/PS: Select this option
when you connect a normal TV
to the player. Displays the wide
picture with a portion automatically cut off (the left and
right edges).
General Setup / TV Display
NORMAL/LB : Select this for a
conventional sized TV set. Black
bands appear in both upper and
down sides. (Letter-Box Style)
WIDE : Select this for a widescreen TV set, played in full size.
Setting the side-screen TV to
FULL mode is also necessary.
GENERAL SETUP
Page 63
On
Of f
- - General Setup Page - -
TV Display
Angle Mark
OSD Lang
Captions
Screen Saver
Last Memory
PS
On
ENG
On
On
Of f
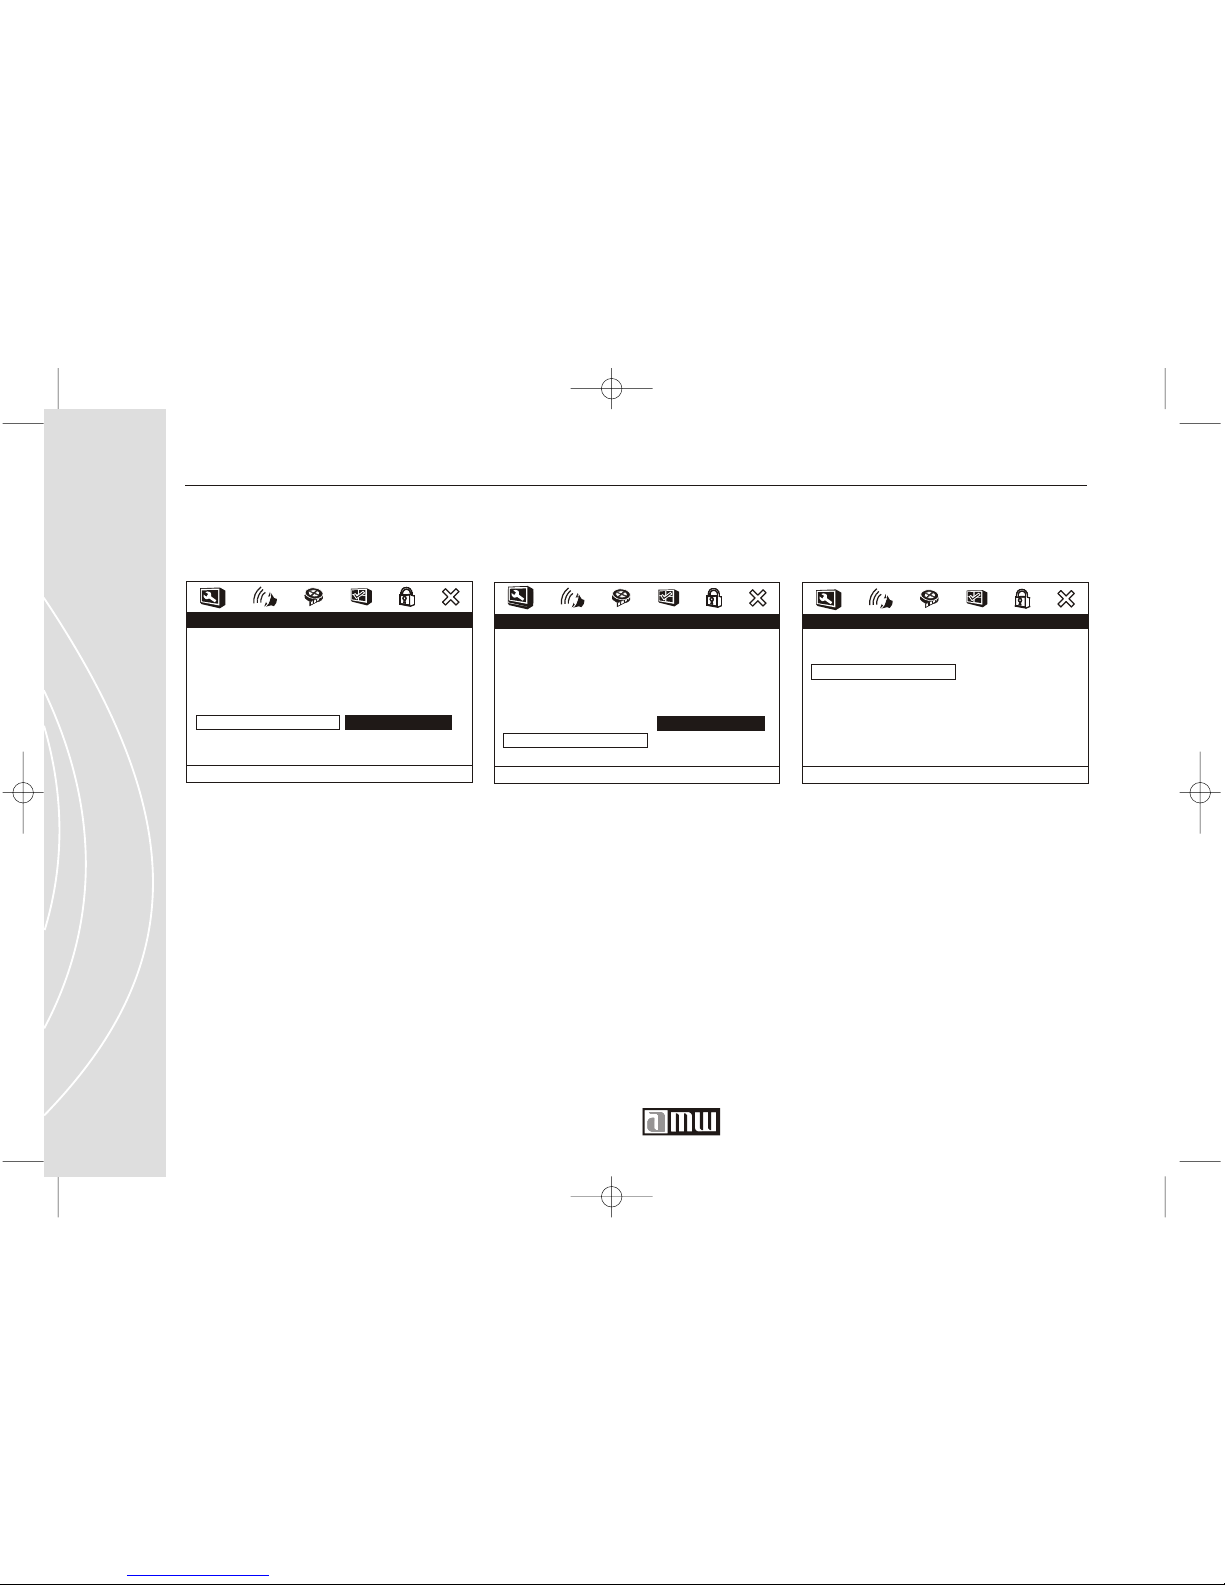
Set Angle Mark
English
Chinese
- - General Setup Page - -
TV Display
Angle Mark
OSD Lang
Captions
Screen Saver
Last Memory
PS
On
ENG
On
On
Of f
Set OSD Language
On
Of f
- - General Setup Page - -
TV Display
Angle Mark
OSD Lang
Captions
Screen Saver
Last Memory
PS
On
ENG
On
On
Of f
Closed Caption
63
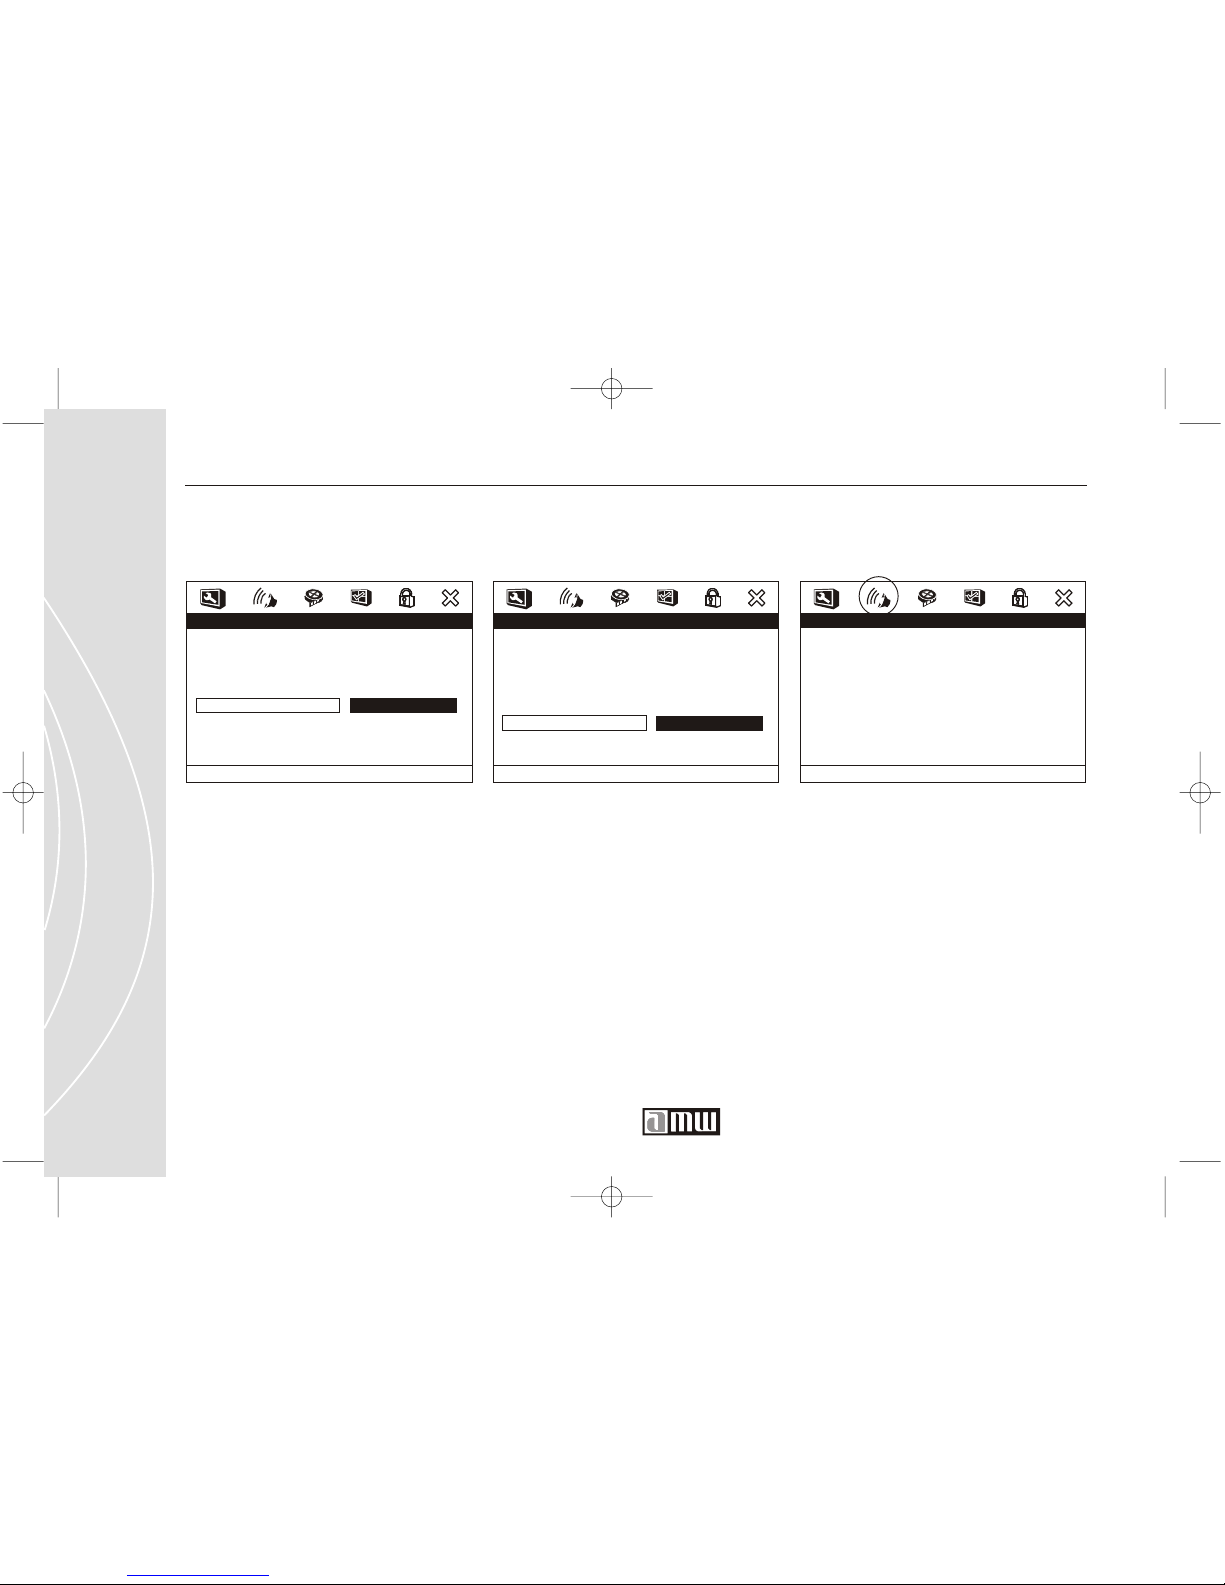
ANGLE MARK
This function can be set to ON or
OFF. Only works on discs that
support multiple angle view
feature.
General Setup / Angle Mark
OSD LANG
The setup menu can shown in
other languages. Turning the power
off will not effect the setting. The
setting can only be changed on the
setup menu. Note: Some DVDs may
not include the pre-selected
languages. In this case, the player
automatically displays menu which
is consistent with the disc's initial
language setting.
General Setup / OSD Lang
CAPTIONS
This function allows you to turn
the subtitles ON or OFF.
General Setup / Captions
Page 64
64
On
Of f
- - General Setup Page - -
TV Display
Angle Mark
OSD Lang
Captions
Screen Saver
Last Memory
PS
On
ENG
On
On
Of f
Customer Service 1 626 968 6860
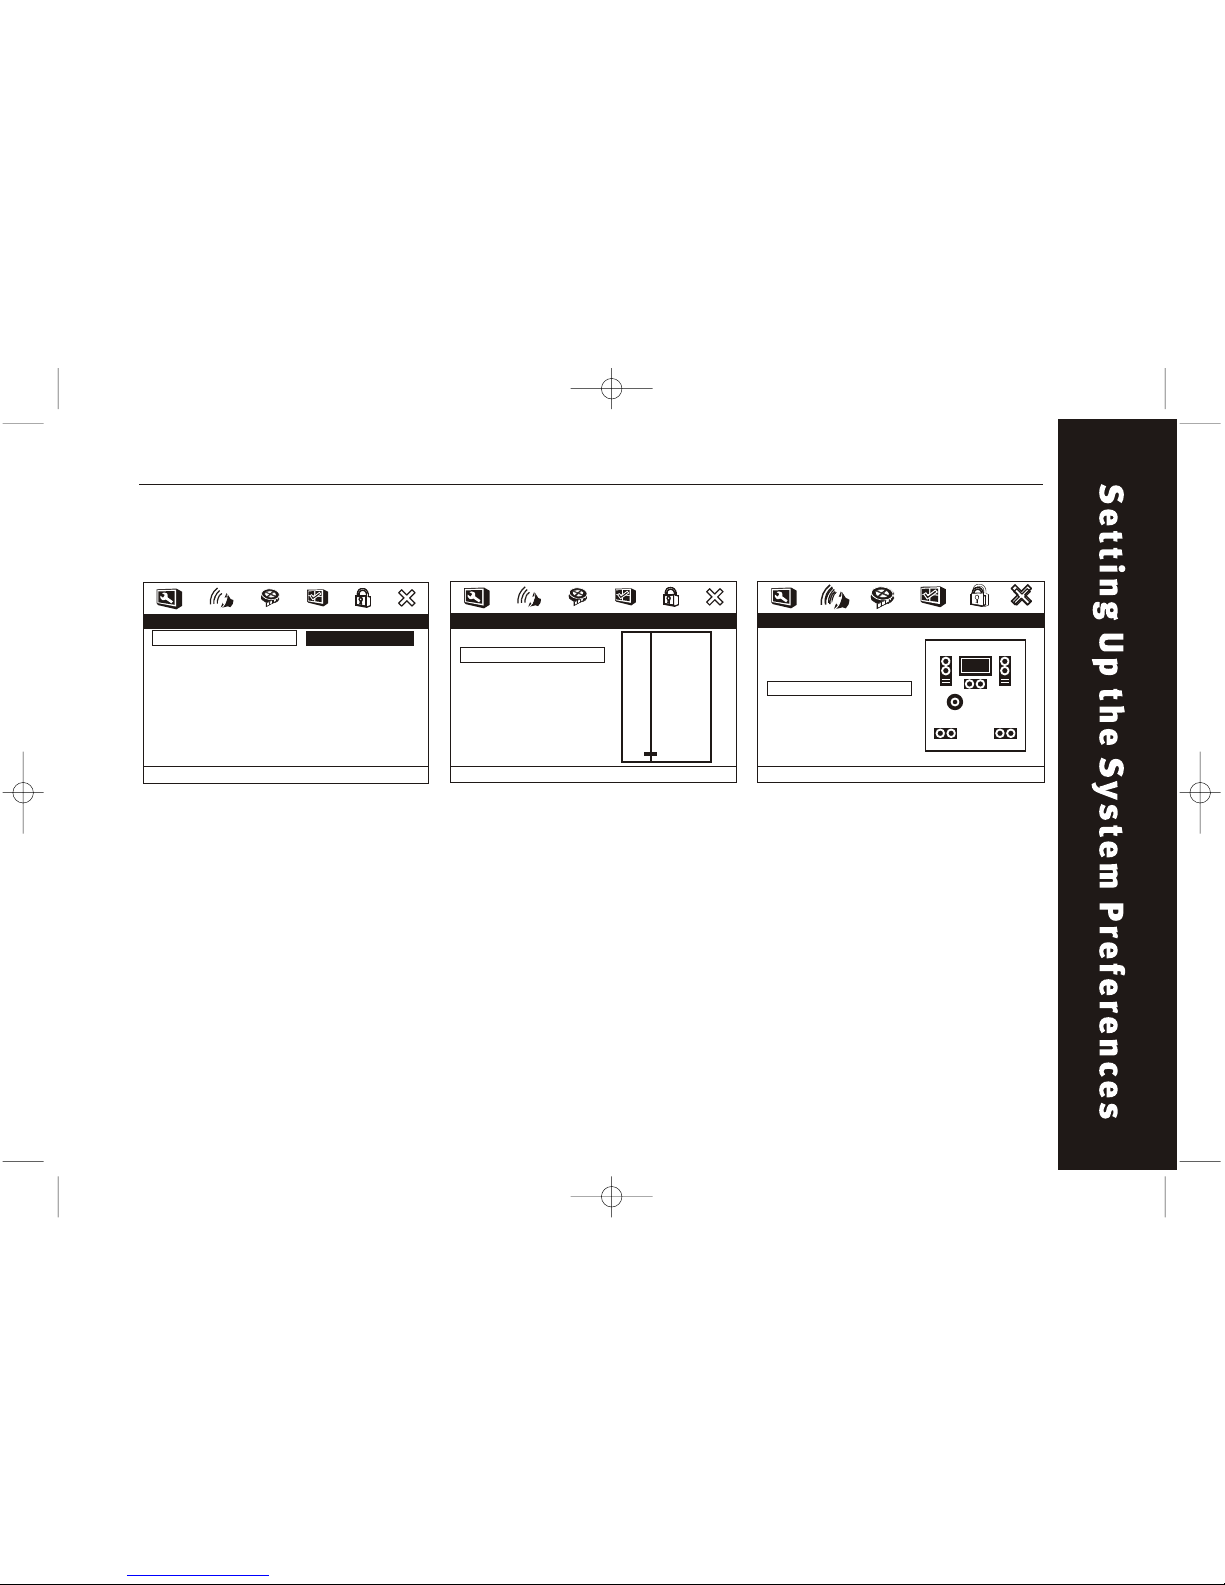
SCREEN SAVER
This function can be set to ON or
OFF.
General Setup / Screensaver
AUDIO SETUP
Audio Setup
NOTE: Audio setup options
should only be changed if the
DVD player is connected to a
LEFT or RIGHT surround sound
processor.
- - Audio Setup Page - -
Speaker Setup
SPDIF Setup
Dolby Digital Setup
Channel Delay
Equalizer
3D Processing
Go To
Speaker
Setup
Page
On
Of f
- - General Setup Page - -
TV Display
Angle Mark
OSD Lang
Captions
Screen Saver
Last Memor y
PS
On
ENG
On
On
Of f
LAST MEMORY
This function can be set to ON or
OFF. When the setting is "On", the
player starts memorizing the last
memory of the last disk. This
function only works when the
player is powered on.
General Setup / Last Memory
Page 65
- - Speaker Setup Page - -
Downmix
Fr ont Speaker
Center Speaker
Rear Speaker
Subwoofer
Test tone
Dialog
Post DRC
STR
LRG
SML
SML
On
Of f
00
Auto
Large
Small
Setup Front Speaker
- - Speaker Setup Page - -
Downmix
Fr ont Speaker
Center Speaker
Rear Speaker
Subwoofer
Test tone
Dialog
Post DR C
STR
LRG
SML
SML
On
Of f
00
Auto
LT/RT
Ster eo
V SURR
Of f
Set Downmix Mode
65
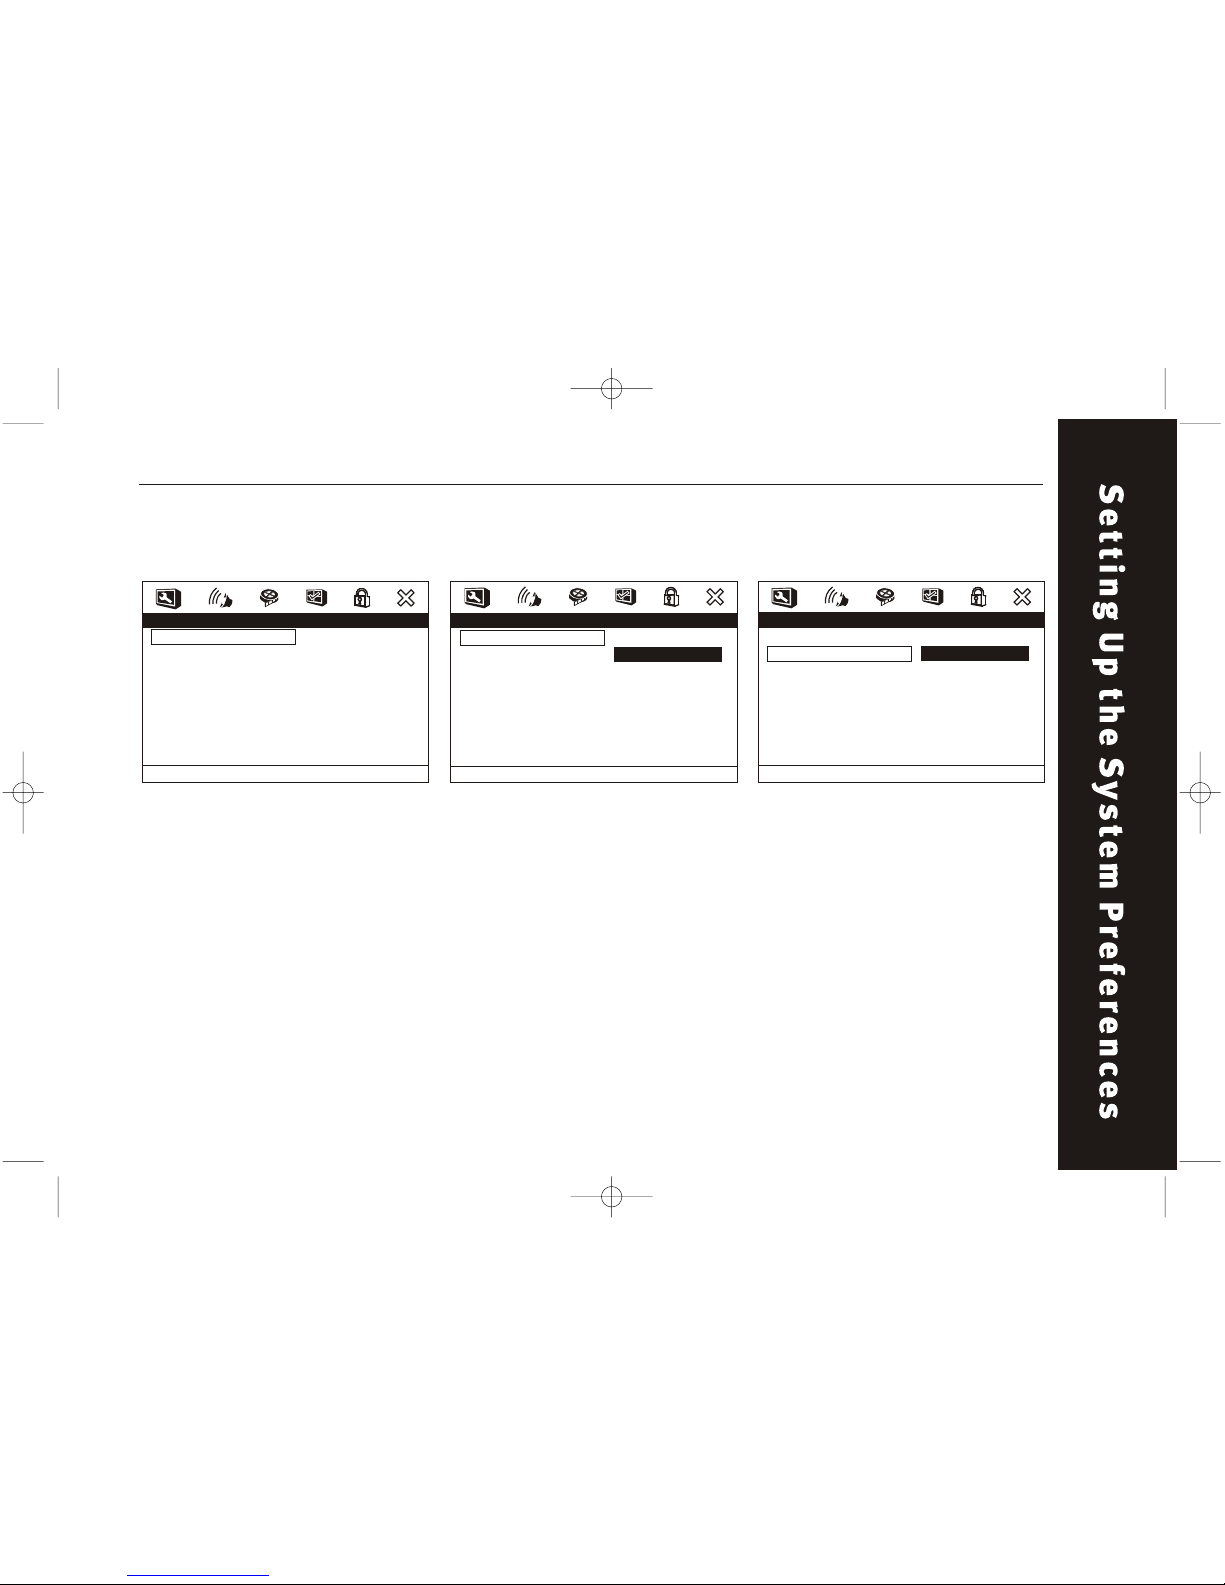
DOWNMIX
Switches the mixing down
methods when you play a DVD
with rear signal components.
This function can be set to LT/RT,
STEREO, or OFF.
Audio Setup /Speaker Setup /
Downmix
Audio Setup /Speaker Setup / Front
Speaker
FRONT SPEAKER
These function allow you to
determine whether the front,
center, rear or subwoofer
speaker is LARGE or SMALL
depending on your needs.
Audio Setup / Speaker Setup
- - Audio Setup Page - -
Speaker Setup
SPDIF Setup
Dolby Digital Setup
Channel Delay
Equalizer
3D Processing
Go To
Speaker
Setup
Page
Page 66
66
- - Speaker Setup Page - -
Downmix
Fr ont Speaker
Center Speaker
Rear Speaker
Subwoofer
Test tone
Dialog
Post DRC
STR
LRG
SML
SML
On
Of f
00
Auto
Large
Small
Of f
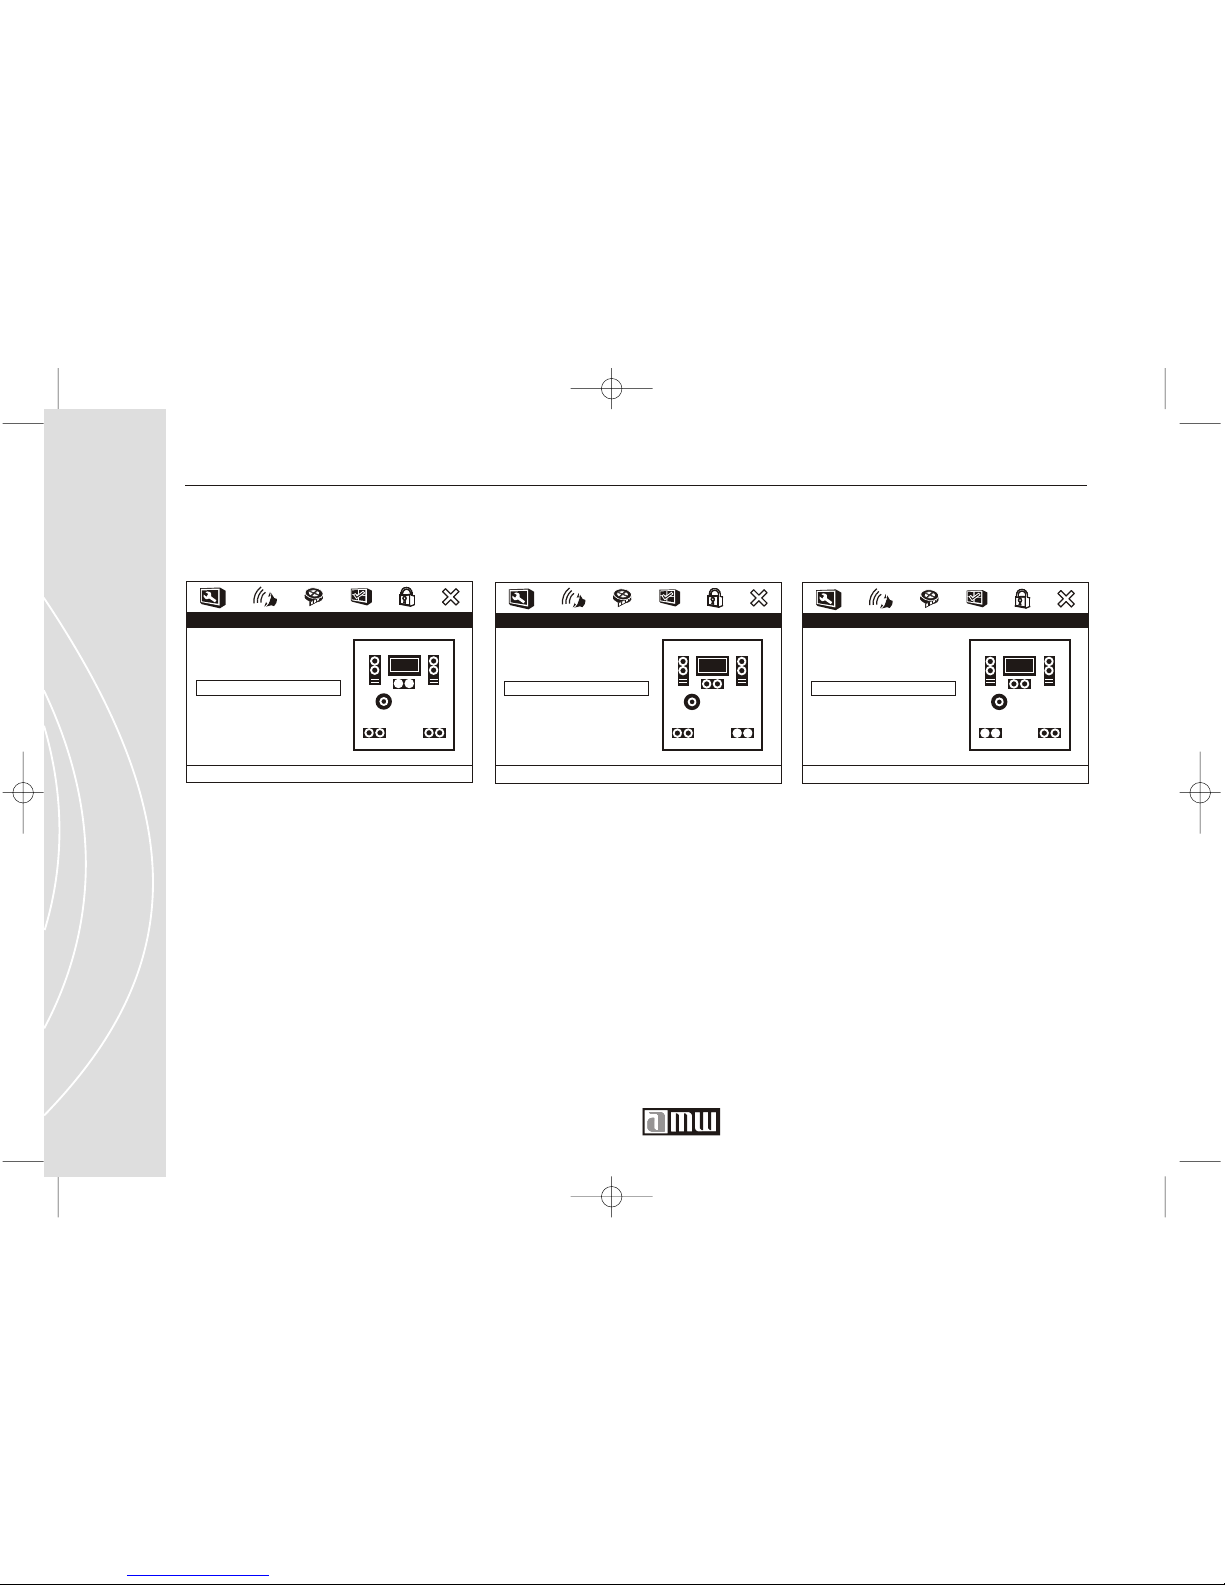
Setup Rear Surr ound Speaker
- - Speaker Setup Page - -
Downmix
Fr ont Speaker
Center Speaker
Rear Speaker
Subwoofer
Test tone
Dialog
Post DR C
STR
LRG
SML
SML
On
Of f
00
Auto
On
Of f
Setup Subwoofer
Customer Service 1 626 968 6860
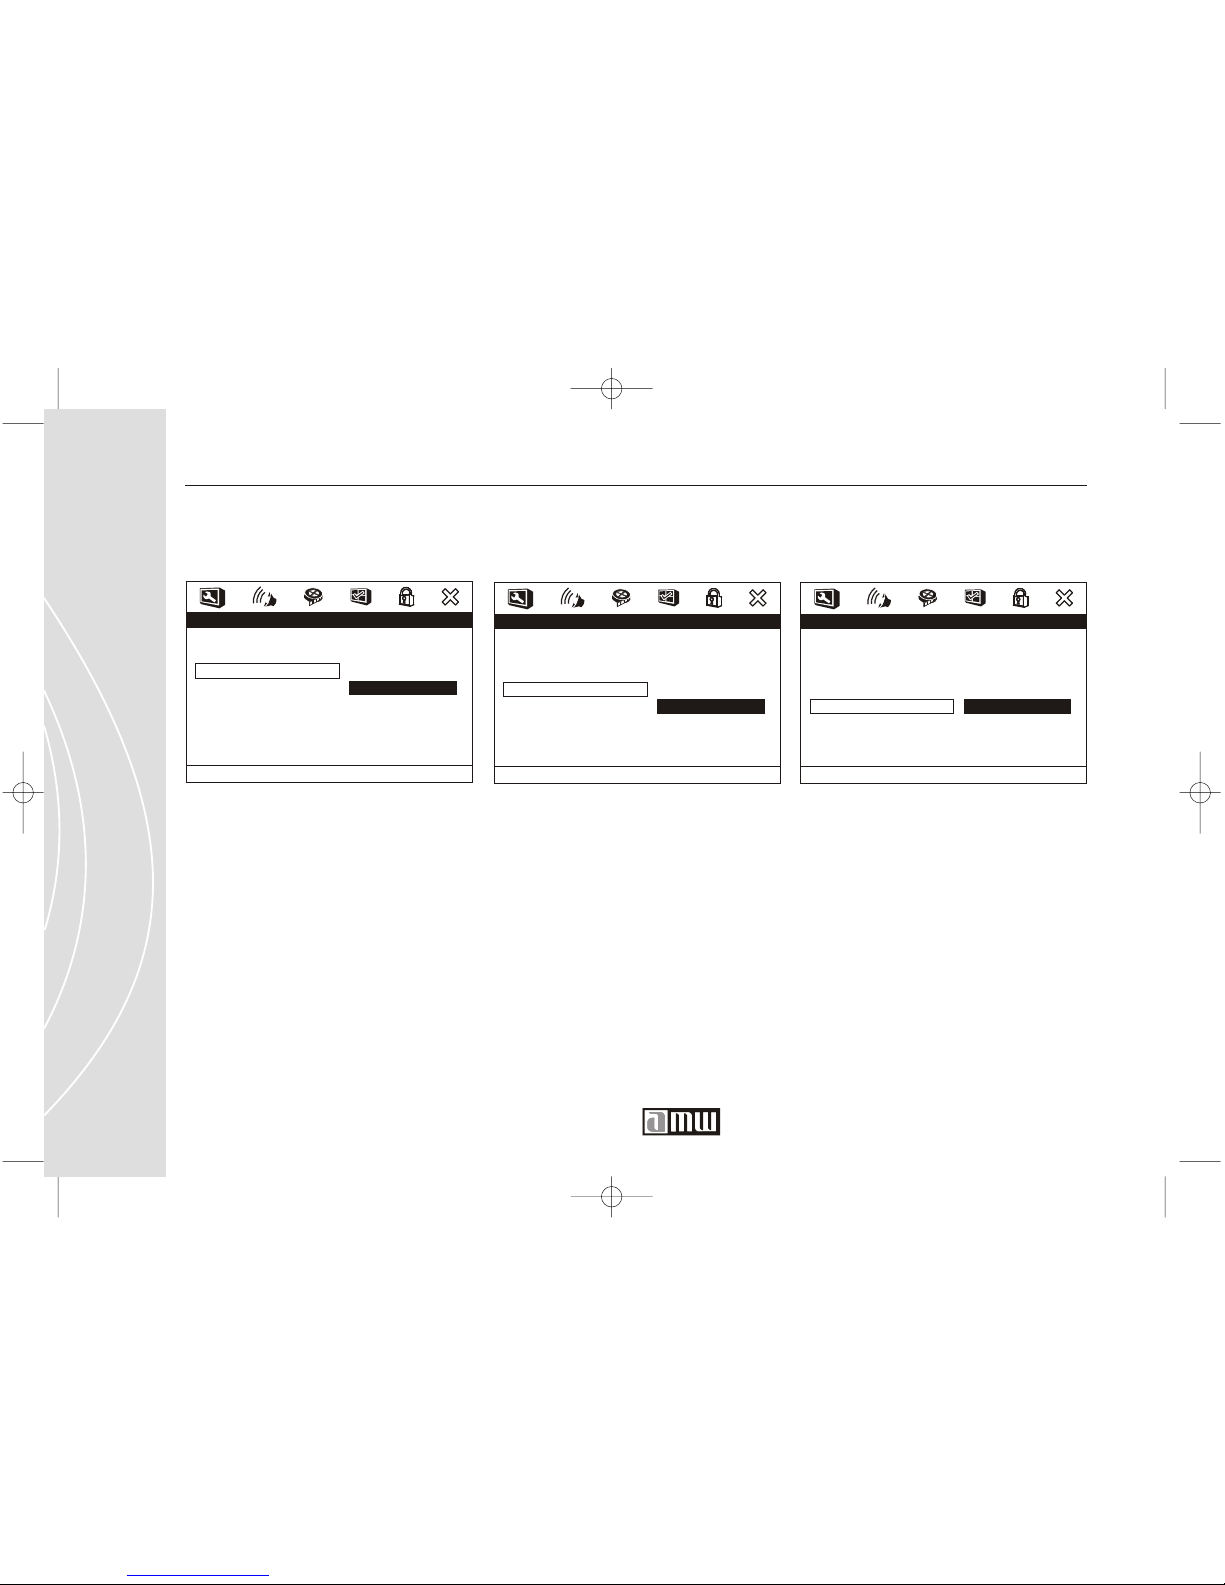
Audio Setup /Speaker Setup /
Subwoofer
Audio Setup /Speaker Setup / Rear
Speaker
REAR SPEAKER
These function allow you to
determine whether the front,
center, rear or subwoofer
speaker is LARGE , SMALL or
OFF depending on your needs.
SUBWOOFER
These function allow you to
determine whether the front,
center, rear or subwoofer
speaker is LARGE , SMALL or
OFF depending on your needs.
Audio Setup /Speaker Setup / Center
Speaker
CENTER SPEAKER
These function allow you to
determine whether the front,
center, rear or subwoofer
speaker is LARGE , SMALL or
OFF depending on your needs.
- - Speaker Setup Page - -
Downmix
Fr ont Speaker
Center Speaker
Rear Speaker
Subwoofer
Test tone
Dialog
Post DRC
STR
LRG
SML
SML
On
Of f
00
Auto
Large
Small
Of f
Setup Center Speaker
Page 67
- - Speaker Setup Page - -
Downmix
Fr ont Speaker
Center Speaker
Rear Speaker
Subwoofer
Test tone
Dialog
Post DRC
STR
LRG
SML
SML
On
Of f
00
Auto
On
Of f
Auto
Post DRC
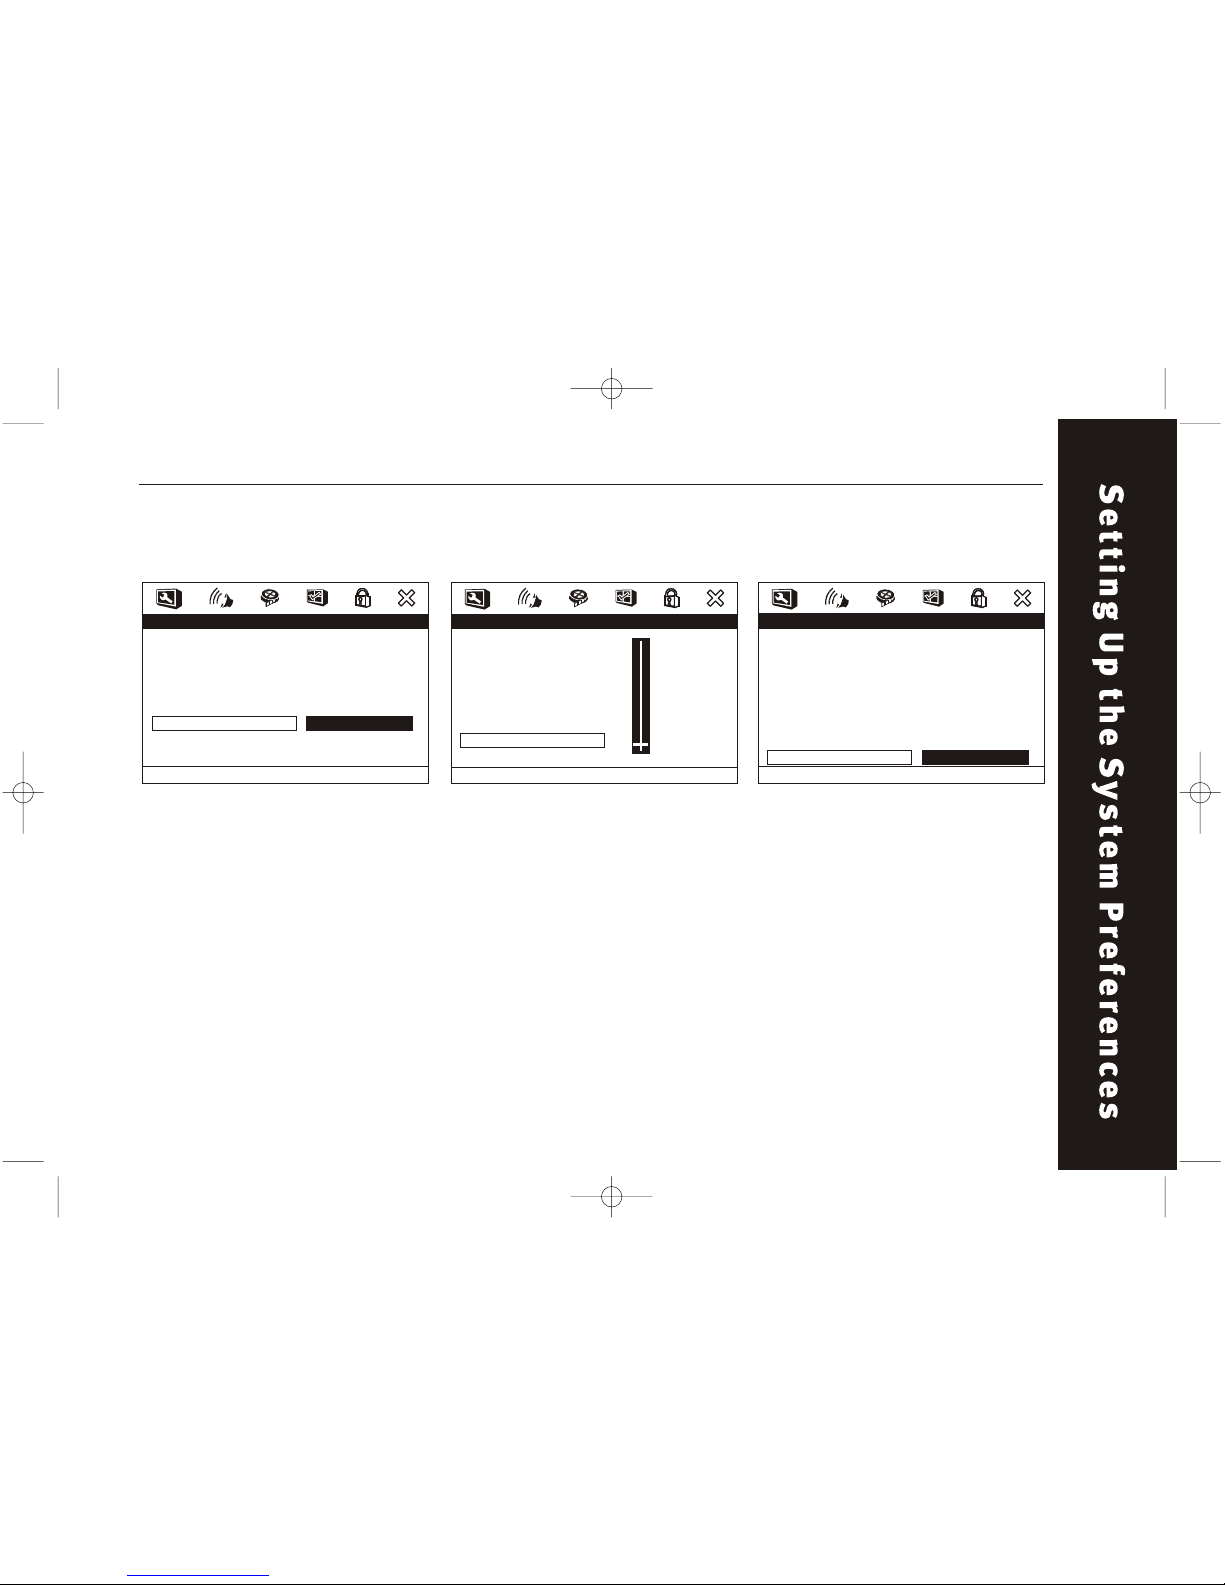
DIALOG
Adjust the dialog volume by
setting the Downmix as LT/RT or
"STEREO".
Audio Setup /Speaker Setup /Dialog Audio Setup /Speaker Setup / Post
DRC
POST DRC
This is selected to adjust post
dynamic range compression to
obtain different compression
results.
- - Speaker Setup Page - -
Downmix
Fr ont Speaker
Center Speaker
Rear Speaker
Subwoofer
Test tone
Dialog
Post DRC
STR
LRG
SML
SML
On
Of f
00
Auto
Dialog Volume
67
TEST TONE
This item allows you to open or
close the test tone function.
Downmix has to be set to OFF
when there is no disc in the
player.
Audio Setup /Speaker Setup / Test
Tone
- - Speaker Setup Page - -
Downmix
Fr ont Speaker
Center Speaker
Rear Speaker
Subwoofer
Test tone
Dialog
Post DR C
STR
LRG
SML
SML
On
Of f
00
Auto
On
Of f
Center
Page 68
68
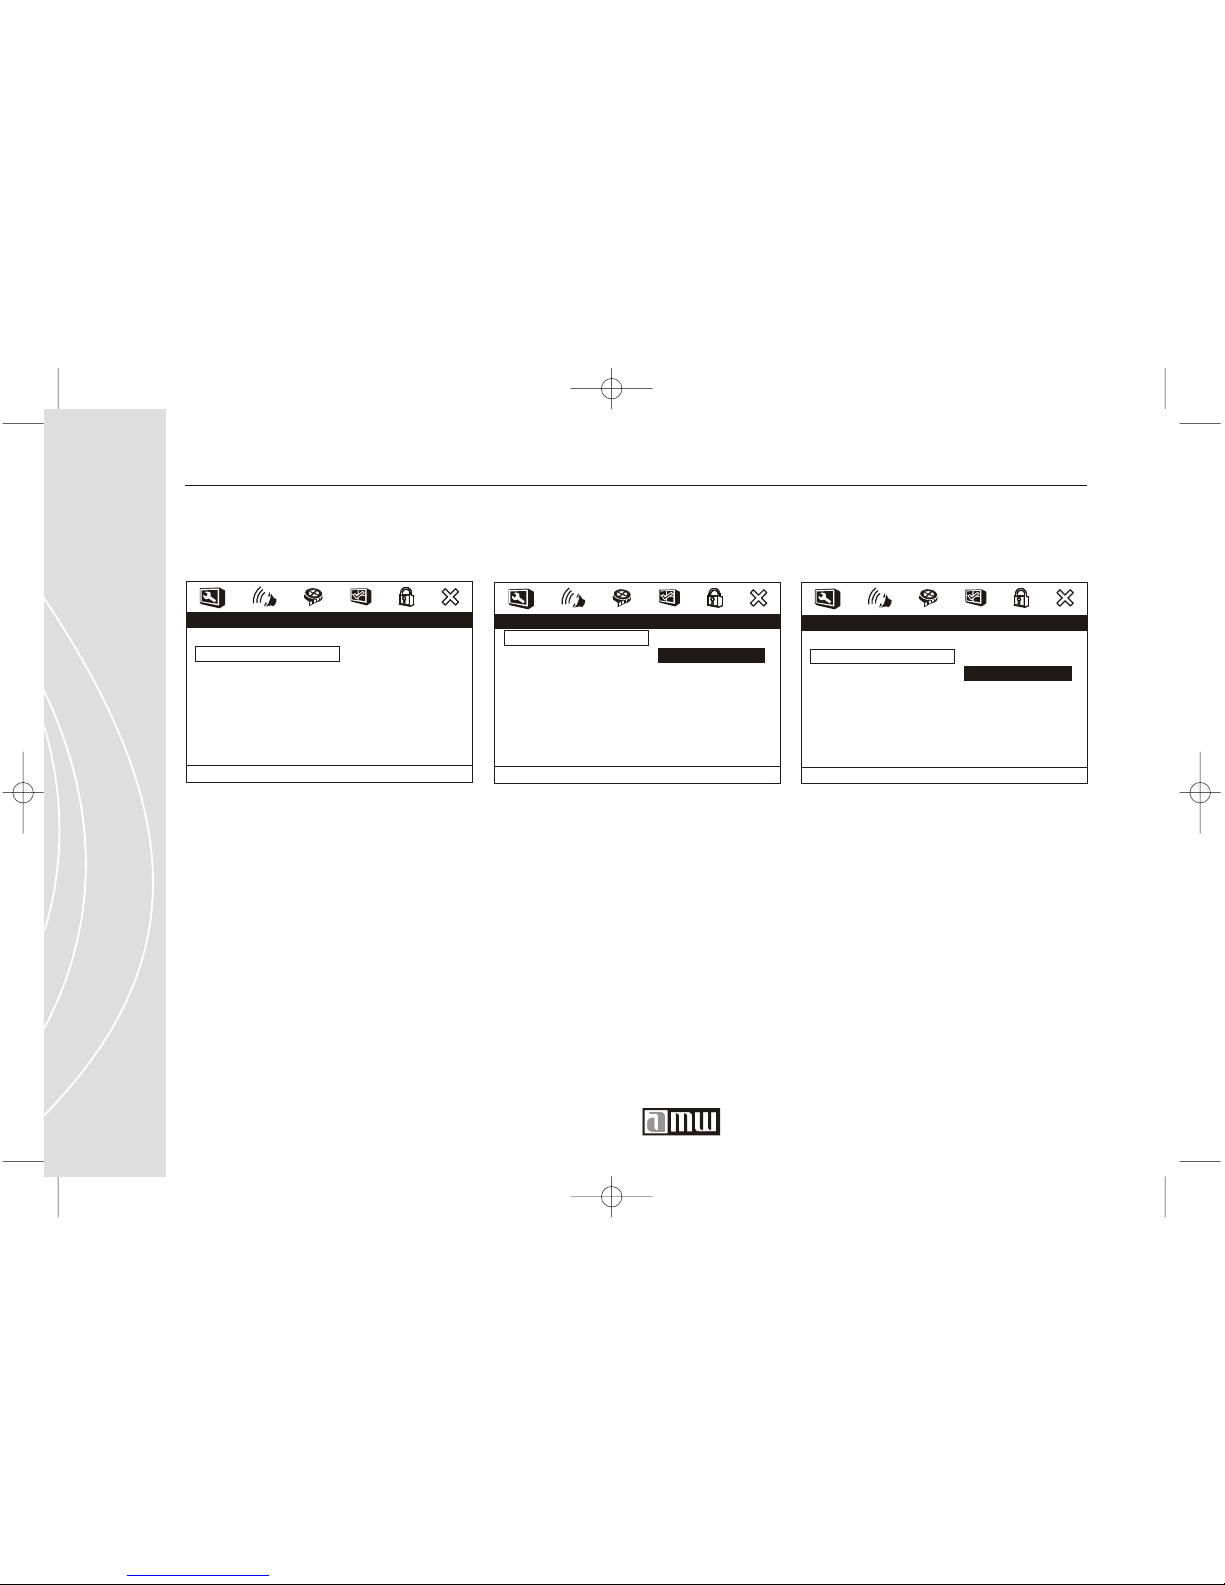
Audiol Setup /SPDIF Setup / CDAudio Setup /SPDIF Setup / SPDIF
Output
SPDIF OUTPUT
Set up the SPDIF OUTPUT
selection.
CD
Set up CD DIGITAL output when
SPDIF OUTPUT is set to
MANUAL.
- - SPDIF Setup Page - -
SPDIF Output
CD
Dolby Digital
DTS
MPEG
PCM Channel
LPCM Out
Manu
RAW
RAW
RAW
RAW
L/R
48K
SPDIF Of f
SPDIF/RAW
SPDIF/PCM
Manual
Setup SPDIF
- - SPDIF Setup Page - -
SPDIF Output
CD
Dolby Digital
DTS
MPEG
PCM Channel
LPCM Out
Manu
RAW
RAW
RAW
RAW
L/R
48K
SPDIF Of f
SPDIF/RAW
SPDIF/PCM
Center
Customer Service 1 626 968 6860
- - Audio Setup Page - -
Speaker Setup
SPDIF Setup
Dolby Digital Setup
Channel Delay
Equalizer
3D Processing
Go To SPDIF Setup Page
Audio Setup / SPDIF Setup
Page 69
DTS
Set up DTS digital output when
SPDIF OUTPUT is set to
MANUAL.
Audio Setup /SPDIF Setup /Dts Audio Setup /SPDIF Setup / MPEG
- - SPDIF Setup Page - -
SPDIF Output
CD
Dolby Digital
DTS
MPEG
PCM Channel
LPCM Out
Manu
RAW
RAW
RAW
RAW
L/R
48K
SPDIF Of f
SPDIF/RAW
SPDIF/PCM
Right Surr ound
- - SPDIF Setup Page - -
SPDIF Output
CD
Dolby Digital
DTS
MPEG
PCM Channel
LPCM Out
Manu
RAW
RAW
RAW
RAW
L/R
48K
SPDIF Of f
SPDIF/RAW
SPDIF/PCM
Right
MPEG
Set up MPEG digital output
when SPDIF OUTPUT is set to
MANUAL.
69
DOLBY DIGITAL
Set up DOLBY DIGITAL output
when SPDIF OUTPUT is set to
MANUAL.
Audio Setup /SPDIF Setup / Dolby
Digital
- - SPDIF Setup Page - -
SPDIF Output
CD
Dolby Digital
DTS
MPEG
PCM Channel
LPCM Out
Manu
RAW
RAW
RAW
RAW
L/R
48K
SPDIF Of f
SPDIF/RAW
SPDIF/PCM
Left
Page 70
70
Audio Setup / Dolby Digital SetupAudiol Setup /SPDIF Setup / LPCM
Out
LPCM OUT
Set up the LPCM OUT
frequency. The 2 channel model
can be set to 48k or 96k. The 5.1
channel model can be set to
48k, 96k, 192k.
- - SPDIF Setup Page - -
SPDIF Output
CD
Dolby Digita l
DT S
MPEG
PCM Channel
LPCM Out
Manu
RA W
RA W
RA W
RA W
L/R
48K
48K
96K
192K
Set LPCM SPDIF Output RA TE
- - Audio Setup Page - -
Speaker Setup
SPDIF Setup
Dolby Digital Setup
Channel Delay
Equalizer
3D Pr ocessing
Go To
Dolby Digital Setup
Customer Service 1 626 968 6860
Audio Setup /SPDIF Setup / PCM
Channel
- - SPDIF Setup Page - -
SPDIF Output
CD
Dolby Digital
DTS
MPEG
PCM Channel
LPCM Out
Manu
RAW
RAW
RAW
RAW
L/R
48K
Right
SPDIF LS/RS
SPDIF C/LFE
SPDIF L/R
Page 71
DYNAMIC
Adjusts the linear compression
rate of the signal.
Audio Setup / Channel DelayAudio Setup /Dolby Digital Setup /
Dynamic
- - Dolby Digital Setup - -
Dual Mono
Dynamic
STR
Set DRC Of f
-
- FULL
-
- 3/4
-
- 1/2
-
- 1/4
-
- OF F
- - Audio Setup Page - -
Speaker Setup
SPDIF Setup
Dolby Digital Setup
Channel Delay
Equalizer
3D Processing
Go To CH Delay Setup
71
DUAL MONO
This is the output mode of the L
and R signals of the set audio
output. When set to MIX-MONO,
this function only works when a
DVD is being played in the 2
channel model.
Audio Setup /Dolby Digital Setup /
Dual Mono
- - Dolby Digital Setup - -
Dual Mono
Dynamic
STR Stereo
L-Mono
R-Mono
Mix-Mono
Dual Mono (1 + 1) Setup
Page 72
72
LS
Set up the LEFT SURROUND
channel delay distance. The
default setting is 170cm.
Audio Setup /Channel Delay / RSAudio Setup /Channel Delay /LS
- - Audio Setup Page - -
Speaker Setup
SPDIF Setup
Dolby Digital Setup
Channel Delay
Equalizer
3D Processing
170cm
- - Audio Setup Page - -
Speaker Setup
SPDIF Setup
Dolby Digital Setup
Channel Delay
Equalizer
3D Processin g
170cm
RS
Set up the RIGHT SURROUND
channel delay distance. The
default setting is 170cm.
Customer Service 1 626 968 6860
CENTER
Set up the CENTER channel
delay distance. The default
setting is 0cm.
Audio Setup /Channel Delay /Center
- - Audio Setup Page - -
Speaker Setup
SPDIF Setup
Dolby Digital Setup
Channel Delay
Equalizer
3D Processing
0cm
Page 73
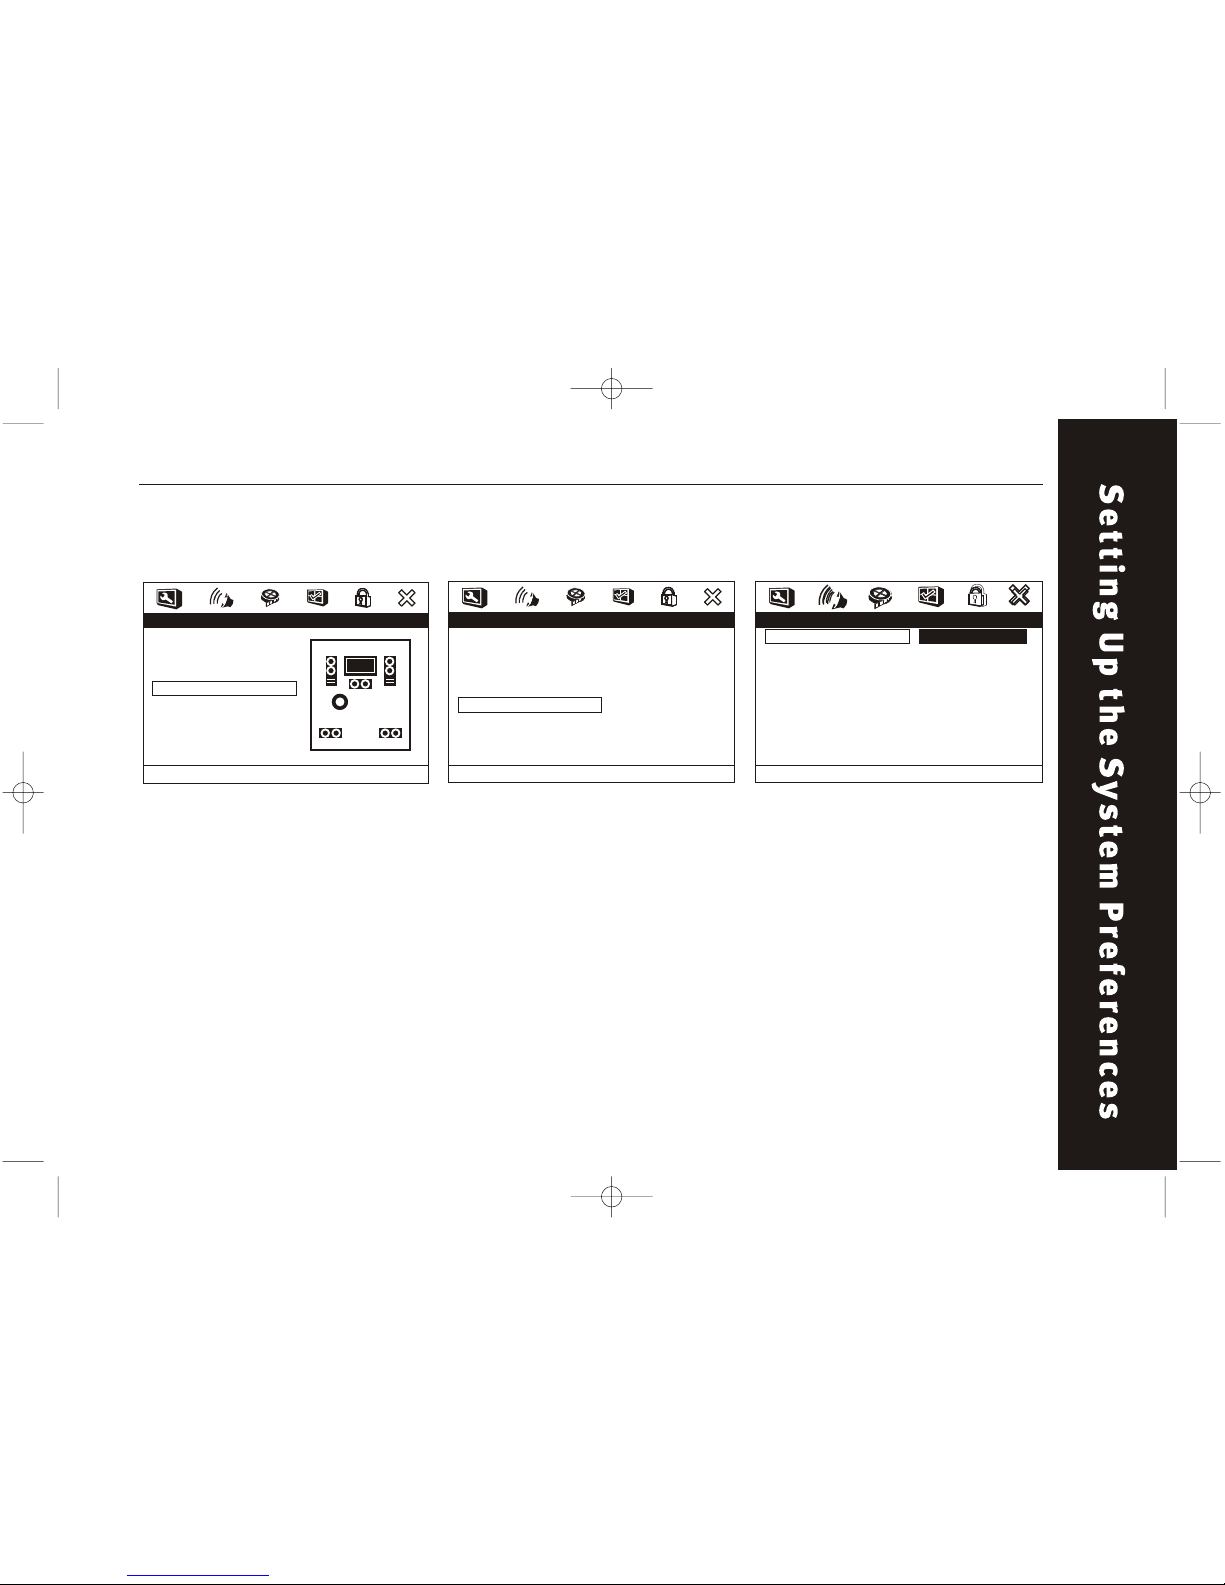
EQ TYPE
There are 7 EQ setting. You may
select a sound effect depending
on the DVD.
Audio Setup / Equalizer / EQ TypeAudio Setup / Equalizer
- - Audio Setup Page - -
Speaker Setup
SPDIF Setup
Dolby Digital Setup
Channel Delay
Equalizer
3D Processing
Go To Equalizer Page
- - Equalizer Page - -
EQ Type
Bass Boost
Super Bas s
Tr eble Boost
None
Of f
Of f
Of f
None
Rock
Pop
Live
Dance
Techno
Classic
Sof t
Select Equalizer Type
73
Audiol Setup /Channel Delay /
Subwoofer
- - Audio Setup Page - -
Speaker Setup
SPDIF Setup
Dolby Digital Setup
Channel Delay
Equalizer
3D Processing
0cm
SUBWOOFER
Set up the SUBWOOFER
channel delay distance. The
default setting is 0cm.
Page 74
74
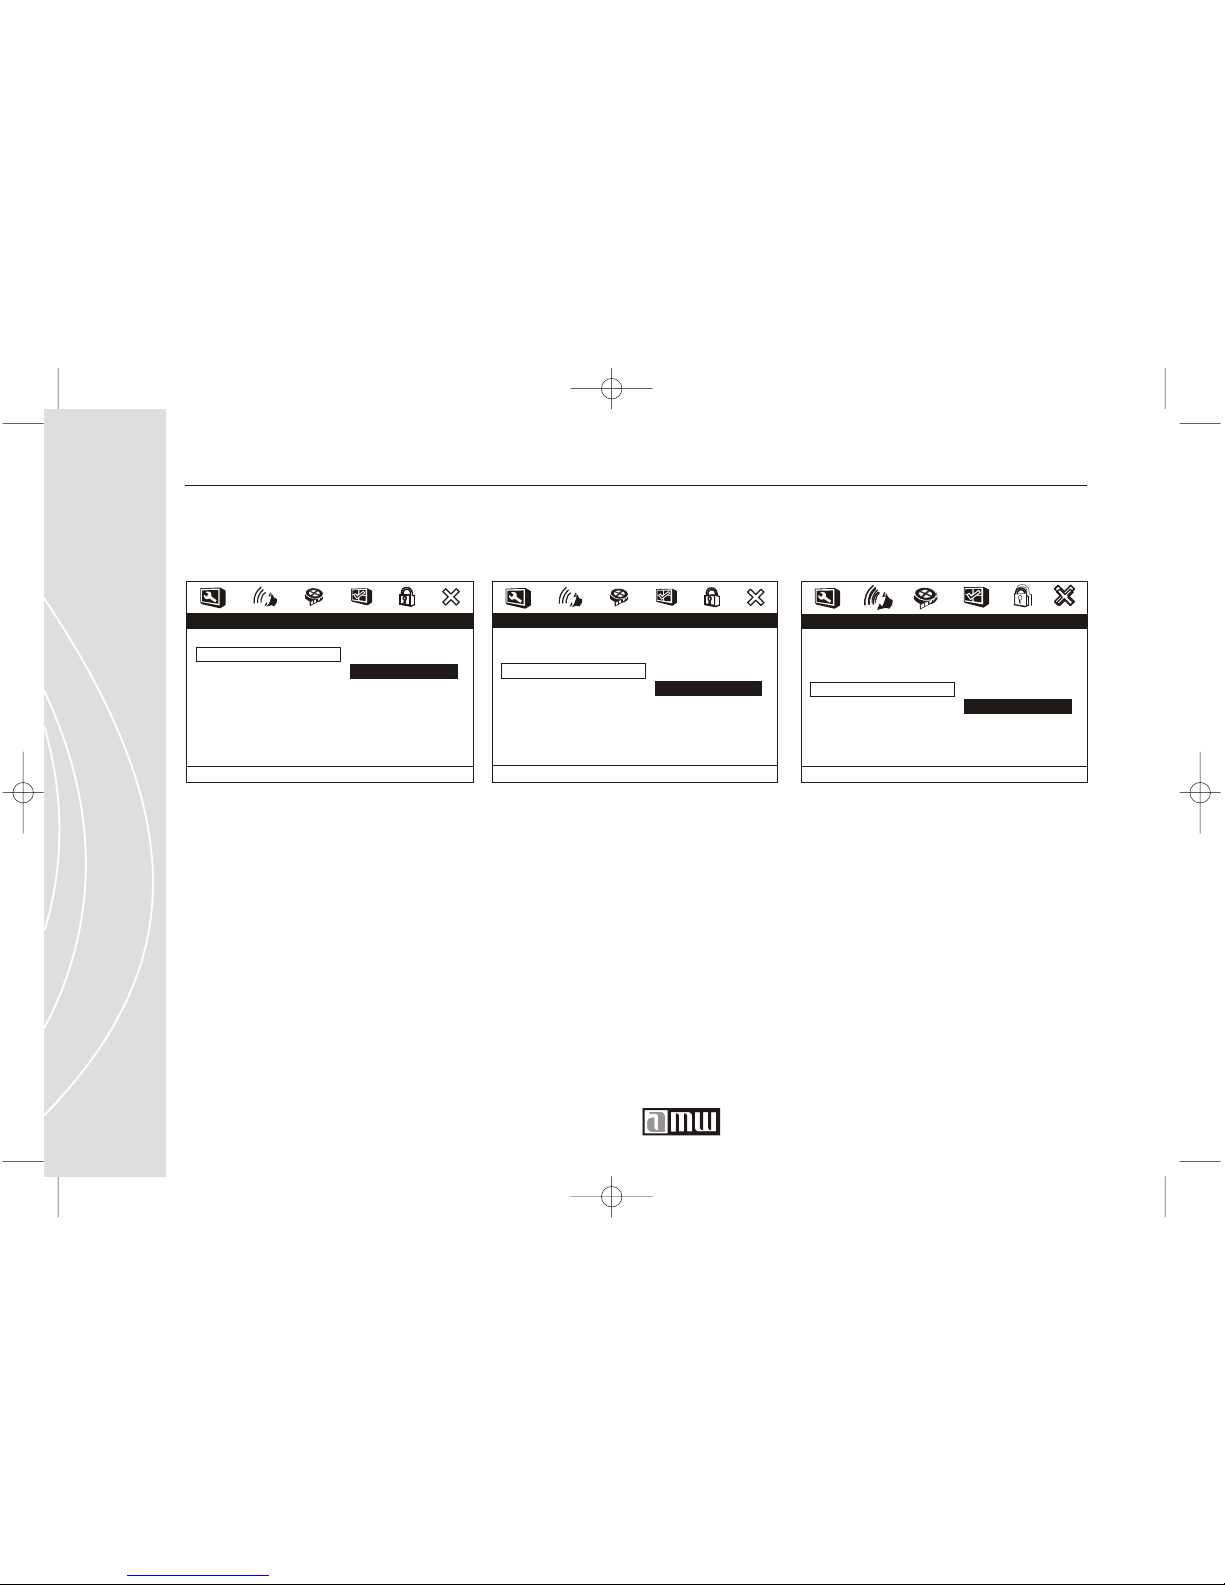
SUPER BASS
Enables the SUPER BASS
function. This function only works
when "Bass Boost" is on.
Audio Setup / Equalizer / Super Bass
- - Equalizer Page - -
EQ Type
Bass Boost
Super Bass
Tr eble Boost
None
Of f
Of f
Of fOnOf f
Super Bass
Customer Service 1 626 968 6860
TREBLE BOOST
Enables the TREBLE BOOST
function.
Audio Setup / Equalizer / Treble Boost
- - Equalizer Page - -
EQ Type
Bass Boost
Super Bass
Tr eble Boost
None
Of f
Of f
Of F On
Of f
Tr eble Boost
BASS BOOST
Enables the BASS BOOST
function.
- - Equalizer Page - -
EQ Type
Bass Boost
Super Bass
Tr eble Boost
None
Of f
Of f
Of f
On
Of f
Bass Boost
Audio Setup / Equalizer / Bass Boost
Page 75
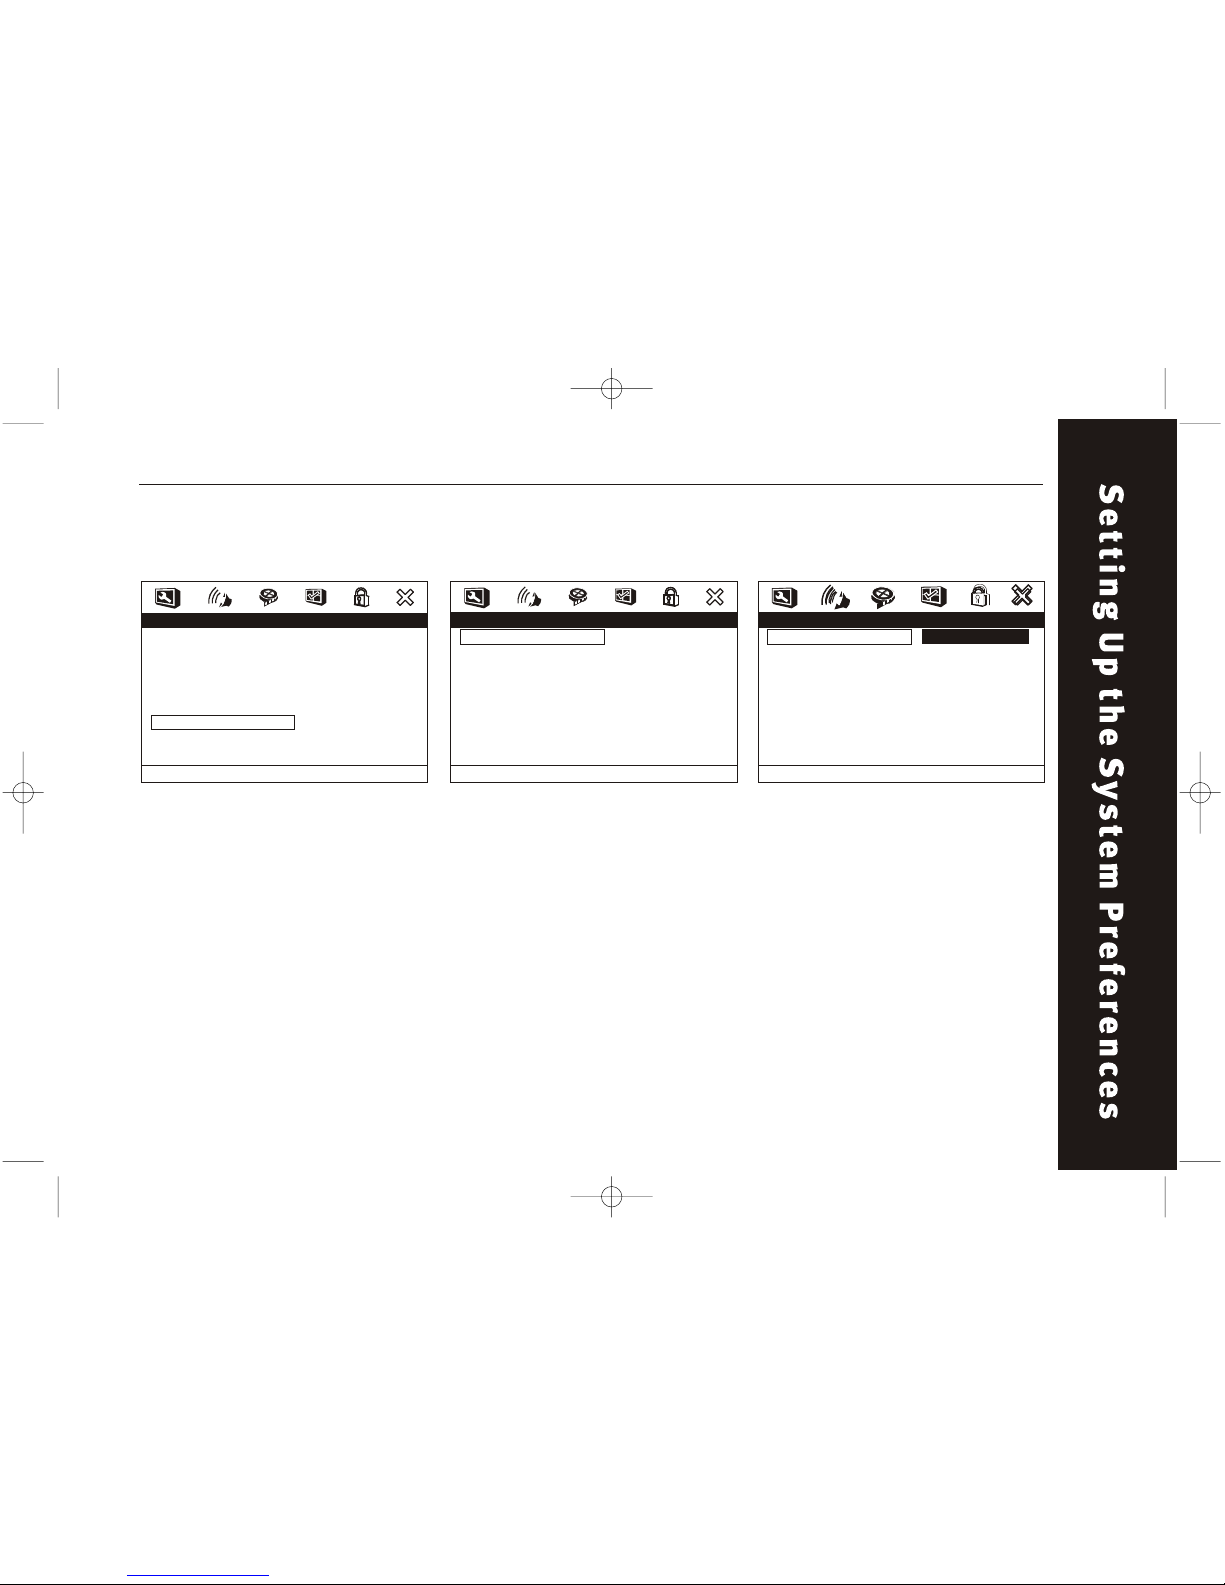
PROLOGIC
The deluxe model supports
Prologic surround. Prologic II
drives five-channel surround from
any stereo program material.
Prologic II also provides two fullrange surround channels.
Audio Setup / 3D Processing / Prologic Audio Setup / 3D Processing / Prologic
- - 3D Processing Page - -
PRO Logic II
Reverb Mode Of f
Go To PRO Logic II Config Page
PRO Logic II Config
PRO Logic II
Mode
Panorama
Dimension
Center Width
On
MUS
Of f
00
03
On
Of f
Auto
PRO Logic II
75
NOTE:
The below function "Mode" "Panorama" - "Dimension" "Center Width" only work when
"PROLOGIC II" is selected to "On"
or "Auto".
Audio Setup / 3D Processing
- - Audio Setup Page - -
Speaker Setup
SPDIF Setup
Dolby Digital Setup
Channel Delay
Equalizer
3D Processing
Go To 3D Pr ocessing Page
Page 76
76
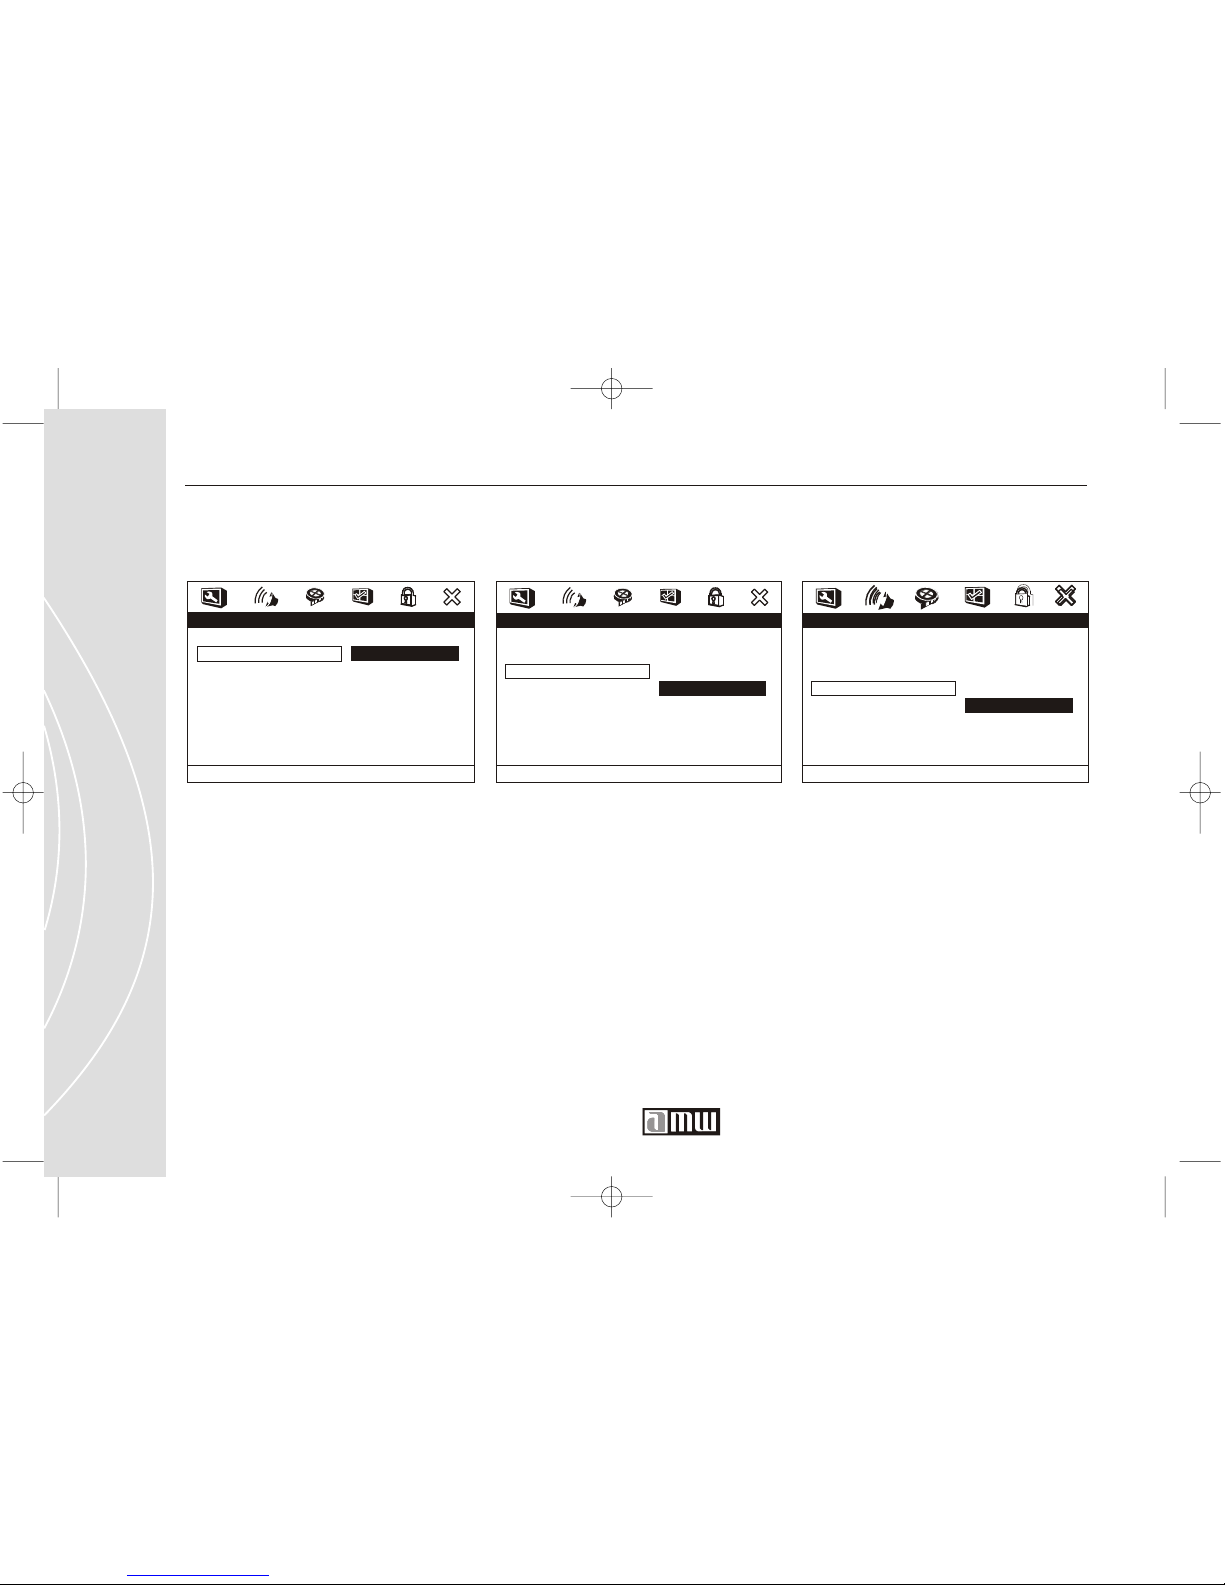
Audio Setup / 3D Processing / Prologic Audio Setup / 3D Processing / Prologic
PRO Logic II Config
PRO Logic II
Mode
Panorama
Dimension
Center Width
On
MUS
Of f
00
03
Size -3
Size -3
Size -1
Size 0
Size 1
Size 2
Size 3
Set PRO Logic II Dimension Size
PRO Logic II Config
PRO Logic II
Mode
Panorama
Dimension
Center Width
On
MUS
Of f
00
03
On
Of f
Set PRO Logic II Panorama Contr ol
Customer Service 1 626 968 6860
Audio Setup / 3D Processing / Prologic
PRO Logic II Config
PRO Logic II
Mode
Panorama
Dimension
Center Width
On
MUS
Of f
00
03
Music
Movie
PRO Logic
Auto
Select PRO Logic II Mode
Page 77
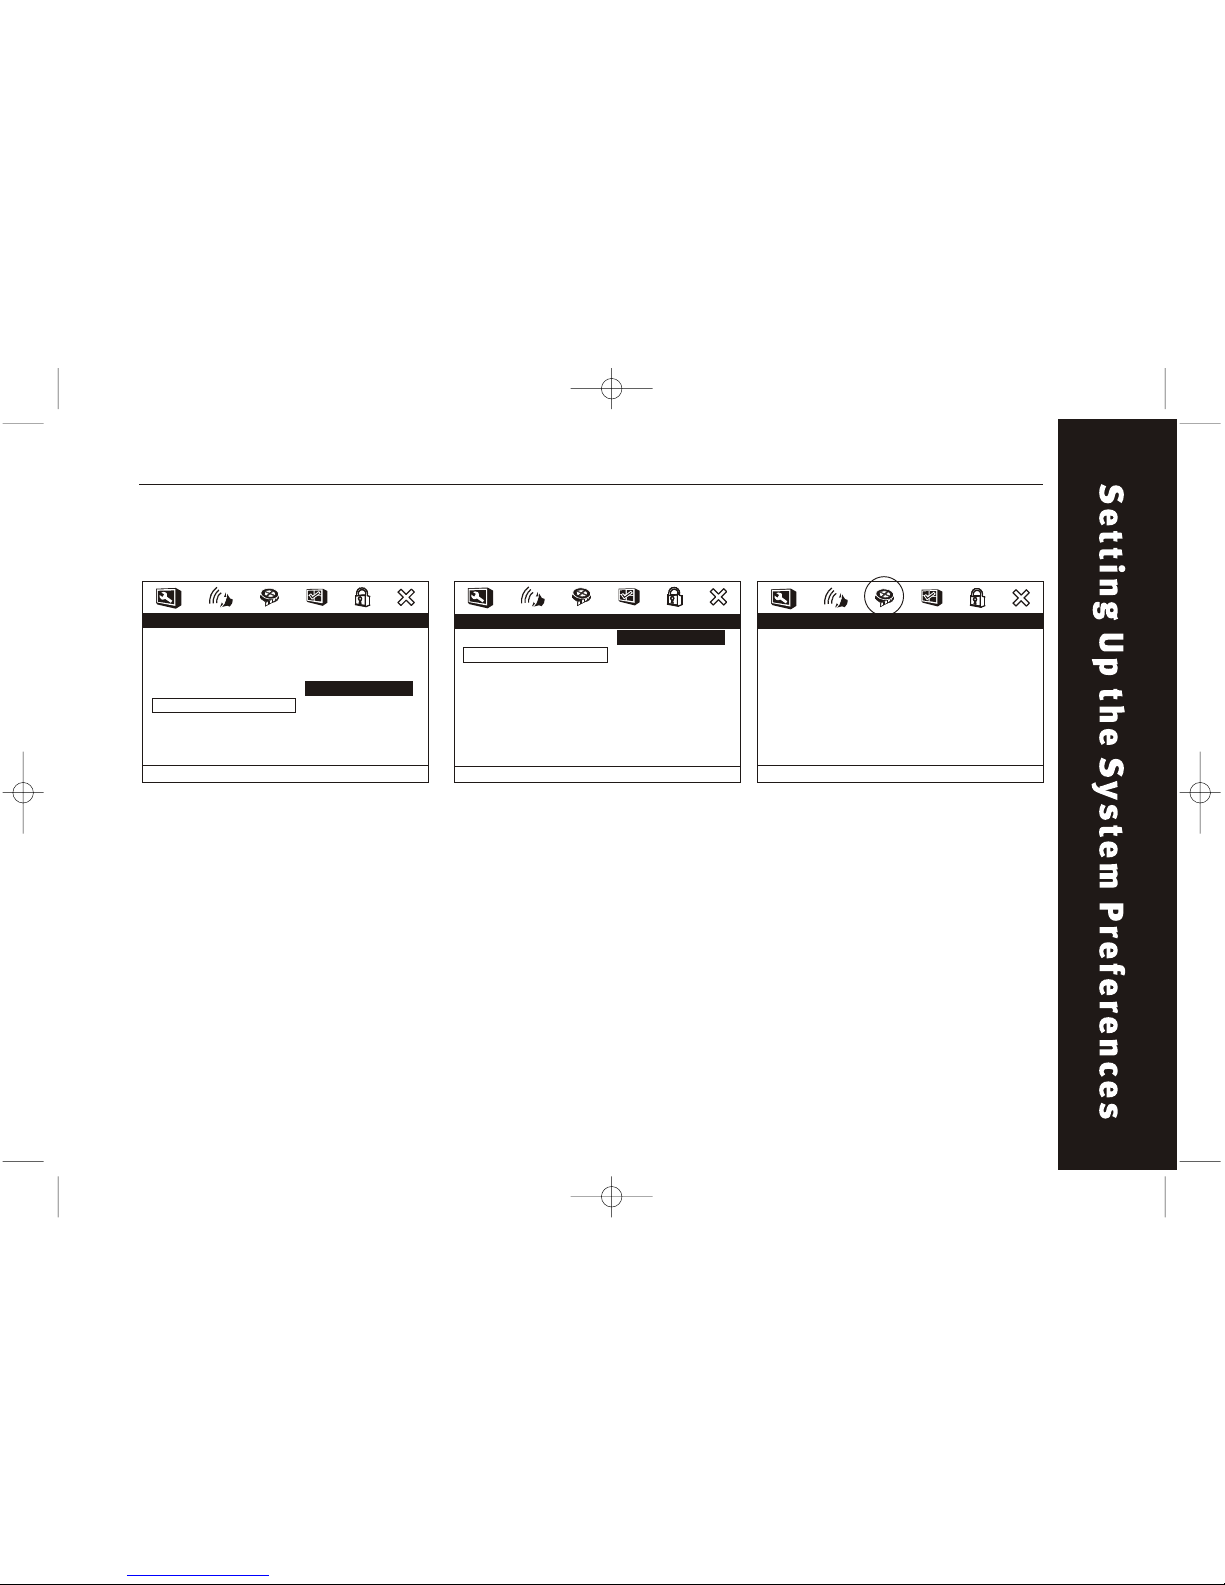
REVERB MODE
3D PROCESSING MODE
selection. There are 7 options
including, CONCERT, LIVING
ROOM, HALL, BATHROOM, CAVE,
ARENA, CHURCH.
Audio Setup / 3D Processing / Reverb
Mode
- - 3D Processing Page - -
PRO Logic II
Reverb Mode Of f
Of f
Concer t
Living Room
Hall
Bathr oom
cave
Arena
Church
Reverb Mode
77
Video Setup
VIDEO SETUP
- - Video Setup Page - -
Go To Video Setup Page
Quality
Audio Setup / 3D Processing / Prologic
PRO Logic II Config
PRO Logic II
Mode
Panorama
Dimension
Center Width
On
MUS
Of f
00
03
Level 0
Level 1
Level 2
Level 3
Level 4
Level 5
Level 6
Level 7
Set PRO Logic II Center Width
Page 78
78
Customer Service 1 626 968 6860
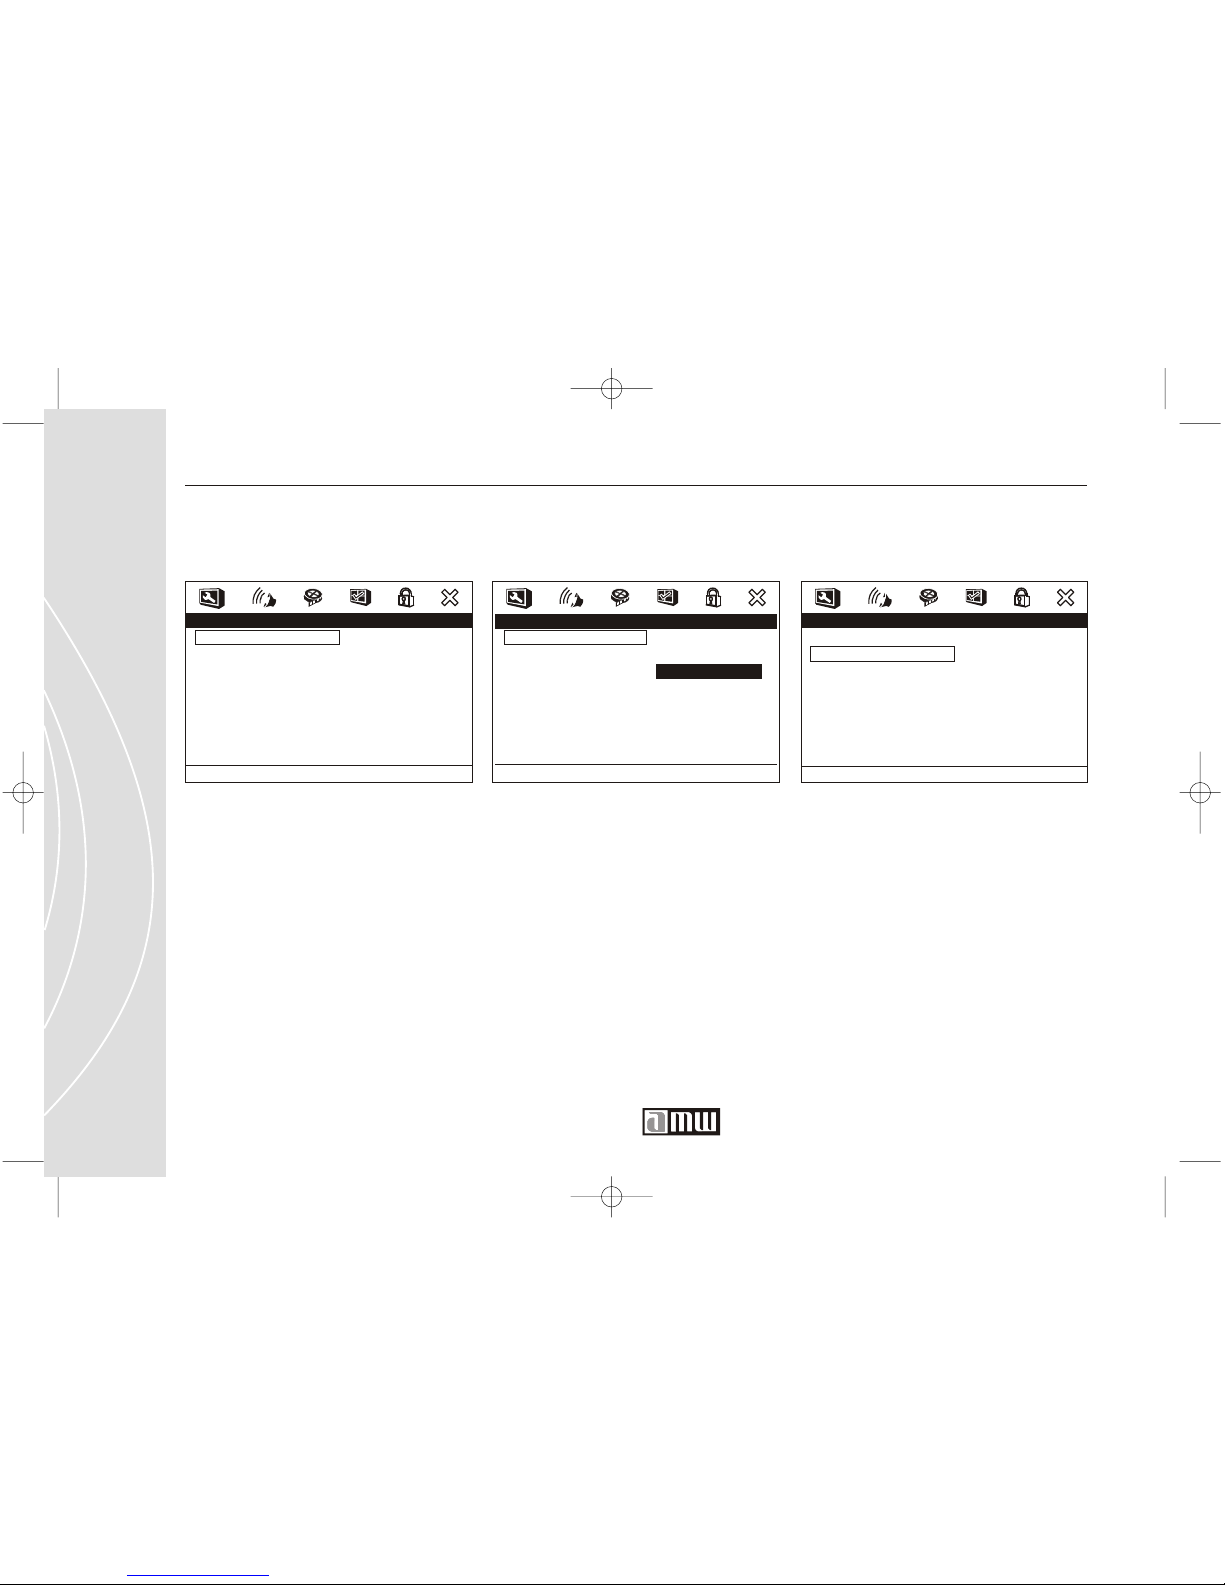
QUALITY
Adjust the video output quality.
Video Setup / Quality Video Setup / Quality / Sharpness
Adjust the SHARPNESS.
Video Quality Setup
Sharpness
Brightness
Contrast
Gamma
Hue
Saturation
Luma Delay
Lo w
00
00
None
00
00
1 T
High
Medium
Low
Sharpness
- - Video Setup Page - -
Quality
Go To Video Quality Setup Page
Video Setup / Quality / Brightness
Adjust the BRIGHTNESS.
Video Quality Setup
Sharpness
Brightness
Contrast
Gamma
Hue
Saturation
Luma Delay
Low
00
00
None
00
00
1 T
Brightness
Page 79
P400 Manual 4/20/03 Page 63
79
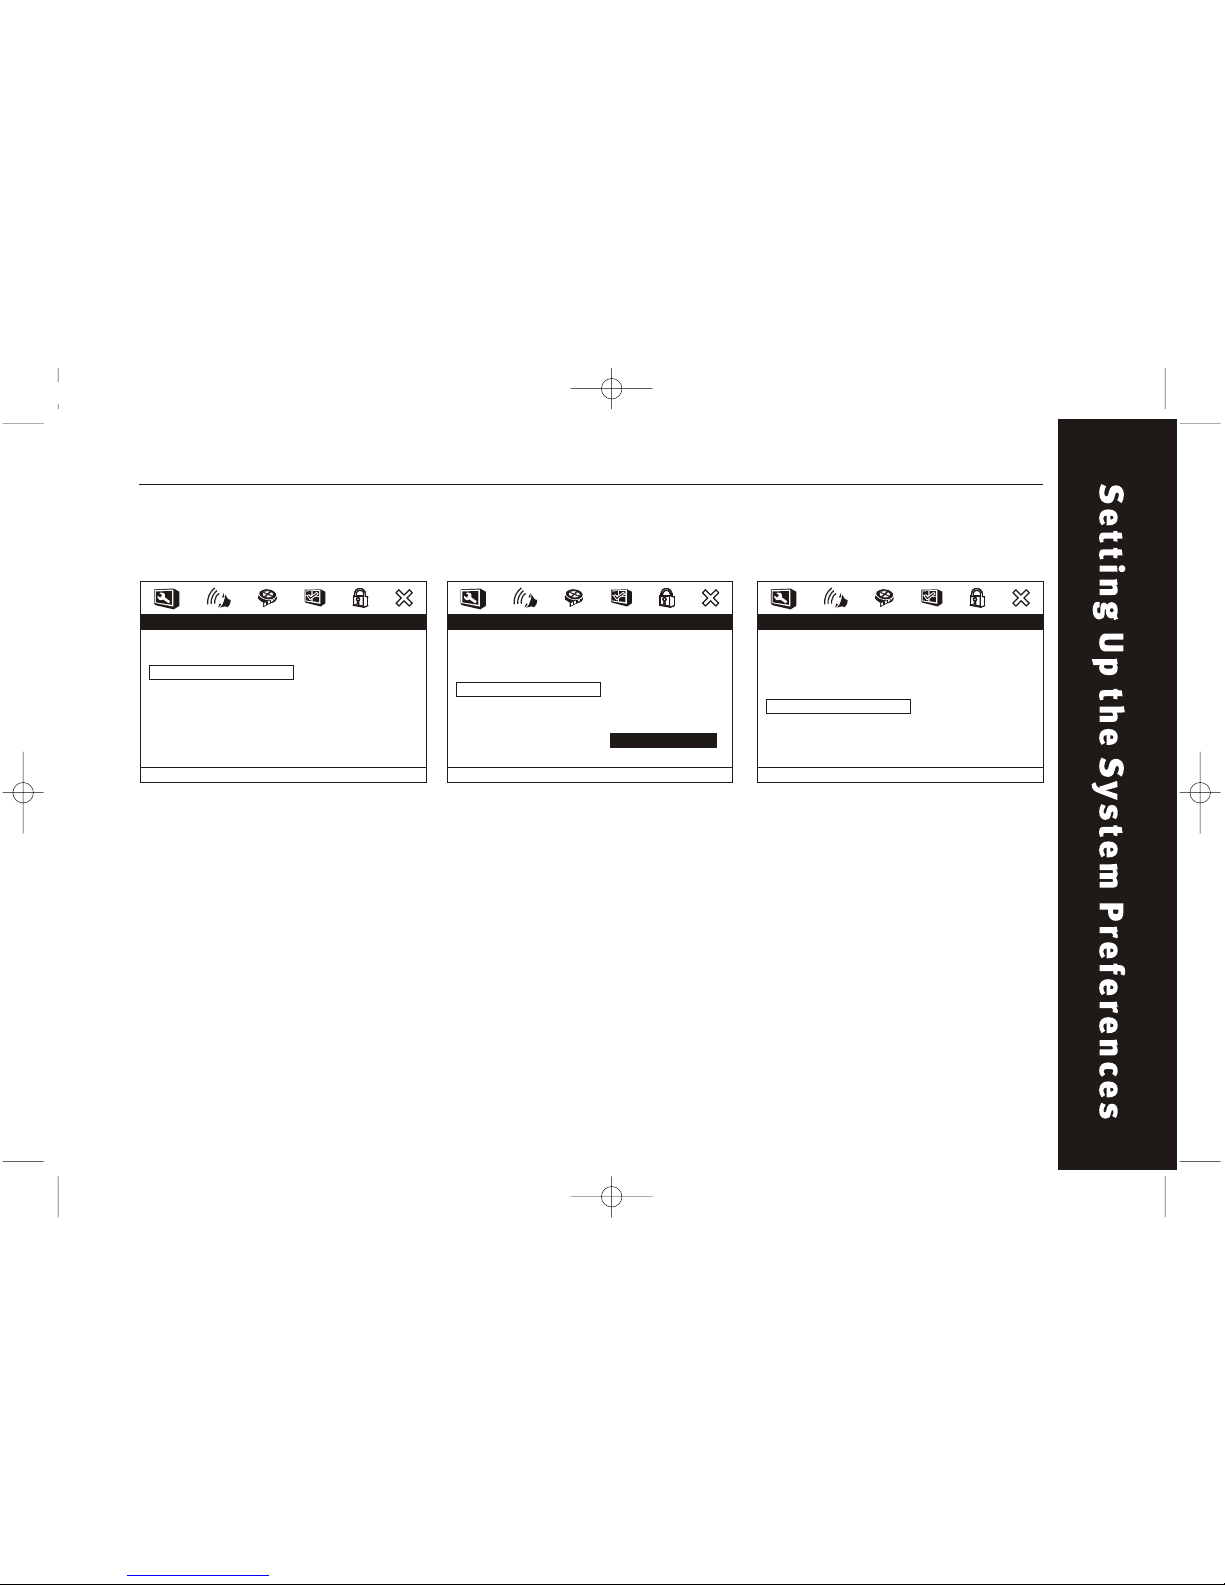
Video Setup / Quality / GammaVideo Setup / Quality / Contrast
Adjust the GAMMA.Adjust the CONTRAST.
Video Quality Setup
Sharpness
Brightness
Contrast
Gamma
Hue
Saturation
Luma Delay
Lo w
00
00
None
00
00
1 T
High
Medium
Low
None
Gamma
Video Quality Setup
Sharpness
Brightness
Contrast
Gamma
Hue
Saturation
Luma Delay
Lo w
00
00
None
00
00
1 T
Contrast
Video Setup / Quality / Hue
Adjust the HUE.
Video Quality Setup
Sharpness
Brightness
Contrast
Gamma
Hue
Saturation
Luma Delay
Lo w
00
00
None
00
00
1 T
Hue
Page 80
80
Customer Service 1 626 968 6860
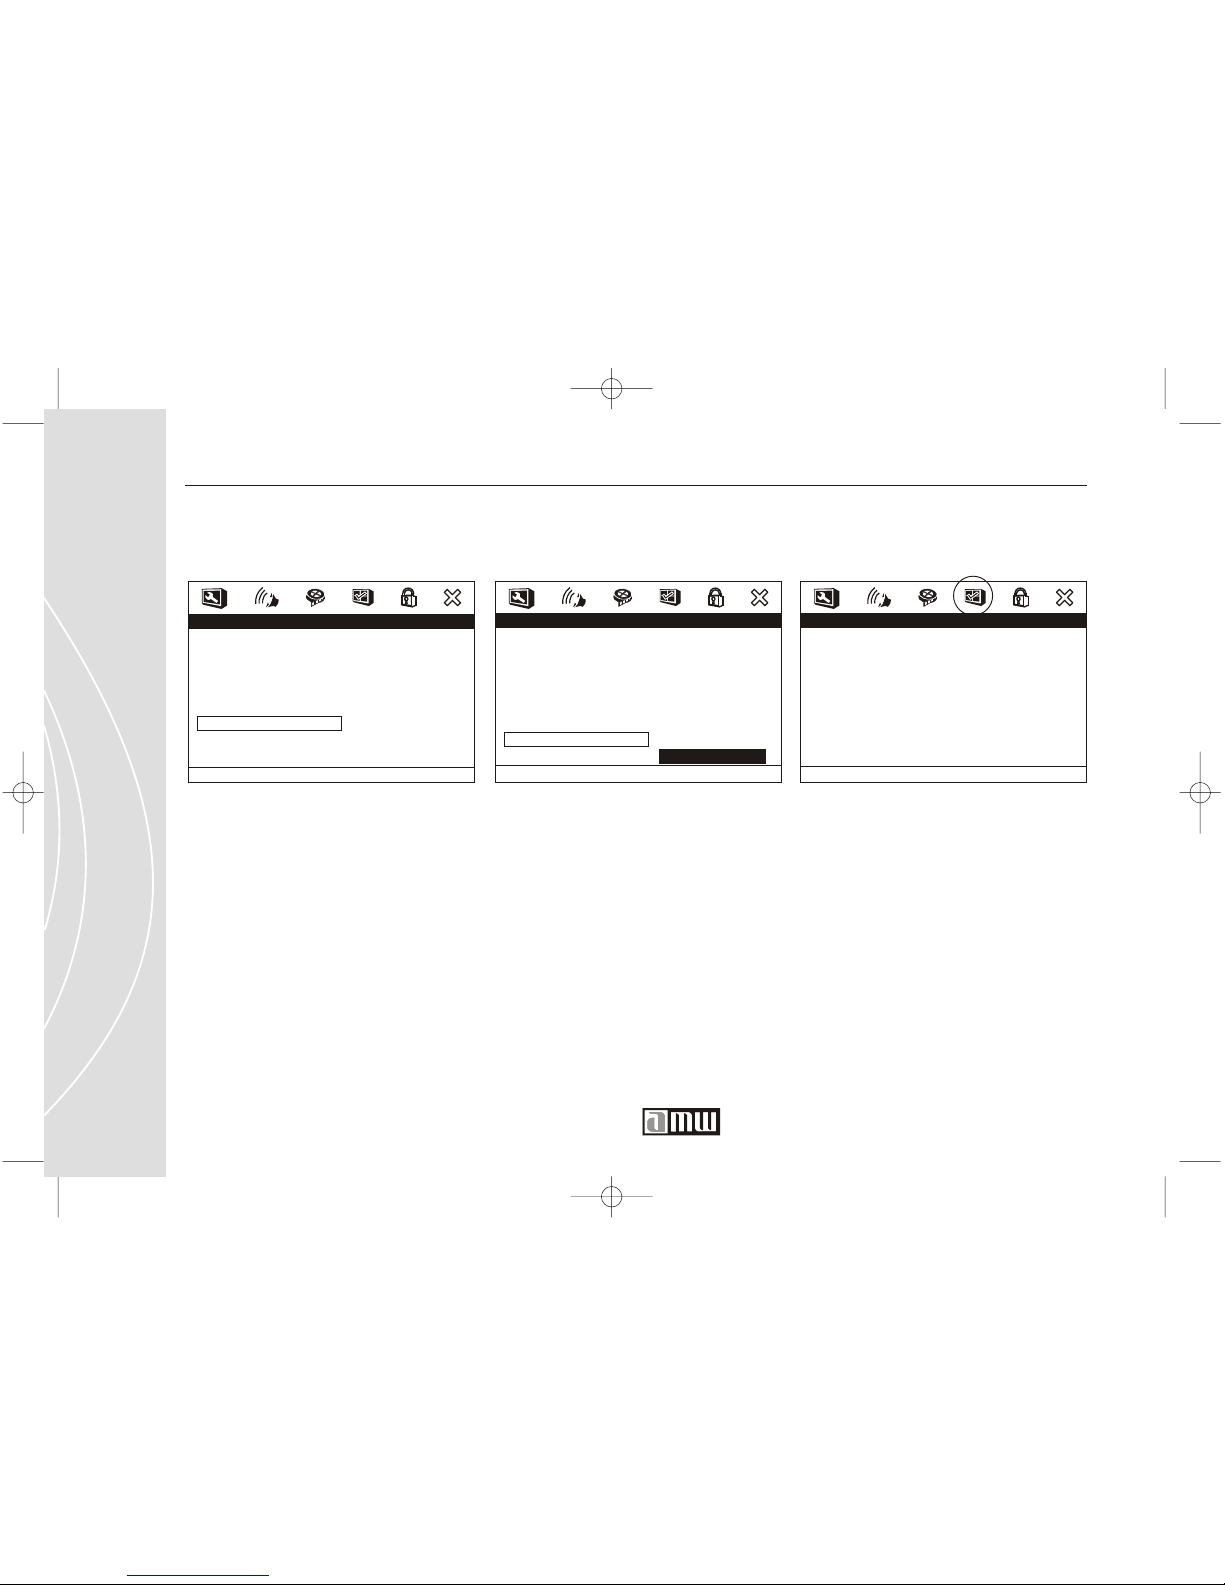
Video Setup / Quality / Luma DelayVideo Setup / Quality / Saturation
Adjust the LUMA DELAY.Adjust the SATURATION.
Video Quality Setup
Sharpness
Brightness
Contrast
Gamma
Hue
Saturation
Luma Delay
Lo w
00
00
None
00
00
1 T
Saturation
Video Quality Setup
Sharpness
Brightness
Contrast
Gamma
Hue
Saturation
Luma Delay
Low
00
00
None
00
00
1 T0
T
1 T
Luma Delay
Preference Setup
PREFERENCE SETUP
- - Pr efer ence Page - -
TV Type
PBC
Audio
Subtitle
Disc Menu
Par ental
Country Region
Default
NTSC
On
ENG
JAN
USA
Go To Prefer ence Page
NOTE:
If you want to access the Preference
Setup Page, please make sure there
is no disk inside the DVD player.
You can not adjust the settings of
the Preference Setup Page while a
disc is inside the player.
Page 81
81
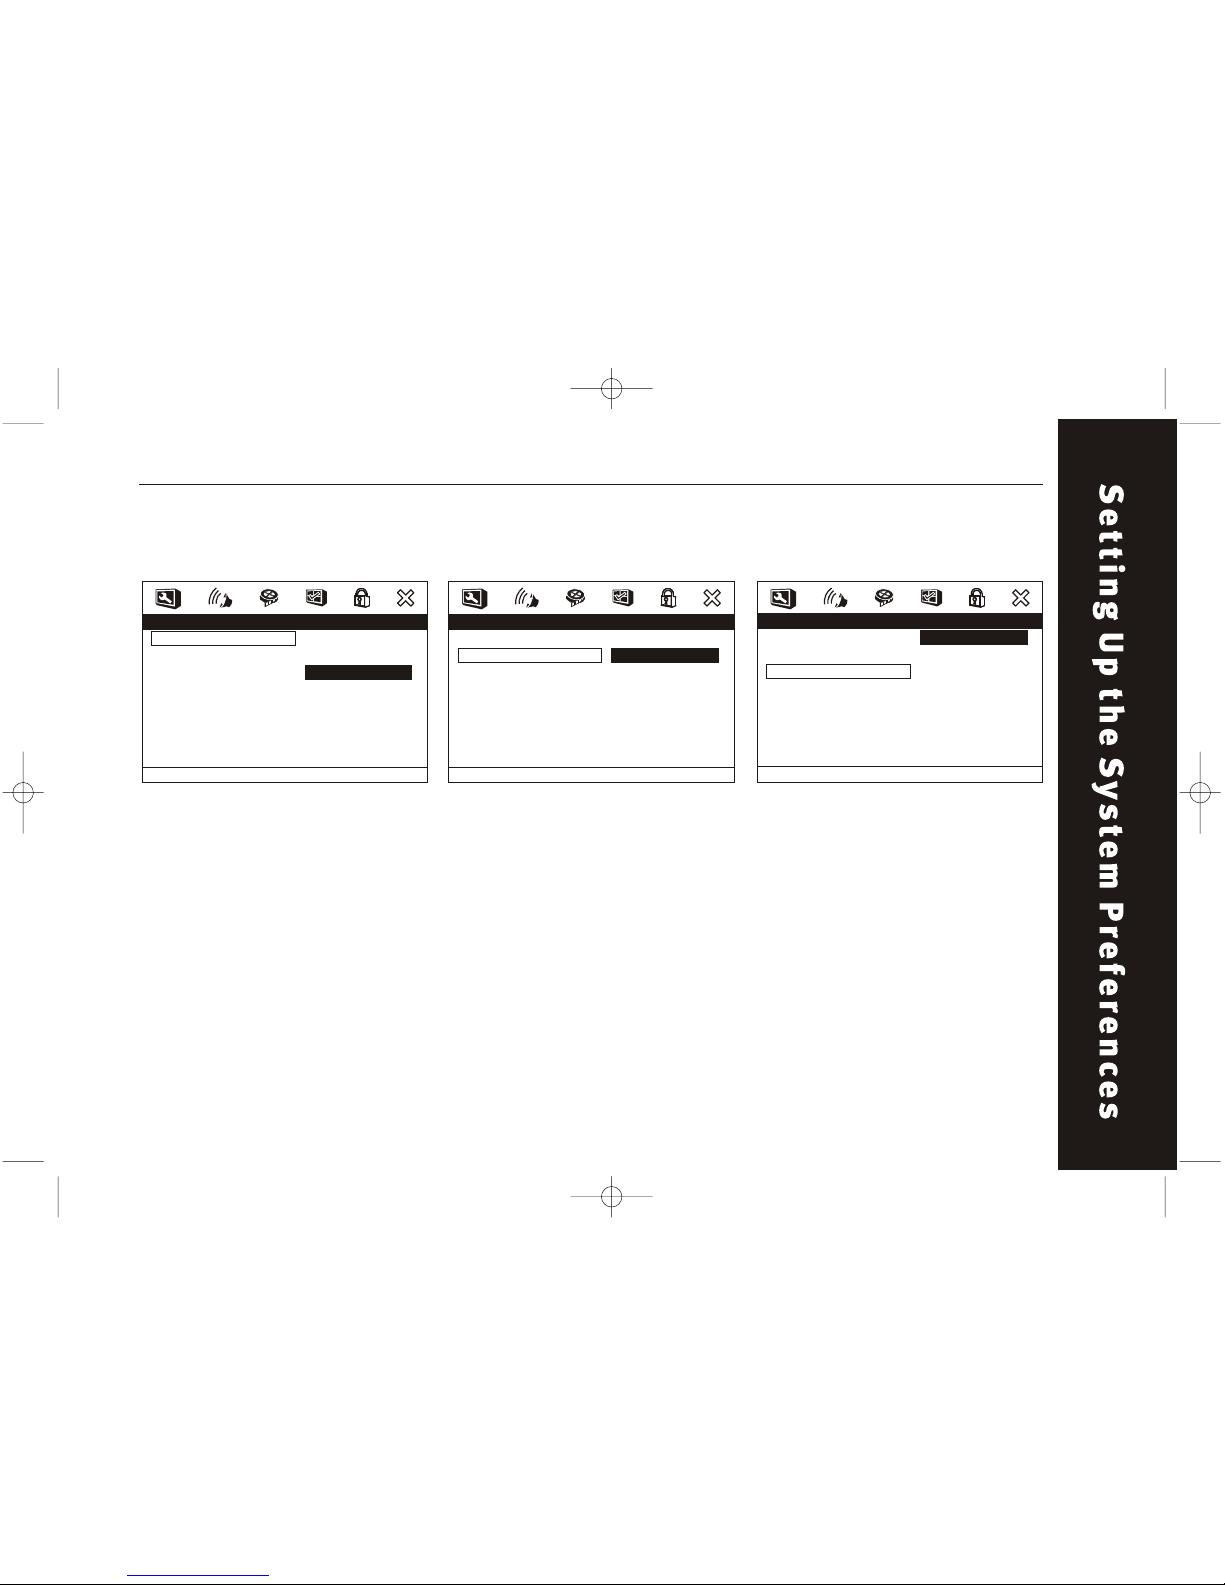
Preference Setup / TV Type Preference Setup / PBC
TV TYPE
Select the TV TYPE according to
the TV set. Includes NTSC, PAL
and MULTI.
PBC
Playback control. This is the
function especially for VCD.
Press PBC (ON) to program a
selected chapter. After this
material is completed, the root
menu will appear. Press PBC
(OFF) again to play movie
uninterrupted.
- - Pr efer ence Page - -
TV Type
PBC
Audio
Subtitle
Disc Menu
Par ental
Country Region
Default
NTSC
On
ENG
JAN
USA
On
Of f
Set PBC State
- - Pr efer ence Page - -
TV Type
PBC
Audio
Subtitle
Disc Menu
Par ental
Country Region
Default
NTSC
On
ENG
JAN
USA
PA L
Multi
NTSC
Set TV Standard
Preference Setup / Audio
AUDIO
Choose between several
languages (depending on the
DVD format).
- - Pr efer ence Page - -
TV Type
PBC
Audio
Subtitle
Disc Menu
Par ental
Country Region
Default
NTSC
On
ENG
JAN
USA
English
Fr ench
Spanish
Chinese
Japanese
Korean
Russian
Thai
Preferr ed Audio Language
Page 82
82
Customer Service 1 626 968 6860
Preference Setup / Subtitle Preference Setup / Disc Menu
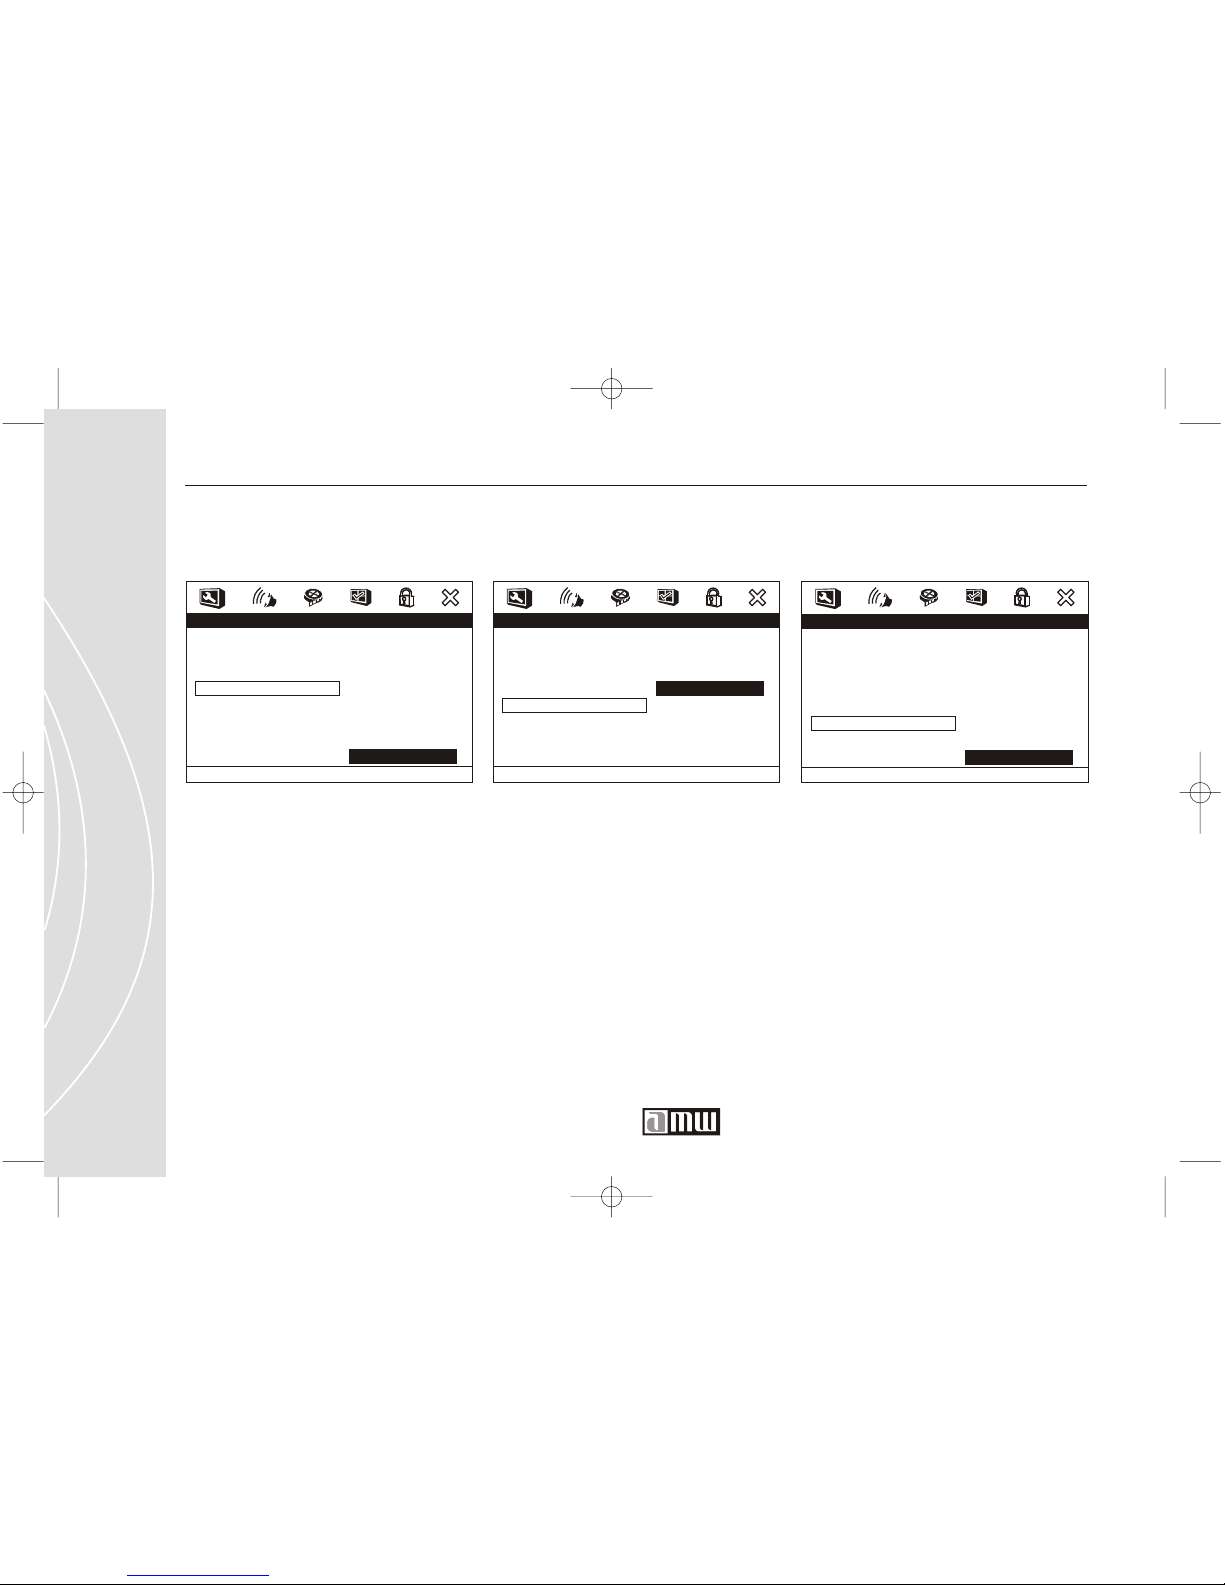
SUBTITLE
Choose between several
languages (depending on the
DVD format).
DISC MENU
Choose between several
languages (depending on the
DVD format).
- - Pr efer ence Page - -
TV Type
PBC
Audio
Subtitle
Disc Menu
Par ental
Country Region
Default
NTSC
On
ENG
JAN
USA
Fr ench
Spanish
Chinese
Japanese
Korean
Russian
Thai
Others
Preferred Subtitle Language
- - Prefer ence Page - -
TV Type
PBC
Audio
Subtitle
Disc Menu
Par ental
Country Region
Default
NTSC
On
ENG
JAN
USA
Fr ench
Spanish
Chinese
Japanese
Kor ean
Russian
Thai
Others
Preferred Menu Language
PARENTAL
Parental control only works with
DVD discs that has this
protection system encoded.
Parental control does not work
for VCD or audio CD discs. The
initial factory setting for OLD
PASSWORD is : 1234 for 2CH DVD
player; 123456 for 5.1CH DVD
player. Enter this number if you
want to change the password.
- - Pr efer ence Page - -
TV Type
PBC
Audio
Subtitle
Disc Menu
Par ental
Country Region
Default
NTSC
On
ENG
JAN
USA
1 KID SAF
2 G
3 PG
4 PG 13
5 PG R
6 R
7 NC 17
8 Adult
Set Par ental Control
Page 83
83
Preference Setup / Default
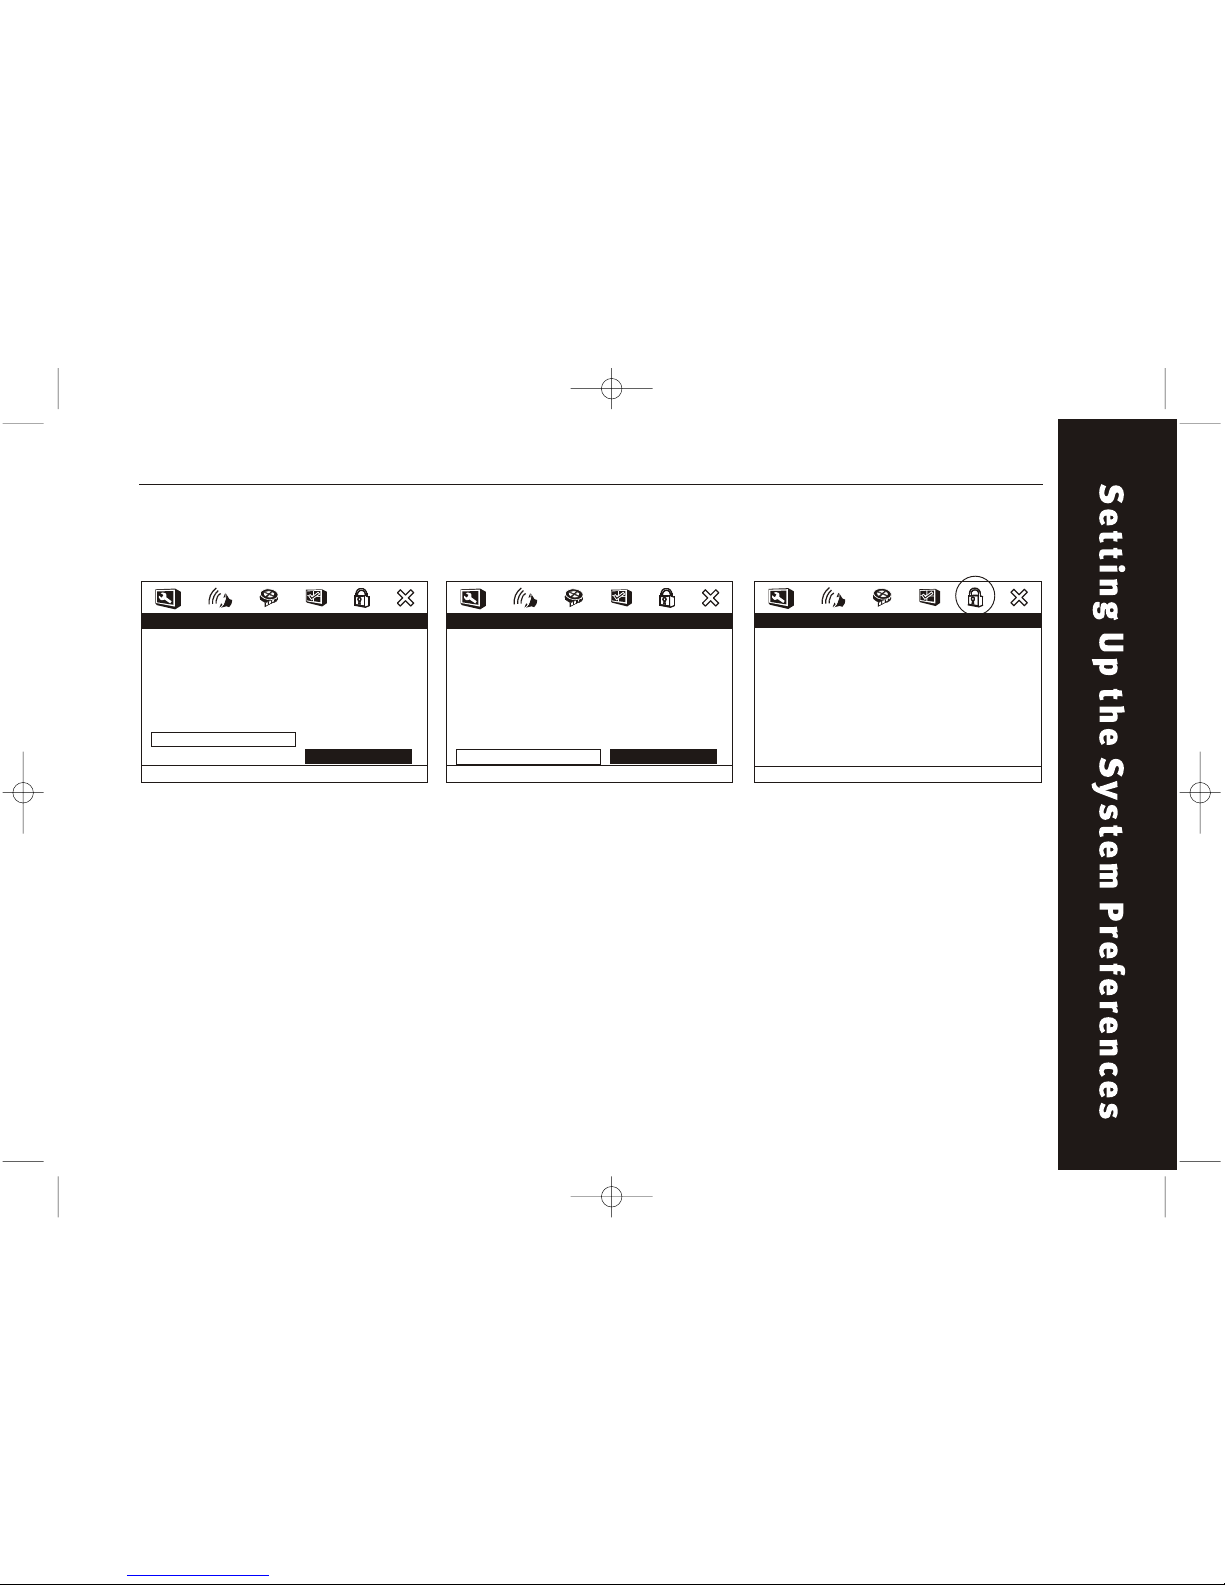
DEFAULT
This function will change all
parameters to their default
settings.
- - Pr efer ence Page - -
TV Type
PBC
Audio
Subtitle
Disc Menu
Par ental
Country Region
Default
NTSC
On
ENG
JAN
USA
Reset
Load Factory Setting
Preference Setup / Country Region
COUNTRY REGION
Set up the parental control
country region.
- - Pr efer ence Page - -
TV Type
PBC
Audio
Subtitle
Disc Menu
Par ental
Country Region
Default
NTSC
On
ENG
JAN
USA
China
France
Hong Kong
Japan
Taiwan
GBR
USA
PG Country Region Code
Password Setup
PASSWORD SETUP
- - Password Setup Page - -
Password Mode On
Password
Go To Password Setup Page
Page 84
84
Customer Service 1 626 968 6860
Password Setup / Password Mode
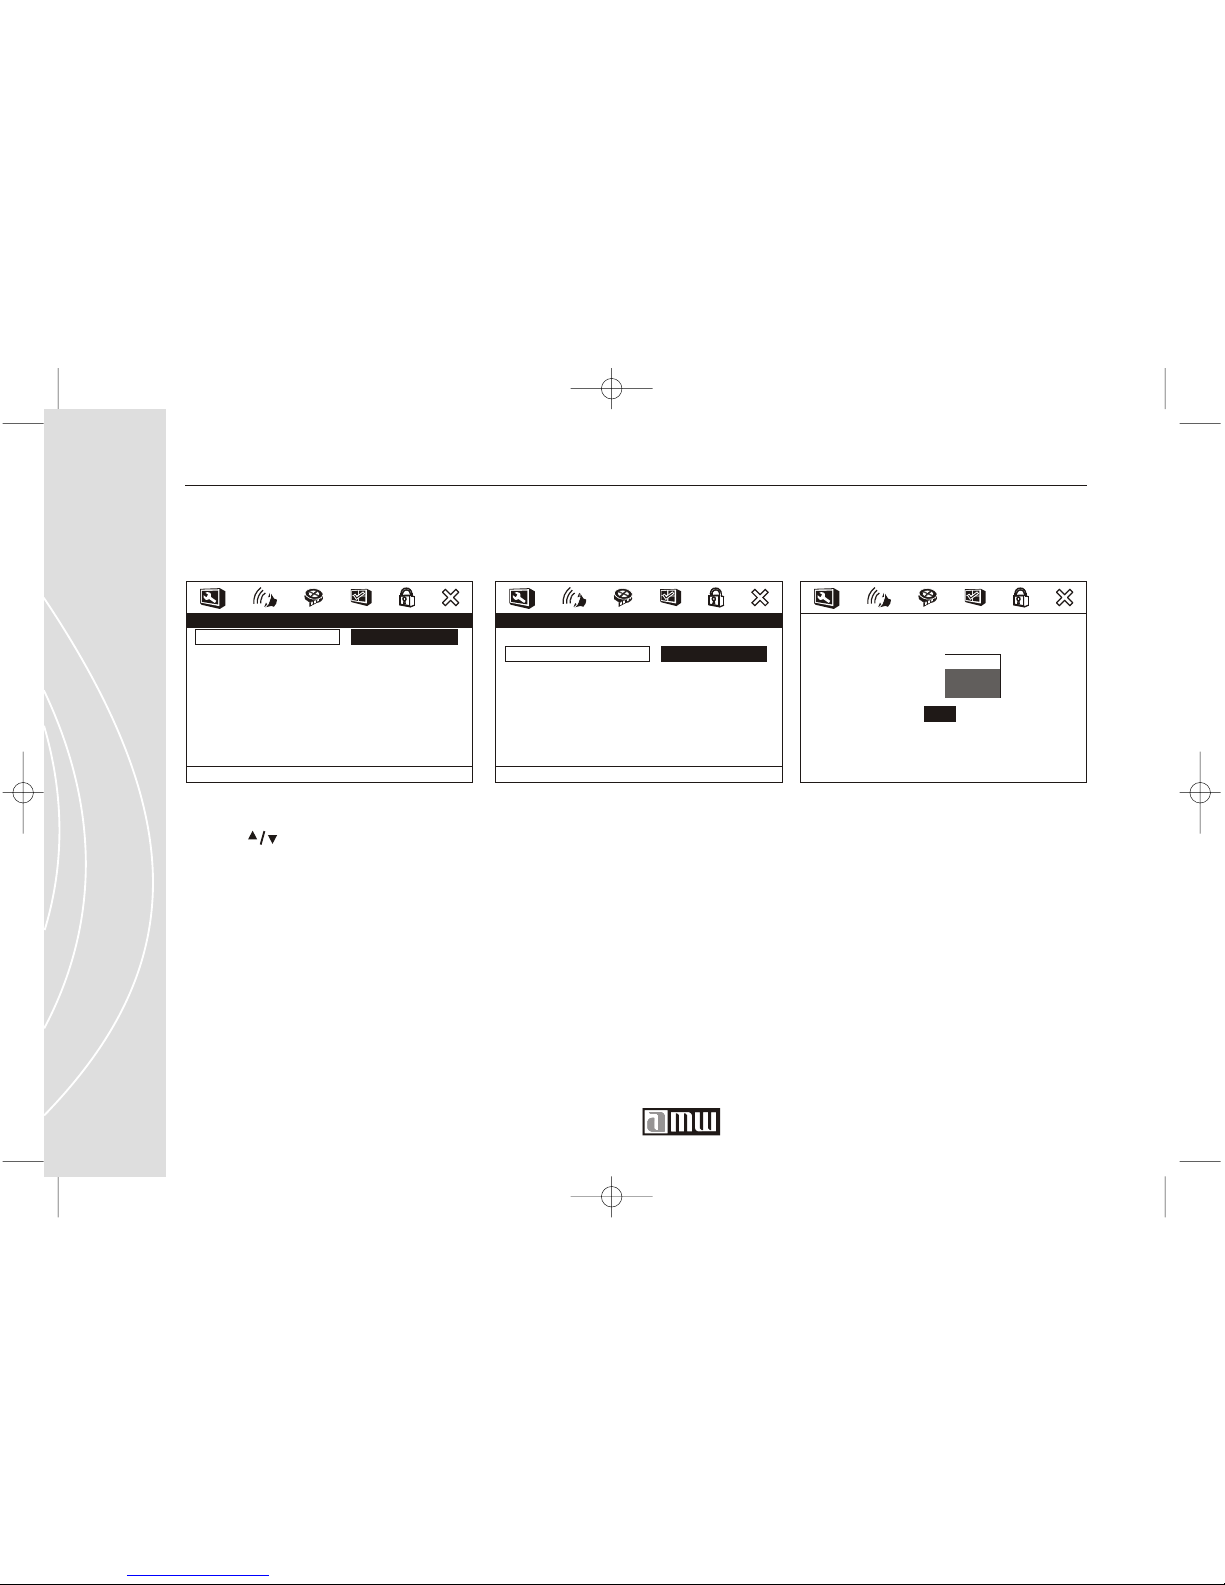
PASSWORD MODE
Press " " to select "Password
Mode" to "On" or "Off".
- - Password Setup Page - -
Password Mode On
Password
Password Mode
On
Off
Password Setup / Password Change
- - Password Setup Page - -
Password Mode On
Password
Change Password
Change
Password Setup / Password
PASSWORD
The initial factory setting for "Old
Password" is 123456. You need to
enter this number if you want to
change the password.
Old Password
New Password
Confirm PWD
OK
Page 85
85
Exit Setup Page
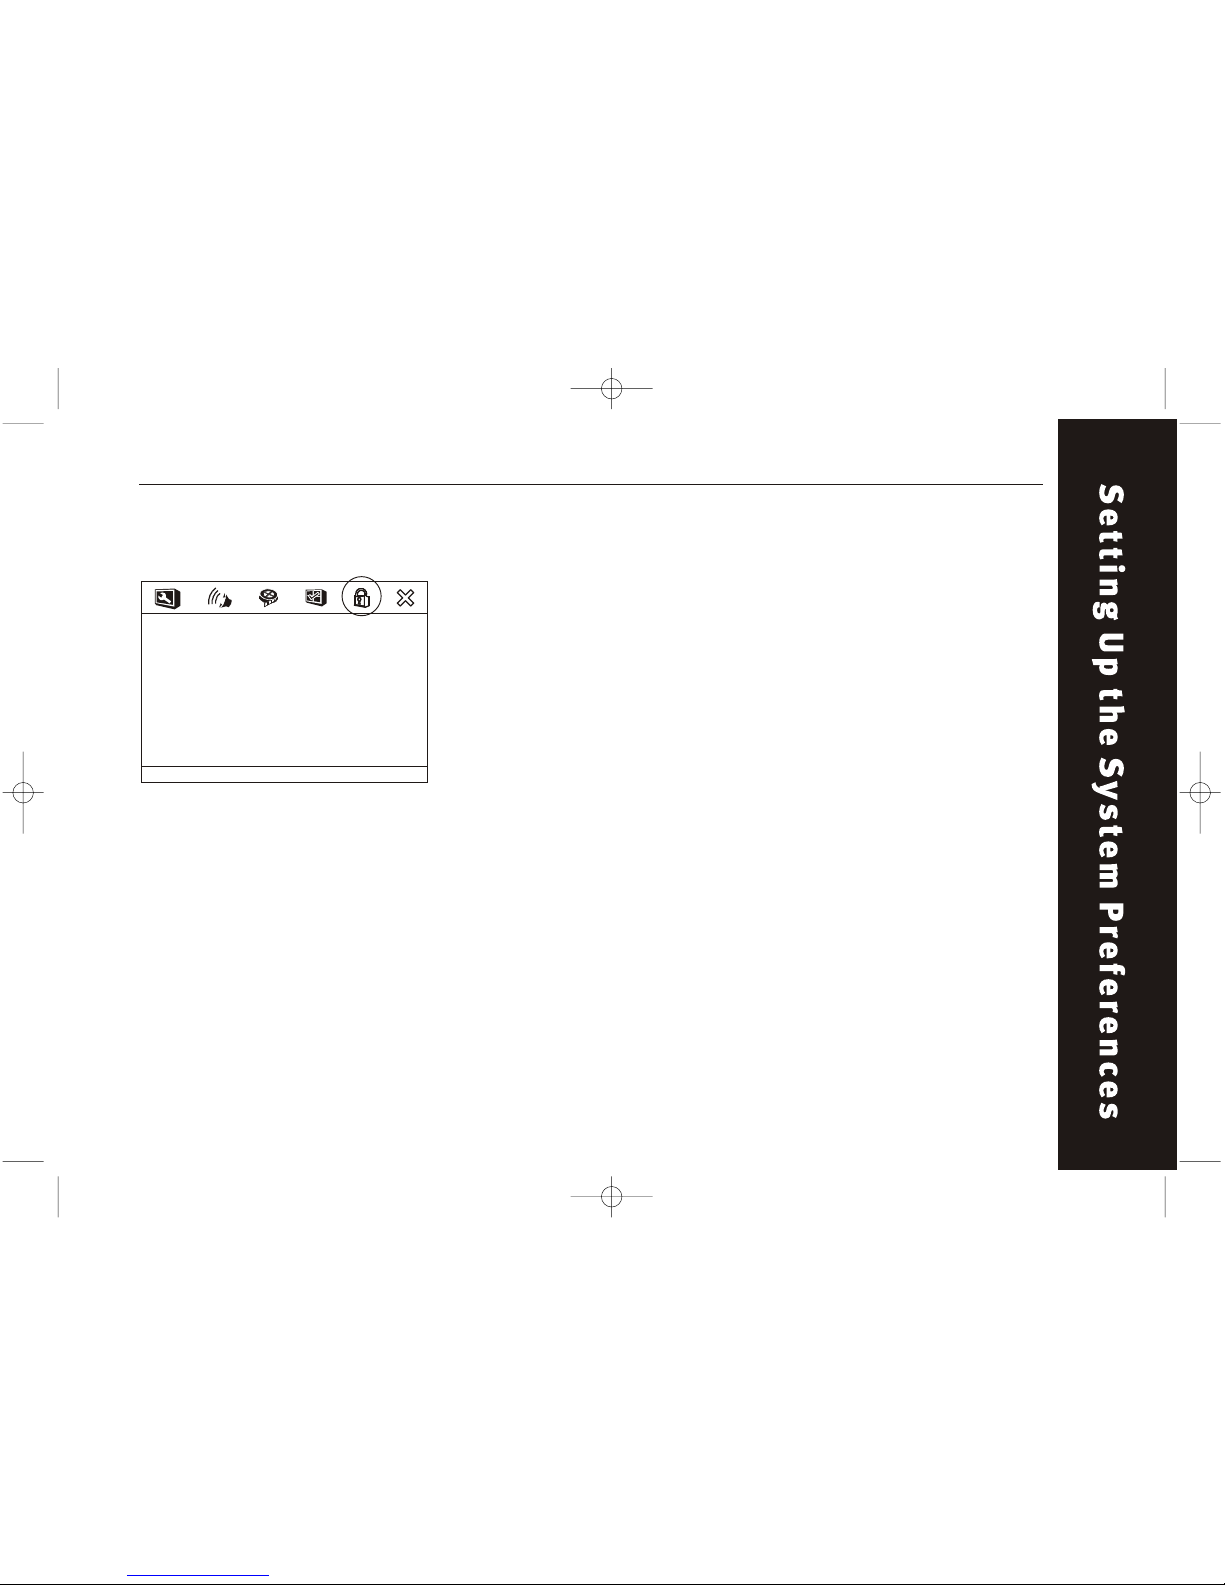
EXIT SETUP PAGE
Exit Setup Menu
EXIT SETUP PAGE
Press "ENTER" to exit the Setup
Menu.
Page 86
P400 Manual 4/20/03 Page 70
Page 87

Angle
Recorded onto some DVD discs are scenes which
have been simultaneously shot from a number
of different angles (the same scene is shot from
the front, from the left side, from the right side,
etc) With such discs, the ANGLE button can be
used to view the scene from different angles.
Chapter Number
These numbers are recorded on DVD discs. A title
is subdivided into many sections, each of which is
numbered, and specific parts of video presentations can be searched quickly by using these
numbers.
DVD
This refers to a high-density optical disc on which
high-quality pictures and sound have been recorded by means of digital signals. Incorporating a
new video compression technology (MPEG 2) and
high-density recording technology, DVD enables
aesthetically pleasing full-motion video to be
recorded over long periods of time (for instance, a
whole movie can be recorded. ) DVD has a structure consisting of two 0.6 mm thin discs that are
adhered to each other. Since the thinner the disc,
the higher the density at which the information can
be recorded, a DVD disc has a greater capacity
than a single 1.2 mm thick disc. Since the two thin
discs are adhered to each other, there is the potential to achieve double-sided play sometime in
the future for even longer duration play.
87
Appendix
Page 88
88
Customer Service 1 626 968 6860
Subtitles
These are the printed lines at the bottom of the
screen that translate or transcribe the dialogue.
They are recorded on DVD discs.
Time number
This indicates the playing time that has elapsed
from the start of a disc or a title. It can be used to
find a specific scene quickly. (It may not work with
some discs.)
Title Number
These numbers are recorded on DVD discs. When
a disc contains two or mor e movies, these movies
are numbered as title 1, title 2, etc.
CSS
the data scrambling method used to garble the
content of a DVD disc. According to most sources,
CSS was put into use for the purpose of ensuring
that copyrighted material placed in this format
would only be usable with licensed DVD playback
mechanisms.
Dolby Digital
Dolby Digital is an advanced form of digital audio
coding that makes it possible to store and transmit
high-quality digital sound far more efficiently than
was previously possible. First used in movie theaters in 1992, it is the result of decades spent by
Dolby Laboratories developing signalprocessing
systems that exploit the characteristics of human
hearing.
Dolby Digital 5.1 Channel
At the option of their producers, Dolby Digital
programs can deliver surround sound with two
discrete range channels-left and right.
CSS stands for "Content Scramble System". It is
Page 89
Appendix
Notes
89
Appendix
Page 90
Page 91
Play back does not start immediately when
the Play button is pressed.
The disc drive does not open.
The DVD does not play.
No sound is produced.
Sound quality is not good.
Remote control unit does not operate.
Subtitle language or correct language audio
does not operate.
Problem
Check whether the disc has any scratches or is
deformed.
Is the power cord plugged securely into the
power outlet?
Check the region number of the DVD.
Are the speakers properly connected?
Is the Speaker Setup correctly customized?
Are the speaker cables loose?
Are the batteries dead? If so, replace with new
batteries.
The subtitle language or audio language feature
does not operate with DVDs that do not include
multiple subtitle languages or audio.
91
TroubleShooting Guide
Solution
Troubleshooting Guide
Page 92
Page 93
Please r ead all of these instr uctions carefully
before operating the DVD Player.
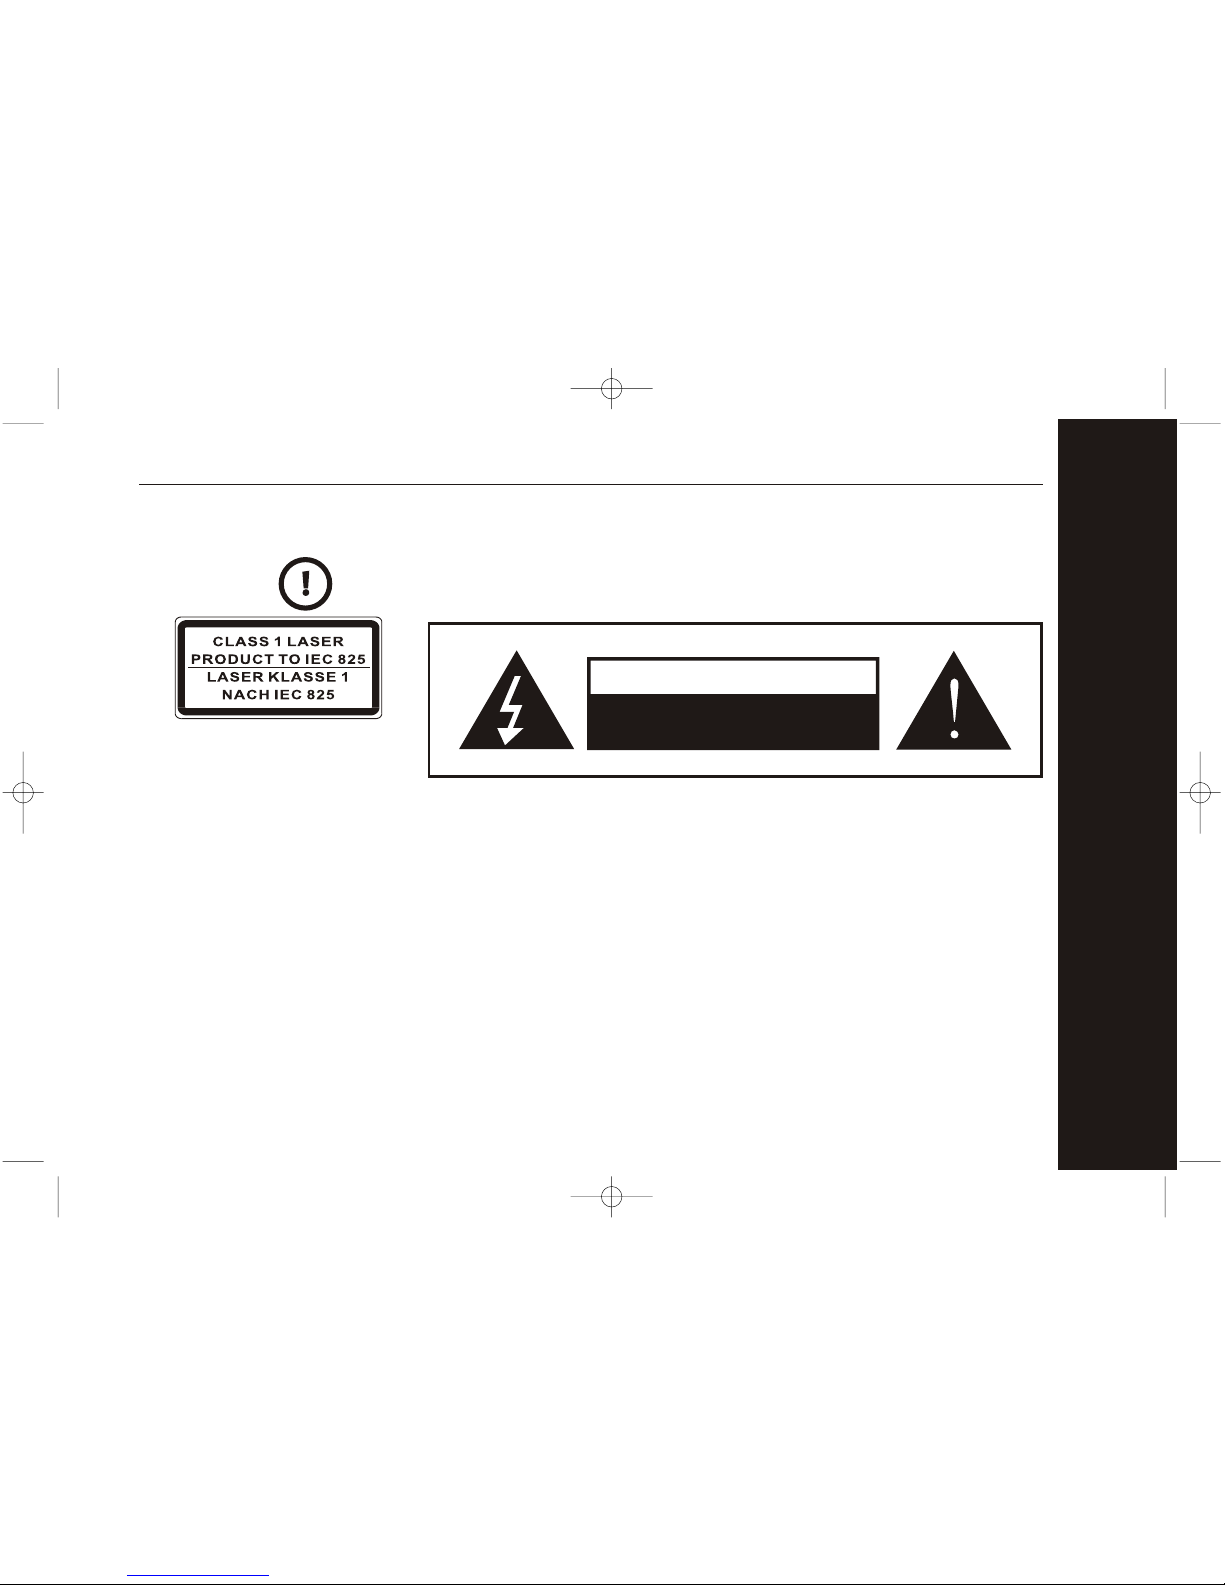
Warning!- This symbol alerts you to a potentially hazardous condition such as
the presence of dangerous voltage that reduce the risk of fire or electrical
shock. Do not expose this apparatus to r ain or moisture. Refer to the
accompanying Warning Label or tag, and exercise extreme caution.
CAUTION
RISK OF ELECTRIC SHOCK
DO NOT OPEN
93
Safety Instruction
Page 94
94
Customer Service 1 626 968 6860
When Setting up the DVD-Player
Do not place the DVD-Player near water, for example near a bathtub,
washbowl, kitchen sink, or laundry tub, in a wet basement, or near a
swimming pool.
Do not allow anything to rest on the power cord. Do not locate the DVDPlayer where people may walk on the cord.
Do not overload power outlet and extension cords. Otherwise the electric
power overload will cause fire or electric shock.
In order to avoid the damage of the DVD-Player from lightning and power
surges. unplug all the connectors from the system unit when the DVDPlayer is under a spare time or lightning storm.
Page 95

When Operating the DVD-Player
Use only attachments recommended by the manufacturer; un-approved
attachments may be hazardous.
Never push any objects into the slot in the DVD-Player cabinet. It could
touch dangerous voltage points or short out parts resulting in a fire or
electric shock. Never spill liquid on the DVD-Player.
DVD-Player is a high quality laser product, however this player uses a
visible laser beam that could cause hazardous radiation exposure if directed. Be sure to operate the player correctly as instructed.
While this player is be plugged to the wall outlet, do not place y our eyes
close to the opening of the disc tray or other openings to look into the
inside of this product for your own safety.
95
Safety Instruction
Page 96
96
Customer Service 1 626 968 6860
When Cleaning the DVD-Player
Unplug the connector from DVD-Player to the system unit before
cleaning. Do not use liquid or aerosol cleaners.
Use a damp cloth for cleaning.
Page 97
When the DVD-Player requires service:
Do not attempt to service the DVD-Player on yourself; Opening or removing
the cover will make you to expose under a harmful voltage state or other
hazards. Refer all servicing to qualified service personnel. Unplug the DVDPlayer from the system unit and refer servicing to qualified service personnel
under the following conditions:
When the power cord or plug is damaged or frayed.
If liquid has been spilled into the DVD-Player
If the DVD-Player has been exposed to rain or water.
If the DVD-Player does not operate normally and you are following the
operating instructions. Adjust only those controls covered by the operating instructions; improper adjustment other controls may result in
damage and may require extensive work by a qualified technician to
restore the DVD-Player to normal operation.
If the DVD-Player has been dropped or the cabinet has been damaged.
When the video and audio of DVD-Player exhibits a distinct change in
performance.
97
Safety Instruction
Page 98
Page 99

Legal Notifications
Copyright
This product incorporates copyright protection technology that is protected by method claims of certain
U.S. patents and other intellectual property rights owned by Macrovision Corporation and other right
owners. Use of this copyright protection technology must be authorized by Macrovision Corporation,
and is intended for home and other limited viewing uses only unless otherwise authorized by
Macrovision Corporation. Reverse engineering or disassembly is prohibited. Manufactured under license
from Dolby Laboratories. "Dolby" and the double-D symbol are trademarks of Dolby Laboratories.
99
Legal Notification
Page 100
100
Customer Service 1 626 968 6860
Federal Communications Commission (FCC) Statement
This device complies with Part 15 of the FCC Rules. Operation is subject to the following two conditions:
This device may not cause harmful interference, and
This device must accept any interference received; including interference that may cause undesired
operation.
This Equipment has been tested and found to comply with the limits for a Class B digital device,
pursuant to Part 15 of the FCC rules. These limits are designed to provide reasonable protection
against harmful interference in a residential installation. This equipment generates, uses and can
adiate radio frequency energy and, if not installed and used in accordance with the instructions, may
cause harmful interference to radio commun-ications. However, there is no guarantee that interference
will not occur in a particular installation. If this equipment does cause harmful interference to radio or
television reception, which can be determined by turning the equip-ment off and on, the user is
encouraged to try to correct the interference by one or more of the following measures:
Reorient or relocate the receiving antenna.
Increase the separation between the equipment and receiver.
Connect the equipment into an outlet on a circuit different from that to
which the receiver is connected.
Consult the dealer or an experienced radio/TV technician for help.
1.
2.
 Loading...