

Page 1
Page 2

Table of Co ntents
Import ant Safety Instructions.......................................................................................................... 01
Notes on Discs............................................................................................................................. 02
Introduction
Front Panel ................................................................................................................................... 03
Rear Panel ..................................................................................................................................... 03
Remote Control Func tions ................................................................................................................ 04
Prepare the remote Control............................................................................................................... 04
Getting Started
Video Connection ........................................................................................................................... 05
Audio Connection ............................................................................................................................ 05
Operating DVD player with the remote control................................................................................... 06
Basic Operation
Playing a DVD ............................................................................................................................... 07
Front Panel Operation .................................................................................................................... 07
Remote Control O peration............................................................................................................... 08
Special Operation
What is MP3................................................................................................................................... 12
What is JPEG................................................................................................................................... 12
MP3/JPEG Oper ation............................................................................................................................ 12
Kodak Pic ture & CD Discs Compatible................................................................................................. 12
System Co nfiguration
System Setup Page ......................................................................................................................... 13
Language Setup Page ......................................................................................................................... 14
Audio Setup Page ............................................................................................................................ 15
Video Setup Page ............................................................................................................................ 16
Speaker Setup Page............................................................................................................................. 17
Digital Setup Page........................................................................................................................... 18
Exit Setup Menu................................................................................................................................ 18
Appendix (Definition of Keywords)....................................................................................................... 19
Page 3
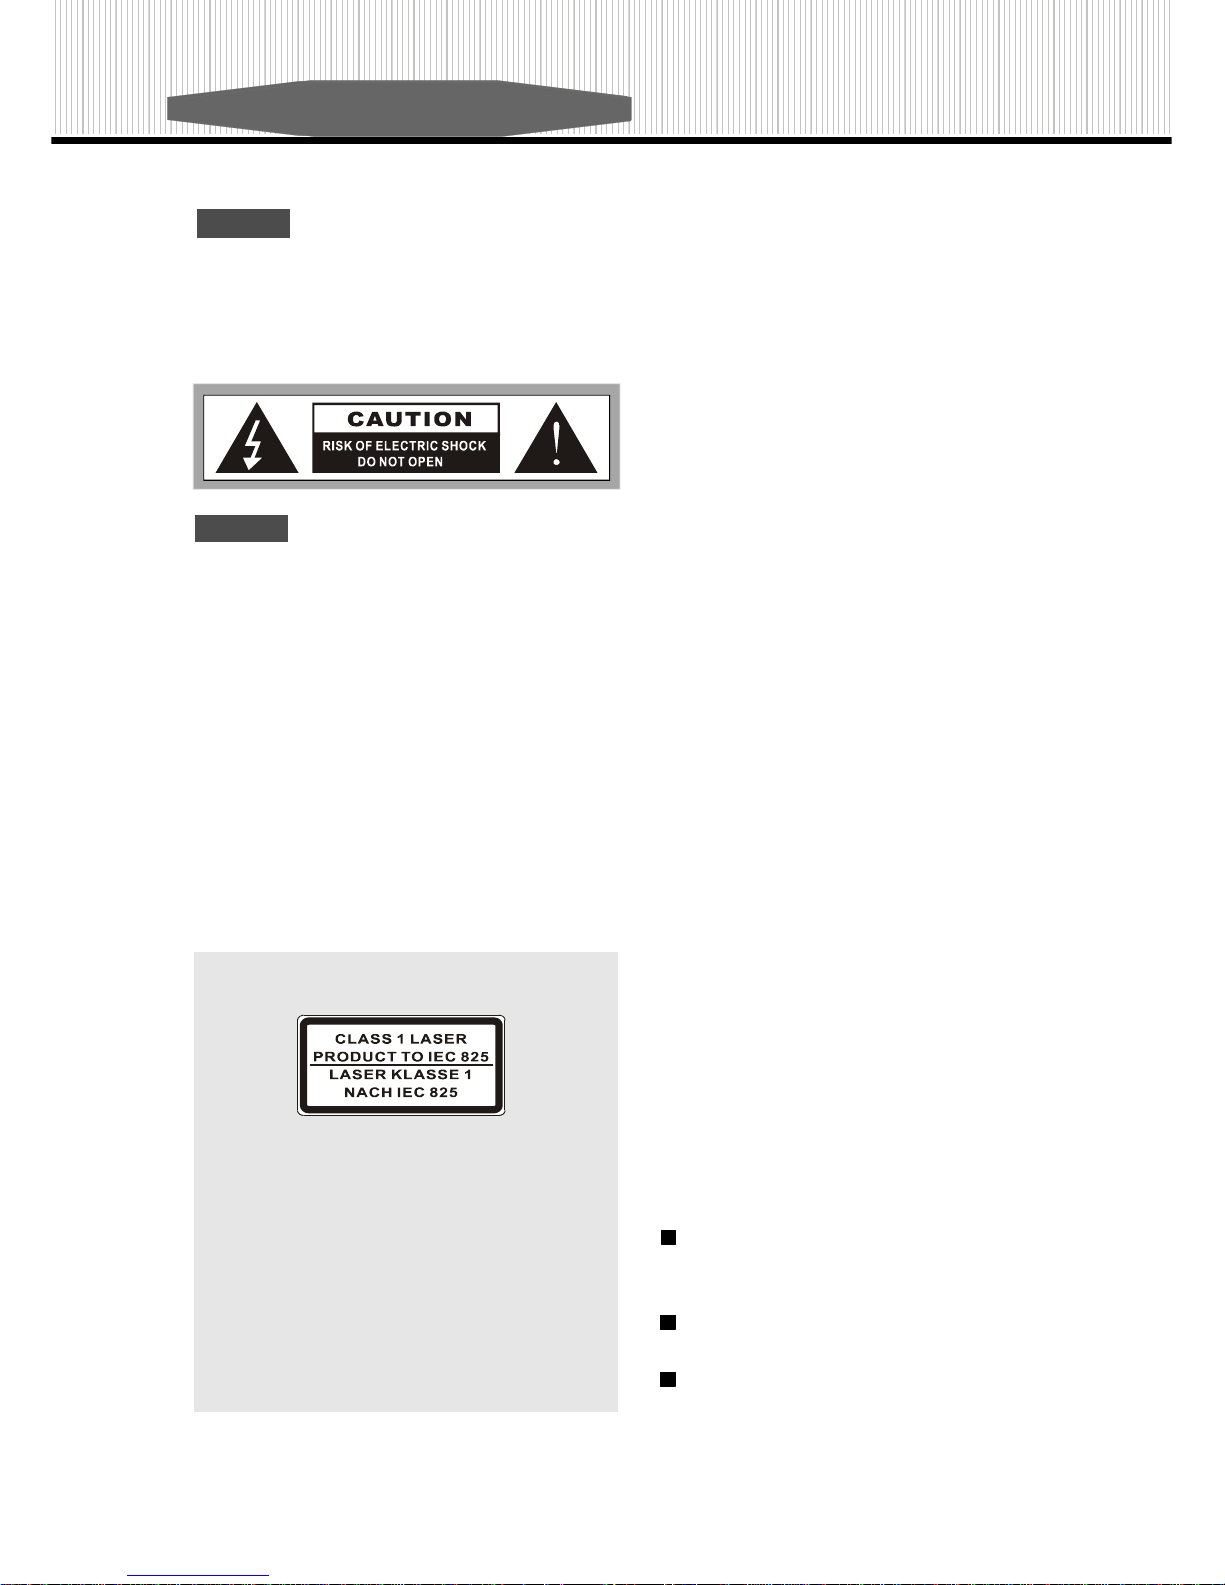
Caution! - Thi s symbol is int ended to alert you to the
pres ence of importa nt operating an d maintenance instructions in the litera ture accompanying the appli ance.
Ref er to t he User’s Manual or Operator’s Manual for
preca utiona ry ins tructi ons.
Caution!
To reduce the risk of electric shock, do not remove cover (front
or bac k). No user-s erviceable parts inside. Ref er servicing to
qual ified service professional.
THIS PRODUCT APPLIES U.S. PA TENT NOS. 4,631,603,
4,577,2 16, 4,81 9,098, AND 4,907,093 LICENSED FOR
LIMITED VIEWING USES ONLY.
Warning! - This symbol is intended to alert you to the
presence of dange rous voltage with the prod uct’s enclosure that may be of sufficient magnitude, to reduce
a risk of electri cal shock or fire. Do not expos e the unit
to rain or moisture . Refer to the warning l abel or tag
includ ed, an d exerci se with extreme caution.
WARNING
Statement
This d evice co mplies with Part 15 of the F CC Rul es. Operati on is subject to the fo llowing two conditions :
(1) Th is devic e may not cause harmful
interference, and
(2) This device must accept any interference
received ; includ ing in terferen ce that may
caus e undes ired operation.
Cop yright
This produ ct incorp orates co pyright pro tection technology t hat i s protected by method claims of certai n U.S.
patents and other intellectual prope rty right s owned by
Macrovision Corporation and other rights owners. Use
of t his c opyrigh t pro tectio n technology mus t be autho rize d by Macrovision Co rporation, and is intended for
home and other limited viewing uses only unle ss otherwise authorized by Macrovision Corporation. Reverse
engineering or disassembly is prohibited.
Manufa ctured unde r lic ense from Dolby Lab oratories.
“Dolby ” and the double-D symb ol are trademarks o f
Dolb y Lab orato ries.
This product is class 1 laser product,
Warnings
Use o nly shie lded c ables to conn ect I / O devices
to this equipme nt.
Reorie nt or relocate the receiving antenn a.
Increase the sep arati on between the equipment and
receiver.
Connec t the equipment into an outlet on a circu it
differen t from that to which the receiver i s connected.
Consul t the d ealer or an experienced rad io/TV
techni cian f or hel p.
This Equipme nt has been tested and found to comply with
the l imits for a Class B dig ital d evice, pursuant to Part 1 5
of the FCC rules. These limits are designed to p rovi de
rea son able protec tion against harmful int erference i n a
resi dent ial installa tion . This equipment generates, uses
and can radiate radio frequency energy and, if not installed
and used in accordanc e with the instructions , may cause
harmful interference to radio communications. However,
there is no guarantee th at in terference will not o ccur in a
particular installation. If this equipment does cause harmful int erferenc e to ra dio or television reception, which can
be determine d by turning the equipment off and on , the
user is encouraged to try to correct the interference by one
or more of the following measures:
Page 4
01. Read these instructions.
02. Keep these instructions.
03. Heed all warnings.
04. Follow all in struc tions.
05. Do not use thi s
app aratus near water.
06. Clean only with a da mp
cloth.
07. Do no t block an y of the ven tilation o penings. Install
in accordanc e with the manufacturer’s instructions.
08. Do not install it near any heat sourc es such as
radiators , heat registers, stoves, or other apparatus
(including amplifie rs) that produc e heat.
09. Do not defeat the s afety purpose of the polarized type plug: A polarized plug has two blades with one
wide r than the other. The wi der blade is provided
for your safety. When the provided plug does not fit
into y our outlet, consult an electrician for
replac ement of the obsolete outlet.
10. Prote ct the power cord from being walked on or
p inched (particularly the p lug, convenience
receptacl es, and th e point where they exit from the
apparatus).
11. Only u se attachments/accessories specifie d by the
manufa cturer.
12. Use o nly with a cart, stand, tripod, bracket, or table
spec ified by the manufac turer, or sold with the
appara tus. When a cart i s used , use with cauti on.
13. Unplug this apparatus during lightning, storms , or
when unus ed for a l ong perio d of ti me.
14. Refer a ll serv icing to qualified service personnel.
Servicing is required when the apparatus has been
damag ed in any way: ex. power-supply cord or
plug is damaged, liquid has been spilled or
objects have fallen into the apparatus, the apparatus
has been exposed t o rain or mo isture, does not
operate normally, or has been dropped.
Impor tant Safety Instructions
01
Please read all of these instructions thoroughly be fore operating the DVD Player.
Unplu g the conne ctor from DVD-Player to the
system unit before cleanin g. Do not us e liquid or
aeros ol cleaners.
Use a damp cloth for cl eaning.
Use only attachments recommended by the
manufacturer; un-app roved at tachmen ts may be
hazardous.
Do not place the DVD-Player near water, for example
near a bathtub, washbowl, kitchen s ink, or laundry
tub, in a wet b asemen t, or near a swimming pool.
Do no t place the DVD-Player on an unstable cart,
stand or tab le. If the DVD-Player falls, it could injure
a pe rson or ca use serious damage t o the applia nce.
Use only a cart or stand re commended by the manu facturer or sold with the mounting kit approved by the
manufacturer and fol low the kit ins truction s.
The DVD-Player is equippe d with a three-wire
grounded plug, a plu g with a third (grounding) pin.
This is a safety feature. If your outlet does not accom modate the three-wire plug , have an electrician in st all the correct outlet, or use an adapt er to groun d
the app liance safely. Do not defeat the safety pur pose of the grounded plu g.
Do not allow a nything to rest on the power cord.
Do n ot locate th e DVD-Player where people may
walk on the cord.
In order to avoid the damage of the DVD-Player from
lightning and power surges, please unplug all the
connectors from the s ystem unit when the DVD
Player is under a spare time or ligh tning storm.
Do not overload power outl et and e xtension co rds.
Electric power overload will c ause fire or elec tric
shock.
Never push any objects into the slot in the DVD-Player
ca binet. It could touch dangerous voltag e points o r
short out parts resulti ng in a fire or electric shock.
Never spill liqui d on the DVD-Player.
If your DVD-Player does not operate normally, un p lug it i mmedia tely and c ontact a n authorized
technician .
To avoid electric shock, do not attempt to open the
cabinet and repair an y damage d parts . Unpl ug the
DVD-Player from the system unit and re fer servic ing to qualified service personnel un der the
following conditions:
Page 5
When the power cord or plug is damaged or frayed.
If liquid has been spilled onto the DVD-Player..
If the DVD-Player has be en exposed to rain or
mo isture.
If the DVD-Player does not operate normal ly after
you have follow ed the operating instructions. Ad jus t only those controls covered by the operating
instructions; improper adjustments to other c on
trols may result in damage and ma y require ex
t ensive work by a qualified techni cian to res tore
the DVD-Player to normal operation.
If the DVD-Player has been dropped or the cabi net has been damaged.
When the video and audio of DVD-Player exhibits
a distinct change in performance.
To reduce the risk of electric shock, do not remove
the cover (front or back). No us er-servicea ble
parts i nside. Refer servicing to q ualified service
profes sional.
This product applies to U.S. Patent Nos. 4,6 31,
60 3, 4,57 7,216, 4,819,098 and 4, 90 7,093 Licensed for limited viewing uses only.
DVD-Player is a high quality laser produc t. Th is
player uses a visible laser beam that could cause
haza rdou s radiation e xposure if directed to the
eyes.
02
Handling precautions
Hold the disc by the edges so the surface will not be
soiled with fingerpr ints. Fingerprints, dirt a nd
scratches can caus e ski pping and distortion.
Do not write on the label side with a ball-point pen or
other writing tools .
Do not use record cleaning sprays, benzene, thinner,
stati c electricity p revention liq uids or any other
solvent.
Be c areful not to drop or bend the disc .
Do n ot ins tall mo re than 1 dis c on the disc tray.
Do not try to close the disc tray when the disc is not
in stalled pro perly.
Be sure to store the disc i n its exclusive case.
If the Surface is soiled
W ipe gently with a soft, damp (water only) cloth.
W hen wipin g discs, always move the cl oth from the
cent er hole toward the outer edge .
If you wipe the discs using a circular motion, circul ar
scra tches are likely to occur, which will cause no ise
while playing.
If the disc is brought from cold to w arm environment,
moisture may form on the disc.
W ipe this moisture off with a soft, dry, lint-free cloth
be fore usin g the disc .
Improper disc storage
You can damage discs if you store them in the following places:
Are as exposed to direct sunlight.
Hu mid o r dusty areas.
Areas directly exposed to a heat ou tlet or he ating
appliance .
The player canno t play discs
Maintenance
Be sure to turn the pow er button OFF and discon nect the power plug before maintaining the unit.
Wipe this unit with a dry soft cloth.
If the surface is extremely dirty, wipe clean with a cloth
that has been dipped in water and then wipe agai n
with a dry cloth.
Never use alcohol, benzene, thinner, cleaning fluid or
other chemicals. And d o not use co mpressed air to
remove dust.
Importan t Safety Instructions
DVD region code is not suitab le for yo ur player.
Notes on Discs
Page 6
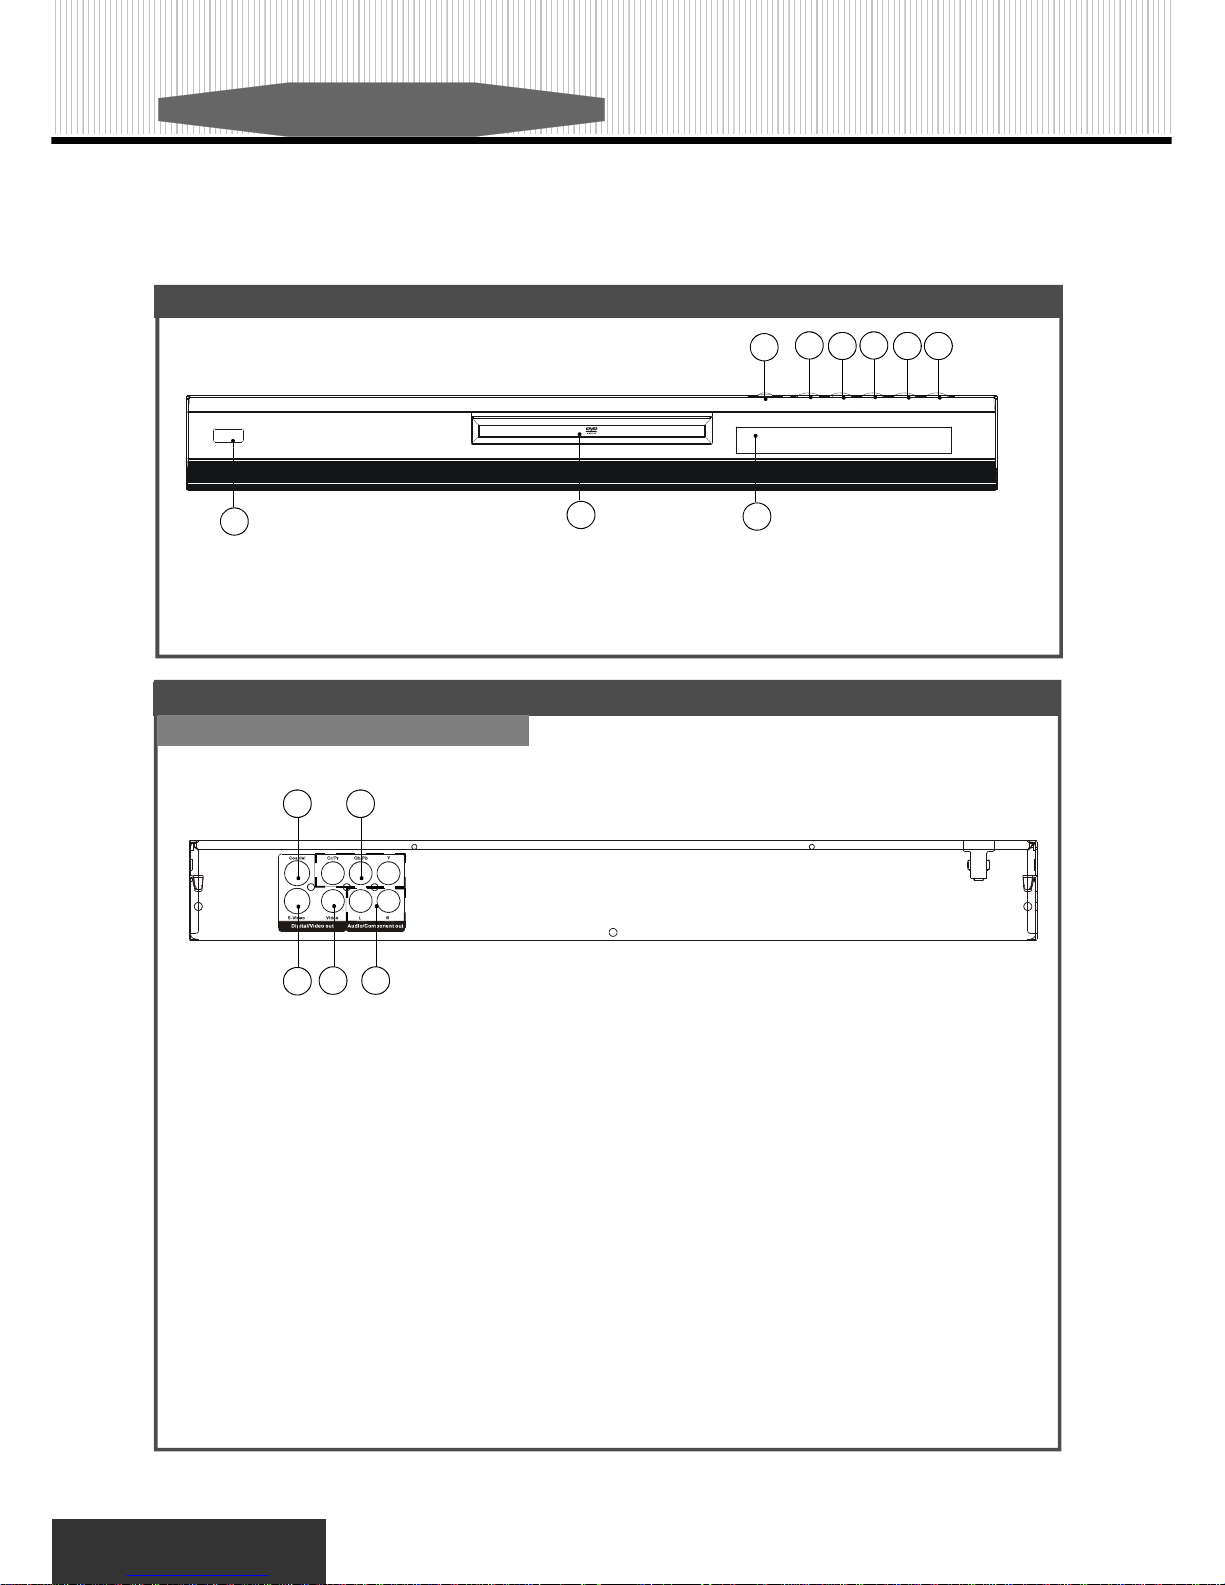
This section desc ribes a full-fuction high performance DVD Player that is mic roprocessor-contro lled and also allows
users to place thei r own settings i nto memory via external se tting. The setting status is indicated on the sc reen.
Front Panel
03
Introduction
Rear Panel
(1) COAXIAL OUTPUT JACK
(3) CO MPOSIT E VIDEO OUT PUT JACK
(5) STEREO AUDIO OUTPUT JACKS
(2) S- VIDEO O UTPUT JACK
(4) COMPONENT OUTPUT JACKS
3
1 4
2 Channel
2
5
(1)POWER
(4)STOP
(7)OPEN/CLOSE
(2)PLAY
(5)PREV.
(8)DOOR TRAY
(3)PAUSE
(6)NEXT
(9)IR REMOTE SENSOR
7
2
3
4
5 6
1
8
9
Page 7
04
Introduction
( 3 ) DISPLAY
( 8 ) LANGUAGE
(13) RESUME
(18) PREVIOUS, F.R./
NEXT, F.F.
(27) VOCAL-ASSIST
Remote Control Functio ns
To operate the DVD player , you must place the batteries in the remote control first.
3
21
1. Open the cover.
3. Close the cover.
Prepare the Remote C ontrol
( 1 ) POWER
( 6 ) SEARCH
(11) MENU
(16) SLOW
(21) NTSC/PAL
(25) MUTE
( 4 ) EJECT
( 9 ) TITLE
(14) PAUSE
(19) 1/ALL
(23) TV PICTURE
(28) 3D
( 5 ) SUBTITLE
(10) SETUP
(15) PLAY/ENTER
(20) A-B
(24) PROGRAM
( 2 ) PBC
( 7 ) ANGLE
(12) ZOOM
(17) STOP
(22) VIDEO(OPTION)
(26) VOL- / VOL+
5
10
1
13
18
15
16
26
28
25
24
14
17
12
8
9
4
7
11
22
21
2
6
3
19
20
23
27
2. Insert two “AAA” batteries.
Make sur e the position of +
and - on the batteries match
the marks inside the battery
compartment.
Page 8

05
Gettin g Started
Video Output
Connect the DVD p layer’s video output (RCA connector or S-Vid eo) on the rear panel to t he TV’s video
i nput (or other devices) using AV, S-Video or
Component.
Note:
Certain output formats may not be available on all
models. Please check product outer box for available.
Video Connection
Audio Connection
Stereo Configuration
Connect your TV stereo audio inputs (L for left channel and R for ri ght channel) to the DVD player’s stereo a udio o utput L and R respectively.
An alog 2 Channel Output
For your convenien ce and cost concern, DVD-Player
supports Dolb y 2 Channe l audio output di rectly.
However, you still need to connect the 2 Channel
au dio outp ut to your audio amplifier relativ ely as
fol lowing.
Note:
When you connect the DVD player to another device, be sure
to turn off the power and unplug all of the equi pment from the
wall outlet before making any connections. The output sound
of the DVD player has a wide dynamic range. Be s ure to
adjust the receiver’s volume to a moderat e l istening level.
Otherwise, the speakers may be damaged by a sudden high
volum e sound. Turn of f the receiver before you connect or
dis connect the DVD player’s power cord. If you leave the
receiver power on, the speakers may be damaged.
Notes:
1.Refer to the instructions supplied with the component to
be connected.
2.D o not connect this player to a video deck. If you do,
noise may appear in the picture.
V C R
T V
X
Connect
directly
CD / DVD
PLAYER
If your display device supports S-Video termina l,
you can also connect your display device to DVD
player’s S-Video Outp ut connector o n the rear
panel.
S-Video Output
YELLOW
Rear of TV set
S-video cord
(not supplied)
S-video input
terminal (S1, S2)
To S-video terminal
White
Red
White Red
Page 9
G etting Started
Operating DVD player with the remote control
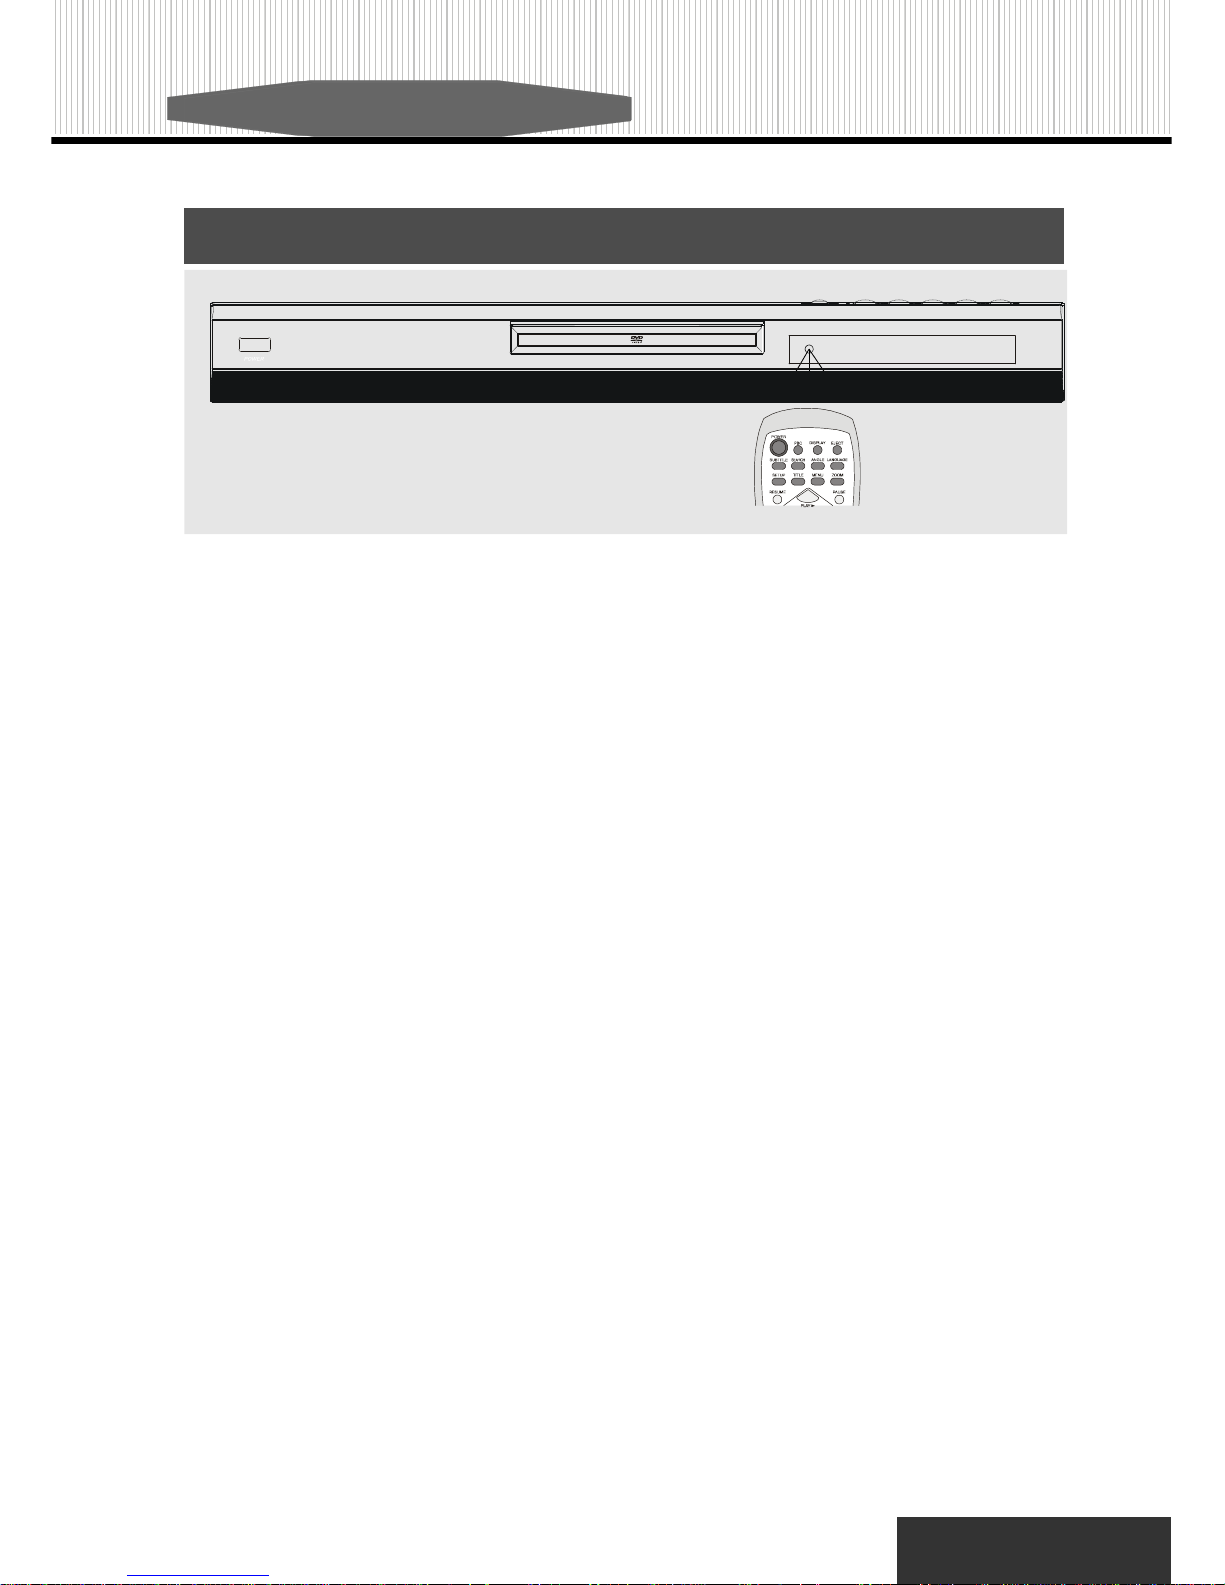
*Do not expose the remote sensor directly to direct sunlight or lighting apparatus. The DVD player will malfunction if you do so.
When using the remote control, point to the remote sensor on the DVD player.
Distanc e:
Maximum of 7m
Angle:
Approximately 300 from e ach direction.
06
30
30
Page 10
Playing a DVD
Front Panel Operation
Basic Operation
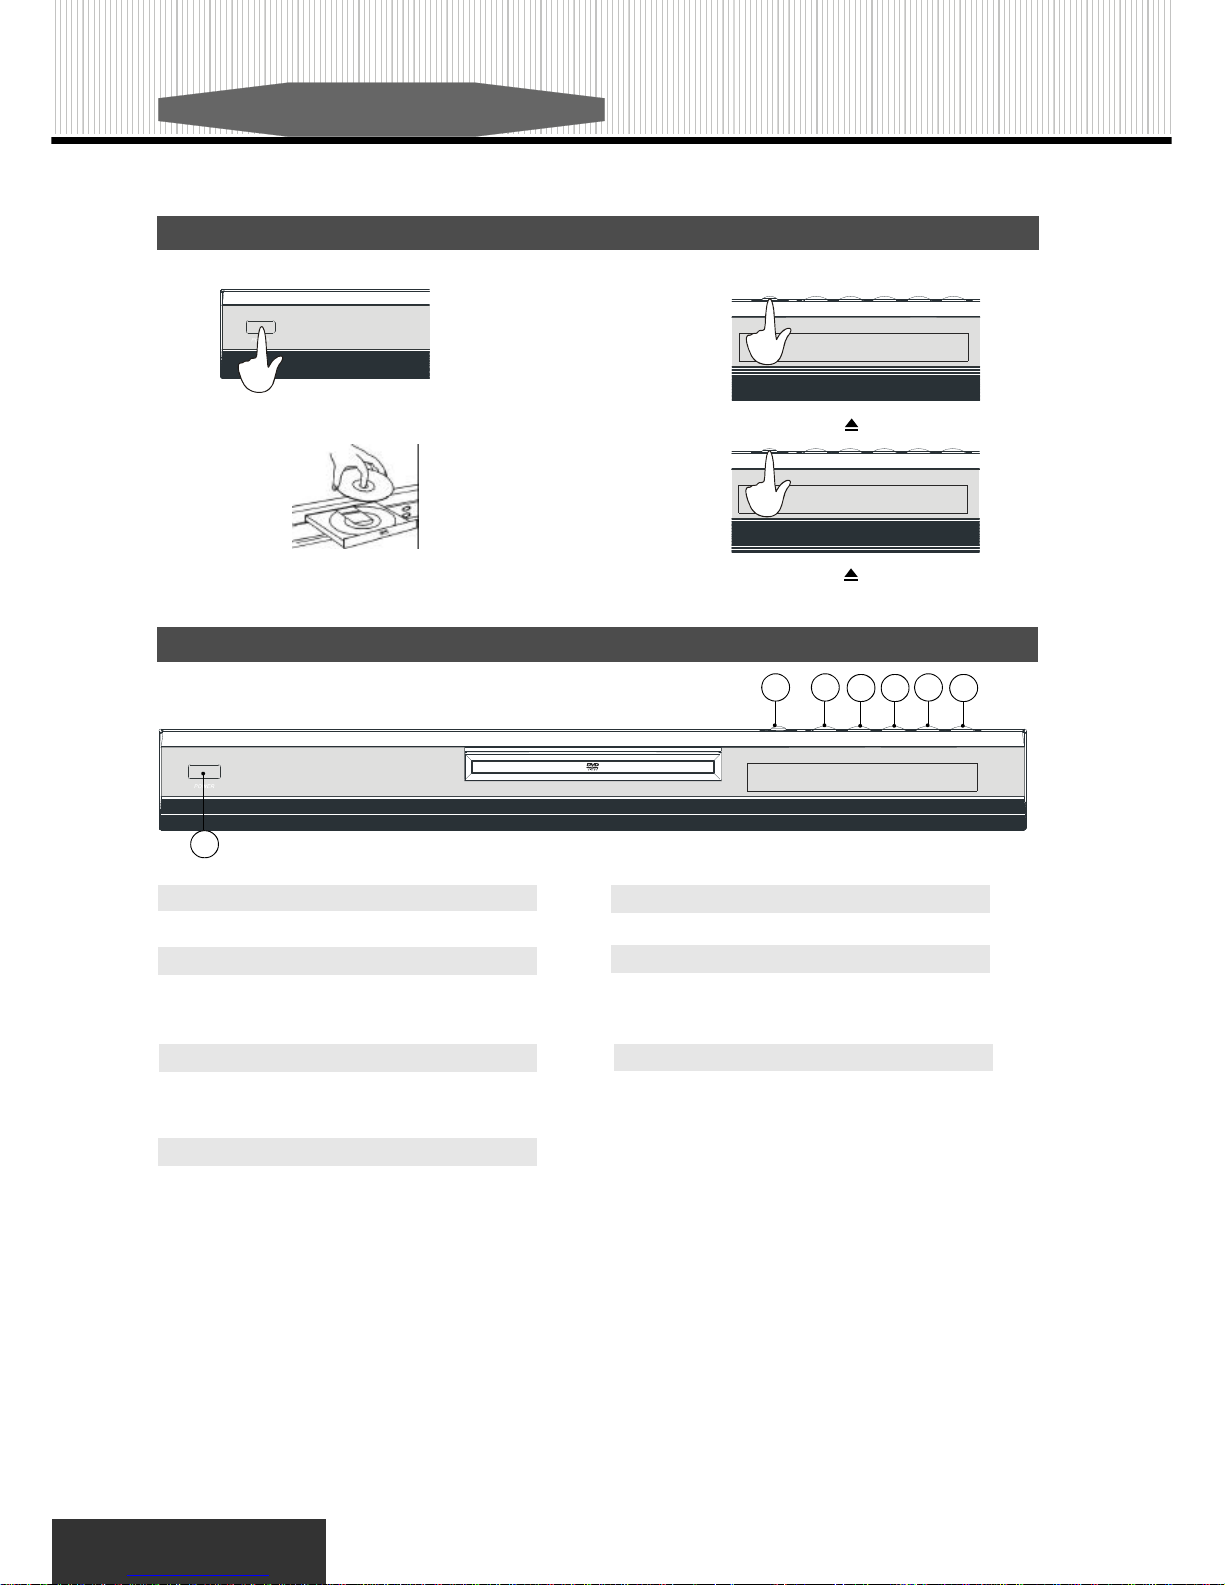
1.Press the Power button to turn on the player.
3.Insert a disc.
07
2.Press the Eject button ( ) to open the tray door.
4.Press the Eject button ( ) to close the tray door.
1.POWER
Turn on or tu rn off the player.
2.PLAY
Play the program on the disc.
3.PAUSE
Momentarily stop the program on the disc.
Press “PLAY” to return to normal play.
4.STOP
Stop playing.
5.PREV.
Go back to the p receding chapter or track
7.OPEN/CLOSE
Open or clos e the tray.
6.NEXT
Go to the next chapter or track.
1
2
3 4
5
6
7
Page 11
08
Basic Op eration
Remote Control Operation
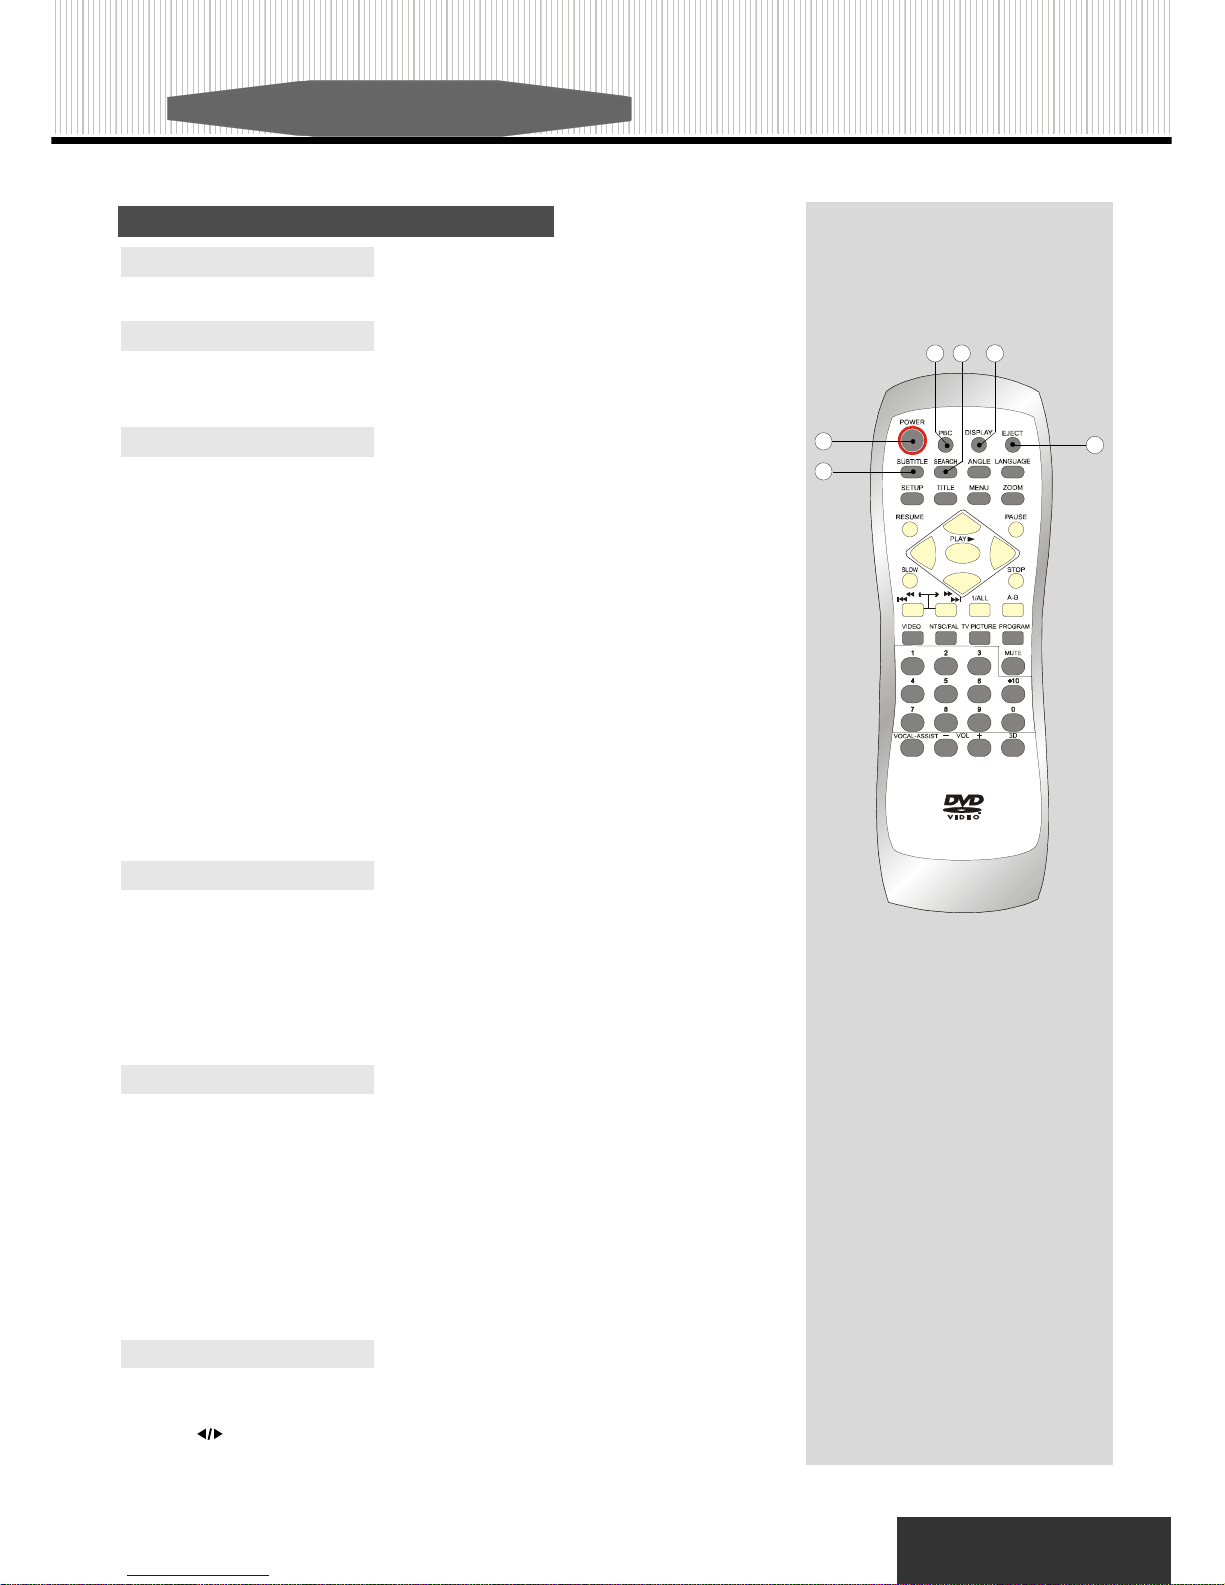
5.SUBTITLE
If the disc has two or more subtitles r ecorded on it, they can either be disp layed or
cleared on the scree n.
1. Press “SUBTITLE” during play. It will show as many subtitles as the disc has.
2. Keep on pressing, selected subtitle (including subtitle off) will
appear in turn.
3. Stop pressing the button after the selected subtitle appears.
Note: In some cases, the subtitle language is not changed immedi
ately to the selected one. When the selected language is not working,
even after pressing the button several times, it means that
the language is not available on the disc. This function is only for
DVD discs.
4.EJECT
Press “EJECT” to open the disc tray. Place a Disc on the tray dish. Hold the disc with-
out touching the surface, position it with the printed title side facing up, align it with the
guides, and place it in its proper position.
Press “EJECT” to start playing. The disc tray will automatically close and start playing .
If the disc has one or more titles recorded on it, the menu screen w ill appear on the TV
monitor.
Playback control. Press “PBC” (on) to program selected chapter. The root menu will
appear. Press PBC(off) to play movie uninterrupted.
2.PBC
1.POWER
Turn on or tu rn off the player.
3.DISPLAY
Each time you press the “DISPLAY” button, the following information will appear on the
TV screen:
a). When you are playing a DVD
Disc format, Title, Chapter, Chapter Elapsed time
Language, Subtitle, Angle
Chapter remain time
Title time
Title remain time
Display off
b). When you are playing a CD , VCD or MP3
Disc format, Chapter, Mute icon, Dts/PBC, Chapter Elapsed time
Chapter remain time
Title time
Title remain time
Display off
6.SEARCH
Use this button you can search TITLE, CHAPTER & PLAYING TIME.
1.Press “SEARCH” to show on-screen display.
2.Use “ ” to select the different modes.
3.Press “PLAY” to select the details.
5
1
4
2
6
3
Page 12
Basic Op eration
09
10
13
14
12
8
9
7
11
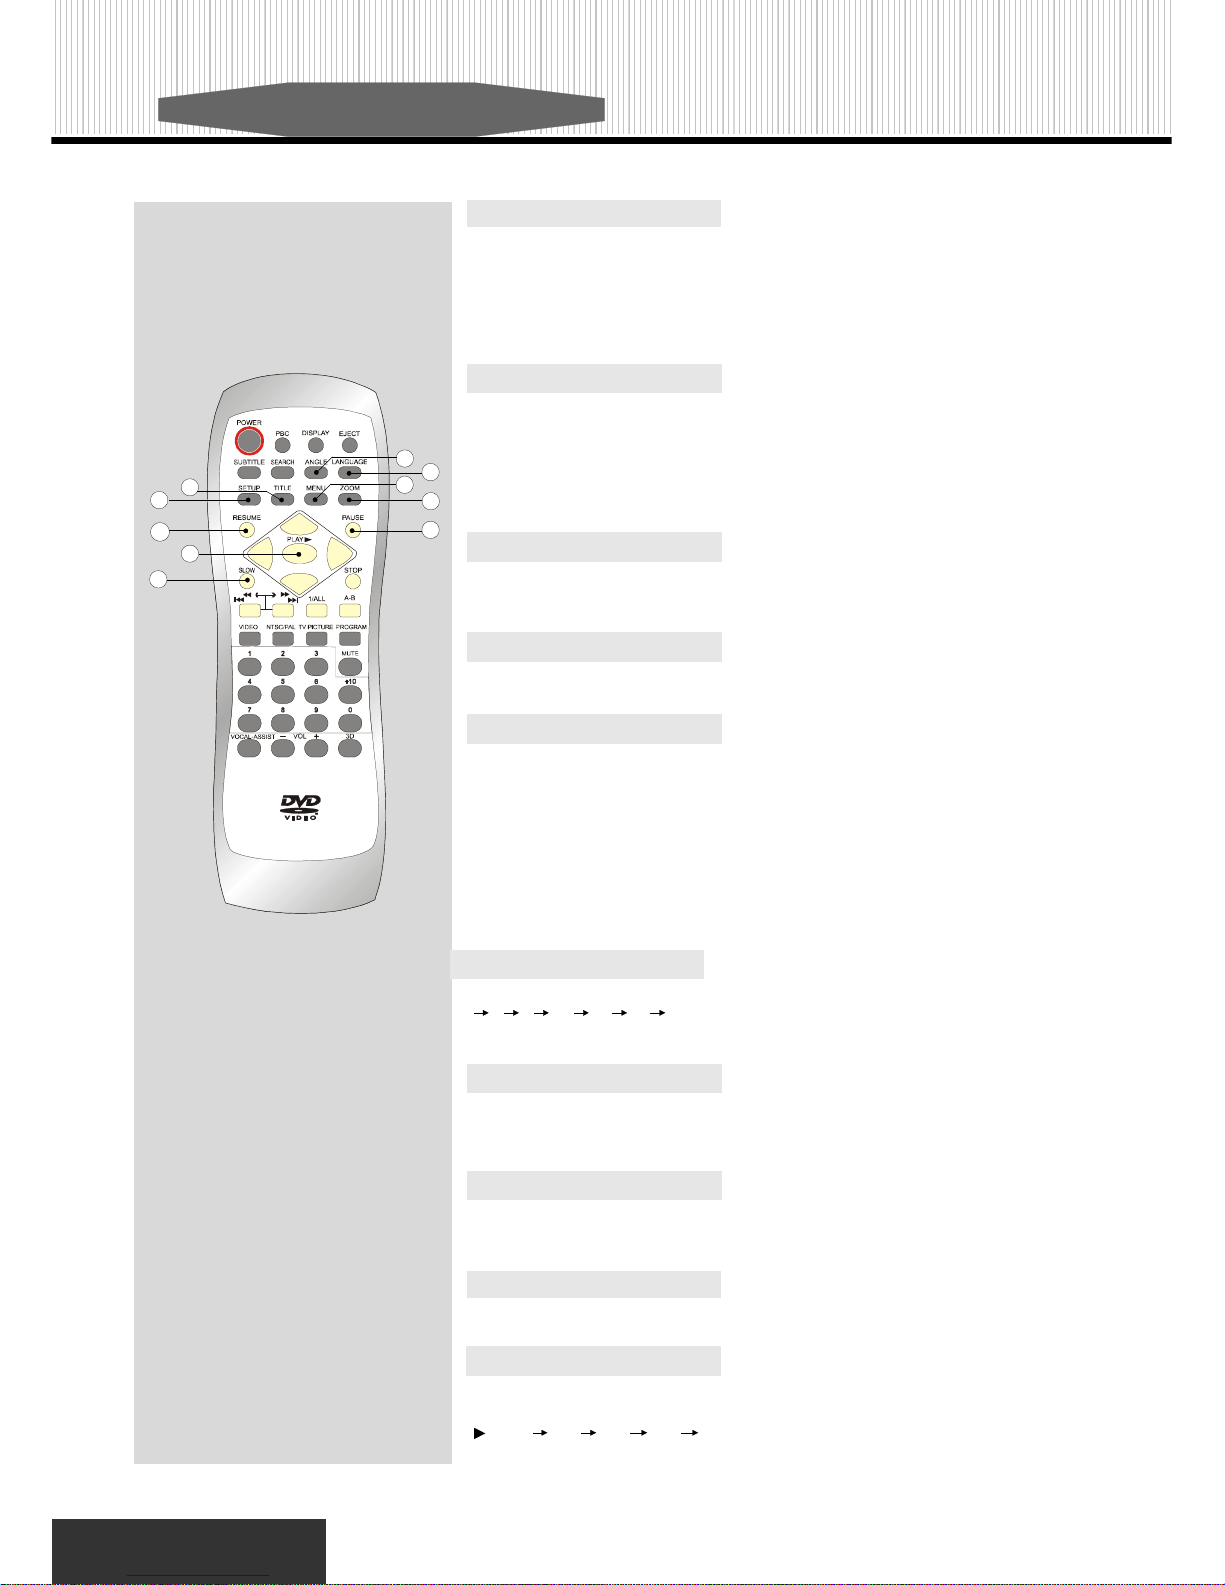
15.PLAY/ENTER
Start playing the program on the disc.
14.PAUSE
Press “ PAUSE ” during play to get a still picture. Press “ PLAY” again to
return to normal play.
13.RESUME
Press “RESUME” to exit the menu system of the DVD returning to normal play-
back mode.
11.MENU
Some discs with movies, for example, come with two or more titles. If the disc
has a title menu recorded on it, the “ MENU ” button can be used to select the
movie title. (The details of this operation differ depending on the disc used.)
This function is only used for DVD disc.
1. Press “ MENU ” during play. A list of the titles on the
disc will be displayed.
2. Press direction key to select the preferred title.
3. Press “ PLAY ”. The selected title now starts to play.
Access the System Setup Menu.
10.SETUP
9.TITLE
Press “TITLE” to select preferred options. Use direction keys to select.Press
“PLAY” to enter the selection.
8.LANGUAGE
It is possible to change the audio soundtrack language from the one selected at the
initial setting to a different language, if available. (This o peration works only with
discs on which multiple audio soundtrack languages are recorded.)
Press “LANGUAGE” during play. The options will appear on the screen. Continue
pressing the “LANGUAGE” button until your desired language is displayed.
7.ANGLE
Some DVD discs may contain scenes that have been filmed simultaneously from a
number of di fferent angles. For these discs, t he same scene can be viewed from
various angles using the “ANGLE” button. (The recorded angles varies depending
on the disc.)
This function is only for DVD discs.
12.ZOOM
Each time this button is pressed, the enlarged image changes as followed:
2x 3x 4x 1/2x 1/3x 1/4x restore image’s normal size
You can move the scene with direction key.
16.SLOW
Press “ SLOW ” in the play mode. Th e slow motion changes each time this
button is pressed as followed,
:1/2x 1/4x 1/6x 1/8x restore normal play mode.
15
16
Page 13
10
Basic Op eration
18
24
17
22
21
19
20
23
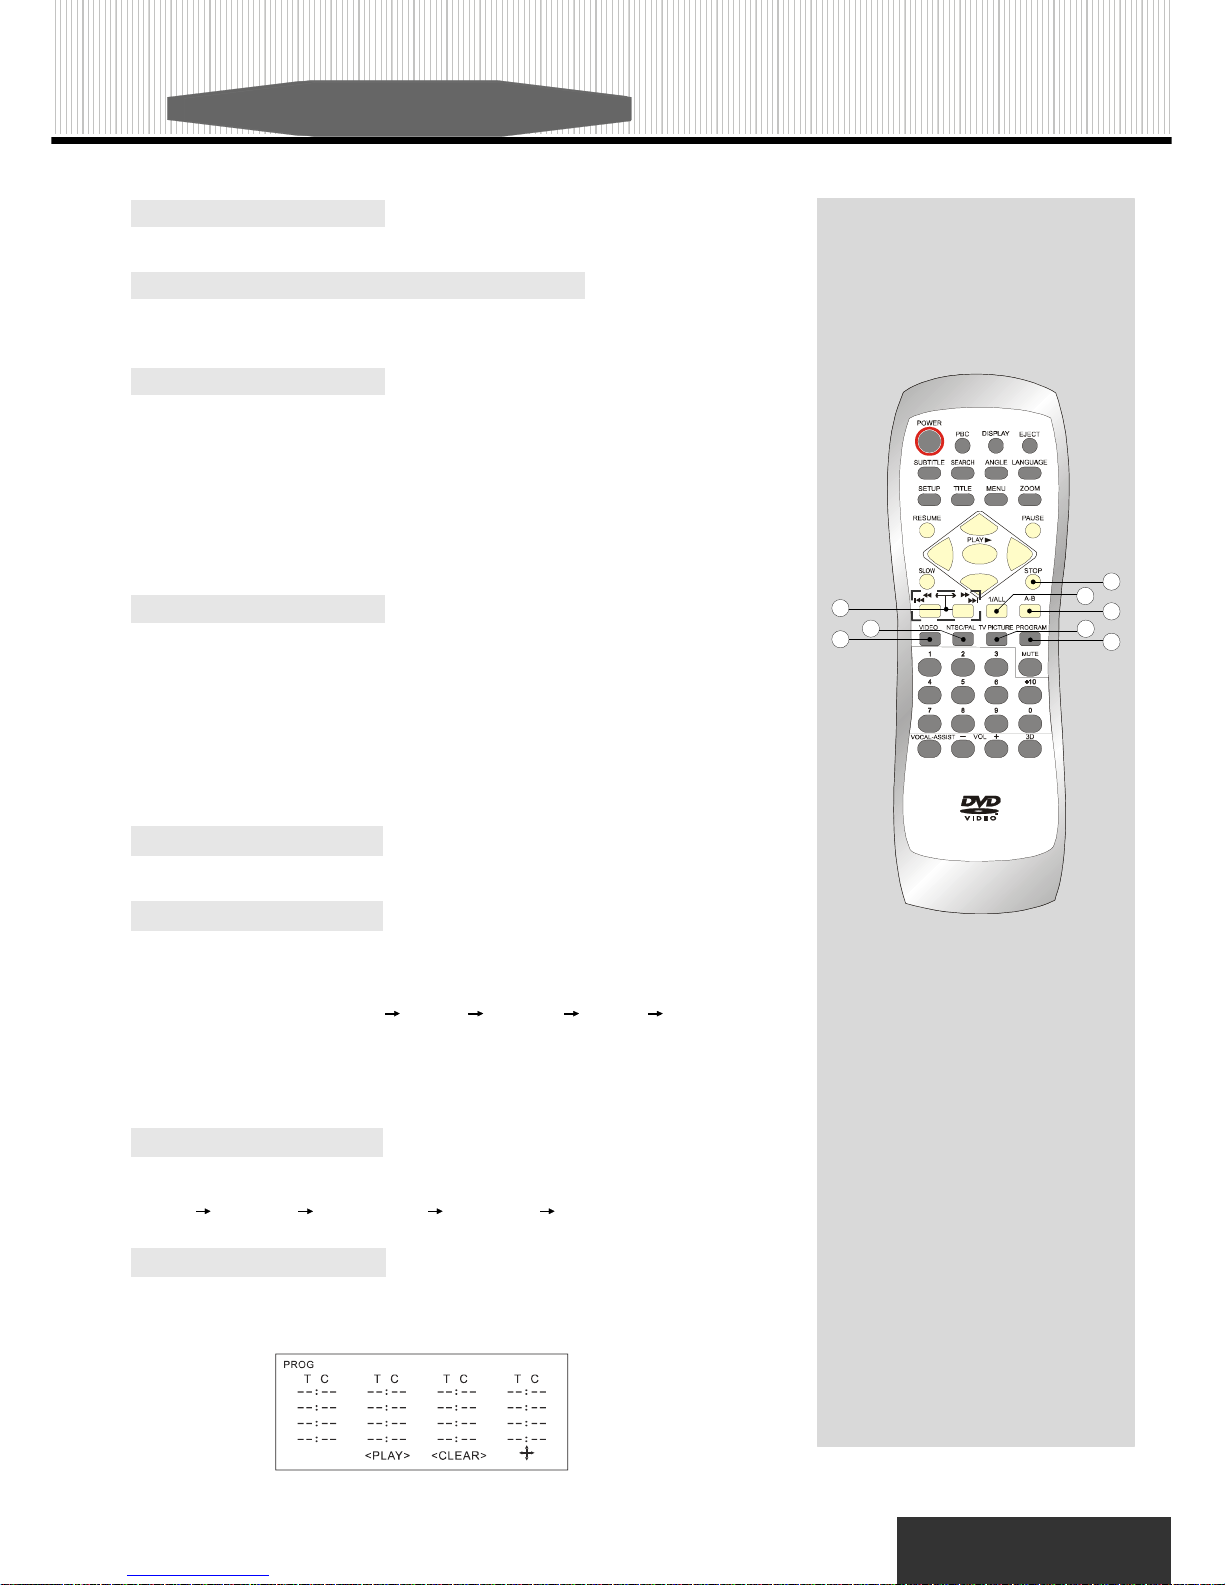
24.PROGRA M
You can arrange the o rders of the titles, c hapters, or tracks on the disc and create your
own program. This function is only active in PBC (Play Bac k Control) OFF mode.
Program: DVD, MP3 / JPEG disc program menu
22.VIDEO(optional)
Each time you press the button during play, the video output mode will be
changed as followed:
AV (o r S-video or Y-Cb-Cr) TVRGB P-SCAN PCVGA restore normal
output mode.
Note: 1.If your TV doesn’t support P-SCAN mode, the screen will disappear, press it again to solve the problem.
2.You can’t select some specific functions if the product doesn’t support it.
21.NTSC / PAL
Choosing TV mode fro m “NTSC”, “PAL” , “PAL-60” and “Auto”.
20.A-B
Repeat A-B
1. Press “A-B ” to repeat play between two intervals. Press “A-B” (1), to set the begin-
ning of the repeat cycle. Press “A-B” again (2), to set the end of the repeat cycle. This
process will enable constant repeat playing between (1) and (2).
2. Press “A-B” again to end the process and return to normal play mode.
Note: A-B repeat play works only with discs for which the elapsed playing time appears on the unit’s
display during playback. This funciton is not available for MP3 discs. Some subtitles recorded around
point A or B may fail to appear.
Note: Repeat play works only with discs for which the elapsed playing time appears in the unit’s display during
playback. Repeat play may not work correctl y with some DVDs. For MP3 disc, there are three modes to repeat
the contents: Folder (default value), Rep-one and Folder Rep.
19.1/ALL
Repeat Chapter
Press “1/ALL” during play, the repeat options will be changed as following:
Repeat Chapter(Track) Repeat all
Repeat Title Cancel repe at mode
18.PREVIOUS, F.R. / NEXT, F.F.
Press these buttons all the time (about 2 sedconds) to change the chapter or track during
play. And press them once to change the speed.
17.STOP
Press this button to stop playing a disc.
23.TV PICTURE
Press the button each time, the TV pictur e will be changed as followed:
MILD MEMORY STANDARD DYNAMIC restore normal mode.
Page 14
Basic Operation
1 1
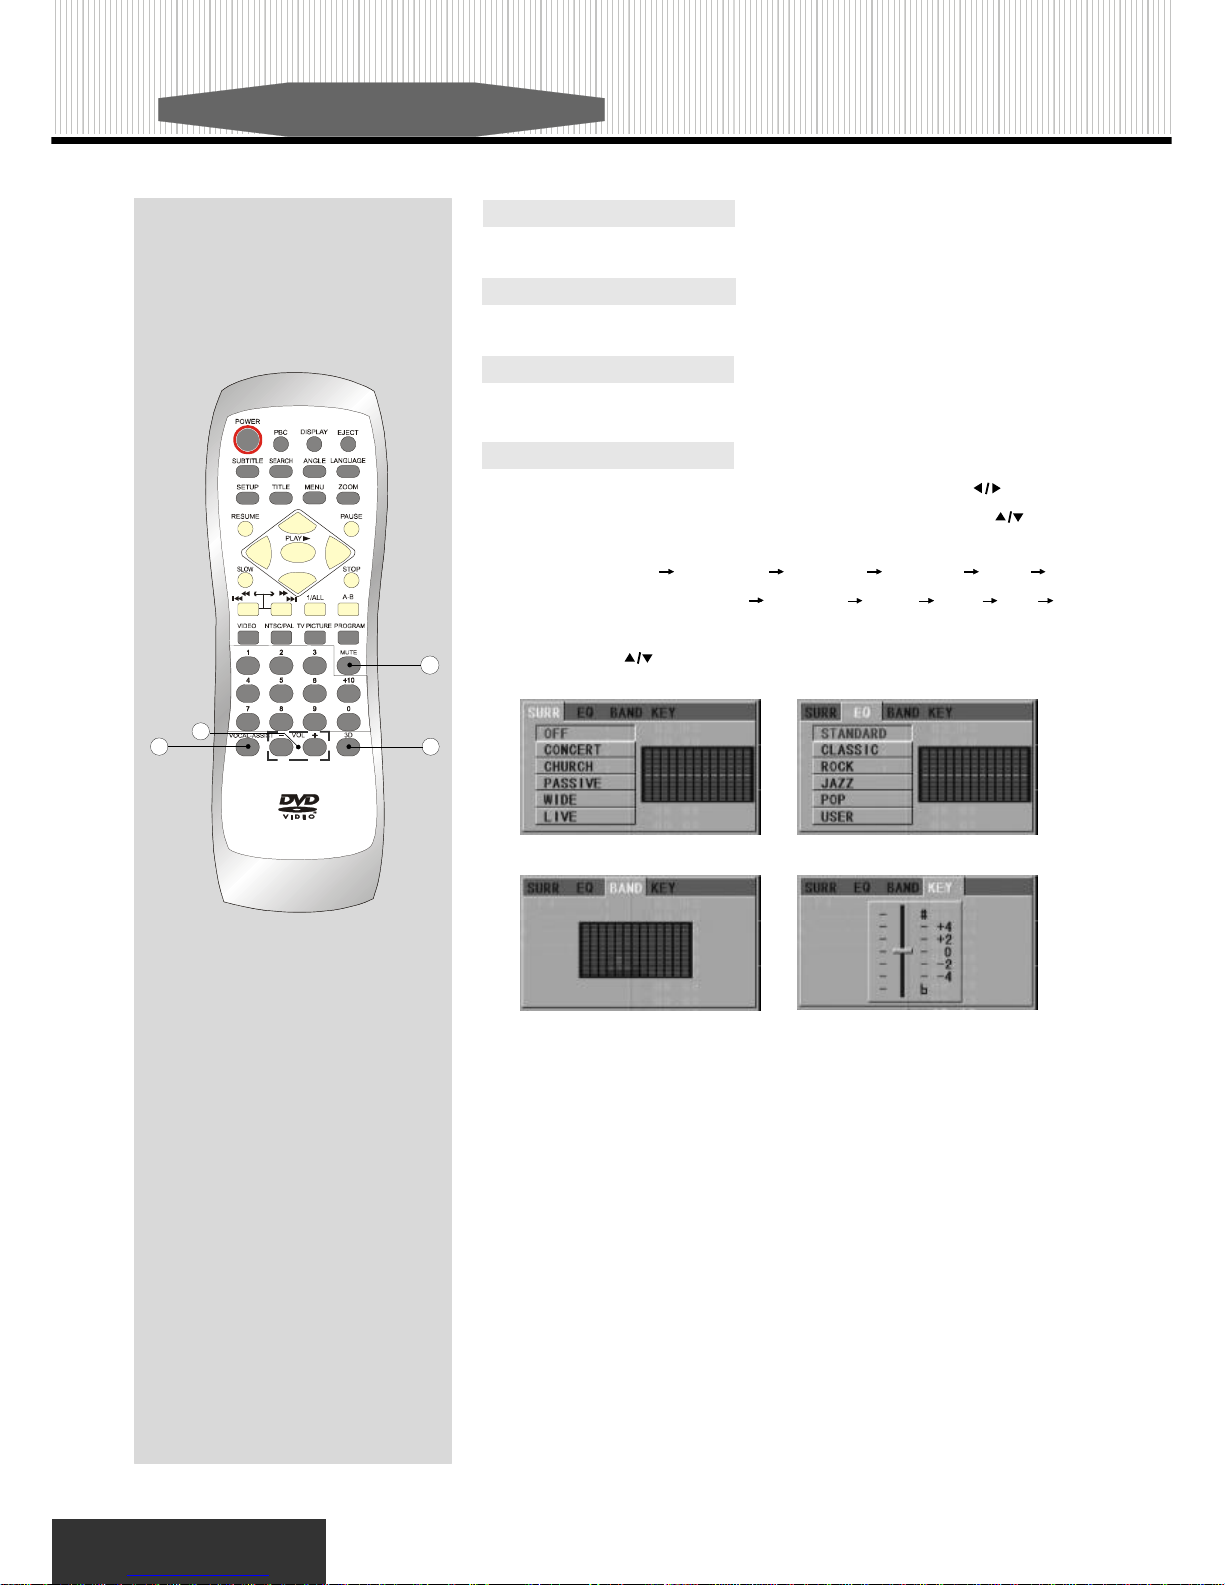
26.VOLUME
Use “ VOL-” or “ VOL+” button to adjust the output volume.
27.VOCAL-A SSIST
You can select Left channel output only or Right channel output only or Stereo output.
25.MUTE
Press this button to mute sound. Press it again to restore sound.
26
28
25
27
28.3D
Press this button to show the music profile icon. Use “ ” to choose
SURROUND , EQUALIZATION , BAND or KEY. Then press “ ” to select
the details.
(1). Surround: OFF CONCERT CHURCH PASSIVE WIDE LIVE
(2). Equalization: STANDARD CLASSIC ROCK JAZZ POP USER
(3). Band: to show the music profile.
(4). Key: Use “ ” to adjust the tone of the music.
(1) (2)
(3) (4)
Page 15
12
Special Operatio n
What is MP3
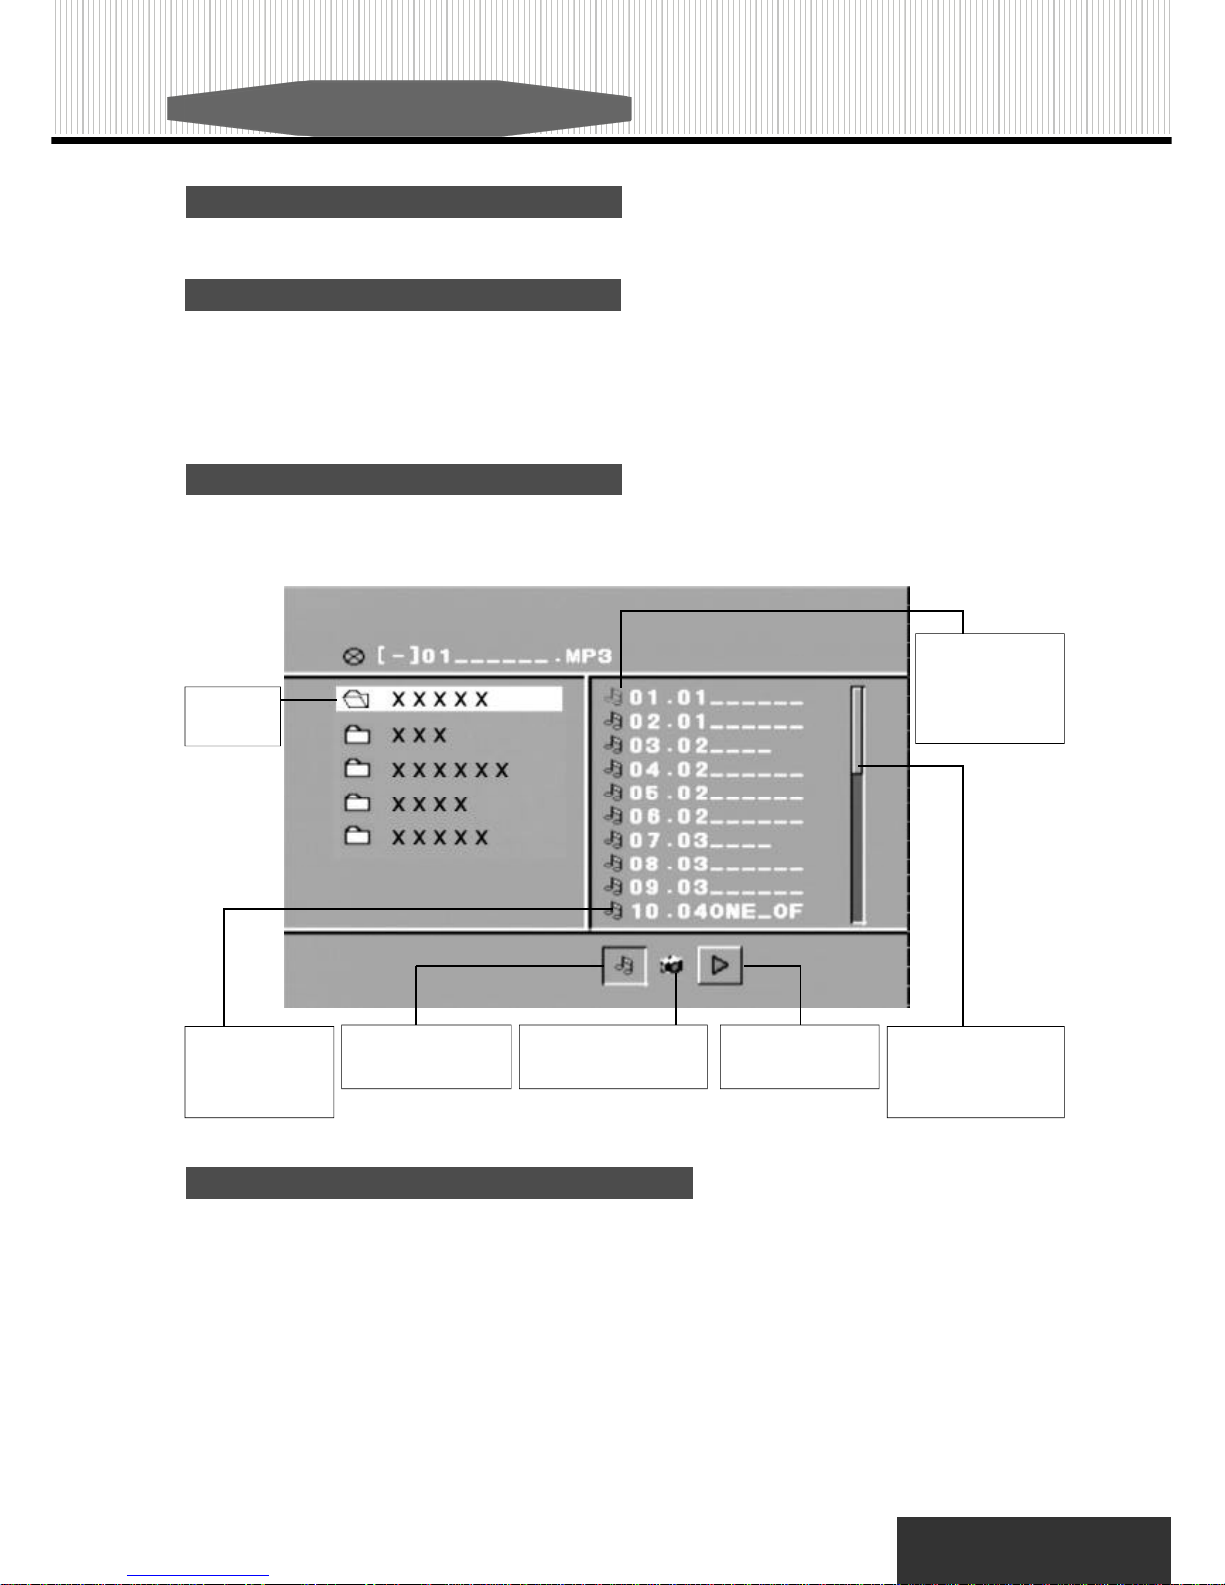
MP3 is a new music format which is capable of playing the music on the internet.
MP3/JPEG Operation
After inserting MP3/JPEG discs, the player will automatically search different menu of the discs. After searching, the
player will automatically enter the first menu of MP3 disc, and play the first track in the first menu. OSD shows the
followings:
What is JPEG
JPEG is short for the “Jo int Pho tograph ic Experts Group ”, a group of experts nomin ated to produce standards for
cont inuous tone image coding.
The best known s tandard from JPEG is IS 10918-1 (ITU-T T.81), which is the first of a multi-part set of standards for
still image compression. This allows you to create files (such as photographs, draw ings, and most clip-art) that can be
archived on a CD-R for viewing on the RDV650, computer, or the web.
Music s ign may
blink in front of
the playing track
Shows the present
file is MP3 format.
Shows the present
JPEG picture format.
Shows the other
format discs.
Sliding block will
move according to
playing of tracks.
File: MP3 files
or JPEG files in
the present
menu.
Present
file name
Kodak Picture & CD Discs Compatib le
Whe n play picture CD discs, OSD will show you the operating menu, make your choice by pressing the directional
buttons on the remo te control and then pres s “PAUSE” button. Now press “ ZOOM” bu tton to enlarge the picture,
press “PLAY” button to automatically search pictures.
Page 16
13
System Configuration
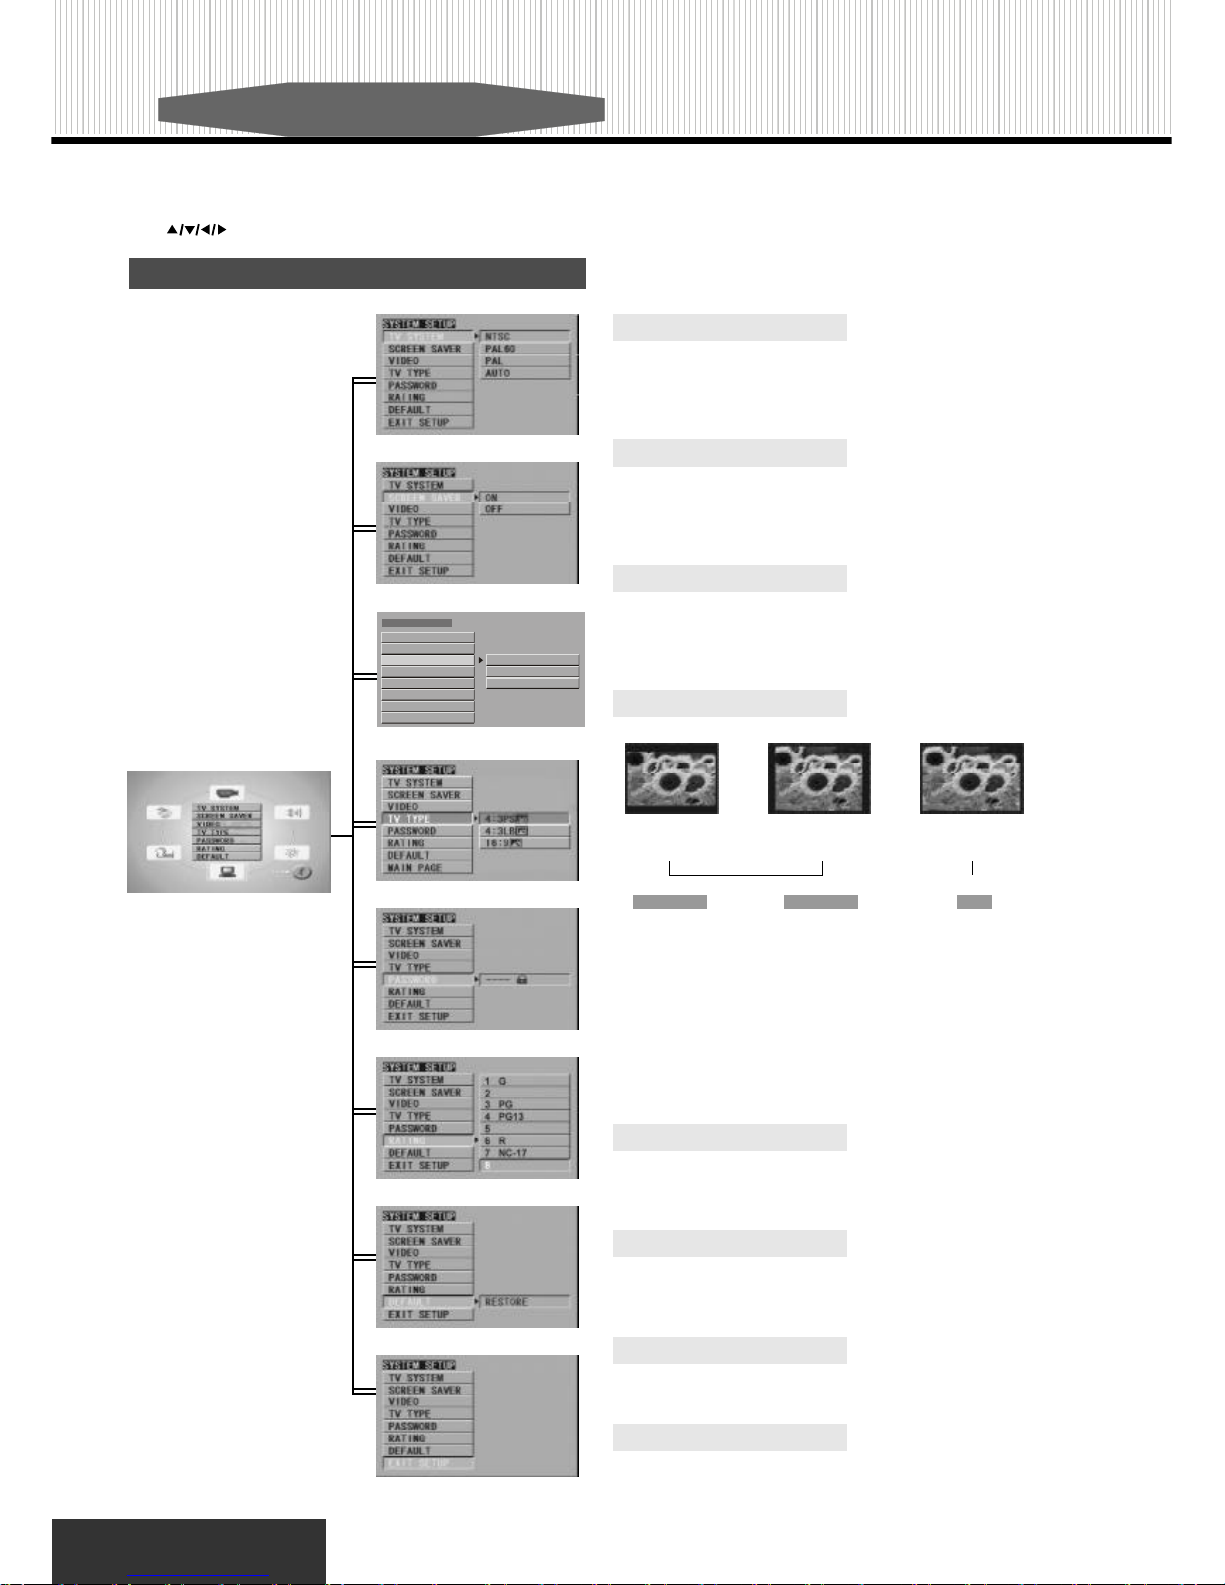
Use the Setup Menu display to change the system configuration. In this section, each item on the Setup Menu display will be de scribed.
Use “ ” buttons to select the item that you want and press “PLAY” or “ENTER” button to confirm.
Setup different function of DVD
player and the TV set.
System Setup Page
TV SYSTEM
TV system: Select the appropriate setting depending on your TV type. It’s
recommended that you leave this setting on AUTO mode. You may choose
from AUTO, NTSC , PAL, PAL60.
SCREEN SAVER
Screen saver have two mode: ON, OFF. When in “ON” mode, if you do
not make any operation or in stop mode for one minute, the screen saver
picture will appear.
VIDEO
Video output: refer to chapter four and setup the Video Output mode according to the connection mode. If common video, just choose S-Video,
if use YU V input TV, use YUV output mode.
PASSWORD
Select “CHANGE” to change the original password. The original password is 0000.
RATING
Three grades of laws: NO ADULT, KID SAFE, VIEW ALL. The factory
default to VIEW ALL.
DEFAULT
Change your setup state to the factory default setup.
EXIT SETUP
Return to the main setup page.
TV TYPE
NOTE:
• No matter what kind of picture mode is chosen , picure recorded in the stand ard
4:3 format will be displaye d in the 4:3 picture mode.
• Dependent upon the present discs, the recording format will be different.
• If choose 16:9 broad mode on the standard 4:3 picture mod e TV se t, the 16:9
mode picture will be compressed in the horizontal direction.
• Some disc are recorded in certain format. If so, no matter what kind of pictur e
mode you are chosing, the picture will be displayed in their original recor ding
mode.
4:3 subtitle block to
view the full width of the
broad mod e.
To view the stand ard 4:
3 picture or the cutted
stanard 4:3 picture.
To view broad mode picture wi th the broad
screen TV set.
Normal TV set Broad mode TV set
Preference pictures:
NORMAL/PS NORMAL/LB WIDE
SYSTEM SETUP
VIDEO
TV TYPE
PASSWORD
RATING
DEFAULT
EXIT SETUP
TV SYSTEM
SCREEN SAVER
INTERLACE-YUV
S-VIDEO
P-SCAN YPBPR
Page 17
System Configuration
14
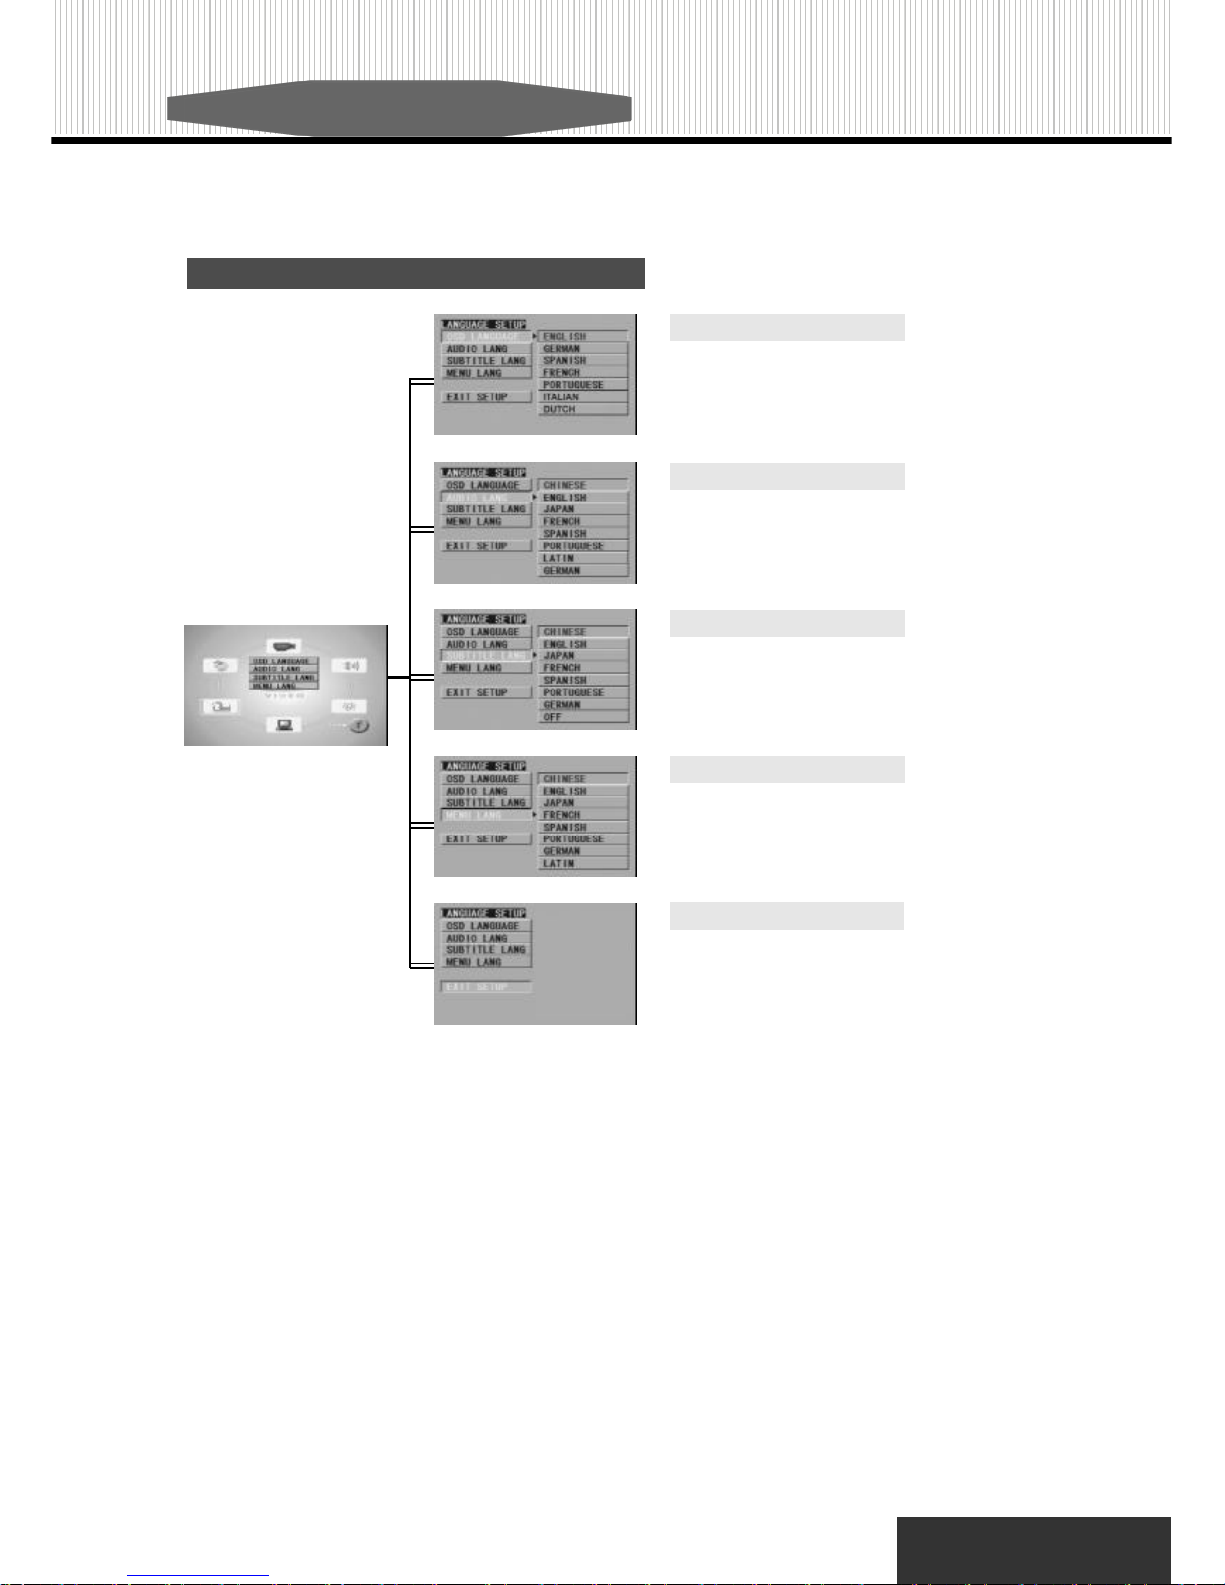
Language Setup Page
NOTE: Subtitle language menu language are only valid to the setup of
DVD discs.
OSD L ANGUAGE
OSD has seven different languages: ENGLISH, GERMAN, S PANISH,
FRENCH, PORTUGUESE, ITALIAN and DUTCH. If you choose a
language, the menu will be all in the language.
AUDIO L ANGUAGE
AUDIO LANG setup has eight different languages: CHINESE , ENGLISH,
JAPAN, FRENCH, SPANISH, PORTUGUESE, LATIN and GERMAN. If
you choose a language, the disc must be equipped with the language.
SUBT ITLE LANGUAGE
SU BTITLE LANG setup has eight different languages: CHINESE,
ENGLISH, JAPAN, FRENCH, SPANISH, PORTUGUESE , GERMAN. If
you choose the subtitle language, the disc must first be equipped with
different language subtitles.
MENU LANGUAGE
MENU LANG setup has eight different languages: CHINESE, ENGLISH,
JAPAN, FRENCH, SPANISH, PORTUGUESE, GERMAN and LATIN. If
you choose menu language, the disc must first be equipped with
mutil anguage menus.
EXIT SETUP
Return to the main setup page.
Page 18
15
System Configuration
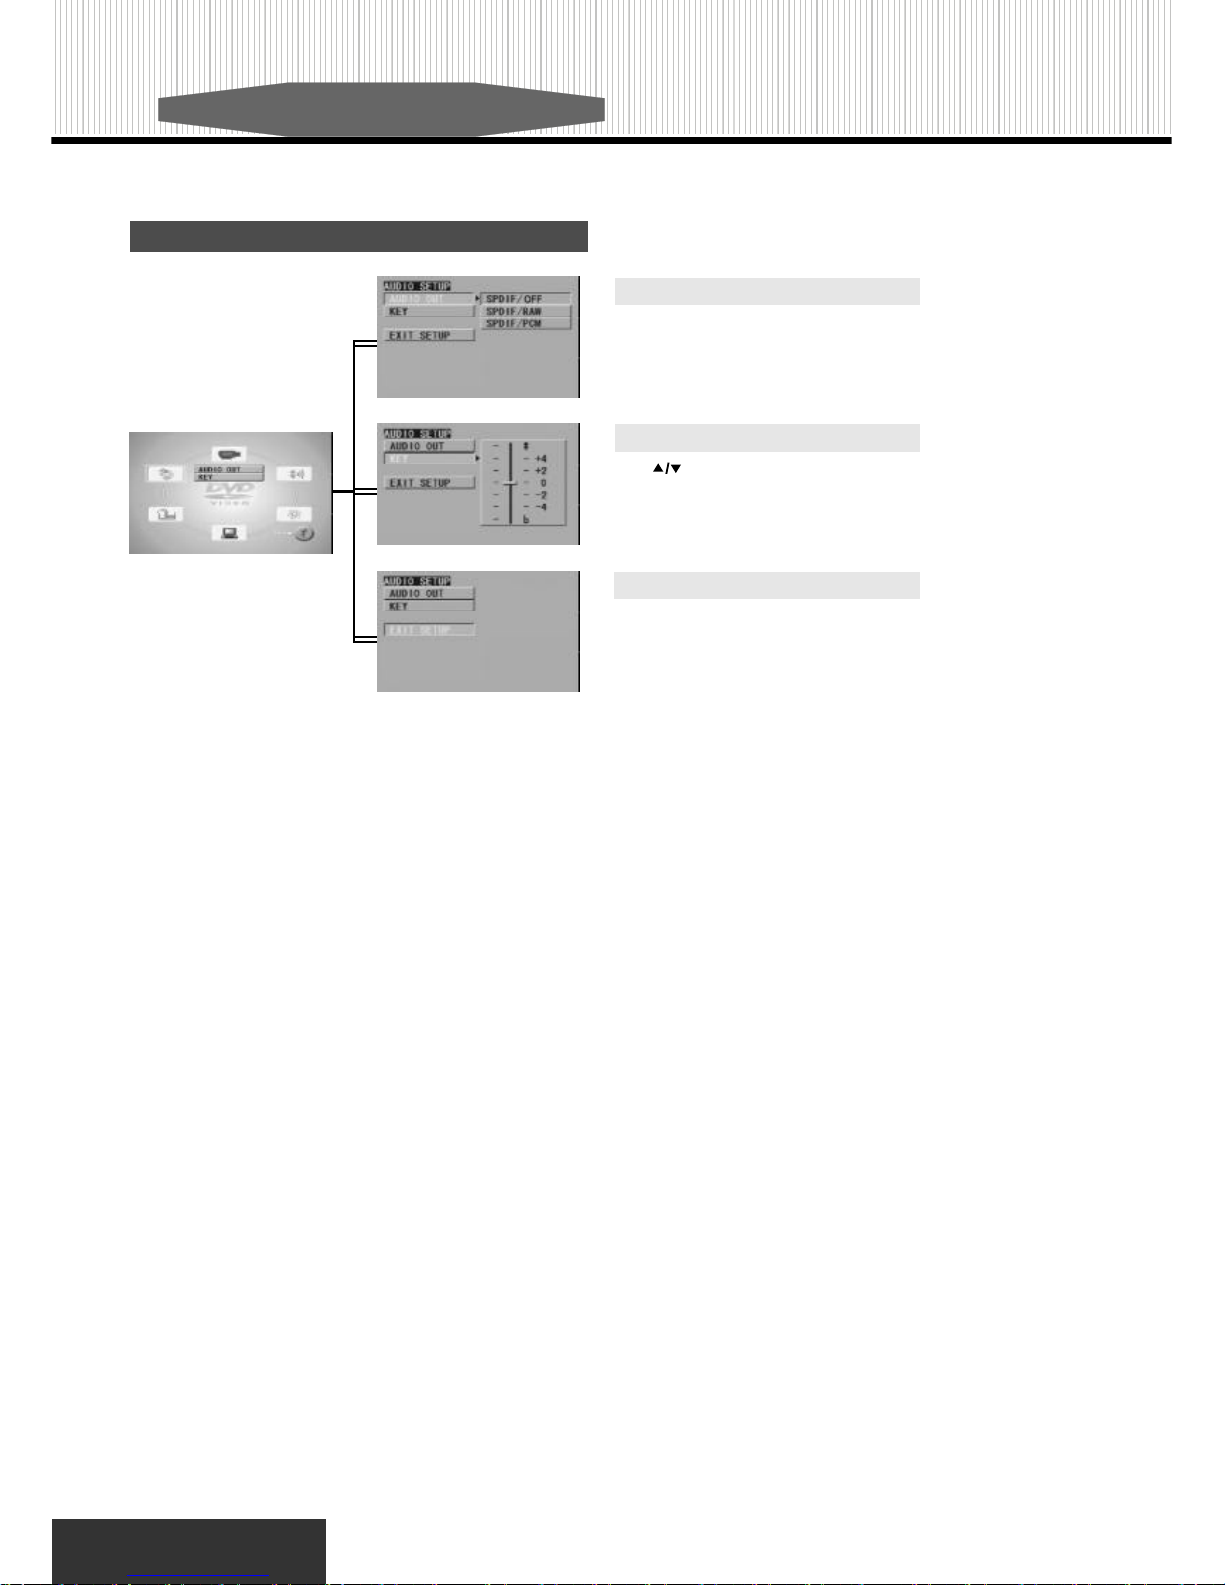
Audio Setup Page
AUDIO O UT
AUDIO OUT has three different types: for common AV output, please
choose “SPDIF/OFF”; for optical or coaxial output, please choose “SPDIF/
RAW” or “SPDIF/PCM”.
KEY(for KARAOKE function)
Use “ ” directional buttons to adjust the tone of the music. Choose
“ b ” to have a lower tone. Choose “ # ” to have a higher tone.
EXIT SETUP
Return to the main setup page.
Page 19
System Configuration
16
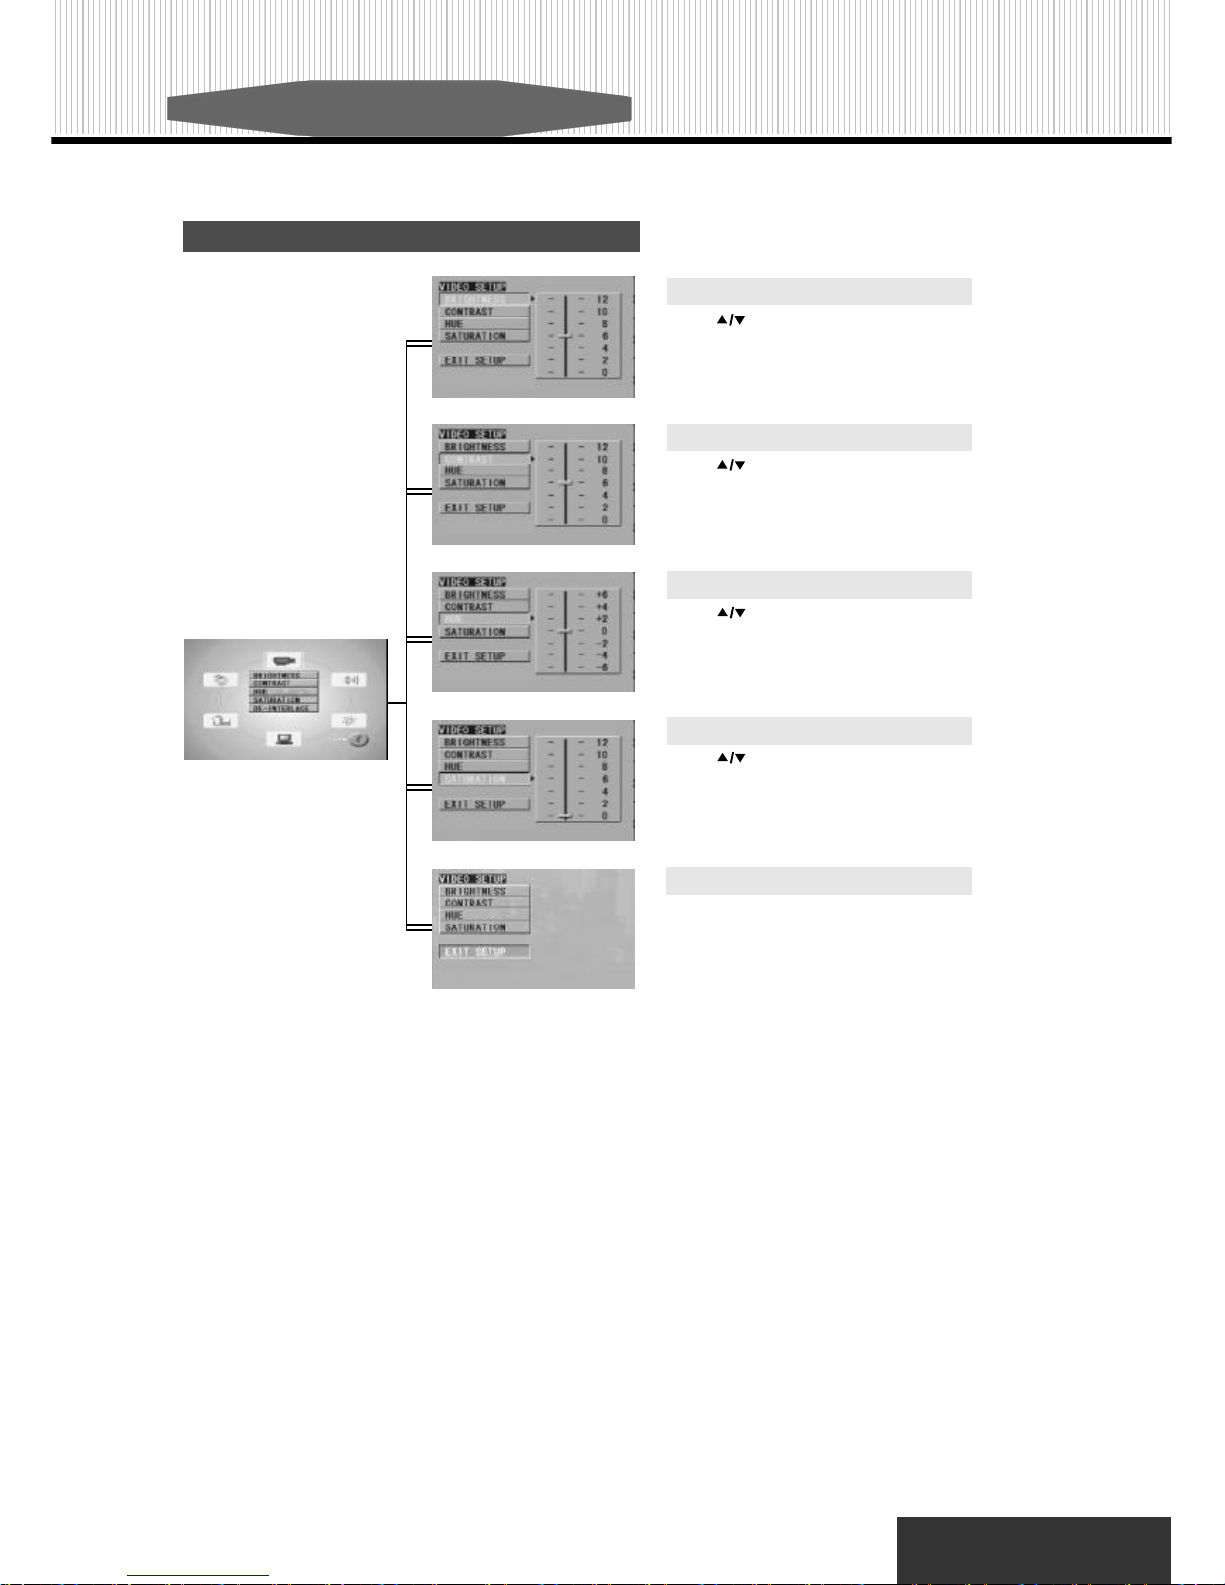
Video Setup Page
BRIGHTNESS
Press “ ” to adjust brightness.
CONTRAST
Press “ ” to adjust contrast.
HUE
Press “ ” to adjust hue.
EXIT SETUP
Return to the main setup page.
SATURATION
Press “ ” to adjust saturation.
Page 20
17
System Configuration
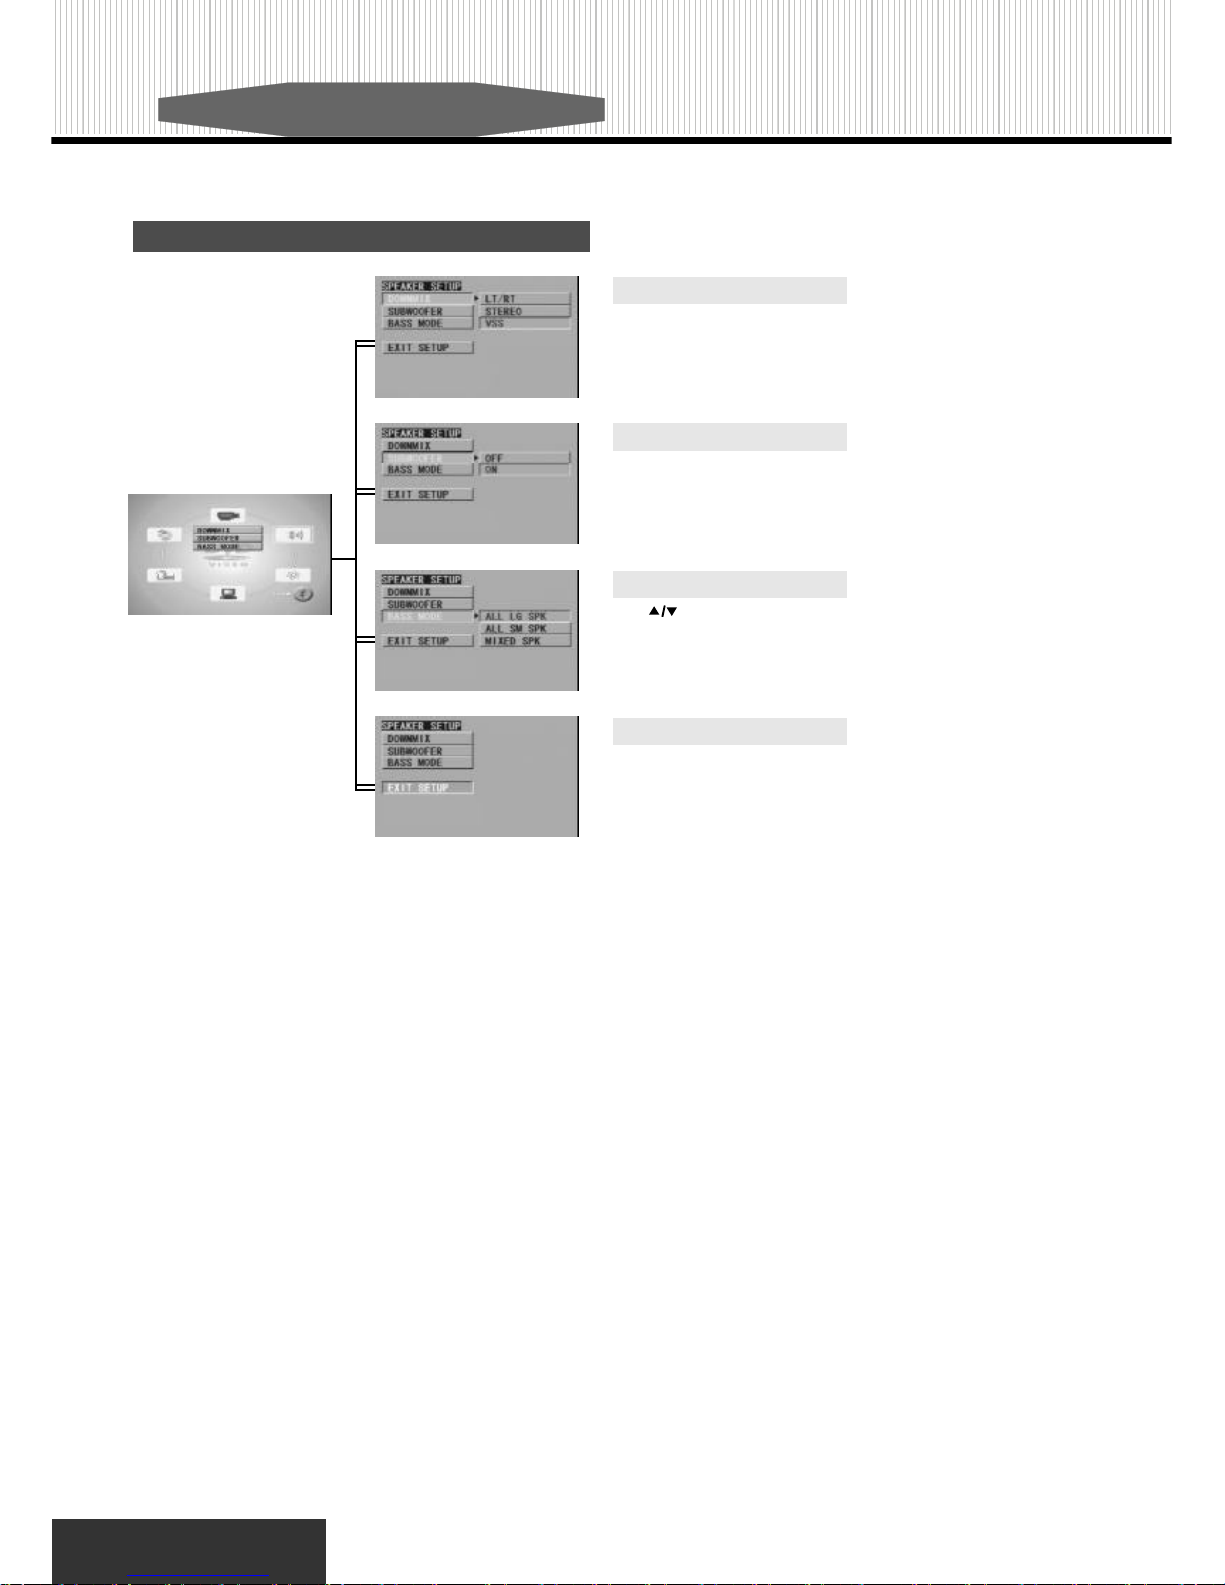
Speaker Setup Page(for 2ch output)
EXIT SETUP
Return to the main setup page.
BASS MO DE
Use “ ” directional buttons to select the “ALL LG SPK”, “ALL SM SPK”
or “MIXED SPK”.
SUBWOO FER
The function lets you turn your subwoofer “ON” or “OFF”.
DOWNMIX
Switches the mixing down methods when you play a DVD with rear signal
components. This function can be set to “LT/RT”, “STEREO”, “VSS”,
“OFF”.
Page 21
18
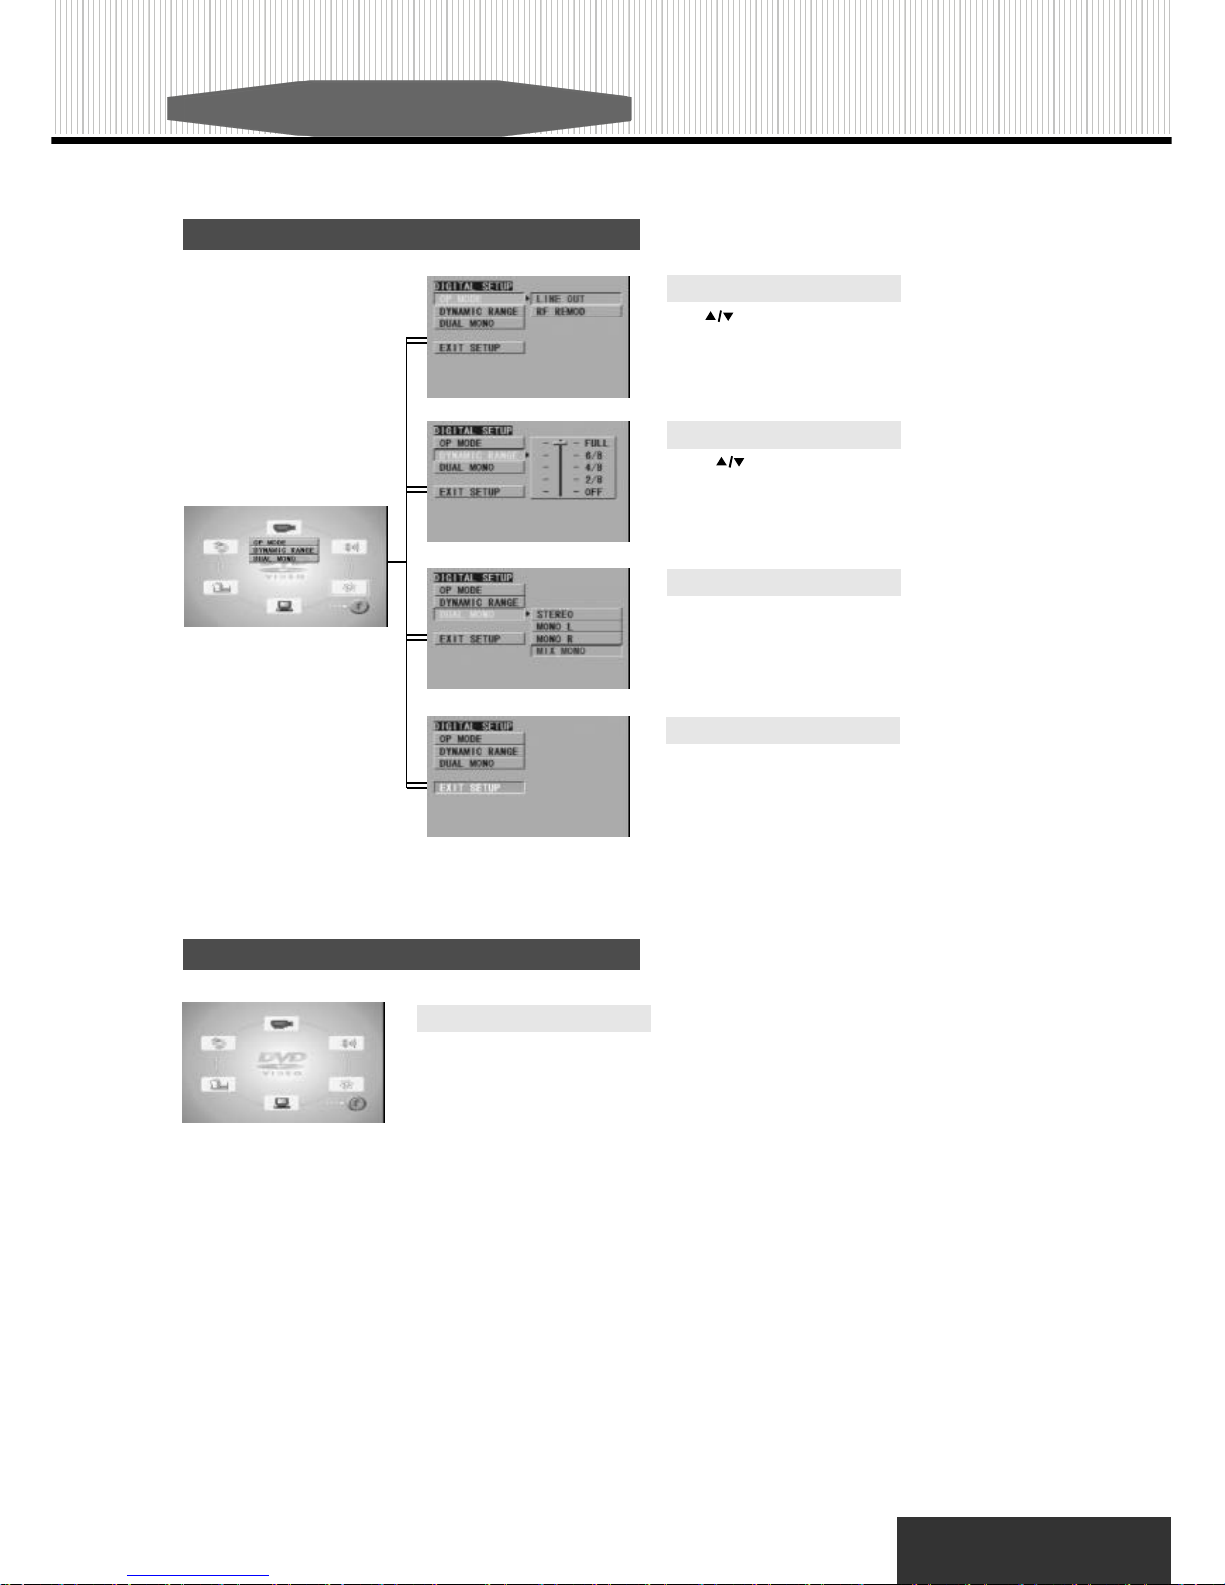
Digital Setup Page
EXIT SETUP
Return to the main setup page.
OP MODE
Use “ ” to select “LINE OUT” or “RF REMOD”.
DYNAMIC RANGE
Press “ ” to adjust the linear compression rate of the signal.
DUAL MONO
This i s the output mode of the L and R signals of the set audio output. If
it is set “MIX MONO”, this function only works when the DVD is being
played in 2 channel.
System Configuration
Exit Setup Page
EXIT SETUP MENU
Press “PLAY” to exit the Setup Menu.
Page 22

Time number
This indi cates the playing time that has elapsed from the start
of a disc or a title. I t can be used to f ind a spec ific scene
quickly. (It may not work with some discs.)
Title number
These numbers are recorded on DVD disc s. When a disc
contains two or more movies, these movies are numbered as
title1, title2, e tc.
CSS
CSS stands for "Content Scramble System". It is the data scrambling method used to garble the content of a DV D disc. According to most sourc es, CSS was put into use for the purpose of ensuring t hat c opyrighted material plac ed in this format would only be usable with licensed DVD playback
mechanisms.
DVD
This ref ers to a high-densi ty optical disc on which high-quality
pictures and sound have been recorded by means of digital
signals. Incorporating a new video compression technology
(MPEG II) and high-density recording technology, DVD enables
aes thetically pleasing full-motion v ideo to be rec orded over
long periods of time (for instance, a whole movie can be recorded.)
DVD ha s a structure consisting of two 0.6mm thin discs that are
adhered to each other . Since the thinner the disc, the higher the
density at which the information can be recorded, a D VD disc has
a greater capacity than a single 1.2mm thick disc. Since the two
thin discs are adher ed to each other, there is the potential to achieve
double-sided play sometim e in the future for even longer duration
play.
Subtitle
These are the printed lines appearing at the bottom of the
screen that translate or transcribe the dialogue. They are
recorded on DVD discs.
Dolby Digital
Dolby Digi tal is an advanced form of digital audi o coding t hat
makes it p ossible to store and transmit high-quality digital sound
far more efficiently than was previously poss ible. First used
in movied theaters in 1992, it is the result of decades spent by
Dolby Laboratories developing signal-processing systems that
exploit the characteristics of human hearing.
Dolby Digital 2 Channel
At t he option of their producers, Dolby Digital programs can
deliver surround sound with two discrete range channels-
left and ri ght .
Angle
Recorded onto some DVD discs are scenes which have been
simultaneously shot from a number of different angles (the
same sc ene is shot from t he front, from the left si de, from the
right side, etc.) With such discs, the ANGLE button can be
used to view t he s cene from diff erent angles.
Chapter n umber
These numbers are recorded on DVD discs. A title is subdivided into many sections, each of which is numbered, and
specifi c parts of video presentations can be searched quickly
by usi ng these numbers.
Appendix (Definition of Keywords)
19
 Loading...