

AMT Datasouth AMTACCEL-5350 User Manual

AMT ACCEL-535 0
Document No. 397000 B
User's Guide
AMT ACCEL-535 0
User's Guide
Document No. 397000 B

Document No. 397000 B
User's Guide
AMT ACCEL-535 0

A MT ACCEL-5350
User's Guide
Unpacking
Set Up
Loading Paper
Control Panel
Cleaning & Maintenance
Solving Problems
Bottom-Feed Tractors
Bar Codes
Interfaces
Code Sets
Specifications
A MT ACCEL-5350
Document No. 397000
Revision B
AMT DATASOUTH CORP.
4765 Calle Quetzal
Camarillo, CA 93012-8546
TEL: (805) 388-5799 FAX: (805) 389-3657
User's Guide
Unpacking
Set Up
Loading Paper
Control Panel
Cleaning & Maintenance
Solving Problems
Bottom-Feed Tractors
Bar Codes
Interfaces
Code Sets
Specifications
Document No. 397000
AMT DATASOUTH CORP.
4765 Calle Quetzal
Camarillo, CA 93012-8546
TEL: (805) 388-5799 FAX: (805) 389-3657
Revision B

User's Guide
User's Guide
ii Preface
ii Preface

Preface
User's Guide
Preface iii
Preface
Thank you for selecting an AMT Datasouth® ACCEL™-5350 series
printer. Using an all-metal chassis, 24-wire dot-matrix printhead, state-
of-the-art electronics, and simple user controls, your printer will provide
fast and reliable printing for years to come.
Printer Models
There are two models of AMT Datasouth ACCEL-5350 series printers.
They look different but operate the same. The 5350 has two paper paths
(top and rear) and the 5350d has three paper paths (top, rear and
bottom).
User's Guide
Thank you for selecting an AMT Datasouth® ACCEL™-5350 series
printer. Using an all-metal chassis, 24-wire dot-matrix printhead, stateof-the-art electronics, and simple user controls, your printer will provide
fast and reliable printing for years to come.
Printer Models
There are two models of AMT Datasouth ACCEL-5350 series printers.
They look different but operate the same. The 5350 has two paper paths
(top and rear) and the 5350d has three paper paths (top, rear and
bottom).
Preface iii

User's Guide
User's Guide
iv Preface
About This User's Guide
This user's guide provides information that will help you set up and
operate your printer. If you are using the printer for the first time, you
should perform the procedures in sections 1, 2 and 3 to set up the printer.
Then, use section 4 to learn how to use control panel functions. The rest
of the guide contains reference information that will help you get the
most from your printer.
The guide is divided into six sections and five appendixes:
Section 1, Unpacking, describes how to find a good place for your
printer and unpack it.
Section 2, Set Up, points out the various components you use to
operate the printer and describes how to install the paper deflector,
ribbon cartridge and Intelli-card. It also describes how to check the
voltage select switch, attach the power cable, turn the printer on,
load paper, print a self test and attach the interface cables.
Section 3, Loading Paper, describes how to load various kinds of
media into the printer, including single sheets, pin-feed paper,
multipart forms, labels and transparencies.
Section 4, Control Panel, describes how to use the control panel.
Section 5, Cleaning and Maintenance, describes how to keep your
printer in good shape and how to replace the ribbon cartridge, print-
head and fuse.
Section 6, Solving Problems, describes printer messages, provides a
troubleshooting guide, and shows how to run printer tests.
Appendix A, Bottom-Feed Tractors, describes how to use the
powered bottom-feed forms tractors.
Appendix B, Bar Codes, provides information on printing bar codes.
Appendix C, Interfaces, provides technical information on the
parallel and serial interfaces of the printer.
Appendix D, Code Sets, describes the printer's code sets.
Appendix E, Specifications, lists printer specifications.
About This User's Guide
This user's guide provides information that will help you set up and
operate your printer. If you are using the printer for the first time, you
should perform the procedures in sections 1, 2 and 3 to set up the printer.
Then, use section 4 to learn how to use control panel functions. The rest
of the guide contains reference information that will help you get the
most from your printer.
The guide is divided into six sections and five appendixes:
Section 1, Unpacking, describes how to find a good place for your
printer and unpack it.
Section 2, Set Up, points out the various components you use to
operate the printer and describes how to install the paper deflector,
ribbon cartridge and Intelli-card. It also describes how to check the
voltage select switch, attach the power cable, turn the printer on,
load paper, print a self test and attach the interface cables.
Section 3, Loading Paper, describes how to load various kinds of
media into the printer, including single sheets, pin-feed paper,
multipart forms, labels and transparencies.
iv Preface
Section 4, Control Panel, describes how to use the control panel.
Section 5, Cleaning and Maintenance, describes how to keep your
printer in good shape and how to replace the ribbon cartridge, printhead and fuse.
Section 6, Solving Problems, describes printer messages, provides a
troubleshooting guide, and shows how to run printer tests.
Appendix A, Bottom-Feed Tractors, describes how to use the
powered bottom-feed forms tractors.
Appendix B, Bar Codes, provides information on printing bar codes.
Appendix C, Interfaces, provides technical information on the
parallel and serial interfaces of the printer.
Appendix D, Code Sets, describes the printer's code sets.
Appendix E, Specifications, lists printer specifications.

Conventions
User's Guide
Preface v
Conventions
Some of the procedures in this guide contain special notices that
highlight important information:
Notes Indicate information that you should know to help
your printer run properly and efficiently.
Cautions Indicate guidelines that, if not followed, can cause
damage to equipment.
Warnings Indicate a situation where there may be a danger to
yourself.
The use of the terms right and left assume that you are looking at the
front of the printer.
Technical Support
If you have a problem with your printer, refer to the Solving Problems
section for troubleshooting information. If you are unable to solve the
problem yourself, contact the Dealer that sold you the printer. The
Dealer should be able to assist you or tell you where to find additional
help.
Trademarks
AMT Datasouth is a registered trademark of Advanced Matrix
Technology, Inc. ACCEL, Intelli-card and Select-dial are trademarks of
Advanced Matrix Technology, Inc. All other brands and product names
are registered trademarks of their respective owners.
Some of the procedures in this guide contain special notices that
highlight important information:
Notes Indicate information that you should know to help
Cautions Indicate guidelines that, if not followed, can cause
Warnings Indicate a situation where there may be a danger to
The use of the terms right and left assume that you are looking at the
front of the printer.
Technical Support
your printer run properly and efficiently.
damage to equipment.
yourself.
User's Guide
Trademarks
If you have a problem with your printer, refer to the Solving Problems
section for troubleshooting information. If you are unable to solve the
problem yourself, contact the Dealer that sold you the printer. The
Dealer should be able to assist you or tell you where to find additional
help.
AMT Datasouth is a registered trademark of Advanced Matrix
Technology, Inc. ACCEL, Intelli-card and Select-dial are trademarks of
Advanced Matrix Technology, Inc. All other brands and product names
are registered trademarks of their respective owners.
Preface v

User's Guide
User's Guide
vi Preface
Copyright
© Copyright, 2000 by AMT Datasouth Corp. (AMT Datasouth). All
rights reserved. No part of this publication may be reproduced,
stored in a retrieval system, or transmitted, in any form or by any
means, mechanical, photocopying, recording or otherwise, without the
prior written permission of AMT Datasouth. No patent liability is
assumed with respect to the use of the information contained herein.
AMT Datasouth assumes no responsibility for errors or omissions.
Neither is any liability assumed for damages resulting from the use of
information contained herein. Changes are made periodically to the
information in this publication; these changes will be incorporated into
future editions. AMT Datasouth is without obligation to notify any
person of such revisions.
One-Year Limited Warranty
AMT Datasouth Corp. ("AMT Datasouth") warrants your printer to be
free from defects in materials and workmanship for a period of one year
from the date of purchase from AMT Datasouth or an Authorized AMT
Datasouth Dealer. This warranty is limited to the original purchaser
("Purchaser") of the printer and is not transferable.
AMT Datasouth's obligation under this warranty is limited to replacing or
repairing, at its option, at its designated site, and by its designated agent,
any products or major assemblies that are returned to AMT Datasouth or
its agent within the warranty period that are found by AMT Datasouth to
be defective in proper usage. Purchaser may, at its option, return the
printer to AMT Datasouth or disassemble the printer and return to AMT
Datasouth only the major assembly needing repair, referencing in writing
the serial number of the major assembly needing repair and the serial
number of the product from which the assembly is removed. Purchaser
shall prepay transportation and insurance charges to AMT Datasouth's
designated site. If returned parts are repaired or replaced under the
terms of this warranty, AMT Datasouth will prepay transportation
charges back to Purchaser's location; otherwise, Purchaser shall pay
transportation and insurance charges in both directions.
Copyright
© Copyright, 2000 by AMT Datasouth Corp. (AMT Datasouth). All
rights reserved. No part of this publication may be reproduced,
stored in a retrieval system, or transmitted, in any form or by any
means, mechanical, photocopying, recording or otherwise, without the
prior written permission of AMT Datasouth. No patent liability is
assumed with respect to the use of the information contained herein.
AMT Datasouth assumes no responsibility for errors or omissions.
Neither is any liability assumed for damages resulting from the use of
information contained herein. Changes are made periodically to the
information in this publication; these changes will be incorporated into
future editions. AMT Datasouth is without obligation to notify any
person of such revisions.
One-Year Limited Warranty
AMT Datasouth Corp. ("AMT Datasouth") warrants your printer to be
free from defects in materials and workmanship for a period of one year
from the date of purchase from AMT Datasouth or an Authorized AMT
Datasouth Dealer. This warranty is limited to the original purchaser
("Purchaser") of the printer and is not transferable.
vi Preface
AMT Datasouth's obligation under this warranty is limited to replacing or
repairing, at its option, at its designated site, and by its designated agent,
any products or major assemblies that are returned to AMT Datasouth or
its agent within the warranty period that are found by AMT Datasouth to
be defective in proper usage. Purchaser may, at its option, return the
printer to AMT Datasouth or disassemble the printer and return to AMT
Datasouth only the major assembly needing repair, referencing in writing
the serial number of the major assembly needing repair and the serial
number of the product from which the assembly is removed. Purchaser
shall prepay transportation and insurance charges to AMT Datasouth's
designated site. If returned parts are repaired or replaced under the
terms of this warranty, AMT Datasouth will prepay transportation
charges back to Purchaser's location; otherwise, Purchaser shall pay
transportation and insurance charges in both directions.

User's Guide
User's Guide
Preface vii
Dated proof-of-purchase must be provided by the Purchaser when
requesting warranty work to be performed. (A warranty reply card is
included with the product and should be returned to AMT Datasouth
within 10 days of accepting the product.) The Purchaser may request
information on how to get warranty service by contacting an Authorized
AMT Datasouth Dealer or writing to AMT Datasouth, 4216 Stuart
Andrew Blvd. Charlotte, NC 28217 for further information.
THE FOREGOING LIMITED WARRANTY IS IN LIEU OF ALL
OTHER WARRANTIES WITH RESPECT TO THE PRODUCTS,
EITHER EXPRESSED OR IMPLIED, INCLUDING WITHOUT
LIMITATION ANY IMPLIED WARRANTY OF MERCHANT-
ABILITY OR FITNESS FOR A PARTICULAR PURPOSE, AND
ANY OTHER OBLIGATION ON THE PART OF AMT.
THE FOREGOING LIMITED WARRANTY SHALL CONSTITUTE
THE SOLE AND EXCLUSIVE OBLIGATION AND LIABILITY OF
AMT. IN NO EVENT SHALL AMT BE LIABLE FOR INDIRECT,
INCIDENTAL OR CONSEQUENTIAL DAMAGES, AND IN NO
EVENT SHALL THE LIABILITY OF AMT ARISING IN CONNEC-
TION WITH ANY PRINTER SOLD HEREUNDER (WHETHER
SUCH LIABILITY ARISES FROM A CLAIM BASED ON CON-
TRACT, WARRANTY, TORT OR OTHERWISE) EXCEED THE
ACTUAL AMOUNT PAID BY THE PURCHASER FOR THE
PRINTER.
Dated proof-of-purchase must be provided by the Purchaser when
requesting warranty work to be performed. (A warranty reply card is
included with the product and should be returned to AMT Datasouth
within 10 days of accepting the product.) The Purchaser may request
information on how to get warranty service by contacting an Authorized
AMT Datasouth Dealer or writing to AMT Datasouth, 4216 Stuart
Andrew Blvd. Charlotte, NC 28217 for further information.
THE FOREGOING LIMITED WARRANTY IS IN LIEU OF ALL
OTHER WARRANTIES WITH RESPECT TO THE PRODUCTS,
EITHER EXPRESSED OR IMPLIED, INCLUDING WITHOUT
LIMITATION ANY IMPLIED WARRANTY OF MERCHANTABILITY OR FITNESS FOR A PARTICULAR PURPOSE, AND
ANY OTHER OBLIGATION ON THE PART OF AMT.
THE FOREGOING LIMITED WARRANTY SHALL CONSTITUTE
THE SOLE AND EXCLUSIVE OBLIGATION AND LIABILITY OF
AMT. IN NO EVENT SHALL AMT BE LIABLE FOR INDIRECT,
INCIDENTAL OR CONSEQUENTIAL DAMAGES, AND IN NO
EVENT SHALL THE LIABILITY OF AMT ARISING IN CONNECTION WITH ANY PRINTER SOLD HEREUNDER (WHETHER
SUCH LIABILITY ARISES FROM A CLAIM BASED ON CONTRACT, WARRANTY, TORT OR OTHERWISE) EXCEED THE
ACTUAL AMOUNT PAID BY THE PURCHASER FOR THE
PRINTER.
Preface vii

User's Guide
User's Guide
viii Preface
Factory Service
If you suspect that your printer needs service, first contact the Dealer that
sold you the printer. The Dealer will ask you for the printer's model
number and serial number, the date you purchased the printer, and an
explanation of the problem. In the event that your Dealer is unable to
help you and the warranty period is in effect, contact AMT Datasouth,
4216 Stuart Andrew Blvd. Charlotte, NC 28217, phone 800-476-2450 and
press 4 for the Technical Support Department. Be ready to provide the
name of the Dealer that you contacted, the printer's model number and
serial number, the date you purchased the printer, and an explanation of
the problem.
If the AMT Datasouth Technical Support Representative is unable to
solve the problem on the phone, you will be issued a Return Materials
Authorization number (RMA number) and an address where to ship your
printer for service. You must write the RMA number on the outside of
the printer's shipping carton so that AMT Datasouth will accept the
printer when it arrives at the Service Center. You must also enclose a
copy of your purchase receipt or some other proof of the date of original
purchase. You must send your printer prepaid and with adequate insur-
ance to the supplied address. If the printer is repaired under the terms of
the warranty, AMT Datasouth will prepay transportation charges back to
your location, provided that this location is within the continental United
States; otherwise, you must pay transportation and insurance charges in
both directions.
YOU MUST USE THE ORIGINAL PACKING MATERIAL TO SHIP
YOUR PRINTER; OTHERWISE, A CHARGE WILL BE INCURRED
FOR REPACKAGING.
Factory Service
If you suspect that your printer needs service, first contact the Dealer that
sold you the printer. The Dealer will ask you for the printer's model
number and serial number, the date you purchased the printer, and an
explanation of the problem. In the event that your Dealer is unable to
help you and the warranty period is in effect, contact AMT Datasouth,
4216 Stuart Andrew Blvd. Charlotte, NC 28217, phone 800-476-2450 and
press 4 for the Technical Support Department. Be ready to provide the
name of the Dealer that you contacted, the printer's model number and
serial number, the date you purchased the printer, and an explanation of
the problem.
If the AMT Datasouth Technical Support Representative is unable to
solve the problem on the phone, you will be issued a Return Materials
Authorization number (RMA number) and an address where to ship your
printer for service. You must write the RMA number on the outside of
the printer's shipping carton so that AMT Datasouth will accept the
printer when it arrives at the Service Center. You must also enclose a
copy of your purchase receipt or some other proof of the date of original
purchase. You must send your printer prepaid and with adequate insurance to the supplied address. If the printer is repaired under the terms of
the warranty, AMT Datasouth will prepay transportation charges back to
your location, provided that this location is within the continental United
States; otherwise, you must pay transportation and insurance charges in
both directions.
viii Preface
YOU MUST USE THE ORIGINAL PACKING MATERIAL TO SHIP
YOUR PRINTER; OTHERWISE, A CHARGE WILL BE INCURRED
FOR REPACKAGING.

Agency Compliances
User's Guide
Preface ix
Agency Compliances
AMT Datasouth ACCEL-5350 and -5350d series printers have been
tested and found to comply with the application U.S. and Canadian
requirements of Underwriter's Laboratory Inc.
®
LISTED File Number E99947
EDP EQUIPMENT
94KO
Information to the user for Class A digital device
WARNING: This equipment has been tested and found to comply with
the limits for Class A digital device pursuant to Part 15 of the FCC
Rules. These limits are designed to provide reasonable protection
against harmful interference when the equipment is operated in a
commercial environment. This equipment generates, uses, and can
radiate radio frequence energy and, if not installed and used in
accordance with the instruction's manual, may cause inteference to radio
communications. Operation of this equipment in a residential area is
likely to cause interference in which case the user will be required to
correct the interference at his own expense.
The user is cautioned that changes and modifications made to the
equipment without approval of the manufacturer could void the user's
authority to operate this equipment.
It is suggested that the user use only shielded and grounded cables to
ensure compliance with FCC Rules.
AMT Datasouth ACCEL-5350 and -5350d series printers have been
tested and found to comply with the applicable requirements of the EPA
Energy Star guidelines for efficiency. The
ENERGY STAR
™
emblem does
not represent EPA endorsement of any product or service.
AMT Datasouth ACCEL-5350 and -5350d series printers have been
tested and found to comply with the application U.S. and Canadian
requirements of Underwriter's Laboratory Inc.
LISTED File Number E99947
EDP EQUIPMENT
94KO
Information to the user for Class A digital device
WARNING: This equipment has been tested and found to comply with
the limits for Class A digital device pursuant to Part 15 of the FCC
Rules. These limits are designed to provide reasonable protection
against harmful interference when the equipment is operated in a
commercial environment. This equipment generates, uses, and can
radiate radio frequence energy and, if not installed and used in
accordance with the instruction's manual, may cause inteference to radio
communications. Operation of this equipment in a residential area is
likely to cause interference in which case the user will be required to
correct the interference at his own expense.
User's Guide
®
The user is cautioned that changes and modifications made to the
equipment without approval of the manufacturer could void the user's
authority to operate this equipment.
It is suggested that the user use only shielded and grounded cables to
ensure compliance with FCC Rules.
AMT Datasouth ACCEL-5350 and -5350d series printers have been
tested and found to comply with the applicable requirements of the EPA
Energy Star guidelines for efficiency. The
not represent EPA endorsement of any product or service.
ENERGY STAR
™
emblem does
Preface ix

User's Guide
User's Guide
x Preface
Power Precautions
When installing and using the printer, be sure to take the following
precautions:
Use the appropriate power supply and voltage frequency. Be sure to
check the voltage select switch before the printer's first installation.
Make sure the total length of the power cord does not exceed 16.4
feet (5 meters). Using a longer power cord can result in reduced
voltage and possible malfunctions. Do not use an extension cord.
After turning the power off, always wait at least five seconds before
turning it back on.
In case of smoke, odd smells, or other trouble, unplug the power
cord. Do not place furniture or other obstacles in front of the outlet.
Caution: When unplugging the power cord, pull the plug, not
the cord.
GND
L
N
0:05
OFF
ON
Power Precautions
When installing and using the printer, be sure to take the following
precautions:
L
GND
N
Use the appropriate power supply and voltage frequency. Be sure to
Make sure the total length of the power cord does not exceed 16.4
check the voltage select switch before the printer's first installation.
feet (5 meters). Using a longer power cord can result in reduced
voltage and possible malfunctions. Do not use an extension cord.
OFF
x Preface
0:05
After turning the power off, always wait at least five seconds before
turning it back on.
ON
In case of smoke, odd smells, or other trouble, unplug the power
cord. Do not place furniture or other obstacles in front of the outlet.
Caution: When unplugging the power cord, pull the plug, not
the cord.
Operating Precautions
User's Guide
Preface xi
Operating Precautions
When installing and using the printer, be sure to take the following
precautions:
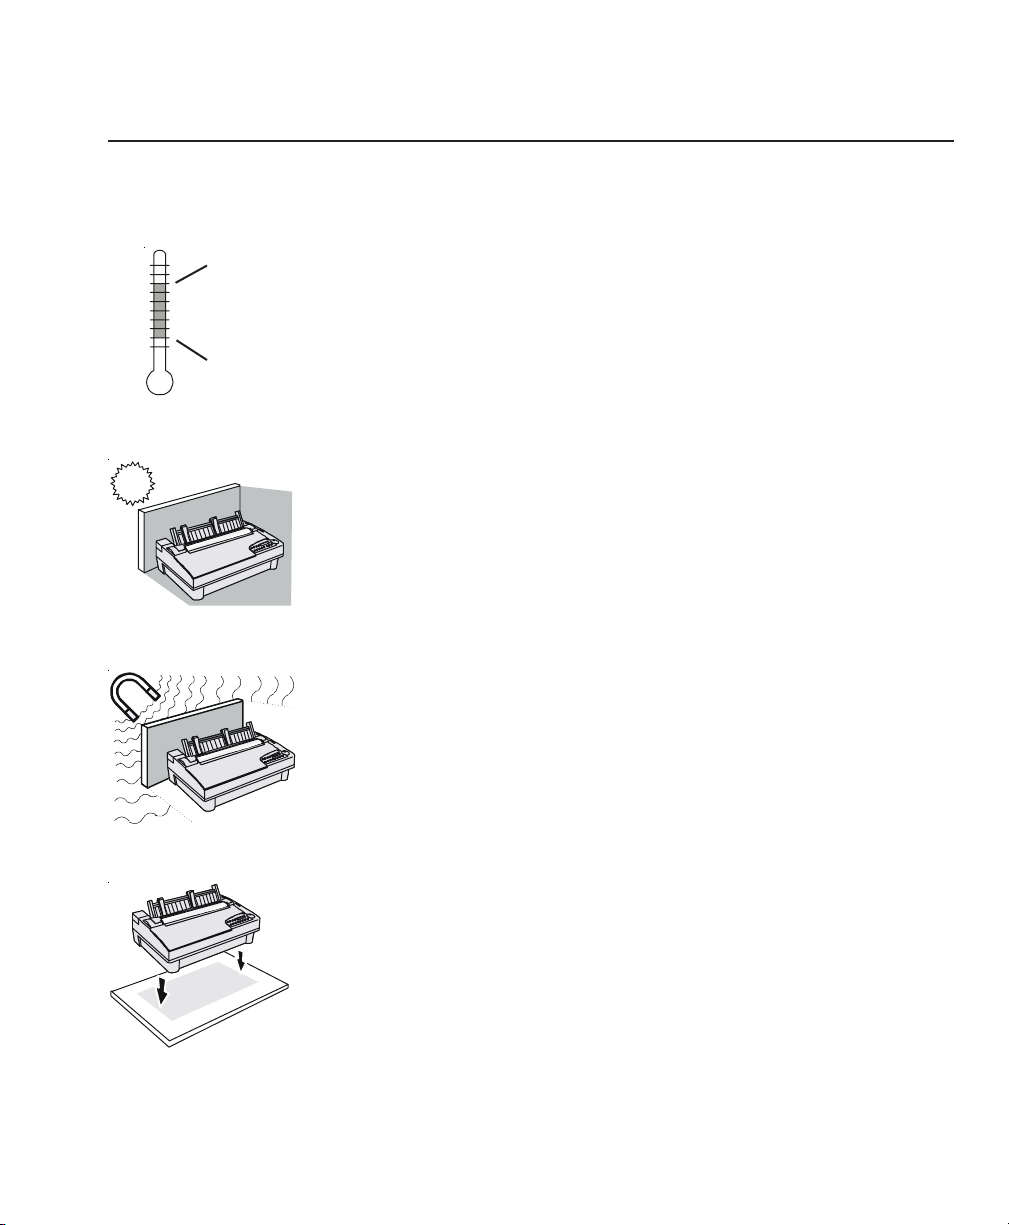
Use the printer only within the following temperature and humidity
ranges:
Ambient temperature: 7° to 46° Centigrade (45° to 115° F)
Relative humidity: 10% to 85% noncondensing
Avoid direct sunlight. Use a blind or heavy curtain to protect the
printer from direct sunlight when the printer is near a window.
Do not install the printer near devices that contain magnets or
generate magnetic fields.
Place the printer on a flat, horizontal surface. Protect the printer
from strong physical shocks and vibrations. Lift the printer from
underneath and on both sides.
115° F
46° C
45° F
7° C
When installing and using the printer, be sure to take the following
precautions:
115° F
46° C
45° F
7° C
Use the printer only within the following temperature and humidity
ranges:
Ambient temperature: 7° to 46° Centigrade (45° to 115° F)
Relative humidity: 10% to 85% noncondensing
Avoid direct sunlight. Use a blind or heavy curtain to protect the
printer from direct sunlight when the printer is near a window.
User's Guide
Do not install the printer near devices that contain magnets or
generate magnetic fields.
Place the printer on a flat, horizontal surface. Protect the printer
from strong physical shocks and vibrations. Lift the printer from
underneath and on both sides.
Preface xi
User's Guide
User's Guide
xii Preface
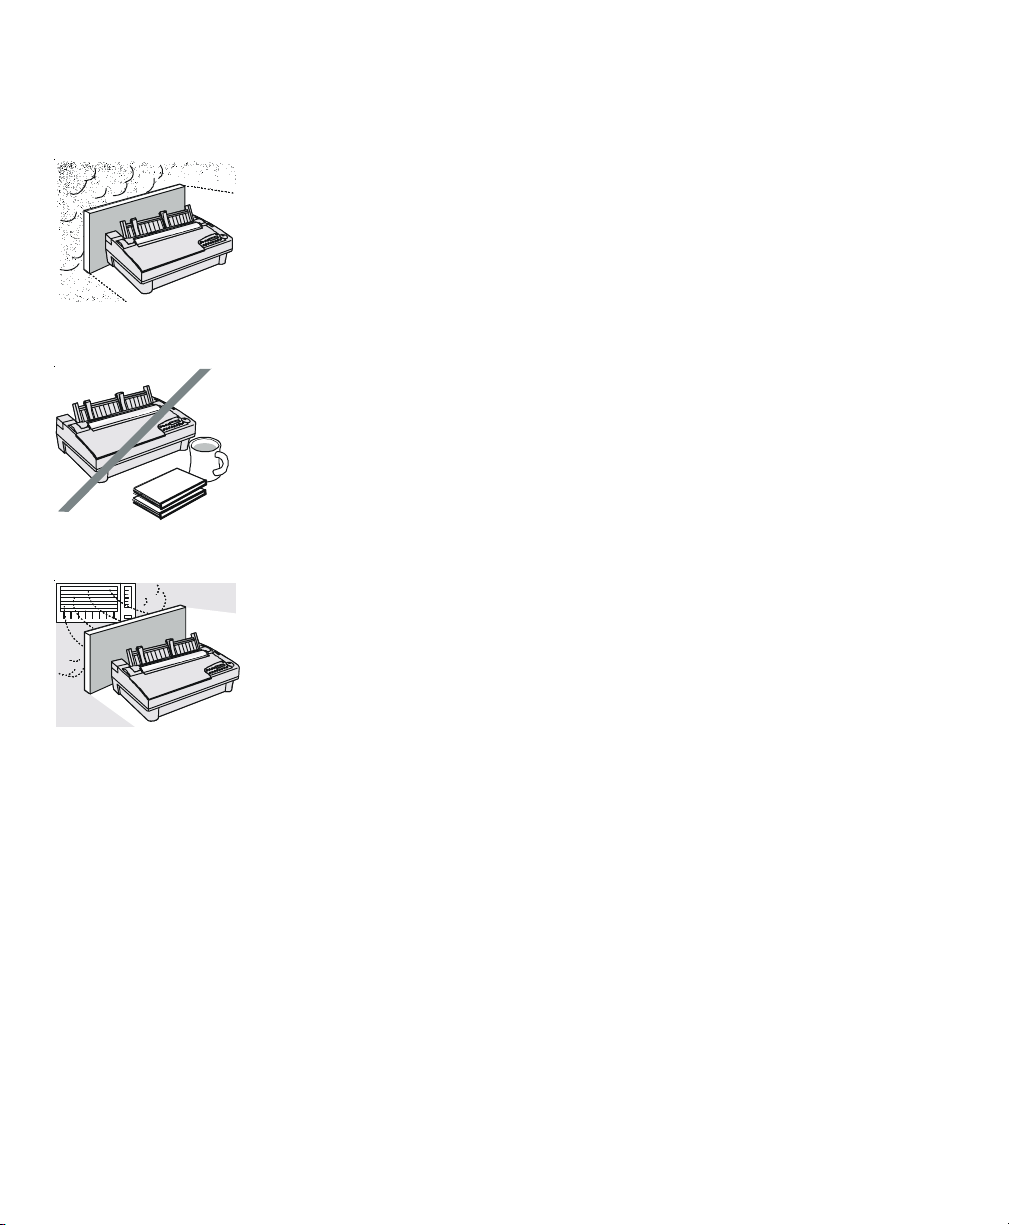
Operating precautions––continued
Keep the printer clean. Dust accumulation and paper fiber deposits
can cause the printer to function improperly.
Do not place cups, books or other objects on top of the printer. Be
careful not to hang jewelry, clothes or hair near the paper entry slots.
Do not install the printer near an air conditioner.
xii Preface

Contents
User's Guide
Contents xiii
Contents
Preface iii
Printer Models ............................................................................. iii
About This User's Guide ............................................................. iv
Conventions.................................................................................. v
Technical Support ........................................................................ v
Trademarks .................................................................................. v
Copyright ...................................................................................... vi
One-Year Limited Warranty ....................................................... vi
Factory Service ............................................................................ viii
Agency Compliances ................................................................... ix
Power Precautions....................................................................... x
Operating Precautions ................................................................. xi
Contents xiii
Figures and Tables xxi
Section 1—Unpacking 1-1
Selecting a Good Place for the Printer ........................................ 1-1
Unpacking the Printer .................................................................. 1-2
Removing Internal Packing ......................................................... 1-4
User's Guide
Preface iii
Printer Models ............................................................................. iii
About This User's Guide ............................................................. iv
Conventions.................................................................................. v
Technical Support ........................................................................ v
Trademarks .................................................................................. v
Copyright ...................................................................................... vi
One-Year Limited Warranty ....................................................... vi
Factory Service ............................................................................ viii
Agency Compliances ................................................................... ix
Power Precautions....................................................................... x
Operating Precautions ................................................................. xi
Contents xiii
Figures and Tables xxi
Section 1—Unpacking 1-1
Selecting a Good Place for the Printer ........................................ 1-1
Unpacking the Printer .................................................................. 1-2
Removing Internal Packing ......................................................... 1-4
Contents xiii

User's Guide
User's Guide
xiv Contents
Section 2—Set Up 2-1
Introducing Printer Components ................................................. 2-1
Installing the Paper Deflector ...................................................... 2-5
Installing the Ribbon Cartridge ................................................... 2-6
Checking the Voltage Select Switch ............................................ 2-7
Attaching the Power Cord ........................................................... 2-8
Turning the Printer On and Off ................................................... 2-9
Printing a Self Test ...................................................................... 2-10
Attaching the Interface Cable ..................................................... 2-11
Setting Communications Parameters ........................................... 2-12
Configuring Software ................................................................... 2-13
Selecting the Correct Printer .................................................. 2-13
Selecting the Correct Output Port........................................... 2-13
Section 3—Loading Paper 3-1
Choosing Paper ............................................................................ 3-1
Paper Paths .................................................................................. 3-2
Selecting a Paper Path ................................................................. 3-3
Loading Forms ............................................................................. 3-4
Positioning a Form.................................................................. 3-5
Ejecting a Form....................................................................... 3-5
Loading Pin-Feed Report Paper .................................................. 3-6
Positioning Pin-Feed Report Paper......................................... 3-8
Advancing Pin-Feed Report Paper ......................................... 3-8
Using the Demand Document Mode ...................................... 3-8
Using Paper Park .................................................................... 3-11
Unloading Pin-Feed Report Paper .......................................... 3-11
Loading Multipart Forms .............................................................. 3-12
Loading Labels ............................................................................. 3-12
Loading Transparencies ............................................................... 3-13
Aligning Preprinted Forms ........................................................... 3-14
Setting Page Length ..................................................................... 3-14
Reviewing the Paper Handling Controls ...................................... 3-16
Section 4—Control Panel 4-1
Understanding Display Messages ........................................... 4-2
Status ...................................................................................... 4-2
Alternate Status....................................................................... 4-2
Section 2—Set Up 2-1
Introducing Printer Components ................................................. 2-1
Installing the Paper Deflector ...................................................... 2-5
Installing the Ribbon Cartridge ................................................... 2-6
Checking the Voltage Select Switch ............................................ 2-7
Attaching the Power Cord ........................................................... 2-8
Turning the Printer On and Off ................................................... 2-9
Printing a Self Test ...................................................................... 2-10
Attaching the Interface Cable ..................................................... 2-11
Setting Communications Parameters ........................................... 2-12
Configuring Software ................................................................... 2-13
Selecting the Correct Printer .................................................. 2-13
Selecting the Correct Output Port........................................... 2-13
Section 3—Loading Paper 3-1
Choosing Paper ............................................................................ 3-1
Paper Paths .................................................................................. 3-2
Selecting a Paper Path ................................................................. 3-3
Loading Forms ............................................................................. 3-4
Positioning a Form.................................................................. 3-5
Ejecting a Form....................................................................... 3-5
Loading Pin-Feed Report Paper .................................................. 3-6
Positioning Pin-Feed Report Paper......................................... 3-8
Advancing Pin-Feed Report Paper ......................................... 3-8
Using the Demand Document Mode ...................................... 3-8
Using Paper Park .................................................................... 3-11
Unloading Pin-Feed Report Paper .......................................... 3-11
Loading Multipart Forms .............................................................. 3-12
Loading Labels ............................................................................. 3-12
Loading Transparencies ............................................................... 3-13
Aligning Preprinted Forms ........................................................... 3-14
Setting Page Length ..................................................................... 3-14
Reviewing the Paper Handling Controls ...................................... 3-16
xiv Contents
Section 4—Control Panel 4-1
Understanding Display Messages ........................................... 4-2
Status ...................................................................................... 4-2
Alternate Status....................................................................... 4-2

User's Guide
User's Guide
Contents xv
Operator and Error .................................................................. 4-2
Setup Menu ............................................................................. 4-2
Using the Select-Dial ................................................................... 4-3
Moving the Paper Up and Down ............................................ 4-3
Moving the Carriage Back and Forth ..................................... 4-3
Scrolling Through the Setup Menu ........................................ 4-3
Using the Control Panel Buttons ................................................. 4-4
Turning Printing On and Off .................................................. 4-4
Selecting a Printer Emulation ................................................. 4-5
Selecting a Text Quality ......................................................... 4-5
Selecting a Font ...................................................................... 4-5
Selecting a Pitch ..................................................................... 4-6
Selecting a Color .................................................................... 4-6
Form Feeding .......................................................................... 4-6
Line Feeding ........................................................................... 4-6
Setting the Top-Of-Form ........................................................ 4-7
Moving the Bail ...................................................................... 4-7
Parking the Paper .................................................................... 4-7
Clearing the Buffer ................................................................. 4-7
Resetting the Printer ............................................................... 4-8
Printing a Self Test ................................................................. 4-8
Printing a Printer Status Report .............................................. 4-9
Displaying the Setup Menu .................................................... 4-9
Using the Setup Menu ................................................................. 4-11
Selecting Operations .................................................................... 4-16
Restore Printer Settings .......................................................... 4-16
Save Printer Settings ............................................................... 4-16
Select Power-On Default Settings .......................................... 4-17
Run Printer Tests .................................................................... 4-17
Selecting Print Modes .................................................................. 4-18
Set Printer Emulation .............................................................. 4-18
Turn Quiet Mode On and Off ................................................. 4-18
Set Language .......................................................................... 4-19
Select Characters for Codes 128-255 ..................................... 4-20
Turn Automatic Carriage Return Mode On and Off .............. 4-22
Turn Automatic Line Feed Mode On and Off ........................ 4-22
Select Audible Alarm Mode.................................................... 4-22
Contents xv

User's Guide
User's Guide
xvi Contents
Using Text Appearance Parameters
Set Print Quality ...................................................................... 4-23
Set Font ................................................................................... 4-23
Set Pitch .................................................................................. 4-23
Set Character Cell Size ........................................................... 4-24
Set Number of Lines per Inch ................................................ 4-24
Set Color ................................................................................. 4-25
Turn Italic Mode On and Off .................................................. 4-25
Turn Double-High Mode On and Off ..................................... 4-25
Turn Double-Wide Mode On and Off .................................... 4-25
Turn Super/Subscript Modes On and Off ............................... 4-26
Turn Underline Mode On and Off .......................................... 4-26
Turn Bold/Shadow Modes On and Off................................... 4-26
Turn Zero Slashing On and Off .............................................. 4-26
Set Printing Direction ............................................................. 4-27
Using Page Setup Paramaters ..................................................... 4-28
Set Form Length ..................................................................... 4-28
Set Maximum Print Width....................................................... 4-28
Set Top Margin ....................................................................... 4-29
Set Bottom Margin .................................................................. 4-29
Set Left Margin....................................................................... 4-29
Set Right Margin ..................................................................... 4-30
Turn Automatic Form Feed Mode On and Off ...................... 4-30
Using Paper Handling Parameters .............................................. 4-31
Select Paper Path ................................................................... 4-31
Set Line Feed Speed ............................................................... 4-31
Turn Demand Document Mode On and Off .......................... 4-32
Turn Paper Jam Sensing On and Off ..................................... 4-33
Select Page End Method ........................................................ 4-33
Turn Preprinted Forms Alignment Mode On and Off ............ 4-34
Turn Automatic Bail Mode On and Off.................................. 4-34
Set Print Density ..................................................................... 4-35
Set Print Force ........................................................................ 4-35
Specifying Communications Parameters ..................................... 4-36
Select Interface....................................................................... 4-36
Specify Baud Rate .................................................................. 4-36
Specify Input Buffer Size ........................................................ 4-36
Specify Handshaking Method ................................................. 4-37
xvi Contents

User's Guide
User's Guide
Contents xvii
Specify Number of Data Bits ................................................. 4-37
Specify Number of Stop Bits .................................................. 4-37
Specify Parity.......................................................................... 4-38
Set DTR Signal Polarity .......................................................... 4-38
Specify STROBE Pulse Edge for Data Capture .................... 4-38
Reviewing the Setup Menu .......................................................... 4-39
Section 5—Cleaning and Maintenance 5-1
Removing and Installing the Top Cover...................................... 5-2
Cleaning the Platen and Bail Rollers ........................................... 5-3
Cleaning the Main Carriage Shaft ............................................... 5-4
Cleaning the Printhead Wires ...................................................... 5-5
Cleaning Printer Surfaces ............................................................ 5-6
Replacing the Ribbon Cartridge .................................................. 5-7
Replacing the Fuse....................................................................... 5-7
Inspecting Printer Parts................................................................ 5-8
Replacing the Printhead ............................................................... 5-10
Section 6—Solving Problems 6-1
Understanding Printer Messages ................................................. 6-1
Correcting Operating Errors ................................................... 6-2
Correcting Programming Errors ............................................. 6-4
Understanding Messages ........................................................ 6-5
Understanding Warnings ......................................................... 6-7
Correcting Communication Errors .......................................... 6-8
Correcting Printer Errors ........................................................ 6-10
Troubleshooting Problems ............................................................ 6-12
Running Printer Tests .................................................................. 6-21
Checking Memory ................................................................... 6-21
Checking Sensors and Switches ............................................. 6-22
Checking Ribbon Alignment .................................................... 6-24
Checking Printing Alignment .................................................. 6-25
Re-Calibrating the Paper Sensor ................................................. 6-26
Checking Carriage Movement ..................................................... 6-27
Checking the Platen ..................................................................... 6-28
Aligning the Ribbon ...................................................................... 6-29
Fine-Adjusting the Top-Of-Form ................................................. 6-30
Fine-Adjusting the Forms Tear-Off Position ............................... 6-30
Contents xvii

User's Guide
User's Guide
xviii Contents
Fine-Adjusting the Carriage Home Position ................................ 6-31
Fine-Adjusting the Paper Sensor ................................................. 6-31
Changing User Names................................................................. 6-32
Locking Control Panel Functions ................................................. 6-33
Disabling the Cover Open Interlock ............................................ 6-34
Appendix A—Bottom-Feed Tractors A-1
Selecting a Printer Stand .............................................................. A-2
Activating the Bottom-Feed Tractors .......................................... A-2
Accessing the Bottom-Feed Tractors .......................................... A-3
Loading Paper in the Bottom-Feed Tractors ............................... A-4
Using the Bottom-Feed Tractors ................................................. A-5
Alternating Between Paper Paths ............................................... A-5
Troubleshooting ............................................................................ A-6
Appendix B—Bar Codes B-1
Introducing Bar Codes ................................................................. B-1
Selecting the Bar Code Emulation ............................................... B-3
Printing Bar Codes....................................................................... B-3
Bar Code Specifications .............................................................. B-4
Appendix C—Interfaces C-1
Centronics Parallel Interface ....................................................... C-1
Voltages .................................................................................. C-1
Signals and Timing .................................................................. C-2
Cable/Connector Requirements .............................................. C-4
Setting Parallel Parameters..................................................... C-5
Pin Assignments...................................................................... C-5
RS-232-C Serial Interface ........................................................... C-8
Voltages .................................................................................. C-8
Signals and Data Format ......................................................... C-8
Cable/Connector Requirements .............................................. C-10
Setting Serial Parameters ........................................................ C-11
Handshaking Methods ............................................................. C-11
Pin Assignments...................................................................... C-12
Fine-Adjusting the Carriage Home Position ................................ 6-31
Fine-Adjusting the Paper Sensor ................................................. 6-31
Changing User Names................................................................. 6-32
Locking Control Panel Functions ................................................. 6-33
Disabling the Cover Open Interlock ............................................ 6-34
Appendix A—Bottom-Feed Tractors A-1
Selecting a Printer Stand .............................................................. A-2
Activating the Bottom-Feed Tractors .......................................... A-2
Accessing the Bottom-Feed Tractors .......................................... A-3
Loading Paper in the Bottom-Feed Tractors ............................... A-4
Using the Bottom-Feed Tractors ................................................. A-5
Alternating Between Paper Paths ............................................... A-5
Troubleshooting ............................................................................ A-6
Appendix B—Bar Codes B-1
Introducing Bar Codes ................................................................. B-1
Selecting the Bar Code Emulation ............................................... B-3
Printing Bar Codes....................................................................... B-3
Bar Code Specifications .............................................................. B-4
xviii Contents
Appendix C—Interfaces C-1
Centronics Parallel Interface ....................................................... C-1
Voltages .................................................................................. C-1
Signals and Timing .................................................................. C-2
Cable/Connector Requirements .............................................. C-4
Setting Parallel Parameters..................................................... C-5
Pin Assignments...................................................................... C-5
RS-232-C Serial Interface ........................................................... C-8
Voltages .................................................................................. C-8
Signals and Data Format ......................................................... C-8
Cable/Connector Requirements .............................................. C-10
Setting Serial Parameters ........................................................ C-11
Handshaking Methods ............................................................. C-11
Pin Assignments...................................................................... C-12

User's Guide
User's Guide
Contents xix
Appendix D—Code Sets D-1
AMT and Diablo 630 Code Set ................................................... D-2
Character Codes ...................................................................... D-2
Printing Characters Assigned to Control Codes ................ D-2
Printing International Characters ....................................... D-4
Control Codes and Escape Sequences .................................... D-4
Epson JX, Epson LQ-2550 and IBM XL24 Code Set ................. D-21
Character Codes ...................................................................... D-21
Printing Characters Assigned to Control Codes ................ D-21
Printing International Characters ....................................... D-23
ECS Fonts .......................................................................... D-23
Control Codes and Escape Sequences .................................... D-23
Bar Code Escape Sequences ........................................................ D-49
ASCII Code Table ....................................................................... D-50
Appendix E—Specifications E-1
Warranty Registration
Request for Reader's Comments
Contents xix

User's Guide
User's Guide
xx Contents
xx Contents

Figures and Tables
User's Guide
Contents xxi
Figures and Tables
Figures
1-1 Unpacking the Printer ............................................................. 1-3
1-2 Removing the Foam Blocks .................................................... 1-4
2-1 Printer Components, Front ..................................................... 2-2
2-2 Printer Components, Internal .................................................. 2-3
2-3 Printer Components, Rear....................................................... 2-4
2-4 Installing the Paper Deflector ................................................. 2-5
2-5 Hooking the Paper Deflector .................................................. 2-5
2-6 Installing a Ribbon Cartridge ................................................... 2-6
2-7 Setting the Voltage Select Switch ........................................... 2-7
2-8 Locating the Fuse Compartment ............................................. 2-7
2-9 Attaching the Power Cord ...................................................... 2-8
2-10 Turning On the Printer ............................................................ 2-9
2-11 Loading a Cut Sheet................................................................ 2-10
2-12 Printing a Self Test ................................................................. 2-10
2-13 Connecting the Parallel Cable ................................................. 2-11
2-14 Connecting the Serial Cable .................................................... 2-11
Figures
1-1 Unpacking the Printer ............................................................. 1-3
1-2 Removing the Foam Blocks .................................................... 1-4
User's Guide
2-1 Printer Components, Front ..................................................... 2-2
2-2 Printer Components, Internal .................................................. 2-3
2-3 Printer Components, Rear....................................................... 2-4
2-4 Installing the Paper Deflector ................................................. 2-5
2-5 Hooking the Paper Deflector .................................................. 2-5
2-6 Installing a Ribbon Cartridge ................................................... 2-6
2-7 Setting the Voltage Select Switch ........................................... 2-7
2-8 Locating the Fuse Compartment ............................................. 2-7
2-9 Attaching the Power Cord ...................................................... 2-8
2-10 Turning On the Printer ............................................................ 2-9
2-11 Loading a Cut Sheet................................................................ 2-10
2-12 Printing a Self Test ................................................................. 2-10
2-13 Connecting the Parallel Cable ................................................. 2-11
2-14 Connecting the Serial Cable .................................................... 2-11
Contents xxi

User's Guide
User's Guide
xxii Contents
3-1 Selecting a Paper Path ............................................................ 3-3
3-2 Attaching the Support Extender ............................................. 3-4
3-3 Loading a Form....................................................................... 3-4
3-4 Raising the Tractor Cover....................................................... 3-6
3-5 Unlocking the Tractors ........................................................... 3-6
3-6 Aligning the Left-Edge Tractor .............................................. 3-6
3-7 Loading Paper Into the Tractors ............................................. 3-7
3-8 Making Sure the Paper is Taut ............................................... 3-7
3-9 Checking the Exit Path ........................................................... 3-7
4-1 Control Panel .......................................................................... 4-1
4-2 Sample Printer Status Report ................................................. 4-10
4-3 Setup Menu ............................................................................. 4-12
5-1 Removing the Top Cover........................................................ 5-2
5-2 Aligning the Platen Window and Top Cover ......................... 5-2
5-3 Cleaning the Platen and Bail Rollers ...................................... 5-3
5-4 Cleaning the Main Carriage Shaft .......................................... 5-4
5-5 Cleaning the Printhead Wires ................................................. 5-5
5-6 Cleaning the Printer Surfaces ................................................. 5-6
5-7 Cleaning the Forms Tractors .................................................. 5-6
5-8 Inspecting the Printer, Front ................................................... 5-8
5-9 Inspecting the Printer, Rear .................................................... 5-9
5-10 Replacing the Printhead .......................................................... 5-10
A-1 Printer With Bottom-Feed Tractors ........................................ A-1
A-2 Raising and Lowering the Printer ........................................... A-3
A-3 Loading Paper in the Bottom Path .......................................... A-4
A-4 Aligning Paper in the Bottom Path ......................................... A-4
C-1 Parallel Data Transfer Timing Diagram ................................. C-3
C-2 Parallel Cable Assembly ......................................................... C-4
C-3 Serial Data Format .................................................................. C-10
C-4 Serial Cable Assembly............................................................ C-11
3-1 Selecting a Paper Path ............................................................ 3-3
3-2 Attaching the Support Extender ............................................. 3-4
3-3 Loading a Form....................................................................... 3-4
3-4 Raising the Tractor Cover....................................................... 3-6
3-5 Unlocking the Tractors ........................................................... 3-6
3-6 Aligning the Left-Edge Tractor .............................................. 3-6
3-7 Loading Paper Into the Tractors ............................................. 3-7
3-8 Making Sure the Paper is Taut ............................................... 3-7
3-9 Checking the Exit Path ........................................................... 3-7
4-1 Control Panel .......................................................................... 4-1
4-2 Sample Printer Status Report ................................................. 4-10
4-3 Setup Menu ............................................................................. 4-12
5-1 Removing the Top Cover........................................................ 5-2
5-2 Aligning the Platen Window and Top Cover ......................... 5-2
5-3 Cleaning the Platen and Bail Rollers ...................................... 5-3
5-4 Cleaning the Main Carriage Shaft .......................................... 5-4
5-5 Cleaning the Printhead Wires ................................................. 5-5
5-6 Cleaning the Printer Surfaces ................................................. 5-6
5-7 Cleaning the Forms Tractors .................................................. 5-6
5-8 Inspecting the Printer, Front ................................................... 5-8
5-9 Inspecting the Printer, Rear .................................................... 5-9
5-10 Replacing the Printhead .......................................................... 5-10
xxii Contents
A-1 Printer With Bottom-Feed Tractors ........................................ A-1
A-2 Raising and Lowering the Printer ........................................... A-3
A-3 Loading Paper in the Bottom Path .......................................... A-4
A-4 Aligning Paper in the Bottom Path ......................................... A-4
C-1 Parallel Data Transfer Timing Diagram ................................. C-3
C-2 Parallel Cable Assembly ......................................................... C-4
C-3 Serial Data Format .................................................................. C-10
C-4 Serial Cable Assembly............................................................ C-11

User's Guide
User's Guide
Contents xxiii
Tables
4-1 Setup Menu Summary............................................................. 4-39
6-1 Troubleshooting Guide ........................................................... 6-12
A-1 Troubleshooting the Bottom-Feed Tractors ........................... A-6
B-1 Bar Code Specifications ......................................................... B-4
C-1 Parallel Pin Assignments ........................................................ C-5
C-2 Serial Pin Assignments ........................................................... C-12
D-1 AMT and Diablo 630 Character Code Assignments .............. D-3
D-2 AMT and Diablo 630 Control Codes ..................................... D-5
D-3 AMT and Diablo 630 Escape Sequences ............................... D-7
D-4 Epson and IBM Character Code Assignments ....................... D-22
D-5 Epson and IBM Control Codes ............................................... D-24
D-6 Epson and IBM Escape Sequences ......................................... D-26
D-7 Bar Code Escape Sequences ................................................... D-49
D-8 ASCII Table ............................................................................ D-50
E-1 Specifications .......................................................................... E-1
Contents xxiii


Unpacking
User's Guide
Unpacking 1-1
Unpacking
This section describes how to select a good place for the printer and
unpack it. If the printer is already set up, you can skip ahead to the
next section.
Selecting a Good Place for the Printer
When selecting a place for your printer, observe the following guide-
lines:
99
99
9 The site must be large enough to accommodate the printer: 24
inches (61 cm) wide by 19 inches (49 cm) deep.
99
99
9 The printer must be close enough to the computer for your cable to
reach: 10 feet (3 meters) for parallel or 50 feet (15 meters) for serial.
99
99
9 The printer must be on a flat, solid surface––never on a chair or any
other unstable support.
99
99
9 Choose a place that is clean and free from excessive heat (including
direct sunlight), moisture, and dust.
99
99
9 Use a grounded outlet––one that has three holes to match the power
plug on the printer. Don't use an adapter plug or an extension cord.
Section
1
User's Guide
Section
1
This section describes how to select a good place for the printer and
unpack it. If the printer is already set up, you can skip ahead to the
next section.
Selecting a Good Place for the Printer
When selecting a place for your printer, observe the following guidelines:
99
9 The site must be large enough to accommodate the printer: 24
99
inches (61 cm) wide by 19 inches (49 cm) deep.
99
9 The printer must be close enough to the computer for your cable to
99
reach: 10 feet (3 meters) for parallel or 50 feet (15 meters) for serial.
99
9 The printer must be on a flat, solid surface––never on a chair or any
99
other unstable support.
99
9 Choose a place that is clean and free from excessive heat (including
99
direct sunlight), moisture, and dust.
99
9 Use a grounded outlet––one that has three holes to match the power
99
plug on the printer. Don't use an adapter plug or an extension cord.
Unpacking 1-1

User's Guide
User's Guide
1-2 Unpacking
Selecting a Good Place for the Printer––continued
99
99
9 Avoid outlets on the same circuit with large motors, such as copiers
or postage machines, or other appliances that might disturb the
power supply.
99
99
9 Leave several inches of empty space in front, behind, and on both
sides of the printer for good air flow.
99
99
9 Leave proper clearances for your paper loading needs.
Unpacking the Printer
To unpack the printer, use the following procedure:
1. Cut the packing tape and open the shipping carton.
2. Remove the printer components from the top foam cap.
3. Lift out the top foam cap.
4. Remove the other items in the shipping carton.
5. Carefully lift the printer out of the carton and place it on the site
you selected.
6. Remove the protective plastic covering from the printer.
7. Peel off the tape that secures the wire locking loops on the parallel
interface connector. The parallel interface connector is located on
the back of the printer.
8. Verify that you have all of the items shown in figure 1-1. If any-
thing is missing or damaged, contact the Dealer that sold you the
printer.
9. Fill in the Warranty Registration Card at the back of this guide and
mail it to AMT. Returning this card ensures that you will be
notified of the latest printer news and enhancements.
10. Be sure to save all of the packing materials in case you need to ship
or store the printer later.
Selecting a Good Place for the Printer––continued
99
9 Avoid outlets on the same circuit with large motors, such as copiers
99
or postage machines, or other appliances that might disturb the
power supply.
99
9 Leave several inches of empty space in front, behind, and on both
99
sides of the printer for good air flow.
99
9 Leave proper clearances for your paper loading needs.
99
Unpacking the Printer
To unpack the printer, use the following procedure:
1. Cut the packing tape and open the shipping carton.
2. Remove the printer components from the top foam cap.
3. Lift out the top foam cap.
1-2 Unpacking
4. Remove the other items in the shipping carton.
5. Carefully lift the printer out of the carton and place it on the site
you selected.
6. Remove the protective plastic covering from the printer.
7. Peel off the tape that secures the wire locking loops on the parallel
interface connector. The parallel interface connector is located on
the back of the printer.
8. Verify that you have all of the items shown in figure 1-1. If anything is missing or damaged, contact the Dealer that sold you the
printer.
9. Fill in the Warranty Registration Card at the back of this guide and
mail it to AMT. Returning this card ensures that you will be
notified of the latest printer news and enhancements.
10. Be sure to save all of the packing materials in case you need to ship
or store the printer later.
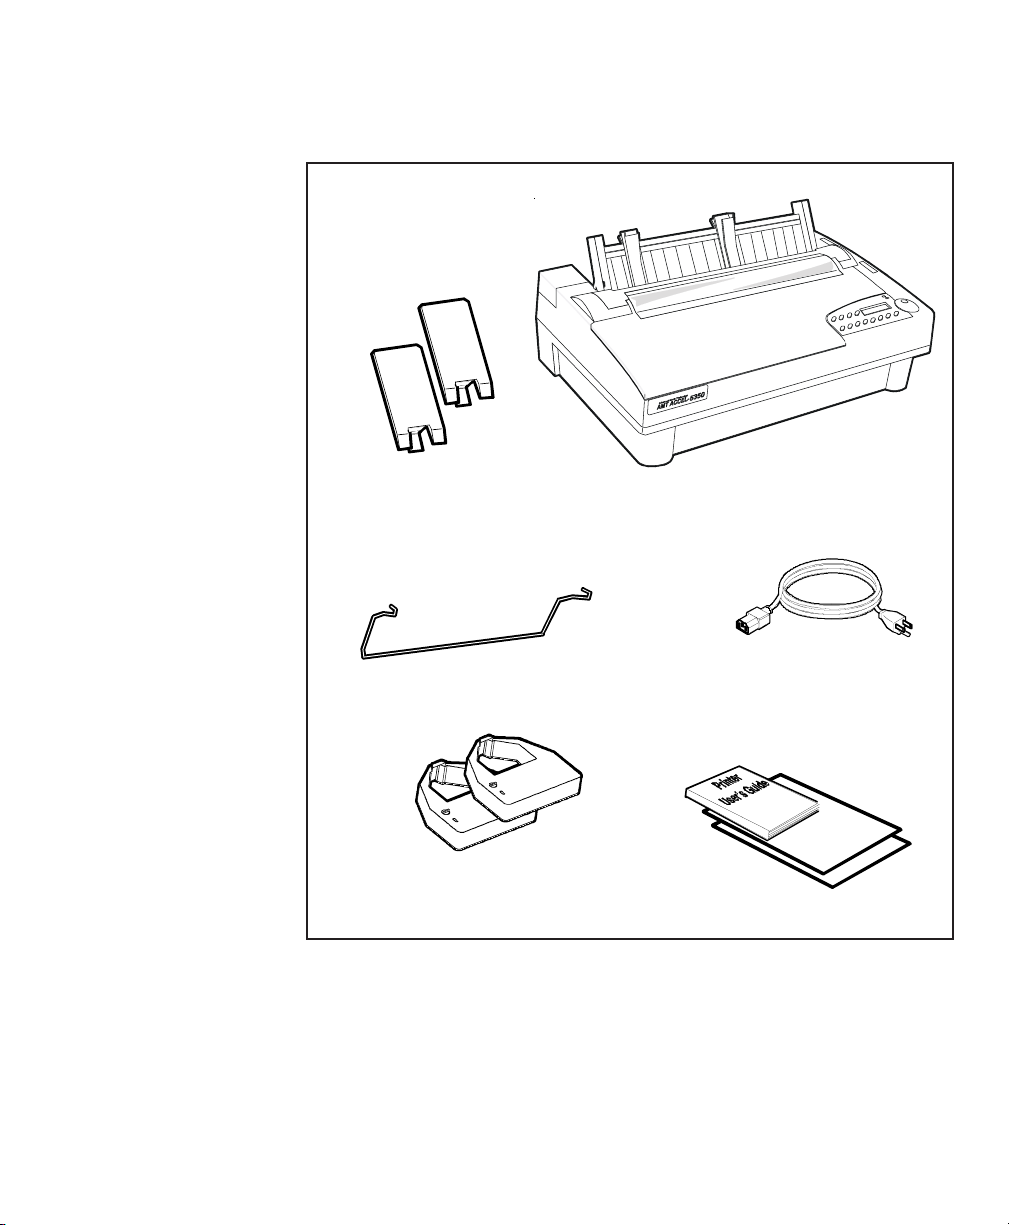
Unpacking the Printer––continued
User's Guide
Unpacking 1-3
Unpacking the Printer––continued
Figure 1-1. Unpacking the Printer
PAPER
DEFLECTOR
RIBBONS
POWER
CORD
PRINTER
USER'S GUIDE
PAPER
SUPPORTS
PAPER
SUPPORTS
PAPER
DEFLECTOR
PRINTER
User's Guide
RIBBONS
Figure 1-1. Unpacking the Printer
POWER
CORD
USER'S GUIDE
Unpacking 1-3
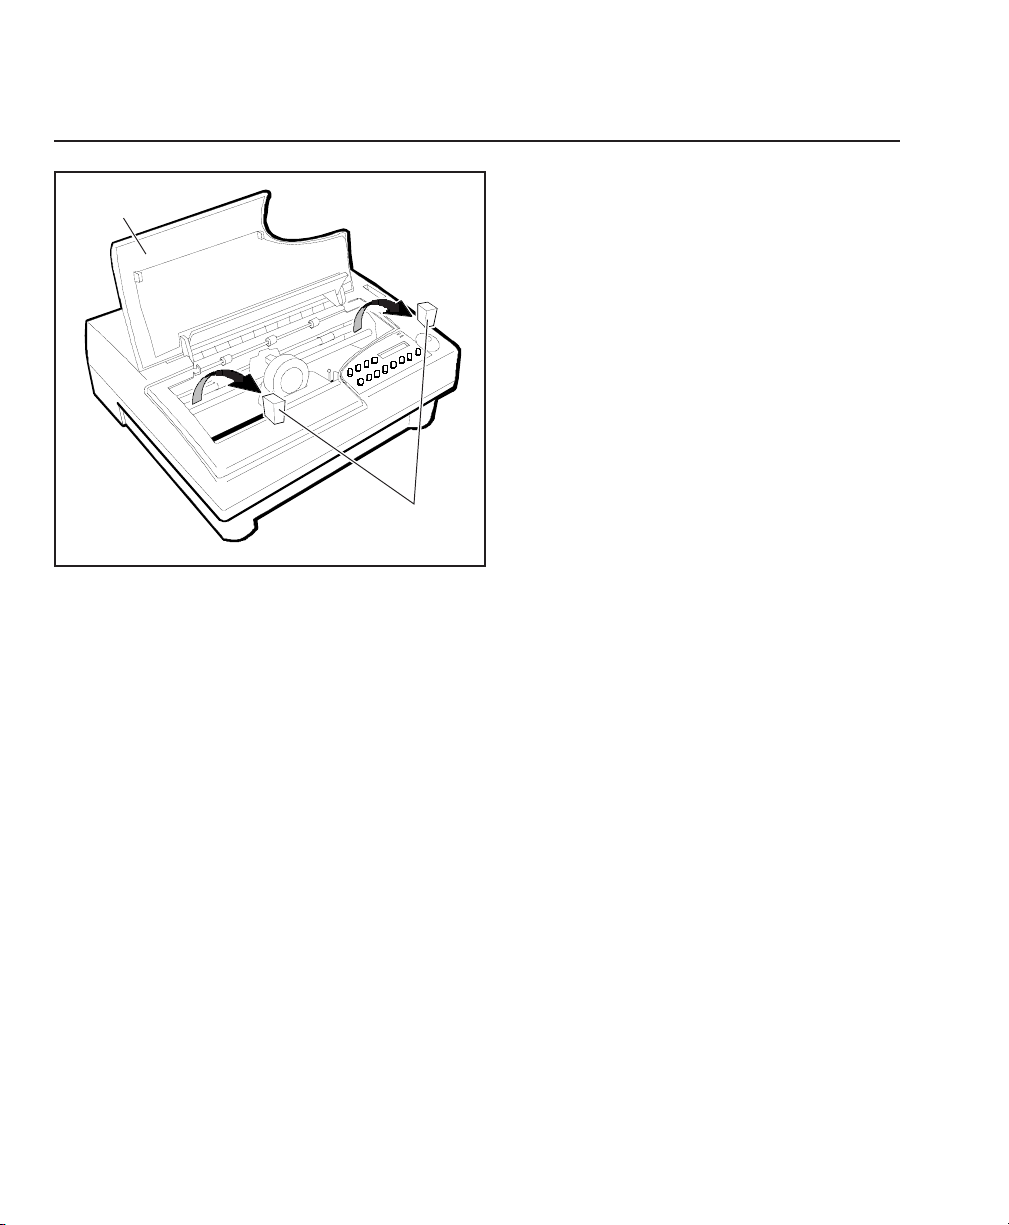
User's Guide
User's Guide
1-4 Unpacking
Removing Internal Packing
To remove the internal packing, use the
following procedure:
1. Raise the top cover and locate the two
foam blocks (one on each side of the
main carriage shaft).
2. Carefully remove the foam blocks from
the printer, as shown in figure 1-2.
3. Lower the top cover.
Be sure to save the internal packing materi-
als with the rest of the packaging in case
you need to ship or store the printer later.
Figure 1-2. Removing the Foam Blocks
TOP COVER
FOAM BLOCKS
Removing Internal Packing
TOP COVER
FOAM BLOCKS
Figure 1-2. Removing the Foam Blocks
To remove the internal packing, use the
following procedure:
1. Raise the top cover and locate the two
foam blocks (one on each side of the
main carriage shaft).
2. Carefully remove the foam blocks from
the printer, as shown in figure 1-2.
3. Lower the top cover.
Be sure to save the internal packing materials with the rest of the packaging in case
you need to ship or store the printer later.
1-4 Unpacking
 Loading...