

AMT Datasouth Accel 7450 User Manual
Document #130090
Accel-7450
24-Pin Dot Matrix Printer
User’s Guide
© April 2012, AMT Datasouth Corp.

Copyright Declaration
FCC
Class B
Information in this manual is subject to change without notice and does not represent a
commitment on the part of AMT Datasouth Corporation. No part of this manual may be
reproduced or transmitted in any form by any means, for any purpose other than the
purchaser’s personal use, without the expressed written permission of AMT Datasouth
Corporation.
Trademark Credits:
EPSON is a registered trademark of Seiko Epson Corporation.
ESC/P-K2 is a registered trademark of Seiko Epson Corporation.
IBM is a registered trademark of International Business Machines Corporation.
IBM 2391 is a registered trademark of International Business Machines Corp.
OKI is a registered trademark of Oki Data Corporation.
OKI 5530SC is a registered trademark of Oki Data Corporation.
Windows is a registered trademark of Microsoft Corporation.
Regulatory Statement:
This device complies with Part 15 of the FCC Rules.
Operation is subject to the following two conditions:
(1) This device may not cause harmful interference, and (2)
this device must accept any interference received, including
interference that may cause undesired operation.
The manufacturer is not responsible for any radio or TV
interference caused by unauthorized modifications to this
equipment. Such modifications could void the user’s
authority to operate the equipment.
- ii -

ACCEL- 7450
Table of Contents
User Caution................................................................................................................... 4
Installation ...................................................................................................................... 5
Unpacking the printer .................................................................................................................................... 5
Installing the ribbon cassette ......................................................................................................................... 6
Connecting the printer to the power source .................................................................................................. 8
Connecting the printer to the PC ................................................................................................................... 9
Installing the Front Paper Rack ................................................................................................................... 10
Setting up for Cut Sheet Manual mode ....................................................................................................... 12
Special Note for Loading Narrow Cut Sheet Paper ..................................................................................... 14
Special Note for Loading Dark Colored Forms ............................................................................................ 14
Installing the Rear Tractor ........................................................................................................................... 15
Paper Cutter ................................................................................................................................................ 18
Control Panel................................................................................................................ 19
Control Panel Layout ................................................................................................................................... 19
Control Panel Key Functions ....................................................................................................................... 19
LCD .............................................................................................................................................................. 24
Lamps (LED Indicators) ............................................................................................................................... 25
Paper Path Lever ......................................................................................................................................... 26
Head adjustment lever ................................................................................................................................. 27
Special Key Functions ................................................................................................................................. 27
Control Panel Menu ..................................................................................................... 28
Menu key ..................................................................................................................................................... 28
Menu selection keys .................................................................................................................................... 29
Item selection keys ...................................................................................................................................... 29
ENTER key .................................................................................................................................................. 29
MENU key .................................................................................................................................................... 29
Menu Setting Example ................................................................................................................................ 30
Static Ethernet IP Address Setting .............................................................................................................. 31
Using “PWR UP AS” Setup Profiles ............................................................................................................ 32
Factory Defaults........................................................................................................................................... 33
Print Driver Installation ............................................................................................... 34
Problem Solving ........................................................................................................... 37
Error messages ............................................................................................................ 41
Printer Specifications .................................................................................................. 44
- 3 -
ACCEL- 7450
Do not put your finger on the tractor
gear, when using the rear tractor.
Do not touch the print head immediately
after printing because it is too hot.
Do not put your finger under the tractor
cover while loading fanfold paper.
Place the printer on a rigid,
horizontal base in a location that is
free of vibration.
Before connecting or disconnecting
the interface cable, be sure to turn
off the printer.
Do not connect the printer to a non-
standard power source.
Unpack the printer. Make sure that the
printer body and all accessories are
included in the package and no parts are
damaged.
Do not use the printer in a location
exposed to direct sunlight or close to a
heater or other heat generating
equipment.
Do not use the printer in a dusty location
or any location subject to sudden
changes in temperature and humidity.
Rear Operating Clearance
Fanfold Paper: 2” plus Paper Length
Manual Cut Sheets: Paper Length
Minus 9”
If the case or cover becomes dirty,
clean it with a soft cloth moistened
with a small quantity of neutral
detergent diluted with water. Never
use a hard cloth or volatile solvent
such as alcohol, thinner, or benzene.
Take care not to twist the ribbon while
installing the ribbon cassette.
Never try to print without a ribbon
cassette installed and paper loaded.
Push the lock levers of both tractors to
the LOCK positions firmly when loading
fanfold paper.
Do not turn off the printer during
printing, as this may lead to a
malfunction.
Operational safety
CAUTION
Cautions in setting up
CAUTION
- 4 -
User Caution
- 4 -
ACCEL- 7450
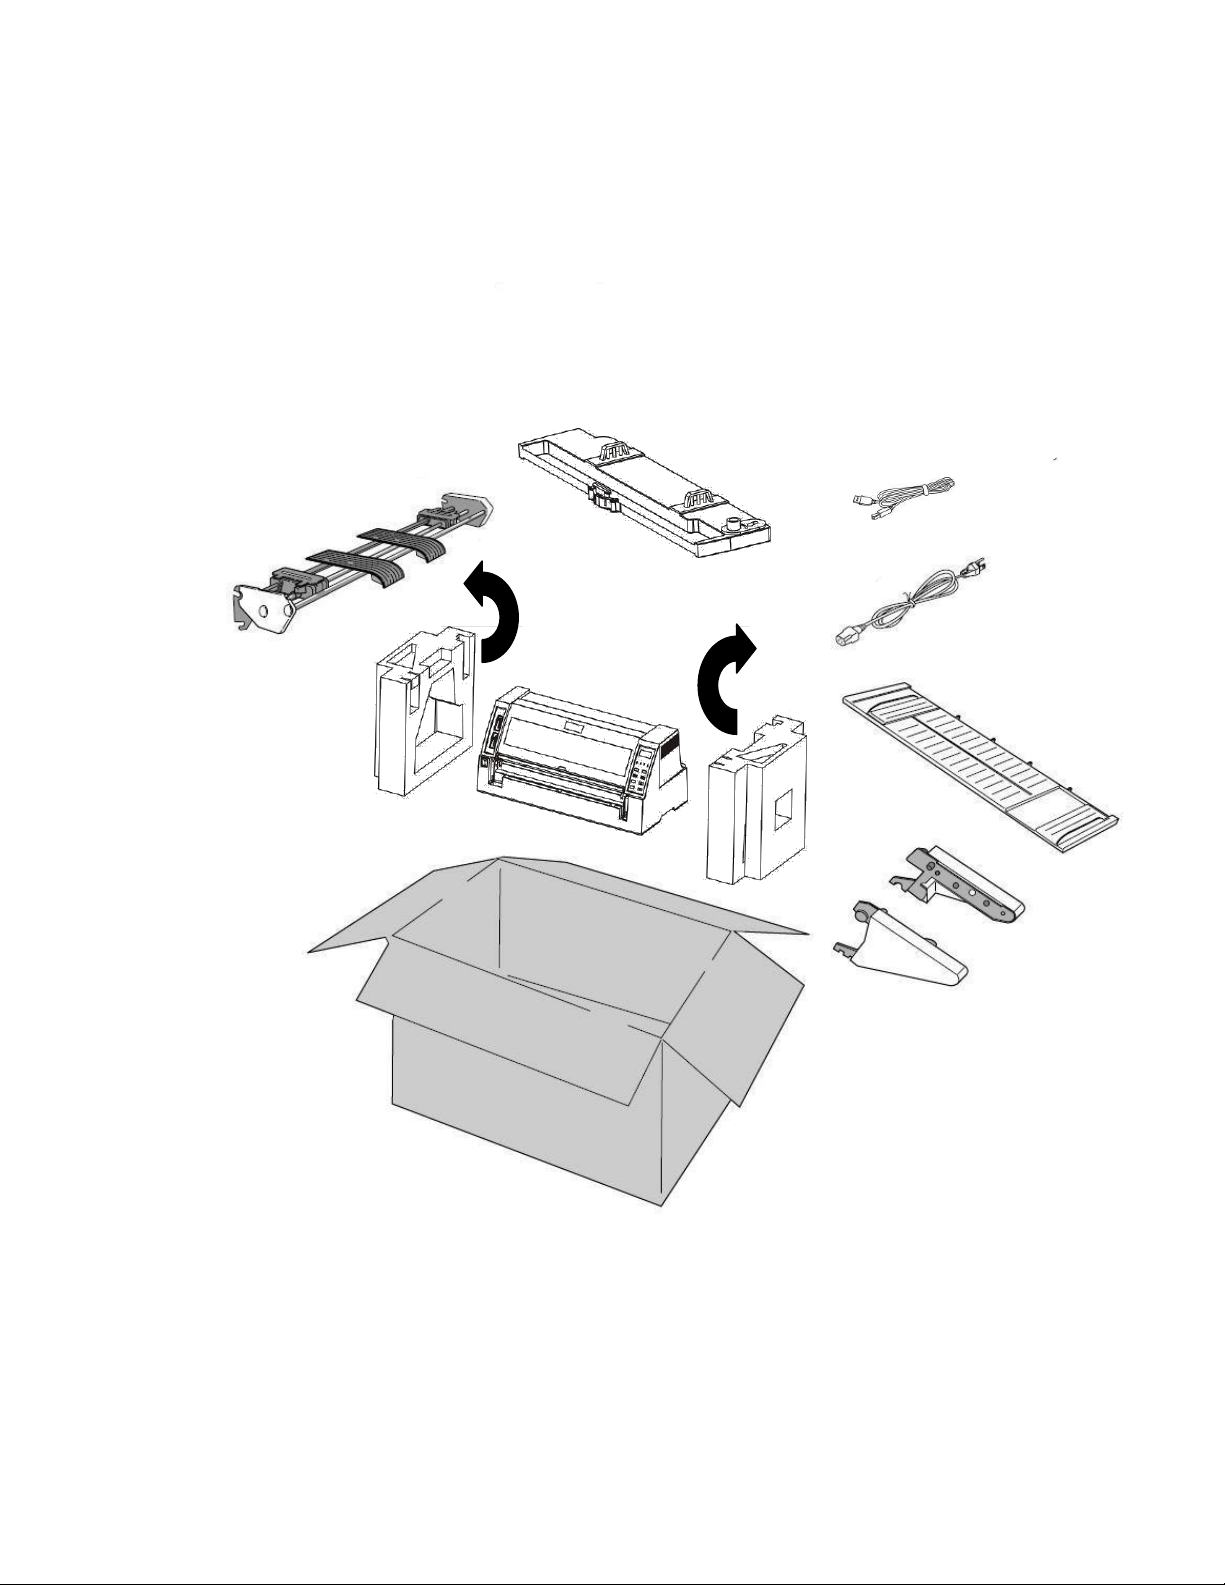
Ribbon cassette
USB cable
Printer
Power cable
Tractor
Paper rack holder
Paper rack
Installation
Unpacking the printer
The packing style is subject to change without notice.
- 5 -

ACCEL- 7450
CAUTION
Do not touch the print head immediately after
printing because it may be too hot.
Installing the ribbon cassette
1. Make sure the power switch is OFF. Open the front cover. Move the print
head to the left end position.
2. For a new printer, remove and discard the clear protective sheet from
under the print head.
- 6 -
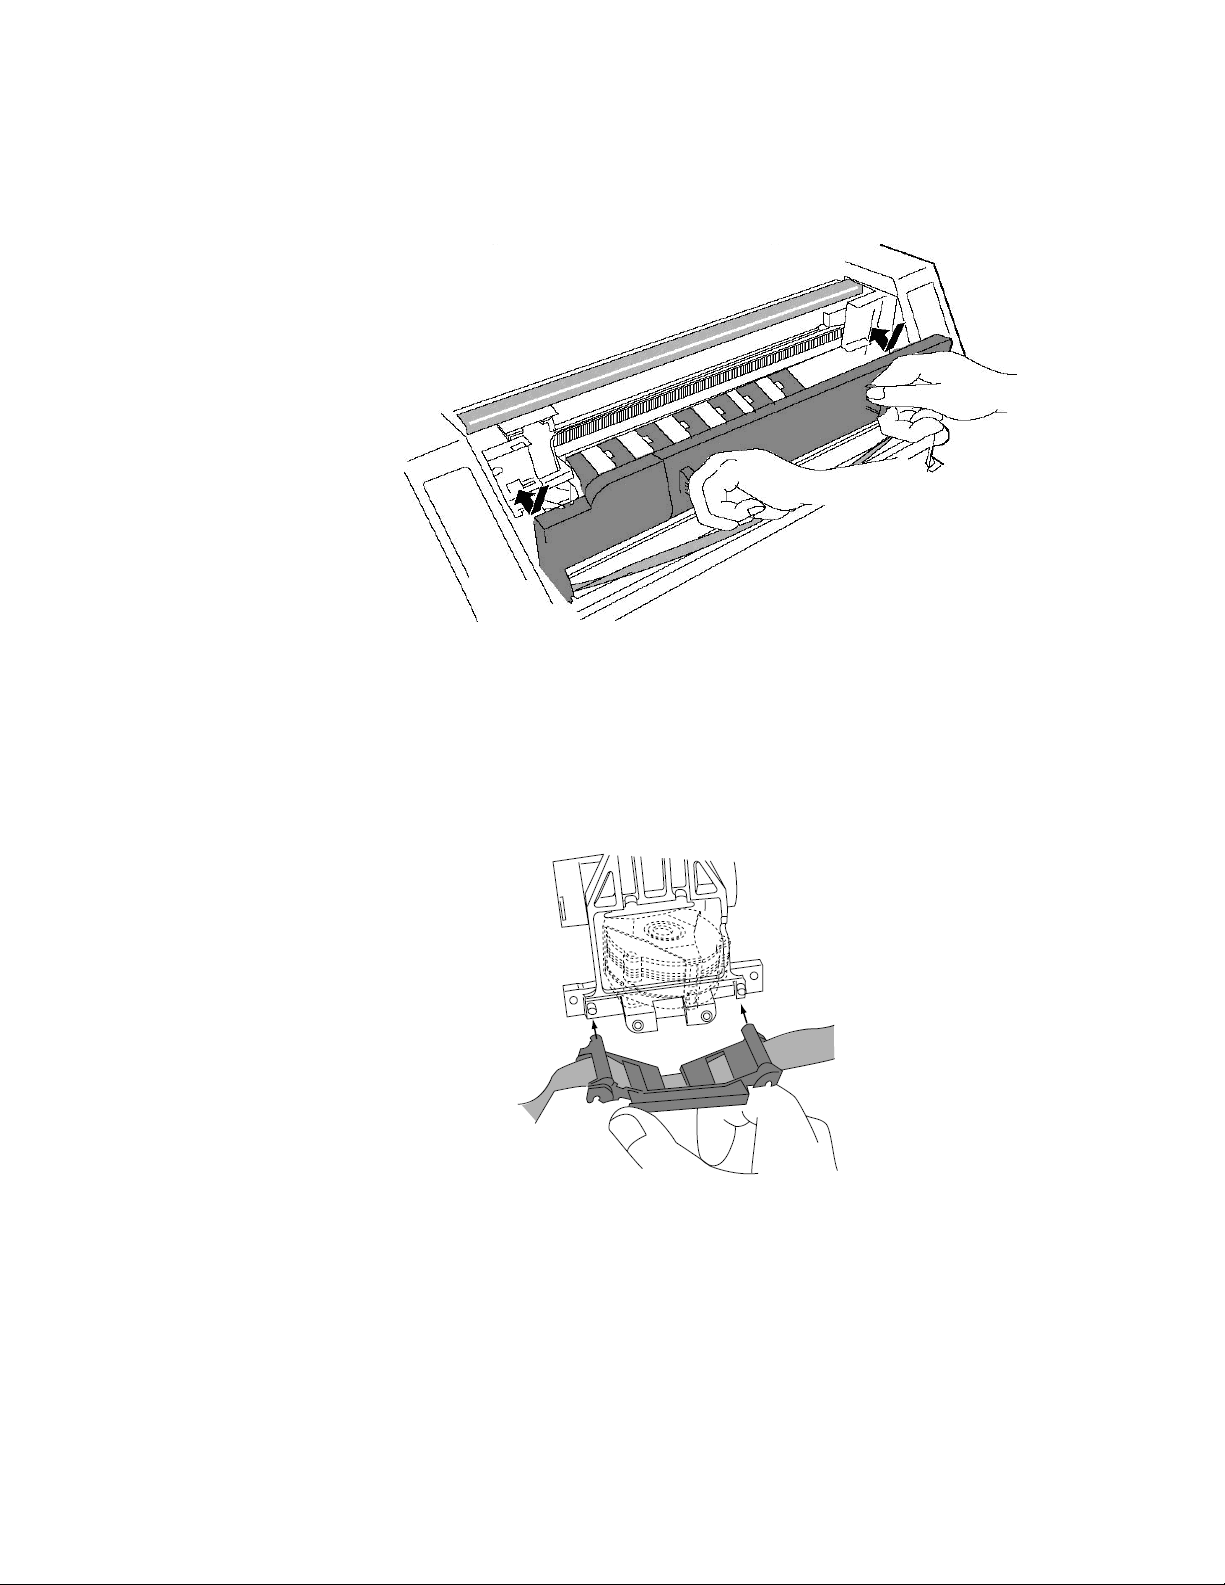
3. Remove the Red shipping lock located at the center of the ribbon
cassette. Attach the cassette, as shown below.
ACCEL- 7450
4. Fit the holes in the ribbon attachment to the right and left projections
on the print head.
• Make sure that the ribbon is located properly under the edge of the
print head.
- 7 -

ACCEL- 7450
Ribbon Feed Knob
• Turn the ribbon feed knob counterclockwise to remove any slack in
the ribbon.
Connecting the printer to the power source
• Make sure that the power switch is set to off. Connect the printer with the
supplied power cord to an AC outlet.
Connect the AC power plug to an AC outlet of the voltage designated on the
rating label located on the back of the printer.
- 8 -
ACCEL- 7450
The factory default interface is set to
AUTO and will automatically receive
transmitted data on any of the above
ports.
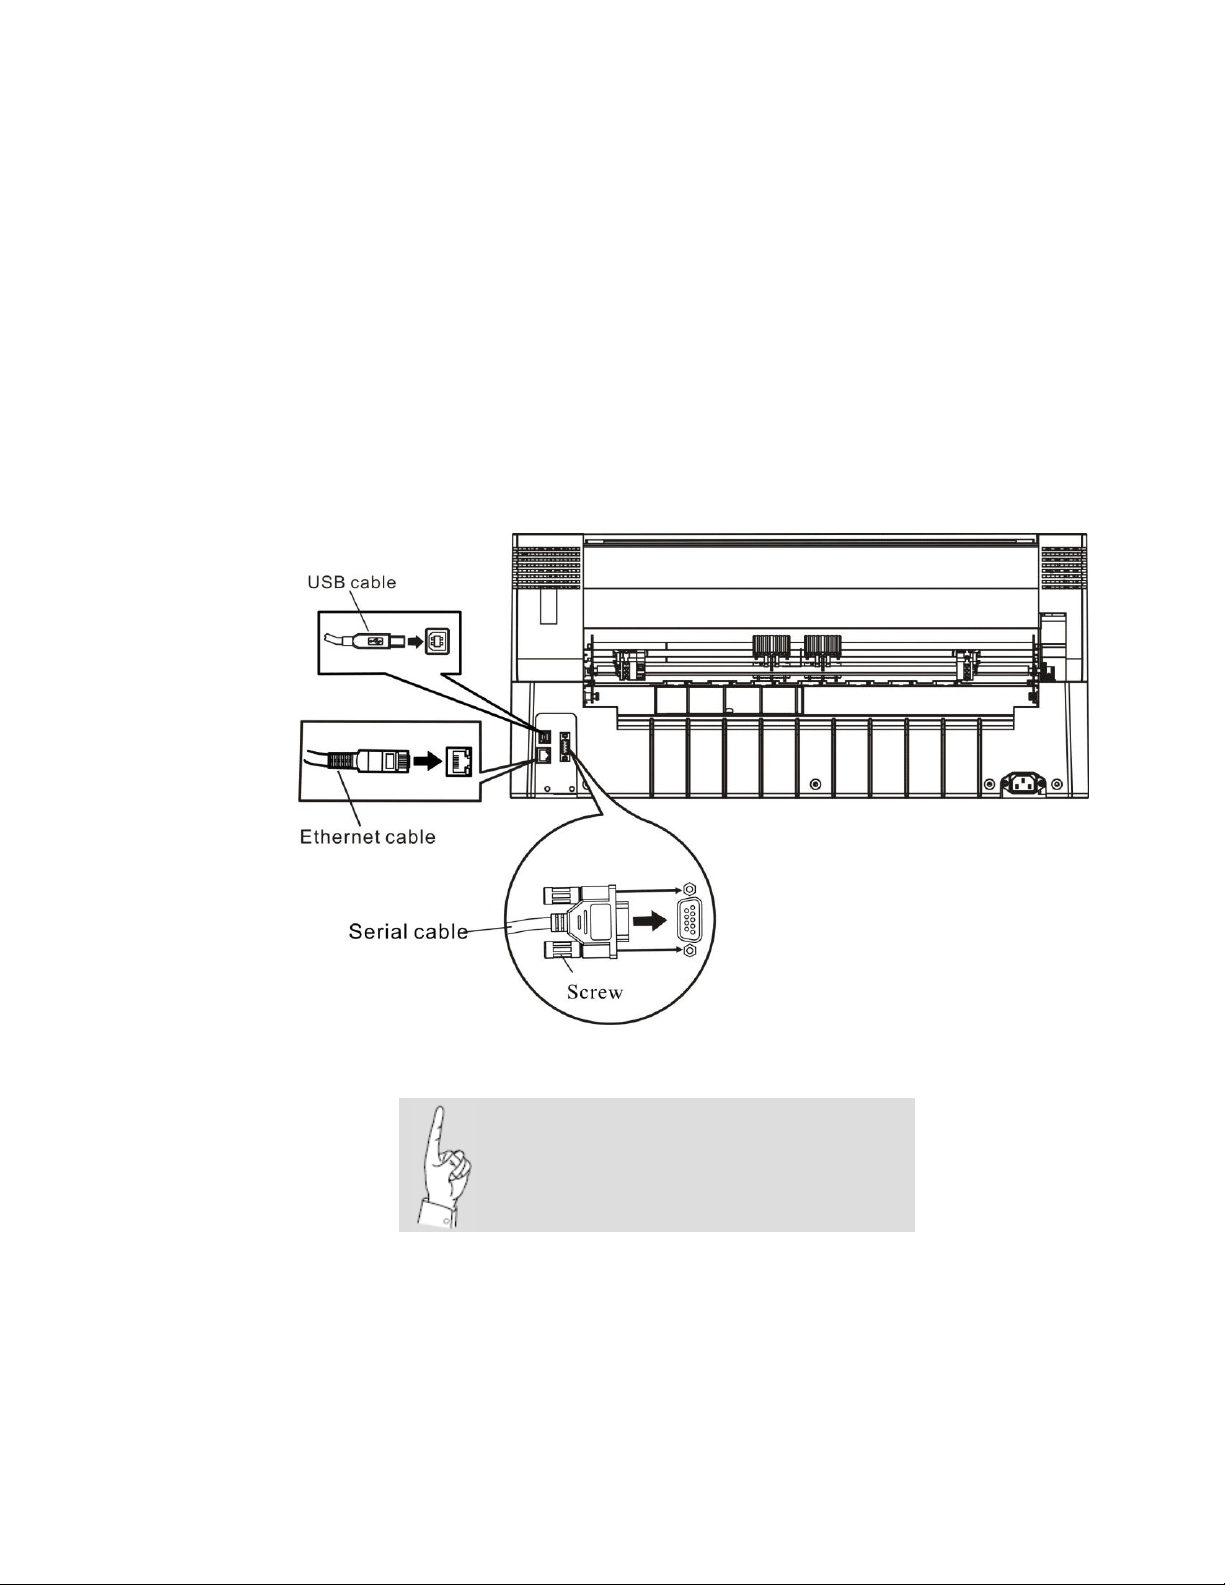
Connecting the printer to the PC
Note: The Accel 7450 printer can use a USB, Ethernet or Serial cable to connect
to the PC.
1. Install desired interface connection.
Make sure that the power switch is turned to off.
Connect the signal cable(s) to the printer and the computer.
- 9 -
Install vertically and
push down
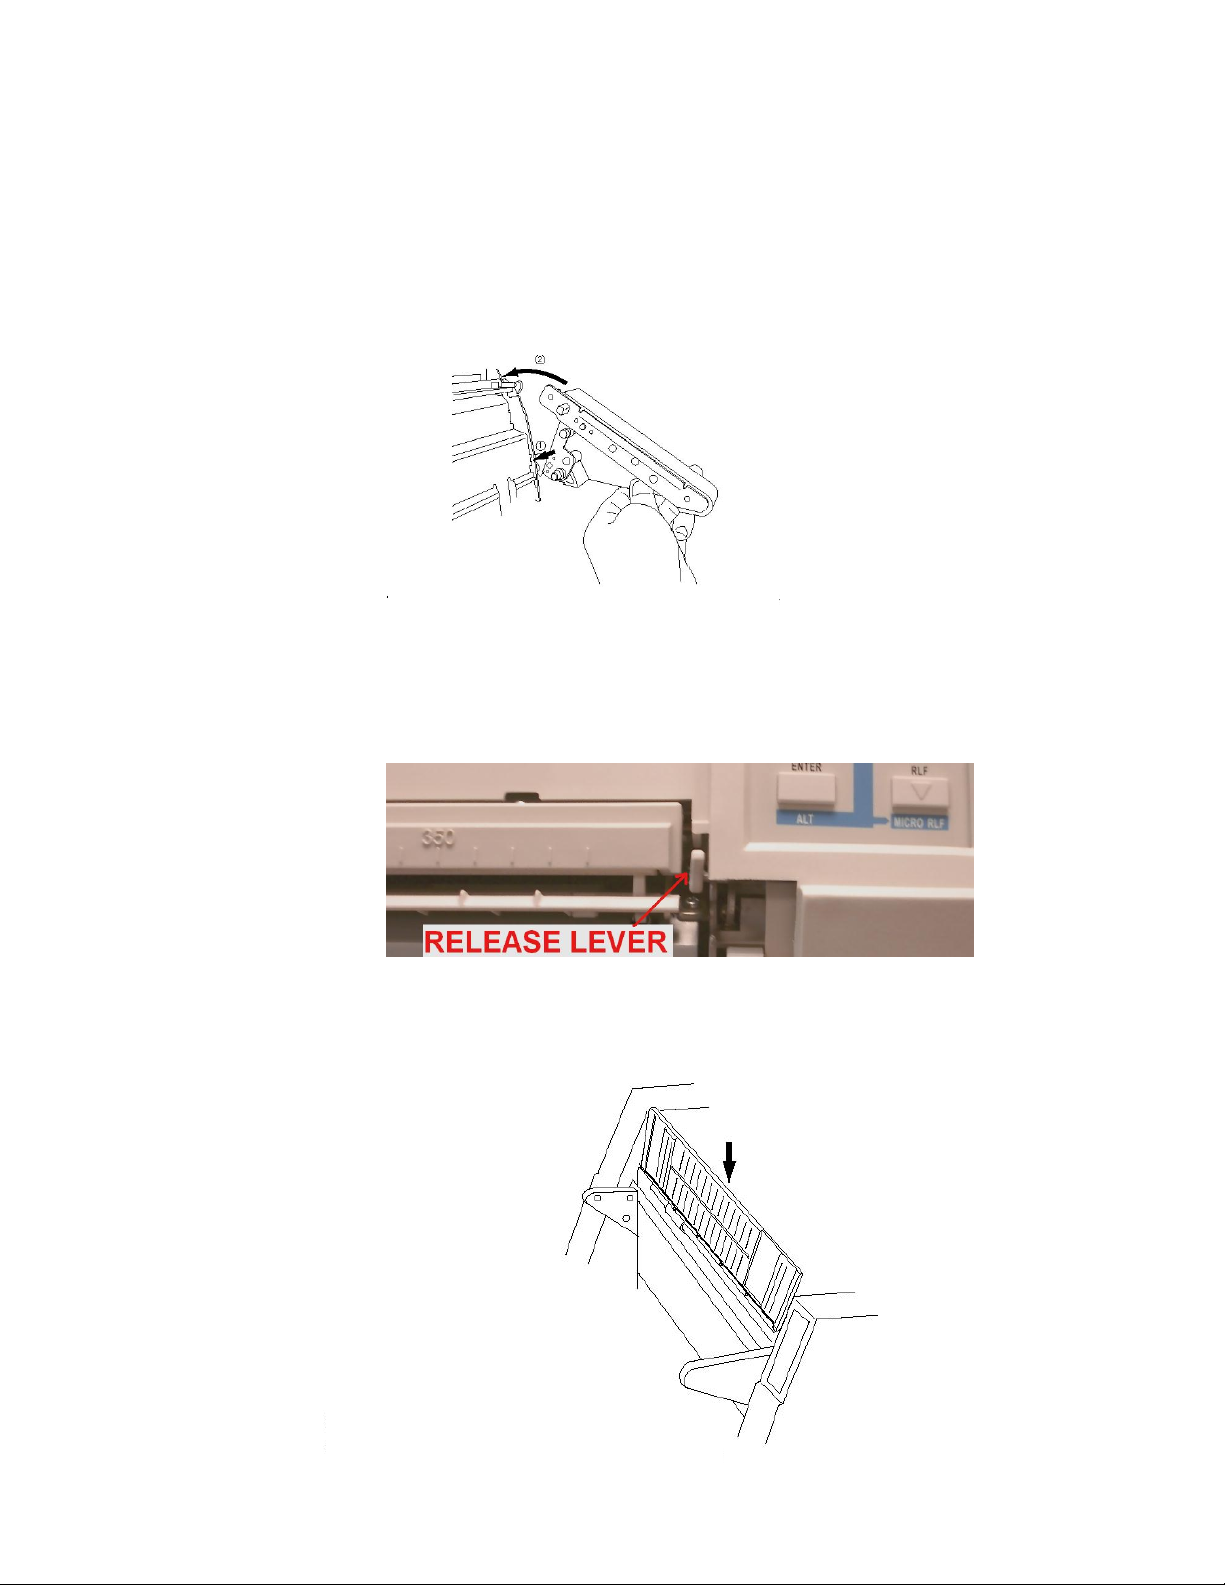
Installing the Front Paper Rack
1. Insert each (left/right) paper rack arm slot down onto the bottom
printer pin and rotate up until it clicks into place.
To remove the paper rack, first push up on both the left and right
release levers (right lever pictured below), rotate the holder all the
way down then lift.
ACCEL- 7450
2. Attach the paper rack to the paper rack holders.
- 10 -
ACCEL- 7450
The right paper guide should be
positioned all the way to the right for
optimum performance.
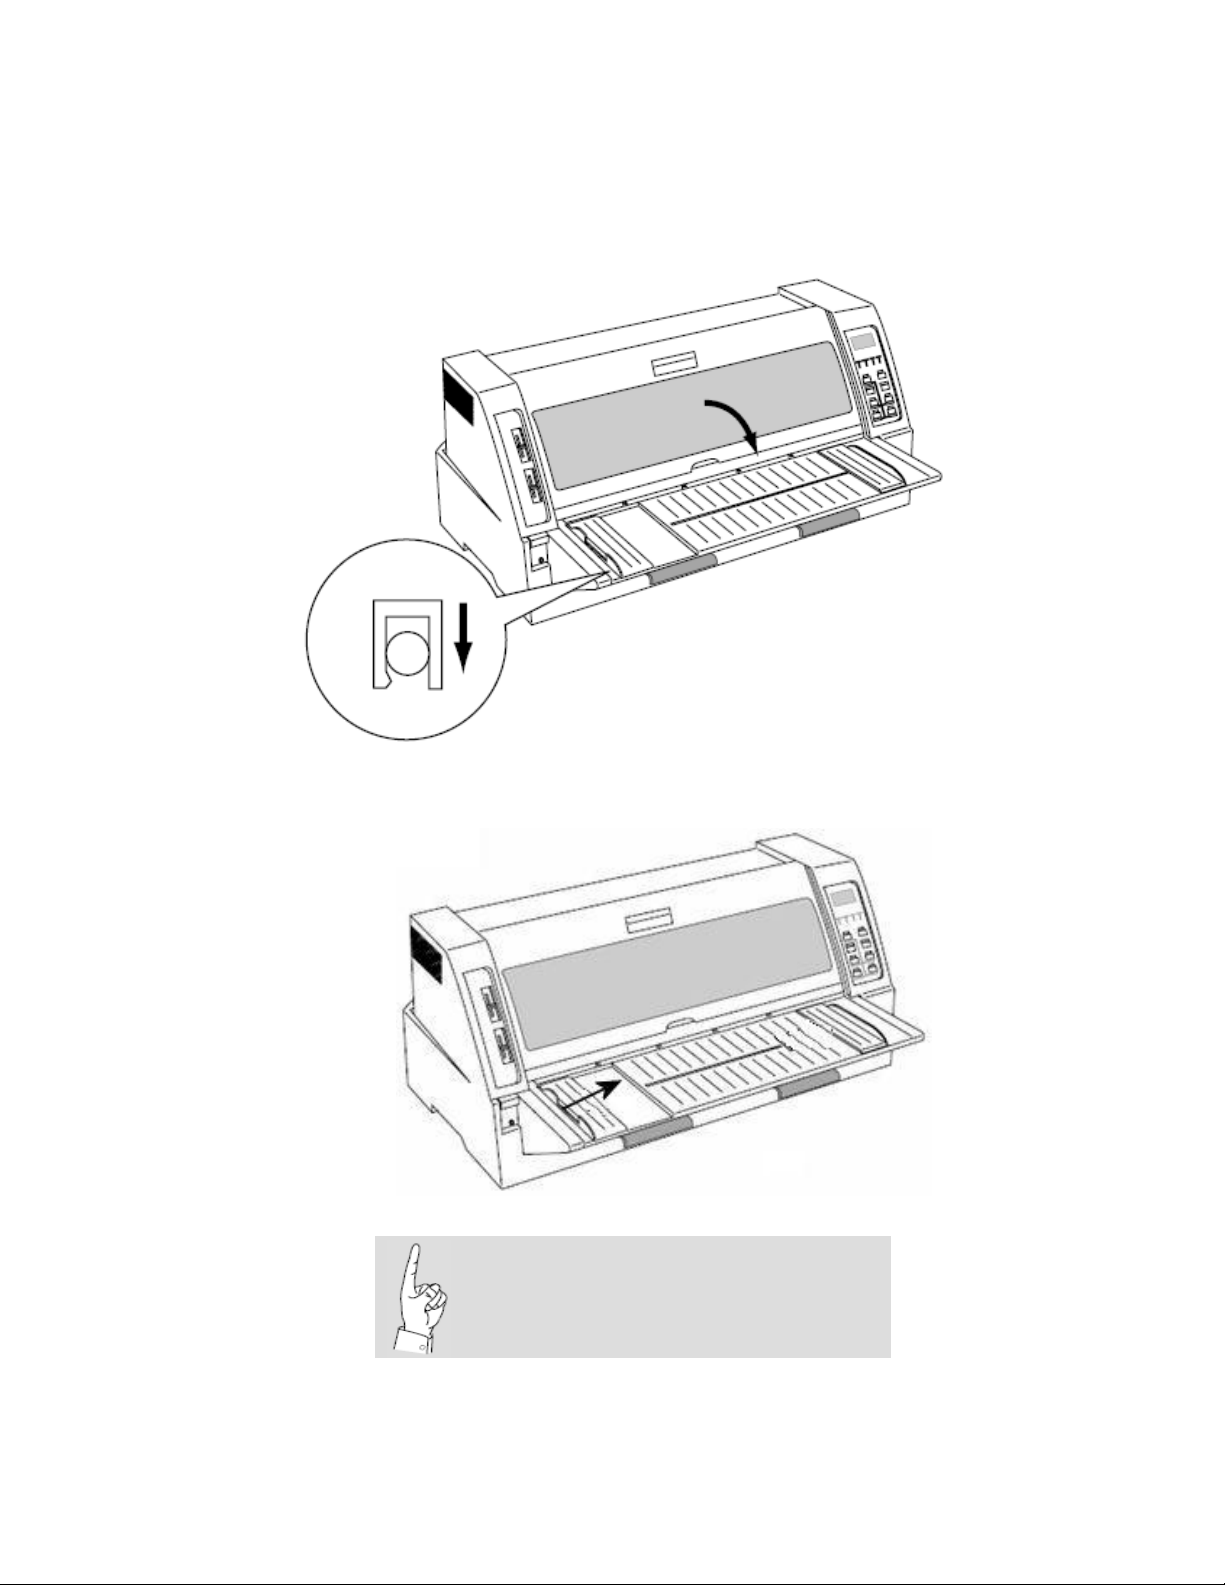
3. Rotate the paper rack down and press onto the rack holder pins.
4. Slide the left paper guide all the way right against the paper rack
stop. This squares the left guide and locates the paper edge for
auto detection.
- 11 -

Setting up for Cut Sheet Manual mode
1. Attach the paper rack holders (right / left) and the paper rack, as
ACCEL- 7450
described in Installing the
Front Paper Rack
on page 10.
2. Slide the left paper guide all the way right against the paper rack stop.
This squares the left guide and locates the paper edge for auto
detection.
- 12 -
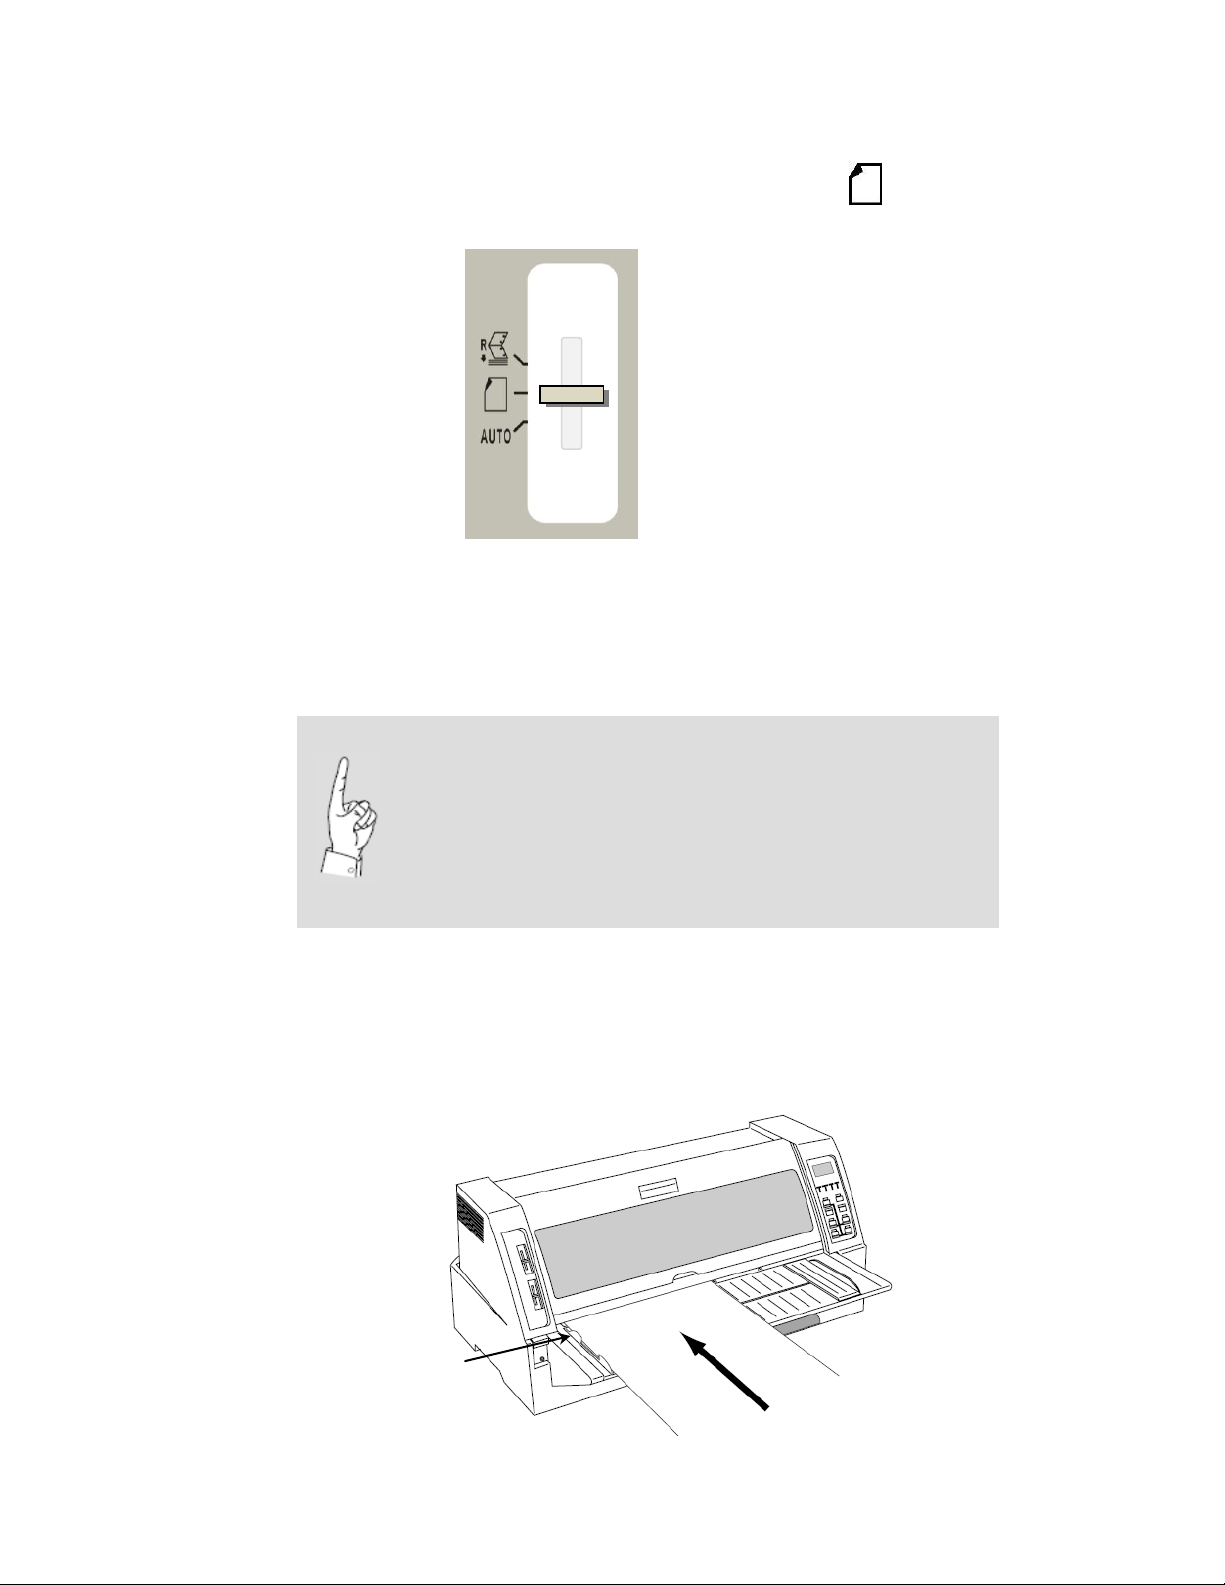
ACCEL- 7450
LEFT paper guide
Cut sheet paper will NOT load unless the printer’s
reflective photo sensor sees the back of the sheet
about 1 ¾ inches (44.45 mm) in from the leading
edge.
This sensor’s horizontal location is around the 25mm
(approx 1 inch) mark on the printer ruler.
3. Slide the paper path lever to the cut sheet symbol.
Note: The printer in this mode will automatically load cut sheet paper
about one (1) second after a sheet is fully inserted in the manual input
paper slot.
4. Insert a cut sheet paper straight along the LEFT paper guide. Make sure
the paper is inserted as far as it will go and that it is square to the feed
rollers. The printer beeps one time then feeds the sheet in. NOTE: The
delay period can be adjusted by setting Control Panel menu item #36
LOAD DELAY.
- 13 -

ACCEL- 7450
The SKEW: NO setting can be re-instated by
performing an initialization #1(press HIGH
IMPACT+LF keys and cycle ON power).
Special Note for Loading Narrow Cut Sheet Paper
To load cut sheets narrower than 4 ½ inches, disable menu item #25
PAPER SKEW DETECT. Refer to Control Panel operation on page 19 .
Special Note for Loading Dark Colored Forms
Excessive top/left margins or paper not loading may be caused by forms with
non-reflective or colored areas. Use the special DARK FORM LOAD feature to
print such forms. To get started, make sure at least one (1) reflective (white or
light colored) form has been loaded and ejected since the printer was last
powered up or since the left paper guide was moved. This step sets the left
starting print position in the printer’s memory.
Press the keys. The LCD shows DARK FORM LOAD.
Fully insert the form into the paper slot until it seats square in the feed
rollers BEFORE the printer starts loading.
Eject the form and start over if the form is not grasped immediately as the
printer will not automatically compensate for the top starting print position.
Send the print job.
Press the ALT+EJECT/LOAD keys again to load each dark form. The printer
reverts to normal (white or light colored) paper loading after each load.
- 14 -
 Loading...