

AMT Datasouth 4600 User Manual

Document #140106A
March 2011
Fastmark 4600 PLUS Series
Thermal Transfer Barcode Printer
User’s Guide

1
Getting Started .................................................................................................... 2
Table of Contents
Unpacking ....................................................................................................... 2
Package Contents ........................................................................................... 3
Placing the Printer .......................................................................................... 4
Connecting the Power Cord .......................................................................... 4
Getting to Know Your Printer ............................................................................. 5
Front Panel ...................................................................................................... 5
Loading a Ribbon ......................................................................................... 15
Loading Media .............................................................................................. 18
PALTM Print and Program Overview ................................................................ 27
Traditional Printing ....................................................................................... 27
Legacy Data Stream Interpretation .............................................................. 27
Standalone/Downtime Applications ............................................................ 28
Calibration & Configuration ............................................................................. 30
Performing Calibration ................................................................................. 30
Printing a Configuration Report .................................................................. 31
Resetting to Factory Default Settings ......................................................... 32
Computer Connections .................................................................................... 33
USB Interface Requirements ....................................................................... 33
Centronics Parallel Port ............................................................................... 33
Serial (RS-232) Port ...................................................................................... 34
Ethernet 10/100 Internal Printer Server Option .......................................... 34
Ethernet Module Status Indicators .............................................................. 35
Communicating with the Printer ...................................................................... 37
Troubleshooting ................................................................................................ 44
LED and LCD Diagnosis ............................................................................... 44
Media Problems ............................................................................................ 44
Ribbon Problems .......................................................................................... 45
Other Problems ............................................................................................. 45
Light /Missing Print ...................................................................................... 46
Miscellaneous ............................................................................................... 47
Recovery ....................................................................................................... 48
Caring for Your Printer ..................................................................................... 49
Cleaning the Print Head ............................................................................... 49
Cleaning the Roller ....................................................................................... 50
Cleaning the Media Compartment ............................................................... 50
Technical Reference ......................................................................................... 51
General Specifications ................................................................................. 51
Fonts, Bar Codes and Graphics Specification ........................................... 54
Interface Specifications ............................................................................... 57
ASCII TABLE ................................................................................................. 63

2
Table of Contents
Appendix A: Printer Status .............................................................................. 64
Appendix B: Stand-alone Keyboard and Barcode Reader ............................ 65
Keyboard ....................................................................................................... 65
Form Control Functions ............................................................................... 65
Barcode Reader ............................................................................................ 69
Appendix C: Cutter Installation ....................................................................... 72
Appendix D: Dispenser Installation ................................................................. 75
Appendix E: Adjusting Ribbon Tension .......................................................... 78
Appendix F: Switching Ribbon Wound Ink-side out or Ink-side in............... 78

1
IMPORTANT SAFETY INSTRUCTIONS
AND OTHER NOTICES
This printer complies with the requirements in Part 15 of FCC rules for a
Class A computing device. Operation of this equipment in a residential area
may cause unacceptable interface to radio and TV reception, requiring the
operator to take whatever steps are necessary to correct the interference.
Place the printer on a flat, firm and solid surface.
Do not place the printer near a heat source or near water.
Refer to the specification label on the bottom of this printer and ensure that
your power source exactly meets these requirements.
Do not open the printer during operation to avoid electrical shock.
Do not attempt to disassemble this printer if it malfunctions.
All rights are reserved. No part of this document may be reproduced or
issued to third parties in any form without permission of AMT Datasouth.
The material in this document is provided for general information and is
subject to change without notice.
TRADEMARK CREDITS
Windows ® , MS-Word and MS-DOS are registered trademarks of Microsoft
Corporation
PC ® is a registered trademark of International Business Machines
Centronics ® is a registered trademark of Centronics Corporation
TM
PAL
is registered trademark of AMT Datasouth Corporation

2
Getting Started
Congratulations on choosing the AMT Datasouth Fastmark 4600 PLUS Series
industrial barcode printer. This user‟s manual describing the FM 4600 PLUS
Series printer models will help you get to know your new printer. The manual
includes a guide to operate the printer as well as related information on
troubleshooting, maintenance, and technical reference. Illustrations are provided
to help you quickly become familiar with the printer.
Unpacking
After receiving your printer, please check for possible shipping damage:
1. Inspect the outside of both the box and the printer for possible damage.
2. Open the top cover of the printer to see if the media compartments are in
order.
Note: If damage has occurred, contact your shipping company immediately to
file a claim.
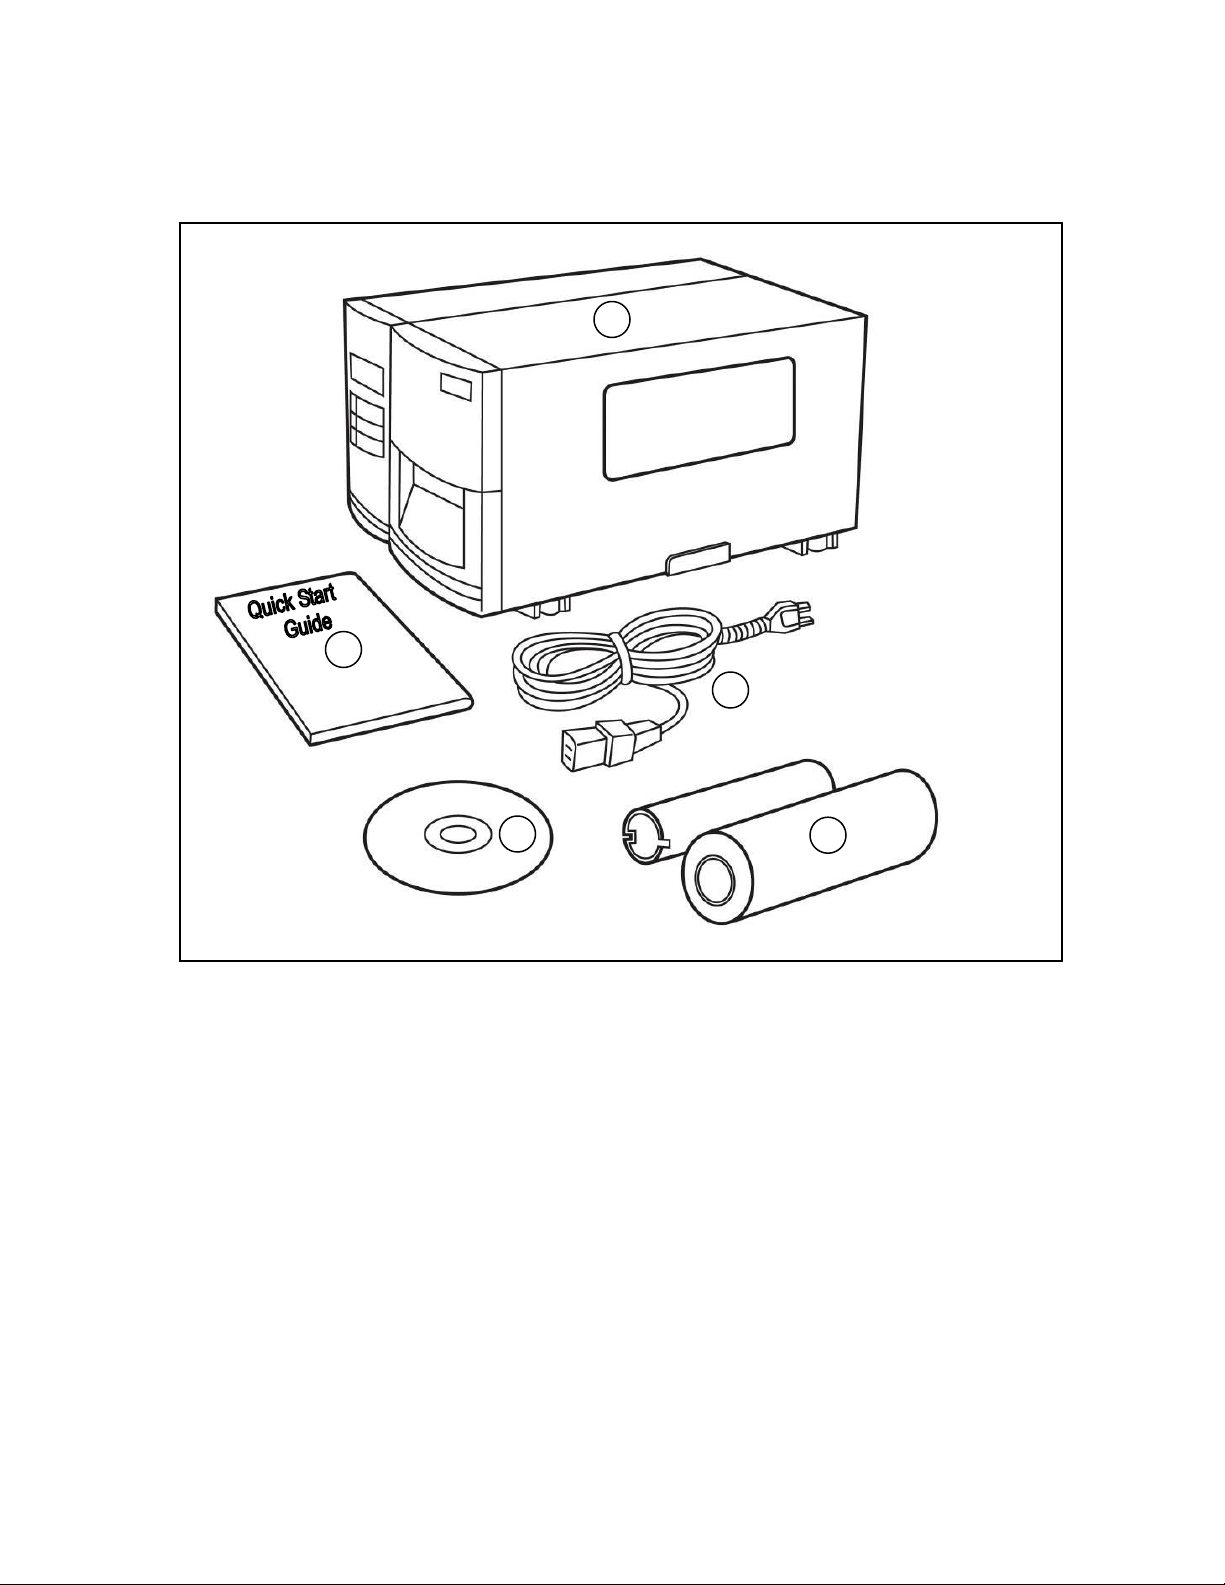
3. Check whether you have received the following accessories together with
the printer. If there are any items missing, please contact your local dealer.
3
4 5 3
2
1
Package Contents
1. 4600 PLUS Series Printer
2. Installation Quick Start Guide
3. CD Rom (User Guides, Utility Software & Drivers)
4. AC Power Cord
5. Sample Ribbon
4
Placing the Printer
| |
Before setting up and connecting the printer you should consider the following.
WARNING! Do not operate the printer in an area where it might get wet.
Find a solid flat surface with adequate room for the printer and enough
space above for media and ribbon access.
Place the printer within cable distance of the host and printer (serial or
parallel cable.)
Isolate the power cord from other electrical cables.
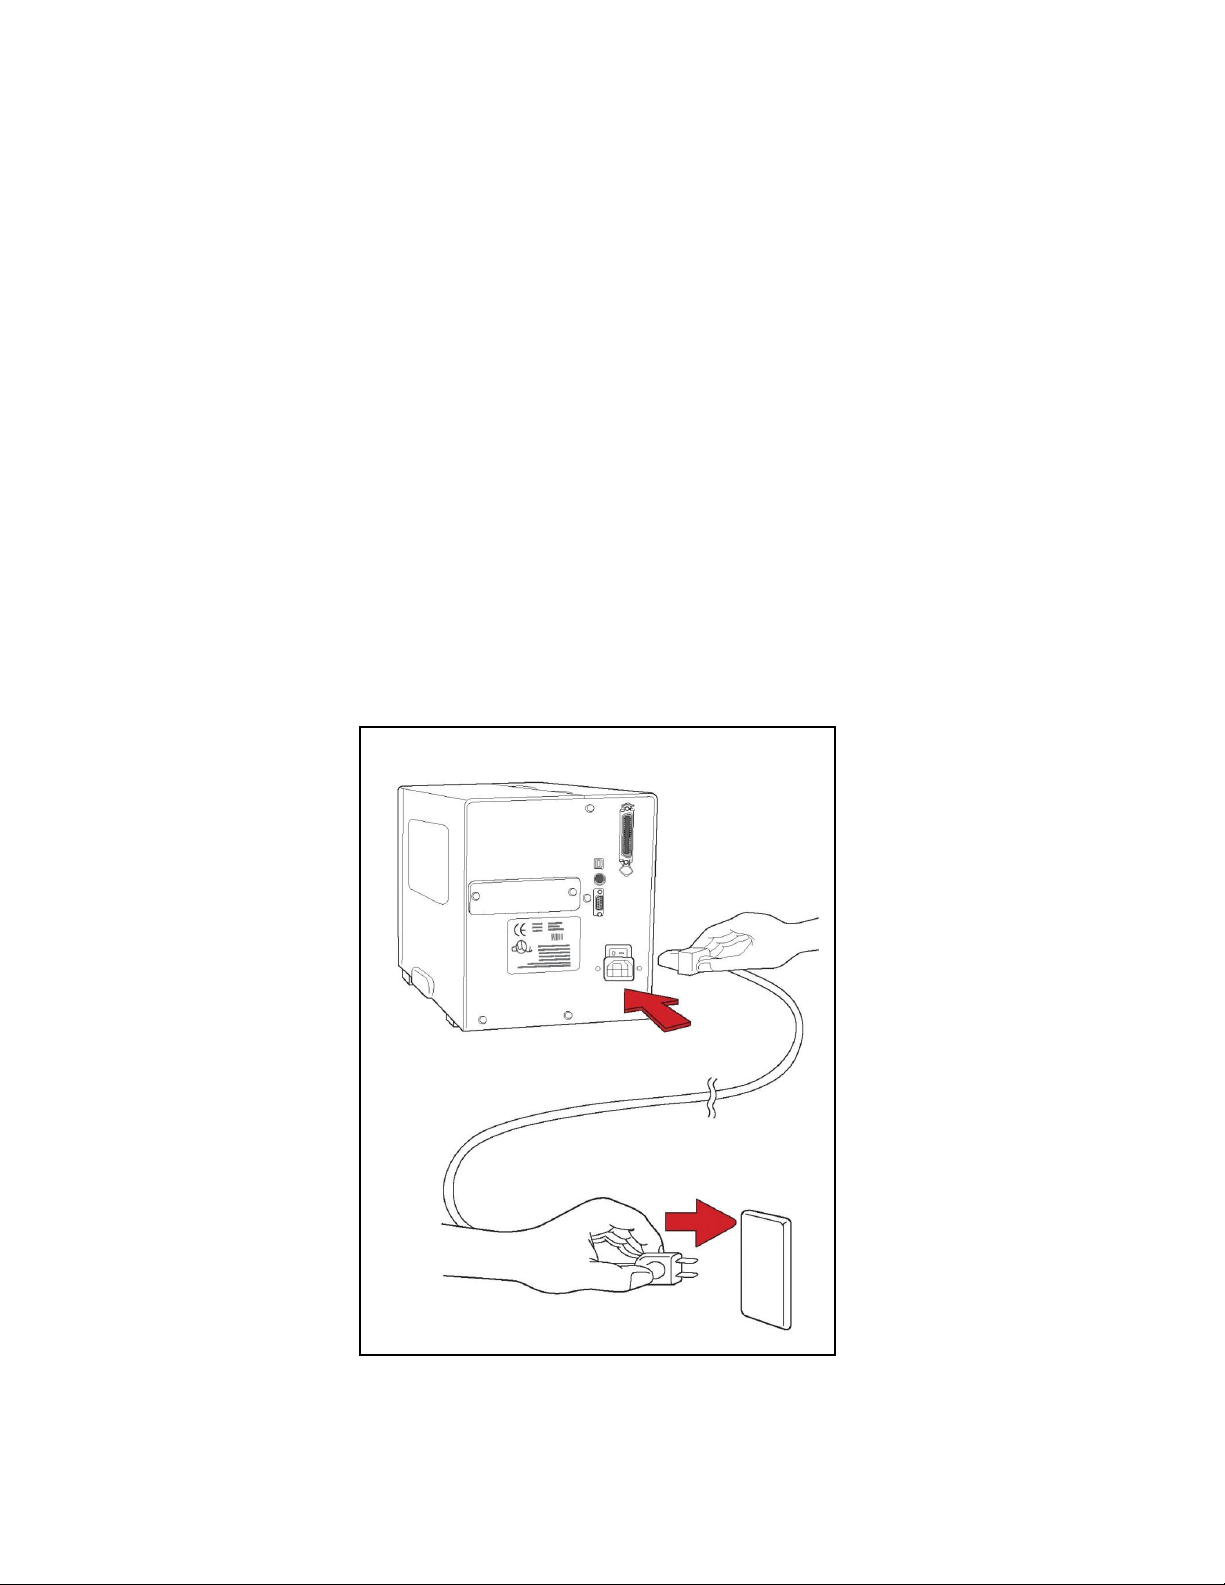
Connecting the Power Cord
Connect the power cord as below.

5
Getting to Know Your Printer
Control Panel
LED‟s and
Switches
LCD Message
Display
Top Access
Door
Front Access
Door
The front panel includes:
3 LED indicators (READY, MEDIA and RIBBON)
3 buttons (FEED, PAUSE and CANCEL)
LCD display
Top Access Door
Front Access Door
Printer Models:
TIA-200V (FM 4602 PLUS / 203dpi)
TIA-230E (FM 4602 PLUS / Int. Ethernet 203dpi)
TIA-320 (FM 4603 PLUS / 300dpi)
TIA-320E (FM 4603 PLUS / Int. Ethernet 300dpi)
The illustrations below describe parts and features of the FM 4600 PLUS Series
printer.
Front Panel

6
LED Indicators
READY
On – Normal operation
Off – Printer error
MEDIA
On – Normal operation
Blinking – Install new media
Printhead overheat
The printer is paused,
RIBBON
On – thermal transfer mode with ribbon installed
Off – direct thermal mode ( no ribbon installed )
Blinking – Install a new ribbon
For the FM 4602 PLUS Series, and the FM
4603 PLUS Series models, modes of thermal
transfer and direct transfer can be set via the
printer panel or Utility software.
Button
Function 1
(Press the button)
Function 2
(Press the button and
power switch together)
FEED/
CONFIG
Feed a label
Perform self test & print
configuration report
PAUSE/
CALIBR
Pause printing
Press again to resume printing
Perform a media calibration
CANCEL/
RESET
Interrupt and delete a print task
Force printer to continue after an
error is solved.
Reset FLASH settings
There are three LED indicators on the front panel, READY, MEDIA and RIBBON.
These indicators display the operation status of the printer.
Buttons
There are three buttons, each with two basic functions.

7
(203, PAL/PPLZ)
(300, PAL/PPLZ)
(203, PAL/PPLZ)
<ESC> FOR KEYBD
Notes:
1. You should perform a media calibration after installation and when
changing to a different type or size of media.
2. Before calibration, you must load the media and ribbon properly and move
the label sensor to the correct position avoiding holes.
3. After calibration the printer saves parameters to FLASH. Without correct
calibration gap detection is easily lost during printing especially for small
labels (less than 1.5 inches in height).
4. After self-test, the printer is in dump mode. For normal operation, you must
press CANCEL to restart the printer.
LCD Display
The FM 4600 PLUS Series models have a LCD that shows:
printer status
printer settings
input data from a keyboard or barcode reader
The first parameter is either 203 or 300, which stands for the print resolution. The
second parameter indicates the emulation (printer language), PAL/PPLZ, PPLA,
or PPLB.
After power-on, the LCD displays the following message as examples:
FM 4602 PLUS Series
FM 4603 PLUS Series
If a keyboard is plugged in, the display shows:
FM 4602 PLUS Series

8
(300,PAL/PPLZ)
<ESC> FOR KEYBD
(203,PAL/PPLZ)
WITH B.C. READER
(300,PAL/PPLZ)
WITH B.C. READER
RIBBON OUT
LANGUAGE
ENGLISH
FM 4603 PLUS Series
If a barcode reader is connected, the display shows:
FM 4602 PLUS Series
FM 4603 PLUS Series
If an abnormal condition occurs, a related message is displayed. For example:
Setting Display Language
The printer‟s LCD display supports six languages: English, French, German,
Italian, Spanish, and Portuguese.
To select a language:
1. Press the PAUSE and CANCEL buttons at the same time.
2. Hold both buttons for about 3 seconds and release.
3. The language selection screen appears.
4. Press the FEED button for the next language.
5. Press the CANCEL button to select and set the language.
Press PAUSE or the PAUSE+CANCEL buttons to exit the language selection
screen and enter normal mode.

9
Changing Settings from the Panel
Buttons
Function
FEED+PAUSE
Press to enter setting mode.
(Don‟t press over 1 second)
FEED+CANCEL
Press to show next features.
CANCEL
Press to select desired feature.
FEED+CANCEL
To scroll through the list of values for the
chosen feature.
CANCEL
To save the currently displayed value.
PAUSE
To exit setup mode.
You may change settings using the front panel buttons of the 4600 PLUS series
printer models. In addition you may also change settings via software Utility and
data stream commands.
Setting Procedure:
To change settings using the buttons on the front panel:
1. Press PAUSE, verify mode on LCD display.
2. Press FEED and PAUSE at the same time to enter setup mode.
3. Press and hold FEED, use CANCEL to scroll through the list of features.
4. Press CANCEL to select desired feature.
5. Press and hold FEED, use CANCEL to scroll through the list of values for
the chosen feature.
6. Press CANCEL to save the currently displayed value.
7. Press PAUSE twice to exit setup mode and READY the printer.
10
Feature
Parameter
Factory Default
Remarks
PRINT MODE
Thermal transfer /
Direct thermal
Thermal transfer
AUTO
CALIBRATE
MODE
Mode 1~4
Mode 1
Calibrates on demand.
CUT/PEEL
OFFSET
-015 ~+.050
0
Controls cut and peel
position.
TPH VERTICAL
OFFSET
-.003~+.003”
0
Offset of vertical print
position.
RECOVER
PRINT
ENABLED,
DISABLED
ENABLED
Contents reprint after media
out or ribbon-out.
CUTER
INSTALLED
YES
NO
NO
PEELER
INSTALLED
YES
NO
NO
READER
INSTALLED
YES
NO
NO
WIN. CON. LIN.
0~254
0
Only under Windows with
bundled printer driver and
continuous media.
BASE SEED
0~4 ips
0 ips
COUNTING
DOWN
UP
DOWN
DOWN
MEDIA
SENSOR TYPE
GAP
BLACK BAR
GAP
Select for media
characteristics. Once
changed make sure to
calibrate before printing.
BACKFEED
ENABLED
DISABLED
DISABLED
PRESENT
DISTANCE
.0~040”
.87”
Appears only when
BACKFEED enabled.
BASE
DARKNESS
-028~+028
0
BAUD RATE
(RS232)
600 / 1200 / 2400/
4800 / 9600 /
19200 /NONE
9600
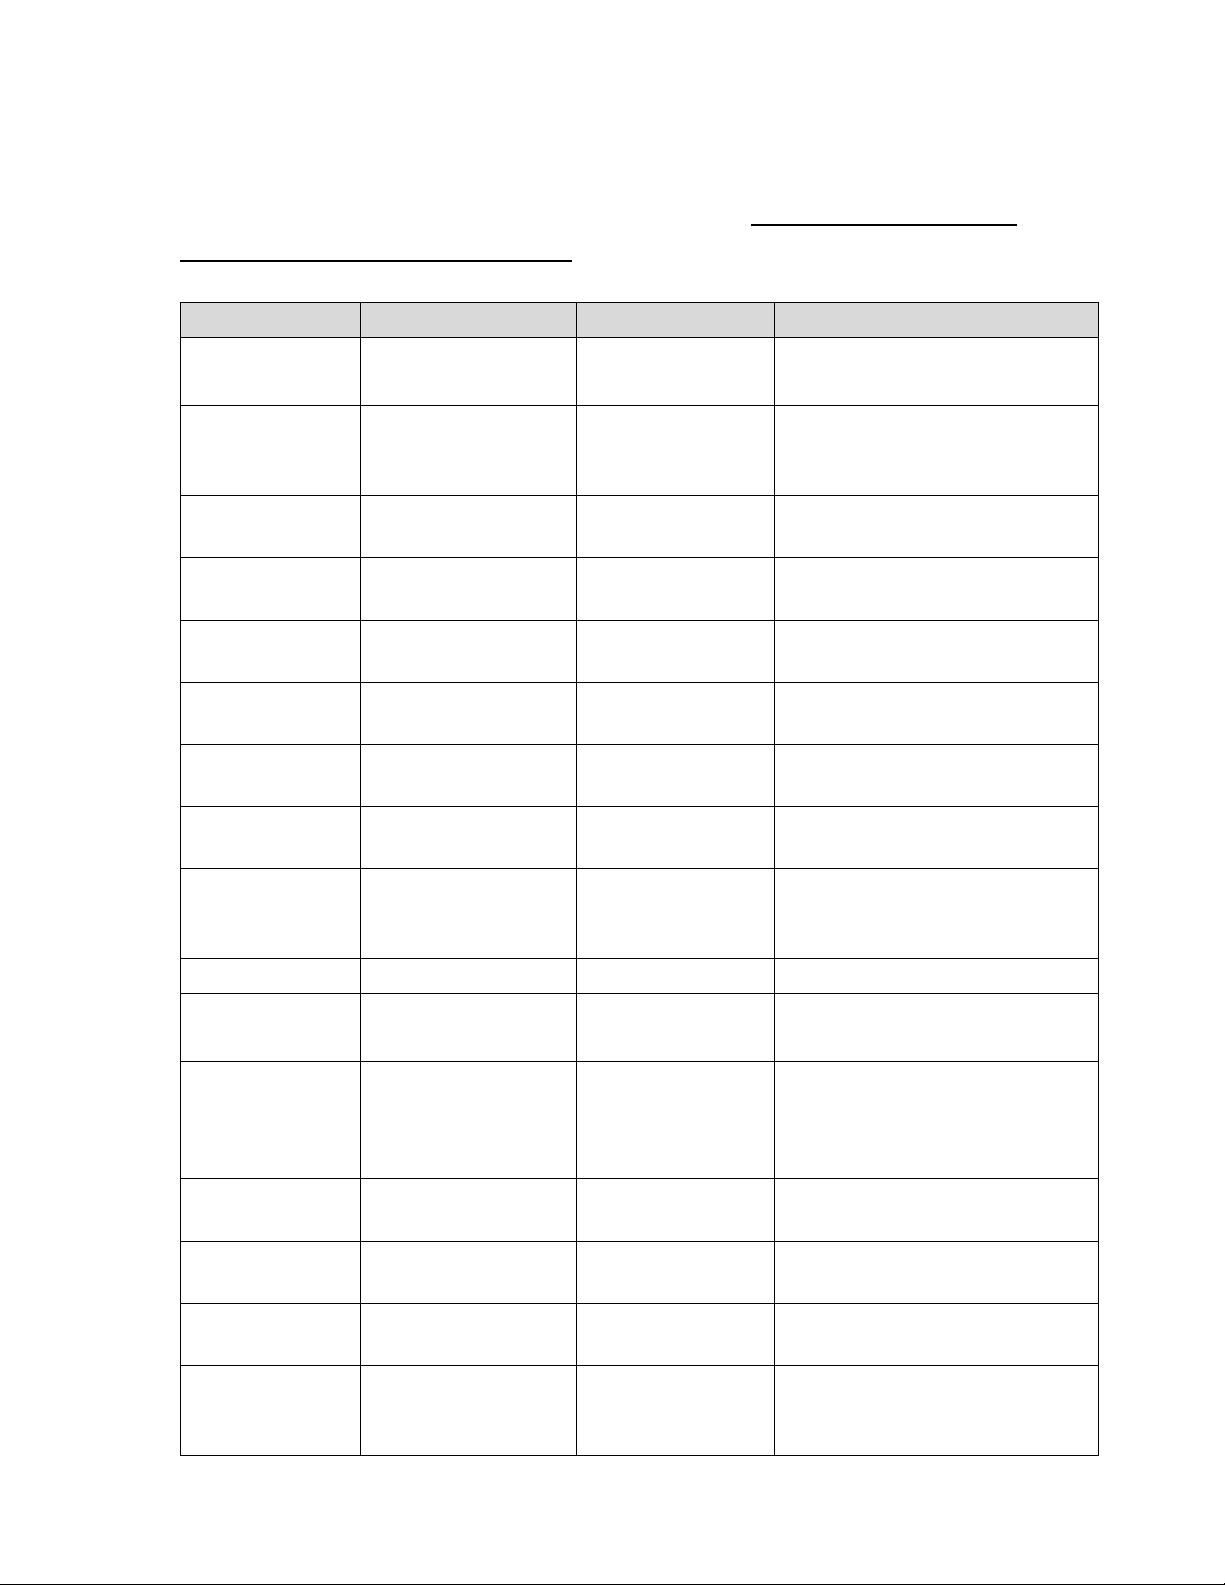
Basic Printer Features and Parameter Settings , PPLA/PPLB.
NOTE: Features can vary based on printer model. Do not change settings
during printing or communication.
11
Feature
Parameter
Factory Default
Remarks
PARITY
(RS232)
NONE
EVEN
ODD
NONE
LENGTH
(RS232)
8 DATA BITS
7 DATA BITS
8 DATA BITS
CLEAR FLASH
YES/NO
NO
PRINTERS WITH ETHERNET
DHCP
ENABLE
DISABLE
ENABLE
IP ADDRESS
###.###.###.###
SUBNET MASK
###.###.###.###
DEFAULT
GATEWAY
###.###.###.###
MAC
ADDRESS
####.####.####
Feature
Parameter
Factory Default
Remarks
PRINT MODE
Thermal transfer /
Direct thermal
Thermal transfer
AUTO
CALIBRATE
MODE
Mode 1~4
Mode 1
Calibrates on demand.
CUT/PEEL
OFFSET
-015 ~+.050
0
Controls cut and peel
position.
TPH VERTICAL
OFFSET
-.003~+.003”
0
Offset of vertical print
position.
RECOVER
PRINT
ENABLED,
DISABLED
ENABLED
Contents reprint after media
out or ribbon-out.
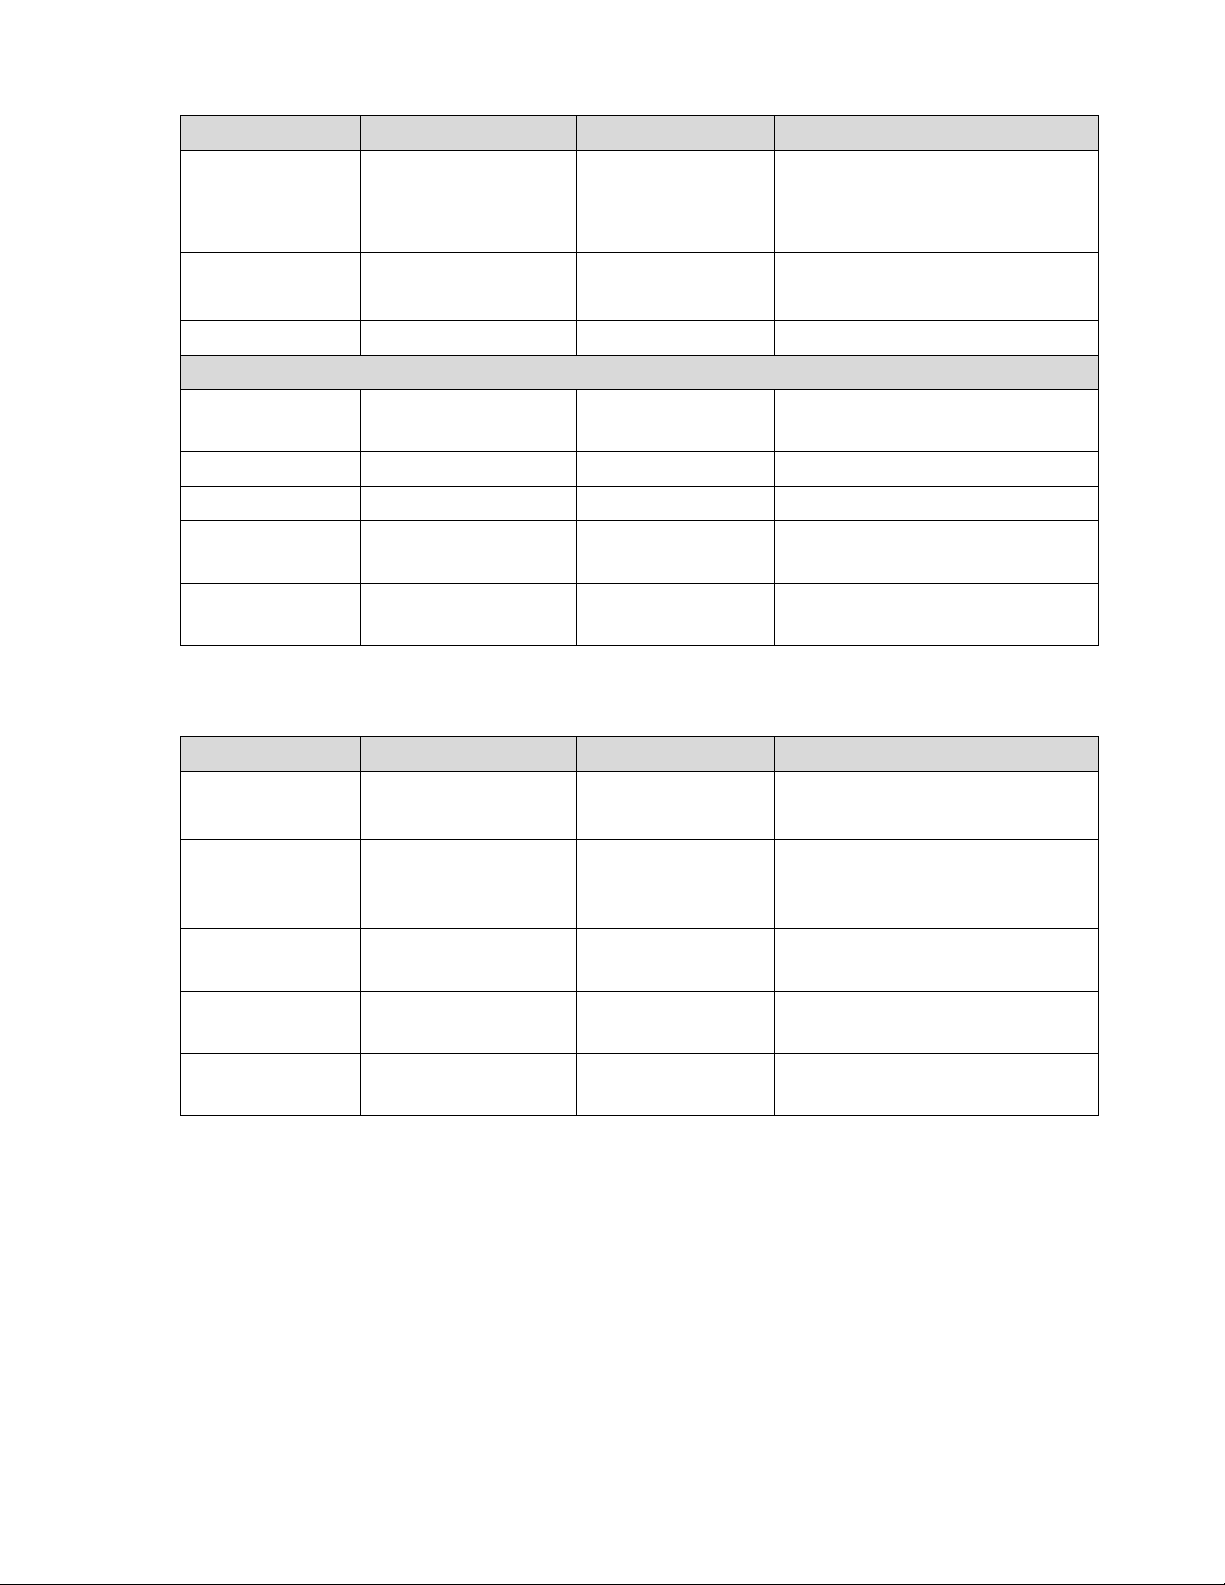
Printer Features and Parameter Settings, PAL/PPLZ
12
Feature
Parameter
Factory Default
Remarks
PEELER
INSTALLED
YES
NO
NO
COUNTING
UP
DOWN
DOWN
MEDIA
SENSOR TYPE
GAP
BLACK BAR
GAP
Select for media
characteristics. Once
changed make sure to
calibrate before printing.
PRESENT
DISTANCE
.0~040”
.87”
Appears only when
BACKFEED enabled.
ABS
DARKNESS
0~30
0
Setting darkness
TRIM
DARKNESS
-30~30
0
Fine-tuning darkness
BAUD RATE
(RS232)
600 / 1200 / 2400/
4800 / 9600 /
19200 /NONE
9600
PARITY
(RS232)
NONE
EVEN
ODD
NONE
LENGTH
(RS232)
8 DATA BITS
7 DATA BITS
8 DATA BITS
CLEAR FLASH
YES/NO
NO
PRINTERS WITH ETHERNET
DHCP
ENABLE
DISABLE
ENABLE
IP ADDRESS
###.###.###.###
SUBNET MASK
###.###.###.###
DEFAULT
GATEWAY
###.###.###.###
MAC
ADDRESS
####.####.####
13
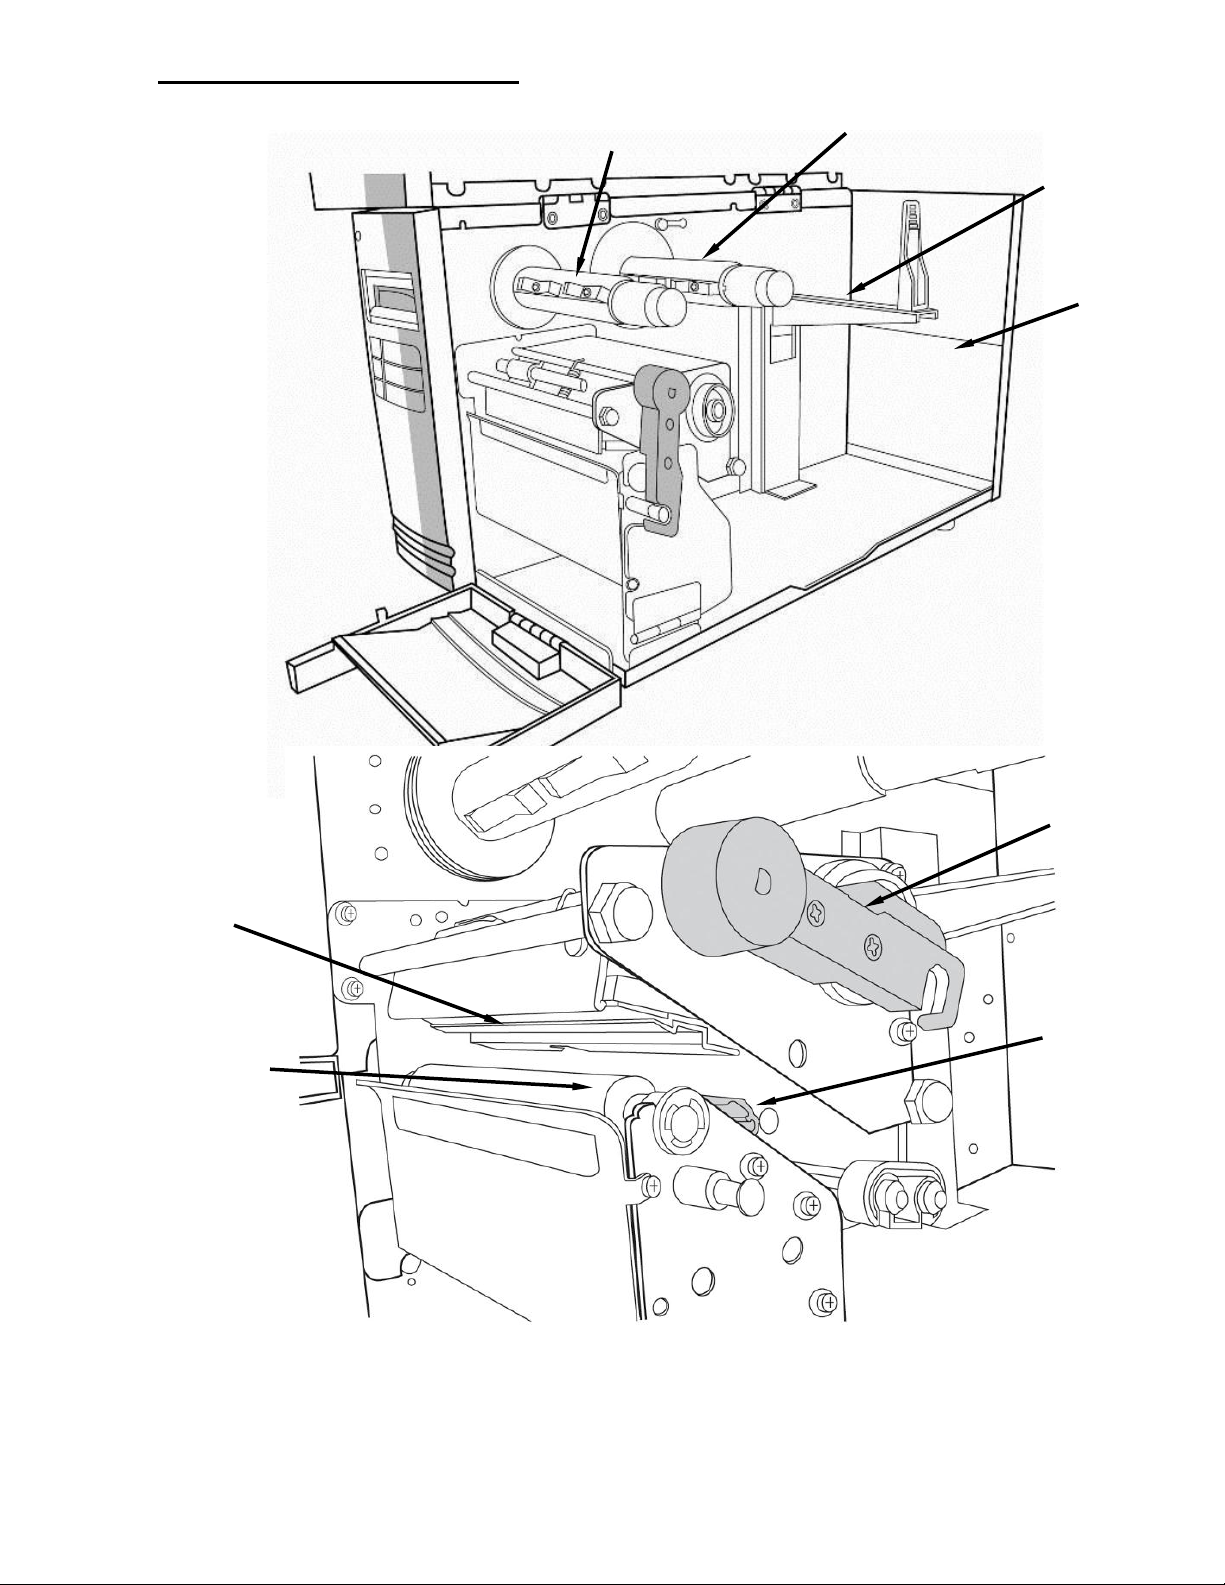
Ribbon Pick-up Spindle
Ribbon Supply Spindle
Media Supply Spindle
Rear
Feed Slot
Head Latch
Thermal Printhead
Paper Sensor
Guide
Internal Parts and Features
Paper Drive Roller
14
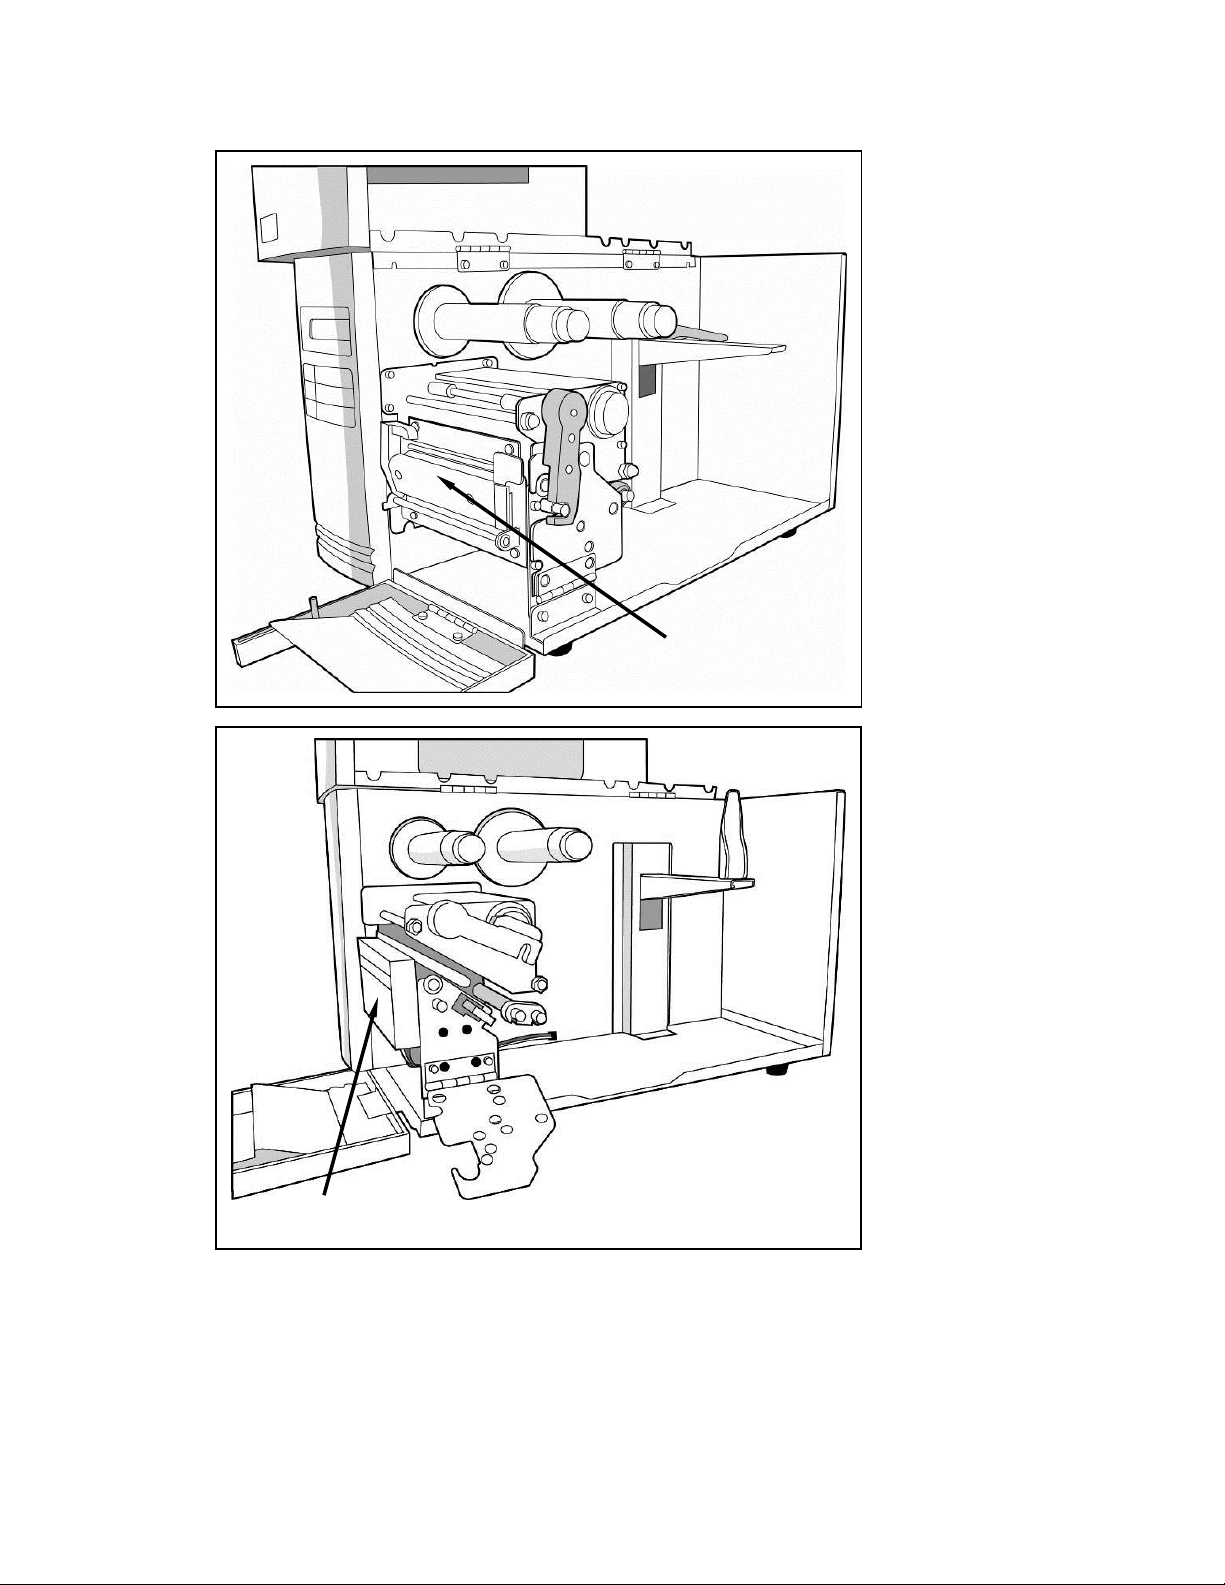
Cutter Module
Peeler Option
15
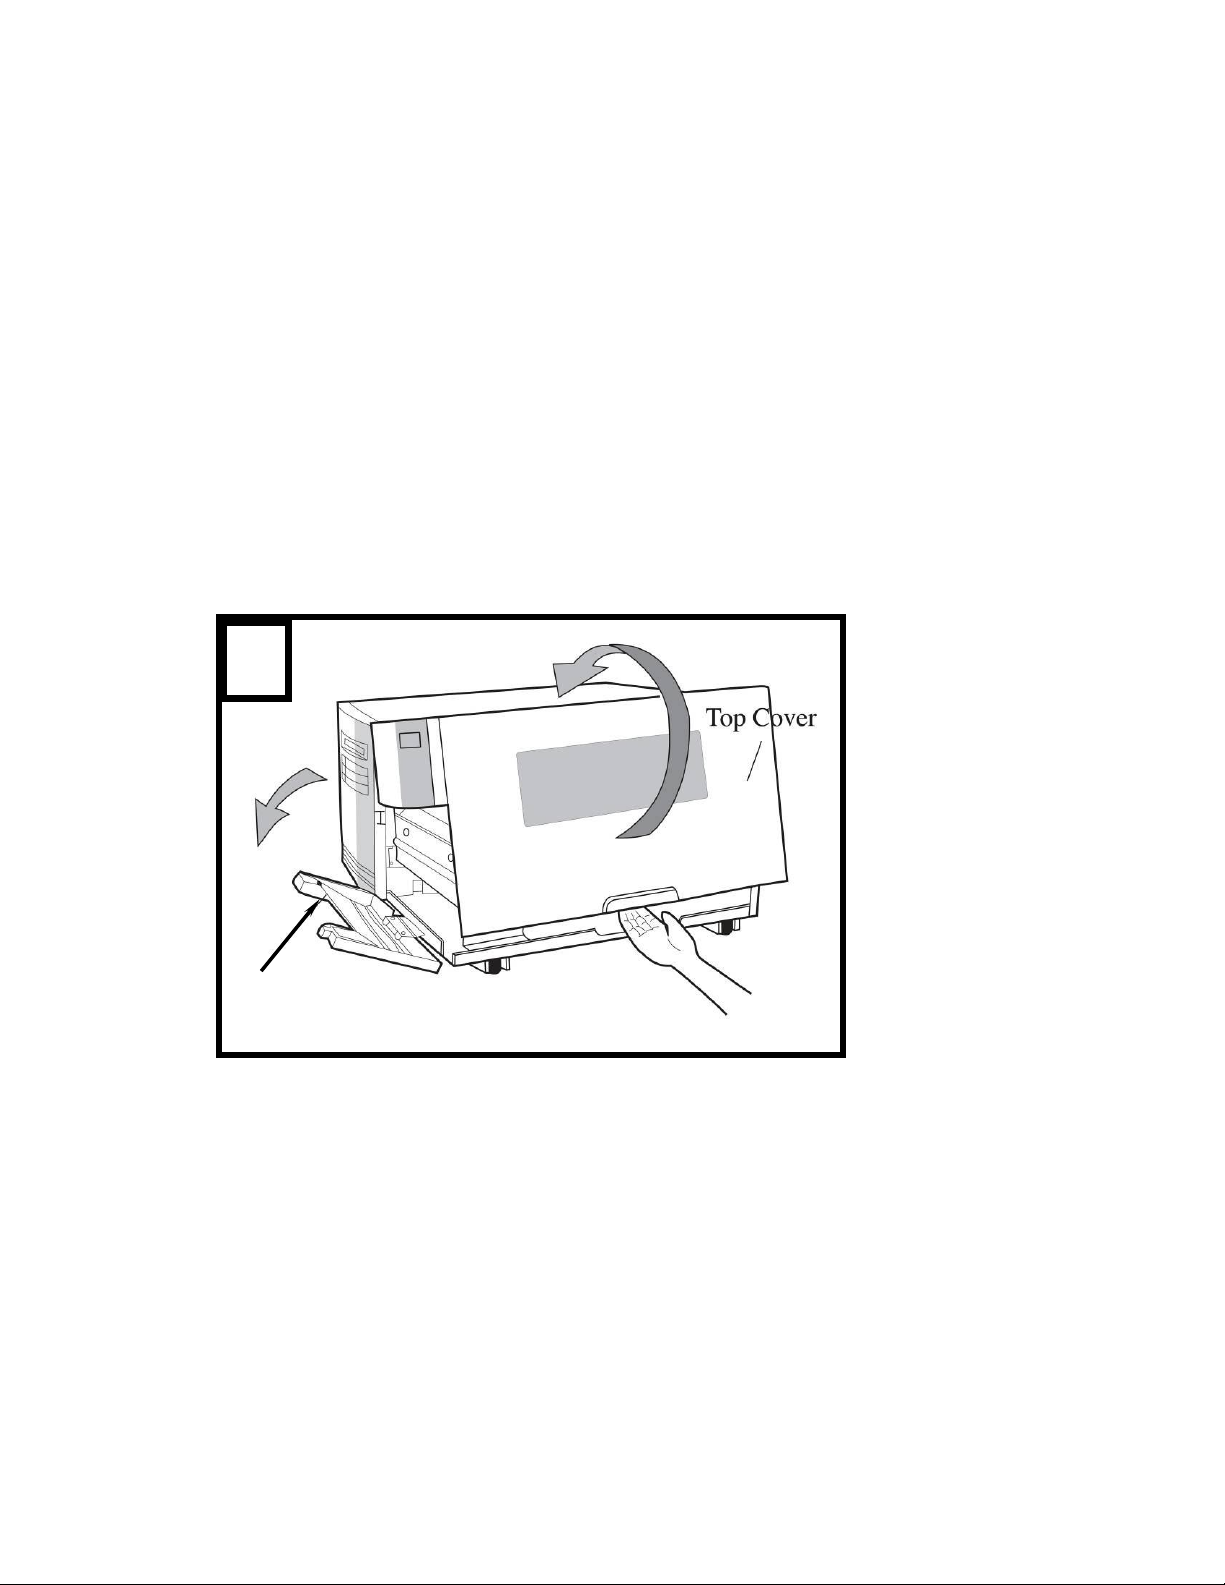
1
Front Access
Loading Ribbon and Media
This section describes how to load ribbon and media.
Loading a Ribbon
Note: This section can be referred to, when transfer thermal printing is used.
The steps below are based on ribbon wound ink-side in as an example.
1. Lift the top cover and front access door to expose the media compartment.
(Figure 1)
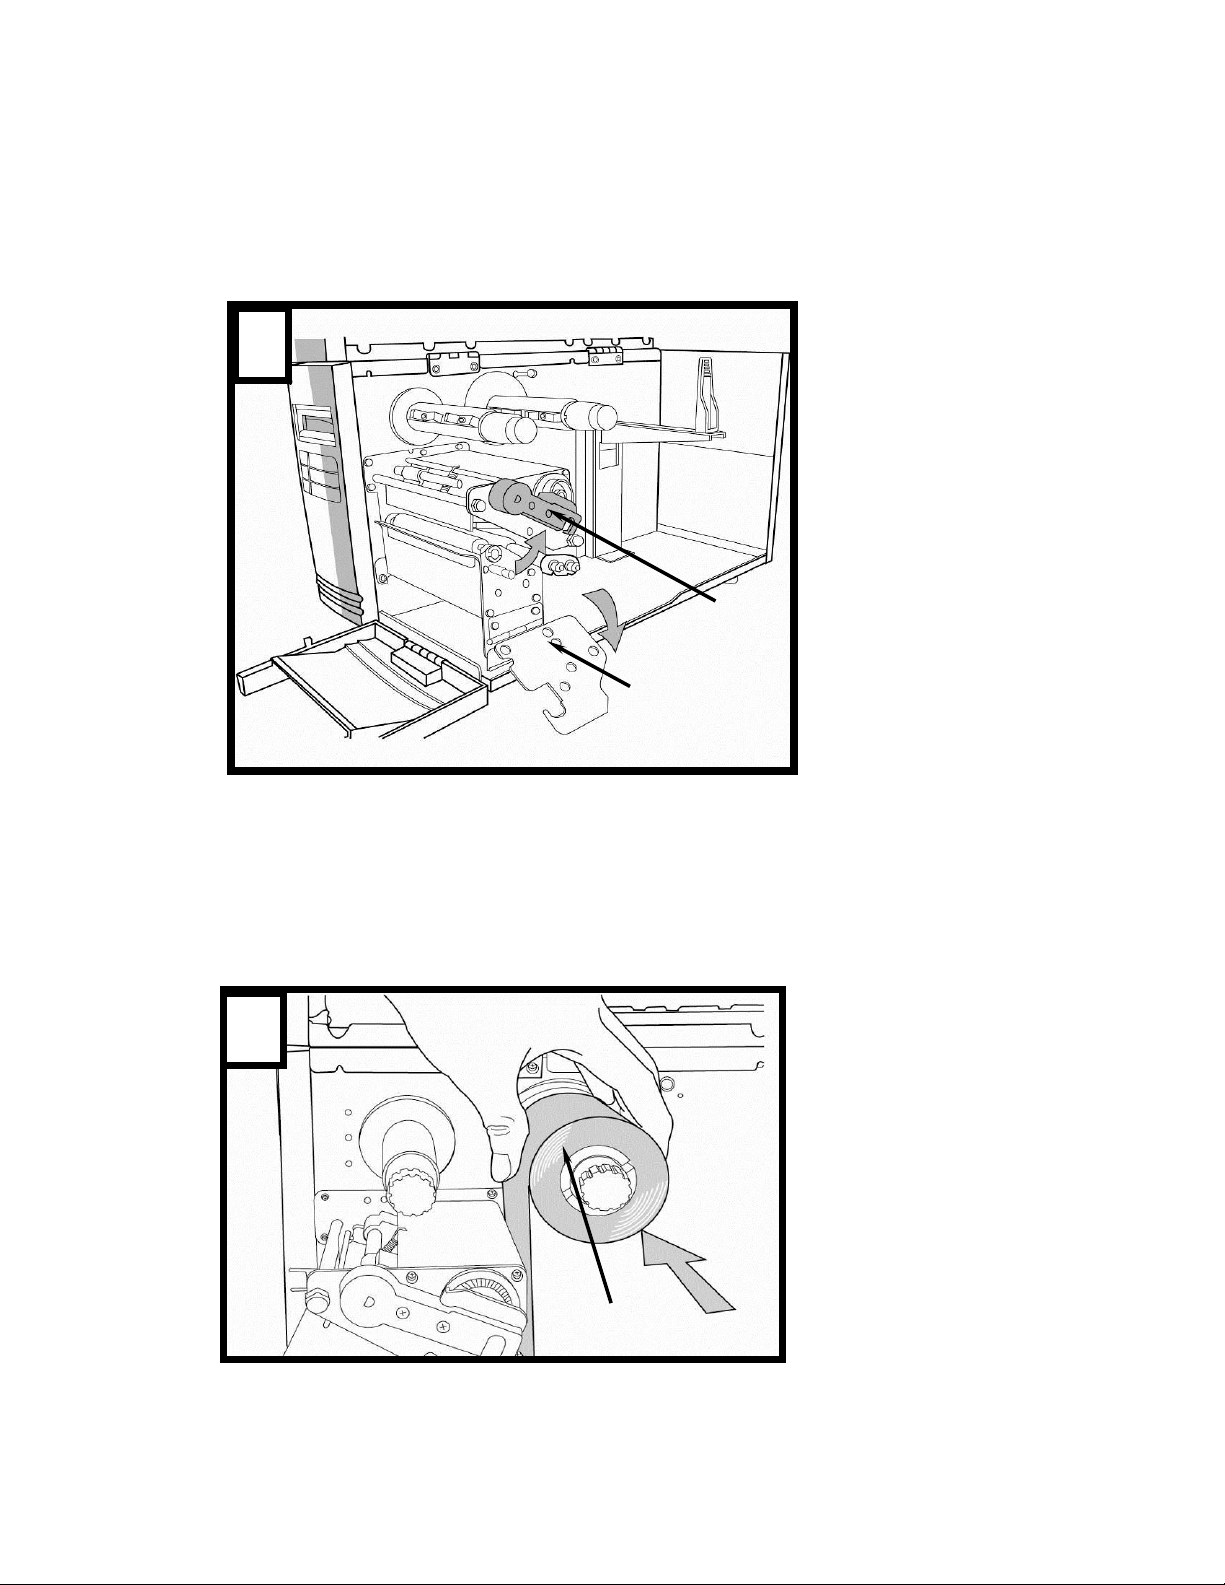
16
Bracket
2
Head
Latch
3
Ribbon Supply
2. Turn the head latch counter-clockwise and open the bracket. (Figure 2)
3. Unwrap the ribbon and separate the ribbon roll from the bare core. Insert
the ribbon roll onto the ribbon supply spindle. (Figure 3)
17
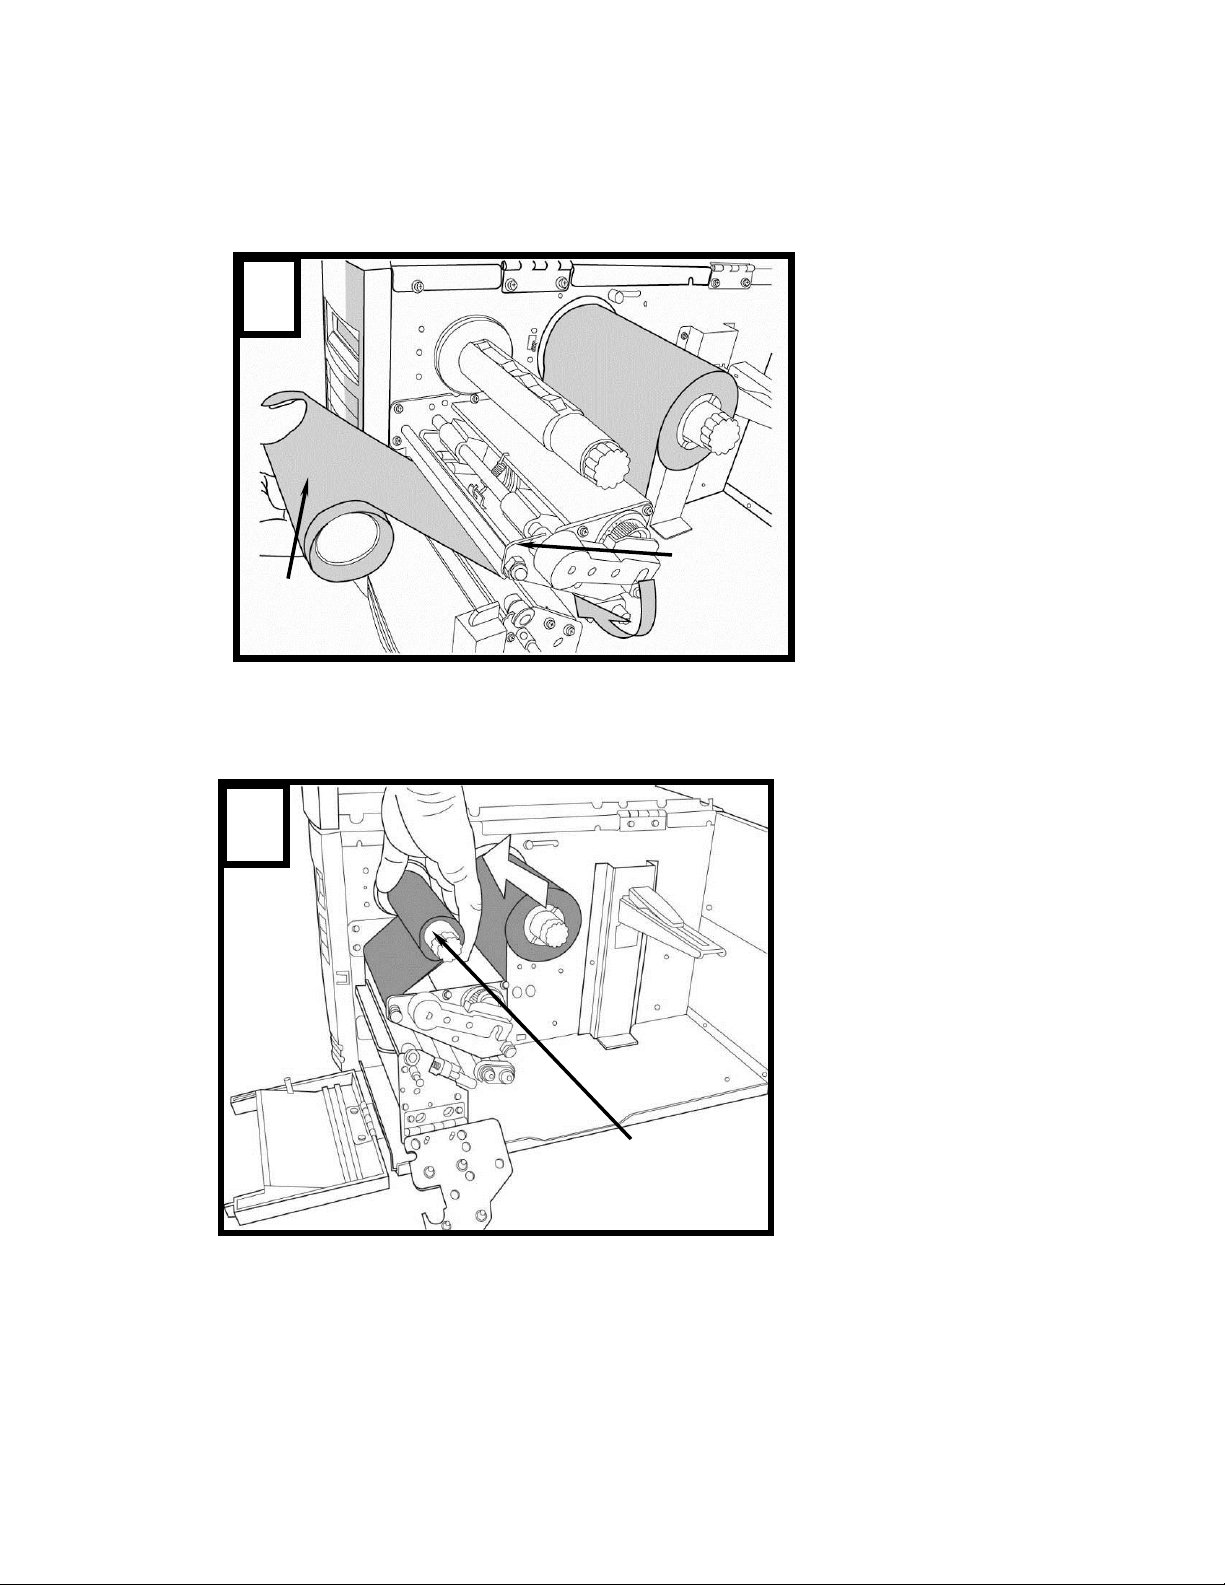
4. Lead the ribbon through the print head module. (Figure 4)
Bar Core
Print
Head
Module
4
Ribbon
Pick-up
5
Ribbon Pick-up
Spindle
5. Attach the edge of the ribbon onto the bare core and wind it a bit onto the
core. Make sure the coating side of the ribbon is face down.
6. Insert the core onto the ribbon pick-up spindle. (Figure 5)
7. Turn the pick-up spindle to ensure the ribbon is tightly wound.

18
6
Media
Guide
Media Supply
Spindle
Loading Media
The 4600 PLUS series printers offer three different loading modes: standard,
peel-off, or with a cutter.
Standard mode allows you to collect each label freely.
Peel-off mode peels backing material away from the label as it prints. After
the label is removed, the next label prints.
Cutting mode automatically cuts the label after it prints.
Standard Mode
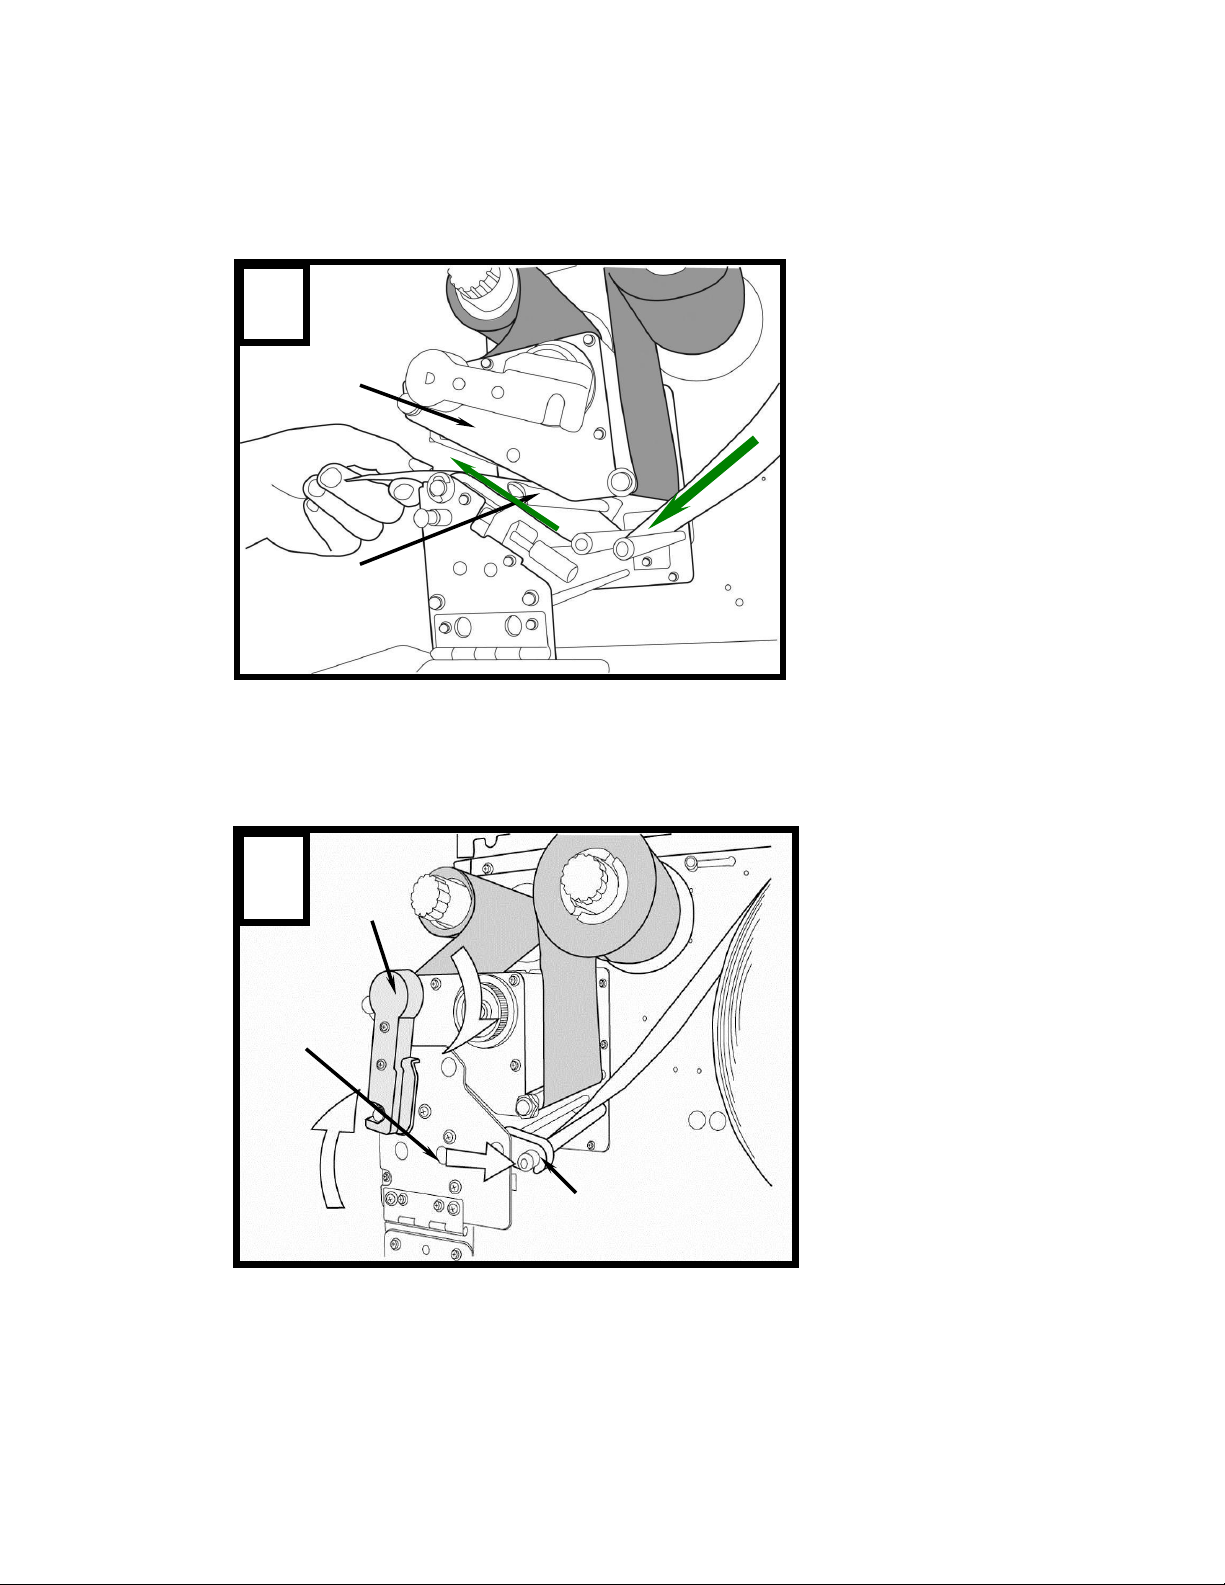
1. Insert the media roll into the media supply spindle and move the media
guide to the inside. (Figure 6)

19
Head
Latch
Bracket
Outside
Media
Guide
7
2. Turn the head latch counter-clockwise and open the bracket. Remove the
outside media guide. (Figure 7)
20
3. Lead the media through the print head module and under the paper
9
Head
Latch
Outside Media Guide
Bracket
8
Print Head
Module
Paper Sensor
Guide Module
sensor guide. (Figure 8)
4. Return the outside media guide, close the bracket, and hook the head
latch. (Figure 9)
21
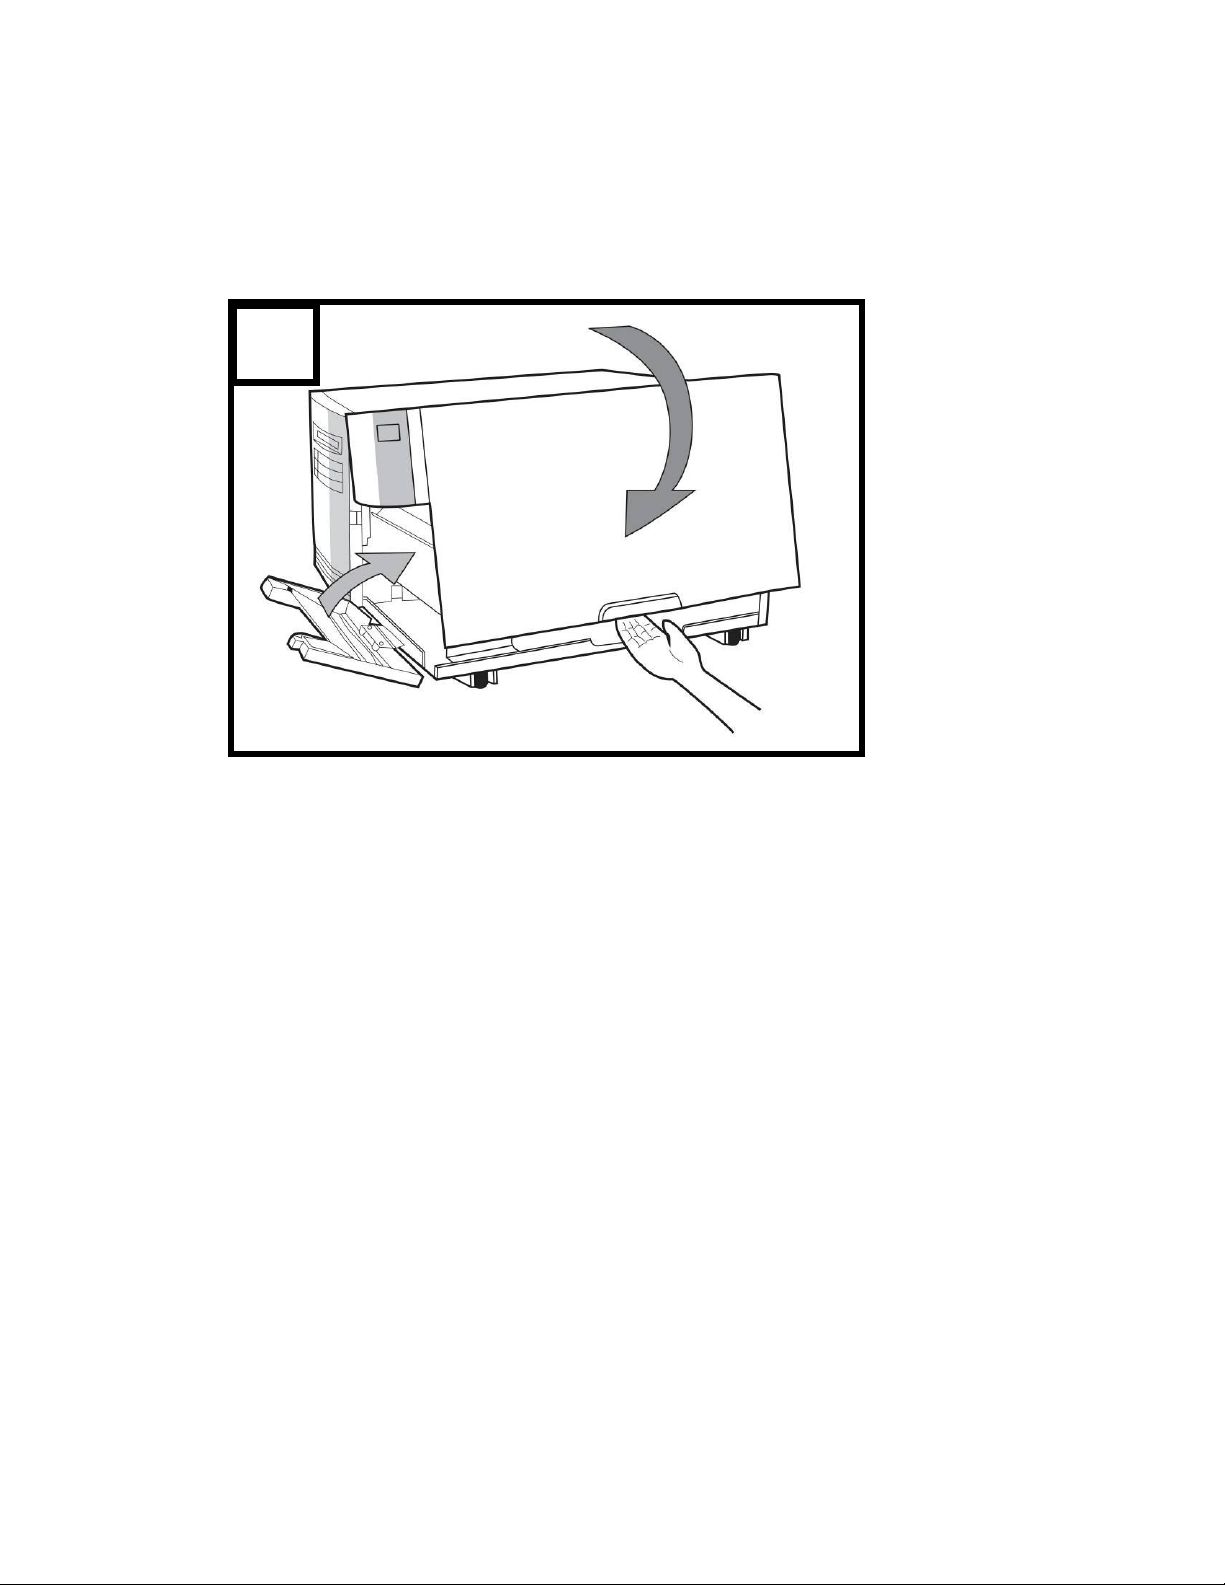
10
5. Close the top cover and the front access door and turn on the printer, or
press the “FEED” button if the printer is already on. (Figure 10)
22
11
Remove labels
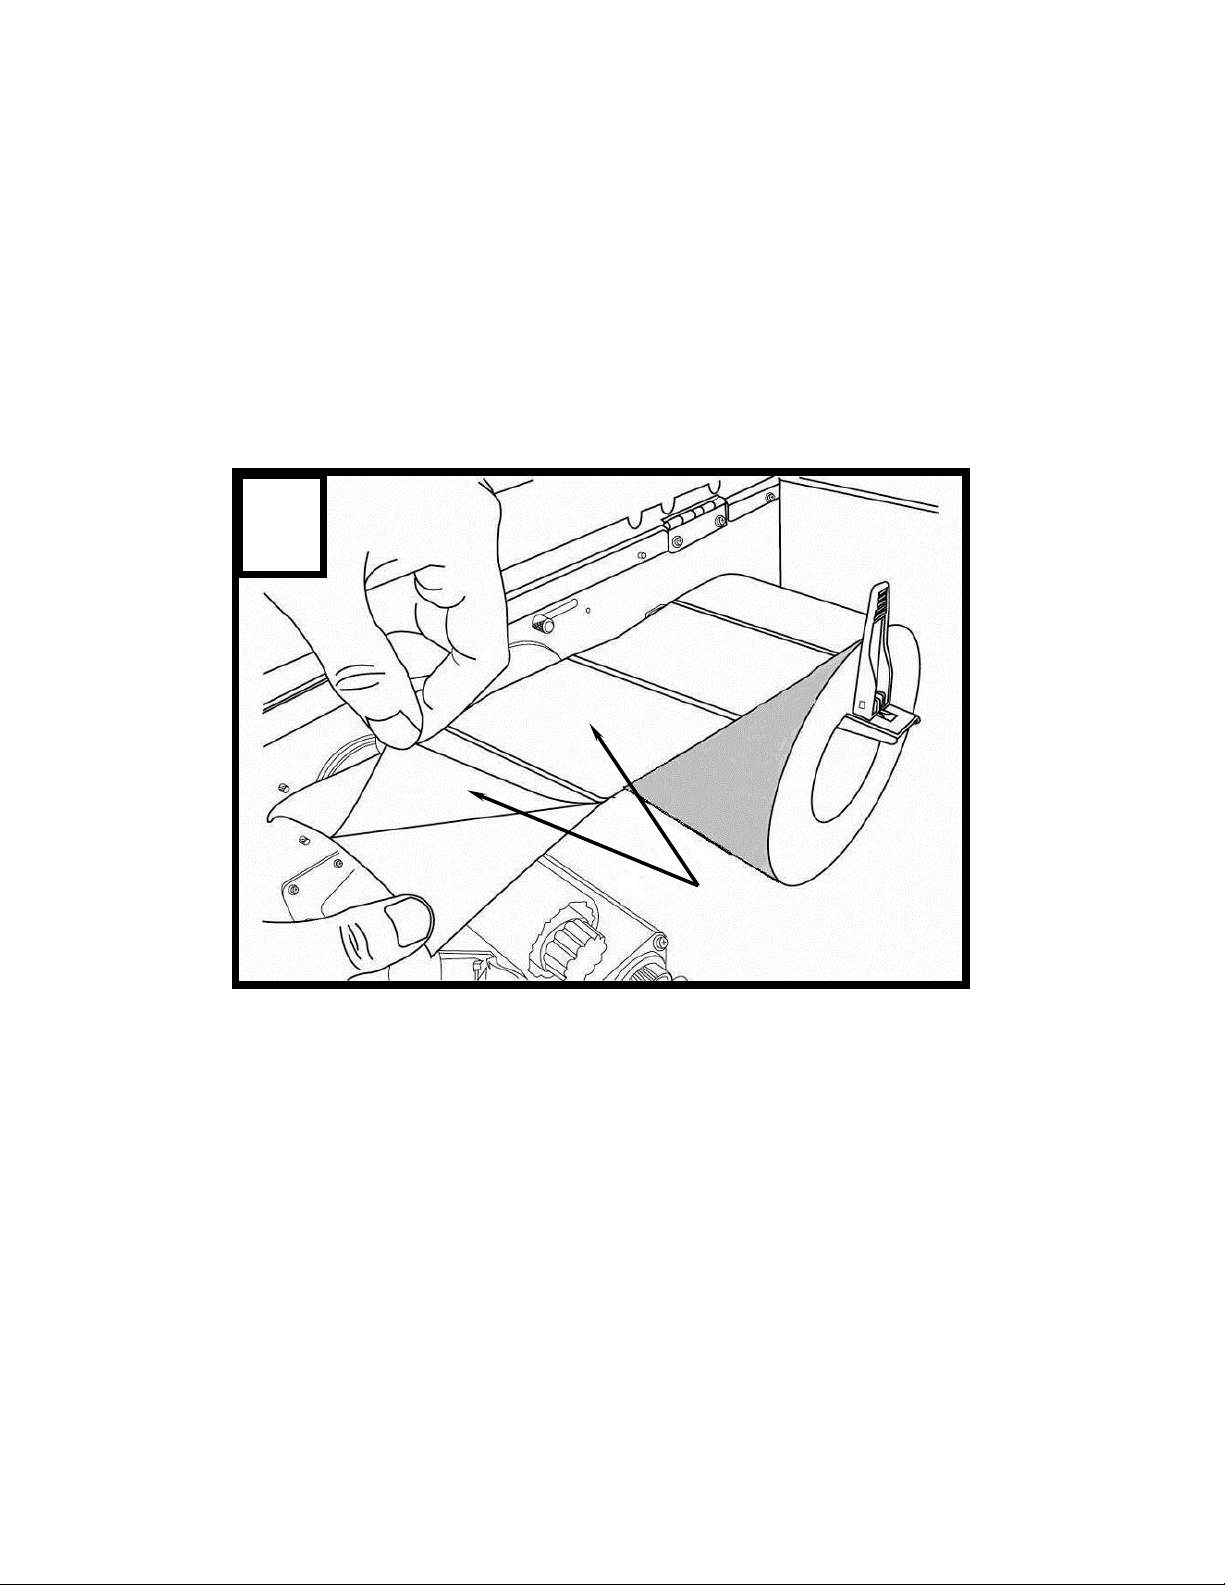
Peel Off Mode
Follow steps 1 to 3 in “Loading the Media – Standard Mode” above.
1. From the leading end of the media roll remove enough labels to expose
6-inches of backing/liner. (Figure 11)
 Loading...