

Page 1
!se$ s!%ui(e
)i*i+al!.a+elli+e!/ecei1e$
Page 2

Information contained in this manual is subject to change without notice. No part of this
publication may be copied, reproduced, or translated to another language for any
purpose.
FOR YOUR SAFETY
Be sure to read the user manual before starting the operation of the receiver.
Do not open the housing. The receiver contains high-voltage components and parts.
Even after switching off the receiver still contains high-voltage for a while.
Do not expose to rain or moisture.
Do not make objects or fluid enter the housing through the ventilation slot. If any
spilt liquid went into to the housing, unplug the power cord and call your local
service provider.
Do not place close to any heat source.
Do not press with hard or heavy object.
To protect possible malfunction by lighting, we recommend you to use power surge
unit. Call your local dealer for advise.
F O R Y O U R S A F E T Y
II
Page 3

For Your Safety
1. Before Getting Started 1
1.1 Main Features 1
1.2 Accessories 2
2. Controls and Functions 3
2.1 Front Panel 3
2.2 Rear Panel 4
2.3 Remote Control Unit 5
3. Connections 7
3.1 Connecting to the TV, VCR and Satellite Antenna 7
3.2 Connecting DiSEqC switch 7
3.3 Connecting to the TV, HiFi system and SPDIF 8
4. Settings and Operations 9
4.1 Basic Settings 9
4.2 Viewing TV(or Radio) 14
4.3 Other functions 18
4.4 System Settings 21
4.5 Game 24
5. Appendix 25
5.1 Troubleshooting 25
5.2 Specification 25
5.3 Glossary 26
III
C O N T E N T S
Page 4
1.1 Main Features
Easy Menu Function
TV Guide Function
RF Output Function
Electronic Program Guide(EPG) for On Screen Channel Information
Software Upgrading Function Through RS-232C Cable by PC
Perfect DiSEqC 1.2 and 0/12V Support for Various Antenna System or 2-LNB on 1
Antenna System
Supports of Ku/C band, SCPC and MCPC
Additional Audio Output Function for Connection to Hi-Fi Audio System
Other Functions of Remote Controller, Receiving Level Selection, Channel Editing,
Menu Language Selection and Audio Selection
Digital free-to-air Satellite Receiver
NTSC & PAL Output Function
Regardless of the TV type, NTSC and PAL channels can be viewed by selection
When PAL channel is viewed on NTSC TV, small deletion on up & down sides of the screen
may occur and it is normal, as its conversion is managed by software. And darker color on the
bottom side of the screen may occur, when NTSC channel is viewed on PAL TV.
1200 Transponders and 1820 Channel Memory Function
Teletext Supported
Multi Language Function(Menu, Audio)
B E F O R E G E T T I N G S T A R T E D
1
Note
Page 5
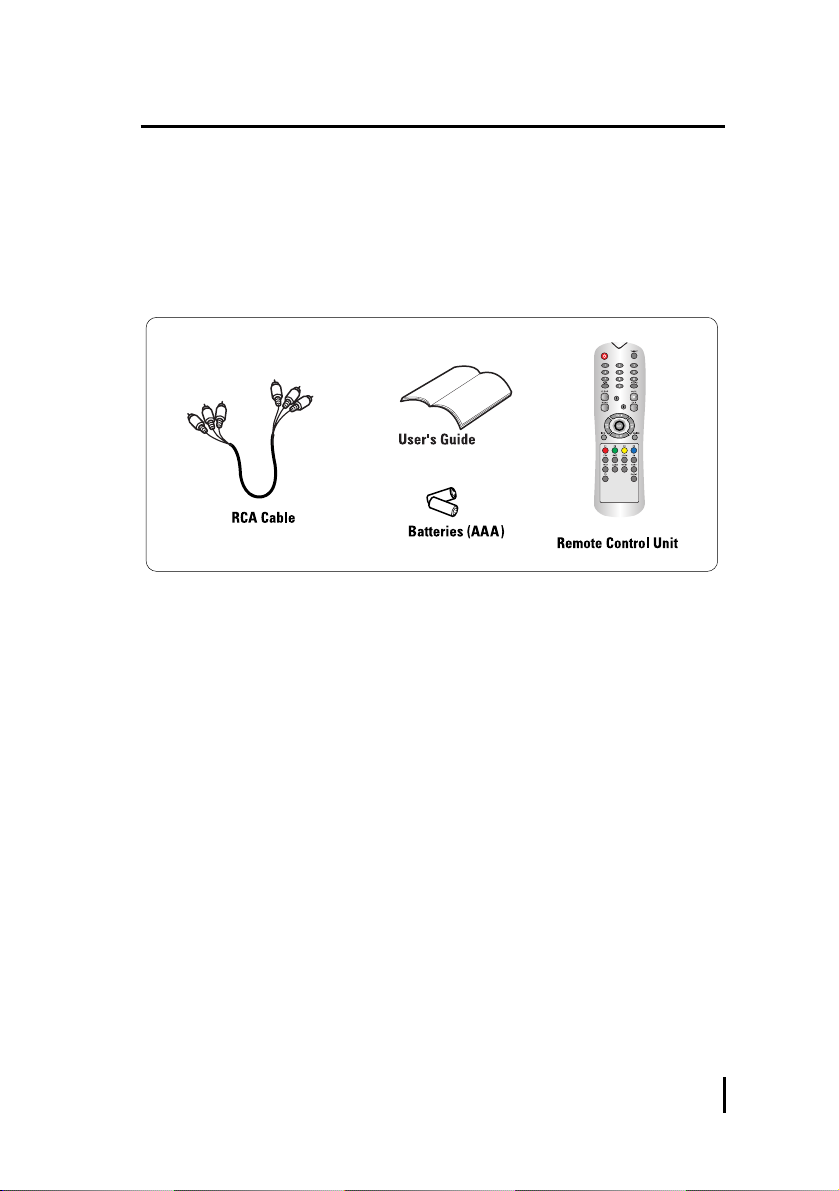
1.2 Accessories
RCA cable
User’s Guide
Batteries(AAA)
Remote Control Unit
2
A c c e s s o r i e s
Page 6
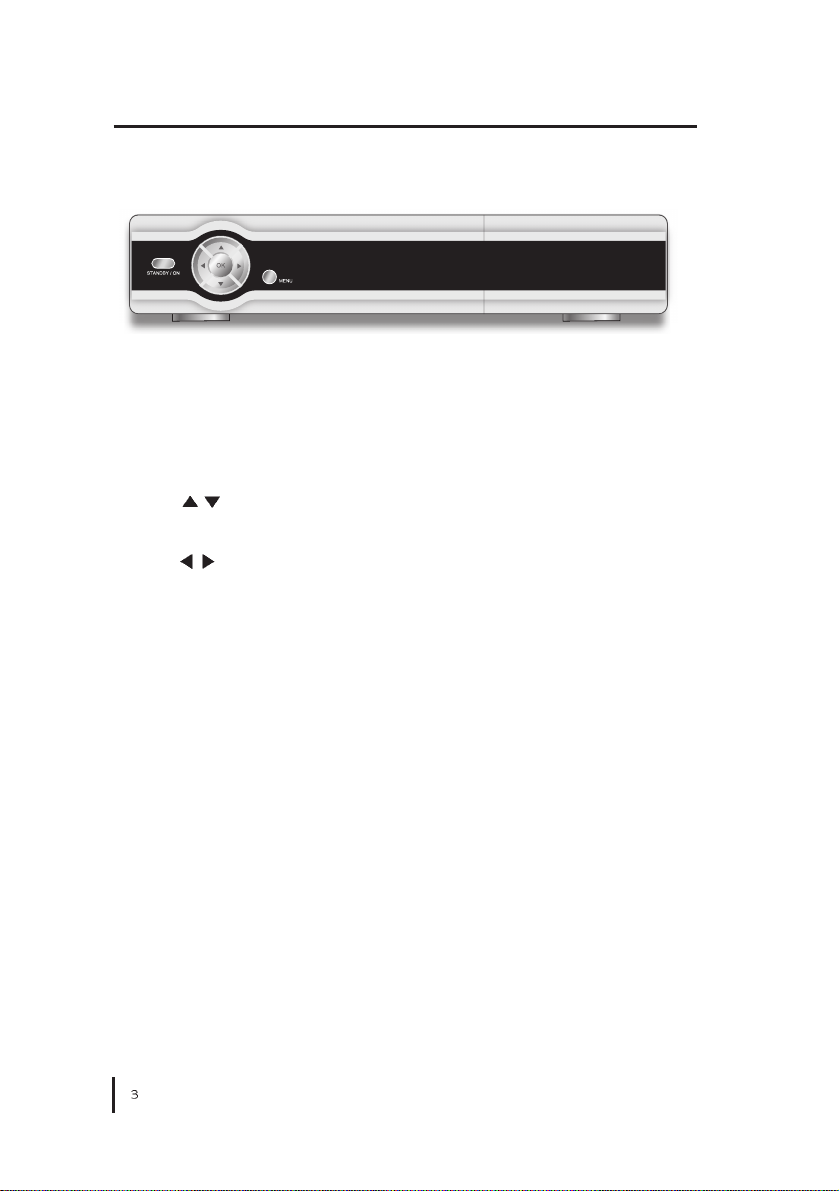
2.1 Front panel
STANDBY / ON
Turn the power on/off.
MENU
Shows the menu application.
Channel
Change channel, move menu, or input frequency value.
Volume
Control volume, change item on menu or input frequency value.
C O N T R O L S A N D F U N C T I O N S
Page 7
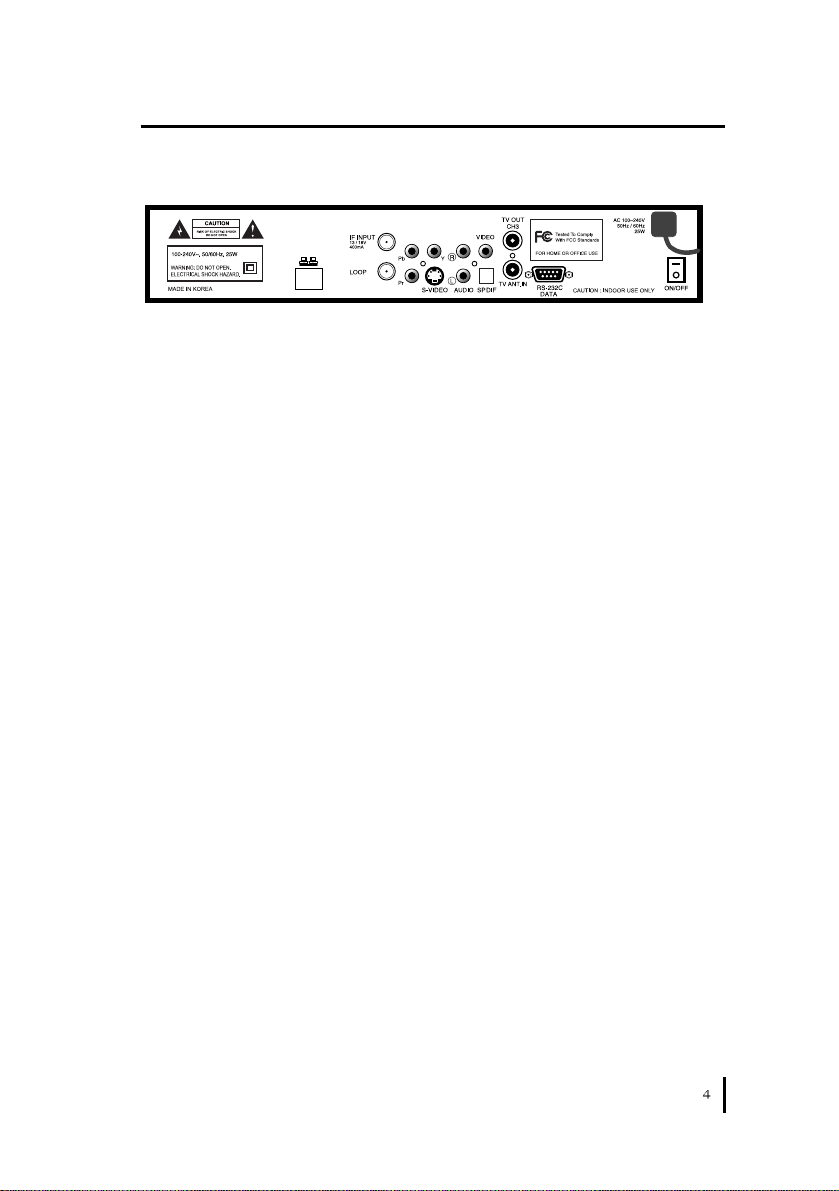
2.2 Rear panel
IP Connection
Network interface
IF INPUT
It receives signals from the LNB in the range of 950 ~ 2150MHz. Connect a satellite dish
to DIGITAL.
LOOP
It sends signal to the another receiver.
YPbPr
Component analog video signal.
S-VIdeo
It provides high definition screen.
AUDIO
It provides stereo audio output. Connect the audio on TV to AUDIO with RCA cable.
VIDEO
It provides composite video output. Connect the Video on TV to VIDEO with RCA cable.
SPDIF
Output for connection to a digital amplifier
TV OUT CH3
It provides a modulated audio and video from the receiver. Connect the TV/VCR on TV to
TV/VCR with the RF cable.
TV ANT IN
The signal supplied to this connector from a TV antenna will be sent to TV antenna
output. Connect a TV antenna to TV ANT IN.
RS-232C DATA
It receives data by connecting to PC for software upgrading. Connect with RS-232C
cable a PC and receiver.
ON/OFF
The switch is to turn on or off the main power of the receiver mechanically.
R e a r p a n e l
Page 8
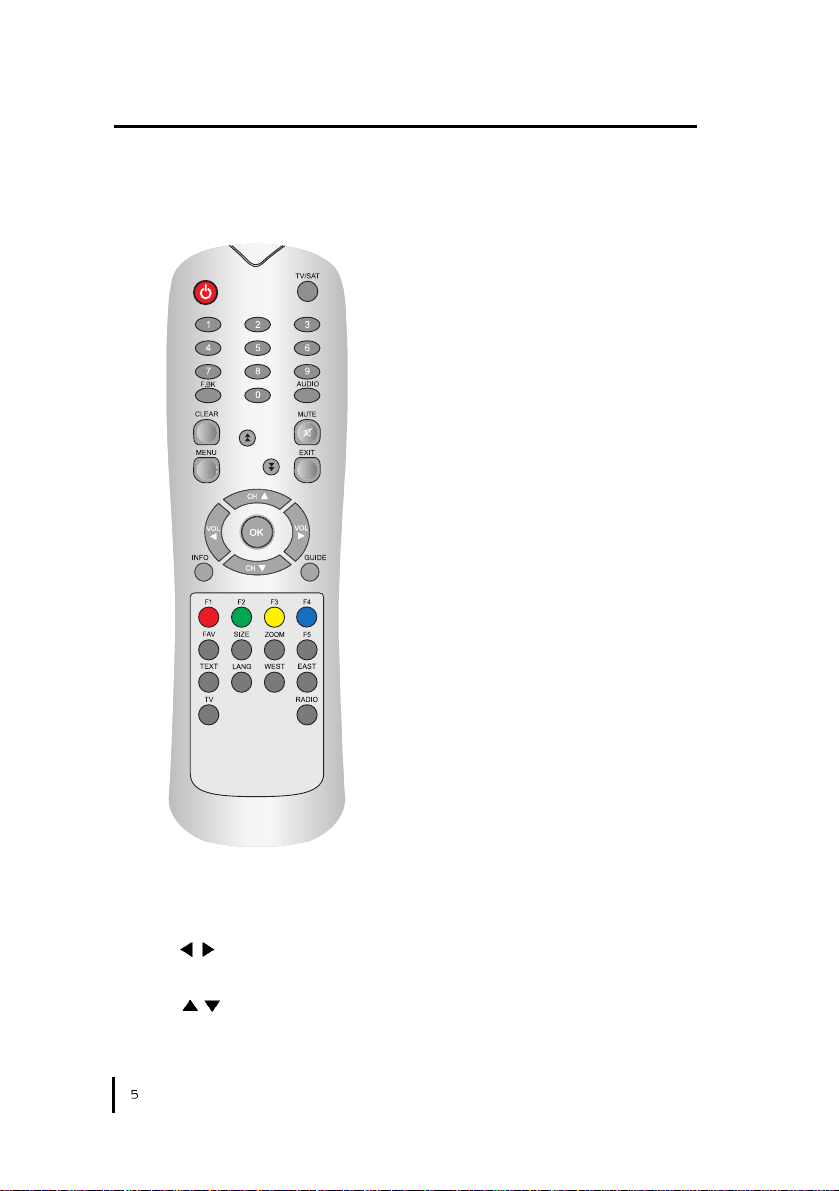
2.3 Remote Control Unit
C O N T R O L S A N D F U N C T I O N S
Open the controller cover on the back and insert two batteries (AAA - 1.5V).
POWER
Turn the power on/off.
TV/SAT
Select between TV Channels and Satellite
channels for RF output.
Numeric(0~9)
Change channel or input frequency value.
F. BK
It is to move to previous channel.
AUDIO
Select Stereo , Mai n or Sub from mult i
language channels available.
CLEAR
Clear wrong number input or delete channel
from TV (Radio) list or favorite channel list.
MUTE
Deactivate current sound.
MENU
Shows the menu application.
Page UP/DOWN
Move to previous/next page on TV(Radio),
Fa v orite Ch a nnels or Ed i t TV(Rad i o)
Channels.
EXIT
Exit from the menu.
Volume
Control volume, change item on menu or input frequency value.
Channel
Change channel, move menu, or input frequency value.
Page 9

OK
Select menu or value on menu item.
INFO
Shows the information of current channel. Click the INFO button twice, EPG mode will
be displayed. When pressed in channel list channels will be sorted in alphabetical order
A-Z.
GUIDE
Shows EPG[Electronic Program Guide]
FAV
Add TV or Radio channel to the favorite list on Edit TV(Radio) Channels, or watch favorite
channel from your favorite list.
SIZE
Select between standard 4:3 and wide 16:9 screen sizes.
ZOOM
2 times zoom in mode. First press, show target area box. Second press, show zoomed
screen. Zoom area can be moved with arrow keys. Exit zoom in mode with "EXIT" remote
key.
TEXT
Change to Teletext mode.
LANG
Select the audio language from 2 or more audio language channels available.
EAST/WEST
Th e f uncti o n o f EAST/ W EST butt on is to move th e P ositi o n A ctuat or
westward/eastward.
TV
Change to TV mode from radio channel.
RADIO
It is for fast change to radio mode from TV channel. .
R e m o t e C o n t r o l U n i t
Page 10
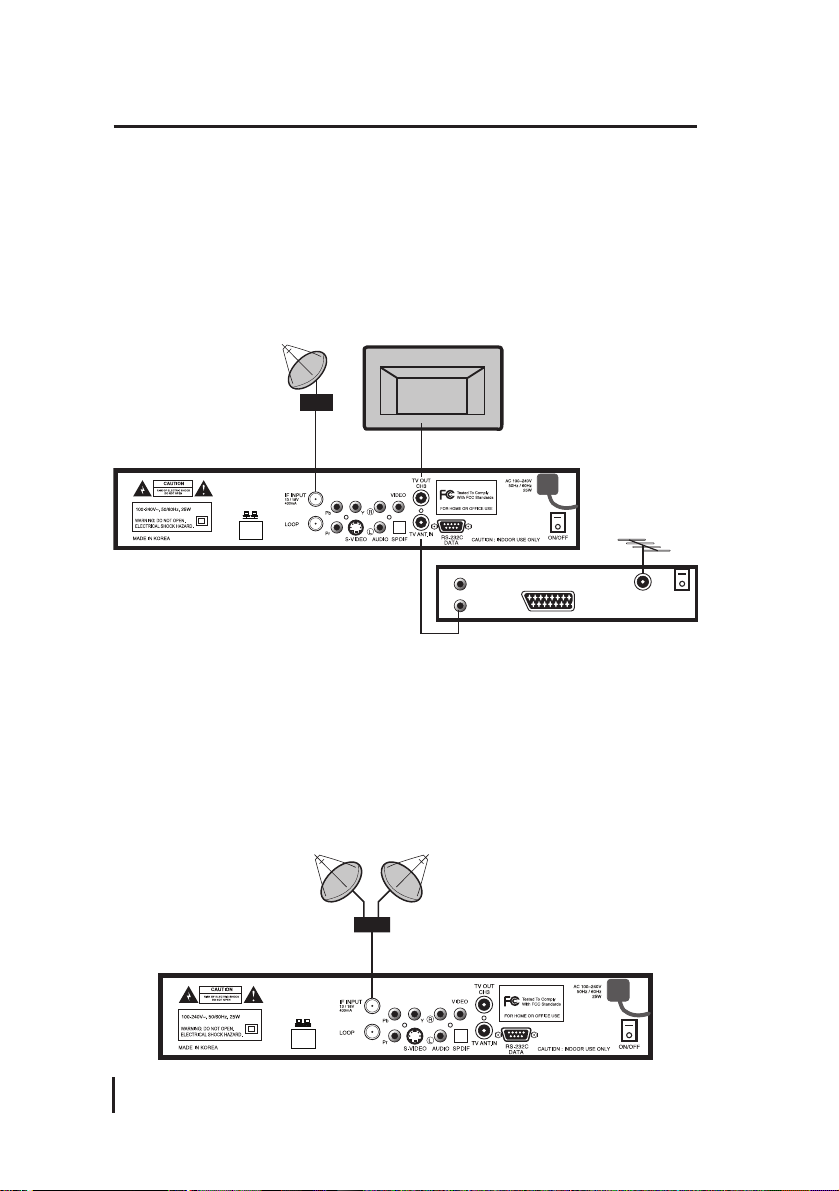
3.1 Connecting to the TV, VCR and Satellite Antenna
It is not necessary to adjust power, as the product is of free - voltage (110~220V )
1. Connect the RF cable from the TV OUTPUT on the satellite receiver to a TV and
connect the RF modulate on the VCR and the TV ANT.IN.
3. Connect an antenna to the LNB socket on the VCR or other receiver and cable of the
satellite dish to the DIGITAL on the satellite receiver.
3.2 Connecting DiSEqC switch
If you have one antenna equipped with many LNBs or two antennas with one LNB on
each, you need a DiSEqC switch.
1. Connect the LNBs to a DiSEqC switch at first.
2. Connect the antenna cable to the OUT connector on the DiSEqC switch and connect
the end of the cable to the DIGITAL on the satellite receiver.
C o n n e c t i o n s
7
DiSEqC switch
Page 11
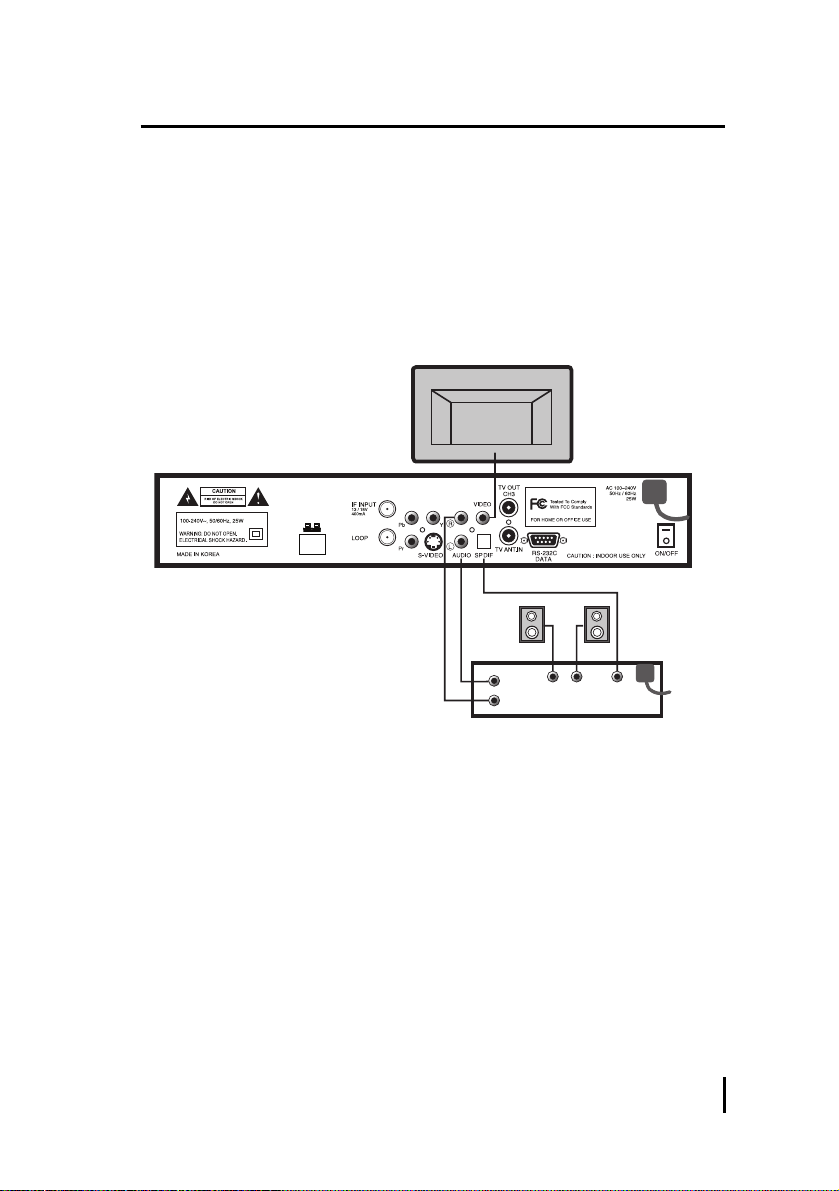
3.3 Connecting to the TV, HiFi system and 0/12V switch
1. Connect the RCA cable from the VIDEO INPUT on the TV to the VIDEO on the satellite
receiver.
2. To use 0/12V switch, connect one cable of the 0/12V switch to the 0/12V on the
satellite switch and connect another cable to the DIGITAL on the satellite receiver.
3. Connect a RCA stereo cable from the AUDIO RL on the satellite receiver to the AUDIO
RL on the HiFi system.
8
C o n n e c t i n g t o t h e T V
Page 12
S e t t i n g s a n d O p e r a t i o n s
4.1 Basic Settings
If it is the first time using a receiver, you should set parameters for system configuration.
Refer to the following section.
1. Turn on your TV and Satellite receiver.
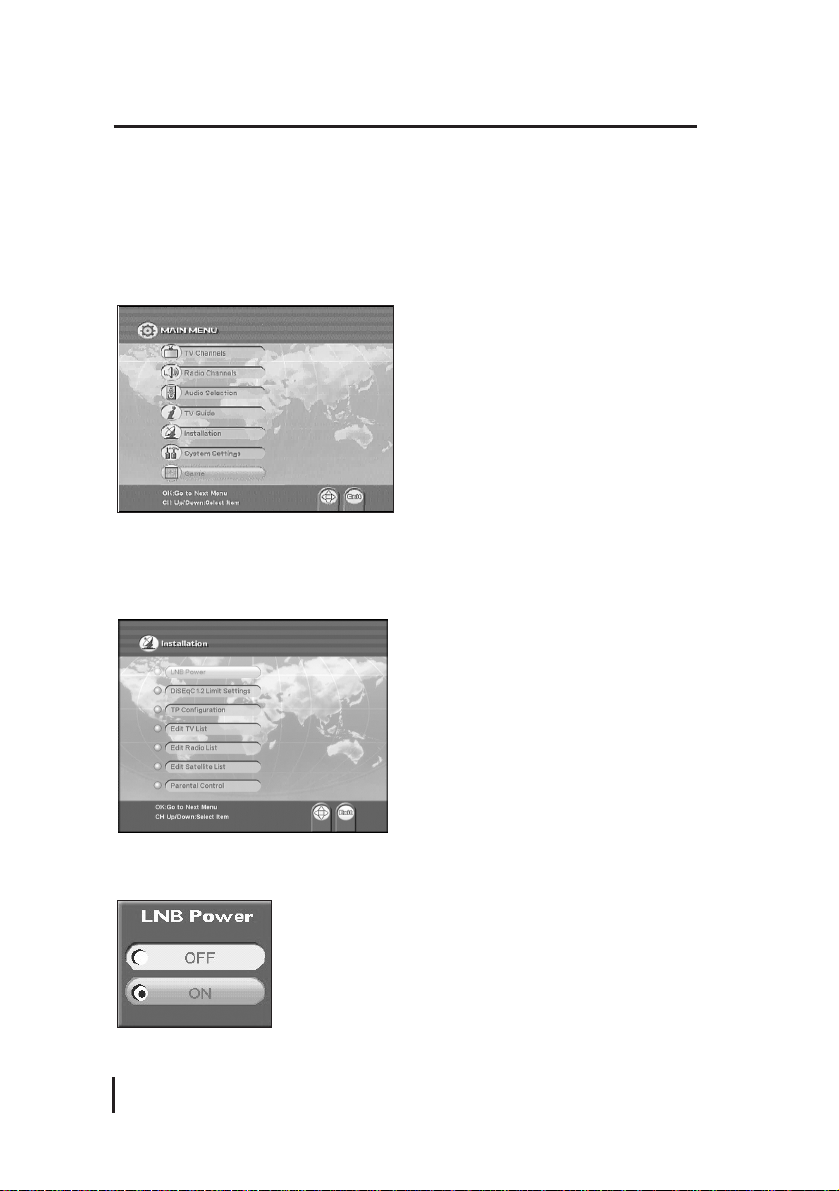
2. Press the MENU button, main menu screen will appear as shown below.
<LNB Power>
1. Select Installation on the Main Menu.
2. Select LNB Power.
3. If LNB Power is independently supplied from outside source, set the LNB Power OFF.
Otherwise set it ON.
4. After completion of LNB Power setting, go back to Installation menu by pressing MENU.
9
Page 13
<DiSEqC 1.2 Limit Settings>
If you have a DiSEqC 1.2 motoried system to control your satellite antenna you have to
make the following setting. First, you must select ON on DiSEqC 1.2 of LNB Setting in
the TP Configuration. <
Please refer to the TP Configuration section >
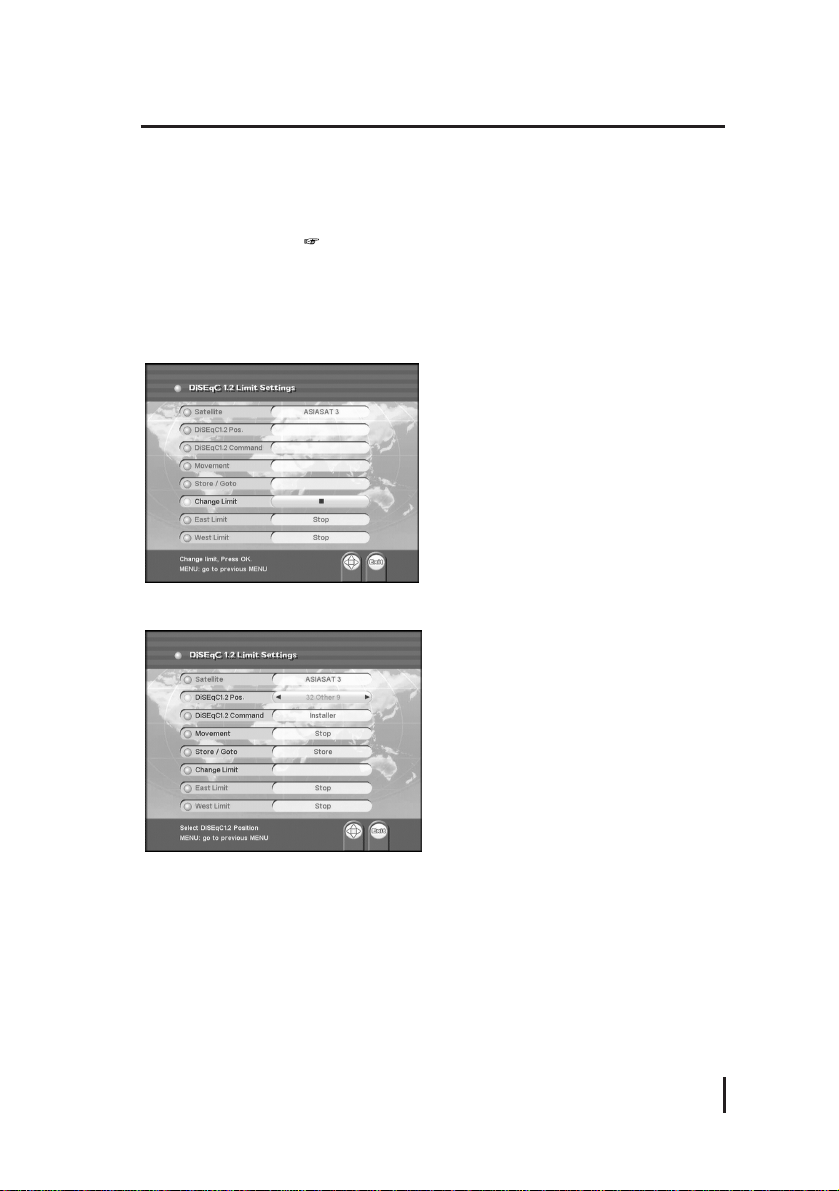
1. Select DiSEqC 1.2 Limit Settings of the installation.
2. You should set the East Limit and West Limit of your satellite antenna If you use the
satellite receiver at first. Press OK button on the Change Limit item, set the East/West
Limit.
3. Select satellite you want and DiSEqC1.2 Pos. will be set automatically.
Satellite / DiSEqC1.2 Pos.
The Satellite shows current name of satellite, and DiSEqC1.2 Pos. shows positioner
value of the current satellite.
DiSEqC1.2 Command
DiSEqC1.2 Command changes the current mode between Installer and User.
Movement
In User mode this is used to tune the position of the motor. In Installer mode this is used
10
D i S E q C 1 . 2 L i m i t S e t t i n g s
Page 14
to search for the position of a satellite manually.
Store
Stores the current position of the motor for the selected satellite name.
Goto
Moves the motor to the stored position of the selected satellite name.
<TP Configuration>
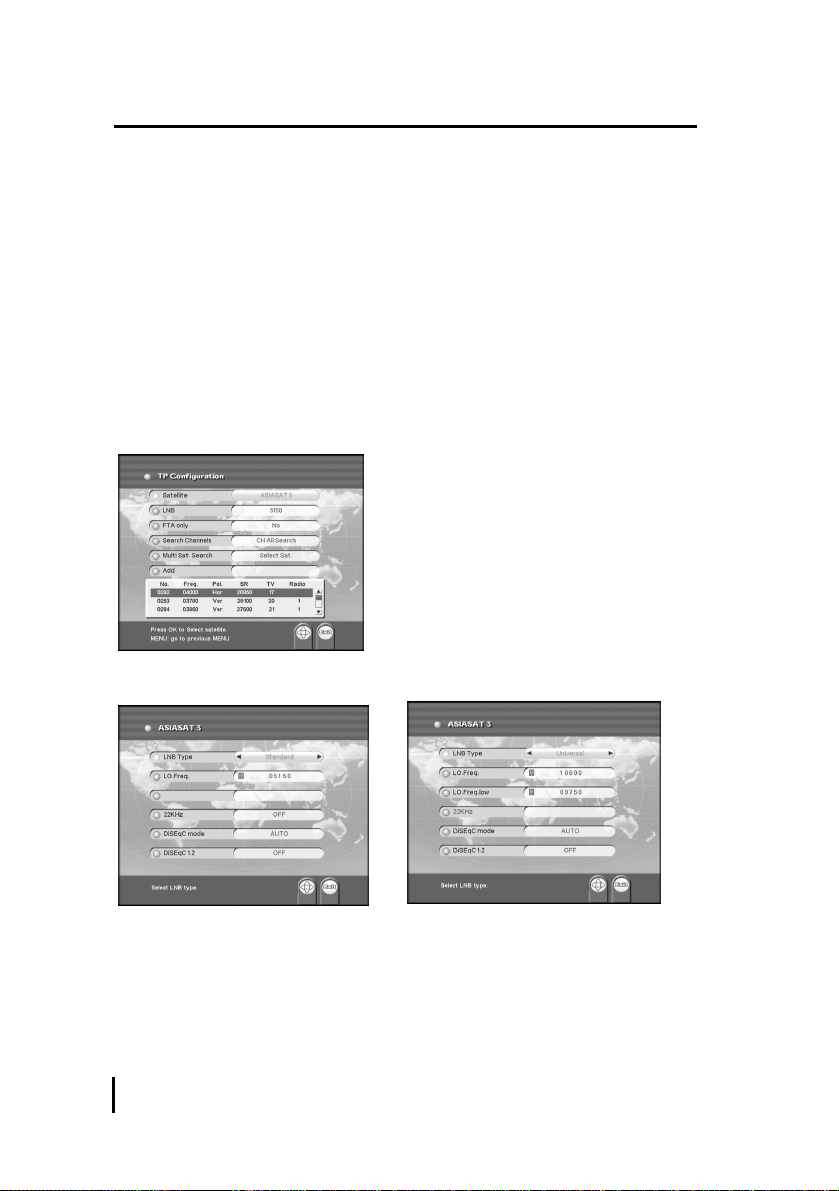
You have to know valid value for your LNB at first.
1. Select TP Configuration of the installation.
2. Select correct name of Satellite. If there is no proper satellite name listed in the item,
select one from any of USER1 ~ USER 19.
3. To change value of LNB from each satellite, press OK button from LNB.
< Standard > < Universal >
11
S e t t i n g s a n d O p e r a t i o n s
Page 15
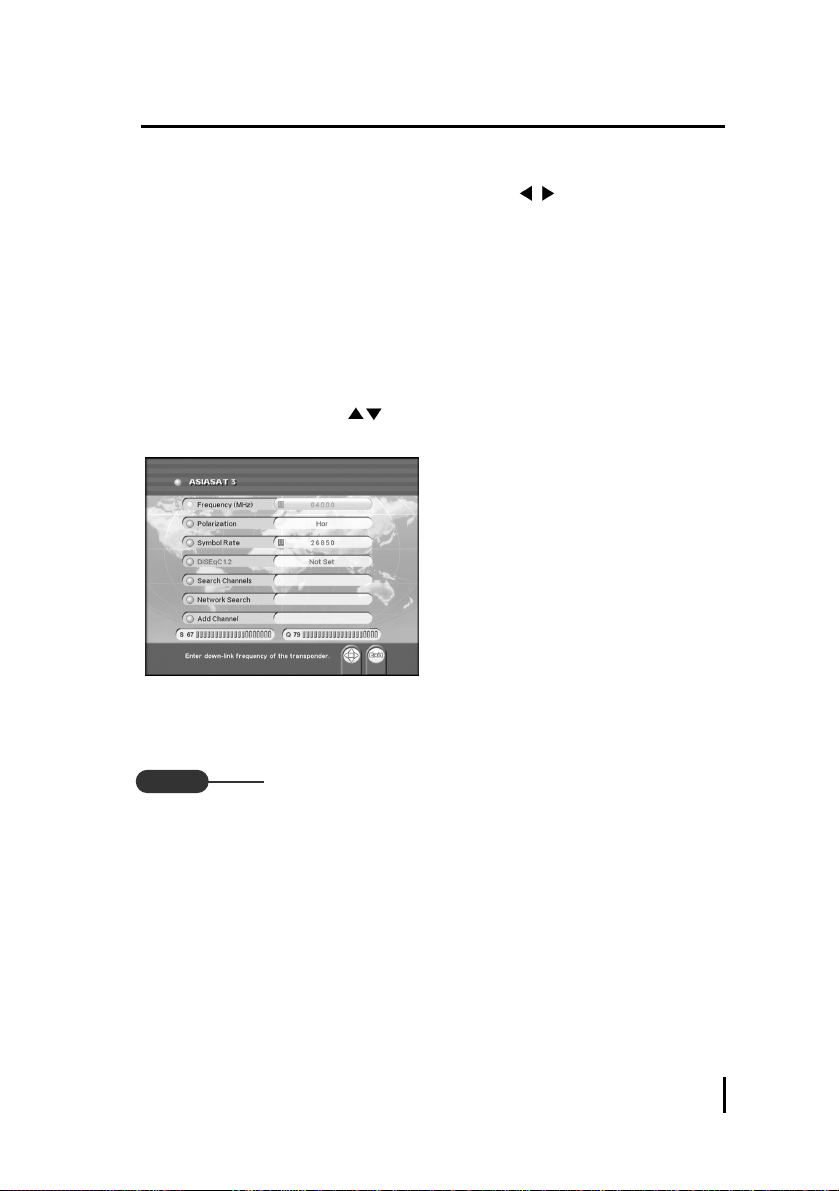
4. For universal type of LNB, select Universal from LNB Type item and input the LNB
frequency value on Freq.High and Freq.Low by using VOL or numeric key.
For standard type of LNB, select Standard from LNB Type and input correct value on
Freq..
5. While only 1 antenna is in use, set the 0/12V switch and DiSEqC mode. to Disable. In
case of STANDARD, select OFF from 22KHz. If more then 1 antenna is in use, select 0V
or 12V from 0/12V SWITCH, or select a proper position from Mini A, Mini B, DiSEqC 1 ~
DiSEqC 4 by different DiSEqC type as you are using DiSEqC switch.
6. Select Search Channels on the TP Configuration press OK, all the available TP will be
searched automatically.
7. Move to desired TP with CH
on the RCU. If there are no transponder data which
you want, move to Add New TP and press OK button.
8. Select the desired satellite. And input correct values of Frequency, Polarization and
Symbol Rate. Select the Polarization value as Hor of Ver. If you did not know accurate
polarization value select Auto.
You should find the correct data from satellite magazine or internet(http://www.SATCOD
9. After all the values are input, select Search Channels and wait until the automatic
search is complete
If FTA only is selected as YES, only free channels will be searched without scrambled
pay channels. Otherwise all channel with scrambled pay channels will be searched.
Scrambled pay channels is marked as $ at the beginning of the channel name.
After successful completion of channel searching, move to TV Channels or Radio
Channels on MAIN MENU to select currently received channels. Then you should select
the TV channel or Radio channel which you want. After then you can watch the TV
program or listen to the radio.
12
T P C o n f i g u r a t i o n
Note
 Loading...