

Page 1
www.hotoneaudio.com
Bluetooth MIDI Controller
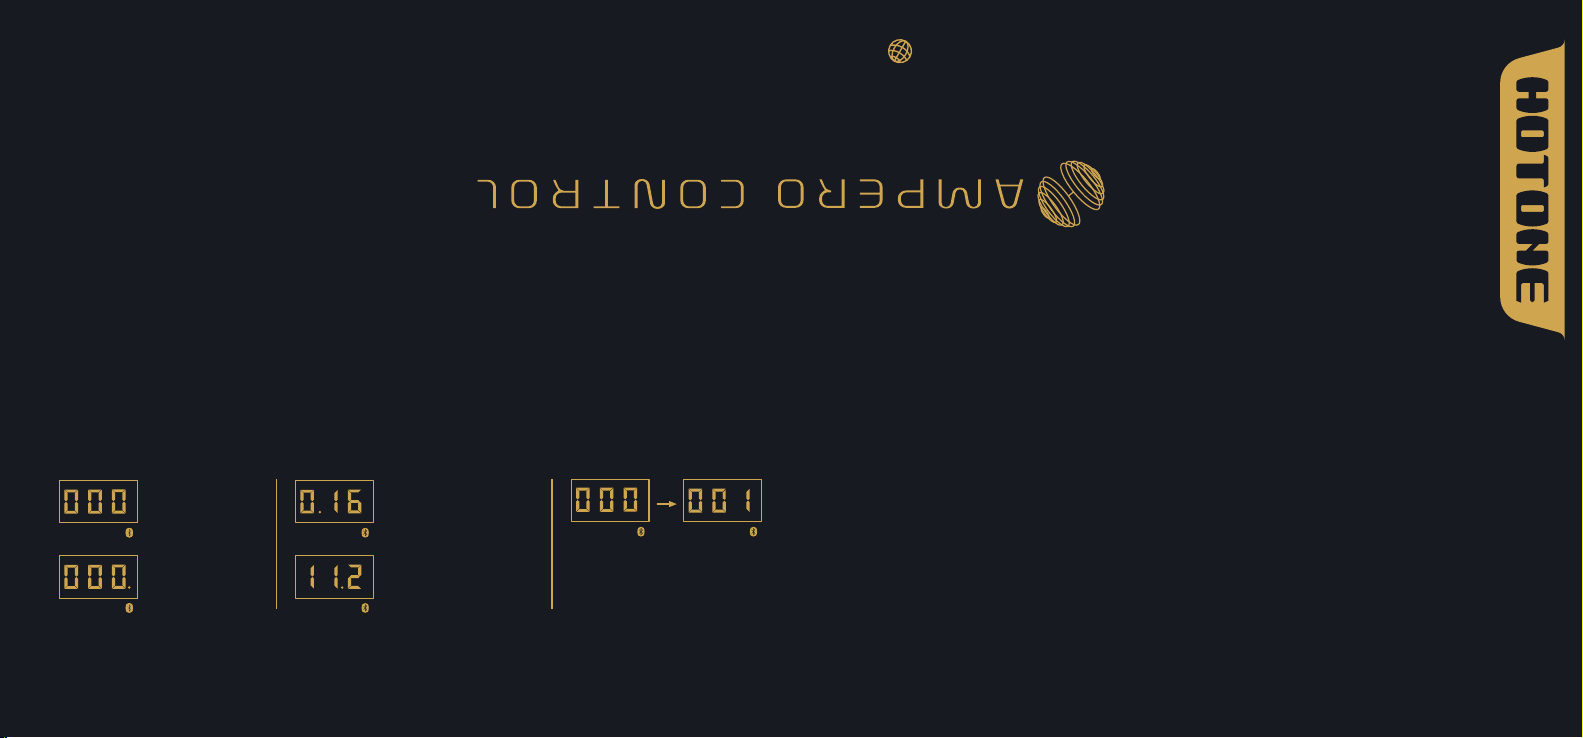
Screen Display Getting Started
Bluetooth
Bluetoothnot
PC CC PC CC
connected
Bluetooth
PC CC PC CC
The Bluetooth indicator (the dot shown
above) will flash when Ampero Control
is in Bluetooth Pair Mode (hold FS 2+3).
connected
PC CC
PC CC
MIDI
ThisindicatesaPC
message(PC16)
hasbeensent
ThisindicatesaCC
message(CC112)
hasbeensent
Bank
PC CC PC CC
Thisindicatesunitbank
change
(bank00tobank01)
1. Turn on the Bluetooth switch on your mobile device,
then turn on your Ampero Control and launch the app.
2. Login your account (optional).
3. Press and hold FS 2+3 on your Ampero Control to
enable Bluetooth Pair Mode. A dot will flash on the
bottom right corner on the screen of your unit to
indicate pairing status on.
4. When your Ampero Control appears listed on the
startup page, select and tap the “Connect To The
Selected Device” button on the screen. If search failed,
you can retry searching by manually tap “Search
Again” button.
Notes:
1. You can enter offline mode if no device is found.
2. Ampero Control can only be edited by one device at a
time. To use other devices, tap “Settings” icon on the
lower right corner of the screen, find “Connection
Status” and enter, then tap “Disconnect”. Connect
another device when finished.
3. The default device name is Ampero Control. You can
customize your device name if needed.
4. If search failed (no device found or timeout), you can
retry searching by manually tap “Search Again” button,
or restart Bluetooth on your mobile device.
5. When using Bluetooth connection for editing or MIDI
control, please keep your Ampero Control close to your
phones/pads/computers for best possible experience.
The recommended range is less than 5m.
Page 2
A B
1 2 3 4
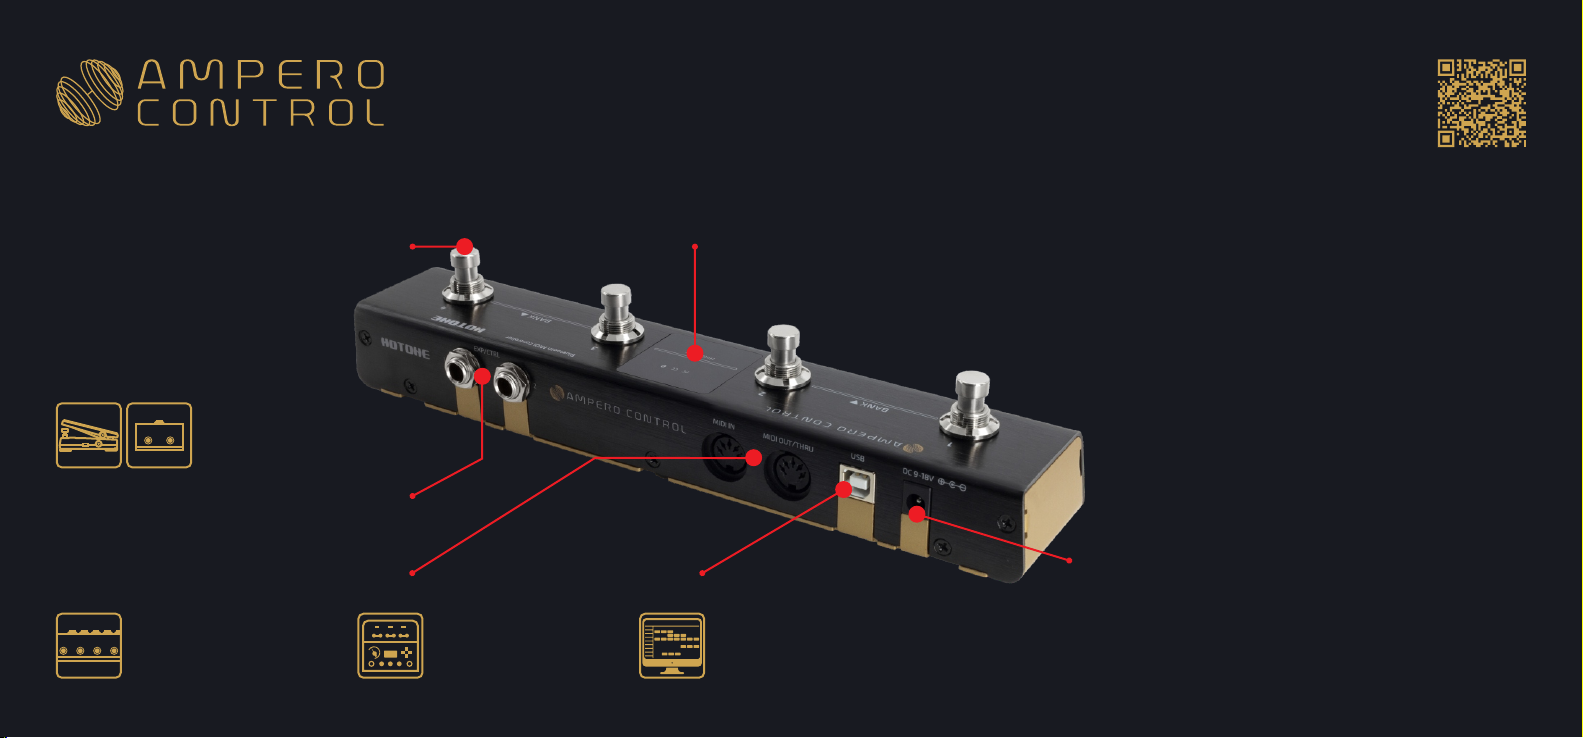
Panel
Programmable Footswitch (FS) 1-4:
For sending MIDI messages depending on your needs.
Use Ampero Control app for detailed settings.
Tap FS 1+2: Bank down
Tap FS 3+4: Bank up
Hold FS 2+3: Enable Bluetooth Pair Mode
Hold FS 4 while powering up:
Enable Expression Pedal
Calibration Mode
EXP/CTRL 1/2:
1/4” TRS inputs, for connecting
external expression pedals/momentary
footswitch controllers.
Perfect for Hotone Ampero Press or
Ampero Switch.
MIDI IN:
Standard 5-pin MIDI input jack,
for receiving MIDI messages.
Thank y o u f or purchasing a Hotone p ro du ct . Scan t he QR c od e f or th e full m an ua l an d a pp do wn lo ad links.
感谢您购买Hotone产品,请扫描右侧⼆维码获取完整说明书及配套软件下载地址。
www.hotoneaudio.com/support
MIDI OUT/THRU:
5-pin MIDI output jack,
for sending MIDI
messages.
We recommend you update the latest firmware/software for the best possible experience.
3-digit LED screen:
Indicates unit info (bank number, MIDI
messages, etc.). Please check Screen
Display section for details.
USB:
USB 2.0 Type-B jack, for USB MIDI control.
Ampero Control can be powered by the USB port.
我们建议您及时升级到最新固件/软件以获得最佳的⽤⼾体验。
Specifications
Compatible Exp Pedal Pot Resistance:
Power Requirement:
9-18V DC center negative or 5V DC (USB)
Current Consumption: Max. 100mA
Working Range: ≤5m
258.5mm (W)×55.5mm (D)×49mm (H)
Power Supply Connection:
(9-18V DC center negative).
The contents of this manual
are subject to change without notice.
Max. 10kΩ
Dimensions:
Weight: 440g
Power supply input
FCC Statement
This device complies with part 15 of the FCC Rules.
Operation is subject to the following two conditions:
(1) This device may not cause harmful interference, and
(2) This device must accept any interference received,
including interference that may cause undesired
operation. Any Changes or modifications not expressly
approved by the party responsible for compliance could
void the user's authority to operate the equipment.
Note: This equipment has been tested and found to
comply with the limits for a Class B digital device,
pursuant to part 15 of the FCC Rules. These limits are
designed to provide reasonable protection against
harmful interference in a residential installation.
This equipment generates uses and can radiate radio
frequency energy and, if not installed and used in
accordance with the instructions, may cause harmful
interference to radio communications. However, there
is no guarantee that interference will not occur in a
particular installation. If this equipment does cause
harmful interference to radio or television reception,
which can be determined by turning the equipment off
and on, the user is encouraged to try to correct the
interference by one or more of the following measures:
-Reorient or relocate the receiving antenna.
-Increase the separation between the equipment and
receiver.
-Connect the equipment into an outlet on a circuit
different from that to which the receiver is connected.
-Consult the dealer or an experienced radio/TV
technician for help.
This equipment complies with FCC radiation exposure
limits set forth for an uncontrolled environment. This
equipment should be installed and operated with
minimum distance 20cm between the radiator & your
body.
FCC ID: 2AHJSEC-4
 Loading...