

Page 1
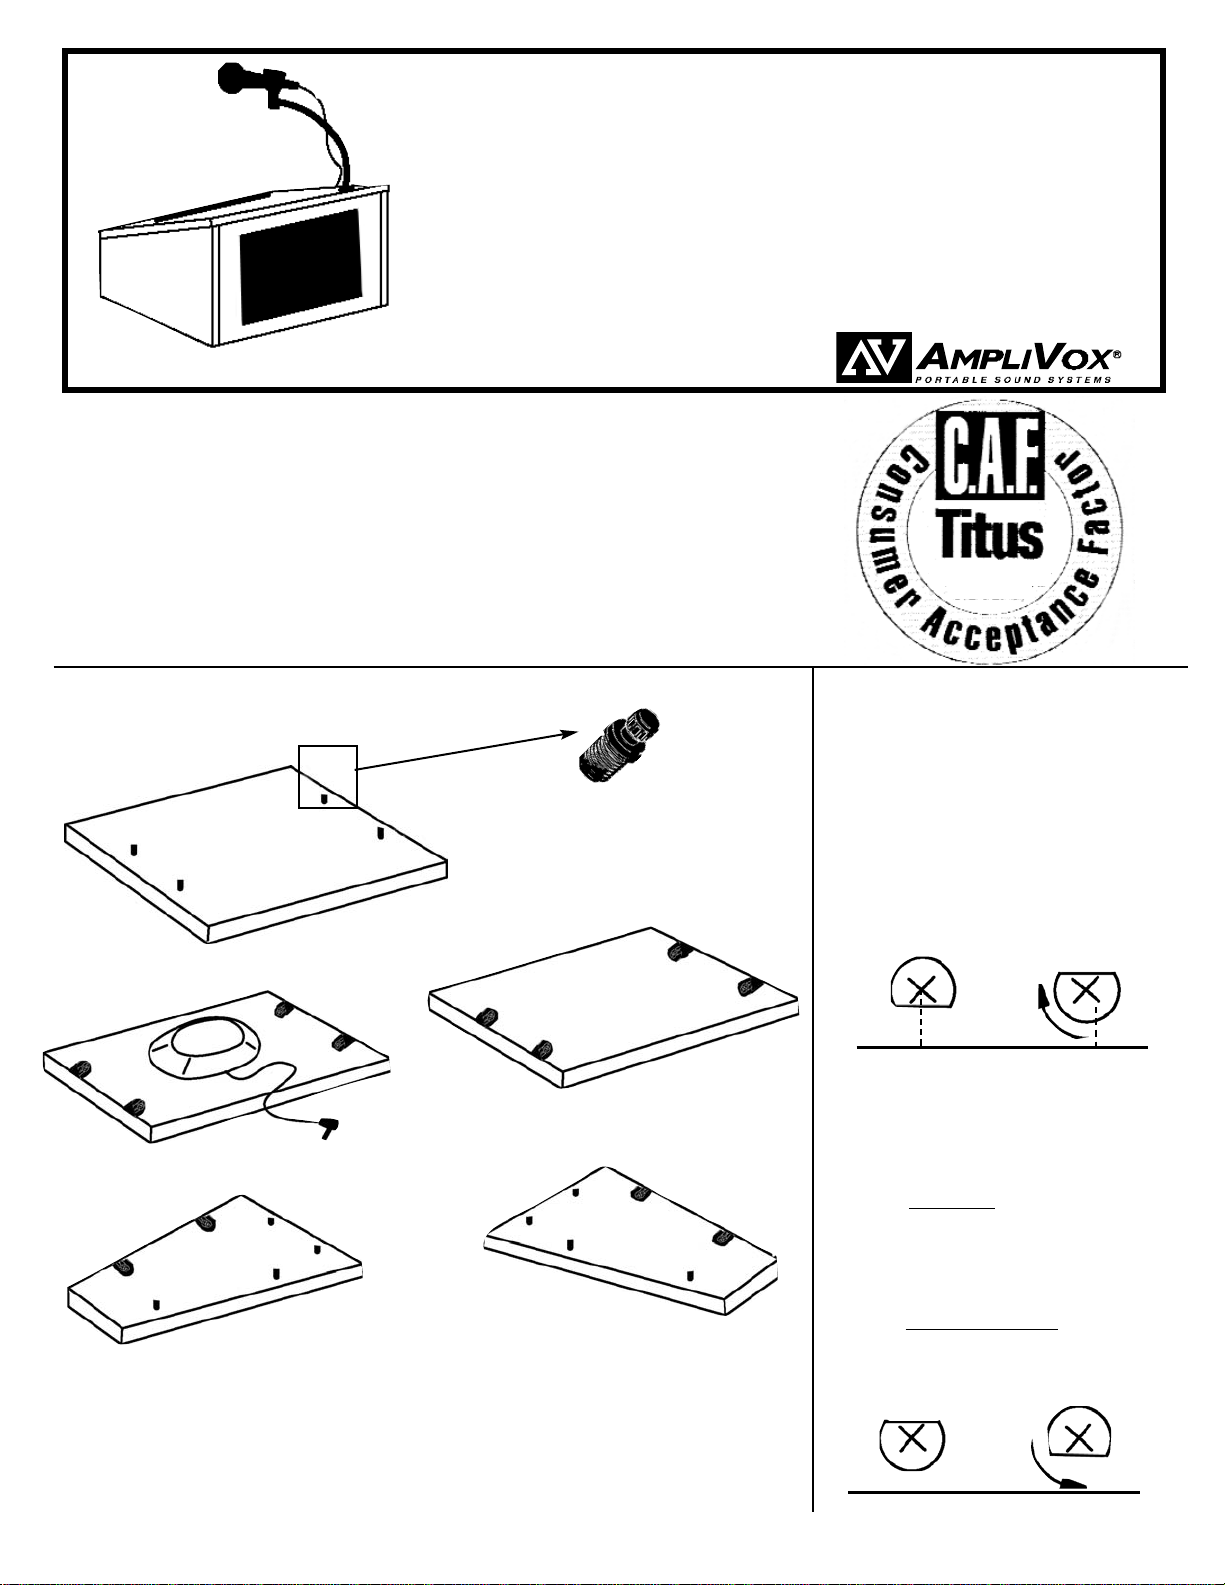
Packing List:
Reading table top
Bottom panel
2 Side panels, lef t and right
Front/speaker panel
Black speaker grille(S-250)
Hand-held mic (S-250)
Mic cable (S-250)
Gooseneck w/mic holder (S-250)
Amplifier (S-250)
Easy Step-By-Step Instructions
Featuring Quickfit-Expando-6 Connectors
for W/S-250 Tabletop Lectern Assembly
The Tabletop Lectern is designed
for easy assembly. If you have any
questions about assembling or using
your new sound system, or if you want
more information about accessories,
call AmpliVox s customer
service line.
The lectern is carefully p acked
to minimize shipping damage. If your
unit was damaged in shipping call our
toll-free customer service line or visit
our web site at http://www.ampli.com
1-800-267-5486
Reading
Table Top Panel
Bottom
Lef t Side
Right Side
How the Quickfit-Expando-6 Connectors
work.
Do not over tighten the connectors .
They will break if turned too far. Turn only
1/2 turn c lockwi se
to lock. The steel
Quickfit-6 expanding dowels and the
Quickfit-Expando-6-Connectors lock
together for easy assembly.
3. Inspect the Pre-installed Quickfit
E xp ando-6 Connectors. Check the Top,
S peaker/Front, Left and Right Side
Panels to insure that the flat edge on the
connector is facing the outer edge of the
board. Use a phillips screwdriver to rot ate
them, if needed.
Untightened
(unlocked)
To tighten
(to lock)
Edge of board
Edge of board
To untighten
(to unlock)
Tightened
(locked)
1. Unp ack all the pieces. Be sure to
save the packing and the box in case
you need to return the lectern for any
reason. Check that you have all the
pieces and that they are not damaged.
2. Insert the dowel pins. W ith your
thumb(or use phillips screwdriver to
ease insertion), push the dowel pins
into the holes in the 2 sides and the top.
Make sure the plastic collar is flush with
the wood surface.
Speaker/
Front
Panel
F:\docs\productinstructions\r-
Quickfit-6 Expanding Dowel Pin
Hardware:
12 Quickfit-Expando-6 Connectors
pre-inst alled
12 Push-in Quickfit-6 Expanding dowels
Tools Needed:
Phillips Screwdriver - for 1/2 turn of pre-
inserted Quickfit-Expando-6 Connectors
The Titus fittings sup -
kit have been specially
for ease of
T urn counterclockwise to unlock
Page 2
Optional Accessories
Batteries
S-1430 Alkaline D-Cell Batteries; set of 10 . .............................................$26.00
S-1465 NiCad battery pack; 4.3 amp hours ..........................................$165.00
Power Supply
S-1460 International AC Adapter/Recharger;110/220 volts;50/60 Hz. ......$109.00
W ireless Kit s
S-1600 W ireless Lapel Mic Kit . .............................................................$308.00
S-1610 W ireless Headset Mic Kit . .........................................................$374.00
S-1612 W ireless Lapel/Headset Mic Kit . .............................................$374.00
S-1620 W ireless Hand-Held Mic Kit . .....................................................$374.00
Microphones
S-2030 Lapel Mic; with 12 f t. extension ..................................................$55.00
S-2040 Headset Mic; with 12 ft. extension . ...........................................$121.00
S-2030A Hand-Held Mic and Cable ..........................................................$99.00
S-1720 Mic Extension Cord; 25-ft...........................................................$65.00
Extra Speaker & Tripod
S-1201 Compact Companion Speaker; black high pressure laminate . .......$209.00
S-1090 Tripod for speaker . ...................................................................$188.00
Light
S-1100 AC Reading Light; clip-on. ...........................................................$55.00
Media Cart Base
S-260 Combines with Tabletop Lectern to form a full-size lectern
or use separately for slide projector , etc...................................$197.00
Prices are subject to change without notice
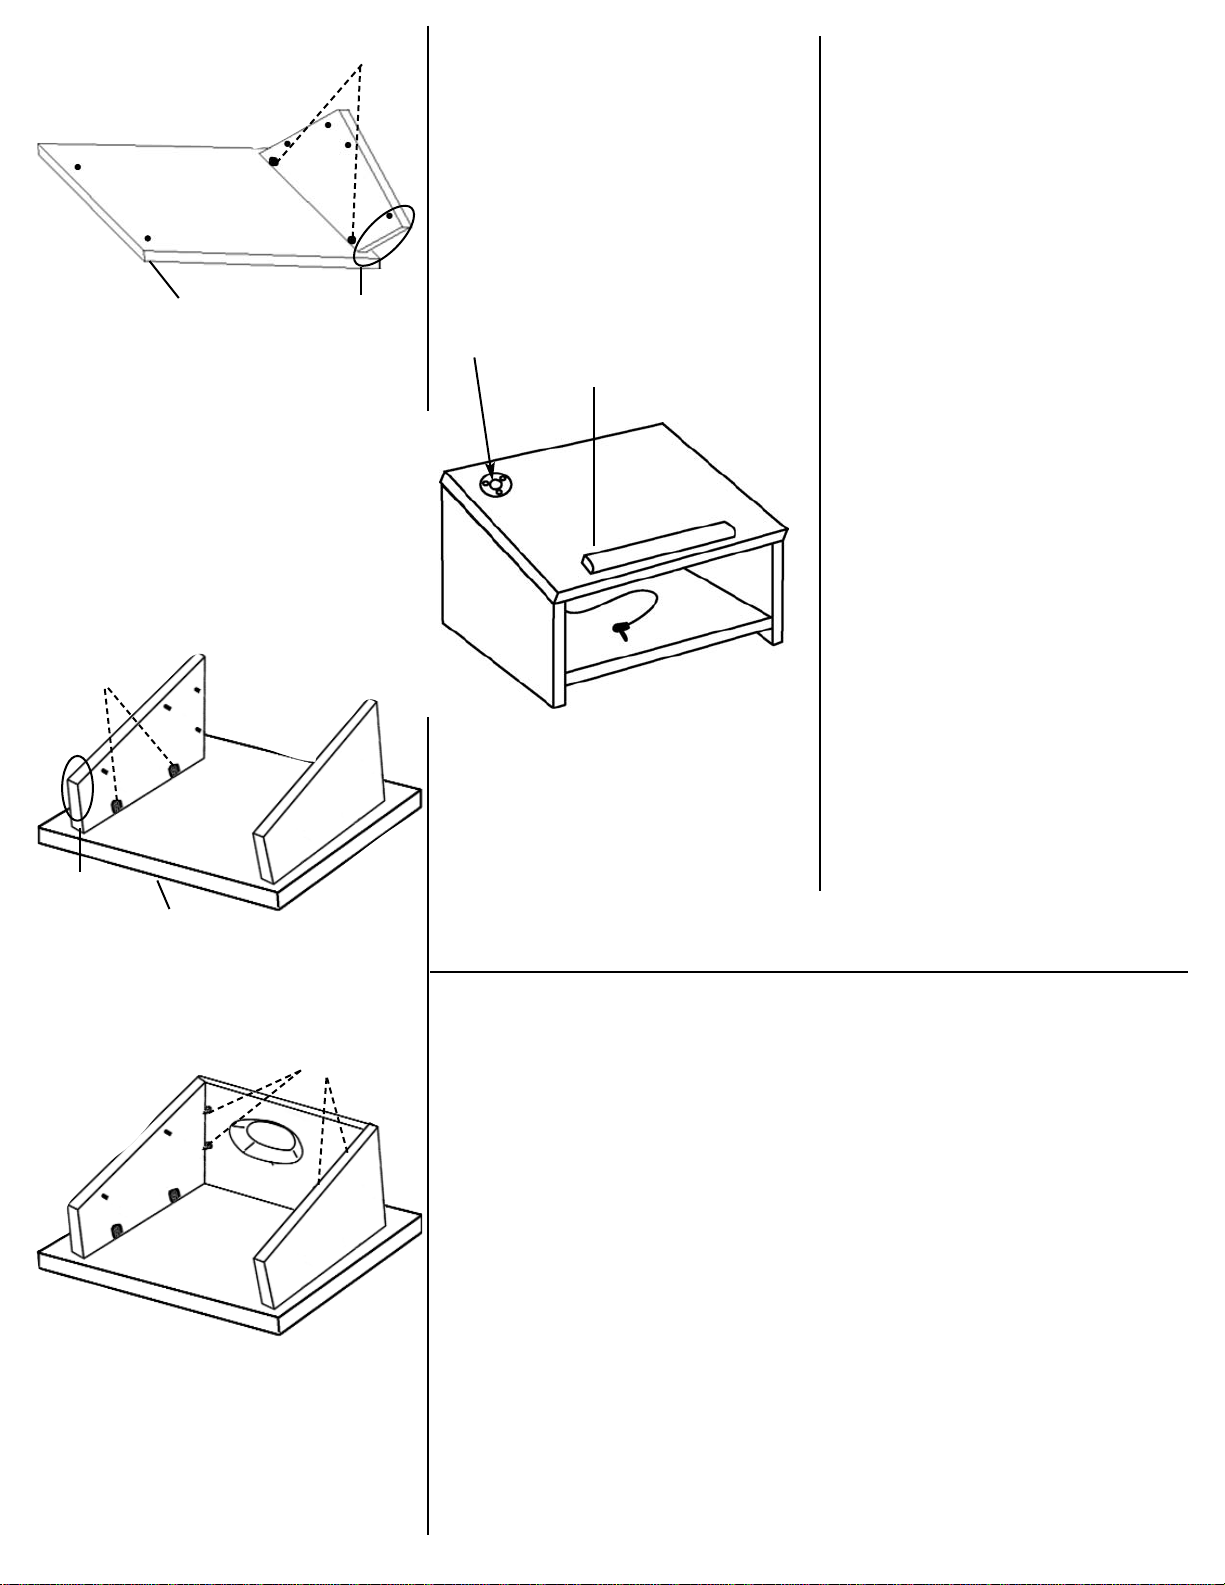
10. Attach the gooseneck. Screw the
gooseneck with mic holder onto the
gooseneck flange. Insert the mic cord
into the mic base. Place the mic into the
mic holder; insert the mic plug into the
dynamic microphone jack.
11. Plug-in the speaker.Plug the speaker cord into either the right or lef t amp
jack. If you have a second external
speaker, connect its 1/4 plug into the
S peaker- R jack Set the amplifier inside
the lectern.
12. Attach the speaker grille by pressing
it s post s into the holes on the front of the
lectern.
Refer to the S-805A amplifier operating
instructions for information about the amp
controls.
If you purchased any optional accessories such as a wireless kit, lapel mic,
International AC Adapter/Recharger,
extra speakers, tripods, etc. refer to the
instructions p acked with them for inst allation and usage information.
Y our T abletop Lectern is now complete.
Thousands of AmpliVox sound products
have been in use since we first began
shipping in 1961. W e hope you enjoy
many years of use from your new
Tabletop Lectern.
If you have any questions or comments,
call customer service line.
1-800-267-5486
6. Attach the front/speaker panel. Make
sure the finished edge of the speaker/front
panel is facing up towards you. Slide
speaker/front panel until the dowel pins of
the right and lef t side p anels are com pletely inserted into the Quick-fit connec tors of the speaker/front panel. T ighten the
4 Quickfit Connectors in speaker/front
panel 1/2 turn.
7. Att ach the bottom. Carefully pick up
and place the T op, Right and Lef t side
p anel assembly on it s side with the T op
panel facing opposite of you. Insert the
Bottom Panel under the pins on the Right
and Left side p anels by sliding the bottom
panel under pins of the sides. Now slide
the bottom panel until the dowel pins of the
side panels are completely inserted into
the Quick-fit connectors of the bottom
p anel. T ighten the 4 Quickfit Connectors
on the bottom panel 1/2 turn.
8. Carefully turn over lectern After tighten ing Expando Connectors on the bottom of
the lectern, Carefully pick up and turn
over lectern so that the Paper Stop is fac ing up.(see illustration above)
S-250 ONLY
9. Inst all the batteries in the amp. Refer to
the amp instruction sheet for battery
inst allation information.
4. Attach the lef t s ide. Place T o p panel on
protected flat surface with dowel pins fac ing up. Place the lef t side p anel with the
finished edge facing up onto the top panel
and slide side panel until its dowel pins are
completely inserted into the Quick-fit con nectors as far as they can go. The short
edge of the side panel should be towards
the edge of the T op p anel that has the
paper stop. Use a phillip s screwdriver
to tighten the 2 Quick-fit Connectors. Turn
only 1/2 turn clockwise. Over tightening
will break the connectors!!
F:\docs\productinstructions\r-
5. Att ach the right side p anel. Att ach the
right side p anel using the same instructions
as the lef t side p anel to the top p anel and
tighten the 2 Quick-fit Connectors.
Short edge
Top
Le f t Side Panel
Tighten
Short edge
Top
Angled
Side
Le f t Side Panel
Tighten
Paper Stop
Paper Stop
Right Side Panel
Le f t Side Panel
Tighten
Le f t Side Panel
Gooseneck flange
Paper Stop
Angled
Side
 Loading...