

Page 1
P
O R T A B L E SO U N D
S
Y S T E M S
E
Y
V
W
I
P
O R T A B L E SO U N D
S
Y S T E M S
E
Y
V
W
NFRARED
X T E N D
O U R
O I C E
I T H
AMPLIVOX
C
OMPAC
PA S
YSTEM
®
I
NFRARED
X T E N D
O U R
O I C E
I T H
AMPLIVOX
C
OMPAC
Amplivox Sound Systems LLC.
3995 Commercial Ave.
Northbrook, IL 60062
800-267-5486
PA S
YSTEM
®
USERS MANUAL
Amplivox Sound Systems - Call 800-267-5486 for assistance - www.ampli.com for support and registration- 10/30/2009Amplivox Sound Systems - Call 800-267-5486 for assistance - www.ampli.com for support and registration- 10/30/2009
Page 2
CONTENTS
Table of Contents
Main Unit---------------------------------------------------------------------1
Installation of Additional Infrared Sensor---------------------------2
Instructions for Charging Main Unit-----------------------------------3
Warnings--------------------------------------------------------------------4
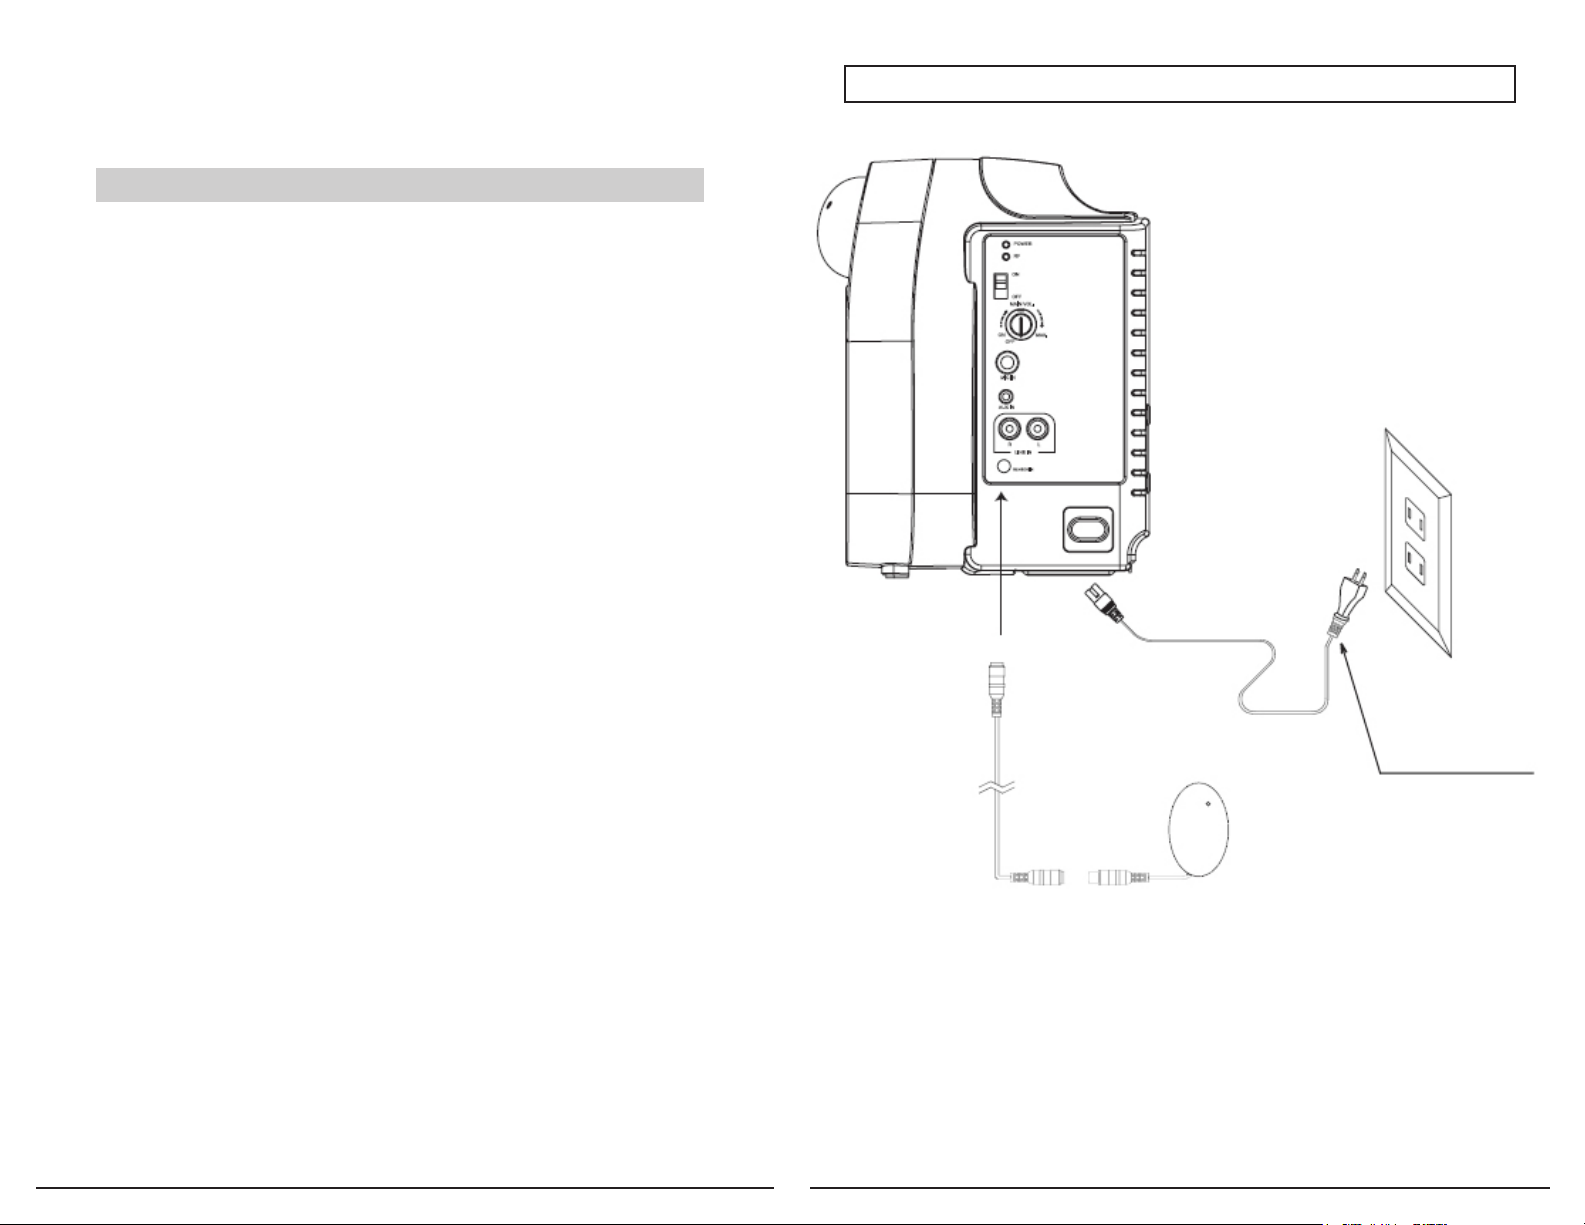
Setup of Main Unit---------------------------------------------------------5
Should you need any assistance please call 800-267-5486. To
register your product for warranty and support please visit
http://www.ampli.com/support.htm or submit warranty registration card to...
AmpliVox Sound Systems
3995 Commercial Ave.
Northbrook, IL 60062
Setup of Main Unit
AC 110/220V
1 Year Limited Warranty on manufacturer’s defect only. This does not cover accidental damage or abnormal operating/storage conditions such as extreme heat
or cold or excessive moisture. Please contact the manufacturer (information
above) for service or replacement. Warranty is considered null and void should
the product case be opened or appear tampered with.
5
Amplivox Sound Systems - Call 800-267-5486 for assistance - www.ampli.com for support and registration- 10/30/2009Amplivox Sound Systems - Call 800-267-5486 for assistance - www.ampli.com for support and registration- 10/30/2009
Page 3
Warnings Main Unit
Infrared Wireless Microphone
Mic Charger Label
Body-Pack
Transmitter
(Not Included)
DC Plug
DC 5V (2A)
Mic
AC 110-220V
AC-DC Adapter
1. Plug AC-DC adapter into AC outlet.
2. Plug in DC Plug from AC-DC Adapter into the DC Jack on the charging station.
Battery charger input voltage is DC5V. However using any other DC Adapter is not
recommended and can cause damage. Such damage is not covered under the
warranty.
3. Insert handheld microphone into battery charger. Make sure it is rmly inserted. Takes
about 2.5 hours for a full charge.
CAUTION
1. Turn microphone unit o when charging.
2. Insert microphone into unit vertically. Do not insert forcefully or damage may occur.
The unit has not been correctly inserted if indicator does not light up.
3. Do not use any other type battery than the supplied nickle hydrogen type. Other batteries may be used to replace, but they must be nickle hydrogen batteries or damage
and poor charging ability may occur.
We are not responsible for damage resulting from any other batteries being used
including re, injury or any other liability.
4. When microphone battery indicator shows the charge is empty (shows red) please
charge as soon as possible to extend the life of the battery.
When microphone battery voltage is low, the result is often that the sound cuts in and
out, distortion is present or wireless signal is week.
5. Do not submerse, or sprinkle with water or other liquids. Do not attach battery leads
with conductive materials. Damage will likely occur.
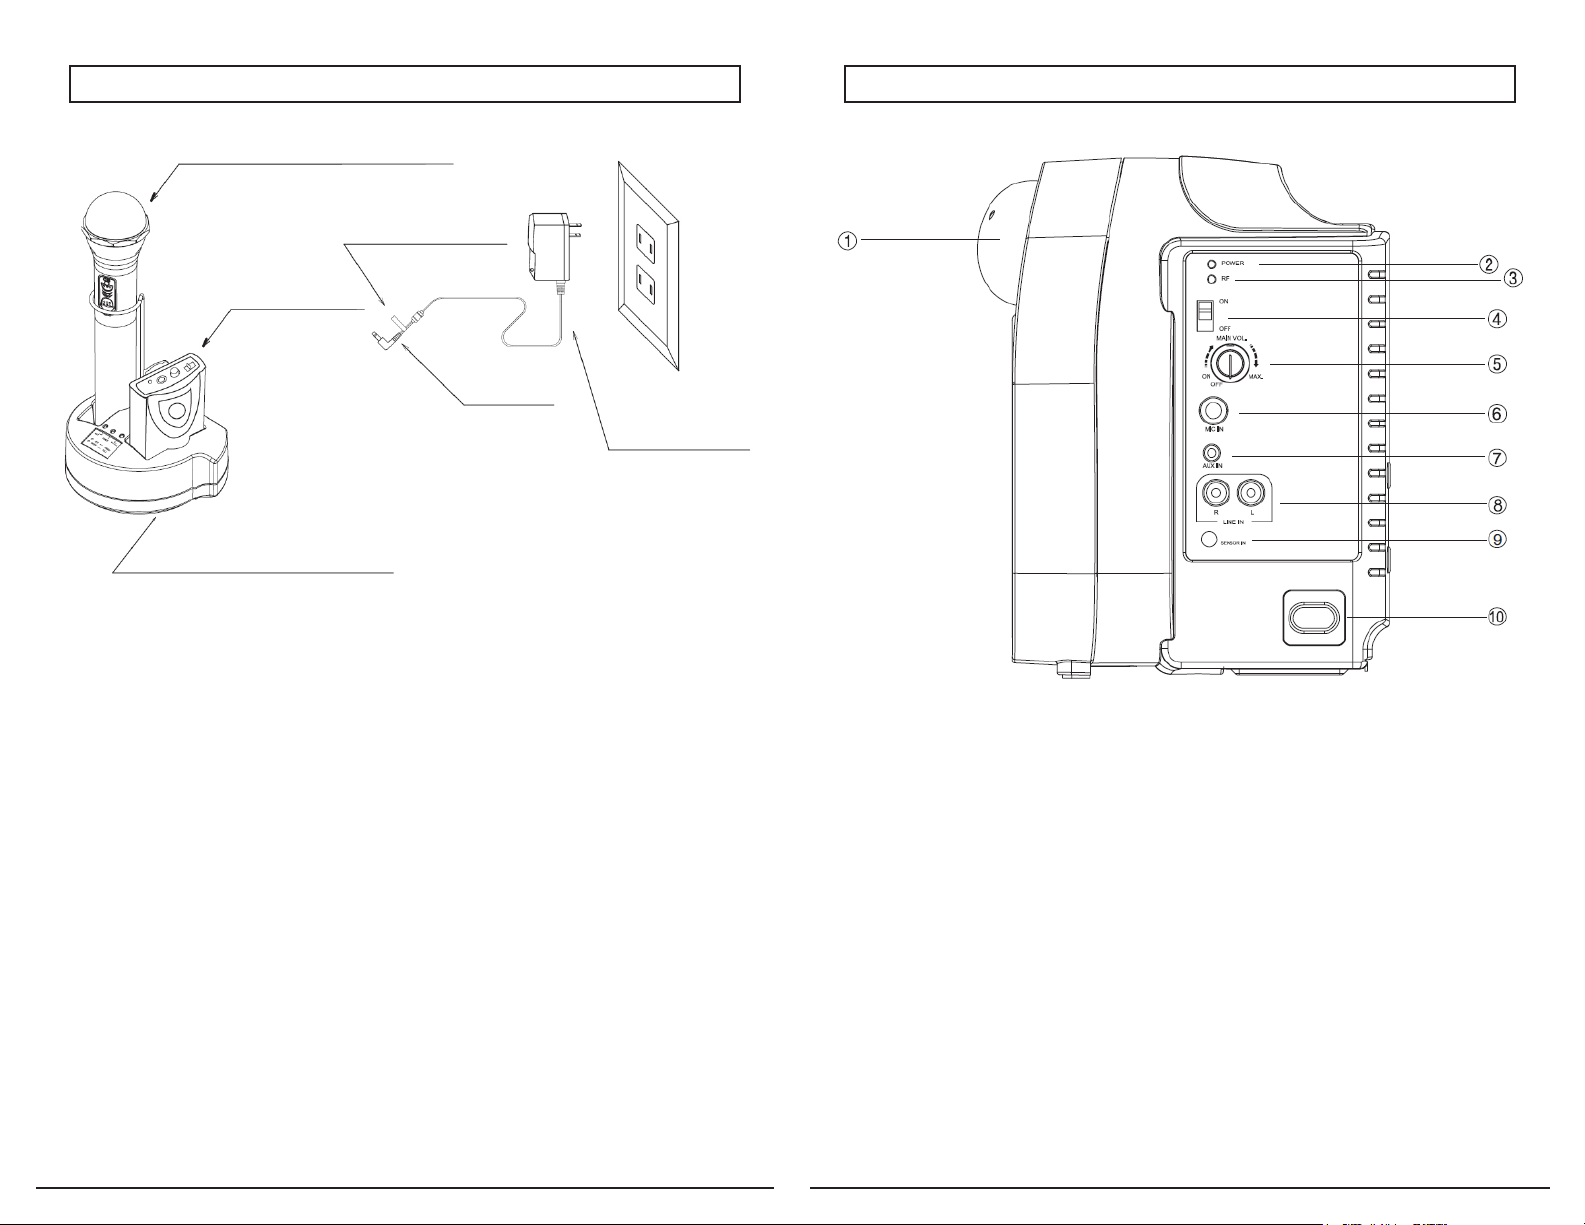
1. Infrared sensor
2. Power Status LED.
3. Wireless (RF=Radio Frequncy) Signal Indicator: This LED indicates when
Wireless (RF) signal is received from transmitter.
4. Power : On/O
5. Wireless receiver module power switch and volume control.
6. 1.8”/3.5mm audio input jack. (For USB/iPod/MP3/ CD/DVD/
Cassette and other similar devices. Adapters from nearly any audio source
to 1/8”/3.5mm are available at Audio Stores)
7. 1/8”/3.5mm mixer output jack. (For Recording or for use with external
speaker systems)
8. Line in R/L - RCA Connectors (standard connectors for home audio devices)
9. Sensor terminal: Infrared sensor unit plugs in here.
10. Power Cord terminal: plug appropriate end of AC wire into here and other
end into wall socket for recharging the battery.
4 1
Amplivox Sound Systems - Call 800-267-5486 for assistance - www.ampli.com for support and registration- 10/30/2009Amplivox Sound Systems - Call 800-267-5486 for assistance - www.ampli.com for support and registration- 10/30/2009
Page 4
Installation of Additional Infrared Sensor Instructions on Charging Main Unit
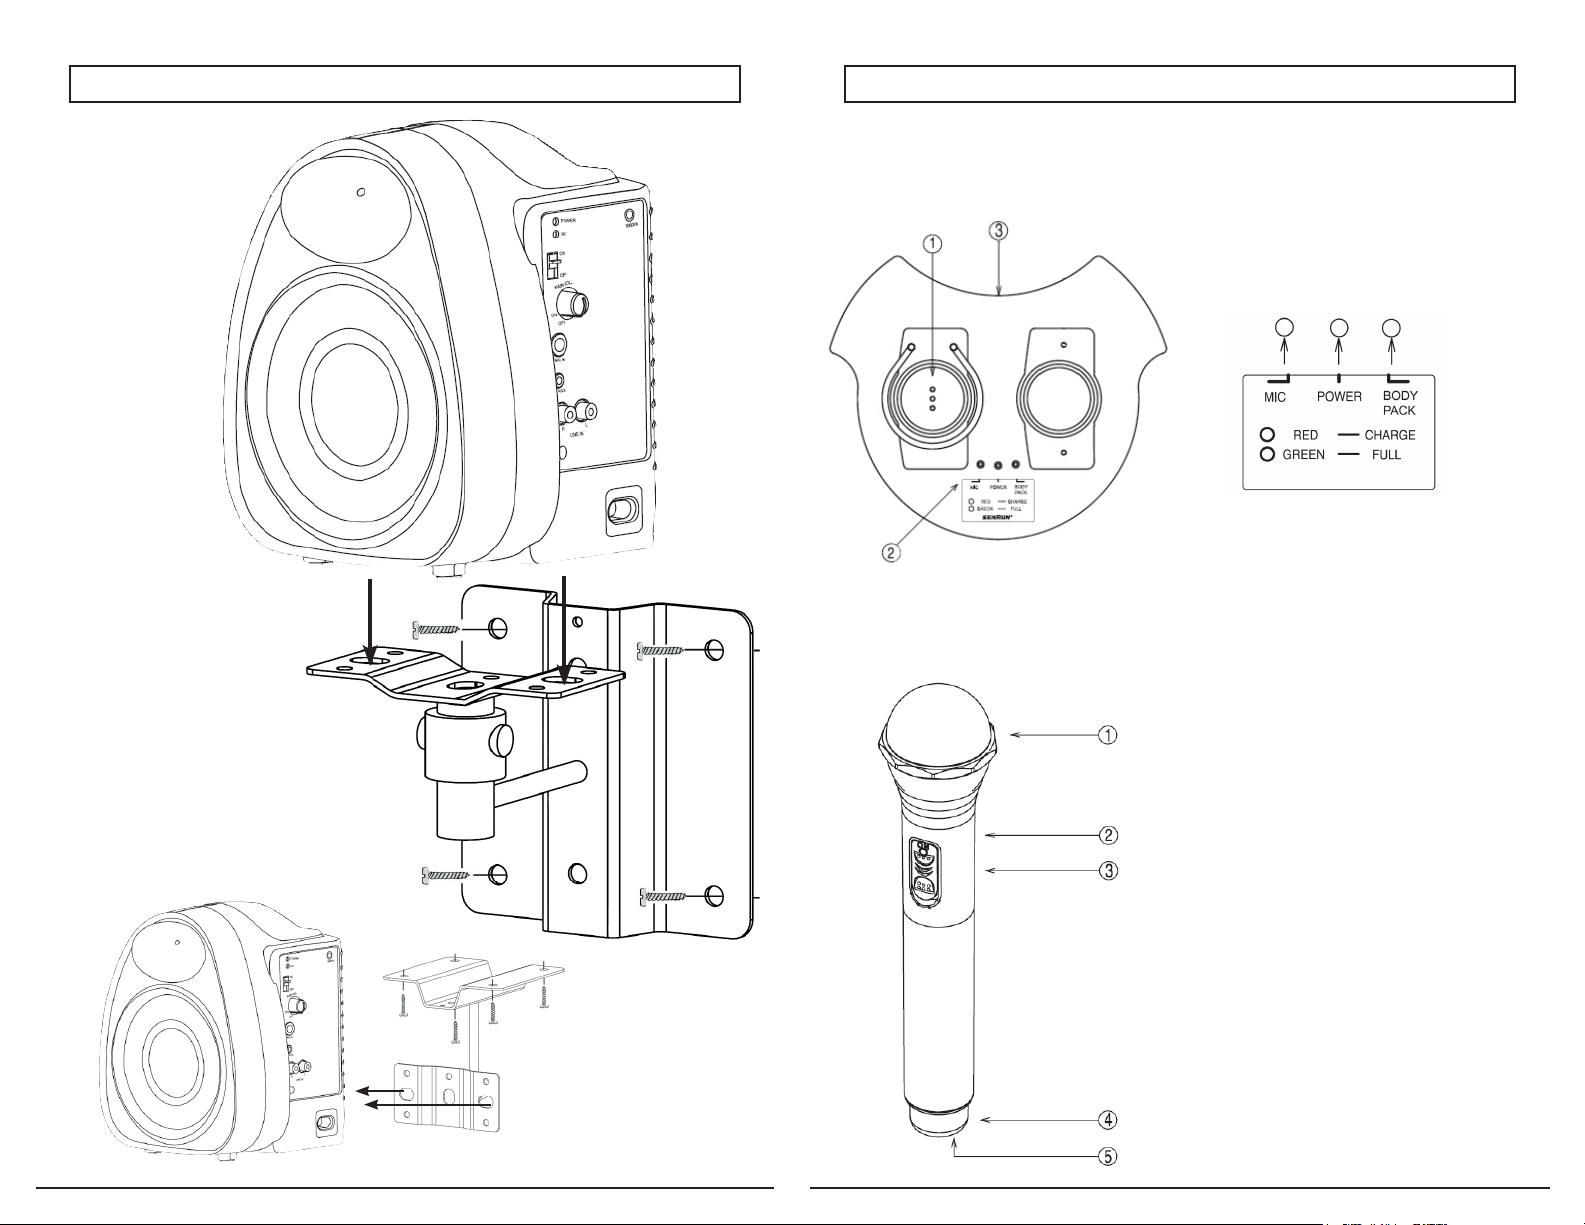
Screw four screws into wall
Then attach IR285 at Base
1. Microphone and Charging terminal
(Adjacent charging area for optional equipment not included. Call to special order)
2. Indicator: Mic | Power | Body Pack (not
used) Mic is for handheld mic charging
status.
3. DC Jack Microphone AC/DC adapter
DC5V 2A
Mic/Body Pack IndicatorsRed: Battery Charging
Green: Battery fully Charged
Power Indicator
The Power is On if Power indicator is red
1. Microphone Head
Or Mount On Ceiling
2. Power On/Battery Charge
Indicator
Red: Battery Empty
Orange: Voltage Low
Green: Fully Charged
3. Mic Power Switch
4. Infrared Transmitter
5. Charging Terminal
2 3
Amplivox Sound Systems - Call 800-267-5486 for assistance - www.ampli.com for support and registration- 10/30/2009Amplivox Sound Systems - Call 800-267-5486 for assistance - www.ampli.com for support and registration- 10/30/2009
 Loading...