

Page 1

1/16
V1.1, 24.04.19
Content What’s in the box? ..............................................................2
Frame number .....................................................................2
Assembly ..............................................................................3
Power on the bike ...............................................................5
Ampler Bikes app ................................................................7
Maintenance.........................................................................8
Electric system support ...................................................11
Charger safety manual .....................................................14
Cargo adapter for Thule trailer ....................................... 15
Specications .................................................................... 15
User Manual
Curt 2019
Page 2
2/16
V1.1, 24.04.19
What’s in the box?
The bike will arrive at your doorstep in a big cardboard box.
Inside this you will nd:
• The bicycle
• A toolbox with the necessary tools for assembly and
maintenance
• Ownership card
• Pedals
• Charger
• *Optional: ABUS Bordo Lock and the lock keys
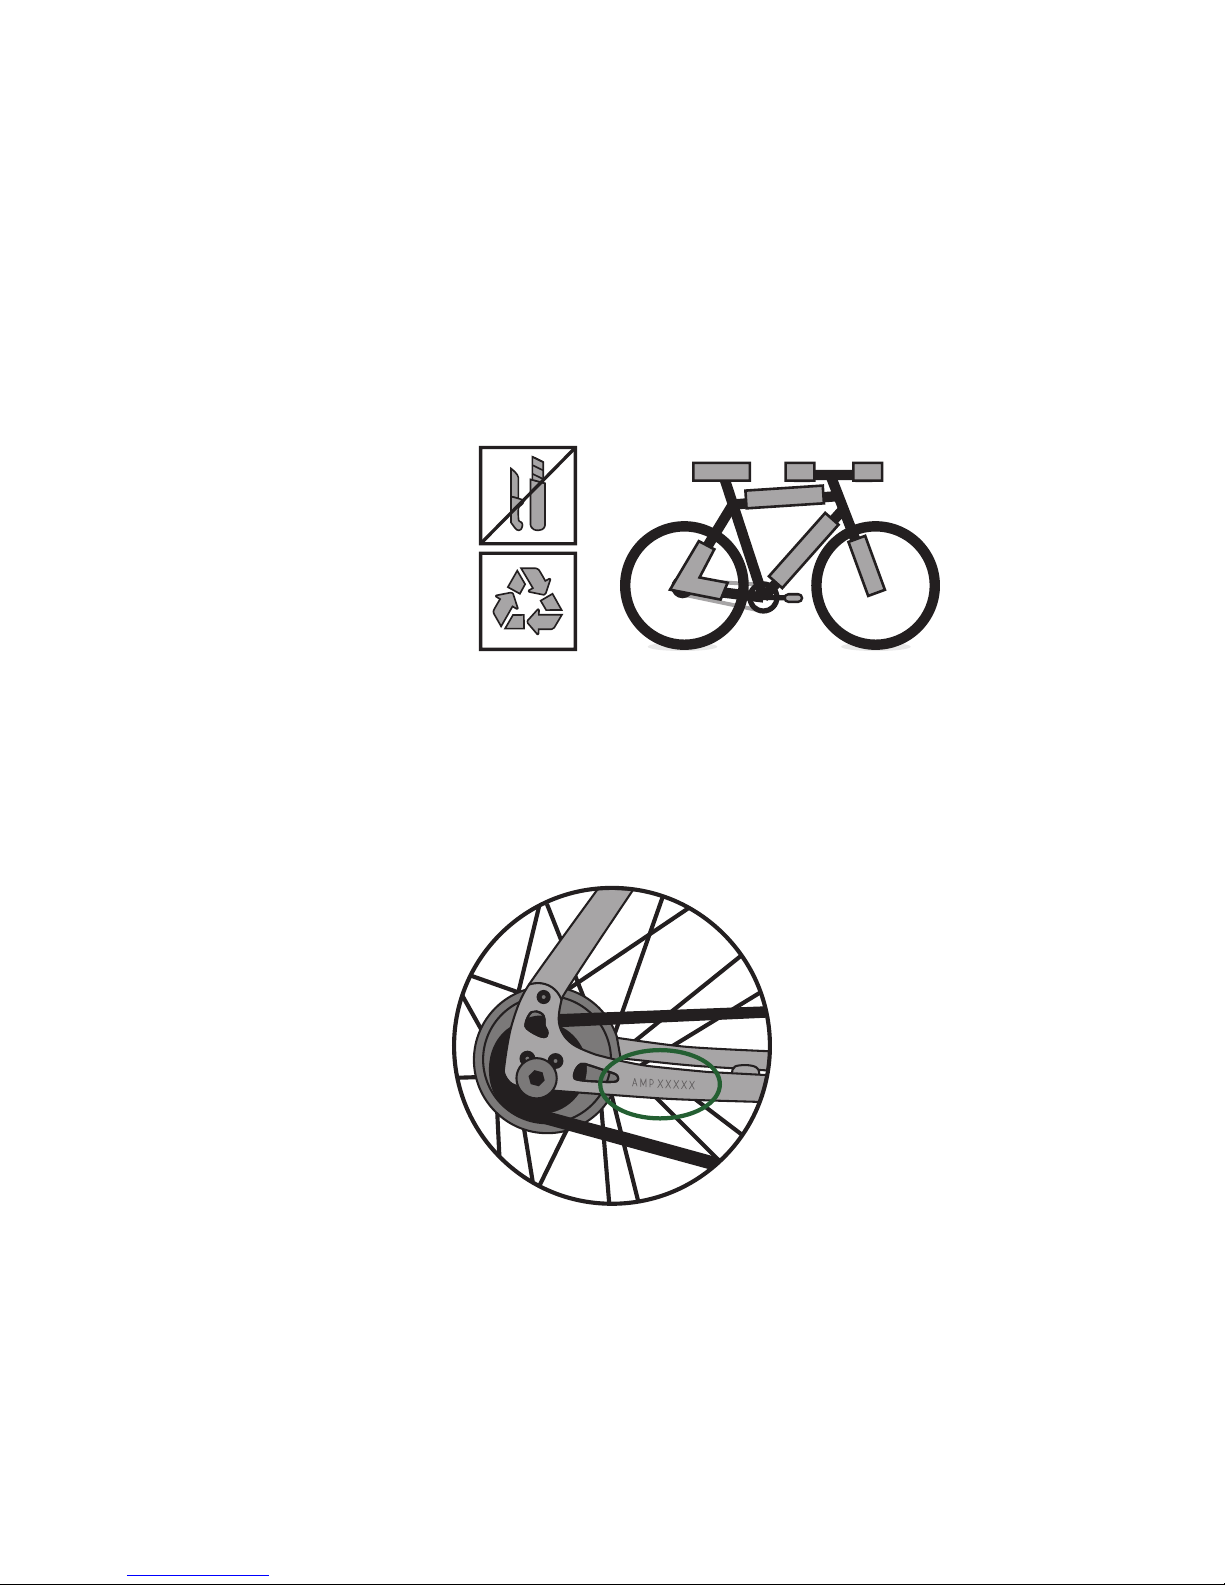
Frame number
The frame number is on the right side of the bike on
the chainstay, next to the rear dropout.
Page 3
3/16
V1.1, 24.04.19
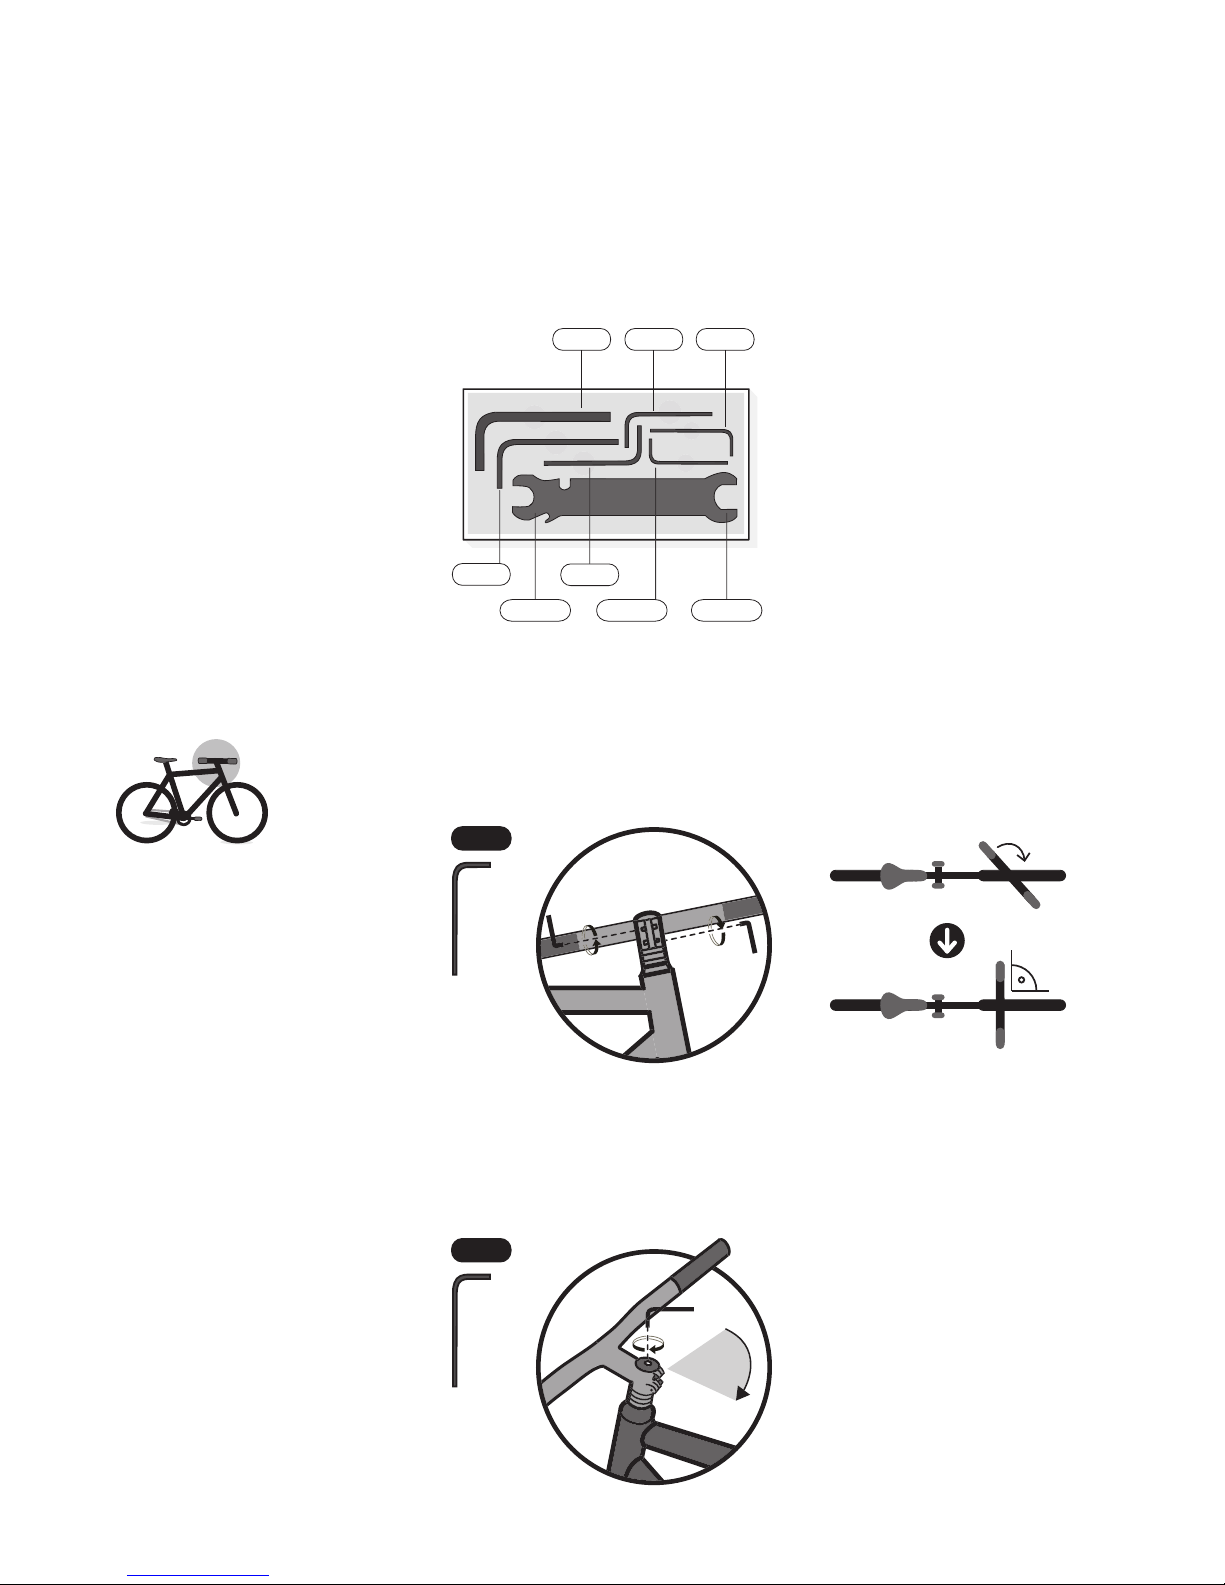
• 4 mm hex key
• 5 mm hex key
• 6 mm hex key
• Pedal washers
• Pedals
You will need
Adjust the handlebar
Assembly
1. Take the 4 mm hex key and loosen the side bolts of
the stem. Turn the handlebar to the riding position.
Make sure the handlebar is aligned with the front
wheel.
2. Take the 5 mm hex key and lightly tighten the top
cap bolt on the handlebar stem.
This will make sure the headset will not have any
play in it.
6 mm
8 mm 3 mm
5 mm
2.5 mm
15 mm
18 mm
4 mm
4 mm
5 mm
1/4
1/4
Page 4
4/16
V1.1, 24.04.19
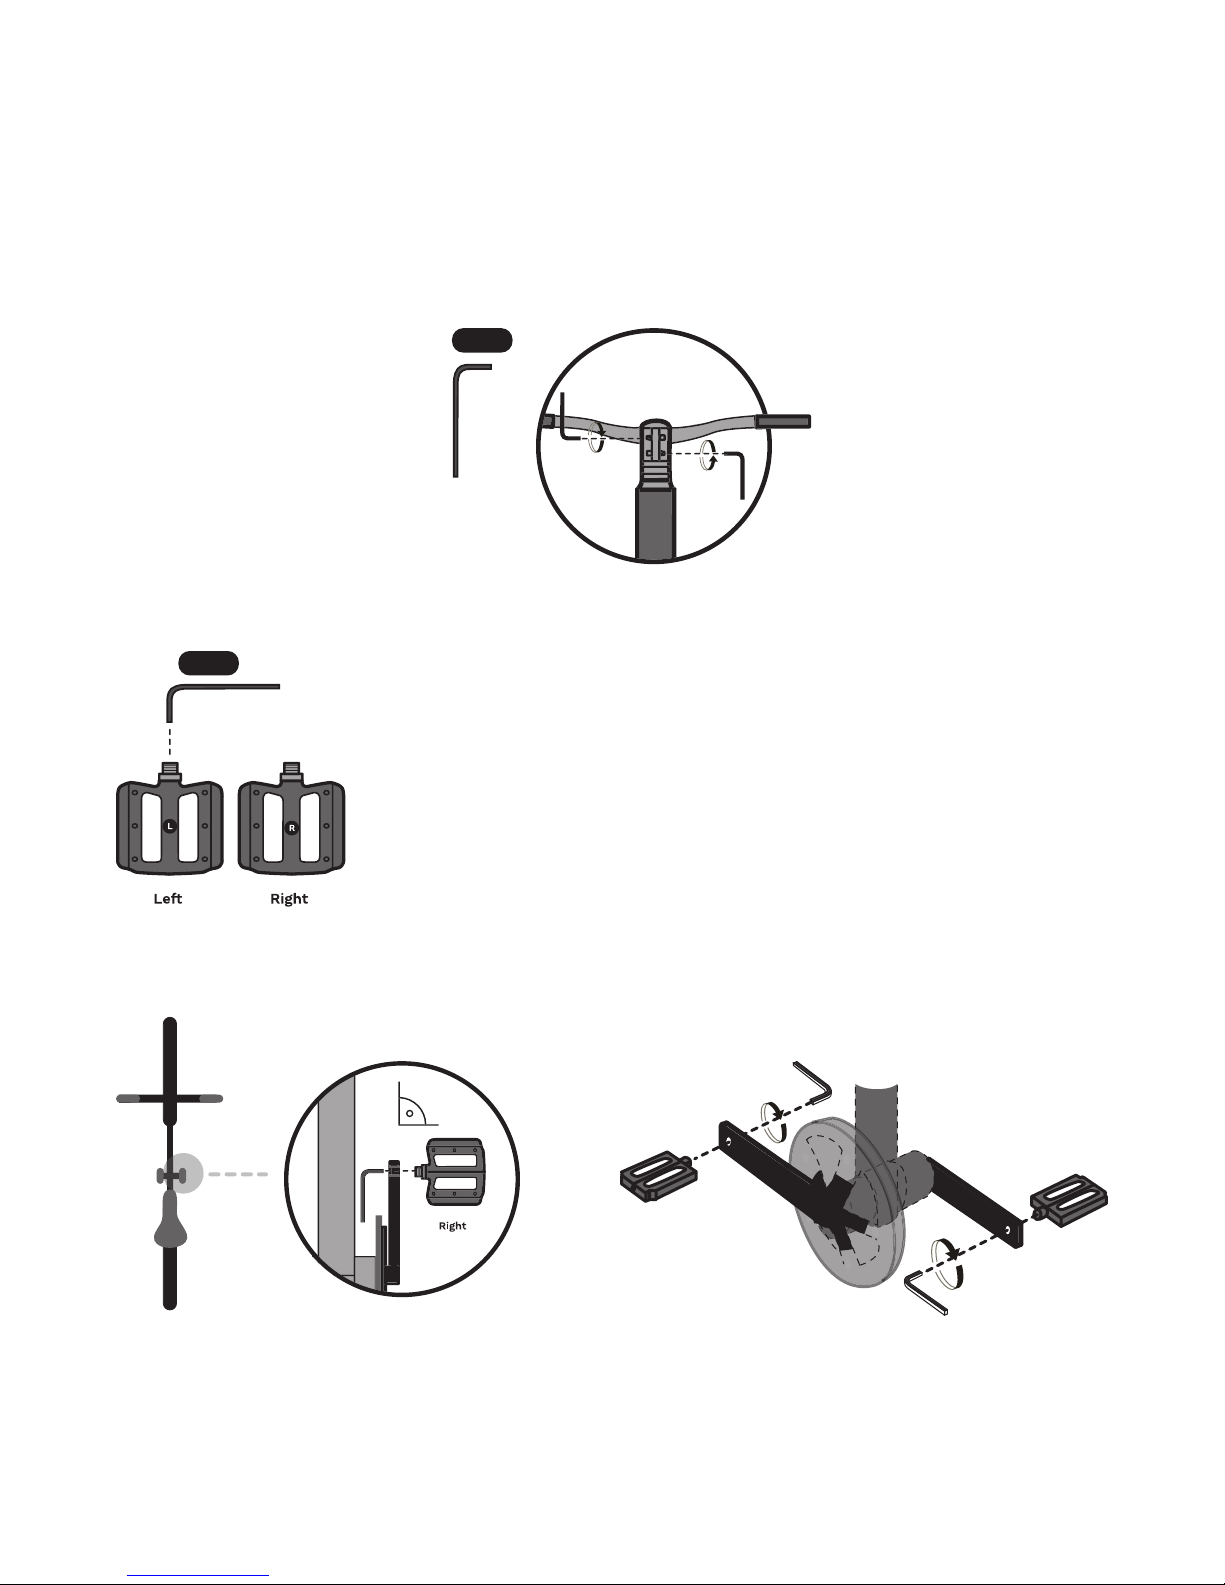
3. Take the 4 mm hex key and carefully tighten the
same stem bolts you loosened 2 steps back.
Turn your handlebar le and right and make sure it
spins freely. If it feels a bit too tight, loosen the
stem bolts and just slightly loosen the top cap.
Assembly
1. Unwrap the pedals. The pedals are marked with R
(right) or L (le). The R pedal goes on the chain-
wheel side and the L pedal goes on the non-chainwheel side.
2. Tighten the pedals with the 6 mm hex key Pedals
need to be tight so make sure you put some
Pedals need to be tight so make sure you put some
force into it. Expect resistance only at the end of the
thread, if the pedal is hard to thread in from the beginning then the threads must be inspected.
Insert the pedals
4 mm
6 mm
Page 5
5/16
V1.1, 24.04.19
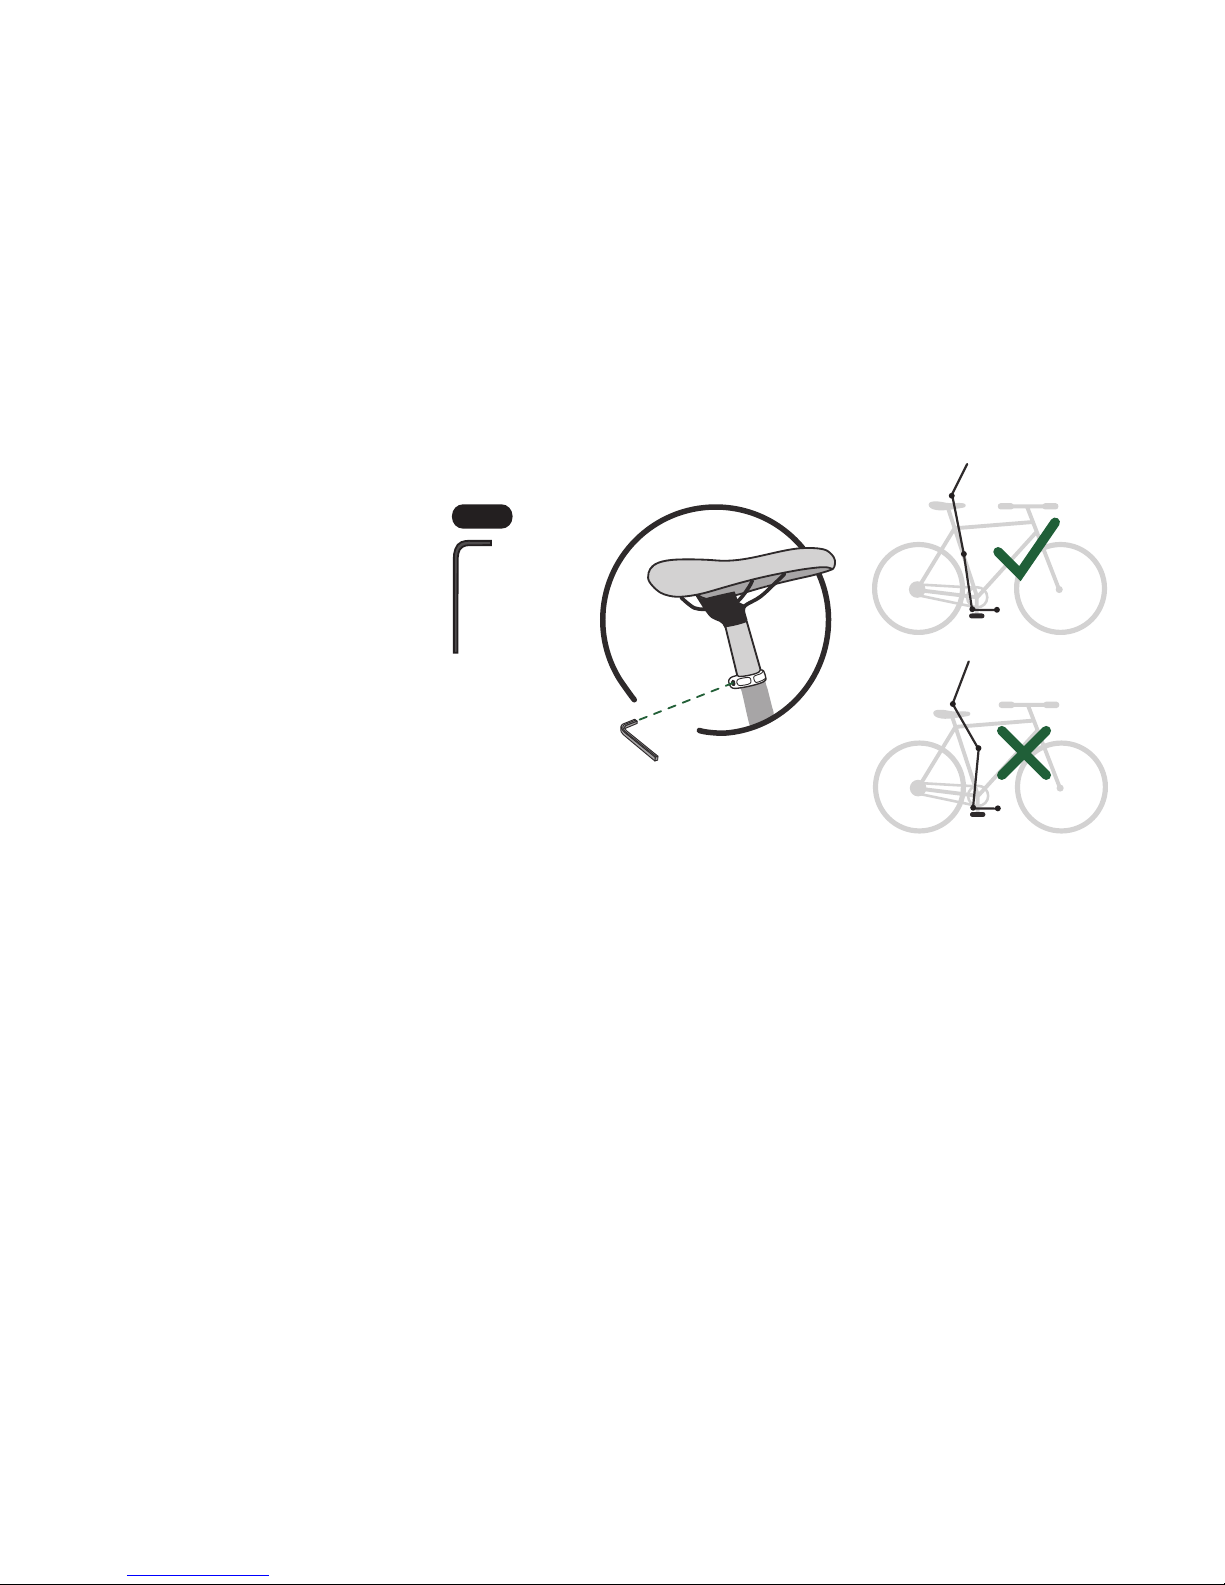
Take the 6mm hex key and adjust the perfect seat height
1. Place the bike in a way that allows you to support
yourself against a wall when siing on it.
2. Put one pedal in its lowest position.
3. Hop on and try to reach the pedal with your heel.
4. You have the perfect seat height when you are able
to place your heel on the pedal with an almost fully
stretched leg.
And you are good to go!
Adjust the seat height
Assembly
Power on the bike
Just press the power buon on the power panel,
located on the le side of the bike. The bike is
already fully charged when you receive it.
Charging the bike is like charging a laptop. Just connect the bike with a standard wall power outlet (110–
240 V AC) and hook the magnetic charger plug to the
charging socket located on the power panel and let it
to charge.
Once the led on the charger turns from red to green
it has been fully charged. It takes about 2.5 hours
from drain to full.
Ampler charger will automatically stop charging when
the baery is full. There is no risk of overcharging the
baery when you forget to unplug it.
Turning the bike on
Charging the bike
6 mm
Page 6

6/16
V1.1, 24.04.19
For your protection, please read carefully “Charger
safety manual” chapter below before operating the
Ampler baery charger.
The power buon also acts as a baery charge moni-
tor. The led colours according to the state of charge.
0–10% Blinking red
10–50% Transition from red to yellow
50–75% Transition from yellow to green
75–100% Green
To turn the lights ON and OFF, hold the power buon
for 1–2 seconds. You can turn the lights on/off also
from your Ampler mobile app.
The bike will remember the last seing, so the lights
will be ON when you leave them on next time you
power the bike.
The bike has two standardized assist modes:
• Normal (1)–25 km/h, 250 W, 100% (max assist
speed, motor power, assist level)
• Boost (2)–25 km/h, 250 W, 150% (max assist speed,
motor power, assist level)
To switch between the assist modes, hold the power
buon down for 3–4 seconds, until it turns orange.
Aer releasing the buon, it will blink ONCE if it
changes to Normal Mode (assist mode 1) or TWICE if
it changes to Boost Mode (assist mode 2).
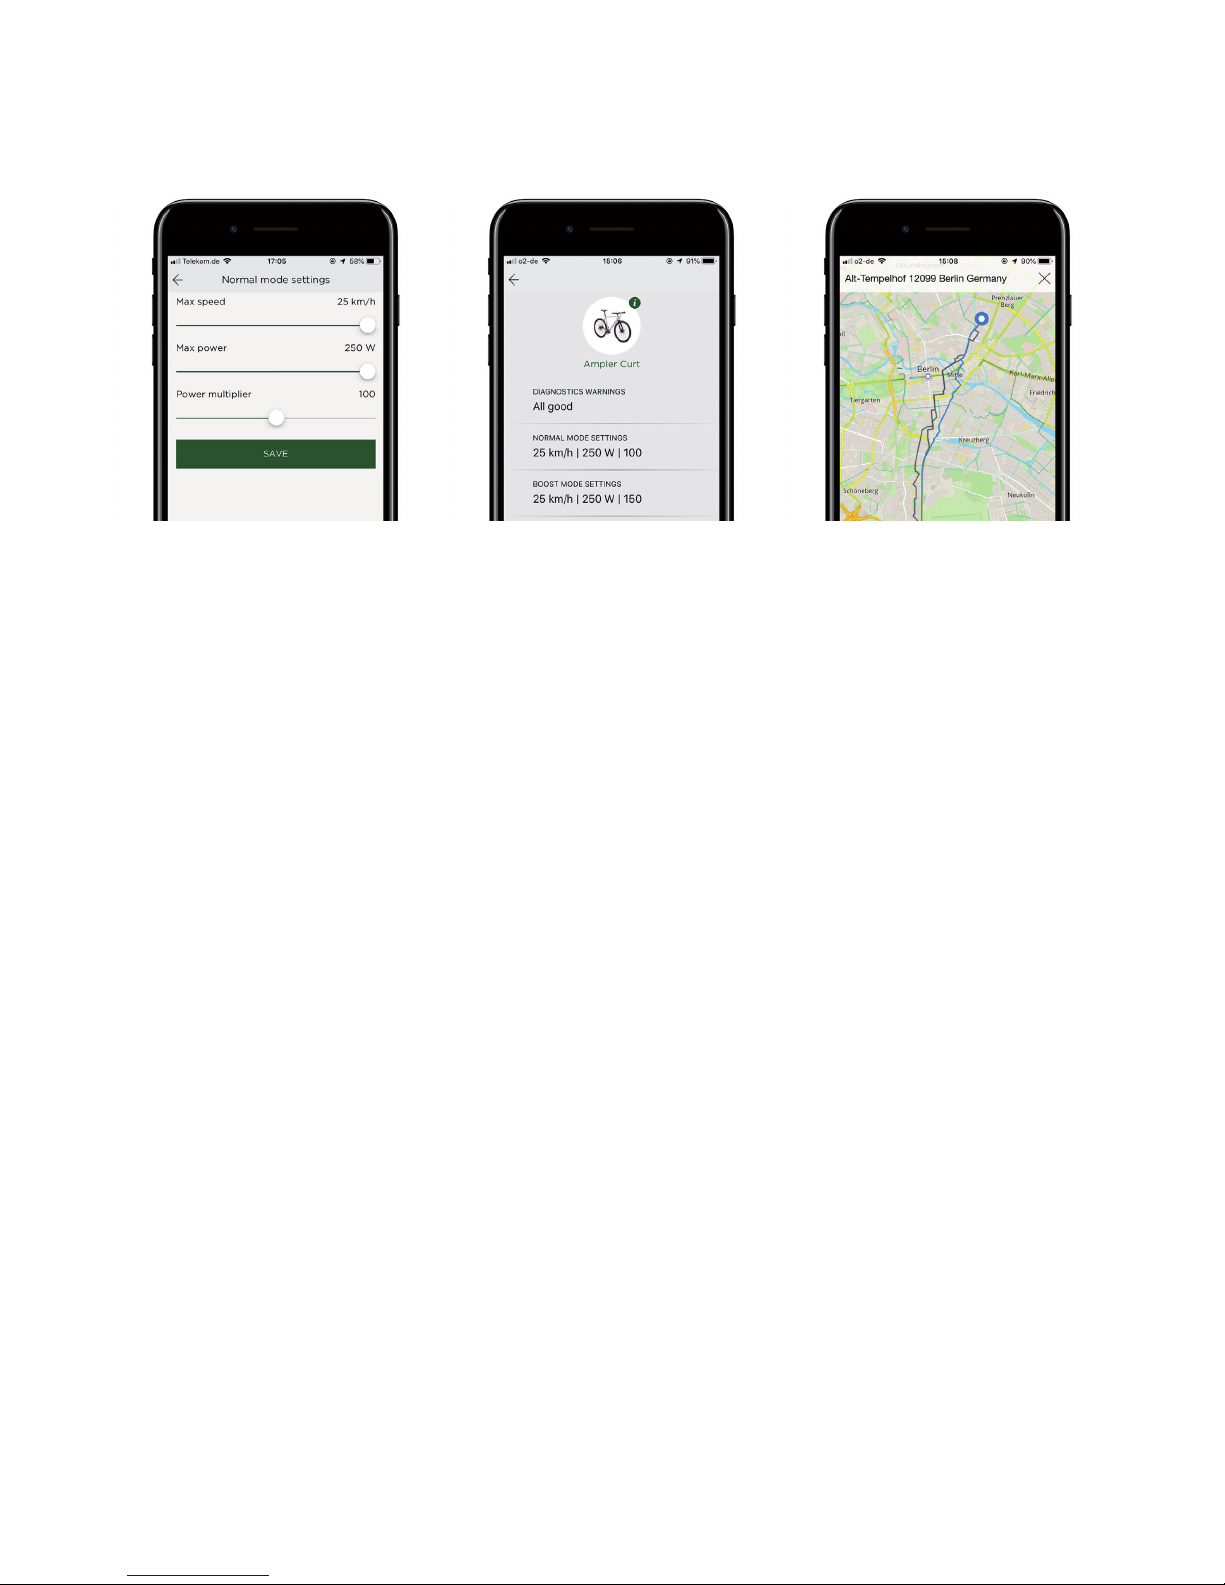
You can fully customise the assist modes with the
Ampler Bikes app under the ‘Vehicle seings’.
Power on the bike
Changing the assist modes
Turning the lights on
State of charge
Page 7

7/16
V1.1, 24.04.19
To fully customise your riding experience please
download the Ampler Bikes available for Android and
iOS.
You can download the app for IOS from the App store,
for Android (Android 4.3 onwards) in play store.
Download the app, stay close to your bike, switch on
the Bluetooth, pair your handy with your bike and log
in. The Ampler smartphone application lets you fully
customise your riding experience with the Ampler
e-bike. Here’s some of the examples you can do:
1. Download the Ampler app
2. Register with your Facebook account or e-mail
3. Pair your bike with your phone over a Bluetooth
connection
Ampler Bikes app
To connect the bike with
the app
Customise You have the option to change the motor parameters
from the smartphone:
• motor power-increase or decrease your acceleration
• max assist speed – the speed at which the electric
assist stops helping you
• assist level – how much the motor assists you in
proportion to your input
Or switch the lights on/off or to “lights only” mode.
• Check your baery range
• Receive updates about your bike’s electronics
• Get the latest Firmware
• Contact Ampler for troubleshooting and servicing
• Navigate with built-in maps*
• Track your speed and power while riding
• Record your trips and share with friends
*Continued use of GPS running in the background can
dramatically decrease your phone’s baery life.
Stay informed
Navigate and track
Page 8
8/16
V1.1, 24.04.19
Ampler Bikes app
Navigate and track
Navigate with built-in
maps
Stay informed
Stay informed about your
bike’s electronics
Adjust the motor power and
max. assist speed
Customise
Maintenance
Bicycles are technical yet sensitive creatures that
need a lile bit of love, aention and care every now
and then. Maintaining your bicycle regularly will keep
it riding (and riding well) for a lot longer and will give
you more range compared to a bike which has empty
tires and running brakes. It’s a lot like maintaining a
car – you check some things on a daily and you take it
to professional service for a check-up and mainte-
nance aer a certain number of kilometres.
Take care of your bike and have the bike maintained
regularly in every 3000 km or at least once a year. The
actual needed maintenance interval can vary depending on your riding habits, road quality and weather
conditions.
Maintaining your Ampler bike is just like maintaining a
regular bicycle and all professional bike shops can
carry out the maintenance of our bikes.
• Cleaning your bike will help to quality and keep the
dirt and dust from geing into the engine and bottom bracket.
• Use soap, water and a variety of sponges and brus-
hes to thoroughly clean the bike
Clean your bike regularly
Page 9

9/16
V1.1, 24.04.19
• The power panel of the bike is washable and waterproof. Now and then clean (non-metallic tool) and
lubricate the charging port with a multi-purpose oil
(for example multi-spray).
• Avoid using pressure washers, as the pressure driven water will get dirt, sand and dust particles inside tiny compartments, causing rust and problems
later down the line.
• Check the tyre pressure regularly. You can always
check the recommended tires pressure noted on
the side walls of the tires.
• Keeping the tires inated to the recommended
pressure will keep the baery range high, protect
the rim and tire from damages.
• Look out for tire wear. Depending on how and where
you ride your bike, the tyres can wear at a different
pace. If you see that the tread looks worn out,
change your tyres.
• If it gets icy, get some winter tyres – we can give you
some suggestions for which ones work best the
different models.
• Check the chain tension – if it has slackened over
time (it looks saggy), get it adjusted. If you feel you
are not right for the job, you can easily get it done in
your local bicycle shop.
• Replace he chain before the wear is reached to 0,75%
• Making sure your chain is lubed will prevent unexpected and premature wear to the drivetrain.
• If the chain feels a lile dry, clean it with a rag and
then add some chain lubricant. Spin the pedals
around a couple of times to spread the lubricant
evenly.
• A carbon belt drive does not need any oil, however
needs to be cleaned aer riding in dirty conditions
with water. You can apply a thin coating of dry silicone spray to the tooth side of the belt if necessary.
• Avoid using the lubricant on brake pads, rotors or
rims. Spray is not recommended, use liquid oil.
• Check the brakes regularly – they should be cleaned
and adjusted.
• Over time the disc brakes get less efcient at
breaking. To stay safe, get your brakes inspected,
serviced and changed if necessary by a professional
Maintenance
Check the tyres
Check the chain
Check the brakes
Page 10

10/16
V1.1, 24.04.19
workshop.
• Squeezing your brakes down should feel solid and
consistent – the lever should not touch the handlebar. If you feel that your brakes aren’t effective, get
a professional to check them out.
• Take a good look at the brake pads on your bike
every few weeks to see how they are holding up.
There shouldn’t be any dirt or oil on the pads. Oen
times, the brakes will make a howling noise if there’s oil on them.
• Check the brake hoses for wear and tear – if you can
see that the house is crumbling or broken in any
place, get it checked immediately by a professional.
• Aer rst couple of weeks check the bolts and nuts.
If there is too much play in the bolts, tighten them
up a lile bit and see if you can identify the cause
of the looseness. Don’t tighten the bolts too far.
• Re-tighten the bolts on the handlebar if needed.
• Check the crank bolts (8 mm hex key, not included),
tighten them if needed.
Re-tighten the pedals, using the key that came with
the bike.
• Re-tighten the boom bracket eccentric bolts.
• If you’re not riding and charging your bike consistent-
ly, charge it every ve–six week or so to maintain the
state of the baery. Due to Bluetooth the bike has a
lile power consumption even when switched off.
• Do not keep the bike in blazing sun or freezing cold
over the extended period if it is not being used.
• Store the bike in a dry place over the winter – it
doesn’t need to be heated, however below 0 is not
recommended.
• Charging the baery should take place indoors (ab-
ove 0 degrees) or/and in dry environment. Do not
keep the charger outside.
Beware that when you bike in the cold, the range
and baery capacity will be lower than average. This
is completely normal, and it won’t affect the bae-
ry’s overall state or lifespan.
• When you nish cycling in the cold, make sure that
the bike has time to warm up a lile before you
charge it.
Maintenance
Keep the bolts tight
Motor and baery
maintenance
Page 11

11/16
V1.1, 24.04.19
Maintaining your Ampler bike is just like maintaining
a regular bicycle and all professional bike shops can
carry out the maintenance of our bikes. We are working on opening a service station in Berlin for our
German customers for the 2018 season.
The rst professional check-up should take place
aer the rst 500 kilometres – this will ensure that
everything is working as it should.
Aer that, have the bike service regularly every
3000 km.
If you ride oen and don’t count the riding distance,
make sure to take it to a professional bike shop for
maintenance at least twice every season, ideally even
three times
• Before the start of the season
• Mid-way through
• At the end of the season.
This way, all the important aspects like brake oil levels, and the condition of brake pads and tyres get
checked, and the internal parts like the crank set and
wheel hubs get cleaned thoroughly.
That’s it – while it’s a long list of things to look out for,
it’s good to remember that maintaining your bike
oen is important for both safety and ride experience
reasons.
Have fun riding!
Maintenance
Professional maintenance
schedule
Electric system support
Ampler hardware (the baery, controller and sensors)
are inserted into the down tube. This keeps the bike
clean, the weight down, and the components safe
from outside elements such as the rain and cold
temperature.
The hardware doesn’t need any special maintenance.
Page 12
12/16
V1.1, 24.04.19
However, we recommend to keep your bike Firmware
up to date and calibrate your bike sensors from time
to time. This will help to keep your bike in a good
shape for longer time.
Soware restart clears up your bikes memory and
starts it fresh. It helps to resolve any problems connected to the hardware, and any communication problems between the bike and the mobile app.
To reset your bike
1. Hold down the power buon for 20 seconds. This
will reset and turn off your bike.
2. Turn on the bike again from the power buon.
Ampler bikes are pedelecs and they have sensors
regulating the motor, measuring the speed of pedalling and your own input power. Therefore, the bike is
easy to use and the motor power is controlled according to your own pedaling force. This creates a safe
and smooth riding experience.
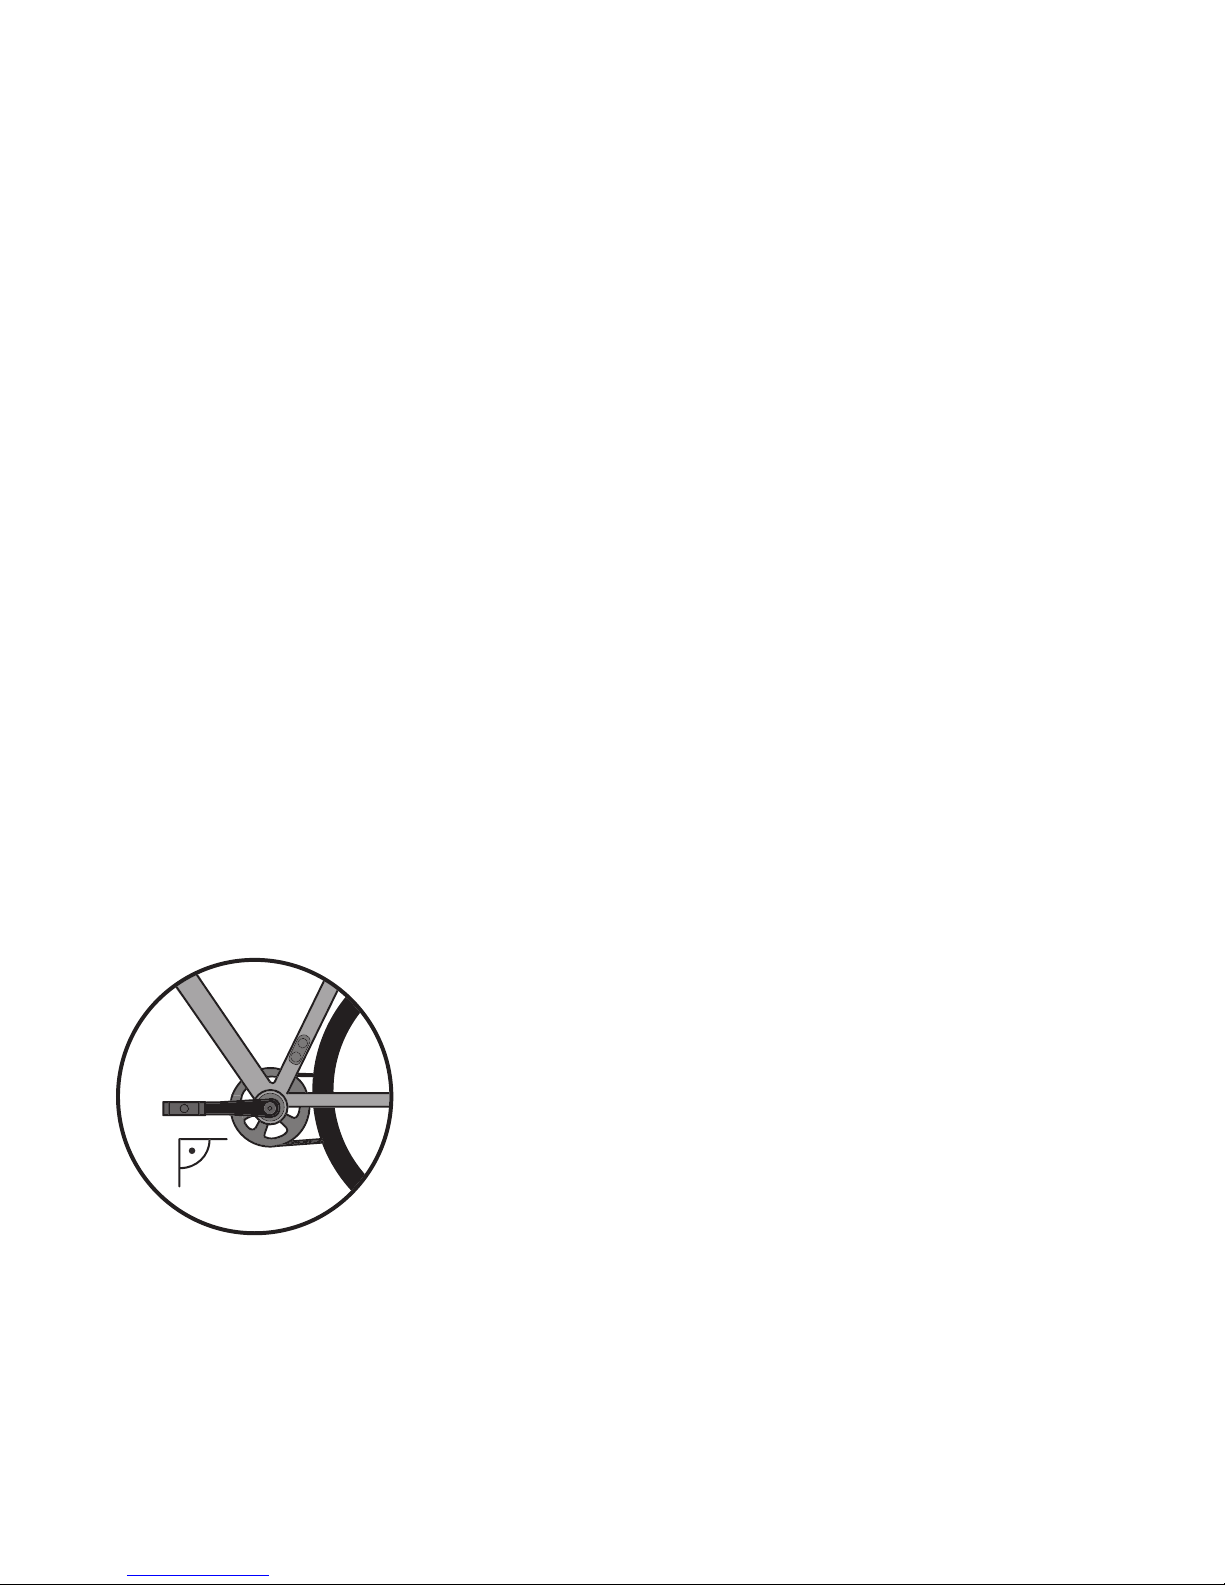
We recommend to calibrate your bike’s torque sensor
every 3–6 months, or in case the bike feels over- or
underpowered. Torque sensor calibration is done via
the Ampler app:
1. Adjust the le crank forward, parallel to the
ground.
2. Connect the Ampler app with your bike via
Bluetooth
3. Open ‘Vehicle’ seing from the menu
4. Click on ‘torque sensor calibration’
5. The LED blinks in orange
6. The LED will turn green once the calibration is
successful
Re-adjusting the sensor signal helps to improve your
bike’s responsiveness and power to its original
gures.
Every Ampler has a motor controller – the so-called
brain of your bike that connects all the elctronics and
makes sure everything runs smoothly. The motor
controller is managed by Firmware (the soware that
Soware restart
Torque sensor calibration
Electric system support
Firmware update
Page 13

13/16
V1.1, 24.04.19
controls the hardware). To guarantee the best riding
experience, we recommend keeping your bike’s Firmware up to date.
Firmware update is done via the Ampler mobile app. If
your bike is connected to the app, you will get a notication in your app about the new available Firmware. Please go to the Vehicle seings to update your
Firmware.
Before starting the update, make sure:
• You have the latest Ampler app version
• You have internet connection on your phone
• Your phone’s baery is not running low
• The baery level of the bike is more than 25%
• You have registered and paired the app with your
bike
The update is done over Bluetooth in several steps.
All the steps are almost identical, and they need to
be done in a row. This means that aer completing
the rst update, if there will be a second update still
available – you will also need to complete this. The
updates should take about a minute to complete.
If you experience any problems with updating the
Firmware, please follow troubleshooting instructions
below.
Flow A
1. Turn Bluetooth OFF
2. Turn Bluetooth ON
3. Wait 10 seconds for connecting
If there is no connection, start ow B. If the connection is established, check if there is another Firmware
update available and complete that one as well.
Flow B
1. Close the Ampler app on the background
2. Go to Bluetooth seings
3. Find the Ampler Bike Bluetooth ID under your Blue-
tooth devices and click the “Info” buon. Press
“Forgot This Device”
4. Turn Bluetooth OFF and then back ON under seings
5. Open the Ampler app
Electric system support
Troubleshooting the
Firmware update
Page 14
14/16
V1.1, 24.04.19
6. Pair your bike with your smartphone
7. Check if the update is available and complete the
update
If a new rmware version becomes available in the
future, you will be notied within the app. Meanwhile
you can check the rmware status in the Vehicle
view – if the rmware is up to date, you’ll see the
information in the lower part of the screen in the
vehicle view.
For your protection, please read this manual carefully
before operating the Ampler baery charger.
The charger is designed for indoor use only. Do not
expose it to rain, snow or expose the device to elevated temperatures.
Only use the genuine Ampler charger designated for
your Ampler e-bike. Do not use this charger for other
baeries. Also, do not use other baery chargers for
your Ampler e-bike.
Store the charger in a cool and dry place.
Always check that the magnetic charging plug and
connector are clean. Any electrically conducting particles at the connection can damage the charger or
the electrical system of the e-bike.
During charging the charger can become moderately
hot. Always place the charger in a well-ventilated
place and keep it away from combustible materials.
Children should be supervised by an adult when using
the product.
This charger must not be disposed with domestic
waste and should be disposed at an authorized place
for recycling electrical appliances.
Electric system support
Important
Charger safety manual
Page 15
15/16
V1.1, 24.04.19
1
2
Specications
Sizes Small 50 cm, Medium 54 cm, Large 58 cm
Parts
Frame Aluminum Alloy 6061, Double bued
Fork Carbon 1 1/8"–1 1/2"
Crankset Alloy 170 mm
Boom Bracket: Sealed BB with a torque sensor
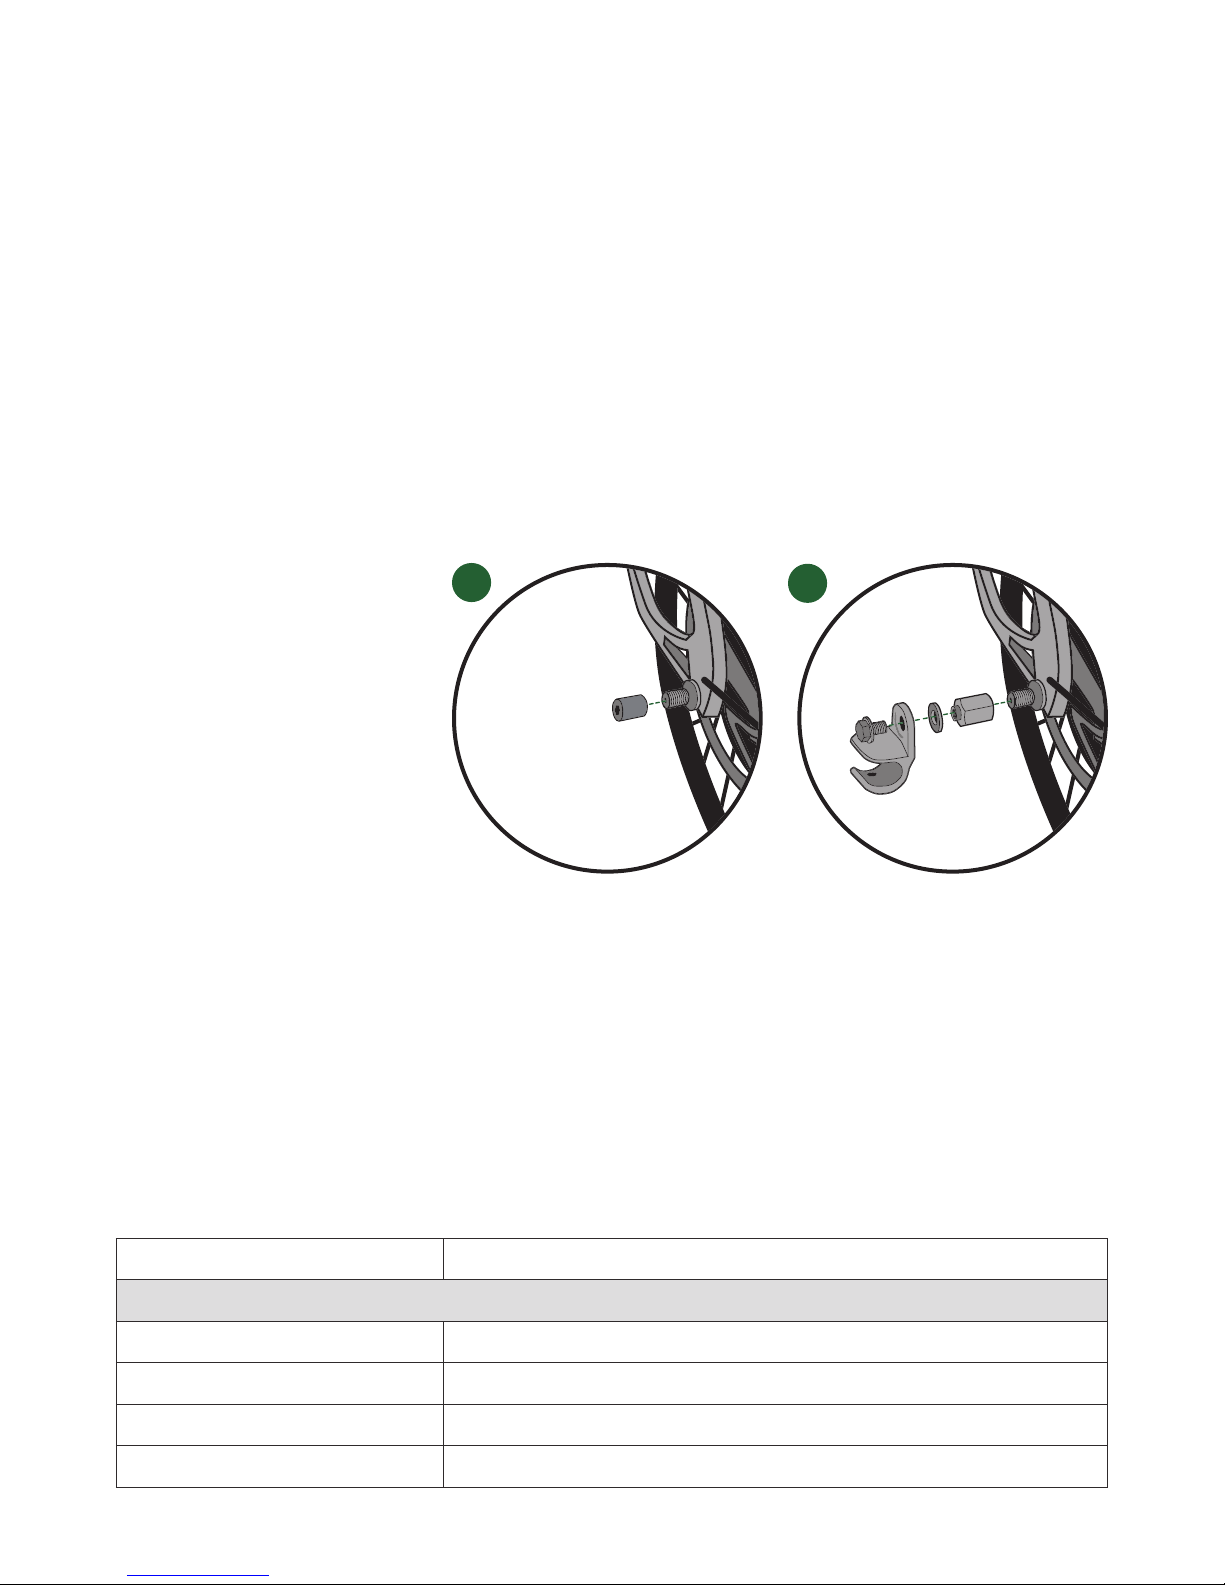
Cargo adapter for Thule trailer
Assembly guide 1. Remove the nut from the le side of the rear drop-
out, located next to the motor. Do not remove the
motor torque washer from the dropout – keep it
aached to the axle.
2. Aach the Ampler motor axle adapter to the frame.
Use a 19 mm wrench (available in the Ampler toolbox) and make sure the axle adapter is securely
fastened.
3. Finally, insert the two security washers, Thule trai-
ler mount and fasten them by using a 15 mm
wrench to tighten the outside bolt.
Page 16
16/16
V1.1, 24.04.19
Specications
Gear shi* Single-speed conguration: 48/16 Gates Carbon Drive
CDX
Blue Front sprocket: CDX 60 tooth
Rear sprocket: CDX 20 tooth
10-gear conguration: Shimano Deore M6000
10-speed upgrade
Derailleur: Shimano M6000
Shier: Shimano M6000 10-spd
Cassee: CS-5700 11-28T
Chain: KMC X10 EL
Chainring: 42 T Narrow/Wide
Chain 10 gears: Shimano / Sram compatible 10 speed chain
Brakes Shimano M500 hydraulic disc brakes
Brake pads Shimano G02S
Rims Asymmetrical 28 mm rims with sealed bearing hubs,
36H
Tyres Continental Grand Prix 4-Season, 32-622 mm
Wheels 28"
Weight* 13.5 kg (Single-speed belt) / 14.3 kg (10-speed chain)
Electronics
Assist speed 25 km/h
Range 45–100 km depending on terrain and assist mode
Baery 48 V 336 Wh LG Li-ion baery
Motor 48 V 250 W rear hub motor
Control mode Precise pedal torque-sensing motor control system
Connectivity Smartphone connectivity with option to change
motor seings
Charger 3A Li-ion charger with Rosenberger magnetic plug
Charging time 2.5 hours for a full charge
Lights Busch+Müller IQ2 Eyc integrated light set / StVZO
approved
*Specications may vary depending on ordered
conguration.
 Loading...