

Page 1

ampire
OHV156-HD
German Engineering. Out of the ordinary.
Owner’s Manual
Before attempting to connect or operate this product, please read the instructions completely.
English
Page 2

Precautions
• Pay utmost attention if you install the monitor into the driver’s compartment.
• Use only in cars with a 12 Volt negative ground.
• Before wiring, disconnect the cable from the negative battery terminal to avoid short
circuits or electrical shocks. Make the correct connections.
• Do not damage pipe or wiring when drilling holes.
• Arrange the wiring so it is not crimped or pinched by a sharp metal edge.
• Do not install the monitor in locations which might hinder vehicle operations and do not
install in locations with any moisture. Use the installation materials provided with the
monitor.
• Do not use bolts or nuts in the brake, airbags or other safety relevant systems to make
ground connections.
• Attention! This monitor is developed for motor vehicle use only.
• WARNING: DO NOT WATCH MOVIES WHILE DRIVING TO AVOID DANGER!
Warranty
12 month warranty for commercial use and 24 month warranty for private use only. The
location of buying (point of purchase) must be within the EU. The proof of warranty is the
original cashiers receipt with date and type of item on it. The owners manual and installation
instructions must be observed. No warranty of destruction by wrong installation, wrong
operation, non regulated use, using of unsuitable accessories, electrical shocks, fire,
moisture or smoke, damage by improper service and cleaning. Warranty repairs are free of
charge. No refund of shipping costs or labour as well as subsequent damages. Complaints
and repairs do not extend the warranty period.
Environmental Reference
• Old electronic devices don’t belong into the bin.
• If you want to dispose this equipment later, remove all cables
and send it back to Ampire.
• You can dispose this device together with your old car, too.
You don’t have to remove it in this case.
• The packing can be recycled. Dispose the packing in a
collecting system planned for it.
2
ampire
2016
Electronics – Subject to correction and technical modifications
Page 3
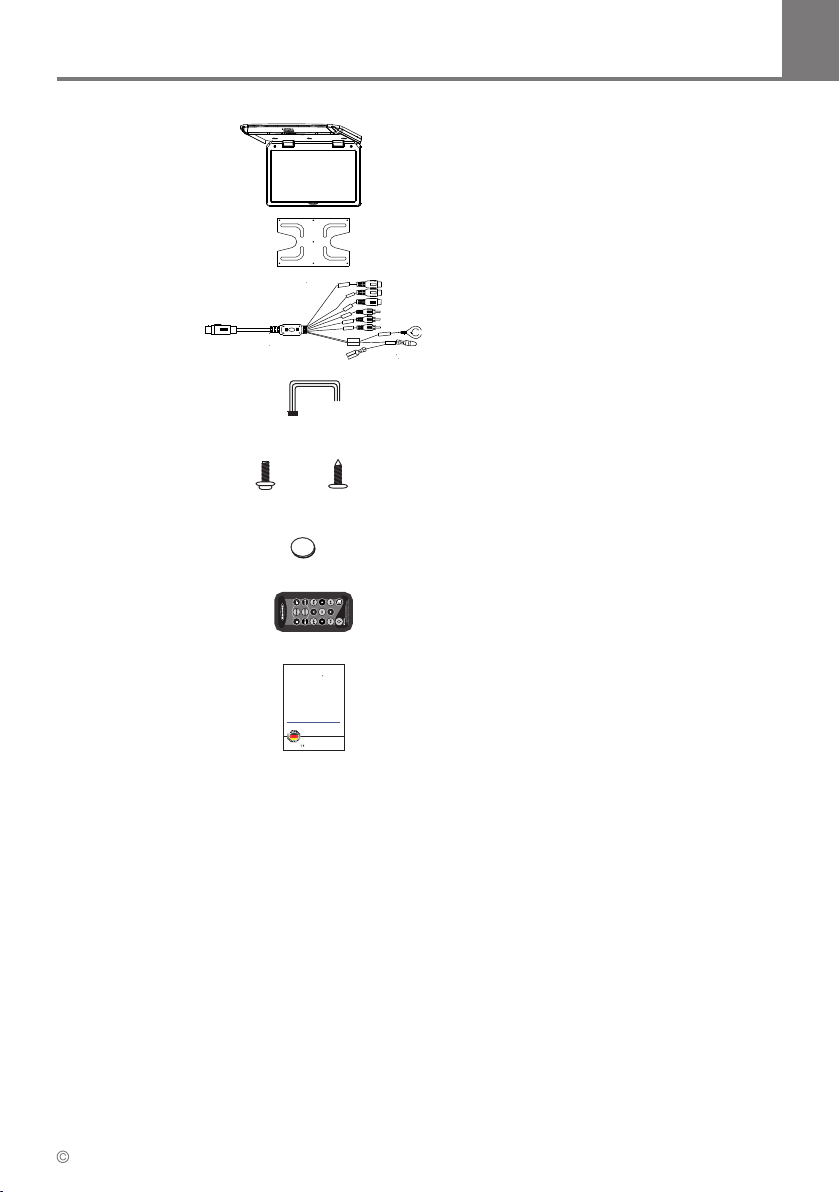
Package Contents
• Monitor
• Metal Bracket
• Main Harness
• Dome Light Wire
EN
x 7
ampire
OHV156-HD
German Engineering. Out of the ordinary.
Bedienungsanleitung
Bitte lesen Sie die komplette Anleitung aufmerksam durch bevor Sie mit der Installation beginnen.
Before attempting to connect or operate this product, please read the instructions completely.
x 7
Owner’s Manual
x 8
• Screws
• Foam Stickers
• Remote
• Owner’s Manual
ampire
2016
3
Electronics – Subject to correction and technical modifications
Page 4
EN
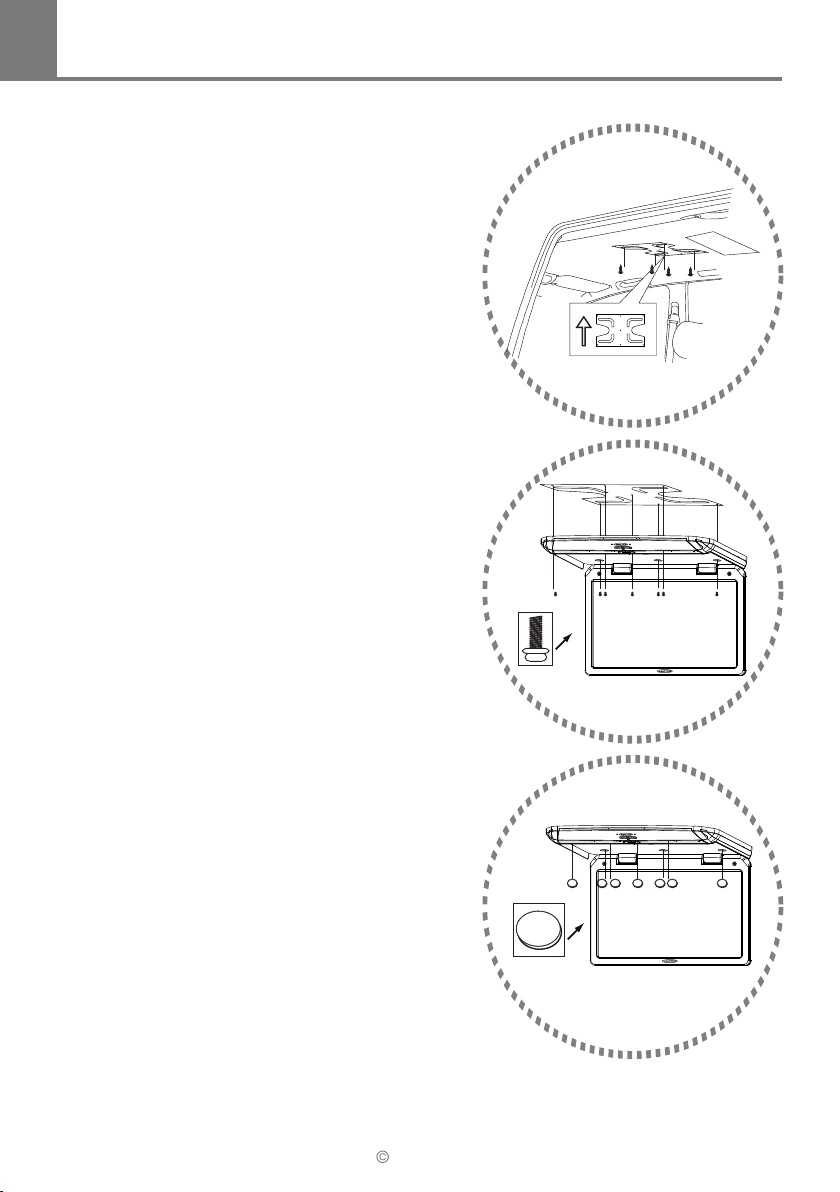
1. Fix the mounting bracket onto the headlining by
using the screws comming with the monitor.
Ensure that the mounting bracket is solid with
the Headlining and no wires are damaged.
2. Run the power, USB and HDMI wire through the
headlining and fix the monitor onto the mounting
bracket by using the screws which are comming
with the monitor.
Installation
3. Cover the screw holes by using the seven black
foam stickers.
4
ampire
2016
Electronics – Subject to correction and technical modifications
Page 5
Connections
EN
11
12
15 16
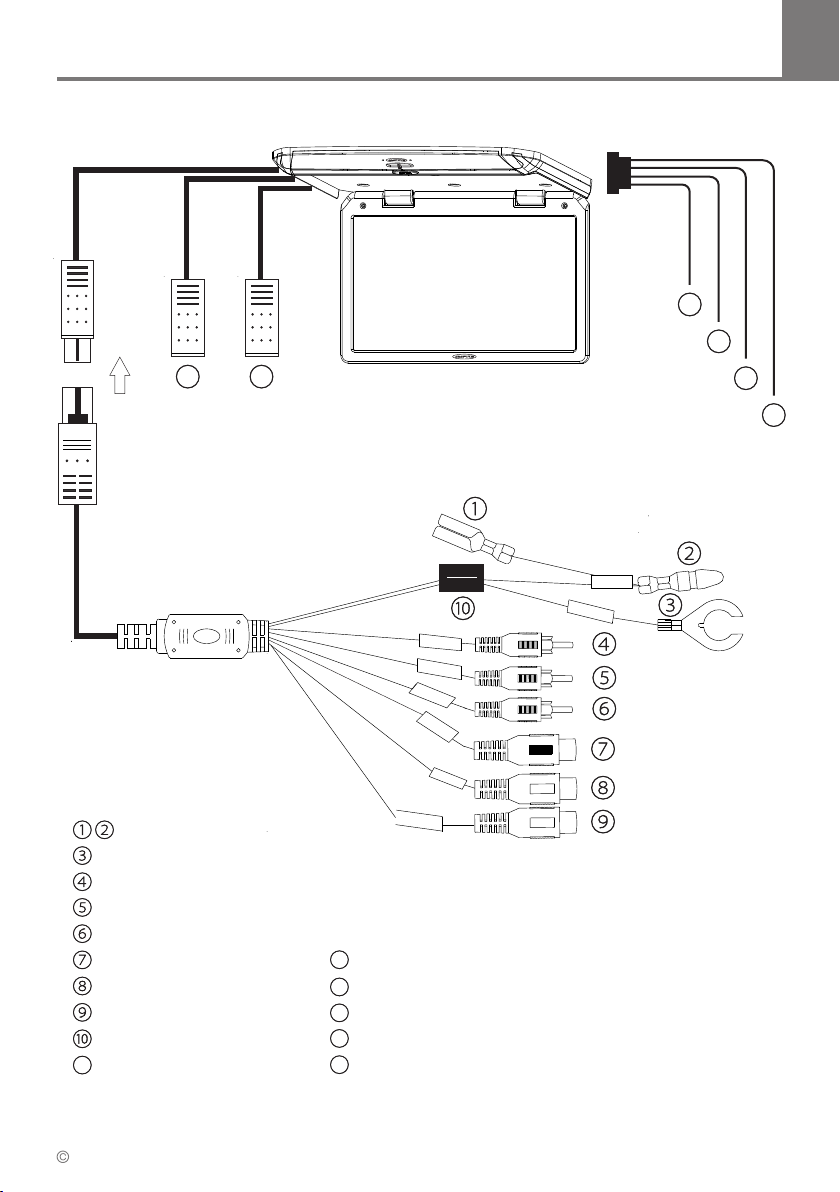
Red: +12VDC
Black: GND
Yellow: Video Output
White: Audio Output left
Red: Audio Output right
Yellow: Video Input
White: Audio Input left
Red: Audio Input right
Filter and 5A Fuse
11
Red: +12VDC
12
Black: GND
13
Yellow: (+) positiv door trigger
14
Green: (-) negativ door trigger
15
USB
16
HDMI Input
13
14
ampire
2016
5
Electronics – Subject to correction and technical modifications
Page 6
EN
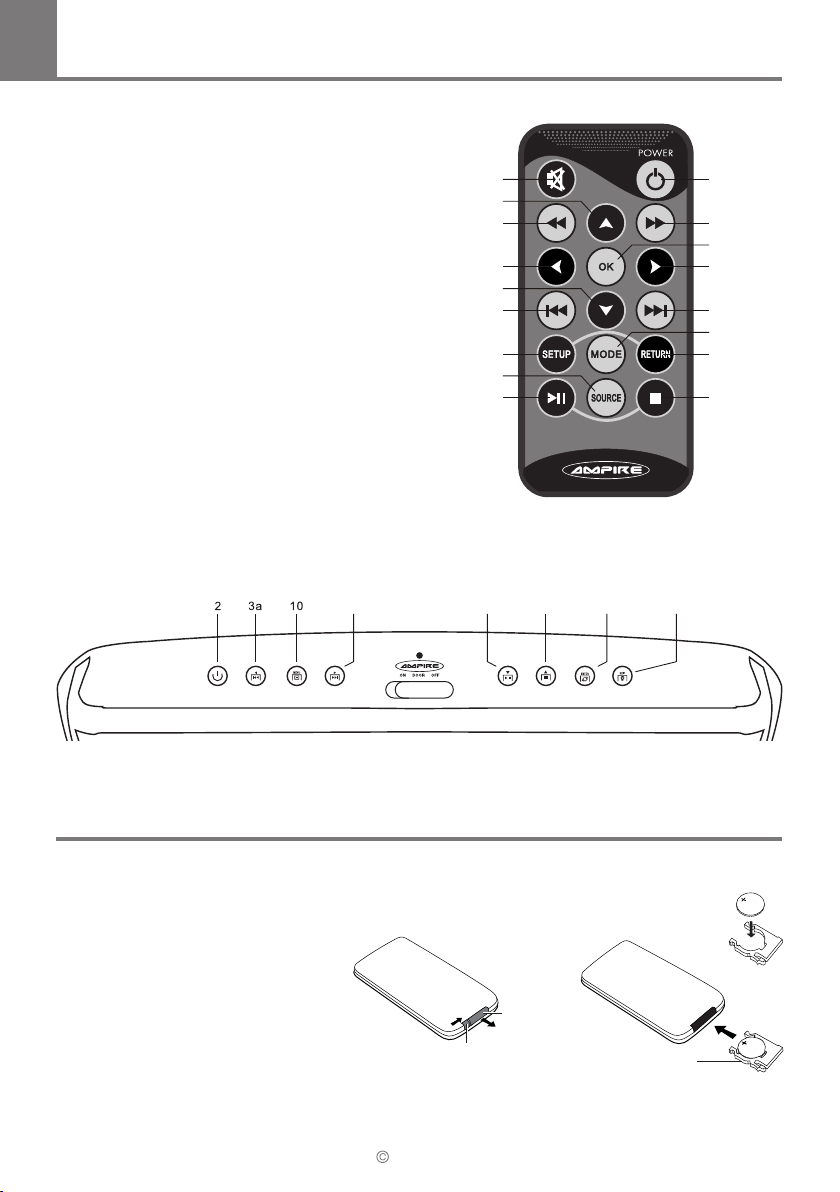
1) Mute
2) Power On / Off
3a) Arrow buttons to select the menu values
3b) Arrow buttons to select the menu values
and for Volume
4) Backward
5) Forward
6) OK to confirm the selected settings
7) Return
8) Next
9) Mode: To change the aspect ratio
10) Setup: To enter the setup menu
11) Return
12) Source: Selects the inputs USB, HDMI, AUX
13) Play/Pause
14) Stop & Return: Press 1x = stop, resume with Play
Press 2x = fully stop, start at the main directory
with Play
3a + 13 3b 3b + 14 6 + 12
Remote
1
3b
4
3a
3b
7
10
12
13
11 +
Lig hts off
2
5
6
3a
8
9
11
14
• Open the battery compartment.
• Insert a “2025” battery. Make sure
of right polarity.
• Close the battery compartment.
• While operating remote control,
please point it to the front panel
of the OHV156-HD.
6
Insert Batteries into Remote
Battery holder
Battery latch
ampire
2016
Electronics – Subject to correction and technical modifications
Battery holder
Page 7
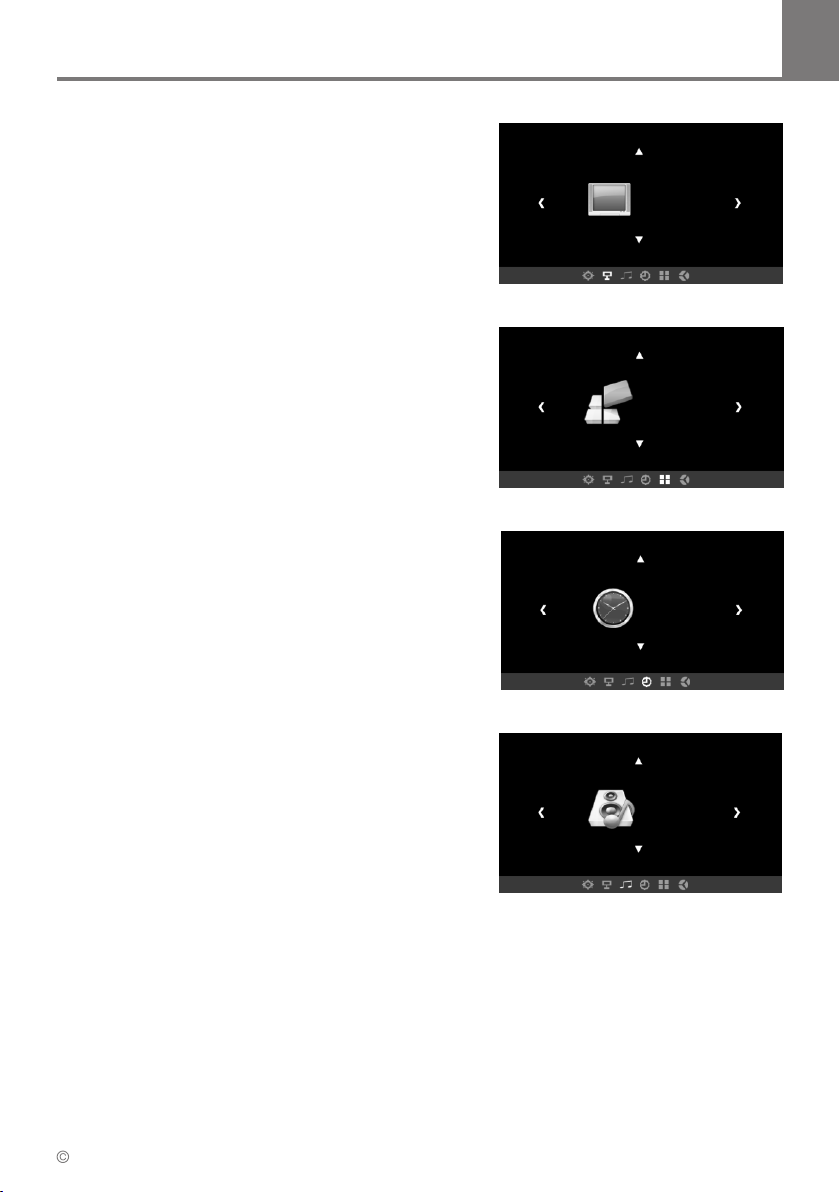
Setup Menu
Picture Setting
1. Press the Setup button of your remote to enter the
setup menu.
2. Use the arrow buttons (3) to select desired function.
3. Press OK (6) to confirm the selection.
4. Press the Return Button (11) to exit the selection.
Language Setting
1. Press the Setup button of your remote twice to enter
the main menu.
2. Use the arrow buttons (3) to select desired function.
3. Press OK (6) to confirm the selection.
4. Press the Return Button (11) to exit the selection.
Time Setting
1. Press the Setup button of your remote twice to
enter the main menu.
2. Use the arrow buttons (3) to select desired function.
3. Press OK (6) to confirm the selection.
4. Press the Return Button (11) to exit the selection.
PICT URE
TIME
OPTI ON
Pict ure Mod e Stand ard
Colo r Tempe rate
Aspe ct Rati o Panora ma
Nois e Reduc tion
Scre en
Back ligh
OSD La nguag e Engli sh
Colo r Range 0 ~255
Blen ding Lo w
HDMI C EC
Osd Du ratio n Off
LED Of f
Cloc k - - - - - - - -
Off Ti me
On Tim e
Slee p Timer
Auto S leep
EN
Sound Setting
1. Press the Setup button of your remote to enter
the sound menu.
2. Use the arrow buttons (3) to make your sound
setting selections.
3. Press OK (6) to confirm the selection.
4. Press the Return Button (11) to exit the selection.
ampire
2016
Electronics – Subject to correction and technical modifications
SOUN D
Soun d Mode St andar d
Bala nce
Auto Vo lume
Surr ound so und off
SPDI F MODE PC M
EQ
IR Sen d Off
FM Sen d Off
7
Page 8
EN
USB Menu
Photo Player
1. Select PHOTO in the USB menu and confirm with OK (6).
2. Use the arrow buttons (3) to select one photo and confirm with OK (6).
3. Press Play (13) to start the slide show and Return (11) to go back to the photo menu.
4. Press the Source Button (11) to return to the USB menu.
Music and Video Player
1. Select MUSIC or VIDEO in the USB menu and confirm with OK (6).
2. Use the arrow buttons (3) to select the right file.
3. Press Play (13) to start the playback.
4. Press Play (13) again for pause.
Text Player
1. Select TEXT in the USB menu and confirm with OK (6).
2. Use the arrow buttons (3) to select the right file.
3. Press OK (6) to display the text.
4. Press the Return button (13) to return to the Text menu.
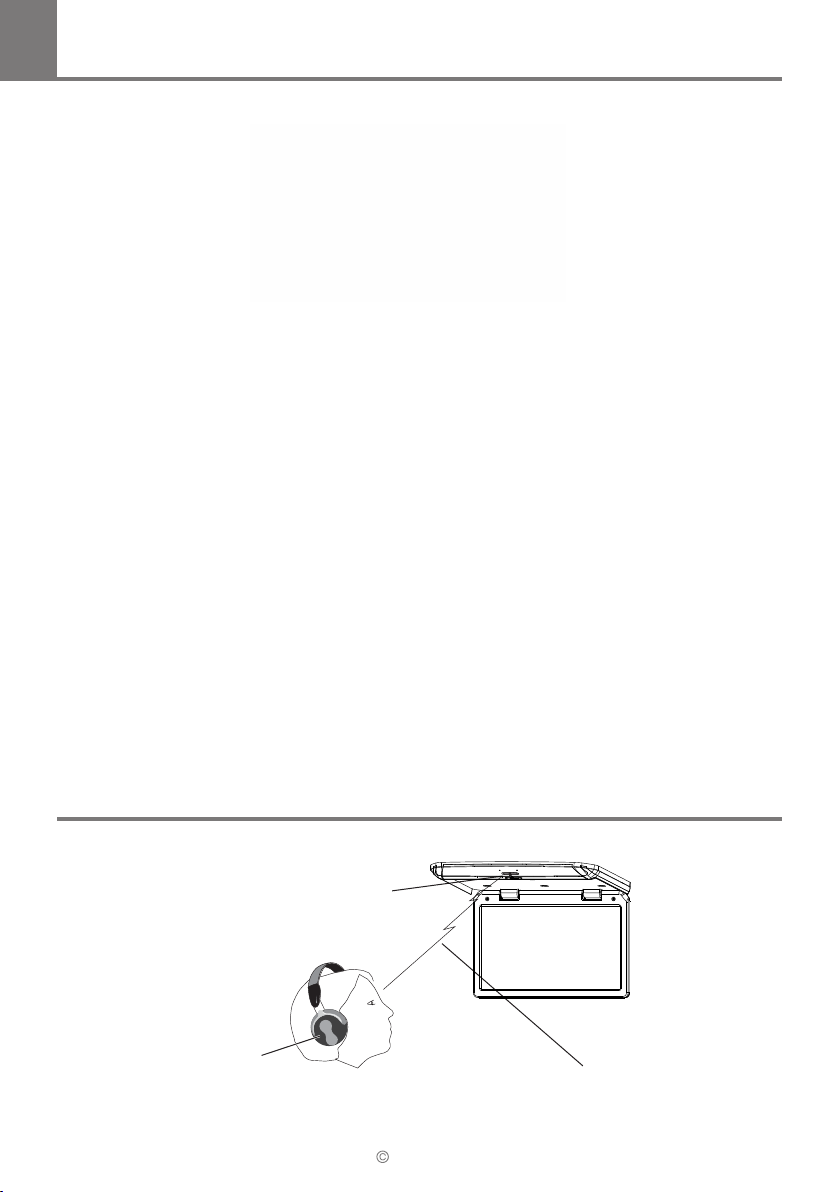
IR Transmitter
IR Transmitter
IR Headphone
(optional)
Line of sight
8
ampire
2016
Electronics – Subject to correction and technical modifications
Page 9

Technical Specifications
EN
Display Size:
Resolution:
Brightness:
Colors:
LED Backlight:
Contrast Ratio:
Viewing Angle:
Video System:
Inputs:
Outputs:
Audio Transmitter:
IR Transmitter
USB Video Formats:
USB Audio Formats:
USB Photo Formats:
USB Sticks:
Operation Voltage:
Current Consumption (Standby):
Current Consuption (max.):
Operation Temperature:
Connection Cable:
Dimensions Closed (WxHxD):
Dimensions Open (WxHxD):
Weight:
15.6” (39,6cm) HD LED
1920 x RGB x 1080 Pixel
300nits
16.700.000
JA
500:1
H160°, V160°
PAL/NTSC
HDMI, AV (Cinch), USB
AV (Cinch, only when AV Input is selected)
IR CH A: 2.8MHz (R) / 2.3MHz (L)
IR CH B: 3.8MHz (R) / 3.2MHz (L)
FM Transmitter
For wireless Headphones (HP301)
MPEG1/2/4, RM, RMVB, MOV, DIVX, MJPEG
WMA, MP3, M4A, AAC
BMP, JPEG, GIF, PNG, TIFF
2.0
11VDC - 14VDC
0,04A
2,0A
-10°C - +70C
2,25m
410x320x30mm
410x320x260mm
2,9kg
ampire
2016
9
Electronics – Subject to correction and technical modifications
Page 10

ampire
OHV156-HD
Since its founding in 1987 Ampire Electronics has only one goal, to provide the best possible
Autoalarm-, Autohifi- and Multimedia products, which are available on the international market.
All manufacturing facilities and suppliers are certified according to ISO 9001 and QS-9000.
Ampire quality products are sold worldwide.
An Ampire customer service is available in many countries.
For more information about distributors in your territory please call: + 49-2181-81955-0.
We are focused on future oriented development of user friendly products.
The outstanding high quality standards, functionalities and designs of our products are unique in the
market. "German Development" is taken literally in AMPIRE.
Langwadener Straße 60
D-41516 Grevenbroich
Email: [email protected]
Techical Support:
Phone: 02181-81955-0
Email: [email protected]
www.ampire.de
© January 2016 AMPIRE ELECTRONICS. All rights reserved. Reproduction in whole or in part without written permission.
 Loading...