

Page 1
ampire
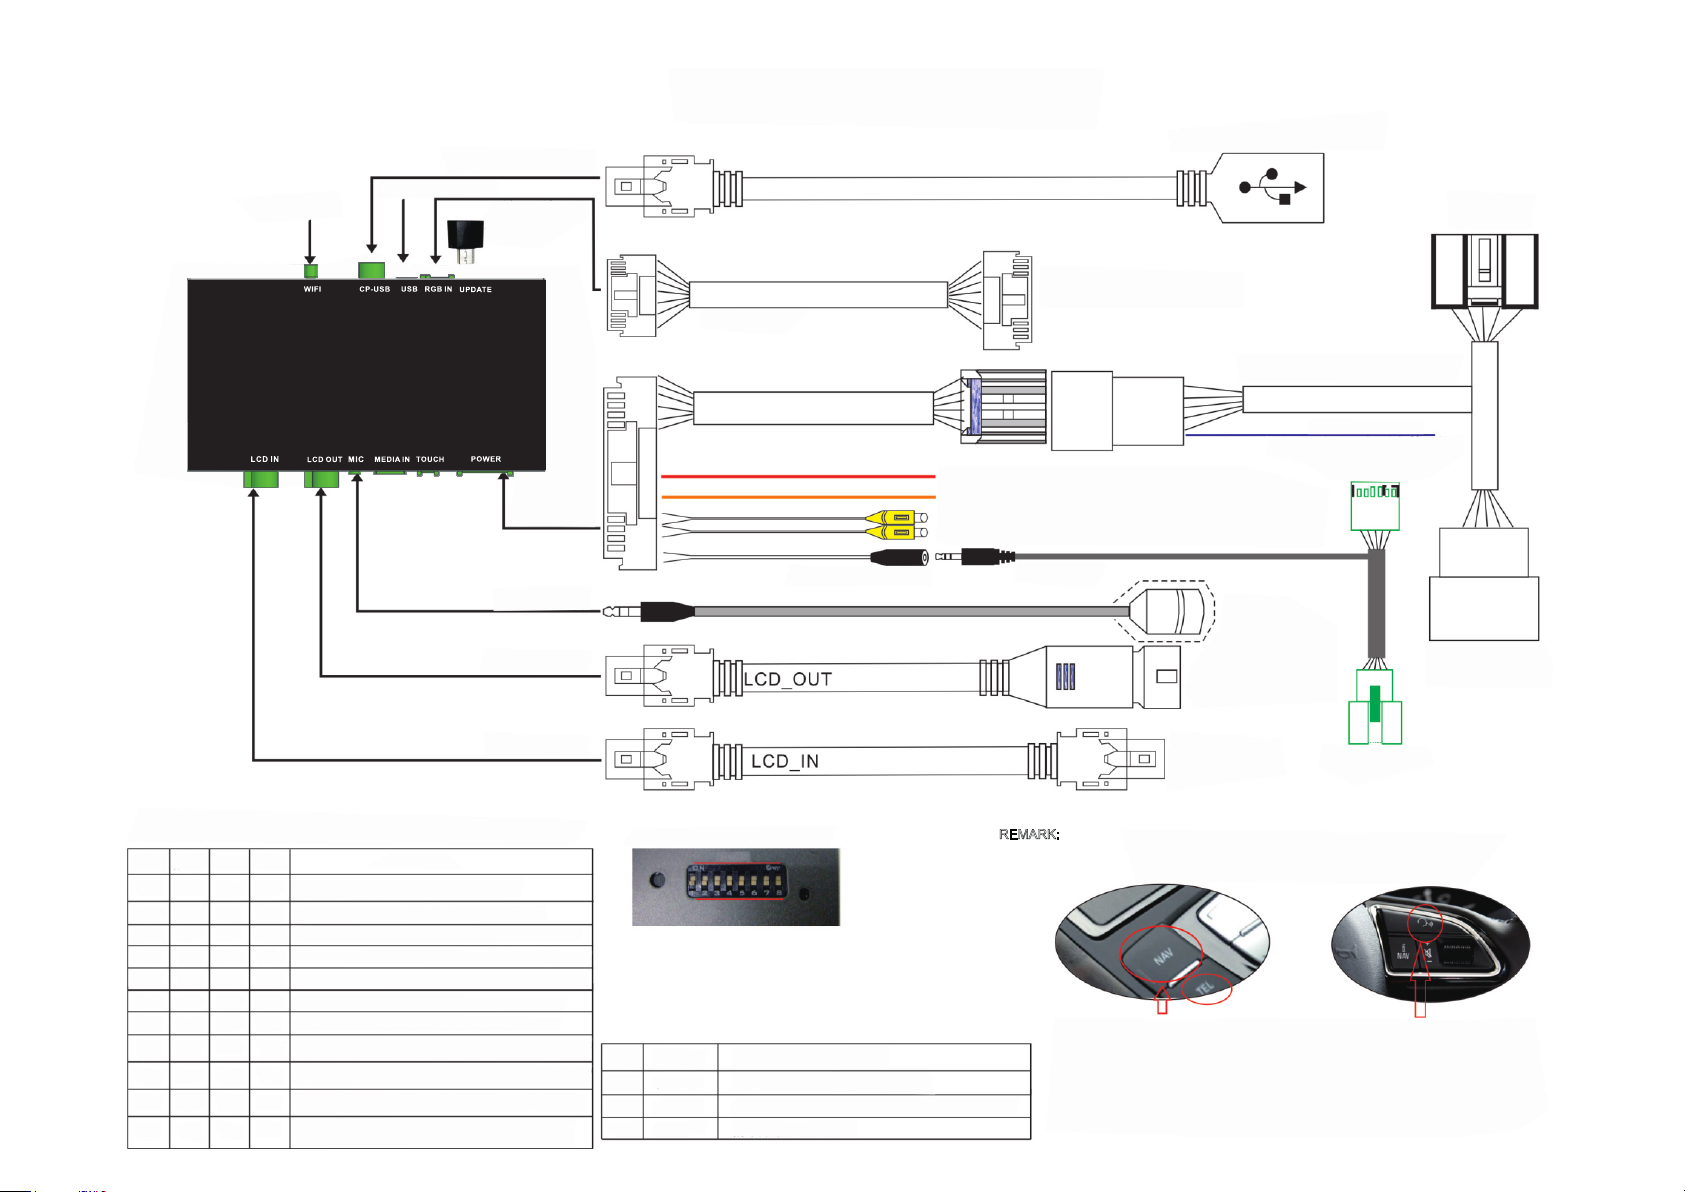
Audi (A6/Q3/Old Q7) WIRING DIAGRAM
WIFI ANTENNA
ampire
ampire
LDS INTER FACE
LDS I NTERFACE
Connect to CARPLAY-USB cable
Multimedia USB
Microphone cable
LCD OUT cable (must not be extended)
RGB input cable
Update adapter
Power cable
Optional cable
Connect to RGB output device
RED---12V output for rear view camera
ORANGE--Reverse control cable (connect to
reversing light) for AVM /without reversing gridline
YELLOW---RCA Front/Rear video input(Connect to
front /rear view camera/360 AVM/DVR
Stereo audio cableBLACK---Stereo audio output
Connect to the original
headunit's cable (The
original cable is gray).
Connect to the Phone's original cable
Connect to A/C panel
or gateway box port
C6/C7 switch wiring for A/C panel or
gateway box.(A8 using spreaded out line)
Blue & white wire for MMI control
Connect to PIN10 of the headunit's
ISO power socket
Connect to the original headunit's big ISO
connector (The
position of the
green inserts)
Microphone
Connect to cable
pulled fromA/C panel
or gateway box port
LCD IN cable (must not be extended)
DIP SWITCH SETTING
(After changing the dip code,press "reset"or power-on again)
PIN 1 PIN 2 PIN 3 PIN 5
ON OFF OFF OFF
ON OFF ON OFF
OFF OFF ON OFF
ON ON OFF OFF
OFF ON OFF OFF
OFF OFF OFF OFF
OFF OFF OFF ON
ON OFF OFF ON
ON OFF ON ON
OFF OFF ON ON
OFF ON ON ON
CAR MODEL
2010~2012 A6L/A7(C6) CAN1 connect to gateway box
10-12 Q7 (7") CAN 1 connect to A/C beige socket's pin7&pin8
13-15 A6/A7/A8(C7) CAN1 connect to A/C red socket's pin4&5
09~18 A4/A5/Q5 CAN1 connect to gateway box's red socket's
pin5&pin15 .(Gateway bos is in the left side of the co-pilot)
High-end 7" A1/Q3 CAN1 connect to gateway box's (Under the
steering wheel)pin5&15 or to A/C panel's beige socket's pin12&13
Low-end 6.5" A1/Q3 CAN1 connect to gateway box's (Under the
steering wheel)pin5&15 or to A/C panel's beige socket's pin12&13
USA version A4/A5/Q5 CAN1 connect to gateway box's red socket's
pin5&pin15 .(Gateway bos is in the left side of the co-pilot)
USA version Q7 (6.5") CAN1 connect to A/C beige socket's pin7&8
17~18 A4/Q7(7") CAN1 connect to ISO socket's (Gray socket)pin6&12,
CAN2 connect to pin1&7; 09~11 Q7 MMI bule&white wire connect to pin3
16~18 A6/A7/A8l CAN1 connect to ISO socket's (Gray socket)pin6&12,
CAN2 connect to pin1&7; MMI system bule&white wire connect to pin3
A3(7") CAN1 connect to ISO socket's (Gray socket)
pin6&12,CAN2 connect to pin1&7
Q3/A3(5.8") CAN1 connect to ISO socket's
(Gray socket)pin6&12,CAN2 connect to pin1&7
Reset Dip Switch LED
ON
OFF
PIN 4 OFF/ON
PIN 6 OFF/ON
PIN 7 OFF/ON
PIN 8 OFF/ON
Reversing gridline/Enable 360 panoramic
Rear view camera CVBS input / RGB input
NG/Touch point coordinate correction PIN7 “ON”,
after configuration PIN7 “OFF”
Aftermarket rear view CAM/Original rear view CAM
Plug into the original
headunit's LVDS port
REMARK:
Please stay in the AUX Interface when opening the CARPLAY Interface
1) For A6/A7, long press and hold the “NAV”
Button to enter the Interface, long press
the “NAV” Button again to exit.
2) Short press “TEL” Button to open “Siri”.
3) Knob to control up/down/right/left/ok.
Connect to the unplugged green
inserts from the original headunit's
ISO cable
1) For A1/Q3, long press and hold the Voice
control Button to enter the Interface, long
press the Voice control Button again to exit.
2) Short press the Voice control Button to
open “Siri”.
3) Steering wheel Roller to control
up/down/ok.
 Loading...