

Page 1
MICRO-VR
Solid State
Bass Guitar Amplifier
Owner’s Manual
Page 2
Micro-VR Bass Guitar Amplifier
PORTABLE CART
WARNING
TABLE OF CONTENTS
Introduction ..........................................................................3
The Front Panel ....................................................................4
The Rear Panel .....................................................................5
System Block Diagram ..........................................................6
Service Information ...............................................................6
Technical Specifications .........................................................8
CAUTION
RISK OF ELECTRIC SHOCK
WARNING: TO REDUCE THE RISK OF FIRE OR ELECTRIC
SHOCK, DO NOT EXPOSE THIS APPARATUS TO RAIN OR
MOISTURE. TO REDUCE THE RISK OF ELECTRIC SHOCK, DO
NOT REMOVE COVER. NO USER-SERVICEABLE PARTS INSIDE.
REFER SERVICING TO QUALIFIED SERVICE PERSONNEL.
DO NOT OPEN
PRECAUCION: PARA REDUCIR EL RIESGO DE INCENDIOS O DESCARGAS
ELECTRICAS, NO PERMITA QUE ESTE APARATO QUEDE EXPUESTO A LA
LLUVIA O LA HUMEDAD. PARA DISMINUOIR EL RIESGO DE CORRIENTAZO.
NO ABRA LA CUBIERTA. NO HAY PIEZAS ADENTRO QUE EL USARIO PUEDO
REPARAR DEJE TODO MANTENIMIENTO A LOS TECHNICOS CALIFICADOS.
PRECAUCION
RIESGO DE CORRIENTAZO
NO ABRA
ATTENTION
RISQUE D'ELECTROCUTION
ATTENTION: PROTÉGEZ CET APPAREIL DE LA PLUIE ET DE L'HUMIDITÉ
AFIN D'ÉVITER TOUT RISQUE D'INCENDIE OU D'ÉLECTROCUTION. POUR
REDUIRE D'ELECTROCUTION NE PAS ENLEVER LE COUVERCLE. AUCUNE
PIECE INTERNE N'EST REPRABL E PAR L'UTI LISATEUR. POUR TOUTE
REPARATION, S'ADRESSER A UN TECHNICIEN QUALIFIE.
NE PAS OUVRIR
IMPORTANT SAFETY INSTRUCTIONS
• READ, FOLLOW, HEED, AND KEEP ALL INSTRUCTIONS AND WARNINGS.
• DO NOT OPERATE NEAR ANY HEAT SOURCE AND DO NOT BLOCK ANY VENTILATION OPENINGS ON THIS APPARATUS. FOR
PROPER OPERATION, THIS UNIT REQUIRES 3” (75mm) OF WELL VENTILATED SPACE AROUND HEATSINKS AND OTHER AIR
FLOW PROVISIONS IN THE CABINET.
• DO NOT USE THIS APPARATUS NEAR SPLASHING, FALLING, SPRAYING, OR STANDING LIQUIDS.
• CLEAN ONLY WITH LINT-FREE DRY CLOTH AND DO NOT USE CLEANING AGENTS.
• ONLY CONNECT POWER CORD TO A POLARIZED, SAFETY GROUNDED OUTLET WIRED TO CURRENT ELECTRICAL CODES AND
COMPATIBLE WITH VOLTAGE, POWER, AND FREQUENCY REQUIREMENTS STATED ON THE REAR PANEL OF THE APPARATUS.
• WHERE THE MAINS PLUG OR AN APPLIANCE COUPLER IS USED AS THE DISCONNECT DEVICE, THE DISCONNECT DEVICE
SHALL REMAIN READILY OPERABLE.
• PROTECT THE POWER CORD FROM DAMAGE DUE TO BEING WALKED ON, PINCHED, OR STRAINED.
• UNPLUG THE APPARATUS DURING LIGHTNING STORMS OR WHEN UNUSED FOR LONG PERIODS OF TIME.
• ONLY USE ATTACHMENTS, ACCESSORIES, STANDS, OR BRACKETS SPECIFIED BY THE MANUFACTURER FOR SAFE OPERATION
AND TO AVOID INJURY.
• WARNING: TO REDUCE THE RISK OF ELECTRIC SHOCK OR FIRE, DO NOT EXPOSE THIS UNIT TO RAIN OR MOISTURE.
• SERVICE MUST BE PERFORMED BY QUALIFIED PERSONNEL.
• OUR AMPLIFIERS ARE CAPABLE OF PRODUCING HIGH SOUND PRESSURE LEVELS. CONTINUED EXPOSURE TO HIGH SOUND
PRESSURE LEVELS CAN CAUSE PERMANENT HEARING IMPAIRMENT OR LOSS. USER CAUTION IS ADVISED AND EAR
PROTECTION IS RECOMMENDED IF UNIT IS OPERATED AT HIGH VOLUME.
• WARNING: THIS UNIT REQUIRES A SAFETY GROUNDED OUTLET WIRED TO CURRENT ELECTRIC CODES HAVING THE
LINE SUPPLY VOLTAGE, POWER, AND FREQUENCY IDENTIFIED ON THE REAR OF THE UNIT. THE OUTLET MUST REMAIN
ACCESSIBLE TO DISCONNECT THE UNIT IF A FAULT SHOULD ARISE WHILE IN USE. THIS UNIT SHOULD BE UNPLUGGED WHEN
NOT IN USE.
• THIS UNIT IS FOR USE IN MODERATE AND/OR TROPICAL CLIMATES.
• ONLY USE ATTACHMENTS, ACCESSORIES, CARTS, STANDS, OR BRACKETS SPECIFIED BY THE MANUFACTURER
FOR SAFE OPERATION AND TO AVOID INJURY. WHEN A CART IS USED, USE CAUTION WHEN MOVING THE CART/
APPARATUS COMBINATION TO AVOID INJURY FROM TIP-OVER.
EXPLANATION OF GRAPHICAL SYMBOLS:
EXPLICACION DE SIMBOLOS GRAFICOS:
EXPLICATION DES SYMBÔLES GRAPHIQUES:
"DANGEROUS VOLTAGE"
=
“VOLTAJE PELIGROSO”
"DANGER HAUTE TENSION"
"IT IS NECESSARY FOR THE USER TO REFER TO THE INSTRUCTION MANUAL"
=
“ES NECESARIO QUE EL USUARIO SE REFIERA AL MANUAL DE INSTRUCCIONES.”
"REFERREZ-VOUS AU MANUAL D'UTILISATION"
NOTE: This equipment has been tested and found to comply with the limits for a Class B digital device, pursuant to part 15 of the FCC Rules.
These limits are designed to provide reasonable protection against harmful interference in a residential installation. This equipment generates,
uses, and can radiate radio frequency energy and, if not installed and used in accordance with the instructions, may cause harmful interference
to radio communications. However, there is no guarantee that interference will not occur in a particular installation. If this equipment does cause
harmful interference to radio or television reception, which can be determined by turning the equipment off and on, the user is encouraged to
try to correct the interference by one or more of the following measures:
• Reorient or relocate the receiving antenna.
• Increase the separation between the equipment and the receiver.
• Connect the equipment into an outlet on a circuit different from that to which the receiver is connected.
• Consult the dealer or an experienced radio/TV technician for help.
CAUTION: Changes or modifications to this device not expressly approved by LOUD Technologies Inc. could void the user's authority to
operate the equipment under FCC rules.
2
Page 3
Introduction
Micro-VR
Stonehenge
Micro-VR Bass Guitar Amplifier
Congratulations!
This no-compromise amplifier packs 200 watts of solid-state MOS-FET fury, a switching power
supply and the classical good looks and features of our renowned SVT Series amplifier head.
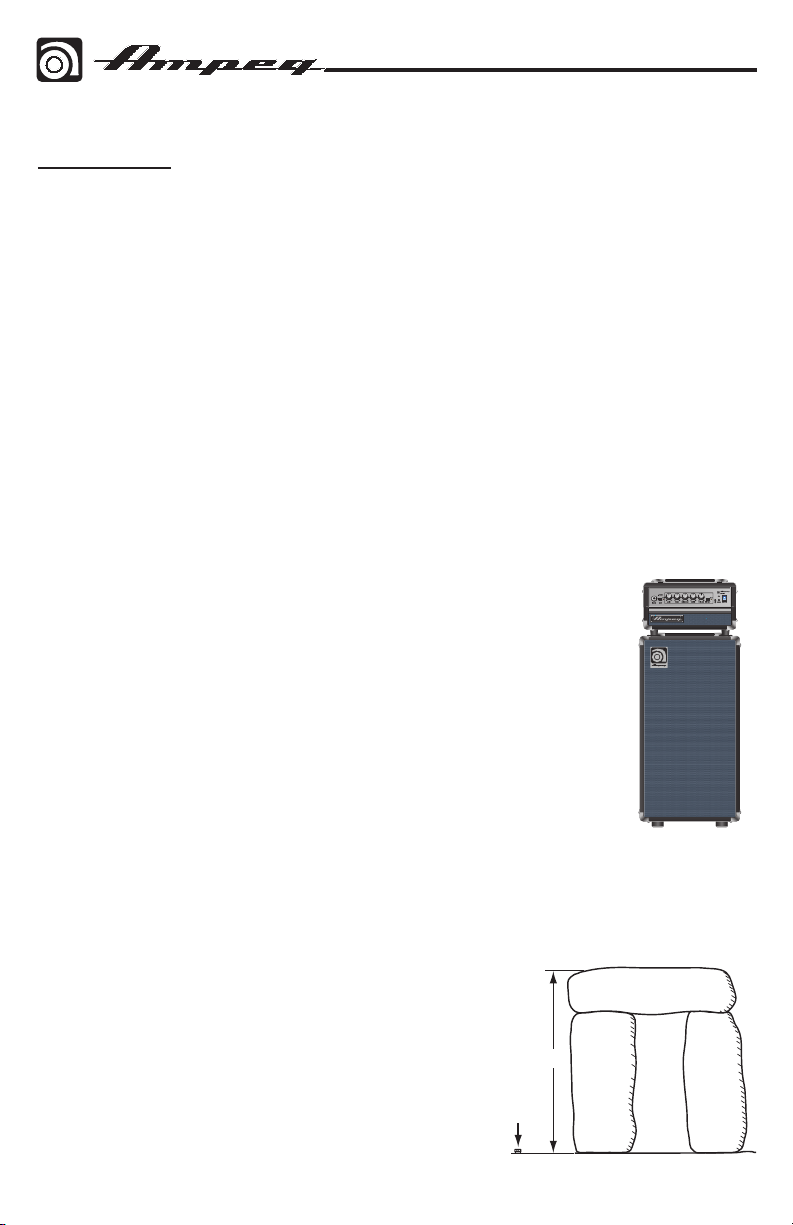
The Micro-VR amplifier is designed as an ideal companion to the SVT 210AV cabinet, available
separately.
The switching power supply keeps the weight low, without sacrificing power output or our
legendary sound quality.
Like all Ampeg products, your Micro-VR amplifier is designed by musicians and built using only
the best of components. Each amplifier is tested to confirm that it meets our specifications,
and we believe that this amplifier is the absolute best that it can be.
In order to get the most out of your new amplifier, please read this manual before you begin
playing.
Here are some of the features packed into your new Amplifier:
• Detailed 1970s-era SVT appearance
• Designed as a stack with the SVT 210AV cabinet (available separately)
• Single channel, entirely solid-state design
• Selectable 15 dB input pad
• Gain control
• Bass, Mid, and Treble controls
• Volume control
• Selectable Limiter and LED
• Peak LED
• Auxiliary input
• Headphone output
• Illuminated power switch
• Effects loop with separate send and return jacks
• Balanced XLR output
• Lightweight switching power supply
• Voltage selector switch
• MOS-FET power amplifier rated at 200 watts rms
into 4 ohms
• Fan cooled
• Much smaller than Stonehenge
You are now the proud owner of an Ampeg Micro-VR bass guitar amplifier.
And
thank you for choosing Ampeg.
Micro-VR and
SVT 210AV
Cabinet
3
Page 4

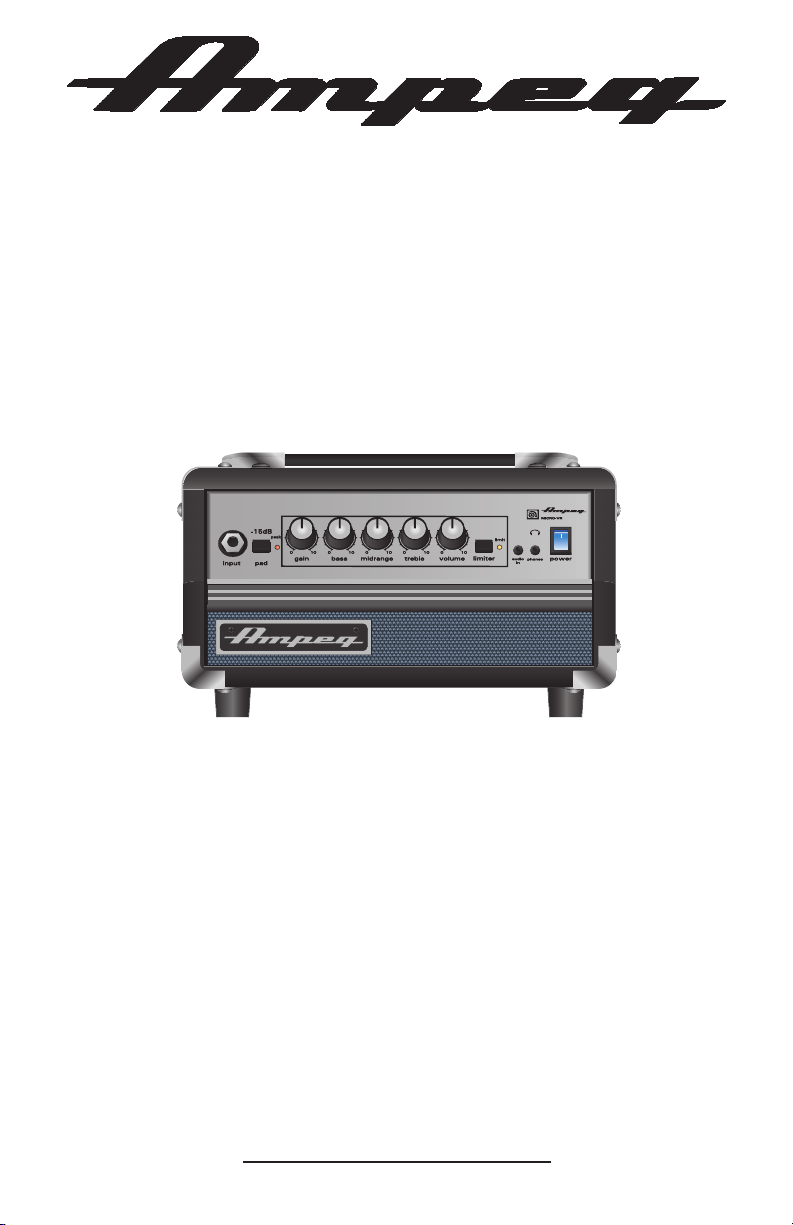
The Front Panel
1
2 3 4 5 6 7 8 9 10 11 12 13
Micro-VR Bass Guitar Amplifier
1. INPUT: The signal output from an instrument (active or passive) may be con
nected to this 1/4" input by means of a
shielded instrument cable.
2. –15 dB PAD: Press this switch in to
reduce the input signal by 15 dB and
compensate for higher output sources.
This attenuation is suited for use with
basses that have active electronics or
high-output pickups. Use this pad if you
notice the peak LED [3] comes on regu
larly. It will reduce the chance of over
driving the preamplifier stage, and allow
more usable range and fine adjustment
of the gain control.
3. PEAK LED: This red warning LED may
come on if: the input signal is too high,
the gain control is set too high, or there
is too much boost from the bass, mid
range and treble controls. If it comes on
regularly, even when these controls are
low, try engaging the –15 dB pad.
4. GAIN: This varies the amount of signal
driving the preamplifier. If a small clock
wise rotation from minimum leads to
overloading and the peak LED coming
on, try engaging the –15 dB pad. This
will give more usable range with the gain
control.
5. BASS: Use this to adjust the low fre
quency level of the amplifier. This pro
vides up to 14 dB of boost, or 12 dB of
cut at 40 Hz. The low frequency output
is flat at the center position.
-
-
-
-
-
6. MIDRANGE: Use this to adjust the mid
range frequency level of the amplifier.
This provides up to 5 dB of boost, or
13 dB of cut at 500 Hz. The midrange
frequency output is flat at the center
position. Rotate the control counter
clockwise for a “contoured” sound
(more distant, less midrange output) or
clockwise for a sound which really cuts
through.
7. TREBLE: Use this to adjust the high fre
quency level of the amplifier. This pro
vides up to 19 dB of boost, or 25 dB of
cut at 8 kHz. The high frequency output
is flat at the center position.
8. VOLUME: Use this to control the overall
output level. It affects the speaker out
puts [17], and headphones output [12].
Use it wisely, and turn it down when
making connections, putting on head
phones, or trying something new.
9. LIMITER SWITCH: Press this switch in
to add the limiter circuit. If the signals
-
driving the amplifier start to peak, the
limiter will automatically reduce the
signals to prevent clipping, and the LED
[10] will flash. The limiter will help keep
the amplifier’s output “clean” up to high
output levels and avoid potentially dam
aging distortion.
-
-
-
-
-
-
4
Page 5

Micro-VR Bass Guitar Amplifier
10. LIMIT LED: This LED illuminates when
the limiter circuit is activated, indicating
that the amplifier is nearing full output
and the limiter is keeping peak signals
from clipping the output.
If you notice that the LED is turning on
regularly, reduce the volume or the EQ
levels to prevent damage to your speak
ers.
11. AUDIO IN: The audio output from linelevel sources such as an iPod
or CD player, can connect to this 1/8"
TRS stereo input. The incoming audio is
mixed with the preamp signals, so you
can play along to a practice track, as
you listen with headphones. (The audio
coming in here only plays in the head
phones, and appears nowhere else.)
12. PHONES: Use this 1/8" TRS stereo
output to connect your headphones.
The output here is a mix of the line-level
signals reaching the amplifier, and any
incoming audio from the audio in jack
[11].
If you just want to listen and practice
through headphones, disconnect the
speaker-level outputs [17] from the
speaker cabinet. (This is a solid-state
amplifier, so there is no harm in playing
without speakers.)
Before putting on headphones, make
sure the volume control [8] is turned
down, and (if connected) any external
audio source has its level turned down.
This will reduce the chance of hearing
damage due to loud volumes.
13. POWER SWITCH: Use this illuminated
switch to turn the overall system power
on or off. Press the top of the switch to
turn on the power, and press the bottom
to turn it off.
®
, MP3,
-
-
5
Page 6

The Rear Panel
1
14 15 16 17 18 19 20
2 3 4 5 6 7 8 9 10 11 12 13
Micro-VR Bass Guitar Amplifier
14. IEC POWER INPUT CONNECTOR: This
is where you connect the supplied AC
power cord.
Before plugging in the power
cord, make sure that the voltage
selector switch [15] is set to the same
voltage as your local AC mains.
15. VOLTAGE SELECTOR SWITCH:
Make sure the switch is in the
correct position for your local AC
mains voltage before you plug in the AC
power cord. Use a small flat screwdriver
to slide the switch if required.
16. VENTILATION: Make sure that the ven
tilation openings are not obscured in any
way. This will allow the flow of cooling
air to the power amplifier’s heatsinks.
17. SPEAKER OUTPUTS: These 1/4" TS
output jacks supply speaker-level power
to the speaker cabinet. The rated power
output is 200 watts rms into 4 ohms.
The two identical outputs are wired in
parallel, and you can use either one, or
use both. Make sure the total speaker
impedance load is 4 ohms or greater.
For example, you could connect:
Two 16 ohm speakers (an 8 ohm load),
Two 8 ohm speakers (a 4 ohm load)
or one 4 ohm speaker.
Use speaker cables with 1/4" TS
ends to make the connections.
Do not use instrument cables as these
may overheat.
18. EFFECTS LOOP RETURN JACK: Use
19. EFFECTS LOOP SEND JACK: Use this
Use the loop return jack [18] to feed the
-
20. XLR LINE OUT JACK: Typically, you
This output can connect to external
Balanced connections allow long cable
this 1/4" TS unbalanced input to return
the processed line-level output of an
external effects processor (for example).
The processor could be fed by signals
from the effects loop send [19].
1/4" TS unbalanced output to send a
line-level output to an external effects
processor (for example). The output here
is affected by all controls except the vol
ume [8] and the limiter switch [9].
returned processed signals back into the
power amplifier.
would connect this balanced output to
the balanced input of an external mixer,
or a recorder. In this way, you do not
have to mic the speaker cabinet in order
to add it to the main mix, or to record.
The output is not affected by the volume
control [8].
power amplifiers, or powered loudspeak
ers, as long as they have their own input
controls to adjust the volume level.
runs to be used, as hum and noise
pickup in the line is minimized.
-
-
6
Page 7

System Block Diagram
15 dB PAD
PHONES
OUTPUT
POWER
AMPLIFIER
LEFT
RIGHT
VOLUME
SPEAKER
OUTPUTS
PREAMPLIFIER
PEAK DETECTOR
LIMITER
LIMIT
LED
RETURN
SEND
EFFECTS
LOOP
XLR BALANCED
LINE OUTPUT
BASSMIDRANGETREBLE
INPUT
GAIN
TONE CONTROLSTONE CONTROLS
AUDIO INPUT
(STEREO)
LEFT
RIGHT
PEAK
LED
PEAK
LED
Micro-VR Bass Guitar Amplifier
Service Information
I
f you are having a problem with your Micro-VR, you can go to our website (www.ampeg.com)
and click on Support for service information, or call 1-800-898-3211 during business hours
(7
am to 5 pm PST, Monday-Friday). If you are outside of the U.S., contact your local distribu-
tor for technical support and service.
Correct disposal of this product: This symbol indicates that this product should not be disposed of with your household waste,
according to the WEEE directive (2002/96/EC) and your national law. This product should be handed over to an authorized
collection site for recycling waste electrical and electronic equipment (EEE). Improper handling of this type of waste could have
a possible negative impact on the environment and human health due to potentially hazardous substances that are generally
associated with EEE. At the same time, your cooperation in the correct disposal of this product will contribute to the effective
usage of natural resources. For more information about where you can drop off your waste equipment for recycling, please contact
your local city office, waste authority, or your household waste disposal service.
7
Page 8

Micro-VR Bass Guitar Amplifier
MICRO-VR TECHNICAL SPECIFICATIONS
Output Power Rating 150 watts rms @ 8 ohms, 5% THD
200 watts rms @ 4 ohms, 5% THD
Signal to Noise Ratio 72 dB (20 Hz–20 kHz, unweighted)
Maximum Gain 62 dB, tone controls centered
Tone Controls Bass: +14/–12 dB @ 40 Hz
Midrange: +5/–13 dB @ 500 Hz
Treble: +19/–25 dB @ 8 kHz
Power Requirements 100–120 VAC, 50–60 Hz, 150 W
220–240 VAC, 50–60 Hz, 150 W
Size (H x W x D) 7.5 in/190 mm (with feet) x 12 in/305 mm
x 10 in/254 mm
Weight 9.9 lb/4.5 kg
The Micro-VR is covered with a durable fabric-backed vinyl material. Clean with a dry lint-free cloth.
Never spray cleaning agents onto the cabinet. Avoid abrasive cleansers which would damage the finish.
Ampeg continually develops new products and improves upon existing ones. For this reason, the specifications
and information in this manual are subject to change without notice.
“Ampeg” is a registered trademark of LOUD Technologies Inc. All other brand names mentioned are trademarks
or registered trademarks of their respective holders and are hereby acknowledged.
Declaration Of Conformity
Manufacturer: LOUD Technologies Inc.
16220 Wood-Red Rd. NE
Woodinville, WA 98072, USA
Product Name: Ampeg Micro-VR
Product Type: Audio Amplifier
Complies with Standards:
LVD: 92/31/EEC, 93/68/EEC, & 73/23/EWG
Safety: EN60065
EMC: EN55013, EN55020, EN55022, EN55103, EN61000-3-2,
& EN61000-3-3
LOUD Technologies Inc., 16220 Wood-Red Road NE, Woodinville, WA 98072 • Tel: 1-866-858-5832
The official Declaration of Conformity for this product is kept on file at:
www.ampeg.com
@2008 LOUD Technologies Inc.
16220 Wood-Red Road NE • Woodinville, WA 98072
Part No. 0031570 Rev. B 10/08
8
 Loading...