

Page 1

User Manual
Manuel d’ utilisation
Page 2
Charging for first time use
The Charging the battery before use is recommended but not required.
The receiver ships pre-charged, however initial charge will vary.
Connect cable to the USB slot of any PC or Mac. The status indicator will
be red while charging and will turn off when fully charged.
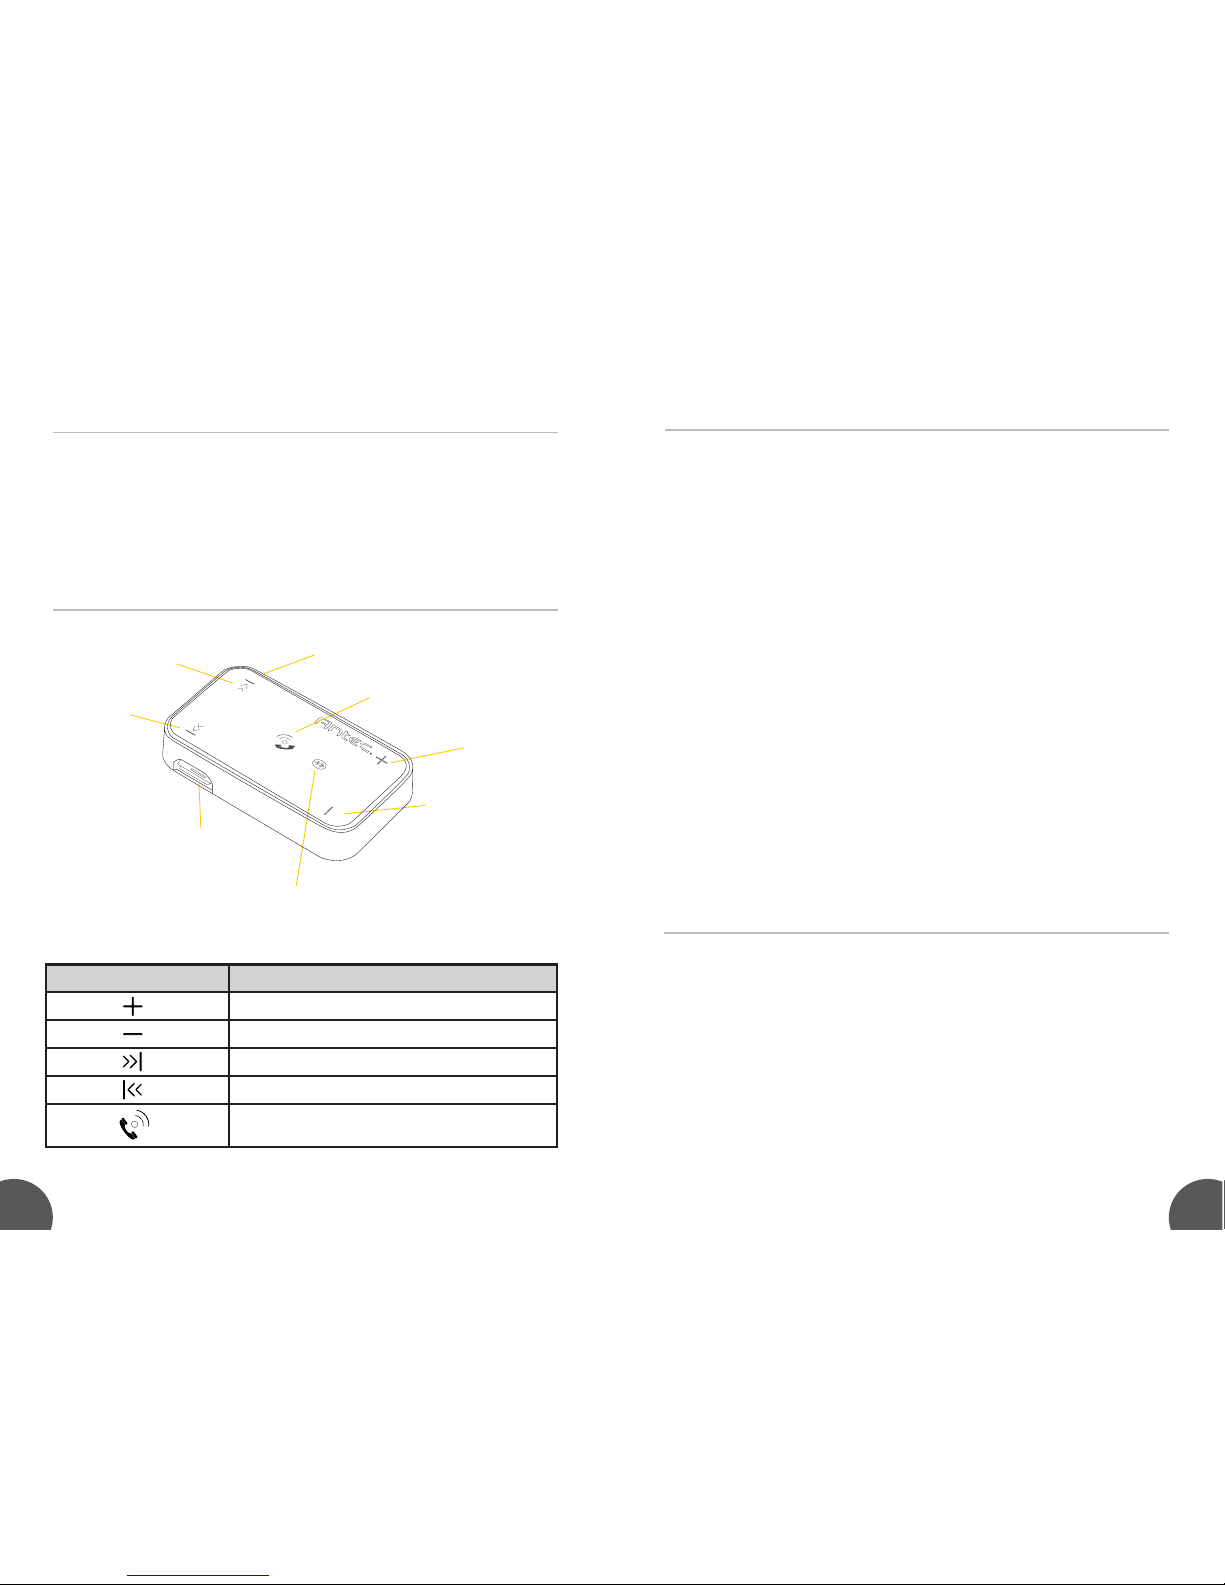
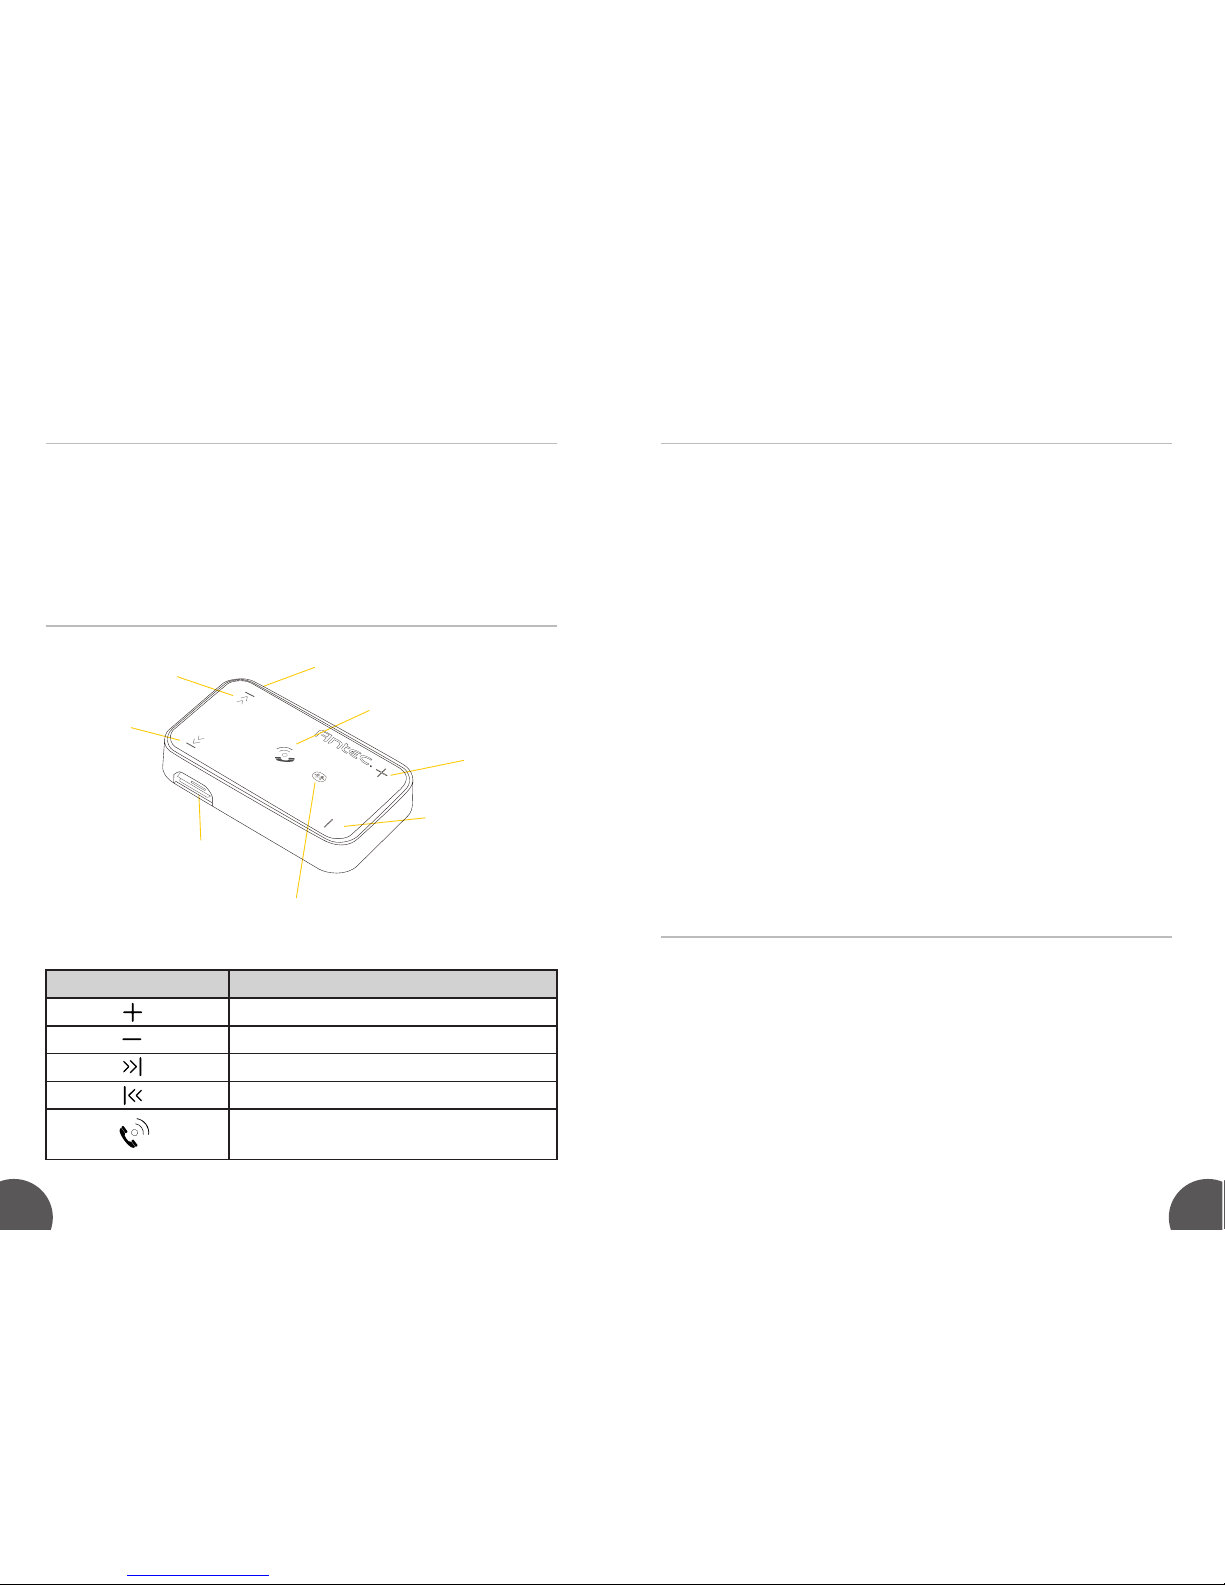
Receiver Features
Pair mode
Playing Music
Begin with receiver powered off. Push and hold Middle Function
Button (MFB) for 6-8 seconds until LED indicator alternates red and
blue. You are now in pair mode. See your phone/music device manual
for pair instructions.
* Note
- If the pairing is not successful, switch off receiver by pushing the MFB
for 3 seconds, and then re-pair according to the steps outlined above.
- After pairing is successful, paired devices will remember each other.
Unless pairing information is deleted, there is no need to pair again.
- The receiver will automatically connect with the latest paired device.
If you want to pair with another Bluetooth device, switch off the
Bluetooth function of the current Bluetooth device, and then pair and
connect it with the new Bluetooth device according to steps outlined
above.
EN EN
Keys Function
Volume up
Volume down
Play next song
Play previous
Power on / off / Play/Pause/Phone call function
Headset Mode
Standby mode:
• Double click MFB to use voice dial function
• Hold the MFB to use the last number redial function
Incoming call (ring) mode:
• Press the MFB to accept phone calls
• Hold the MFB to reject incoming calls
M
i
c
r
o
p
h
o
n
e
V
o
lu
m
e
U
p
V
o
lu
m
e
D
o
w
n
L
E
D
In
d
ic
a
t
o
r
M
i
c
r
o
U
S
B
B
a
c
k
w
a
r
d
M
F
B
B
u
t
t
o
n
F
o
r
w
a
r
d
Page 3

Care and maintenance
In call active mode:
• Press + or - to adjust volume
• Hold the MFB when you hear a beeping tone to toggle
calls between your headset and cellular phone
• Press the MFB to end a call
• Hold + and - simultaneously to mute the microphone
• Keep dry and do not store in a damp place
• Do not put the product in direct sunlight for extended periods of
time or in hot areas.
• High temperature will shorten the life of the electronic device,
destroy the battery and distort certain plastic.
• Do not expose the product to extreme cold.
• Do not disassemble the product.
• Do not drop the receiver.
• Do not use chemicals or detergents to clean the product.
EN EN
Page 4
Cargar por primera vez
Se recomienda la carga de la batería antes su uso pero no es
obligatorio. Los receptores de pre-cargados, sin embargo la carga inicial
pueden variar. Conecte el cable al puerto USB de cualquier PC o Mac.
El indicador de nivel estará de color rojo durante la carga y se apagará
cuando este completamente cargado.
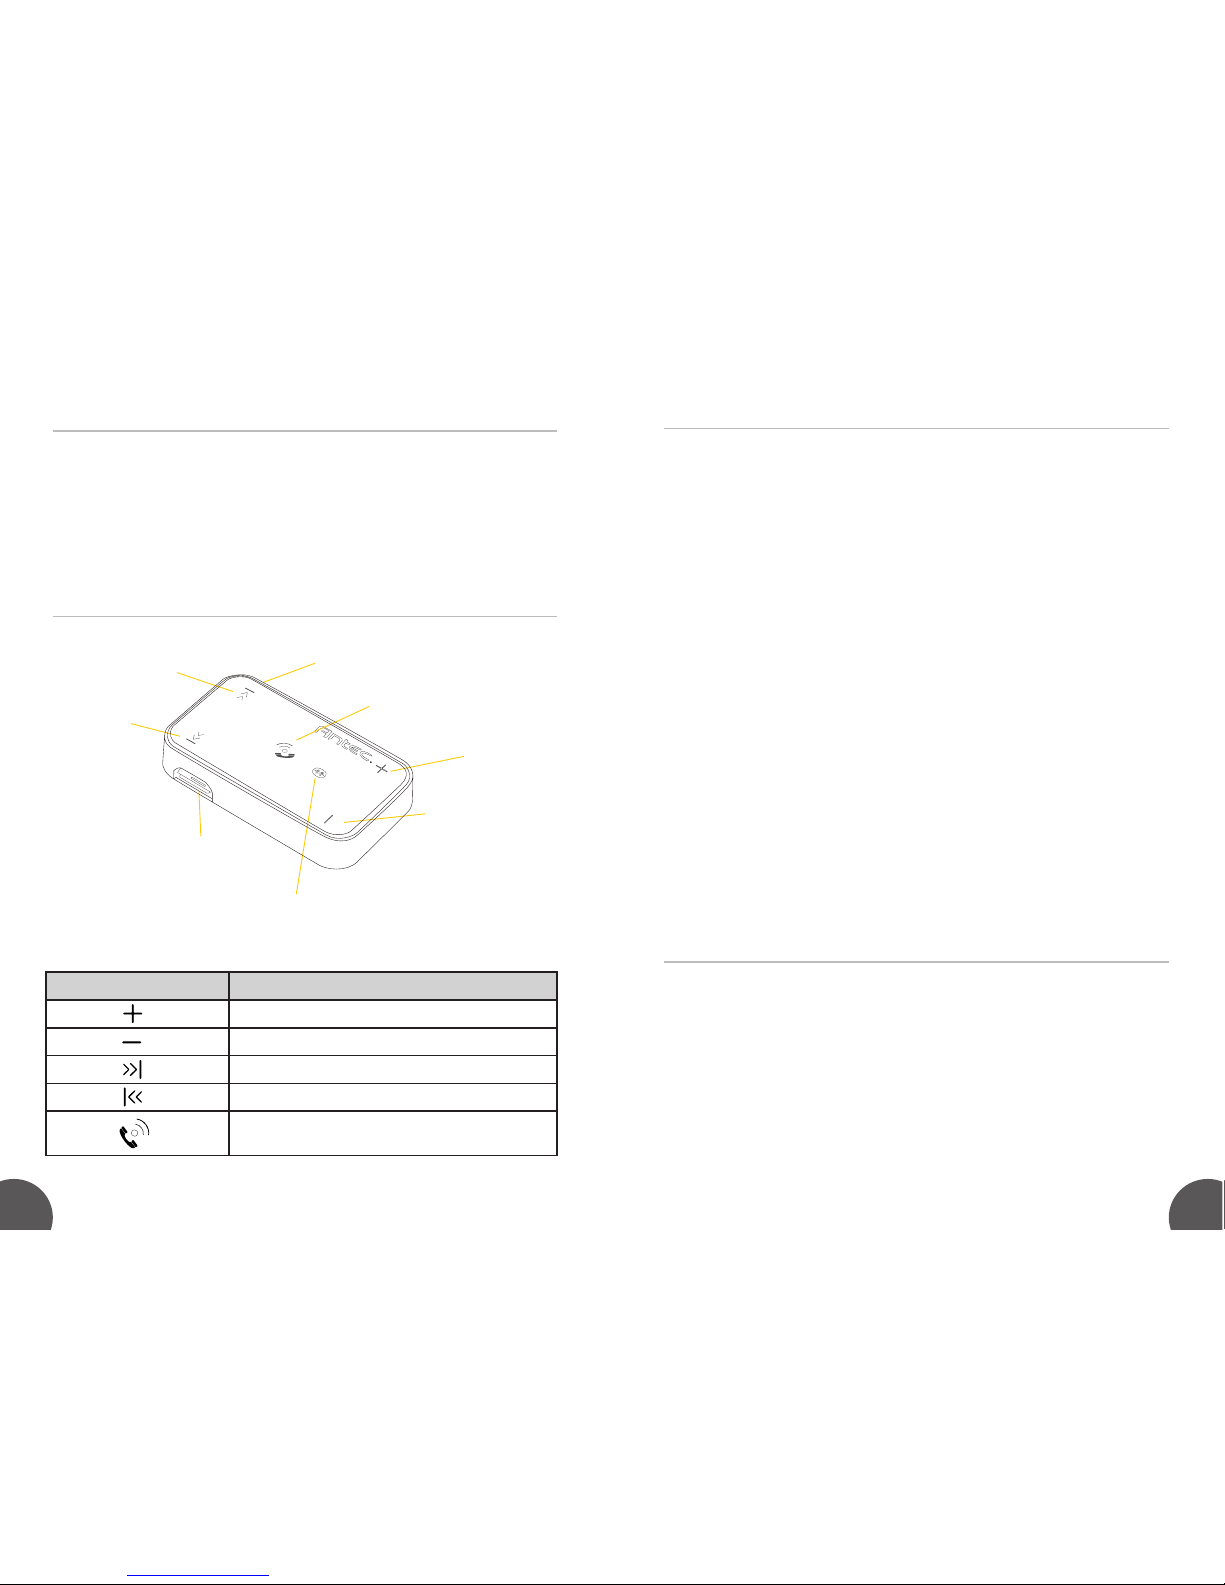
Características del receptor
Modo dúo
Reproducción de música
Comience con el receptor apagado. Mantenga pulsado el botón de
Middle Function (MFB botón) durante 6-8 segundos hasta que se
alterne la luz de estado de color rojo a color azul. Ahora se encuentra
en modo dúo. Mire el manual de su teléfono / dispositivo de música
para obtener más instrucciones.
* Nota
- Si no consigue activar el modo dúo, apague el receptor pulsando el
botón MFB durante 3 segundos y luego vuelva a intentarlo siguiendo
los pasos descritos anteriormente.
- Una vez la vinculación sea correcta, los dispositivos vinculados se
reconocerán entre sí. A menos que la información del dúo se elimine,
no hay necesidad de vincular de nuevo.
- El receptor se conecta automáticamente con el último dispositivo
vinculado. Si usted desea vincularse con otro dispositivo Bluetooth,
apague la función Bluetooth del dispositivo en curso, a continuación,
vincular y conectar con el nuevo dispositivo Bluetooth de acuerdo con
los pasos descritos anteriormente.
ES ES
Teclas Función
Subir Volumen
Bajar Volumen
Reproducir la siguiente canción
Reproducir la canción anterior
Encendido / Apagado / Reproducir / Pausa /
función de llamada telefónica
Modo de auriculares
Modo de espera:
• Haga doble clic en el botón MFB para usar la función de marcación
por voz
• Mantenga pulsado el botón MFB para utilizar la función de
rellamada del último número
M
i
c
r
o
p
h
o
n
e
V
o
lu
m
e
U
p
V
o
lu
m
e
D
o
w
n
L
E
D
In
d
ic
a
t
o
r
M
i
c
r
o
U
S
B
B
a
c
k
w
a
r
d
M
F
B
B
u
t
t
o
n
F
o
r
w
a
r
d
Page 5

Cuidado y mantenimiento
Modo llamada entrante:
• Presione el botón MFB para aceptar llamadas telefónicas
• Mantenga pulsado el botón MFB para rechazar las llamadas entrantes
Modo de llamada activa:
• Presione VOL + o VOL - para ajustar el volumen
• Mantenga pulsado el botón MFB cuando escuche un pitido para
alternar llamadas entre el auricular y el teléfono móvil
• Presione el botón MFB para finalizar una llamada
• Mantenga VOL + y VOL - de forma simultánea para silenciar el
micrófono
• Mantenga seco y no lo guarde en un lugar húmedo
• No coloque el producto en la luz solar directa durante largos periodos
de tiempo o en lugares calurosos.
• Las altas temperaturas reducen la vida útil del dispositivo electrónico,
estropean la batería y la batería y ciertos plásticos ciertos plásticos.
• No exponga el producto a temperaturas extremadamente bajas.
• No desmonte el producto.
• No deje caer el receptor.
• No utilice productos químicos o detergentes para limpiar el producto.
ES ES
Page 6
Recharger pour une première utilisation
Le fait de recharger la batterie avant une première utilisation est
recommandée mais n’est pas obligatoire. Le récepteur est pré-chargé
mais cela varie d’une batterie à l’autre. Branchez le câble au port USB
d’un PC ou d’un Mac. L’indicateur est rouge pendant la recharge et
s’éteint lorsque la recharge est pleine.
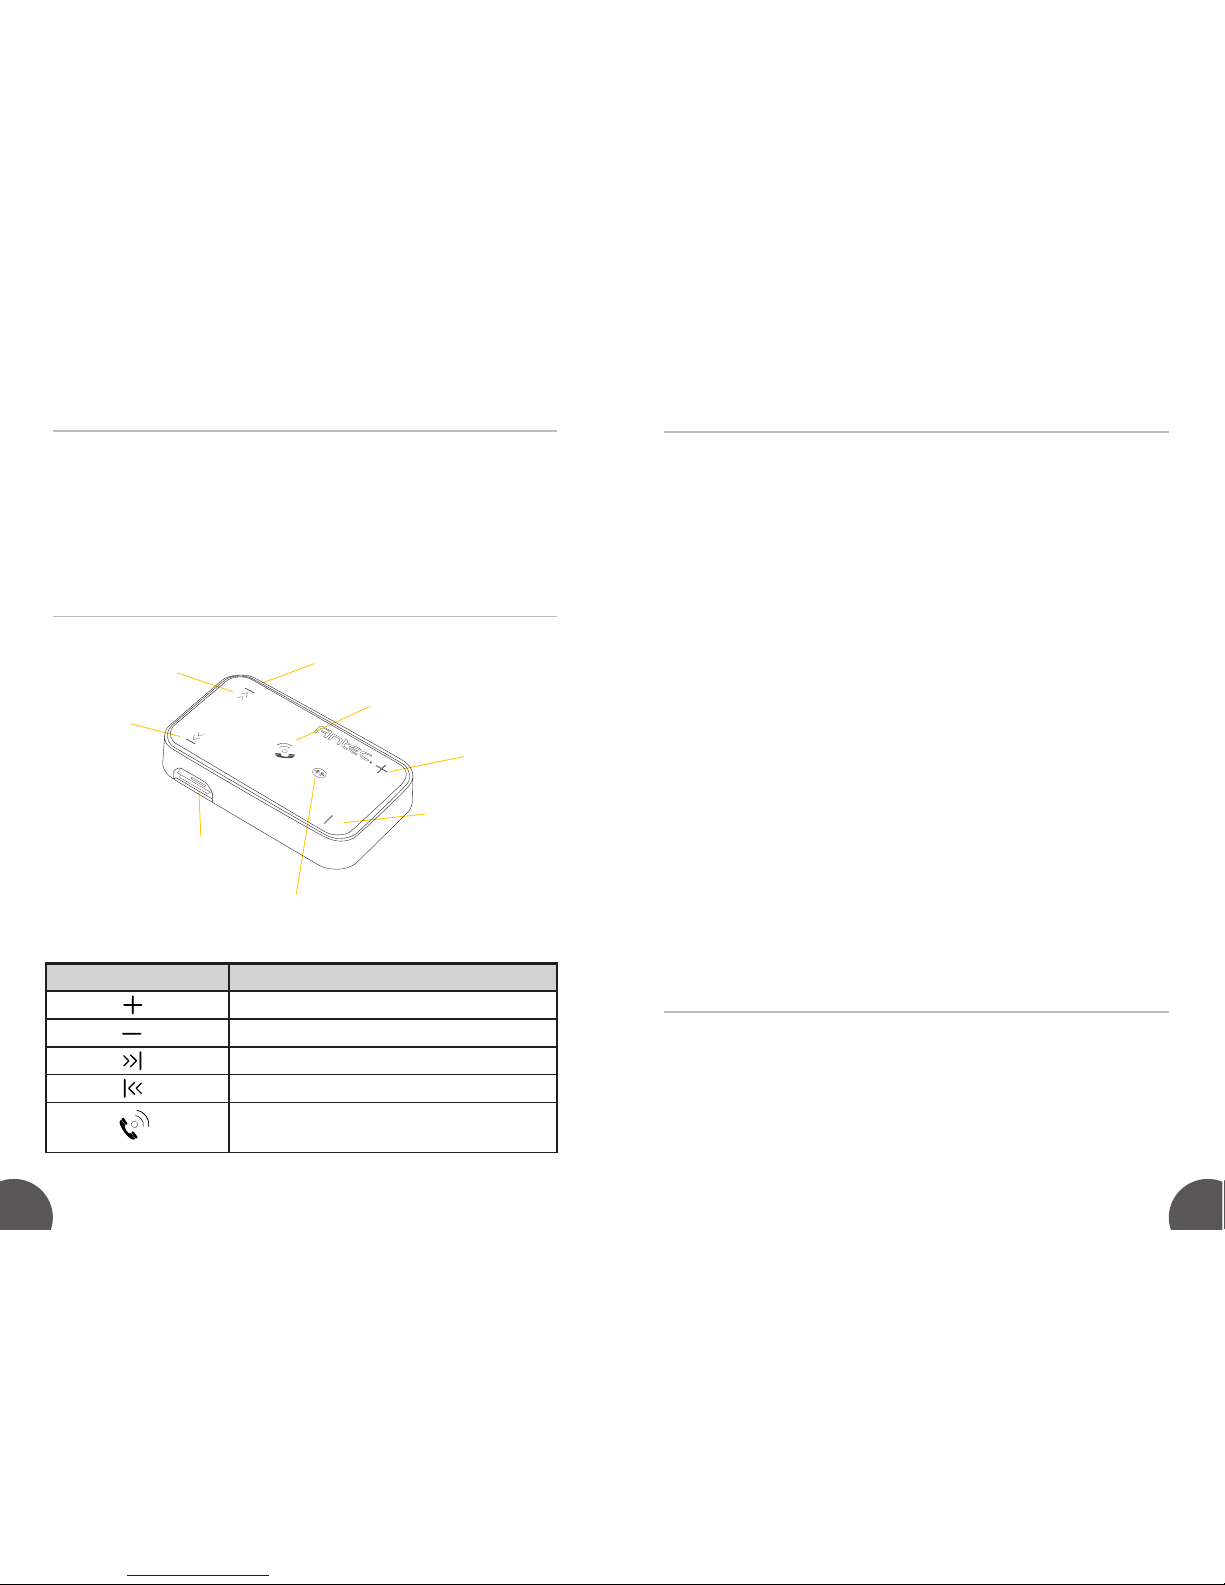
Caractéristiques
Appariement
Lecture Musique
Commencez avec les écouteurs hors tension. Appuyez et maintenez
la touche Multifonction du milieu pendant 6-8 secondes jusqu’à ce que
les indicateurs lumières alternent rouge et bleu. Vous êtes maintenant
en mode appariement. Veuillez lire le manuel d’utilisation de votre
téléphone / appareil de musique pour les fonctions d’appariement.
* Note
- Si l’appariement n’est pas réussi, mettez les écouteurs hors tension
en appuyant sur la touche Multifonction pendant 3 secondes, puis
réessayer l’appariement en suivant les étapes décrites ci-dessus.
- Une fois l’appariement réussi, tous les appareils connectés seront
mémorisés. A moins que les informations d’appariement soient
supprimées, il n’est pas nécessaire de réitérer à chaque fois le
processus d’appariement.
- Le récepteur se connecte automatiquement avec l’appareil jumelé
ltest. Si vous voulez le connecter à un autre périphérique Bluetooth,
mettez la fonction Bluetooth hors tension du périphérique Bluetooth
actuel, puis connectez le avec le nouveau périphérique Bluetooth en
suivant les étapes décrites ci-dessus.
FR FR
Touches Fonction
Fonction pour augmenter le volume
Fonction pour diminuer le volume
Lecture de la chanson suivante
Lecture de la chanson précédente
Activé / Désactivé / Lecture / Pause / Fonction
d’appel téléphonique
Mode casque
Mode Veille :
• Double-cliquer sur la touche Multifonction pour initier la reconnais
sance d’appel vocal
• Appuyez et maintenez la touche de fonction du milieu pour rappelez
le dernier numéro
Microphone
Multifonction
Augmenter
le volume
Baisser le volume
Indicateur LED
Micro USB
Reculer
Avancer
Page 7

Entretien et maintenance
Mode Appel entrant (sonnerie):
• Pression courte sur la touche Multifonction pour répondre à un appel
• Maintenir la touche Multifonction pour rejeter un appel entrant
Mode Appel actif :
• Pression courte sur Vol + ou Vol – pour ajuster le volume
• Maintenir la touche Multifonction lorsqu’une tonalité courte se fait
entendre pour alterner les appels entre le casque et le téléphone
• Pression courte sur la touche Multifonction pour terminer un appel
• Maintenir longuement les touches Avancer et Reculer pour alterner
entre le microphone et le son désactivé.
• Conserver au sec et ne pas mettre dans un endroit humide
• Ne pas exposer le produit au soleil pendant une période prolongée ou
dans des endroits chauds
• Exposer à une température élevée, le produit aura une faible durée de
vie, sa batterie sera détruite et le plastique déformé
• Ne pas exposer le produit à un froid extrême
• Ne pas démontez le produit
• Ne pas laissez tomber les écouteurs
• Ne pas utiliser de produits chimiques ou de détergents pour nettoyer
le produit
FR FR
Page 8
Aufladen des Gerätes vor der ersten Verwendung
Das Aufladen der Batterie vor der Verwendung ist empfohlen aber nicht
unbedingt notwendig. Der Empfänger wird im Werk bereits aufgeladen,
die Restkapazität ist jedoch von verschieden Faktoren abhängig und kann
variieren. Zum Aufladen, verbinden Sie das Ladekabel mit einem freien USB-
Anschluss eines PCs oder eines Macs. Die Status LED leuchtet während des
Aufladens rot auf und erlisch sobald das Gerät vollständig aufgeladen wurde.
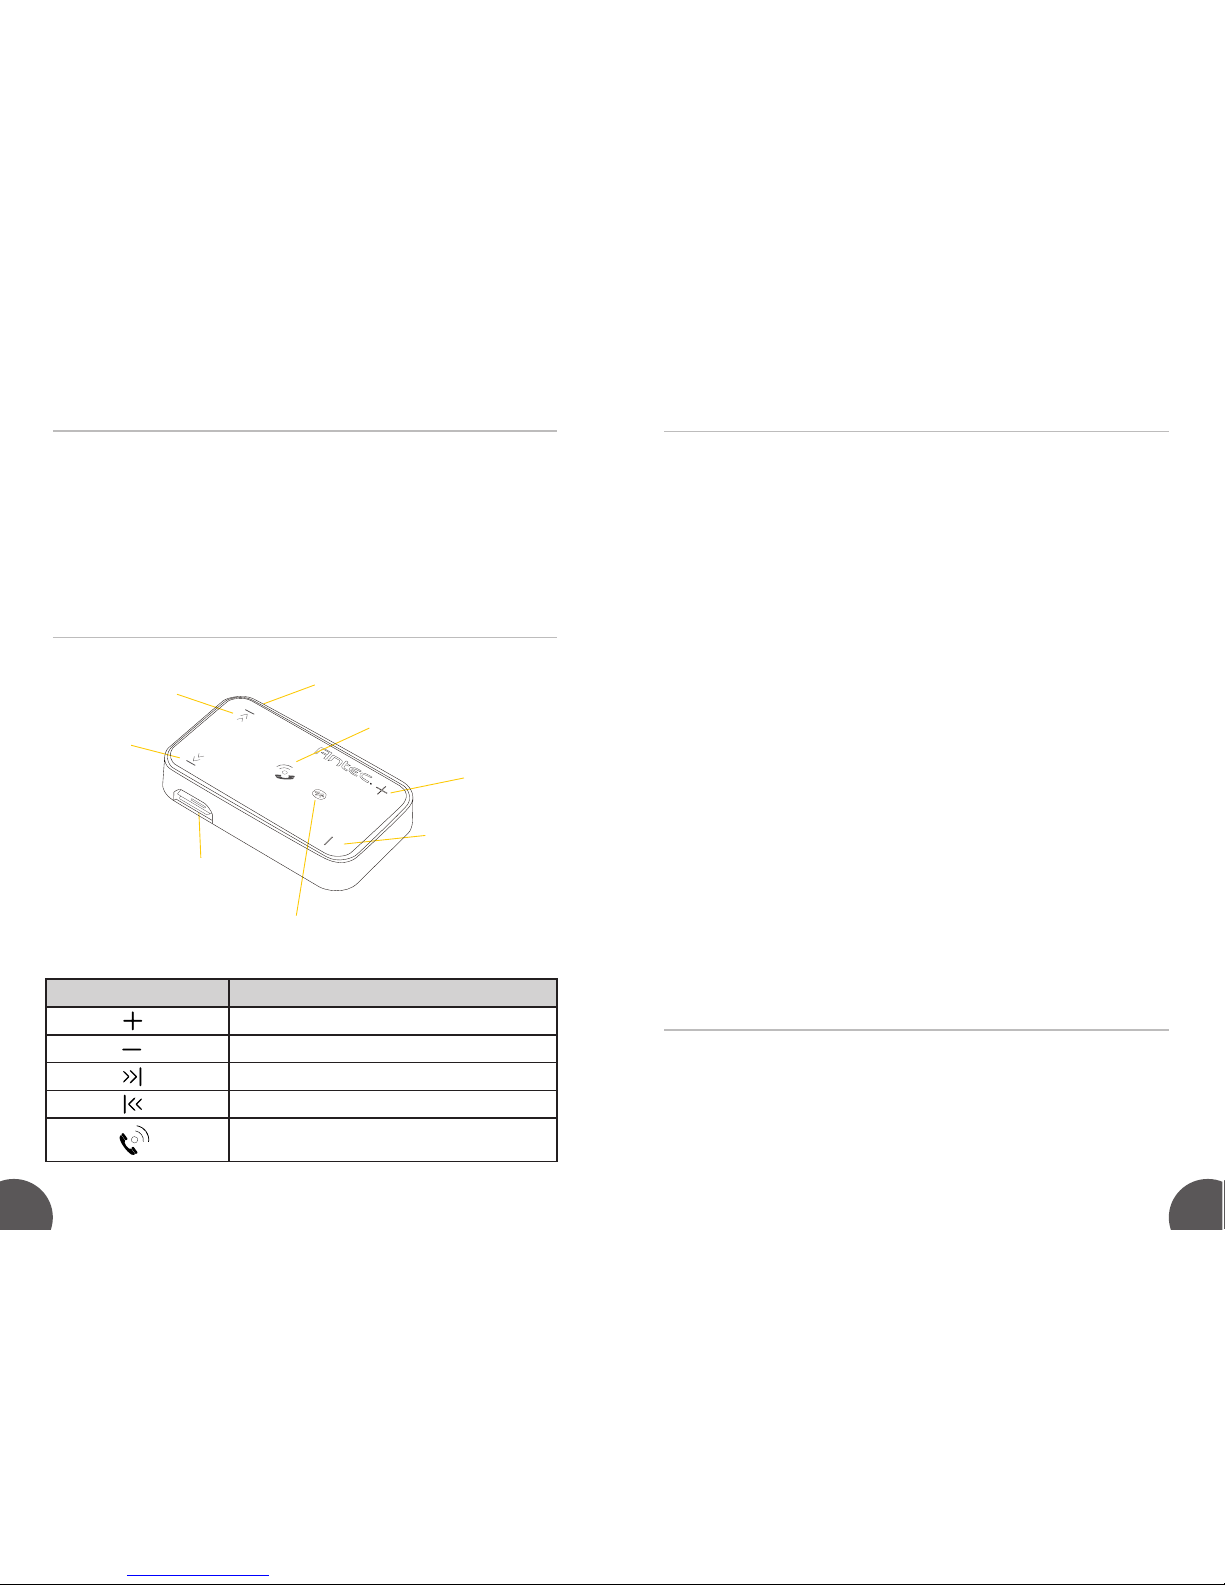
Empfänger Features
Pairing (Koppeln)
Musikwiedergabe
Der Empfänger muss zuerst ausgeschaltet werden. Drücken und
halten Sie nun den Multifunktionsknopf für 6 bis 8 Sekunden bis die
Status LEDs abwechselnd rot und blau aufleuchten. Das Gerät befindet
sich nun im Pairing (Koppeln) Modus. Wie Sie bei Ihrem Telefon
oder weiteren kompatiblen Geräten den Pairing (Koppeln) Modus
einschalten, entnehmen Sie bitte der jeweiligen Gebrauchsanweisung.
* Hinweise
- Sollte das Pairing (Koppeln) nicht erfolgreich gewesen sein, schalten
Sie den Empfänger durch halten des Multifunktionsknopfes
(3 Sekunden) aus und wiederholen Sie die Schritte wie oben
angegeben.
- Nachdem Sie Geräte einmal erfolgreich miteinander gekoppelt
haben, brauchen Sie diese für die nächste Anwendung nicht erneut
zu koppeln.
- Der Empfänger verbindet sich automatisch mit dem zuletzt
gekoppelten Gerät. Sollten Sie ein anderes Gerät verwenden wollen,
schalten Sie das mit dem Empfänger gekoppelte Gerät zunächst aus
und führen dann die Schritte für das Pairing (Koppeln) mit dem neuen
Gerät aus.
DE DE
Knopf Funktion
Wiedergabelautstärke erhöhen
Wiedergabelautstärke verringern
Springt zum nächsten Titel
Springt zum vorherigen Titel
Gerät Ein/Aus, Abspielen / Pause / Telefonfunktion
Telefonfunktionen des Headsets
Standby:
• Multifunktionsknopf zwei Mal kurz hintereinander drücken für
Stimmwahl
• Halten Sie den Multifunktionsknopf zur Wahlwiederholung gedrückt
Mikrofon
Multifunktionsknopf
Lautstärke +
Lautstärke -
LED Statusanzeige
Micro USB
Zurück
Vor
Page 9

Anwendungshinweise
Eingehender Anruf:
• Multifunktionsknopf kurz drücken zum Annehmen
• Multifunktionsknopf lang halten zum Ablehnen
Während eines Telefonats:
• Lautstärke +/- zur Lautstärkenanpassung verwenden
• Langes halten des Multifunktionsknopfes bis ein Bestätigungston ertönt
lässt Sie zwischen dem Headset und dem Telefon hin und her schalten
• Kurzes drücken des Multifunktionsknopfes beendet das Gespräch
• Lautstärke +/- gleichzeitig halten schaltet das Gerät stumm
• Halten Sie das Gerät trocken und verwahren Sie es nicht in einer
feuchten Umgebung.
• Legen Sie das Gerät nicht für längere Zeit in direktes Sonnenlicht und
verwahren Sie es nicht an sehr heißen Orten.
• Hohe Temperaturen verkürzen die Lebensdauer von elektronischen
Geräten, können die Batterie zerstören und bestimmte Plastikteile
schmelzen lassen.
• Setzen Sie das Gerät keiner großen Kälte aus.
• Nehmen Sie das Produkt nicht auseinander.
• Lassen Sie den Empfänger niemals fallen.
• Verwenden Sie keine Reinigungsmittel mit chemischen Zusätzen zum
Säubern.
DE DE
Page 10
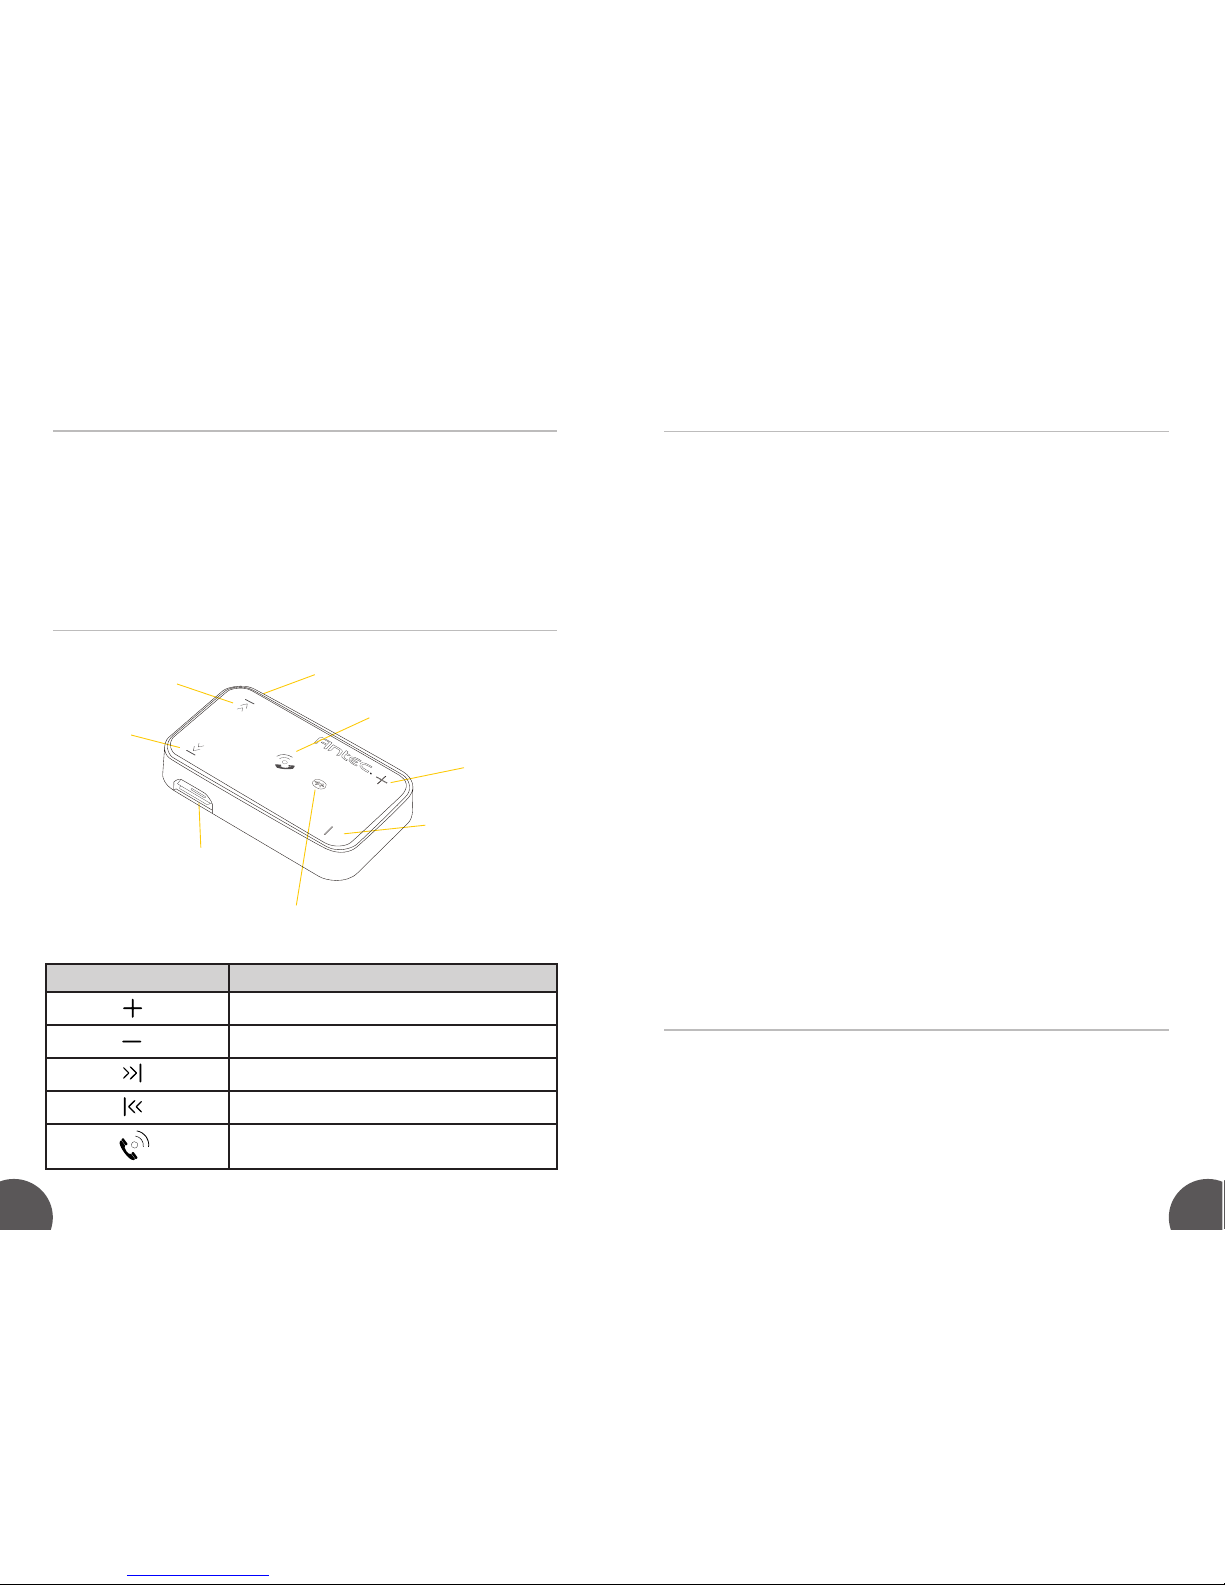
Caricare il ricevitore la prima volta
Ricaricare la batteria prima del primo utilizzo è raccomandato ma non
necessario. Il ricevitore è infatti pre-caricato in fabbrica anche se tuttavia
la carica iniziale può variare quando lo utilizzate per la prima volta.
Collegate il cavo in dotazione alla porta USB di un qualsiasi PC o Mac.
L’indicatore di stato a Led rimarrà rosso durante il processo di carica e si
spegnerà a ricarica completata.
Funzionalità del ricevitore
Modalità accoppiamento
Riproduzione musicale
Cominciate l’operazione a ricevitore spento. Premete e mantenete
premuto il pulsante funzione centrale (pulsante MFB) per 6-8 secondi
finché il led di stato non lampeggia alternativamente tra rosso e blu.
Adesso il ricevitore è in modalità accoppiamento. Controllate il manuale
del vostro telefono / player musicale per le istruzioni di accoppiamento.
* Nota
- se l’accoppiamento non va a buon fine spegnete il ricevitore
premendo per 3 secondi il pulsante MFB e ripetete la procedura come
indicato in precedenza.
- dopo che l’accoppiamento è andato a buon fine i dispositivi
accoppiati memorizzeranno le informazioni e non ci sarà più bisogno
di eseguire la procedura a meno che queste informazioni vengano
cancellate.
- il ricevitore si collegherà automaticamente con l’ultimo dispositivo
accoppiato. Se volete collegarvi a un altro dispositivo Bluetooth
spegnete l’interfaccia Bluetooth del dispositivo accoppiato e ripetete
la procedura di accoppiamento per il nuovo dispositivo come indicato
nei passi precedenti.
IT IT
Tasto Funzione
Volume su
Volume giù
Passa alla traccia successiva
Passa alla traccia precedente
Accensione/spegnimento Play/Pausa/Funzioni
telefoniche
Utilizzo come auricolare telefonico
Modalità Standby:
• Doppio click sul tasto MFB per attivare i comandi vocali
• Mantenere premuto il tasto MFB per ricomporre l’ultimo numero
chiamato
Microfono
Pulsante MFB
Volume su
Volume giù
Indicatore Led
Micro USB
Indietro
Avanti
Page 11

Cura e manutenzione
Chiamate in entrata:
• Premere il tasto MFB per accettare la chiamata
• Premere e mantenere premuto il tasto MFB per rifiutare la chiamata
Utilizzo in conversazione:
• Utilizzare i tasti Vol+ o Vol- per regolare il volume
• Mantenere premuto il tasto MFB finchè non si sente un suono di
conferma per deviare l’audio dagli auricolari al telefono
• Premere il tasto MFB per terminare la chiamata
• Mantenere premuti i tasti Vol+ e Vol- per disabilitare il microfono
• Mantenere il prodotto asciutto e non conservarlo in ambienti umidi
• Non esporre il prodotto al sole diretto per lunghi periodi e non tenerlo
in ambienti troppo caldi.
• Le temperature elevate riducono la vita degli integrati elettronici e
potrebbero causare danni alla batteria e alle plastiche.
• Non esporre il prodotto a temperature eccessivamente basse.
• Non smontare il prodotto.
• Non fare cadere il ricevitore.
• Non utilizzare prodotti chimici o detergenti per pulire il prodotto.
IT IT
Page 12
Carregar pela primeira vez
Carregar a bateria antes de utilizar é recomendado mas não é
necessário. O recetor é enviado pré-carregado, no entanto a carga
inicial irá variar. Conecte por cabo a uma porta USB de qualquer PC ou
MAC. O indicador de estado irá estar vermelho enquanto decorre o
carregamento e desligar-se-á quando completamente carregado.
Receiver Features
Modo de Emparelhamento
Ouvindo Música
Comece com o recetor desligado. Mantenha pressionado Botão de
Funções Central (Botão MFB) durante 6-8 segundos até que a luz de
estado brilhe a vermelho e azul alternadamente. Agora está em modo
de emparelhamento. Consulte o manual do seu telefone/dispositivo de
música para instruções de emparelhamento.
* Nota
- Se o emparelhamento não for bem-sucedido, desligue o recetor
pressionando o botão MFB por 3 segundos e de seguida emparelhe
novamente seguindo os passos indicados acima.
- Após um emparelhamento bem-sucedido, os dispositivos lembrarse-ão um do outro. A menos que a informação de emparelhamento
seja apagada, não haverá necessidade de emparelhar novamente.
- O recetor conecta-se automaticamente com o último dispositivo
emparelhado. Se desejar emparelhar com outro dispositivo Bluetooth,
desligue a função de Bluetooth do dispositivo Bluetooth atual e
emparelhe com o novo dispositivo Bluetooth de acordo com os passos
descritos acima.
PO PO
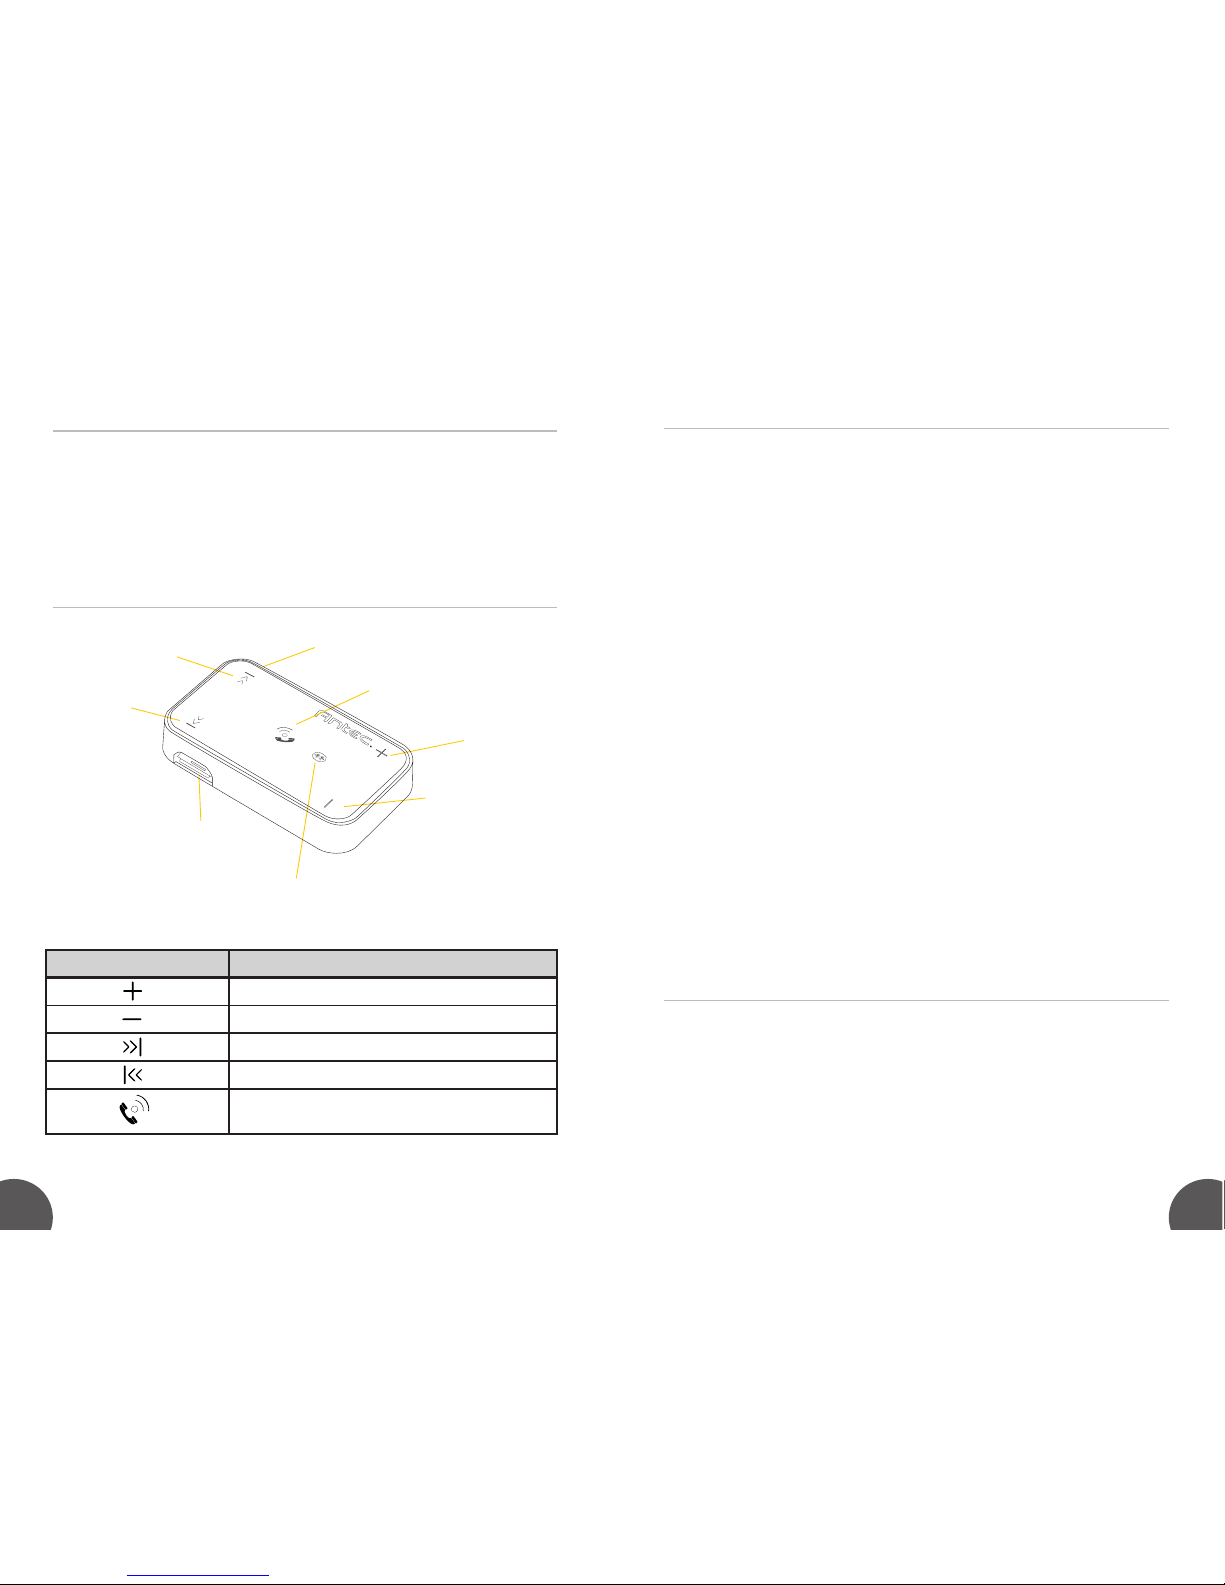
Botões Funções
Aumentar Volume
Diminuir Volume
Reproduzir próxima música
Reproduzir música anterior
Ligar / Desligar / Reproduzir / Pause / Função
de Chamada
Funcionar em Modo Auscultador
Modo Standby:
• Duplo clique no botão MFB para iniciar função de marcação por voz
• Mantenha pressionado o botão MFB para utilizar a função de chamar
último número
M
i
c
r
o
p
h
o
n
e
V
o
lu
m
e
U
p
V
o
lu
m
e
D
o
w
n
L
E
D
In
d
ic
a
t
o
r
M
i
c
r
o
U
S
B
B
a
c
k
w
a
r
d
M
F
B
B
u
t
t
o
n
F
o
r
w
a
r
d
Page 13

Operação com Cancelamento de Ruído Ativo
Cuidados e manutenção
Modo chamada recebida:
• Pressione o botão MFB para atender a chamada
• Mantenha o botão MFB pressionado para rejeitar a chamada
Modo em chamada:
• Pressione Vol+ ou Vol- para ajustar o volume
• Mantenha o botão MFB pressionado para transferir a chamada entre
os auscultadores e o telemóvel
• Pressione o botão MFB para terminar a chamada
• Mantenha Vol+ e Vol- pressionados para colocar o microfone em mute
• Pressione para alterar entre modo NC ligado/desligado
• Quando o NC estiver ligado, o LED verde irá acender. NC desligado,
LED verde também se desliga.
• Manter seco e não guardar em local húmido.
• Não expor a luz solar direta ou lugares quentes durante longos períodos
de tempo.
• Elevadas temperaturas diminuem o tempo de vida do dispositivo
eletrónico, destroem a bateria e degradam certos plásticos.
• Não expor o produto a frio extremo.
• Não desmontar o produto.
• Não deixar cair os auscultadores.
• Não utilizar químicos ou detergentes para limpeza do produto.
PO PO
Page 14
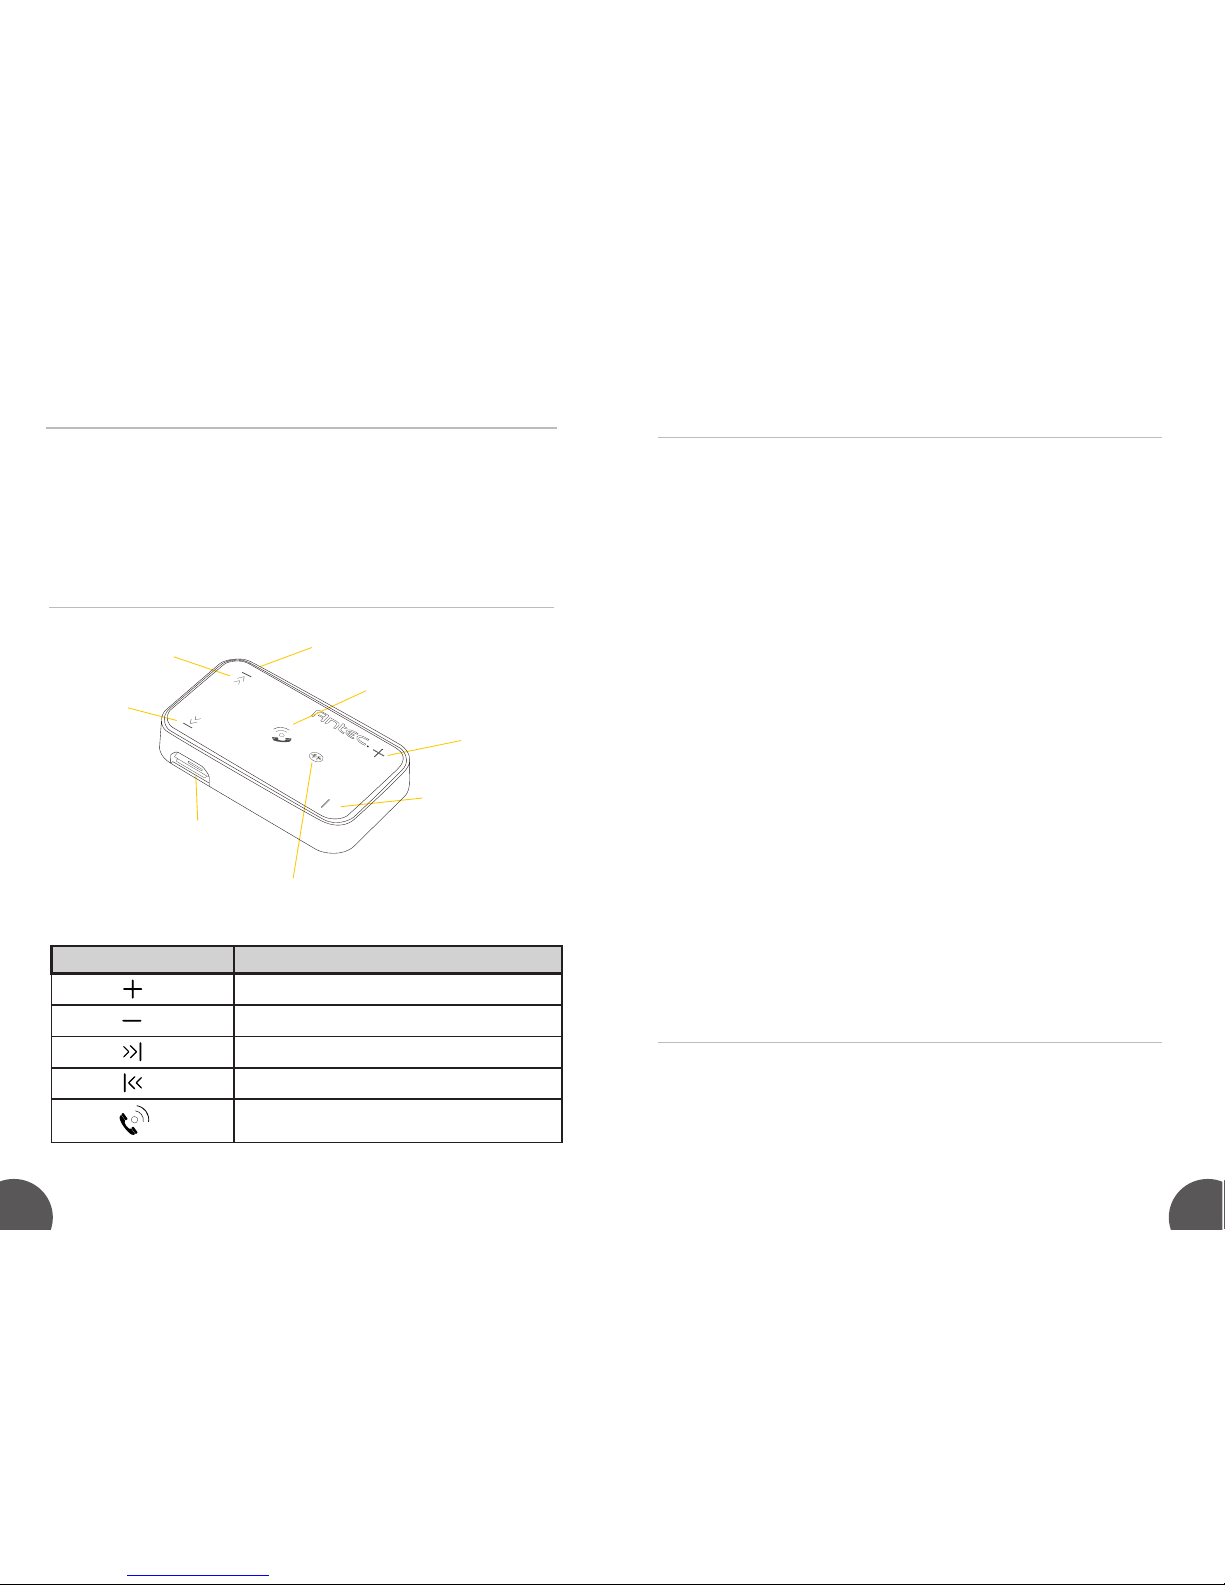
レシーバーの特徴
JP JP
ペアリングモード
ヘッドセットモードでの操作
音楽の再生
レシーバーの充電をオフにしてください。ステータスライトのレッドとブル
ーライトが交互に点灯するまで、ミドルファンクション(MFB)ボタンを6から
8秒押し続けます。これで、ペアリングモード状態になります。ペアリング
するデバイスの手順は、お手持ちの電話機/ミュージックデバイスのマニ
ュアルを参照してください。
スタンバイモード:
• MFBキーをダブルクリックし、ボイスダイヤル機能を起動
• MFBボタンを押し続け、最後にかけた電話番号にリダイヤル
*備考
-ペアリングがうまくいかない際は、MFBボタンを3秒間押してレシーバ
ーの電源をオフにし、上記の方法に従って再度、ペアリングを行ってく
ださい。
-ペアリングができた場合、デバイスはお互いのデバイスを毎回、記憶し
ます。ペアリングの情報が消去されない限り、再度ペアリングを行う必要
はありません。
- レシーバーは、自動的に最後にペアリングされたデバイスと接続しま
す。他のBluetoothデバイスとペアリングする際には、現在ペアリングされ
ているBluetoothデバイスのBluetooth機能をオフにし、新たなBluetooth
デバイスとのペアリングを行ってください。
キー 機能
音量を上げる。
音量を下げる。
次の曲を再生
前の局を再生。
電源on / off/再生/停止/電話機能
初めて使用する際の充電
使用前にバッテリーを充電することをお勧めします。必須ではありません。
このレシーバーは、予めある程度の充電がされています。ケーブルをPCま
たは、MACのUSBスロットに接続してください。状況を示すインジケーター
が充電中は、レッドになり、完全に充電が終了ができると消えます。
M
i
c
r
o
p
h
o
n
e
V
o
lu
m
e
U
p
V
o
lu
m
e
D
o
w
n
L
E
D
In
d
ic
a
t
o
r
M
i
c
r
o
U
S
B
B
a
c
k
w
a
r
d
M
F
B
B
u
t
t
o
n
F
o
r
w
a
r
d
Page 15

JP JP
受信モード:
• MFBキーを短く押し、電話を受ける
• MFBキーを長く押し、電話を拒否
通話中モード:
• ボリュームアップ、ボリュームダウンを短く押し、ボリュームを調整
• MFBキーを長く押し、とヘッドセット携帯電話の切り替え
• MFBキーを短く押すことで通話を終了
• ボリュームアップ、ボリュームダウンを長く押すことでマイクをミュート
ケアとメンテナンス
• 乾燥して湿気のない場所に保管してください。
• 長時間の直射日光や、暖かい場所に置かないでください。
• 高温状態は、電器製品の寿命を短くし、バッテリーや特定のプラスティ
ックにダメージを与えます。
• 極寒状況に晒さないでください。
• この製品を分解しないでください。
• レシーバーを落とさないでください。
• 製品を化学薬品や洗剤で洗浄しないでください。
Page 16
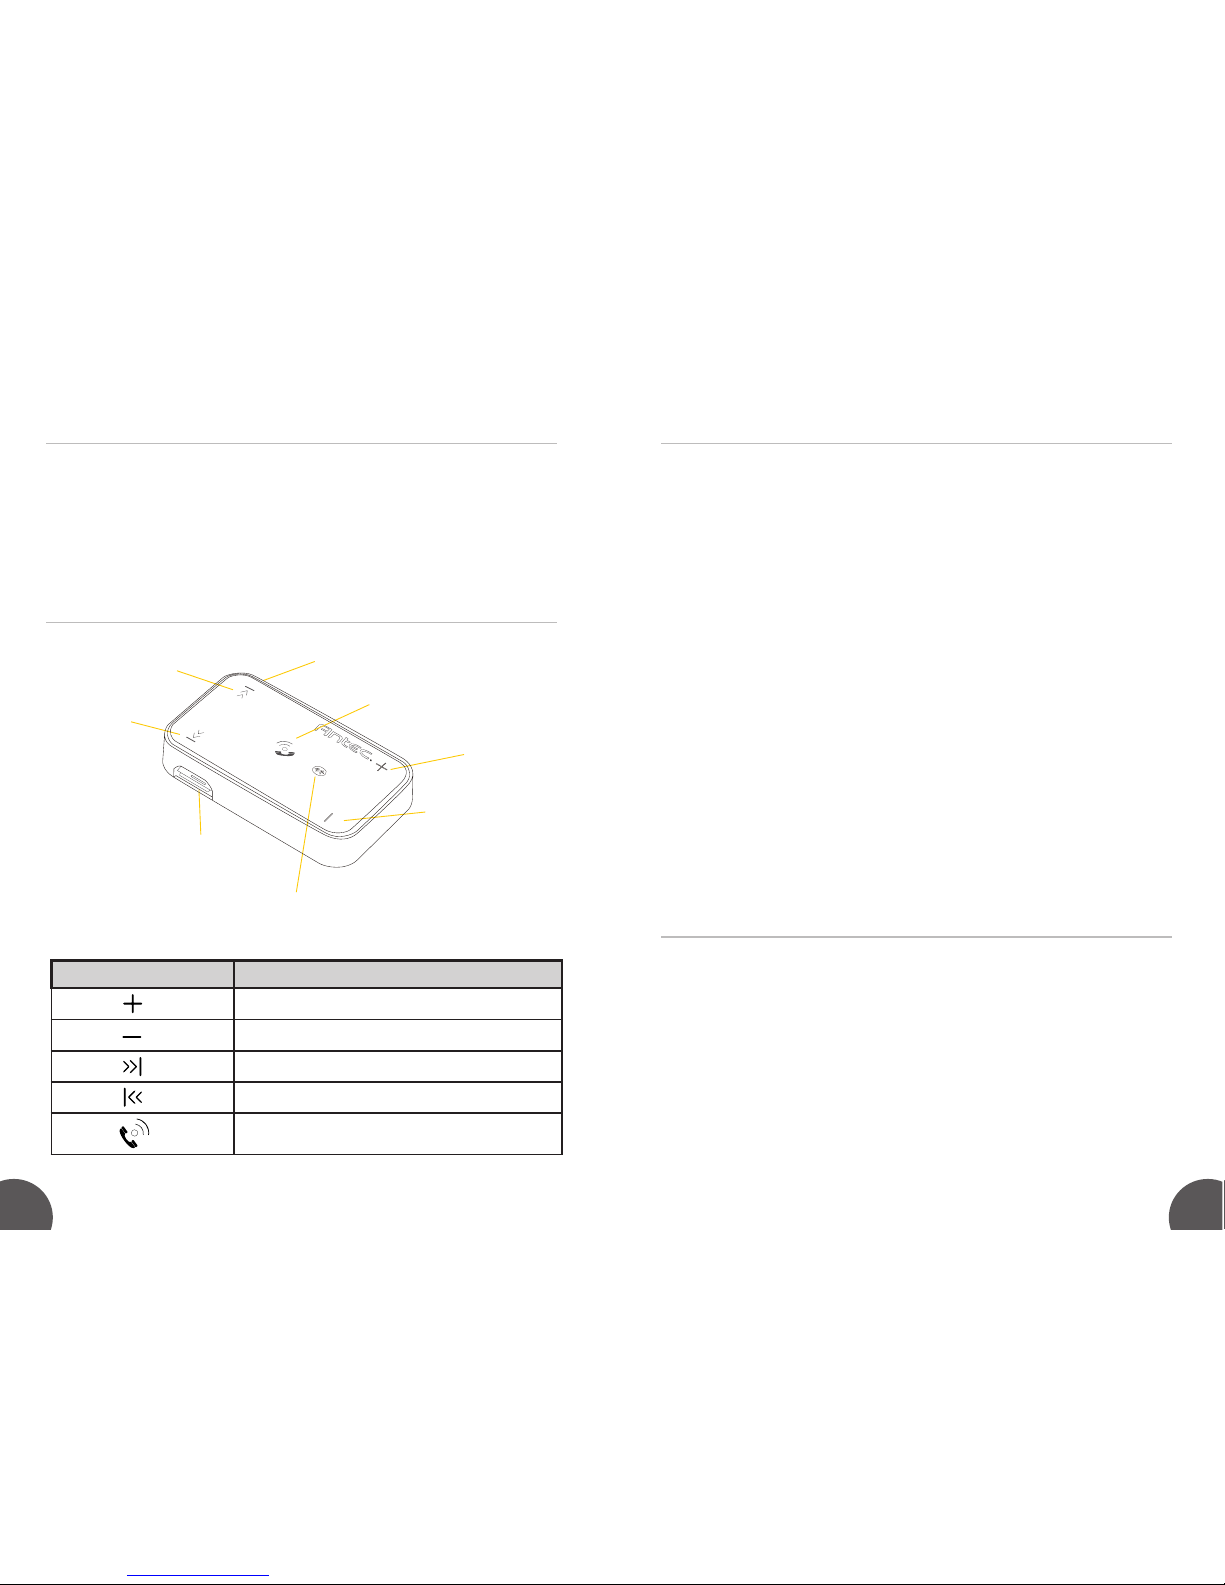
接收器特色
TCN TCN
首次使用前先充電 配對模式
耳機模式下
雖然接收器已經預先充電,但並不代表電池已經完全充電,建議
於首次使用時先充電,但並不是必需的。將USB 纜線連接到任
何PC或Mac的USB插槽,當充電時,狀態指示燈會變成紅色,當
完成充電時,狀態指示燈會自動熄滅。
先關閉接收器電源,然後按住中間的MFB多功能鍵6至8秒,直
到紅色和藍色的狀態指示燈交替閃爍,即可進入配對模式。請參
閱您的手機/音樂設備使用手冊的配對方法。
*注意
- 如果配對不成功,先按住中間的MFB多功能鍵3秒關閉接收器
電源,然後再安照上述步驟再配對。
- 配對成功後,裝置會自動儲存被配對的裝置。除非配對資訊被
刪除,否則沒有必要再進行配對。
- 接收器會與最新配對的裝置自動連接,如果您想與其它藍牙裝
置配對,先關閉當前藍牙裝置的藍牙功能,然後安照上述步驟與
新的藍牙裝置配對。
待機模式:
• 雙擊MFB鍵啟動語音撥號功能
• 按住MFB鍵使用最後一個號碼重撥功能
來電(鈴聲)模式:
• 輕按MFB鍵接聽來電
• 長按MFB鍵拒接來電
播放音樂
按鍵 功能
音量增加
音量減少
選擇下一首音樂檔案
選擇上一首音樂檔案
電源開/關機/播放/暫停/手機通話功能
麥克風
MFB
音量增加
音量減少
LED 指示燈
Micro USB
上一首
下一首
Page 17

TCN TCN
接聽模式:
• 輕按VOL+或VOL-調節音量
• 長按MFB鍵時切換耳機及手機通話功能
• 輕按MFB鍵,結束通話
• 長按上一首及下一首按鈕切換麥克風靜音功能
注意及維護
• 請保持產品乾燥,不要存放在潮濕的地方
• 請不要讓產品長時間暴露在陽光下直射或放在炎熱的地方。
• 高溫會縮短電子設備的壽命,並毀壞電池及導致某些塑料
變形。
• 請不要將產品暴露在極端寒冷的地方。
• 請勿拆卸本產品。
• 請不要摔扔接收器。
• 請不要使用化學物質或清潔劑清潔本產品。
Page 18
接收器特色
SCN SCN
首次使用前先充电 配对模式
耳机模式下
虽然接收器已经预先充电,但并不代表电池已经完全充电,建议
于首次使用时先充电,但并不是必需的。将的USB缆线连接到任
何PC或Mac的USB插槽,当充电时,状态指示灯会变成红色,当
完成充电时,状态指示灯会自动熄灭。
先关闭接收器电源,然后按住中间的MFB多功能键6至8秒,直到
红色和蓝色的状态指示灯交替闪烁,即可进入配对模式。请参阅
您的手机/音乐设备使用手册的配对方法。
*注意
- 如果配对不成功,先按住中间的MFB多功能键3秒关闭接收器
电源,然后再按照上述步骤再配对。
- 配对成功后,装置会自动储存被配对的装置。除非配对资讯被
删除,否则没有必要再进行配对。
- 接收器会与最新配对的装置自动连接,如果您想与其它蓝牙装
置配对,先关闭当前蓝牙装置的蓝牙功能,然后按照上述步骤与
新的蓝牙装置配对。
待机模式:
• 双击MFB键启动语音拨号功能
• 按住MFB键使用最后一个号码重拨功能
来电(铃声)模式:
• 轻按MFB键接听来电
• 长按MFB键拒接来电
播放音乐
Keys Function
音量增加
音量减少
选择下一首音乐档案
选择上一首音乐档案
电源开/关机/播放/暂停/手机通话功能
麦克风
MFB
音量增加
音量减少
LED 指示灯
Micro USB
上一首
下一首
Page 19

接听模式:
• 轻按VOL+或VOL-调节音量
• 长按MFB键时切换耳机及手机通话功能
• 轻按MFB键,结束通话
• 长按上一首及下一首按钮切换麦克风静音功能
注意及维护
• 请保持产品干燥,不要存放在潮湿的地方
• 请不要让产品长时间暴露在阳光下直射或放在炎热的地方。
• 高温会缩短电子设备的寿命,并毁坏电池及导致某些塑料
变形。
• 请不要将产品暴露在极端寒冷的地方。
• 请勿拆卸本产品。
• 请不要摔扔接收器。
• 请不要使用化学物质或清洁剂清洁本产品。
Page 20

Federal Communication Commission Interference Statement
This device complies with Part 15 of the FCC Rules. Operation is
subject to the following two conditions: (1) This device may not cause
harmful interference, and (2) this device must accept any interference
received, including interference that may cause undesired operation.
This equipment has been tested and found to comply with the limits
for a Class B digital device, pursuant to Part 15 of the FCC Rules.
These limits are designed to provide reasonable protection against
harmful interference in a residential installation. This equipment
generates, uses and can radiate radio frequency energy and, if not
installed and used in accordance with the instructions, may cause
harmful interference to radio communications. However, there is no
guarantee that interference will not occur in a particular installation. If
this equipment does cause harmful interference to radio or television
reception, which can be determined by turning the equipment o and
on, the user is encouraged to try to correct the interference by one of
the following measures:
- Reorient or relocate the receiving antenna.
- Increase the separation between the equipment and receiver.
- Connect the equipment into an outlet on a circuit dierent from that
to which the receiver is connected.
- Consult the dealer or an experienced radio/TV technician for help.
FCC Caution: Any changes or modications not expressly approved by
the party responsible for compliance could void the user’s authority to
operate this equipment.
This transmitter must not be co-located or operating in conjunction
with any other antenna or transmitter.
Radiation Exposure Statement:
This product complies with the Canada portable RF exposure limit set
forth for an uncontrolled environment and is safe for intended
operation as described in this manual. Further RF exposure reduction can
be achieved if the product is kept as far away as possible from the user
body or by selecting a lower output power if such a function is available
on the device.
Industry Canada statement:
This device complies with RSS-210 of the Industry Canada Rules.
Operation is subject to the following two conditions: (1) This device
may not cause harmful interference, and (2) this device must accept
any interference received, including interference that may cause
undesired operation.
Ce dispositif est conforme à la norme CNR-210 d’Industrie
Canada applicable aux appareils radio exempts de licence. Son
fonctionnement est sujet aux deux conditions suivantes: (1) le
dispositif ne doit pas produire de brouillage préjudiciable, et (2) ce
dispositif doit accepter tout brouillage reçu, y compris un brouillage
susceptible de provoquer un fonctionnement indésirable.
Radiation Exposure Statement:
This product complies with the Canada portable RF exposure limit
set forth for an uncontrolled environment and is safe for intended
operation as described in this manual. Further RF exposure reduction
can be achieved if the product is kept as far away as possible from the
user body or by selecting a lower output power if such a function is
available on the device.
Déclaration d’exposition aux radiations:
Le produit est conforme aux limites d’exposition pour les appareils
portables RF pour les Etats-Unis et le Canada établies pour un
environnement non contrôlé.
Le produit est sûr pour un fonctionnement tel que décrit dans ce
manuel. La réduction aux expositions RF peut être augmentée si
l’appareil peut être conservé aussi loin que possible du corps de
l’utilisateur ou que le dispositif est réglé sur la puissance de sortie la
plus faible si une telle fonction est disponible.
Page 21

Déclaration de la Commission Fédérale des Communications
d’Interférence (FCC)
Cet appareil est conforme à partie 15 des règlements de la FCC. Son
fonctionnement est soumis aux deux conditions suivantes: (1) Ce
dispositif ne peut causer d’interférences nuisibles, et (2) cet appareil
doit accepter toute interférence reçue, y compris les interférences qui
peuvent provoquer un fonctionnement indésirable.
Cet équipement a été testé et trouvé conforme aux limites pour
un dispositif numérique de classe B, conformément à la Partie 15
des règlements de la FCC. Ces limites sont conçues pour fournir
une protection raisonnable contre les interférences nuisibles dans
une installation résidentielle. Cet équipement génère, utilise et
peut émettre des fréquences radio et, s’il n’est pas installé et utilisé
conformément aux instructions, il peut causer des interférences
nuisibles aux communications radio. Cependant, il n’existe
aucune garantie que des interférences ne se produiront pas dans
une installation quelconque. Si cet équipement provoque des
interférences nuisibles à la réception radio ou télévision, ce qui peut
être résolu en éteignant et en allumant l’équipement, l’utilisateur est
encouragé à essayer de corriger l’interférence par l’une des mesures
suivantes:
- Réorienter ou déplacer l’antenne de réception.
- Augmentez la distance entre l’équipement et le récepteur.
- Branchez l’appareil à une prise sur un circuit diérent de celui
dans laquelle le récepteur est connecté.
- Consulter le revendeur ou un technicien radio / TV pour de l’aide
Avertissement FCC : Tout changement ou modication non
expressément approuvés par la partie responsable de la conformité
pourrait annuler l’autorité de l’utilisateur de faire fonctionner cet
équipement.
Cet émetteur ne doit pas être co-localisés ou fonctionner en
conjonction avec une autre antenne ou transmetteur.
L’exposition aux radiations:
Cet équipement est conforme aux limites d’exposition aux
rayonnements de la FCC établies pour un environnement non
contrôlé. Cet équipement doit être installé et utilisé avec une distance
minimum de 20cm entre le radiateur et votre corps.
Déclaration d’Industry Canada :
Ce dispositif est conforme à la norme CNR-210 d’Industrie
Canada applicable aux appareils radio exempts de licence. Son
fonctionnement est sujet aux deux conditions suivantes: (1) le
dispositif ne doit pas produire de brouillage préjudiciable, et (2) ce
dispositif doit accepter tout brouillage reçu, y compris un brouillage
susceptible de provoquer un fonctionnement indésirable.
Déclaration d’exposition aux radiations:
Cet équipement est conforme aux limites d’exposition aux
rayonnements IC établies pour un environnement non contrôlé. Cet
équipement doit être installé et utilisé avec un minimum de 20 cm de
distance entre la source de rayonnement et votre corps.
For Taiwan 警語: (電信管制射頻器材使用)
經型式認證合格之低功率射頻電機,非經許可,公司、商號或使用
者均不得擅自變更頻率、加大功率或變更原設計之特性及功能。
低功率射頻電機之使用不得影響飛航安全及干擾合法通信;經發
現有干擾現象時,應立即停用,並改善至無干擾時方得繼續使用。
前項合法通信,指依電信法規定作業之無線電通信。低功率射頻
電機須忍受合法通信或工業、科學及醫療用電波輻射性電機設備
之干擾。
Page 22

Antec, Inc.
47900 Fremont Blvd.
Fremont, CA 94538
USA
tel: 510-770-1200
fax: 510-770-1288
Antec Europe B.V.
Stuttgartstraat 12
3047 AS Rotterdam
e Netherlands
Customer Support:
US & Canada
1-800-22ANTEC
Europe
+ 49-40-226-139-22
Asia
+ 866-(0)800-060-696
[email protected]
© 2012 Antec, Inc. All rights reserved.
All trademarks are the property of their respective owners.
Reproduction in whole or in part without written
permission is prohibited.
Printed in China.
 Loading...