

Page 1
Service Manual
LCD TV
MODEL:LC26T1E/LC32T1E/LC37T1E/LC42T1E
Amoi
Notice: Please read this manual and the user’s
manual before repairment. This manual is just for
reference.
Page 2

After-sales Service manual
Model: LC26T1E/LC32T1E/LC37T1E/LC42T1E
Contents
1.Preparation before maintenance…………………………………………………1
2.Product Specifications……………………………………………………………2
3.Electric connection chart…………………………………………………………3
4.Block diagram of electric ………………………………………………………6
5.Work Principle …………………………………………………………………12
6.Schematic Diagrams……………………………………………………………17
7.Internal Block Diagrams & IC’s ………………………………………………60
8.Software version view and upgrade instruction ………………………………97
9. Exploded Views-Mechanical ………………………………………………104
Maintenance spare part list …………………………………………………108
10.
11. Trouble shooting ……………………………………………………………117
Note:Disassembly Instructions
1. Preparation before maintenance: Common contents, it mainly expresses the information
which need your attention, including the Safety instruction and the Protect measure..
2. Electric connection chart: Identify the plug specification and the connection between the
pins and the board by the unit of PCB.
Block diagram of electric: Show the signal processing of the unit in the unit of 1C or
3.
circuit.
4.
Schematic Diagrams: Provide the circuit chart in the unit of PCB and provide the
detailed principle chart with the simple signal processing and control instruction.
5.
Software version view and upgrade instruction: The method of software
version view and the software upgrade instruction.
Maintenance spare part list: Including the Package, Accessory, PCB,
6.
Connector, etc. and the material list that the service person can replace
themselves.
Page 3
1、Preparation before maintenance
1
1.1、Master basic information.
Adequate communication with customers is required, to learn how the
trouble happens and what the status is. This will help to promote effect and
efficiency of the service.
Learn if the trouble has conflict with technical standards.
1.2、Reappearance of the trouble.
Please assure:
a. If the trouble exists as the customer described, and make initial judgment
of the status, then decide what to do next;
b. If any other trouble exists;
c. May reset the machine under some instances. For example: when
the picture and color could not satisfy the customer, could reset the machine
first and then make amendment. Method: Press the “source”button for about
five seconds, the” Factory setting” will be displayed, select the" factory reset”
and enter, then select the" All Setting( Not include calibration)” and enter.
d. Avoid the worse of trouble during the repair.
1.3、 Judgment and Repair
Judge the status of the trouble and find the reason, then repair.
Please cut off the power before disassemble and welding.
Read the manual carefully to learn security attentions.
Please obey the requirement of Disassemble drawing and description strictly ,
use specified screw, take care not to make any scars on the machine especially on the
LCD. Please wear anti-electrostatic gloves when welding. Please review the status
of power, crystal, clock, input and output data. Please read Spare part list if need any
change.
Check the packing material and accessories when change the machine for the
customer.
Page 4
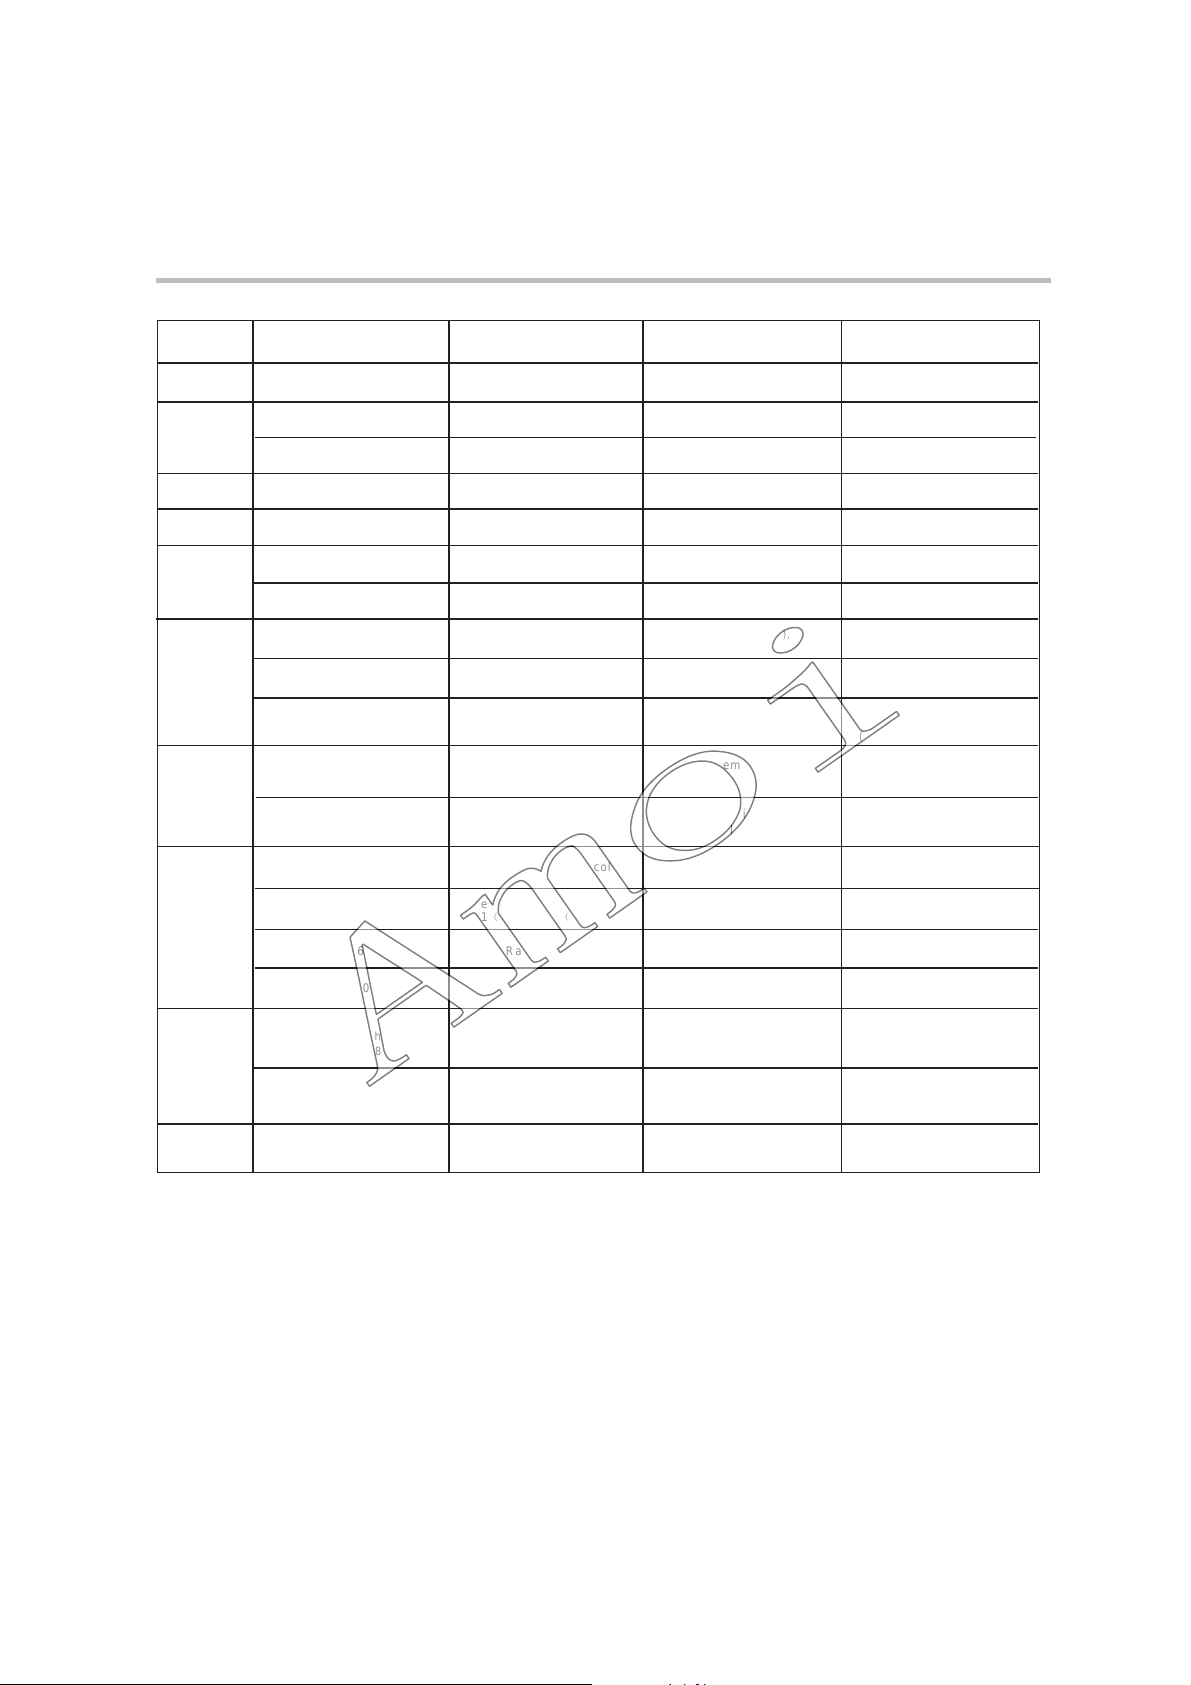
2.Specifications
2
MODEL
Power Supply
Power
Consumption
Audio System
TV System
VGA
Audio
Environmental
Considerations
Specification
of Monitor
LC26T1E
Input:AC 100-240V 50Hz/60Hz
Standby: < 1W
130W
BG/ /L/LDK/I '
PAL, SECAM
Sync: H/V Separate,
TTL,P.orN.
VideoSignal: 0.7Vp-p, 75ohm
Audio in: RCAJACK (L&R),
0.5Vrms(-9dB)
Frequency Response:
80Hz-15KHz (at-3dB)
Earphone out:
Max.10mW Output
3.5 Stereo Jack,32(mm )ΩΦ
OperatingTemperature:
540℃- ℃
Operating Humidity
10%-80% Relative Humidity
Display Colour 16.7M colours:
Pixel Pitch:
0.4215 H 0.4215 V() ()
Aspect Ratio: 16:9
LC32T1E
Input:AC 100-240V 50Hz/60Hz
Standby: < 1W
150W
BG/ /L/LDK/I '
PAL, SECAM
Sync: H/V Separate,
TTL,P.orN.
VideoSignal: 0.7Vp-p, 75ohm
Audio in: RCAJACK (L&R),
0.5Vrms(-9dB)
Frequency Response:
80Hz-15KHz (at-3dB)
Earphone out:
Max.10mW Output
3.5 Stereo Jack,32(mm )ΩΦ
OperatingTemperature:
540℃- ℃
Operating Humidity
10%-80% Relative Humidity
:
Display Colour 16.7M colours:
Pixel Pitch:
0.51 H 0.51 V() ()
Aspect Ratio: 16:9
LC37T1E
Input:AC 100-240V 50Hz/60Hz
Standby: < 1W
200W
BG/ /L/LDK/I '
PAL, SECAM
Sync: H/V Separate,
TTL,P.orN.
VideoSignal: 0.7Vp-p, 75ohm
Audio in: RCAJACK (L&R),
0.5Vrms(-9dB)
Frequency Response:
80Hz-15KHz (at-3dB)
Earphone out:
Max.10mW Output
( 3.5mmStereo Jack,32 )ΦΩ
OperatingTemperature:
540℃- ℃
Operating Humidity
10%-80% Relative Humidity
:
Display Colour 16.7M colours:
Pixel Pitch:
0.426 H 0.426 V() ()
Aspect Ratio: 16:9
LC42T1E
Input:AC 100-240V 50Hz/60Hz
Standby: < 1W
220W
BG/ /L/LDK/I '
PAL, SECAM
Sync: H/V Separate,
TTL,P.orN.
VideoSignal: 0.7Vp-p, 75ohm
Audio in: RCAJACK L&R
0.5Vrms(-9dB)
Frequency Response:
80Hz-15KHz (at-3dB)
Earphone out:
Max.10mW Output
OperatingTemperature:
540℃- ℃
Operating Humidity
10%-80% Relative Humidity
Display Colour 16.7M colours:
Pixel Pitch:
0.1615 H 0.4845 V() ()
Aspect Ratio: 16:9
(),
Stereo Jack,32(3.5mm )ΩΦ
:
Lamp Life 60000H:>=
Unit Dimension(Without stand)
670(H) × 950(W) ×105(D)mm
Unit dimension:
730(H) × 950(W)× 340(D) mm
Gross Weight: 32kg
Net Weight:
25.5kg
Lamp Life: >=60000H
Unit Dimension(Without stand)
:
768(H) ×1067(W) ×119(D)mm
Unit dimension:
823(H) × 1067(W) × 340(D) mm
Gross Weight: 36kg
Net Weight:
29.5kg
:
Size
Weight
Lamp Life: >=60000H
Unit dimension(Without stand):
512(H) ×699(W) ×98(D)mm
Unit dimension:
552(H) ×699(W) × 295(D) mm
Gross Weight: 17kg
Net Weight: 1
3.5kg
Lamp Life: >=60000H
Unit dimension(Without stand):
586(H) ×825(W) ×102(D)mm
Unit dimension:
636(H) ×825(W) × 295(D) mm
Gross Weight: 23.5kg
Net Weight:
18.5kg
NOTE: Specifications subject to change without notice. Weight and dimensions are approximate.prior
Page 5
T
osideboard
T
o loudspeakers
J
V103 10
pin
p
T
o tuner
p
p
J9
J716
J704
p
p
J705
J707
J
701
p
J911
J401
3
INVERTER BOARD
JV601
JV106
16pin
4pin
6pin
J5
8pin
J1
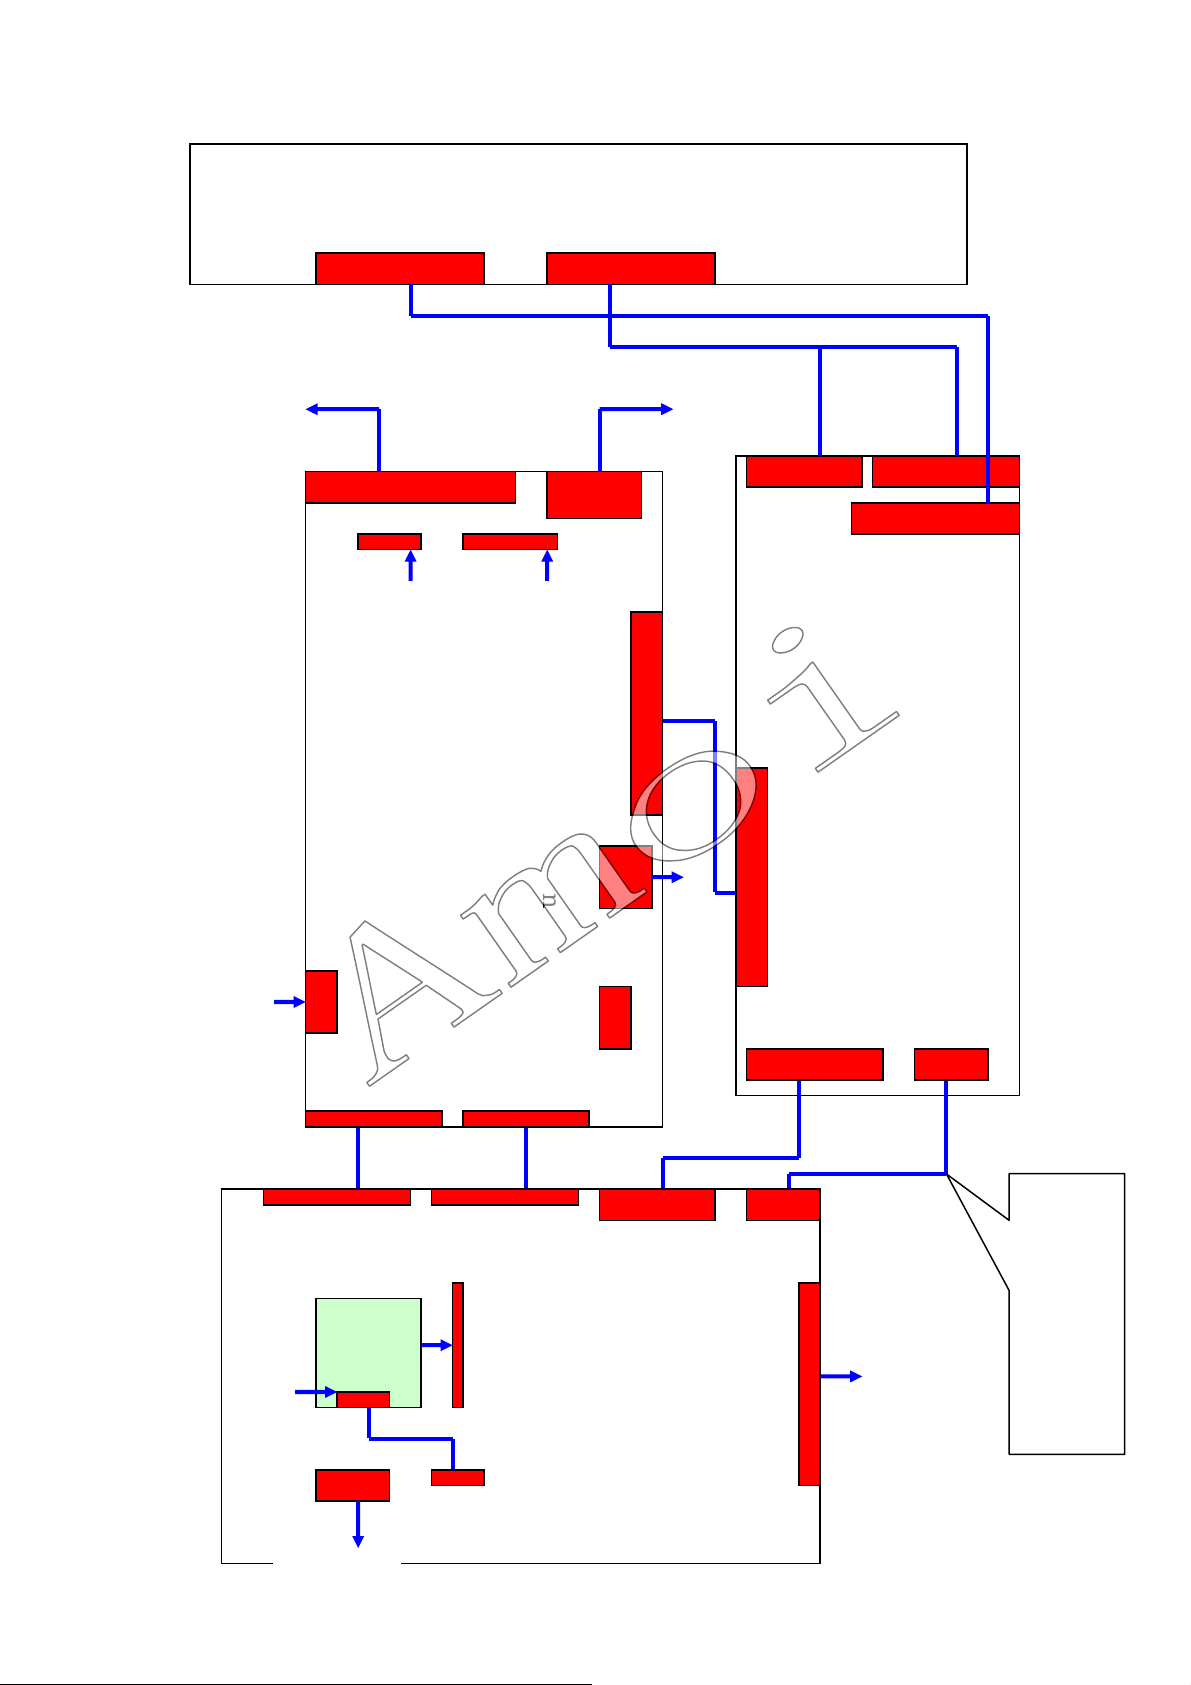
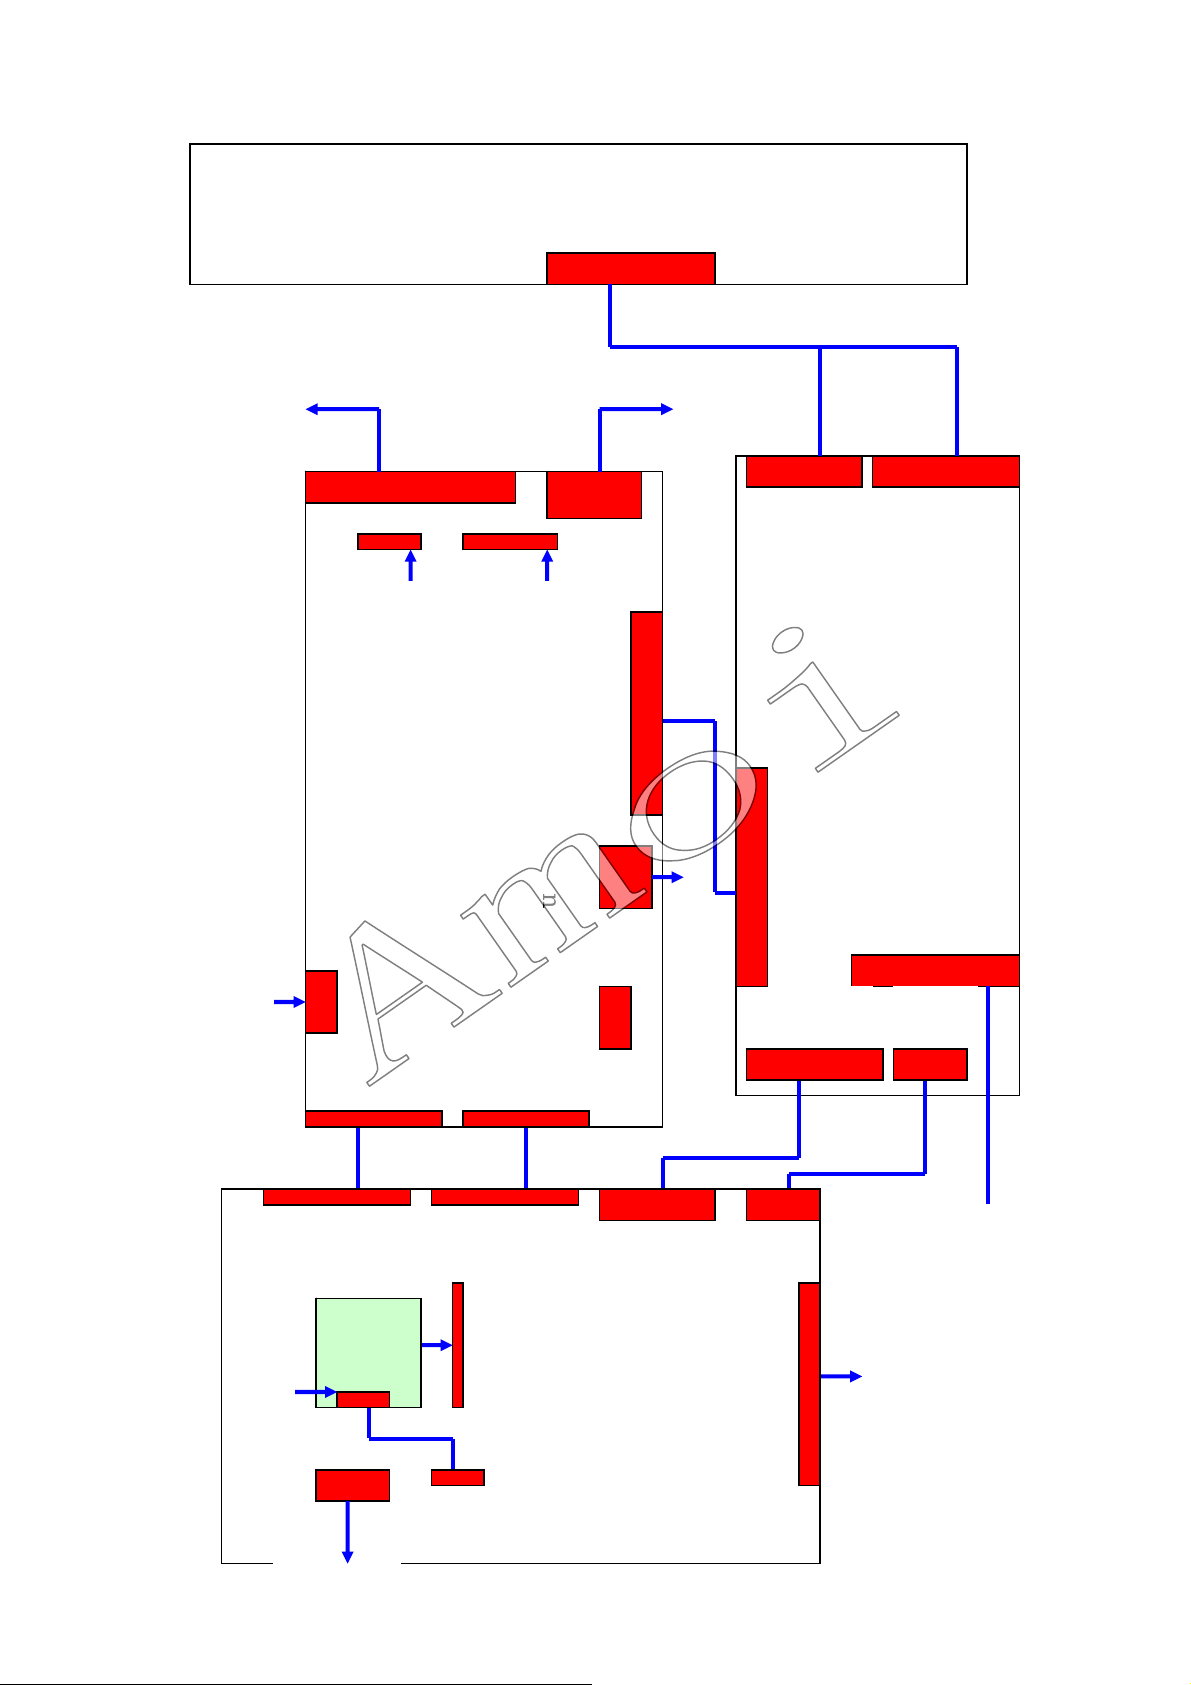
connection chart for LC32T1E and LC37T1E
JV104 4pin updata for TV
5pin to IR
board
JV102
30
JV403
8pin to key
board
JV404
I/O BOARD
JV109
10
in
JV402 5pin
Updata for
MCU
JV101
30
10pin
J2
POWER BOARD
13
in
JF6
3
in
J12
3.1、The electric connection chart
in
BOARD
HDMI
updata for
TV
4pin
5
in
in
J403
SCALER BOARD
To panel
JF603
use in LC37T1E not use
in LC32T1E
This connect cable only
Page 6
T
os
ide board
T
o loudspeakers
J
V103 10
pin
p
T
o tuner
p
p
J9
J716
J704
p
p
J705
J707
J
701
p
J911
J401
4
INVERTER BOARD
JV601
JV106
16pin
4pin
6pin
J5
8pin
J1
8pin to key
5pin to IR
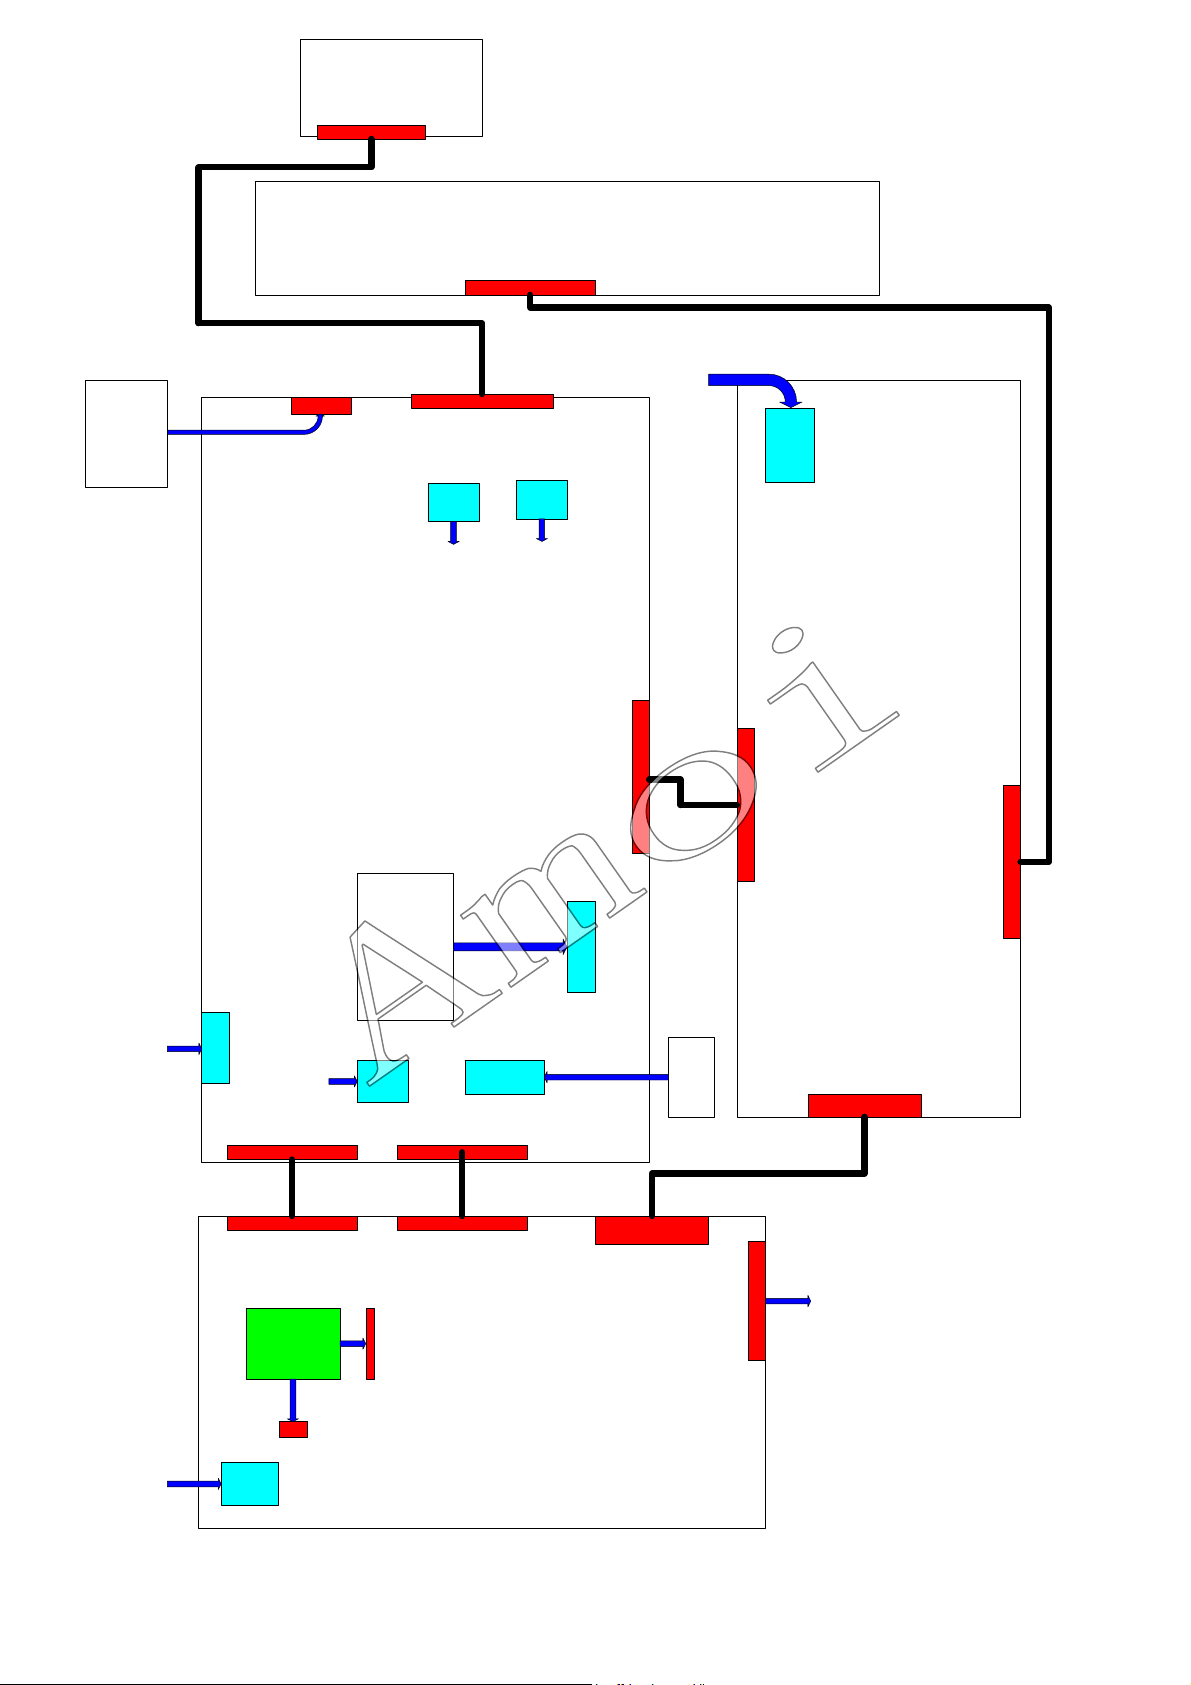
connection chart for LC42T1E
board
JV403
board
JV404
3.2、The electric connection chart
POWER BOARD
I/O BOARD
JV109
10
JV104 4pin updata for TV
30
JV102
30
MCU
JV101
in
JV402 5pin
Updata for
13
in
JF6
3
in
8pin
J12
J4
in
BOARD
updata
for TV
HDMI
4pin
5
in
in
J403
SCALER BOARD
To INVERTER
To panel
JF604
Page 7
BOARD
5
IR
16pin
J101
S-I/O
INVERTER BOARD
5pin
J8
16pin
J12
POWER
JF1
2pin
J33
connection chart for LC26T1E
To right speaker
I/O BOARD
BOARD
TUNER
For TV updata
J31 4pin
30pin
J14
For updata MCU
5pin
30pin
8pin
J13
J22
J6
2pin
J32
To left speaker
J5
12pin
J9 10pin
BOARD
KEY
JF4
12pin
3.3 The electric connection chart
POWER BOARD
JF5
JF6
SCALAR BOARD
J706
J705
J704
To panel
JF603
Board
HDMI
J403
5pin
For TV updata
4pin
J701
J401
50pin
30pin
Page 8
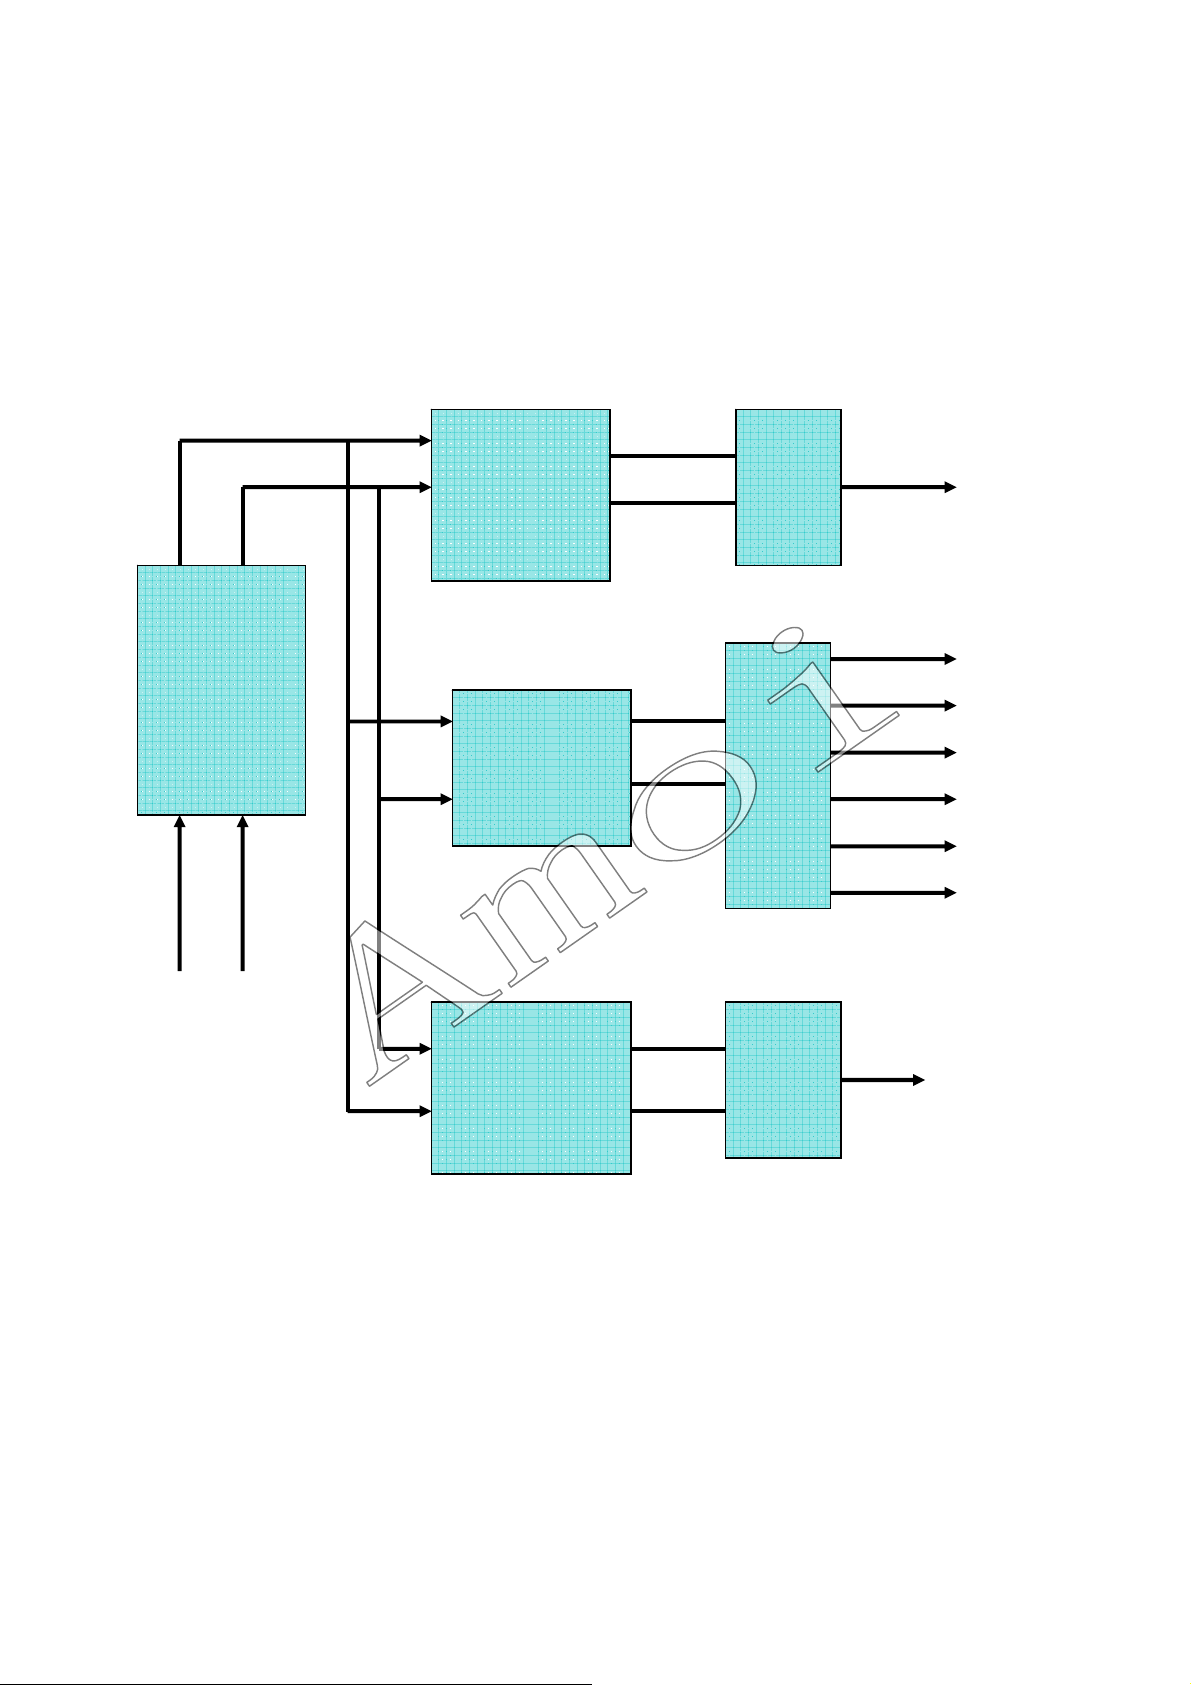
4.1.1、The block diagram of POWER
6
LINE FILTER
AC
INPUT(90V~264V)
(USE FOR LC32T1E/LC37T1E/LC42T1E)
U1 ML4800 for
PWM
U3
FS7M0880
U2
FSD200
T11
T12
T4
+24V
-12V
+12V
+3.3V
+21V
+5V
5V_MUTE
5VS
Page 9
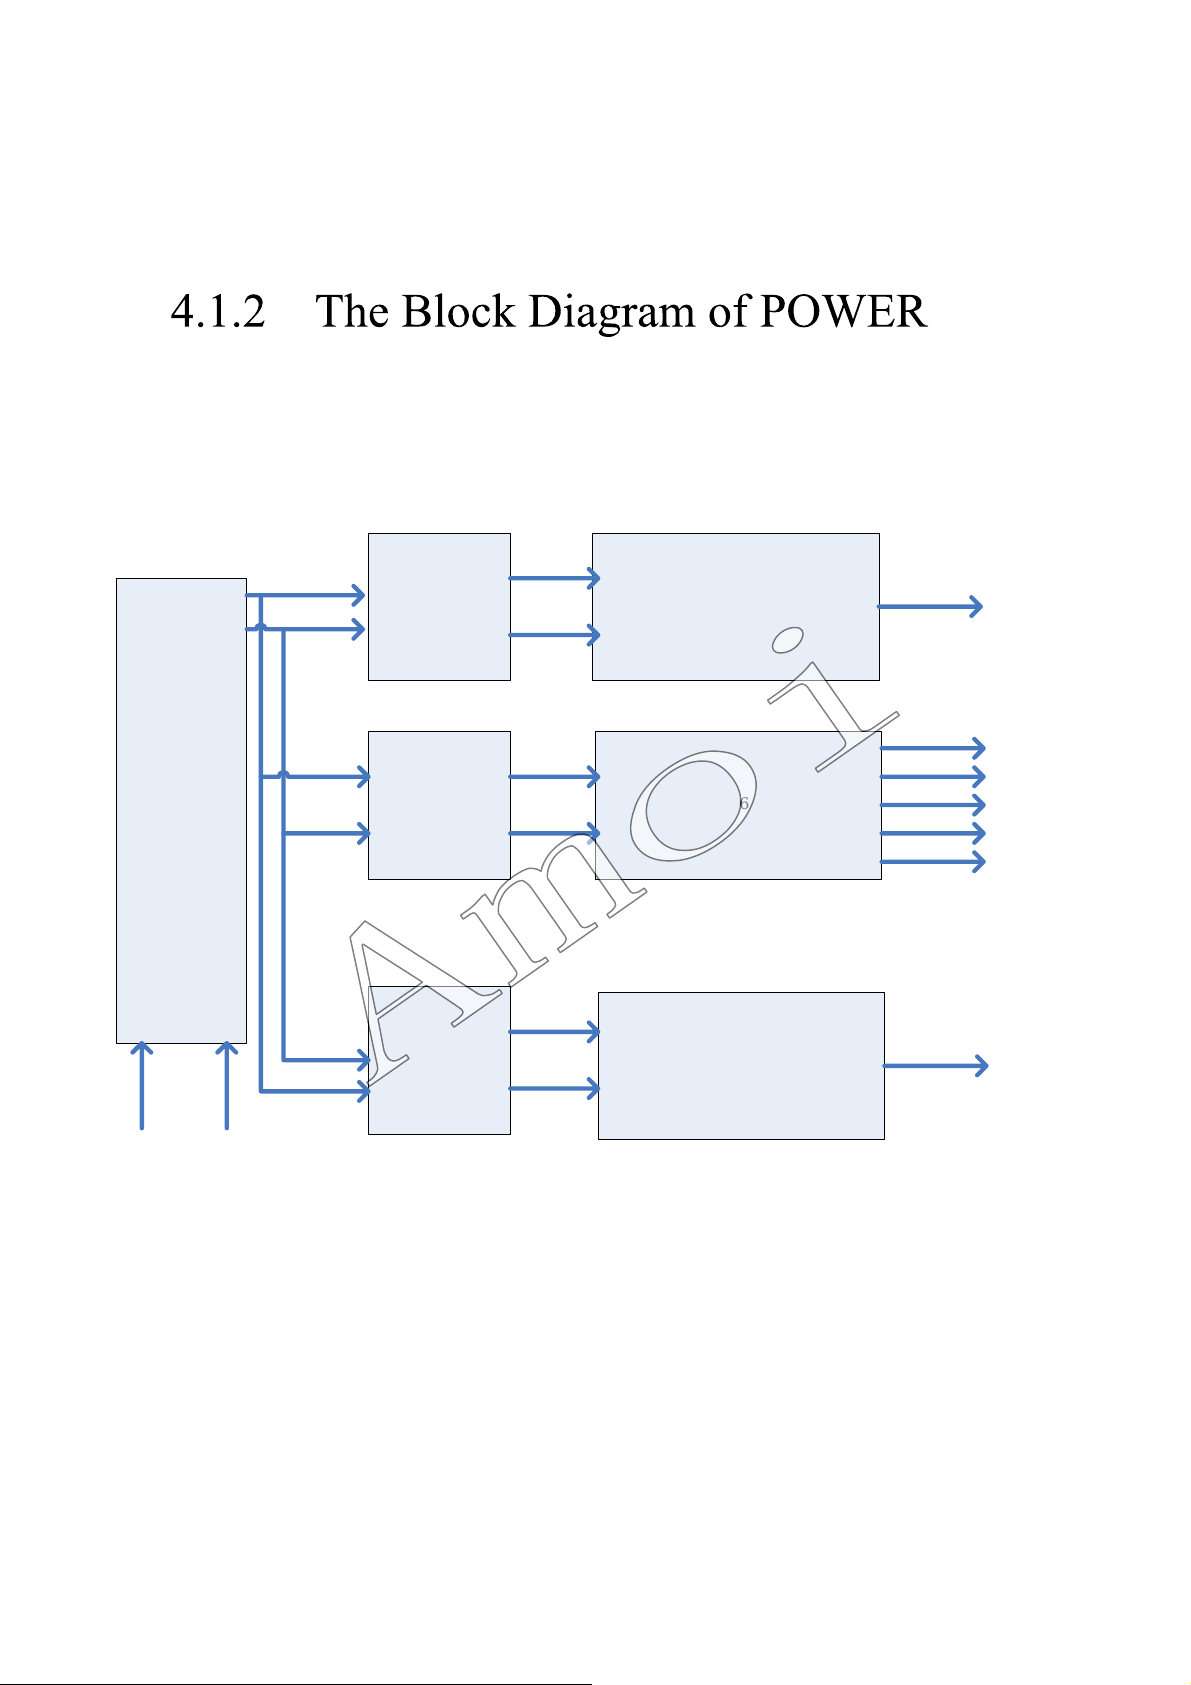
、
7
(USE FOR LC26T1E)
LINE FILTER
AC
INPUT(90~264V)
U3
FS7M0880
U1
ML4800
U2
FSD200
T5
T6
+24V
-12V
+12V
+5V
+18V
+3.3V
S+5V
T4
Page 10
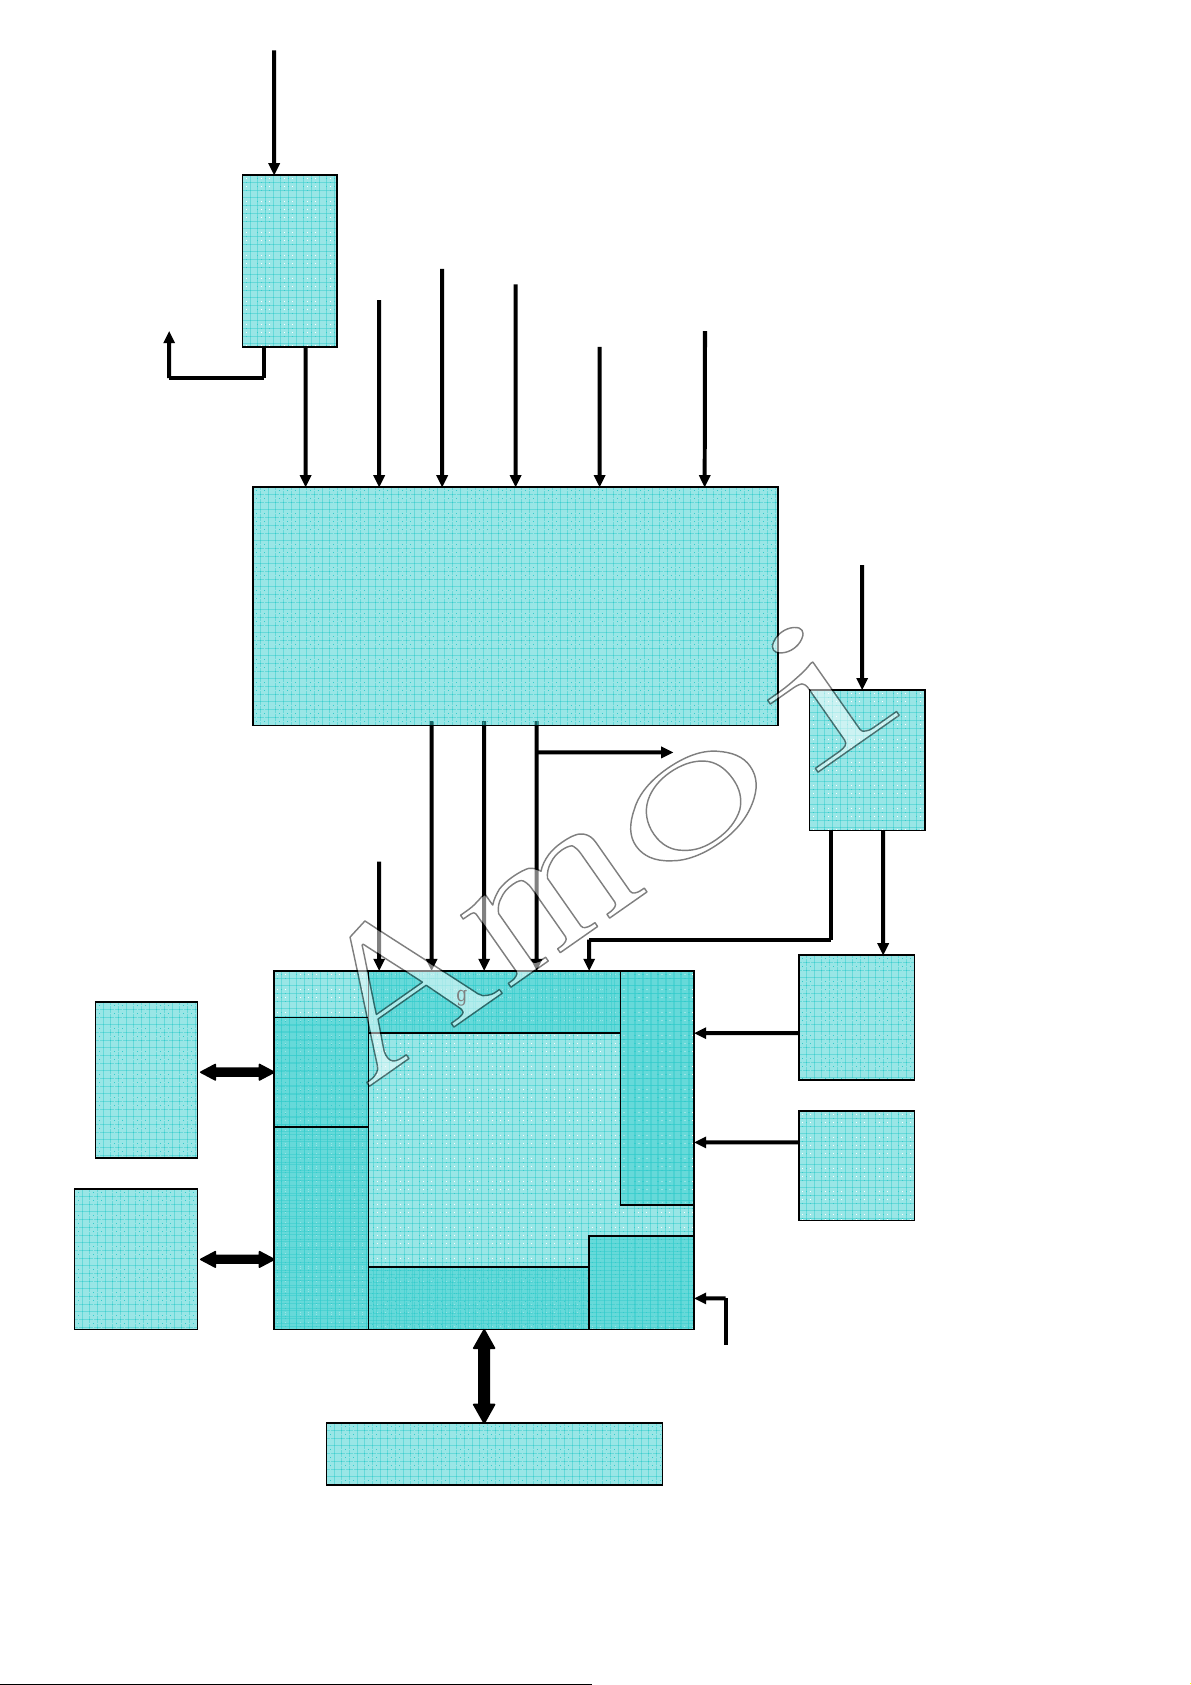
Form tuner
r
9
V
60
8
SCART1 OUT
UV104 filter
circuit
Form JR2
AV-CVBS
SCART2-Y/C
TV-CVBS
SCART2-CVBS
Form JR1
SCART1-CVBS
S1-Y/C
U11、U12
DDR×2
JV108
DRAM
Audio/Video Switch
Form
7--Input 3--Output
SCART1-RGB
Y/C
YPbP
Analog interface
PW106
U9
CX2069Q
UV401
AV-CVBS
I/O board
SCART2 OUT
Digital interface
VGA-RGB
PI5V330Q
U1
RGB
S-RGB
AD9885
U6
4.2、The block diagram of video
(USE FOR LC32T1E/LC37T1E/LC42T1E)
HDMI
signal
Microcontroller
and Flash
FLASH
2
L
U13
Group
PLL
1
LVDS OUTPUT
27M
LCM
Page 11
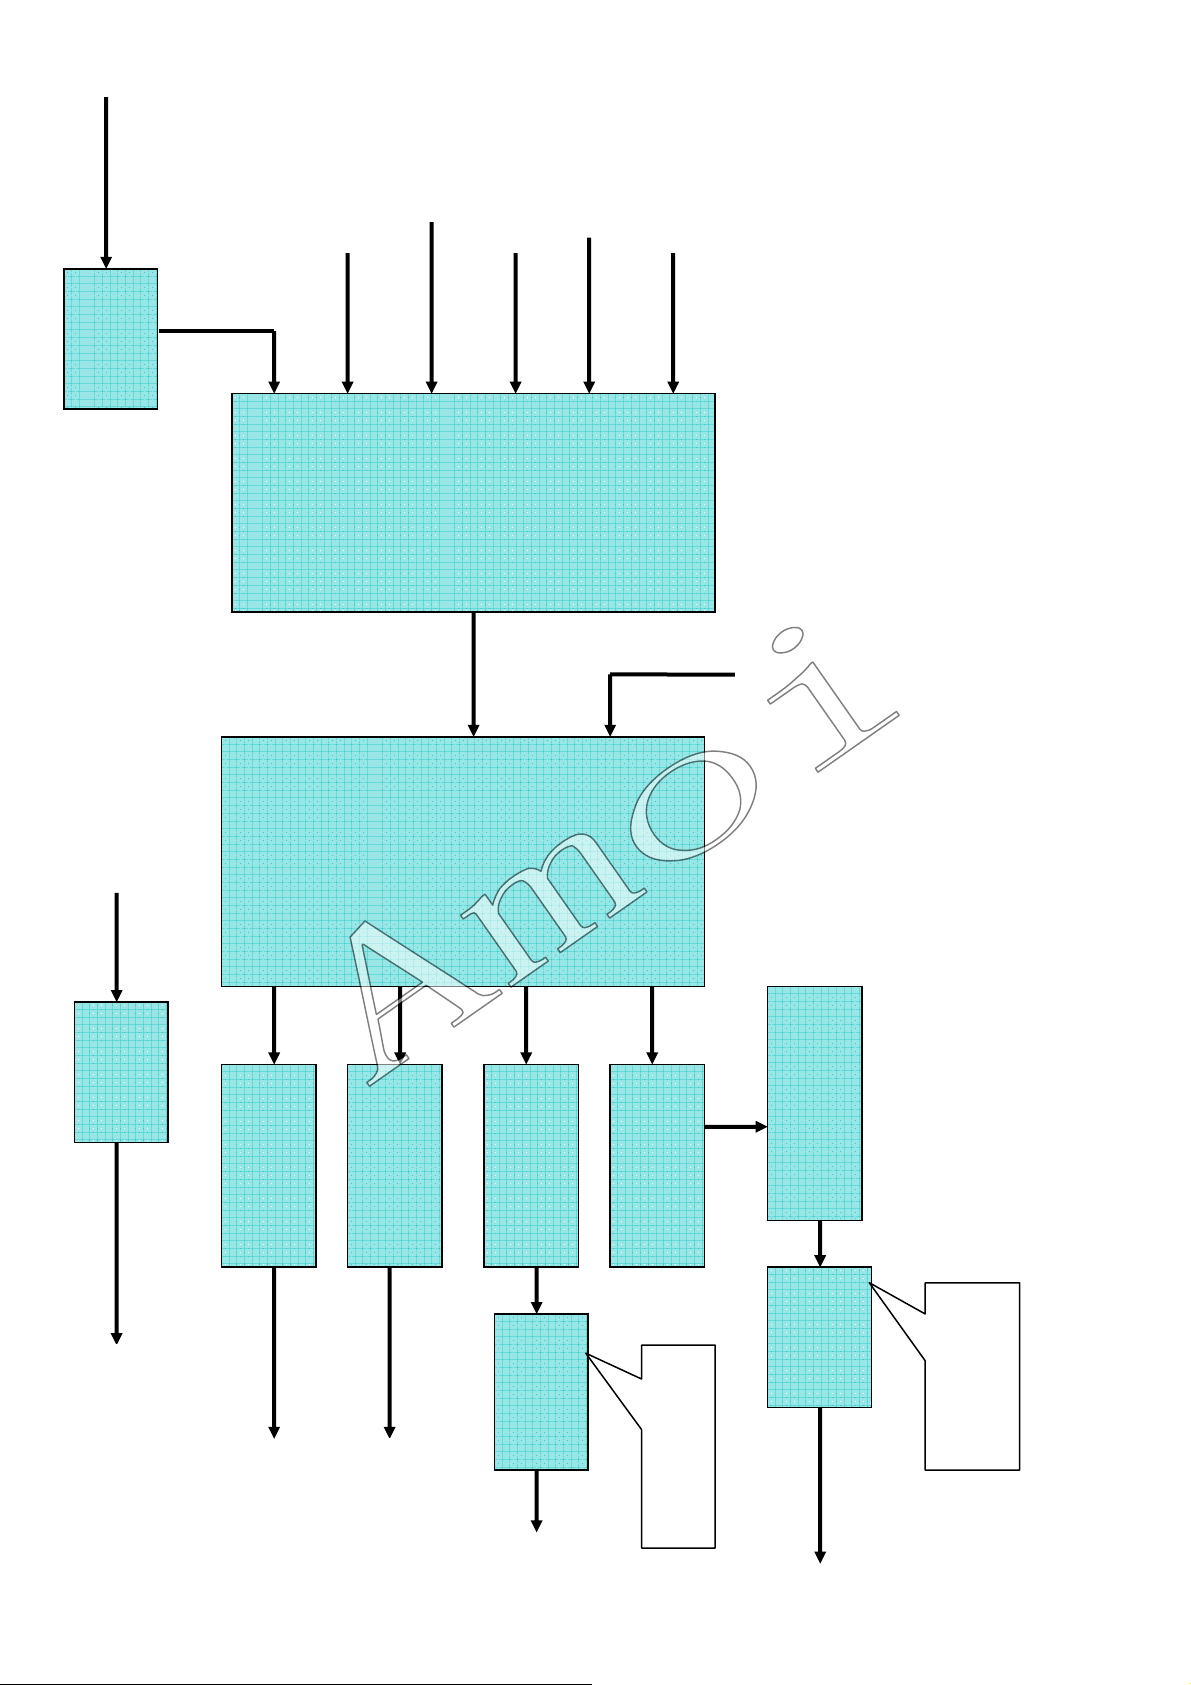
HDMI board
p
p
p
r
p
r
9
Form SCART1
Form JR2
Form SCART2
Form MIC2
Form JR2
WM8761
U5
HDMI board
HDMI-Audio
YPbPr-Audio
S1-Audio
Switch
the input sound
volume; switch select of
Audio/Video
decoder; control of
S2-Audio
7-Input 3-Output
CX2069Q
AV-Audio
Processor. Audio
Digital TV Sound
VGA-Audio
AV-Audio
I/O board
TDA9875
UV401
SIF
UV505(I/O board)
4.3、The block diagram of audio
Form TUNER
(USE FOR LC32T1E/LC37T1E/LC42T1E)
SPDIF
UV601 NJW1137
UV103
74HC04
HDMI-Audio
OUTPUT
UV506 T wo step
filter circuit
AV OUTPUT
UV504 T wo step
filter circuit
AV OUTPUT
filter circuit
UV503 T wo step
filter circuit
UV502 T wo step
BBE processor
UV602
TPA3100
ower am
class-D audio
NJM4556
TO UV102
U101
Drive am
lifie
Loudspeakers
TO SCART2
TO SCART1
Earphone
out
lifie
ut
Page 12
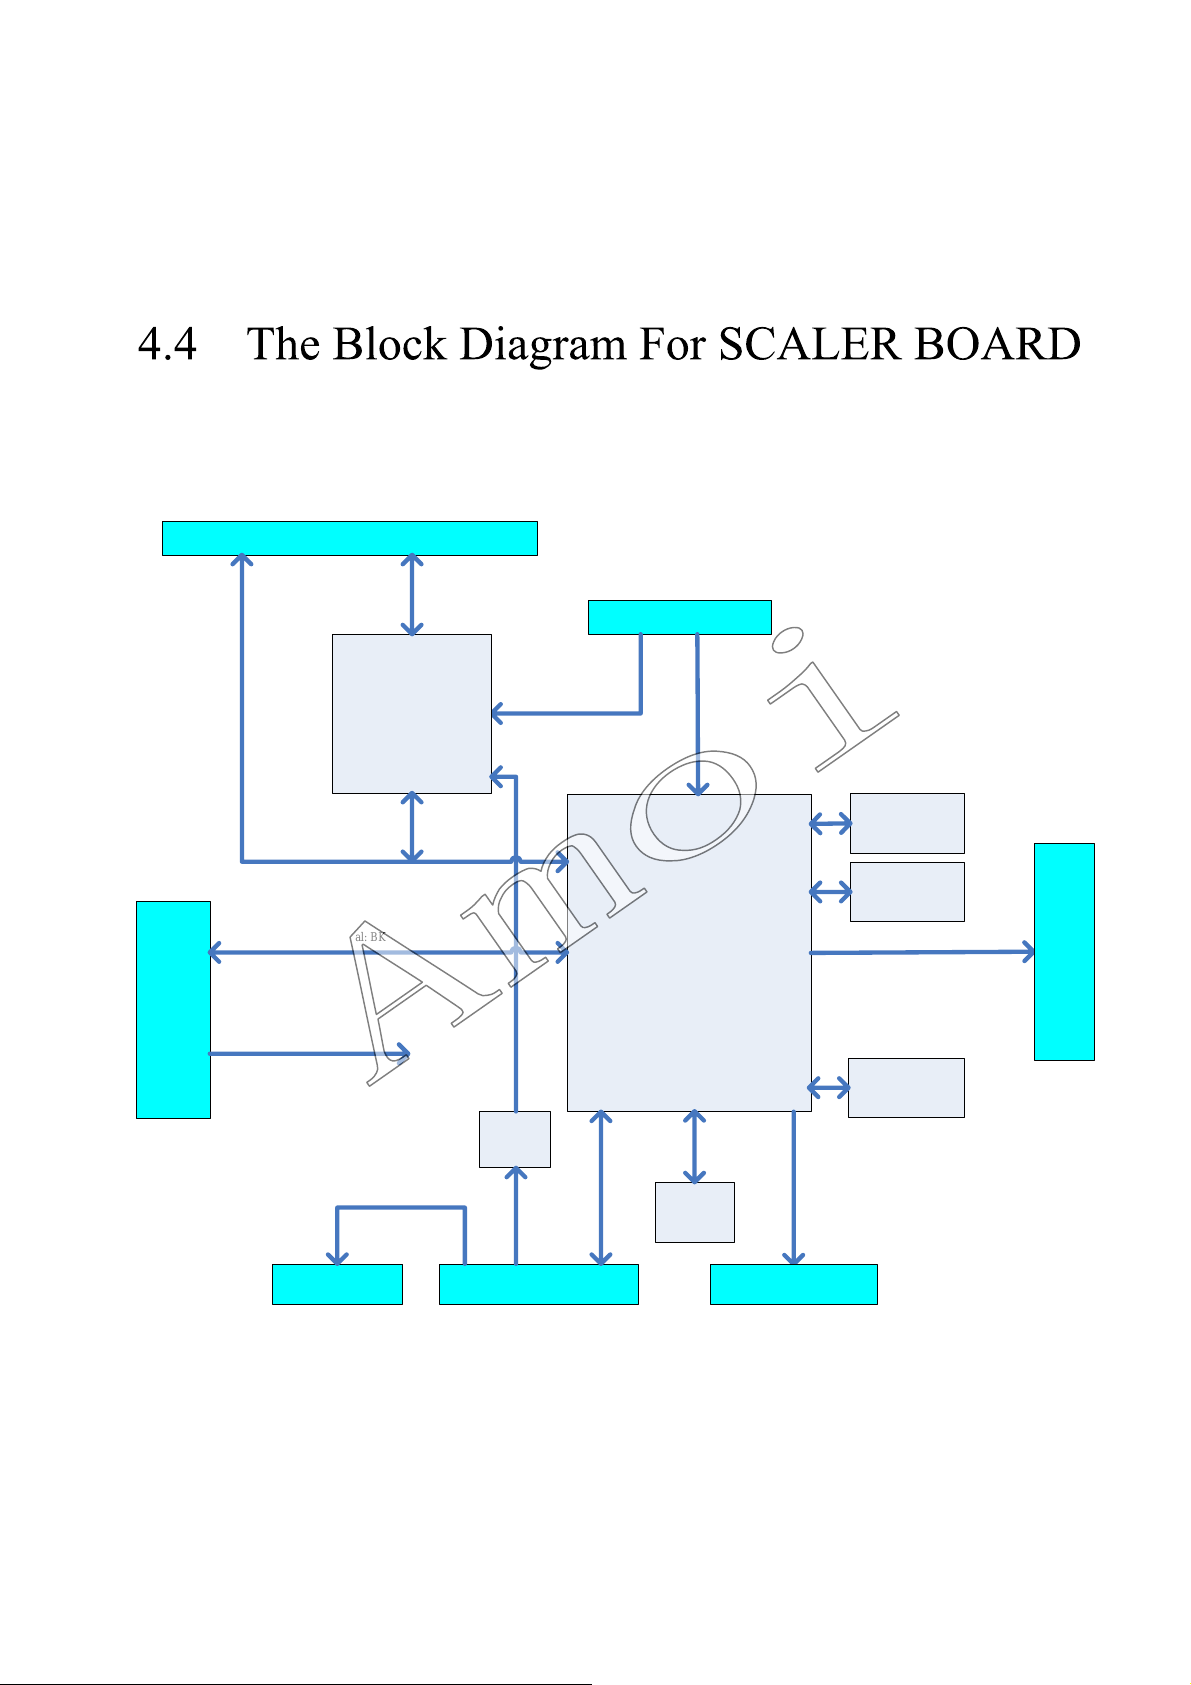
、
10
(USE FOR LC26T1E)
J705: From I/O Board
U15
TDA9875AH
Sound Processor
Audio
Signal
J706: From I/O Board
SIF Signal
J704:
From
POWER
Board
I2C
Signal
Panel Control Signal: BKLON and ANAPWM
POWER:
+5V,+3.3V,+12V
COAXIAL
Audio
Signal
U27:
COAXIAL_OUT
Control
Signal
I2S
Audio
Signal
U5
WM8761
Video
and
Audio
Signal
Control
Signal
J401: From HDMI Board
U9
PW106B-10L
ImageProcessor
I2C
Signal
U10
24LC32
EEPROM
LVDS Signal
Power
and
Control
Signal
J403: TO HDMI Board
U11
DDR-SDRAM
128M
U12
DDR-SDRAM
128M
U13
29LV160CTTC-70
Flash ROM
JF603:
To
LCD
Panel
Page 13
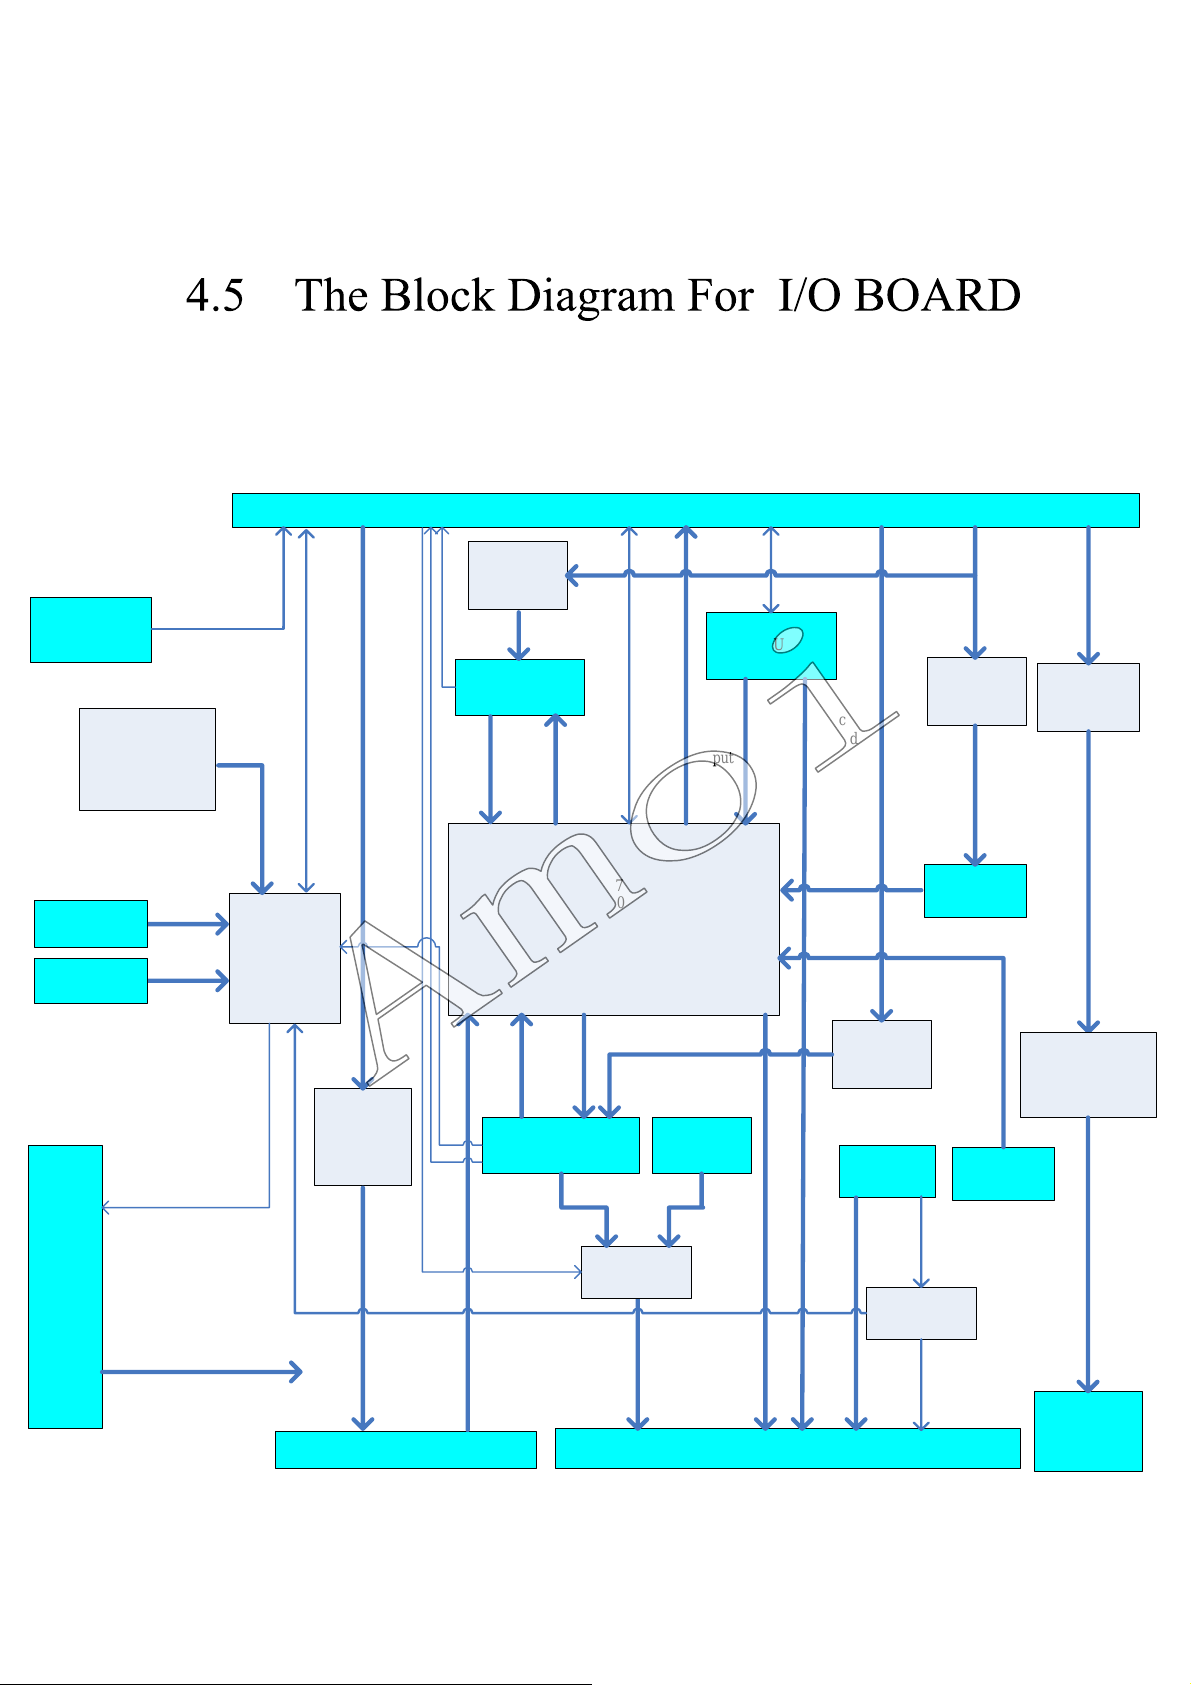
、
11
(USE FOR LC26T1E)
J13: From SCALER Board
Interface
J8: From IR
J6: From KEY
J5: From
POWER
Board
J1
Update
RX-8025SA
TIME
CONTROLLER
Board
Board
Update
Control
Signal
Control
U6
IR
Signal
KEY
Signal
STB Signal
VGA: HS and VS
POWER: S+5V,+5V,
+12V,+18V,-12V
MCU
Timer
Control
PIC16F72ISO
I2C
For
U9
MCU
Headphone
Audio
Headphone
U15
NJM4558M
Amplifier
Audio
J12: From Side I/O Board
Audio Output
FB1
ASP1
CVBS
YC
Video
Audio
Signal
ASP2
Scart2
CVBS
YC
Video
Audio
Signal
U16
NJM4558M
Amplifier
J18
SCART2
AV
CVBS
Signal
Output
CVBS
CVBS
Video
Signal
Audio
Output
Signal
SCART1
RGB
Video
Input
SEL
I2C
Control
For
Switch
U7
CXA2069Q
A/V
SIGNAL
SWITCH
TV
J17
P15V330Q
Video
Singal Inputl
Audio
CVBS
Signal
Signal
Input
Scart1
Audio Output
J2
RCA
U1
I2C
Control
For
TUNER
J9:
From TUNER
Board
TV
CVBS
Video
Signal
J14: From SCALER Board
YPbPr
Video
Input
YC
SIF
Signal
Scart1
Audio
Signal
YPbPr
Audio
Input
Video Signal
NJM4558M
Amplifier
for VGA
Current
Audio
Signal
U22
J11
VGA
U4
74LVC126A
U18
NJM4558M
Amplifier
Audio
Output
J3
RCA
J16
VGA Audio
VGA: HS and VS
VGA: HS and VS
Main
Audio
Signal
U17
NJM4558M
Amplifier
Main
Audio
Signal
UV9
TPA3100D2
POWER
AMPLIFIER
Main
Audio
Output
J32,J33:
To Speaker
Page 14
5、Work Principle
12
The product mainly handles with video signal, such as RF (cable TV),
CVBS(composite video), S-VIDEO(Y/C signal), YPbPr(progressive video), SCART, DTV
signal, VGA and HDMI, as well as audio signal amplifying output. AV includes S-VIDEO
and CVBS. In addition, it can input VGA and other signals to realize PIP function.
Because the product is comprised of three boards, the work principle will separate
into three parts as follows:
5.1、Work Principle of Power Board
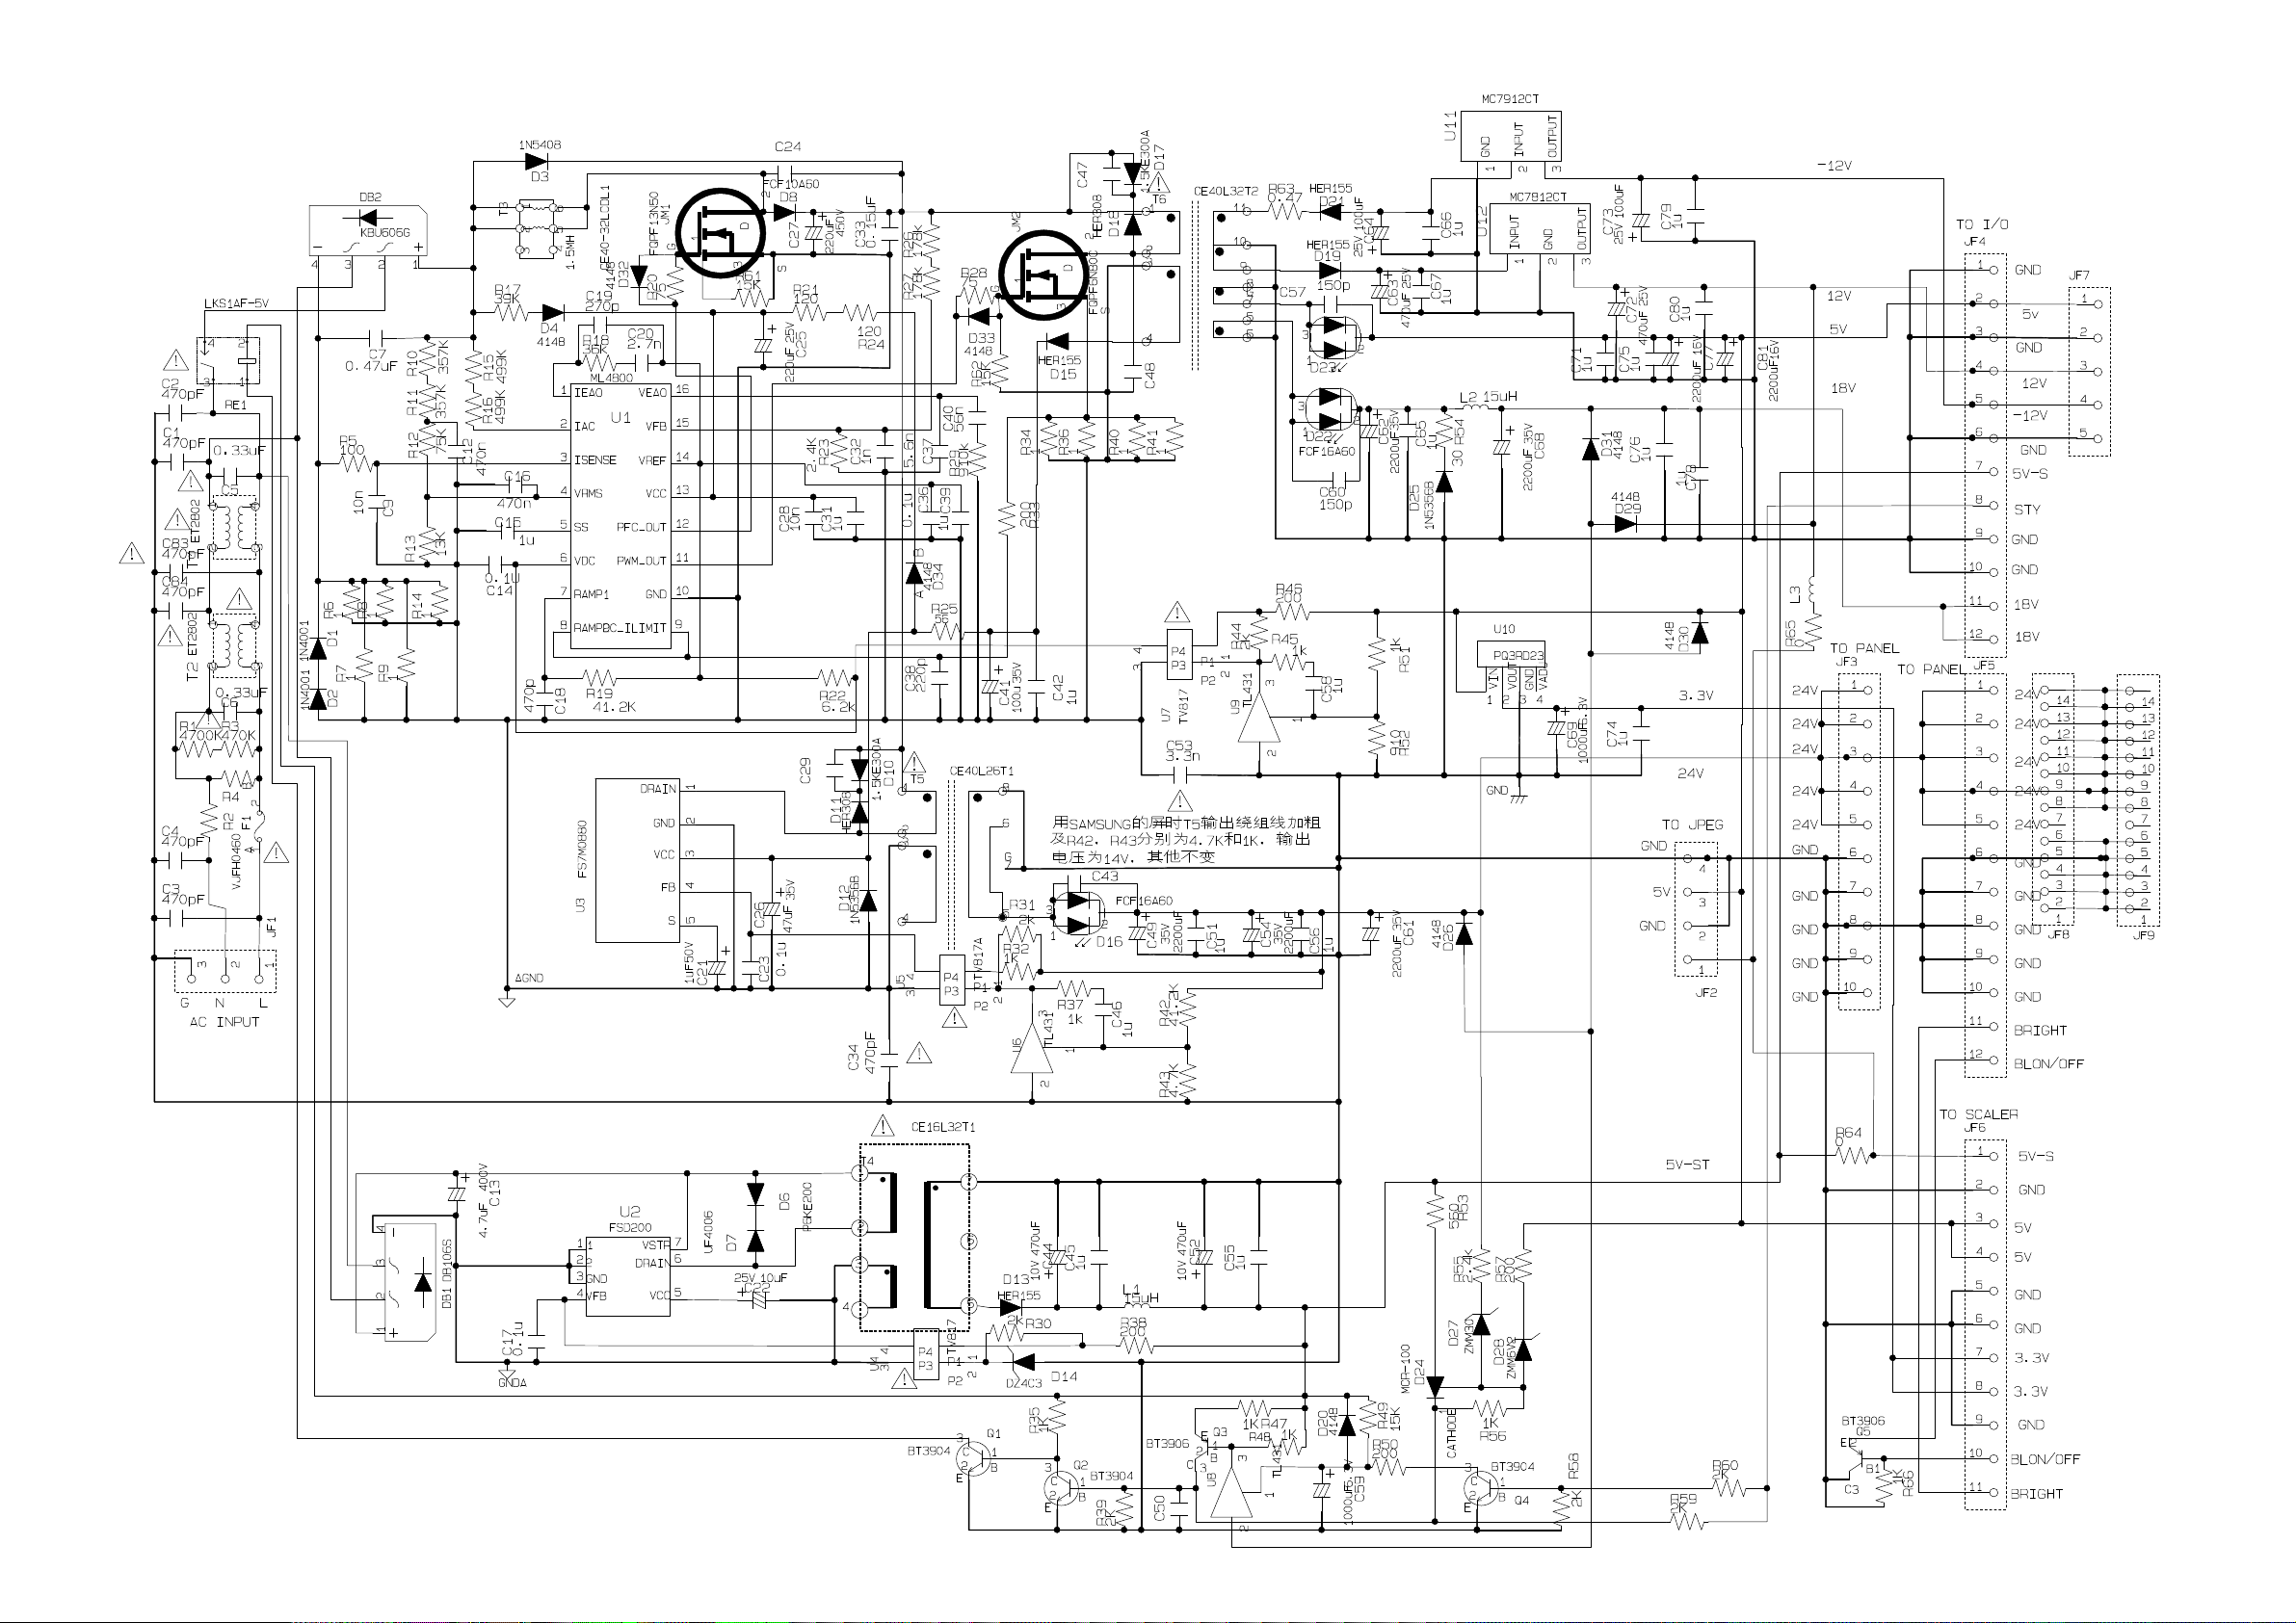
1. When power is supplied, whether the TV is turned on or off is decided by the
voltage of STB pin in the mini MCU PIC16F72, the high voltage means standby, and
the low voltage means turning on.
In the standby state, the winding 5 and winding 7 of transformer T4 will supply
5VS voltage after regulated by D13, then the power is fed back to optical coupling,
After regulated by diode D14.the 5VS becomes steady. The circuit combined with
transformer T4 is a standby circuit, RE1 is off, then the power consumption could
be less then 1W. When STB pin in MCU sends out a low voltage order, the RE1 circuit
will work and the two main circuits output 24V、+/-12V,5V,3.3V.
2. When the RE1 is on, the power (90-264VAC) will be transformed into sine wave
by DB2. The C27 will be charged by D3 at first, not by T3, to avoid the C27 charge
saturation, which may cause hardware damages such as MOS JM1 failure.
At the same time, the pin 2、4 of U1 ML4800 will set up current and voltage
for the multiplication organ inside. Then C25 will be charged by R17 and R18,
supplying the power for the pin 13 (VCC) of U1. The PFC circuit begins to work,
PFC circuit includes pin 1, 2, 3, 4, 15, 16, 12 and correlative circuits, pin 13
of U1 (shares the power supply with PWM), pin 14(7.5V reference voltage), pin
7(brae pulse producing circuit, provides switch frequency), together with JM1,
T3 and D8.
When PFC begins to work, the pin 12 output switch waves, opposite to the half
wave sine waves, so when the voltage is highest, the duty cycle is lowest, when
the voltage is lowest, the duty cycle is highest. When JM1 is on, T3 charges, and
when JM1 is off, the stored energy of T3 is released to C27 by the loop circuit
consist of D8, C27, R81, and R83. In this way, the voltage of C27 is stabilized
to 380VDC. feed back by the 15 pin of U1. R26, R27 and R23 compose the voltage
dividing resistances. After dividing, the voltage of R23 reaches 2.5V.There is
a 2.5V exact voltage source inside the pin 15. Comparing with it, equation means
the voltage reaches 380V steadily. If the voltage of C27 is lower than 380V, then
the voltage of R23 will be lower than 2.5V. Compared with of 2.5V voltage, pin
16 will output high voltage, making the duty cycle of pin 12 higher, then the
energy storage of T3 increases, and voltage of C27 is higher. Contrarily, the
voltage of C27 is lower.
The pin 3 of U1 4800 is the detecting pin for PFC average voltage mode. The
minus voltage peak value on the pin 3 by R81 should not exceed 1V. Otherwise, the
Page 15

current is limited, and the 380V voltage of PFC will descend. Actually, the current
13
is limited when the peak value of this board is 0.7V. The pin 4 is a line voltage
detecting pin. It detects the input AC Voltage, and when the 264V voltage becomes
lower to about 80V, the amplifying ratio of the 4th pin is higher, and the duty
cycle of the pin 12 of FPC is higher, the current to the PFC is higher. So when
the input voltage decreases, the power output to C27 will not change. The pin 2
is power detecting pin. The purpose of this pin is:
1) It tries to make the frequency and phase of PFC switch current envelopment
same with input voltage’s, so the PF is close to 1 and the resonance waves are
smallest;
2) It decreases when the duty cycle of PFC increases, increases when detecting
current decreases.
3. When the TV is turned on and the PFC voltage of C27 reaches 380V 2-3%, the
switching power supply PWM begins to work, pin 5 of 4800 is turned on and begins
to charge, when charges to 0.7V, the PWM circuit begins to work, the duty cycle
of PWM cannot exceed 50% when stimulating positively, therefore the duty cycle
of 4800 is limited to 48%, in order to protect switching power. After this, pin
11 output switch pulse signal, makes the transformer T11 work. After rectificated
by D15, pin 6 and pin 7 of the transformer T11 provide a voltage supply, which
is between 13V and 17.5V. To pin 13 (VCC) of 4800, this positive stimulating
transformer just transform voltage. After rectificated by D16, T8 begins to store
energy, C49 filters and outputs 24V,
The 24V voltage regulation process is: 24V provides 2.5V voltage by voltage
division circuit made of R42、R43,then inputs 2.5V to U6, in TVL431, compares
with the internal norm voltage regulation source, when 24V output voltage is low,
U6 pulls down U5 light coupling voltage ,which pulls down the voltage of pin 6
in 4,800 accordingly, increases duty cycle of the pin 11(PWM), so the 24V output
power increases, resulting in the rising of 24V. Contrarily, it drops down.
There is another FS7M0880 switching power supply, when PFC voltage 380V rises,
pin 3(VCC) of U3 FS7M0880 begins to charge by R65, when VCC reaches 13 - 16V,
pin 5 electric capacity begins to charge and to work. Pin 5 and pin 6 of T12 output
voltage accordingly, supplies the power for VCC, the T11 output 5V, +/-12V voltage.
This switching power supply is regulated from 5V; the voltage regulation process
is the same with 24V’s.
5.2、Work Principle of SCALER board
1、SCALER board can: process all video signals; provide the display format which
is accordance with PANEL requirement; finish OSD display and menu operation;
communicate with mini MCU on IO board to receive the key signal and handle
correspondingly.
2、 Features of SCALER board:
The core of SCALER board is single chip PW106. After the outer signal enters
PW106, it is all up to this chip to finish the video decoding of all formats and
picture processing, and finally provide the PANEL-required display format and
Page 16

switch into LVDS signal to send it to PANEL for processing.
14
3、flow of main video signal process:
CVBS composite video signal of TUNER (including TUNER signal) and S-VIDEO signal
is output to PW106 of SCALER board via 2069 of IO board.
PW106 handles with the input video signal, such as resolution and field switch,
OSD overlapping, multi-window handling, to switch into PANEL-required resolution.
And LVDS channel transports the picture data to PANEL and finally the correct
picture is displayed on PANEL.
It should be noted that PW106 outputs analog video signal and the main transport
mode is difference transport mode. Therefore, when maintenance, not only‘+’
signal but also ‘-’signal of all video channels should be checked.
4、Flow of audio signal process:
Most of audio signals are processed on I/O board, while SCALER board only
processes the audio signal from HDMI. Because HDMI accepts the HD digital signal
input, its audio input should be digital signal, which is switched into analog audio
signal via WM8761. Then the processed analog audio signal is sent to IO board for
amplifying.
5、Flow of main system program
The loading program of PW106 is saved in the 8M flash chip. If the flash chip
is destroyed, TV can’t be powered on and logo can’t be displayed.
The program upgrading of FLASH can be done via the upgrading port of SCALER
board or IO board, as long as the power supply and FLASH and PW106 are normal.
It has nothing to do with DDR chip.
The running of PW106 depends on two DDR chips. If part of DDR circuit is
abnormal, then TV can be powered on and logo can be displayed, but TV doesn’t accept
any IR order once logo disappears.
6、Some other controls
For LCD PANEL, besides PW106 transporting LVDS signal to PANEL, it also: 1/.
suppliers power (LVDSVDD)to signal port of PANEL. The voltage is 5V or 12V,
which is up to the PANEL requirement; 2/. Controls the backlight of PANEL:
BKL-ON/OFF,which controls the On/Off of backlight of PANEL(above 1V=On,below
1V=Off),while BRT-ADJ controls the brightness of backlight.
When TV can’t display, it should be checked first if the backlight is on. If the
backlight is on, then check if LVDSVDD has voltage. If no voltage, then it is the
reason that the drive tube of voltage is destroyed. If LVDSVDD is OK, then please
check LVDS cable.
PW106 checks the status of earphone socket. When the earphone is inserted into
the earphone socket, the EAR-INT signal sent to PW106 will be high level. Then ,
PW106 will low down STANDBY signal, which connect the signal of control end of
amplifier chip LX1722. When the STANDBY signal is high level, then amplifier works;
otherwise, the amplifier enters the standby mode.
It should be noted that sometimes if the connector between mini I/O board and IO
board is lax or pulled off, then EAR-INT will be high level and speaker has no
voice output. Therefore, if maintain the TV with no-voice-output speaker, please
Page 17

check if the EAR-INT signal is abnormal, which is in order to avoid wasting time
15
on checking amplifier.
Regarding the connecting with IO board, it is important that I2C signal
connects with MCU (MCU-INT、SCL-MCU、SDA-MCU). If there is any problem with
the connecting, then the key and remote control work out.
5.3、Work Principle of I/O board
1、I/O board mainly: inputs & outputs AV signal, switches audio and video,
amplifies audio, control mini MCU and process key.
2、I/O board can be divided into three modules, a)audio module,to process,
switch and amplify audio;b)video module, to input & output video switch;c)
mini MCU module. When maintenance, if no sound, then the audio module has problem;
if no picture, then the video module has problem; if the remote control and keys
work out, then the MCU module has problem under the circumstance that IR&KEY board
is OK.
a)Audio module:is divided into small signal process and power amplification.
Small signal can be separated into: left & right audio analog signal. Analog audio
signal enters CX2069Q(UV401) via the following 7 channels: left & right audio
channels of AV2(S-VIDEO2), left & right audio signals of SCART1 & SCART2,
left & right signals of YPbPr,left & right signals of VGA,left & right audio
signals of HDMI sent by SCALER board and the audio signal switched from digital
TUNER. The above audio signals are switched via CXA2069Q,and sent together with
SIF signal from DVB board to TDA9875(UV505) for processing. TDA9875(UV505)
mainly decoding the audio channel of SIF signal and control the volume. After
processed by the chip, 4 routes of L & R signals are output from the output end
of the chip. Among them, two routes are output from SCART1 & SCART2 after filtered
by filter web; one is output from earphone after filtered and amplified by NJM4556;
the last one is output by speaker after processed by NJW1137(UV601)and amplified
by TPA3100(UV602).
During the whole process, UV401, UV601 and UV505 are controlled by I2C. If
the audio trouble is caused by UV401 and UV601, connect the signal via lead from
the input end of chip to output end to judge if the work is normal. If the video
trouble is caused by UV401, please judge in the same way. In the whole audio
channel, if audio output is normal, then MUTE signal is low level, otherwise,
high level.
b)Video module:four routes CVBS, one route S-VIDEO, one route RGB signal
and one route TV-CVBS signal. After switched by CXA2069Q(UV401), one route CVBS,
one route S-VIDEO and one route RGB are input to the corresponding analog input
ports of PW106 of SCALER board respectively. In addition, the YPbPr signal of I/O
board input into the corresponding analog input port of PW106. The last route is
VGA and HDMI. HDMI is directly input to the digital port of PW106, and the input
VGA signal is sent to PI5V330Q(U1) and separated into two routes: one is input
from the analog port of PW106, while one is input from the digital port of PW106
after switched by AD9985(U6) into digital signal. In this way, PIP function can
Page 18

be realized by one video IC.
16
c)Mini MCU module:remote and key signals receiving. The remote and key
signal receiving is dependent, but the processing modes in MCU are the same. If
the remote control and key both work out, then judge if the power supply and
peripheral circuit of MCU is normal. If only one works out, check if PIN21 of U202
IR or PIN26-28 has signal input.
Page 19

17
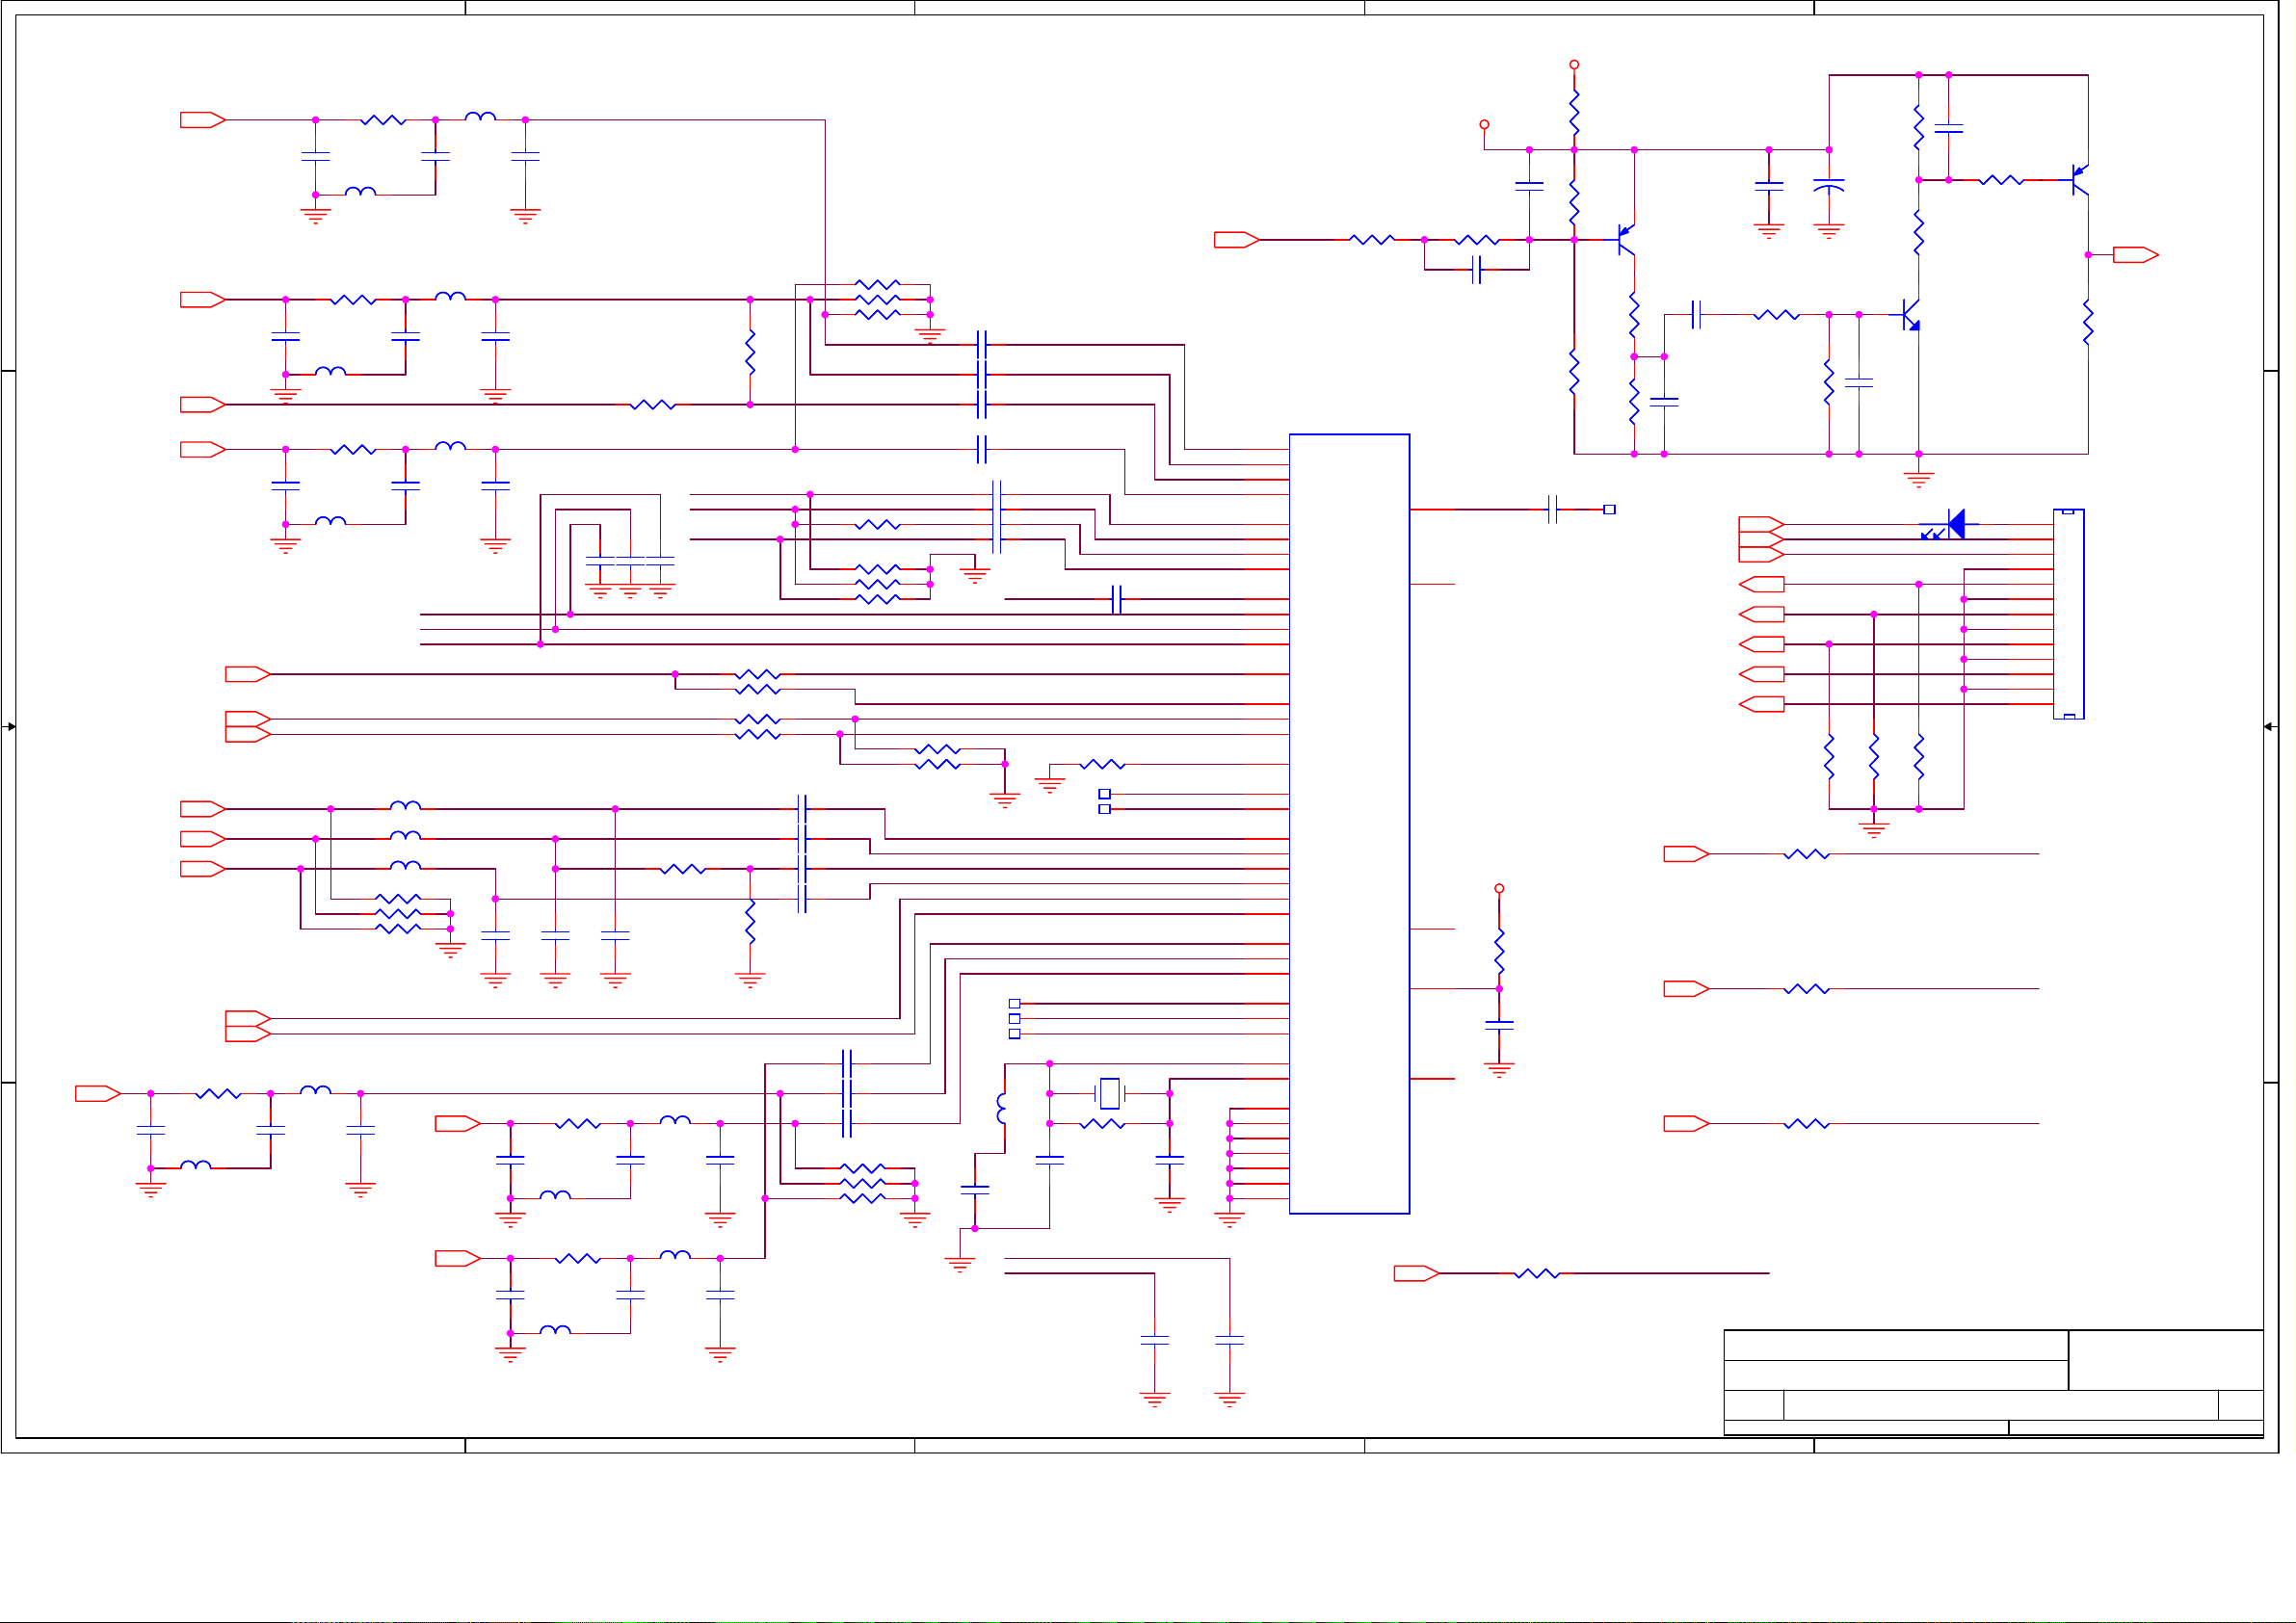
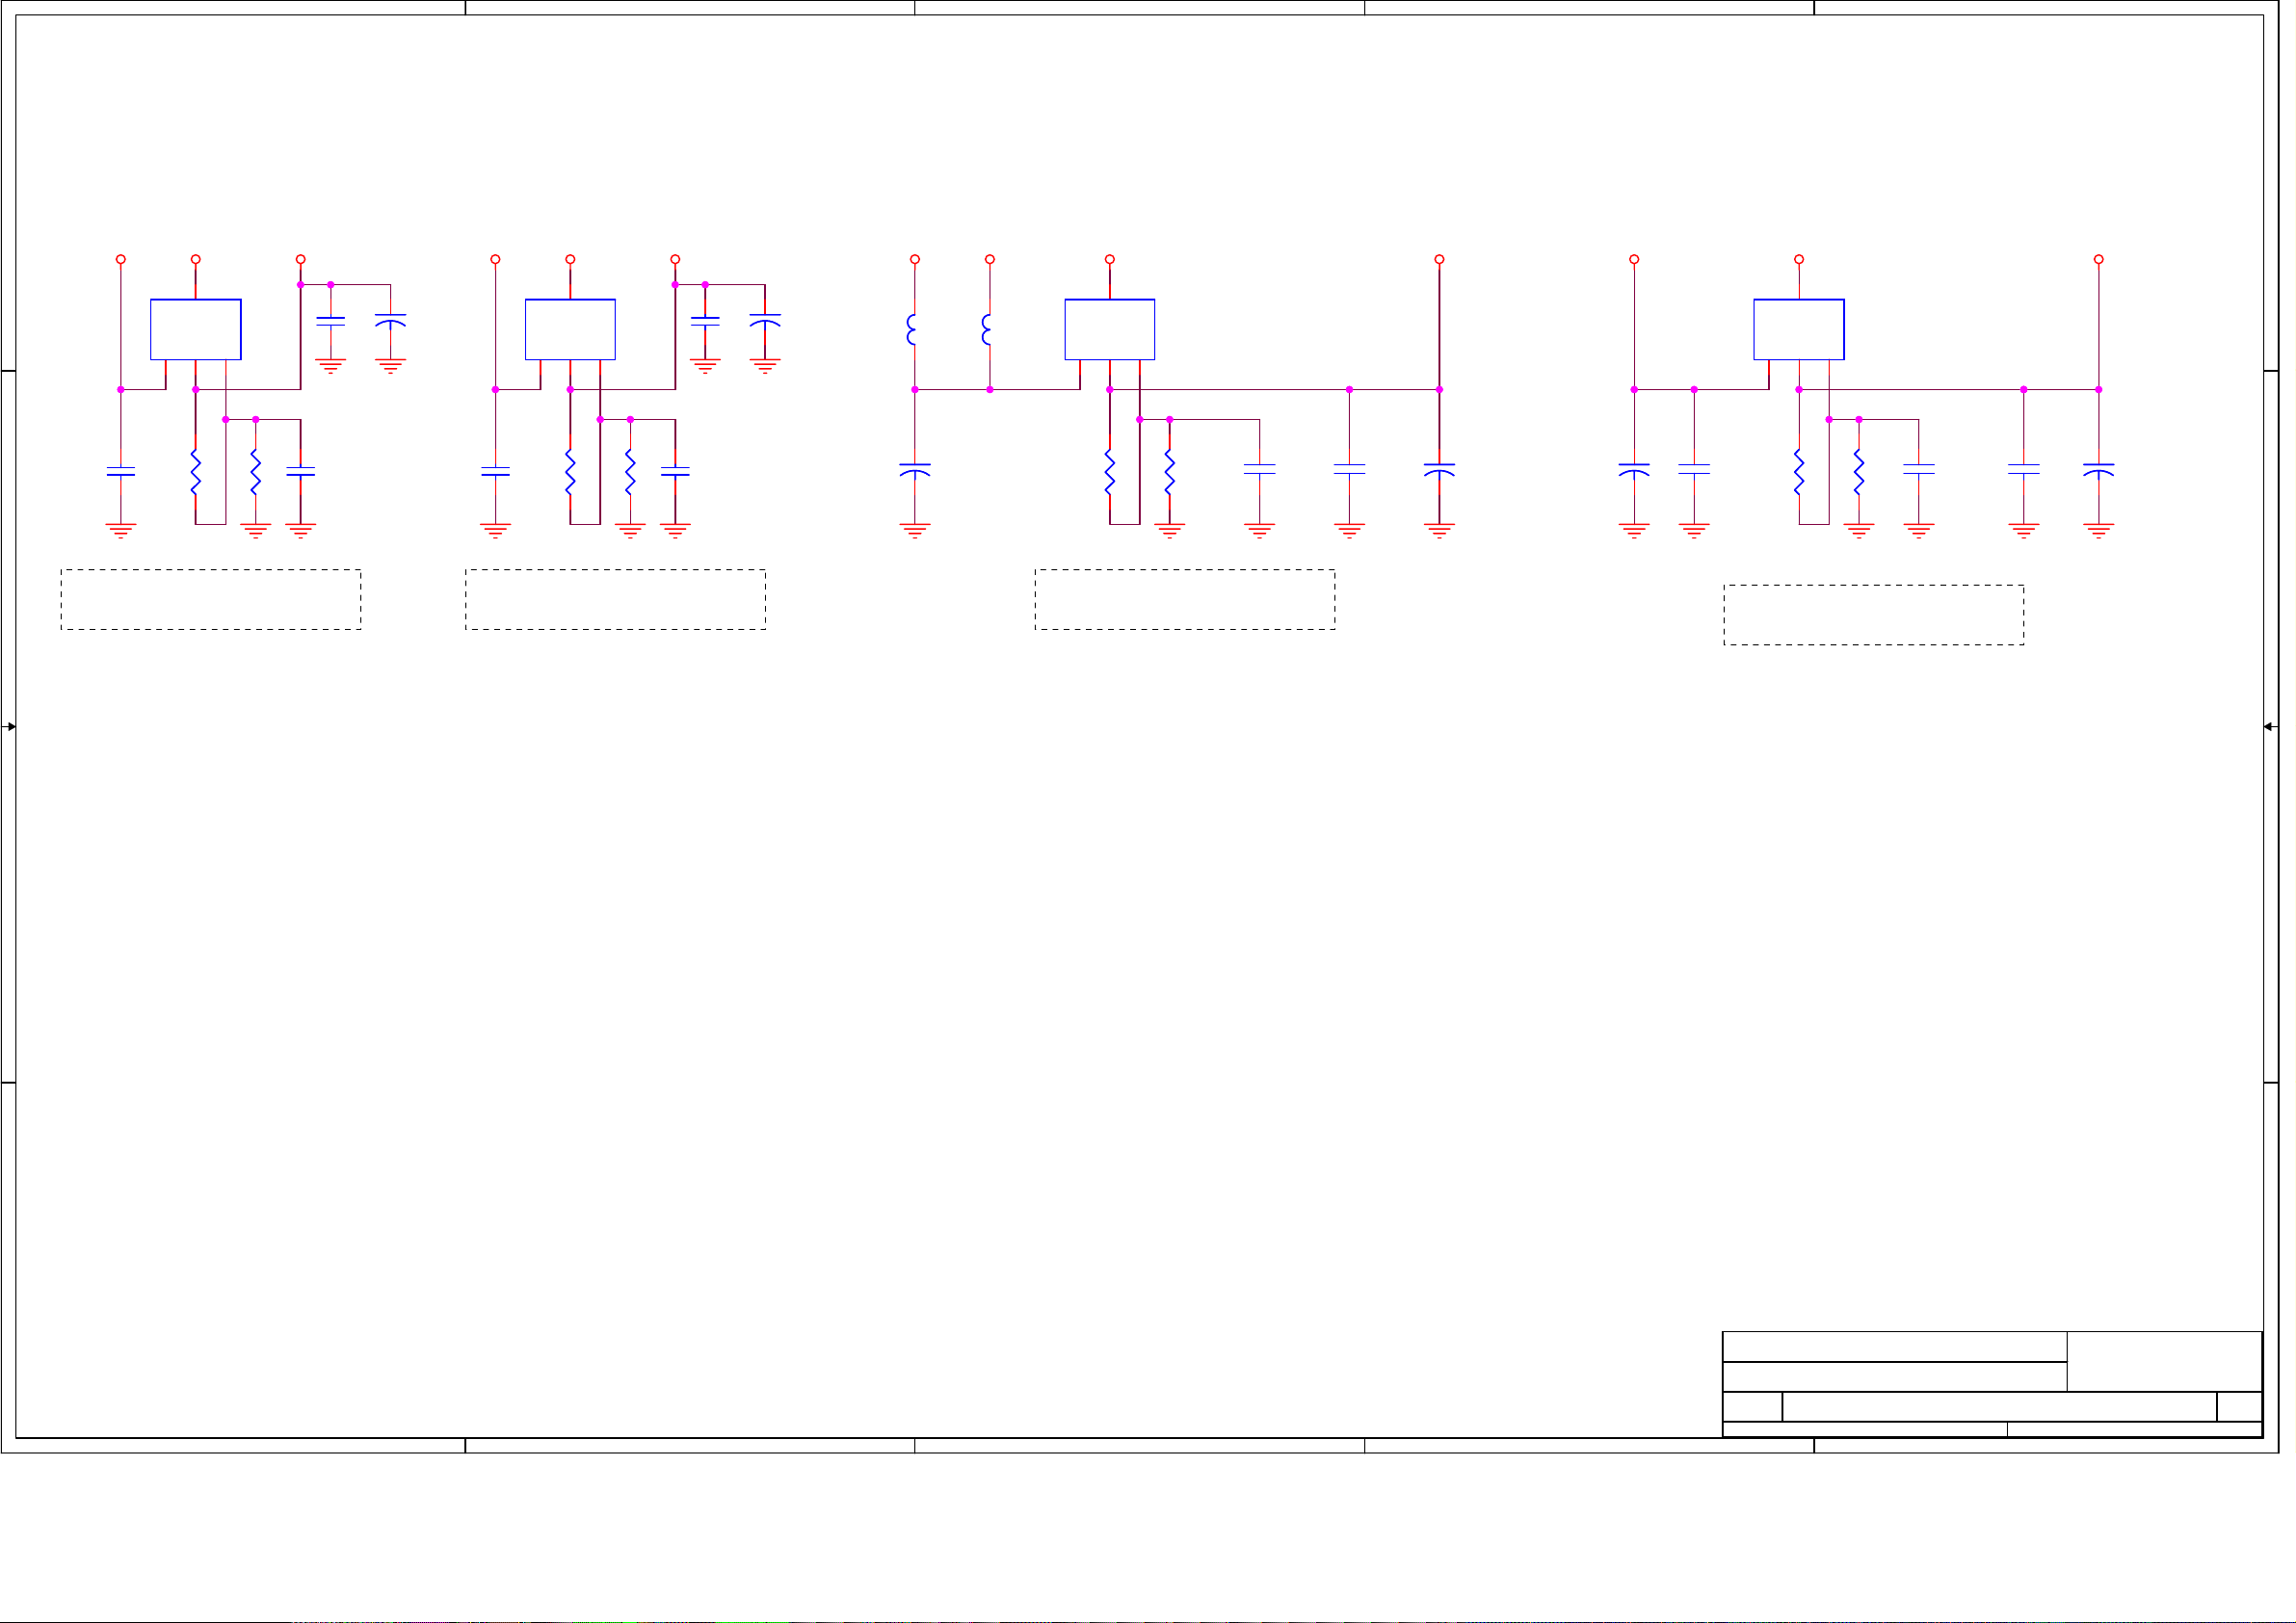
6.1.Schematic Diagrams
Scaler and I/O part for LC26T1E
Page 20
18
Page 21
5
19
4
3
VCC
2
1
C156
C156
470pF
470pF
C112
C112
0.1uF
0.1uF
R3460R346
R345
R345
56K
56K
1
R3483KR348
R349
R349
2
0
3K
4.7K
4.7K
23
TP2TP2
YM
PbM
S-CVBSINY-SOG2
Q3
3906Q33906
PrM
12
C162
C157
C157
0.1uF
0.1uF
C159
1 2
1 2
C159
0.1uF
0.1uF
C158
C158
1000pF
1000pF
DVD-IR
ASEL1
ASEL0
PrM
PbM
YM
DVD-R
DVD-L
R119 36R119 36
YM SCART2-Go
R120 36R120 36
PbM
R121 36R121 36
Pixelworks Shenzhen
Pixelworks Shenzhen
Pixelworks Shenzhen
Title
Title
Title
Size Document Number Rev
Size Document Number Rev
Size Document Number Rev
B
B
B
Date: Sheet
Date: Sheet
Date: Sheet
C162
22uF
22uF
R350
R350
12
1.8K
1.8K
Q4
Q4
MMBT3904
MMBT3904
R351
R351
2.2K
2.2K
ASEL1
ASEL0
PrM
PbM
YM
DVD-R
DVD-L
R9575R95
75
ANALOG INPUT PORT
ANALOG INPUT PORT
ANALOG INPUT PORT
1 2
R352
R352
R35310R353
1
22K
22K
10
C160
C160
5600pF
5600pF
R9675R96
75
SCART2-RoPrM
SCART2-Bo
C161
C161
1uF
1uF
1 2
R354
R354
12
1
22K
22K
3
R355
R355
2
D24A
D24A
PN
LED_NS
LED_NS
CONN RCPT 13
R9775R97
75
Confidential
Confidential
Confidential
CONN RCPT 13
OPAL SINGLE CHANNEL
OPAL SINGLE CHANNEL
OPAL SINGLE CHANNEL
4.7K
4.7K
J702
J702
1
1
2
2
3
3
4
4
5
5
6
6
7
7
8
8
9
9
10
10
11
11
12
12
13
13
1
23
Q5
3906Q53906
SYNC_DECT
8100 SW Nyberg Rd.
8100 SW Nyberg Rd.
8100 SW Nyberg Rd.
Tualatin, OR 97062
Tualatin, OR 97062
Tualatin, OR 97062
(503) 612-6700
(503) 612-6700
(503) 612-6700
112Friday, April 07, 2006
112Friday, April 07, 2006
112Friday, April 07, 2006
of
of
of
A
A
A
L14
L14
10nH
10nH
PR2
YP2
PB2
VGA-R
VGA-G
VGA-B
5
PR2
D D
YP2
Y-SOG2
PB2
C C
FB1
ASP1
ASP2
VGA-R
VGA-G
VGA-B
B B
VGA-HS
VGA-VS
YS1
YS1
A A
R116 36R116 36
C79
C79
270pF
270pF
C61
C61
270pF
270pF
R111 36R111 36
C64
C64
270pF
270pF
R112 36R112 36
C67
C67
270pF
270pF
FB1
ASP2
VGA-HS
VGA-VS
560nH
560nH
C80
C80
470pF
470pF
R110 36R110 36
L2
10nHL210nH
C65
C65
470pF
470pF
L4
10nHL410nH
C68
C68
470pF
470pF
L6
10nHL610nH
t-R1
t-T1
t-U1
FB_11_OHM_500MA
FB_11_OHM_500MA
L40
L40
FB_11_OHM_500MA
FB_11_OHM_500MA
L41
L41
FB_11_OHM_500MA
FB_11_OHM_500MA
L42
L42
R87 75R87 75
R88 75R88 75
R89 75R89 75
L15
L15
C81
C81
CS1
47pF
47pF
CVBS1
C62
C62
470pF
470pF
560nH
560nH
560nH
560nH
R1
T1
U1
L5
L5
L7
L7
L3
L3
560nH
560nH
C66
C66
47pF
47pF
C69
C69
47pF
47pF
C121
C121
12pF
12pF
CS1
CVBS1
C63
C63
47pF
47pF
RAIF
GAIFGAIF
BAIFBAIF
C122
C122
12pF
12pF
R117 36R117 36
C82
C82
270pF
270pF
L16
L16
10nH
10nH
R118 36R118 36
C85
C85
270pF
270pF
L18
L18
10nH
10nH
R74 for YPbPr
R73 for SCART
R73 75R73 75
C338
C338
C339
C337
C337
47pF
47pF
C339
47pF
47pF
47pF
47pF
R90 75R90 75
C123
C123
12pF
12pF
560nH
560nH
C83
C83
470pF
470pF
560nH
560nH
C86
C86
470pF
470pF
SMUXF1Y-SOG2
SCART2-Ro
SCART2-Go
SCART2-Bo
R82 0_NSR82 0_NS
R69 0R69 0
R105 10KR105 10K
R84 10KR84 10K
C117 .047uFC117 .047uF
C118 .047uFC118 .047uF
C119 0.1uFC119 0.1uF
C120 .047uFC120 .047uF
R9175R91
75
L17
L17
C84
C84
47pF
47pF
L19
L19
C87
C87
47pF
47pF
4
R70 75R70 75
R71 75R71 75
R72 75R72 75
R7475R74
75
R81 75R81 75
R78 75R78 75
R79 75R79 75
R80 75R80 75
C124 .047uFC124 .047uF
C125 .047uFC125 .047uF
C126 .047uFC126 .047uF
R94 75R94 75
R93 75R93 75
R92 75R92 75
R343
R343
560
U9B
U9B
RMUXIN0
GMUXIN0
SMUXIN0
BMUXIN0
RMUXOUT
RMUXIN1
GMUXIN1
SMUXIN1
BMUXIN1
BMUXOUT
RMUXIN2
GMUXIN2
SMUXIN2
BMUXIN2
FB
ASPECT0
ASPECT1
ASPECT2
REXT
HSYNCIN0
VS0
RAI1
GAI1
SOG1
BAI1
HSYNCIN1
VS1
AFETEST1
RAI2
GAI2
BAI2
AFETEST2
RAI3
GAI3
BAI3
ADCXIN
ADCXOUT
TESTCLK
AISO0
AISO1
AISO2
AISO3
AISO4
PLLISO0
PLLISO1
PW106
PW106
Y-SOG2
560
CVBS1
CVBS1
C103
C103
.047uF
.047uF
C104
C104
.047uF
.047uF
C105
C105
0.1uF
0.1uF
C106
C106
.047uF
.047uF
C113 .047uFC113 .047uF
C114 .047uFC114 .047uF
SMUXF2 DVD-IR
C115 0.1uFC115 0.1uF
C116 .047uFC116 .047uF
S-CVBSIN
C127 .047uFC127 .047uF
RMIN0
GMIN0
SMIN0
BMIN0
RMIN1
GMIN1
SMIN1
BMIN1
R5
T5
U5
V5
R3
T3
U3
V3
P1
R1
T1
U1
AD11
P2
P4
P5
P6
AD6
AF11
Y1
Y3
AA2
AB3
AC7
AE11
AC2
AD1
AD3
AE2
AF1
AE4
AF5
AE6
U2
U4
W1
Y2
AC1
AD5
AC6
C72
C72
0.1uF
0.1uF
R83 3.9KR83 3.9K
R85 3.9KR85 3.9K
CVBS2CVBS2
YS2YS2
CS2CS2
L1
L1
27uH_NS
27uH_NS
C131
C131
220pF_NS
220pF_NS
R86 22KR86 22K
TP28TP28
TP29TP29
Y2 XTAL 27.000Y2 XTAL 27.000
1 2
R100 1.5MR100 1.5M
C129
C129
33pF
33pF
VS0
HS0
HS0
VS0
ASPC1ASP1
ASPC2
REXT
RAI1
GAI1
SOG1
BAI1
HSYNC
VSYNC
RAI2
GAI2
BAI2
RAI3CVBS2
GAI3YS2
BAI3CS2
XIN1
XOUT1
C130
C130
33pF
33pF
C71
C71
0.1uF
0.1uF
3
W2
W4
AE1
AE3
AE7
SYNC-DE-5V
R344
R344
560K
560K
1 2
ARMUX
V18ab
R146 36R146 36
12
C155
C155
1uF
1uF
R99
R99
13k
13k
C97
C97
12
R3471MR347
1M
0.1uF
0.1uF
Page 22
5
20
D D
V18AVCC V18A V33AVCC V33A VCC V25 V25V18V18V33VCC
U20
Vin
3
U20
4
LM1117-1.8
LM1117-1.8
Vo4
ADJ
Vo2
1
2
C276
C276
0.1uF
0.1uF
12
C277
C277
47uF
47uF
Vin
3
U21
U21
4
LM1117-3.3
LM1117-3.3
Vo4
ADJ
Vo2
1
2
V33AADJ V25SWADJV20SWADJV18AADJ
4
12
C279
C278
C278
0.1uF
0.1uF
C279
47uF
47uF
L64AL64A
L65AL65A
3
3
U23
U23
4
LM1086-1.8_TO263
LM1086-1.8_TO263
Vo4
ADJ
Vo2
Vin
1
2
2
U18
U18
4
LM1117-2.5
LM1117-2.5
Vo4
ADJ
Vo2
Vin
1
2
3
1
C286
C286
0.1uF
0.1uF
C C
R228=4.7K, R229=1.8K, C287=0.1uf
if LM1117-ADJ is stuffed ;
B B
R2280_NS R2280_NS
R2290 R2290
C287
C287
0.1uF_NS
0.1uF_NS
C288
C288
0.1uF
0.1uF
R230=2.2K, R231=3.3K, C289=0.1uF
if LM1117-ADJ is stuffed ;
R2300_NS R2300_NS
R2310 R2310
C289
C289
0.1uF_NS
0.1uF_NS
C292
C292
100uF
100uF
12
R234
R234
0_NS
0_NS
R234=3.3K, R235=1.8K, C294=0.1uF
if LM1086-ADJ is stuffed ;
R2350R235
0
C294
C294
0.1uF_NS
0.1uF_NS
C295
C295
0.1uF
0.1uF
12
C296
C296
100uF
100uF
C270
C270
470uF
470uF
12
C271
C271
R223
R223
0.1uF
0.1uF
0_NS
0_NS
R223=4.7K, R224=3.9K, C272=0.1uF
if LM1117-ADJ is stuffed ;
R2240R224
0
C272
C272
0.1uF_NS
0.1uF_NS
C273
C273
0.1uF
0.1uF
12
C274
C274
470uF
470uF
A A
Confidential
Confidential
Pixelworks Shenzhen
Pixelworks Shenzhen
Pixelworks Shenzhen
Title
Title
Title
Size Document Number Rev
Size Document Number Rev
Size Document Number Rev
Date: Sheet
Date: Sheet
5
4
3
2
Date: Sheet
CORE POWER
CORE POWER
CORE POWER
B
B
B
Confidential
OPAL SINGLE CHANNEL
OPAL SINGLE CHANNEL
OPAL SINGLE CHANNEL
1
8100 SW Nyberg Rd.
8100 SW Nyberg Rd.
8100 SW Nyberg Rd.
Tualatin, OR 97062
Tualatin, OR 97062
Tualatin, OR 97062
(503) 612-6700
(503) 612-6700
(503) 612-6700
212Friday, April 07, 2006
212Friday, April 07, 2006
212Friday, April 07, 2006
of
of
of
A
A
A
Page 23
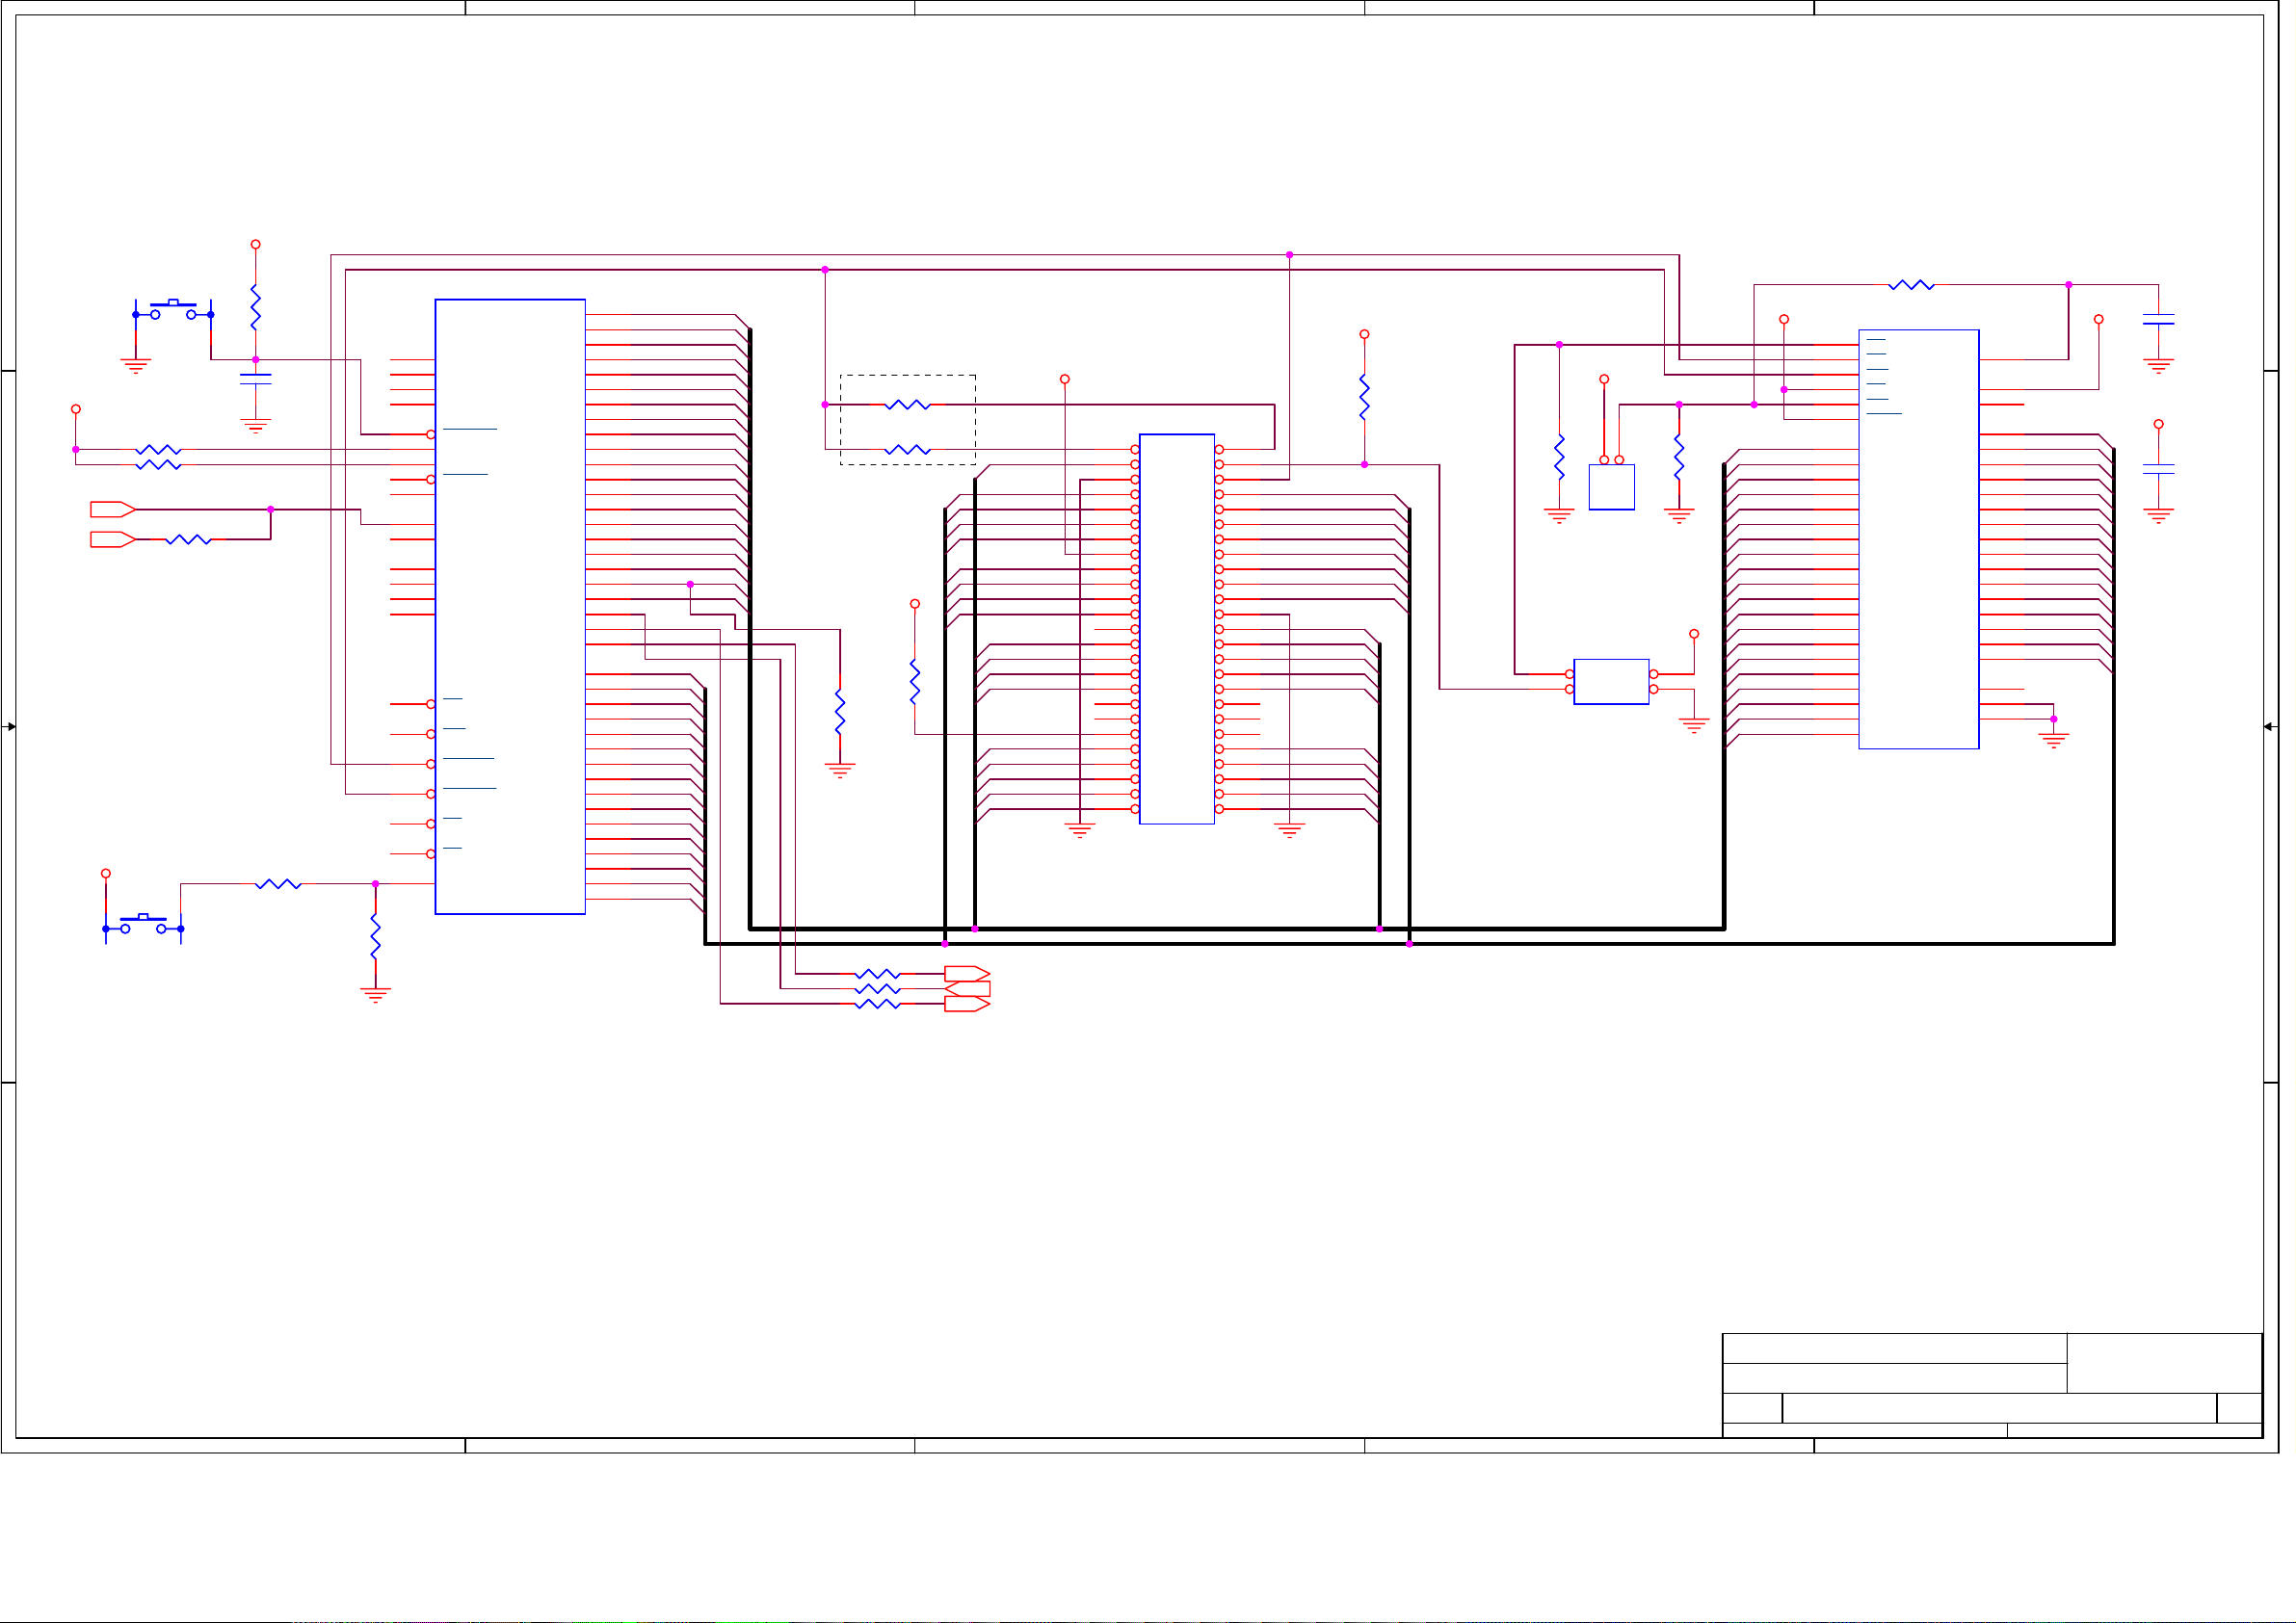
5
21
D D
4
3
2
1
NMI1
R191 10KR191 10K
SW2
SW2
SW_MOM_4P
SW_MOM_4P
V33
R179
R179
10K
10K
C187
C187
1uF
1uF
EXTRSTEN
ADR24B
RSTn
NMI
AC8
AE10
AD9
AF10
AD8
AC20
AD17
AE18
AD16
AF17
AC19
AE17
AF18
AD18
AE26
R192
R192
100K
100K
AF9
AE9
AE8
AB8
AA8
AF8
AF7
TMS
TDO
TDI
TCK
RESETB
EXTRSTEN
ADR24B
TRSTN
EXTMCLK
EXTINT0
EXTINT1
TESTMODE0
TESTMODE1
TESTMODE2
SCANMODE
U9D
U9D
PW106
PW106
CPU
CPU
RD
WR
ROMOE
ROMWE
CS0
CS1
NMI
A1
A2
A3
A4
A5
A6
A7
A8
A9
A10
A11
A12
A13
A14
A15
A16
A17
A18
A19
A20
A21
A22
A23
D0
D1
D2
D3
D4
D5
D6
D7
D8
D9
D10
D11
D12
D13
D14
D15
A1
AC15
A2
AE16
A3
AF16
A4
AC16
A5
AD15
A6
AE15
A7
AC14
A8
AF15
A9
AD14
A10
AC12
A11
AE14
A12
AC13
A13
AF14
A14
AD13
A15
AE13
AF13
A17 D8
AC10
A18
AC11
A19
AD12
A20
AE12
AF12
AC9
AD10
D0
AE24
D1
AC23
D2
AD24
D3
AE23
D4
AF26
D5
AC22
D6
AD23
D7
AE22
D8
AF25
D9
AE21
D10
AD22
D11
AC21
D12
AF24
D13
AF23
D14
AD20
D15
AD21
DO NOT STUFF
R182 0_NSR182 0_NS
R183 0_NSR183 0_NS
R189
R189
3.3K
3.3K
R190
R190
1.8K
1.8K
A[20:1]
D[15:0]
R188 100_NSR188 100_NS
R193 1KR193 1K
R197 10K_NSR197 10K_NS
SW1
SW1
SW_MOM_4P
SW_MOM_4P
RESET
1 2
V33
R186 100R186 100
R187 100R187 100
UPINT
FB1
C C
B B
UPINT
R194 100R194 100
V33
NMI
1 2
V33
ROMOEn
ROMWEn
V33
ICEWELn
ICEWEHn
A1
D0
D1
D2
D3
D12
D13
D14
D15
A15
A13
A11
A9
IRPn
A19
A8
A6
A4
A2
PANEL_CTR2
SYNC_DECT
PANEL_CTR1
J11
J11
1
1
3
3
5
5
7
7
9
9
111112
131314
151516
171718
191920
212122
232324
252526
272728
292930
313132
333334
353536
373738
393940
414142
434344
454546
474748
494950
HDR_RA,25x2
HDR_RA,25x2
2
2
4
4
6
6
8
8
10
10
12
14
16
18
20
22
24
26
28
30
32
34
36
38
40
42
44
46
48
50
Debugger Header
ICEn
D8
D9
D10
D11A16
D4
D5
D6
D7
A17
A16
A14
A12
A10
A20
A18
A7
A5
A3
V33
R181
R181
3.3K
3.3K
R184
R184
10K
10K
J5
J5
1
4
FCEn
V33
2
JUMPER
JUMPER
J12
J12
1
4
HDR_2X2
HDR_2X2
R185
R185
10K
10K
112
2
3
R1781KR178
1K
U13
U13
26
CE
28
OE
11
WE
12
FWPn
A1
A2
A3
A4
A5
A6
A7
A8
A9
A10
A11
A12
V33
2
3
A13
A14
A15
A16
A17
A18
A19
A20
14
47
25
24
23
22
21
20
19
18
8
7
6
5
4
3
2
1
48
17
16
9
RP
WP
BYTE
A0
A1
A2
A3
A4
A5
A6
A7
A8
A9
A10
A11
A12
A13
A14
A15
A16
A17
A18
A19
FLASH_16M
FLASH_16M
VPP
VCC
NC0
D1
D2
D3
D4
D5
D6
D7
D8
D9
D10
D11
D12
D13
D14
D15
D16
NC1
GND1
GND2
13
37
10
29
31
33
35
38
40
42
44
30
32
34
36
39
41
43
45
15
46
27
FVPP
D0
D1
D2
D3
D4
D5
D6
D7
D9
D10
D11
D12
D13
D14
D15
V33V33
V33
C153
C153
0.1uF
0.1uF
C154
C154
0.1uF
0.1uF
A A
Confidential
Confidential
Pixelworks Shenzhen
Pixelworks Shenzhen
Pixelworks Shenzhen
Title
Title
Title
Size Document Number Rev
Size Document Number Rev
Size Document Number Rev
Date: Sheet
Date: Sheet
5
4
3
2
Date: Sheet
CPU
CPU
CPU
B
B
B
Confidential
OPAL SINGLE CHANNEL
OPAL SINGLE CHANNEL
OPAL SINGLE CHANNEL
1
8100 SW Nyberg Rd.
8100 SW Nyberg Rd.
8100 SW Nyberg Rd.
Tualatin, OR 97062
Tualatin, OR 97062
Tualatin, OR 97062
(503) 612-6700
(503) 612-6700
(503) 612-6700
312Tuesday, May 23, 2006
312Tuesday, May 23, 2006
312Tuesday, May 23, 2006
of
of
of
A
A
A
Page 24
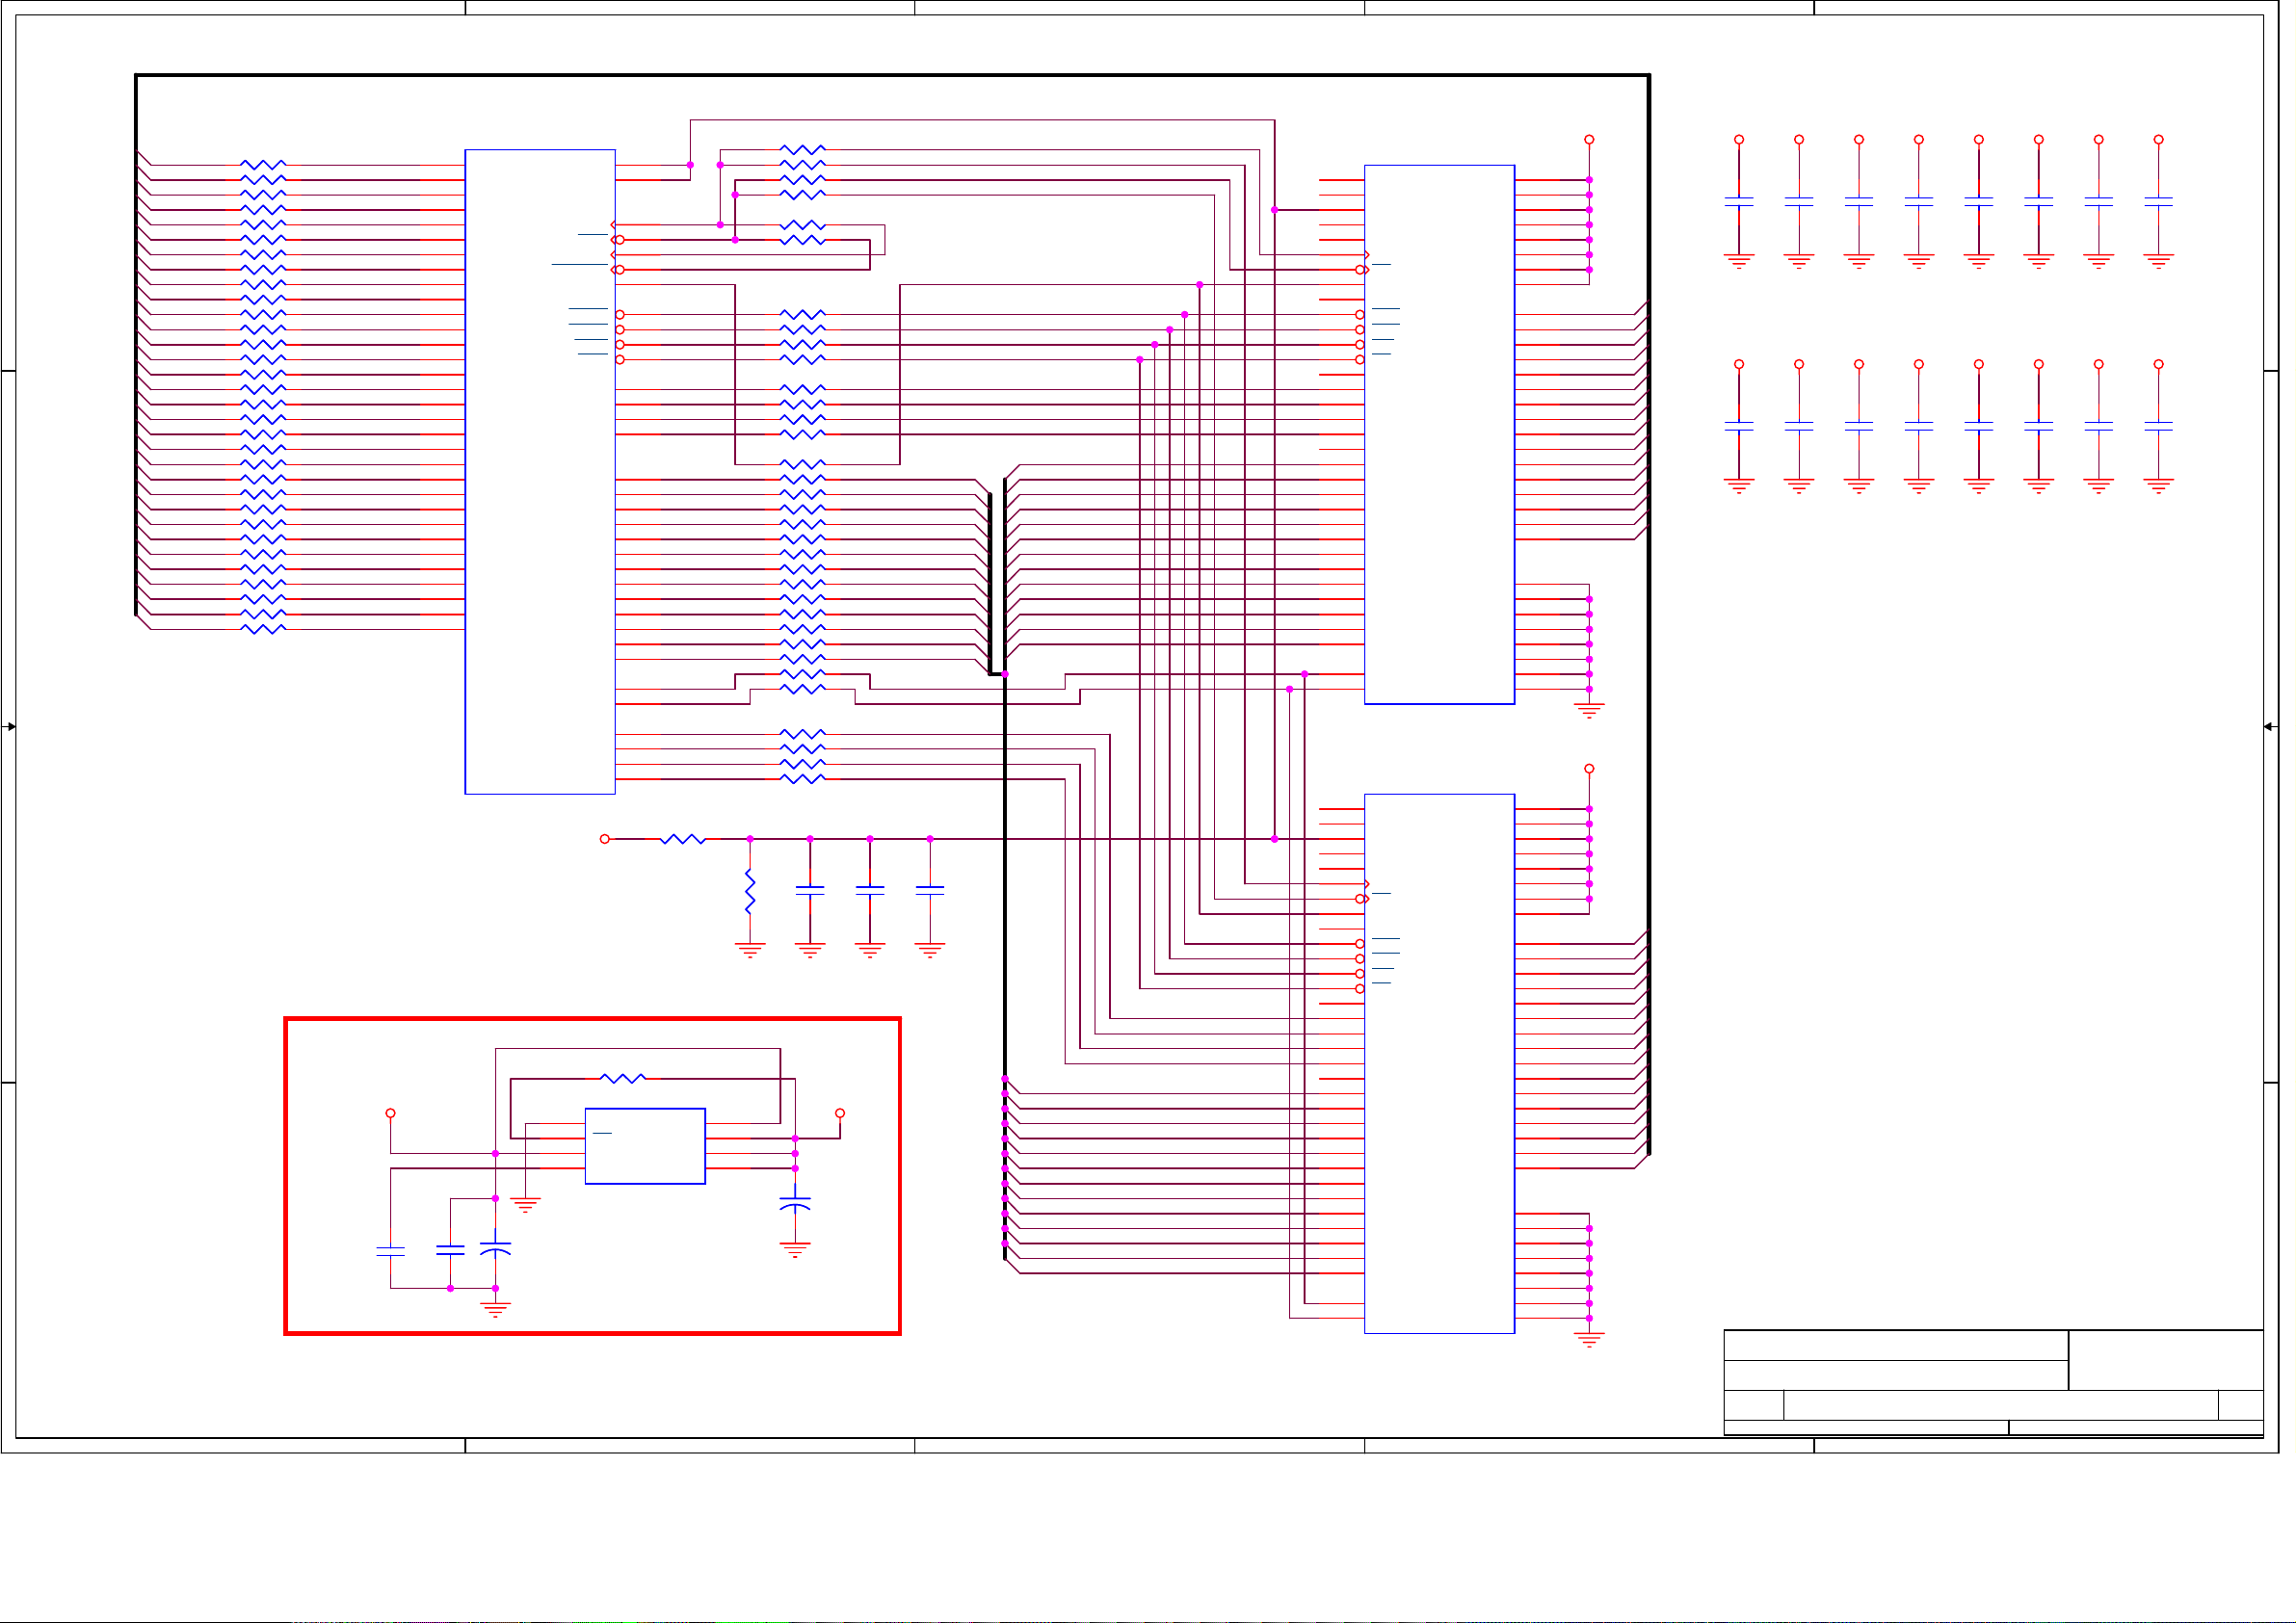
RMD[31:0]
22
5
4
3
2
1
V25
1
18
33
3
9
15
55
61
RMD0
2
RMD1
4
RMD2
5
RMD3
7
RMD4
8
RMD5
10
RMD6
11
RMD7
13
RMD8
54
RMD9
56
RMD10
57
RMD11
59
RMD12
60
RMD13
62
RMD14
63
RMD15
65
34
48
66
6
12
52
58
64
V25
1
18
33
3
9
15
55
61
RMD16
2
RMD17
4
RMD18
5
RMD19
7
RMD20
8
RMD21
10
RMD22
11
RMD23
13
RMD24
54
RMD25
56
RMD26
57
RMD27
59
RMD28
60
RMD29
62
RMD30
63
RMD31
65
34
48
66
6
12
52
58
64
2
C152
C152
0.1uF
0.1uF
RMCK0
RMCK1
RMCK0n
RMCK1n
RMCKE
RMRASn
RMCASn
RMWEn
RMCSn
RMDM0
RMDM1
RMDQS0
RMDQS1
RMA0
RMA1
RMA2
RMA3
RMA4
RMA5
RMA6
RMA7
RMA8
RMA9
RMA10
RMA11
RMA12
RMBK0
RMBK1
RMDM2
RMDM3
RMDQS2
RMDQS3
RMA0
RMA1
RMA2
RMA3
RMA4
RMA5
RMA6
RMA7
RMA8
RMA9
RMA10
RMA11
RMA12
RMA[12:0]RMA[12:0]RMA[12:0]RMA[12:0]RMA[12:0]RMA[12:0]RMA[12:0]RMA[12:0]
RMA[12:0]RMA[12:0]RMA[12:0]RMA[12:0]RMA[12:0]RMA[12:0]RMA[12:0]RMA[12:0]RMA[12:0]RMA[12:0]RMA[12:0]RMA[12:0]RMA[12:0]RMA[12:0]RMA[12:0]RMA[12:0]RMA[12:0]RMA[12:0]RMA[12:0]RMA[12:0]RMA[12:0]RMA[12:0]RMA[12:0]RMA[12:0]RMA[12:0]
RMA0
RMA1
RMA2
RMA3
RMA4
RMA5
RMA6
RMA7
RMA8
RMA9
RMA10
RMA11
RMA12
U11
U11
14
NC0
17
NC1
49
VREF
19
NC2
25
NC3
45
CK
46
CK
44
CKE
43
NC4
23
RAS
22
CAS
21
WE
24
CS
50
NC5
20
LDM
47
UDM
16
LDQS
51
UDQS
53
NC6
29
A0
30
A1
31
A2
32
A3
35
A4
36
A5
37
A6
38
A7
39
A8
40
A9
28
A10/AP
41
A11
42
A12
26
BA0
27
BA1
DDR400_SDRAM_256M
DDR400_SDRAM_256M
U12
U12
14
NC0
17
NC1
49
VREF
19
NC2
25
NC3
45
CK
46
CK
44
CKE
43
NC4
23
RAS
22
CAS
21
WE
24
CS
50
NC5
20
LDM
47
UDM
16
LDQS
51
UDQS
53
NC6
29
A0
30
A1
31
A2
32
A3
35
A4
36
A5
37
A6
38
A7
39
A8
40
A9
28
A10/AP
41
A11
42
A12
26
BA0
27
BA1
DDR400_SDRAM_256M
DDR400_SDRAM_256M
3
VDD1
VDD2
VDD3
VDDQ1
VDDQ2
VDDQ3
VDDQ4
VDDQ5
DQ0
DQ1
DQ2
DQ3
DQ4
DQ5
DQ6
DQ7
DQ8
DQ9
DQ10
DQ11
DQ12
DQ13
DQ14
DQ15
VSS1
VSS2
VSS3
VSSQ1
VSSQ2
VSSQ3
VSSQ4
VSSQ5
VDD1
VDD2
VDD3
VDDQ1
VDDQ2
VDDQ3
VDDQ4
VDDQ5
DQ0
DQ1
DQ2
DQ3
DQ4
DQ5
DQ6
DQ7
DQ8
DQ9
DQ10
DQ11
DQ12
DQ13
DQ14
DQ15
VSS1
VSS2
VSS3
VSSQ1
VSSQ2
VSSQ3
VSSQ4
VSSQ5
RMD0 MD0
RP36-4 22Ω*4RP36-4 22Ω*4
RMD1 MD1
RP36-3 22Ω*4RP36-3 22Ω*4
D D
C C
B B
A A
RP36-2 22Ω*4RP36-2 22Ω*4
RMD3
RP36-1 22Ω*4RP36-1 22Ω*4
RMD4
RP37-4 22Ω*4RP37-4 22Ω*4
RMD5
RP37-3 22Ω*4RP37-3 22Ω*4
RMD6
RP37-2 22Ω*4RP37-2 22Ω*4
RMD7
RP37-1 22Ω*4RP37-1 22Ω*4
RMD8
RP38-1 22Ω*4RP38-1 22Ω*4
RMD9
RP38-2 22Ω*4RP38-2 22Ω*4
RMD10
RP38-3 22Ω*4RP38-3 22Ω*4
RMD11
RP38-4 22Ω*4RP38-4 22Ω*4
RMD12
RP40-4 22Ω*4RP40-4 22Ω*4
RMD13
RP40-3 22Ω*4RP40-3 22Ω*4
RMD14
RP40-2 22Ω*4RP40-2 22Ω*4
RMD15
RP40-1 22Ω*4RP40-1 22Ω*4
RMD16
RP42-1 22Ω*4RP42-1 22Ω*4
RMD17
RP42-2 22Ω*4RP42-2 22Ω*4
RMD18
RP42-3 22Ω*4RP42-3 22Ω*4
RMD19
RP42-4 22Ω*4RP42-4 22Ω*4
RMD20
RP43-3 22Ω*4RP43-3 22Ω*4
RMD21
RP43-4 22Ω*4RP43-4 22Ω*4
RMD22
RP50-4 22Ω*4RP50-4 22Ω*4
RMD23
RP50-3 22Ω*4RP50-3 22Ω*4
RMD24
RP45-3 22Ω*4RP45-3 22Ω*4
RMD25
RP45-4 22Ω*4RP45-4 22Ω*4
RMD26
RP43-1 22Ω*4RP43-1 22Ω*4
RMD27
RP43-2 22Ω*4RP43-2 22Ω*4
RMD28
RP47-4 22Ω*4RP47-4 22Ω*4
RMD29
RP47-3 22Ω*4RP47-3 22Ω*4
RMD30
RP47-2 22Ω*4RP47-2 22Ω*4
RMD31
RP47-1 22Ω*4RP47-1 22Ω*4
5
CB122
CB122
0.1uF
0.1uF
CC0603N
CC0603N
MD2RMD2
MD3
MD4
MD5
MD6
MD7
MD8
MD9
MD10
MD11
MD12
MD13
MD14
MD15
MD16
MD17
MD18
MD19
MD20
MD21
MD22
MD23
MD24
MD25
MD26
MD27
MD28
MD29MD29
MD30
MD31
D1V25
D1V25
CB123
CB123
0.1uF
0.1uF
1 2
CC0603N
CC0603N
H23
F26
G25
H24
H25
J24
H26
K23
J25
K24
J26
K25
L24
L25
N22
M24
V22
V23
Y26
W24
W23
Y24
AB26
Y23
AA24
AB25
AC26
AA23
AC24
AB23
AD25
AE25
MVREF
MD0
MD1
MD2
MD3
MD4
MD5
MD6
MD7
MD8
MD9
MD10
KD11
MD12
MD13
MD14
MD15
MD16
MD17
MD18
MD19
MD20
MD21
MD22
MD23
MD24
MD25
MD26
MD27
MD28
MD29
MD30
MD31
12
MREFIN0
MREFIN1
MCKFBK
MCKFBK
U9G
U9G
MDQS0
MDQS1
PW106
PW106
Main
Main
Memory
Memory
Port
Port
12
+
+
MBNK0
MBNK1
MDQS2
MDQS3
V25
1
2
3
IC LP2996 DDR Termination SOP8
IC LP2996 DDR Termination SOP8
CE36
CE36
220uF/16V
220uF/16V
THA-CPR250-600X1200N
THA-CPR250-600X1200N
L26
V25
T26
MCK
T25
MCK
R23
T22
M26
MCKE
N25
MRAS
N24
MCAS
N23
MWE
R24
MCS
G26
MDM0
K26
MDM1
L22
M22
R25
MA0
N26
MA1
V26
MA2
P22
MA3
U24
MA4
P23
MA5
U25
MA6
P24
MA7
U22
MA8
P25
MA9
T23
MA10
R26
MA11
T24
MA12
V24
W26
Y25
MDM2
AB24
MDM3
AA26
AC25
R217
R217
1 2
4.7k
4.7k
RC0603N
RC0603N
U26
U26
GND
SD
VSENSE
VREF4VDDQ
R176
R176
1.00K
1.00K
NC
RP35-1 22Ω*4RP35-1 22Ω*4
RP35-3 22Ω*4RP35-3 22Ω*4
RP35-2 22Ω*4RP35-2 22Ω*4
RP35-4 22Ω*4RP35-4 22Ω*4
MCK
MCKn
MCKFBK
MCKFBKn
MCKE
MRASn
MCASn
MWEn
MCSn
MDM0
MDM1
MDQS0
MDQS1
MA0
MA1
MA2
MA3
MA4
MA5
MA6
MA7
MA8
MA9
MA10
MA11
MA12
MBNK0
MBNK1
MDM2
MDM3
MDQS2
MDQS3
1.00K
1.00K
VTT
PVIN
AVIN
4
R174 22R174 22
R175 22R175 22
RP44-3 22Ω*4RP44-3 22Ω*4
RP44-2 22Ω*4RP44-2 22Ω*4
RP46-1 22Ω*4RP46-1 22Ω*4
RP48-3 22Ω*4RP48-3 22Ω*4
RP41-1 22Ω*4RP41-1 22Ω*4
RP41-3 22Ω*4RP41-3 22Ω*4
RP41-2 22Ω*4RP41-2 22Ω*4
RP41-4 22Ω*4RP41-4 22Ω*4
RP44-1 22Ω*4RP44-1 22Ω*4
RP48-4 22Ω*4RP48-4 22Ω*4
RP44-4 22Ω*4RP44-4 22Ω*4
RP49-4 22Ω*4RP49-4 22Ω*4
RP39-2 22Ω*4RP39-2 22Ω*4
RP49-1 22Ω*4RP49-1 22Ω*4
RP46-2 22Ω*4RP46-2 22Ω*4
RP49-2 22Ω*4RP49-2 22Ω*4
RP48-1 22Ω*4RP48-1 22Ω*4
RP39-3 22Ω*4RP39-3 22Ω*4
RP48-2 22Ω*4RP48-2 22Ω*4
RP39-1 22Ω*4RP39-1 22Ω*4
RP46-3 22Ω*4RP46-3 22Ω*4
RP46-4 22Ω*4RP46-4 22Ω*4
RP49-3 22Ω*4RP49-3 22Ω*4
RP39-4 22Ω*4RP39-4 22Ω*4
RP50-1 22Ω*4RP50-1 22Ω*4
RP45-1 22Ω*4RP45-1 22Ω*4
RP50-2 22Ω*4RP50-2 22Ω*4
RP45-2 22Ω*4RP45-2 22Ω*4
R177
R177
8
7
6
5
MVREF
C151
C150
C150
0.1uF
0.1uF
C151
0.1uF
0.1uF
V25
12
CE35
CE35
+
+
47uF/16V
47uF/16V
THA-CPR250-600X1200N
THA-CPR250-600X1200N
V25 V25 V25 V25 V25 V25 V25 V25
C136
C135
C134
C134
0.1uF
0.1uF
C142
C142
0.1uF
0.1uF
C135
0.1uF
0.1uF
V25 V25 V25 V25 V25 V25 V25 V25
C143
C143
0.1uF
0.1uF
Pixelworks Shenzhen
Pixelworks Shenzhen
Pixelworks Shenzhen
Title
Title
Title
Size Document Number Rev
Size Document Number Rev
Size Document Number Rev
B
B
B
Date: Sheet
Date: Sheet
Date: Sheet
C136
0.1uF
0.1uF
0.1uF
0.1uF
C145
C144
C144
0.1uF
0.1uF
DDR SDRAM
DDR SDRAM
DDR SDRAM
C145
0.1uF
0.1uF
C137
C137
0.1uF
0.1uF
C146
C146
0.1uF
0.1uF
Confidential
Confidential
Confidential
C140
C138
C138
C139
C139
0.1uF
0.1uF
C147
C147
0.1uF
0.1uF
OPAL SINGLE CHANNEL
OPAL SINGLE CHANNEL
OPAL SINGLE CHANNEL
C140
0.1uF
0.1uF
C148
C148
0.1uF
0.1uF
8100 SW Nyberg Rd.
8100 SW Nyberg Rd.
8100 SW Nyberg Rd.
Tualatin, OR 97062
Tualatin, OR 97062
Tualatin, OR 97062
(503) 612-6700
(503) 612-6700
(503) 612-6700
412Friday, April 07, 2006
412Friday, April 07, 2006
1
412Friday, April 07, 2006
0.1uF
0.1uF
C149
C149
0.1uF
0.1uF
C141
C141
A
A
A
of
of
of
Page 25
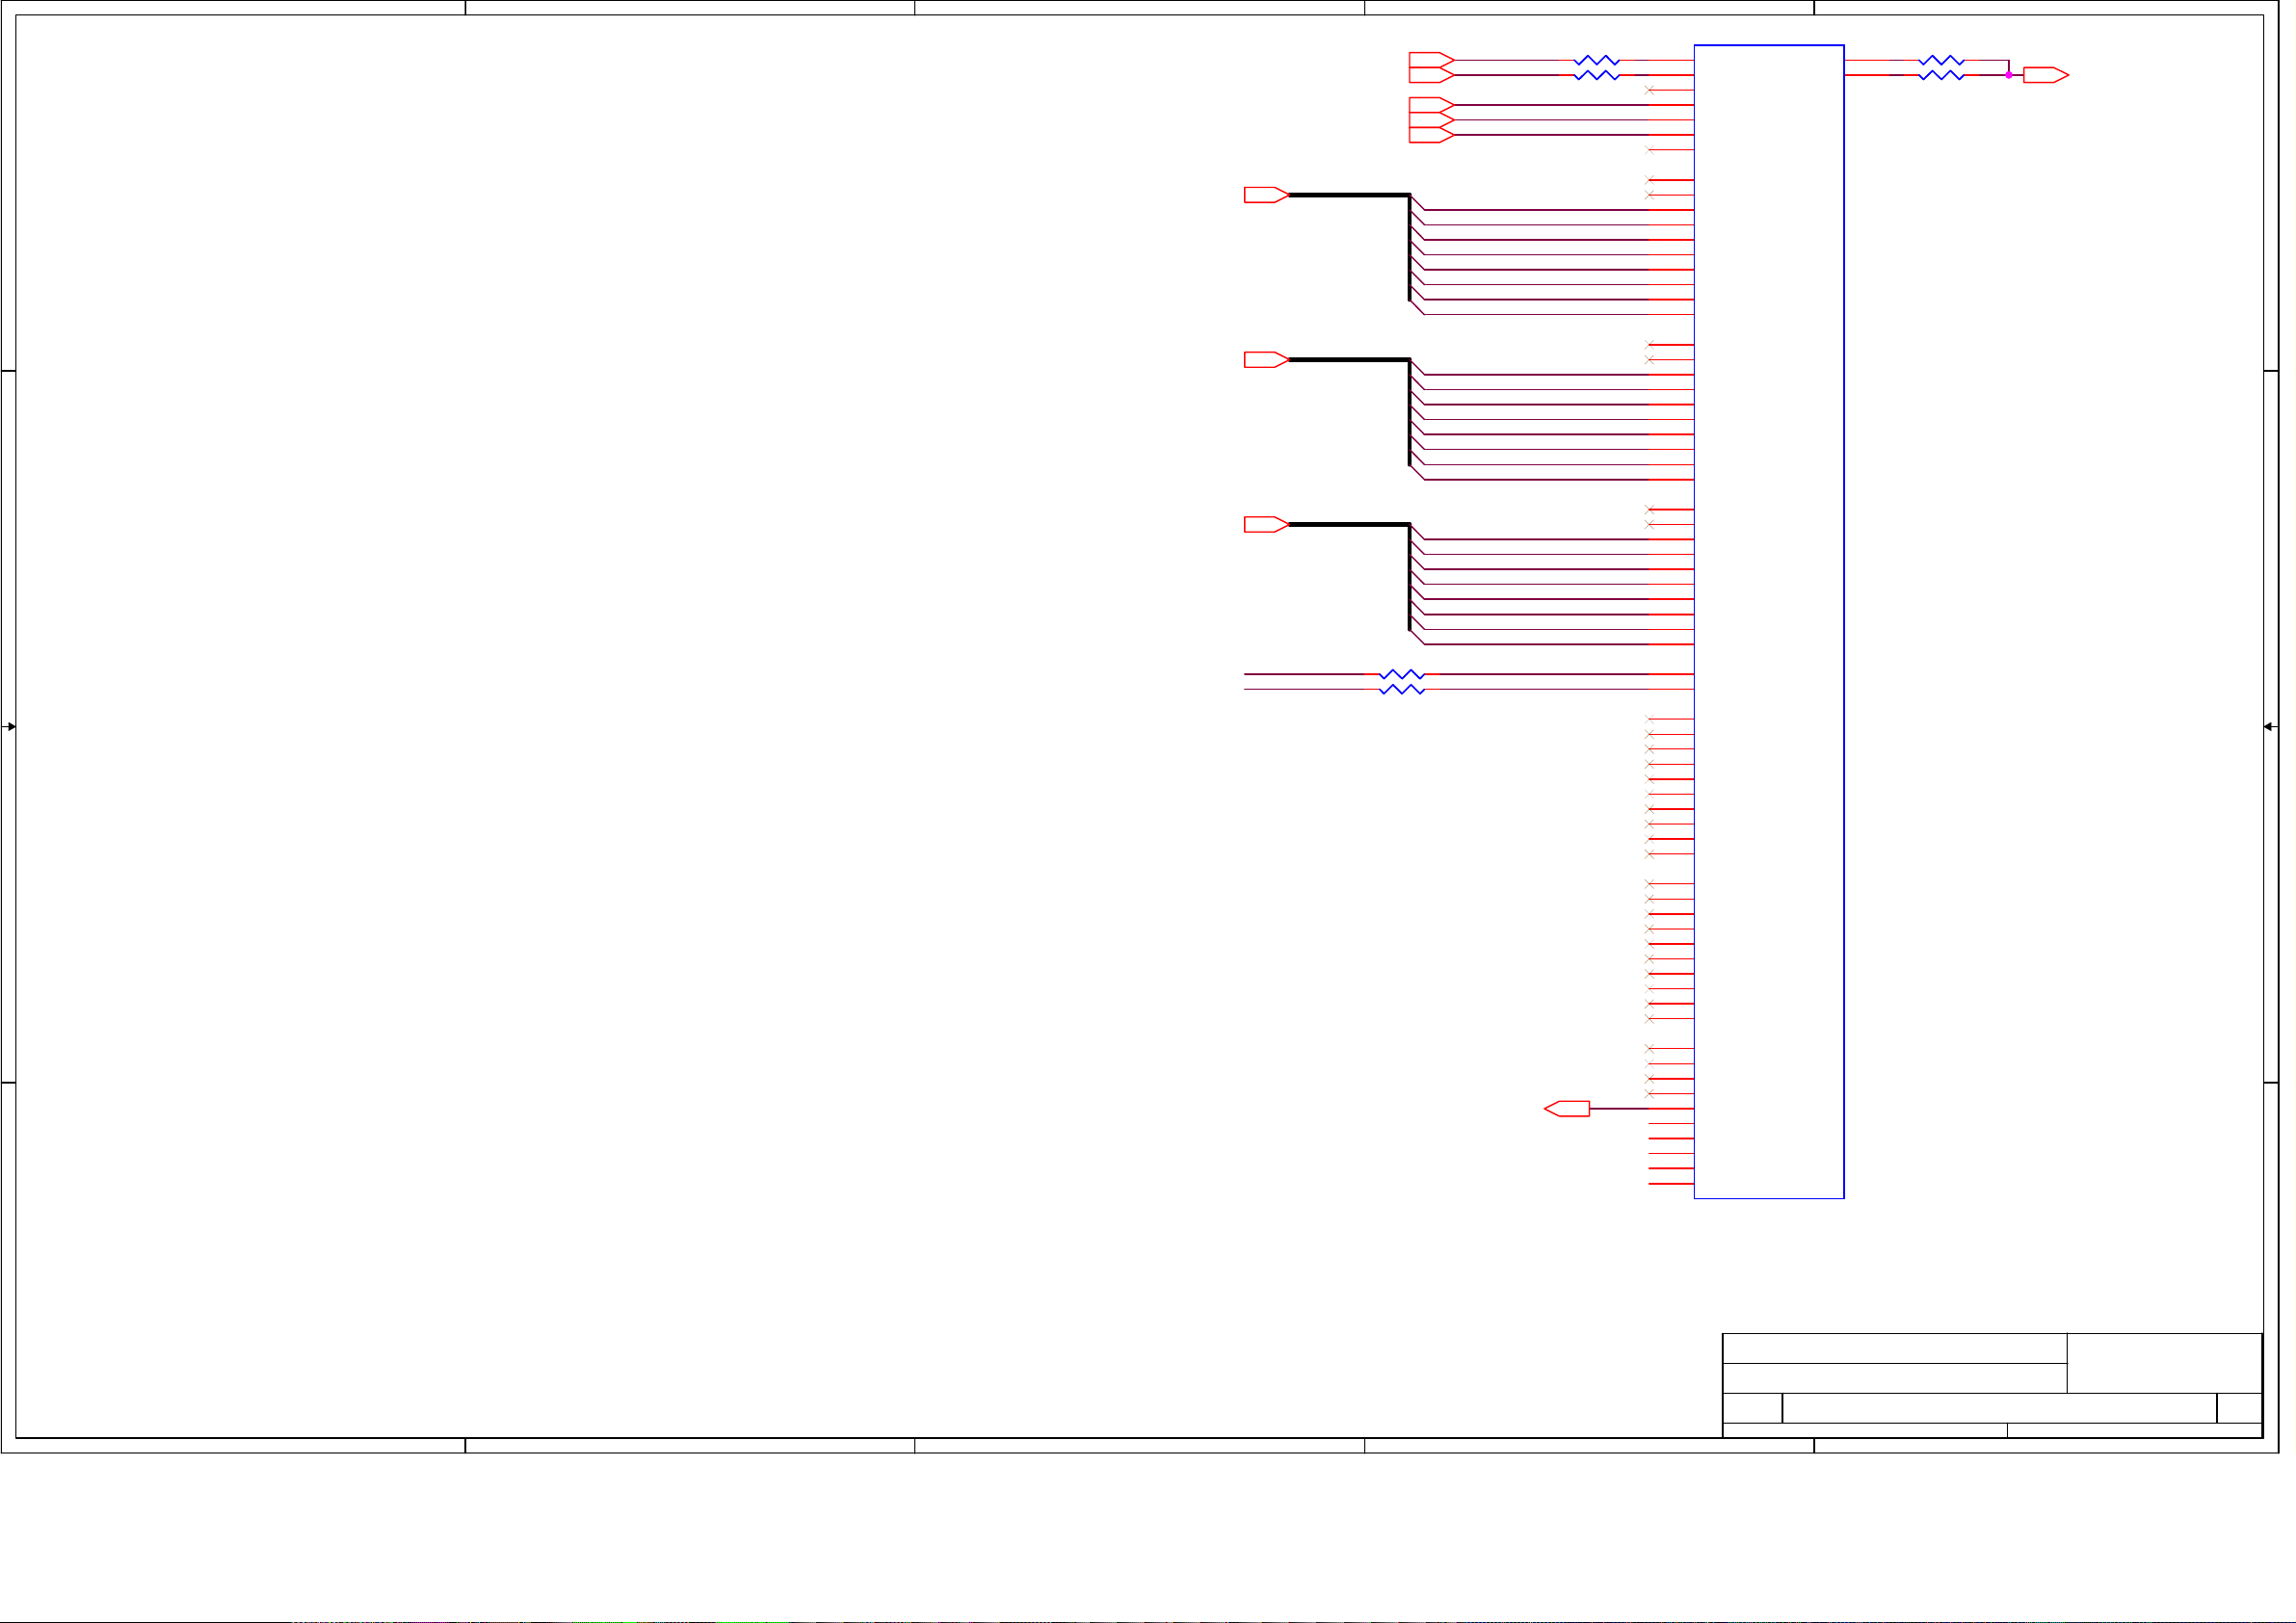
5
23
D D
C C
B B
4
3
IN0RE[9:2]
IN0GE[9:2]
IN0BE[9:2]
IN0CLK
IN0PEN
IN0CLK
IN0PEN
IN0AHS
IN0HS
IN0VS
R103 0_NSR103 0_NS
R104 0_NSR104 0_NS
IN0CLKIN0CLK
IN0PENIN0PEN
IN0AHS
IN0HS
IN0VS
IN0RE2
IN0RE3
IN0RE4
IN0RE5
IN0RE6
IN0RE7
IN0RE8
IN0RE9
IN0GE2
IN0GE3
IN0GE4
IN0GE5
IN0GE6
IN0GE7
IN0GE8
IN0GE9
IN0BE2
IN0BE3
IN0BE4
IN0BE5
IN0BE6
IN0BE7
IN0BE8
IN0BE9
ROTATION
2
R101 0R101 0
R102 0R102 0
C3
D4
E6
C4
B3
A2
D5
A9
D10
B9
A8
E13
C9
E12
B8
D9
A7
C8
B7
E11
A6
E10
D8
E9
C7
E8
B6
A5
C6
B5
A4
D7
A3
D6
B4
E7
C5
K3
K4
B1
C2
E5
D3
E4
C1
D2
E3
D1
E2
F4
F3
E1
F2
F5
G3
F1
G2
G5
G1
G4
H3
H2
H1
H4
H5
J4
J3
J2
J1
IN0CLK
IN0PEN
IN0VBI
IN0AHS
IN0HS
IN0VS
IN0FLD
IN0R0
IN0R1
IN0R2
IN0R3
IN0R4
IN0R5
IN0R6
IN0R7
IN0R8
IN0R9
IN0G0
IN0G1
IN0G2
IN0G3
IN0G4
IN0G5
IN0G6
IN0G7
IN0G8
IN0G9
IN0B0
IN0B1
IN0B2
IN0B3
IN0B4
IN0B5
IN0B6
IN0B7
IN0B8
IN0B9
IN1CLK
IN1PEN
IN1R0
IN1R1
IN1R2
IN1R3
IN1R4
IN1R5
IN1R6
IN1R7
IN1R8
IN1R9
IN1G0
IN1G1
IN1G2
IN1G3
IN1G4
IN1G5
IN1G6
IN1G7
IN1G8
IN1G9
IN1B0
IN1B1
IN1B2
IN1B3
IN1B4
IN1B5
IN1B6
IN1B7
IN1B8
IN1B9
U9A
U9A
PW106
PW106
Digital
Digital
Input
Input
Port
Port
IN0CLP
IN0CST
R67 100R67 100
A1
R68 100R68 100
B2
1
COAST
A A
Confidential
Confidential
Pixelworks Shenzhen
Pixelworks Shenzhen
Pixelworks Shenzhen
Title
Title
Title
Size Document Number Rev
Size Document Number Rev
Size Document Number Rev
Date: Sheet
Date: Sheet
5
4
3
2
Date: Sheet
DIGITAL INPUT PORT and I/O INPUT
DIGITAL INPUT PORT and I/O INPUT
DIGITAL INPUT PORT and I/O INPUT
B
B
B
Confidential
OPAL SINGLE CHANNEL
OPAL SINGLE CHANNEL
OPAL SINGLE CHANNEL
1
8100 SW Nyberg Rd.
8100 SW Nyberg Rd.
8100 SW Nyberg Rd.
Tualatin, OR 97062
Tualatin, OR 97062
Tualatin, OR 97062
(503) 612-6700
(503) 612-6700
(503) 612-6700
512Friday, April 07, 2006
512Friday, April 07, 2006
512Friday, April 07, 2006
of
of
of
A
A
A
Page 26
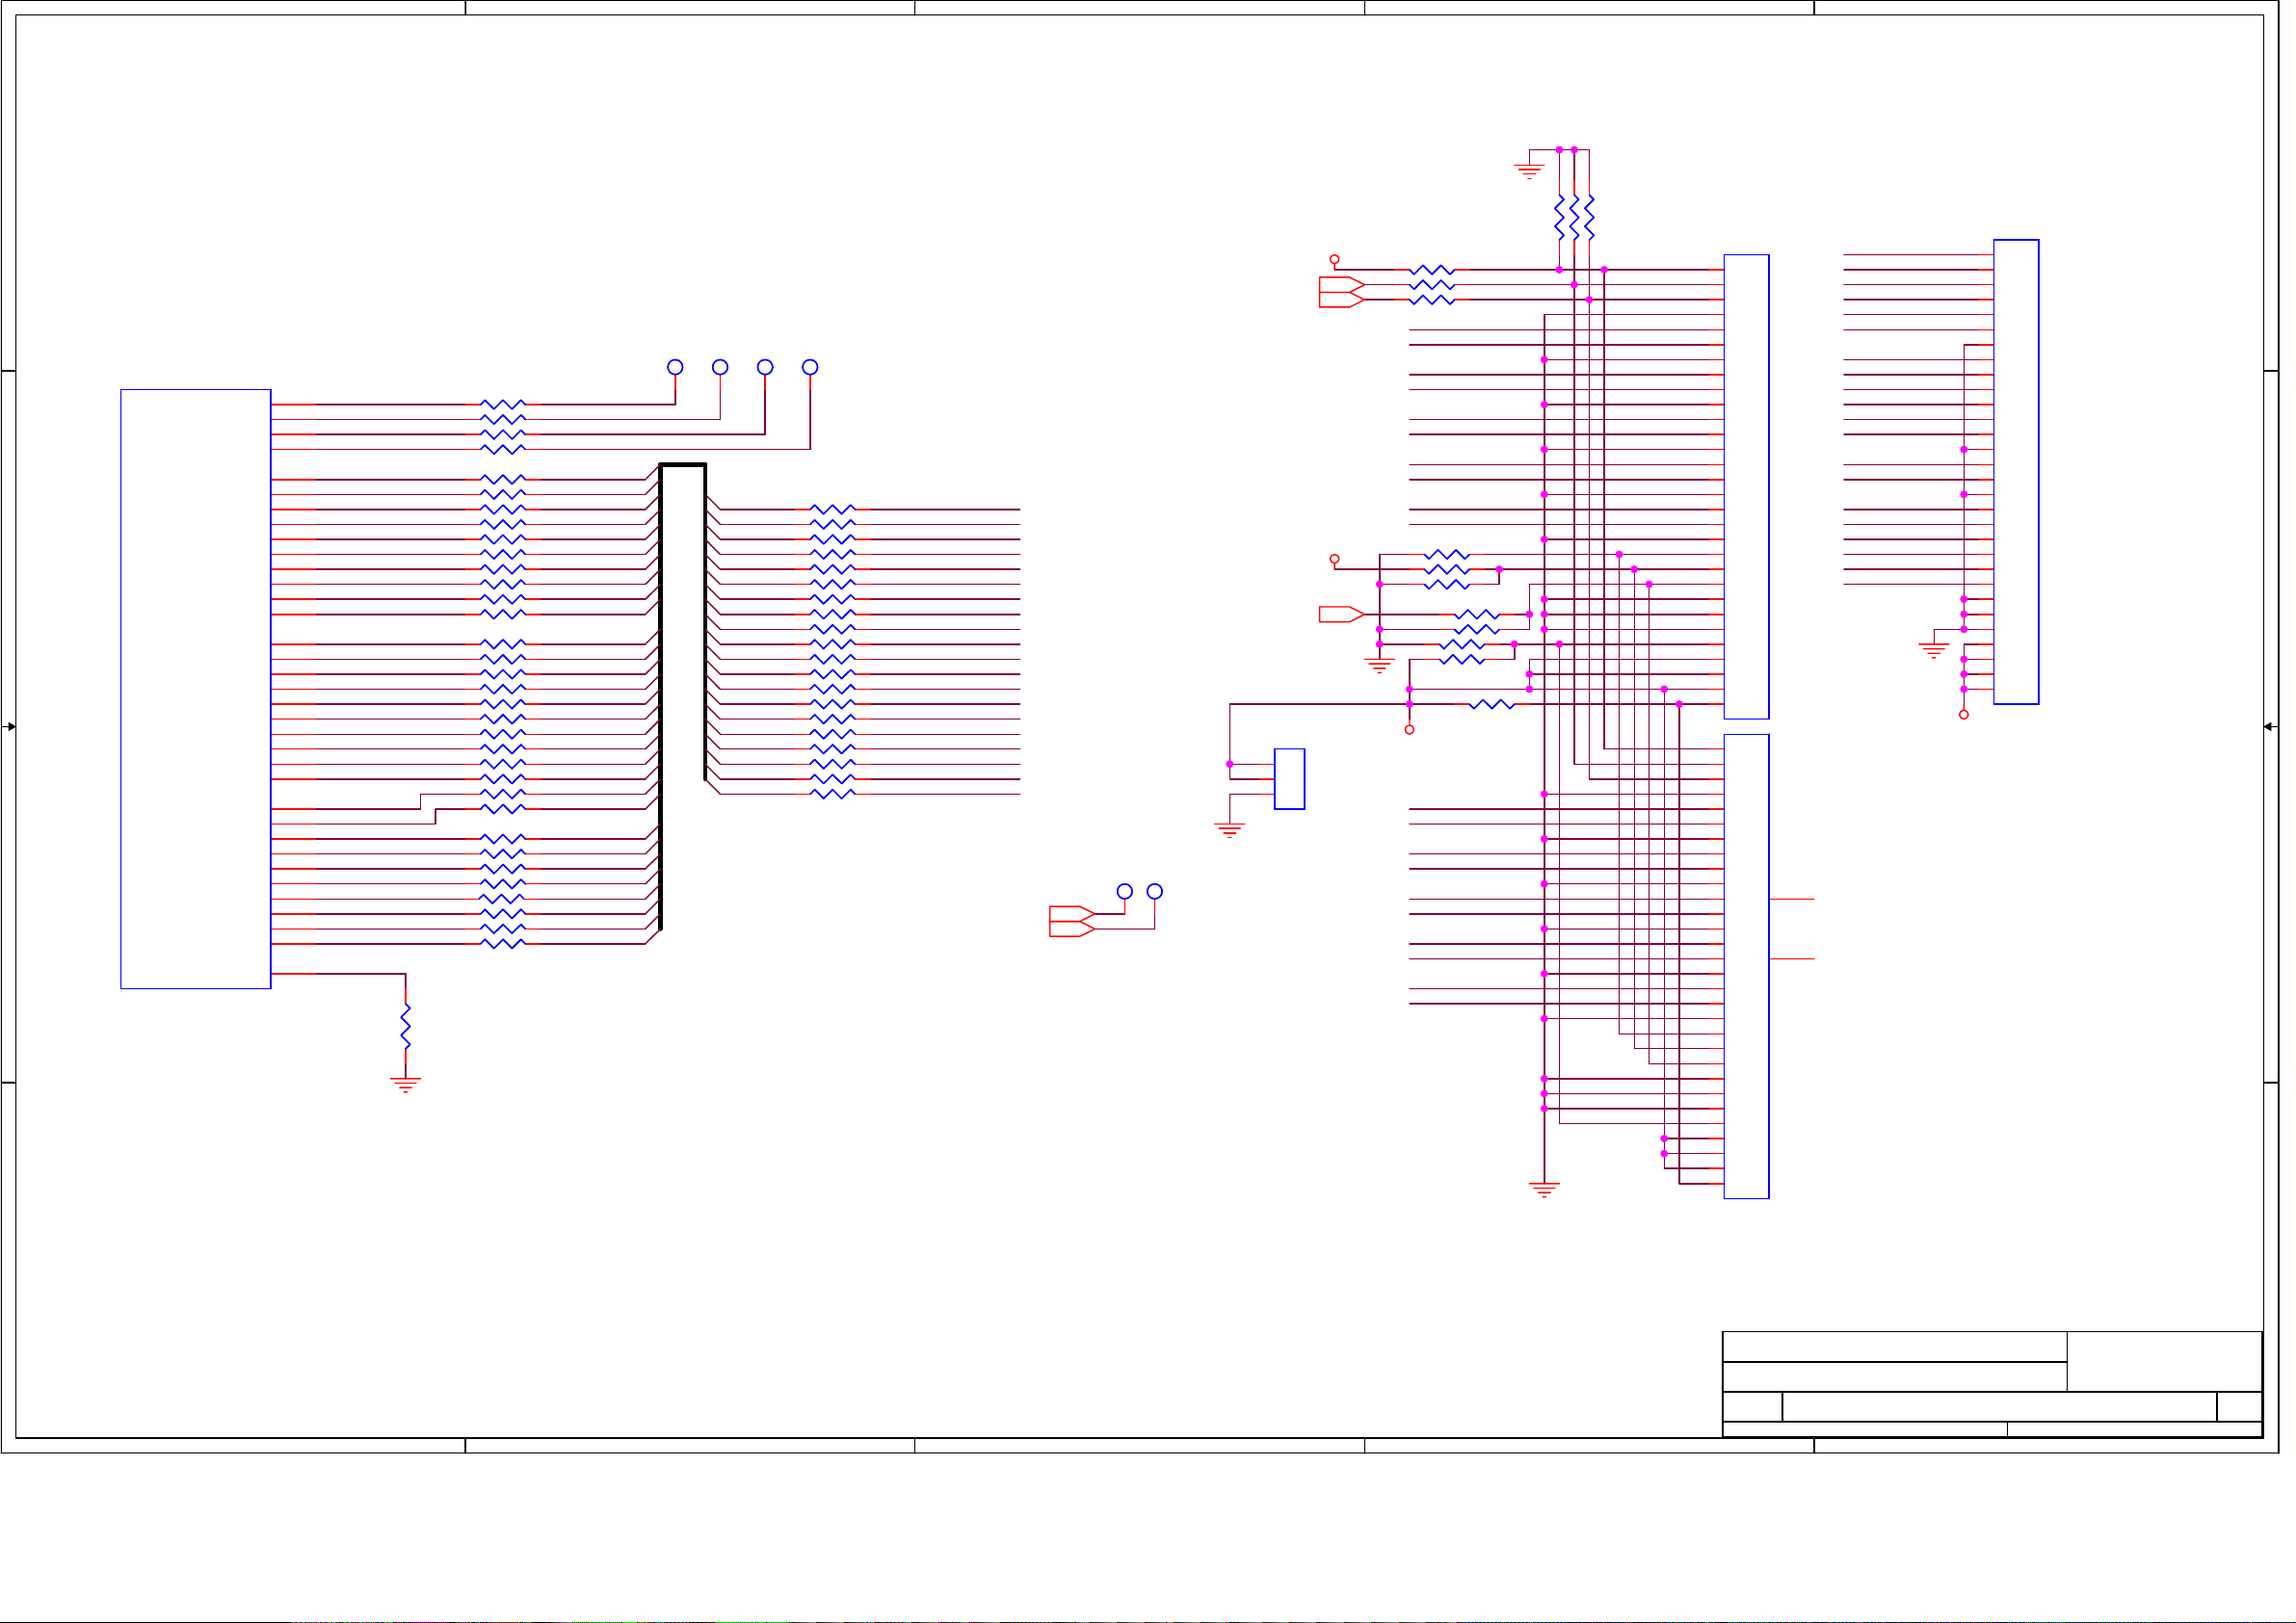
5
24
D D
RDCLK
RP59-2 47Ω*4RP59-2 47Ω*4
RDVSRDVS
RP51-4 47Ω*4RP51-4 47Ω*4
RDHSRDHSRDHS
RP59-1 47Ω*4RP59-1 47Ω*4
RDENRDENRDEN
RP51-1 47Ω*4RP51-1 47Ω*4
RDR0
RP53-4 47Ω*4RP53-4 47Ω*4
RDR1
RP53-3 47Ω*4RP53-3 47Ω*4
RDR2
RP53-2 47Ω*4RP53-2 47Ω*4
RDR3
RP53-1 47Ω*4RP53-1 47Ω*4
RDR4
RP52-2 47Ω*4RP52-2 47Ω*4
RDR5
RP52-3 47Ω*4RP52-3 47Ω*4
RDR6
RP54-2 47Ω*4RP54-2 47Ω*4
RDR7
RP54-3 47Ω*4RP54-3 47Ω*4
RDR8
RP52-1 47Ω*4RP52-1 47Ω*4
RDR9
RP54-4 47Ω*4RP54-4 47Ω*4
RDG0
RP56-3 47Ω*4RP56-3 47Ω*4
RDG1
RP57-3 47Ω*4RP57-3 47Ω*4
RDG2
RP56-2 47Ω*4RP56-2 47Ω*4
RDG3
RP56-1 47Ω*4RP56-1 47Ω*4
RDG4
RP54-1 47Ω*4RP54-1 47Ω*4
RDG5
RP56-4 47Ω*4RP56-4 47Ω*4
RDG6
RP55-3 47Ω*4RP55-3 47Ω*4
RDG7
RP55-4 47Ω*4RP55-4 47Ω*4
RDG8
RP55-1 47Ω*4RP55-1 47Ω*4
RDG9
RP55-2 47Ω*4RP55-2 47Ω*4
RP58-4 47Ω*4RP58-4 47Ω*4
RDB0
RP58-3 47Ω*4RP58-3 47Ω*4
RDB1
RDB2
RP57-1 47Ω*4RP57-1 47Ω*4
RDB3
RP57-2 47Ω*4RP57-2 47Ω*4
RDB4
RP58-1 47Ω*4RP58-1 47Ω*4
RDB5
RP58-2 47Ω*4RP58-2 47Ω*4
RDB6
RP51-3 47Ω*4RP51-3 47Ω*4
RDB7
Rp51-2 47Ω*4Rp51-2 47Ω*4
RDB8
RP59-3 47Ω*4RP59-3 47Ω*4
RDB9
RP59-4 47Ω*4RP59-4 47Ω*4
RPIA
R218
R218
12K
12K
DVS
DHS
DEN
DR0
DR1
DG0
DG1
DB0
DB1
C14
C16
D15
C15
C23
A25
B24
B23
A23
A24
A21
B21
A22
B22
D19
D18
C20
C19
B20
A20
B19
A19
B18
A18
C17
D16
B17
A17
B16
A16
B15
A15
B14
A14
E23
DCLKOUT
U9C
U9C
TXOCp_DR2
TXOCm_DR3
PW106
PW106
TXO2p_DR4
TXO2m_DR5
TXO3p_DR6
TXO3m_DR7
TX04p_DR8
TXO4m_DR9
TXE3p_DG2
TXE3m_DG3
TXE4p_DG4
TXE4m_DG5
TXO0p_DG6
TXO0m_DG7
TXO1p_DG8
TXO1m_DG9
TXE0p_DB2
TXE0m_DB3
TXE1p_DB4
TXE1m_DB5
TXECp_DB6
TXECm_DB7
TXE2p_DB8
TXE2m_DB9
RPIATEST
C C
Display Port
Display Port
B B
DCLK
DVS
DHS
DEN
DR0
DR1
DR2
DR3
DR4
DR5
DR6
DR7
DR8
DR9
DG0DG0
DG1DG1
DG2
DG3
DG4
DG5
DG6
DG7
DG8
DG9
DB0
DB1
DB2
DB3
DB4
DB5
DB6
DB7
DB8
DB9
4
FID4FID4
FID5FID5
1
1
DB2
RP60-1 0Ω*4RP60-1 0Ω*4
DB3
RP60-2 0Ω*4RP60-2 0Ω*4
DB4
RP60-3 0Ω*4RP60-3 0Ω*4
DB5
RP60-4 0Ω*4RP60-4 0Ω*4
DB6
RP61-1 0Ω*4RP61-1 0Ω*4
DB7
RP61-2 0Ω*4RP61-2 0Ω*4
DB8
RP61-3 0Ω*4RP61-3 0Ω*4
DB9
RP61-4 0Ω*4RP61-4 0Ω*4
DG2
RP62-1 0Ω*4RP62-1 0Ω*4
DG3
RP62-2 0Ω*4RP62-2 0Ω*4
DG6
RP62-3 0Ω*4RP62-3 0Ω*4
DG7
RP62-4 0Ω*4RP62-4 0Ω*4
DG8
RP68-1 0Ω*4RP68-1 0Ω*4
DG9
RP68-2 0Ω*4RP68-2 0Ω*4
DR2
RP68-3 0Ω*4RP68-3 0Ω*4
DR3
RP68-4 0Ω*4RP68-4 0Ω*4
DR4
RP69-1 0Ω*4RP69-1 0Ω*4
DR5
RP69-2 0Ω*4RP69-2 0Ω*4
DR6
RP69-3 0Ω*4RP69-3 0Ω*4
DR7
Rp69-4 0Ω*4Rp69-4 0Ω*4
FID3FID3
1
DR[9:0],DG[9:0],DB[9:0]
FID6FID6
3
R356
R356
0_NS
VCC
ANAPWM
BKLONOFF
1
TXE0+
TXE0TXE1+
TXE1TXEC+
TXECTXE2+
TXE2TXE3+
TXE3TXO0+
TXO0TXO1+
TXO1TXOC+
TXOCTXO2+
TXO2TXO3+
TXO3-
Panel_ctr1
Panel_ctr2
FID1FID1
1
2
3
FID2FID2
1
1
ROTATION
J605
J605
1
2
3
CON3
CON3
V33
R360 47R360 47
R361 0R361 0
R362 0R362 0
TXE0TXE0+
TXE1TXE1+
TXE2TXE2+
TXECTXEC+
TXE3TXE3+
R363 11R363 11
R364 10KR364 10K
R365 10KR365 10K
R366 10KR366 10K
R367 10KR367 10K
R359 0_NSR359 0_NS
R369 0R369 0
R368 11R368 11
VLCD
TXE0TXE0+
TXE1TXE1+
TXE2TXE2+
TXECTXEC+
TXE3TXE3+
0_NS
2
0_NS
0_NS
R357
R357
R358
R358
0_NS
0_NS
30
29
28
27
26
25
24
23
22
21
20
19
18
17
16
15
14
13
12
11
10
9
8
7
6
5
4
3
2
1
30
29
28
27
26
25
24
23
22
21
20
19
18
17
16
15
14
13
12
11
10
9
8
7
6
5
4
3
2
1
JF603
JF603
30
29
28
27
26
25
24
23
22
21
20
19
18
17
16
15
14
13
12
11
10
9
8
7
6
5
4
3
2
CON30_3
CON30_3
1
JF604
JF604
30
29
28
27
26
25
24
23
22
21
20
E2
19
18
17
16
E1
15
14
13
12
11
10
9
8
7
6
5
4
3
2
1
CON30_2
CON30_2
E2
E1
TXE0TXE0+
TXE1TXE1+
TXE2TXE2+
TXECTXEC+
TXE3TXE3+
TXO0TXO0+
TXO1TXO1+
TXO2TXO2+
TXOCTXOC+
TXO3TXO3+
VLCD
30
29
28
27
26
25
24
23
22
21
20
19
18
17
16
15
14
13
12
11
10
9
8
7
6
5
4
3
2
1
J301
J301
30
29
28
27
26
25
24
23
22
21
20
19
18
17
16
15
14
13
12
11
10
9
8
7
6
5
4
3
2
1
CON30_1
CON30_1
1
A A
Confidential
Confidential
Pixelworks Shenzhen
Pixelworks Shenzhen
Pixelworks Shenzhen
Title
Title
Title
Size Document Number Rev
Size Document Number Rev
Size Document Number Rev
Date: Sheet
Date: Sheet
5
4
3
2
Date: Sheet
B
B
B
DISPLAY
DISPLAY
DISPLAY
Confidential
OPAL SINGLE CHANNEL
OPAL SINGLE CHANNEL
OPAL SINGLE CHANNEL
1
8100 SW Nyberg Rd.
8100 SW Nyberg Rd.
8100 SW Nyberg Rd.
Tualatin, OR 97062
Tualatin, OR 97062
Tualatin, OR 97062
(503) 612-6700
(503) 612-6700
(503) 612-6700
612Friday, April 07, 2006
612Friday, April 07, 2006
612Friday, April 07, 2006
of
of
of
A
A
A
Page 27
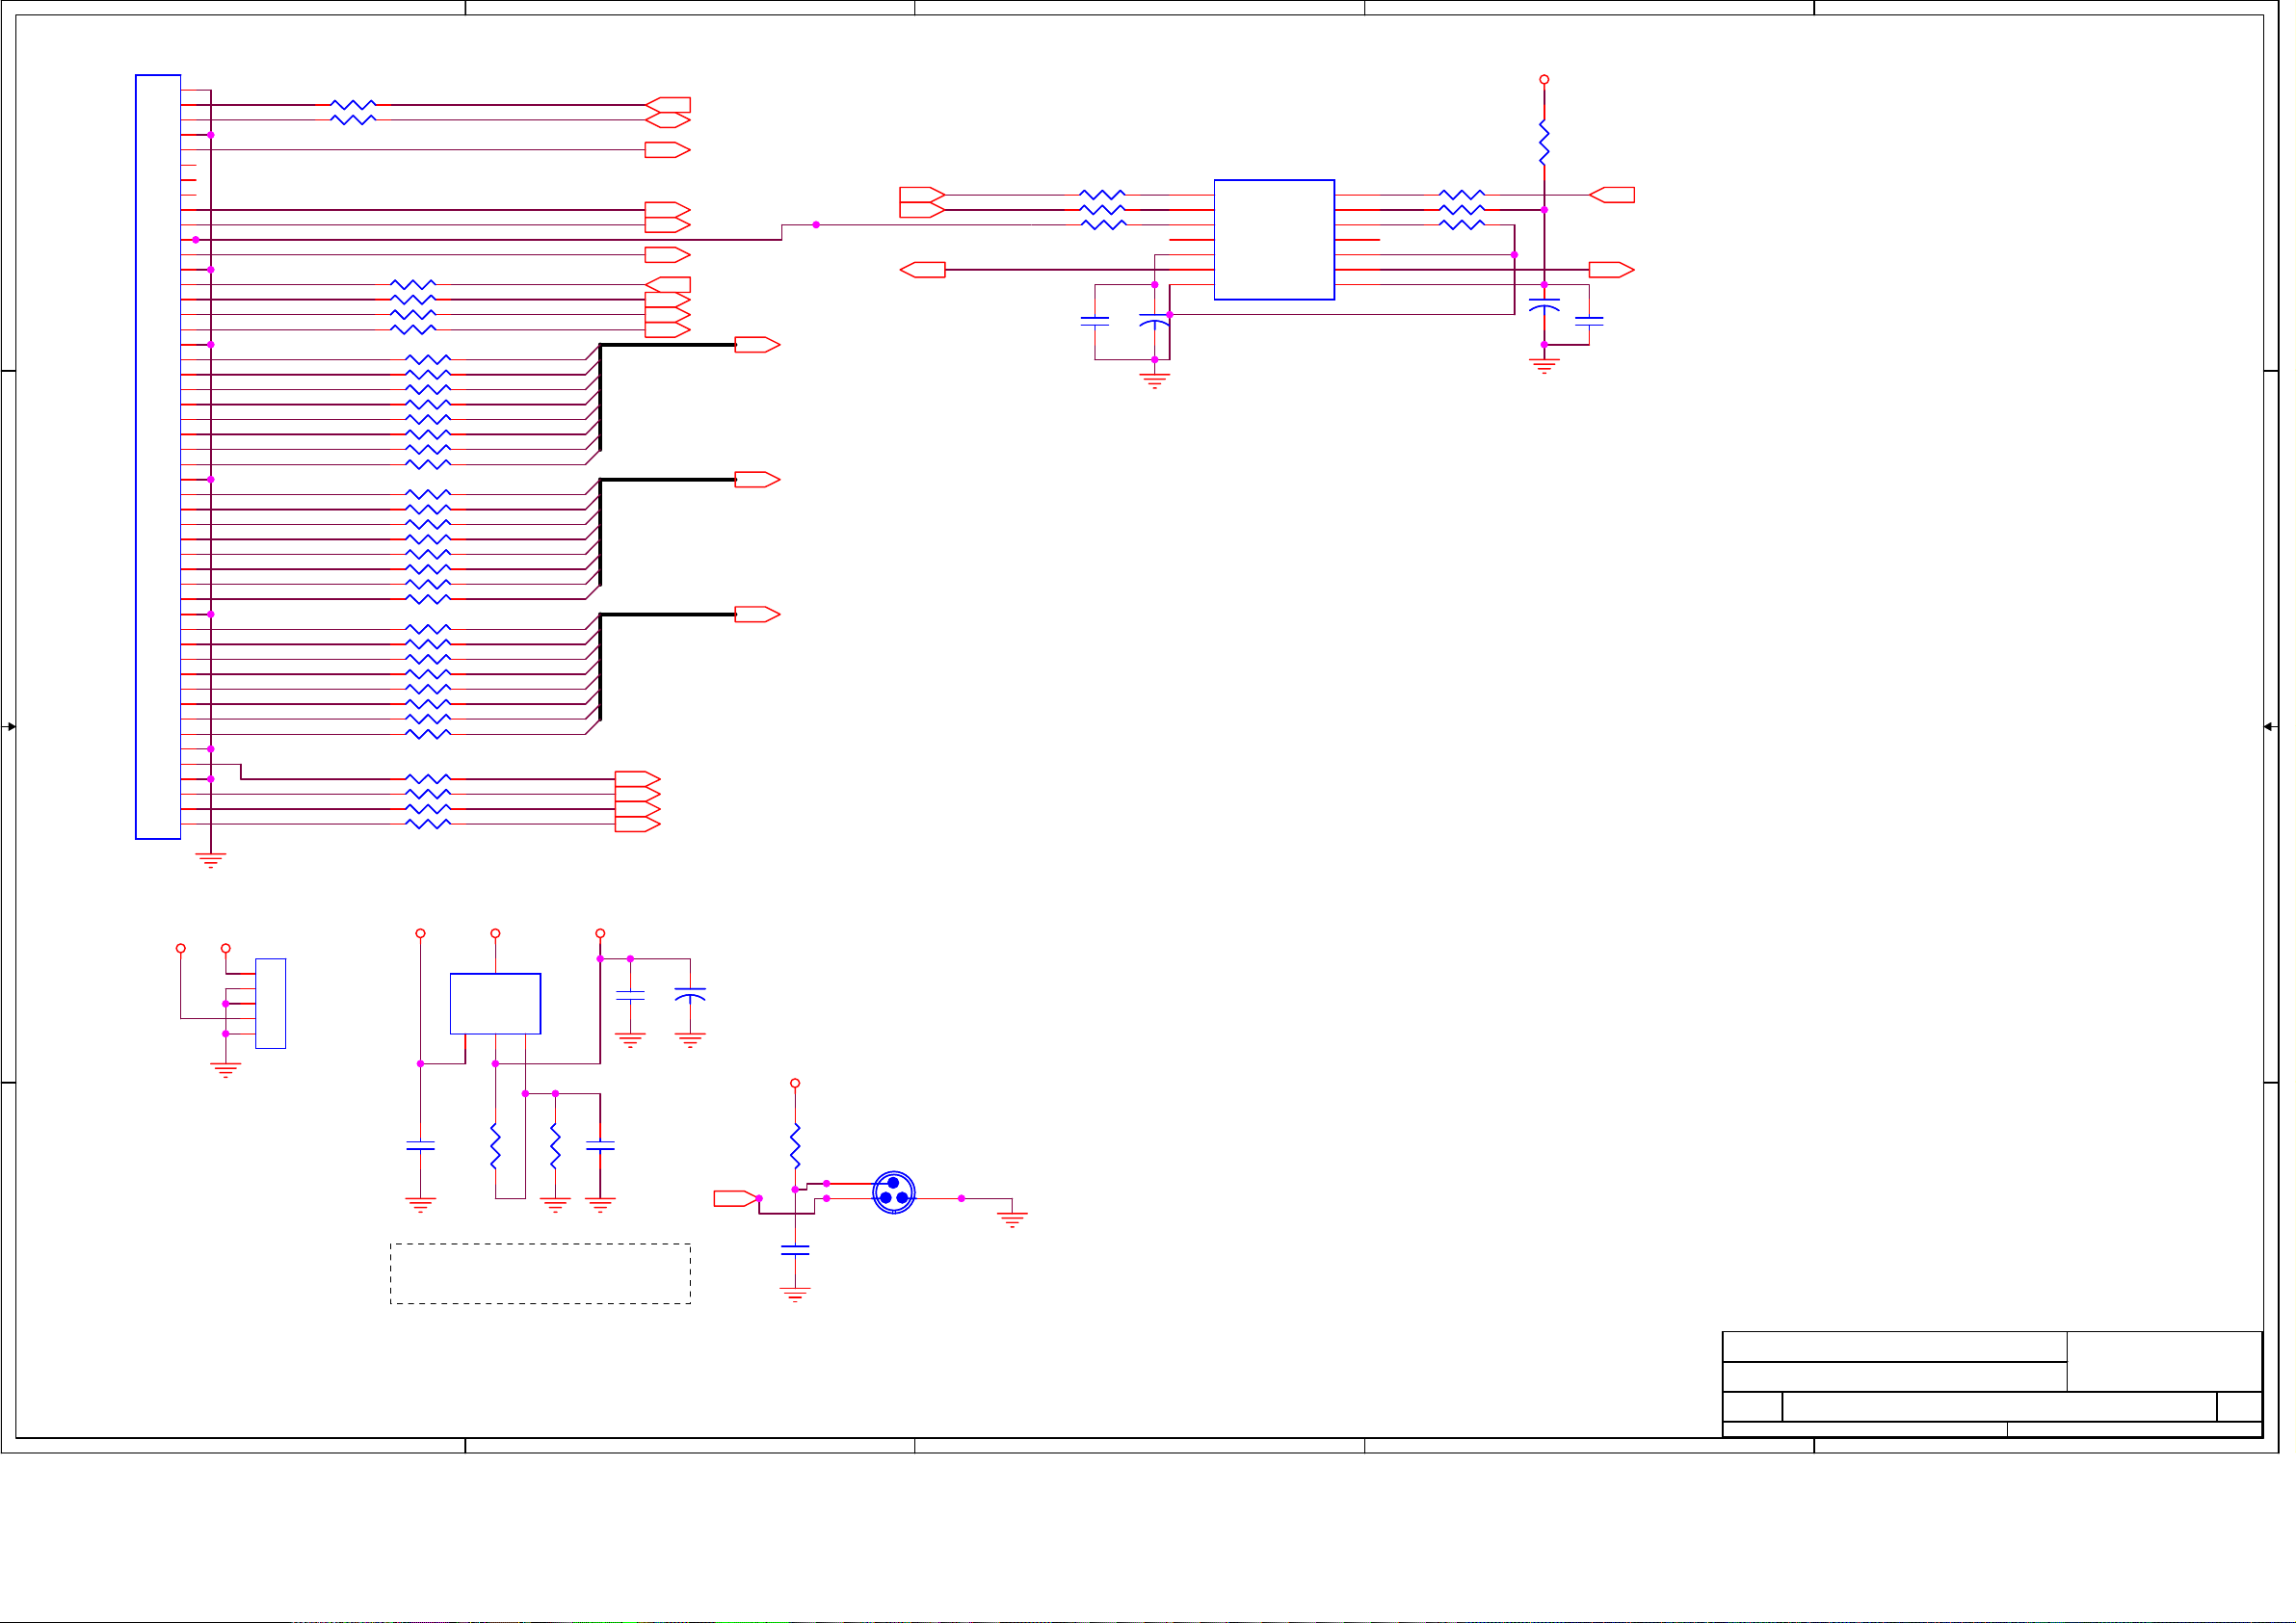
5
25
CON50
CON50
50
50
49
49
48
48
47
47
46
46
45
45
44
44
43
D D
C C
43
42
41
40
39
38
37
36
35
34
33
32
31
30
29
28
27
26
25
24
23
22
21
20
19
18
17
16
15
14
13
12
11
10
J401
J401
42
41
40
39
38
37
36
35
34
33
ADCR7
32
ADCR6
31
ADCR5
30
ADCR4
29
ADCR3
28
ADCR2
27
ADCR1
26
ADCR0
25
24
ADCG7
23
ADCG6
22
ADCG5
21
ADCG4
20
ADCG3
19
ADCG2
18
ADCG1
17
ADCG0
16
15
ADCB7
14
ADCB6
13
ADCB5
12
ADCB4
11
ADCB3
10
ADCB2
9
9
ADCB1
8
8
ADCB0
7
7
6
6
5
5
4
4
ADCPEN
3
3
ADCHS
2
2
ADCVS
1
1
ADCCLK
R4847R48
R4947R49
47
47
R50 47R50 47
R51 47R51 47
R52 47R52 47
R53 47R53 47
RP1-1 47Ω*4RP1-1 47Ω*4
RP1-2 47Ω*4RP1-2 47Ω*4
RP1-3 47Ω*4RP1-3 47Ω*4
RP1-4 47Ω*4RP1-4 47Ω*4
RP2-1 47Ω*4RP2-1 47Ω*4
RP2-2 47Ω*4RP2-2 47Ω*4
RP2-3 47Ω*4RP2-3 47Ω*4
RP2-4 47Ω*4RP2-4 47Ω*4
RP3-1 47Ω*4RP3-1 47Ω*4
RP3-2 47Ω*4RP3-2 47Ω*4
RP3-3 47Ω*4RP3-3 47Ω*4
RP3-4 47Ω*4RP3-4 47Ω*4
RP4-1 47Ω*4RP4-1 47Ω*4
RP4-2 47Ω*4RP4-2 47Ω*4
RP4-3 47Ω*4RP4-3 47Ω*4
RP4-4 47Ω*4RP4-4 47Ω*4
RP5-1 47Ω*4RP5-1 47Ω*4
RP5-2 47Ω*4RP5-2 47Ω*4
RP5-3 47Ω*4RP5-3 47Ω*4
RP5-4 47Ω*4RP5-4 47Ω*4
RP6-1 47Ω*4RP6-1 47Ω*4
RP6-2 47Ω*4RP6-2 47Ω*4
RP6-3 47Ω*4RP6-3 47Ω*4
RP6-4 47Ω*4RP6-4 47Ω*4
RP7-1 47Ω*4RP7-1 47Ω*4
RP7-2 47Ω*4RP7-2 47Ω*4
RP7-3 47Ω*4RP7-3 47Ω*4
RP7-4 47Ω*4RP7-4 47Ω*4
SCL
SDA
COAXIAL-OUT
SD0
LRCIN
BCKIN
SCKI
IN0RE9
IN0RE8
IN0RE7
IN0RE6
IN0RE5
IN0RE4
IN0RE3
IN0RE2
IN0GE9
IN0GE8
IN0GE7
IN0GE6
IN0GE5
IN0GE4
IN0GE3
IN0GE2
IN0BE9
IN0BE8
IN0BE7
IN0BE6
IN0BE5
IN0BE4
IN0BE3
IN0BE2
IN0CLK
IN0PEN
IN0HS
IN0VS
4
SCL
SDA
COAXIAL-OUT
SD0
LRCIN
SCKI
RESETn
CAD-SCTD
CAD-INT
CAD-HPJ
IN0RE[9:2]
IN0CLK
IN0PEN
IN0HS
IN0VS
BCKIN
I2SR-HDMI
IN0RE[9:2]
IN0GE[9:2]
IN0BE[9:2]
SD
R54 47R54 47
R55 47R55 47
R56 47R56 47
C51
C51
C50
C50
0.1uF
0.1uF
10uF
10uF
3
VCC
U5
U5
1
LRCIN
2
3
4
5
6
7
12
DIN
BCKIN
NC0
CAP
VOUTR
GND
WM8761
WM8761
FORMAT
DEEMPH
VOUTL
SCKI
NC1
MUTE
VDD
14
13
12
11
10
9
8
R14 47R14 47
R15 0R15 0
R16 0R16 0
12
C49
C49
10uF
10uF
R180R18
0
2
C48
C48
0.1uF
0.1uF
1
SCKOLRCO
I2SL-HDMI
B B
VCC
V33-P
A A
J403
J403
1
1
2
2
3
3
4
4
5
5
CON5
CON5
R230=2.2K, R231=3.3K, C289=0.1uF
if LM1117-ADJ is stuffed ;
5
C44
C44
0.1uF
0.1uF
Vin
3
V33-P V33-PVCC
4
Vo4
Vo2
2
R190_NS R190_NS
U19
U19
LM1117-3.3
LM1117-3.3
ADJ
1
V33AADJ1
R200 R200
C46
C46
0.1uF
0.1uF
C45
C45
0.1uF_NS
0.1uF_NS
COAXIAL-OUT
12
C47
C47
47uF
47uF
4
VCC
R2147R21
47
C43
C43
0.1uF
0.1uF
U27
U27
2
3
CONN AV 3-P
CONN AV 3-P
1
Confidential
Confidential
Pixelworks Shenzhen
Pixelworks Shenzhen
Pixelworks Shenzhen
Title
Title
Title
Size Document Number Rev
Size Document Number Rev
Size Document Number Rev
Date: Sheet
Date: Sheet
3
2
Date: Sheet
HDMI INTERFACE
HDMI INTERFACE
HDMI INTERFACE
B
B
B
Confidential
OPAL SINGLE CHANNEL
OPAL SINGLE CHANNEL
OPAL SINGLE CHANNEL
1
8100 SW Nyberg Rd.
8100 SW Nyberg Rd.
8100 SW Nyberg Rd.
Tualatin, OR 97062
Tualatin, OR 97062
Tualatin, OR 97062
(503) 612-6700
(503) 612-6700
(503) 612-6700
712Tuesday, May 23, 2006
712Tuesday, May 23, 2006
712Tuesday, May 23, 2006
of
of
of
A
A
A
Page 28
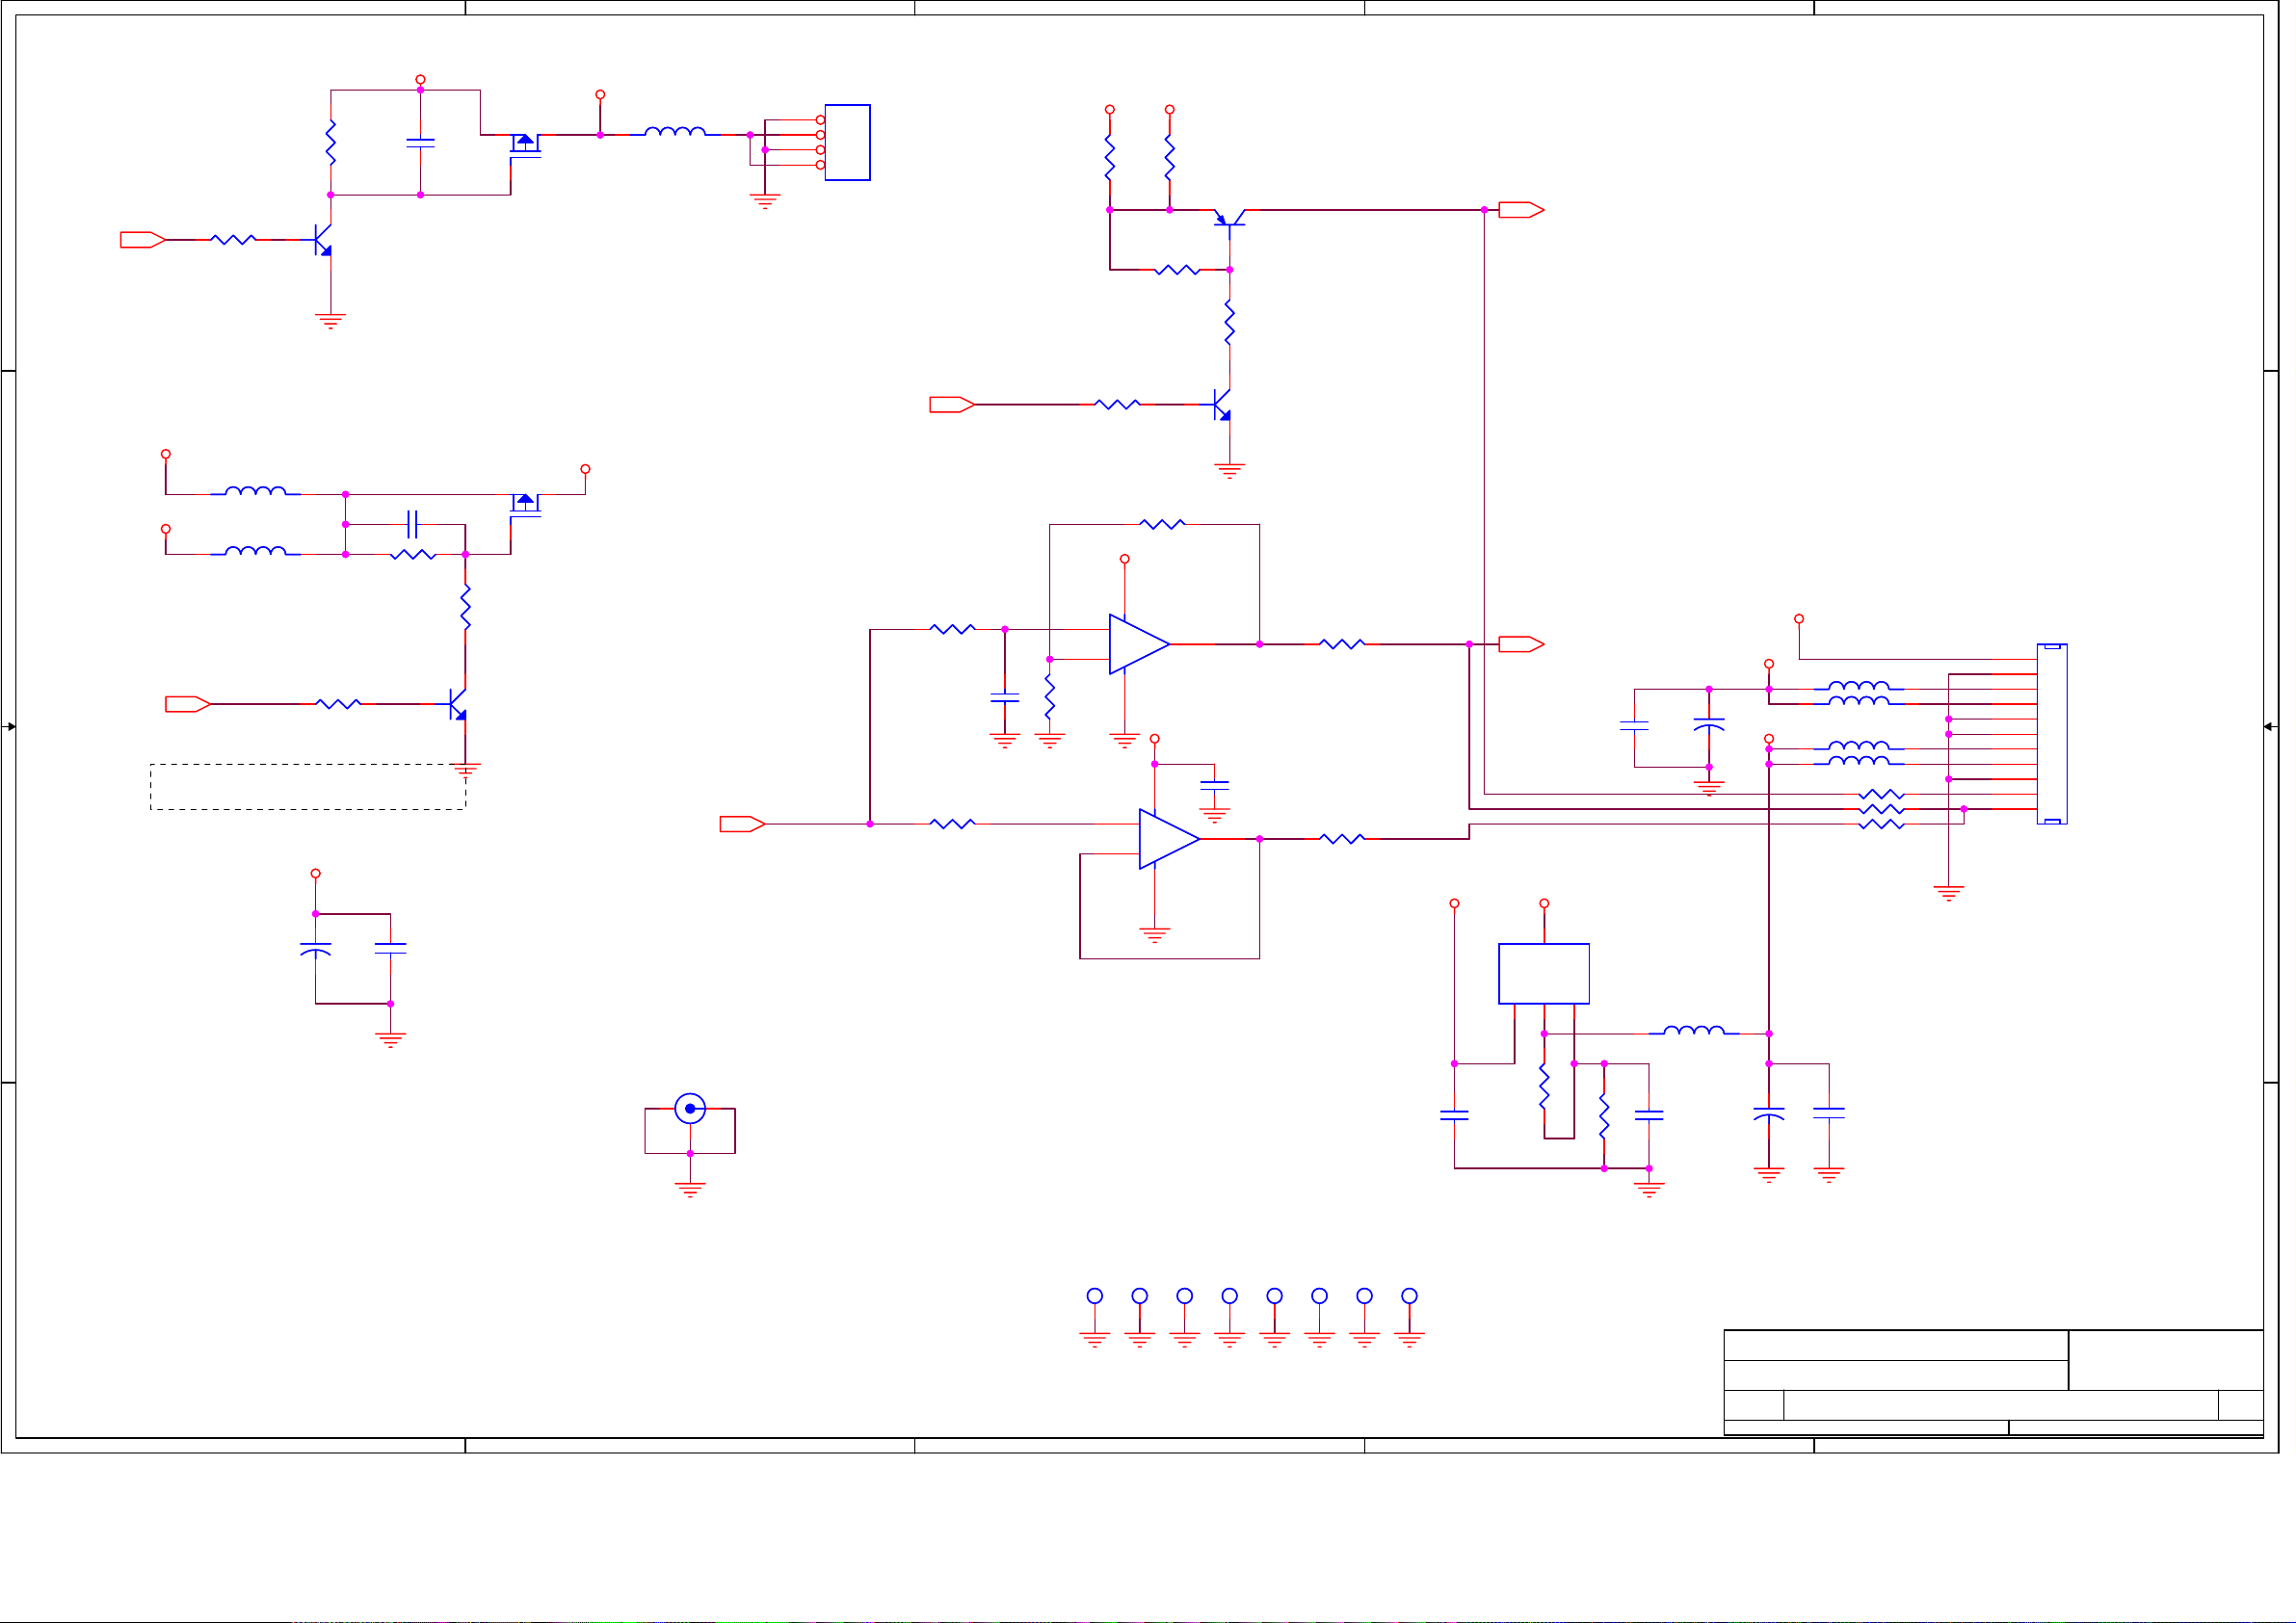
5
26
4
3
2
1
VCC
JM11
12
R256
R256
100K
100K
D D
R257
R257
DIN-T18-STB
C C
LCDON
B B
1 2
3.3K
3.3K
V12
L67
VCC
Stuff one of L60/L62 for VPANEL Voltage
L67
22uH/5A_NC
22uH/5A_NC
L68
L68
22uH/5A
22uH/5A
LCDON
C312
C312
22uF
22uF
3
Q7
R255
R255
3.3K
3.3K
V12
12
Q7
MMBT3904
MMBT3904
2
C313
C313
0.1uF
0.1uF
C318 0.1uFC318 0.1uF
1 2
R254
R254
10K
10K
Q10
Q10
MMBT3904
MMBT3904
1
C325
C325
0.1uF
0.1uF
1 2
12
1
MOSFET P
MOSFET P
JM12
JM12
MOSFET P
MOSFET P
12
R2580R258
0
3
2
JM11
1
1
V0: 0
V1:5.6k
32
32
V5-JPEG
VLCD
L61
L61
22uH/5A
22uH/5A
PWM
PWM
J708
J708
1
1
2
2
3
3
4
4
4 HEADER
4 HEADER
BKLON
R245
R245
47.5K
47.5K
R251
R251
10K
10K
BKLON
C317
C317
0.1uF
0.1uF
R240
R240
4.7K
4.7K
VCC
+
+
-
-
VCC
R244
R244
4.7K_NS
4.7K_NS
R241
R241
3.3K
3.3K
Q9
Q9
MMBT3904
MMBT3904
84
U25A
U25A
LM358_SO8
LM358_SO8
VCC
84
5
+
+
6
-
-
Q8
2 3
3906Q83906
R242
R242
3.3K
3.3K
1
1
12
U25B
U25B
7
LM358_SO8
LM358_SO8
1
3
2
C316
C316
0.1uF
0.1uF
R246 47R246 47
R247 47R247 47
ANAPWM
PWMOUT
VCC V33A3
Vin
3
BKLONOFF
ANAPWM
4
Vo4
Vo2
2
12
U22
U22
LM1117-3.3_NS
LM1117-3.3_NS
ADJ
1
L70 22uH/5A_NSL70 22uH/5A_NS
C315
C315
0.1uF
0.1uF
12
C314
C314
1000uF
1000uF
V12
VCC
L63 22uH/5AL63 22uH/5A
L64 22uH/5AL64 22uH/5A
V33
L65 22uH/5AL65 22uH/5A
L66 22uH/5AL66 22uH/5A
R248 0R248 0
R249 0R249 0
R250 0R250 0
11
11
10
10
9
9
8
8
7
7
6
6
5
5
4
4
3
3
12
12
12
2
1
J704
J704
2
1
CONN PCB 11
CONN PCB 11
V33
R243
R243
4.7K
4.7K
R253 10KR253 10K
3
2
R252
R252
10K
10K
1 2
J717
J717
RCA_V
RCA_V
3
A A
5
2
1
MH1MH1
MH2MH2
4
3
MH5MH5MH3MH3 MH8MH8
MH4MH4
MH6MH6
MH7MH7
C311
C311
0.1uF_NS
0.1uF_NS
R232
R232
0_NS
0_NS
C310
C310
R2330_NS R2330_NS
0.1uF_NS
0.1uF_NS
2
12
C330
C330
100uF
100uF
Pixelworks Shenzhen
Pixelworks Shenzhen
Pixelworks Shenzhen
Title
Title
Title
Size Document Number Rev
Size Document Number Rev
Size Document Number Rev
B
B
B
Date: Sheet
Date: Sheet
Date: Sheet
C329
C329
0.1uF
0.1uF
MAIN POWER
MAIN POWER
MAIN POWER
Confidential
Confidential
Confidential
OPAL SINGLE CHANNEL
OPAL SINGLE CHANNEL
OPAL SINGLE CHANNEL
1
8100 SW Nyberg Rd.
8100 SW Nyberg Rd.
8100 SW Nyberg Rd.
Tualatin, OR 97062
Tualatin, OR 97062
Tualatin, OR 97062
(503) 612-6700
(503) 612-6700
(503) 612-6700
812Friday, April 07, 2006
812Friday, April 07, 2006
812Friday, April 07, 2006
of
of
of
A
A
A
Page 29
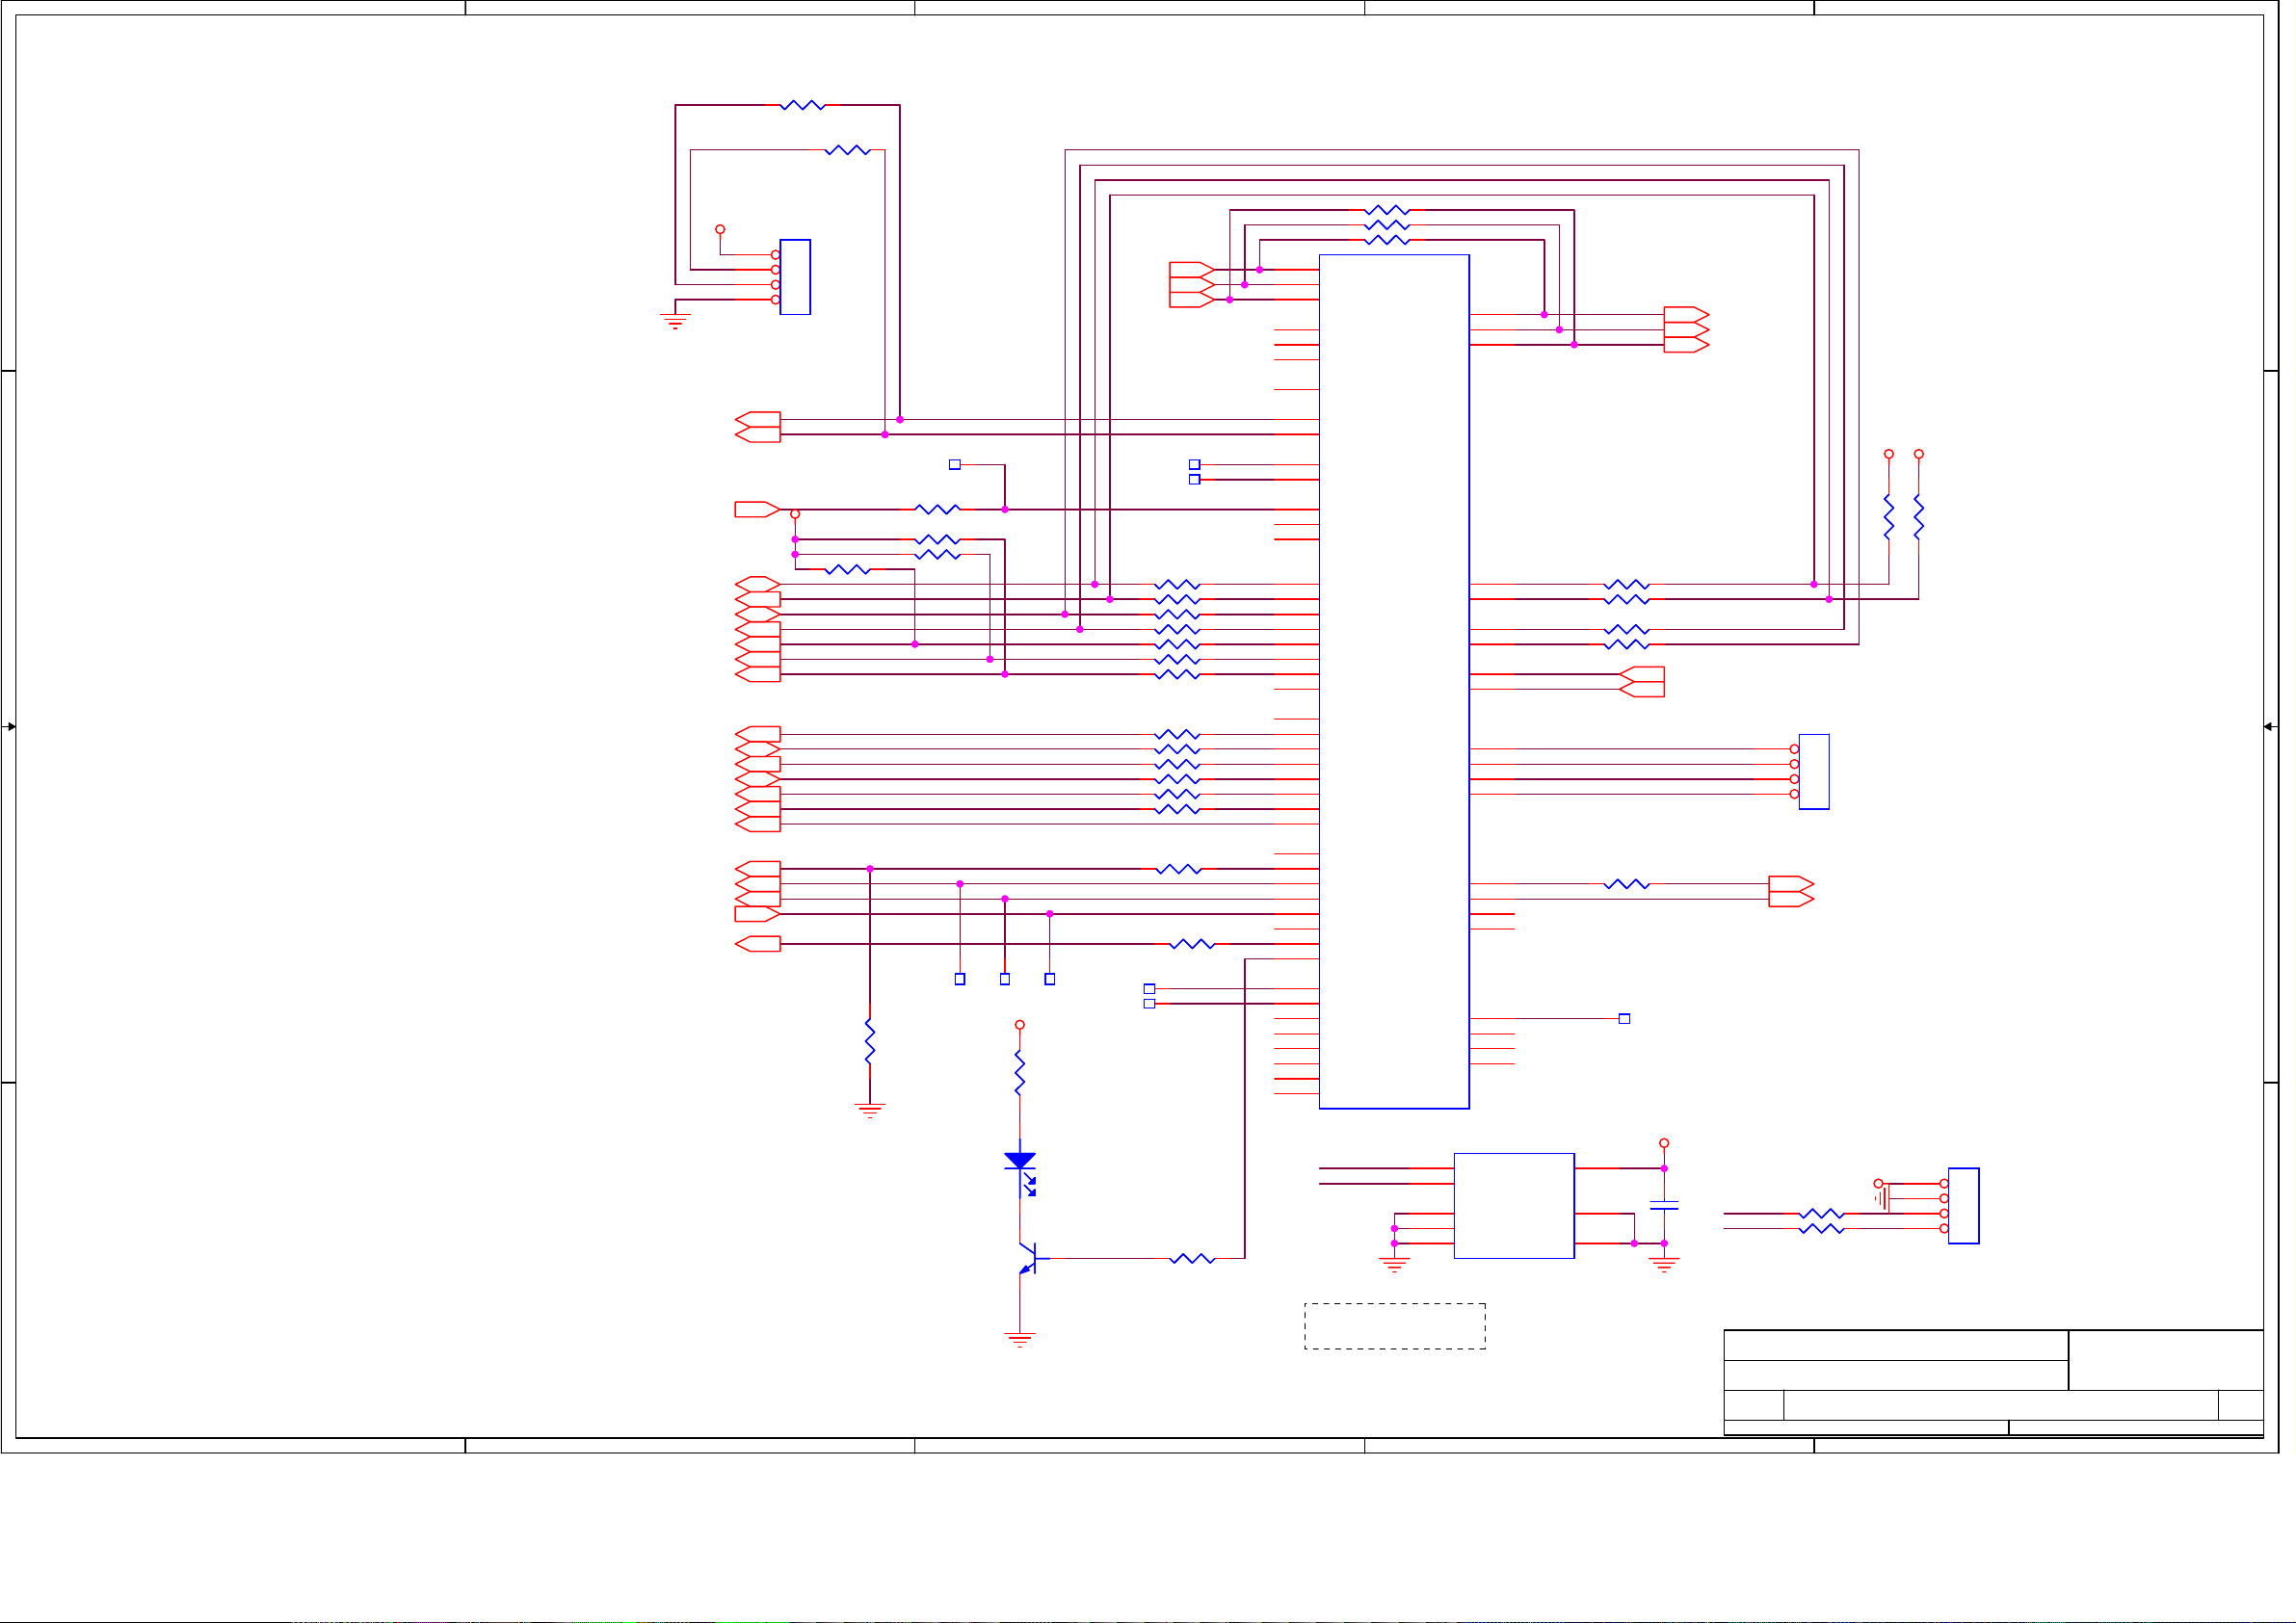
5
27
4
R106 0R106 0
R108 0R108 0
3
2
1
D D
C C
DIN-T18-STB
B B
A A
VCC
TXD
RXD
RXD0
TXD0
DVD-IR
SDA
SCL
SDA1
SCL1
MUTE
ASEL0
ASEL1
EARST
UPSDA
UPSCL
TSDA
TSCL
BKLON
RESETn
PWRON PWM
LCDON
CAD-HPJ
SEL2
J701
J701
1
2
3
4
HDR_1X4
HDR_1X4
V33
R141 4.7KR141 4.7K
SDA
SCL
SDA1
SCL1
MUTE
EARST
UPSDA
UPSCL
TSDA
TSCL
DIN-T18-STB
BKLON
RESETn
PWRON
LCDON
CAD-HPJ
IRIR
R1420R142
0
R152 4.7KR152 4.7K
R150 4.7KR150 4.7K
PWRON1PWRON1
R149
R149
10k
10k
LCDON1LCDON1
Q11
Q11
MMBT3904
MMBT3904
V33
LED
LED
12
2 3
HPDET1HPDET1
R170
R170
220
220
D23
D23
SCKI
LRCIN
SD0
RXD0
TXD0
RXD1RXD1
TXD1TXD1
IRRCVR
R129 100R129 100
R131 100R131 100
R133 100R133 100
R134 100R134 100
R136 100R136 100
R138 100R138 100
R139 100R139 100
R144 100R144 100
R145 100R145 100
R147 100R147 100
R151 100R151 100
R153 100R153 100
R155 100R155 100
R158 100R158 100
R164 100R164 100
ADC0ADC0
ADC1ADC1
LED3
1
ADC0
ADC1
R173 10KR173 10K
LED
R126 0_NSR126 0_NS
R127 0_NSR127 0_NS
R128 0_NSR128 0_NS
D13
I2SICLK0
E18
I2SIWS0
D14
I2SID0
C13
I2SICLK1
E17
I2SIWS1
A13
I2SID1
E19
THRWSC
E20
RXD0
B25
TXD0
A26
RXD1
D22
TXD1
C24
IRRCVR0
E21
IRRCVR1
D23
IRRCVR2
PERIPHERALS
PERIPHERALS
M1
PORTA0
M2
PORTA1
N6
PORTA2
N1
PORTA3
N5
PORTA4
N2
PORTA5
N3
PORTA6
N4
PORTA7
M3
PORTB0
K2
PORTB1
M4
PORTB2
K1
PORTB3
L4
PORTB4
L1
PORTB5
L2
PORTB6
L3
PORTB7
E15
PORTC0
B12
PORTC1
C12
PORTC2
D12
PORTC3
E14
PORTC4
A11
PORTC5
B11
PORTC6
C11
PORTC7
D24
ADC0
C26
ADC1
D25
ADC2
E24
ADC3
F23
ADC4
E22
ADC5
D26
ADC6
E25
ADC7
SCL
SDA
I2SOCLK
I2SOWS
I2SOD
U9F
U9F
PW106
PW106
TWOWSC0
TWOWSD0
TWOWSC1
TWOWSD1
TWOWSC2
TWOWSD2
USBVDD
USBM
USBVSS
PWM0
PWM1
PWM2
PWM3
USBP
DAC0
DAC1
DAC2
DAC3
6
5
1
2
3
A12
E16
B13
D20
C22
C21
D21
D17
C18
AB16
AF19
AC17
AC18
A10
D11
B10
C10
H22
E26
F25
J22
U10
U10
SCL
SDA
NC0
NC1
NC2
24LC32A
24LC32A
R130 100R130 100
R132 100R132 100
R135 100R135 100
R137 100R137 100
R160 100R160 100
DAC0
VCC
WP
GND
SCKO
LRCO
SD
V33 V33
R122 2.2KR122 2.2K
R123 2.2KR123 2.2K
CAD-INT
CAD-SCTD
JP4
JP4
4
3
2
1
HDR_1X4_NS
HDR_1X4_NS
PWM
PWM1
DAC0DAC0
V33
8
C133
7
4
C133
0.1uF
0.1uF
SCL
SDA
PWM1
V33
R171 100R171 100
R172 100R172 100
I2C CONNECTOR
JP6
JP6
HDR_1X4
HDR_1X4
1
2
3
4
IIC Address: 0xA0
Confidential
Confidential
Pixelworks Shenzhen
Pixelworks Shenzhen
Pixelworks Shenzhen
Title
Title
Title
Size Document Number Rev
Size Document Number Rev
Size Document Number Rev
Date: Sheet
Date: Sheet
5
4
3
2
Date: Sheet
PERIPHERALS
PERIPHERALS
PERIPHERALS
B
B
B
Confidential
OPAL SINGLE CHANNEL
OPAL SINGLE CHANNEL
OPAL SINGLE CHANNEL
1
8100 SW Nyberg Rd.
8100 SW Nyberg Rd.
8100 SW Nyberg Rd.
Tualatin, OR 97062
Tualatin, OR 97062
Tualatin, OR 97062
(503) 612-6700
(503) 612-6700
(503) 612-6700
912Friday, April 07, 2006
912Friday, April 07, 2006
912Friday, April 07, 2006
of
of
of
A
A
A
Page 30
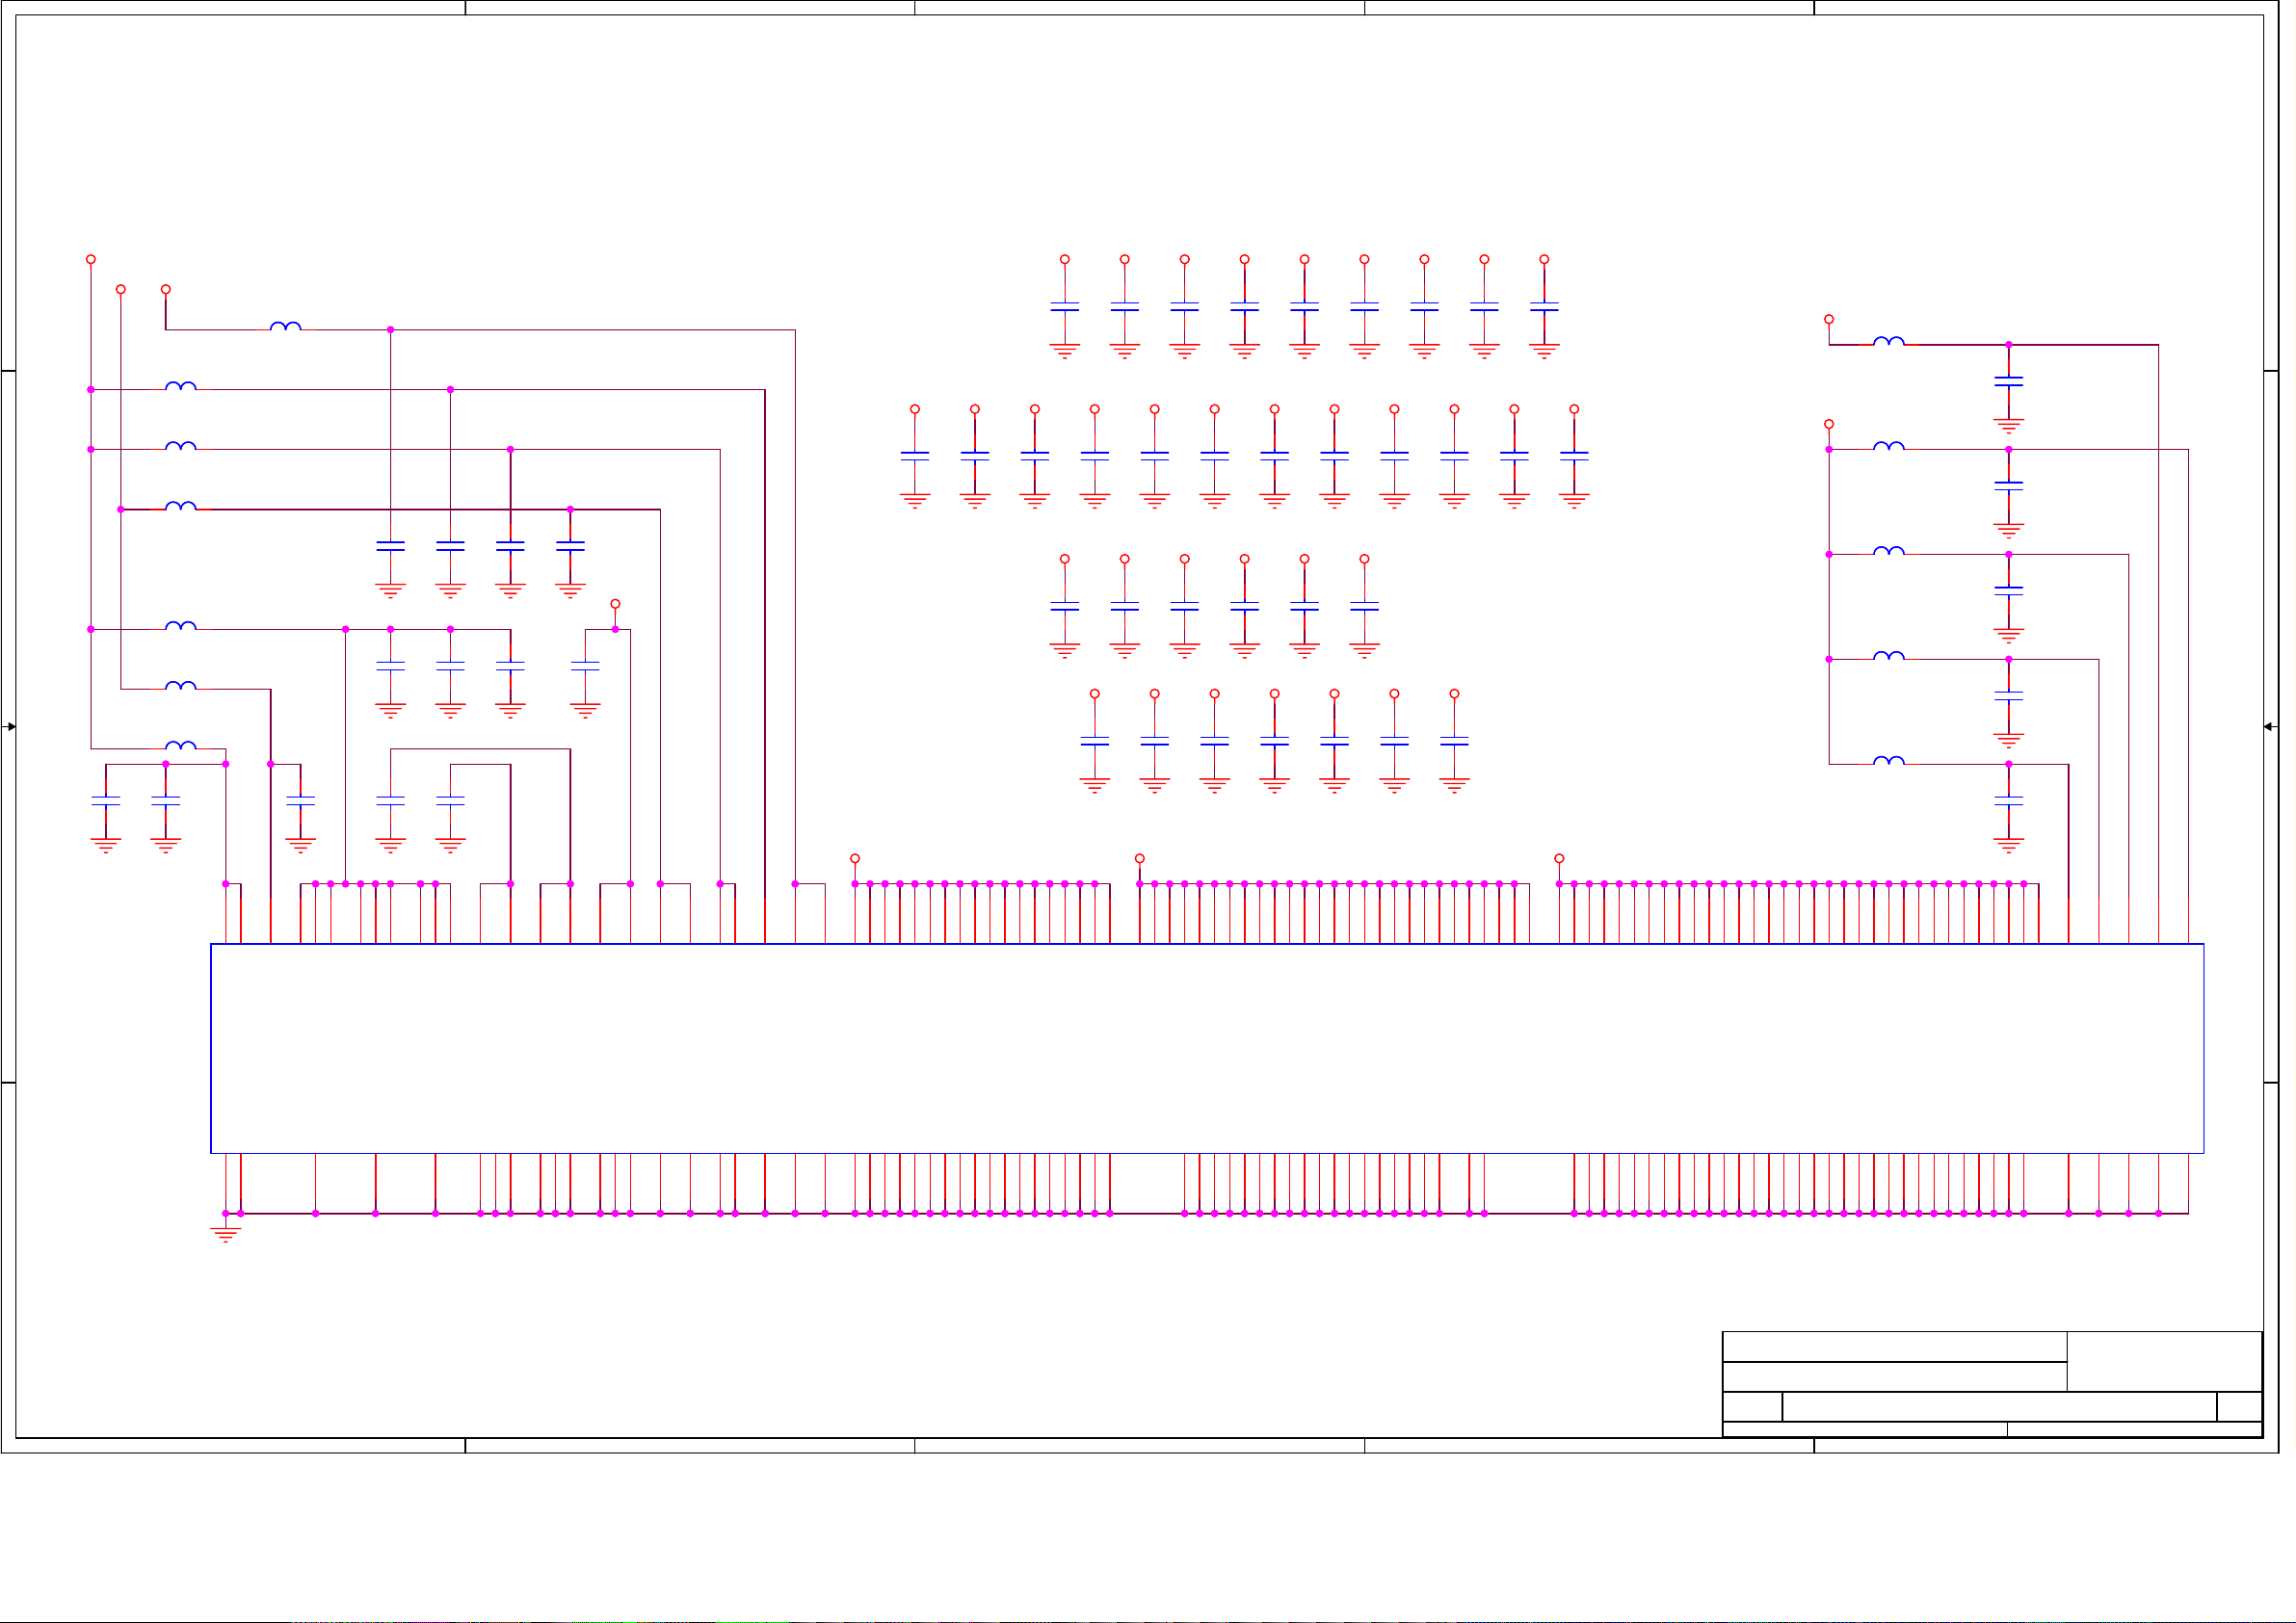
5
28
D D
4
3
2
1
V33A
V18A
V33
FB_1K_OHM_200MA
FB_1K_OHM_200MA
L46
L46
FB_1K_OHM_200MA
FB_1K_OHM_200MA
L48
L48
FB_1K_OHM_200MA
FB_1K_OHM_200MA
L49
L49
FB_1K_OHM_200MA
FB_1K_OHM_200MA
L51
L51
C C
FB_1K_OHM_200MA
FB_1K_OHM_200MA
L53
L53
FB_1K_OHM_200MA
FB_1K_OHM_200MA
L55
L55
FB_1K_OHM_200MA
FB_1K_OHM_200MA
L56
L56
C249
C249
0.1uF
0.1uF
C250
C250
0.1uF
0.1uF
V33X
V33AP
V18ADC
V33AR
V18AM
V33AM
V33ADC
C251
C251
0.1uF
0.1uF
C222
C222
0.1uF
0.1uF
C236
C236
0.1uF
0.1uF
C252
C252
0.1uF
0.1uF
C223
C223
0.1uF
0.1uF
C237
C237
0.1uF
0.1uF
C253
C253
0.1uF
0.1uF
C224
C224
0.1uF
0.1uF
C238
C238
0.1uF
0.1uF
C225
C225
0.1uF
0.1uF
C239
C239
0.1uF
0.1uF
V18ab
V25 V25
C207
C207
0.1uF
0.1uF
C208
C208
0.1uF
0.1uF
V33
V25 V25
C209
C209
0.1uF
0.1uF
V18 V18 V18 V18 V18 V18
C197
C197
0.1uF
0.1uF
C227
C227
0.1uF
0.1uF
V18
V33
C210
C210
0.1uF
0.1uF
C241
C241
0.1uF
0.1uF
V33
C198
C198
0.1uF
0.1uF
V25 V25 V25 V25
C211
C211
0.1uF
0.1uF
C228
C228
0.1uF
0.1uF
V18
C242
C242
0.1uF
0.1uF
C199
C199
0.1uF
0.1uF
C229
C229
0.1uF
0.1uF
V18
V33
C212
C212
0.1uF
0.1uF
C243
C243
0.1uF
0.1uF
V33 V33 V33 V33
C200
C200
0.1uF
0.1uF
C213
C213
0.1uF
0.1uF
C230
C230
0.1uF
0.1uF
V18
C244
C244
0.1uF
0.1uF
C201
C201
0.1uF
0.1uF
C231
C231
0.1uF
0.1uF
C202
C202
0.1uF
0.1uF
V25 V25 V25 V25
C215
C232
C232
0.1uF
0.1uF
C215
0.1uF
0.1uF
C246
C246
0.1uF
0.1uF
C214
C214
0.1uF
0.1uF
V18 V18 V18
C245
C245
0.1uF
0.1uF
C203
C203
0.1uF
0.1uF
C216
C216
0.1uF
0.1uF
C247
C247
0.1uF
0.1uF
C204
C204
0.1uF
0.1uF
V33
C217
C217
0.1uF
0.1uF
C205
C205
0.1uF
0.1uF
C218
C218
0.1uF
0.1uF
V33
FB_1K_OHM_200MA
FB_1K_OHM_200MA
L47
L47
V18A
FB_1K_OHM_200MA
FB_1K_OHM_200MA
L50
L50
FB_1K_OHM_200MA
FB_1K_OHM_200MA
L52
L52
FB_1K_OHM_200MA
FB_1K_OHM_200MA
L54
L54
FB_1K_OHM_200MA
FB_1K_OHM_200MA
L57
L57
V33RES
V18MDSK
V18DPLL
V18MPLL
V18BPLL
C206
C206
0.1uF
0.1uF
C221
C221
1uF
1uF
C226
C226
1uF
1uF
C240
C240
1uF
1uF
C254
C254
1uF
1uF
F24
C25
DACVDD
DACVSS
B26
G23
V33
F10
33VDD1F933VDD2
ADCVDD
33VSS1
ADCVSS
K10
K11
F14
F15
33VDD3
33VDD4
33VSS2
33VSS3
33VSS4
K12
K13
F16
K14
M6
33VDD5
33VDD6L533VDD7L633VDD8M533VDD9
33VSS5
33VSS6
33VSS7
33VSS8
L10
K15
N10
M10
AA10
AA11
33VDD10
33VDD11
33VSS9
33VSS10
33VSS11
P10
R10
AA12
AA16
AA17
33VDD12
33VDD13
33VDD14
33VSS12
33VSS13
33VSS14
T10
U10
U11
AA18
U12
V18AR
B B
A A
R4
R2
AMVDD330
AMVSS330
T4
T2
5
V6
P3
AMVDD18
AMVDD331
AMVSS331
W6
W5
AA1
AVDD331R
AVDD331G
AVDD33REGR0
AVDD33REGR1
AVSS33R
W3
AD4
AF2
AB2
AB1
AVDD33REGG0
AVSS33G
AB4
AF3
AVDD331B
AVDD33REGB0
AVDD33REGG1
AVSS33B
AD2
T6
RREGOUT
AVDD33REGB1
AVSS181R0
AVSS181R1
V4
V2
Y4
U6
AVDDR18
GREGOUT
AVSS181G0
AVSS182R
R6
AA4
AA3
V18AG
Y6
Y5
AVDDG18
BREGOUT
AVSS181B0
AVSS182G
AVSS181G1
V1
AVSS181B1
AC3
AC4
V18AB
AA5
AF4
AVDDB18
DVDD18P
DVSS18P
AVSS182B
Y7
AE5
AA6
AB5
AA7
AVDDP
VDD_33E
DVDD18ADC
VSS_33E
AVSSP
DVSS18ADC
AB7
AB6
AC5
4
AD7
XVDD
XVSS
AF6
AB10
AB11
AB12
33VDD15
33VDD16
33VDD17
33VSS15
33VSS16
33VSS17
U13
U14
U15
V25
G21
F22
25VDD1
33VDD18
33VSS18
3
G22
H21
25VDD2
25VDD3
25VDD4
25VSS1
K17
J21
K21
25VDD5
25VDD6
25VSS2
25VSS3
L16
L17
L21
M21
25VDD7
25VDD8
25VSS4
25VSS5
M15
M16
N21
P21
R21
25VDD9
25VDD10
25VSS6
25VSS7
N15
N16
M17
T21
U21
V21
25VDD11
25VDD12
25VDD13
25VSS8
25VSS9
25VSS10
P15
P16
N17
W21
W22
Y21
25VDD14
25VDD15
25VDD16
U9EPW106
U9EPW106
25VSS11
25VSS12
25VSS13
P17
R15
R16
Y22
AD26
AA25
25VDD17
25VDD18
25VDD19
25VSS14
25VSS15
25VSS16
T16
T17
R17
W25
U26
P26
25VDD21
25VDD20
25VDD22
25VSS17
25VSS18
U17
M23
M25
25VDD23
MREFGND0
U23
V18
F12
J23
L23
R22
25VDD26
25VDD25
25VDD24
25VDD27
Power and Ground
Power and Ground
MREFGND1
F11
18VDD1F618VDD2F718VDD3F818VDD4
18VDD5
18VSS1G718VSS2
18VSS3
18VSS4
L11
K16
G20
2
F13
F17
18VDD6
18VDD7
18VSS5
18VSS6
L12
L13
F18
F19
F20
18VDD8
18VDD9
18VSS7
18VSS8
L14
L15
M11
AF20
F21
18VDD10
18VDD11
18VDD12G618VDD15J618VDD17
18VSS9
18VSS10
18VSS11
M12
M13
M14
Pixelworks Shenzhen
Pixelworks Shenzhen
Pixelworks Shenzhen
Title
Title
Title
Size Document Number Rev
Size Document Number Rev
Size Document Number Rev
Date: Sheet
Date: Sheet
Date: Sheet
K6
AA9
AA13
AA14
AA15
18VDD18
18VDD20
18VSS17
18VSS18
18VSS19
P12
P13
P14
AA19
18VDD21
18VSS20
R11
K5
18VDD13H618VDD19
18VDD14J518VDD16
18VSS12
18VSS13
18VSS14
18VSS15
18VSS16
N11
B
B
B
P11
N12
N13
N14
PW106 PWR
PW106 PWR
PW106 PWR
AA20
AA21
AA22
18VDD22
18VDD23
18VDD24
18VDD25
18VSS21
18VSS22
18VSS23
18VSS24
R12
R13
R14
Confidential
Confidential
Confidential
AB9
AB13
AB14
AB15
AB19
AB20
AB21
AB22
18VDD26
18VDD27
18VDD28
18VDD29
18VDD30
18VDD31
18VDD32
18VSS25
18VSS26
18VSS27
18VSS28
18VSS29
18VSS30
18VSS31
T11
T12
T13
T14
T15
Y20
U16
OPAL SINGLE CHANNEL
OPAL SINGLE CHANNEL
OPAL SINGLE CHANNEL
1
AF21
18VDD33
BPLLVDD
MPLLVDD
BPLLVSS
MPLLVSS
AE19
AB18
8100 SW Nyberg Rd.
8100 SW Nyberg Rd.
8100 SW Nyberg Rd.
Tualatin, OR 97062
Tualatin, OR 97062
Tualatin, OR 97062
(503) 612-6700
(503) 612-6700
(503) 612-6700
10 12Friday, April 07, 2006
10 12Friday, April 07, 2006
10 12Friday, April 07, 2006
AF22
DPLLVDD
DPLLVSS
AB17
of
of
of
AD19
K22
URESVDD
MDSKVDD
MDSKVSS
URESVSS
G24
AE20
A
A
A
Page 31
5
29
4
3
R274
R274
10K
10K
R275
R275
10K
10K
VCCV33V33
V33 V33 V33V33 VCCVCC
R283
R283
4.7K
4.7K
2
R285
R284
R284
4.7K
4.7K
R285
4.7K
4.7K
R286
R286
4.7K
4.7K
R287
R287
4.7K
4.7K
1
R288
R288
4.7K
4.7K
VCC
D D
C168
C168
10uF
10uF
C C
SIF2
C169
C169
10uF
10uF
R3390R339
0
D+5V
C170
C170
1500pF
1500pF
C2
SIF1
47pFC247pF
D+5V
B B
A A
R3811R381
1
C171
C171
10uF
10uF
C1
47pFC147pF
VCC
R383
R383
R382
R382
C4
C4
0.47uF
0.47uF
R3380R338
0
C172
C172
10uF
10uF
C5
1uFC51uF
DVD-R
DVD-L
AV1-RIN
AV1-LIN
A+5V
C173
C173
1500pF
1500pF
120
120
L22
L22
C3
120
120
L23
L23
100
100
100
100
L24 120L24 120
12
R384
R384
0.1uFC30.1uF
Y3 XTAL 24.000Y3 XTAL 24.000
1 2
TDA9875AH
TDA9875AH
C8
1 2
C9
1 2
1uFC81uF
1uFC91uF
1 2
C6 1uFC6 1uF
1 2
C7 1uFC7 1uF
V5SDA
C167 0.47uFC167 0.47uF
10k
10k
U15
U15
64
1
P1
2
SIF2
3
Vref1
4
SIF1
5
ADDR2
6
VSSD1
7
VDDD1
8
CRESET
9
VSSD4
10
XTALI
11
XTALO
12
P2
13
SYSCLK
14
SCK
15
WS
16
SDO2
R37647R376
47
R37547R375
47
V5SCL
D+5V
R387
R387
100
100
63
Iref
VDEC1
SDO117SDI218SDI119TEST120MONOIN
R388
R388
100
100
C166
C166
0.47uF
0.47uF
R385
R385
L29
L29
100
100
120
120
L28
L28
120
120
60
59
62
61
VSSA1
SDA
SCL
ADDR1
57
58
MICAM
TEST222EXTIR23EXTIL24SCIR125SCIL126VSSD327SCIR228SCIL229VDEC230Vref(p)31Vref(n)
21
R374
R374
15k
15k
56
PCLK
VDDD2
55
R3891R389
1
L27
L27
120
120
54
LOL
LOR
R373
R373
15k
15k
A+5V
R3861R386
1
52
50
53
51
MOL
MOR
VDDA
VSSA3
AUXOL
PCAPL
PCAPR
SCOL2
SCOR2
VSSA4
VSSD2
SCOL1
SCOR1
VSSA2
C11
C11
C10
C10
0.47uF
0.47uF
R37047R370
R371 47R371 47
R3800R380
R3790R379
C165
C165
10uF
10uF
49
AUXOR
Vref3
Vref2
i.c.3
i.c.2
i.c.1
i.c.0
32
C12
C12
R372
R372
270
270
10uF
10uF
10uF
10uF
47
C29
C29
0.01uF
0.01uF
48
47
46
45
44
43
42
41
40
39
38
37
36
35
34
33
0
0
C27
C27
0.01uF
0.01uF
C25
C25
0.01uF
0.01uF
R3780R378
C18
C18
C16
C16
C15
C15
C35
C35
C36
C36
1uF
1uF
1uF
1uF
C23
C23
0.01uF
0.01uF
10uF
10uF
10uF
10uF
10uF
10uF
C13
C13
10uF
10uF
C14
C14
10uF
10uF
12
12
C21
C21
470pF
470pF
0
C17
C17
UPINT
C20
C20
C22
C22
C24
C24
C26
C26
C28
C28
C30
C30
C19
C19
470pF
470pF
10uF
10uF
2.2uF
2.2uF
2.2uF
2.2uF
2.2uF
2.2uF
2.2uF
2.2uF
2.2uF
2.2uF
2.2uF
2.2uF
R3770R377
C31
C31
0.01uF
0.01uF
I2SL-HDMI
I2SR-HDMI
SCART2-ROUT
SCART2-LOUT
MAIN-LOUT
MAIN-ROUT
EAR-LOUT
EAR-ROUT
0
C32
C32
2.2uF
2.2uF
C33 2.2uFC33 2.2uF
C34
C34
0.01uF
0.01uF
CVBS1
CVBS2
CS1
YS1
Y-SOG2
PR2
PB2
YP2
VGA-R
VGA-G
VGA-B
VGA-HS
VGA-VS
SIF1
SIF2
UPINT5
2N7002
2N7002
R276
R276
4.7K
4.7K
TSDA
JM3
JM3
UPSCL
UPSDA
SCART1-LOUT
SCART1-ROUT
R2900R290
0
R2910R291
0
R2920R292
0
R2930R293
0
R2940R294
0
R2950R295
0
R2960R296
0
R3040R304
0
R3050R305
0
R3060R306
0
R3070R307
0
R3080R308
0
R3090R309
0
V33 V33 VCC
R280
R280
10K
10K
R281
R281
10K
10K
UP5SCL
V33V33 VCC
JM52N7002 JM52N7002
R277
R277
10K
10K
R278
R278
10K
10K
JM42N7002 JM42N7002
J706
J706
30
30
29
29
28
28
27
27
26
26
25
25
24
24
23
23
22
22
21
21
20
20
19
19
18
18
17
17
16
16
15
15
14
14
13
13
12
12
11
11
10
10
9
9
8
8
7
7
6
6
5
5
4
4
3
3
2
2
1
1
CON30
CON30
V33
JM62N7002 JM62N7002
R282
R282
4.7K
4.7K
V5SDA
V5SCL
TTSCL
R279
R279
4.7K
4.7K
TTSDA
UP5SDA
FB1,ASP1,ASP2 For SCART ONLY!
VCC VCC
R270
R270
4.7K
4.7K
JM1
JM1
2N7002
2N7002
TSCL
ASP2
FB1
DVD-IR
RXD0
TXD0
MUTE
SEL2
EARST
ASP1
UP5SDA
SCART2-ROUT
SCART2-LOUT
MAIN-ROUT
MAIN-LOUT
EAR-ROUT
EAR-LOUT
SCART1-ROUT
SCART1-LOUT
AV1-RIN
AV1-LIN
JM2 2N7002JM2 2N7002
2N7002
2N7002
JM7
JM7
UPINT5
R3190R319
R3200R320
R3210R321
R3220R322
R271
R271
4.7K
4.7K
V5SDA
V5SCL
V33 V33
R3400R340
R3350R335
R3360R336
R33711R337
R3150R315
R3140R314
R3160R316
R3250R325
R3260R326
R3170R317
R3180R318
R3230R323
R3240R324
R3270R327
R3280R328
R3290R329
R3300R330
R3310R331
R3320R332
R3330R333
R3340R334
R272
R272
4.7K
4.7K
R3410R341
0
0
0
0
R273
R273
4.7K
4.7K
TTSCLTTSDA
0
J705
J705
1
SDA1
SCL1
1
2
2
3
3
4
4
5
5
6
6
7
7
8
8
9
9
10
10
11
11
12
12
13
13
14
14
15
15
16
16
17
17
18
18
19
19
20
20
21
21
22
22
23
23
24
24
25
25
26
26
27
27
28
28
29
29
30
30
CON30
CON30
0
0
0
11
0
0
0
0
0
0
0
0
0
0
0
0
0
0
0
0
0
Title
Title
Title
Size Document Number Rev
Size Document Number Rev
Size Document Number Rev
Date: Sheet
Date: Sheet of
5
4
3
2
Date: Sheet of
TDA9875AH
TDA9875AH
TDA9875AH
<Doc> <RevCode>
B
<Doc> <RevCode>
B
<Doc> <RevCode>
B
of
11 12Monday, June 26, 2006
11 12Monday, June 26, 2006
11 12Monday, June 26, 2006
1
Page 32
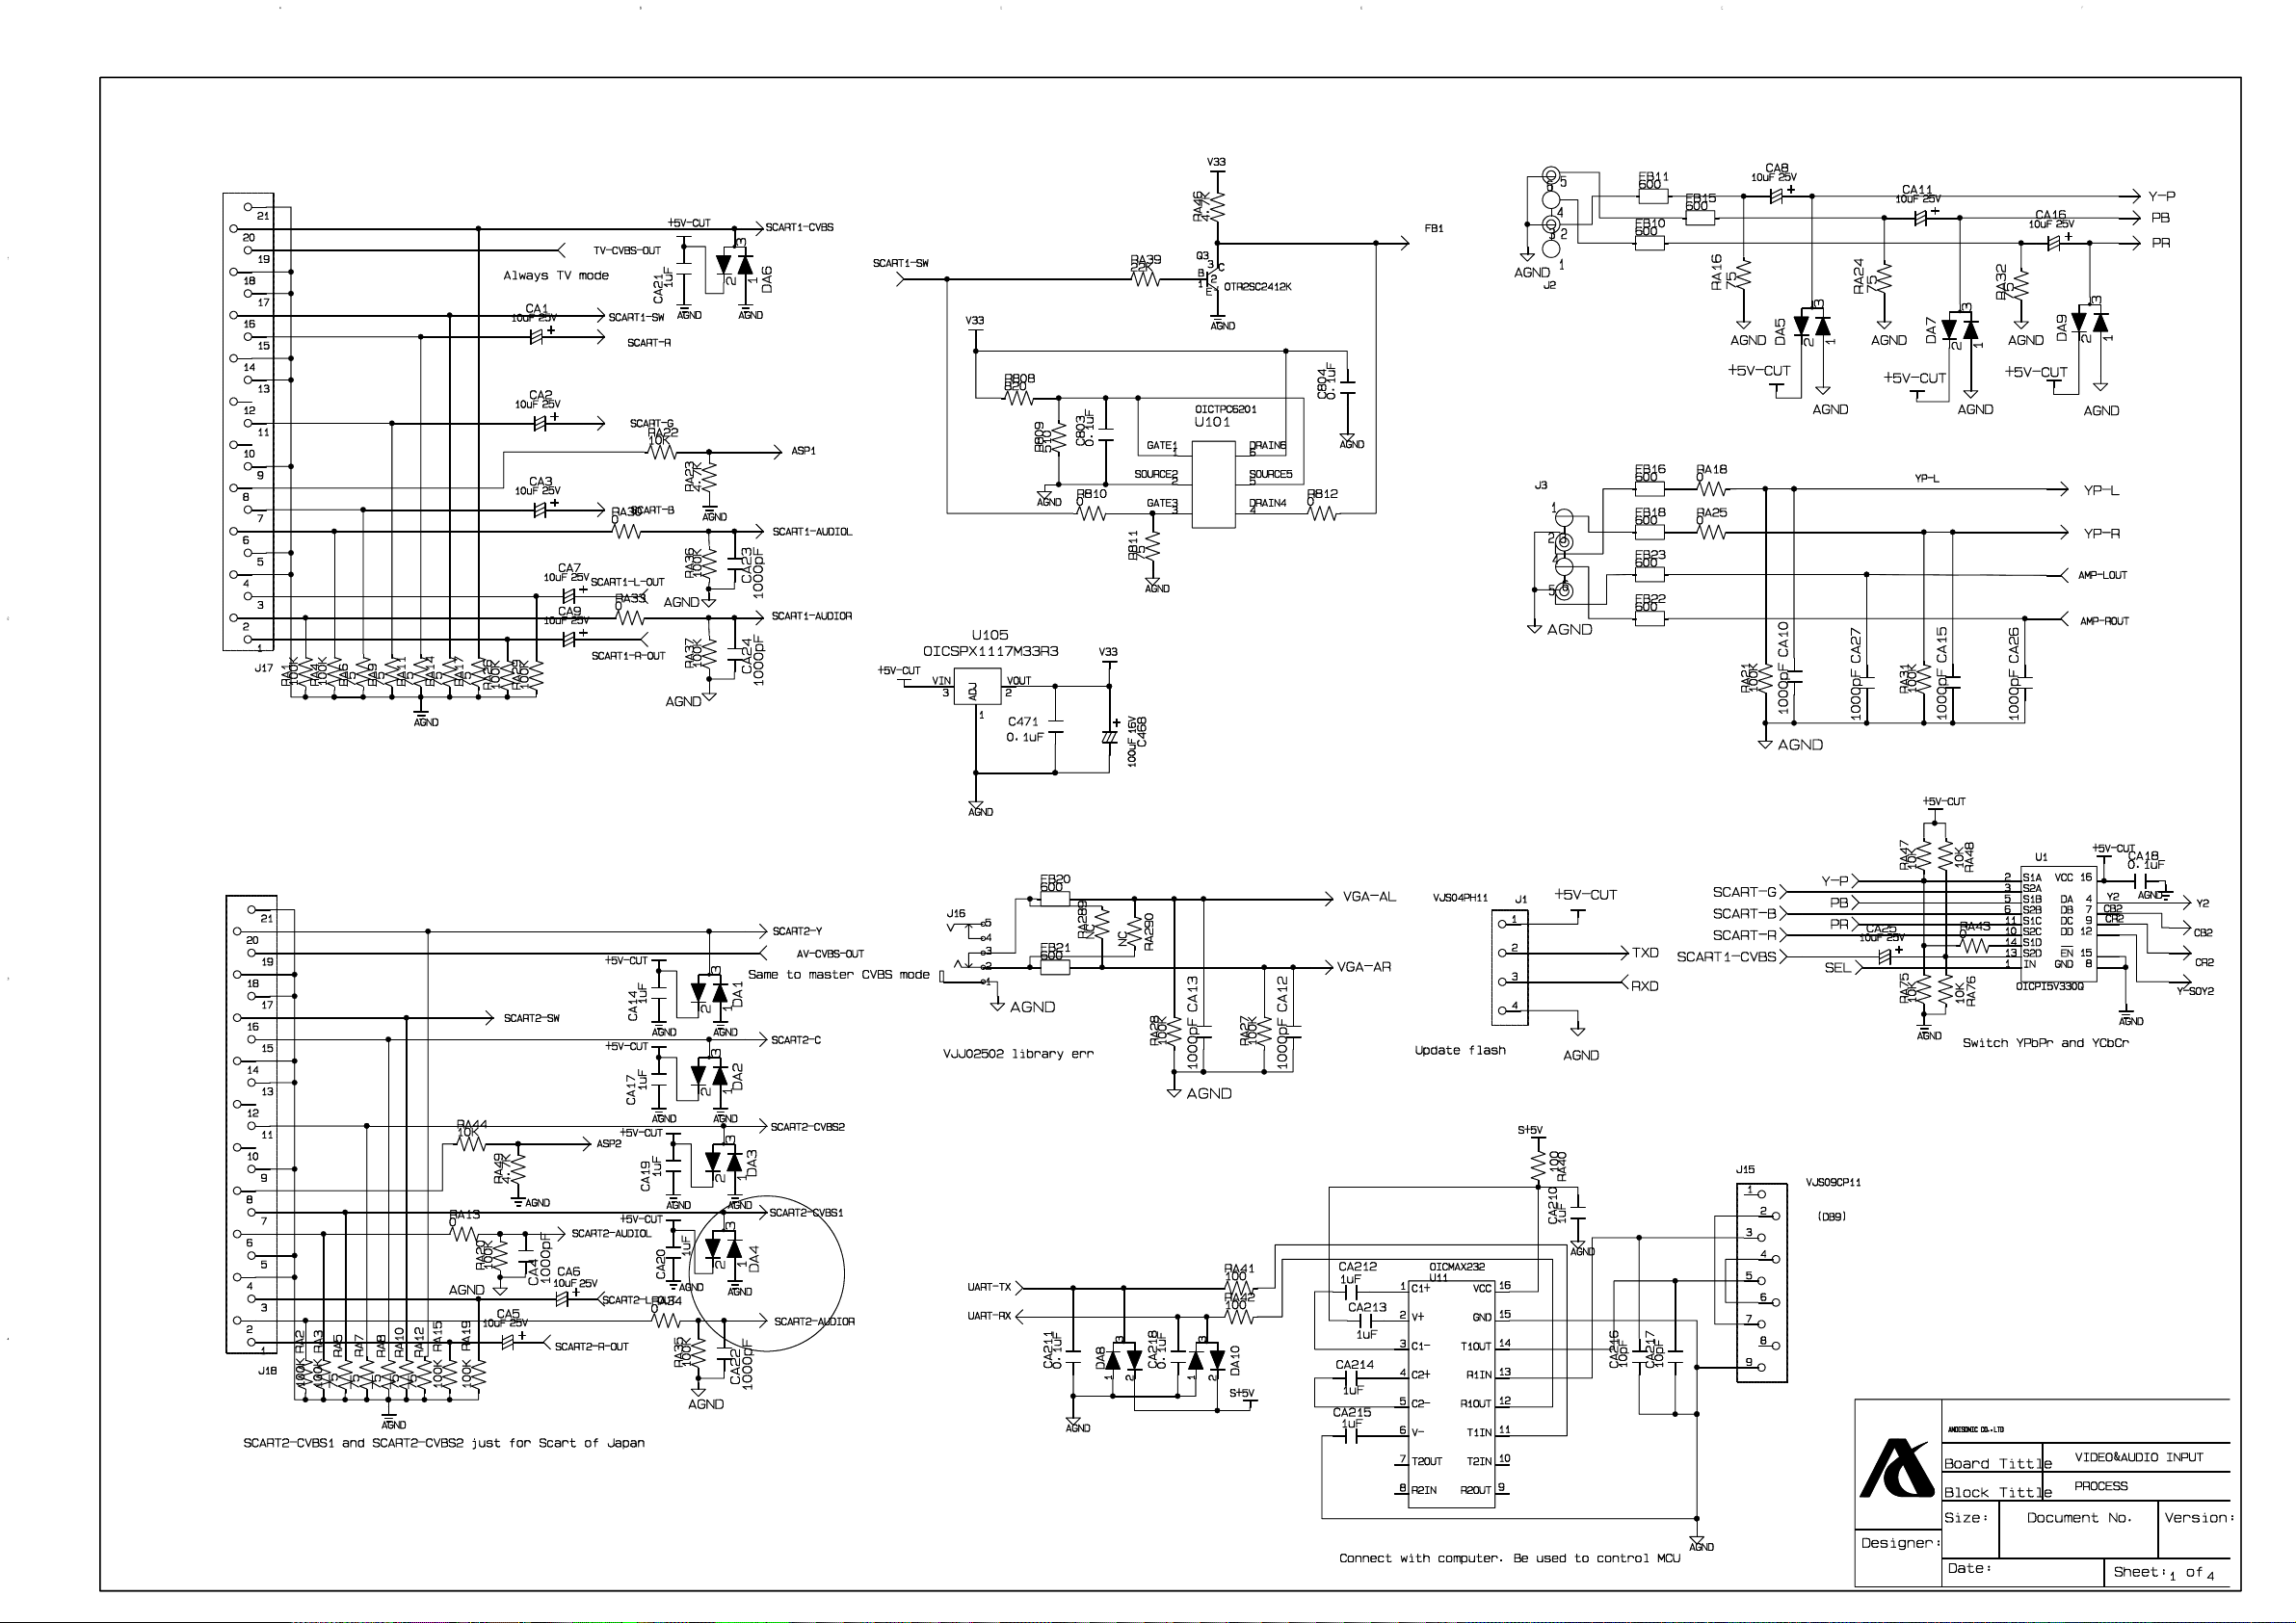
30
TVL1517-OPAL
2006.05.14
Page 33
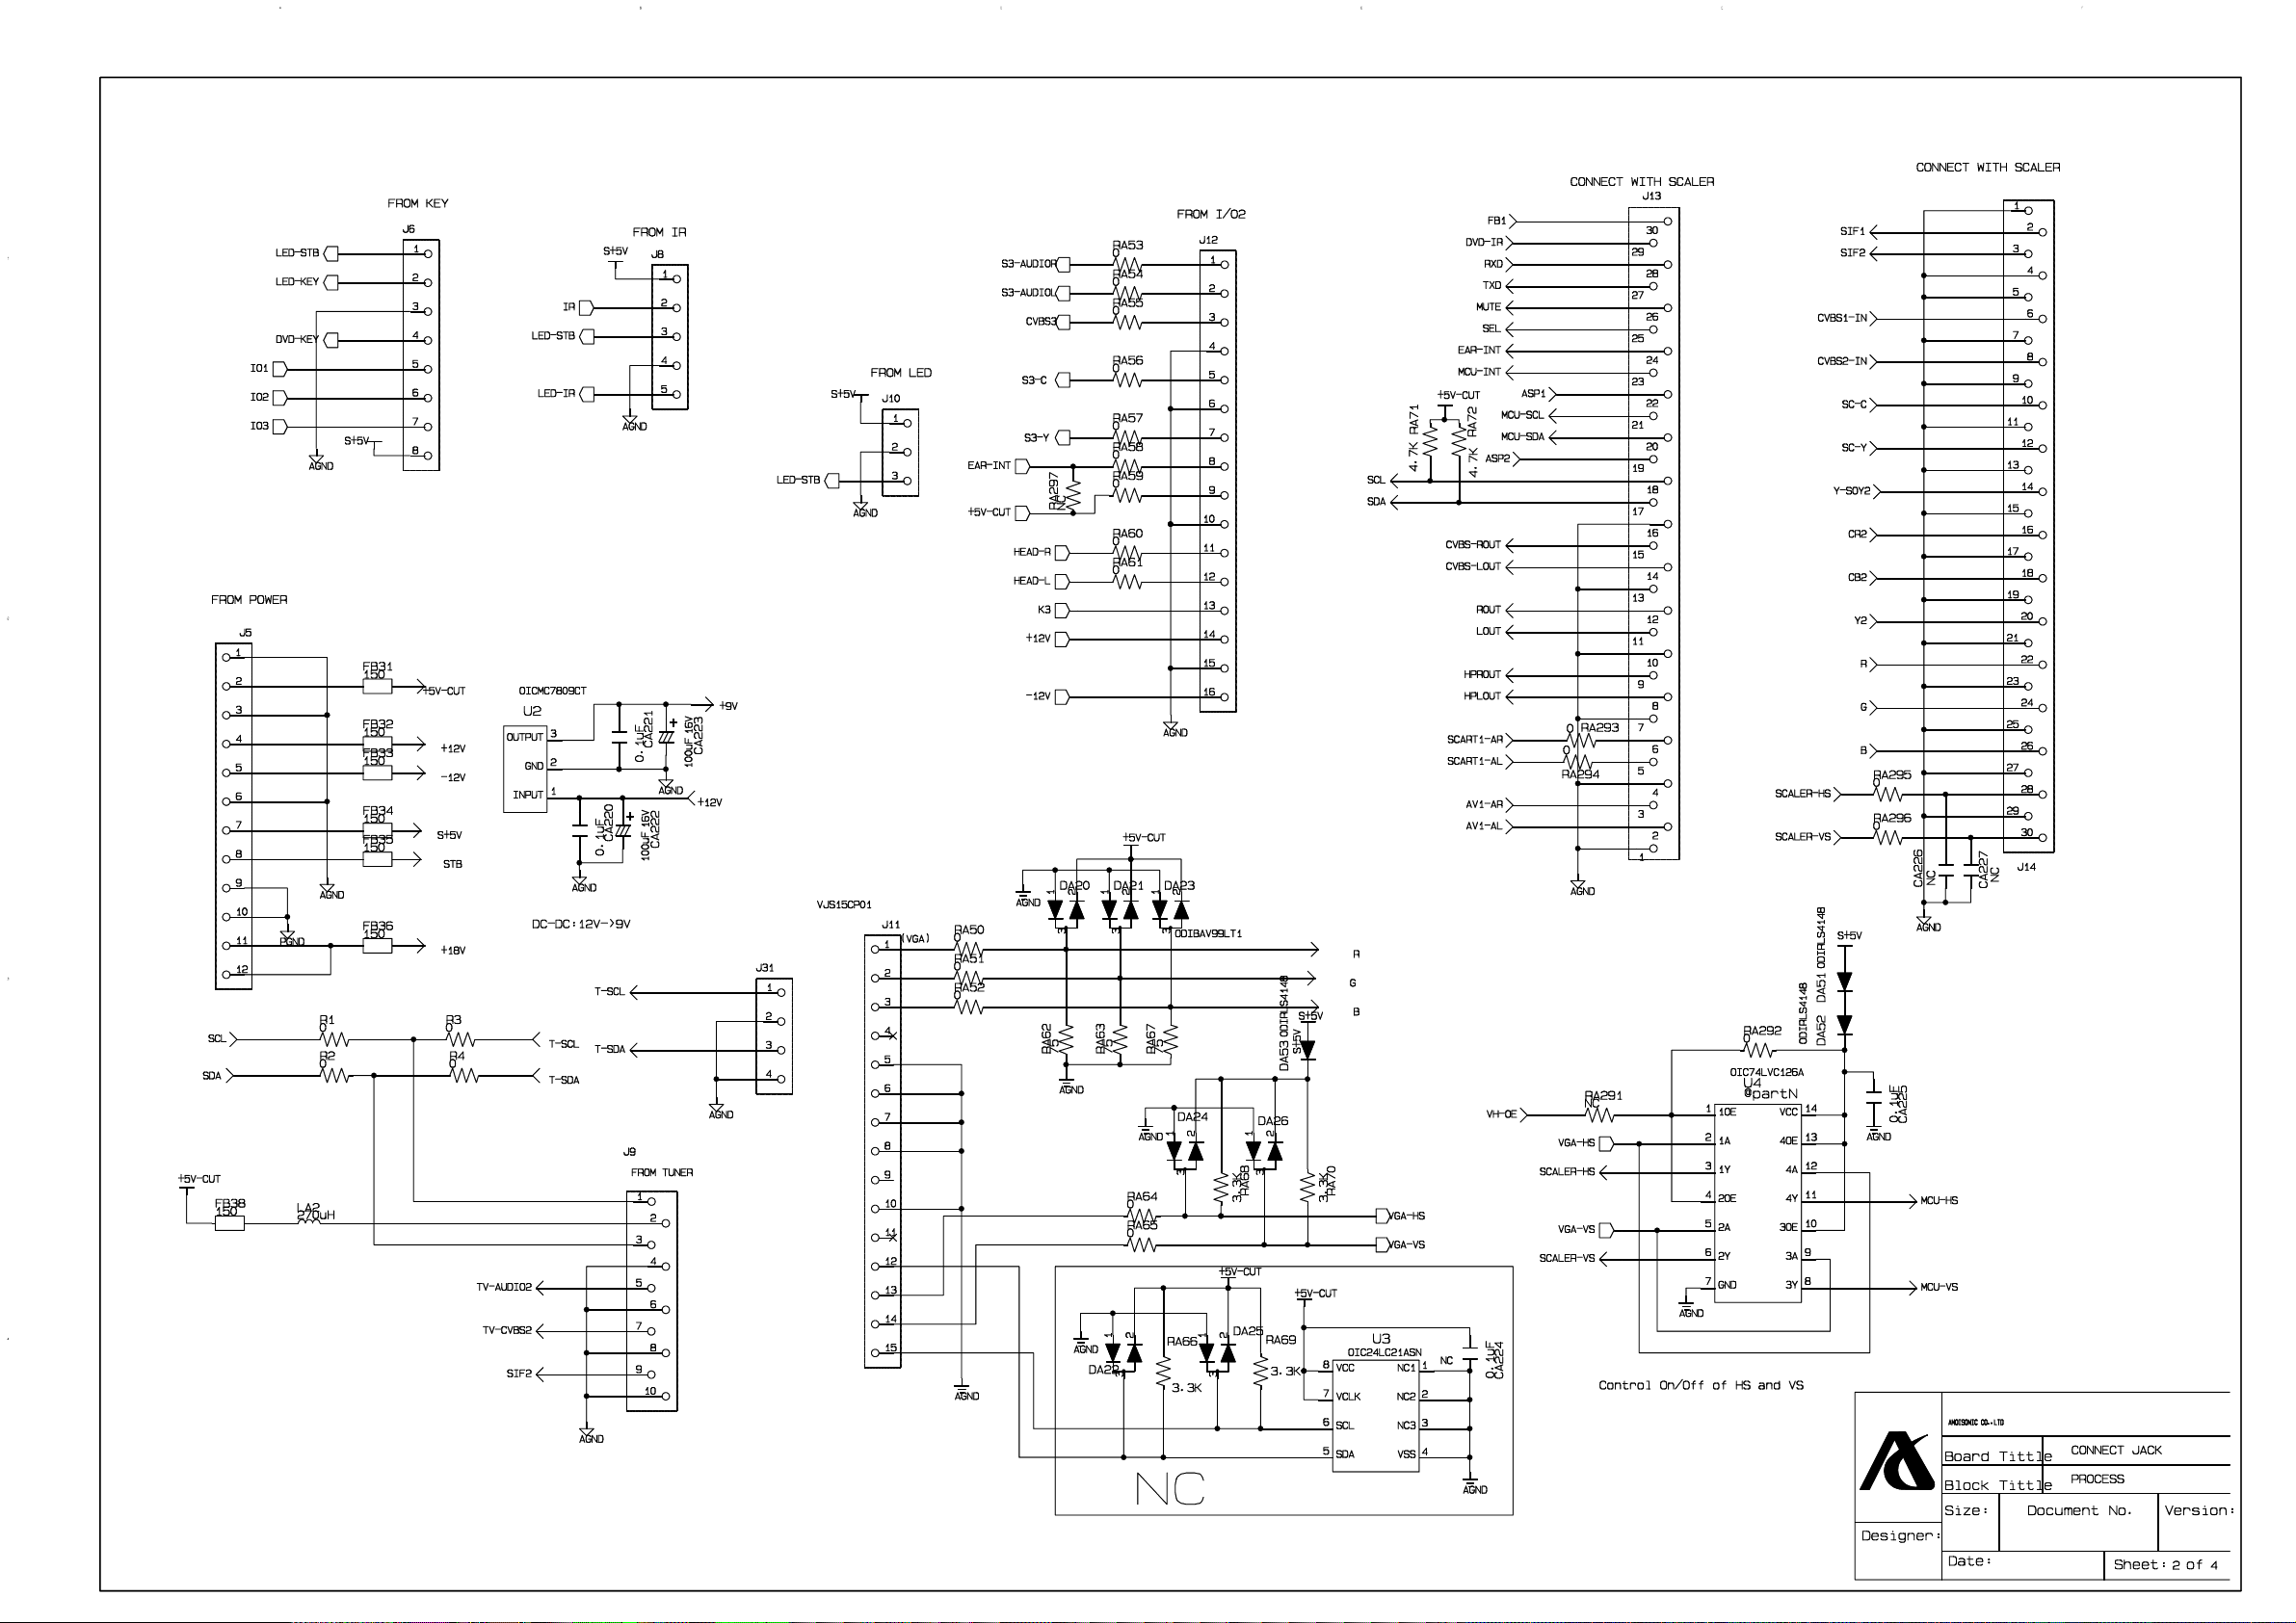
31
TVL1517-OPAL
2006.05.14
Page 34
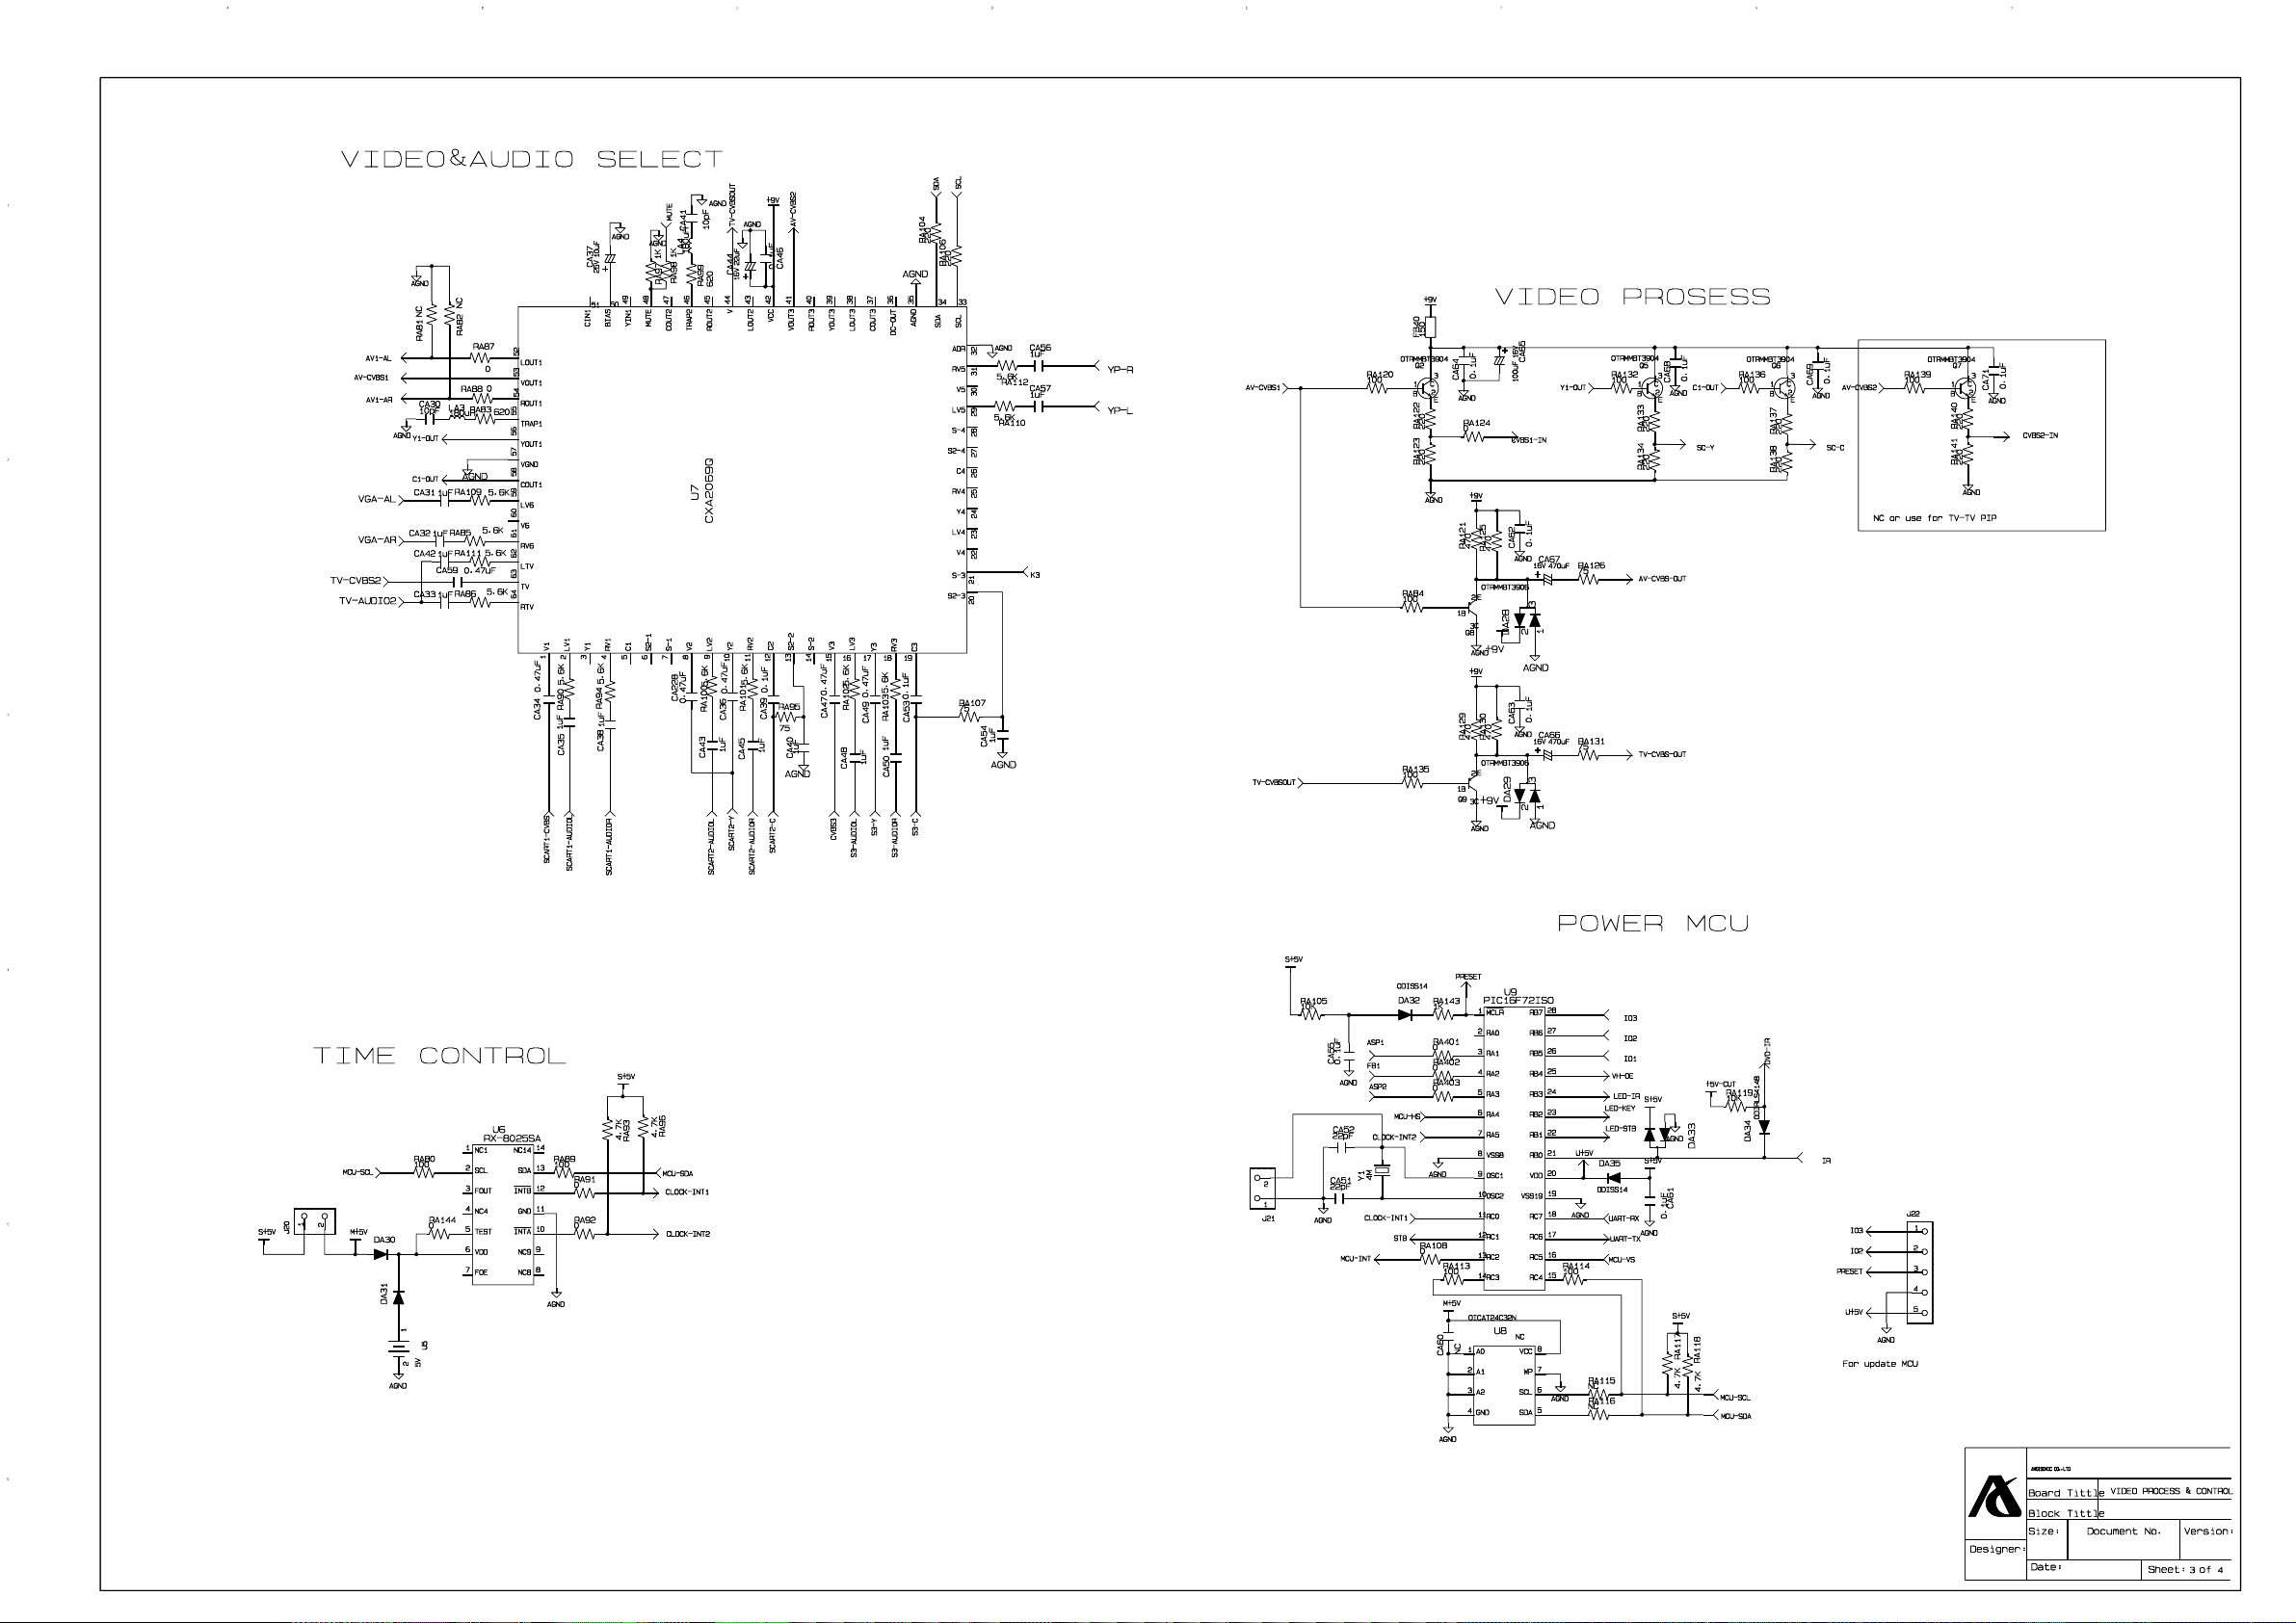
32
TVL1517-OPAL
2006.05.14
Page 35
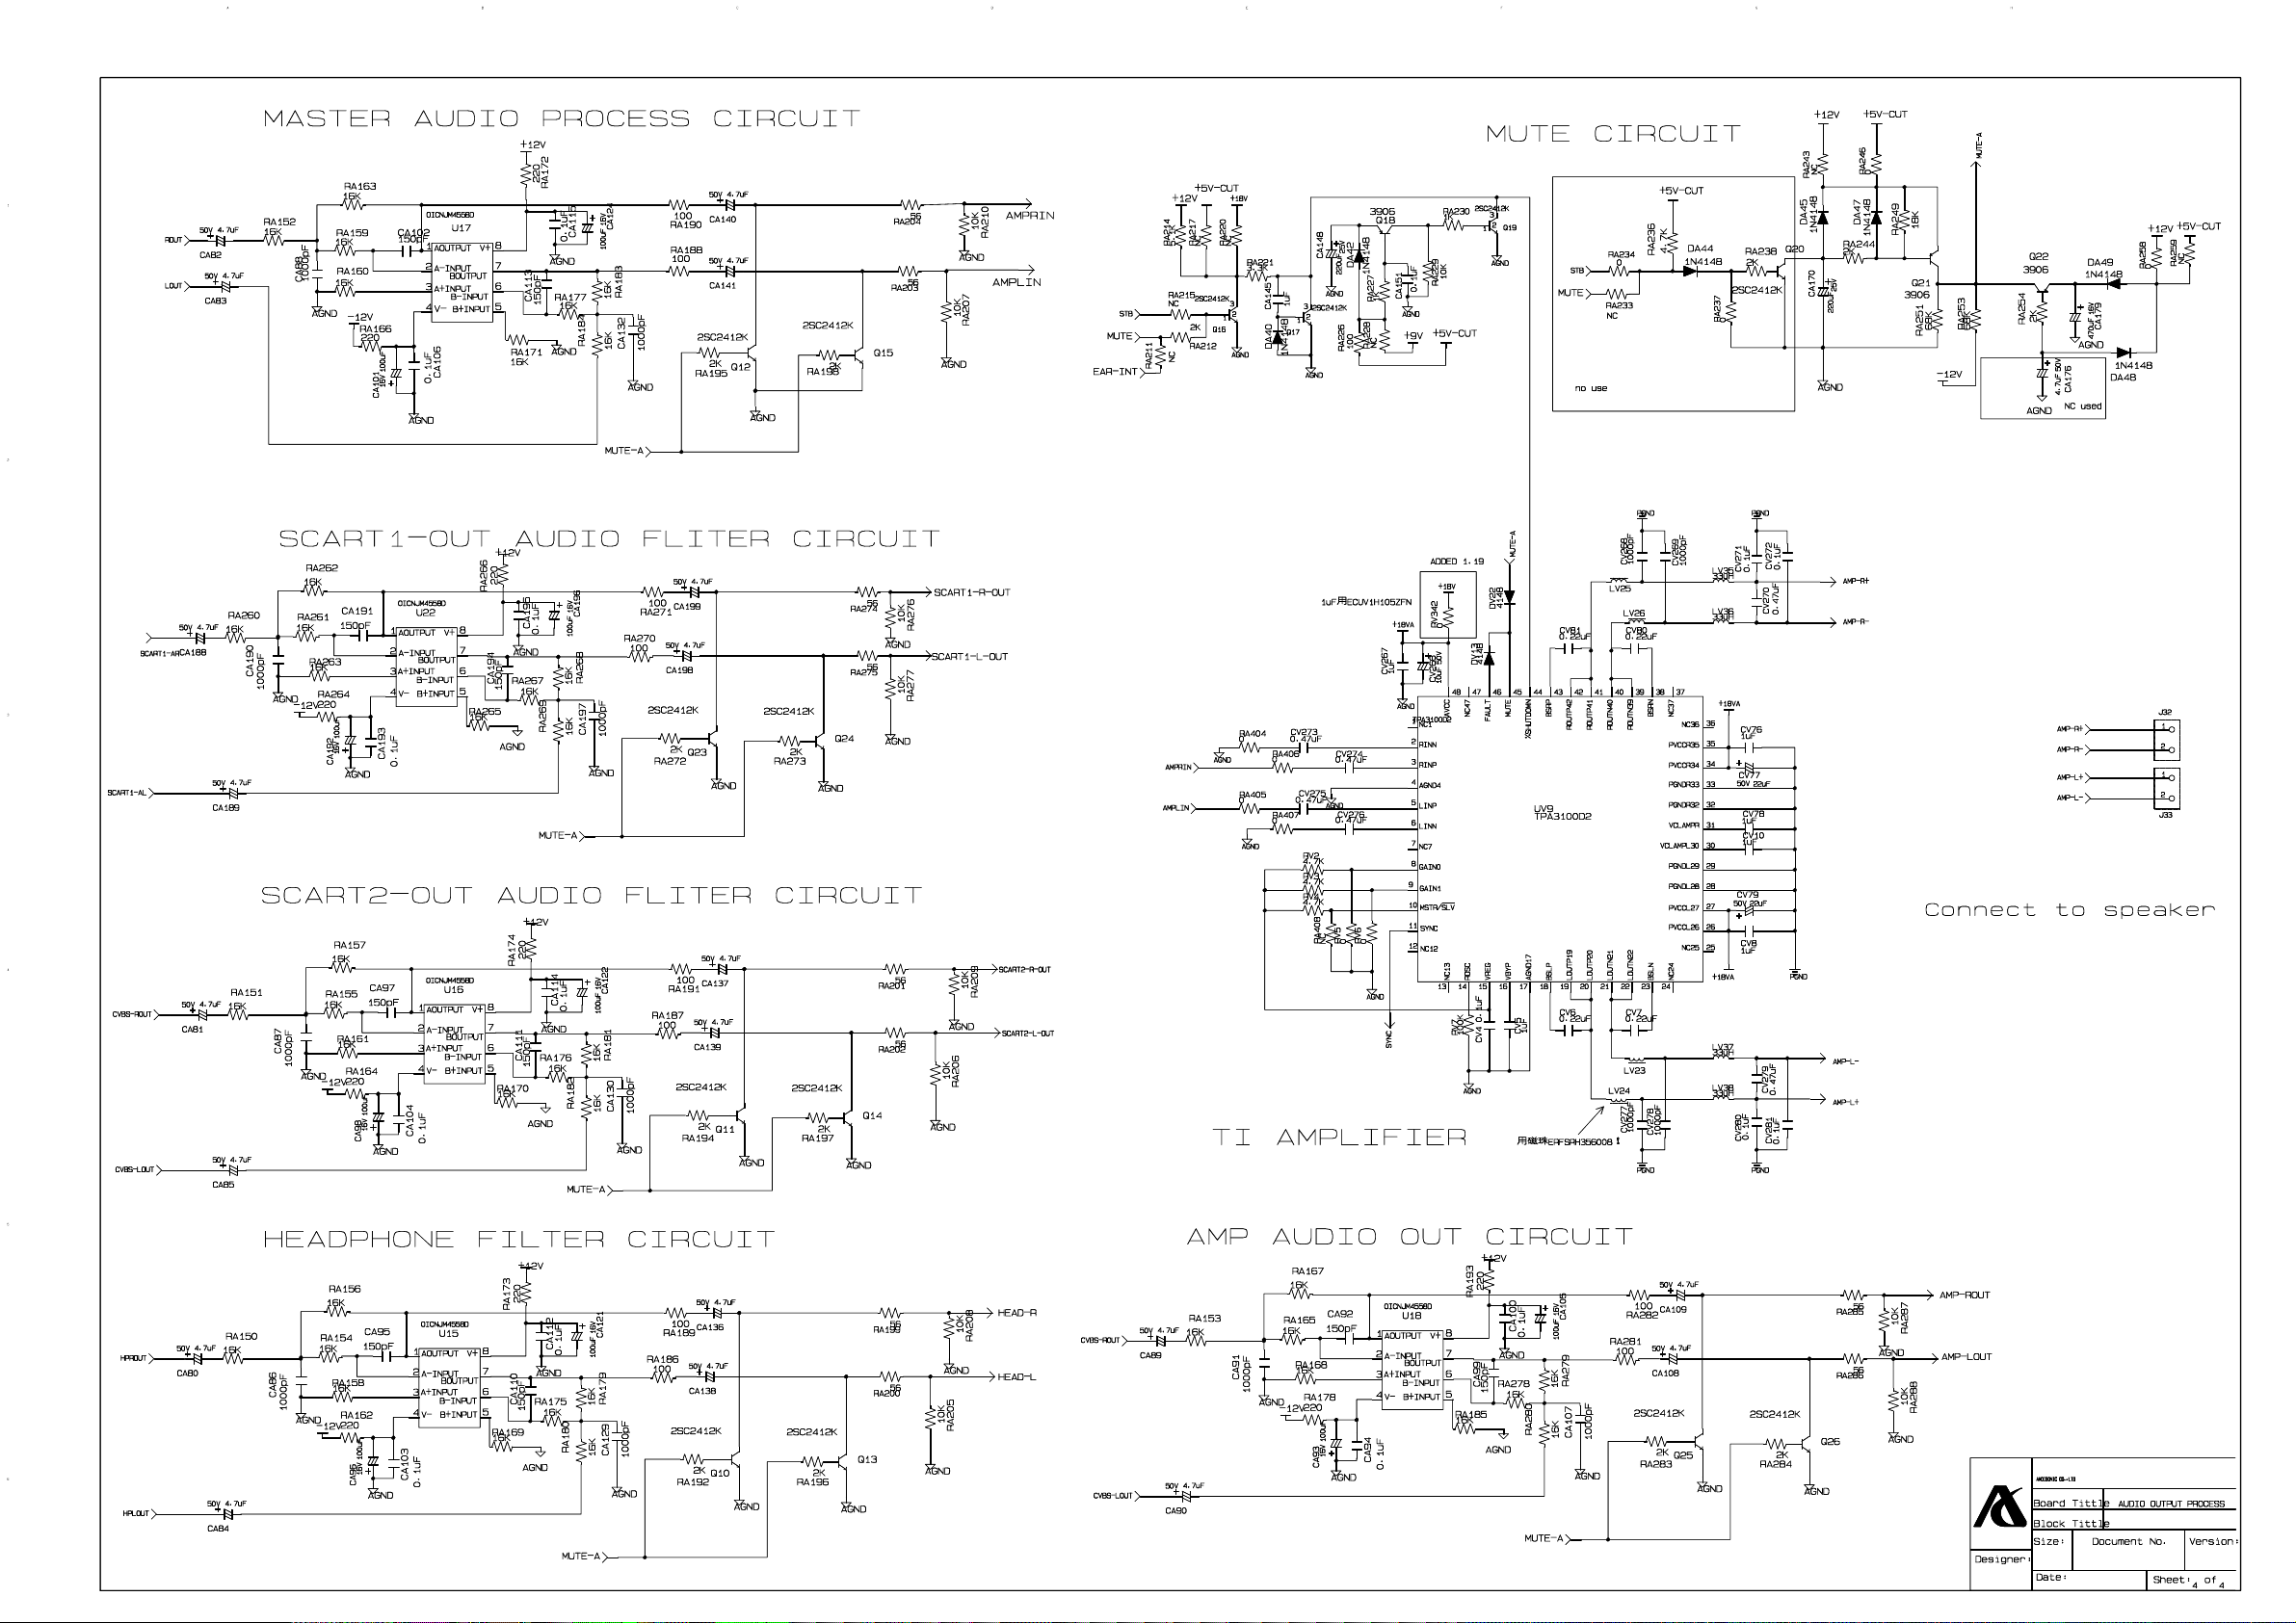
33
TVL1517-OPAL
2006.05.14
Page 36

34 35
6.2.Schematic Diagrams
Scaler and I/O part for LC32T1E/LC37T1E/LC42T1E
Page 37
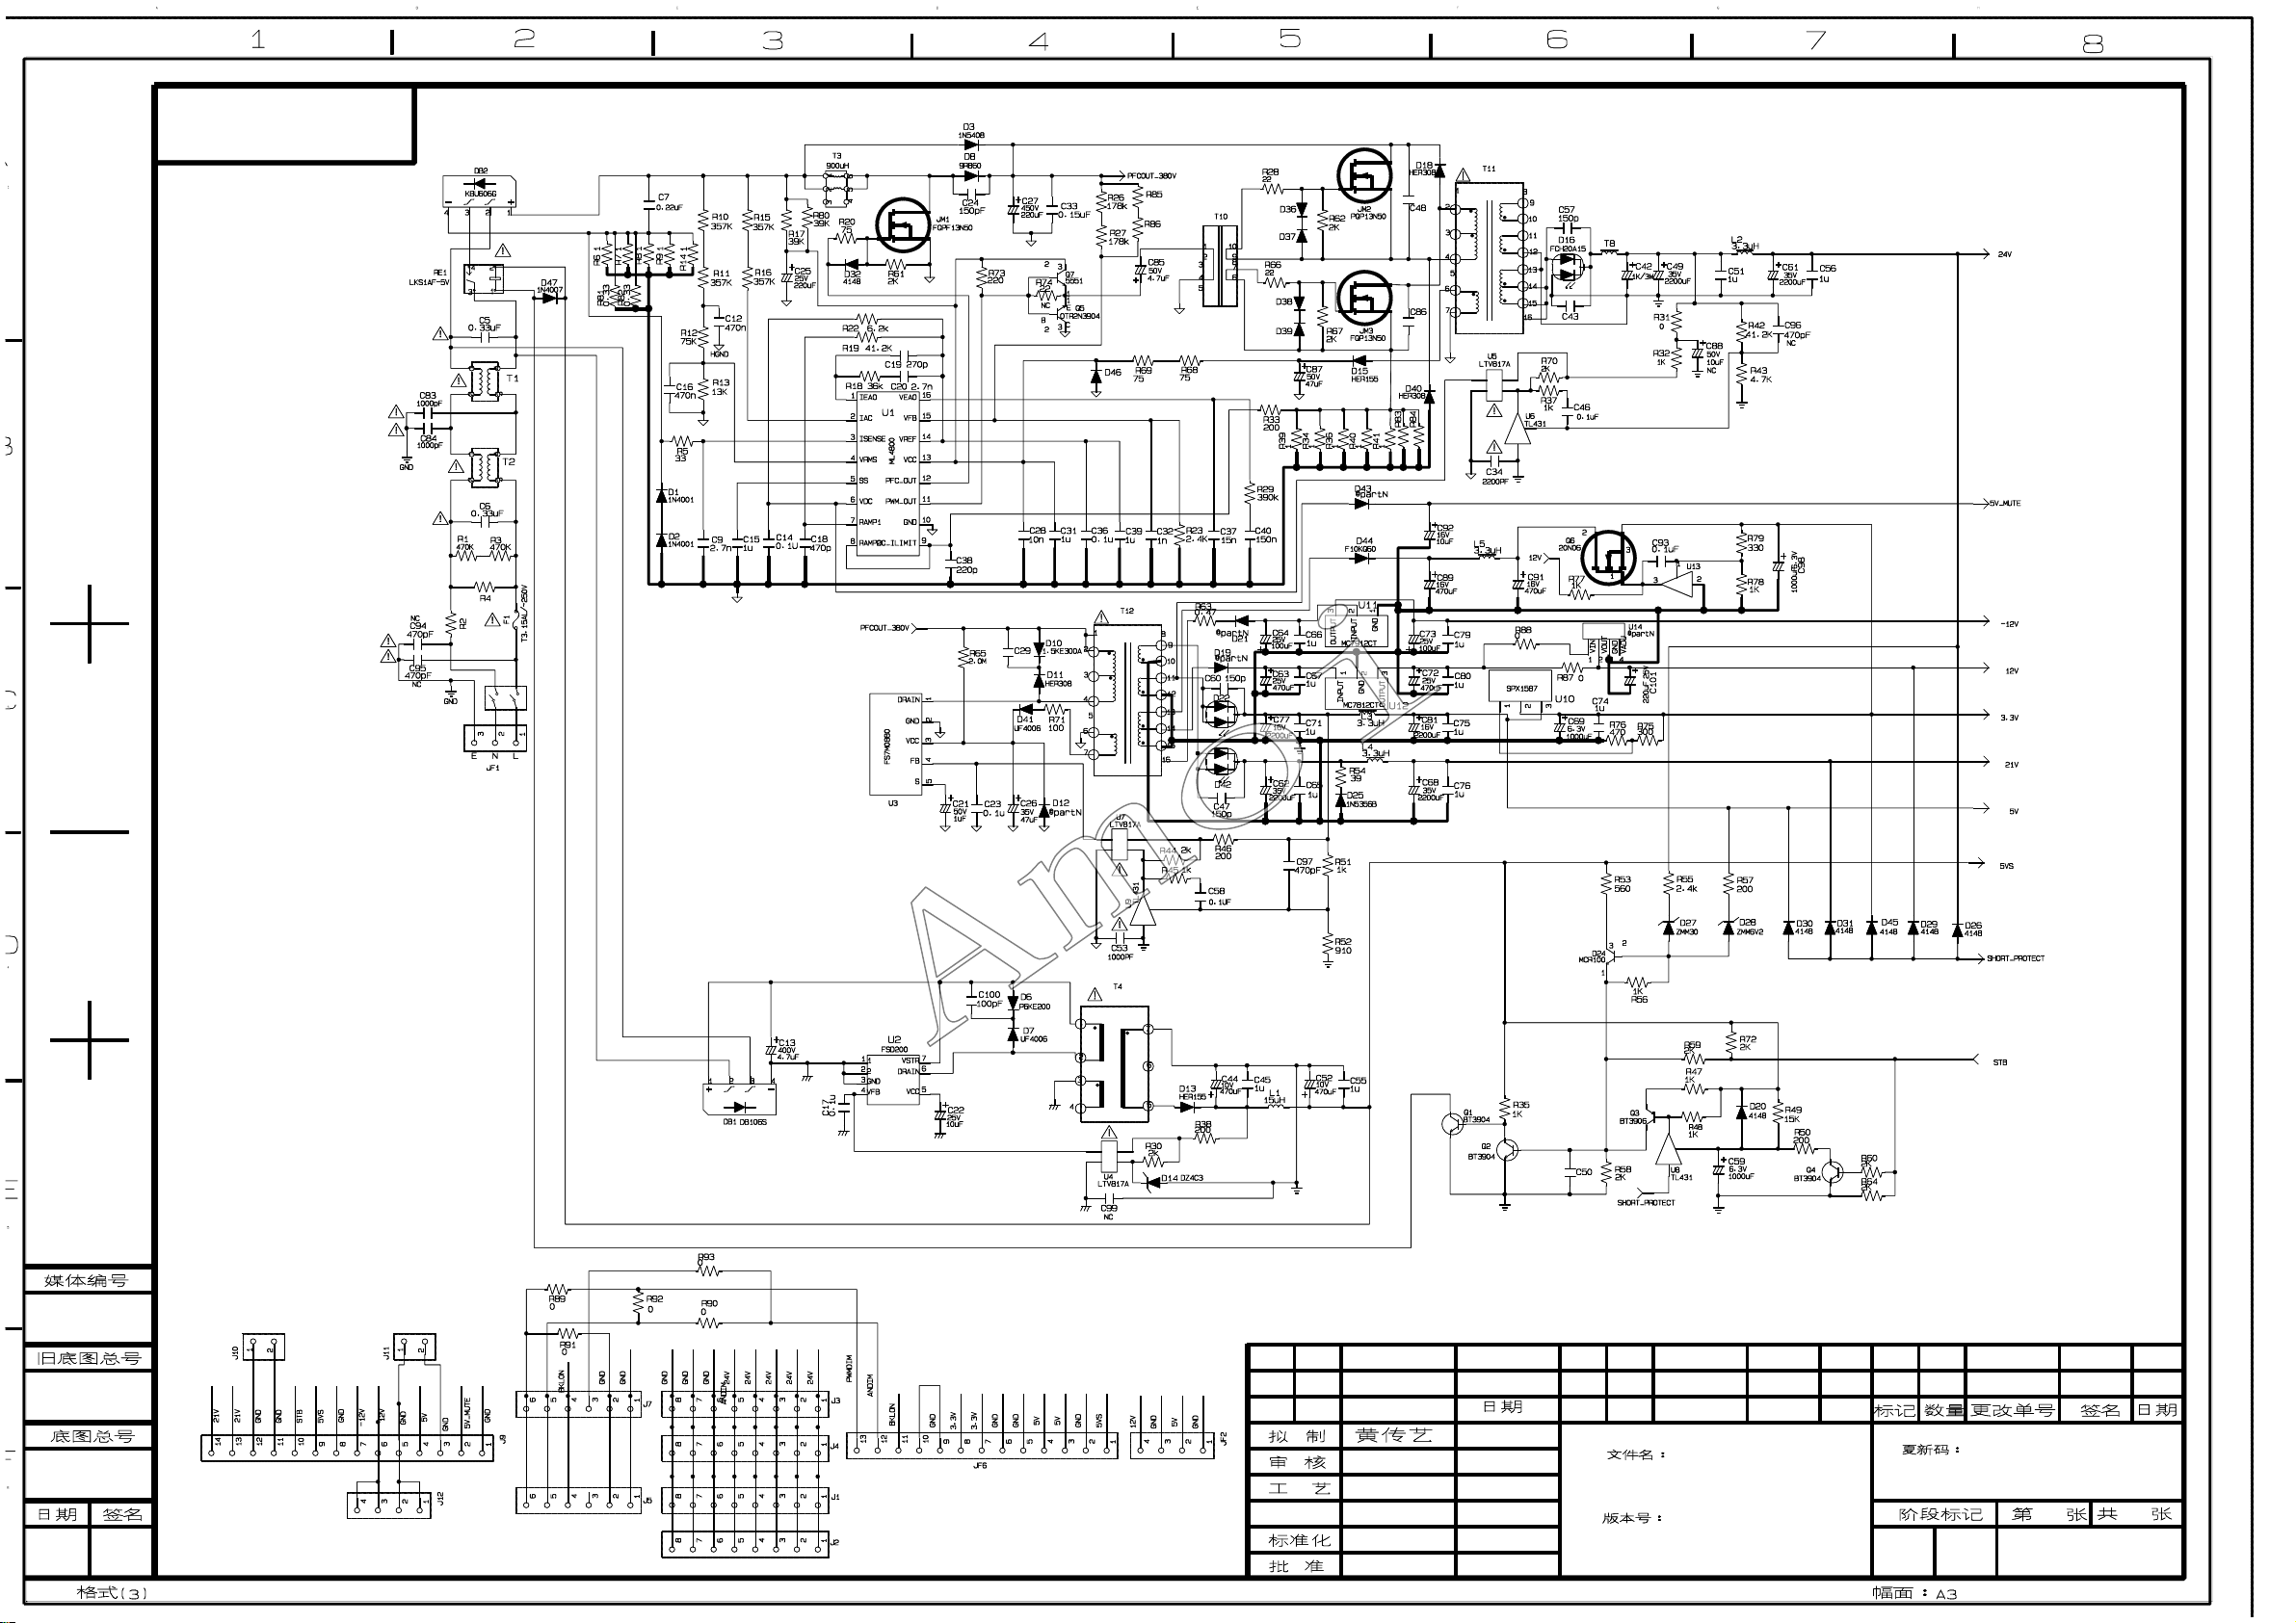
Page 38
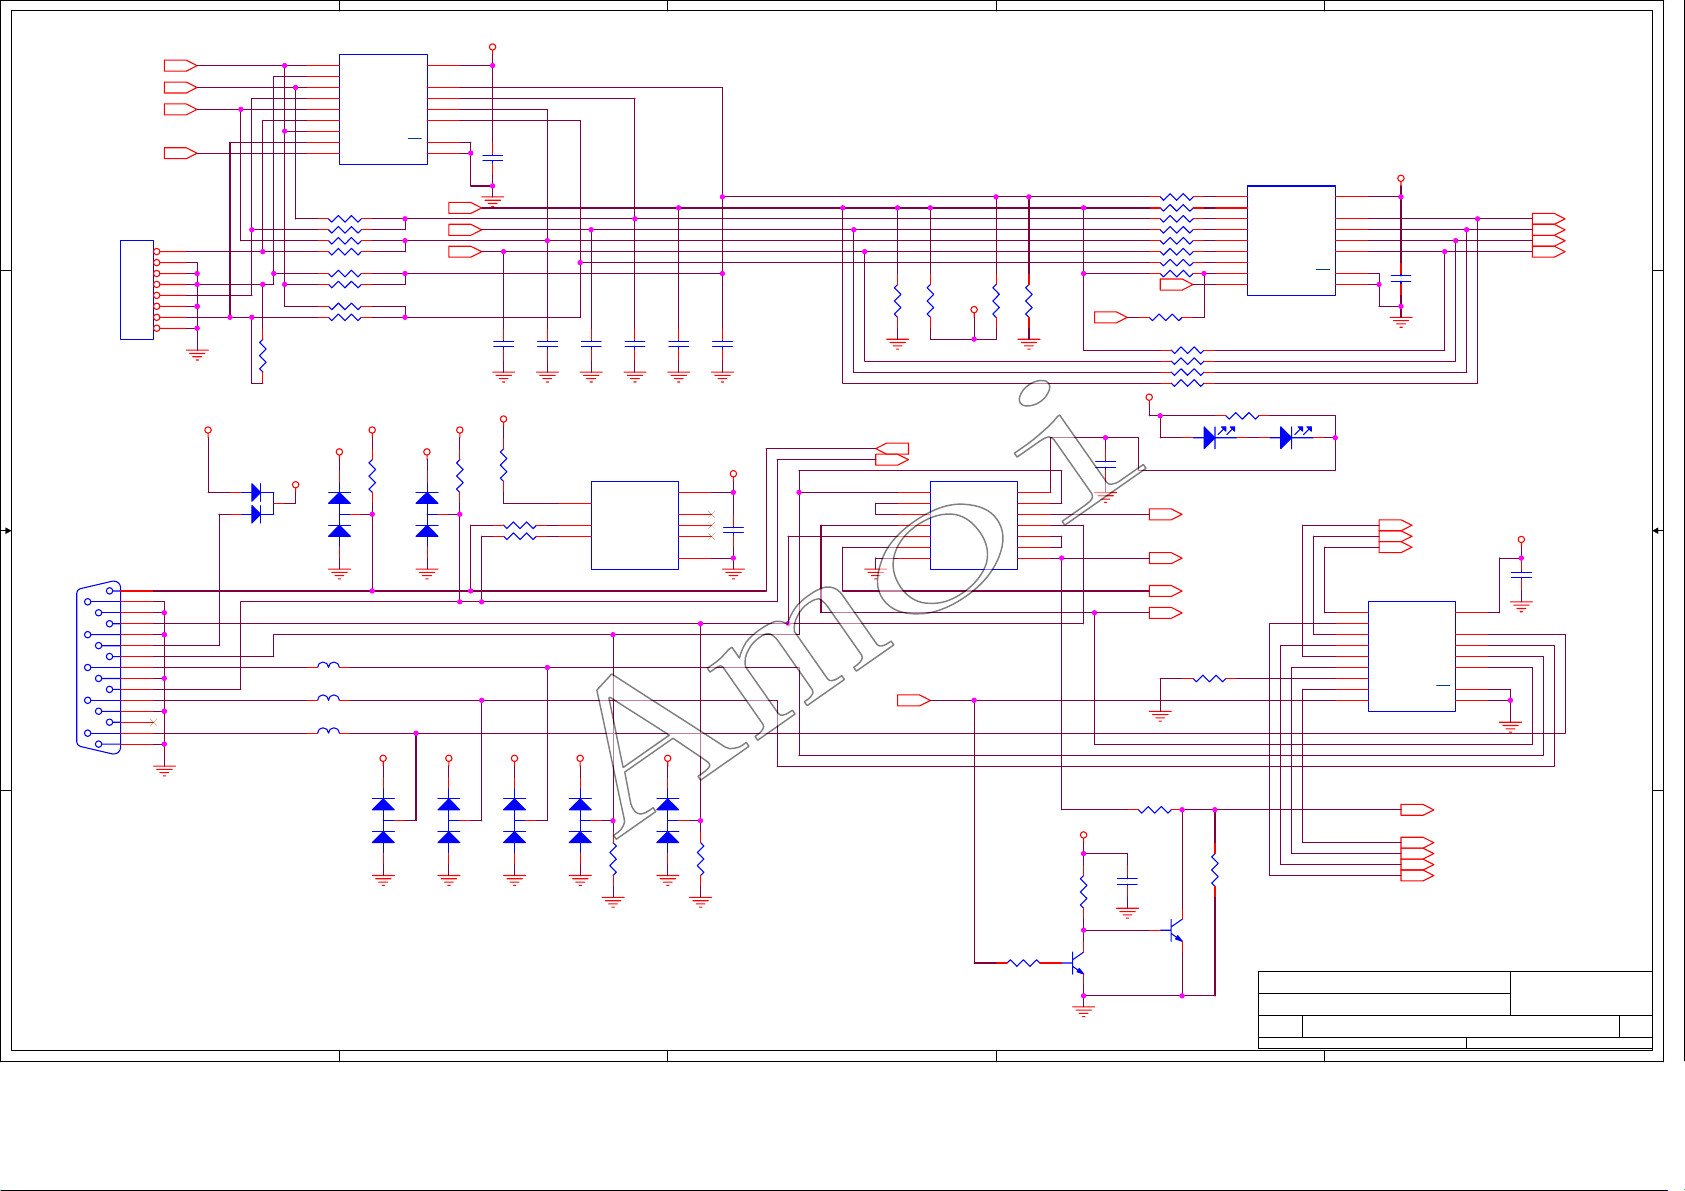
5
36
U7
YM
PbM
PrM
D D
C C
P2
B B
DB15HD_V
A A
SEL-STB
J404
8
7
6
5
4
3
2
1
8 HEADER
15
5
10
14
4
9
13
3
8
12
2
7
11
1
6
R-STB
8
7
6
G-STB
5
B-STB
4
3
2
CVBS-STB
1
R27B
STB+5V
D15
1
2
BAV70L
GTXD
IVS
G5V
IHS
GBLU
GRXD
GGRN
GRED
2
3
6 7
11
10
14
13
1
R33A 0_NS
R33B 0_NS
R34A 0_NS
R34B 0_NS
R31A 0_NS
R31B 0_NS
R32A 0_NS
R32B 0_NS
VCCG
2
VCCG
3
1
FB_11_OHM_500MA
L26
FB_11_OHM_500MA
L27
FB_11_OHM_500MA
L28
S1A
S2A
S2B DB
S1C
S2C
S1D
S2D
IN
54LS224_1
VCCG
D16BAV99L
3
16
VCC
45
DAS1B
9
DC
12
DD
15
EN
8
GND
YP2
PB2
PR2 SW2-SOG
VCCG
R23
2
4.7K
1
2
D18BAV99L
3
1
5
VCCG
R24
4.7K
D17BAV99L
3
2
1
3
4
VCC
C32
0.1uF
C38
120pF
VCCG
R22
4.7K
GVCK
R25 100
R26 100
VCCGVCCGVCCG VCCGVCCG
2
D19BAV99L
1
4
C39
120pF
D20BAV99L
3
7
6
5
2
1
C40
120pF
U3
VCLK
SCL
SDA
24LC21A
D21BAV99L
3
R37
2.2K
C41
120pF
VCC
NC1
NC2
NC3
GND
3
R30
VCC
R29
3.3K
3.3K
14
VCC
13
A6
12
Y6
11
A5
10
Y5
9
A4
8
Y4
R3
1 2
1K
RC0603N
S-CVBS
HSYNC-P
VCC
R1
3.3K
RC0603N
1 2
Q1
2
2N3904
1 3
R35
R36
3.3K
3.3K
C42
C43
120pF
120pF
GTXD
VCCG
8
1
C37
2
3
0.1uF
4
2
D22BAV99L
3
R38
1
2.2K
GRXD
3
SEL1
GTXD
GRXD
1
2
3
4
5
6
7
U4
A1
Y1
A2
Y2
A3
Y3
GND
54LS224_4
VSEL1
R27A 0
C36
0.1uF
VSYNC-P
HSYNC
1 2
2
R46 0
R45 0
R44 0
R43 0
R42 0
R41 0
R40 0
R27 0
R31 0_NS
R32 0_NS
R33 0_NS
R34 0_NS
STB+5V
P N
HSYNC-P
VSYNC
VSYNC-P
HSYNC
R4
12
100
RC0603N
C33
0.1u
cc0603N
2
1 3
2
2
3
6 7
11
10
14
13
1
R12 0
D24
LED_NS
R28
0_NS
R2
NC
RC0603N
1 2
Q2
2N3904
1
U2
S1A
VCC
S2A
S2B DB
S1C
S2C
S1D
S2D
IN
54LS224_1
P N
DAS1B
DC
DD
EN
GND
D25
LED_NS
Title
VGA INPUT
Size Document Number Rev
B
Date: Sheet
VCC
16
45
9
12
15
8
BAIN
GAIN
RAIN
AMOI
C35
0.1uF
BAIN
GAIN
RAIN
U1
2
S1A
3
S2A
6 7
S2B DB
11
S1C
10
S2C
14
S1D
13
S2D
1
IN
54LS224_1
VGAVS
VGAHS
S-B
S-G
S-R
Confidential
VCC
C34
0.1u
cc0603N
1 2
16
VCC
45
DAS1B
9
DC
12
DD
15
EN
8
GND
VGAVS
VGAHS
S-B
S-G
S-R
OPAL SINGLE CHANNEL
111Friday, March 10, 2006
1
SW2-YP
SW2-PB
SW2-PR
of
A
Page 39
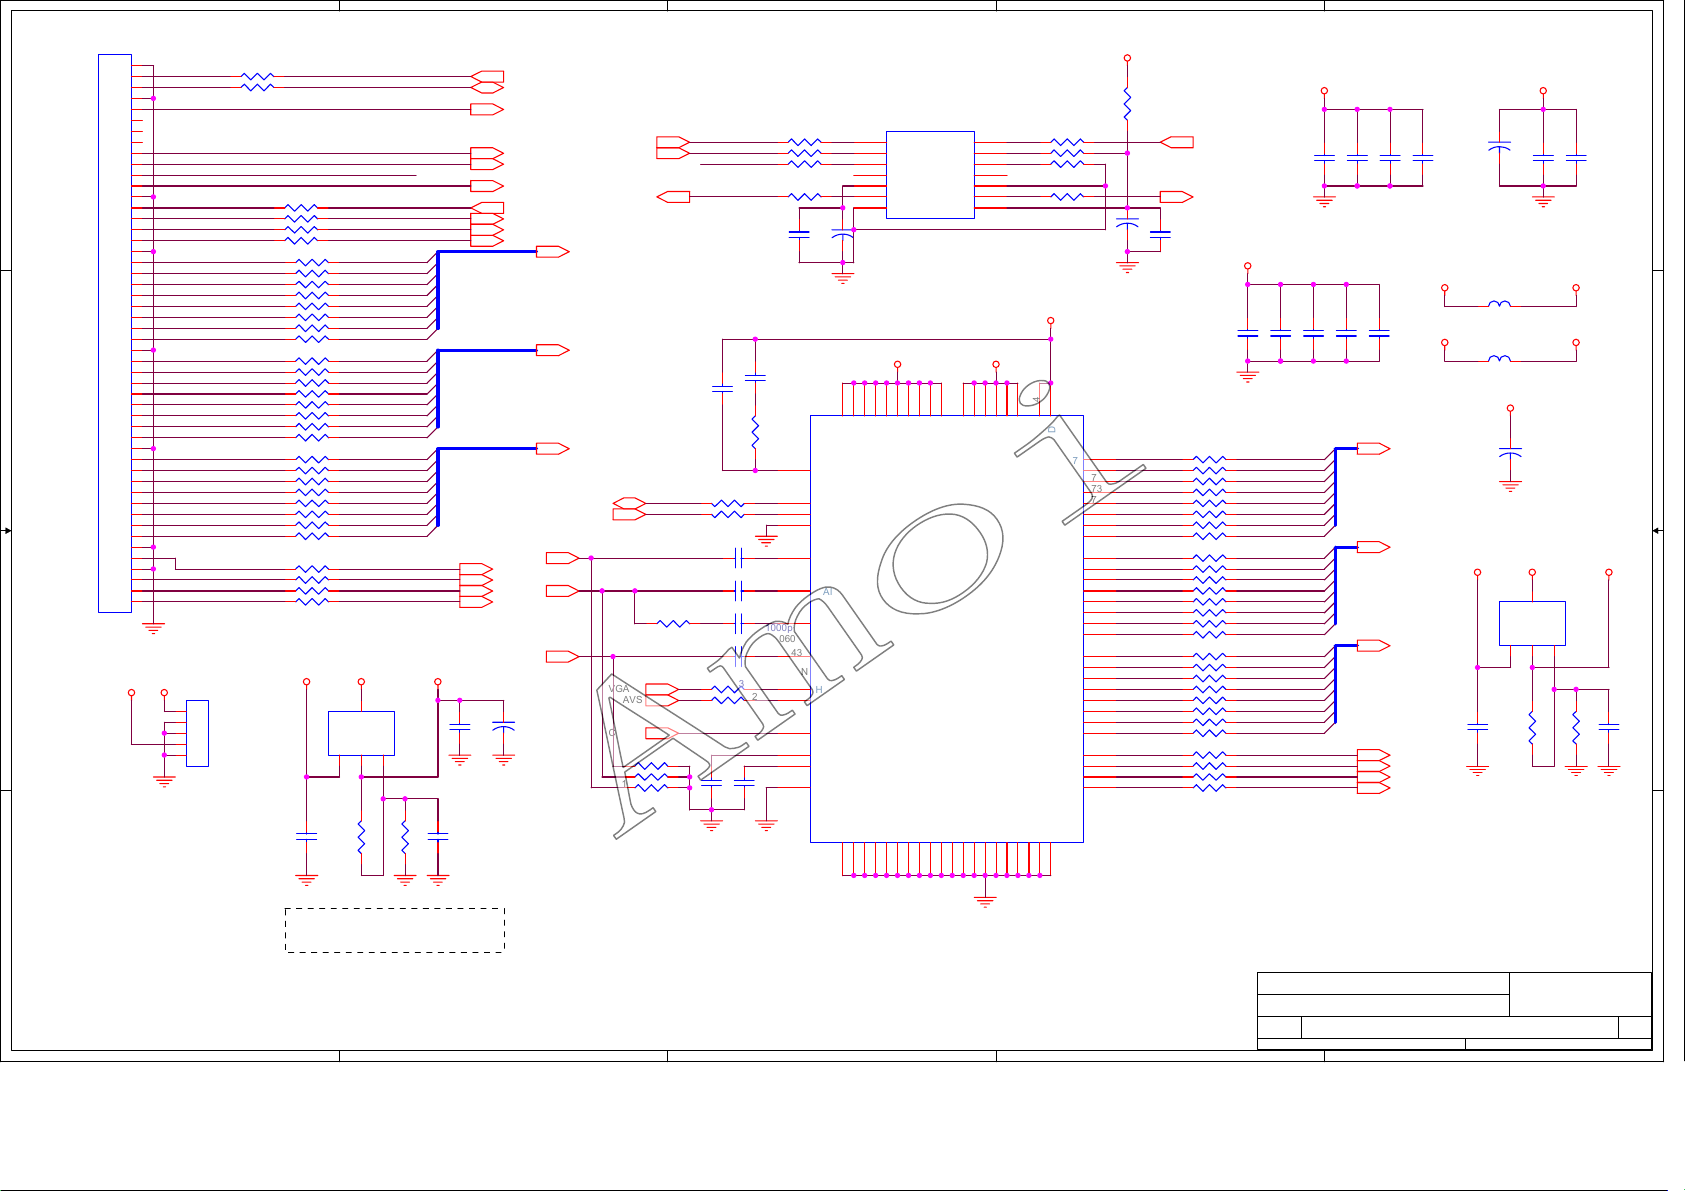
5
37
4
3
2
1
CON50
50
50
49
49
48
48
47
47
46
46
45
45
44
44
43
J401
43
42
41
40
39
38
37
36
35
34
33
32
31
30
29
28
27
26
25
24
23
22
21
20
19
18
17
16
15
14
13
12
11
10
9
8
7
6
5
4
3
2
1
V33-P
42
41
40
39
38
37
36
35
34
33
32
31
30
29
28
27
26
25
24
23
22
21
20
19
18
17
16
15
14
13
12
11
10
9
8
7
6
5
4
ADCPEN
3
ADCHS
2
ADCVS
1
ADCR7
ADCR6
ADCR5
ADCR4
ADCR3
ADCR2
ADCR1
ADCR0
ADCG7
ADCG6
ADCG5
ADCG4
ADCG3
ADCG2
ADCG1
ADCG0
ADCB7
ADCB6
ADCB5
ADCB4
ADCB3
ADCB2
ADCB1
ADCB0
VCC
1
2
3
4
5
ADCCLK
J403
1
2
3
4
5
CON5
D D
C C
B B
R48
R49
47
47
RP1-1 47Ω*4
RP1-2 47Ω*4
RP1-3 47Ω*4
RP1-4 47Ω*4
RP2-1 47Ω*4
RP2-2 47Ω*4
RP2-3 47Ω*4
RP2-4 47Ω*4
RP3-1 47Ω*4
RP3-2 47Ω*4
RP3-3 47Ω*4
RP3-4 47Ω*4
RP4-1 47Ω*4
RP4-2 47Ω*4
RP4-3 47Ω*4
RP4-4 47Ω*4
RP5-1 47Ω*4
RP5-2 47Ω*4
RP5-3 47Ω*4
RP5-4 47Ω*4
RP6-1 47Ω*4
RP6-2 47Ω*4
RP6-3 47Ω*4
RP6-4 47Ω*4
RP7-1 47Ω*4
RP7-2 47Ω*4
RP7-3 47Ω*4
RP7-4 47Ω*4
COAXIAL-OUT
R50
R51
47
R52
47
R53
47
47
3
C44
0.1uF
SCL
SDA
V33-P V33-PVCC
Vin
SD0
LRCIN
BCKIN
SCKI
IN0RE9
IN0RE8
IN0RE7
IN0RE6
IN0RE5
IN0RE4
IN0RE3
IN0RE2
IN0GE9
IN0GE8
IN0GE7
IN0GE6
IN0GE5
IN0GE4
IN0GE3
IN0GE2
IN0BE9
IN0BE8
IN0BE7
IN0BE6
IN0BE5
IN0BE4
IN0BE3
IN0BE2
U19
4
LM1117-3.3
Vo4
Vo2
1
2
R190_NS
ADJ
V33AADJ1
R200
IN0CLK
IN0PEN
IN0HS
IN0VS
C46
0.1uF
C45
0.1uF_NS
IN0RE[9:2]
IN0CLK
IN0PEN
IN0HS
IN0VS
SCL
SDA
COAXIAL-OUT
SD0
LRCIN
SCKI
RESETn
CAD-SCTD
CAD-INT
CAD-HPJ
S-R
S-G
S-B
12
C47
47uF
R54
R55
C51
0.1uF
C53
0.039uF
R264
3.3K
33
57
56
55
C54
54
0.047u
CC0603N
C55
48
0.047u
CC0603N
C56
49
1000p
CC0603N
C57
43
0.047u
CC0603N
30
31
29
58
37
38
47
R56
47
R_0
R57
R_0
C50
10uF
FILT
SDA
SCL
A0
RAIN
GAIN
SOGIN
BAIN
HSYNC
VSYNC
COAST
REFBYP
MIDSCV
CLAMP
SD
I2SR-HDMI I2SL-HDMI
IN0RE[9:2]
IN0GE[9:2]
IN0BE[9:2]
VGAHS
VGAVS
COAST
R58
1 2
R59
1 2
R60
1 2
RC0603N
RC0603N
RC0603N
SDA
SCL
1 2
75
75
75
SDA
SCL
BCKIN
C52
3900pF
R62 300
R61 300
1 2
1 2
R10
1 2
75
RC0603N
1 2
R8 33
1 2
R9 33
1 2
RC0603N
RC0603N
C58
0.1u
1 2
1 2
CC0603N
CC0603N
C59
0.1u
U5
1
LRCIN
2
DIN
3
BCKIN
4
NC0
5
CAP
6
VOUTR
7
GND
12
54LS224_5
2627394245465152596211222369787934
AVD1
AVD2
AVD3
AVD4
AVD5
AVD6
AVD7
AD9883_0
GND1
GND2
GND3
GND4
GND5
GND6
GND7
11020212425283236
SCKI
FORMAT
DEEMPH
MUTE
VOUTL
VDD
AVD8
AVD9
AVD10
U6
GND8
GND9
GND10
40
NC1
41
VDD1
GND11
GND12
444750
14
13
12
11
10
9
8
VDD2
GND13
V33A1V33A 2
VDD3
VDD4
GND14
GND15
6061636880
53
VDD5
GND16
VDD6
SOGOUT
GND17
GND18
V33A4
35
PVD1
PVD2
RED7
RED6
RED5
RED4
RED3
RED2
RED1
RED0
GREEN7
GREEN6
GREEN5
GREEN4
GREEN3
GREEN2
GREEN1
GREEN0
BLUE7
BLUE6
BLUE5
BLUE4
BLUE3
BLUE2
BLUE1
BLUE0
DATACK
HSOUT
VSOUT
GND19
GND20
VCC
R18
0
R14
R15
47
R16
0
0
R17
R_0
12
C49
10uF
DGRO9
70
DGRO8
71
DGRO7
72
DGRO6
73
DGRO5
74
DGRO4
75
DGRO3
76
DGRO2
77
DGGO9
2
DGGO8 IN0GE8
3
4
DGGO6
5
DGGO5
6
DGGO4
7
DGGO3
8
DGGO2
9
DGBO9
12
DGBO8
13
DGBO7
14
DGBO6
15
DGBO5
16
DGBO4
17
DGBO3
18
DGBO2
19
67
66
65
64
SCKOLRCO
C48
0.1uF
RP18-1 47Ω*4
RP18-2 47Ω*4
RP18-3 47Ω*4
RP18-4 47Ω*4
RP19-1 47Ω*4
RP19-2 47Ω*4
RP19-3 47Ω*4
RP19-4 47Ω*4
RP21-1 47Ω*4
RP21-2 47Ω*4
RP21-3 47Ω*4
RP21-4 47Ω*4
RP24-1 47Ω*4
RP24-2 47Ω*4
RP24-3 47Ω*4
RP24-4 47Ω*4
RP27-1 47Ω*4
RP27-2 47Ω*4
RP27-3 47Ω*4
RP27-4 47Ω*4
RP30-1 47Ω*4
RP30-2 47Ω*4
RP30-3 47Ω*4
RP30-4 47Ω*4
RP34-1 47Ω*4
RP34-2 47Ω*4
RP34-3 47Ω*4
RP34-4 47Ω*4
V33A2
C174
0.1uF
C175
IN0RE9
IN0RE8
IN0RE7
IN0RE6
IN0RE5
IN0RE4
IN0RE3
IN0RE2
IN0GE9
IN0GE7DGGO7
IN0GE6
IN0GE5
IN0GE4
IN0GE3
IN0GE2
IN0BE9
IN0BE8
IN0BE7
IN0BE6
IN0BE5
IN0BE4
IN0BE3
IN0BE2
0.1uF
V33A1
C176
C181
0.1uF
0.1uF
C185
C182
0.1uF
0.1uF
C186
IN0RE[9:2]
IN0GE[9:2]
IN0BE[9:2]
IN0CLK
IN0HS
IN0AHS
IN0VS
C183
0.1uF
0.1uF
C184
0.1uF
V33A2
FB_1K_OHM_200MA
L38
FB_1K_OHM_200MA
L39
C293
0.1uF
V33A4
12
C178
C188
0.1uF
100uF
V33A4
V33V33A1
V33A2
12
C60
100uF
V33A4VCC V33A4
U24
4
LM1117-3.3
Vo4
ADJ
Vo2
Vin
1
2
3
V33AADJ0
R2360_NS
C179
R2370
0.1uF
C299
0.1uF_NS
A A
5
R230=2.2K, R231=3.3K, C289=0.1uF
if LM1117-ADJ is stuffed ;
AMOI
Title
HDMI INTERFACE
Size Document Number Rev
B
4
3
2
Date: Sheet
Confidential
OPAL SINGLE CHANNEL
1
of
211Friday, March 10, 2006
A
Page 40
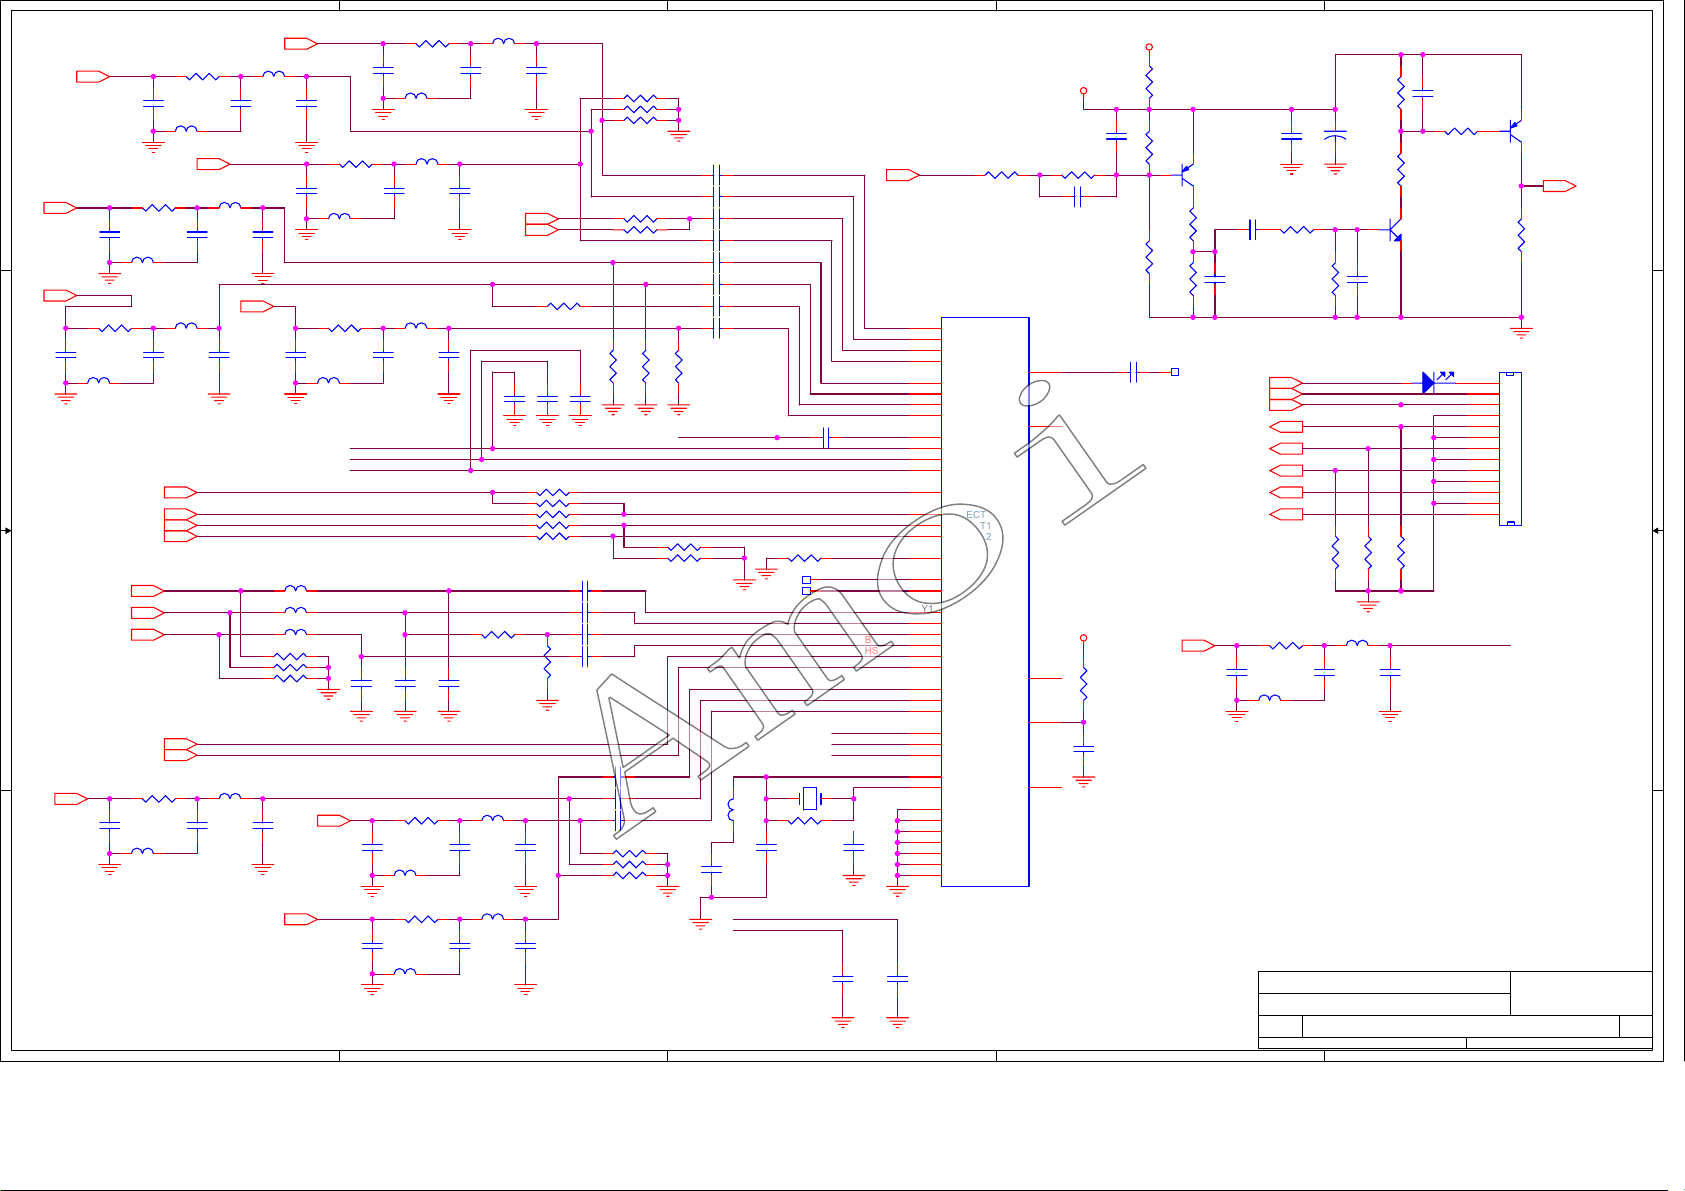
5
38
10nH
L12
L6
CS1
R110 36
C61
270pF
C68
470pF
C77
470pF
R1
T1
U1
C121
12pF
R117 36
C82
270pF
R118 36
C85
270pF
C122
12pF
10nH
10nH
L2
10nH
560nH
L13
560nH
RAIF
GAIFGAIF
BAIFBAIF
L16
L18
L7
SW2-PR
R111 36
PR1
YP1
R114 36
C73
270pF
L10
10nH
FB1
FB2
ASP1
ASP2
RAIN
GAIN
BAIN
YS1
SW2-YP
R113 36
C70
270pF
L8
10nH
HSYNC
VSYNC
R116 36
C79
270pF
L14
10nH
C64
270pF
SW2-PB
C74
470pF
RAIN
GAIN
BAIN
L4
10nH
L11
560nH
C71
470pF
FB1
FB2
ASP1
ASP2
HSYNC
VSYNC
C80
470pF
SW2-PB
560nH
PB1
C75
47pF
560nH
C65
470pF
L9
R87 75
R88 75
R89 75
L15
CVBS1
SW2-YP
D D
PR1
YP1
C C
B B
YS1
A A
SW2-PR
L5
560nH
C66
47pF
R112 36
C67
270pF
C72
47pF
PB1
R115 36
C76
270pF
10nH
t-R1
t-T1
t-U1
FB_11_OHM_500MA
L40
FB_11_OHM_500MA
L41
FB_11_OHM_500MA
L42
C81
CS1
47pF
CVBS1
5
4
560nH
C62
470pF
C69
47pF
SW2-SOG
S-CVBS
C78
47pF
R90 3.32K
C123
12pF
L17
560nH
C83
470pF
L19
560nH
C86
470pF
4
L3
C63
47pF
SW2-SOG
R74
75
C334
C335
47pF
47pF
R81 0
R69 0
R98 0
R82 10K
R84 10K
C117 .047uF
C118 .047uF
C119 0.1uF
C120 .047uF
R91
75
C84
47pF
C87
47pF
R70 75
R71 75
R72 75
R73 75
R78 75
R75
75
C336
47pF
C124 .047uF
C125 .047uF
C126 .047uF
R94 75
R93 75
R92 75
SMUXF1
R77
R76
75
75
S-CVBSIN
R83 3.9K
R85 3.9K
C103
.047uF
C104
.047uF
C105
0.1uF
C106
.047uF
C107
.047uF
C100
.047uF
C101
.047uF
C102
.047uF
C131
220pF
R86 22K
TP28
TP29
CVBS2
Y2 XTAL 27.000
1 2
L1
R100 1.5M
27uH
C129
33pF
VS0
HS0
3
C115 .047uF
HS0
VS0
CVBS2
YS2
YS2
CS2
CS2
C130
33pF
3
RMIN0
GMIN0
SMIN0
BMIN0
RMIN1
GMIN1
BMIN1
ASPC1
ASPC2
REXT
RAI1
GAI1
SOG1
BAI1
HSYNC
VSYNC
RAI2
GAI2
BAI2
XIN1
XOUT1
C332
0.1uF
CVBS1
AD11
AD6
AF11
AA2
AB3
AC7
AE11
AC2
AD1
AD3
AE2
AF1
AE4
AF5
AE6
AC1
AD5
AC6
C333
CVBS1
R5
T5
U5
V5
R3
T3
U3
V3
P1
R1
T1
U1
P2
P4
P5
P6
Y1
Y3
U2
U4
W1
Y2
0.1uF
U9B
RMUXIN0
GMUXIN0
SMUXIN0
BMUXIN0
RMUXOUT
RMUXIN1
GMUXIN1
SMUXIN1
BMUXIN1
BMUXOUT
RMUXIN2
GMUXIN2
SMUXIN2
BMUXIN2
FB
ASPECT0
ASPECT1
ASPECT2
REXT
HSYNCIN0
VS0
RAI1
GAI1
SOG1
BAI1
HSYNCIN1
VS1
AFETEST1
RAI2
GAI2
BAI2
AFETEST2
RAI3
GAI3
BAI3
ADCXIN
ADCXOUT
TESTCLK
AISO0
AISO1
AISO2
AISO3
AISO4
PLLISO0
PLLISO1
PW106-10_2
R343
560
C155 1uF
W2
W4
AE1
AE3
AE7
SYNC-DE-5V
R344
560K_NS
1 2
ARMUX
V18AB
C97
0.1uF
R99
13k
2
VCC
R346
0
12
C156
R345
56K_NS
470pF
12
R347
1M
C112
0.1uF
1
R348
R349
S-CVBS
2
3K
4.7K
TP2
23
Q3
3906
1 2
DVD-IR
ASEL1
ASEL0
PrM
PbM
YM
DVD-R
DVD-L
C157
0.1uF
C159
R350
1 2
0.1uF
C158
1000pF
C88
270pF
R351
R119 36
L20
10nH
Title
Size Document Number Rev
B
Date: Sheet
R352
22K
12
C162
22uF
R353
10
3
1
Q4
C160
5600pF_NS
1 2
ASEL1
ASEL0
DVD-R
DVD-L
R95
75
L21
560nH
MMBT3904
2
D24A
P N
LED_NS
R97
R96
75
75
C90
47pF
Confidential
1.8K
2.2K
12
PrM
PbM
YM
C89
470pF
AMOI
ANALOG INPUT PORT
1 2
1
C161
1uF
R354
22K
CONN RCPT 13
12
1
R355
4.7K
J702
1
2
3
4
5
6
7
8
9
10
11
12
13
S-CVBSIN
23
Q5
3906
1
2
3
4
5
6
7
8
9
10
11
12
13
OPAL SINGLE CHANNEL
of
311Friday, March 10, 2006
1
SYNC_DECT
A
Page 41
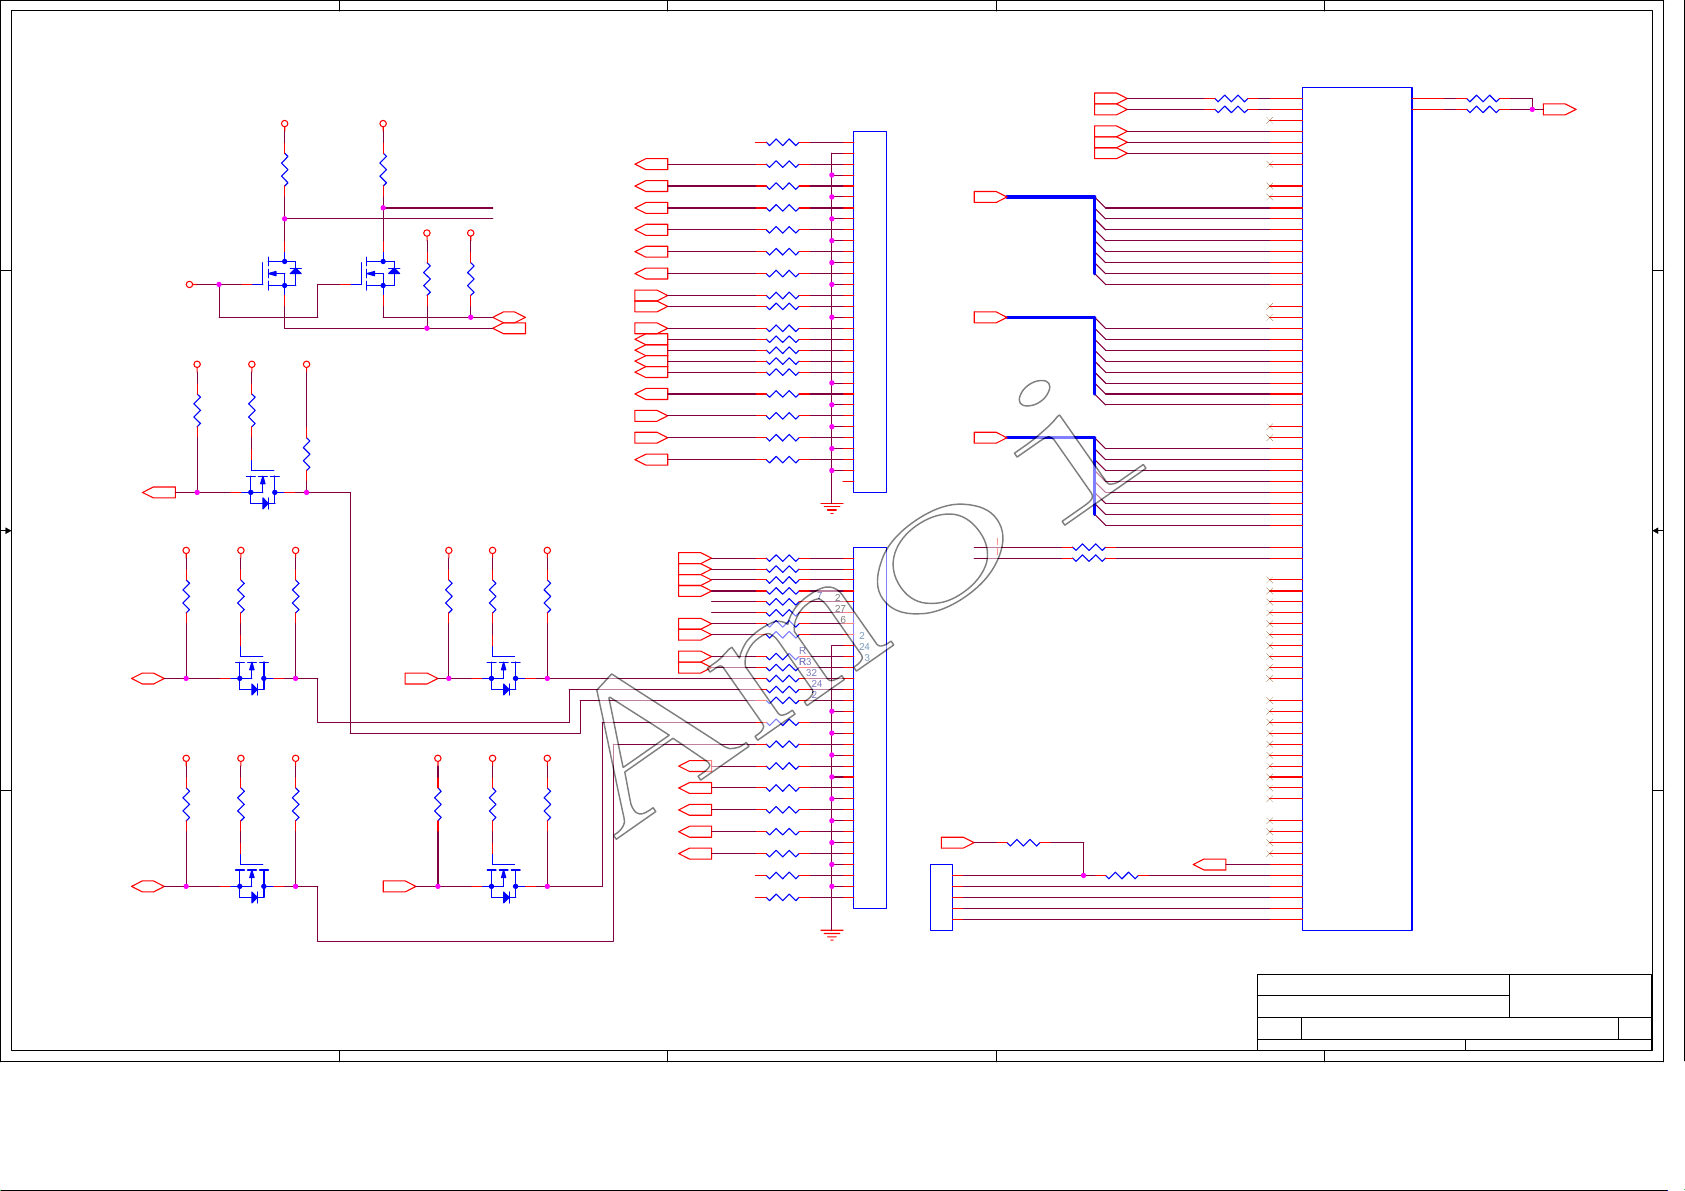
5
39
4
3
2
1
IN0CLKIN0CLK
IN0CLK
IN0PEN
IN0PEN
IN0AHS
IN0HS
IN0VS
R103 0_NS
R104 0_NS
R310 0_NS
VCC VCC
D D
JM1
V33
C C
UPINT
B B
A A
2N7002
R274
10K
R277
10K
V33 V33 V33V33 VCC
R283
4.7K
R278
10K
R284
4.7K
R275
10K
JM42N7002
JM62N7002
JM32N7002
VCC
VCC
R270
4.7K
JM2
2N7002
VCCV33V33
R276
4.7K
R279
4.7K
R285
4.7K
R271
4.7K
V5SDA
V5SCL
V33 V33
R272
R273
4.7K
4.7K
SDA1
SCL1
FB1 From Pin16 of SCART1
FB2 From Pin16 of SCART2
ASP1 From Pin8 of SCART1
ASP2 From Pin8 of SCART2
S-CVBS,FB1,FB2,ASP1,ASP2 are
only available for SCART.
YP1
PB1
PR1
YP2
PB2
PR2
I2SL-HDMI
I2SR-HDMI
COAXIAL-OUT
ASP1
FB1
ASP2
FB2
DVD-IR
DVD-L
DVD-R
S-CVBS
FB1
FB2
S-CVBS:From CVBS of the SCART with RGB
V33 V33V33V33 VCC
R281
R280
10K
10K
UPSCLUPSDA
JM52N7002
R286
R287
4.7K
4.7K
TSCLTSDA
JM72N7002
R282
4.7K
R288
4.7K
RESET2
STBAMP
MUTE
EARST
TXD0
RXD0
VSYNC-P
HSYNC-P
SOUND-L
SOUND-R
CVBS1
YS1
CS1
UPINT5
V5SDA
V5SCL
R290
R
R291
R
R292
R
R293
R
R294
R
R295
R
R296
R
R297
R298
R
R
R299
R300
R
R301
R
R302
R
R303
R
R
R304
R
R305
R
R306
R
R306
R
R313
R314
R
R315
R
R316
R
R317
R
R318
R
R319
R
R320
R
R
R321
R322
R
R323
R
R324
R
R325
R
R
R326
R
R327
R
R328
R
R329
R
R330
R
R331
R
R332
R
R333
R
R334
R
32
31
30
29
28
27
26
25
24
23
22
21
20
19
18
17
16
15
14
13
12
11
10
32
31
30
29
28
27
26
25
24
23
22
21
20
19
18
17
16
15
14
13
12
11
10
9
8
7
6
5
4
3
2
1
9
8
7
6
5
4
3
2
1
J707
32
31
30
29
28
27
26
25
24
23
22
21
20
19
18
17
16
15
14
13
12
11
10
9
8
7
6
5
4
3
2
1
CON32_1
J705
32
31
30
29
28
27
26
25
24
23
22
21
20
19
18
17
16
15
14
13
12
11
10
9
8
7
6
5
4
3
2
1
CON32_2
IN0RE[9:2]
IN0GE[9:2]
IN0BE[9:2]
PWM1 output the clock for FM
J402
CON5
5
4
3
2
1
R309 0
CTL-speaker
5
WORK3
4
WORK2
3
WORK1
2
CTL-STB5V
1
PWM1
IN0PENIN0PEN
IN0AHS
IN0HS
IN0VS
IN0RE2
IN0RE3
IN0RE4
IN0RE5
IN0RE6
IN0RE7
IN0RE8
IN0RE9
IN0GE2
IN0GE3
IN0GE4
IN0GE5
IN0GE6
IN0GE7
IN0GE8
IN0GE9
IN0BE2
IN0BE3
IN0BE4
IN0BE5
IN0BE6
IN0BE7
IN0BE8
IN0BE9
IN1CLKIN0CLK
IN1PEN
ROTATION
R101 0
R102 0
D10
E13
E12
E11
E10
C3
IN0CLK
D4
IN0PEN
E6
IN0VBI
C4
IN0AHS
B3
IN0HS
A2
IN0VS
D5
IN0FLD
A9
IN0R0
IN0R1
B9
IN0R2
A8
IN0R3
IN0R4
C9
IN0R5
IN0R6
B8
IN0R7
D9
IN0R8
A7
IN0R9
C8
IN0G0
B7
IN0G1
IN0G2
A6
IN0G3
IN0G4
D8
IN0G5
E9
IN0G6
C7
IN0G7
E8
IN0G8
B6
IN0G9
A5
IN0B0
C6
IN0B1
B5
IN0B2
A4
IN0B3
D7
IN0B4
A3
IN0B5
D6
IN0B6
B4
IN0B7
E7
IN0B8
C5
IN0B9
K3
IN1CLK
K4
IN1PEN
B1
IN1R0
C2
IN1R1
E5
IN1R2
D3
IN1R3
E4
IN1R4
C1
IN1R5
D2
IN1R6
E3
IN1R7
D1
IN1R8
E2
IN1R9
F4
IN1G0
F3
IN1G1
E1
IN1G2
F2
IN1G3
F5
IN1G4
G3
IN1G5
F1
IN1G6
G2
IN1G7
G5
IN1G8
G1
IN1G9
G4
IN1B0
H3
IN1B1
H2
IN1B2
H1
IN1B3
J4
IN1B4
J3
IN1B5
H4
IN1B6
J2
IN1B7
H5
IN1B8
J1
IN1B9
IN0CLP
IN0CST
U9A
PW106-10_2
Digital
Input
Port
AMOI
Title
DIGITAL INPUT PORT and I/O INPUT
Size Document Number Rev
B
5
4
3
2
Date: Sheet
R67 100
A1
R68 100
B2
Confidential
OPAL SINGLE CHANNEL
1
411Friday, March 10, 2006
COAST
A
of
Page 42
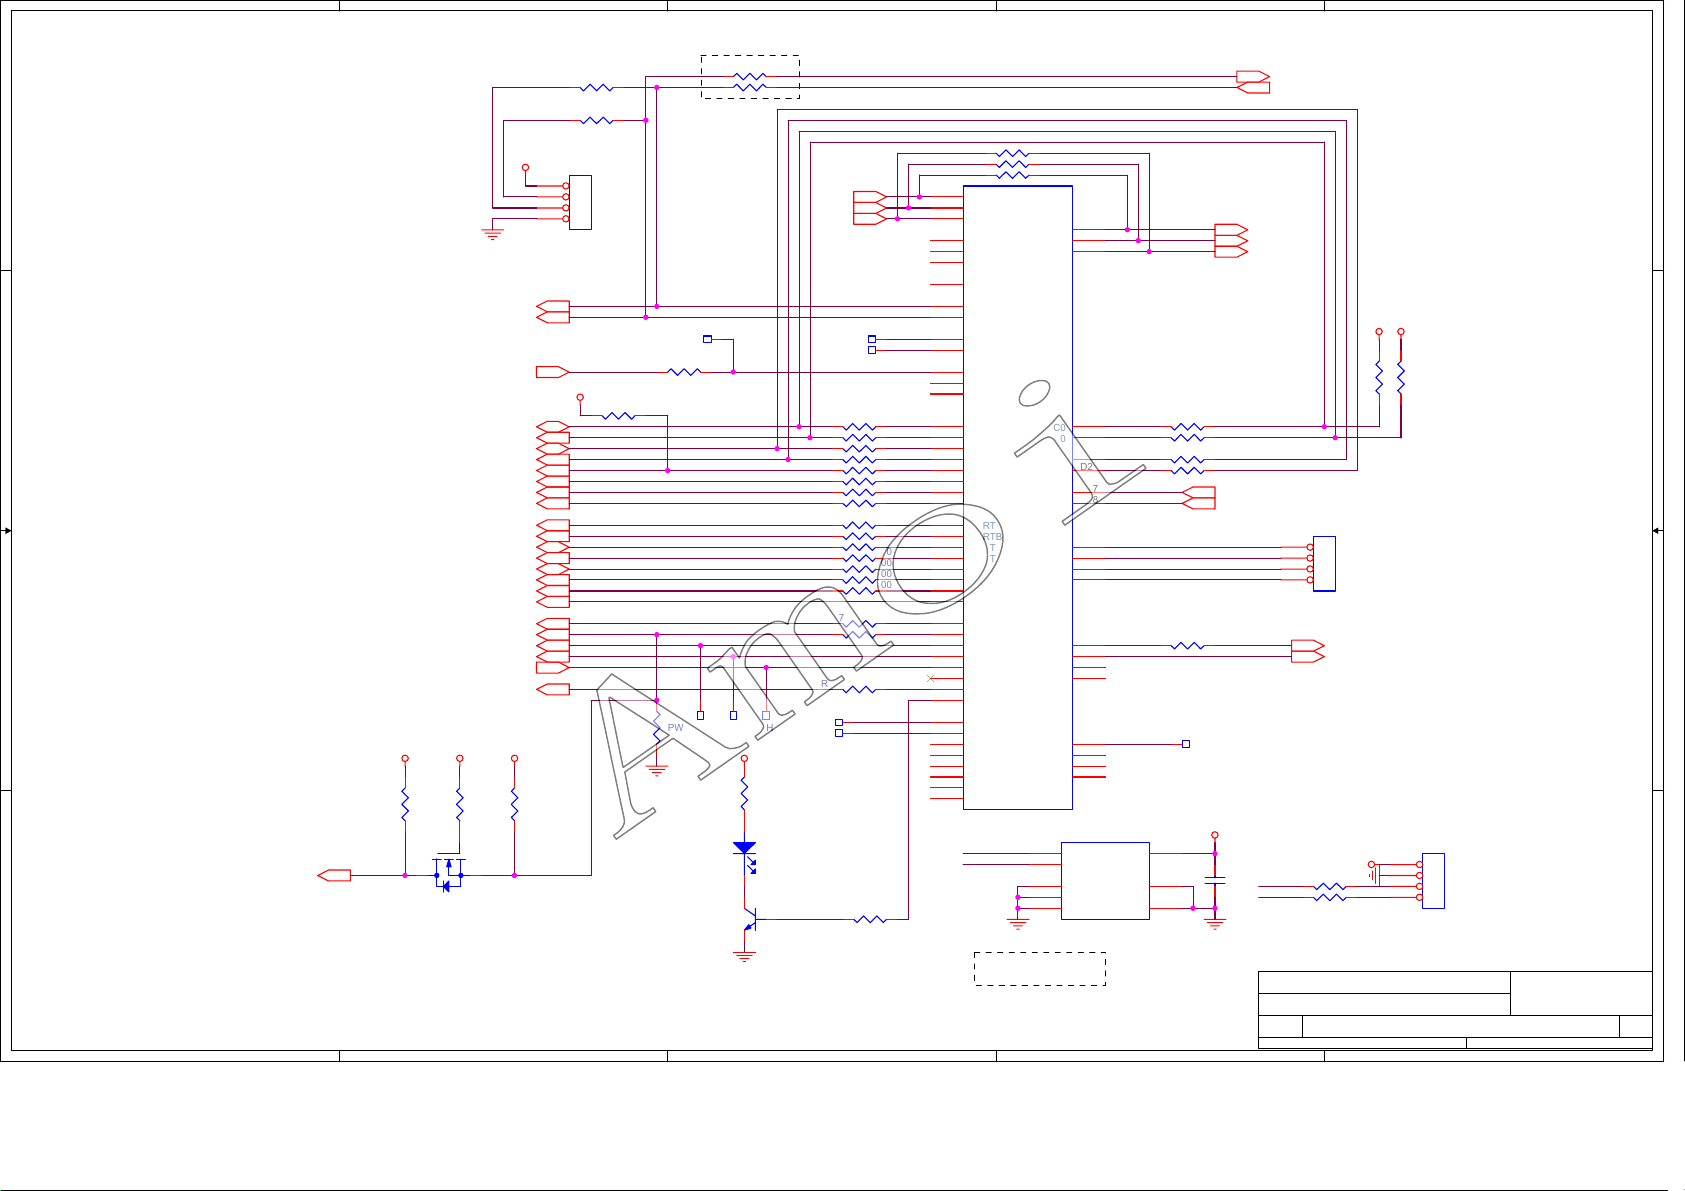
5
40
4
3
2
1
DO NOT STUFF
R105 0_NS
IR
R142
4.7K
PWRON1
MMBT3904
R107 0_NS
HPDET1
LCDON1
V33
R170
220
12
D23
LED
Q11
1
LED2
2 3
LED3
ADC0
ADC1
SCKI
LRCIN
SD0
RXD0
TXD0
RXD1
TXD1
IRRCVR
R129 100
R131 100
R133 100
R134 100
R136 100
R138 100
R139 100
R140 100
R143 100
R144 100
R145 100
R147 100
R151 100
R153 100
R155 100
R157 100
R158 100
R164 100
ADC0
ADC1
R173 10K
LED
R126 0 NC
R127 0 NC
R128 0 NC
D13
I2SICLK0
E18
I2SIWS0
D14
I2SID0
C13
I2SICLK1
E17
I2SIWS1
A13
I2SID1
E19
THRWSC
E20
RXD0
B25
TXD0
A26
RXD1
D22
TXD1
C24
IRRCVR0
E21
IRRCVR1
D23
IRRCVR2
PERIPHERALS
M1
PORTA0
M2
PORTA1
N6
PORTA2
N1
PORTA3
N5
PORTA4
N2
PORTA5
N3
PORTA6
N4
PORTA7
M3
PORTB0
K2
PORTB1
M4
PORTB2
K1
PORTB3
L4
PORTB4
L1
PORTB5
L2
PORTB6
L3
PORTB7
E15
PORTC0
B12
PORTC1
C12
PORTC2
D12
PORTC3
E14
PORTC4
A11
PORTC5
B11
PORTC6
C11
PORTC7
D24
ADC0
C26
ADC1
D25
ADC2
E24
ADC3
F23
ADC4
E22
ADC5
D26
ADC6
E25
ADC7
SCL
SDA
I2SOCLK
I2SOWS
I2SOD
U9F
PW106-10_2
TWOWSC0
TWOWSD0
TWOWSC1
TWOWSD1
TWOWSC2
TWOWSD2
USBVDD
USBP
USBM
USBVSS
PWM0
PWM1
PWM2
PWM3
DAC0
DAC1
DAC2
DAC3
U10
6 8
5
1
2
3
24LC16
A12
E16
B13
D20
C22
C21
D21
D17
C18
AB16
AF19
AC17
AC18
A10
D11
B10
C10
DAC0
H22
E26
F25
J22
SCL VCC
SDA
NC0
NC1
NC2
WP
GND
R106 0
R108 0
D D
C C
B B
R342
3.3K
RESET2
A A
JM8 2N7002
TXD
RXD
RXD0
TXD0
DVD-IR
SDA1
SCL1
MUTE
ASEL0
ASEL1
SEL-STB
STBAMP
EARST
UPSDA
UPSCL
DIN-T18-STB
BKLON
SEL1
RESETn
PWRON
LCDON
CAD-HPJ
VSEL1
V33V33VCC
R341
10K
VCC
SDA
SCL
TSDA
TSCL
R340
10K
J701
1
2
3
4
HDR_1X4
V33
R141 4.7K
SDA
SCL
SDA1
SCL1
MUTE
STBAMP
EARST
UPSDA
UPSCL
TSDA
TSCL
DIN-T18-STB
BKLON
SEL1
RESETn
PWRON
LCDON
CAD-HPJ
VSEL1
RESETn
R149
10K
IIC Address: 0xA0
5
4
3
GTXD
GRXD
R130 100
R132 100
R135 100
R137 100
R160 100
DAC0
V33
7
4
2
GTXD
GRXD
SCKO
LRCO
SD
V33 V33
R123 2.2K
R122 2.2K
CAD-INT
CAD-SCTD
JP4
4
3
2
1
HDR_1X4
C133
0.1uF
PWM
PWM1
SCL
SDA
PWM
PWM1
I2C CONNECTOR
V33
R171 100
R172 100
AMOI
Title
PREIPHERALS
Size Document Number Rev
B
Date: Sheet
JP6
1
2
3
4
HDR_1X4
Confidential
OPAL SINGLE CHANNEL
1
of
A
511Friday, March 10, 2006
Page 43
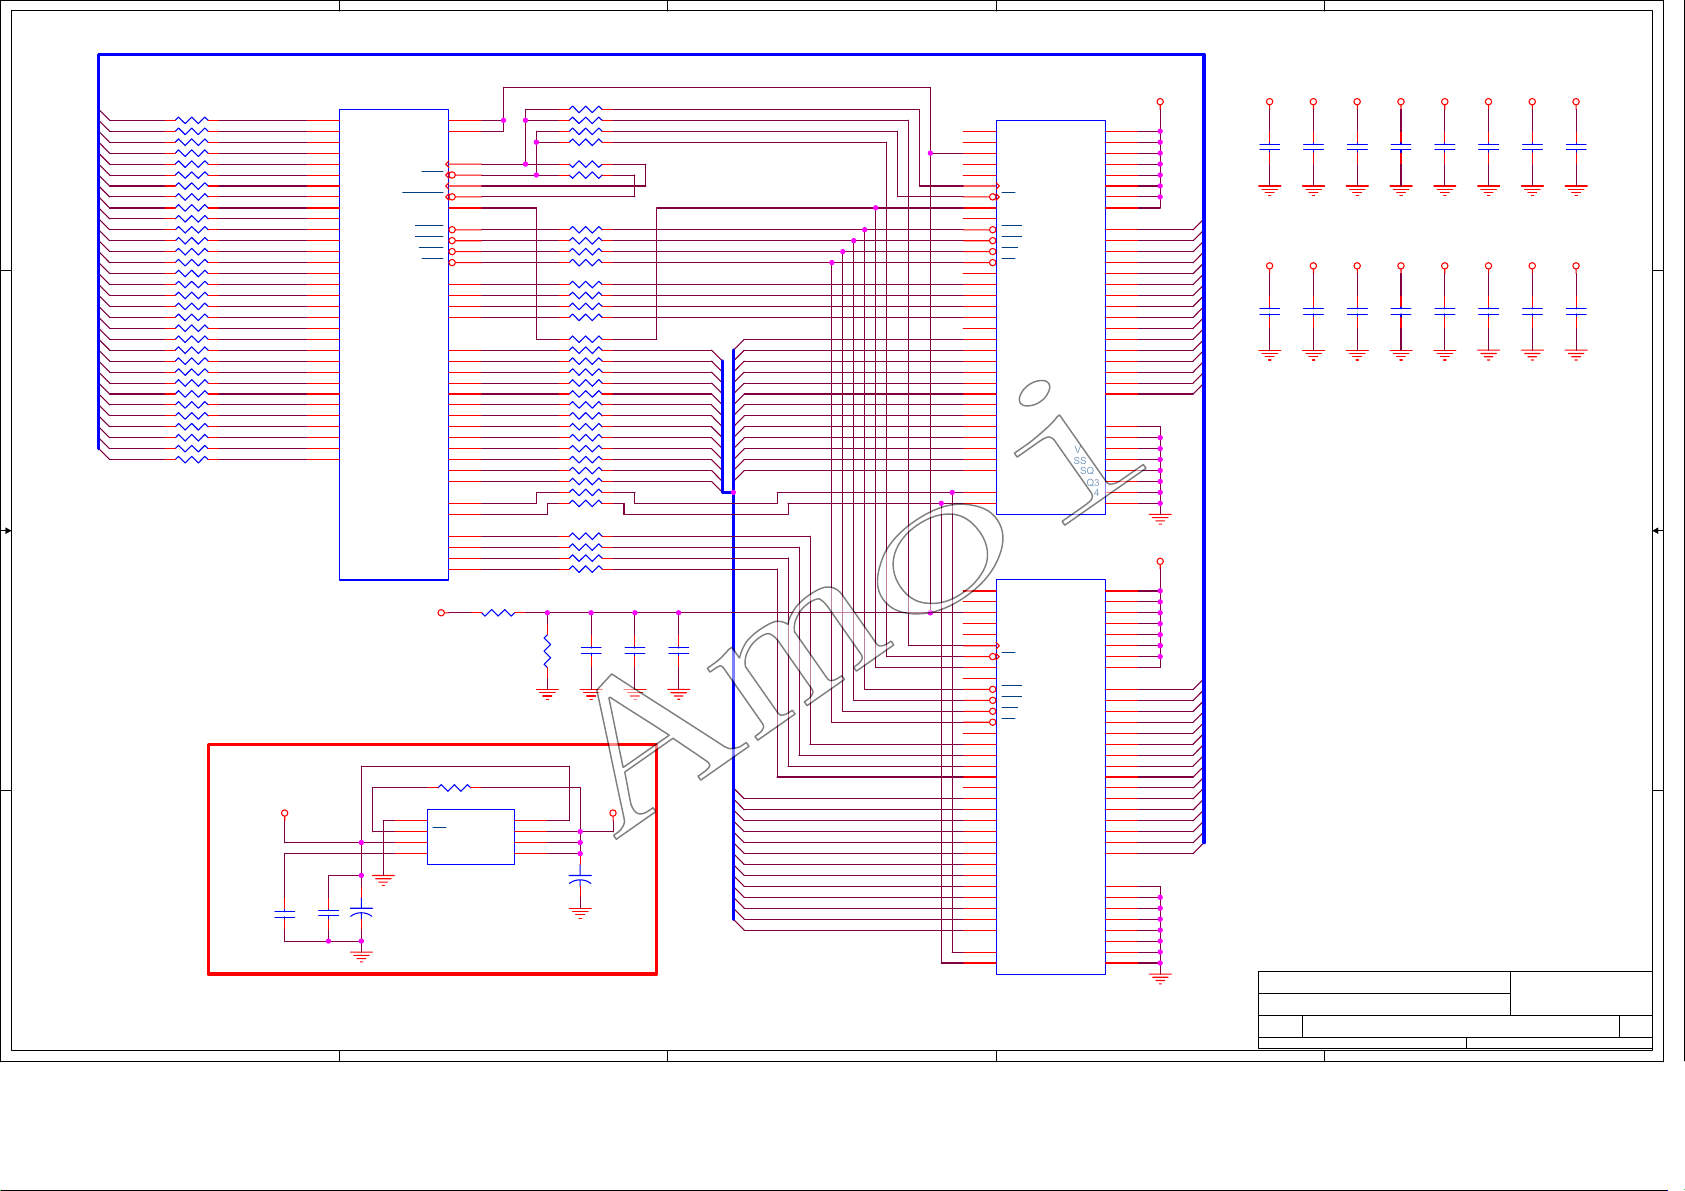
RMD[31:0]
41
5
4
3
2
1
RMD0 MD0
RP36-4 22Ω*4
RP36-3 22Ω*4
RMD1 MD1
D D
C C
RP36-2 22Ω*4
RP36-1 22Ω*4
RMD3
RP37-4 22Ω*4
RMD4
RP37-3 22Ω*4
RMD5
RP37-2 22Ω*4
RMD6
RP37-1 22Ω*4
RMD7
RP38-1 22Ω*4
RMD8
RP38-2 22Ω*4
RMD9
RP38-3 22Ω*4
RMD10
RP38-4 22Ω*4
RMD11
RP40-4 22Ω*4
RMD12
RP40-3 22Ω*4
RMD13
RP40-2 22Ω*4
RMD14
RP40-1 22Ω*4
RMD15
RP42-1 22Ω*4
RMD16
RP42-2 22Ω*4
RMD17
RP42-3 22Ω*4
RMD18
RP42-4 22Ω*4
RMD19
RP43-3 22Ω*4
RMD20
RP43-4 22Ω*4
RMD21
RP50-4 22Ω*4
RMD22
RP50-3 22Ω*4
RMD23
RMD24
RP45-3 22Ω*4
RP45-4 22Ω*4
RMD25
RP43-1 22Ω*4
RMD26
RP43-2 22Ω*4
RMD27
RP47-4 22Ω*4
RMD28
RP47-3 22Ω*4
RMD29
RP47-2 22Ω*4
RMD30
RP47-1 22Ω*4
RMD31
MD2RMD2
MD3
MD4
MD5
MD6
MD7
MD8
MD9
MD10
MD11
MD12
MD13
MD14
MD15
MD16
MD17
MD18
MD19
MD20
MD21
MD22
MD23
MD24
MD25
MD26
MD27
MD28
MD29MD29
MD30
MD31
H23
F26
G25
H24
H25
J24
H26
K23
J25
K24
J26
K25
L24
L25
N22
M24
V22
V23
Y26
W24
W23
Y24
AB26
Y23
AA24
AB25
AC26
AA23
AC24
AB23
AD25
AE25
MD0
MD1
MD2
MD3
MD4
MD5
MD6
MD7
MD8
MD9
MD10
KD11
MD12
MD13
MD14
MD15
MD16
MD17
MD18
MD19
MD20
MD21
MD22
MD23
MD24
MD25
MD26
MD27
MD28
MD29
MD30
MD31
U9G
PW106-10_2
Main
Memory
Port
B B
D1V25
D1V25
MVREF
12
12
CB123
0.1uF
1 2
CC0603N
CE36
+
220uF/16v
CCP5053NA
CB122
A A
5
0.1uF
CC0603N
L26
MREFIN0
V25
MREFIN1
T26
MCK
T25
MCK
R23
MCKFBK
T22
MCKFBK
M26
MCKE
N25
MRAS
N24
MCAS
N23
MWE
R24
MCS
G26
MDM0
K26
MDM1
L22
MDQS0
M22
MDQS1
R25
MA0
N26
MA1
V26
MA2
P22
MA3
U24
MA4
P23
MA5
U25
MA6
P24
MA7
U22
MA8
P25
MA9
T23
MA10
R26
MA11
T24
MA12
V24
MBNK0
W26
MBNK1
Y25
MDM2
AB24
MDM3
AA26
MDQS2
AC25
MDQS3
V25
R217
1 2
4.7k
U26
RC0603N
1
GND
2
SD
3
VSENSE
4 5
VREF VDDQ
IC LP2996 DDR Termination SOP8
RP35-1 22Ω*4
RP35-3 22Ω*4
RP35-2 22Ω*4
RP35-4 22Ω*4
MCK
MCKn
MCKFBK
MCKFBKn
MCKE
RP44-3 22Ω*4
MRASn
RP44-2 22Ω*4
MCASn
RP46-1 22Ω*4
MWEn
RP48-3 22Ω*4
MCSn
RP41-1 22Ω*4
MDM0
RP41-3 22Ω*4
MDM1
RP41-2 22Ω*4
MDQS0
RP41-4 22Ω*4
MDQS1
RP44-1 22Ω*4
RP48-4 22Ω*4
MA0
RP44-4 22Ω*4
MA1
RP49-4 22Ω*4
MA2
RP39-2 22Ω*4
MA3
RP49-1 22Ω*4
MA4
RP46-2 22Ω*4
MA5
RP49-2 22Ω*4
MA6
RP48-1 22Ω*4
MA7
RP39-3 22Ω*4
MA8
RP48-2 22Ω*4
MA9
RP39-1 22Ω*4
MA10
RP46-3 22Ω*4
MA11
RP46-4 22Ω*4
MA12
RP49-3 22Ω*4
RP39-4 22Ω*4
MBNK0
MBNK1
RP50-1 22Ω*4
MDM2
RP45-1 22Ω*4
MDM3
RP50-2 22Ω*4
MDQS2
RP45-2 22Ω*4
MDQS3
R176
1.00K
R177
1.00K
8
VTT
7
PVIN
6
AVIN
NC
4
R174 22
R175 22
MVREF
C150
0.1uF
V25
12
+
0.1uF
CE35
47uF/16v
CCP5053NA
C151
0.1uF
RMCK0
RMCK1
RMCK0n
RMCK1n
RMCKE
RMRASn
RMCASn
RMWEn
RMCSn
RMDM0
RMDM1
RMDQS0
RMDQS1
RMA0
RMA1
RMA2
RMA3
RMA4
RMA5
RMA6
RMA7
RMA8
RMA9
RMA10
RMA11
RMA12
RMDM2
RMDM3
RMDQS2
RMDQS3
C152
RMBK0
RMBK1
U11
14
NC0
17
NC1
49
VREF
19
NC2
25
NC3
45
CK
46
CK
44
CKE
43
NC4
23
RAS
22
CAS
21
WE
24
CS
50
NC5
20
LDM
47
UDM
16
LDQS
51
UDQS
53
RMA0
RMA1
RMA2
RMA3
RMA4
RMA5
RMA6
RMA7
RMA8
RMA9
RMA10
RMA11
RMA12
RMA[12:0]RMA[12:0]RMA[12:0]RMA[12:0]RMA[12:0]RMA[12:0]RMA[12:0]RMA[12:0]
RMA[12:0]RMA[12:0]RMA[12:0]RMA[12:0]RMA[12:0]RMA[12:0]RMA[12:0]RMA[12:0]RMA[12:0]RMA[12:0]RMA[12:0]RMA[12:0]RMA[12:0]RMA[12:0]RMA[12:0]RMA[12:0]RMA[12:0]RMA[12:0]RMA[12:0]RMA[12:0]RMA[12:0]RMA[12:0]RMA[12:0]RMA[12:0]RMA[12:0]
RMA0
RMA1
RMA2
RMA3
RMA4
RMA5
RMA6
RMA7
RMA8
RMA9
RMA10
RMA11
RMA12
3
NC6
29
A0
30
A1
31
A2
32
A3
35
A4
36
A5
37
A6
38
A7
39
A8
40
A9
28
A10/AP
41
A11
42
A12
26
BA0
27
BA1
DDR400_SDRAM_256M
U12
14
NC0
17
NC1
49
VREF
19
NC2
25
NC3
45
CK
46
CK
44
CKE
43
NC4
23
RAS
22
CAS
21
WE
24
CS
50
NC5
20
LDM
47
UDM
16
LDQS
51
UDQS
53
NC6
29
A0
30
A1
31
A2
32
A3
35
A4
36
A5
37
A6
38
A7
39
A8
40
A9
28
A10/AP
41
A11
42
A12
26
BA0
27
BA1
DDR400_SDRAM_256M
VDD1
VDD2
VDD3
VDDQ1
VDDQ2
VDDQ3
VDDQ4
VDDQ5
DQ0
DQ1
DQ2
DQ3
DQ4
DQ5
DQ6
DQ7
DQ8
DQ9
DQ10
DQ11
DQ12
DQ13
DQ14
DQ15
VSS1
VSS2
VSS3
VSSQ1
VSSQ2
VSSQ3
VSSQ4
VSSQ5
VDD1
VDD2
VDD3
VDDQ1
VDDQ2
VDDQ3
VDDQ4
VDDQ5
DQ0
DQ1
DQ2
DQ3
DQ4
DQ5
DQ6
DQ7
DQ8
DQ9
DQ10
DQ11
DQ12
DQ13
DQ14
DQ15
VSS1
VSS2
VSS3
VSSQ1
VSSQ2
VSSQ3
VSSQ4
VSSQ5
V25
1
18
33
3
9
15
55
61
RMD0
2
RMD1
4
RMD2
5
RMD3
7
RMD4
8
RMD5
10
RMD6
11
RMD7
13
RMD8
54
RMD9
56
RMD10
57
RMD11
59
RMD12
60
RMD13
62
RMD14
63
RMD15
65
34
48
66
6
12
52
58
64
V25
1
18
33
3
9
15
55
61
RMD16
2
RMD17
4
RMD18
5
RMD19
7
RMD20
8
RMD21
10
RMD22
11
RMD23
13
RMD24
54
RMD25
56
RMD26
57
RMD27
59
RMD28
60
RMD29
62
RMD30
63
RMD31
65
34
48
66
6
12
52
58
64
2
V25 V25 V25 V25 V25 V25 V25 V25
C134
C135
0.1uF
0.1uF
V25 V25 V25 V25 V25 V25 V25 V25
C142
C143
0.1uF
0.1uF
Title
DDR SDRAM
Size Document Number Rev
B
Date: Sheet
C136
0.1uF
C144
0.1uF
AMOI
C137
0.1uF
C145
0.1uF
C139
C138
0.1uF
0.1uF
C146
C147
0.1uF
0.1uF
Confidential
OPAL SINGLE CHANNEL
1
C140
0.1uF
C148
0.1uF
C141
0.1uF
C149
0.1uF
611Friday, March 10, 2006
of
A
Page 44
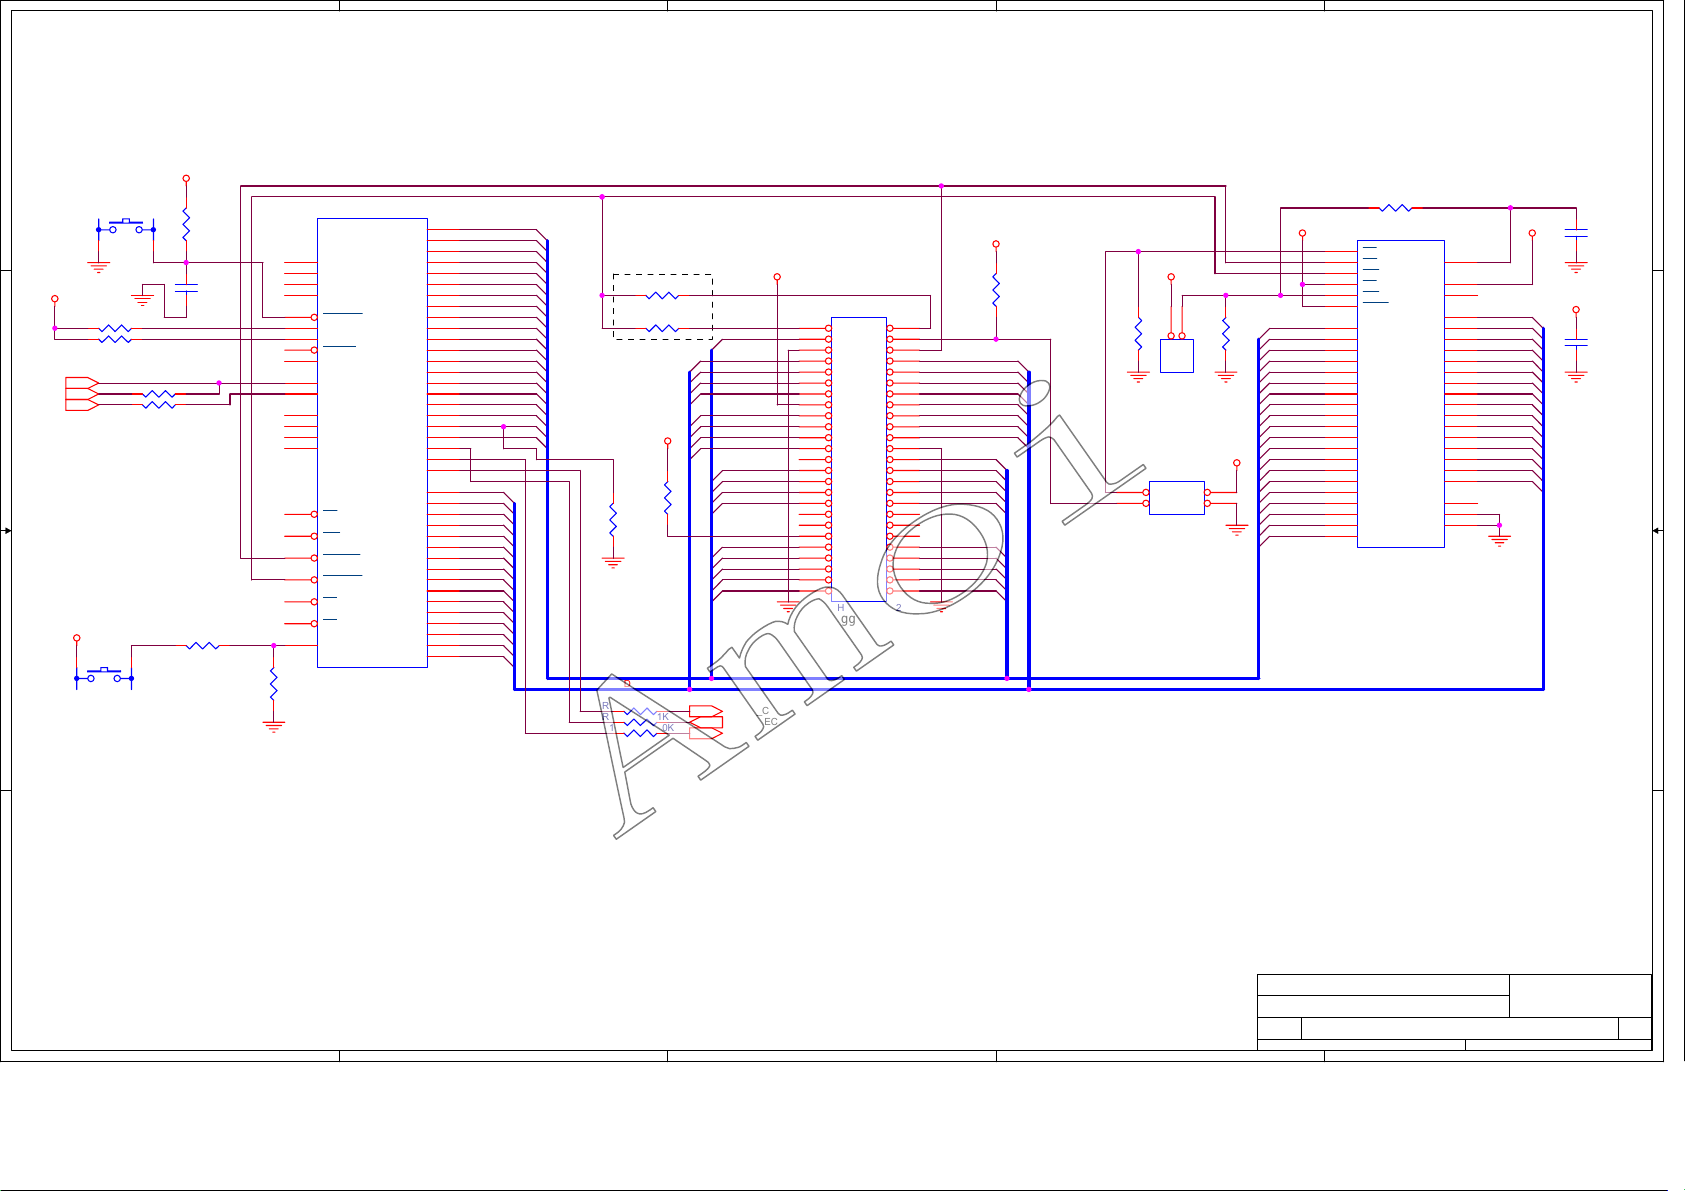
5
42
D D
V33
R179
SW1
SW_MOM_4P
NMI1
SW2
SW_MOM_4P
2.2K
RSTn
C189
0.01uF
EXTRSTEN
ADR24B
R191 10K
NMI
AE10
AF10
AC20
AD17
AE18
AD16
AF17
AC19
AE17
AF18
AD18
AE26
R192
100K
AF9
AE9
AE8
AC8
AD9
AD8
AB8
AA8
AF8
AF7
TMS
TDO
TDI
TCK
RESETB
EXTRSTEN
ADR24B
TRSTN
EXTMCLK
EXTINT0
EXTINT1
TESTMODE0
TESTMODE1
TESTMODE2
SCANMODE
U9D
PW106-10_2
CPU
RD
WR
ROMOE
ROMWE
CS0
CS1
NMI
RESET
1 2
V33
R186 100
R187 100
V33
NMI
1 2
UPINT
R194 100
R195 100
UPINT
FB1
C C
FB2
B B
A10
A11
A12
A13
A14
A15
A16
A17
A18
A19
A20
A21
A22
A23
D10
D11
D12
D13
D14
D15
AC15
A1
AE16
A2
AF16
A3
AC16
A4
AD15
A5
AE15
A6
AC14
A7
AF15
A8
AD14
A9
AC12
AE14
AC13
AF14
AD13
AE13
AF13
AC10
AC11
AD12
AE12
AF12
AC9
AD10
AE24
D0
AC23
D1
AD24
D2
AE23
D3
AF26
D4
AC22
D5
AD23
D6
AE22
D7
AF25
D8
AE21
D9
AD22
AC21
AF24
AF23
AD20
AD21
4
ROMOEn
ROMWEn
A1
A2
A3
A4
A5
A6
A7
A8
A9
A10
A11
A12
A13
A14
A15
A17 D8
A18
A19
A20
D0
D1
D2
D3
D4
D5
D6
D7
D8
D9
D10
D11
D12
D13
D14
D15
DO NOT STUFF
R182 0_NS
R183 0_NS
V33
R189
3.3K
R190
1.8K
A[20:1]
D[15:0]
R188 100
R193 1K
R197 10K
ICEWELn
ICEWEHn
A1
D0
D1
D2
D3
D12
D13
D14
D15
A15
A13
A11
A9
IRPn
A19
A8
A6
A4
A2
PANEL_CTR2
SYNC_DECT
PANEL_CTR1
V33
3
J11
1 2
12
3 4
34
5 6
56
7 8
78
9 10
910
11 12
11 12
13 14
13 14
15 16
15 16
17 18
17 18
19 20
19 20
21 22
21 22
23 24
23 24
25 26
25 26
27 28
27 28
29 30
29 30
31 32
31 32
33 34
33 34
35 36
35 36
37 38
37 38
39 40
39 40
41 42
41 42
43 44
43 44
45 46
45 46
47 48
47 48
49 50
49 50
HDR_RA,25x2
Debugger Header
ICEn
D8
D9
D10
D11A16
D4
D5
D6
D7
A17
A16
A14
A12
A10
A20
A18
A7
A5
A3
V33
R181
3.3K
R184
10K
1 2
2
FCEn
V33
R185
1
2
J5
10K
1
2
JUMPER
J12
12
34
34
HDR_2X2
V33
FWPn
A1
A2
A3
A4
A5
A6
A7
A8
A9
A10
A11
A12
A13
A14
A15
A16
A17
A18
A19
A20
26
28
11
12
14
47
25
24
23
22
21
20
19
18
48
17
16
8
7
6
5
4
3
2
1
9
R178
1K
U13
CE
OE
WE
RP
WP
BYTE
A0
A1
A2
A3
A4
A5
A6
A7
A8
A9
A10
A11
A12
A13
A14
A15
A16
A17
A18
A19
29LV160_0
VPP
VCC
NC0
D10
D11
D12
D13
D14
D15
D16
NC1
GND1
GND2
FVPP
13
37
10
29
D1
31
D2
33
D3
35
D4
38
D5
40
D6
42
D7
44
D8
30
D9
32
34
36
39
41
43
45
15
46
27
1
D0
D1
D2
D3
D4
D5
D6
D7
D9
D10
D11
D12
D13
D14
D15
V33V33
V33
C153
0.1uF
C154
0.1uF
A A
Title
AMOI
CPU
Size Document Number Rev
B
5
4
3
2
Date: Sheet
Confidential
OPAL SINGLE CHANNEL
1
of
711Friday, March 10, 2006
A
Page 45
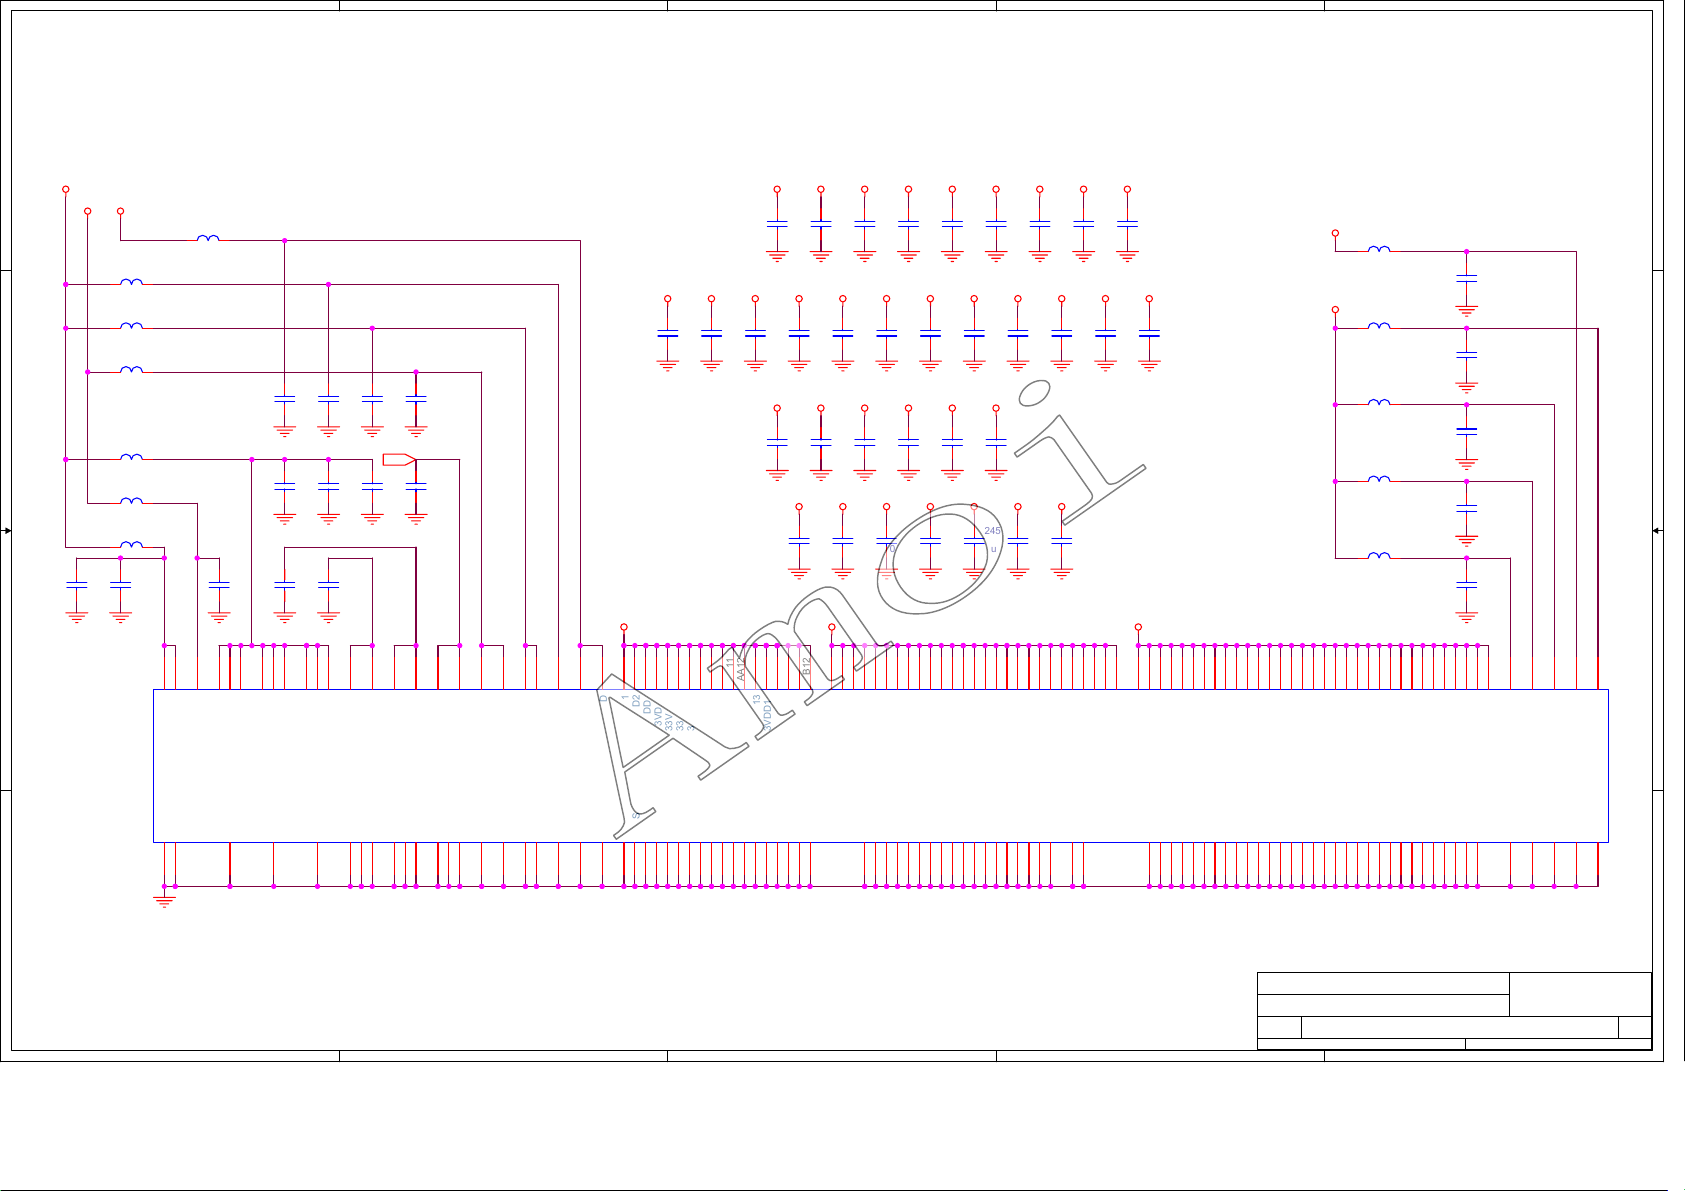
5
43
D D
4
3
2
1
V33A
V18A
V33
FB_1K_OHM_200MA
L46
V33ADC
FB_1K_OHM_200MA
L48
V33X
FB_1K_OHM_200MA
L49
V33AP
FB_1K_OHM_200MA
L51
V18ADC
C223
C C
FB_1K_OHM_200MA
V33AR
L53
FB_1K_OHM_200MA
L55
V18AM
FB_1K_OHM_200MA
V33AM
L56
C249
C250
0.1uF
0.1uF
B B
C251
0.1uF
P3
R4
V6
R2
AMVDD18
AVDD331R
AMVDD331
AMVDD330
C222
0.1uF
0.1uF
V18AB
C236
C237
0.1uF
0.1uF
C253
C252
0.1uF
0.1uF
W6
W5
AVDD33REGR0
AD4
AB2W3AF2
AB1
AA1
AVDD331G
AVDD33REGR1
AVDD33REGG0
AVDD33REGG1
AVDD331B
AF3
AVDD33REGB0
T6
RREGOUT
AVDD33REGB1
C224
0.1uF
C238
0.1uF
V18AR
U6
AVDDR18
C225
0.1uF
C239
0.1uF
V18AB
V18AG
AB5
AA6
Y5
Y4
AVDDG18
GREGOUT
AF4Y6AA5
AVDDB18
DVDD18P
BREGOUT
AD7
F24G23
AA7
XVDD
AVDDP
DACVDDDACVSS
VDD_33E
DVDD18ADC
C25B26
ADCVDDADCVSS
V33
F9
F10
33VDD1
V25 V25
F14
F15
F16L5L6M5M6
33VDD2
33VDD3
33VDD4
C207
0.1uF
33VDD5
33VDD6
33VDD7
33VDD8
V33
V33
V33
C198
C197
0.1uF
V25 V25
C210
C209
C208
0.1uF
AA10
33VDD9
33VDD10
AA11
33VDD11
0.1uF
0.1uF
V18 V18 V18 V18 V18 V18
C227
0.1uF
V18
C241
0.1uF
AA12
AA16
AA17
AA18
AB10
AB11
33VDD12
33VDD13
33VDD14
33VDD15
33VDD16
33VDD17
C199
0.1uF
0.1uF
V25 V25 V25 V25
C211
0.1uF
C228
C229
0.1uF
0.1uF
V18
V18
C242
0.1uF
V25
G21
G22
H21
J21
F22
AB12U15
25VDD2
25VDD3
25VDD4
25VDD5
25VDD1
33VDD1833VSS18
V33
V33 V33 V33 V33
C201
C200
0.1uF
0.1uF
C212
C213
0.1uF
0.1uF
C230
C231
0.1uF
0.1uF
V18
V18 V18 V18
C244
C243
0.1uF
0.1uF
K21
L21
M21
N21
P21
R21
T21
U21
25VDD6
25VDD7
25VDD8
25VDD9
25VDD10
25VDD11
25VDD12
C202
C203
0.1uF
0.1uF
V25 V25 V25 V25
C214
C215
0.1uF
0.1uF
C232
0.1uF
C246
C245
0.1uF
0.1uF
V21
W21
25VDD13
25VDD14
W25
W22
Y21
Y22
AD26
AA25
U26
25VDD15
25VDD21
25VDD16
25VDD17
25VDD18
25VDD19
25VDD20
U9EPW106-10_2
V33
C204
C205
0.1uF
0.1uF
C217
C216
0.1uF
0.1uF
C247
0.1uF
V18
P26
J23
L23
M25
R22
25VDD22
25VDD23
25VDD26
25VDD25
25VDD24
25VDD27
Power and Ground
C218
0.1uF
F6F7F8
18VDD1
18VDD2
V33
FB_1K_OHM_200MA
L47
V33RES
C206
AB9
18VDD26
AB13
18VDD27
AB14
18VDD28
AB15
18VDD29
AB19
18VDD30
0.1uF
C221
1uF
C226
1uF
C240
1uF
C254
1uF
AB20
18VDD31
AB21
18VDD32
AB22
18VDD33
AF20
AF22
K22
AD19
AF21
BPLLVDD
DPLLVDD
MPLLVDD
URESVDD
MDSKVDD
V18A
FB_1K_OHM_200MA
L50
V18MDSK
FB_1K_OHM_200MA
L52
V18DPLL
FB_1K_OHM_200MA
V18MPLL
L54
FB_1K_OHM_200MA
L57
V18BPLL
F12
F13
F17
F18
F19
F20
F11
18VDD5
18VDD3
18VDD4
F21
G6
J6K6AA9H6AA13
AA14
AA15
AA19
AA20
AA21
J5
K5
18VDD6
18VDD7
18VDD8
18VDD9
18VDD10
18VDD11
18VDD12
18VDD15
18VDD17
18VDD18
18VDD13
18VDD19
18VDD14
18VDD16
AA22
18VDD20
18VDD21
18VDD22
18VDD23
18VDD24
18VDD25
AVSS33R
AVSS33G
AB4
AVSS182R
AVSS181R0
AVSS181R1
AD2
R6
V4
V2
AMVSS331
AMVSS330
T4
T2
A A
AVSS33B
AVSS181G0
AVSS182G
AVSS181G1
AA4
V1
AA3
AVSS181B0
AVSS181B1
AVSS182B
AC3
AC4
Y7
DVSS18P
AE5
AB6
DVSS18ADC
VSS_33E
AVSSP
AB7
AC5
XVSS
AF6
33VSS1
K10
K11
33VSS2
33VSS3
K12
K13
33VSS4
33VSS5
K14
K15
33VSS6
33VSS7
L10
M10
33VSS8
33VSS9
N10
P10
33VSS10
33VSS11
33VSS12
R10
T10
33VSS13
33VSS14
U10
U11
33VSS15
33VSS16
U12
U13
33VSS17
U14
25VSS1
K17
L16
25VSS2
25VSS3
L17
M15
25VSS4
25VSS5
M16
M17
25VSS6
25VSS7
N15
N16
25VSS8
25VSS9
N17
P15
25VSS10
25VSS11
25VSS12
P16
P17
25VSS13
25VSS14
R15
R16
25VSS15
25VSS16
R17
T16
25VSS17
25VSS18
T17
U17
BPLLVSS
DPLLVSS
18VSS1
18VSS2
18VSS3
18VSS4
18VSS5
18VSS6
18VSS7
18VSS8
18VSS9
18VSS10
18VSS11
18VSS12
18VSS13
18VSS14
18VSS15
18VSS16
18VSS17
18VSS18
18VSS19
18VSS20
18VSS21
18VSS22
18VSS23
18VSS24
18VSS25
18VSS26
18VSS27
18VSS28
18VSS29
MREFGND0
MREFGND1
G7
G20
K16
L11
L12
L13
L14
L15
M11
M12
M13
M14
N11
N12
N13
N14
P11
P12
P13
P14
R11
R12
R13
R14
M23
U23
T11
18VSS30
T12
T13
T14
T15
U16
Y20
18VSS31
AE19
MPLLVSS
AB18
AB17
URESVSS
AE20
MDSKVSS
G24
AMOI
Title
PW106 PWR
Size Document Number Rev
B
5
4
3
2
Date: Sheet
Confidential
OPAL SINGLE CHANNEL
1
of
811Friday, March 10, 2006
A
Page 46
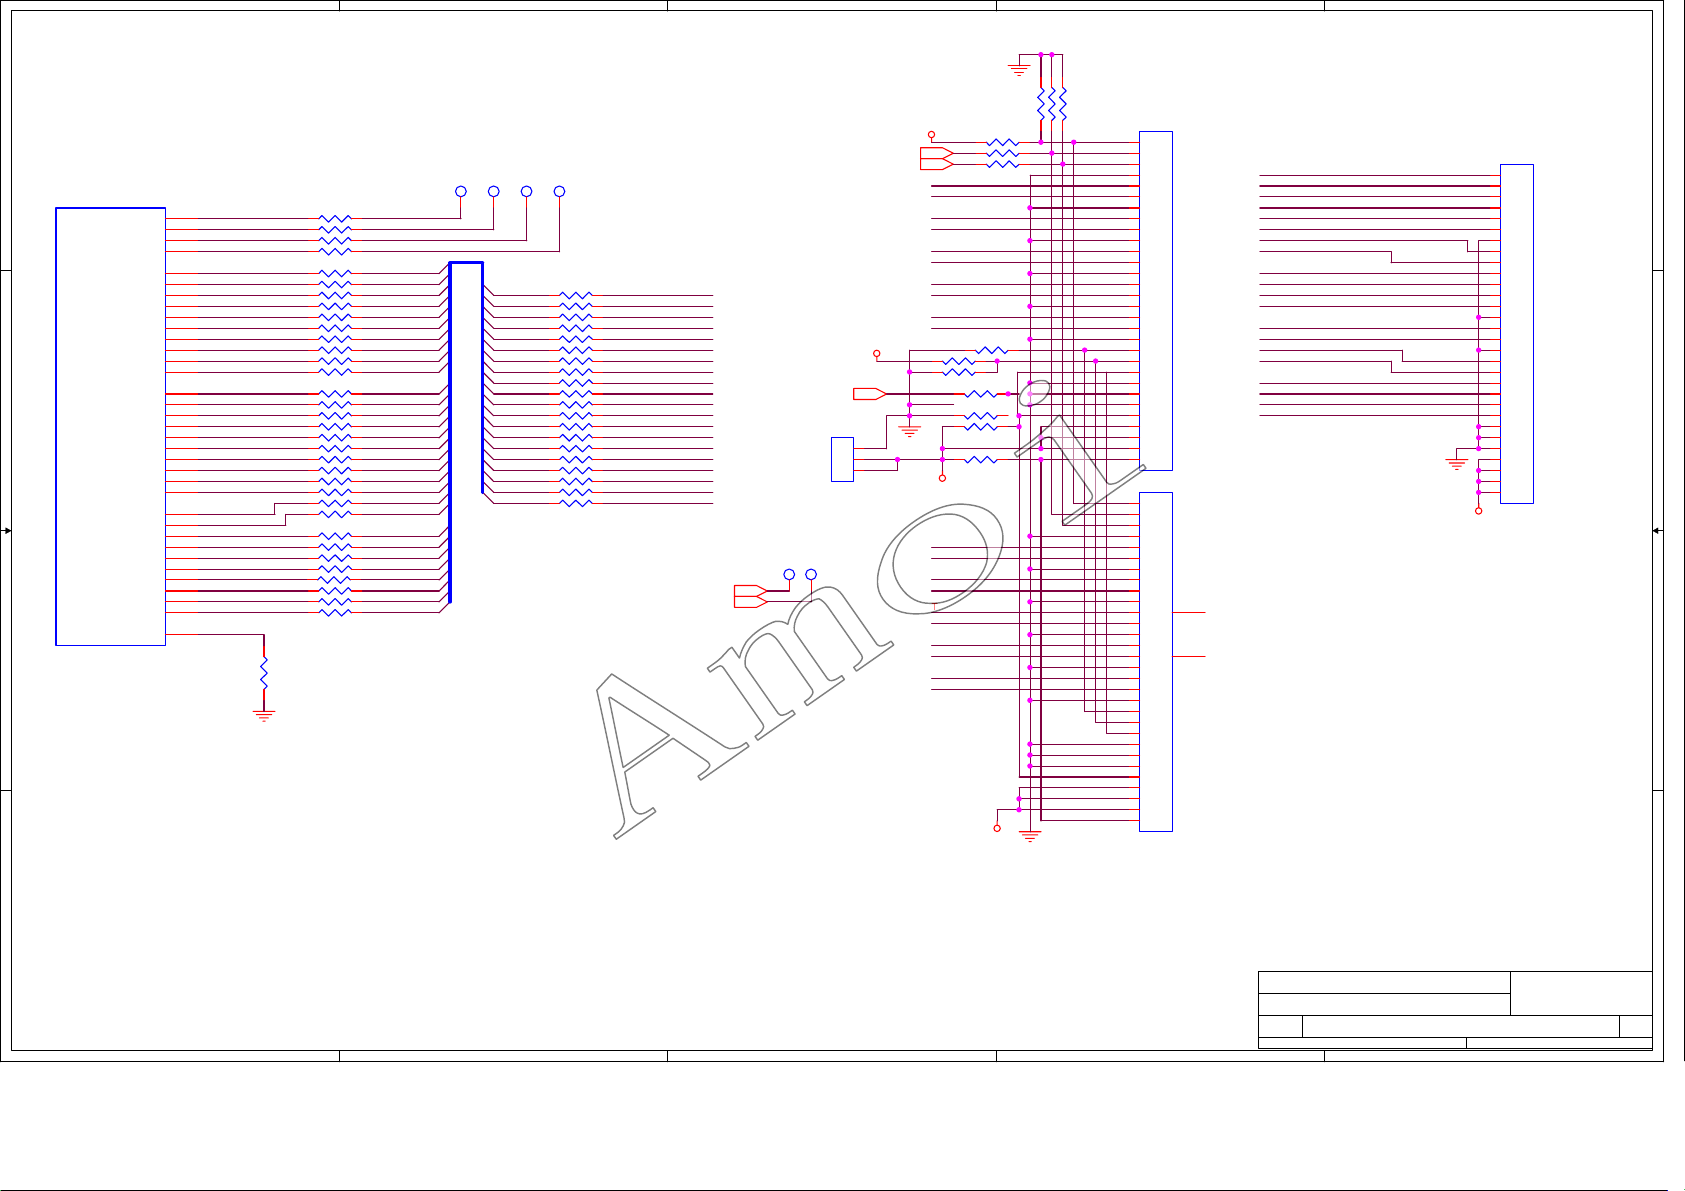
5
44
D D
RP59-2 47Ω*4
DCLKOUT
C16
DVS
D15
DHS
C15
DEN
C23
U9C
PW106-10_2
C C
Display Port
B B
DR0
DR1
TXOCp_DR2
TXOCm_DR3
TXO2p_DR4
TXO2m_DR5
TXO3p_DR6
TXO3m_DR7
TX04p_DR8
TXO4m_DR9
DG0
DG1
TXE3p_DG2
TXE3m_DG3
TXE4p_DG4
TXE4m_DG5
TXO0p_DG6
TXO0m_DG7
TXO1p_DG8
TXO1m_DG9
DB0
DB1
TXE0p_DB2
TXE0m_DB3
TXE1p_DB4
TXE1m_DB5
TXECp_DB6
TXECm_DB7
TXE2p_DB8
TXE2m_DB9
RPIATEST
A25
B24
B23
A23
A24
A21
B21
A22
B22
D19
D18
C20
C19
B20
A20
B19
A19
B18
A18
C17
D16
B17
A17
B16
A16
B15
A15
B14
A14
E23
RP51-4 47Ω*4
RDVSRDVS
RP59-1 47Ω*4
RDHSRDHSRDHS
RP51-1 47Ω*4
RDENRDENRDEN
RP53-4 47Ω*4
RDR0
RP53-3 47Ω*4
RDR1
RP53-2 47Ω*4
RDR2
RP53-1 47Ω*4
RDR3
RP52-2 47Ω*4
RDR4
RP52-3 47Ω*4
RDR5
RP54-2 47Ω*4
RDR6
RP54-3 47Ω*4
RDR7
RP52-1 47Ω*4
RDR8
RP54-4 47Ω*4
RDR9
RP56-3 47Ω*4
RDG0
RP57-3 47Ω*4
RDG1
RP56-2 47Ω*4
RDG2
RDG3
RP56-1 47Ω*4
RDG4
RP54-1 47Ω*4
RDG5
RP56-4 47Ω*4
RP55-3 47Ω*4
RDG6
RDG7
RP55-4 47Ω*4
RP55-1 47Ω*4
RDG8
RDG9
RP55-2 47Ω*4
RP58-4 47Ω*4
RP58-3 47Ω*4
RDB0
RDB1
RDB2
RP57-1 47Ω*4
RP57-2 47Ω*4
RDB3
RP58-1 47Ω*4
RDB4
RP58-2 47Ω*4
RDB5
RDB6
RP51-3 47Ω*4
RDB7
Rp51-2 47Ω*4
RP59-3 47Ω*4
RDB8
RP59-4 47Ω*4
RDB9
RPIA
R218
12K
RDCLK
C14
DCLK
DVS
DHS
DEN
DR0
DR1
DR2
DR3
DR4
DR5
DR6
DR7
DR8
DR9
DG0DG0
DG1DG1
DG2
DG3
DG4
DG5
DG6
DG7
DG8
DG9
DB0
DB1
DB2
DB3
DB4
DB5
DB6
DB7
DB8
DB9
4
FID3
DR[9:0],DG[9:0],DB[9:0]
FID5
FID4
1
1
1
RP60-1 0Ω*4
DB2
RP60-2 0Ω*4
DB3
RP60-3 0Ω*4
DB4
RP60-4 0Ω*4
DB5
RP61-1 0Ω*4
DB6
RP61-2 0Ω*4
DB7
RP61-3 0Ω*4
DB8
RP61-4 0Ω*4 R365 10K
DB9
RP62-1 0Ω*4
DG2
RP62-2 0Ω*4
DG3
RP62-3 0Ω*4
RP62-4 0Ω*4
DG7
RP68-1 0Ω*4
DG8
RP68-2 0Ω*4
DG9
RP68-3 0Ω*4
DR2
RP68-4 0Ω*4
DR3
RP69-1 0Ω*4
DR4
RP69-2 0Ω*4
DR5
RP69-3 0Ω*4
DR6
Rp69-4 0Ω*4
DR7
FID6
3
0_NS
R356
R357
0_NS
VCC
R360 47
ANAPWM
BKLONOFF
1
TXE0+
TXE0TXE1+
TXE1TXEC+
TXECTXE2+
TXE2TXE3+
TXE3TXO0+DG6
TXO0TXO1+
TXO1TXOC+
TXOCTXO2+
TXO2TXO3+
TXO3-
Panel_ctr1
Panel_ctr2
FID1
FID2
1
V33
ROTATION
CN1
3
3
2
2
1
1
1
R361 0
R362 0
TXE0TXE0+
TXE1TXE1+
TXE2TXE2+
TXECTXEC+
TXE3TXE3+
R363 11
R364 10K
R366 10K
R359 0_NS
R369 0
R368 11
VLCD
TXE0TXE0+
TXE1TXE1+
TXE2TXE2+
TXECTXEC+
TXE3TXE3+
VLCD
0_NS
R358
30
29
28
27
26
25
24
23
22
21
20
19
18
17
16
15
14
13
12
11
10
30
29
28
27
26
25
24
23
22
21
20
19
18
17
16
15
14
13
12
11
10
9
8
7
6
5
4
3
2
1
9
8
7
6
5
4
3
2
1
2
JF603
30
29
28
27
26
25
24
23
22
21
20
19
18
17
16
15
14
13
12
11
10
9
8
7
6
5
4
3
2
1
CON30_3
JF604
30
29
28
27
26
25
24
23
22
21
E2
20
19
18
17
E1
16
15
14
13
12
11
10
9
8
7
6
5
4
3
2
1
CON30_2
1
VLCD
30
29
28
27
26
25
24
23
22
21
20
19
18
17
16
15
14
13
12
11
10
9
8
7
6
5
4
3
2
1
J301
30
29
28
27
26
25
24
23
22
21
20
19
18
17
16
15
14
13
12
11
10
9
8
7
6
5
4
3
2
1
CON30_1
TXE0TXE0+
TXE1TXE1+
TXE2TXE2+
TXECTXEC+
TXE3TXE3+
TXO0TXO0+
TXO1TXO1+
TXO2TXO2+
TXOCTXOC+
TXO3TXO3+
E2
E1
A A
AMOI
Title
DISPLAY
Size Document Number Rev
B
5
4
3
2
Date: Sheet
Confidential
OPAL SINGLE CHANNEL
1
of
911Friday, March 10, 2006
A
Page 47
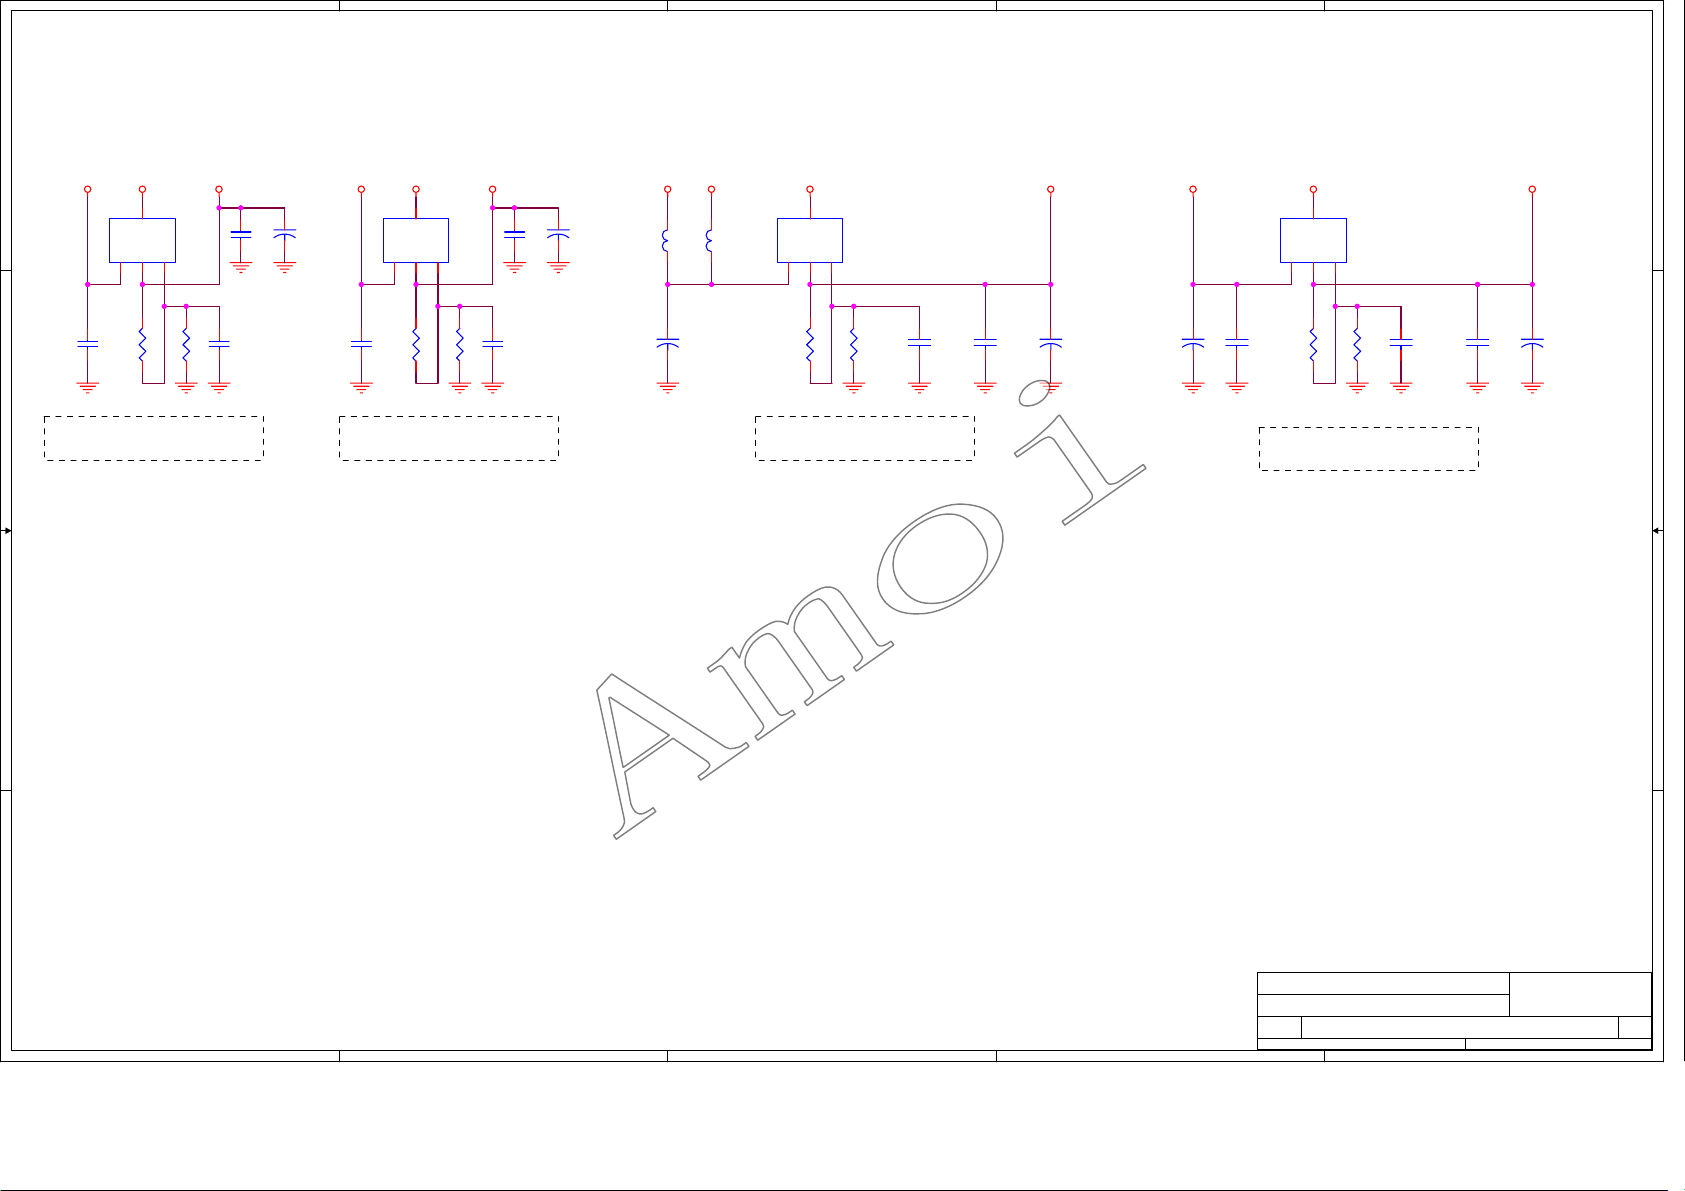
5
45
D D
V18AVCC V18A V33AVCC V33A VCC V25 V25VCC V18V18V33
3
Vin
U21
4
LM1117-3.3
Vo4
Vo2
1
2
R2300_NS
U20
4
LM1117-1.8
Vo4
ADJ
Vo2
Vin
1
2
3
R2280_NS
C286
0.1uF
C C
R228=4.7K, R229=1.8K, C287=0.1uf
if LM1117-ADJ is stuffed ;
R2290
C287
0.1uF_NS
C276
0.1uF
12
C277
47uF
C288
0.1uF
R230=2.2K, R231=3.3K, C289=0.1uF
if LM1117-ADJ is stuffed ;
4
12
C279
C278
0.1uF
ADJ
V33AADJ V25SWADJV20SWADJV18AADJ
C289
R2310
0.1uF_NS
47uF
C292
100uF
L64A
L65A
12
R234
0_NC
R234=3.3K, R235=1.8K, C294=0.1uF
if LM1086-ADJ is stuffed ;
Vin
3
3
U23
4
LM1086-1.8_TO263
Vo4
ADJ
Vo2
1
2
R235
0
C294
0.1uF_NC
C295
0.1uF
12
C296
100uF
2
C270
470uF
1
U18
4
LM1117-2.5
Vo4
ADJ
Vo2
Vin
1
2
3
12
R223
C271
0_NS
0.1uF
R223=4.7K, R224=3.9K, C272=0.1uF
if LM1117-ADJ is stuffed ;
R224
0
C272
0.1uF_NS
C273
0.1uF
12
C274
470uF
B B
A A
Title
AMOI
CORE POWER
Size Document Number Rev
B
5
4
3
2
Date: Sheet
Confidential
OPAL SINGLE CHANNEL
1
of
10 11Friday, March 10, 2006
A
Page 48
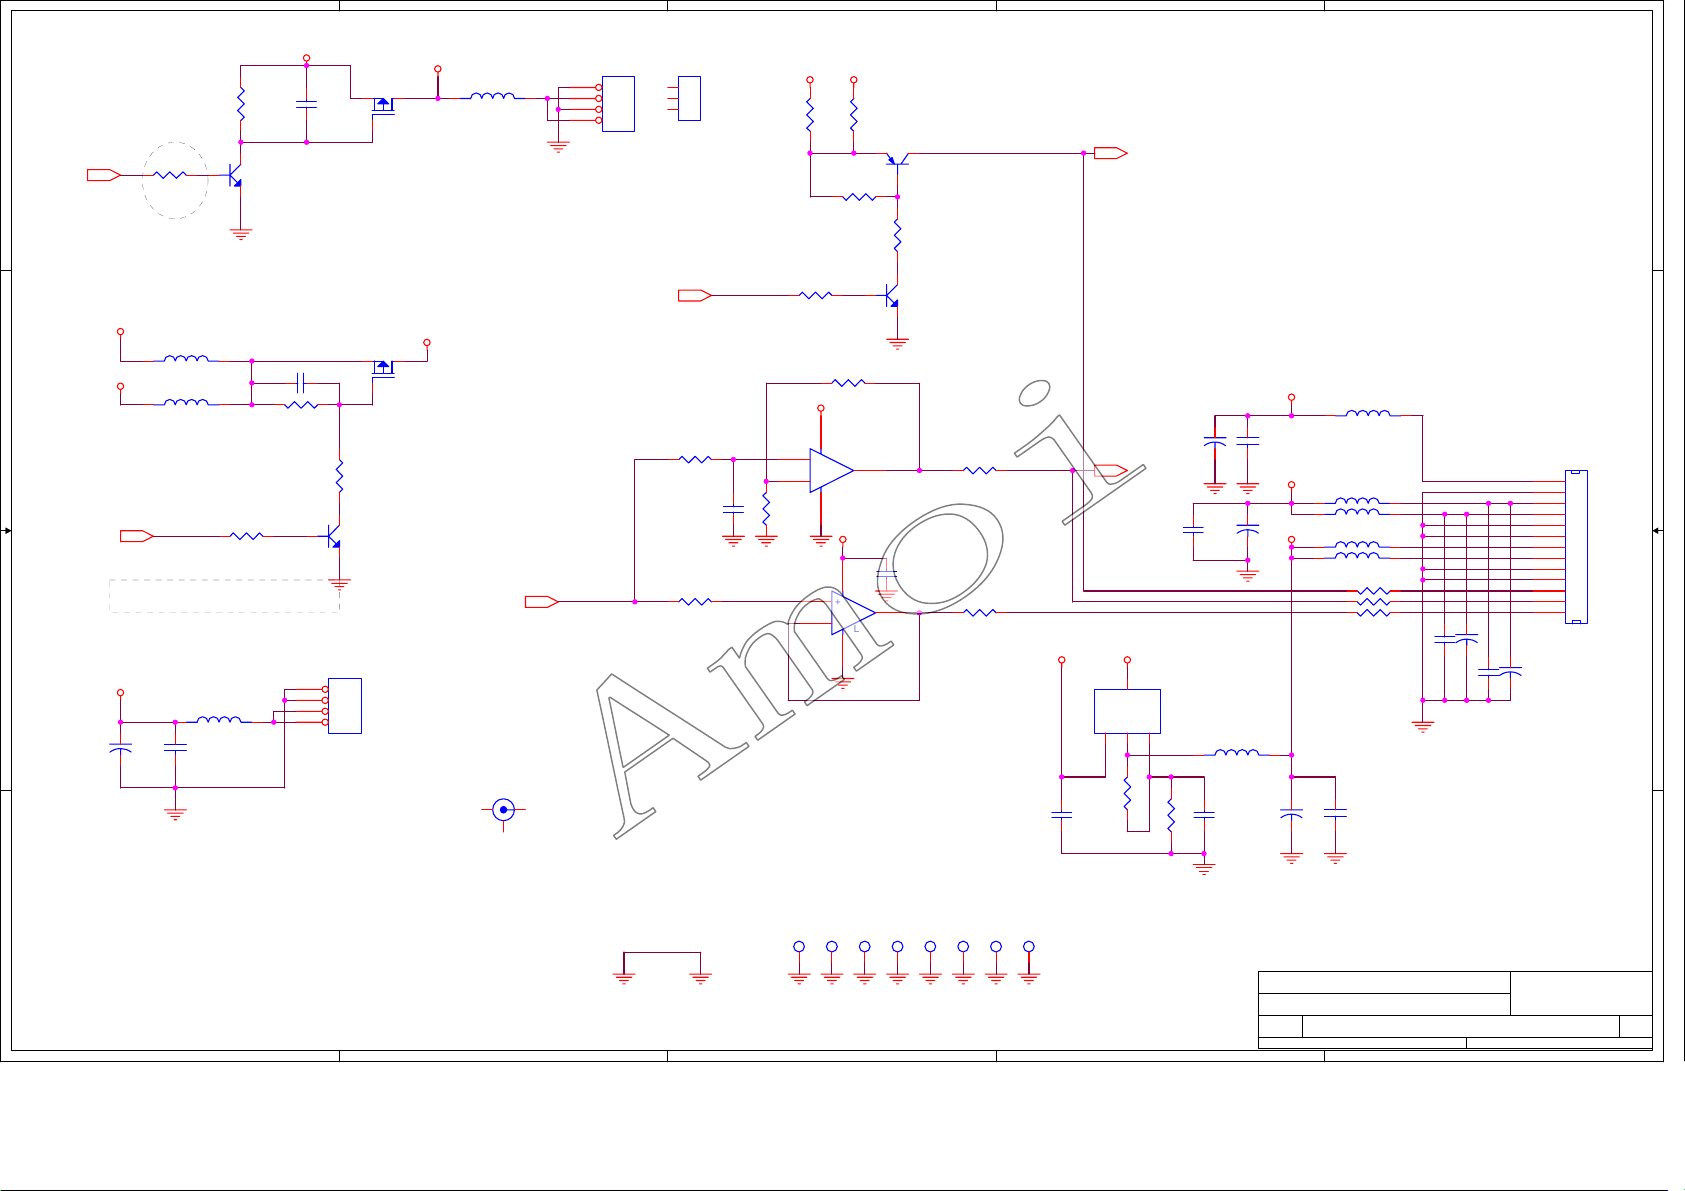
5
46 47 48 49 50
4
3
2
1
VCC
12
R256
100K
D D
DIN-T18-STB
1 2
R257
3.3K
3
Q7
1
MMBT3904
MOSFET P
C325
0.1uF
1 2
2
JM11
1
V5-JPEG
L61
32
22uH/5A
J708
1
1
2
2
3
3
4
4
4 HEADER
J708
1
1
2
2
3
3
R243
4.7K
V33
R244
4.7K
VCC
R241
Q8
2 3
3906
1
BKLONOFF
3.3K
R242
84
U25A
AD746/SO
VCC
5
+
6
-
3.3K
1
Q9
MMBT3904
1
84
U25B
LM358_SO8
3
2
STB+5V
12
C327
0.1uF
C314
1000uF 10V
VCC
V33
R246 47
ANAPWM
ANAPWM
C326
100uF
12
C315
0.1uF
12
C316
0.1uF
R247 47
7
PWMOUT
VCC V33A3
U22
4
LM1117-3.3
Vo4
ADJ
Vo2
Vin
1
2
3
L70 22uH/5A
R232
C291
0.1uF_NS
0_NS
C290
R2330
0.1uF_NS
L62
22uH/5A
L63 22uH/5A
L64 22uH/5A
L65 22uH/5A
L66 22uH/5A
12
C329
C330
0.1uF
100uF
R248
R249
R250
J704
1
1
2
2
3
3
4
4
5
5
6
6
7
7
8
8
9
9
10
C310
11
12
13
CON13
10
11
12
13
12
0
12
0
12
0
12
C312
C313
1000uF 10V
0.1uF
C311
0.1uF
12
1000uF 10V
R240
C317
0.1uF
10K
R253 10K
VCC
3
+
2
-
R252
10K
R245
47.5K
R251
10K
BKLON
1 2
BKLON
V12
L67
VCC
22uH/5A_NC
C C
L68
22uH/5A
1 2
R254
10K
C318
0.1uF
12
MOSFET P
1
JM12
VLCD
32
12
R258
0
3
LCDON
LCDON
R255
3.3K
Stuff one of L60/L62 for VPANEL Voltage
B B
C297
22uF
V12
AU PANEL POWER INPUT
12
C298
0.1uF
L69
22uH/5A_NC
1
Q10
MMBT3904
1
2
3
4
2
J716
1
2
3
4
4 HEADER
3
PWM
J717
RCA_V_0
2
PWM
1
A A
5
4
MH1
MH2
MH3
3
MH4
MH5
MH6
MH7
MH8
AMOI
Title
MAIN POWER
Size Document Number Rev
B
2
Date: Sheet
Confidential
OPAL SINGLE CHANNEL
1
of
A
11 11Friday, March 10, 2006
Page 49
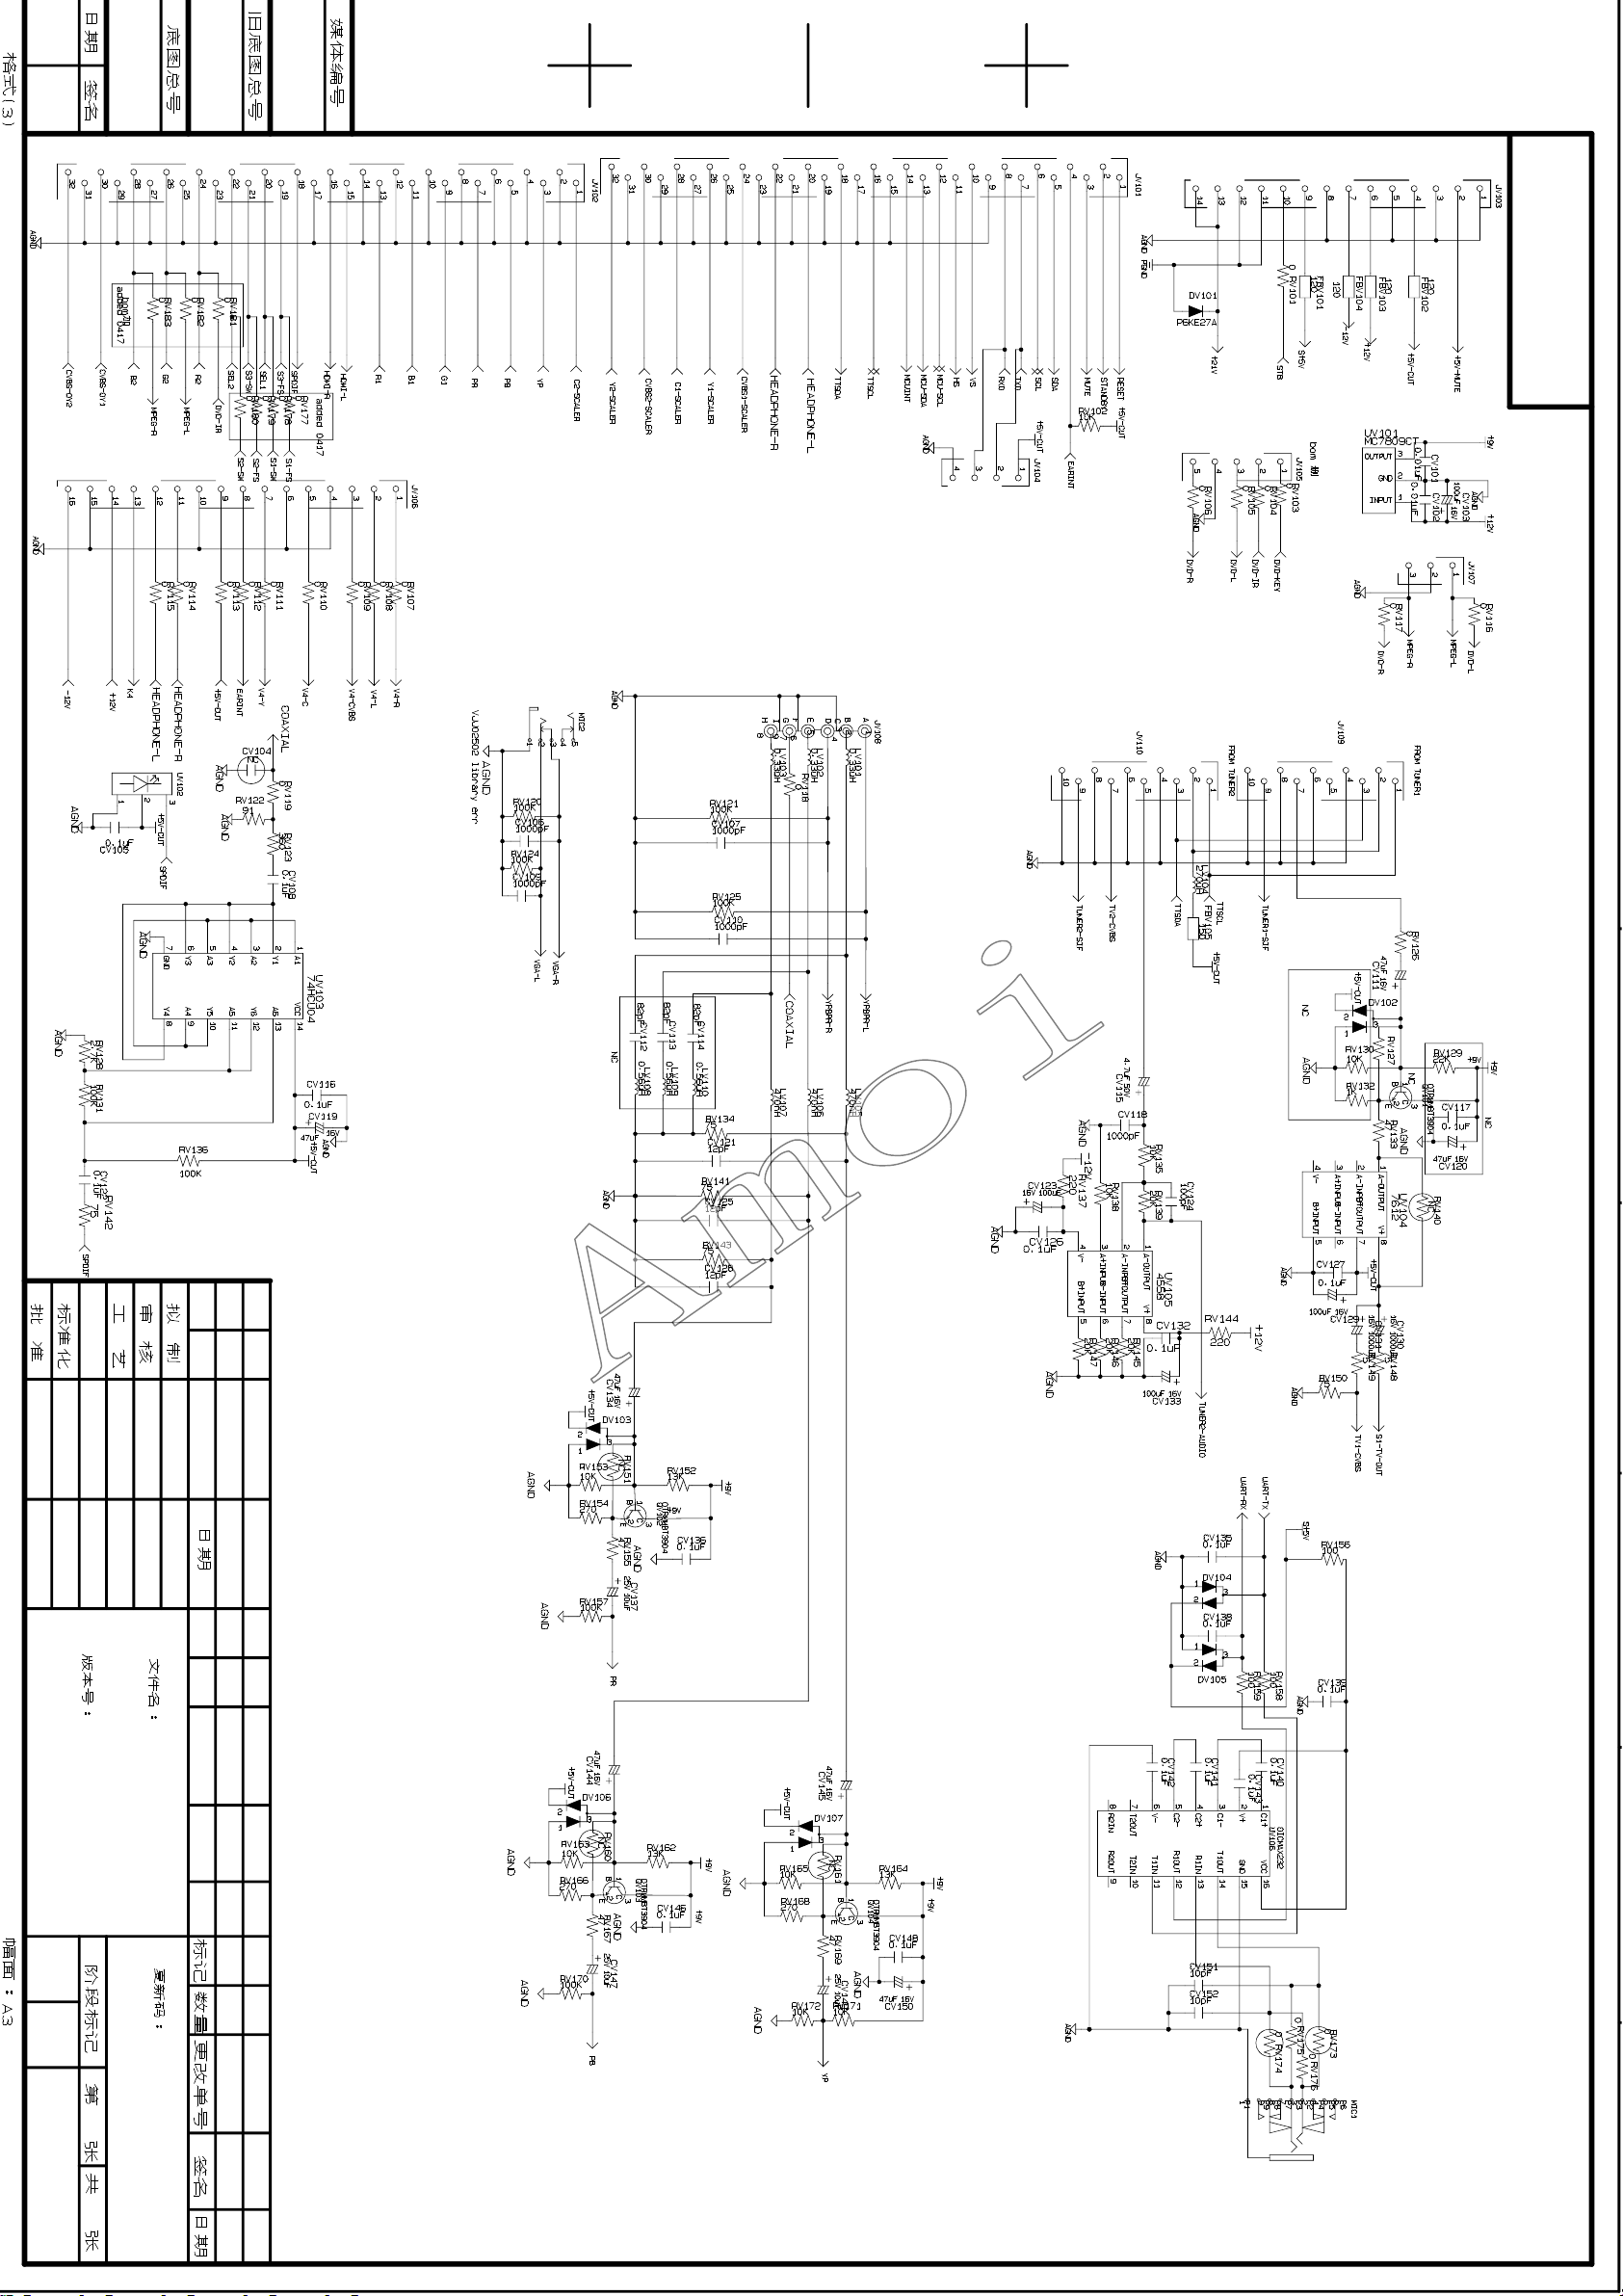
Page 50
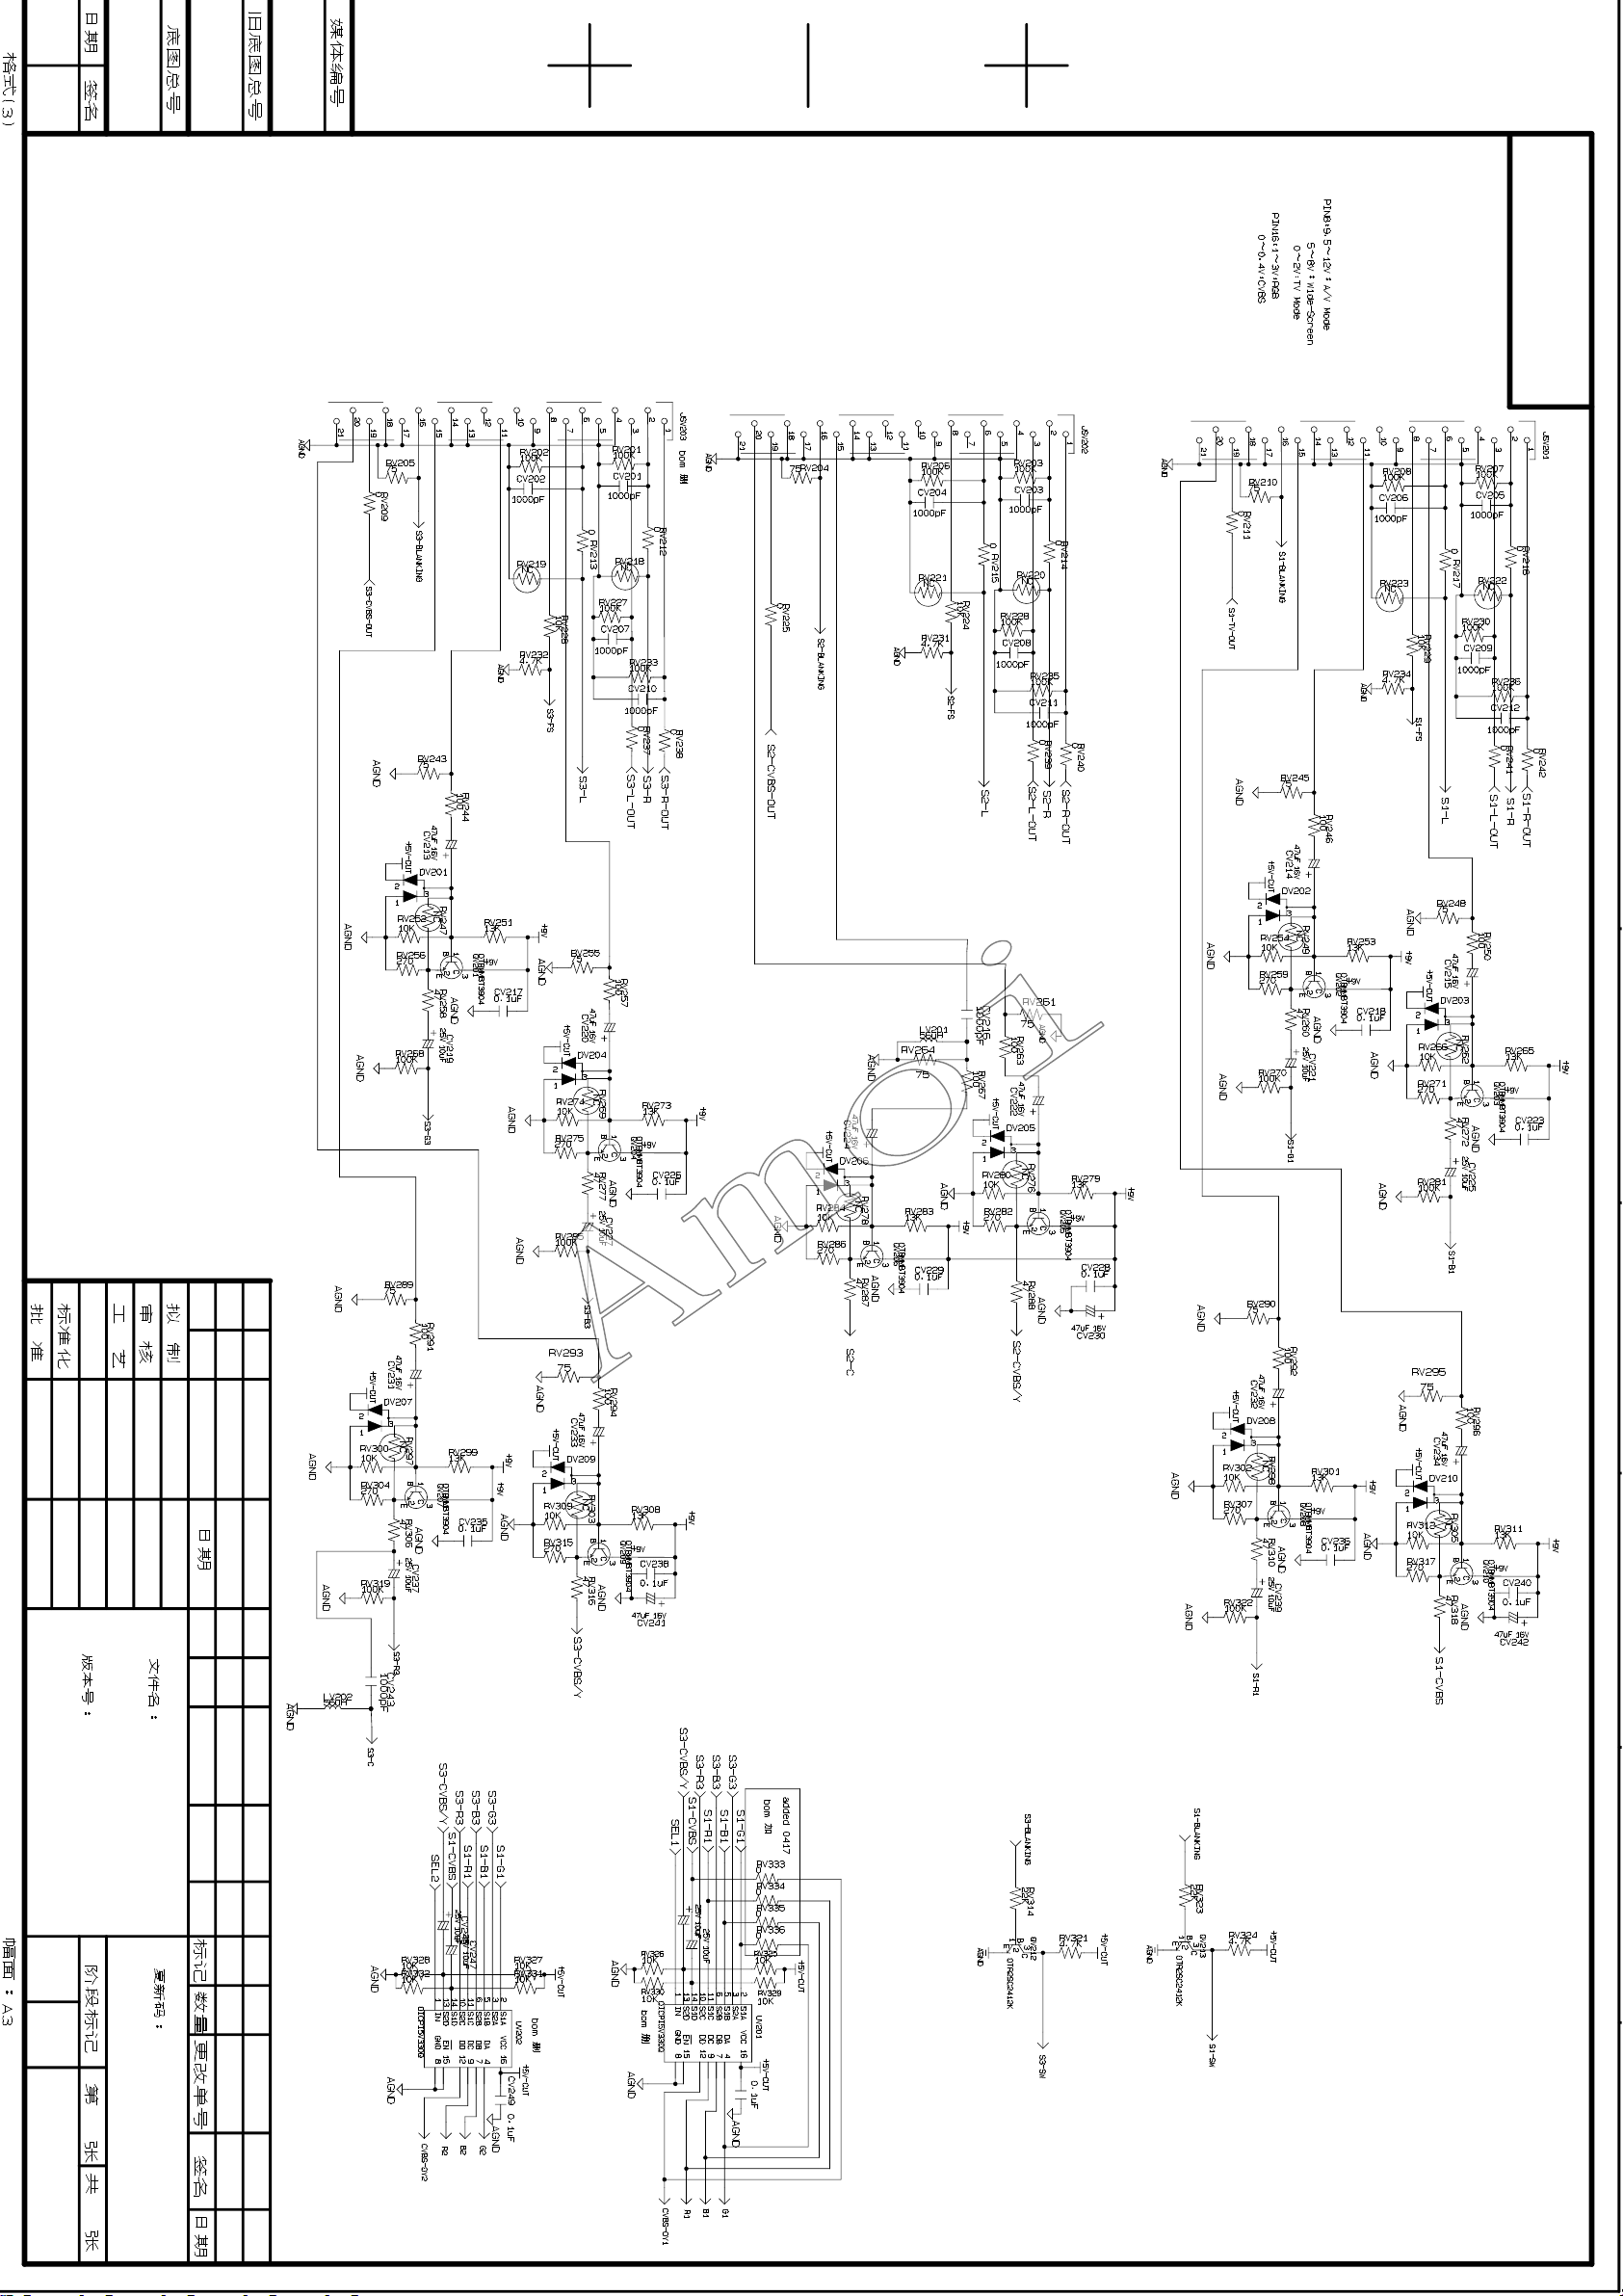
Page 51
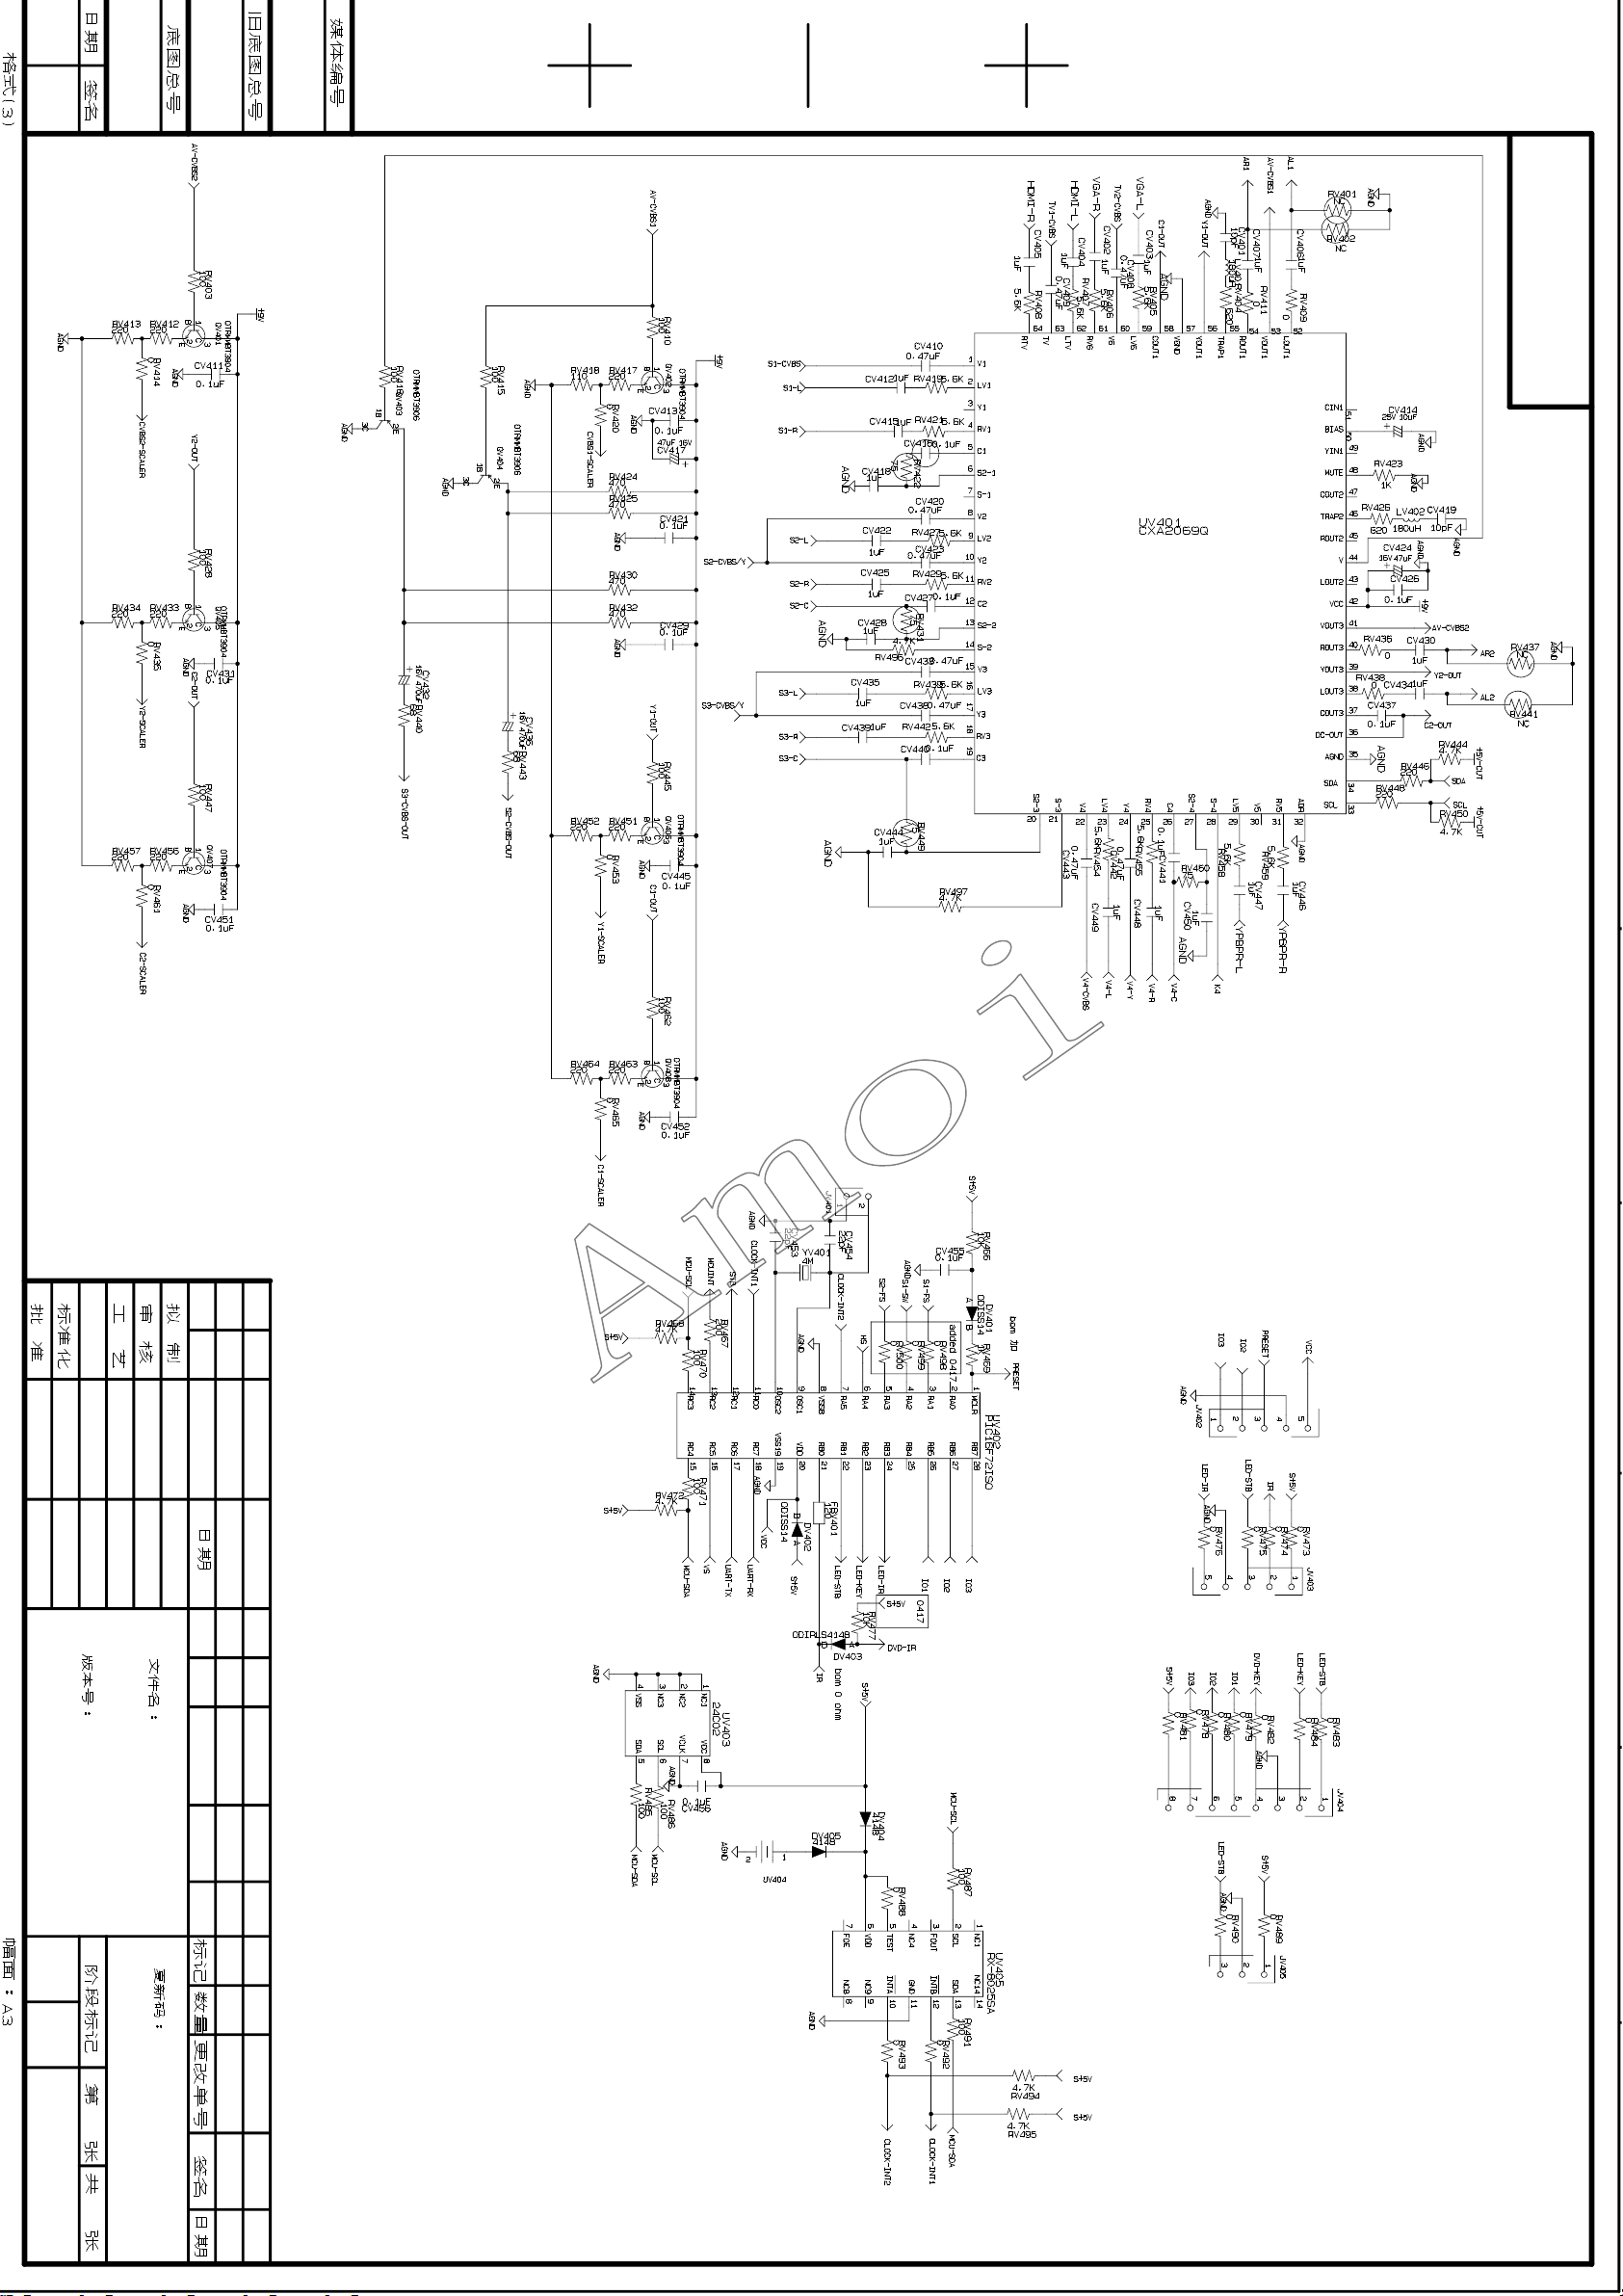
Page 52
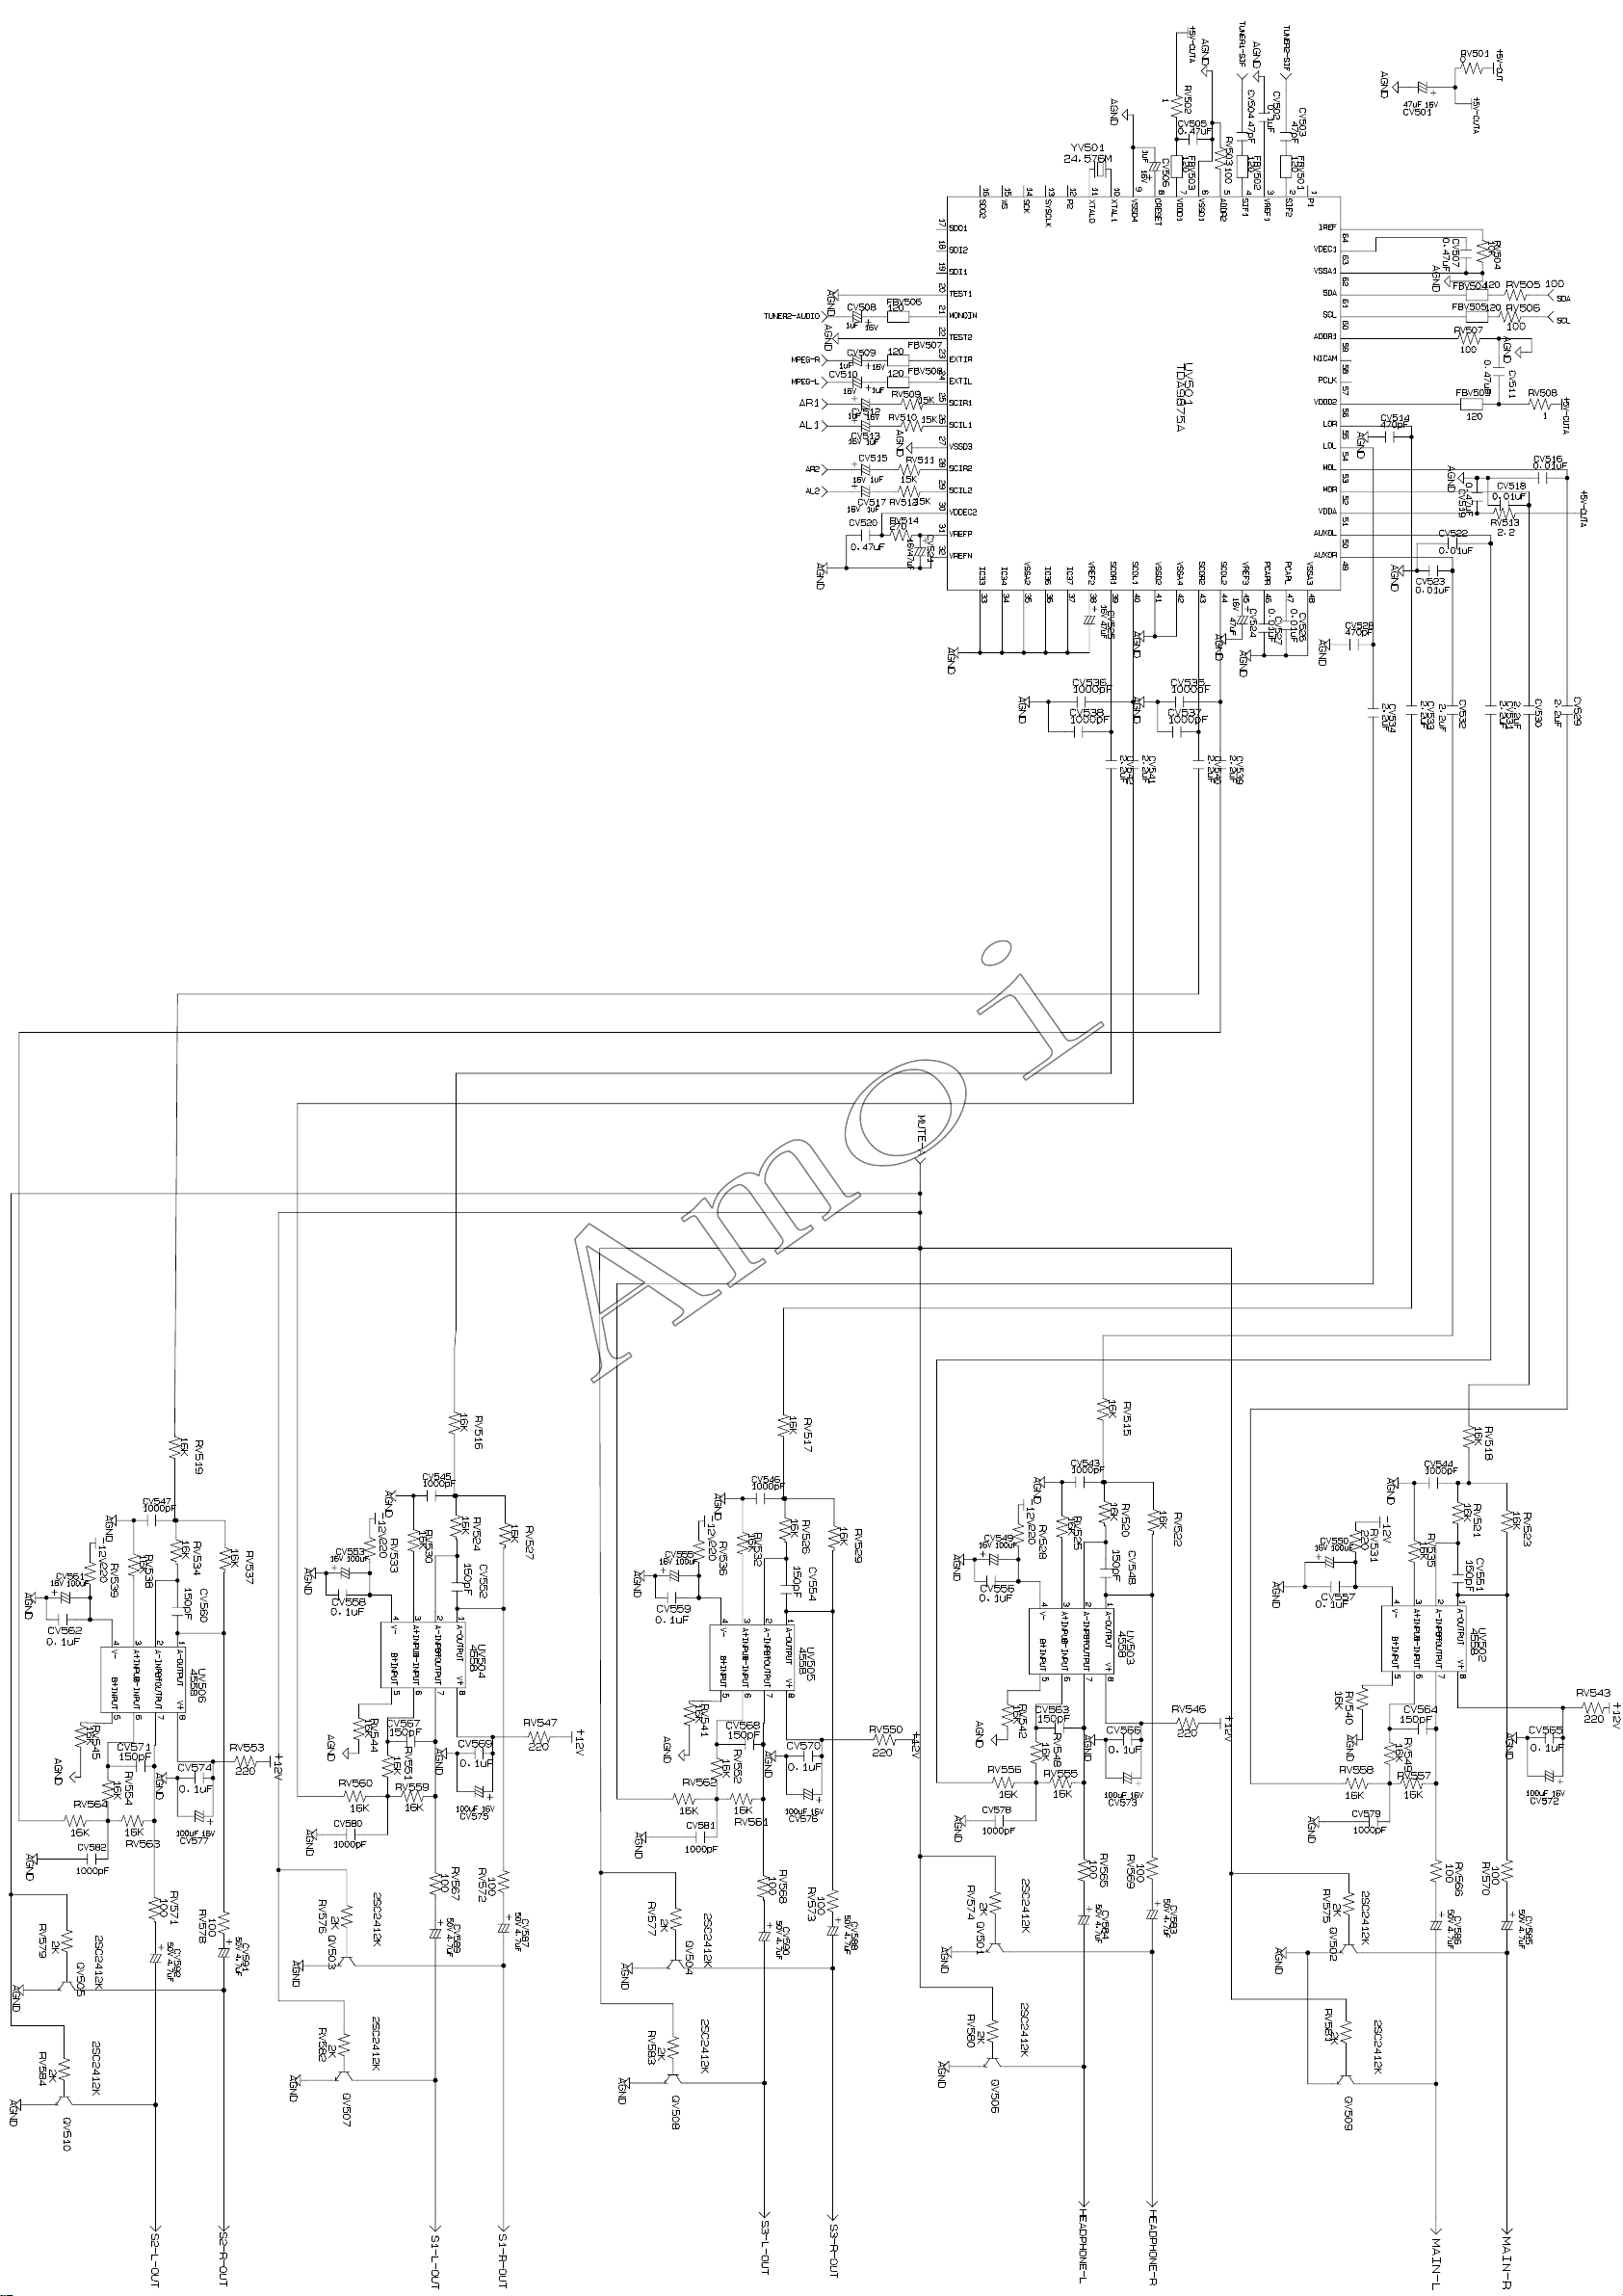
Page 53
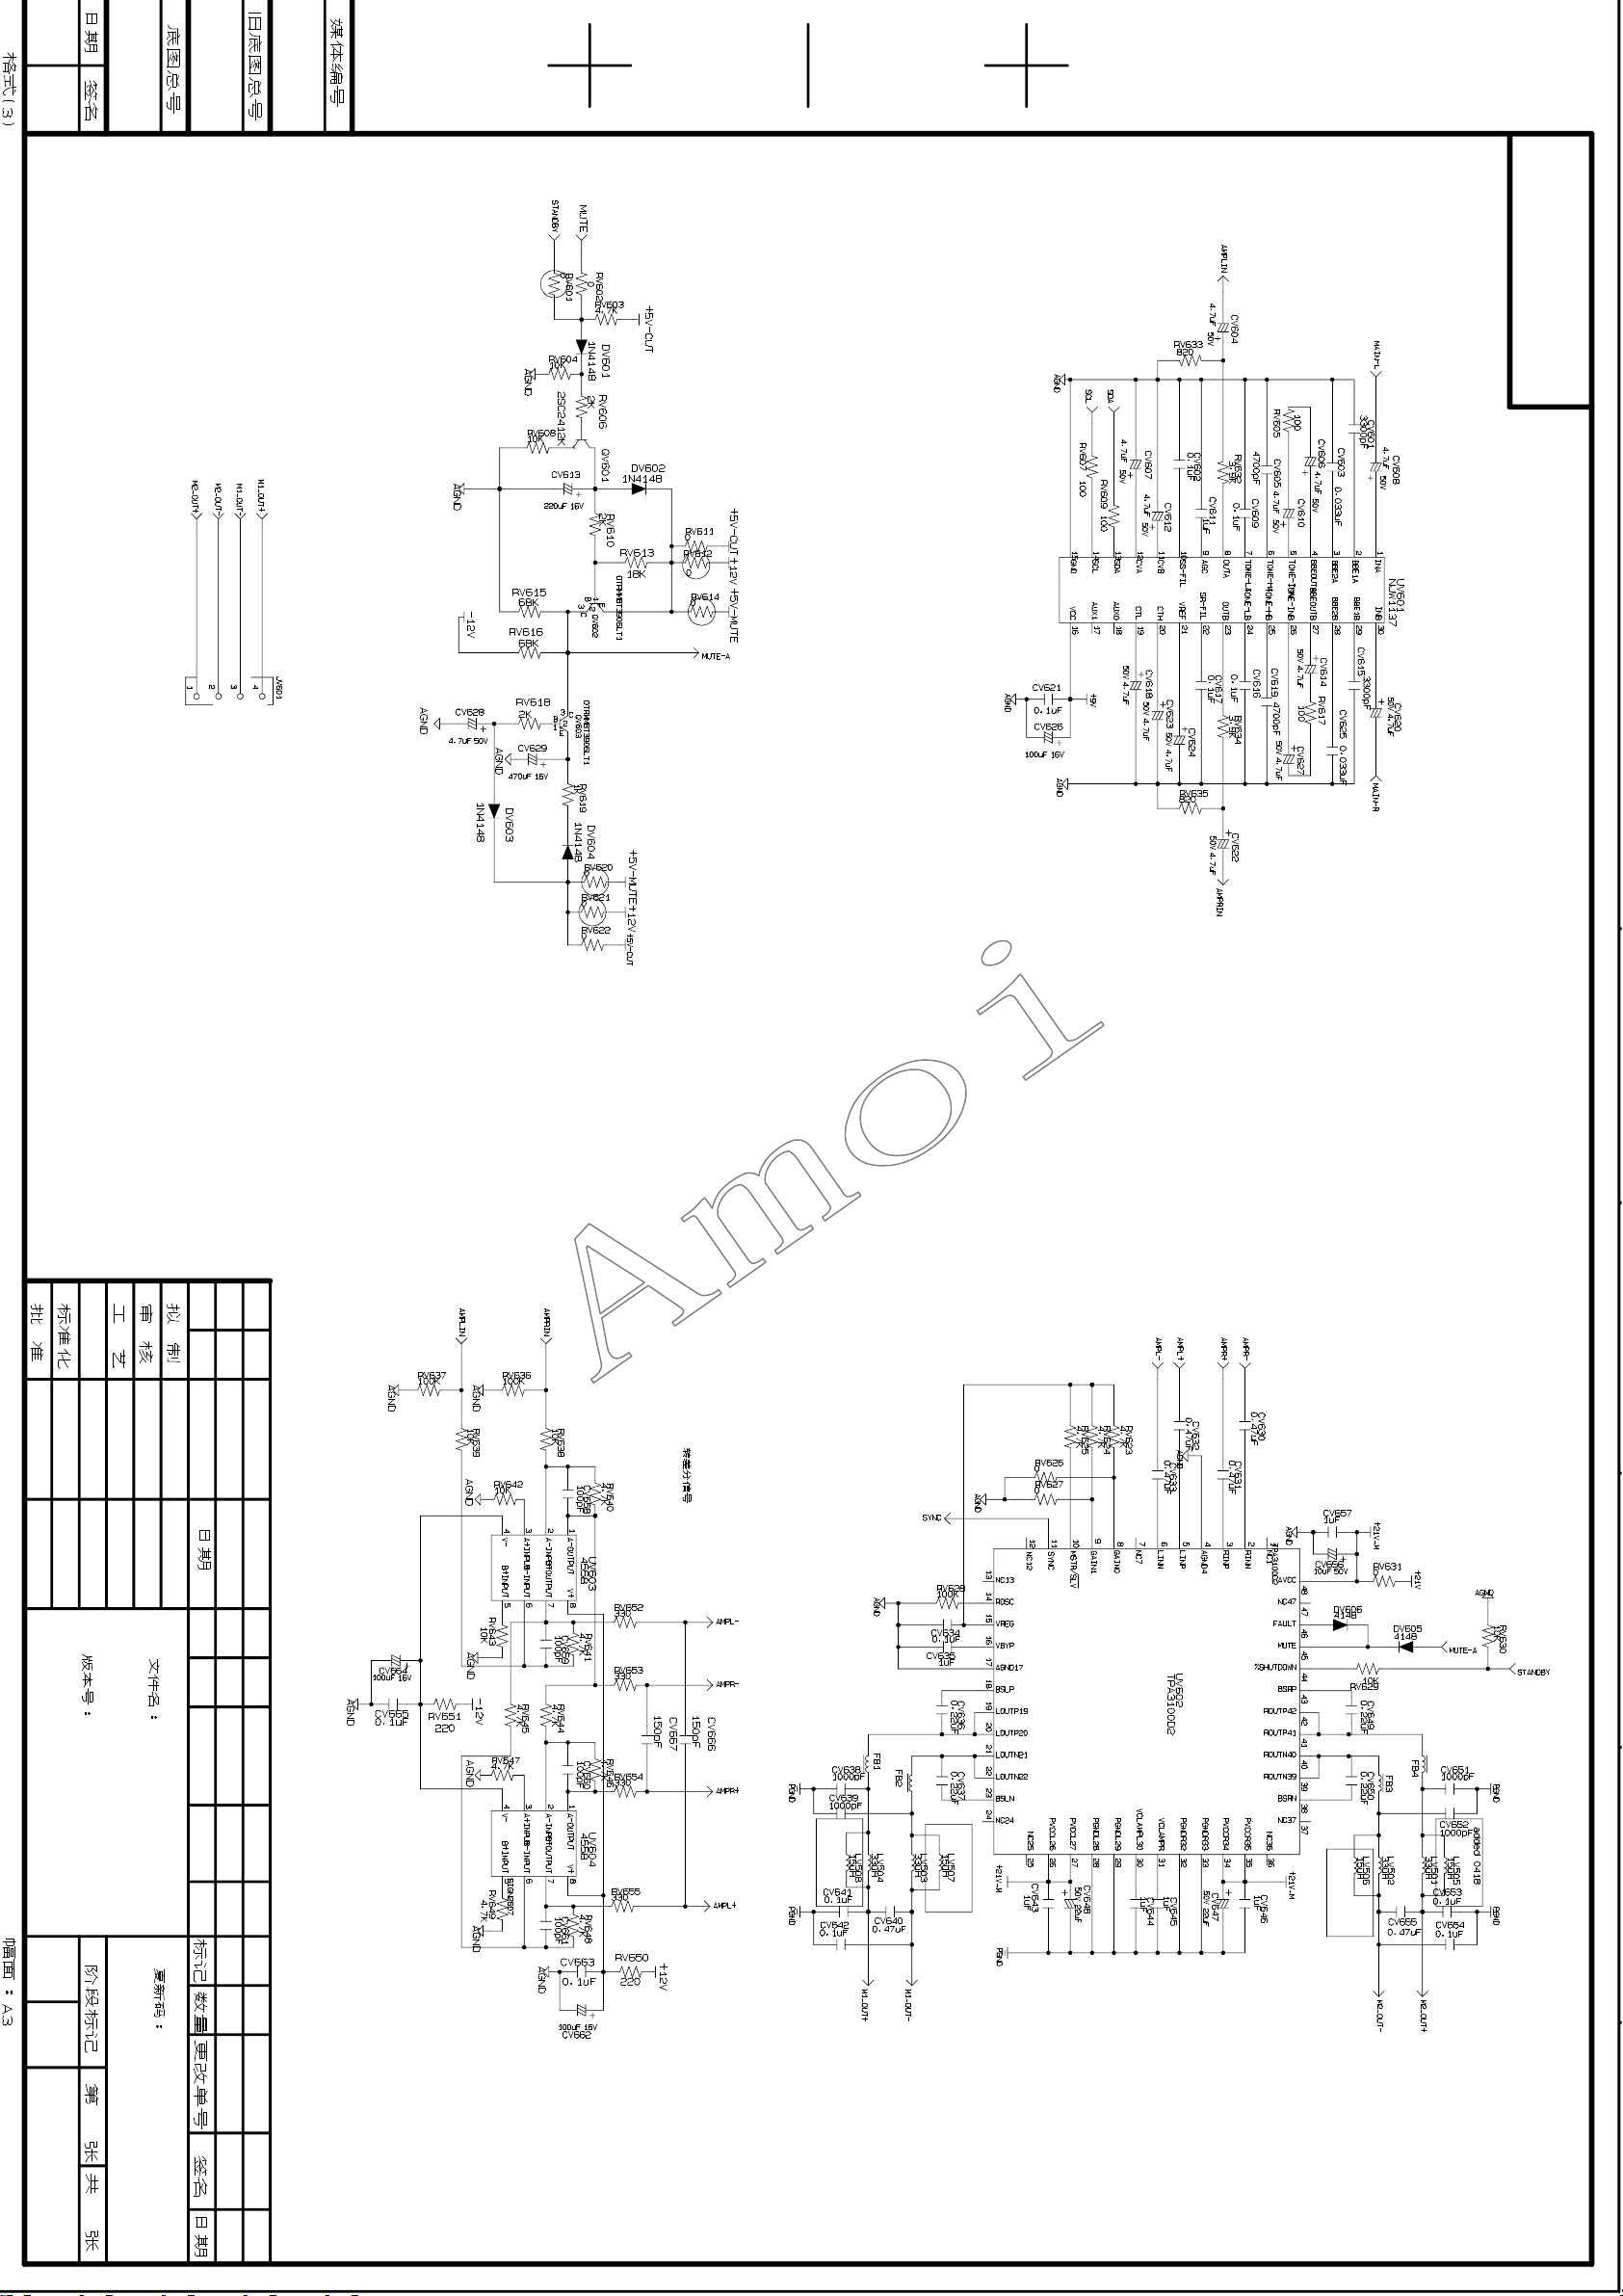
51
Page 54

52 53 54 55 56 57 58
6.3.Schematic Diagrams
Public part for LC26T1E/LC32T1E/LC37T1E/LC42T1E
Page 55
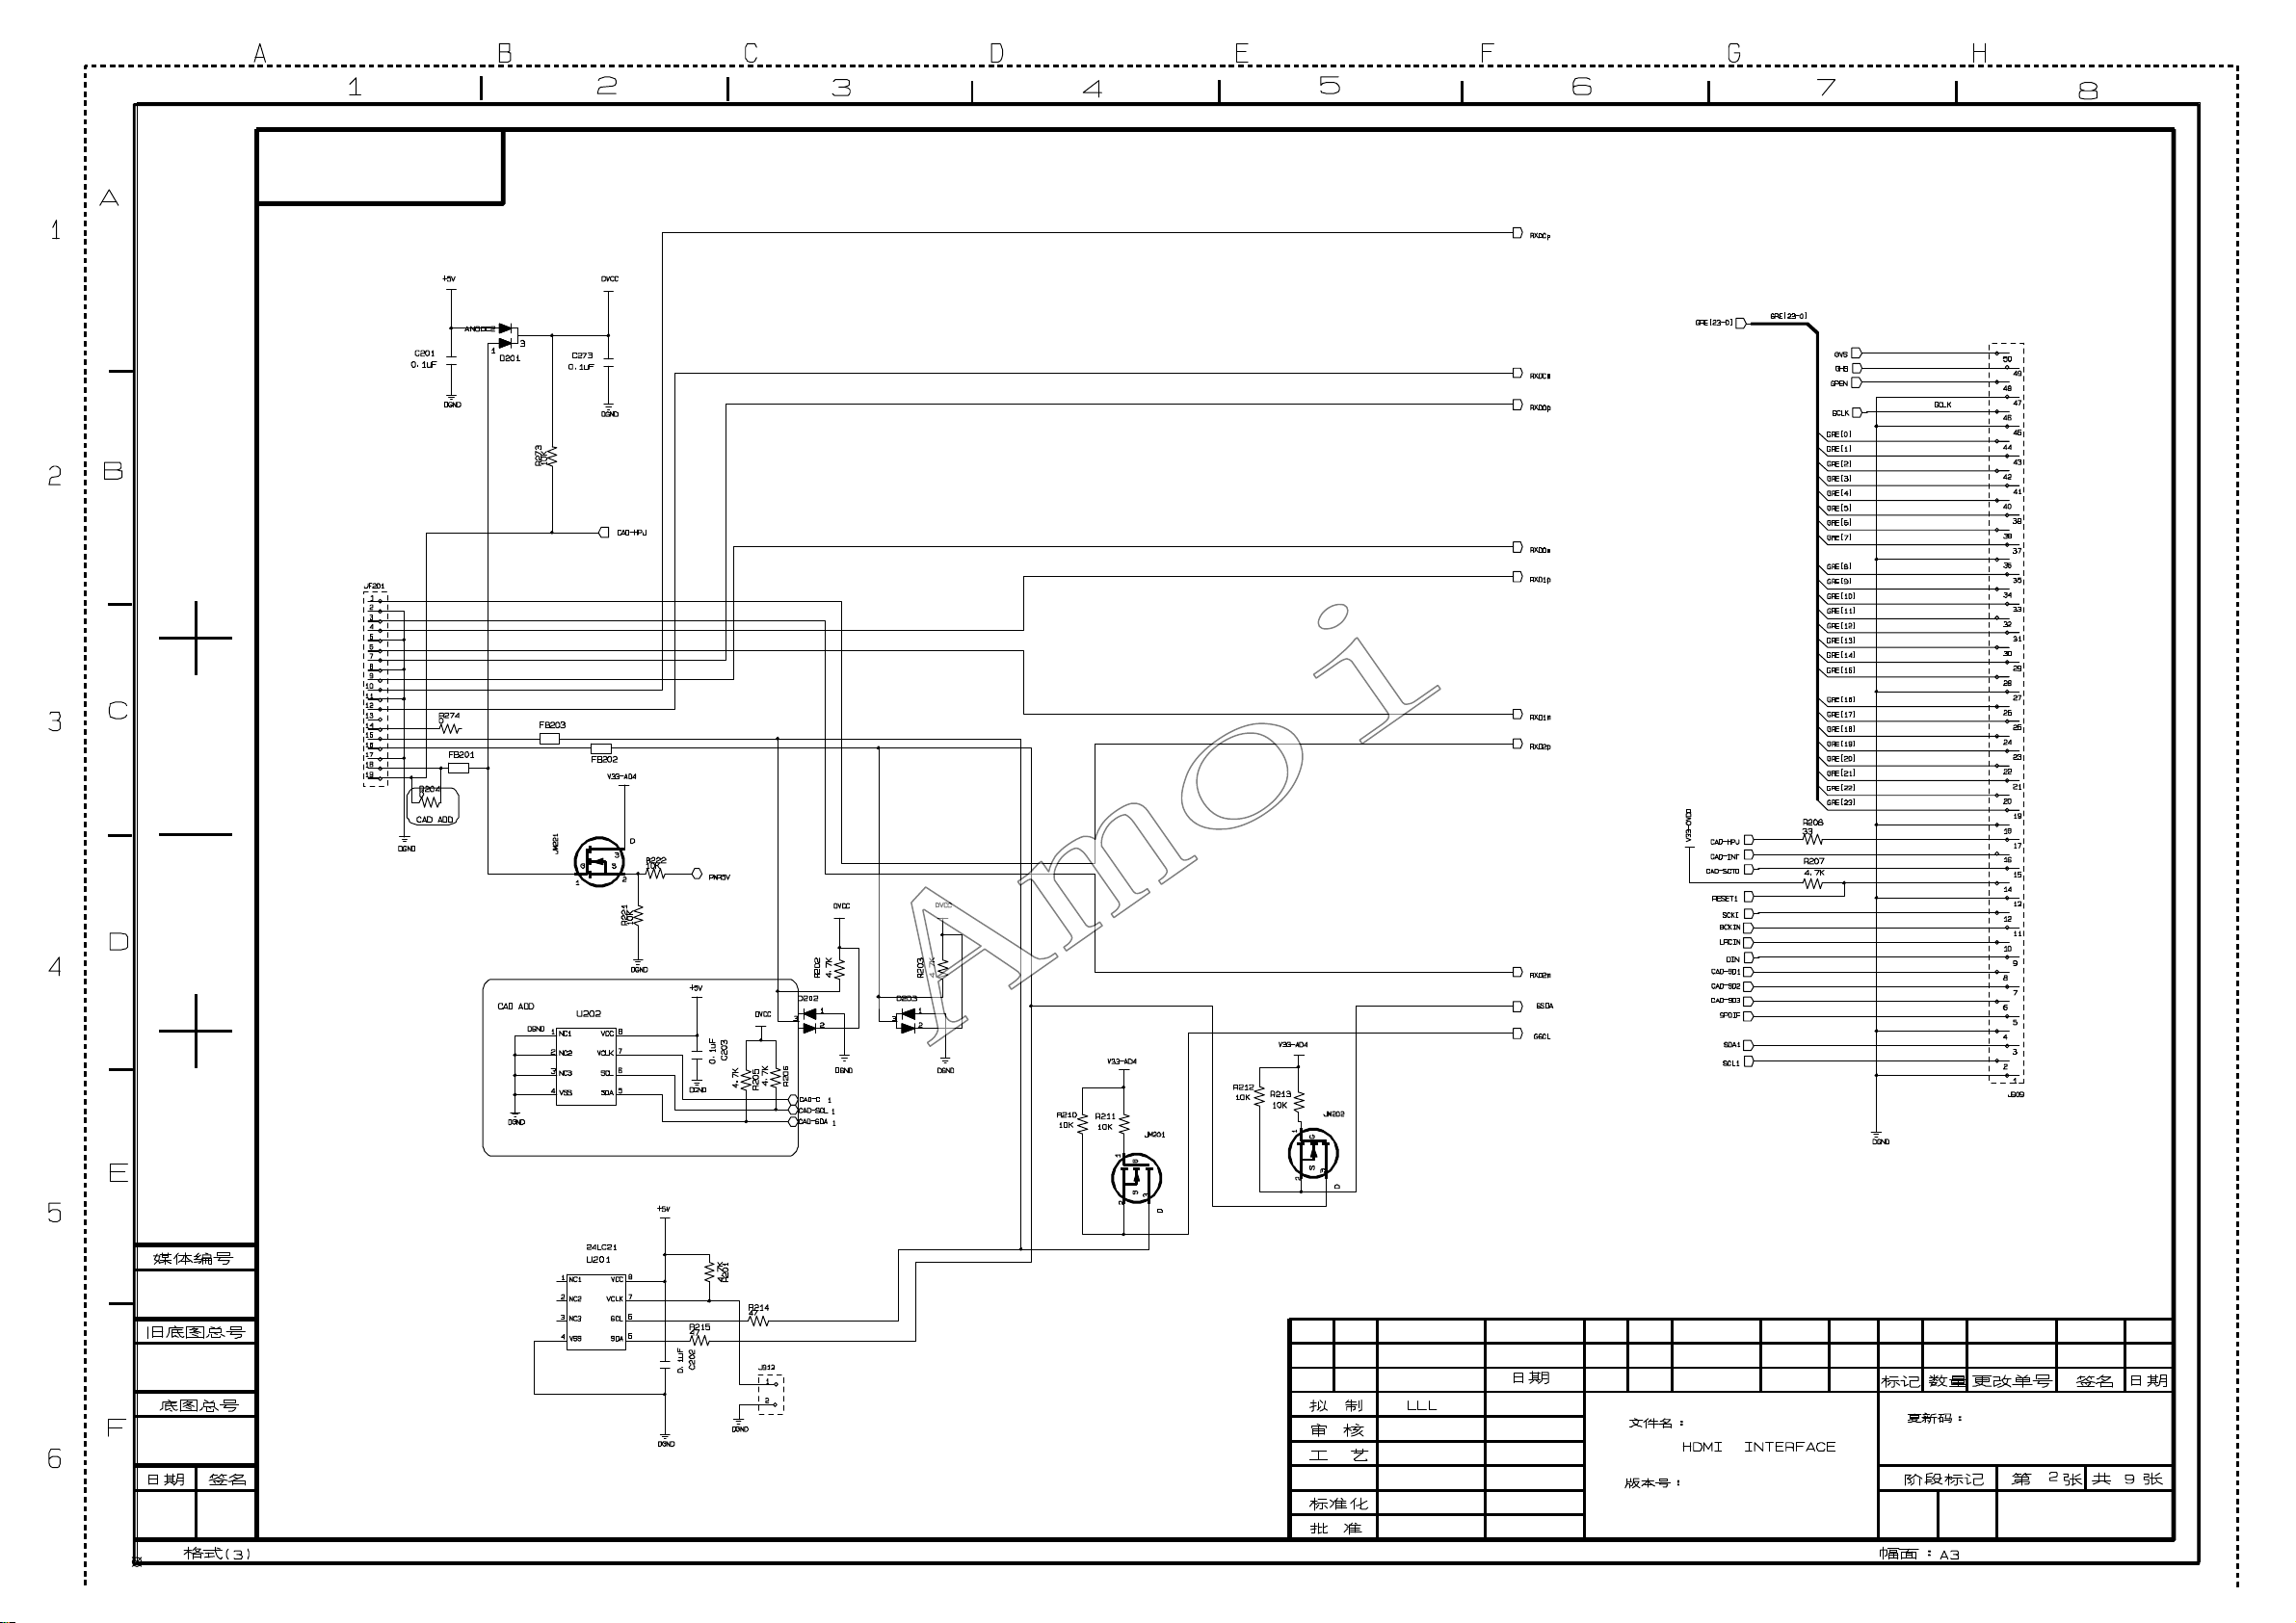
Page 56
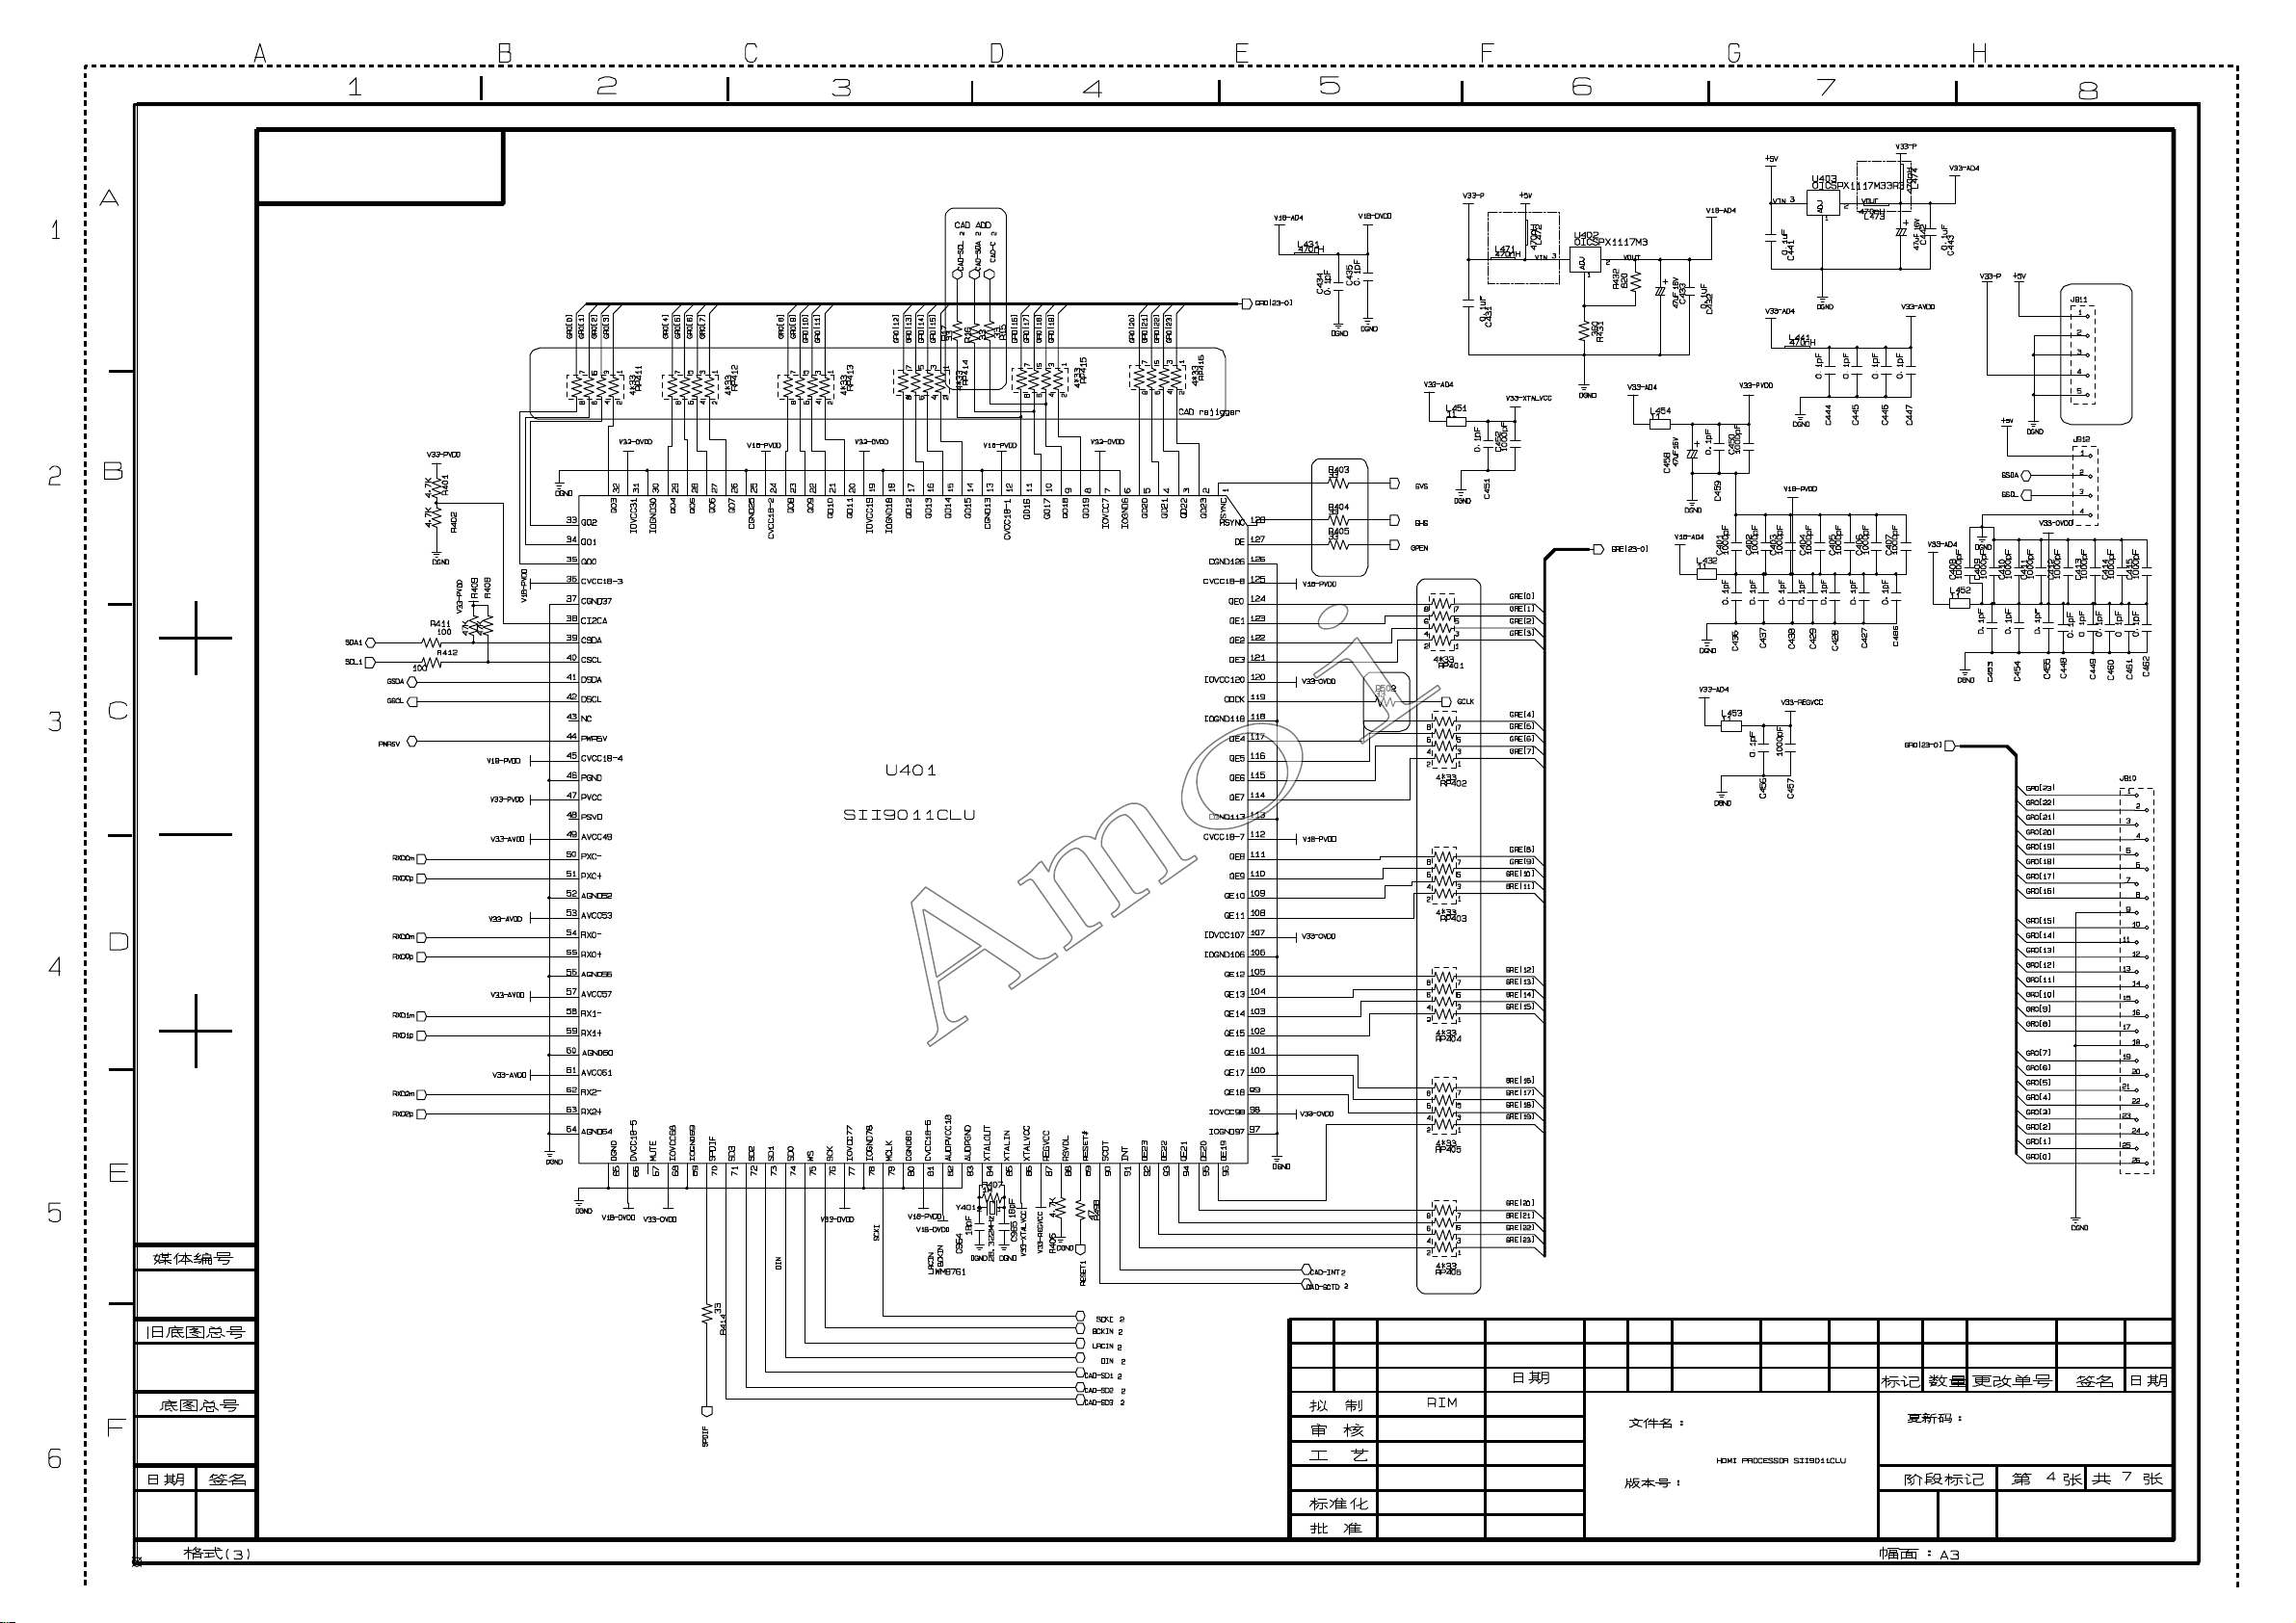
Page 57
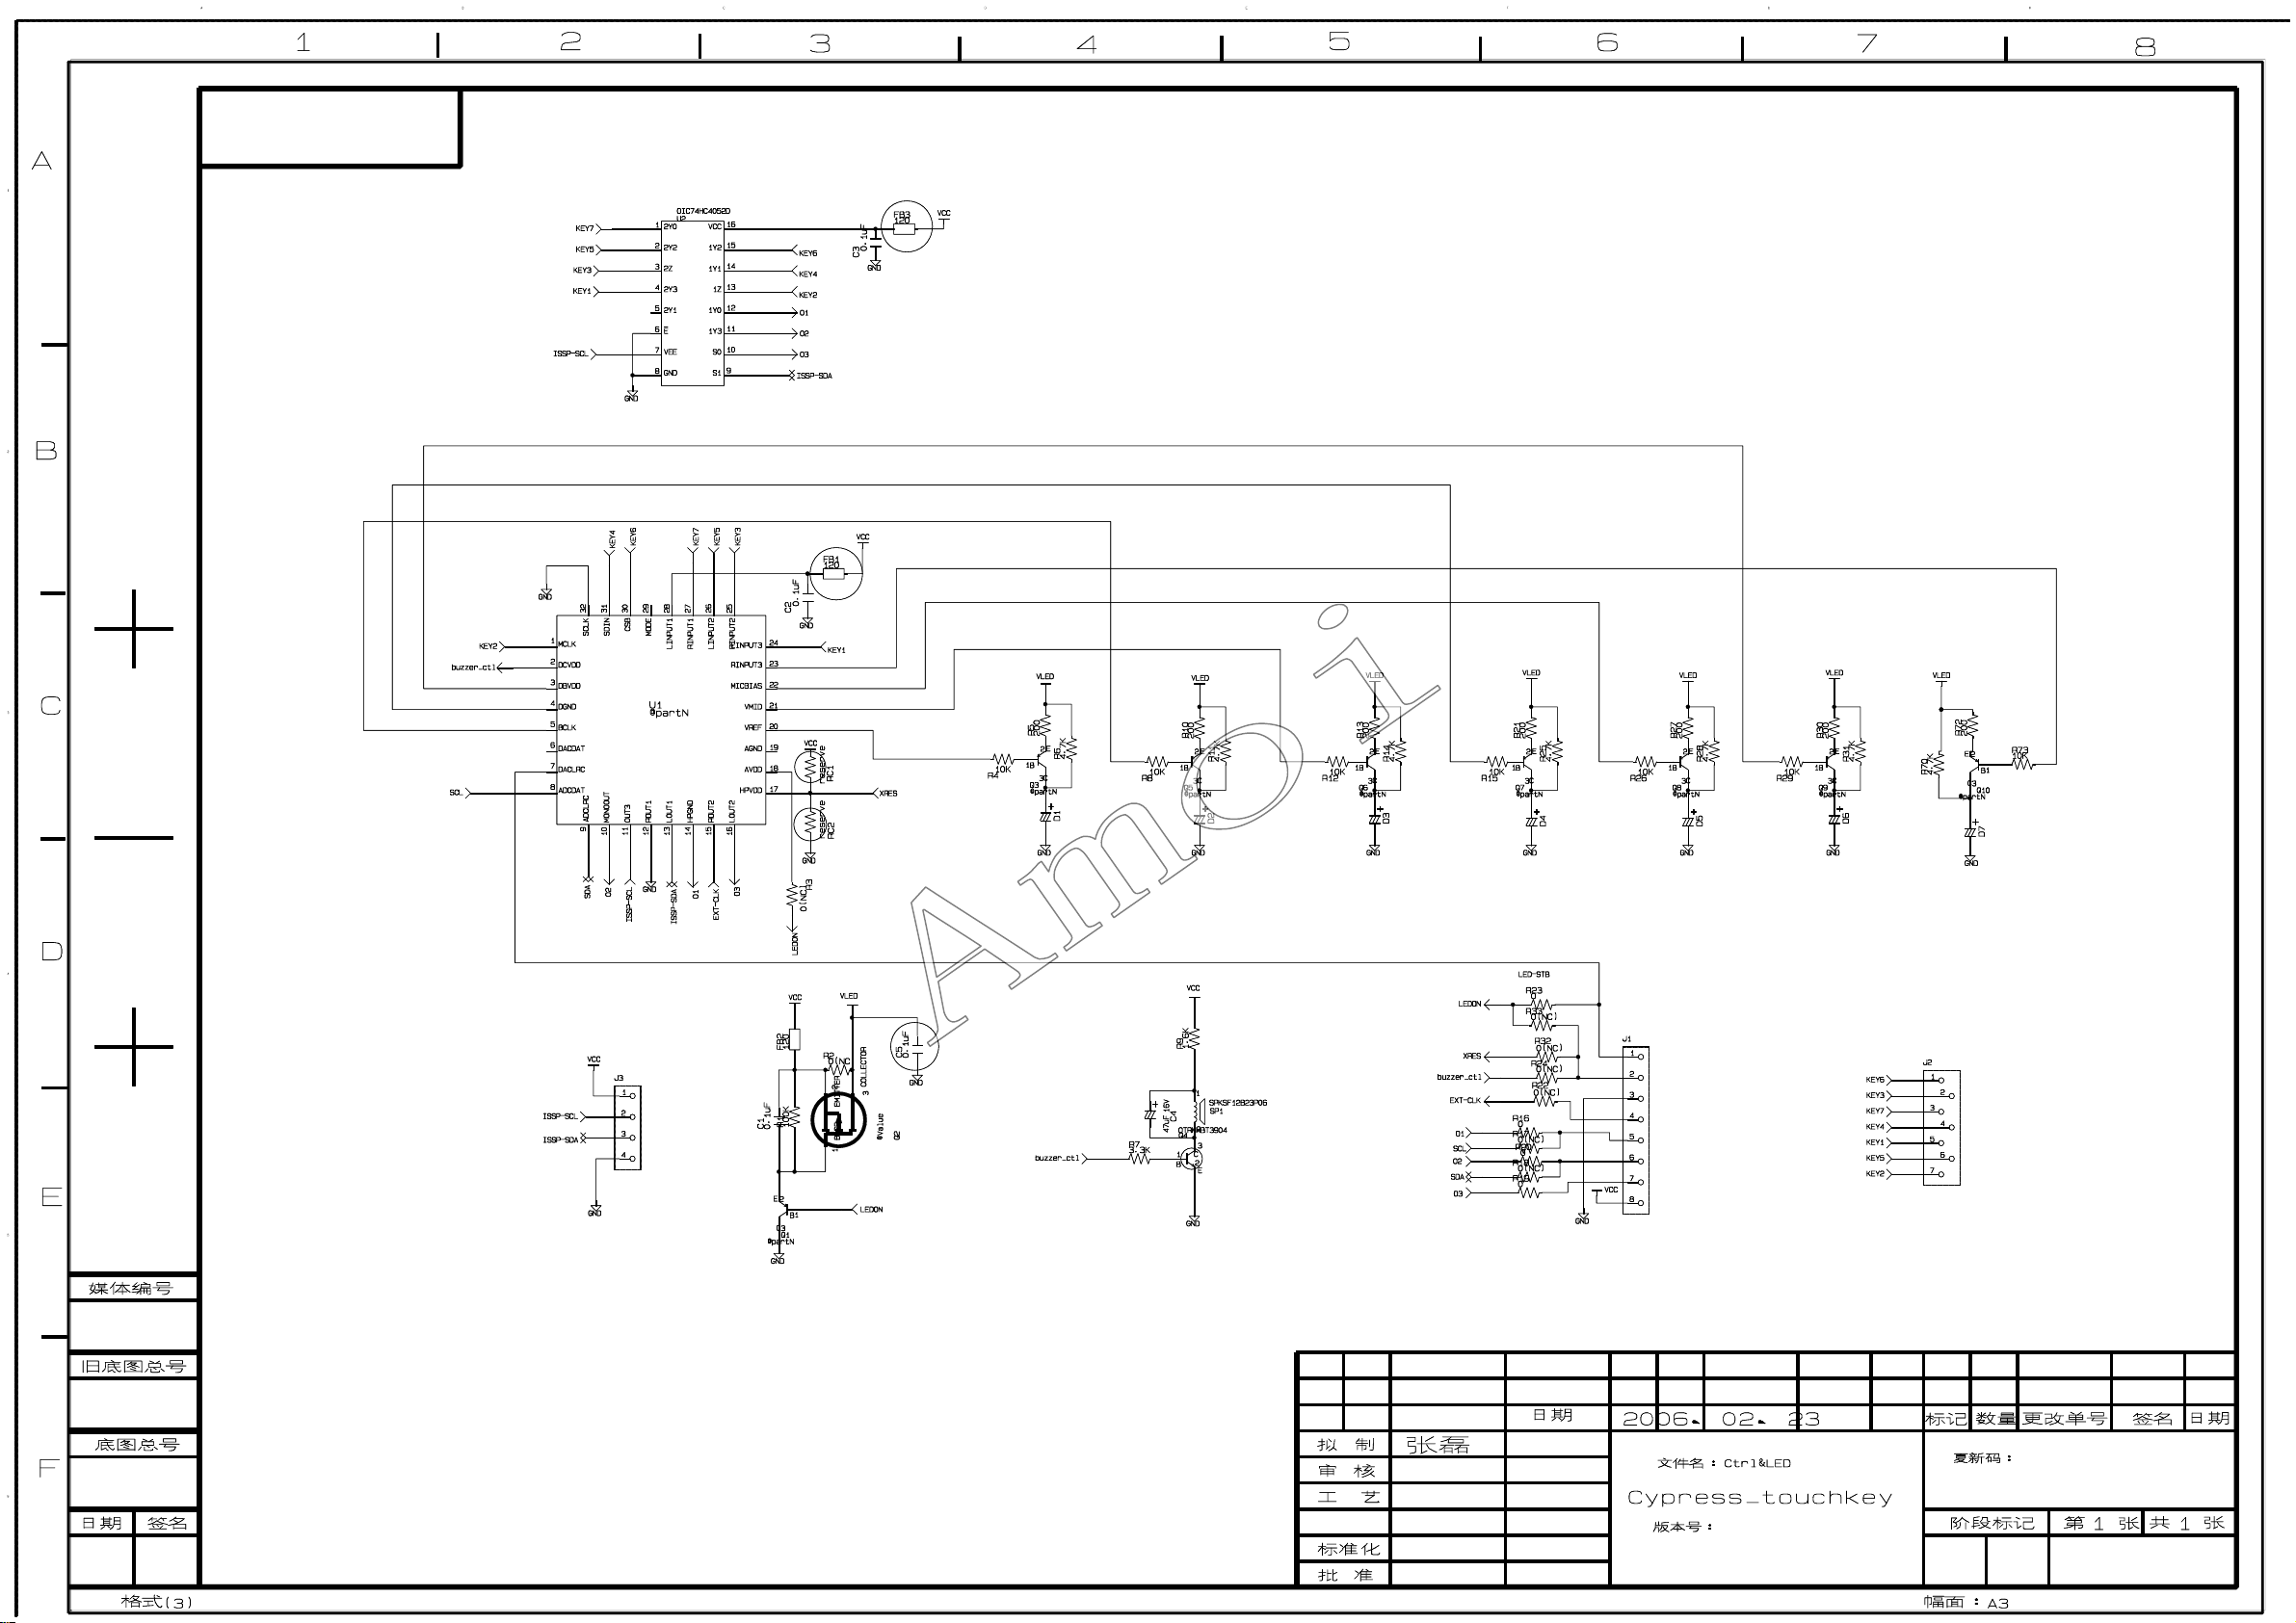
Page 58
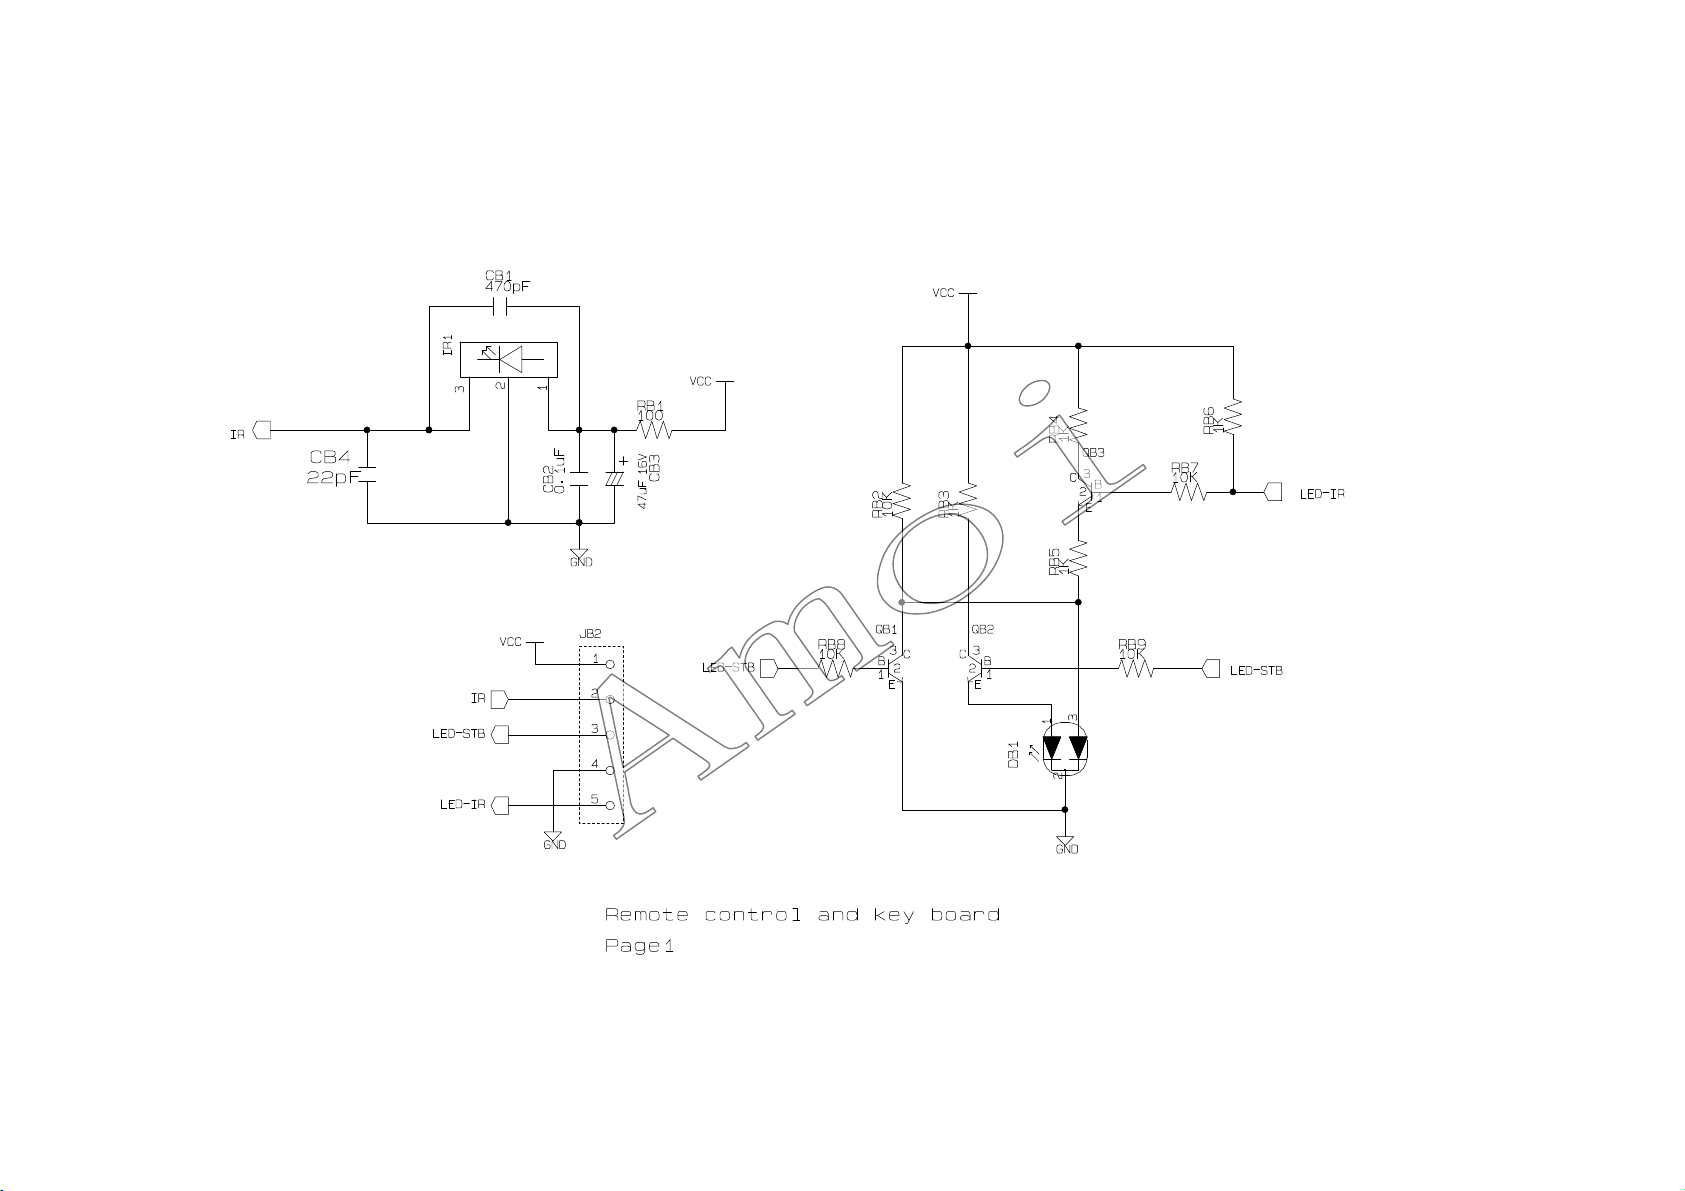
Page 59
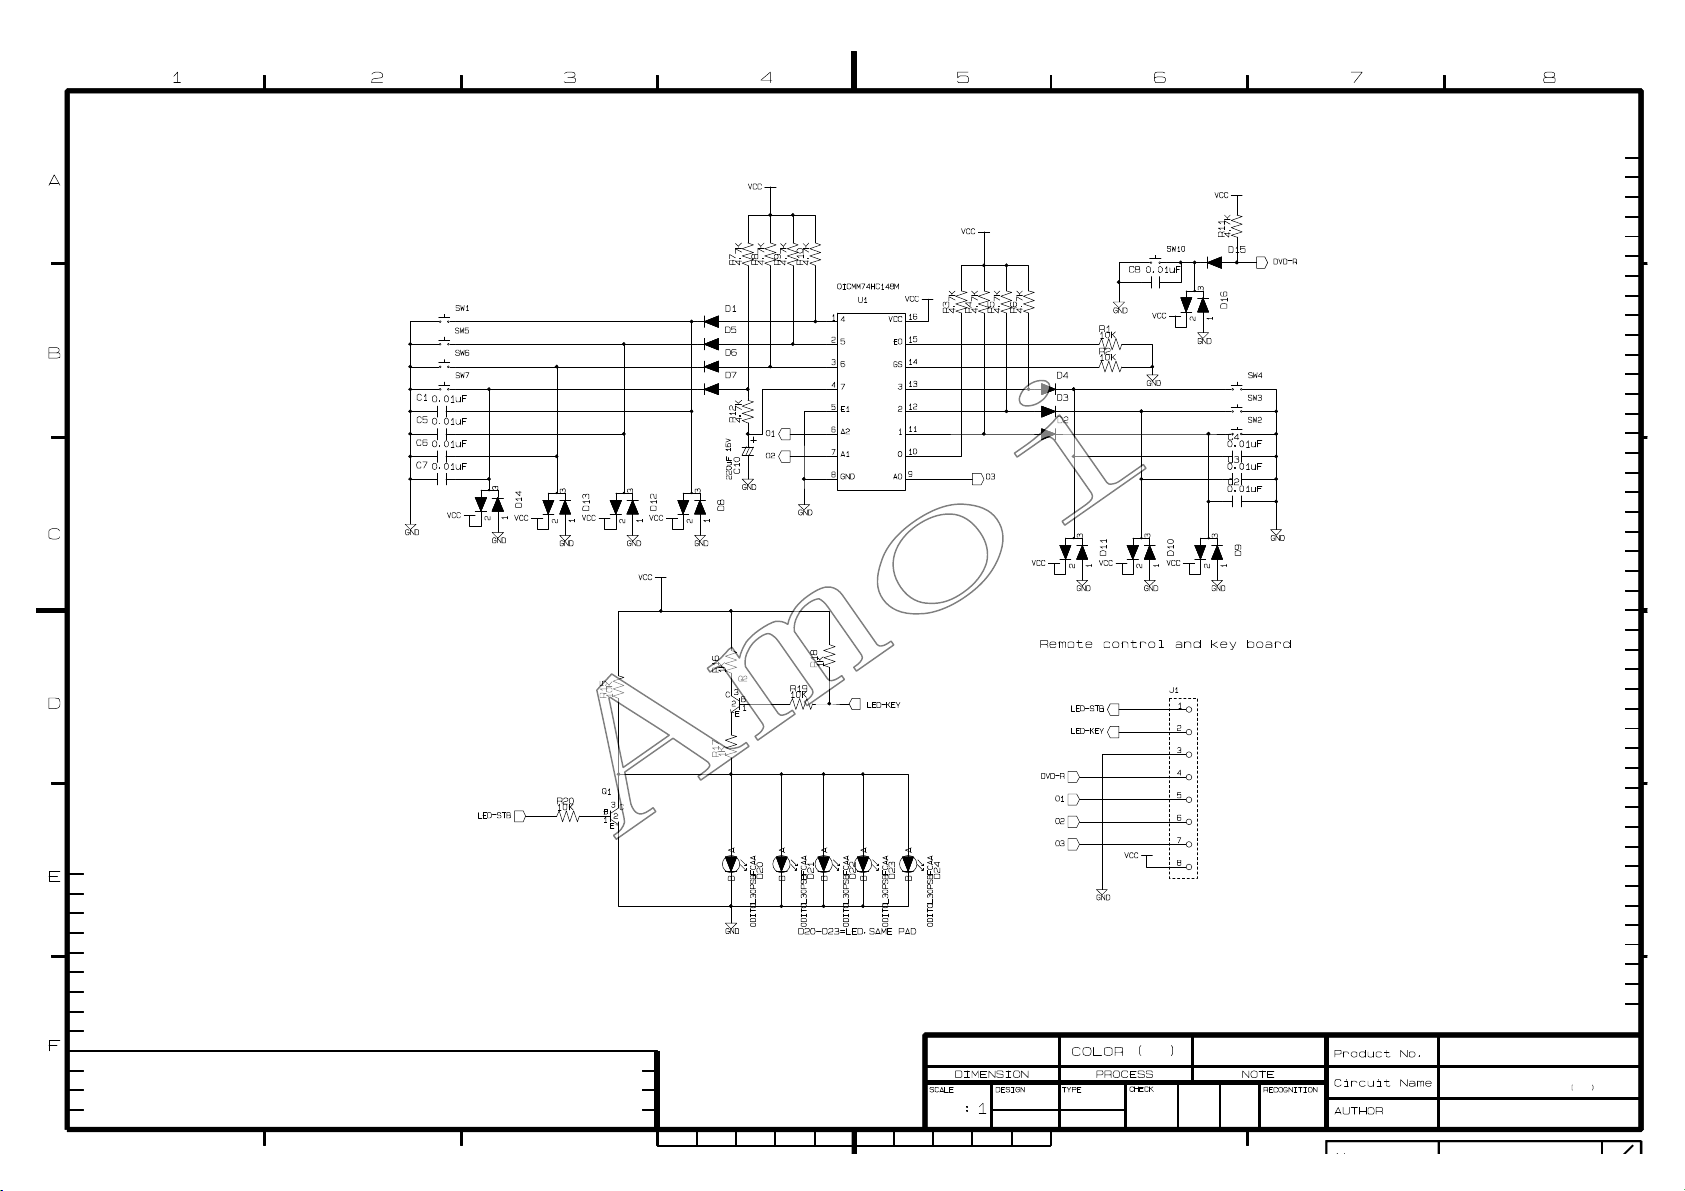
Page 60
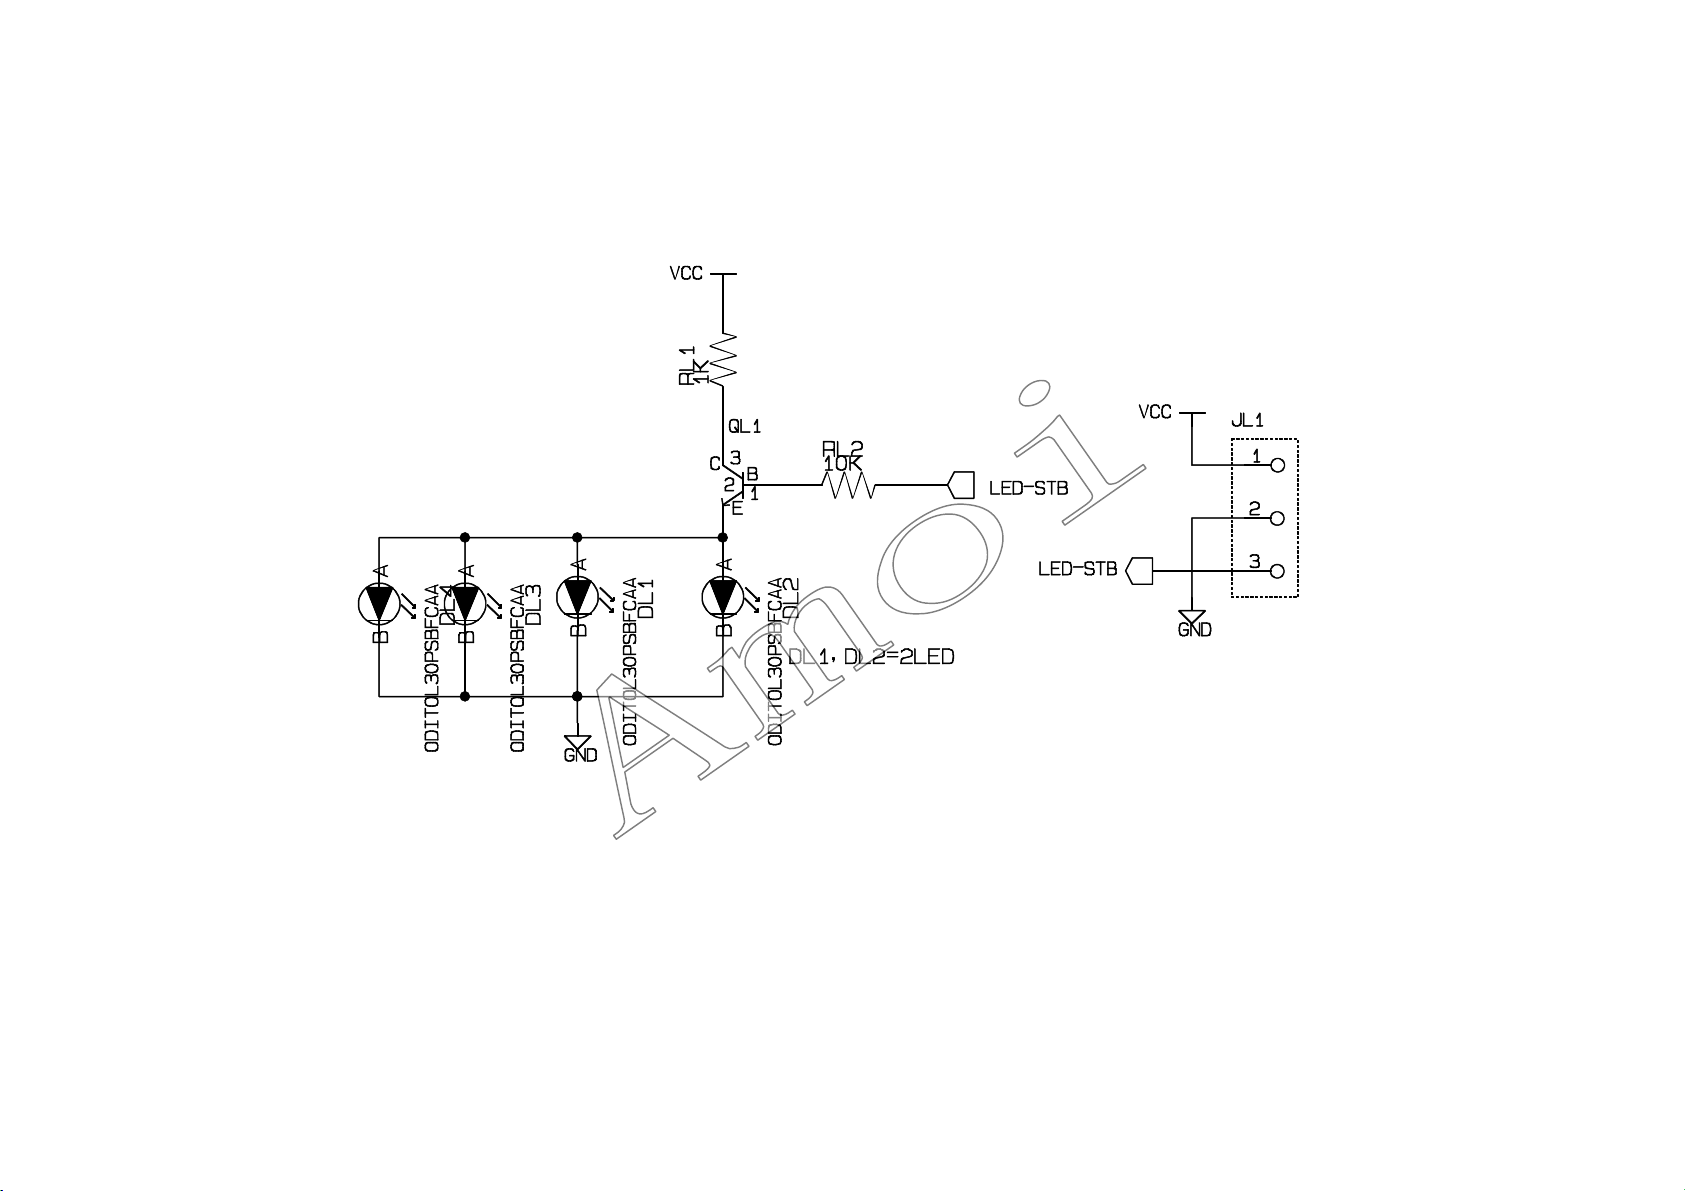
Page 61
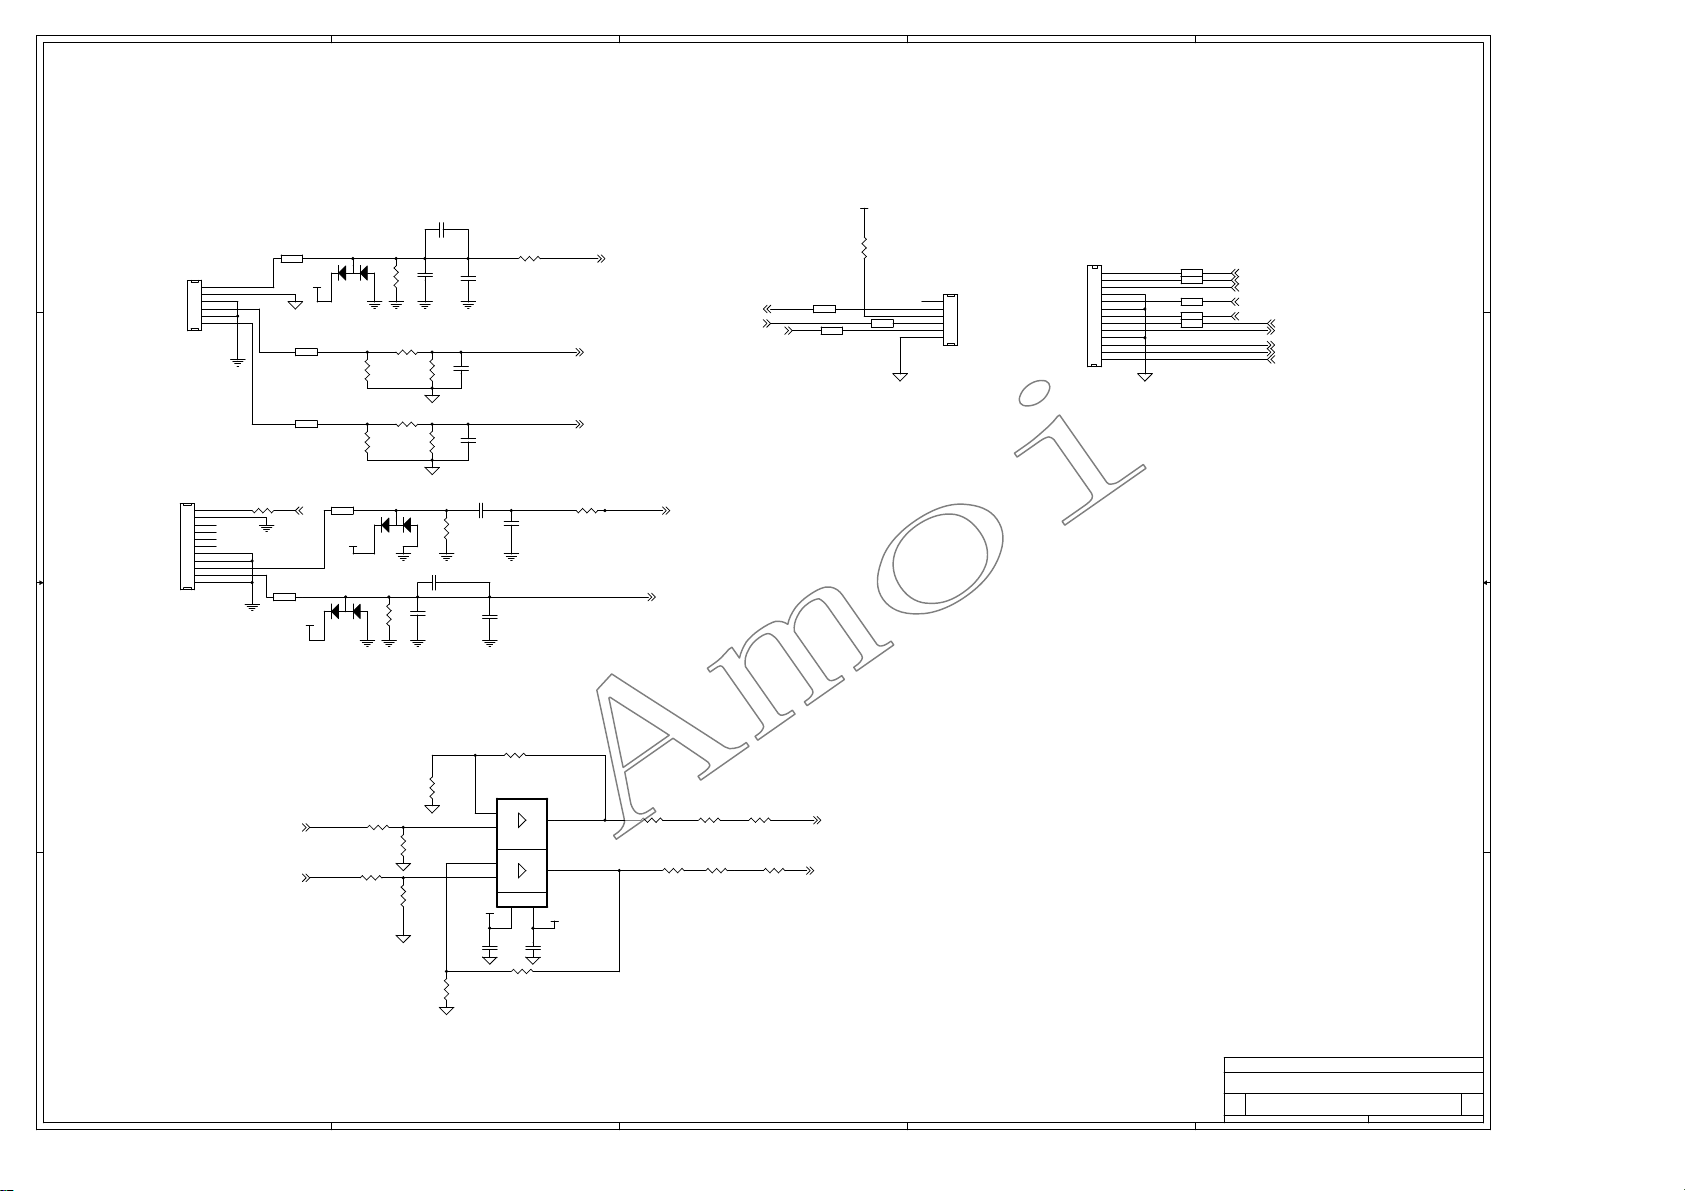
5
59
IO BOARD
小
D D
AFB1
JP4
6
6
5
5
4
4
3
3
2
2
1
1
3RC
C C
FB
+5V
Q1 BAV99
AFB6
FB
AFB7
FB
C1 NC
3
AR1
12
82
AR3
AR4
6.8K
NC
AR6
AR7
6.8K
NC
4
AR2
C2
C3
NC
AR5
2.2K
AR8
2.2K
100
NC
C4
NC
C5
NC
CVBS3-IN
CVBS3-AR
CVBS3-AL
EARST
HEAD-ROUT
3
HEAD-LOUT
AFB5
AFB3
2
+5V
AR15
NC
JP2
6
6
FB
AFB4
FB
5
5
4
4
3
FB
3
2
2
1
1
ERJI
JP3
1
1
2
2
3
3
4
4
5
5
6
6
7
7
8
8
9
9
10
10
11
11
12
12
13
13
CONN RCPT 13
AFB17
AFB18
FB
FB
FB
FB
FB
AFB11
AFB12/100
AFB14
CVBS3-AR
CVBS3-AL
CVBS3-IN
S3-C
S3-Y
EARST
+5V
HEAD-ROUT
HEAD-LOUT
K3
1
AR10
56UH
100
1
OutA
7
OutB
V+
8
A+12V
C12
0.1U
C1
AR19 0
AR25 0
S3-C
S3-Y
AR20 0
AR26 0
AFB15 0
AFB16 0
HEAD-LOUT
HEAD-ROUT
Title
<Title>
Size Document Number Rev
<Doc> <RevCode>
C
星期三 三月
3
2
Date: Sheet of
1
1 1, 03, 2004
AFB9
AFB8
FB
+5V
3
AR14 100
AR21 100
12
3
Q3 BAV99
AR13
82
C9 NC
AR16
AR22
K3
FB
+5V
Q2 BAV99
JP1
11
10
9
8
7
6
5
4
3
2
1
S
B B
AR9 4.7K
11
10
9
8
7
6
5
4
3
2
1
HEAD-LOUT
HEAD-LOUT
A A
5
C8
AR11
12
1000P
82
C11
NC
100K
100K
AR18
C12
NC
AR17 15K
NC
JP5 4556AD
2
-In A
3
+In A
6
-In B
5
+In B
V-
A-12V
4
C15
0.1U
AR24
AR23 15K
NC
4
Page 62
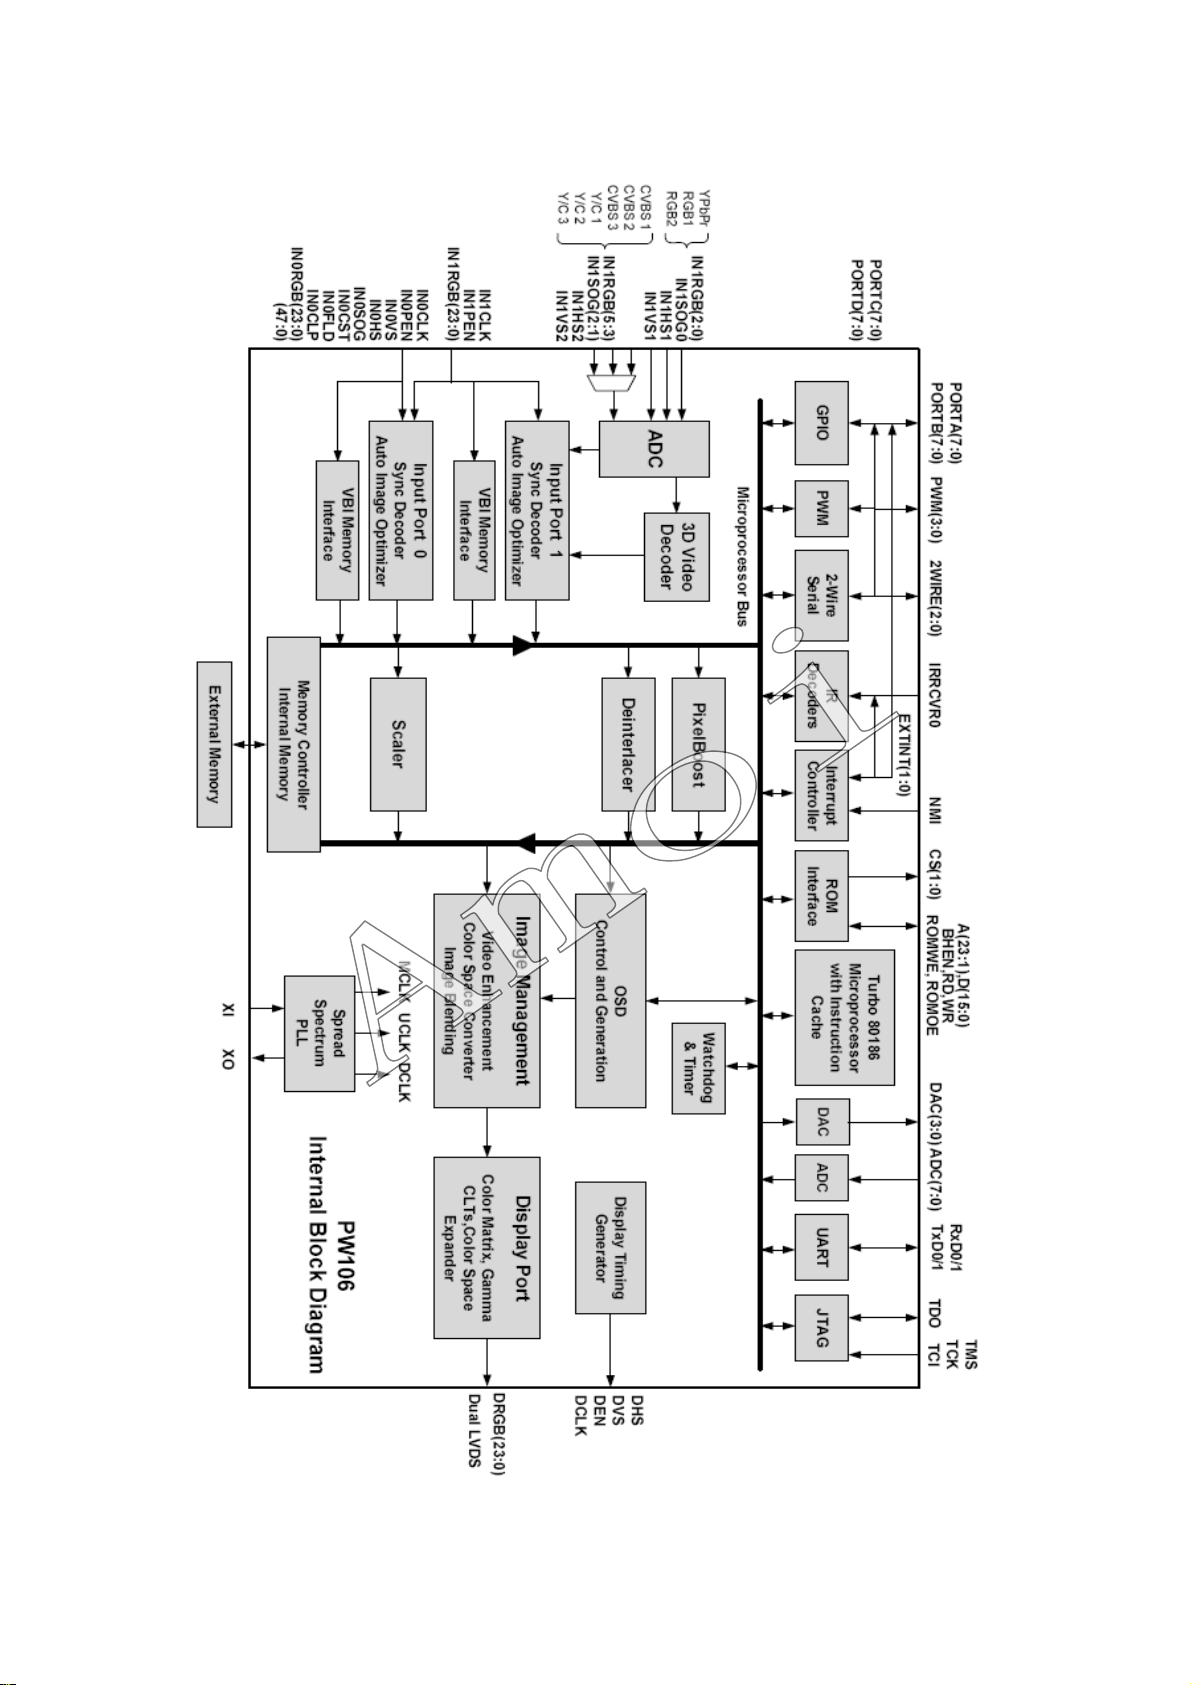
IC PW106
60
Page 63

61
Page 64
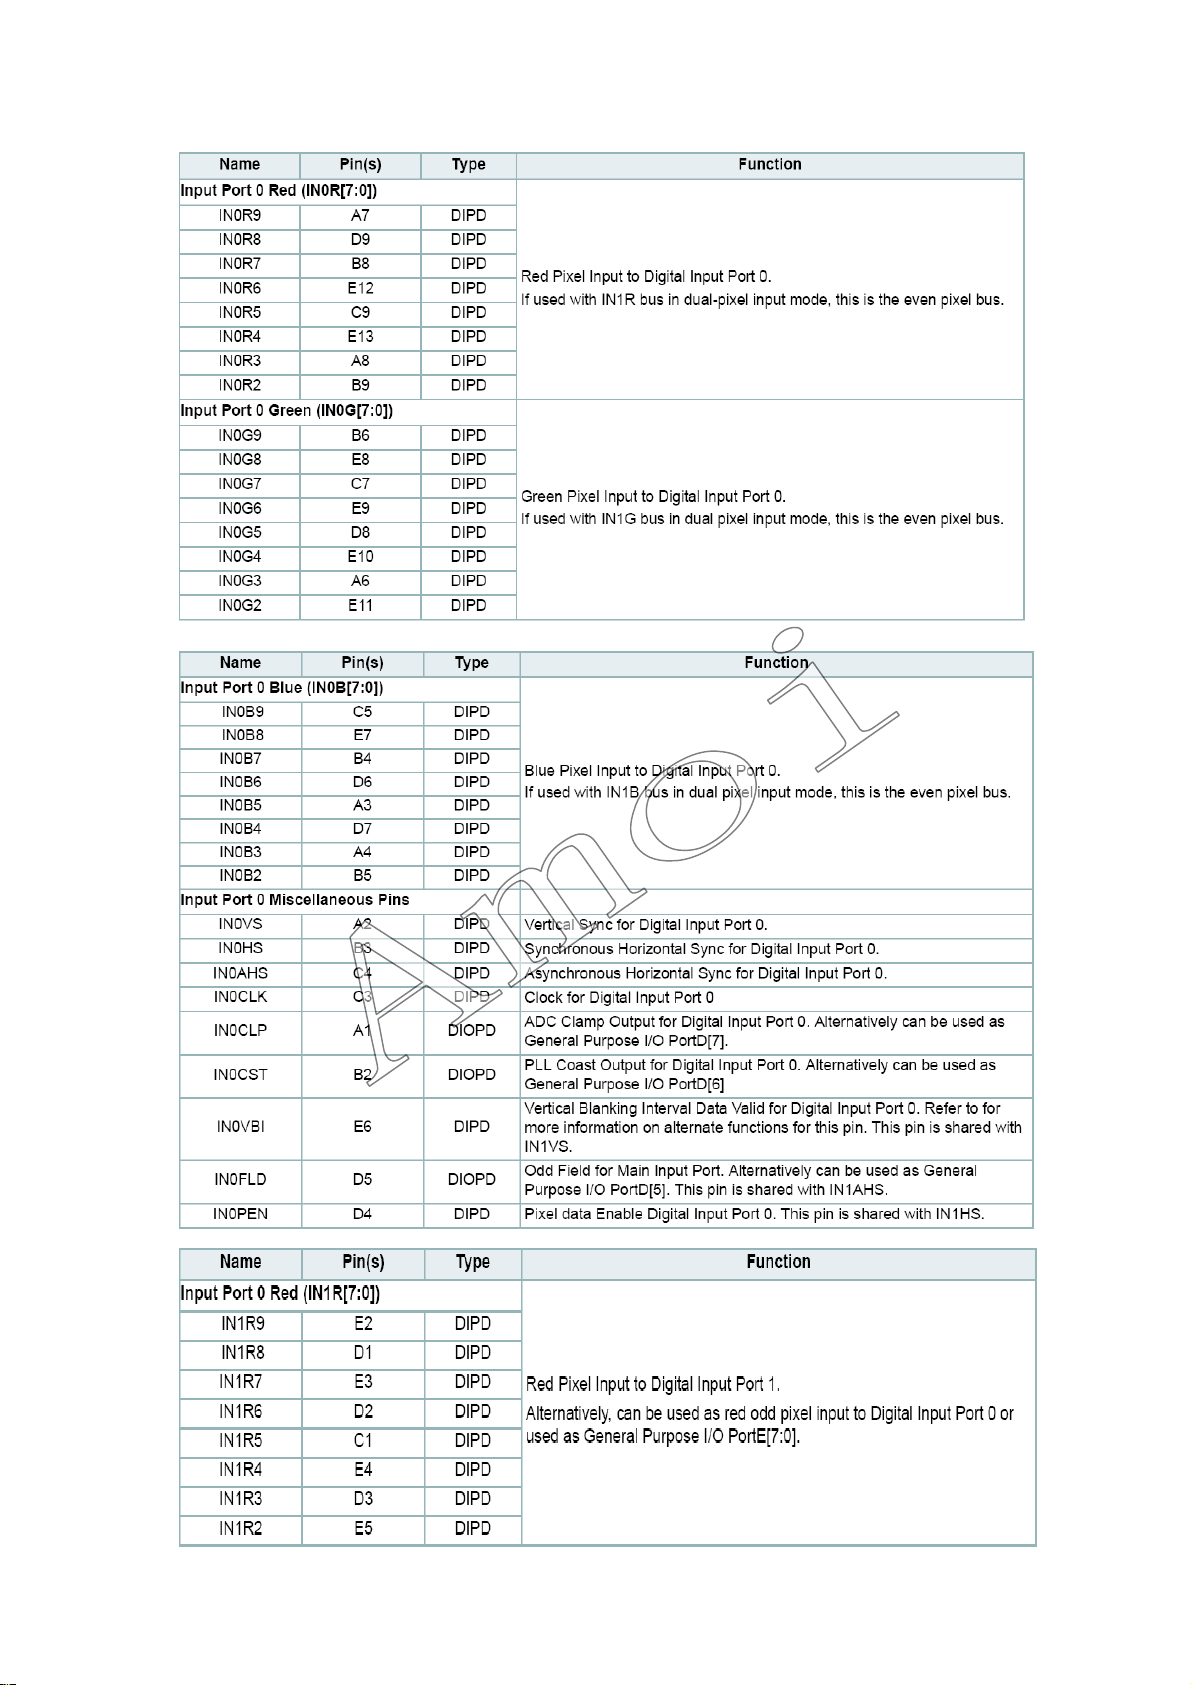
62
Page 65
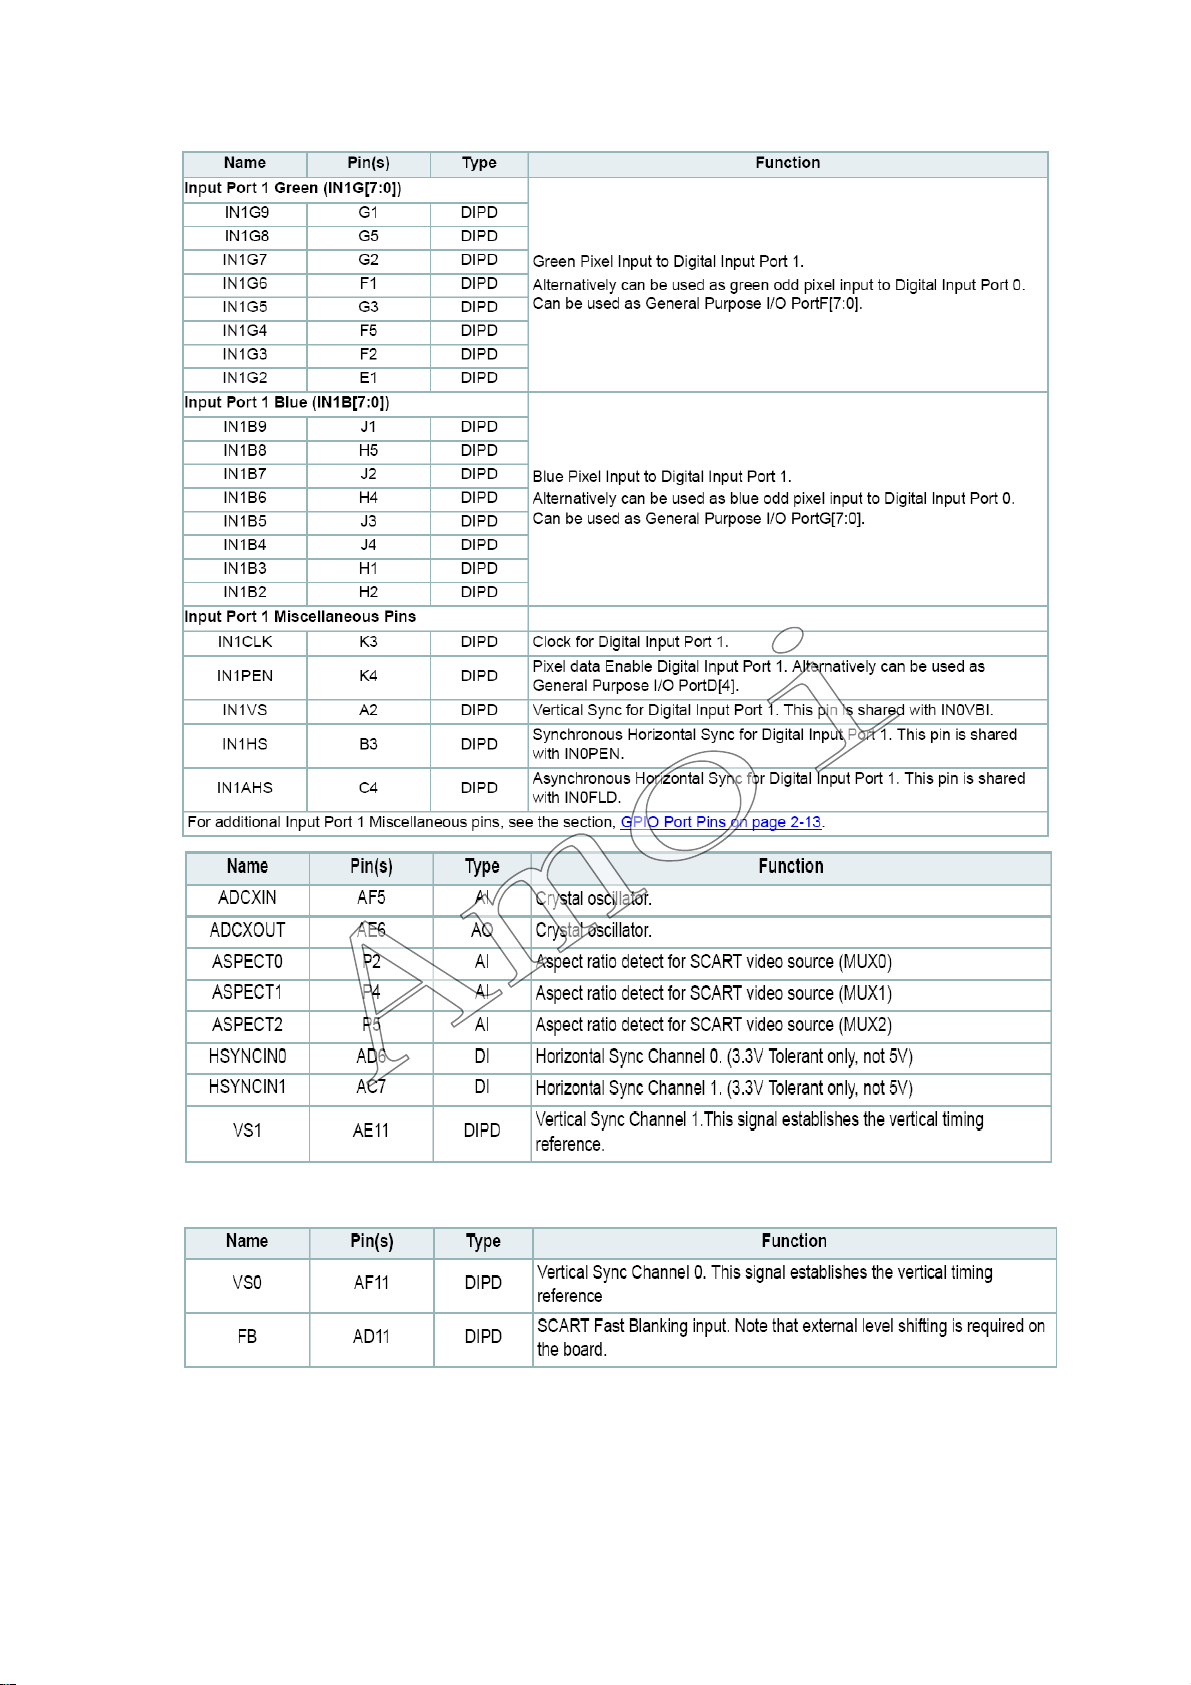
63
Page 66
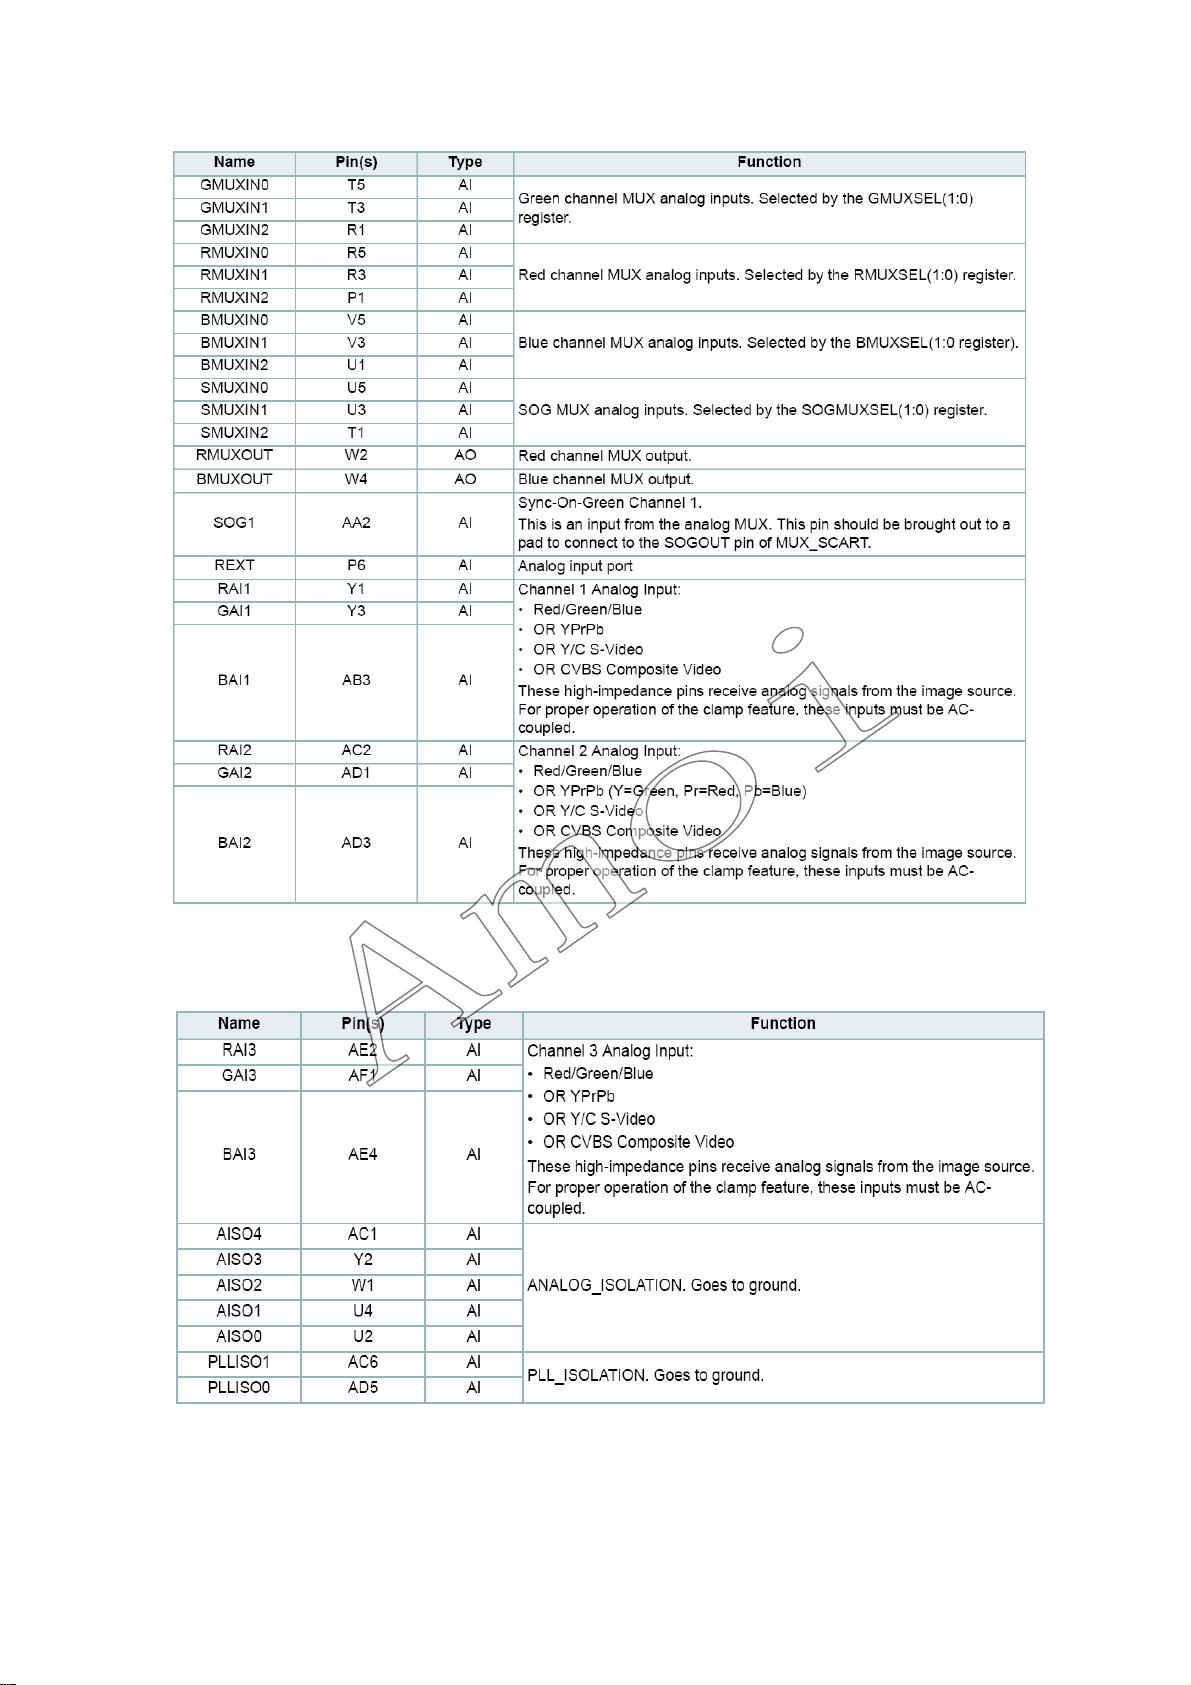
64
Page 67
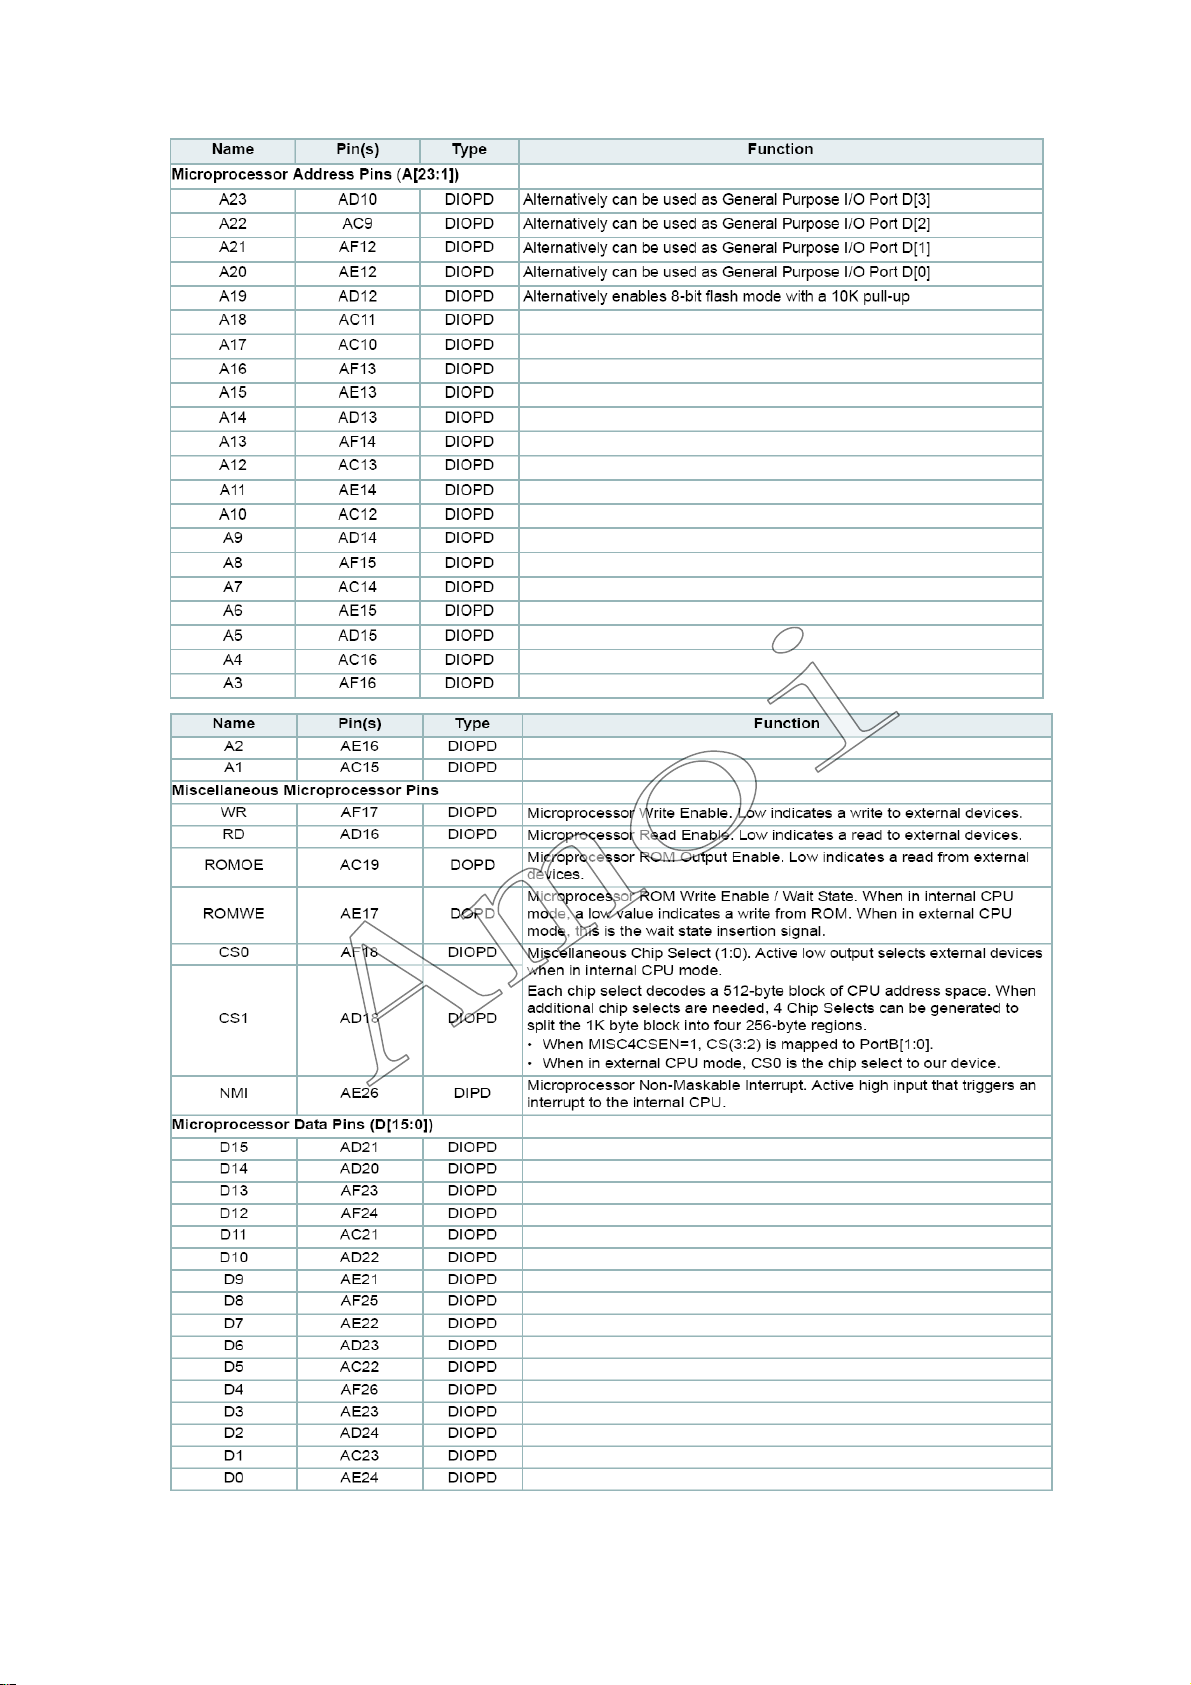
65
Page 68
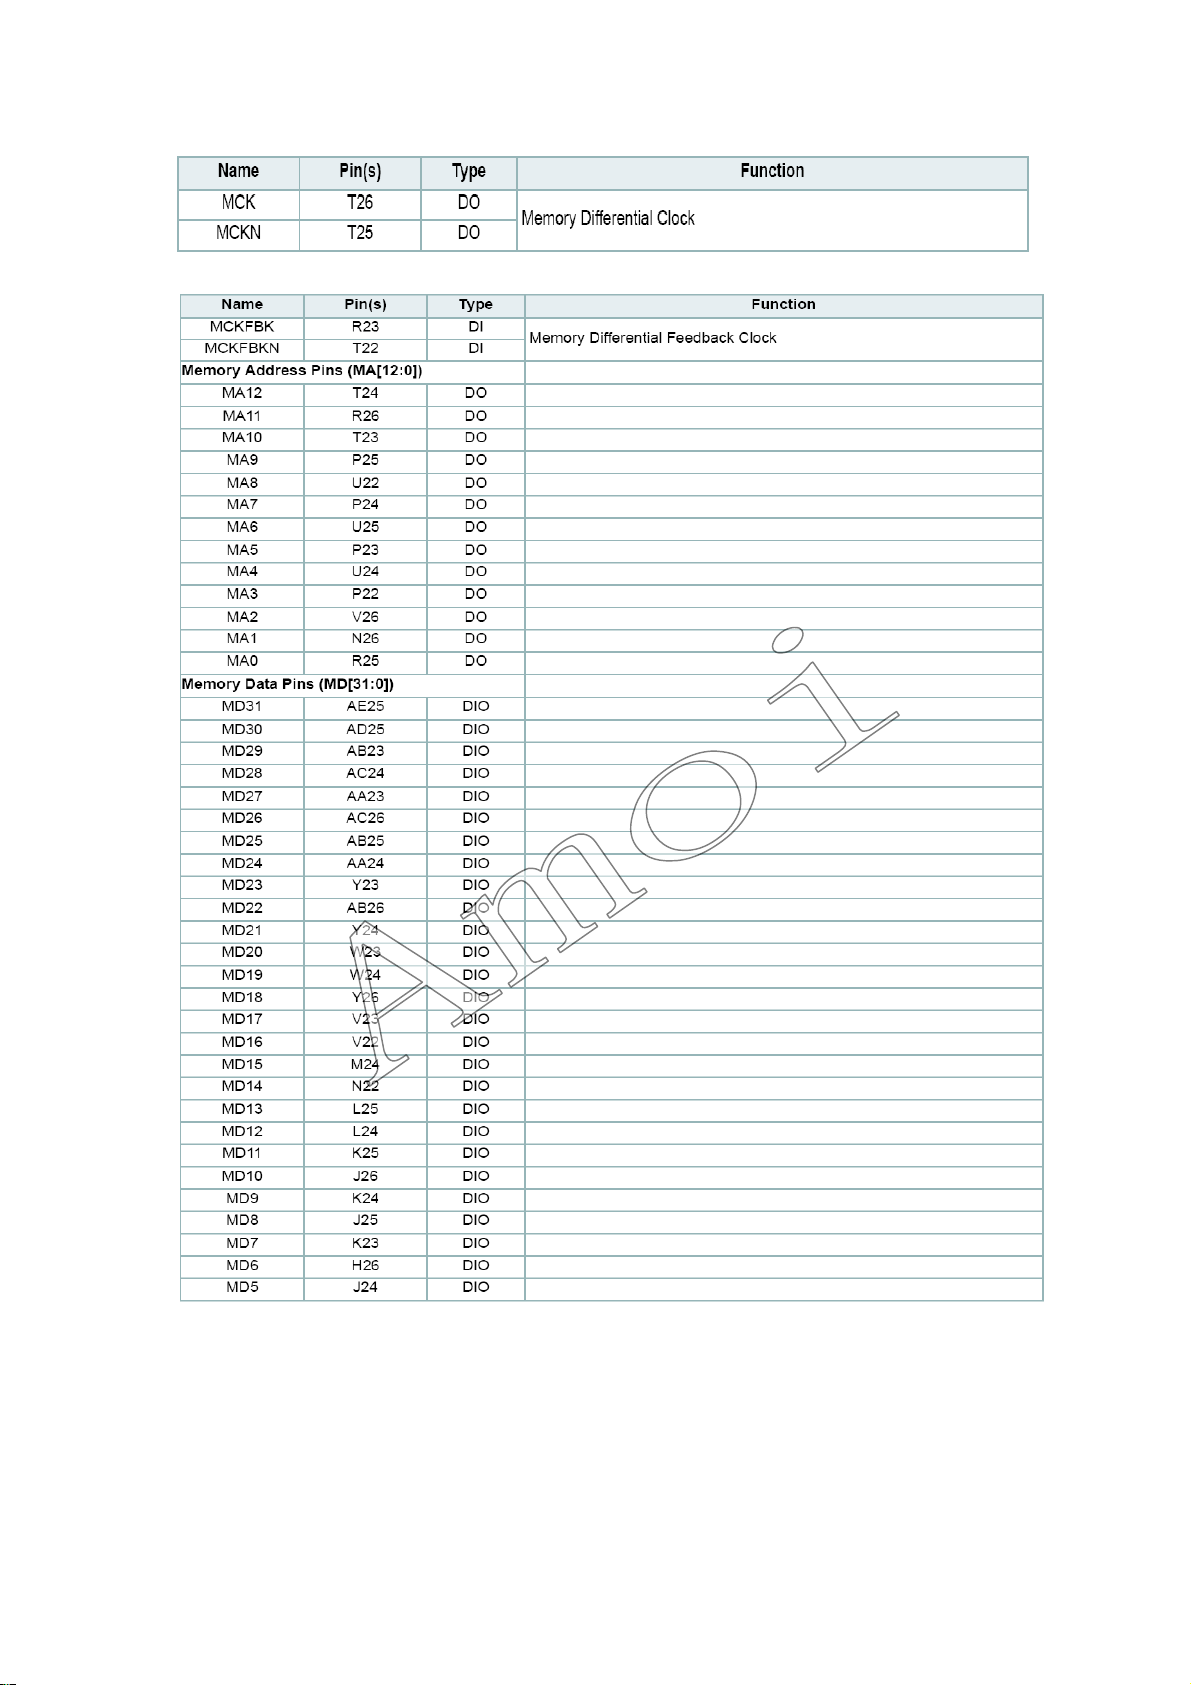
66
Page 69
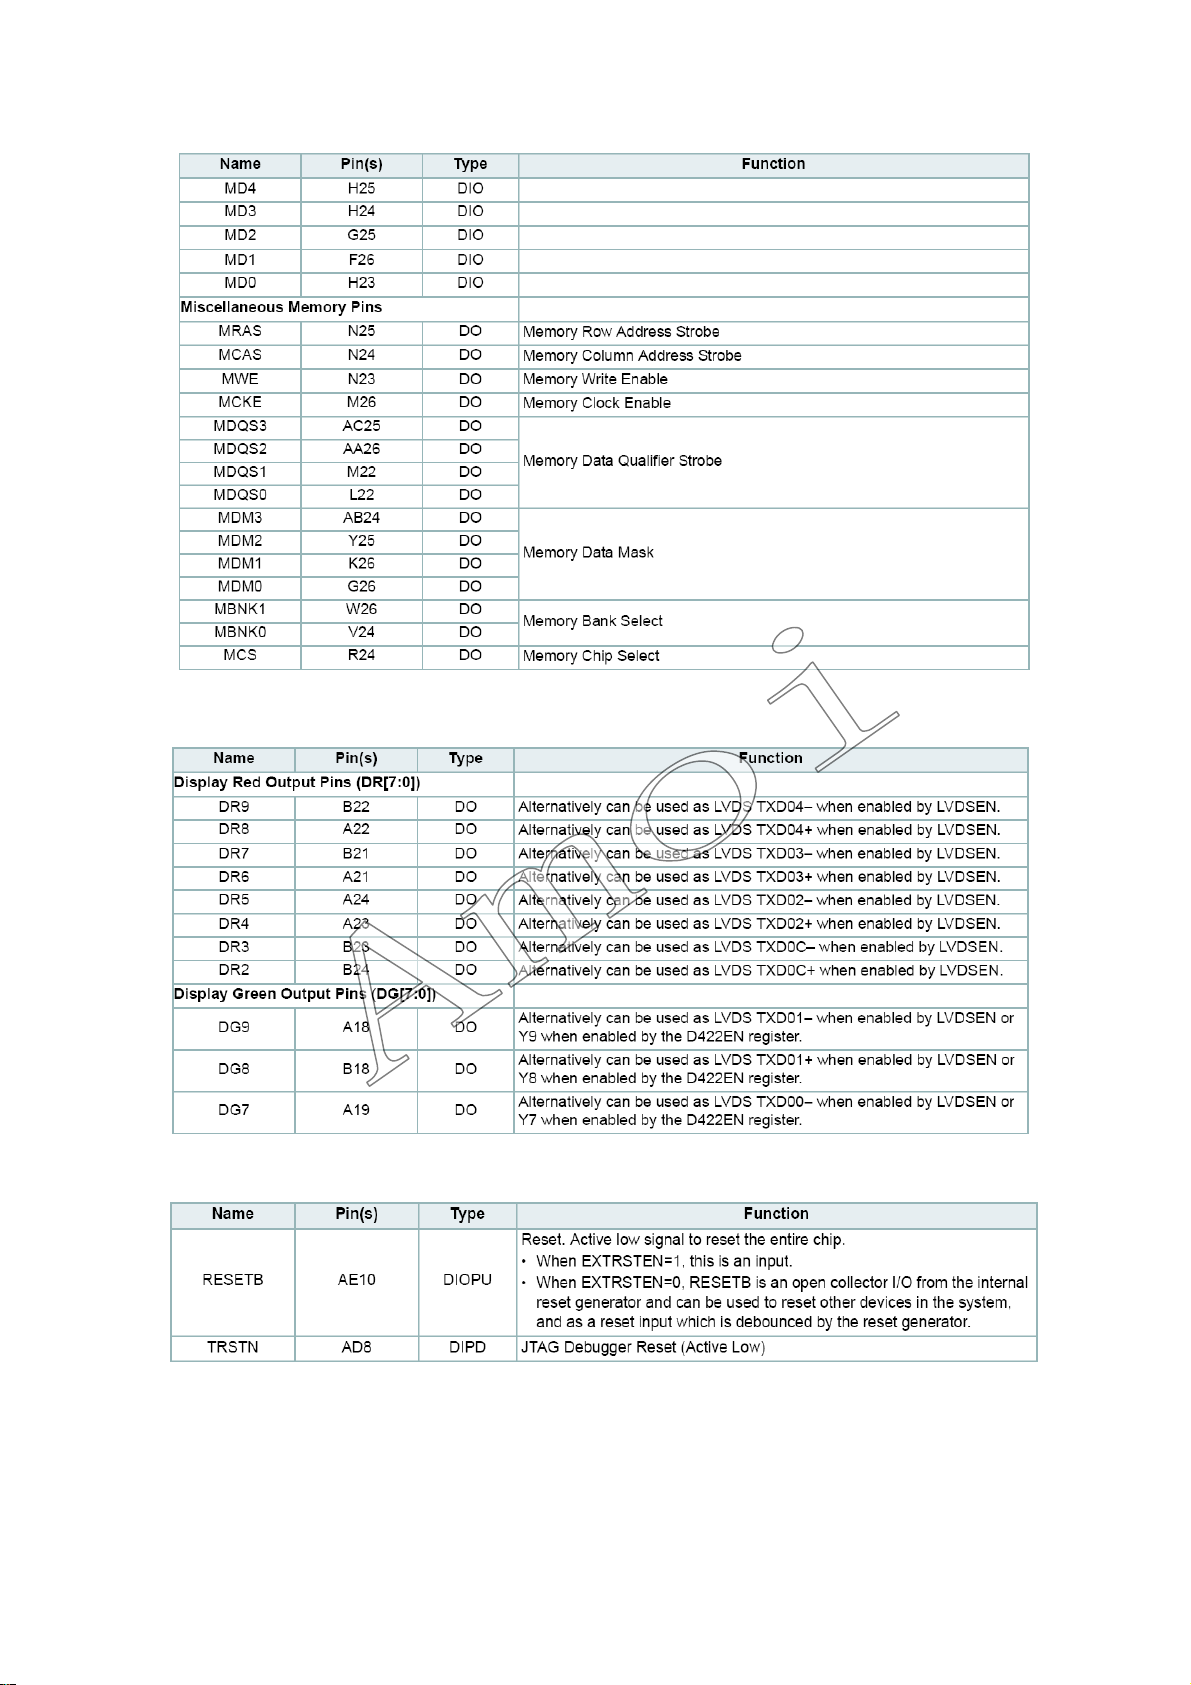
67
Page 70
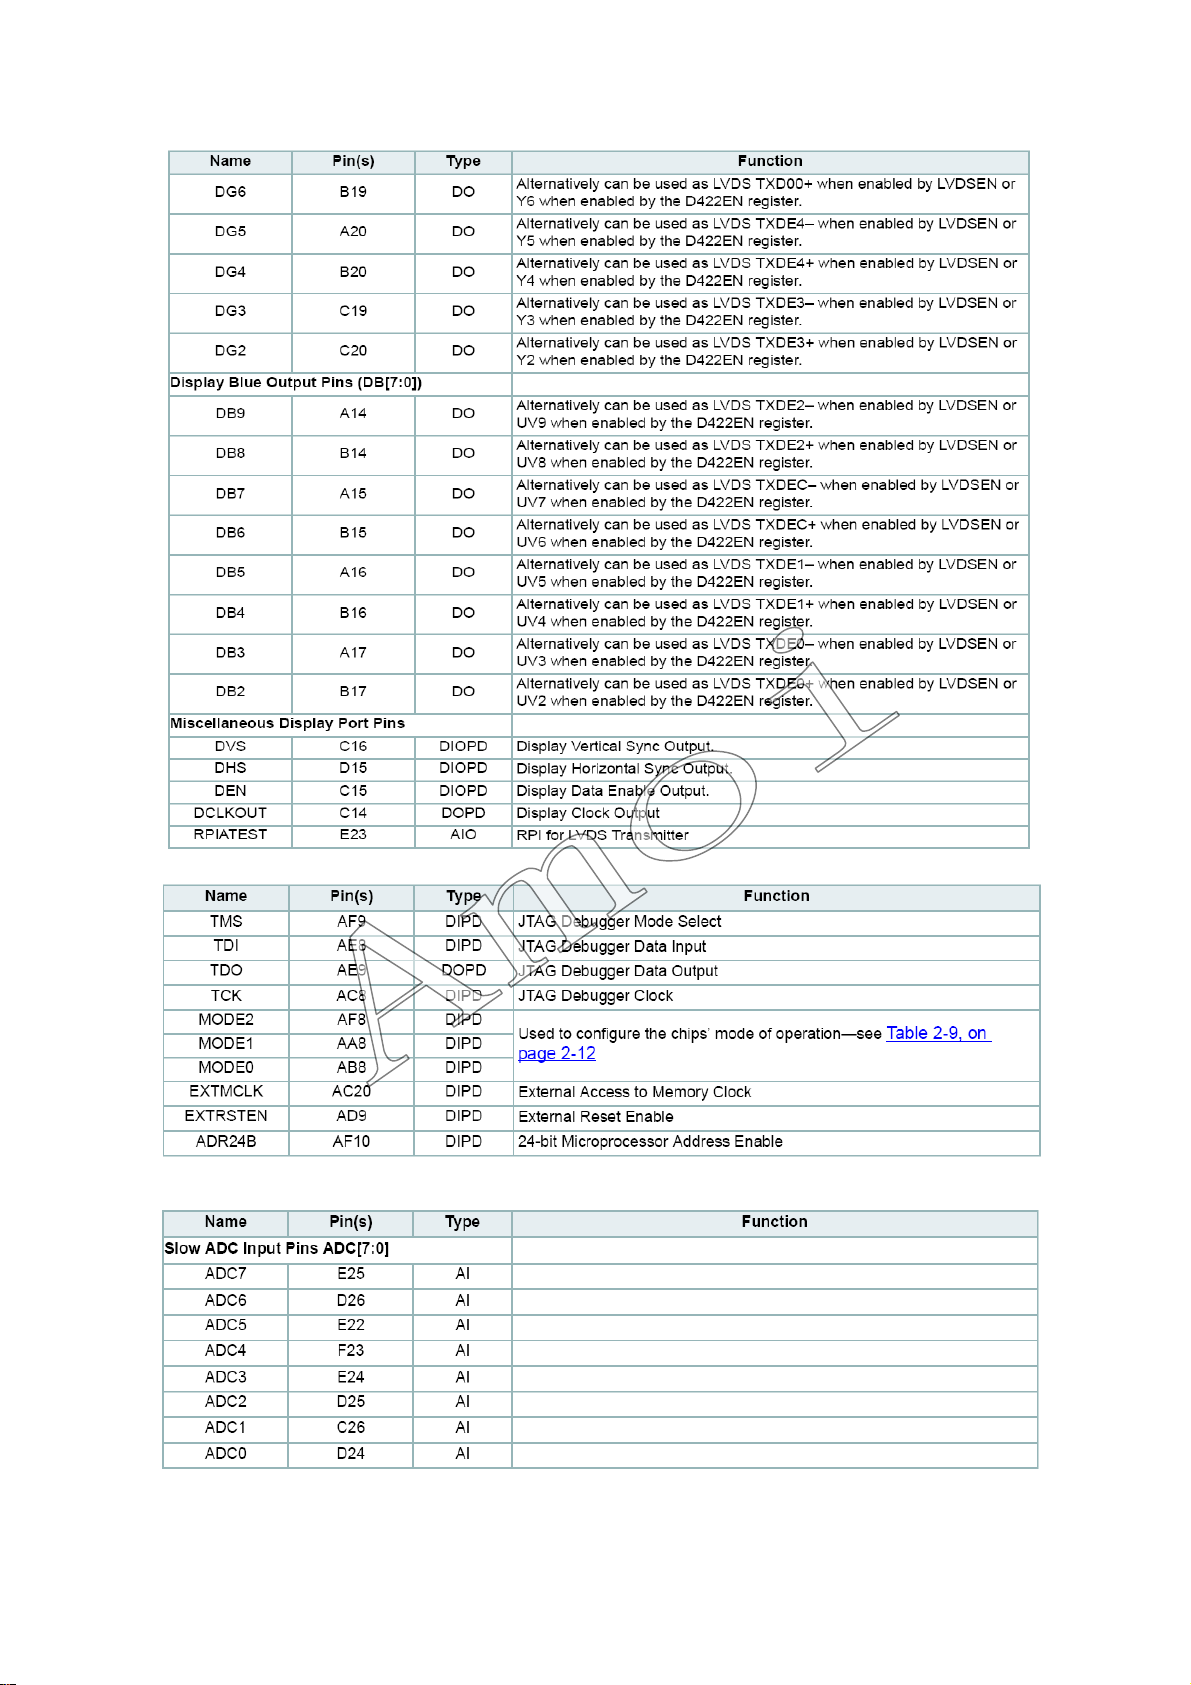
68
Page 71
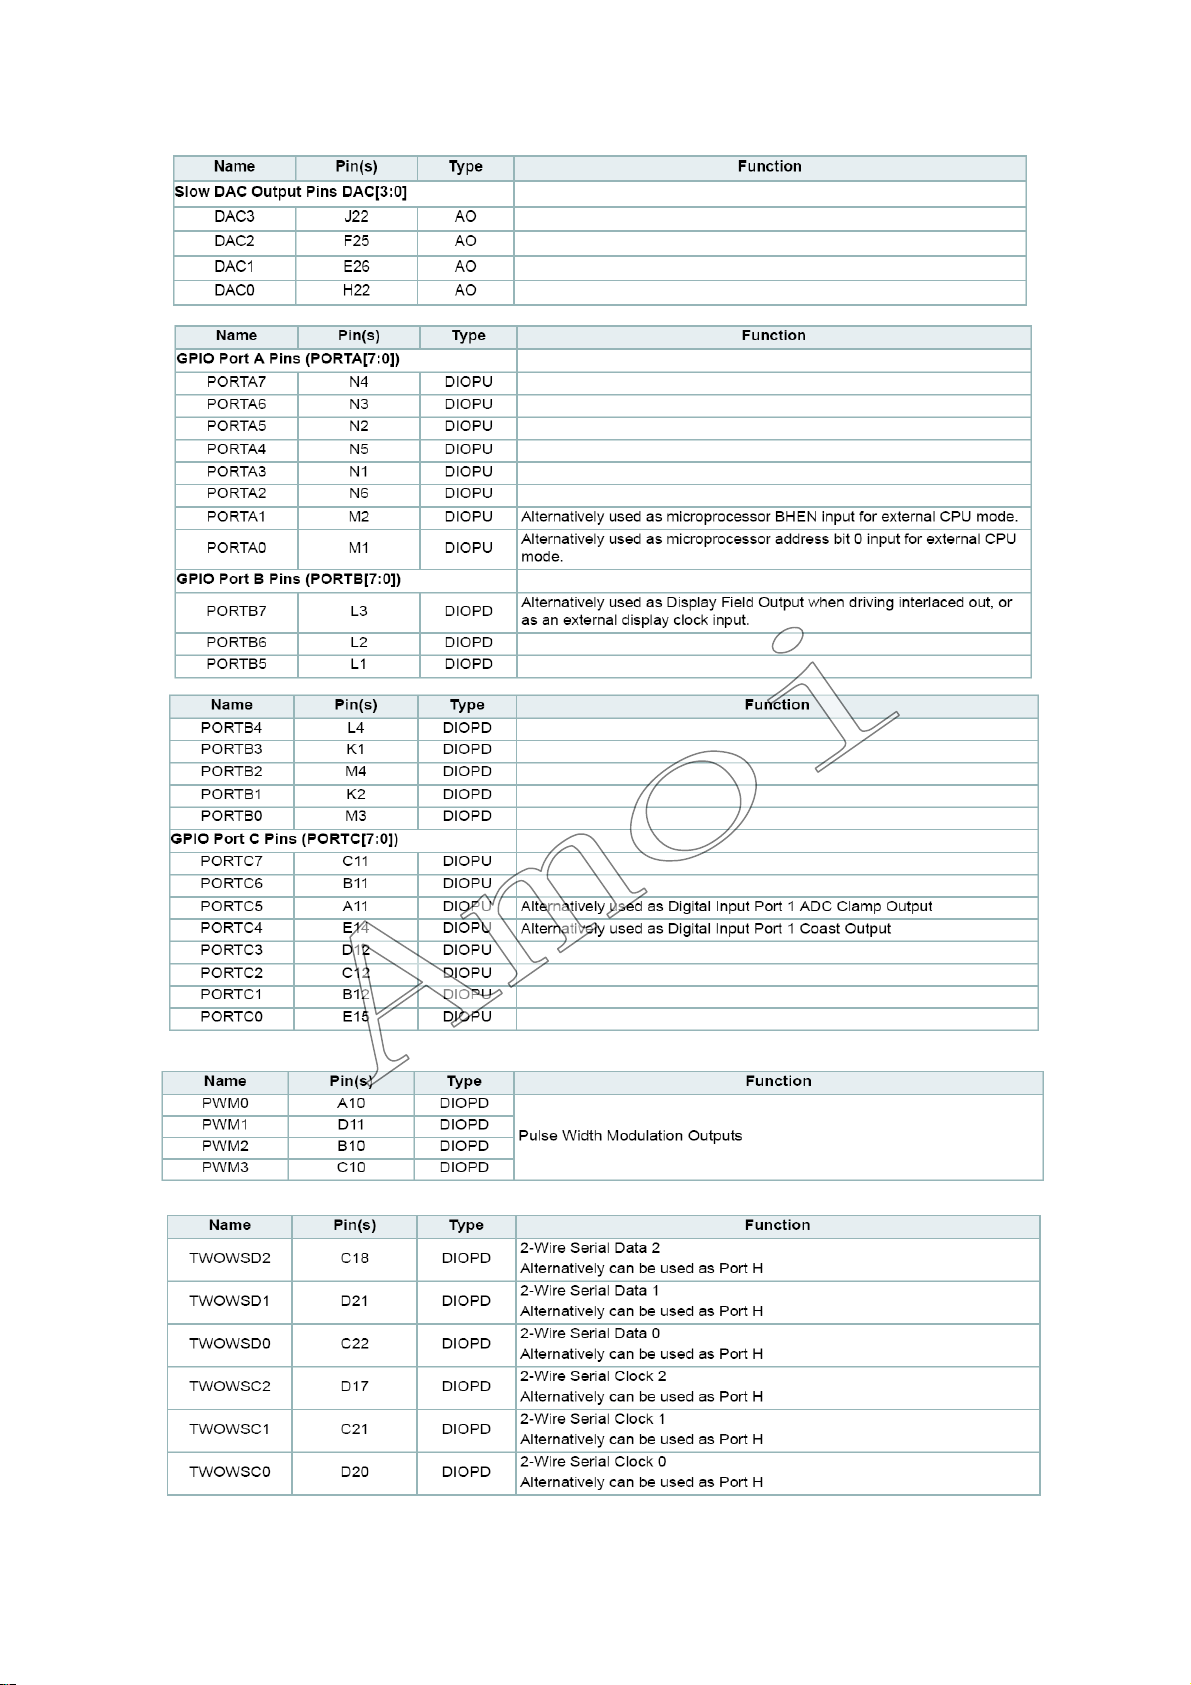
69
Page 72
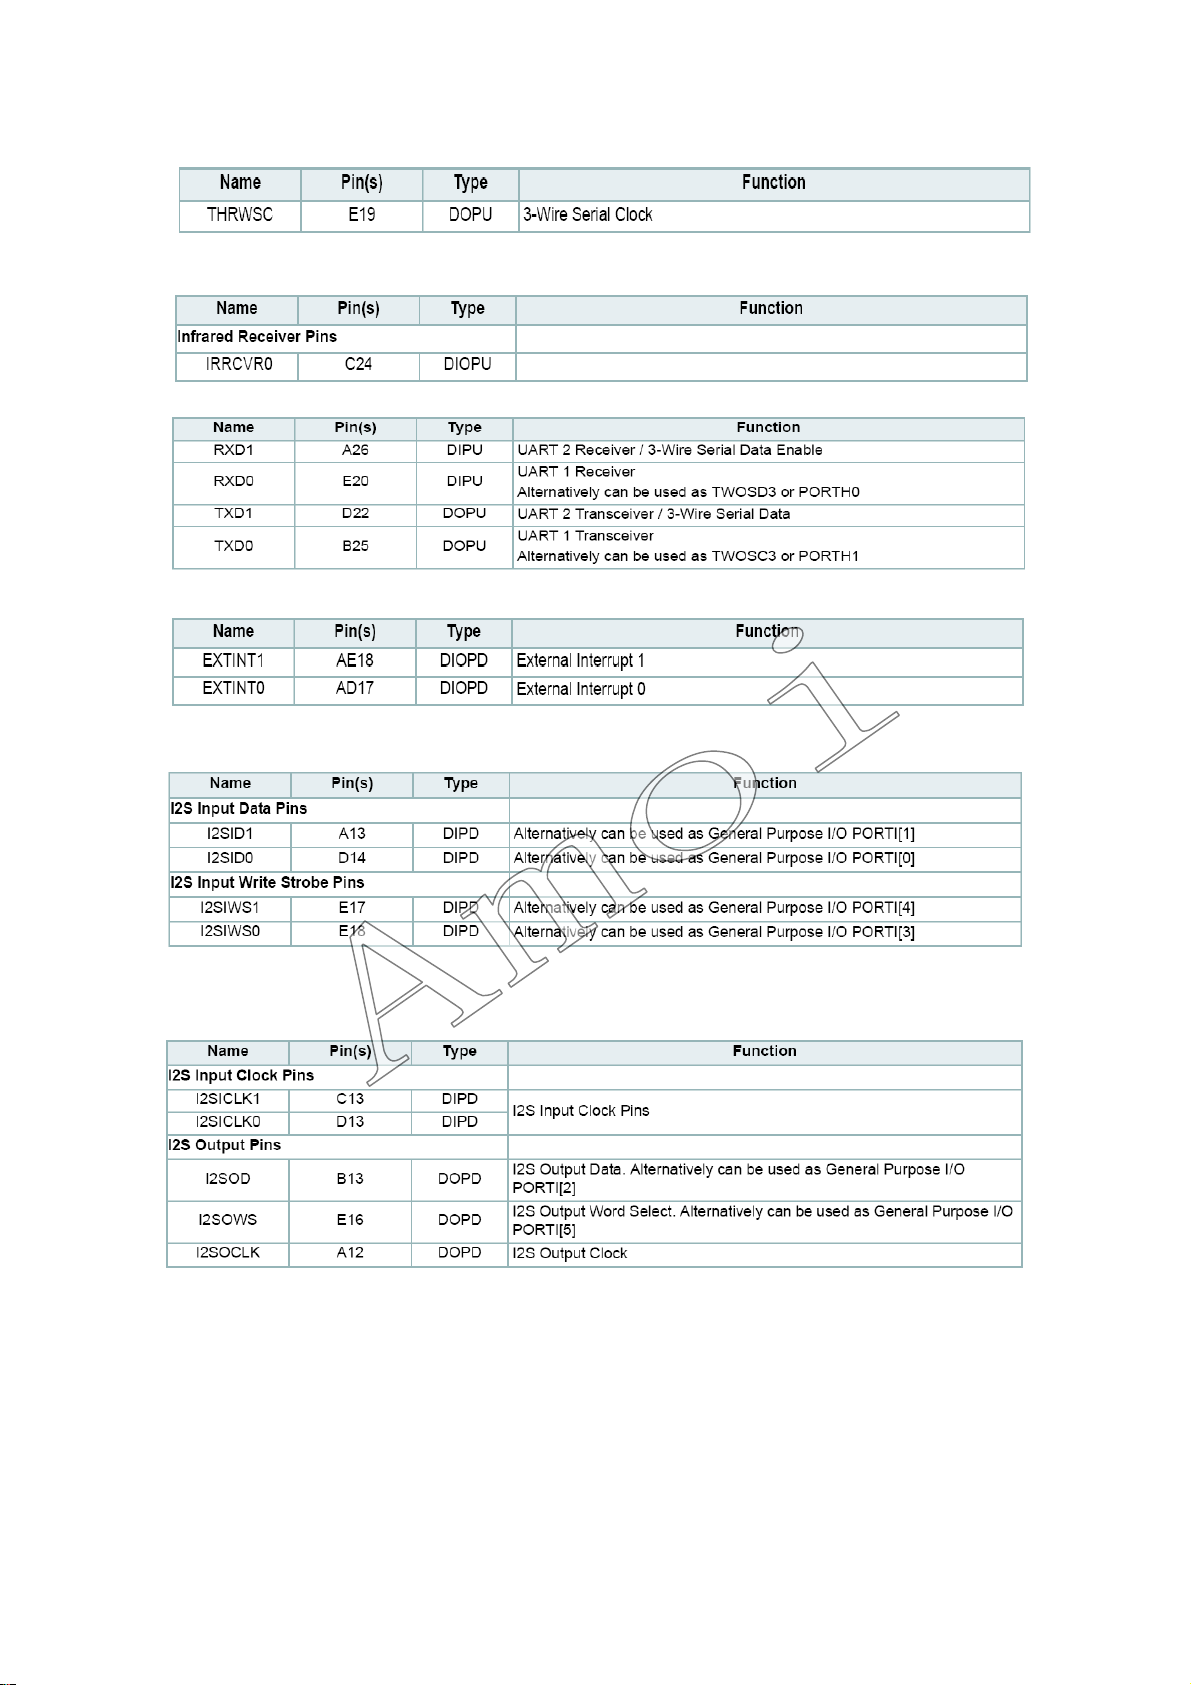
70
Page 73
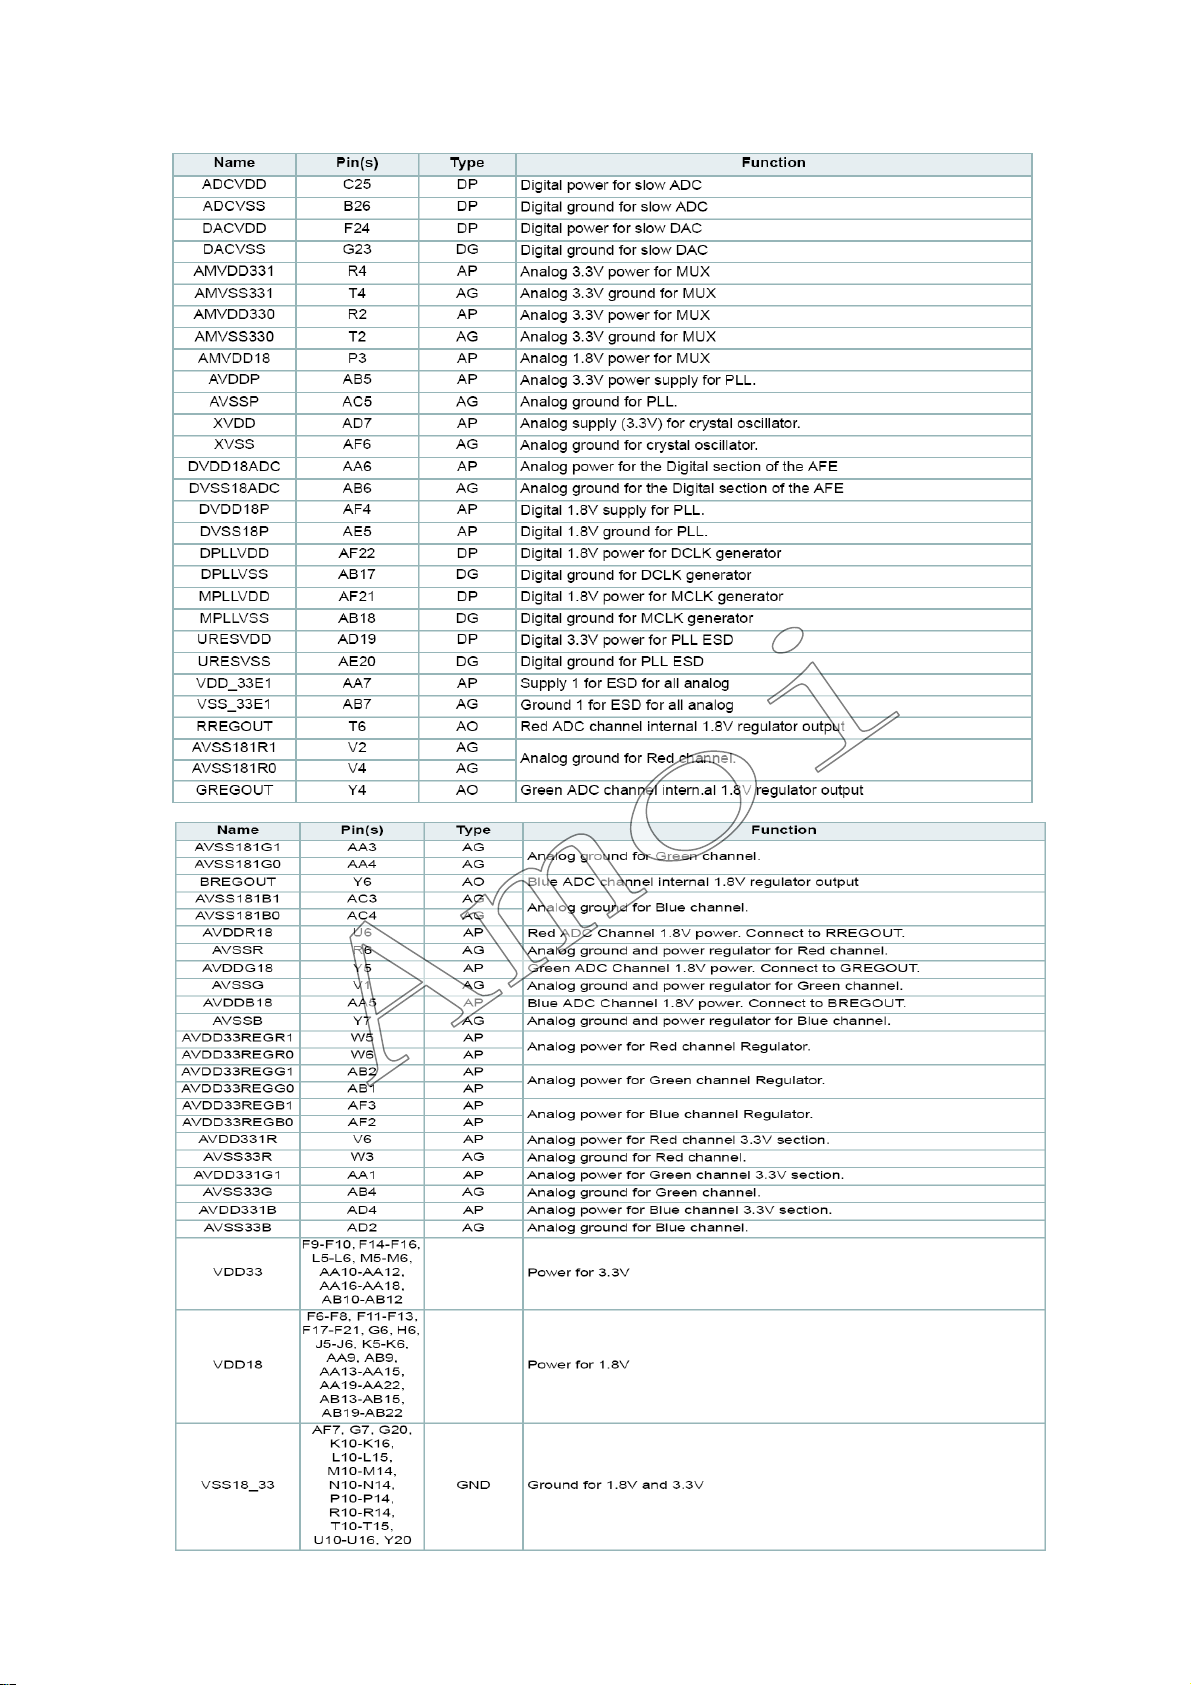
71
Page 74
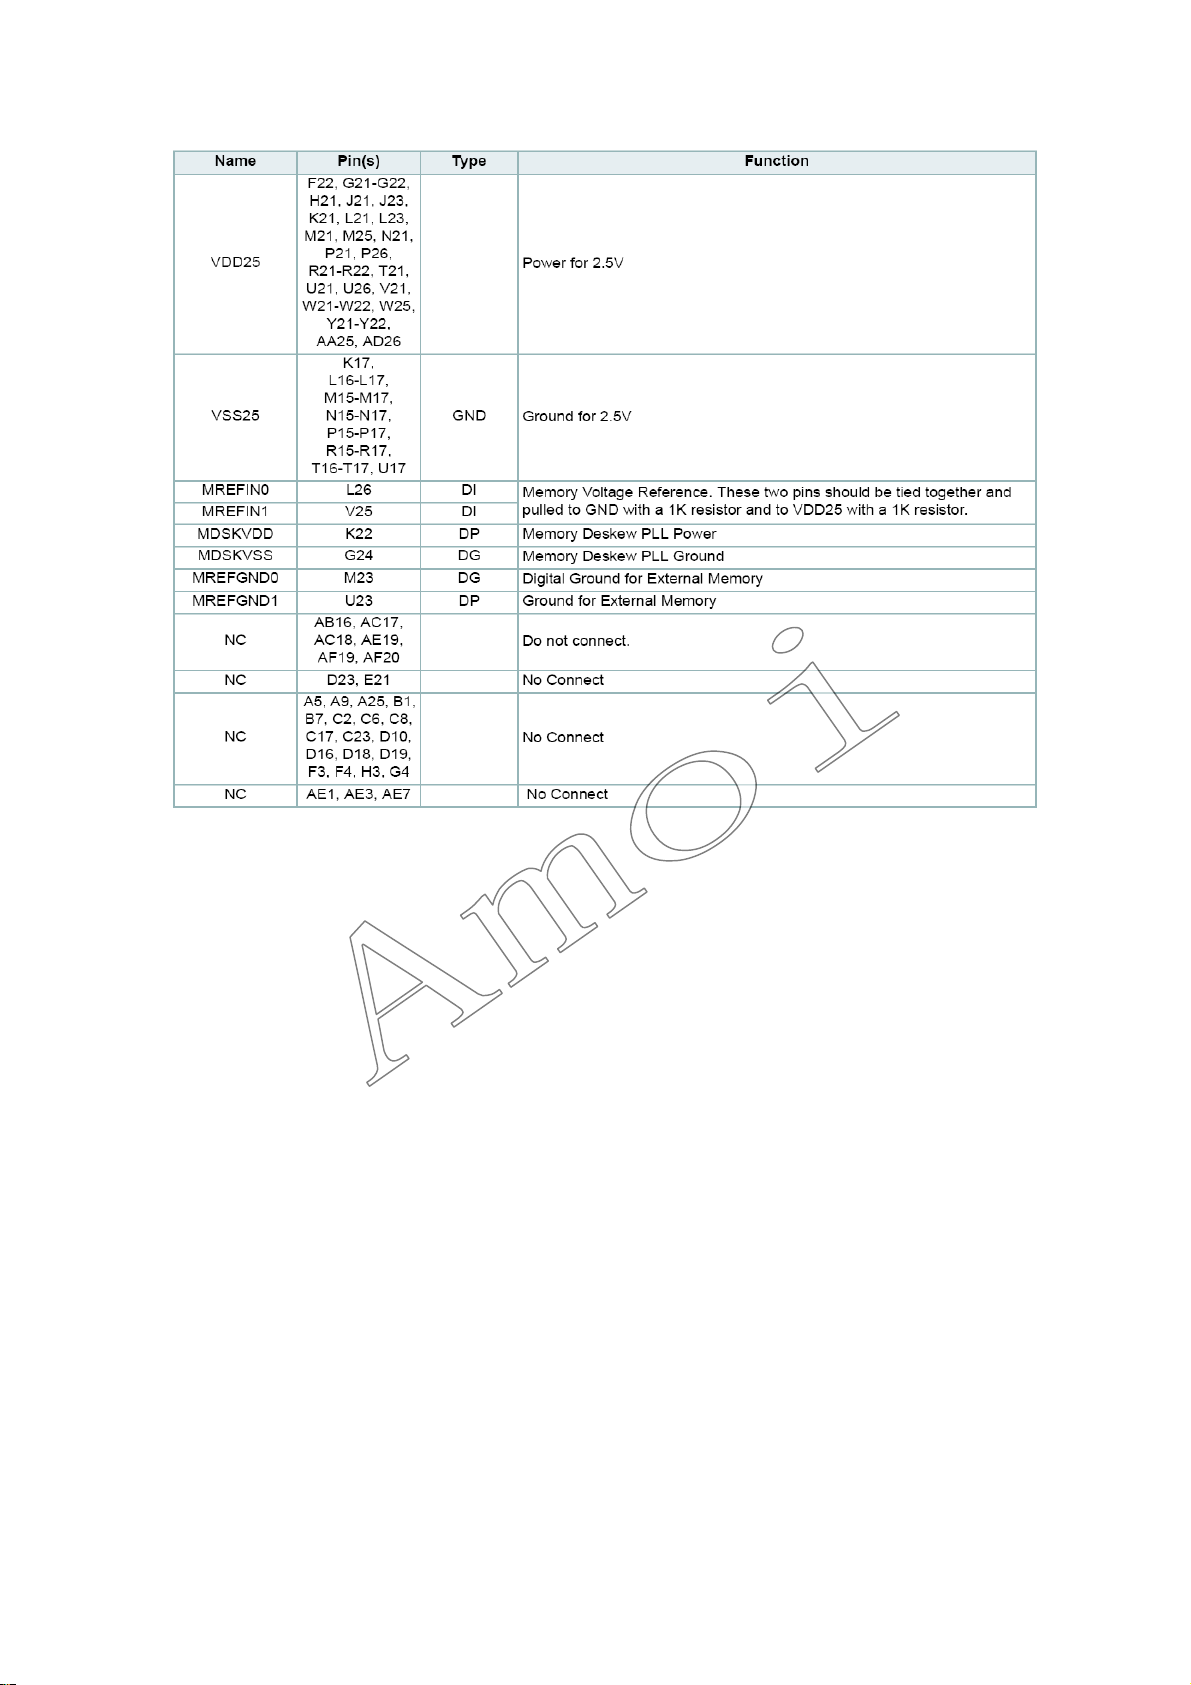
72
Page 75
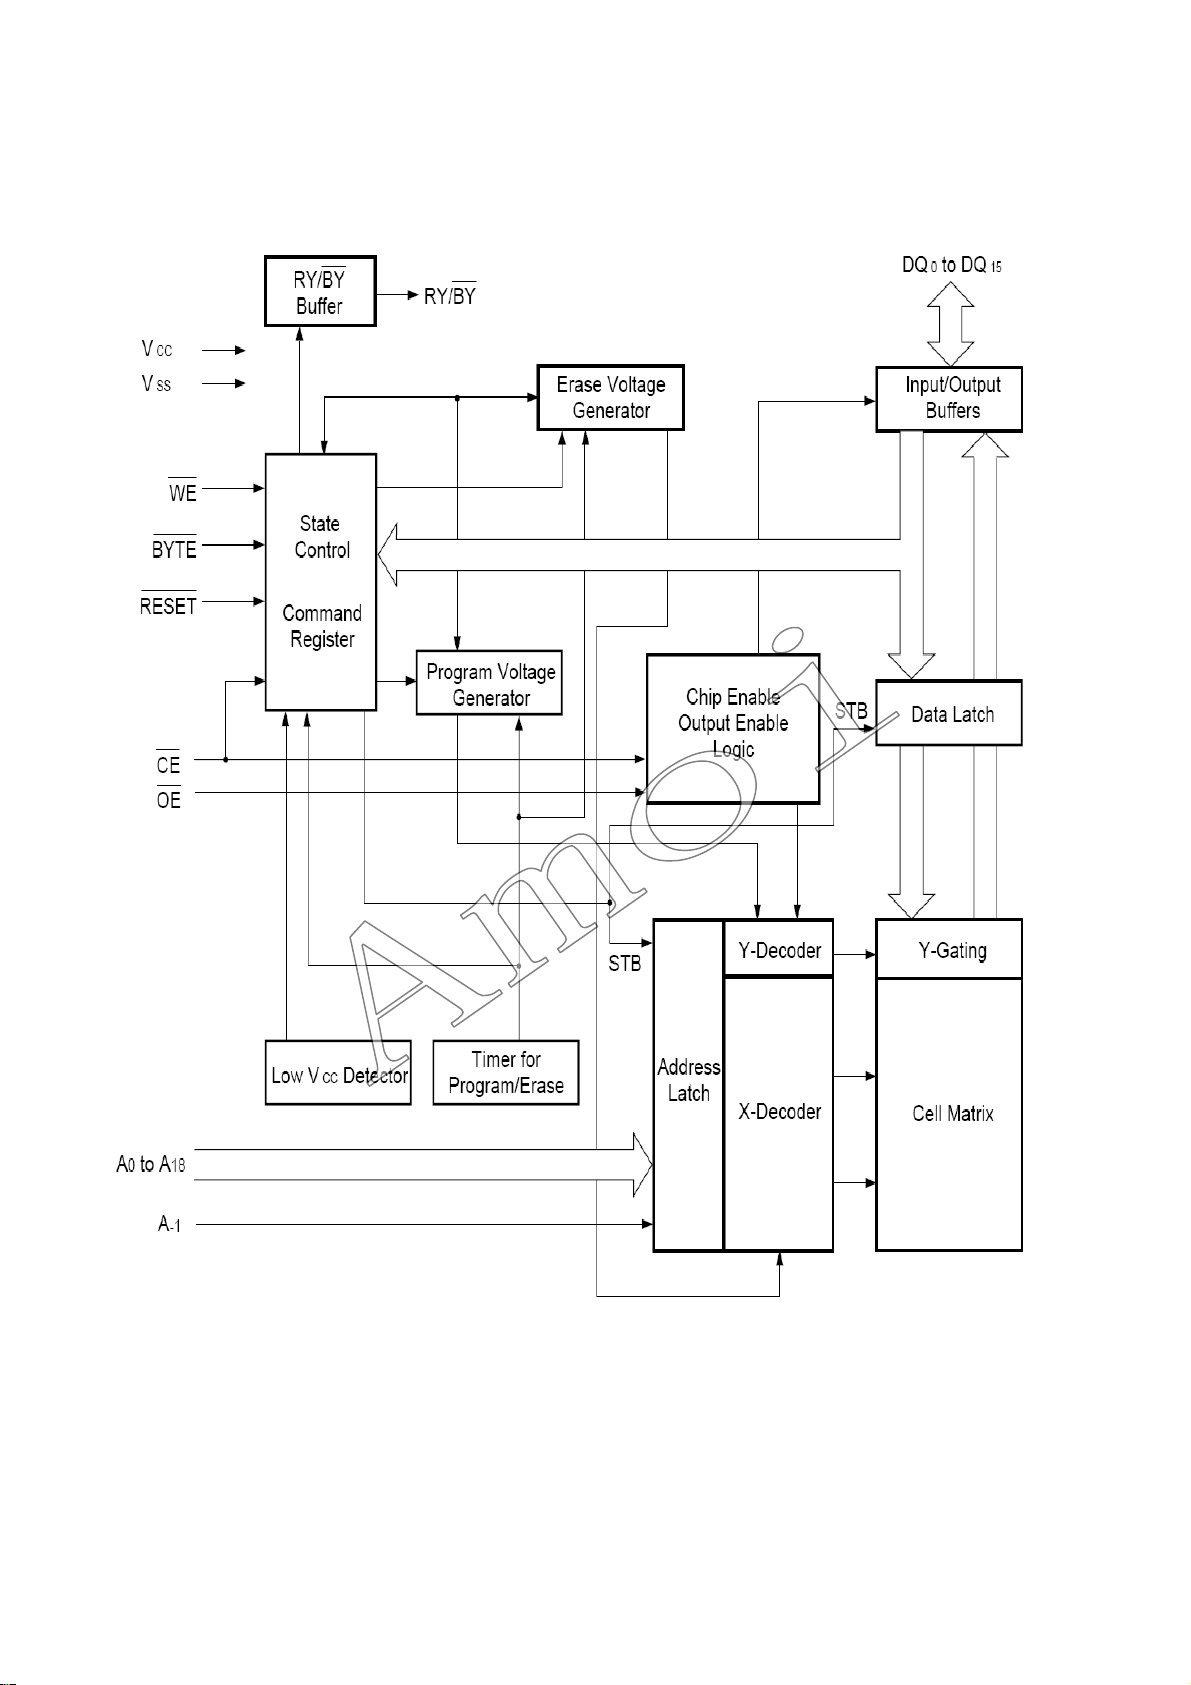
IC 29LV800TA
73
Page 76
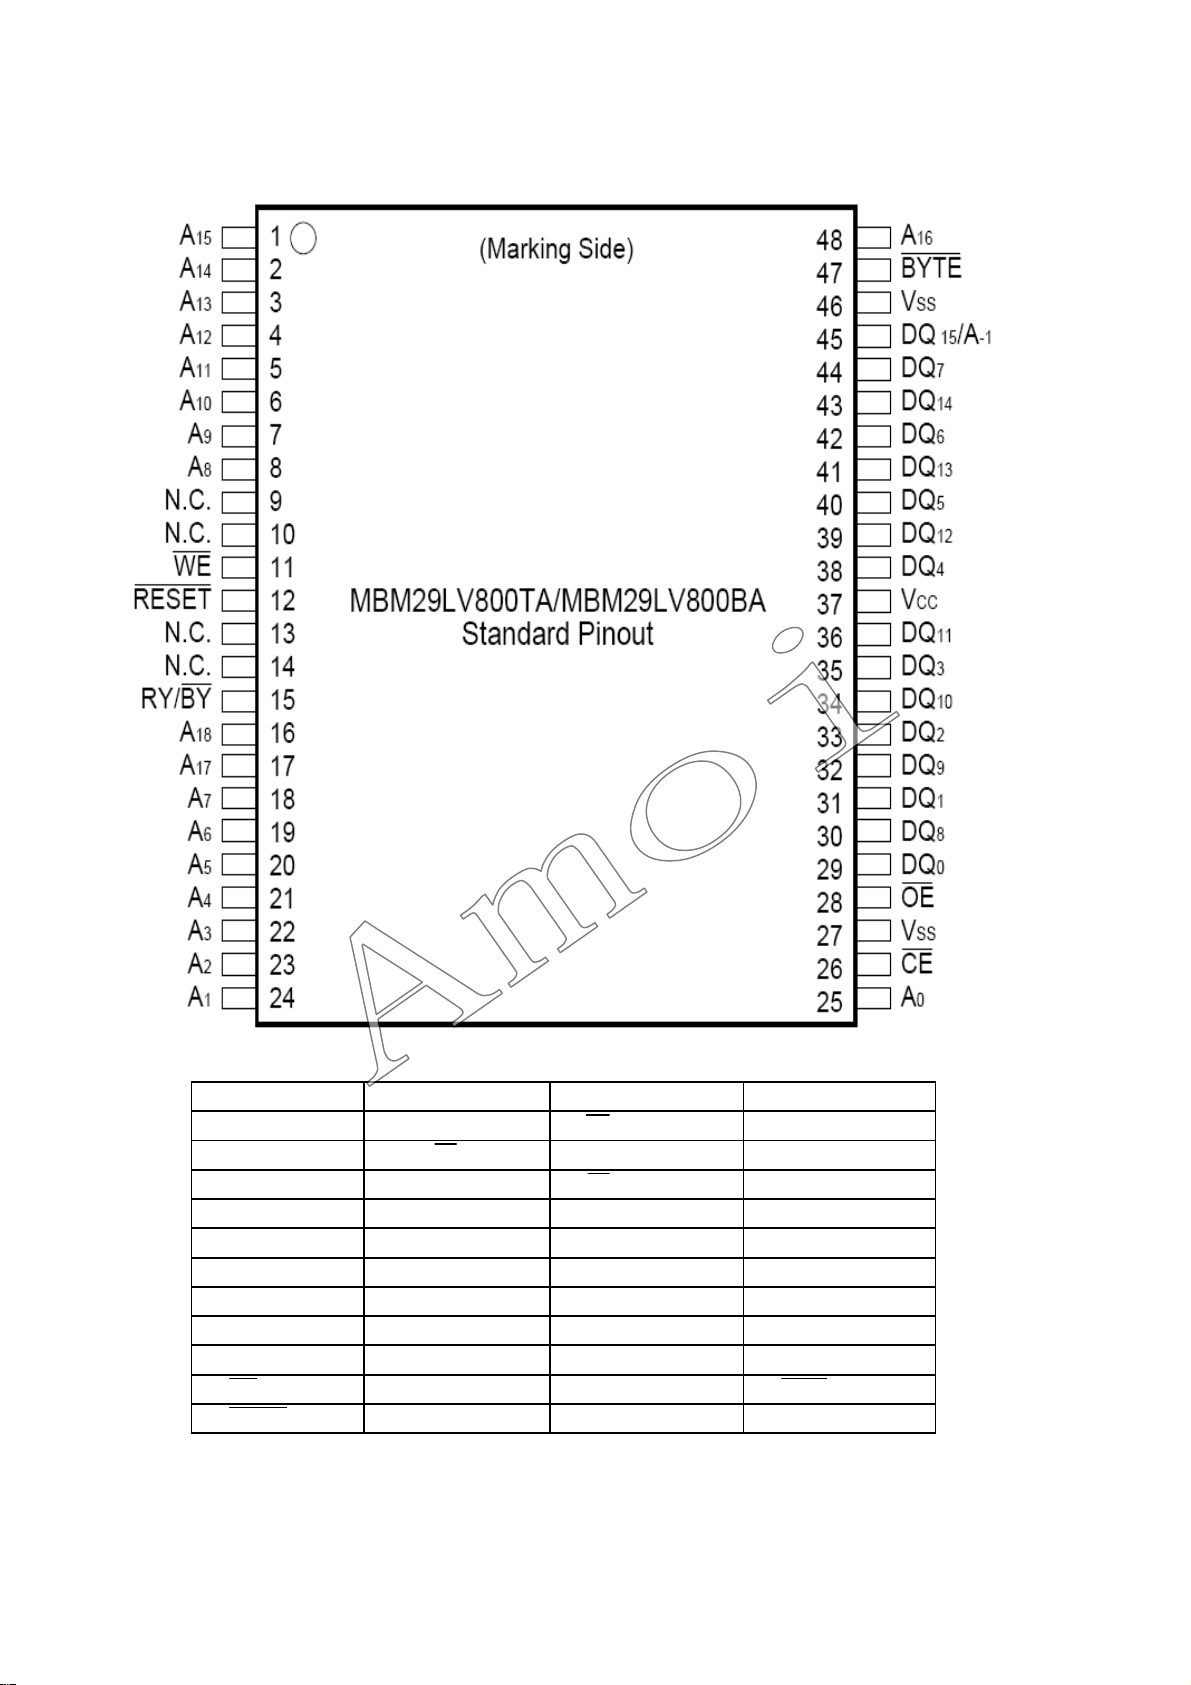
74
1. A15 13. N.C. 25. A0 37. VCC
2. A14 14. N.C. 26. CE 38. DQ4
3. A13 15. RY/BY 27. VSS 39. DQ12
4. A12 16. A18 28. OE 40. DQ5
5. A11 17. A17 29. DQ0 41. DQ13
6. A10 18. A7 30. DQ8 42. DQ6
7. A9 19. A6 31. DQ1 43. DQ14
8. A8 20. A5 32. DQ9 44. DQ7
9. N.C. 21. A4 33. DQ2 45. DQ15/A-1
10. N.C. 22. A3 34. DQ10 46. VSS
11. WE 23. A2 35. DQ3 47. BYTE
12. RESET 24. A
1 36. DQ11 48. A16
Page 77
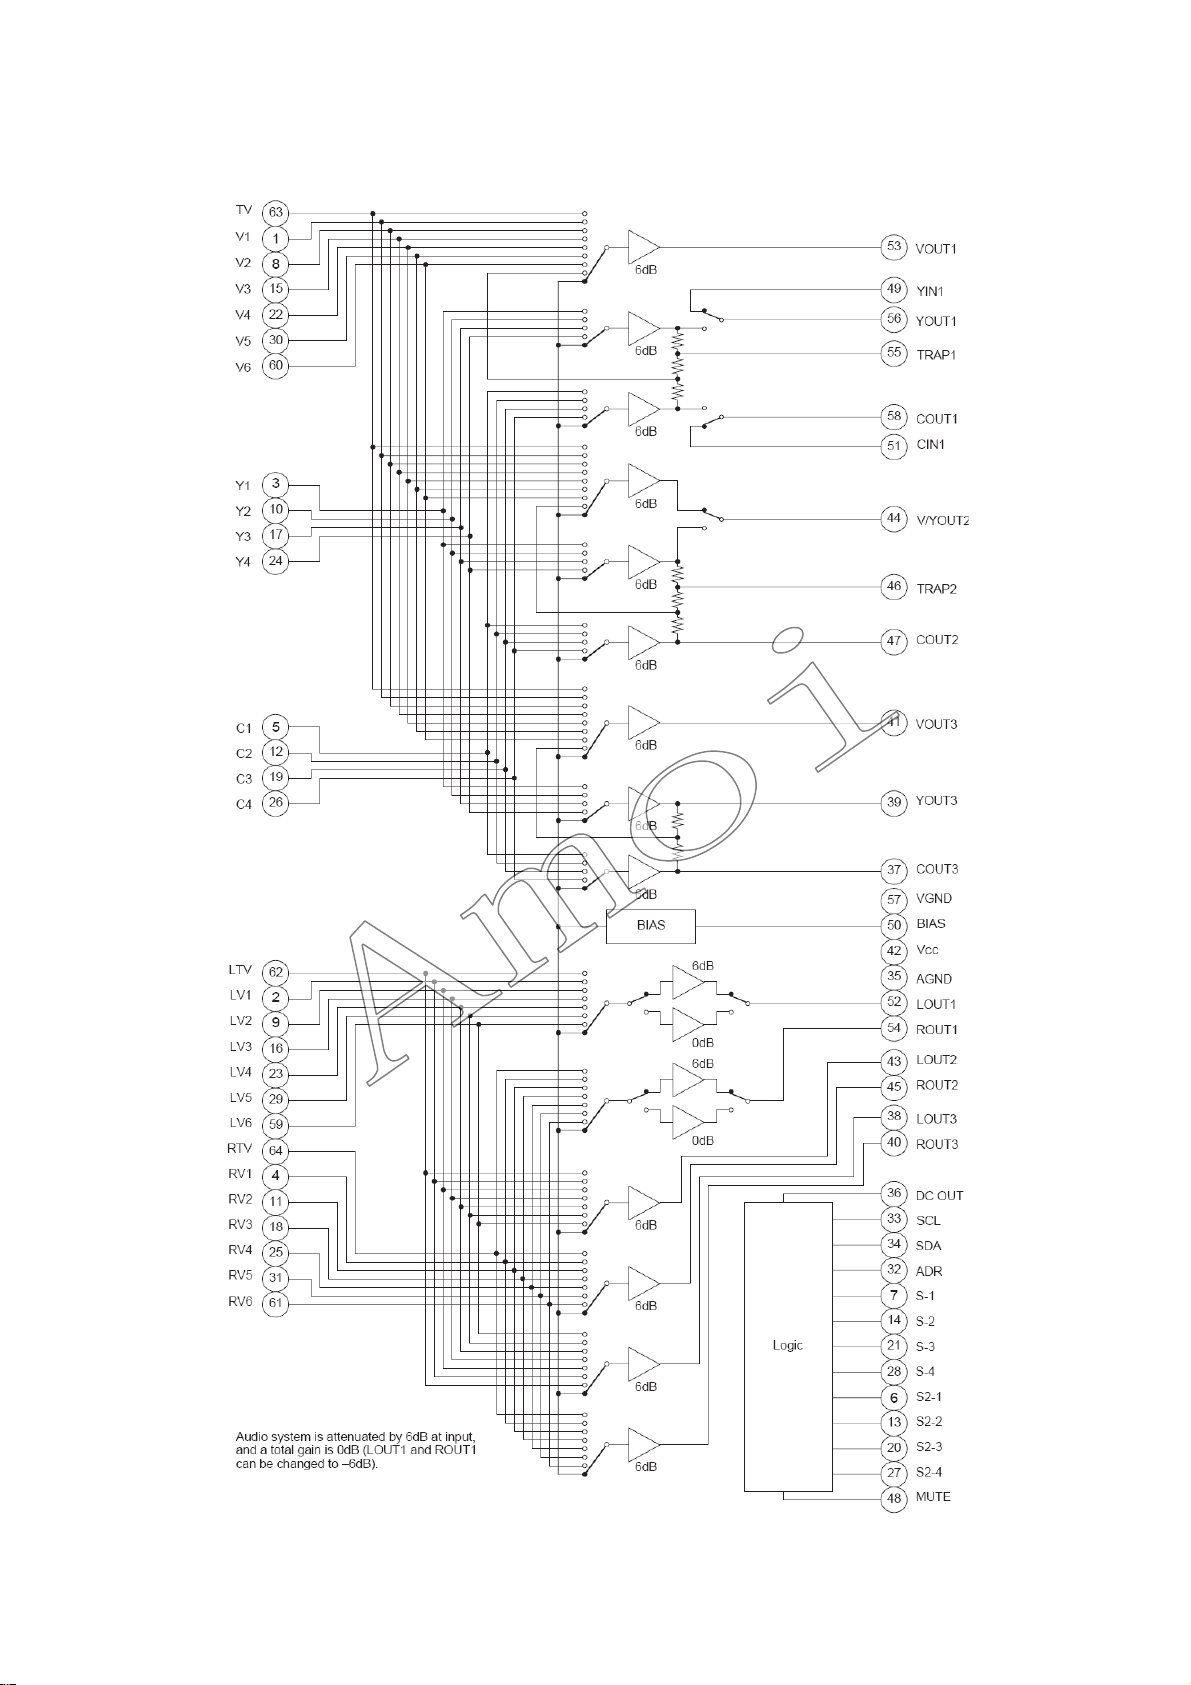
IC CXA2069Q
75
Page 78
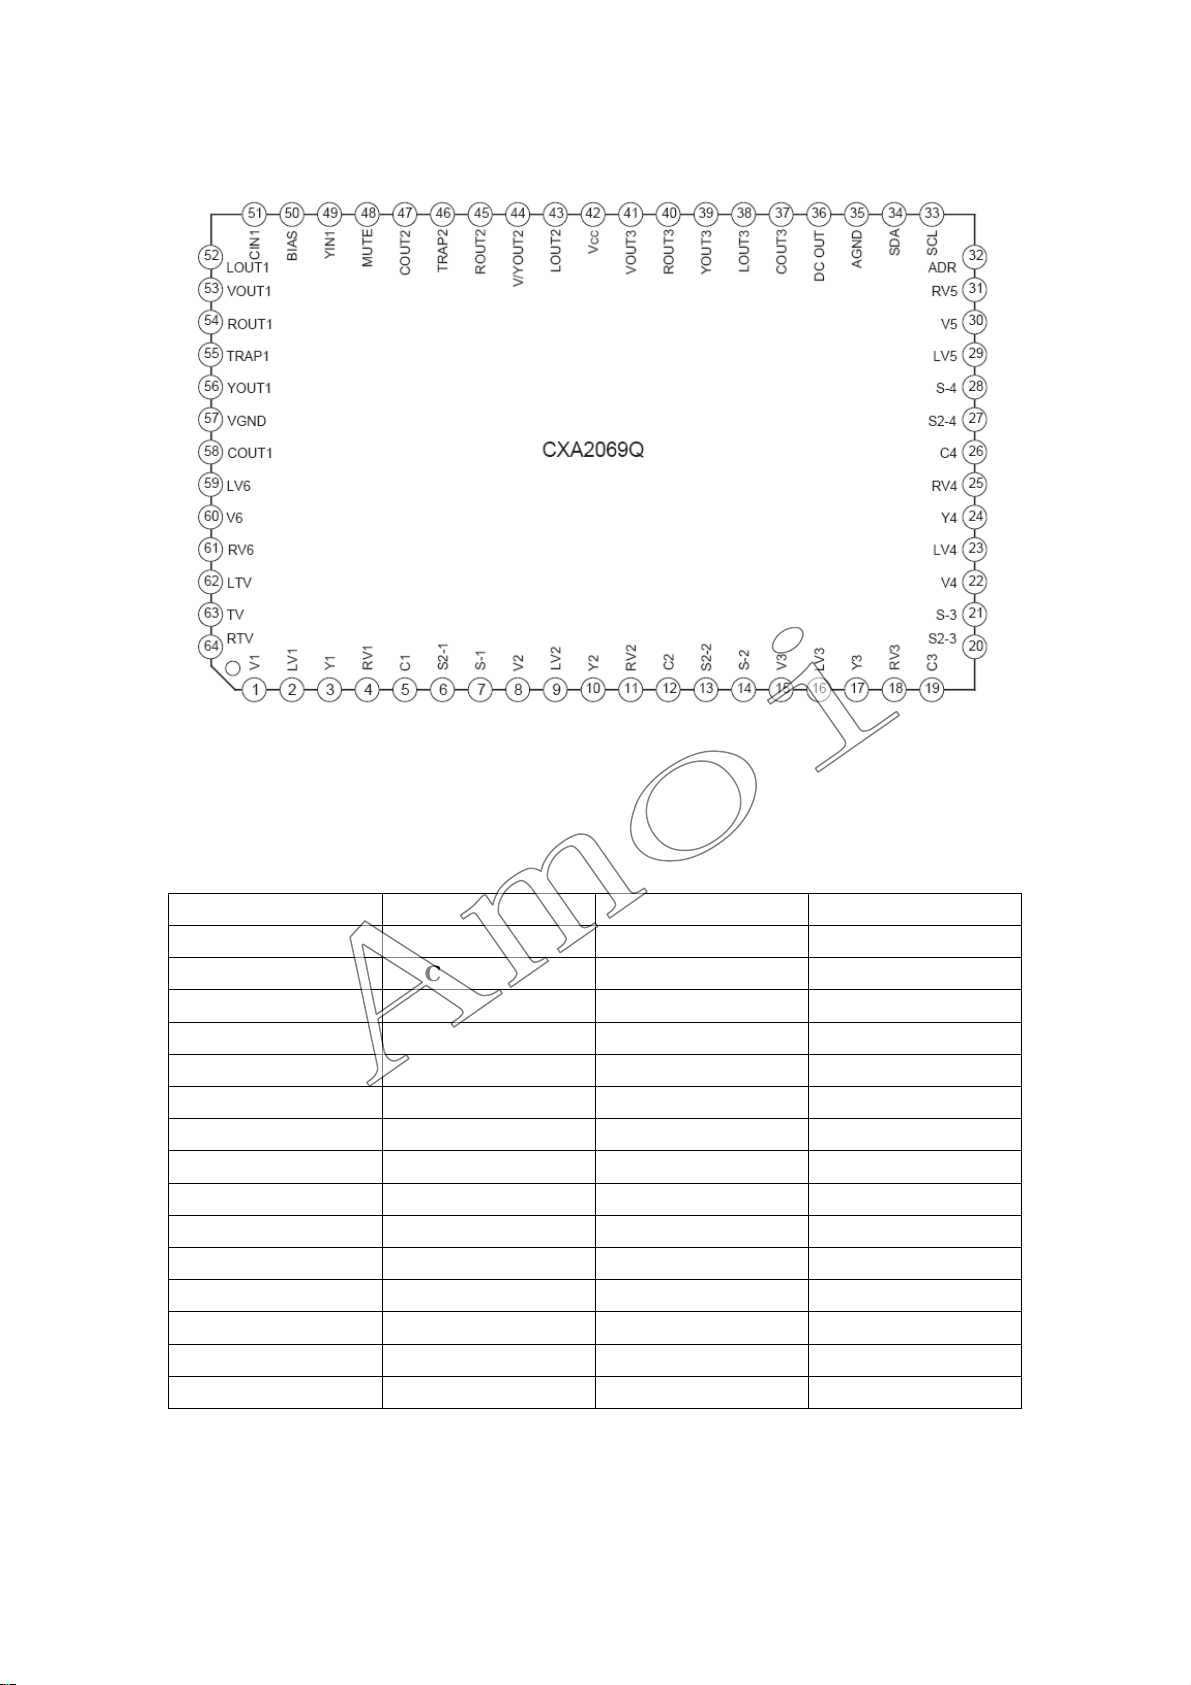
76
1. V1 17. Y3 33. SCL 49. YIN1
2. LV1 18. RV3 34. SDA 50. BIAS
3.Y1 19. C3 35. AGND 51. CIN1
4. RV1 20. S2-3 36. DC OUT 52. LOUT1
5. C1 21. S-3 37. COUT3 53. VOUT1
6. S2-1 22. V4 38. LOUT3 54. ROUT1
7. S-1 23. LV4 39. YOUT3 55. TRAP1
8. V2 24. Y4 40. ROUT3 56. YOUT1
9. LV2 25. RV4 41. VOUT3 57. VGND
10. Y2 26. C4 42. VCC 58. COUT1
11. RV2 27. S2-4 43. LOUT2 59. LV6
12. C2 28. S-4 44. V/YOUT2 60. V6
13. S2-2 29. LV5 45. ROUT2 61. RV6
14. S-2 30. V5 46. TRAP2 62. LTV
15. V3 31. RV5 47. COUT2 63. TV
16. LV3 32. ADR 48. MUTE 64. RTV
Page 79
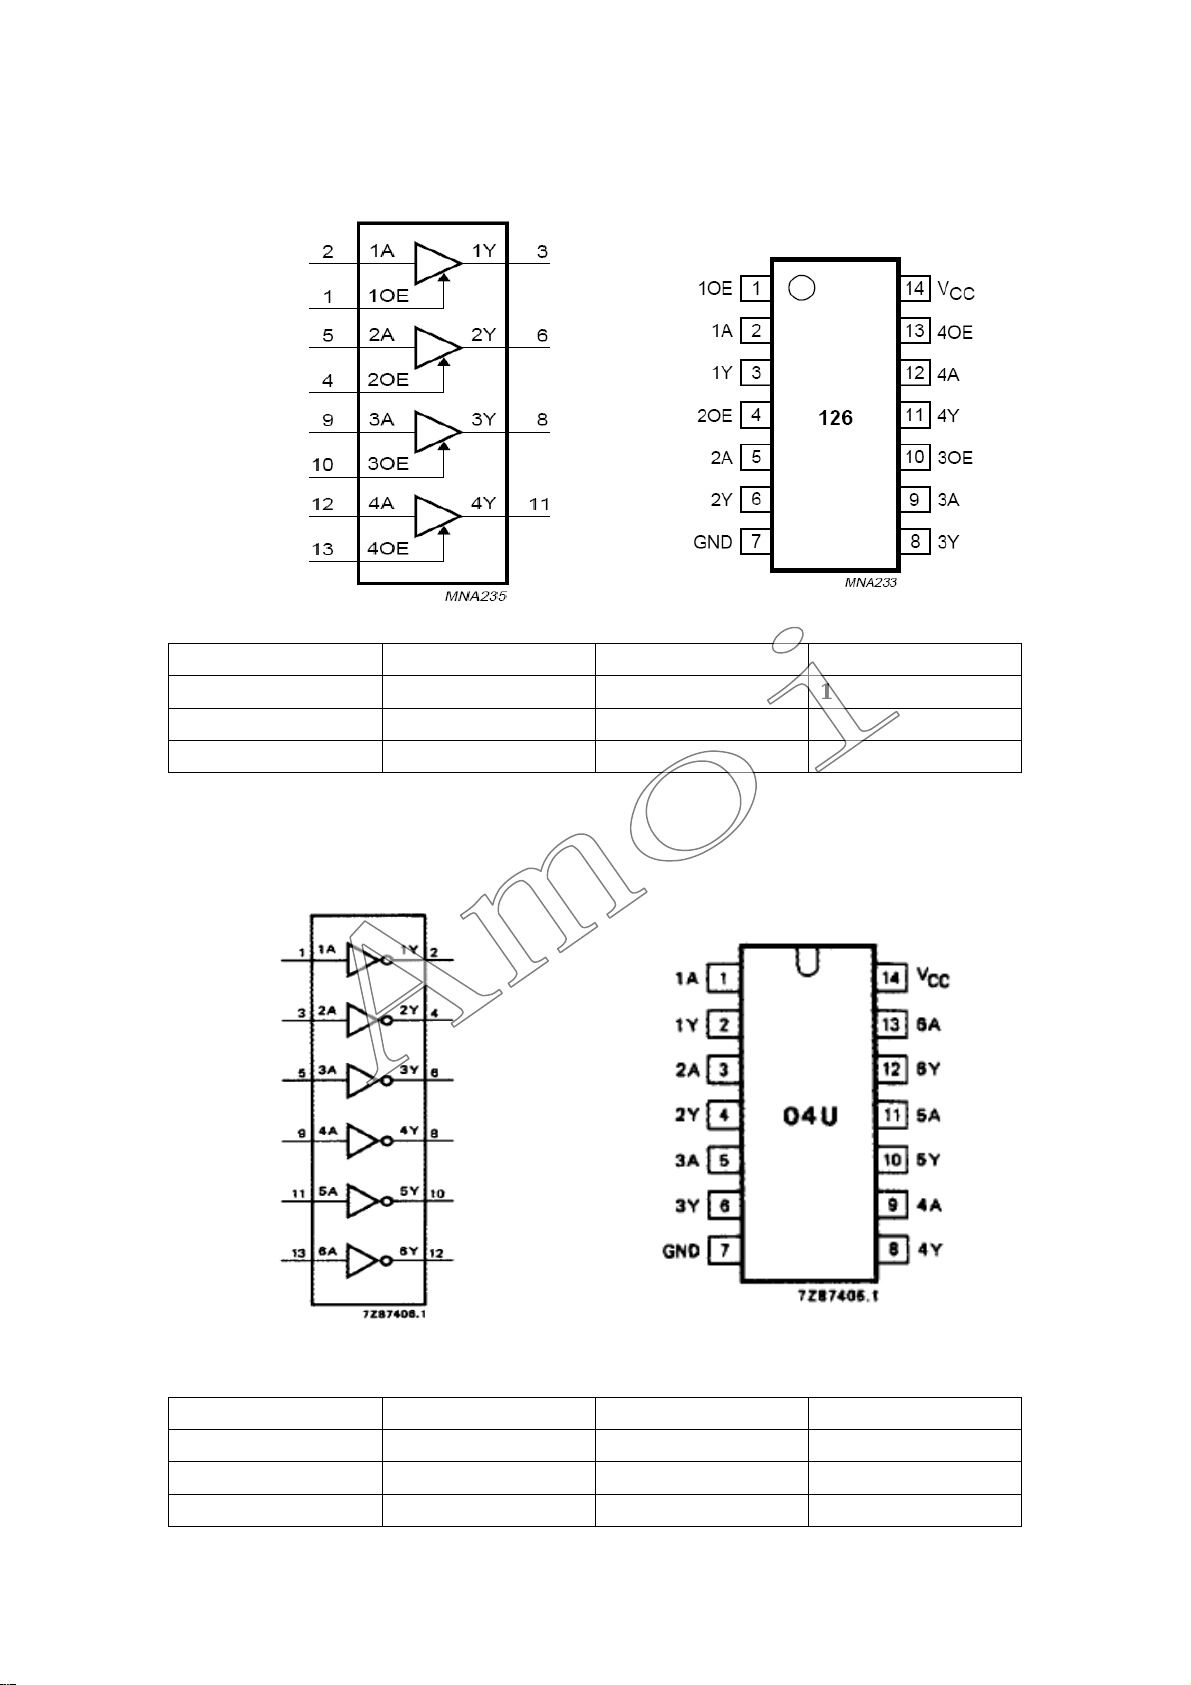
IC 74LV126
77
1. 1OE 5. 2A 9. 3A 13. 4OE
2. 1A 6. 2Y 10. 3OE 14. VCC
3. 1Y 7. GND 11. 4Y
4. 2OE 8. 3Y 12. 4A
IC 74HC04
1. 1A 5. 3A 9. 4A 13. 6A
2. 1Y 6. 3Y 10. 5Y 14. VCC
3. 2A 7. GND 11. 5A
4. 2Y 8. 4Y 12. 6Y
Page 80
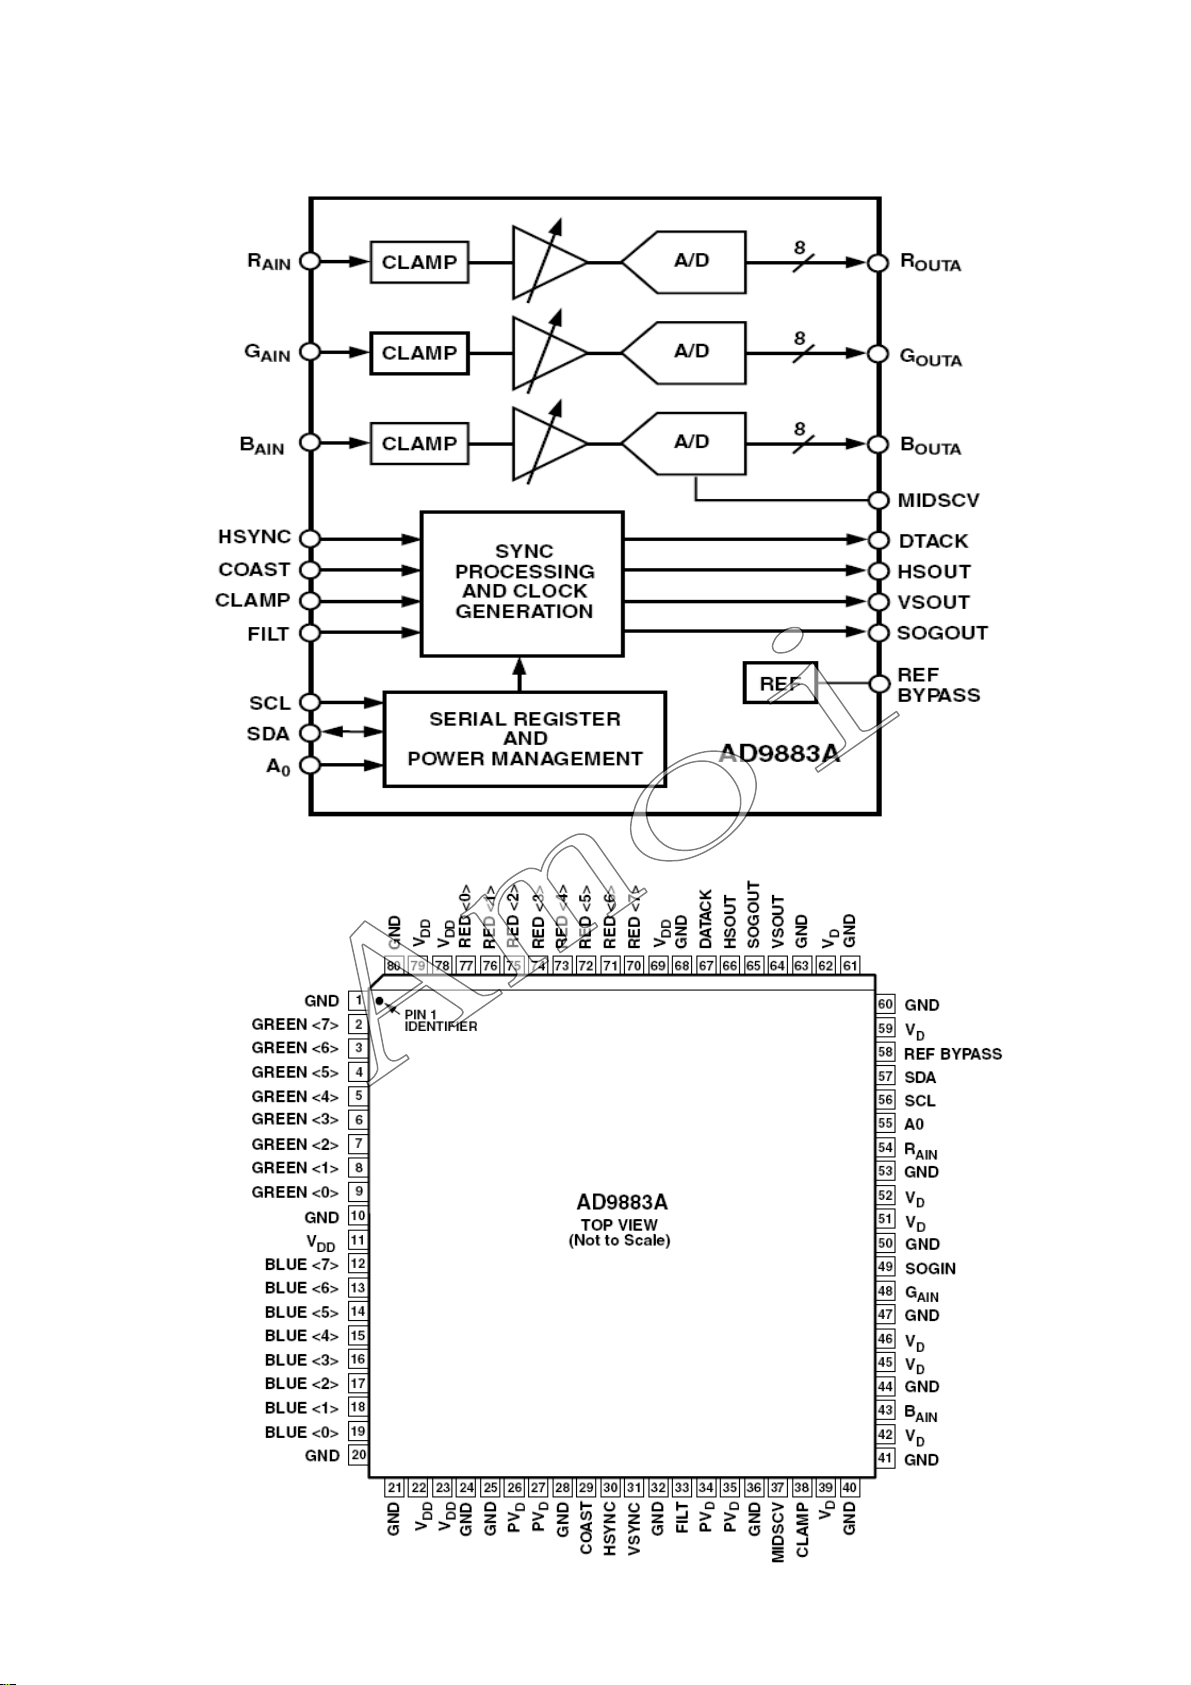
IC AD9883
78
Page 81
79
1. GND 21. GND 41. GND 61. GND
2. GREEN<7> 22. VDD 42. VD 62. VD
3. GREEN<6> 23. VDD 43. BAIN 63. GND
4. GREEN<5> 24. GND 44. GND 64. VSOUT
5. GREEN<4> 25. GND 45. VD 65. SOGOUT
6. GREEN<3> 26. PVD 46. VD 66. HSOUT
7. GREEN<2> 27. PVD 47. GND 67. DATACK
8. GREEN<1> 28. GND 48. GAIN 68. GND
9. GREEN<0> 29. COAST 49. SOGIN 69. VDD
10. GND 30. HSYNC 50. GND 70. RED<7>
11. VDD 31. VSYNC 51. VD 71. RED<6>
12. BLUE<7> 32. GND 52. VD 72. RED<5>
13. BLUE<6> 33. FILT 53. GND 73. RED<4>
14. BLUE<5> 34. PVD 54. RAIN 74. RED<3>
15. BLUE<4> 35. PVD 55. A0 75. RED<2>
16. BLUE<3> 36. GND 56. SCL 76. RED<1>
17. BLUE<2> 37. MIDSCV 57. SDA 77. RED<0>
18. BLUE<1> 38. CLAMP 58. REF BYPASS 78. VDD
19. BLUE<0> 39. VD 59. VD 79. VDD
20. GND 40. GND 60. GND 80. GND
Page 82
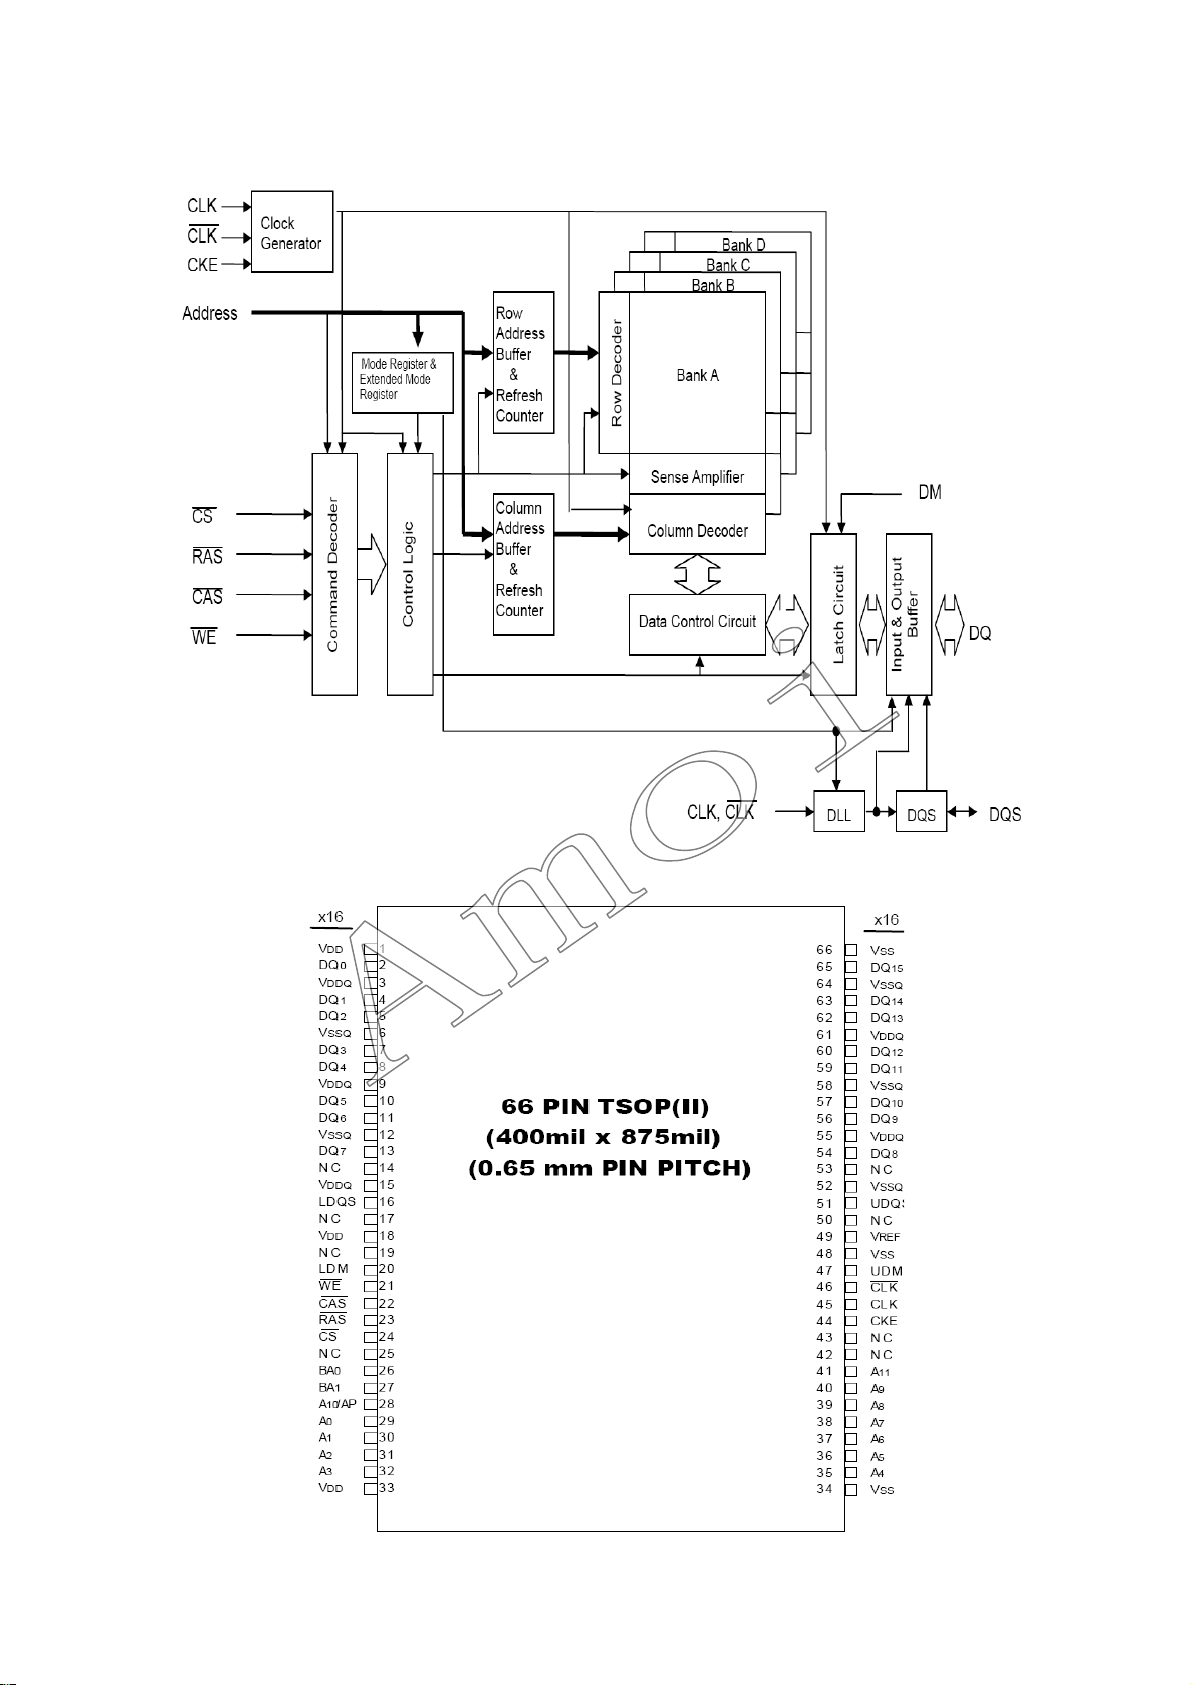
IC M13S128168A
80
Page 83
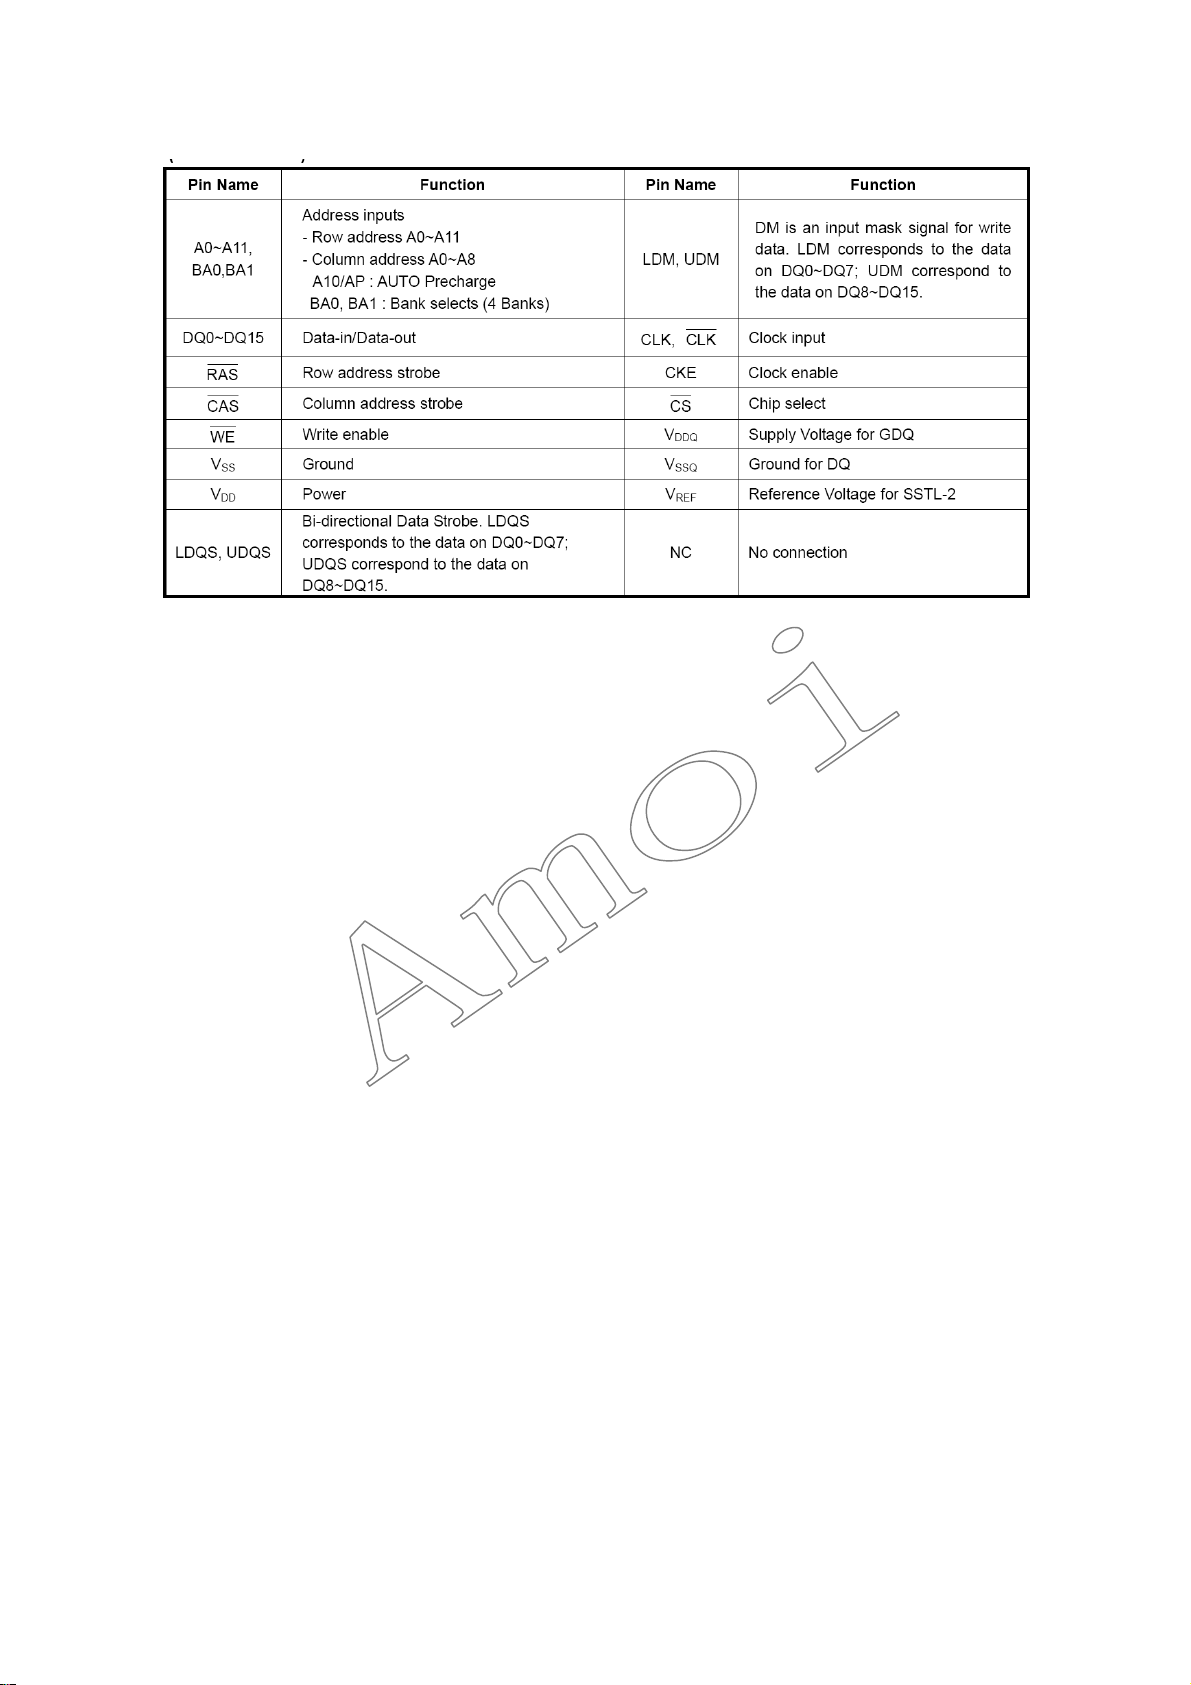
81
Page 84
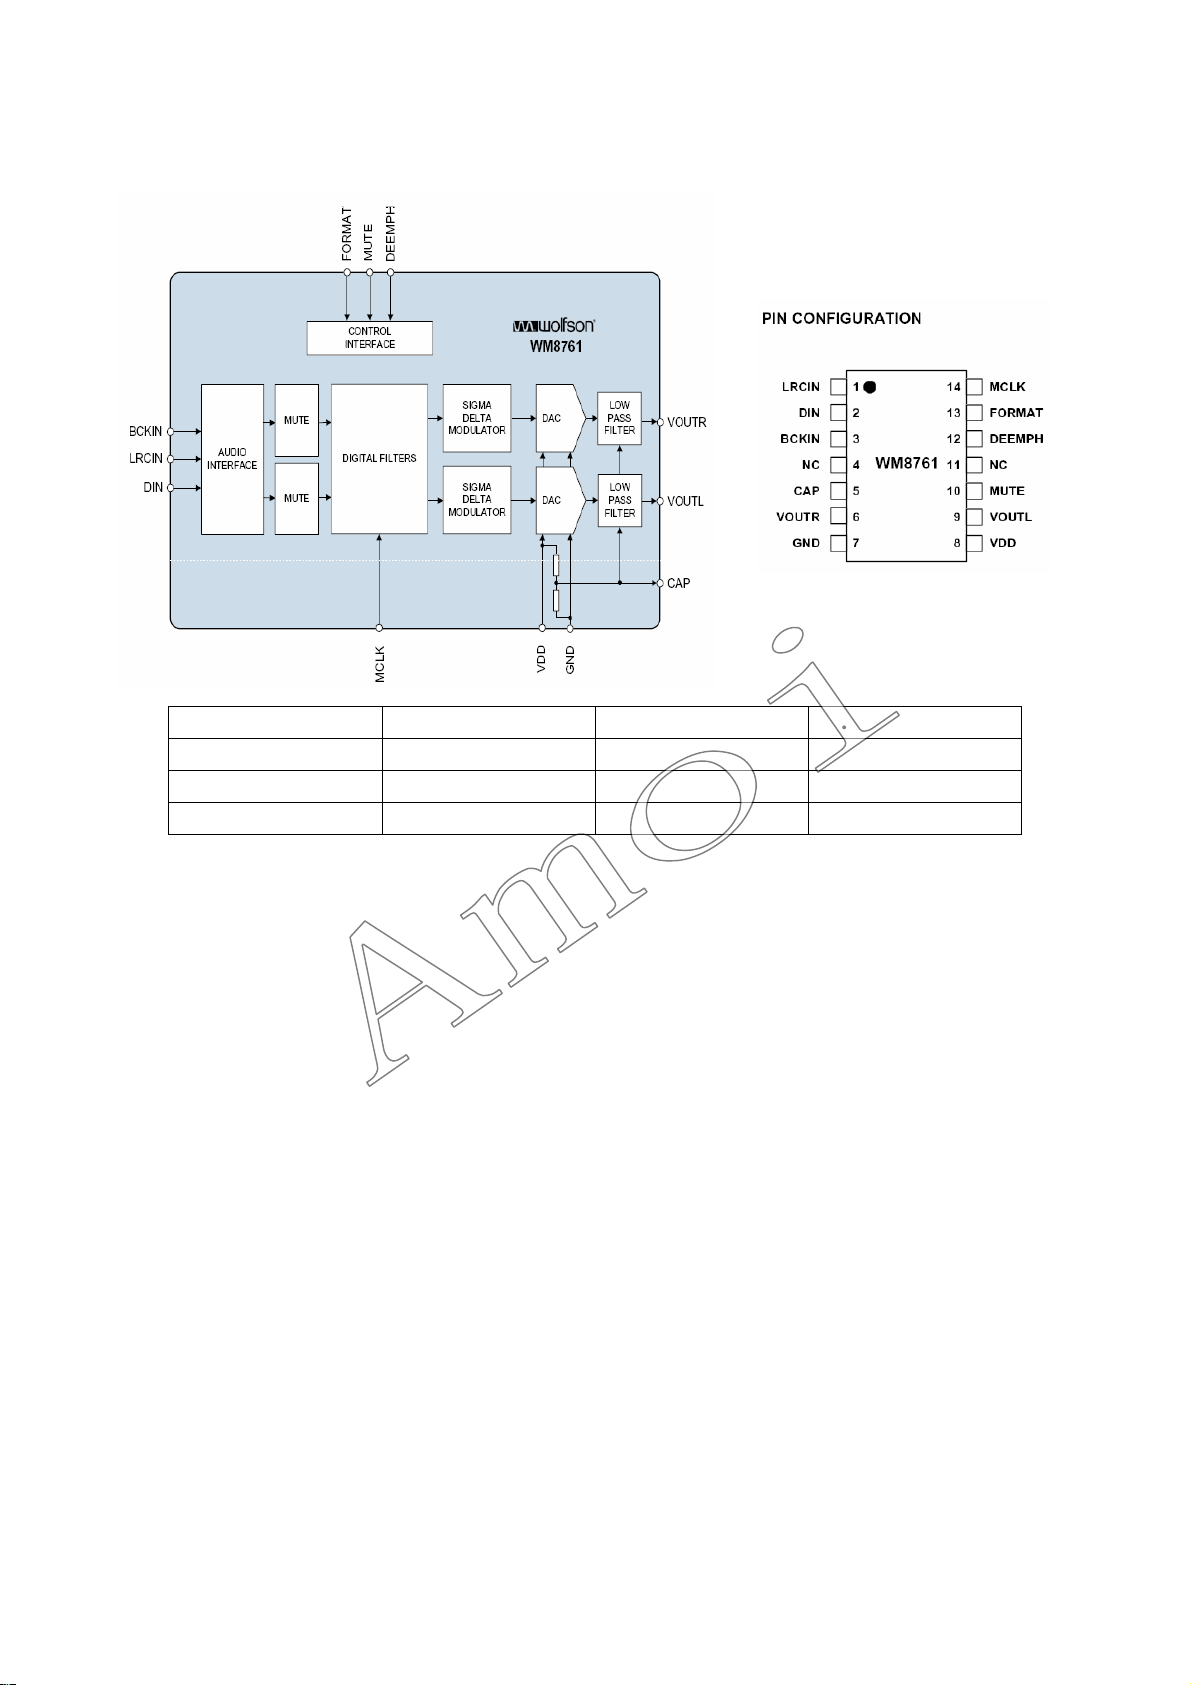
IC WM8761
82
1. LRCIN 5. CAP 9. VOUTL 13. FORMAT
2. DIN 6. VOUTR 10. MUTE 14. MCLK
3. BCKIN 7. GND 11. NC
4. NC 8. VDD 12. DEEMPH
Page 85
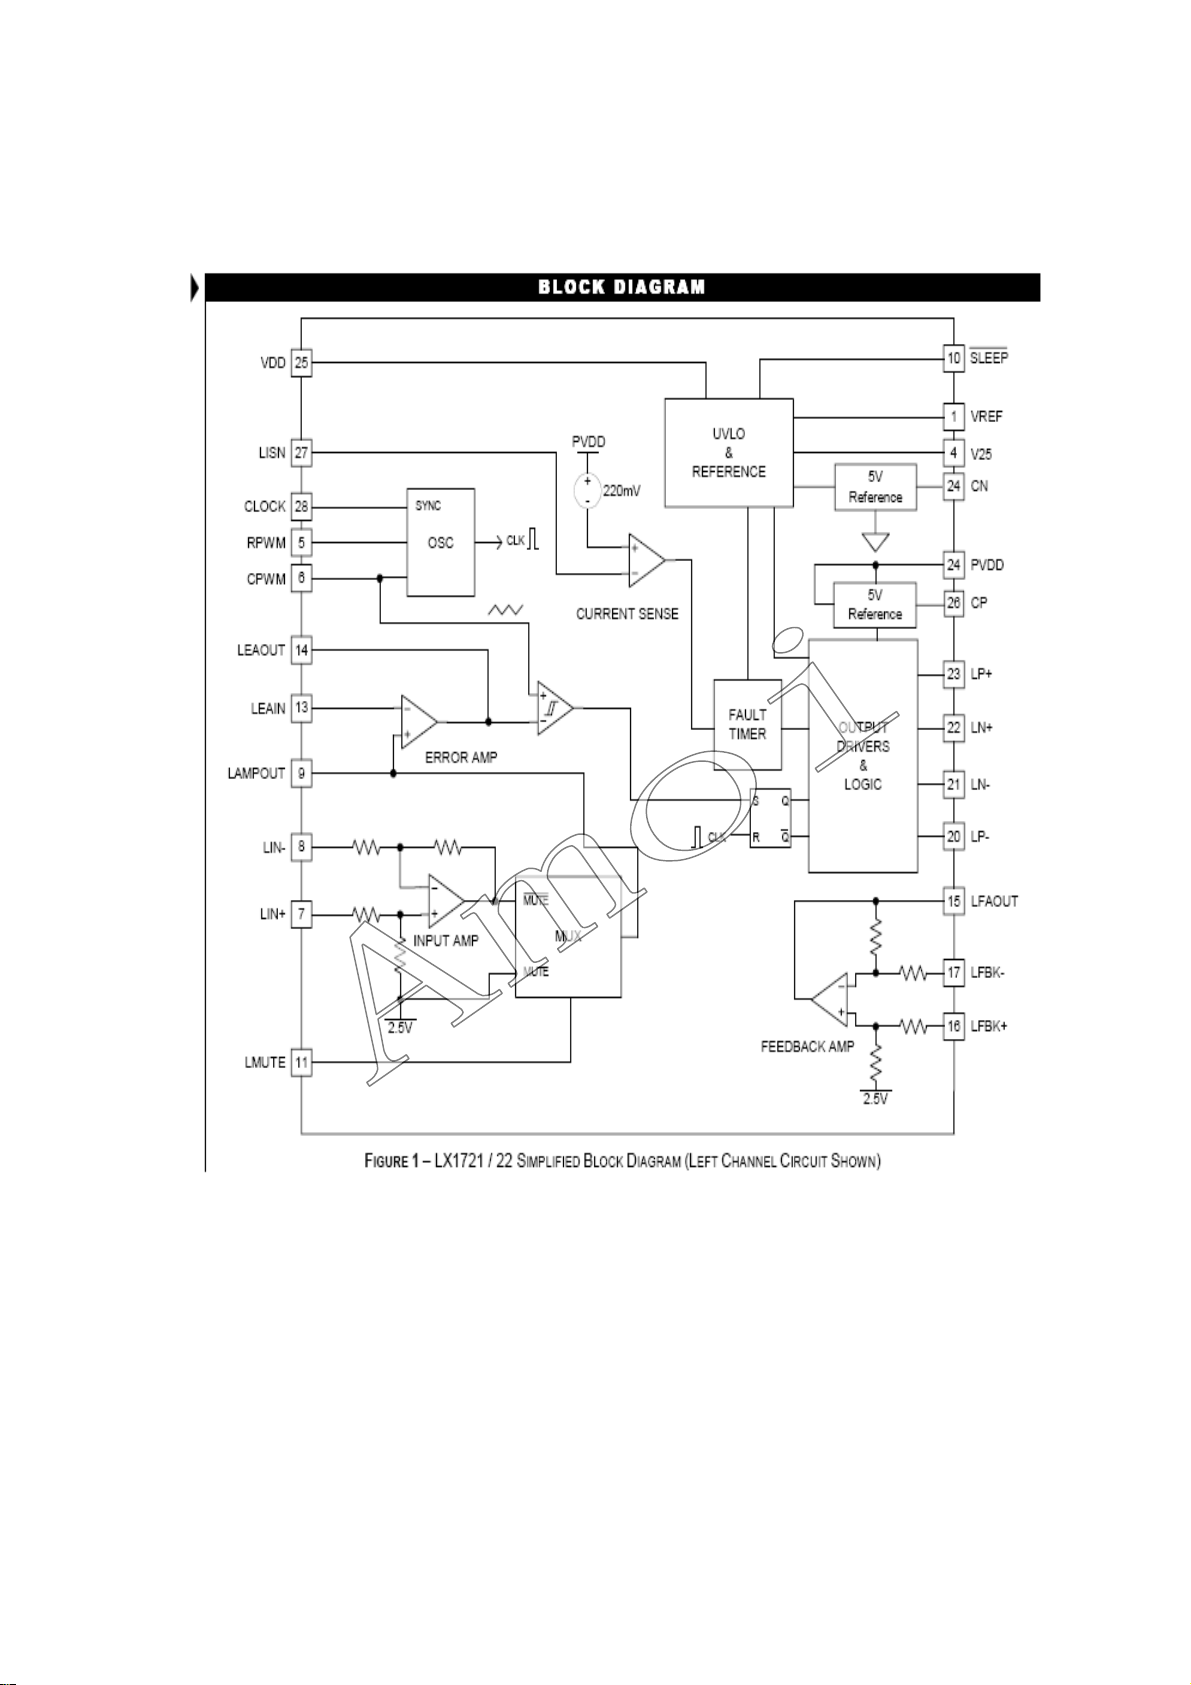
IC LX1722
83
Page 86
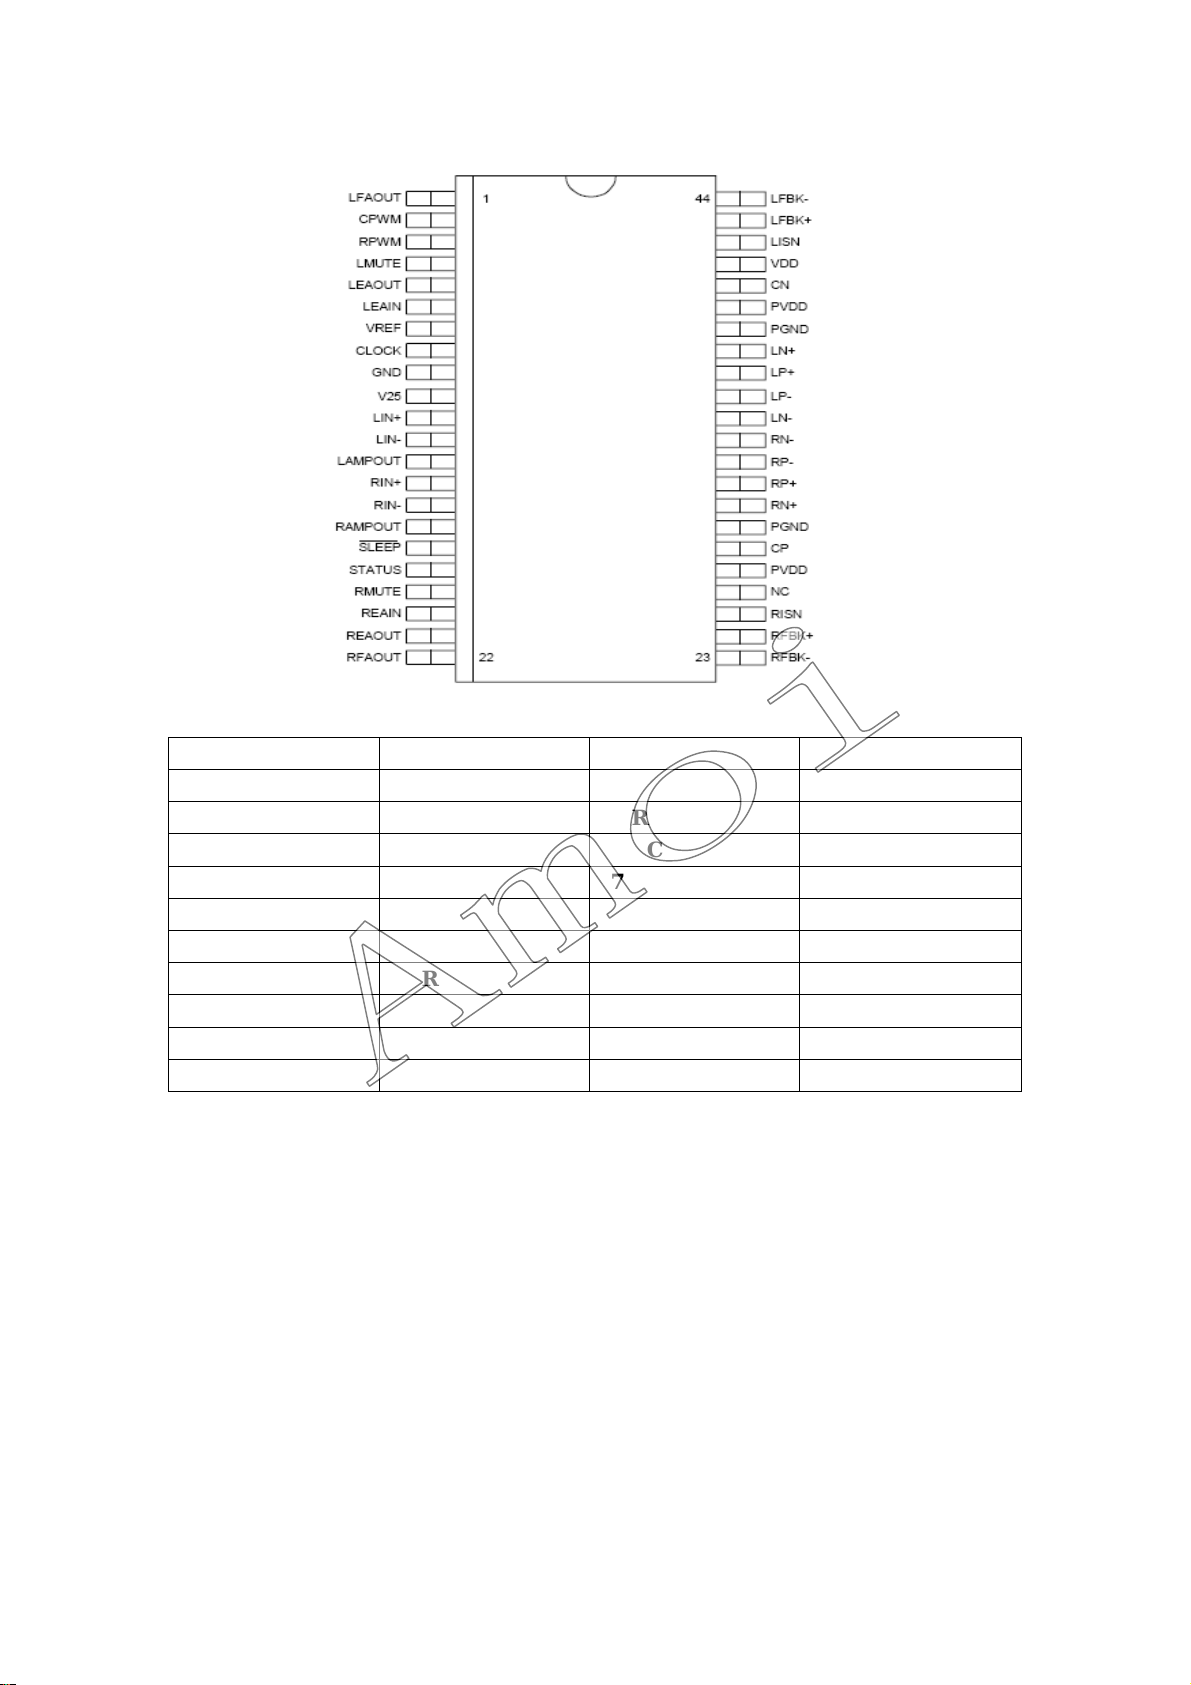
84
1. LFAOUT 12. LIN- 23. RFBK- 34. LN-
2. CPWM 13. LAMPOUT 24. RFBK+ 35. LP-
3. RPWM 14. RIN+ 25. RISN 36. LP+
4. LMUTE 15. RIN- 26. NC 37. LN+
5. LEAOUT 16. RAMPOUT 27. PVDD 38. PGND
6. LEAIN 17. SLEEP 28. CP 39. PVDD
7. VREF 18. STATUS 29 . PGND 40. CN
8. CLOCK 19. RMUTE 30. RN+ 41. VDD
9. GND 20. REAIN 31. RP+ 42. LISN
10. V25 21. REAOUT 32. RP- 43. LFBK+
11. LIN+ 22. RFAOUT 33. RN- 44. LFBK-
Page 87
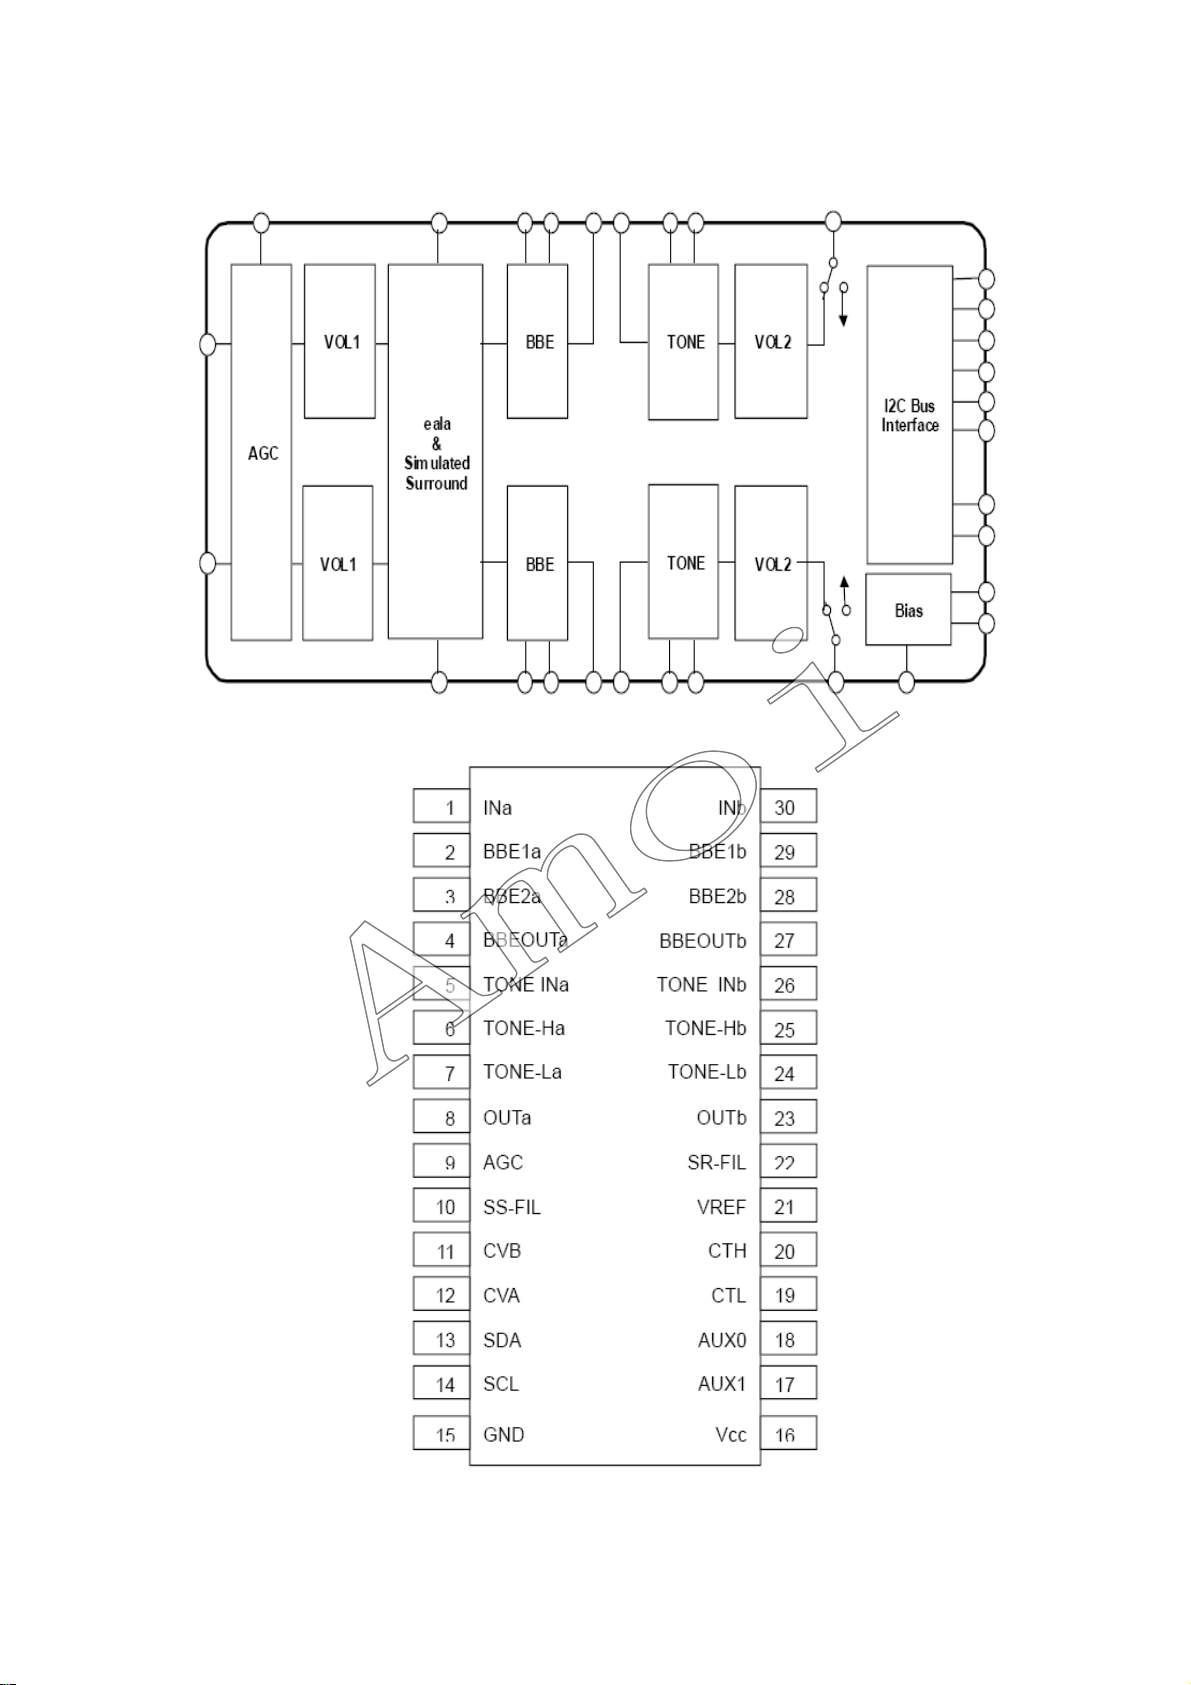
IC NJ1137
85
Page 88
1. INa 9. AGC 17. AUX1 25. TONE-Hb
86
2. BBE1a 10. SS-FIL 18. AUX0 26. TONE INb
3. BBE2a 11. CVB 19. CTL 27. BBEOUTb
4. BBEOUTa 12. CVA 20. CTH 28. BBE2b
5. TONE Ina 13. SDA 21. VREF 29. BBE1b
6. TONE-Ha 14. SCL 22. SR-FIL 30. INb
7. TONE-La 15. GND 23. OUTb
8. OUT a 16. VCC 24. TONE-Lb
Page 89
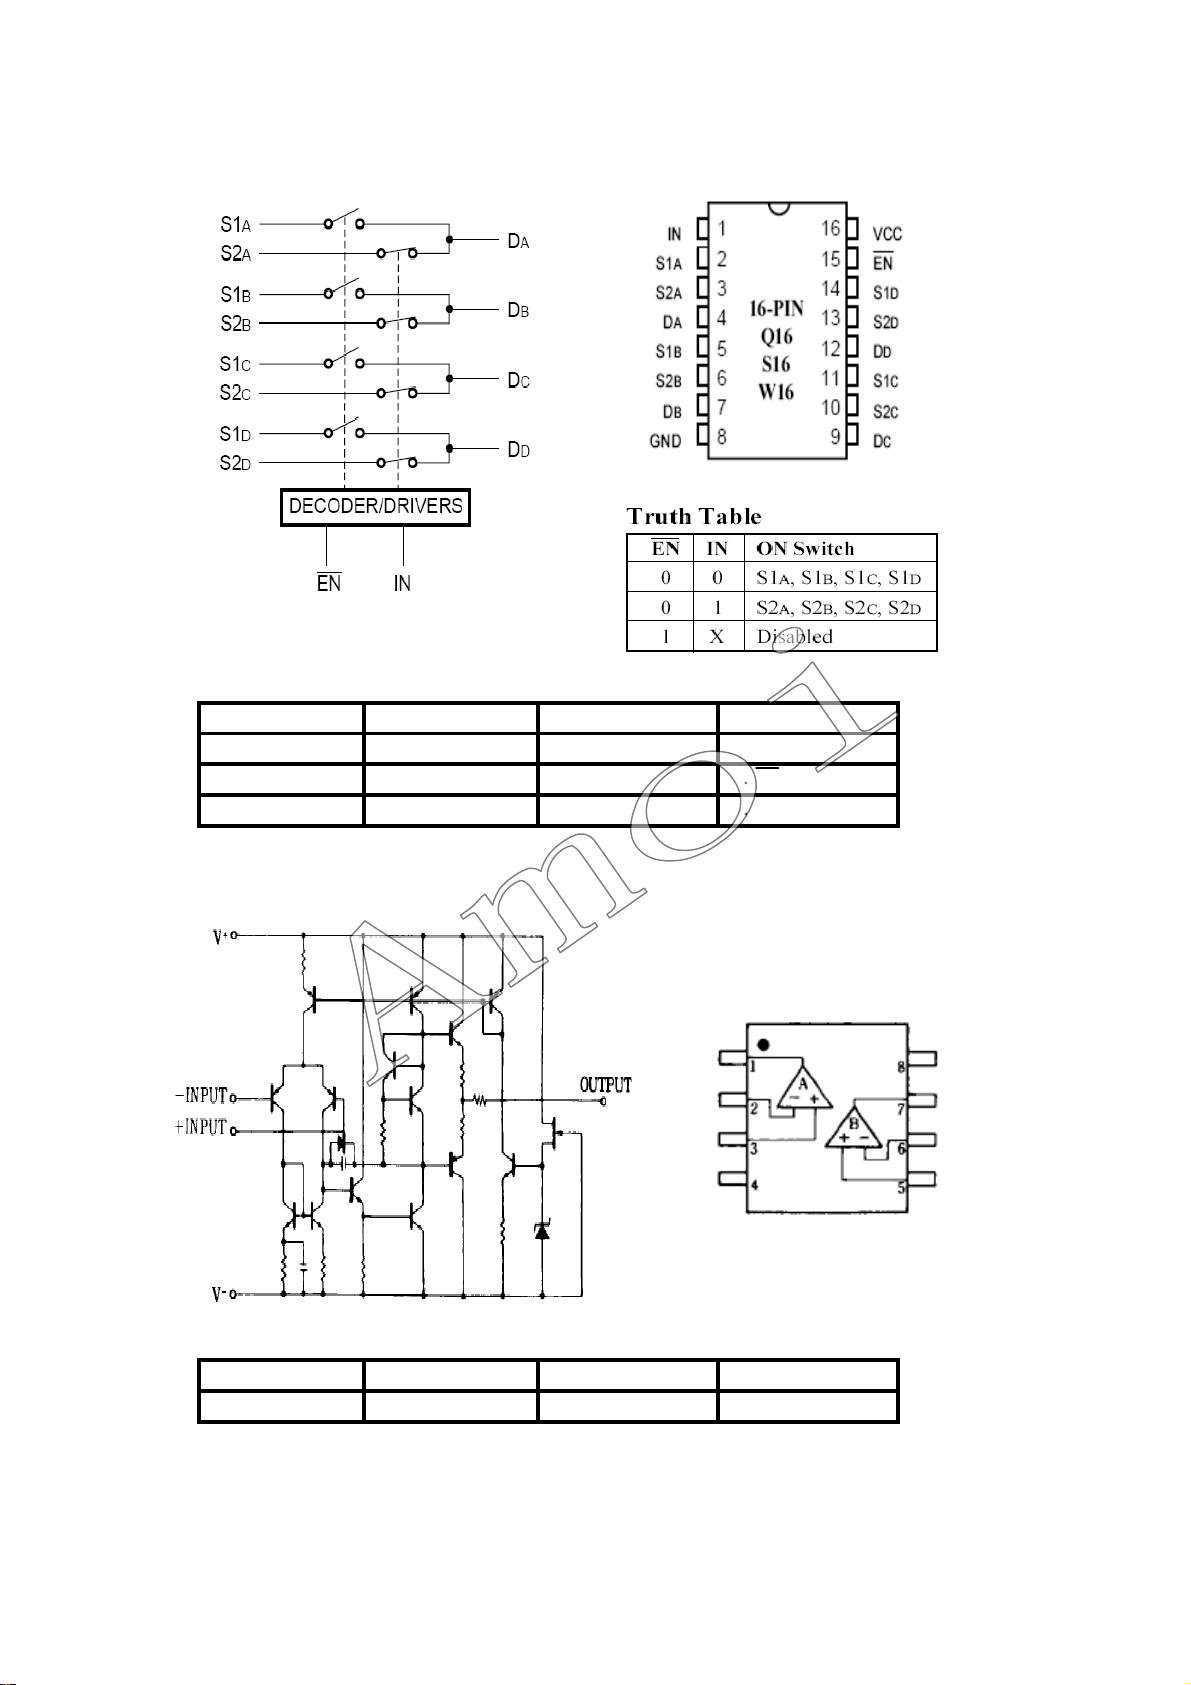
IC PI5V330Q
87
1. IN 5. S1B 9. DC 13. S2D
2. S1A 6. S2B 10. S2C 14. S1D
3. S2A 7. DB 11. S1C 15. EN
A 8. GND 12. DD 16. VCC
4. D
IC NJM4558
1. A OUTPUT 3. A+INPUT 5. B+INPUT 7. B OUTPUT
2. A-INPUT 4. V- 6. B-INPUT 8. V+
Page 90
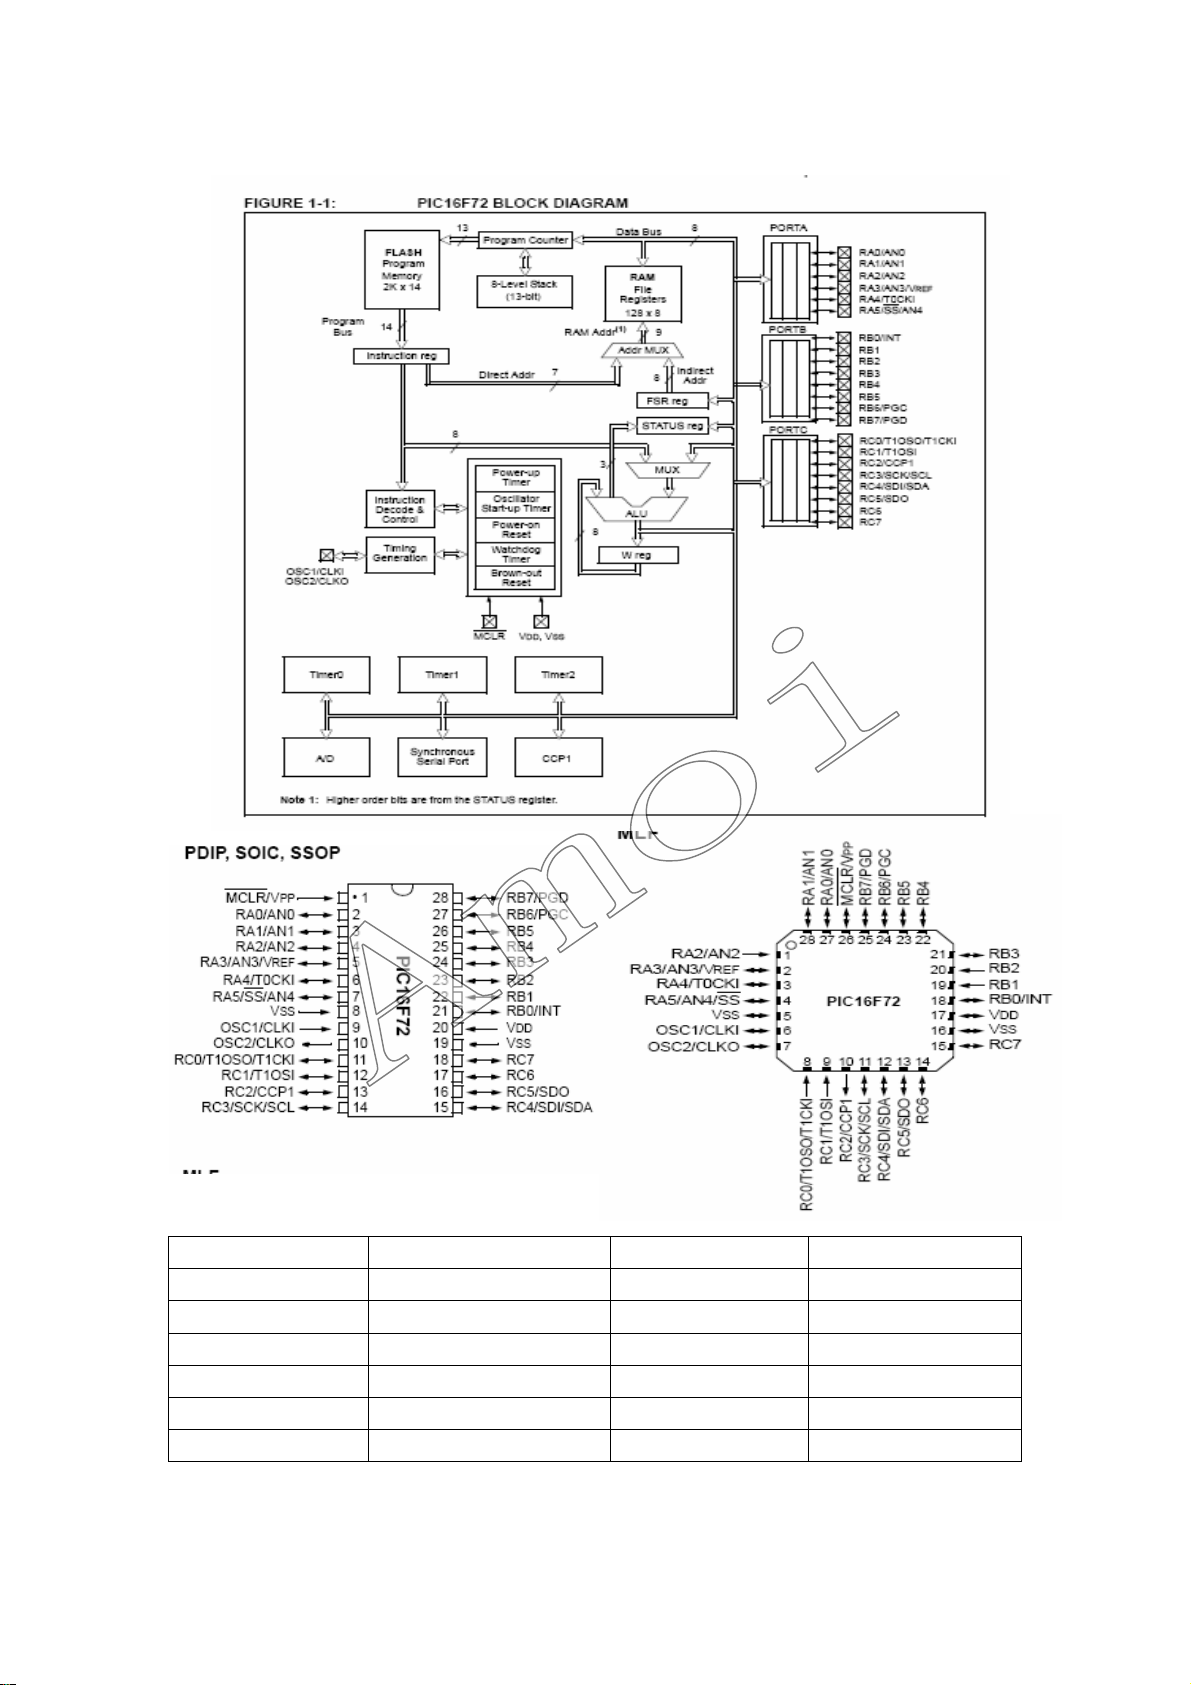
IC PIC16F72
88
1. MCLR/VPP1 8. VSS 15. RC4/SDI/SDA 22. RB1
2. RA0/AN0 9. OSC1/CLK1 16. RC5/SDO 23. RB2
3. RA1/AN1 10. OSC2/CLKO 17. RC6 24. RB3
4. RA2/AN2 11. RC0/T1OSO/T1CK1 18. RC7 25. RB4
5. RA3/AN3/VREF 12. RC1/T1OS1 19. VSS 2 6. RB5
6. RA4/T0CK1 13. RC2/CCP1 20 . VDD 27. RB6/PGC
7. RA5/SS/AN4 14. RC3/SCK/SCL 21. RB0/INT 28. RB7/PGD
Page 91
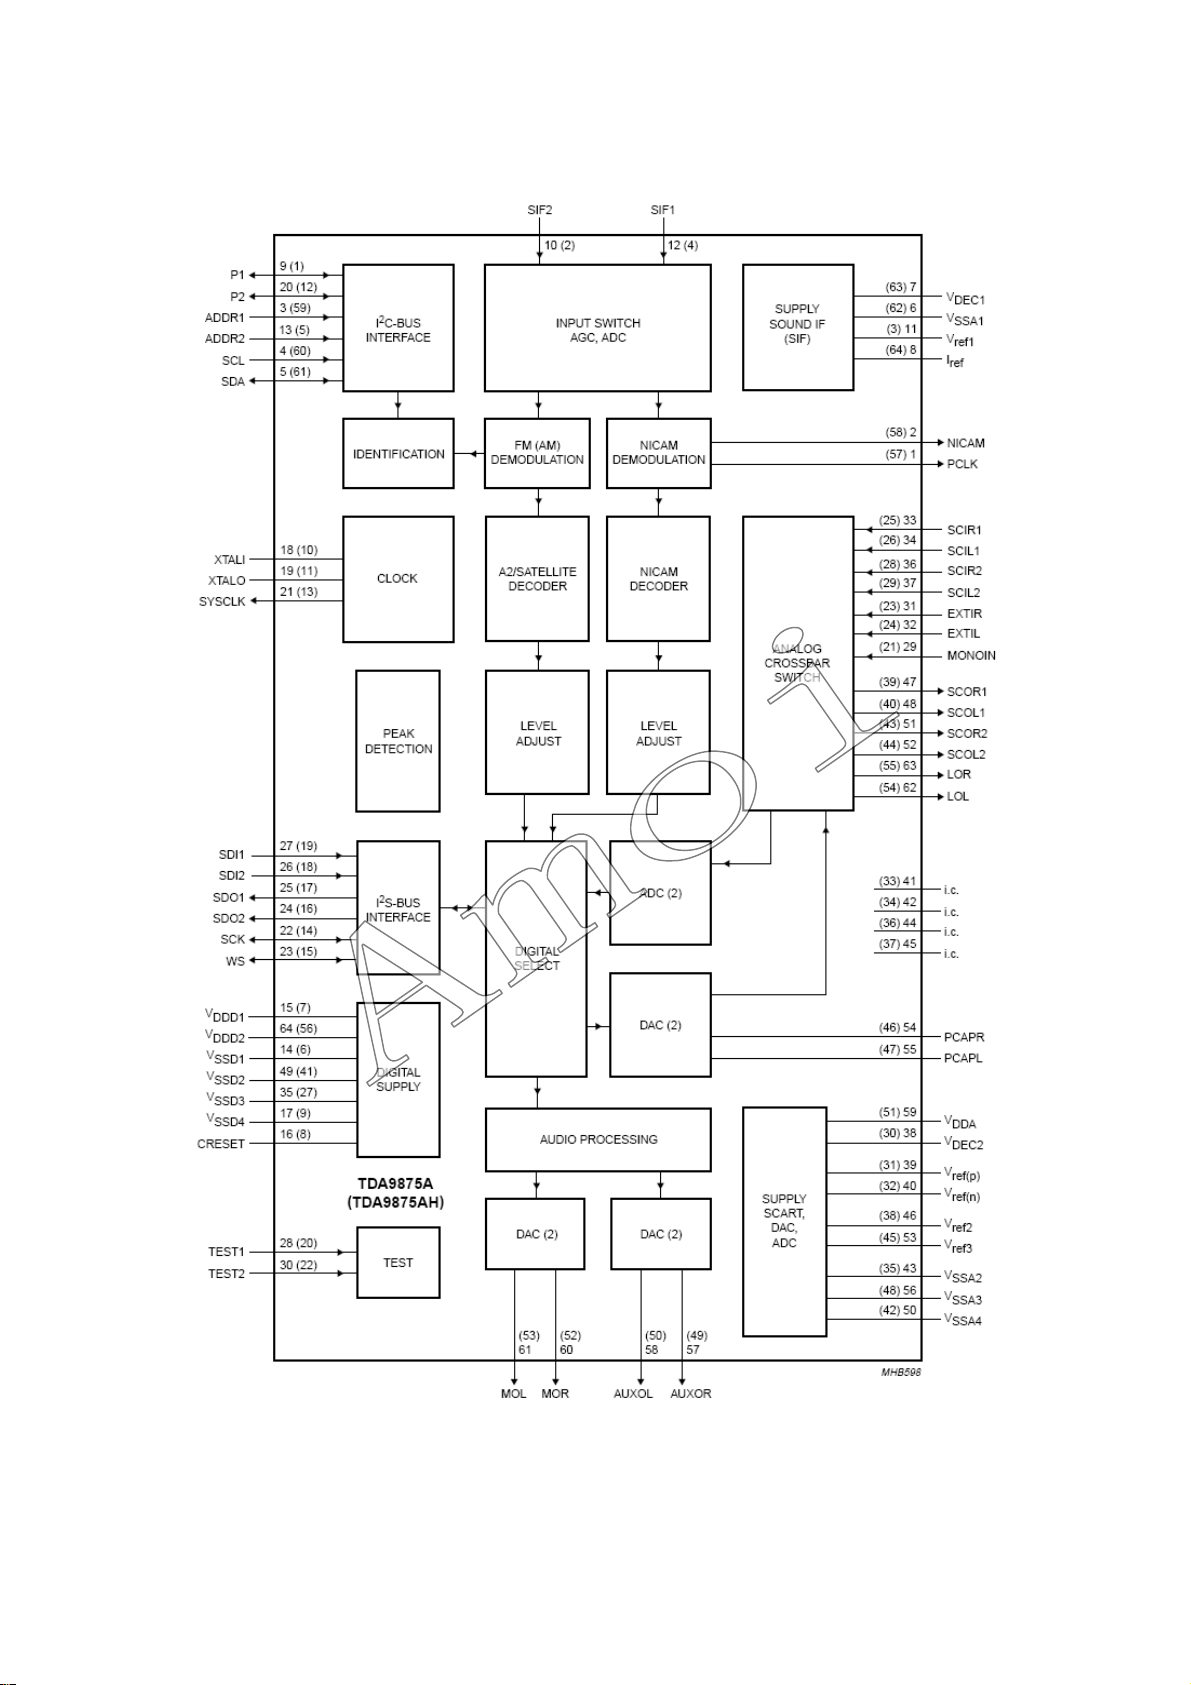
IC TDA9875
89
Page 92
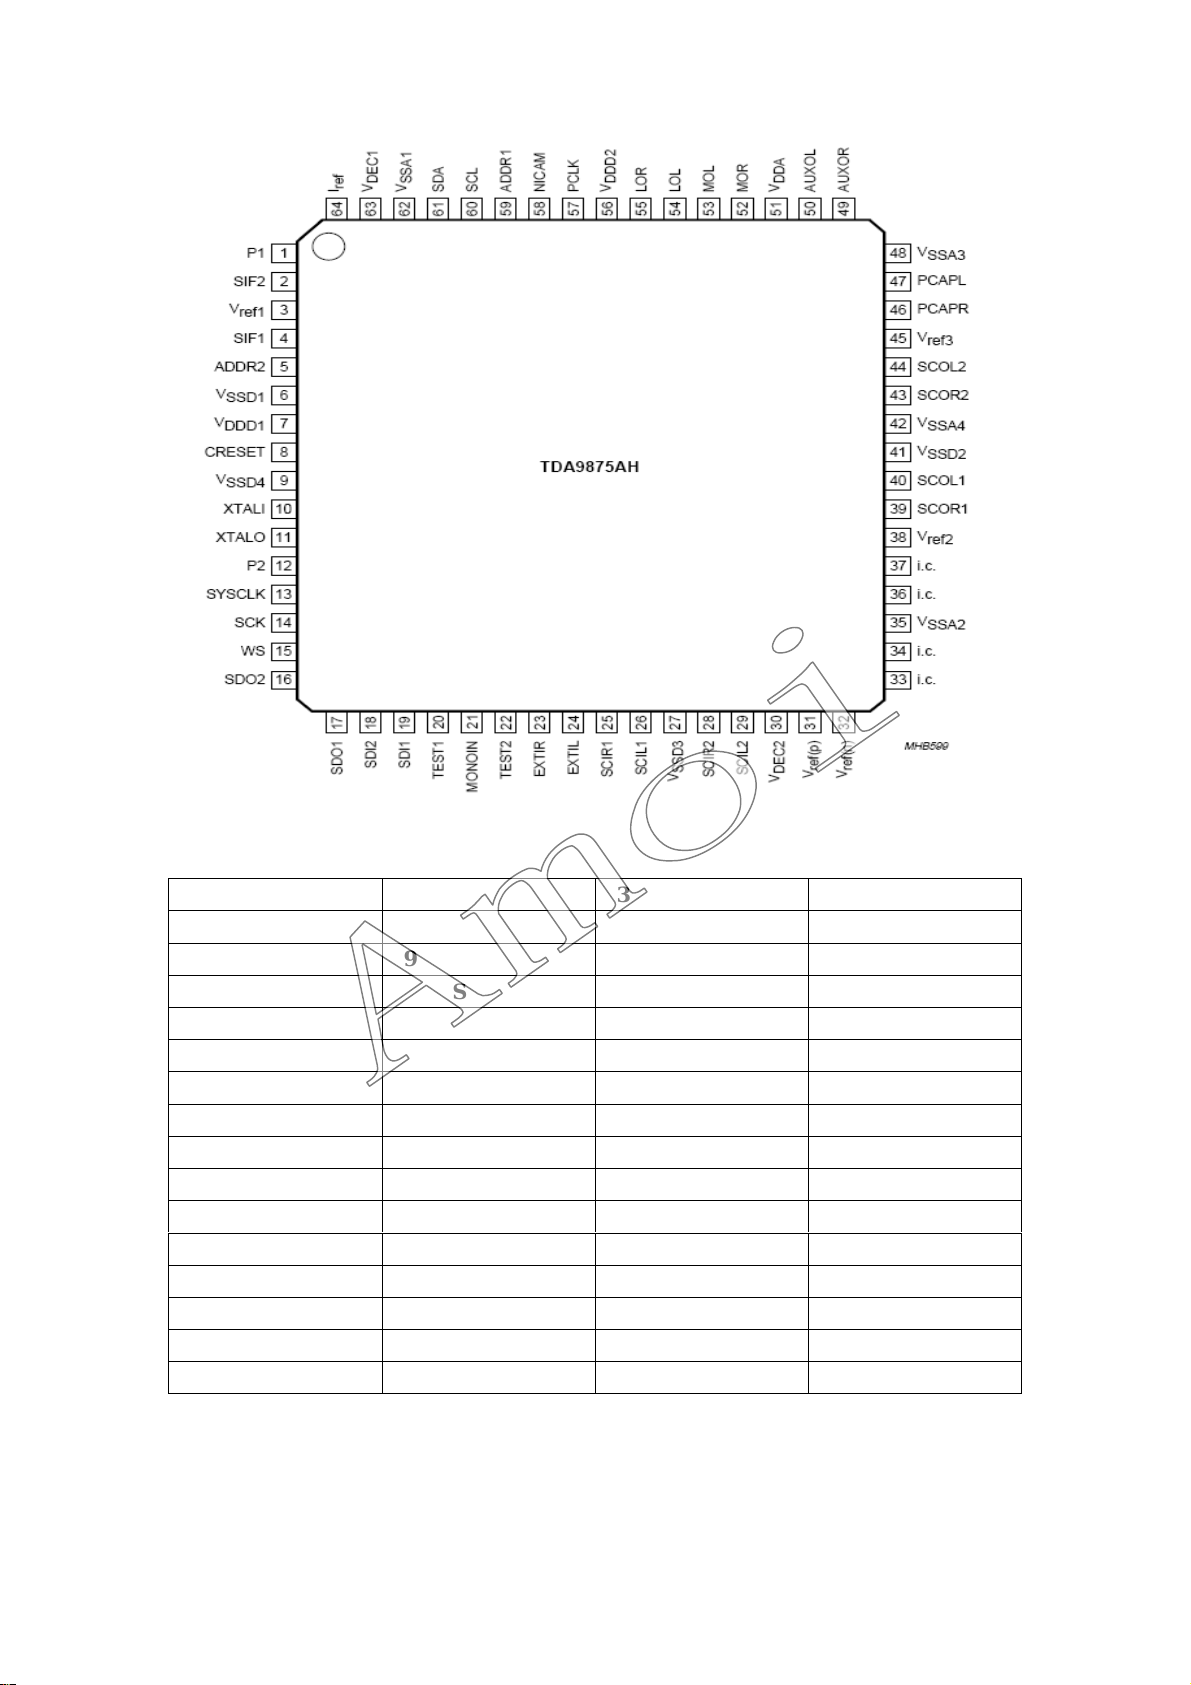
90
1. P1 17. SDO1 33. i.c. 49. AUXOR
2. SIF2 18. SD12 34. i.c. 50. AUXOL
3. V ref1 19. SD11 35. VSSA2 51. VDDA
4. SIF1 20. TEST1 36. i.c. 52. MOR
5. ADDR2 21. MONOIN 37. i.c. 53. MOL
6. VSSD1 22. TEST2 38. V r ef2 54. LOL
7. VDDD1 23. EXTIR 39. SCOR1 55. LOR
8. CRESET 24. EXTIL 40. SCOL1 56. VDD2
9. VSSD4 25. SCIR1 41. VSSD2 57. PCLK
10. XTAL1 26. SCIL1 42. VSSA4 58. NICAM
11. XTAL0 27. VSSD3 43. SCOR2 59. ADDR1
12. P2 28. SCIR2 44. SCOL2 60. SCL
13. SYSCLK 29. SCIL2 45. Vref3 61. SDA
14. SCK 30. VDEC2 46. PCAPR 62. VSSA1
15. WS 31. Vref(p) 47. PCAPL 63. VDEC1
16. SDO2 32. Vref(n) 48. VSSA3 64. Iref
Page 93
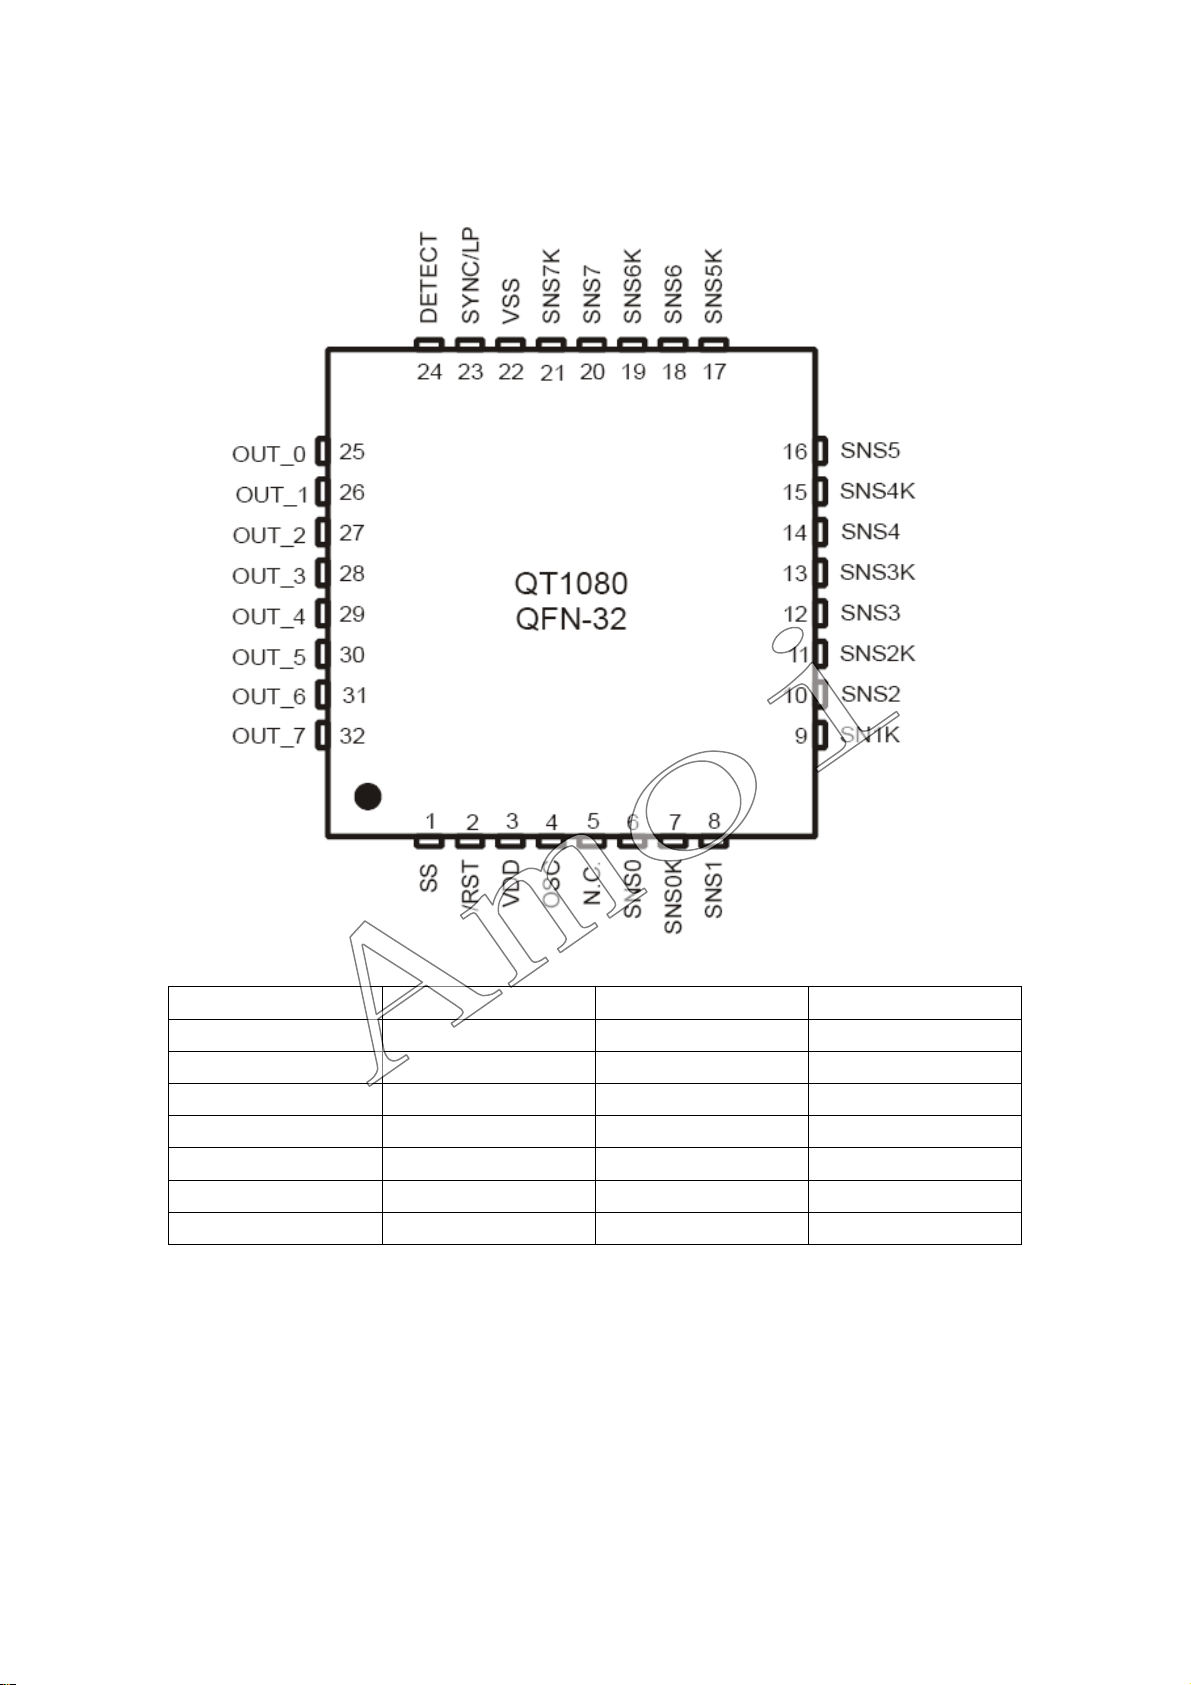
QT1080-1
91
1. SS 9. SN1K 17. SNS5K 25. OUT_0
2. /RST 10. SNS2 18. SNS6 26. OUT_1
3. VDD 11 . SNS2K 19. SNS6K 27. OUT_2
4. OSC 12. SNS3 20. SNS7 28. OUT_3
5. N.C. 13. SNS3K 21. SNS7K 29. OUT_4
6. SNS0 14. SNS4 22. VSS 30. OUT_5
7. SNS0K 15. SNS4K 23. SYNC/LP 31. OUT_6
8. SNS1 16. SNS5 24. DETECT 32. OUT_7
Page 94
92
www.fairchildsemi.com
ML4800
Power Factor Correction and PWM Controller
Combo
Features
• Internally synchronized leading-edge PFC and trailingedge PWM in one IC
• TriFault Detect™ for UL1950 compliance and enhanced
safety
• Slew rate enhanced transconductance error amplifier for
ultra-fast PFC response
• Low power: 200µA startup current, 5.5mA operating
current
• Low total harmonic distortion, high PF
• Reduced ripple current in storage capacitor between PFC
and PWM sections
• Average current, continuous boost leading edge PFC
• PWM configurable for current-mode or voltage mode
operation
• Current fed gain modulator for improved noise immunity
• Overvoltage and brown-out protection, UVLO, and soft
start
Block Diagram
15
2
4
3
7
8
V
FB
2.5V
I
AC
V
RMS
I
SENSE
RAMP 1
RAMP 2
VEAO
VEA
+
MODULATOR
16
GAIN
1.6kΩ
IEA
+
-
1.6kΩ
IEAO
1
POWER FACTOR CORRECTOR
0.5V
+
-
+
-
OSCILLATOR
General Description
The ML4800 is a controller for power factor corrected,
switched mode power supplies. Power Factor Correction
(PFC) allows the use of smaller, lower cost bulk capacitors,
reduces power line loading and stress on the switching FETs,
and results in a power supply that fully complies with
IEC1000-3-2 specification. Intended as a BiCMOS version
of the industry-standard ML4824, the ML4800 includes
circuits for the implementation of leading edge, average
current, “boost” type power factor correction and a trailing
edge, pulse width modulator (PWM). It also includes a
TriFault Detect™ function to help ensure that no unsafe
conditions will result from single component failure in the
PFC. Gate-drivers with 1A capabilities minimize the need
for external driver circuits. Low power requirements improve
efficiency and reduce component costs.
An over-voltage comparator shuts down the PFC section in
the event of a sudden decrease in load. The PFC section also
includes peak current limiting and input voltage brownout
protection. The PWM section can be operated in current or
voltage mode, at up to 250kHz, and includes an accurate
50% duty cycle limit to prevent transformer saturation.
13
V
TRI-FAULT
DUTY CYCLE
LIMIT
2.75V
-1V
OVP
+
+
PFC I
V
CC
17V
-
SRQ
-
LIMIT
Q
SRQ
Q
7.5V
REFERENCE
CC
V
PFC OUT
REF
14
12
V
DC
6
V
CC
SS
5
DC I
LIMIT
9
25µA
1.25V
V
REF
-
+
+
V
FB
2.45V
PULSE WIDTH MODULATOR
-
+
VIN OK
1.0V
+
DC I
LIMIT
V
CC
SRQ
UVLO
PWM OUT
11
Q
REV. 1.0.5 9/25/01
Page 95
93
2
ML4800 PRODUCT SPECIFICATION
Pin Configuration
ML4800
16-Pin PDIP (P16)
16-Pin Narrow SOIC (S16N)
1
IEAO
2
I
AC
V
RMS
SS
V
DC
3
4
5
6
7
8
TOP VIEW
I
SENSE
RAMP 1
RAMP 2
Pin Description
Pin Name Function
1 IEAO Slew rate enhanced PFC transconductance error amplifier output
2I
3I
4V
AC
SENSE
RMS
5 SS Connection point for the PWM soft start capacitor
6V
DC
7 RAMP 1 Oscillator timing node; timing set by R
8 RAMP 2 When in current mode, this pin functions as the current sense input; when in voltage mode,
9 DC I
LIMIT
10 GND Ground
11 PWM OUT PWM driver output
12 PFC OUT PFC driver output
13 V
14 V
15 V
CC
REF
FB
16 VEAO PFC transconductance voltage error amplifier output
PFC AC line reference input to Gain Modulator
Current sense input to the PFC Gain Modulator
PFC Gain Modulator RMS line voltage compensation input
PWM voltage feedback input
it is the PWM modulation ramp input.
PWM cycle-by-cycle current limit comparator input
Positive supply
Buffered output for the internal 7.5V reference
PFC transconductance voltage error amplifier input
16
15
14
13
12
11
10
9
C
T
T
VEAO
V
FB
V
REF
V
CC
PFC OUT
PWM OUT
GND
DC I
LIMIT
REV. 1.0.5 9/25/01
Page 96
FS7M0880
94
Fairchild Pow er Switch(FPS)
www.fairchildsemi.com
Features
• Precision Fixed Operating Frequency
• FS7M0880(66kHz)
• Pulse By Pulse Over Current Limiting
• Over Load Protection
• Over Voltage Protection (Min. 25V)
• Internal Thermal Shutdown Function
• Under Voltage Lockout
• Internal High Voltage Sense FET
• Latch Up Mode
•Soft Start
Internal Block Diagram
Description
The Fairchild Power Switch(FPS) product family is specially
designed for an off line SMPS with minimal external
components. The Fairchild Power Switch(FPS) consists of a
high voltage power SenseFET and the current mode PWM controller IC. The PWM controller includes an integrated fixed
oscillator, the under voltage lock out, the leading edge blanking
block, the optimized gate turn-on/turn-off driver, the thermal
shut down protection, the over voltage protection, the temperature compensated precision current sources for loop compensation and an fault protection circuit. Compared to just PWM
controller combined MosFET or R
tion, a Fairchild Power Switch(FPS) can reduce total component price, design size, and weight,also simultaneously increase
efficiency, productivity, and system reliability. It has a s imple
method of application well suited for cost down design in either
a flyback converter or a forward converter .
TO-3P-5L
1
1. DRAIN 2. GND 3. V
4. FB 5. S/S
CC
switching converter solu-
CC
#3 Vcc
#3 Vcc
Voltage
Good
Good
Logic
Logic
S
S
R
R
Voltage
Ref.
Ref.
Q
Q
Control IC
Control IC
Sense
Sense
SenseFET
SenseFET
#4
#4
Drain
Drain
#2
#2
Source
Source
GND
GND
UVLO
UVLO
Vcc Vcc
#4
#4
Feedback
Feedback
#5
#5
Soft Start
Soft Start
Vcc Vcc
5V
5V
Reset
Reset
1mA5uA
1mA5uA
7.5V
7.5V
2.5R
2.5R
R
R
OSC
OSC
Voffset
Voffset
Rsense
Rsense
Vck
Vck
Thermal
Thermal
Protection
Protection
OVP
OVP
OCL
OCL
S
S
R
R
LEB
LEB
Q
Q
Reset
Reset
Rev.1.0.1
©2003 Fairchild Semiconductor Corporation
Page 97
FSD20x-SERIES
95
FSD200, FSD201
Fairchild Pow er Switch(FPS)
www.fairchildsemi.com
Features
• Single Chip 700V SenseFET Power Switch
• Precision Fixed Operating Frequency (134kHz)
• Internal Start-up Switch
• UVLO with Hysteresis (6V/7V)
• Over Load Protection
• Over Current Protection
• Internal Thermal Shutdown Function (Hysteresis)
• Secondary Side Regulation
• Auto-Restart Mode
• Frequency Modulation for EMI
• No Bias Winding
Applications
• Charger & Adaptor for Mobile Phone, PDA & MP3
• Auxiliary Power for PC, C-TV & Monitor
Internal Block Diagram
Description
The FSD20x is specially designed for an off-line SMPS with
minimal external components. The FSD20x is a monolithic
high voltage power switching regulator that combine the
SenseFET(LDMOS) with voltage mode PWM control block.
Included PWM controller features integrated fixed oscillator
with frequency scaling, under voltage lock out, leading edge
blanking, optimized gate turn-on/turn-off driver, thermal shut
down protection and temperature compensated precision
current sources for loop compensation and fault protection
circuitry. Compared to discrete MOSFET and controller or
RCC
switching converter solution, a FSD20x can reduce total
component count, design size, weight and at the same time
increase efficiency, productivity, and system reliability. It has a
basic platform well suited for cost effective design in a flyback
converter.
7-DIP
1.2.3.GND 4.Vfb 5.Vcc 7.Drain 8.Vstr
7-SMD
Preliminary Specification
Vstr
8
Bias
/ 8
HV/REG
ON/
OFF
DRIVER
S
Q
R
LEB
Iover
S
Q
R
Vth
Rsense
1, 2, 3
SFET
7
GND
Drain
Vcc
5
OLP
TSD
His 50
Voltage
Ref.
OSC
℃
Vfb
7V
5uA 250uA
4
Reset
Frequency
Scaling
UVLO
S/S
3mS
Internal
Vck
Rev.0.9.1
©2002 Fairchild Semiconductor Corporation
Page 98
FSD20X-SERIES
96
Absolute Maximum Ratings
(Ta=25°C unless otherwise specified)
Parameter Symbol Value Unit
Maximum Drain Voltage V
Maximum Vstr Pin Voltage V
Continuous Drain Current (T
Continuous Drain Current (TC=25°C) I
Maximum Supply Voltage V
Input Voltage Range V
Operating Ambient Temperature T
Storage Temperature Range T
=25°C) I
C
D,MAX
str,max
FSD200 0.5 A
D,
FSD201 1.0 A
D,
CC,MAX
FB
A
STG
700 V
700 V
20 V
−0.3 to V
−25 to +85 °C
−55 to +150 °C
start
PIN Definitions
Pin Number Pin Name Pin Function Description
1, 2, 3 GND These pins are the control ground and the SenseFET Source.
This pin is the inverting input of the PWM comparator, and it operates
normally between 0.5V and 2.5V. It has a 0.25mA current source connected
internally and a capacitor and opto coupler connected externally. A
4Vfb
5Vcc
7Drain
8Vstr
feedback voltage of 3V to 4V triggers overload protection (OLP). There is a
time delay due to the 5uA current source, which prevents false triggering
under transient conditions but still allows the protection mechanism to
operate under true overload conditions.
This is the positive supply voltage input. During operating, power is supplied
from pin1, Vstr and the voltage is regulated by internal HV/reg (7V shunt
regulator). The Auxiliary transformer winding is not needed.
This pin is designed to directly drive the converter transformer and is
capable of switching a maximum of 700V.
This pin connects directly to the rectified AC line voltage source. At start up
the internal switch supplies internal bias and charges an external capacitor
that connects from the Vcc pin to ground. once V
operates, and Trferal HV/REG regulates 7V of V
reaches 7V, then FPS
CC
.
CC
DC
DC
V
Preliminary Specification
2
Page 99
8、Software version view and Upgrade
97
instruction
Software version view
Power on the TV normally, hold the “SOURCE” key for about 10s, then
“Software version, Publish Date and MCU version” info. will display on
the screen.
Software upgrade method
Ⅰ、Power off the power, you can find the software upgrade port beside
the VGA port in the TV back cover (see picture 1).
Software
upgrade port
Picture 1: Software upgrade port
Ⅱ、Connect the computer COM port to the TV upgrade port with upgrade cable,
as the pictures below. If the computer has several COM ports, usually
they will be marked as 1, 2, 3, etc, choose one (suggest to use COM1);
if there is only one COM port, then it is COM1.
*Note: Please upgrade the software by the PC with COM output, if your
PC is Notebook PC, please upgrade before changing PCMCIA into COM port.
Page 100

98
Picture 2. Upgrade cable
Picture 3. COM port of the PC
 Loading...