

Page 1

1
Thank you very much for choosing Amoi CS6 , the fashionable and
elegant color screen mobile phone. The CS6 is perfect integration of
unparalleled contemporary design and consummate craftsmanship,
bringing you easy communication and entertainment, as well as
highlighting your tastes.
Key features:
• SMS+MMS
• Radio
• Calculator
• Countdown
• Notebook
• Internet access and surf
• Color bar alarm function
• 40-polyphonic ring tone
• Schedule and Person Info
• Various screen saver images
• PC Sync
• Voice memo
• 3 Alarm clocks
• Intelligent speed dial
• Vivid standby theme
• Games, music player
• Phonebook memory of 200 entries
• Speaking Clock
Page 2

2
Specifications:
• GSM 900/1800MHz
• HR, FR and EFR voice codec
• Music ringing/Vibrating
• GPRS class 10, WAP 2.0
• Size: 91.5 x44x20.2mm
•
Weight: 82 g with slim batter
Page 3

3
The manufacturer may, at any time and without notice, make changes or
improvements to the products offered, but provide necessary corrigendum with this
manual or release new version of this manual for the following lot. Th e Amoi logo
and trademark are the property of the manufacturer. January 2004
TABLE OF CONTENTS
Safety precautions………………………………………….7
Unpacking…………………………………………………….9
Your Phone…………………………………………………10
Phone Layout ………………………………………………..10
Keys Description……………………………………………12
Display………………………………………………………13
Getting Started…………………………………………….14
Installing a SIM Card………………………………………14
Charging a Battery…………………………….……….…..16
Switching the Phone On/Off………………………………..20
Your Phones Modes ………………………….……………...21
Call Function………………………………………………22
Making Calls ……………………………………………......22
Receiving Call……………….………………….……….....23
Missed Calls………………….………………….....….24
Call Menu…..………………….……………………....... 25
Conference Call……………………………………………..27
Using Menus………………………………………….........28
Select functions of options ……………………………….....28
Speaking Clock......................................................……….....31
Phonebook……………………………………………….....31
Page 4

4
Storing a Phone Number in PB……………………………...31
PB Menu…………………………………………………….32
PHBook Manager………………………………………….34
Info………………………………………………………......35
SMS.…………………...…………………………….36
Inbox.…..………………………………….………………...37
Outbox………………………………………………………39
Write SMS….……………………………….……....39
Delete……………………………………….…………….....40
Memory………………………………………… .……....41
Set……………………………………………………41
Broadcast………….………………………………………...43
Voice Mail…………………………………………………...44
Models..……...……………………………….…………..…44
MMS………………………………………………………..44
New………………….............................................................44
Inbox……………….........................................................…..45
Outbox...…………….............................................................46
Drafts…………………..........................................................46
Sent………………….............................................................46
Templates……………............................................................46
Memory…………………………………………………....47
Settings……………..........................................................….47
Entering Text……………………………………………….48
Changing Text Input Mode………………………………...49
Using User’s Dictionary ……………………………………. 50
Insert Symbol..…………………………………….……...51
Page 5

5
eZi English Mode……………………………….………...52
Abc Mode……………………………….……...….…......52
123 Mode………… ..…………………………….…...53
List of Menu Functions ...................................... ..................54
Fun………..............………………………………...…. 64
FM Tuner………………..………………………….………64
Karaoke…….……………………………………...…...…...65
Games…….…….......…………………….………………....66
Internet/WAP..…………………………...…………….….67
Personality…………...………………………..…………70
Display........................................................................... 70
Sound........................................................................71
Settings……………………………………………………...72
Clock………………………………………………………73
Mobile……………………………………………………..74
Call…………………………………………………………75
Network……………………………………………………78
Security ………………………………………………… 79
Toolbox…...………………………………………………....82
Voice Memo……………………………………………….82
PC Sync……….…….……………………………………....84
Calculator……………….……………………………….......85
World Time………………………………………………….86
Countdown……………………………………………….86
Multimedia File………………………………………..……86
Private…………………………………………........………87
Call Lists............................................….......….....................87
Page 6

6
Calendar..................................................................................88
Notes.......................................................................................91
Reference Information…………………………………..91
Access Code…………………………………………………91
Using The Batteries ………………………………………… 93
Care And Maintenance……………………………………95
Glossary…………………………………………………97
Troubleshooting
..………………………………………………101
Page 7
7
SAFETY PRECAUTIONS
Read these brief guidelines. Failure to comply with them
may be dangerous or illegal.
Road safety comes first
Do not use a hand-held mobile phone while driving;
park the vehicle first. Remember that in some countries,
it is illegal to use a mobile phone while driving.
Switch off on aircraft
Mobile phones can cause interference. Using them on
aircraft is both illegal and dangerous. (Please also close
the power-off alarm clock.)
Switch off near an explosion place
Do not use the phone near an explosion place, because it
likely disturbs the remote control of the explosion.
Switch off when refueling
Do not use the phone at a refueling point (service
station) or near fuels or chemicals.
Page 8
8
Switch off in hospital
Follow any regulations or rules. Switch phone off near
medical equipment.
Interference
All wireless phones may be subject to radio interference,
which may affect their performance.
Accessories and batteries
Use only approved accessories and batteries.
Use sensibly
Use only in the normal position (to ear). Do not touch
the antenna unnecessarily when the phone is switched
on.
Emergency Call ( SOS)
By pressing the soft key SO S you can reach an emergency
call on any network without a SIM card and without
entering a pin ( not available in all countries )
Radio frequency exposure information
These guidelines are consistent with the safety standard for human
exposure to radio frequency electromagnetic energy previously set by
both U.S. and international standards bodies. The design of this phone
complies with the FCC guidelines and these international standards.
To maintain compliance with FCC RF exposure guidelines, if you
wear a handset on your body, use the supplied or approved carrying
case, holster, or other body-worn accessory.
Page 9
9
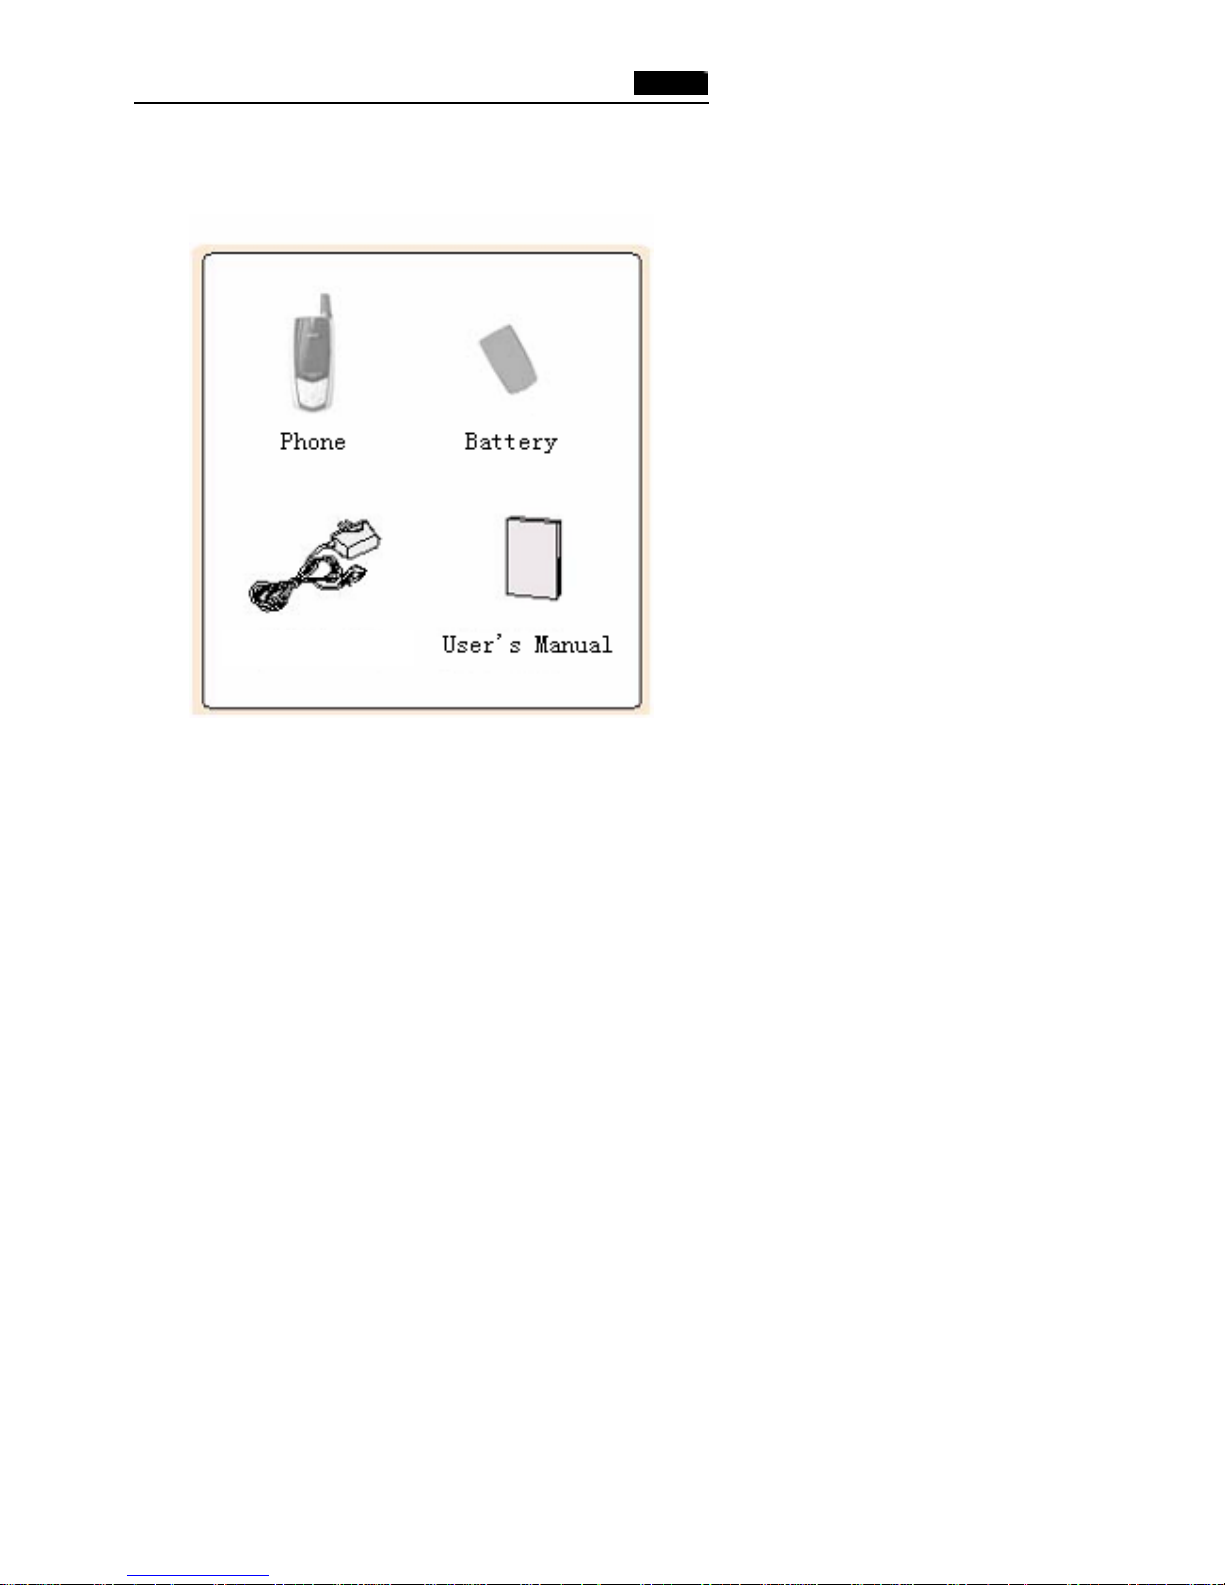
UNPACKING
You package contains the following items.
In addition, you can buy the following accessories for your phone
from your local dealer:
• Standard, slim batteries
• Data kit
• Desktop charger
• Earphone
• Leather case
Travel Charger
Page 10
10
YOUR PHONE
Phone Layout
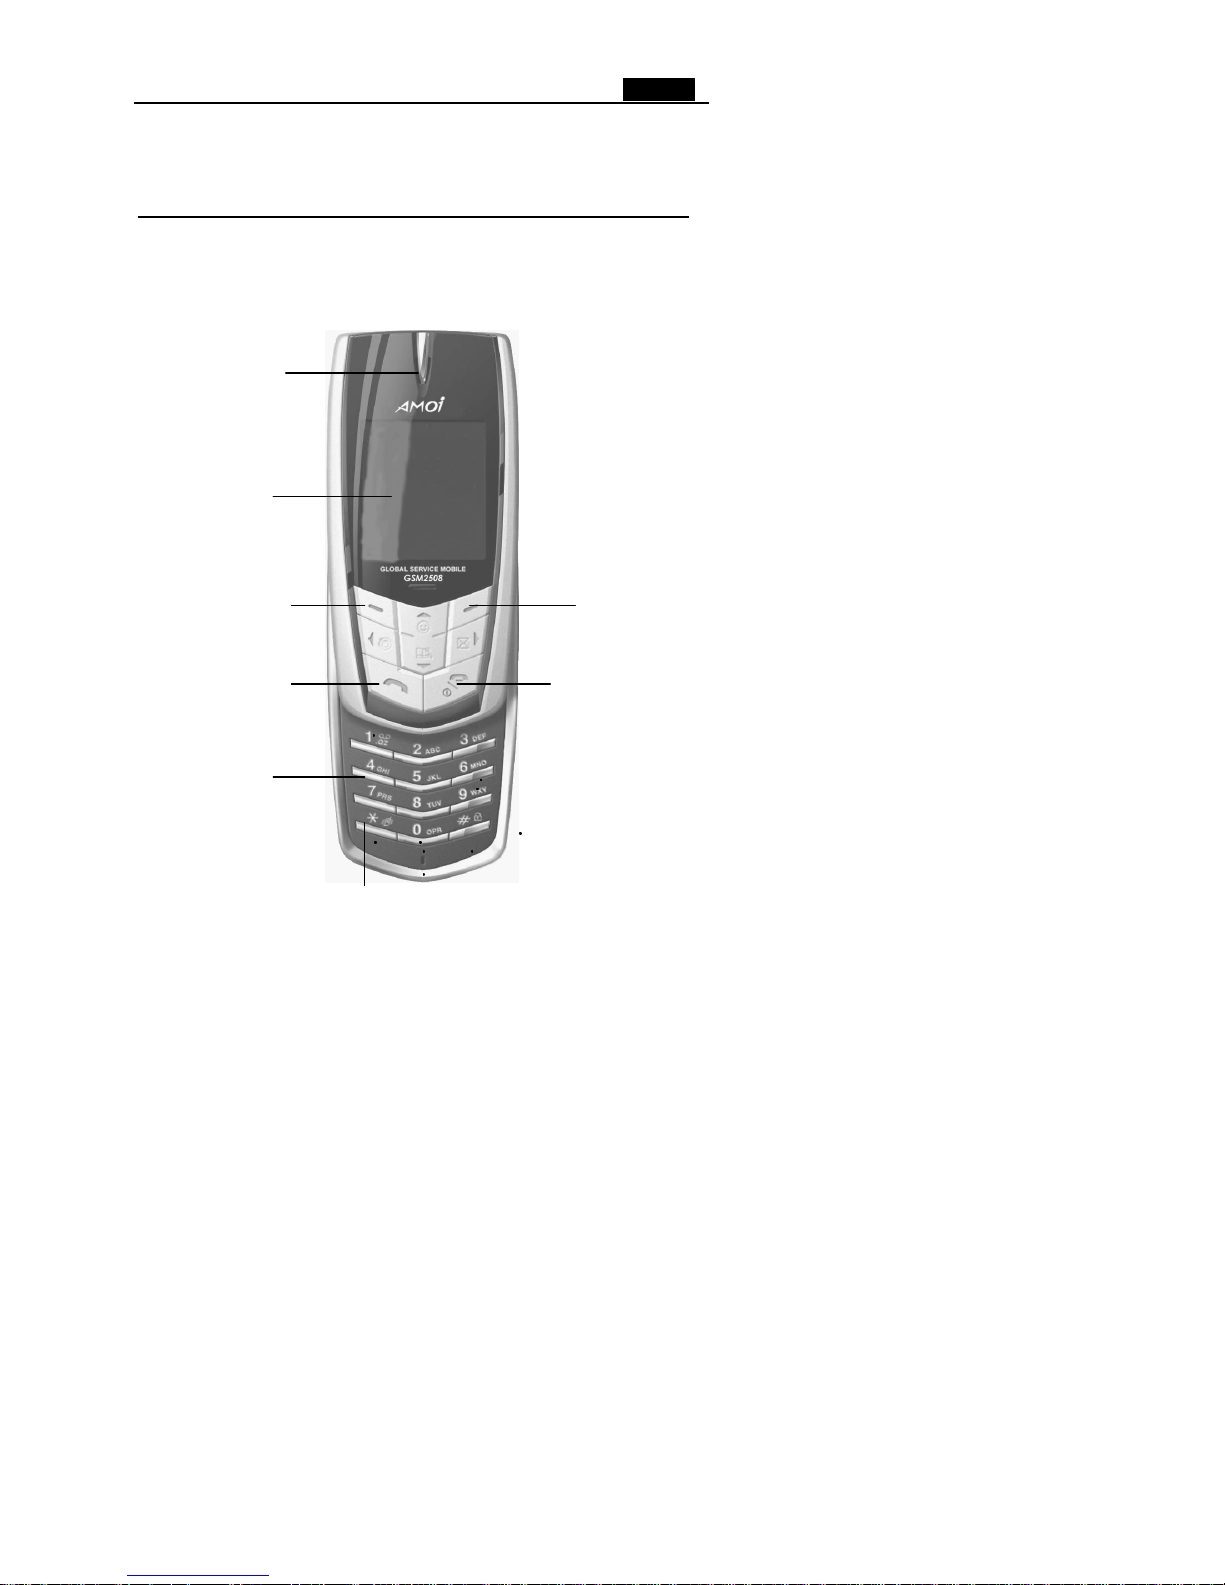
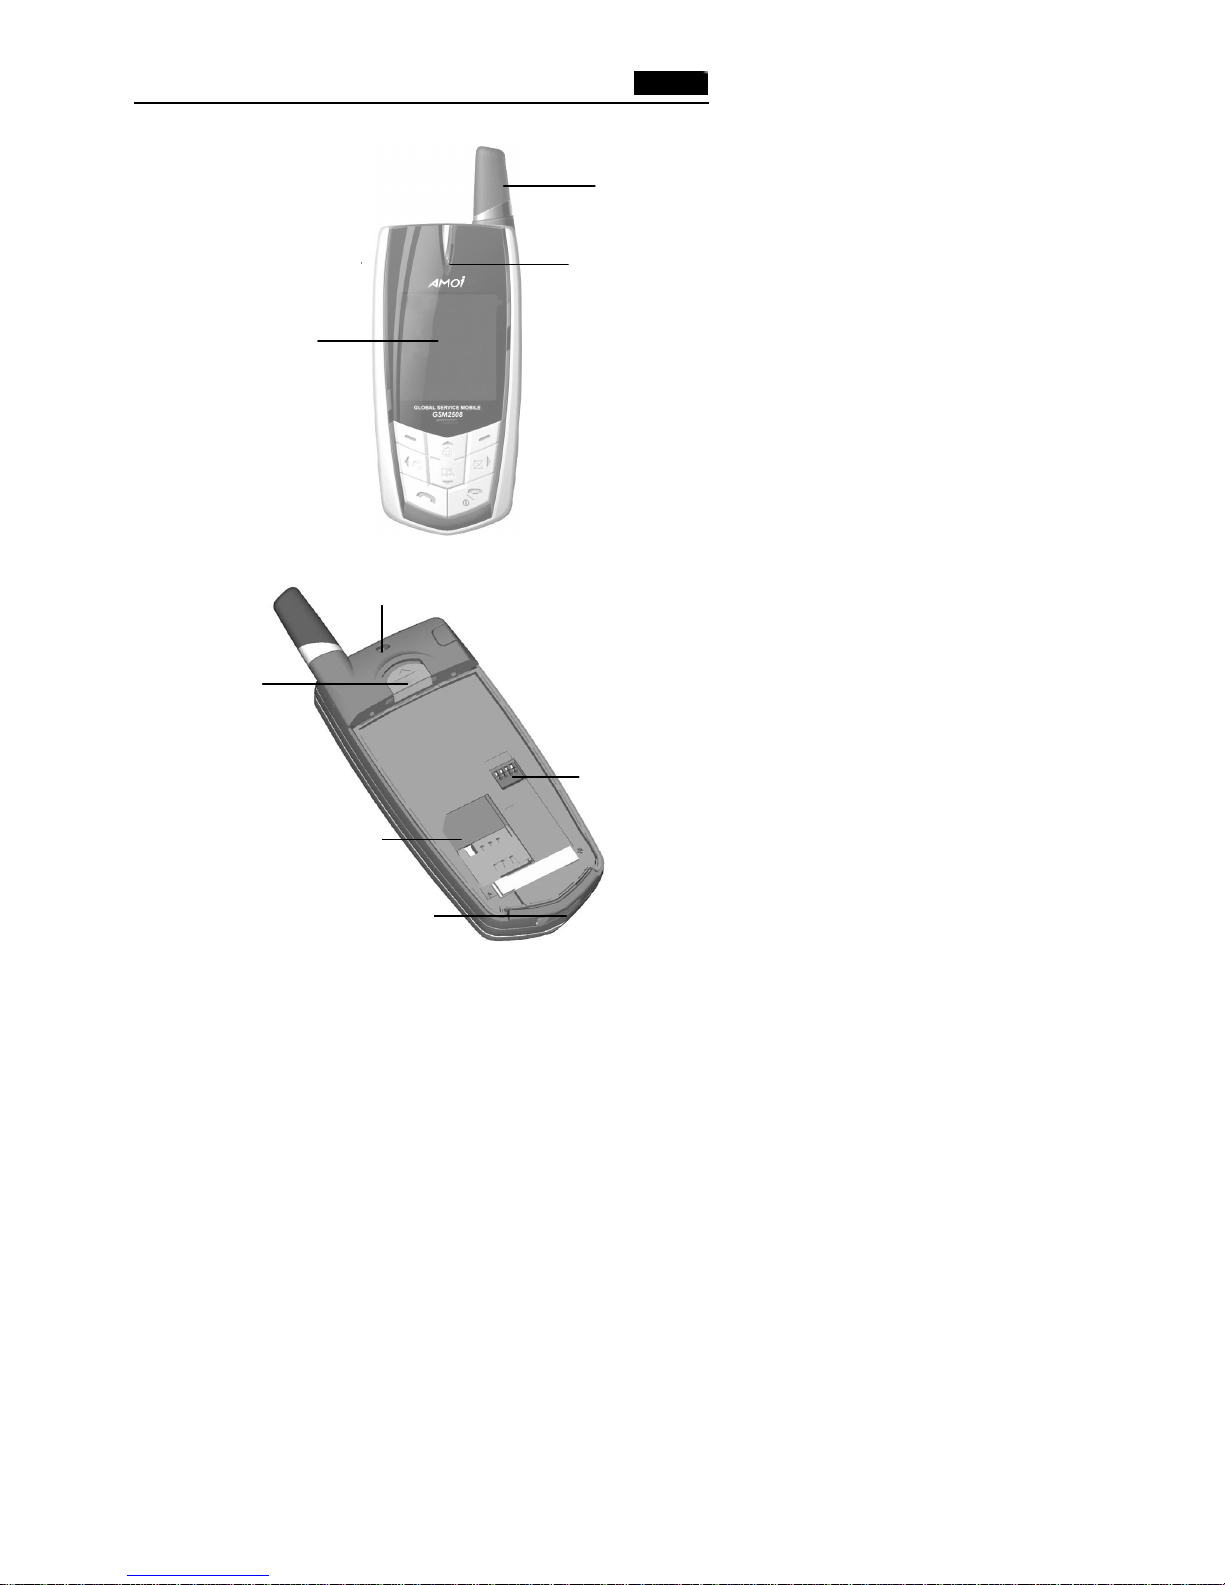
The following illustrations show the main elements of your phone.
Open View
Earpiece
Display
Left Soft Key
Right Soft Key
Power On/Off Key
Send Key
Alphanumeric Key
Special Function Key
Page 11
11
Closed View
Rear view
Antenna
External Display
Earpiece
Hand S
trap Hole
Battery Lock
Battery Terminals
Metal Lock
Cable Connector Slot
Page 12
12
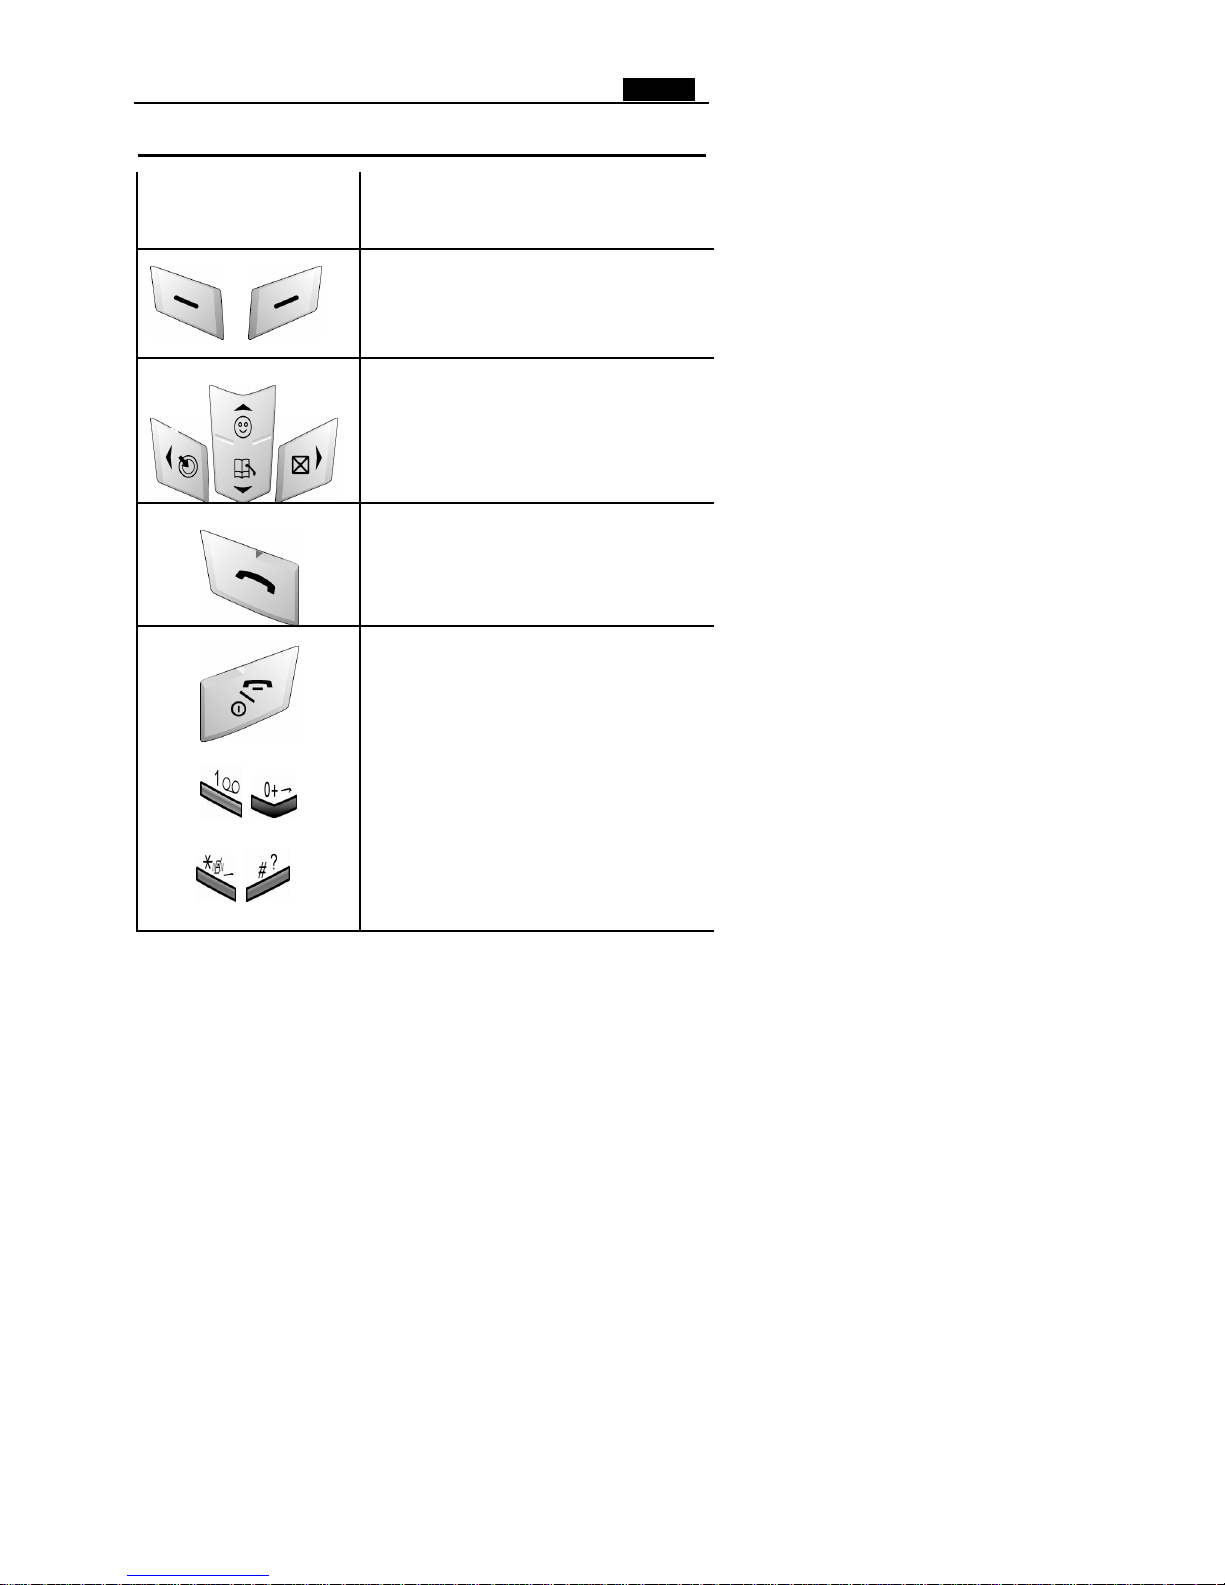
Keys Description
Key
Description
Two soft keys perform the functions indicated by
the text above them (in the bottom line of the
display).
Navigation Keys: Scroll through the menus;
In Standby mode, the ‚ key to view the call
records , the ƒ key to enter Amusement Menu
and the „ key to use SMS (Short Message
Service) feature . Press • key to give the current
time ;press and hold • key to use Internet
feature.
Send key: Makes or answers a call.
In Standby mode, recalls the last number dialed.
Power On/Off key: Hold it to switch on/off the
phone; End a call;In the menu facility, returns to
the Standby mode and cancels your input.
Enter numbers, letters and some special
characters.
Use these keys for various special functions.
Page 13
13
Display
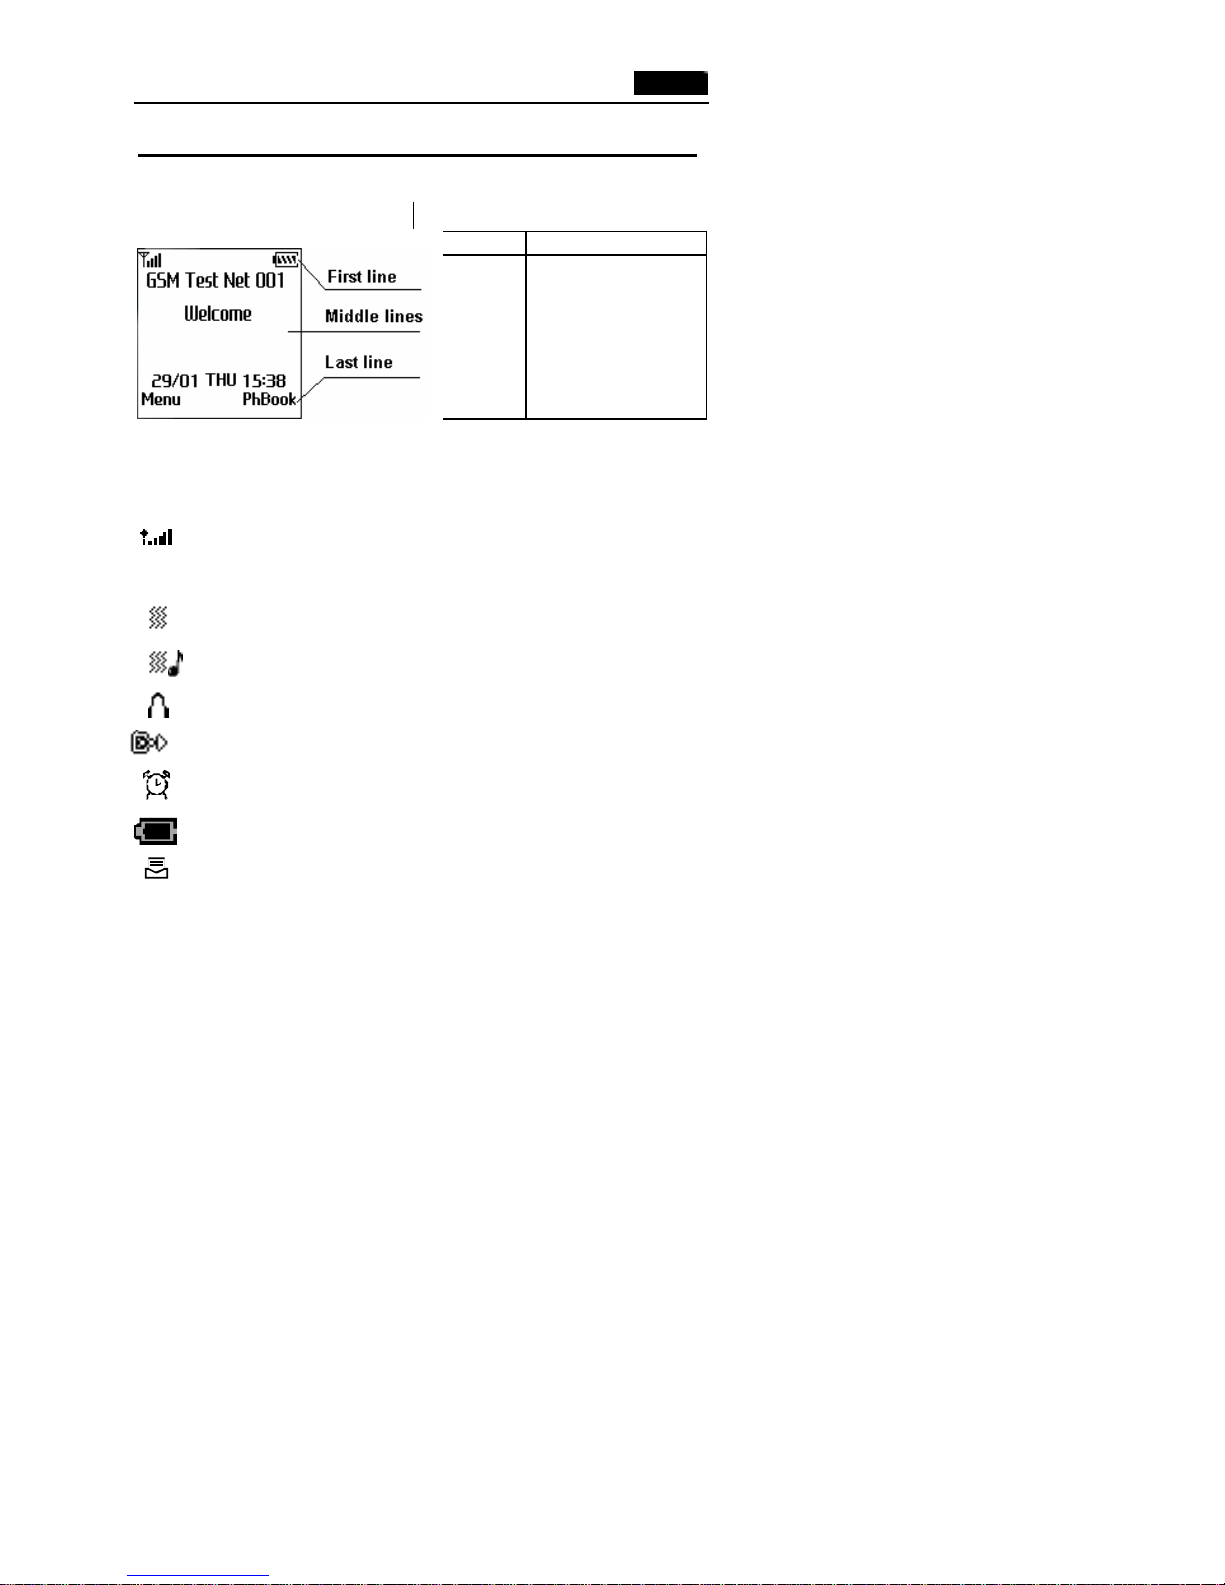
Display Layout
The display comprises three areas.
Area Description
First
line
Displays various icons
Middle
lines
Displays messages,
instructions and any
information that you
enter
Last
line
Shows the functions
currently assigned to the
two soft keys.
Icons
Signal strength: Shows the received signal strength. The
greater the number of bars, the better the signal strength.
*
New Message : Appears when a new message has been
received; flash indicates that your message box is full.
Vibrate Mode: Indicates the phone vibrates when a call
coming.
Ring+Vibrate: Indicate that your phone will ring and vibrate
when a call coming.
Mute Mode: Appears when the quiet mode is active.
Call Divert: Appears when the call divert is active.
Alarm: Appears when the alarm is active.
Battery status: Shows the level of your battery. The more
black area you see, the more power you have left.
New MMS: Appears when a new mms has been received;
flash indicates that your message box is full.
Page 14
14
GETTING STARTED
You must insert the SIM card and charge the battery before you can
use the phone.
Installing a SIM Card
When you subscribe to a mobile network, you are provided with a
plug-in SIM (Subscriber Identity Module) card loaded with your
subscription details (PIN, Phone book information, and so on).
Note:
The SIM card can be easily damaged by scratching or bending, so you
should be careful when handling, inserting or removing the card. Follow
the instructions supplied with th e SIM card. Keep all SIM cards out of
the reach of small children.
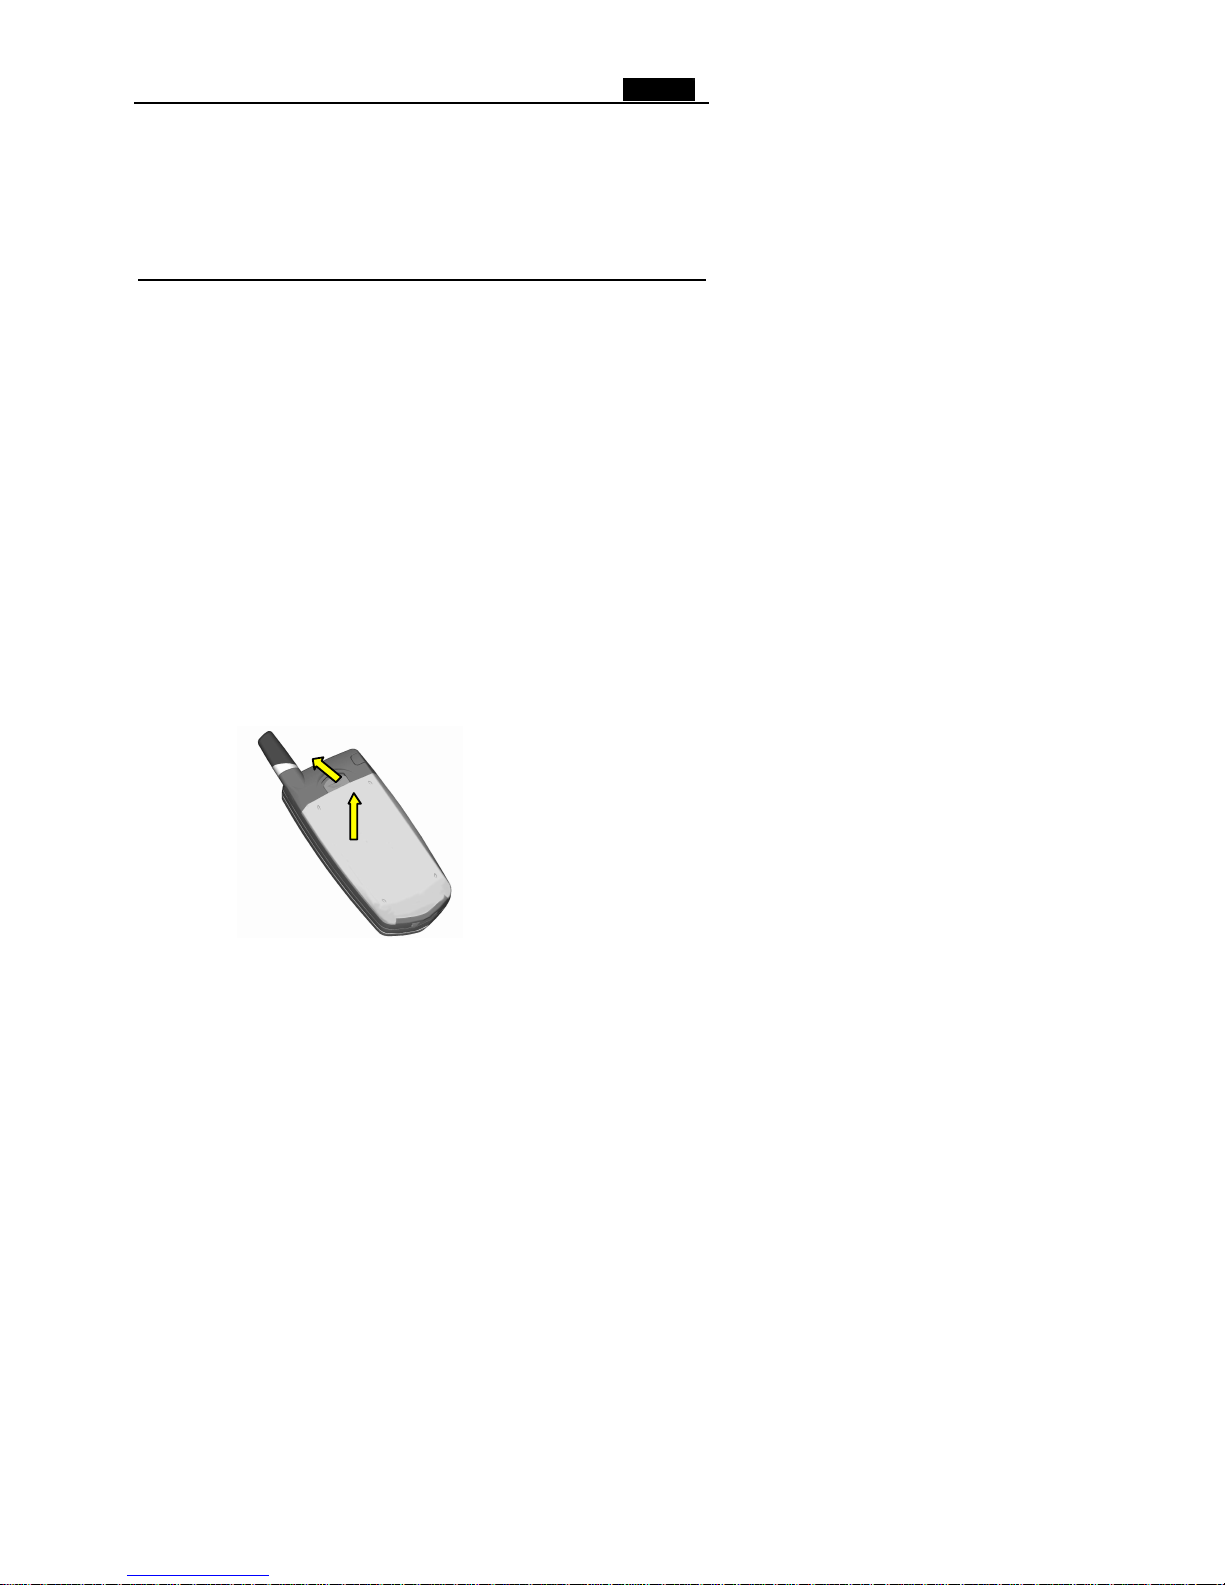
1. Switch the phone off.
2. Remove the battery. To do so:
? Pull the battery lock above the battery toward the top of the
phone and hold it in the position.
? Lift the battery away, as shown.
?1
?2
Page 15
15
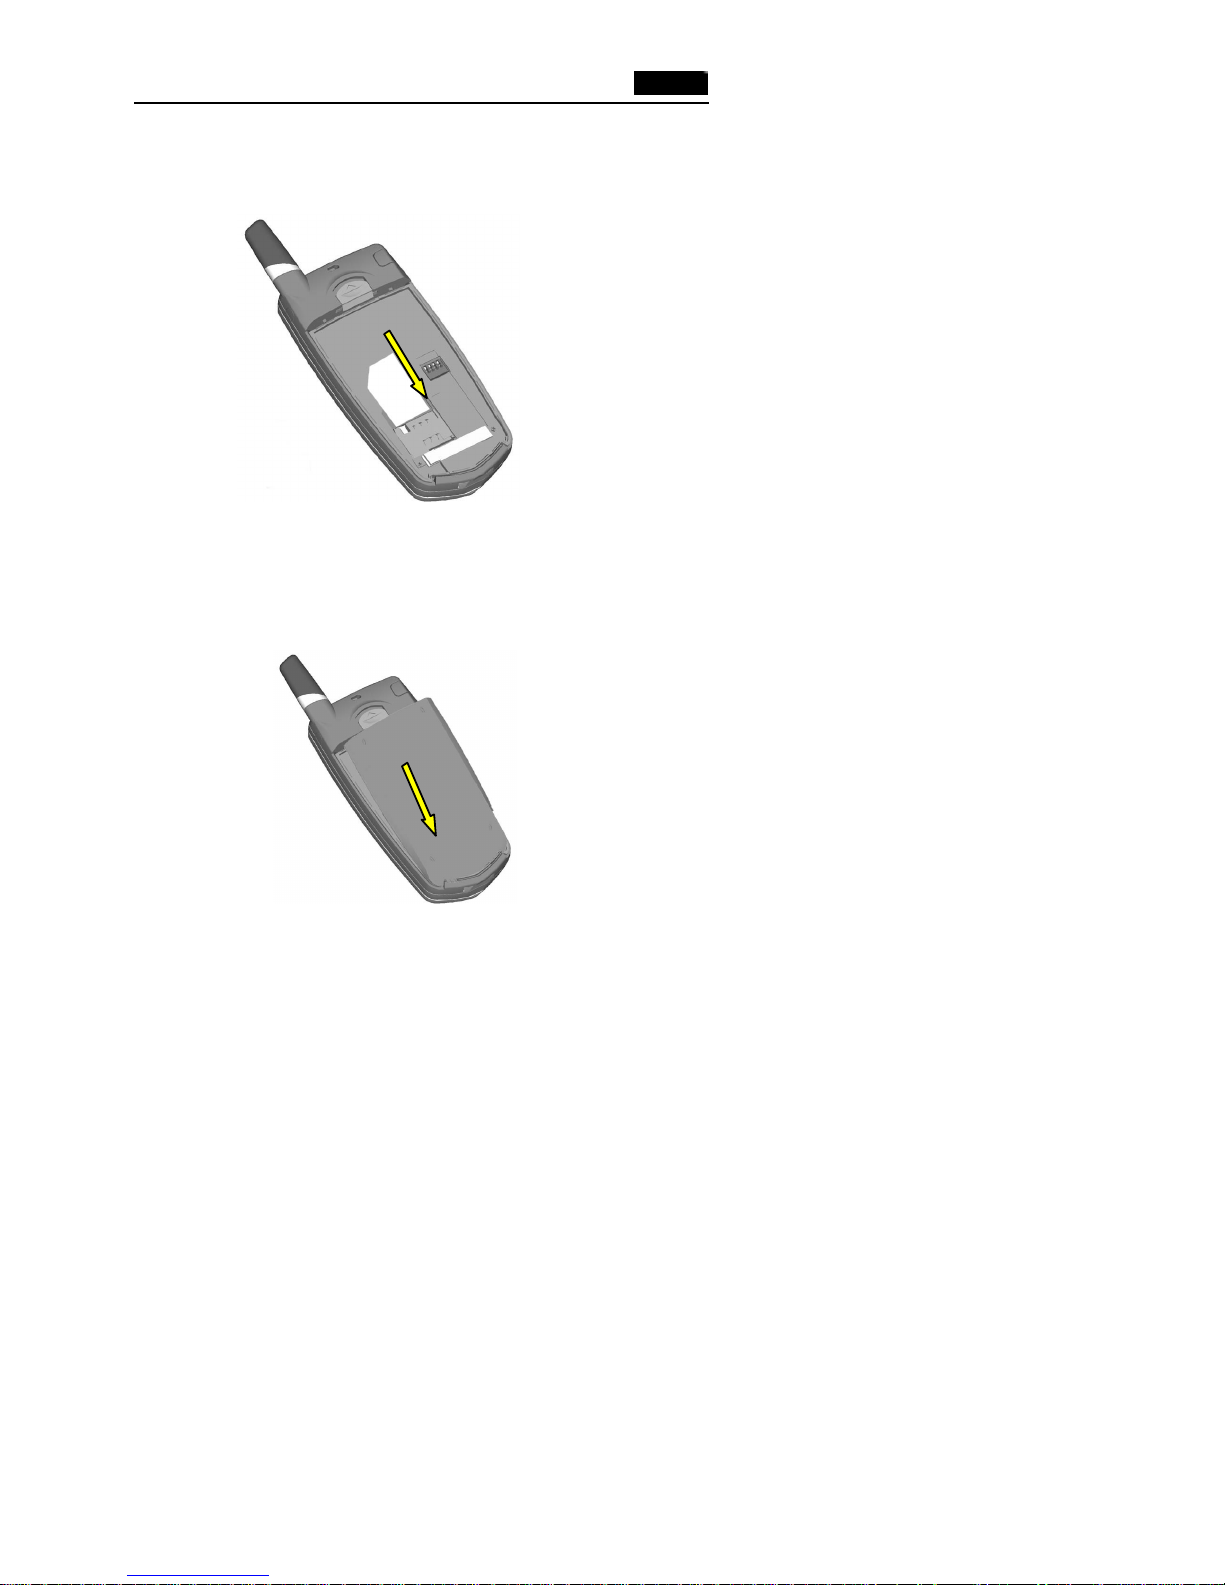
3. Insert the SIM card ensuring that the cut corner is at the top left
and the gold contacts of the card face into the phone. Slide the
metal lock.
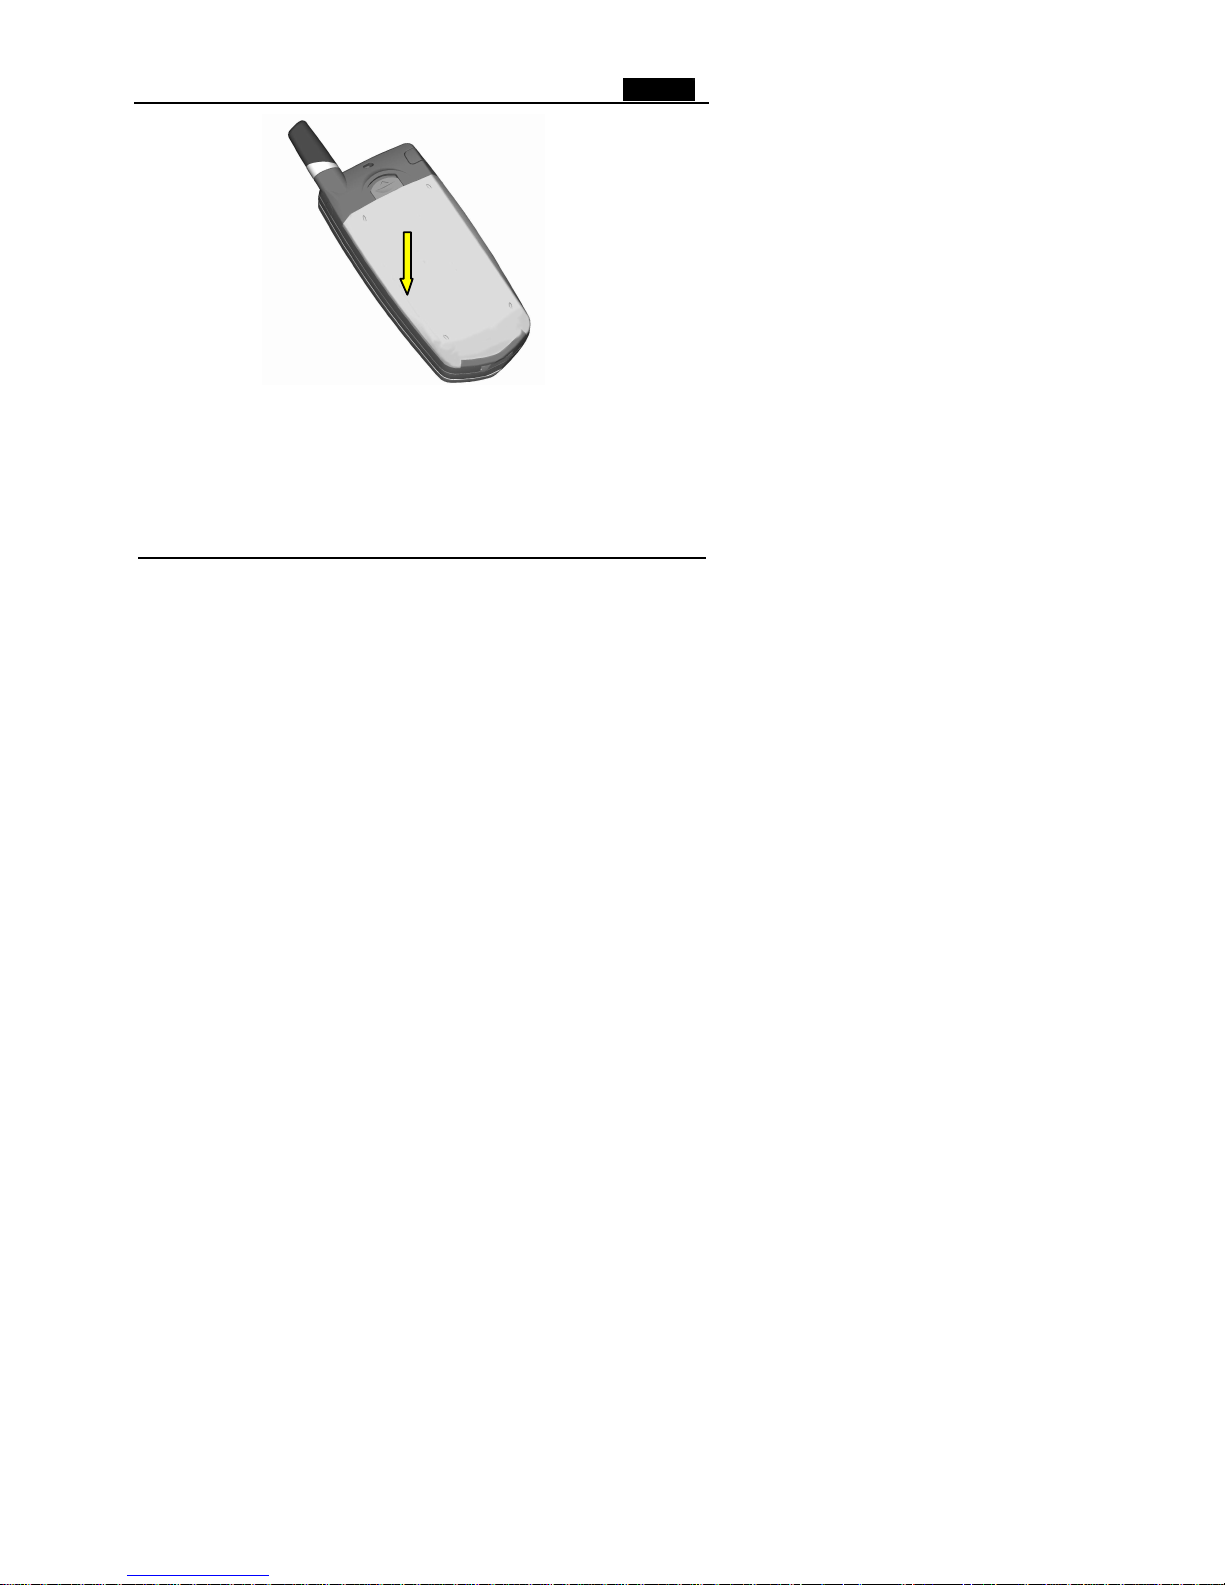
4. Reinstall the battery To do so:
? Place the battery so that the tabs on it align to the notches at
the bottom of the phone.
Page 16
16
? Push the battery down until it clicks into place. Make sure
that the battery is properly installed before switching on the
phone.
Charging a Battery
Your phone is powered by a rechargeable Li -ion battery.
You are provided with a travel charger when buying the phone. Use
only approved batteries and chargers. Ask your local dealer for further
details.
Note:
You must fully charge the battery before using your phone for the first
time. The phone can be used while the battery is charging.
Page 17
17
Using a Travel Charger
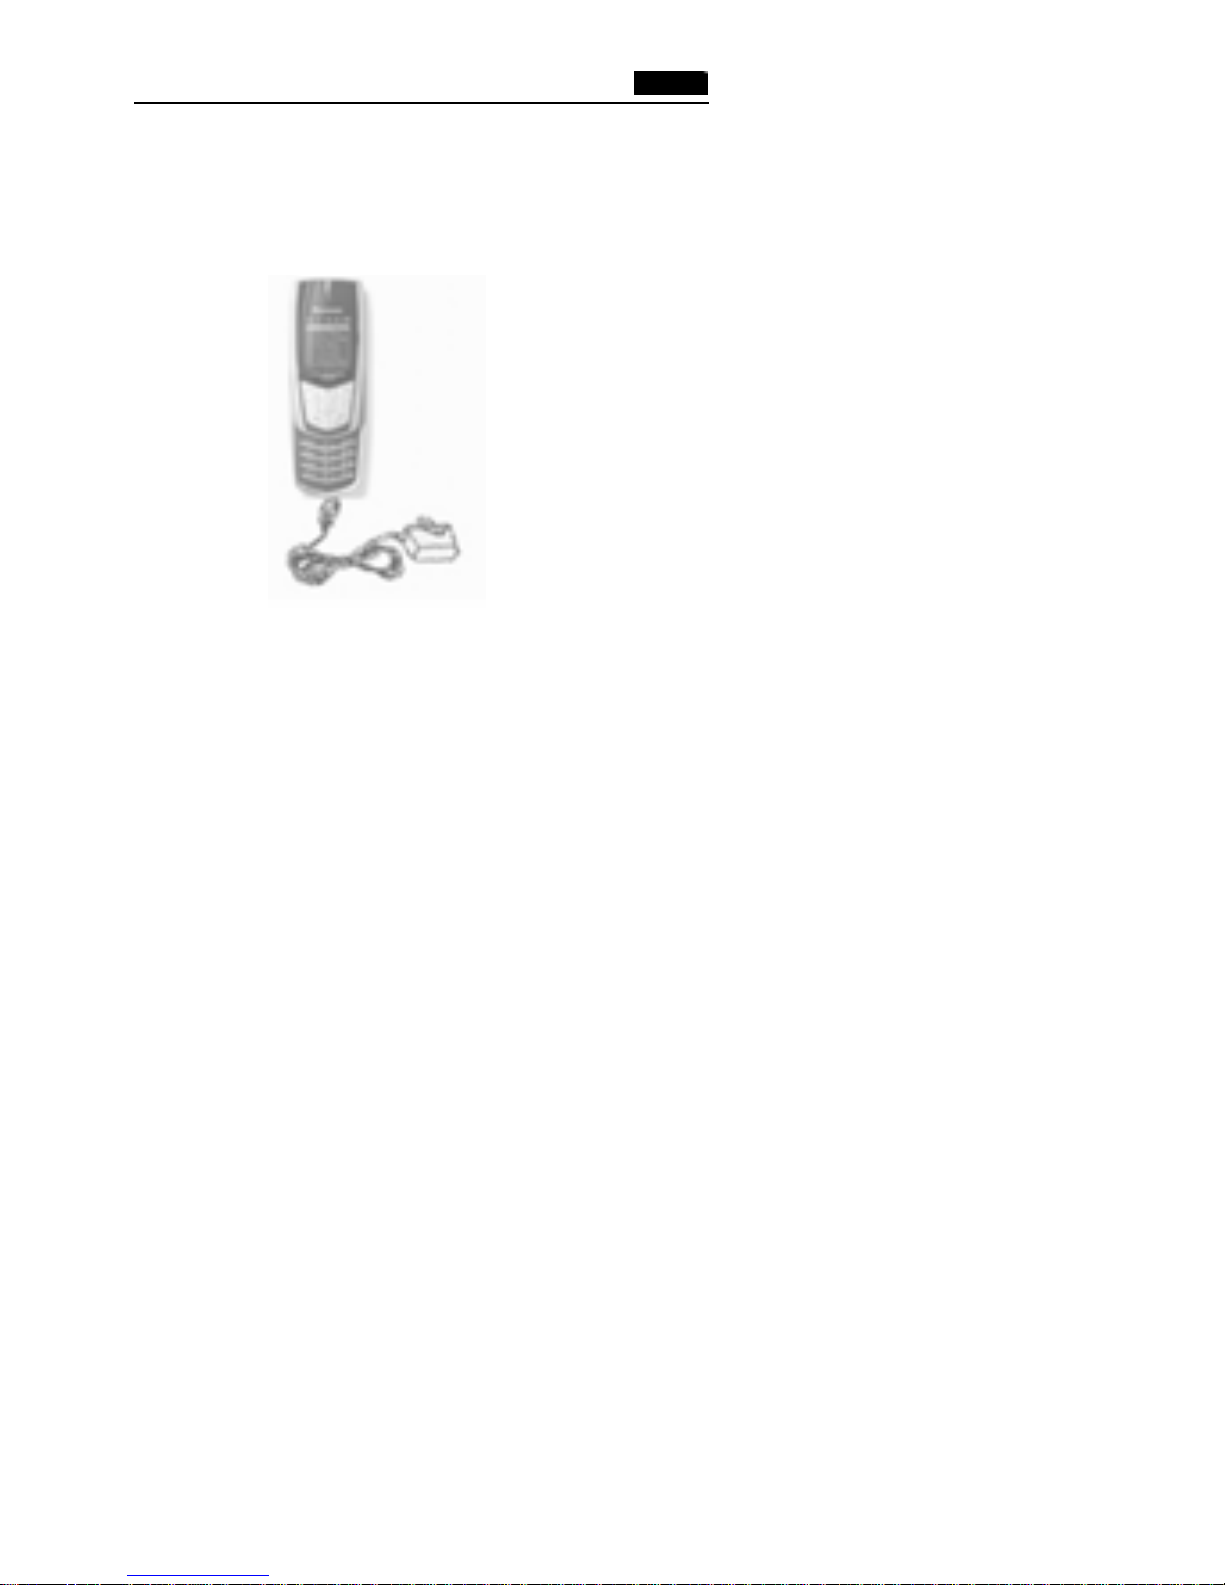
1? Place the battery on the back of the phone (see“reinstall the
battery” ), connect the lead from the travel adapter to the connector at
the bottom of the phone.
2? Connect the adapter to a standard AC wall outlet.
3? When charging is finished (the full battery icon becomes solid),
disconnect the adapter from the AC wall outlet, then from the phone.
Note: When disconnect the lead of the adapter from the phone, you
should press the buttons on both sides of it, otherwise it ’s easily damaged.
Using a Desktop Charger
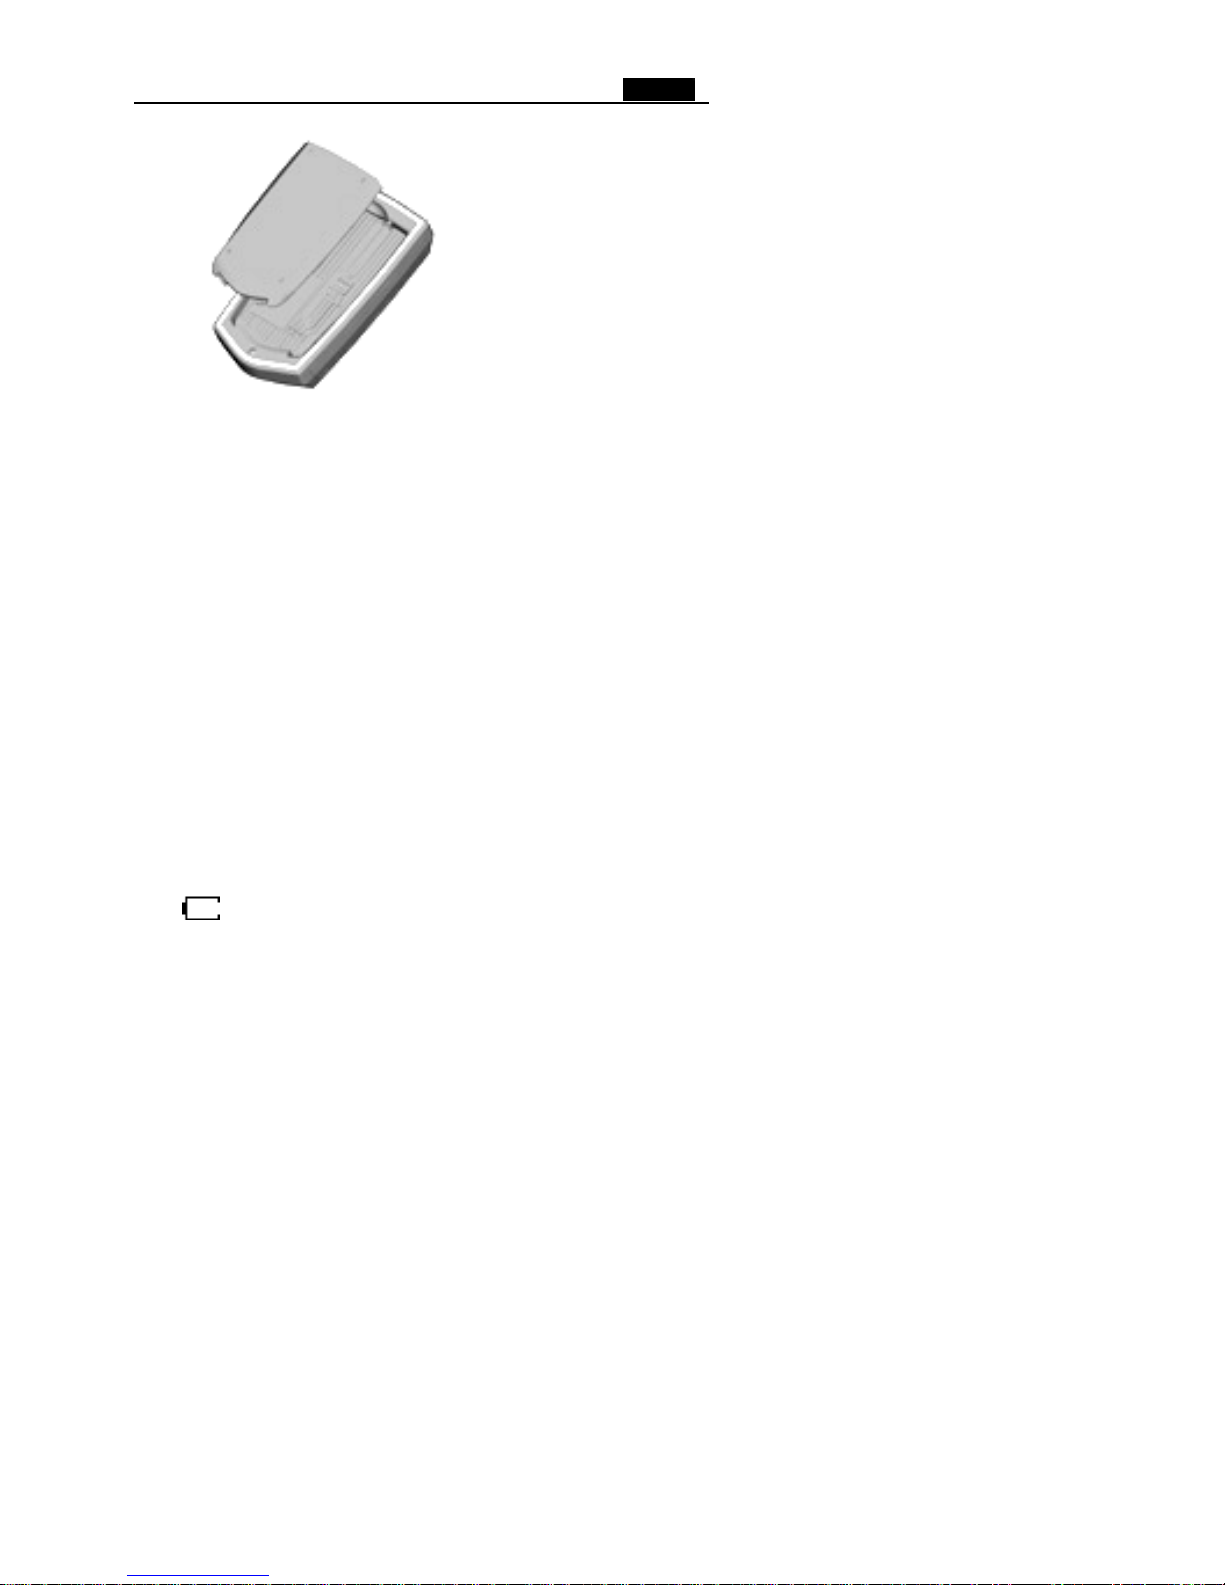
1. Insert the battery alone into the slot making sure that the
terminals on the battery contact to the terminals on the charger.
Page 18
18
2. Push down the battery until you hear a click.
3. Insert the lead of the travel adapter into the connector socket of
the desktop charger.
4. Connect the adapter to a standard AC wall outlet.
5. The colour indication of the LED on the charger is as follows:
• Red: charging
• Green: fully charged
6. When charging is finished , unplug the power cord of the adapter
from the AC outlet and remove the battery from the charger.
Note: This charger is applicable to the series of S6 battery.
Low Battery Indicator
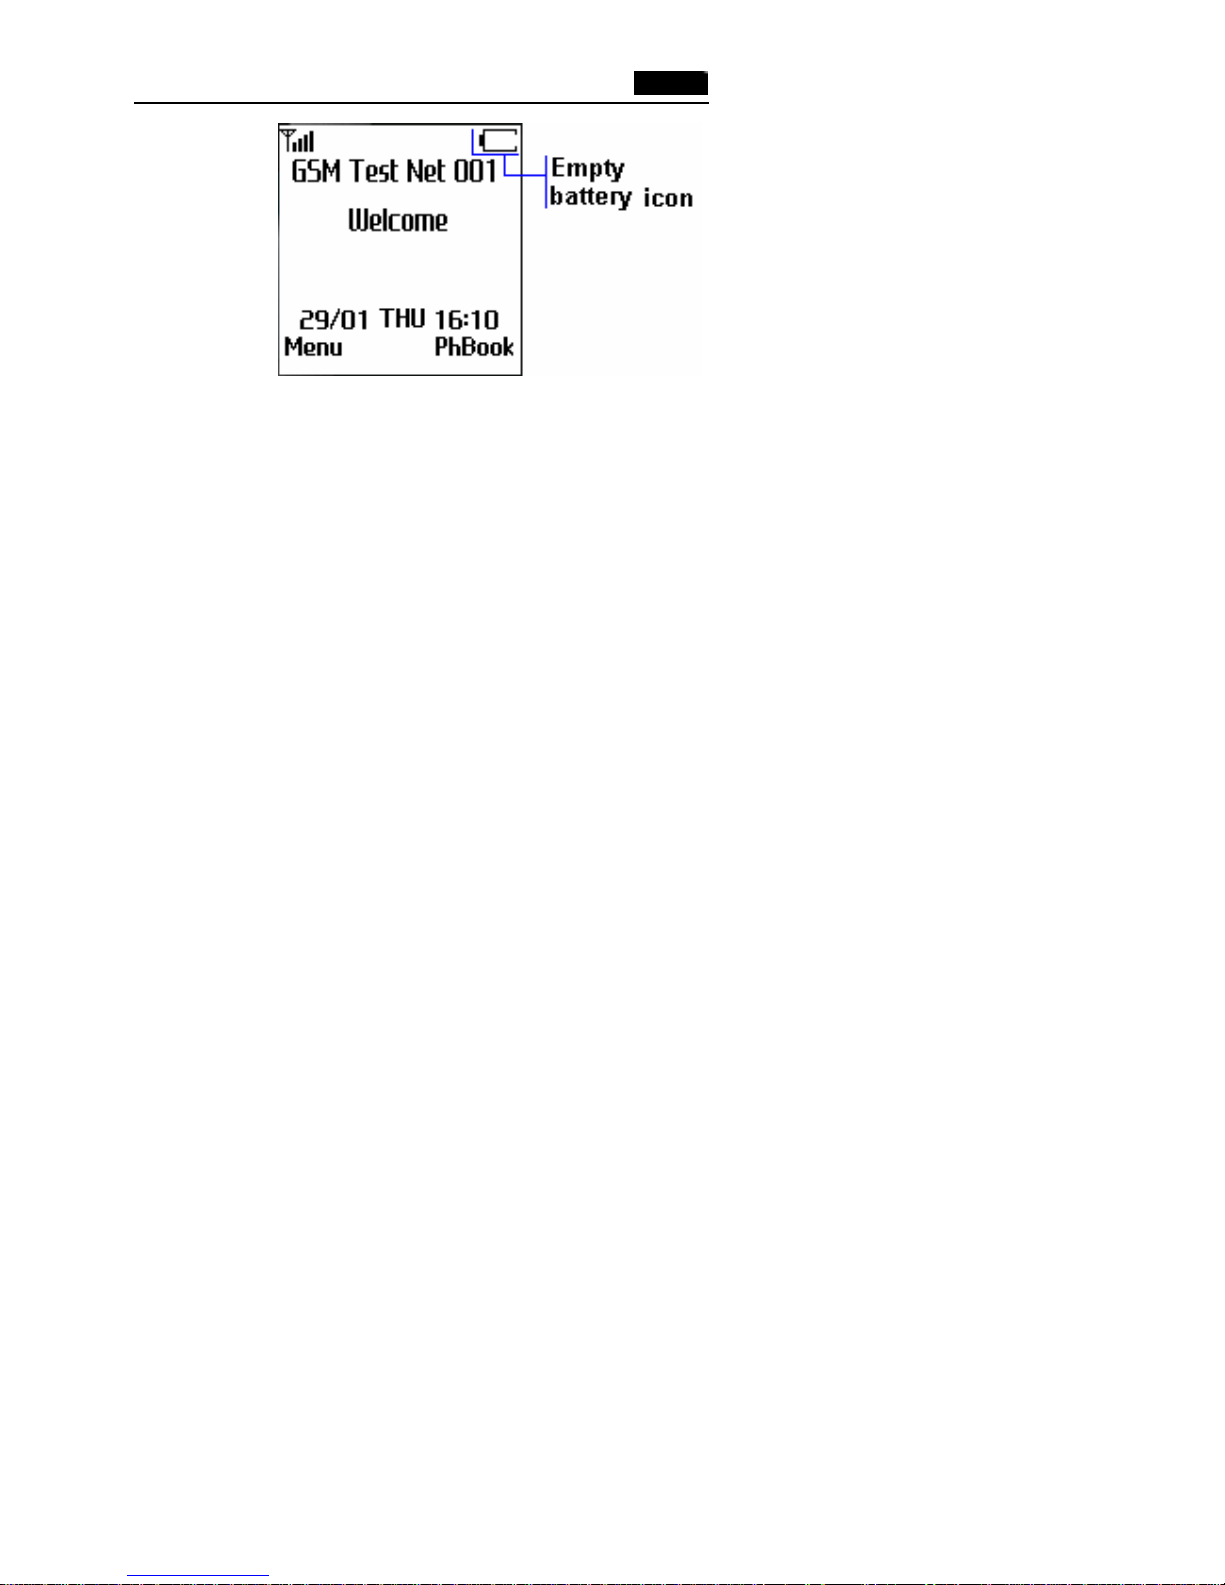
When the battery charge level gets low, you can see an empty battery
icon at the top right of the display and a text notification.
Page 19
19
If the battery level gets too low, the phone will turn off automatically.
Unfortunately, if this happen, you’ll lose whatever you are doing,
including dropping your call. Watch the battery strength icon and
make sure your battery is adequately charged.
Page 20
20
Switching the Phone On/Off
1. Press and hold the key until switch the phone on.
2. Enter your PIN , if you have one for your SIM card. (refer to
Glossary/PIN)
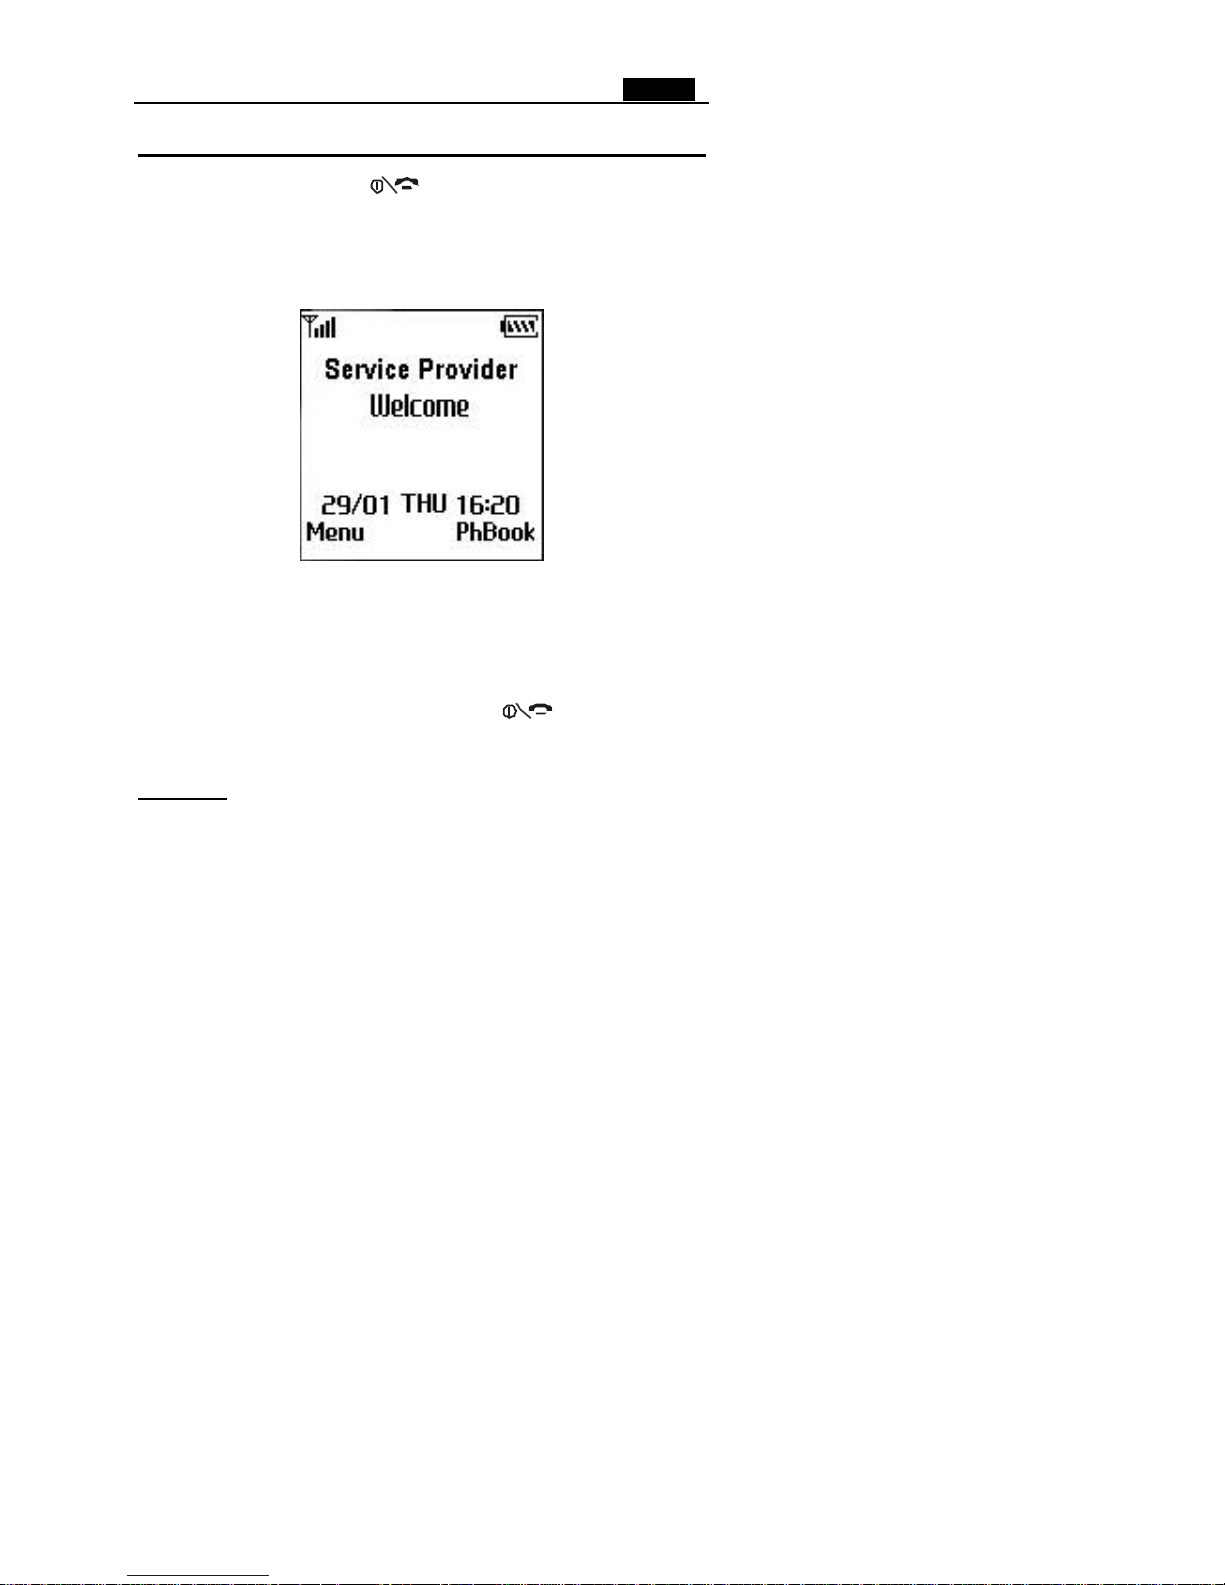
3. Press the left soft key, then your phone connects to the GSM
network, and you’ll see the following screens.
Note: If the network signal is very weak, ‘No Service’ appea rs in the
display, and you cannot place and receive calls. Wait a little while for a
better signal or move into an open area to regain the service.
4. To switch the phone off, hold down the key for more
than two seconds.
WARNING!
Do not switch on the phone where mobile phone use is prohibited or when it may
cause interference or danger.
Note: Do not touch the antenna on the phone unnecessarily when the
phone is switched on. Contact with the antenna affects call quality and
may cause the phone to operate at a higher power level than otherwise
needed.
Page 21

21
Your Phone’s Mode s
Standby Mode
Standby is the basic mode of your phone. The phone goes into
Standby mode soon after you turn it on, or whenever you briefly press
the key. When your phone is in Standby mode, you will
typically see the current date and time. If you enter a phone number,
you can press the key to dial it.
Press the key at any time to return to Standby mode. Be
careful; if you are on a call when you press the key, you will
return to Standby mode, and the call disconnected.
Talk Mode
You can place and answer calls only when your phone is turned on.
During a call, the phone is in Talk mode. While you are in Talk mode,
pressing the left soft key gives you a list of Options referred to as
“Call Menu.”
Page 22

22
CALL FUNCTIONS
Making Calls
Before you can make or receive a call, you must turn on the phone and
be within range of a network.
1. In Standby mode, enter the phone number. (If you make a
mistake while dialing, use ƒ or „ key to move the cursor to the
right of the digit, press the right soft key to erase it; Press and
hold to erase the entire number.)
TIP: When inputting a number, you can insert a pause by holding the #
key (f or example: between the switchboard and the extension), the latter
number will be dialed several seconds after the former one.
2. Press the key to make the call.
3. When you finish talk ing, press or close the phone to end
the call.
TIP: When using the handsfree kit, you can press the Send key on it to
end the call.
Making a Call from the Phonebook
See “entering the phonebook” to search for a desired number, and
press the key to dial.
Page 23

23
Last number redialing
In standby mode, press the ‚ key to access the list of the 20
numbers you last called; scroll to the number or name you want, and
press to call the number.
Note: If you have set Auto Redial menu to On, if there is no answer or
the line is busy, the phone automatically retries to make the call.
Making International Calls
1. Press and hold the “0” key until a “+” sign appears in the display.
2. Enter the country code, area code, and phone number, then press the
key to begin dialing.
Receiving Calls
When a call is received, the phone alerts you by ringing and/or
vibrating; the screen displays an incoming call message. If you have
subscribed to the Line Identification Service (contact your service
provider), the caller’s phone number is displayed; if you have saved
the number in your phone book, the name is displayed.
Three modes are provided for receiving a call. Refer to Settings/
Call/Answer mode for the details.
Press to answer a call and to reject.
Page 24

24
Note: If you receive a call while using the phone functions and menus,
the current operation will be halted.
Missed Calls
When an incoming call is not answered, the Missed Call log is
displayed on your screen.
-- To view the missed call immediately, press the left soft key , the
number or the name is displayed, if available. Scroll through the
missed calls, press to call the number.
-- Press the Option soft key, you’ll enter the missed calls menu. The
following options are available:
Call To press Left soft key to call the number.
Detail To view the details (name, number, time)
Save To store the number to the phonebook.(refer to Storing
a phone number in PB)
Send Edit the message to this number.
Delete To delete the number from the missed calls list.
Delete All Delete all number from the missed calls list.
Tip: You can press the key at any time to exit the Missed Call
menu. You can view the missed calls at any time. Refer to Call list for
details.
Page 25

25
Call Menu
Some of the features you can use during a call depends on whether
your network provides these services.
During a call, press Option soft key to enter Call Menu. The options
change in different conversation circumstance.
The followings are the possible options.
Record: You can record the current call for the maximum of 30
seconds.
Mute: You can switch microphone off so that the caller can’t hear
you.
Hold ( current call ): You can hold the current call.
Hold current call /Dial new number: You can hold the current call
and
dial new number.
Hold current call/ Answer new call: You can hold the current call
and
answer a new call.
Connect held call to conference call: You can connect the held call
to a
conference call.
End the current call: Select to end the current call.
End held call: Select to end the held call.
End current call/ Answer new call: You can end the current call and
answer the new call.
End current call/ Answer held call: You can end the current call and
Page 26

26
answer the held call.
End all calls: Select to end all the calls.
Main menu: Select to enter the main menu and make the general
operations.
Other Options in the Call Menu
You may also directly press the number-keys to choose the functions
and press to make it.
Hold/ Switch
The ‘Hold’ function can switch the current call to a held one and
recover the previous call.
When there is a held call and a current call:
Press 0 + to end the held call
Press 1 + to end the current call and recover the hel d call.
Press 2 + to switch the current call to a held one and switch the
held one to the current call.
Call Waiting
If your network supports this function and you have activated the
feature, the phone will remind you when there’s a new incoming call
during a call.
Call Hold
If your network supports this function you can dial another number
while you have a call in progress.
Method 1: (1) Dial the required number or find the required number
from telephone book and then press to make
Page 27

27
the second call.
(2) The first call will be put on hold automatically.
Method 2: (1) Press to hold the current call.
(2) Dial the second call. When the new call is connected,
the previous one will be held automatically. These two
calls can be switched freely. Please refer to Hold/
Switch function.
Conference Call
Conference Call is a network service. It allows up to six people to take
part simultaneously in a call.
(1) Dial the first number.
(2) Dial the second number and the first number is held automatically
after the first is connected.
(3) Press 3 + to let the first number to participate in the conference.
(4) Repeat Step 2 and 3 to add more numbers to participate in the
conference.
(5) Press and 3 + to allow the new number to participate in
the conference, repeat the operation to have more numbers to the
conference.
(6) Press 1 + x + to refuse one current number, repeat the
operation to refuse more numbers (x means the number you
choose to refuse ).
(7) Press to end the whole conference call.
Page 28

28
USING MENUS
Select functions of options
Your phone offers a set of functions that allow you to customize your
phone. These functions are arranged in menus and sub-menus,
accessed via . Each menu and sub-menu allows you to view and
alter the settings of a particular function.
The roles of the soft keys vary according to the current context; the
label on the bottom line of the display just above each key indicates its
current role.
To view the various functions/options available and select the one
required, proceed as follows.
1. Press the corresponding soft key.
2. To... Then press the...
Select the function displayed Left soft key
Move up or down in the options • or ‚ key.
Move right or left in the options „ or ƒ key.
Back to the previous menu Back soft key.
Exit without changing the settings the key
In some functions, you may be asked for a password or PIN. Enter
the required code and press the Left soft key .
Example: Setting the Display Language
Page 29
29
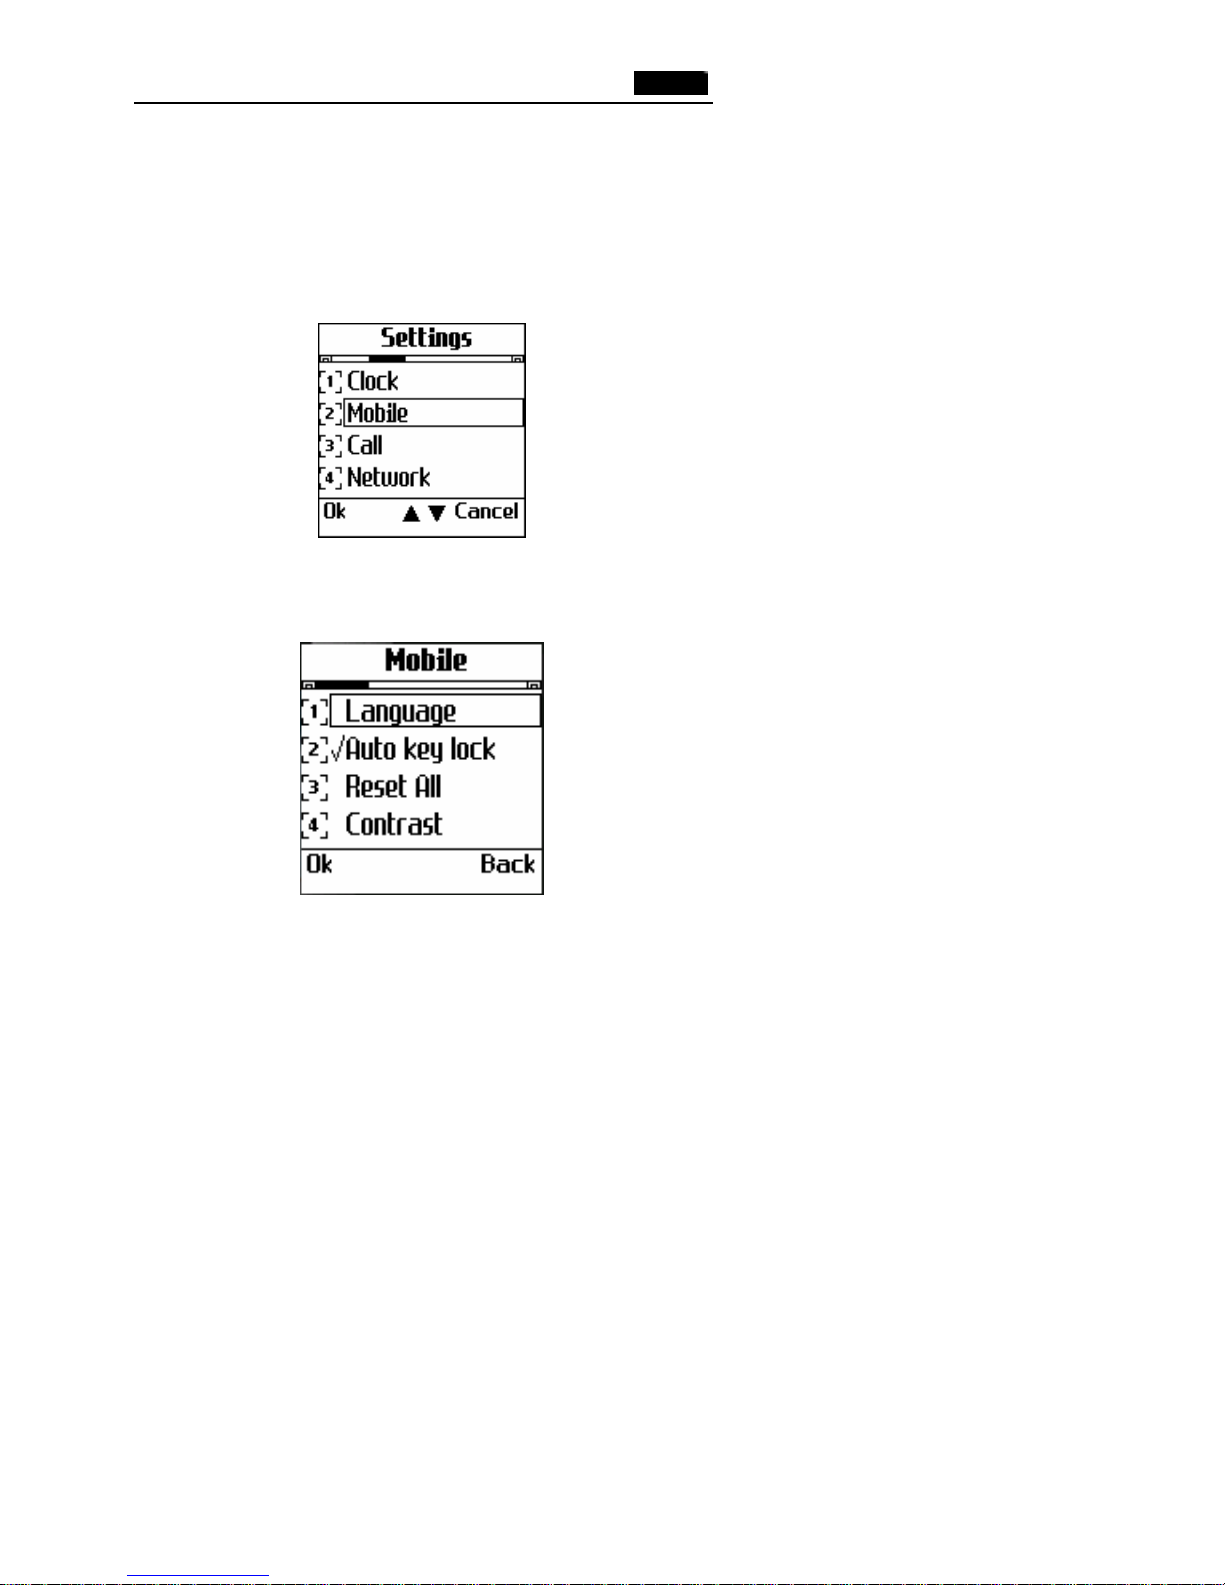
1? In the standby mode, press the Menu soft key to enter the main
menu .
2? Scroll through the menus until the Settings menu, by pressing
the ? ? or ? ? key repeatedly.
3? To enter the Settings menu, press the Left soft key.
4? Scroll through the sub-menus until you reach the Mobile
sub-menu, by pressing the • or ‚ key
5? To enter the Mobile menu, press the Left soft key.
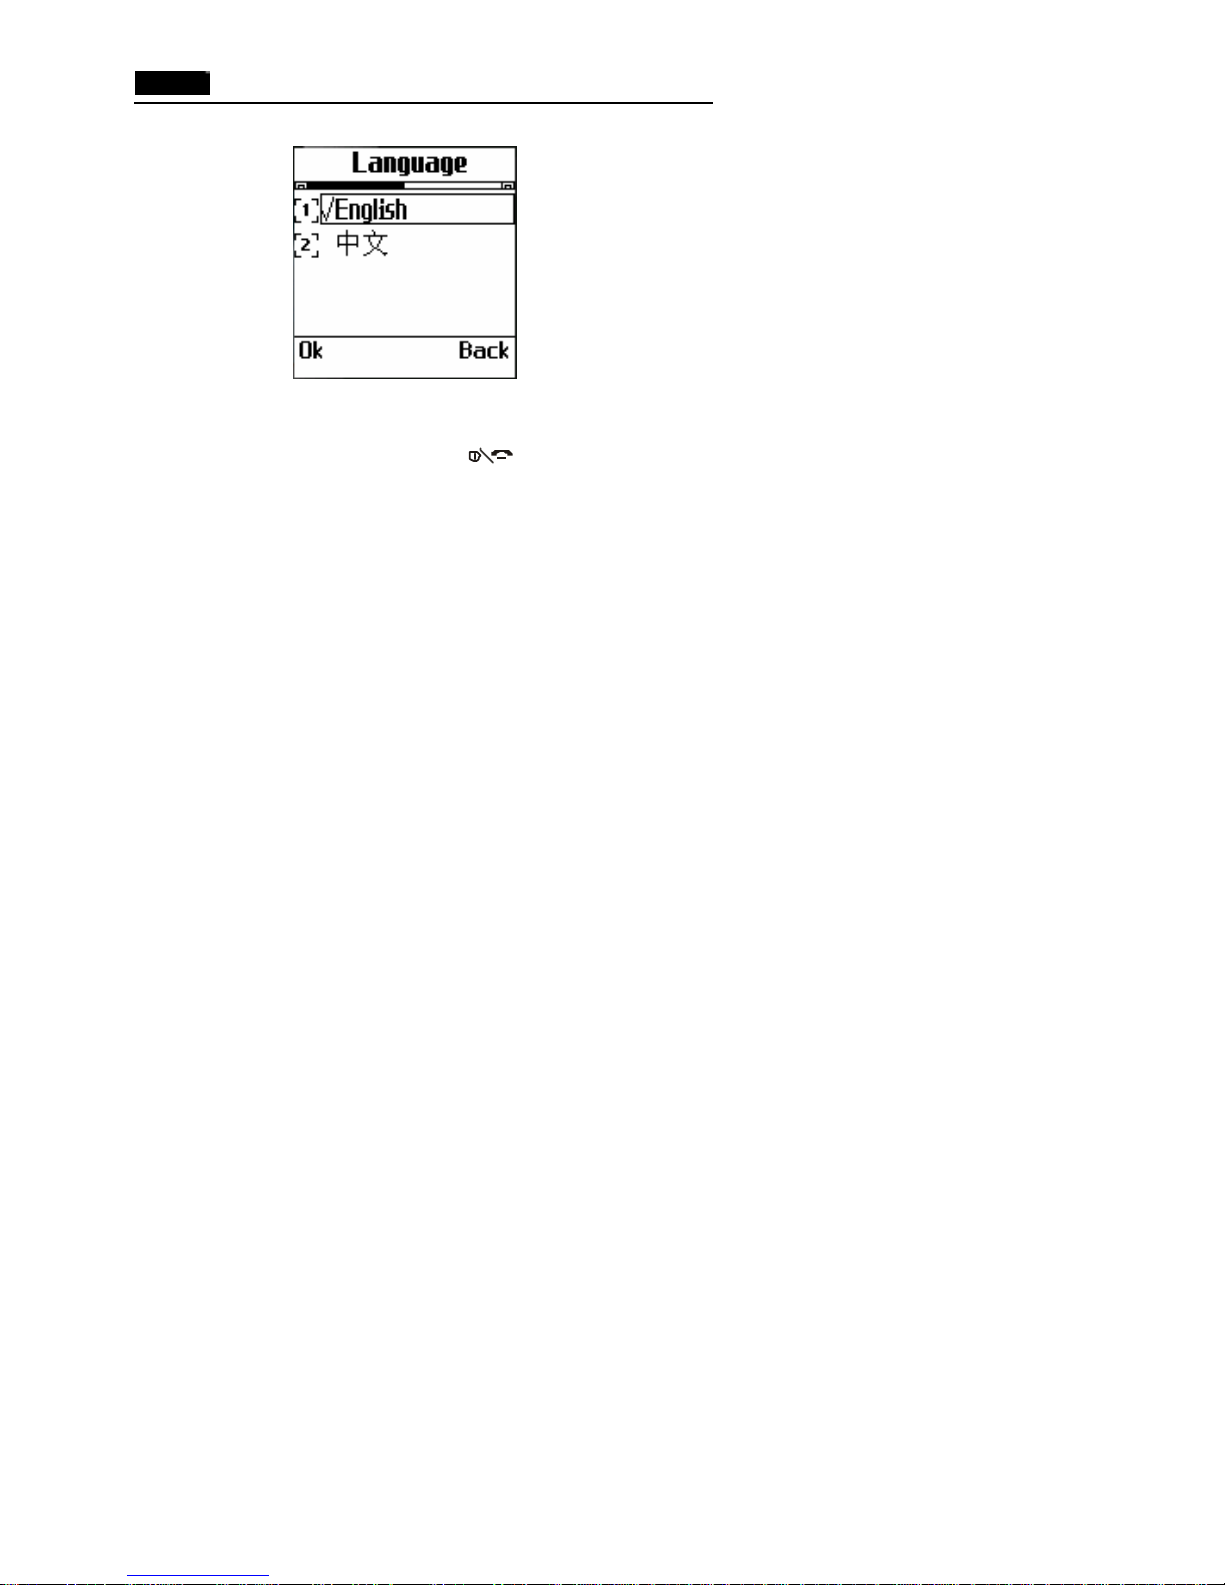
6? Scroll through the sub-menus until you reach the Language
sub-menu, by pressing the • or ‚ key
7? To view the languages available, press the Left soft key.
Page 30
30
The display shows the current setting.
8? Find the appropriate language by pressing the ? or ? key.
9? Press the Left soft key to confirm your selection.
10? Press the Back soft key or the key to exit the menu
structure.
By shortcut
The menus, submenus and setting options are numbered and you can
access them by using their shortcut number.
1. In Standby mode, press the Menu soft key.
2. Within three seconds, key the index number of the menu
function you want to access.
Notes:
The numbers assigned to each menu function are indicated on the list of
the following pages . They may not match the menu number on the
phone. It depends on the services supported by the SIM. For example,
the STK menu will locate the first main menu and all the other menu
functions backspace. By press the „ navigation key you can access the
SMS function.
Page 31

31
Speaking Clock
Press the ? key in the standby mode, the phone will give the current
time.
Note: This function is available only in non-silent style
PHONEBOOK (NAMES)
You can store your phone numbers and the relative name in SIM card
or in your phone memory. Phone memory can store 200 entries at the
most; in every entry including a name, three phone numbers, two
email addresses, one fax number, one OICQ number and one remark.
The quantities of the entries, which SIM can store, depend on the type
of SIM; for every entry including a name and a number.
Tip: If you change phones, any numbers stored in your SIM card are
available with the new phone.
Storing a Phone Number in PB
1. Key in the number to be stored.
2. Press the Store soft key.
3. Select Local PB or SIM PB then press Left soft key.
Save Local :
(1) Input name, press Left soft key.
(2) Enter three phone numbers by sequence (after input the Mobile
Number, press Next soft key and then enter the Home Number and
Page 32

32
the Office Number).
(3) Enter Private email address, Public email address, Fax number,
OICQ number and Memo separately (the same method as step 2).
(4) Press Left soft key and “Saved” is displayed.
Save SIM:
(1) Input name, press Left soft key.
(2) Key in the numbers, press Store soft key.
(3) Press Left soft key and “Saved” is displayed.
There are three ways to enter phonebook in standby mode:
² Press right soft key.
² Enter the serial number.
² Enter the associated alphanumeric keys then press *. For
example, enter 866* to search the name of Tom.
Tip: In standby mode, press right soft key to enter PB Menu.
PB Menu
In the PB (PhoneBook) Menu, the following operations are available:
Smart Dial
This Option allows you to find an entry quickly in your PB.
1. When Smart Dial is highlighted, press Left soft key to enter.
2. Input the correspondent numerical key of the desired name (see the
third way to enter PB).
3. Press Left soft key. Scroll to your desired entry.
4. Press to dial it or press Select soft key to enter “Select
operation” to display the following Options:
Page 33

33
Edit: Edit the details of the selected entry.
Copy: Allows you to copy the selected entry from the phone
memory to the SIM memory and vice versa.
Delete: Press the OK key and phone will display " Delete?"
Select "Yes" to delete this entry. Select "No" to cancel this
operation.
Call: Press the OK key to dial this number.
Write SMS: Refer to Messages/Write .
Send number: Send all the numbers in this entry to the appointed
number.
View
This Option allows you to find a Phonebook entry by searching from
the list of all entries sorted by name.
(1)Press the • or ‚ key until you find the desired entry from the list.
(2) Press the key to dial the number for more details.
Search Name
Enter the character(s) of the desired name by pressing the associated
alphanumeric key(s) and press the Search soft key to see the details in
your phonebook.
New
When new contact is highlighted, press Left soft key. Choose the
Local PB or SIM PB. (refer to Storing a phone number in PB)
Page 34
34
Note: If the input position already exists, the phone will display
"Message Full".
PhBook Manager
Copy ( Take “Local to SIM” for example)
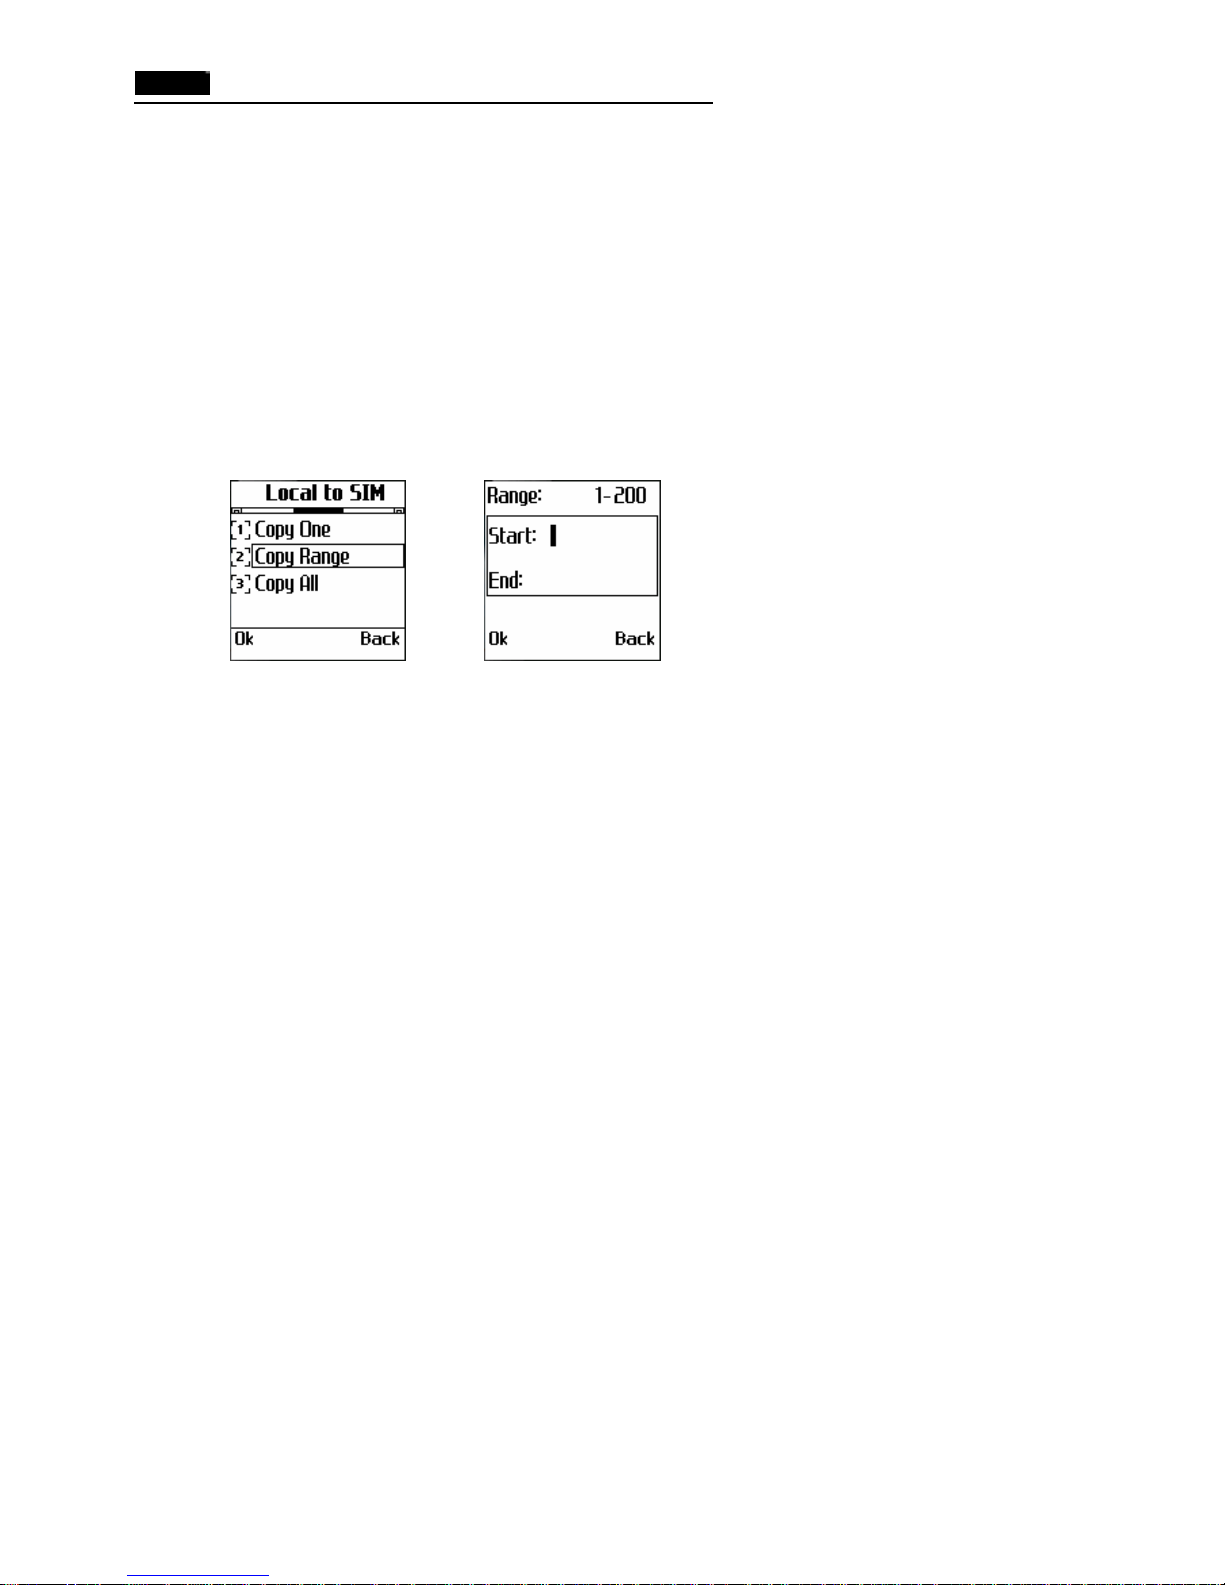
(1)Copy One: Press • or ‚ to view the phone number one by one and
press left soft key to copy the desired one.
(2) Copy Range: Input the start number and the end number, then
press Left soft key to copy these entries you want to
SIM card. (view the following picture)
(3) Copy All: Copy all the numbers stored in phone to SIM card.
Note: If the entry already exists in target PB, the entry will not be copied.
If the space of target PB is not enough for the copy, only the front
phone numbers will be copied until the target PB is full.
If the name length of target PB is less than that of original PB, the
exceeded part will be lost.
Delete
Just same as Copy, you can delete One, All and the specified Range.
Memory
Page 35
35
Check the total capacity and the amount of used entries of PB of SIM
card and Local.
Info
Country/Area Codes
Select this function, press ƒ or „ to view the country/area code;
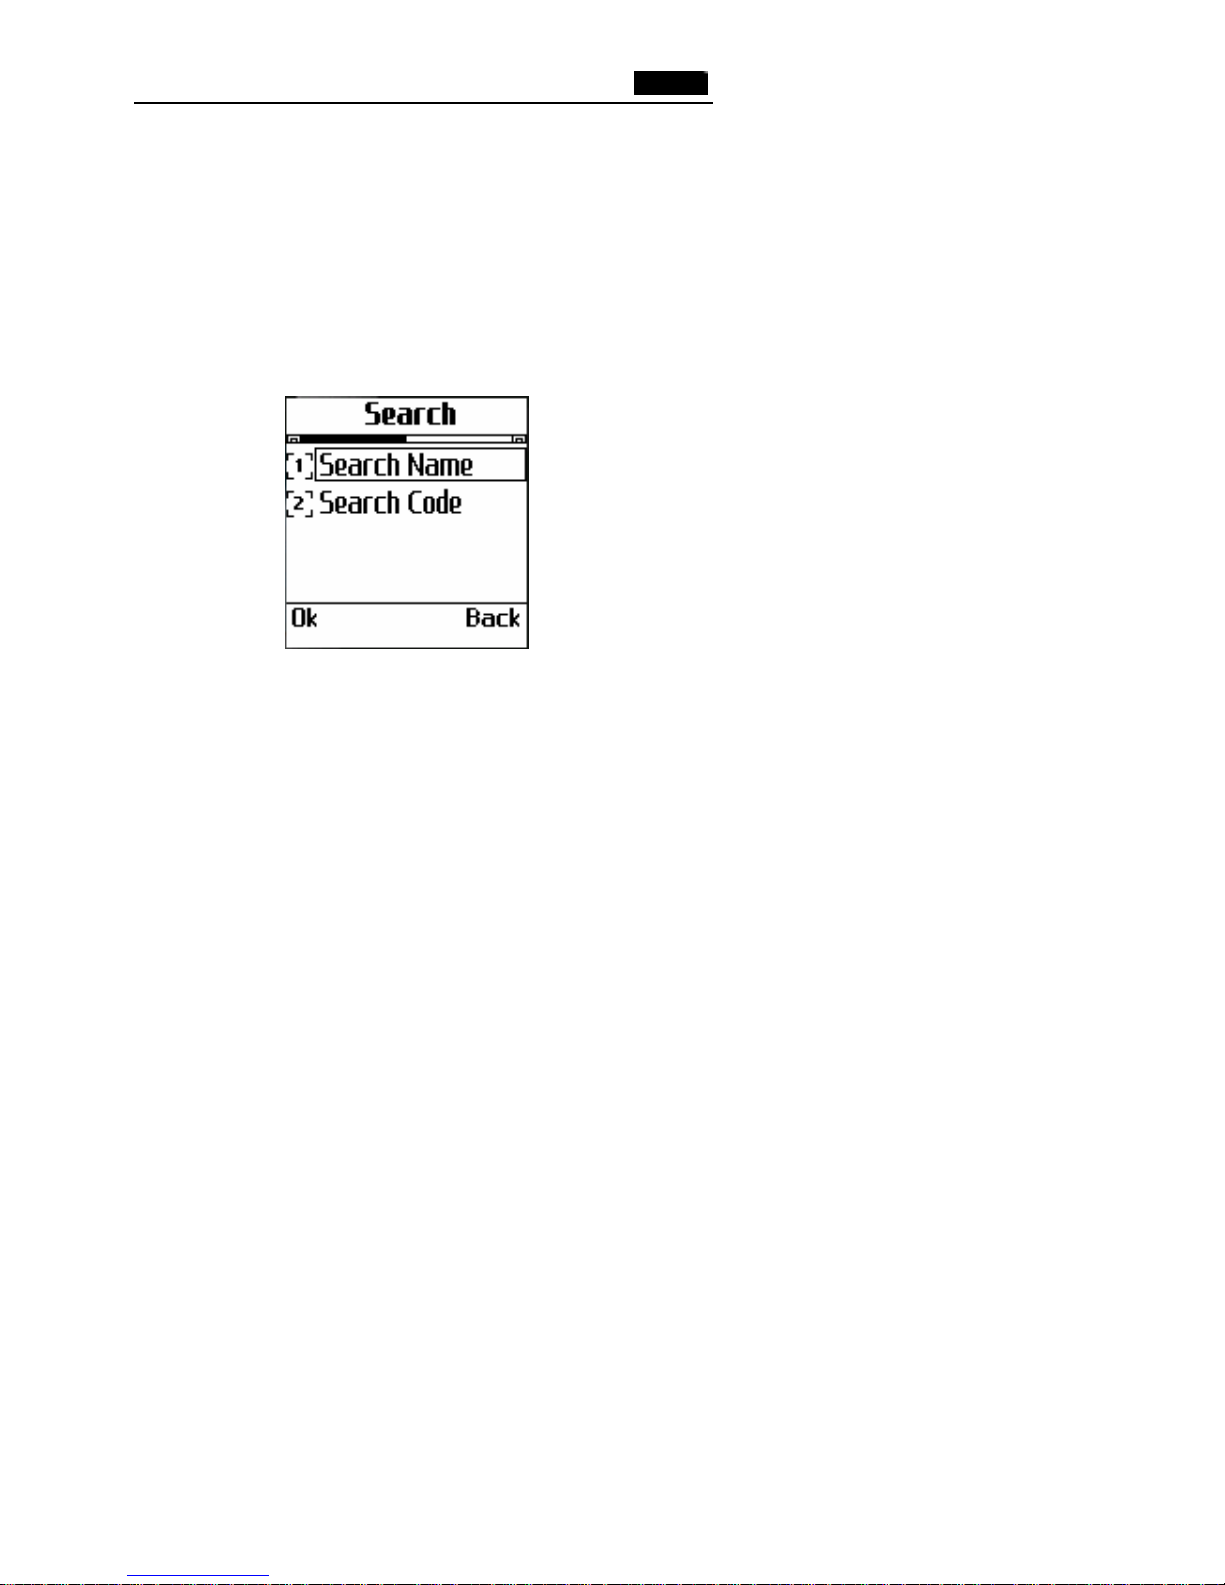
Press left soft key to search by name or by code:
Own Number
Store the SIM card number of local phone for reference.
SMS
The SMS (Short Message Service) function is a network service and
may not be supported by your network. Message can be sent by text,
Page 36
36
fax, E-mail and paging messaging systems, to send text messages by
phone, you must obtain the number of the SMS center from your
service provider. This number may be automatically available from
your SIM.
Two message boxes are available: Personal SM and Broadcasting SM.
Personal SM: It is the message which the mobile users use to transmit
information.
Broadcast SM: If you select this option, you can receive public
information from Network Operators such as
Weather Broadcasting and so on.
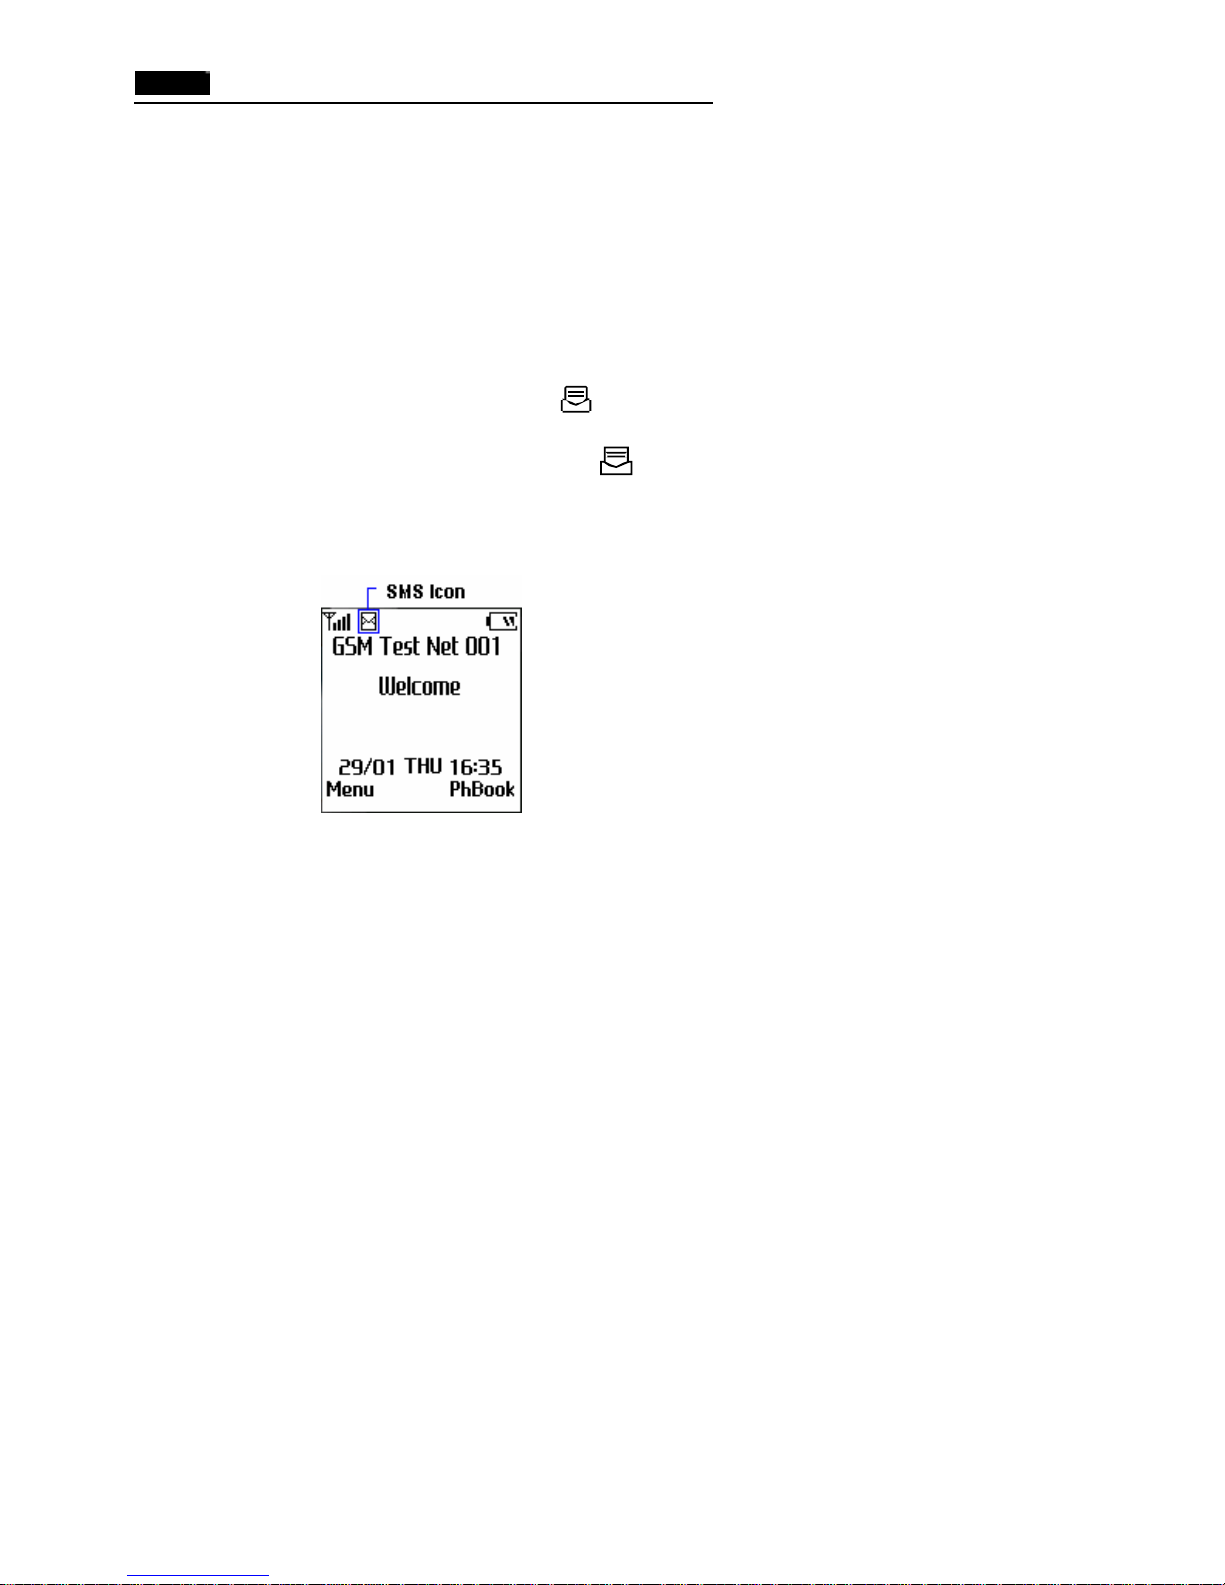
SM Indicator: When you receive a new message, and *
will appear respectively in the internal and external
screen. If the message memory is full, is
displayed and you cannot receive or save any new
messages. Use the ‘Delete’ menu to delete obsolete
messages.
If you enable the SMS key in Setup, you must enter right SIM Lock
code, otherwise you will not be able to read SMS.
Note: In standby mode, use „ or after entering Main menu to select
Page 37
37
Messages, both can enter Message option. But if your SIM card has
the function of STK, you can only use the former.
Inbox
Inbox stores the messages that you have received, the one with ‘*’ is
new message.
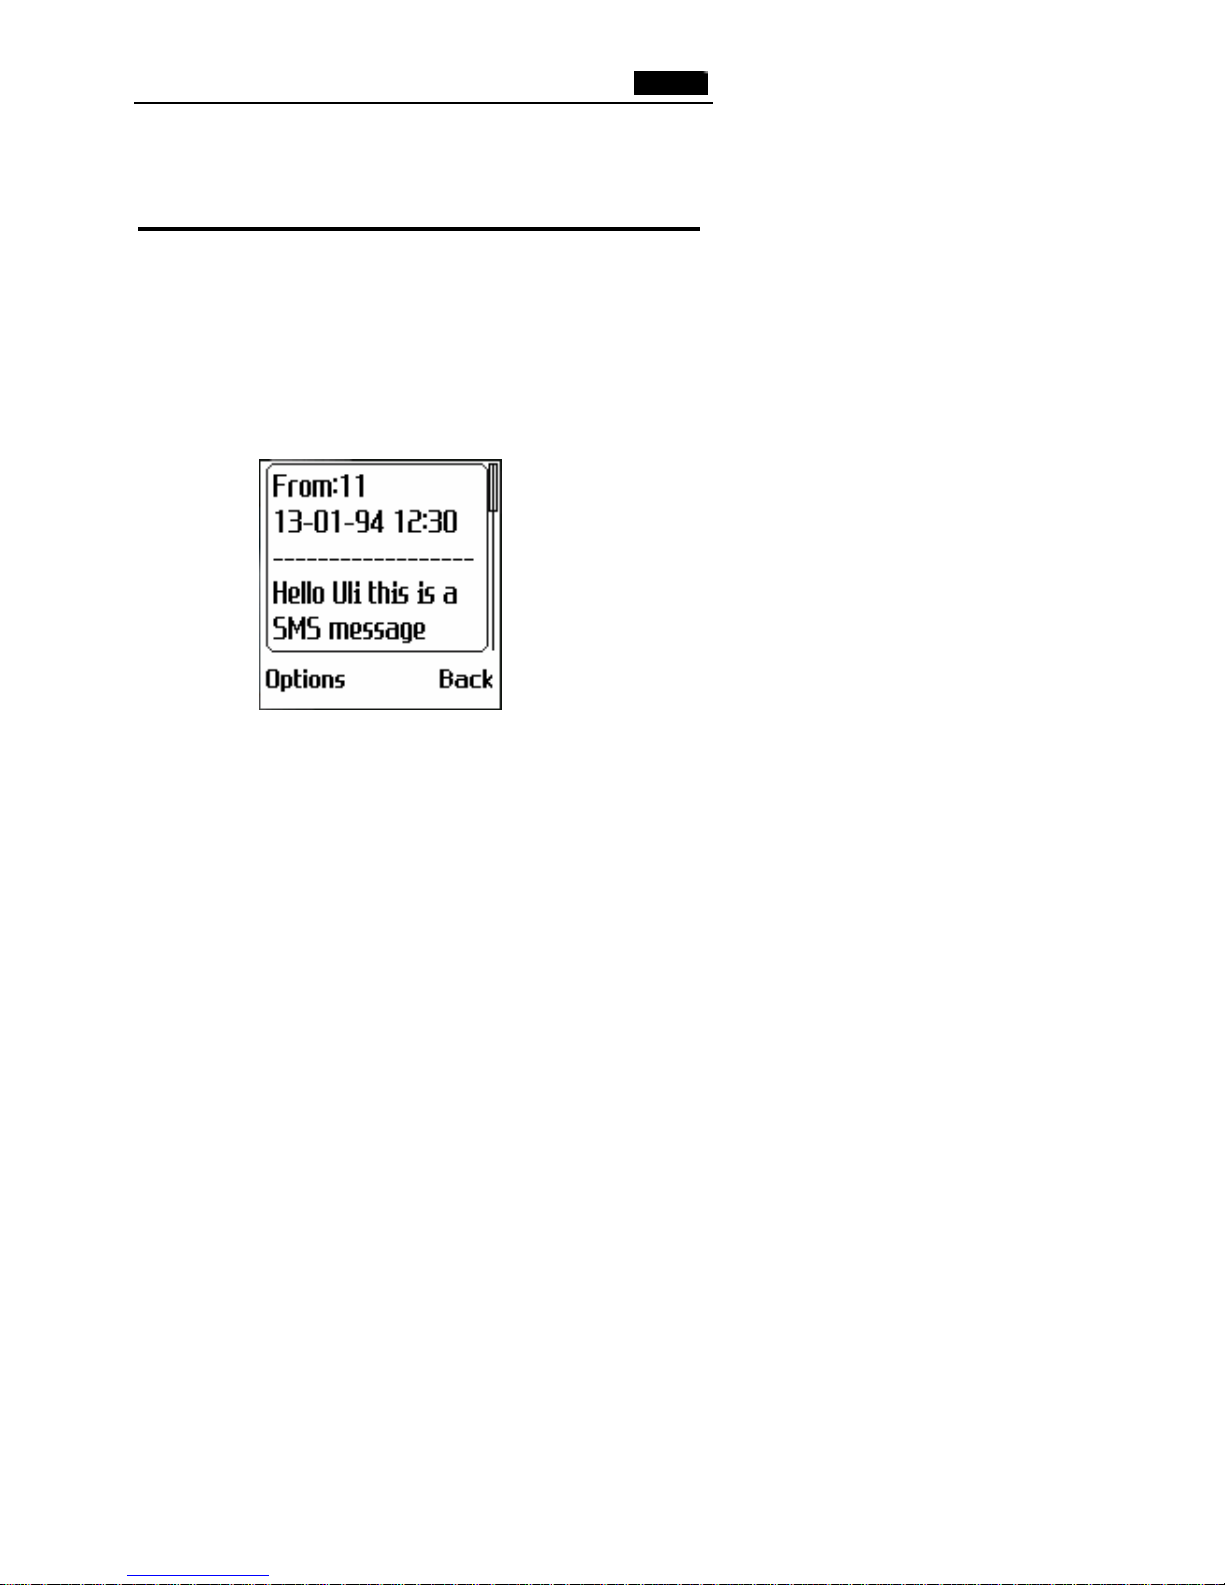
1. Press 56key to choose the desired message.
2. Press Left soft key to view details of message. (To scroll through
the message, press 5 or 6 key.)
3. Press ? or ? key to show the previous or next SMS.
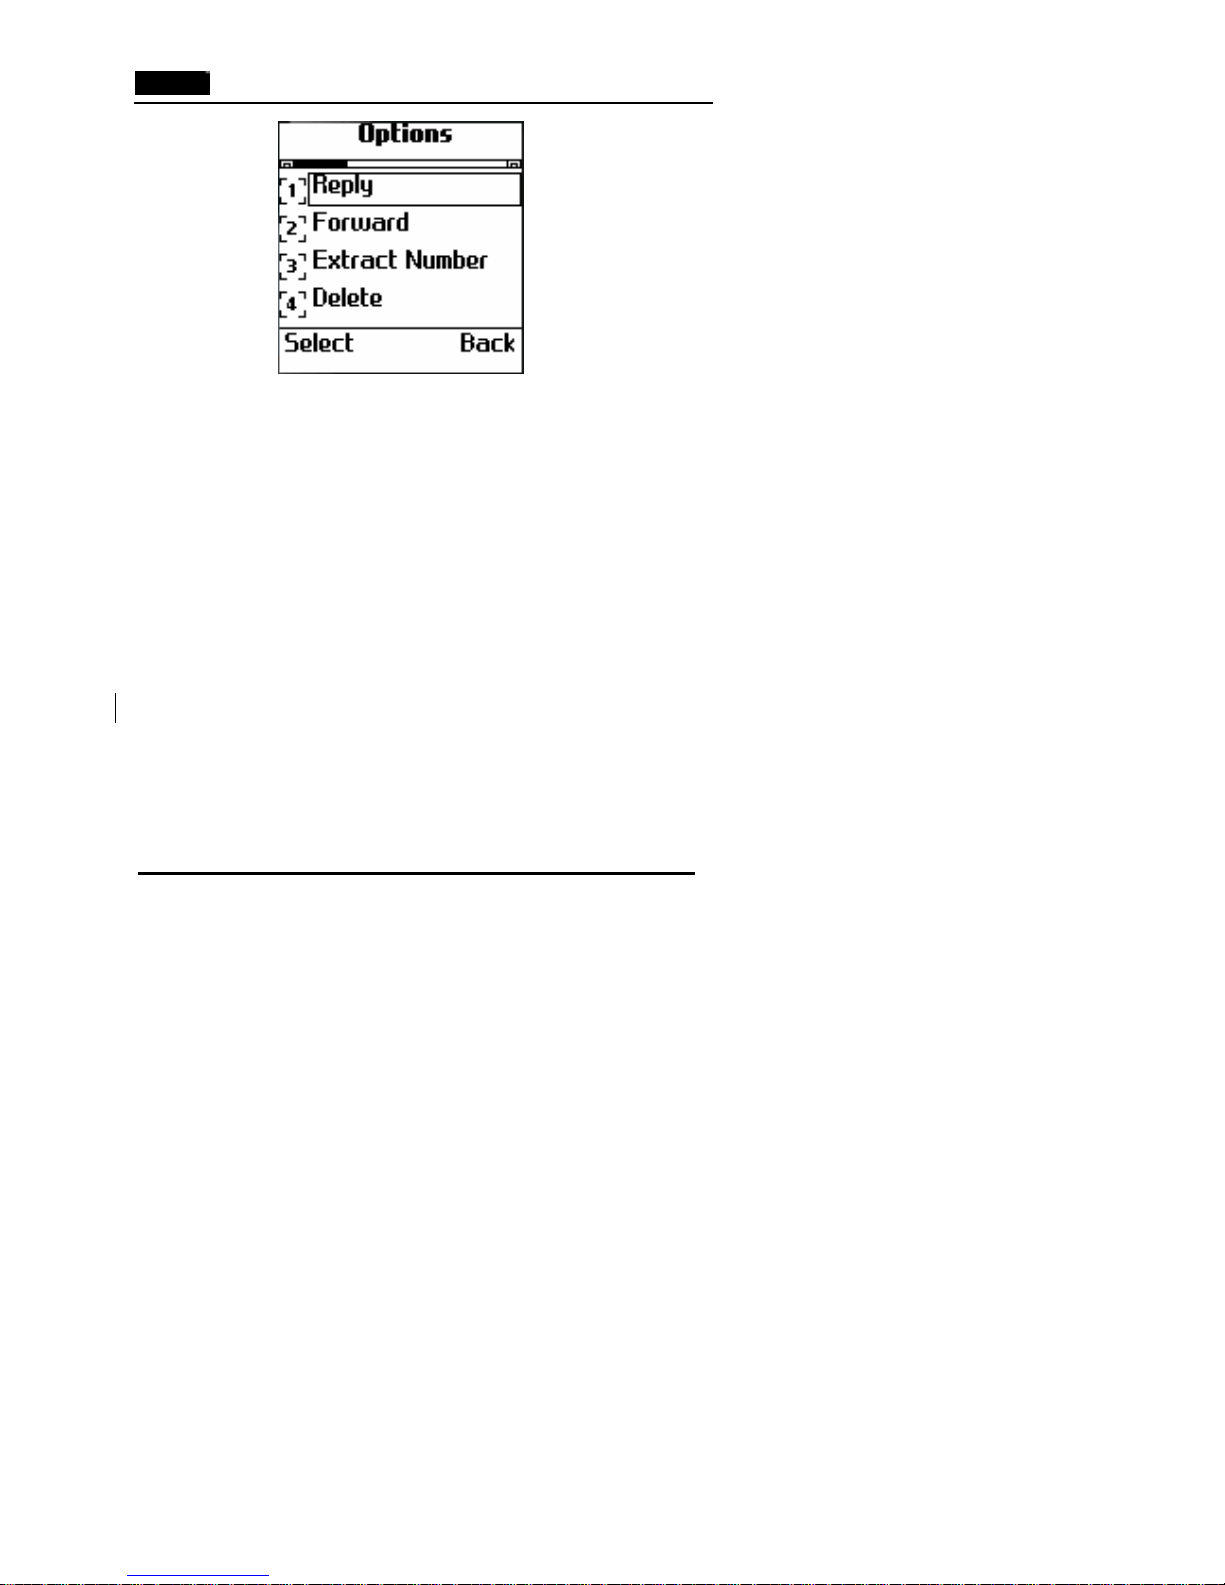
4.Press ‘Option’ left soft key and you can operate as follows:
Page 38
38
l Reply:
Reply to the sender. You can write a piece of new message
and then choose ‘Send’, ‘Store & Send’ , ‘S tore’ or ‘Mul
Send’to do with the Message.
l Forward:
S end the message to others. You can edit the message and then
choose ‘Send’, ‘Store & Send’ , ‘Store’ or ‘Mul Send’to do
with the Message.
l Extract Number:
Y ou can extract numbers from this message and store to
SIM/Phone.
l Delete:
Delete this message.
Outbox
Outbox stores the messages that you have already sent or unsent. The
Page 39
39
letter with ‘*’ is unsent message.
1. Press 5 6key to choose the desired message.
2. Press Left soft key to view details of message.
3. Press ‘Option’ soft key and you can operate as follows:
Write SMS: You can write a piece of new message or edit the
message and then choose ‘Send’, ‘Store & Send’,
‘Store’ or ‘Multiple Send ’to do with the Message.
Extract Number: You can extract numbers from this message, and
store to phone/SIM.
Delete: Delete this message.
Write SMS
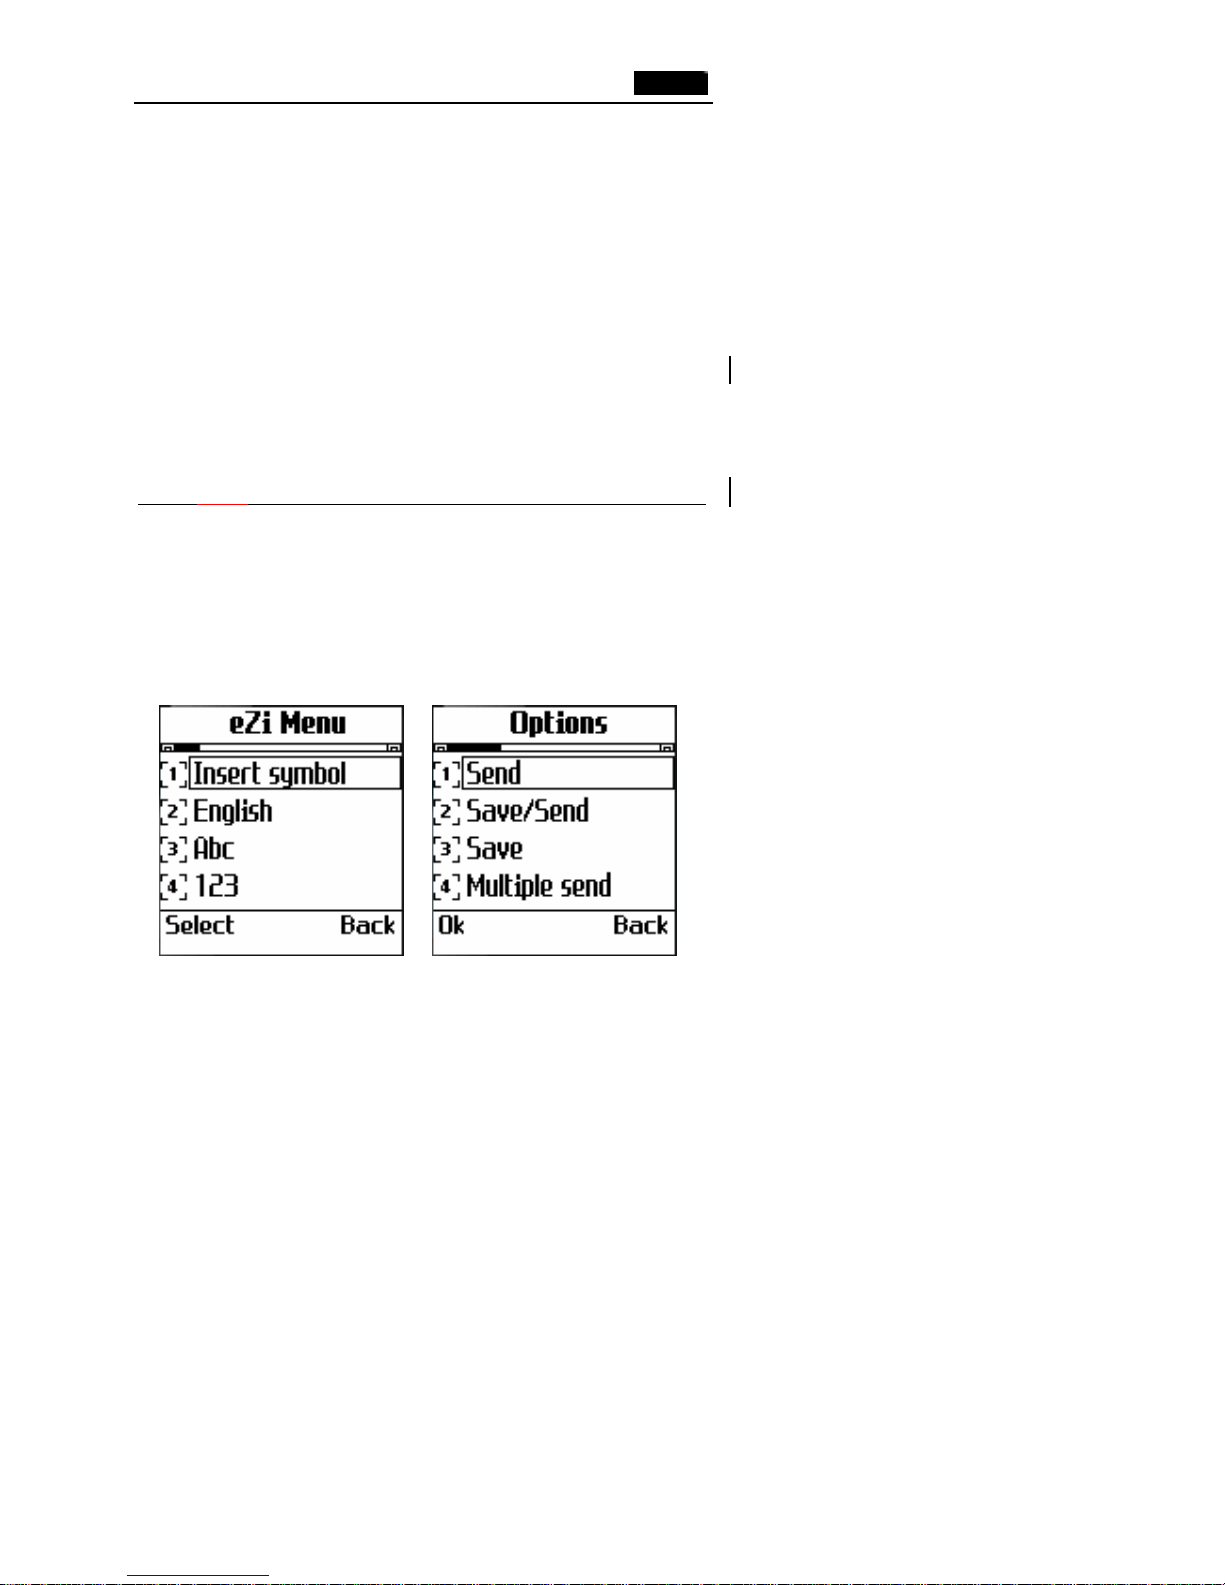
The text message can be made up of 160 letters at most (or 70 Chinese
characters). Edit a new message or press ‘Send’ key and enter the “eZi
Menu”, select “Insert Template”, press left soft key to insert the
desired custom. After inputting the text message, press left soft key
and you have the following options:
Page 40

40
Send: Send the message.
Save/Send: Allows you to save and send t he message. Even it
send fail, it can be stored in outbox.
Save : Allows you to save the message so that it can be sent
later.
Multiple Send: Allows you to send the message to multi
receivers. You can send the message to less
than 5 phone numbers.
Note:
1. To send text messages by phone, you must obtain the number of the
SMS centre from your service provider. The number of the SMS centre is
included in SIM card mostly.
2. Enter the number of destination, or press left soft key to enter the
PhoneBook, select the number by Name.
Delete
You can delete the messages in Inbox or Outbox.
For example: Press ‘OK’ left soft key to select ‘Inbox’, select ‘One By
One’, press 5 6 keys to select the message you want
and then press ‘Delete’ left soft key to delete it. You
can also select ‘Delete All’ to delete all messages in the
inbox.
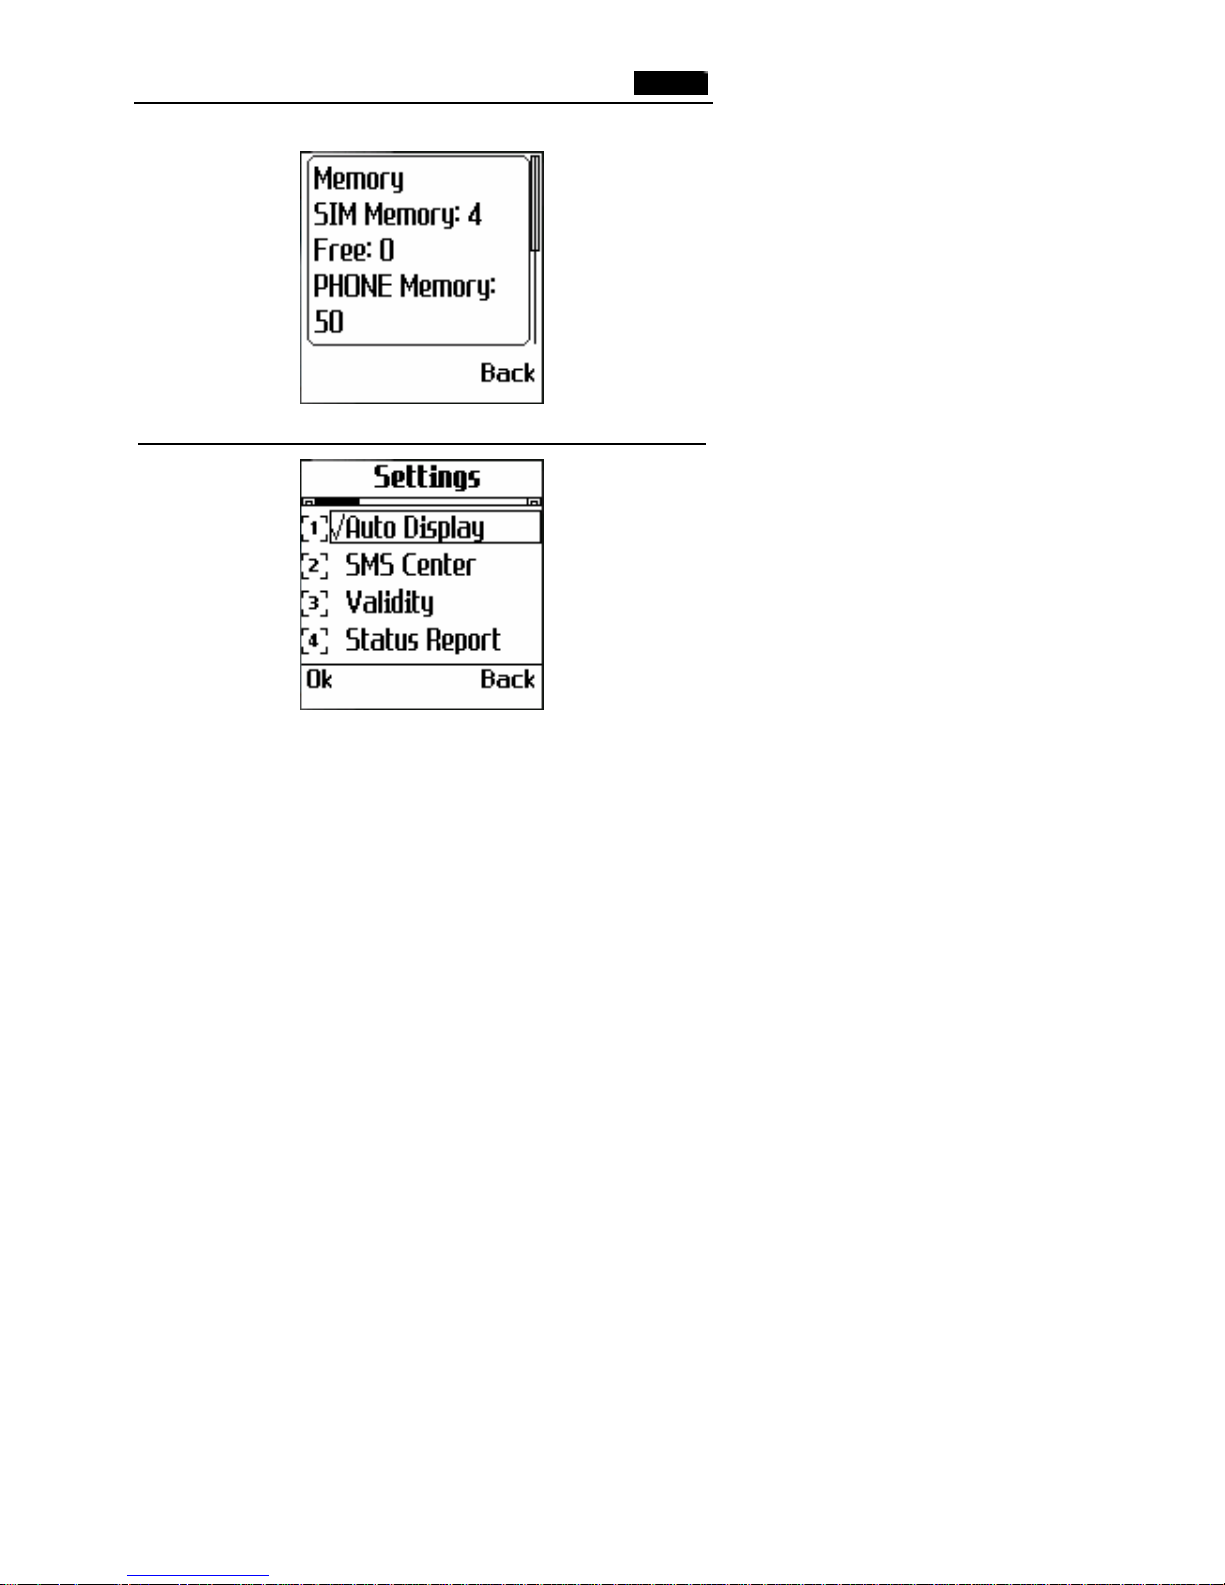
Memory
Page 41
41
You can select the menu to check total space available.
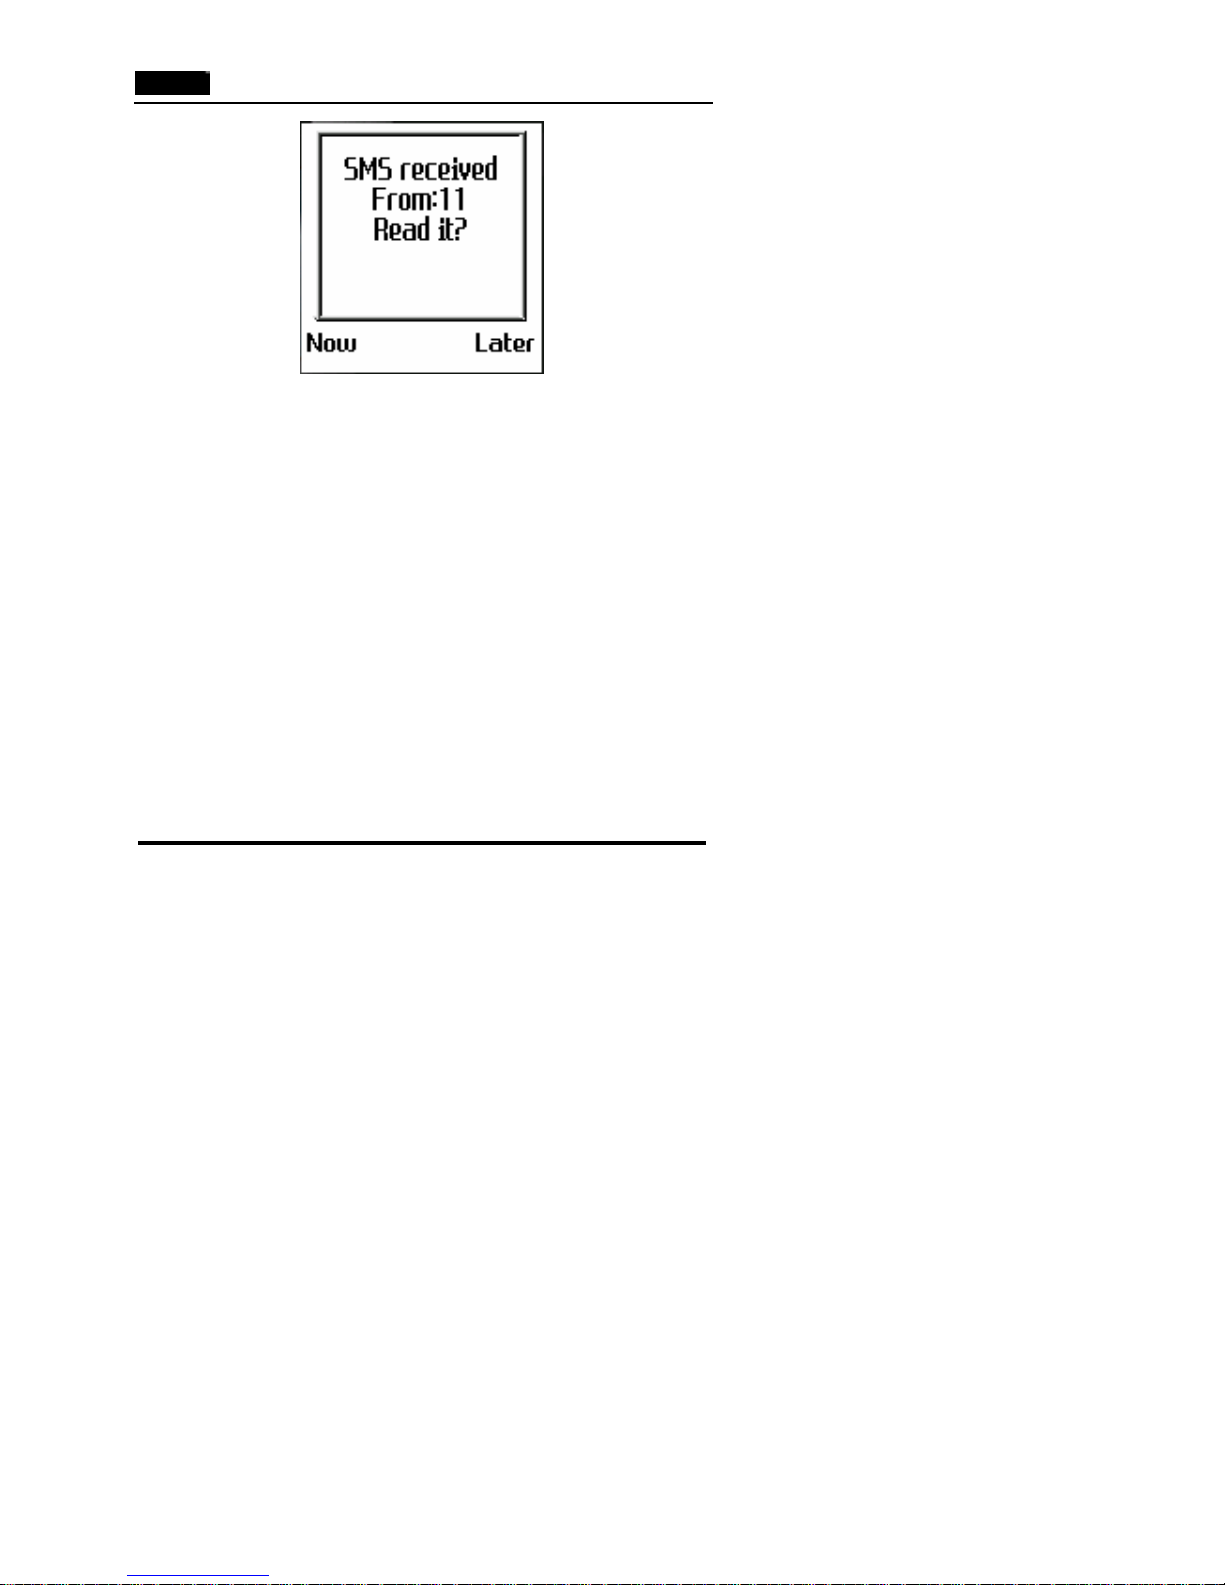
Set
Auto display: Select this function and press ‘Ok’ soft key. When you
receive a new message, it can display automatically.
You can select ‘Cancel ’to cancel this function.
Page 42
42
SMS Center: Allows you to store or change the number of your SMS
center while sending messages. You can obtain this
number from your service provider.
Validity: Allows you to set the length of time for which your text
messages will be stored at the message center while
attempts are made to deliver them to you. 1 hour, 6
hours, 12 hours, 1 day, 2 days, 1 week, and Max are
available.
Status Report: You can select ‘On’ to require the SMS center to
inform whether your message has been sent or not.
SMS PWD: You can select ‘On’ to require operator to input SIM
Lock Code when the operator want to read inbox and
outbox.
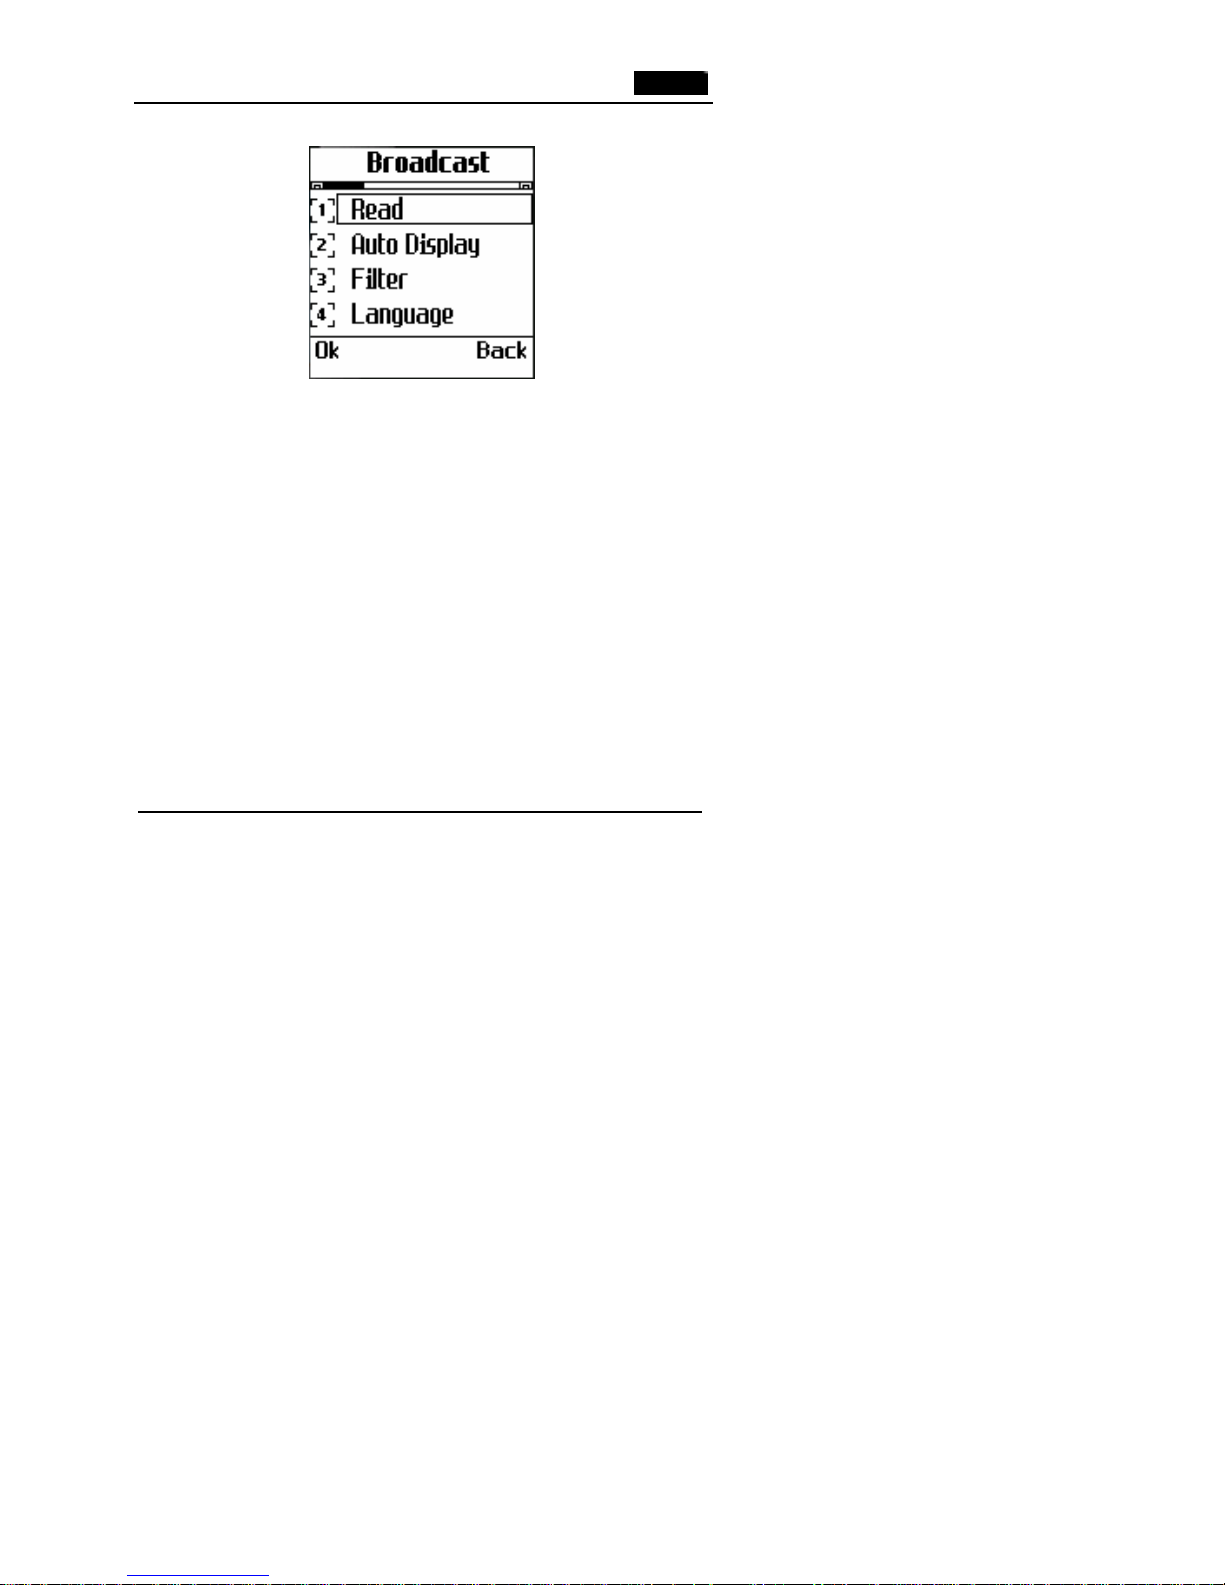
Broadcast
You can receive broadcast messages with various contents via this
network service, such as weather or traffic.
Page 43
43
Read: You can view the up to date broadcast message.
Auto Display: If you set this function ‘on’, messages are display ed
immediately when they are received.
Filter: Helps you choose the channels you like from which you can
receive broadcast messages.
Languages: Helps you select the language you prefer in which the
broadcast message displays.
CB Tone: You can select to turn on or off broadcast tone.
Note:
Language support depends on the Network operator.
Voice Mail
This menu provides you with a quick way of accessing your voice
mail (if provided by your network):
Number: Allows you to input the mailbox number obtained from
Page 44

44
your service provider.
Call : press the ‘Send’ soft key to listen to your messages.
Models
Several customized short message have been stored in this item and
you can edit some customized message to be sent conveniently later.
MMS
Note: Both WAP and MMS Server have the correct settings to use MMS
function.
New
You can create one new message by selecting ‘New’ or ‘From
Template’
The following process to edit and send a message:
1.Press 5or 6 key to choose the content:
Add Text : Enter the text. Press left soft key to enter, the cursor
glints in the editing frame, enter the text directly. Press
‘*’ key to change the text mode; press left soft key to
confirm.
Add Image: Press left soft key to select the stored pictures;
Add Sound: Press left soft key to select the stored music;
Add Slide: Press left soft key to add one slide.
2. When you finish editing, press option soft key:
Select ‘send’, select the number or e-mail address from your
PhoneBook, or input it directly, use the blank key if there are several.
Page 45

45
Inbox
1 .In the message list displayed the receiving messages, with indicated
icon, title, time and size of every message.
2? Press 5or 6 key to select a desired one.
3? Press ‘Option’ soft key:
View(or Receive) : Press left soft key to view
the received message or to receive a new
one.
Delete : Press left soft key to delete the message.
Detail: Press left soft key to view the title of the message, the
sender, the time and the size.
Outbox
The message you’ve failed sending are stored in the Sent box when
you make some settings: Select Settings->Store the sent
message->Activate?
Enter the Sent Box, the available options and operations are the same
as those in Inbox.
Drafts
When editing or viewing message, you can store it in Draft box, and
select one to reedit and send.
Sent
Page 46
46
The messages you’ve sent are stored in the Sent Box if you make
some settings: Setting ->Store the Sent Message->Activate.
Templates
When editing or viewing the MMS, you can store it in the ‘Template’
in order to edit or sent it later.
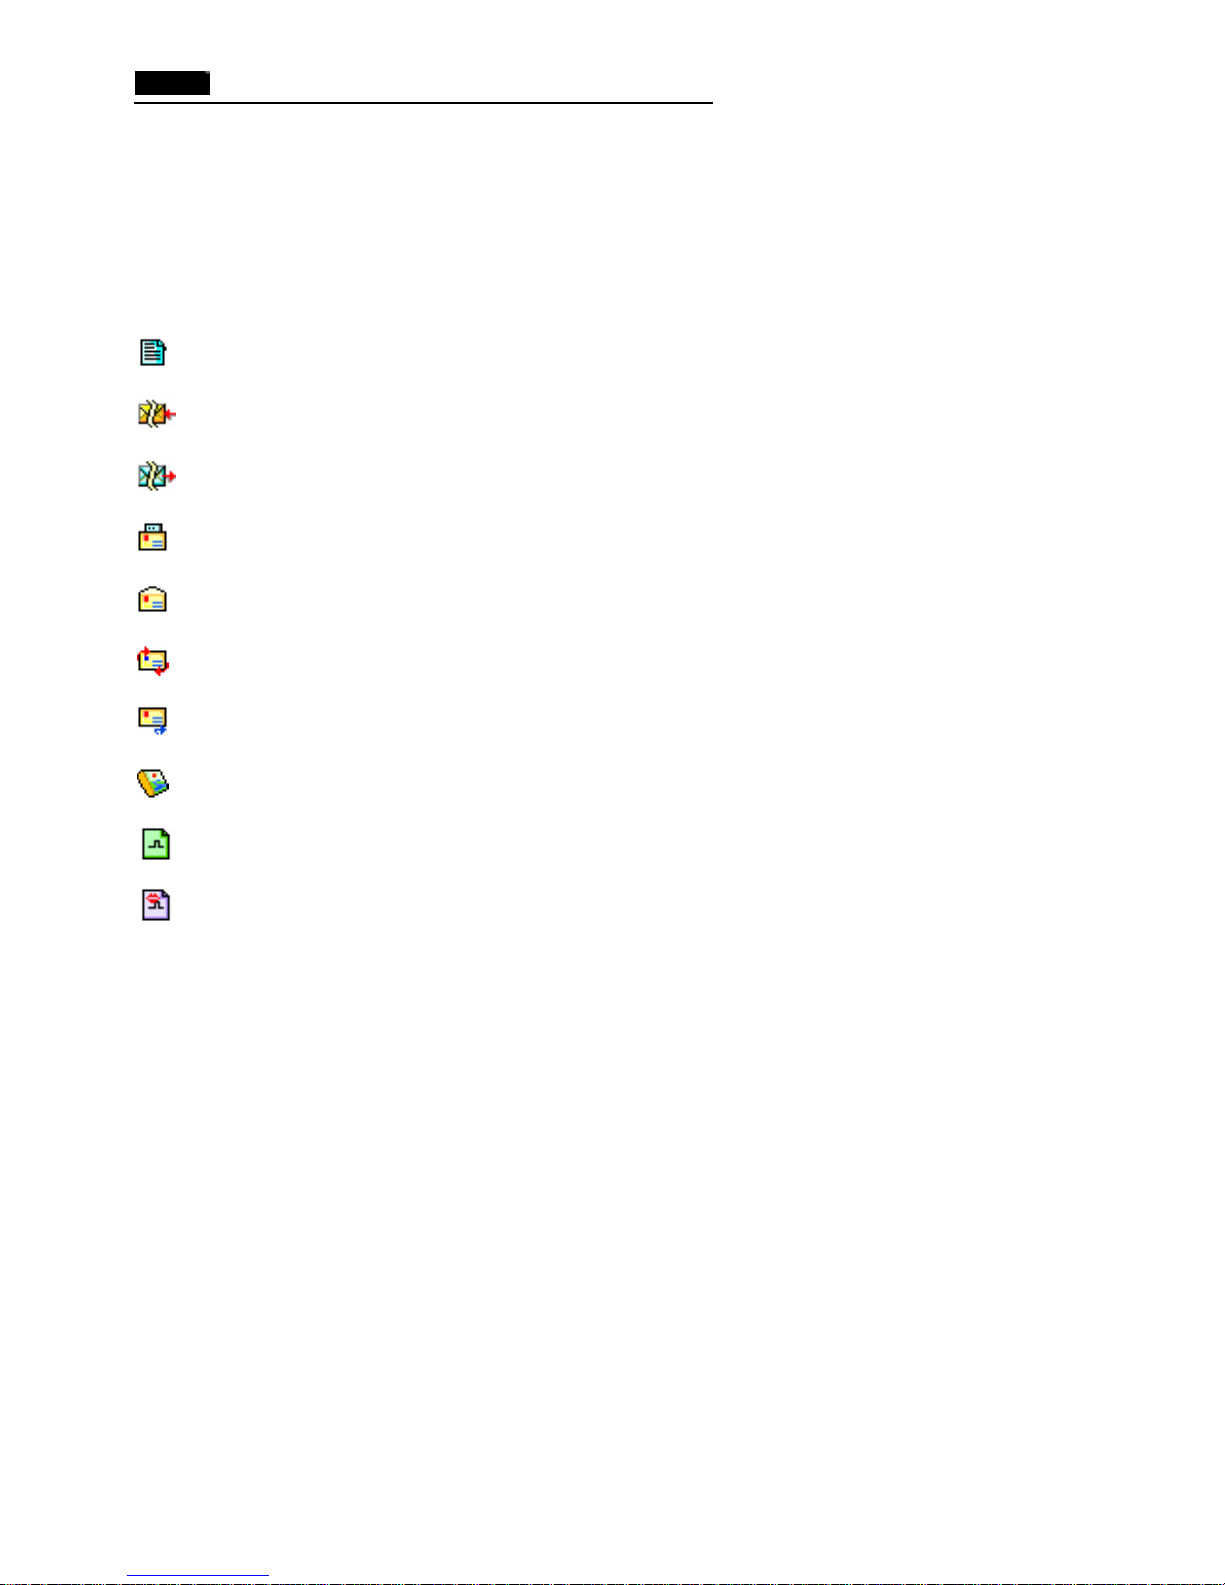
Icons:
New Message
Fail receiving
Fail sending
To be checked
Been read
Forwarded
Replied
Image
midi audio file
amr sound file
Page 47

47
fr sound file
Memory
You can check up the total space and the space available in each
box.
Settings
Connection: You can choose from ‘Proxy Server’, ‘Add Server’, ‘Add
from preset list’ to add up to 9 proxy servers in the
connection list. Select one to reset its parameters.
( Refer to Parameter Table in appendix) .
Adverts: You can choose whether or not receive the adverts.
Validity: Allows you to set the length of time for which your messages
will be stored at the MMS center while attempts are
made to deliver them to you.
Save Sent: To set whether or not store the messages which have been
sent.
Receiving Mode: To set the mode of receiving MMS.
Page 48

48
ENTERING TEXT
When storing a name in the phonebook, creating your personal
greetings or scheduling events in your calendar, you will need to enter
text.
You are provided with the following text input modes.
• Symbol: Allows you to enter the symbols or punctuation
marks.
• English: Allows you to enter the English letters by pressing
each key once for each character.
• Abc: Allows you to enter letters by pressing the key
labeled with the desired letter once, twice, or three
times until the letter appears on the display.
• 123 : Allows you to enter numbers.
Page 49

49
Changing Text Inputting Mode
When in a text entry screen, Press the key to enter the eZi Menu
list, and press the ? or ? key to find the desired input mode from
the list.
The following options are available:
• Insert Symbol
• English
• Abc
• 123
• Insert Template
• Insert Phone No.
• Dictionary
You will see the text input mode indicator in the top line of the
display:
• eng › eZi English mode
• Abc › Abc mode
• 123 › Numeric mode
Note:
The current input method will be the same as the one you last used
before you quite the input mode.
Page 50

50
Using User’s Dictionary
While entering a SMS message, you can use your own dictionary
which allows you to add a new word-and then the word has a high
priority in eZi English mode.
Adding a Word to the Dictionary
1. In the text en try mode, press the key.
2. Press the ? or ? key to scroll to Dictionary and press the
Left soft key.
3. Select New and input the word you want to add, then press the
Options soft key.
4. Press the ? or ? key to scroll to Add to UPD and press the
Left soft key to add the word.
Now, the added word becomes the first candidate for the associated
keypress. You can check the added words on the List Dictionary
menu.
Deleting the Words from the Dictionary
1. In the screen of eZi text mode, press Left soft key.
2. Use the ? or ? key to scroll to List Dictionary and press Left
soft key .You can see the list of the words you have added.
3. Use the ? or ? key to find the word you want to delete, and
press the Options soft key.
4. Press the ? key to scroll to Del from UPD then Left soft key to
delete the selected word.
Page 51
51
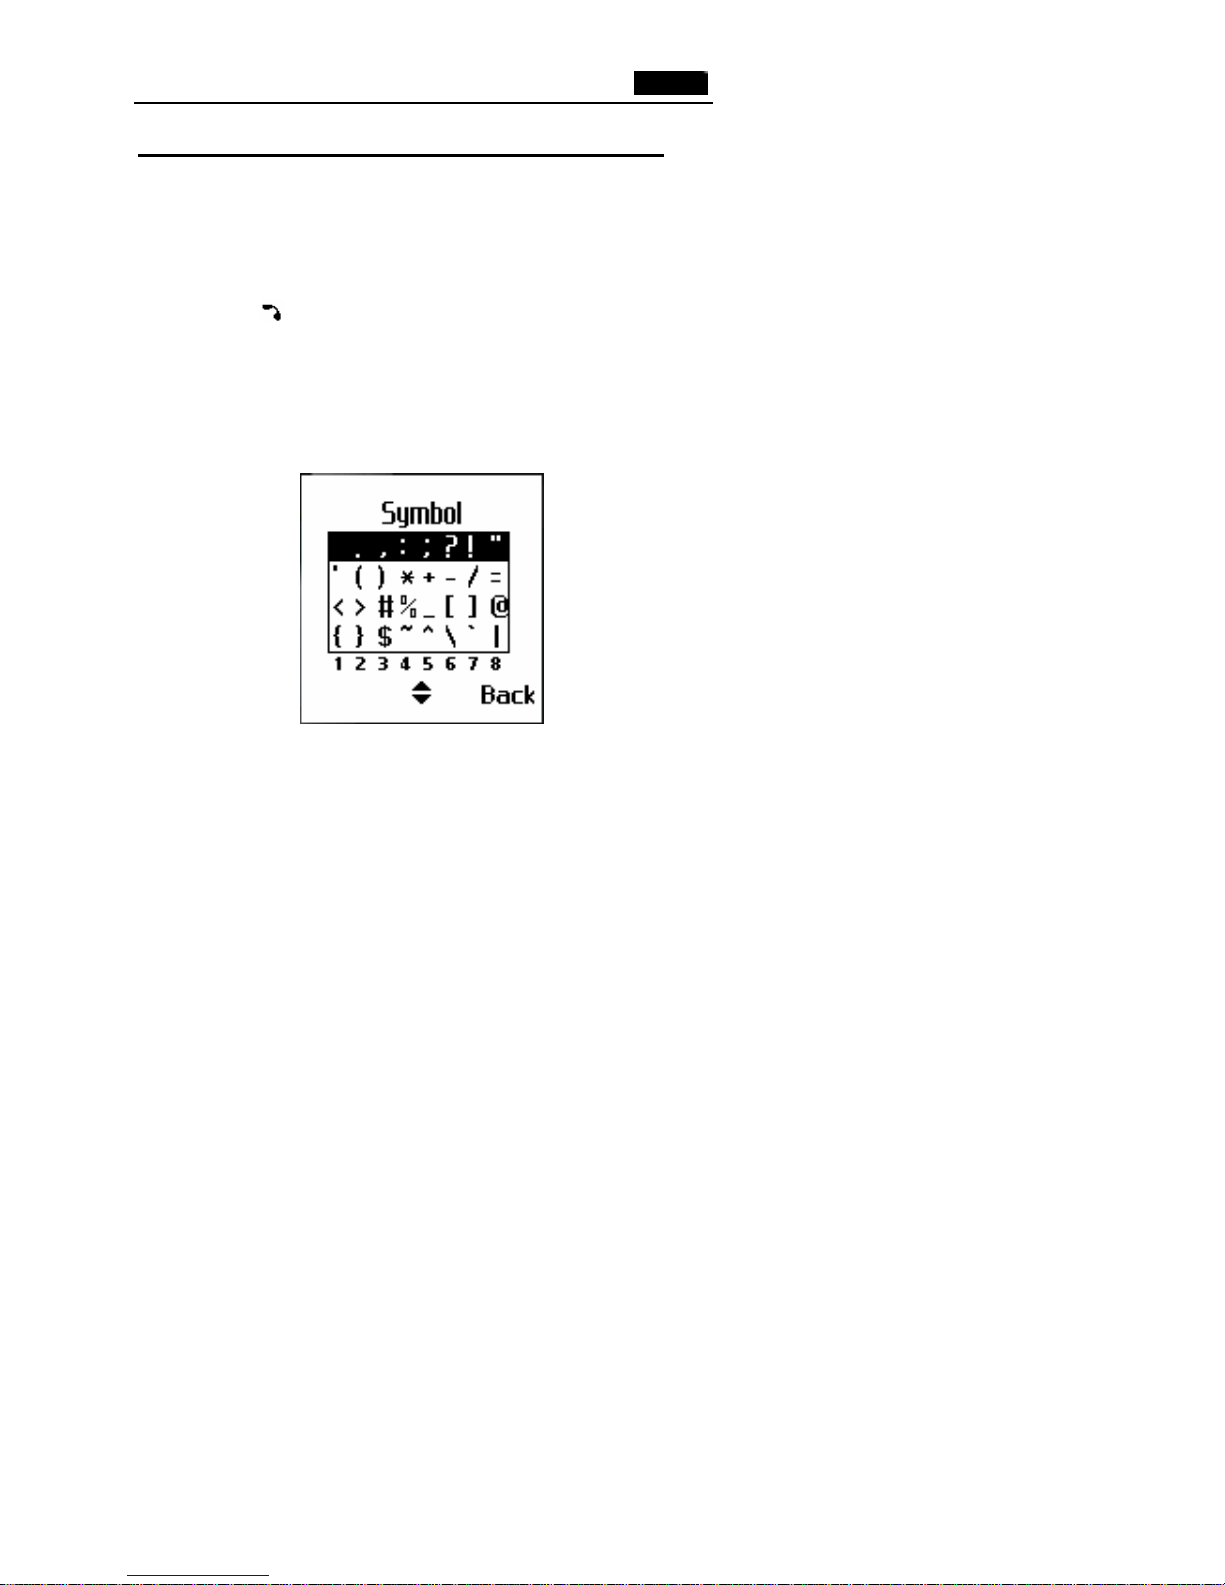
Insert Symbol
Symbolic mode enables you to enter symbols into a text message.
To enter a symbol,
1. Press the key in the text entry mode.
2. Press the ? or ? key to select the column which including
the symbol mark you want to use.
3. Press the corresponding numeric key to insert the desired symbol
mark.
Then, the phone automatically switches back to the text entry mode
used just prior to selecting Symbols mode.
Tip:
The alternate method to enter a common symbol is pressing the 1 key one
or more times in the text entry mode.
Page 52

52
eZi English Mode
This mode allows you to enter words with only one keystroke per
letter. Each key on the keypad has more than one letter – when you
press once, J, K or L may be displayed. The English mode
automatically compares your keystrokes with an internal linguistic
dictionary to determine the correct word, thus requiring far fewer
keystrokes than the ABC mode.
For example:
To enter ‘hello’, press the following keystrokes: 4, 3, 5, 5, 6. If the
word that appears in the display is not the word that you desire, press
the „ or ƒ key to display alternate word choices for the keys you
have typed. (For example, ‘of’ and ‘me’ both shares the sequence 6, 3)
The phone displays the most commonly used choice first.
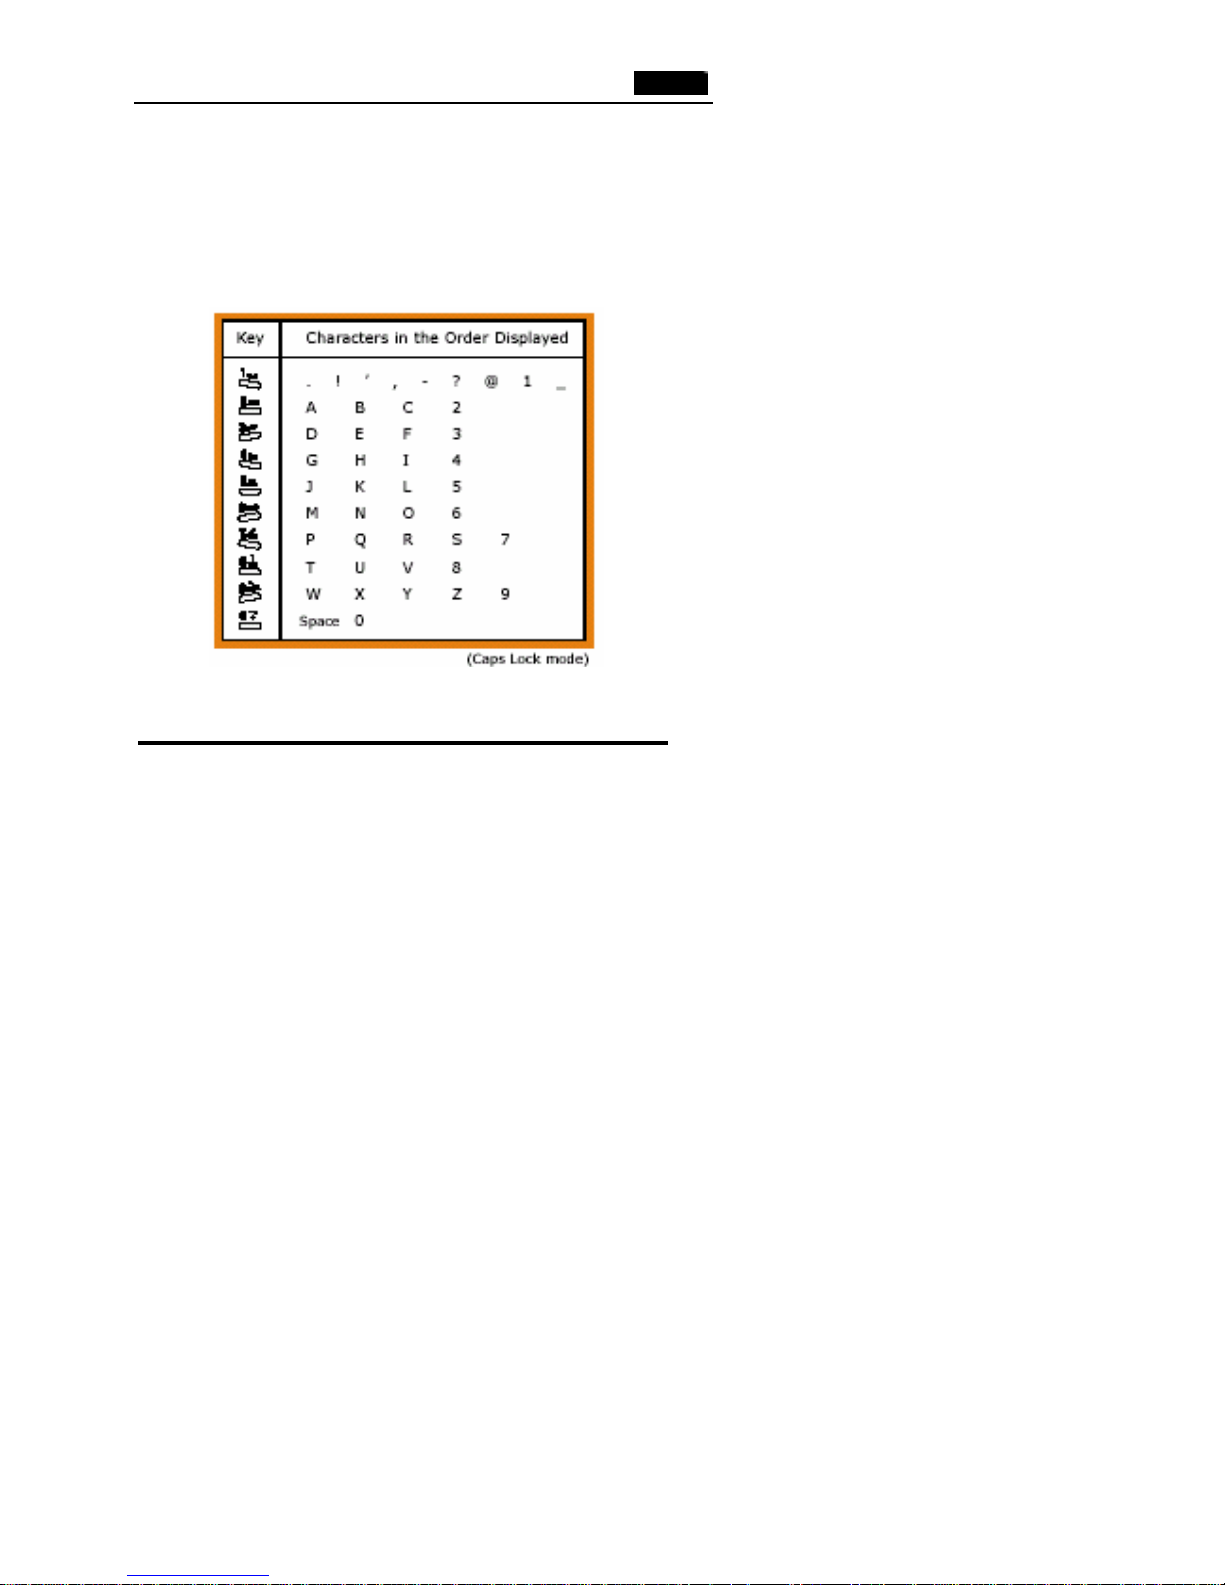
Abc Mode
This mode allows you to enter letters by pressing the key labeled with
the required letter once, twice, three or four times until the letter is
displayed. For example, you press the 2 key three times quickly to
display the character “C”, the 5 key two times quickly to display the
character “L”.
There are three models: ABC, abc and Abc, press the # key to change
the inputting mode.
Page 53
53
Note:
When entering the same character twice (or a different character on the
same key), just wait for a second for the cursor to move right
automatically, and then select the next character.
List of characters available:
123 Mode
Numeric or 123 indicate numeric mode. It enables you to enter
numbers into a text message. Press keys corresponding to the desired
digits, and manually switch back to the text entry mode of choice.
Page 54

54
List of Menu Functions
The list shows the menu structure available and indicates the number
assigned to each option.
1? Fun
1-1: FM Tuner
1-2:Karaoke
1-3: Games
2? Internet
2-1 :Homepage
2-2 :Bookmarks
2-3 :Go To URL
2-4 :Settings 2-4-1:Connection
2-4-2 :Clear Cache
2-4-3 :Reset
1-3-1: Test Vision
1-3-2: Snake
1-3-3: Teris
Page 55

55
3? Personality:
3-1: Display
3-1-1: Standby
3-1-2: Power on
3-1-2-1:Text
3-1-2-2:Animation
3-1-3: Power off
3-1-3-1:Text
3-1-3-2:Animation
3-2: Sound
3-2-1:Music Select
3-2-1-1:Incoming Tone
3-2-1-2:SMS Tone
3-2-1-3:AlarmClock Tone
3-2-1-4:Calendar Tone
3-2-1-5:Countdown Tone
3-2-1-6:Power on Tone
3-1-1-1: Picture
3-1-1-2: Calendar
3-1-1-3: Text
3-1-1-4: Downloaded
Page 56

56
3-2-2:Volume
3-2-3:Call prompt
3-2-3-1:Tone
3-2-3-2:Vibrator
3-2-3-3:Tone&Vibrator
3-2-3-4:No Notify
3-2-4:Key Sound
3-2-4-1:DTMF Tone
3-2-4-2:Silence
3-2-5Prompt Sounds
3-2-5-1:Inf Beep
3-2-5-2:Service Beep
4? Settings
4-1: Clock
4-1-1:Alarm
4-1-1-1:Alarm 1
4-1-1-1-1: Time
4-1-1-1-2:Mode
4-1-1-1-2-1:Everyday
4-1-1-1-2-2:Workday
4-1-1-1-2-3:personal
Page 57

57
4-1-1-2:Alarm Clock2
4-1-1-3:Alarm Clock3
4-1-1-4:Cancel All
4-1-2:Auto On/Off
4-1-2-1:Power On
4-1-2-1-1:On
4-1-2-1-2:Set
4-1-2-2:Power Off
4-1-2-2-1:On
4-1-2-2-2:Set
4-1-3: Time
4-1-4: Date
4-1-5: Time Format
4-1-5-1:24 h
4-1-5-2:12 h
4-1-6: Date Format
4-1-6-1:D/M/Y
4-1-6-2:M/D/Y
4-1-6-3:Y/M/D
4-2: Mobile
Page 58

58
4-2-1:Language
4-2-1-1:English
4-2-2:Auto Key Lock
4-2-3:Contrast
4-2-4:Backlight
4-2-5:Reset All
4-3: Call
4-3-1:Divert
4-3-1-1:Not reachable
4-3-1-2: No Reply
4-3-1-3:All
4-3-1-4: Busy
4-3-1-5:Status
4-3-1-5-1:Not Reachable
4-3-1-5-2: No Reply
4-3-1-5-3:All
4-3-1-5-4: Busy
4-3-1-6:Cancel All
4-3-2:Incoming Filter
4-3-2-1: Reject
4-3-2-1-1: list
4-3-2-1-2: Number
4-3-2-2: Accept
4-3-2-2-1: List
4-3-2-2-2: Number
Page 59

59
4-3-3:Volume
4-3-4:Answer Mode
4-3-4-1:Call Key
4-3-4-2:Any key
4-3-4-3:Auto
4-3-4-4:ProSlide Answer
4-3-5:Auto Redial
4-3-6:Send Number
4-3-6-1: Set by Net
4-3-6-2:On
4-3-6-3:Off
4-3-7:1’ Beep
4-3-8:Call Waiting
4-3-8-1:Activate
4-3-8-2:Cancel
4-3-8-3:Status
4-4:Network
4-4-1:Mode
4-4-1-1:Auto
4-4-1-2:Manual
4-4-2: Search
4-4-3: Sequence
Page 60

60
4-4-4:Band 4-4-4-1:GSM1900
4-4-4-2:GSM900/1800
4-4-4-3:Automatic
4-5: Security
5? Toolbox
5-1: Voice Memo
5-2: PC Sync
5-3: Calculator
5-4: Word Time
5-5: Countdown
5-6: Multimedia File
4-5-1: SIM Lock
4-5-2: Check PIN
4-5-3: PIN1 Change
4-5-4: PIN2 Change
4-5-5: PWD Change
4-5-6: Fixed Numbers
4-5-7:Bar Calls
5-1-1: Record
5-1-2: Play
5-1-3: Label
5-1-4: Delete OneByOne
5-1-5:Delete All
5-6-1: Image
5-6-2: Audio
5-6-3: Karaoke
5-6-4:Memory
Page 61

61
6? Private
6-1: Call Lists
6-2-1:Calendar
6-3: Notes
7? Messages
7-1-1:Inbox
7-1-2:Outbox
7-1-3:Write SMS
7-1-4:Delete
7-1-4-1:Inbox
7-1-4-1-1:Delete OneByOne
7-1-4-1-2:Delete All
7-1-4-2:Outbox
7-1-4-2-1: Delete OneByOne
7-1-4-2-2:Delete All
7-1-5:Memory
6-1-1: Incoming
6-1-2: Missed
6-1-3: Outgoing
6-1-4: Last
6-1-5: Total
6-1-6: Charge Info
6-1-7: Blacklist
7-1: SMS
Page 62

62
7-1-6: Set
7-1-6-1:Auto Display
7-1-6-2:SMS Center
7-1-6-3:Validity
7-1-6-4:Status Report
7-1-6-5:SMS PWD
7-1-7:Broadcast
7-1-7-1:Read
7-1-7-2:Auto Display
7-1-7-3:Filter
7-1-7-4:Languages
7-1-7-5:CB Tone
7-1-8:Voice Mail
7-1-8-1:Number
7-1-8-2:Call
7-1-9:Models
7-2:MMS
7-2-1:New
7-2-1-1:New
7-2-1-2:From Template
7-2-2:Inbox
7-2-3:Outbox
7-2-4:Drafts
7-2-5:Sent
7-2-6: Templates
Page 63

63
7-2-7:Memory
7-2-8:Settings
7-2-8-1:Connection
7-2-8-2: Adverts
7-2-8-3: Validity
7-2-8-4:Save Sent
7-2-8-5:Receiving Mode
FUN
FM Tuner
You can listen to the FM radio
Caution: 1.The frequency is from 87.9MHZ- 108.0MHZ.
2.This function has to be used with earphone.
Operate
Press ??to choose the volume of the sound.
Press ??to choose the channel (You can save 10 channels)
Page 64

64
Operating menu
Edit name:
Give the current channel a name (In 4 Chinese characters or 8 English
letters).
Automatic Tuning
Press ?? to search and the system will stop at the first channel
which you searched.
Manual Tuning
Press ?? to search(the frequency will change 0.1MHZ every time
you press the ?? key)
Set frequency
You can set the current frequency.
Note: You should save the frequency which you set,or it will disappear
next time.
Switch Off
Press left soft key to close (the radio will be closed if you take
off the earphone)
Karaoke_________________________________________
You can enjoy some music with words and flash animation through
Page 65

65
this music player. There’re two songs stored in this player. Press • or
‚ to scroll to your desired song.
To … Then press…
Send Key Pause
Play the song Left soft key
Repeat Left soft key
Advance or back ƒ or „
Adjust the music scale • or ‚
Exit Right soft key
Games
Test Vision
Start : Start a new game?
Help: Describes the rules in the game.
Beep: Allows you to select voice on/off of the game.
Snake
Page 66

66
The directional key controls the direction of snake moving. The snake
will lengthen when you eat. If you can eat much food without
bumping the wall and itself, you can get higher score.
Start : Start a new game.
Level: The speed will go up with the class increasing.
Help: Detailed operation method in offering.
Score: Five best scores are recorded.
Tetris
Start: Start a new game.
Level: The speed of the descending
Help: Describes the rules in the game.
Score: You can look up score list.
Beep: Switch on/off the sound.
INTERNET/WAP
WAP is a platform of combining wireless communication with internet,
you can gain abundant internet information and some application of
e-commerce by phone.
Note: To connect wap net, you need network sustain and you should
apply for the service of surfing internet, the method of setting details
Page 67

67
in ‘Setiings/WAP Settings’.
Select Internet -> Homepage to connect WAP. You can also select Go
to URL from WAP Settings to visit a certain URL.
Note: Press and hold the key * to enter the browser menu.
The following options are available when visit WAP.
Back: To return the previous window.
Home: Skip to the homepage.
Exit: Exit the browser window.
Mark Site: Allows user to add website in bookmark, in order to visit
anon.
Bookmarks: Display the websites list you have added, select one to
visit the corresponding web.
Inbox: You can check up what ’s in your inbox.
Save Image: You can store your favorite pictures.
Reload: Exit browser menu, return to the page you just visiting.
Settings: You can make some modifications on settings of homepage
and proxy server.
About: You can look up some information about the browser.
Note: Your network serves possible non-support in some functions
Keyboard use:
Press “end” key to shift letter symbol or number input, press “ *” key
to shift letter, press “right” soft to delete, hold “right” soft key to clean
edited text. Press • ‚ key to move the cursor.
Page 68

68
Shortcut:
In WAP window, press and hold 1-9 key, to enter directly the
corresponding webside in your bookmark; hold 0 key to enter your
Inbox; hold to exit the browser.
Amoi WAP Special area:
Select the function of amoi WAP special area to enter, you can view
information from the WAP website that is cooperated between sina
and Amoi, to download the ring or picture.
Note: Service provider dependent, please check with local dealers for
more details.
Setting
1. connection
You can choose from the preset opt ions or according to your own
meaning.
Take Telcom GPRS for example:
Name: Set your favorite names such as Telcom.
Homepage: You can set the homepage, such as
http://wap.monternet.com.
Security: You can set it as On or Off. Off is recommended.
IP Address: Set IP address linking to homepage. For example:
010.000.000.172
Bearer: Set the types of data service, choose from GPRS and Data.
AP Name: Input AP name, such as cmwap.
User Name: Set the user name for WAP, for example, lovely.
Passeword: Set password for WAP.
Page 69

69
2. Bookmarks
New Bookmark: You can add a URL which you visit frequently to
your Favorite and entitle it so that you can visit it
easily.
Go To Bookmark: Enter the favorite, select one URL title and link to
the correspondent homepage.
3. Go to URL
Enter an URL and press the ok key, then your handset can start to link.
When your handset can not link to the URL, it will link to the
homepage automatically.
4. Settings
Reset all of the settings of WAP.
PERSONALITY
Display
Menu Style
This option allows you to select the menu display style. You can
choose between Bitmap and Animated.
Display
Page 70

70
Standby
Your phone provides you with a variety of items to display in Standby
mode. You can change the idle screen to one of the following items
depending on your preference.
The following Options are available:
Picture: Display the selected picture.
Calendar: Display a calendar. You can select Monthly calendar.
Text : Display the text you have created as your preference. Create
your message up to 19 characters.
Downloaded: You can use RAF to download back images.
Power On
You can select the Animation or Text for your phone’s display when
the phone is switched on or turned off.
Power Off
Sound
You can select the music styles of your phone’s ringing and set the
different profiles.
Music Select
Incoming Tone
There are 27 kinds of ring s for you to choose ;
Page 71

71
Message Tone
There are 5 kinds of ring s for you to choose ;
AlarmClock Tone
There are 27 kinds of rings for you to choose ;
Calendar Tone
There are 27 kinds of rings for you to choose ;
Countdown Tone
There are 27 kinds of rings for you to choose ;
Power on Tone
There are 27 kinds of rings for you to choose ;
Volume
You can adjust the volume of ring. Press ?key to increase volume
and ? key to decrease .
Call Prompt
You can select Tone , Vibrator, Tone&vibrator,or No Notify when
there is an incoming call. Scroll to the option you want, press ‘Ok’ soft
key to confirm.
Key Sound
To adjust the Key sound, you can select ‘DTMF Tone’, or ‘S ilence’.
Prompt Sounds
Info Beep: The information indication tones of the phone. For
example: tone if low battery. Select it and then press
Page 72
72
‘on’ soft key. To cancel this feature, press ‘off’.
Service Beep: The phone will send out the service tone when it
connects to the network for the first time, if it is
active.
SETTINGS
Many different features of your phone can be customized for your
preferences.
Clock
Alarm
There are three alarm clocks to be used. For every alarm, you can
make the following operations:
Time: Set the time when the alarm will work.
Mode: There are three modes.
1. Everyday: The alarm works at the set time every day.
2. Workday: The alarm works at the set time from Monday to Friday.
3. Personal: You can choose one or several days of one week for the
alarm to work.
Cancel All: Close all alarms.
Note:
The alarm works at the set time, press any key except and
to stop it; if not, it continues to alarm for one minute.
Auto On/Off
Deleted: 
Page 73
73
The phone will switch on or off at the preset time.
On: Enable the automatic power on/off of the phone.
Set: Enter the time when you want your phone to switch
on/off.
Time
This function allows you to change the current time displayed in
standby state.
Date
This function allows you to change the current date displayed in
standby state.
Time Format
Choose between 24 hours mode and 12 hours mode.
Date Format
Format date: Select the day format:
D/M/Y
M/D/Y
Y/M/D
Mobile
Language
² English: All the menus and information is displayed in English.
Auto Key Lock
Page 74
74
You can use the auto key lock to avoid touching keyboard wrongly.
When you choose this function, the keyboard will be locked after
30seconds idle.
Note:
You can lock the keyboard by hands.
Contrast
You can adjust the contrast of by pressing ?? keys.
Backlight
You can select whether or not to use the backlight of phone and its
contract. The backlight comes on when you open your phone and
switches off if no key is pressed within the set time.
You can choose among Always On/5 seconds/10 seconds/20 seconds.
Reset All
You can reset some settings to factory set. You need enter PCK
number.
Call
Divert
This network service enables the incoming calls to be transferred to
the number that you specify. For example: You may hope to transfer
your business calls to a colleague while you are on holiday.
Deleted:
Deleted: ing
Page 75

75
Not reachable: Calls are transferred if you are not in an area covered
by your service provider.
No reply: Calls are transferred if you do not answer the call.
All: All calls are transferred.
Busy: Calls are transferred if you are already making another call.
Note: This option is invalid if Call Waiting is activated, unless you reject
the incoming call.
Status: You can inquire the network about the current status of Call
Transfer function.
Cancel all: All Call Transfer functions are cancelled.
Select one item to divert your phone, you should:
1.Scroll to the desired item then press Left soft key.
2.Select ‘Divert On’ and press Left soft key (If you want to cancel this
operation, select ‘Divert Off’)
3.Input the number you want to divert to, press Left soft key.
4. The info is displayed to indicate if you’ve succeeded this execution
or not.
Incoming Filter
With this operation, you can put numbers into Reject Number that will
never get through your phone; and put numbers into Accept Number
so that the others can’t get through your phone.
Reject/Accept List: The rejected/accepted numbers are listed and you
can get the prompt information in the standby mode.
Page 76

76
Reject/Accept Number: Enter the numbers that you want to
reject/accept.
Volume
Adjust volume of talk by pressing the ƒ or „ key or via side keys
during a call.
Answe r Mode
There are three methods to ans wer a call.
Call Key:
Press to answer a call.
Any Key: Press any key to answer a call.
Auto:
If you insert Car Kit, the phone can automatically answer after 3
seconds. Before the auto answer, you can also press to answer it.
ProSlide Answer: Slide the phone to answer a call.
Auto Redial
If switching auto redial on, the phone will display “Auto redial” after
an unsuccessful call. Press to redial.
Send Num ber
This function must be supported by network.
Set by Net:
Your phone number will be hidden or displayed according to the
network when making a call
Page 77

77
On: Your phone number will be displayed to receiver.
Off: Your phone number will be hidden and unknown to receiver.
1’ Beep
Set to hear an elapsed time reminder in the 50th second of every
minute during your calls.
Call Waiting
The phone supported the function of ‘call wait ’ and ‘ call hold’ of
GSM net. If you select this function, the network will tell you there is
a new call coming in during another call. You can receive the new call
by hold the present call.
Activate: The Call-Wait Tone will be heard when there is another new
call coming during one call. If it’s a domestic fixed phone,
its city name will be displayed, otherwise ‘Incoming’ will be
displayed.
Cancel: By selecting it this function will be canceled.
Status: By Selecting it the status of this network function will be
displayed: ‘Active’ or ‘Off’.
Network
When you use the phone, the phone will auto select the Internet
service. When th e phone is beyond the service area or in abroad, you
can select the appropriate Internet manually.
Mode:
Page 78

78
Switch between these two modes.
. Auto Net Sel
. Manual Net Sel
Search:
To select this item, the LCD will display " searching …..". After
you get it, the GSM will auto display the found network. If there
are two available networks, you can use the ?or? to select.
Those with the mark "*" are forbidden to be used.
Sequence:
This item allows you to list out the Internet you can use when your
GSM in the roaming. If the listed network can be used, your phone
will select the network from the prior list. Three operations are
available.
Move: To press the key ?or? to shift it to your desired place.
New: You can add the new Internet. Input the country code and the
Internet code then press the "confirm" button.
Delete: You can delete the chosen network.
Band: You have 3 choices, American, European and Automatic.
SSeeccuurriittyy
SIM lock:
If enabled, only the current SIM card is valid. When change another
SIM, the mobile will request the phone code.
Check PIN:
Page 79

79
Press the "Select" left soft key to enable this function.
1. To press the "On" left soft key.
2. Input the PIN code and start up the function of PIN check by
press Ok left soft key.
Note:
If you have started up the function of the PIN check function, you have
to input the PIN code every time when you switch on your mobile phone.
If you input the wrong number for three times in succession, the SIM
card will be locked.
3. Press Off right soft key to cancel this function .
PIN1 Change
To select the " PIN 1 Change" by the navigation key ?or? .
1. Press the " select" soft key.
2. Input the old PIN code and press the " Ok" key.
3. Input the new PIN code (four to eight digit) and press the "Ok"
left soft key.
4. Input the new PIN code again and press the "Ok" left soft key.
5. LCD indicate "PIN CHANGED".
Note:
Only first start up the PIN check can alter the PIN code.
PIN2 Change
The process is the same as "PIN Changed"
Page 80

80
PIN code is provided with SIM card, which is used to some special
service such as "call charge" function etc. If you want to know
whether your SIM card can support these functions, please contact
with the network service.
PWD Change
1. Press select left soft key and input the old password, then press the
"Ok".
2. Input the new password and press Ok left soft key.
3. Input the new phone password again and press the Ok left soft key.
4. The screen indicate " phone password changed'.
Fixed Numbers
If the network service can support and your SIM card has this function,
you can limit the outgoing telephone number.
If this function is set in the "On" mode, your mobile phone can only
call the number in the fixed telephone number book. If you dial the
other number (except the urgent number), the phone will display
"Forbidden number". You need input PIN2 code to set this function.
Bar calls
The calling limitation function can help you to limit the incoming and
outgoing calls but this service may not be available on all networks.
The following operations are available:
. All Out: To select this item, the phone will be restricted to dial any
calls (except the urgent calls)
. Out Intl: To select this item, the phone will be restricted dialing the
Page 81

81
international calls.
. Out Intl Roam: To select this item, the phone will restrict dialing
the international calls except to your home
country.
All In: To select this item, it will restrict all incoming calls.
In When Roam: To select this item, it will restrict all incoming calls
when roaming.
. Status: To select this item, you can query the present state.
. Cancel All: To select this item , the phone will allow dialing and
answering all the calls.
TOOLBOX
Voice Memo
With your phone, you can record up to 5 voice memos (including
recording conversation) of 30 seconds in length.
Note: Recording voice conversations is illegal in some countries. Make
sure the other party has stated its consent to being recorded.
Record
1. Scroll to Record, press Left soft key.
Page 82

82
2. Record the voice memo by speaking into the microphone.
Note: When recoding, press Pause soft key to have a pause then Record
key to continue; A timer displays to show you the elapsed time.
When recording time expires, the phone will automatically save the
memo already recorded by that time.
3. When recording is completed, then press End soft key; the
record will be kept at once with the date and time together.
Play
1. Scroll to Playback, press Left soft key and then Play soft key,
the latest memo displays.
2. Press the • or ‚ key to scroll to the desired memo and press
Left soft key to play it back.
Note: While playback, press the End soft key to stop playing and exit the
playback mode.
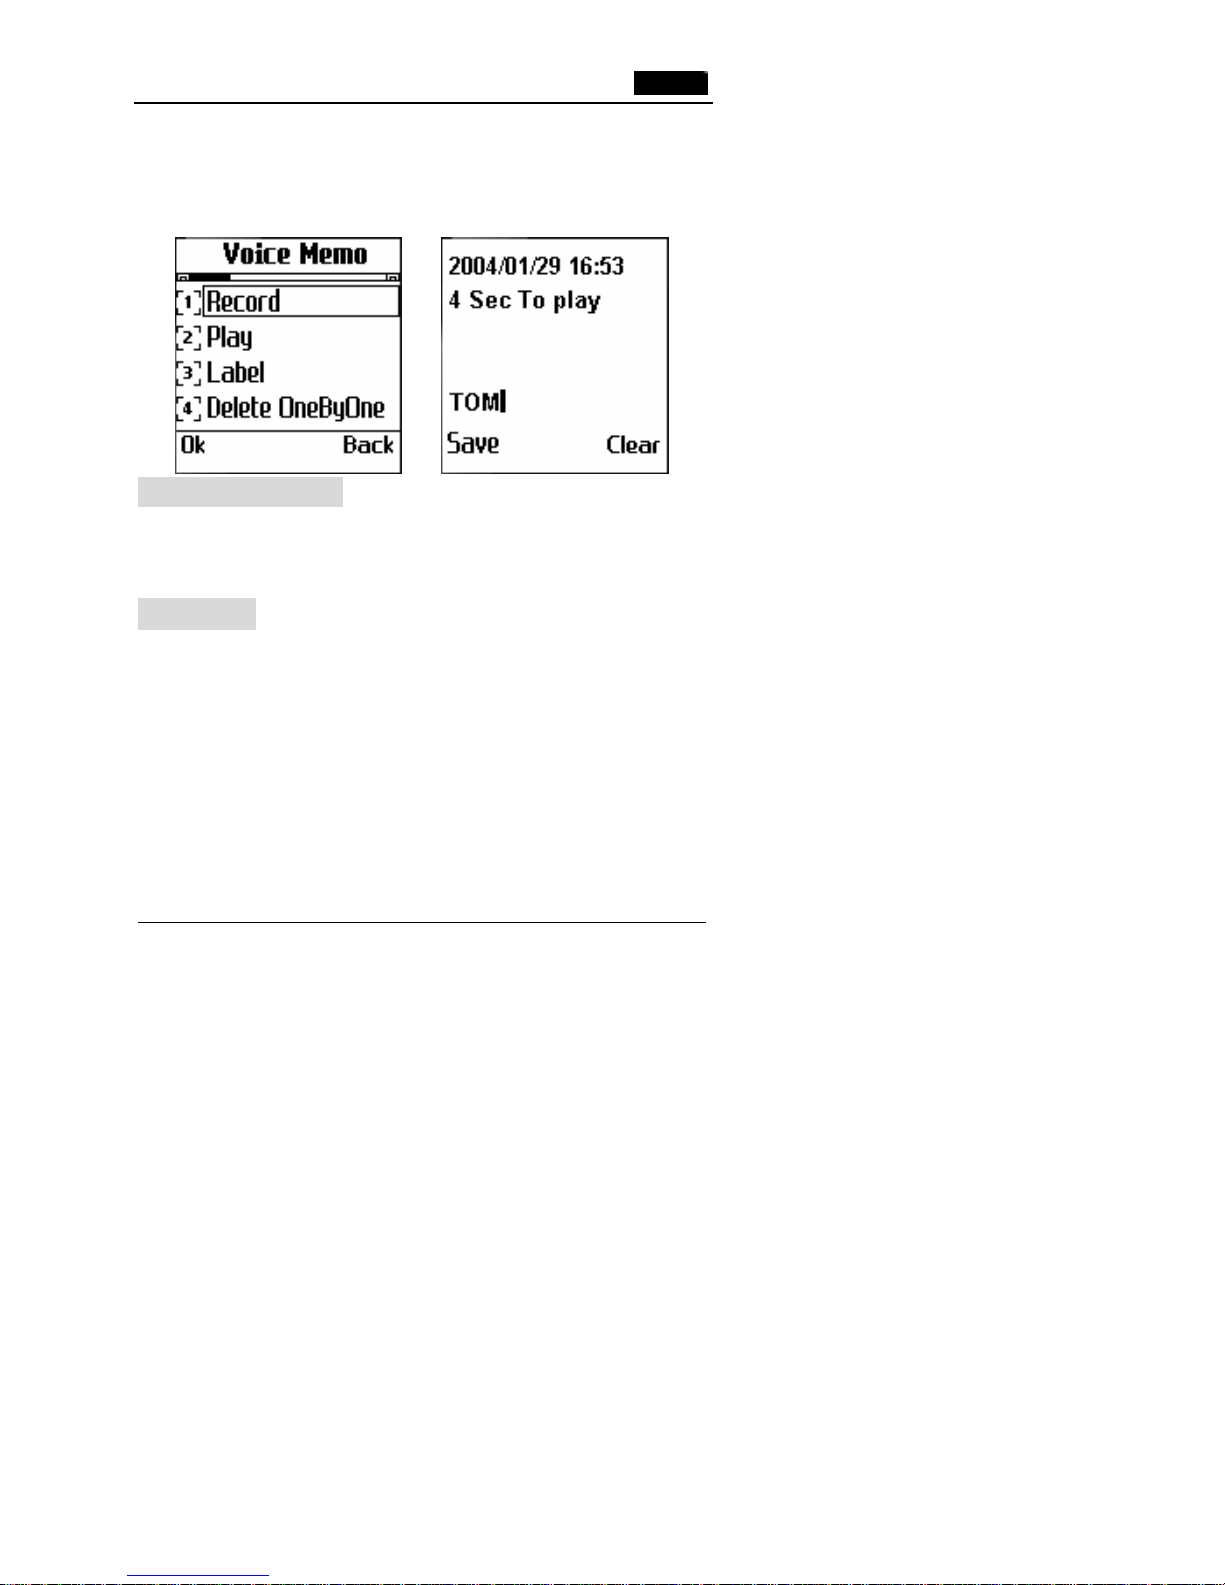
Label
You can make a label for your voice memo by this operation.
1. Press the • or ‚key to select “label”, the recording list is
displayed.
2. Press Direction soft key to select recording record that you want
Page 83
83
to label. Entering the label edit interface, input some letter labels
or press • key to enter ZI proceed Chinese edit (limit length is
three Chinese characters), press S ave soft key to save in order to
will search later on.
Delete OneByOne
Use the • or ‚ key to select the one you want to delete, press Erase
soft key to delete it.
Delete All
1. Press the • or ‚ key to select Delete All, and press Left soft
key .
2. When a confirming message appears (Delete all memos?), press
Yes soft key to delete all memos or No soft key to cancel
deleting.
PC Sync
Page 84

84
With this function, your PC can make a data communication with your
phone through “PC Sync Program ”, such as read and edit phonebook;
read, edit and send a message; download ring tones, pictures, e-book
and so on.
To use this function, you should enter the “PC Sync” window to
switch off AT and activate PC Sync.
In the course of communication, don’t exit this window and make sure
that the data line is well connected. You can press to exit.
Note: A coming call maybe break RAF.
Please refer to Help Menu of “PC Sync” for more detail operations.
Calculator
Using this feature, you can use the phone as a calculator. The
calculator provides the basic arithmetic functions: addition,
subtraction, multiplication and division.
Performing a Calculation
1. Enter the first number using the numeric keys .
2. Press • ‚ ƒ „ to set the operator for your calculation
referring to the screen: + (add), - (subtract), x (multiply), /
(divide).
Page 85

85
3. Enter the second number.
4. To calculate the result, press the Left soft key.
5. Repeat steps 1 to 4 as many times as required.
Each time you change the operator without pressing Left soft key, the
previous calculation is performed and the result is displayed as the top
number in the display.
Notes: • To erase any mistakes and clear the display, press the Clear soft
key. You can reset the calculator by pressing the Reset soft key.
• Use the OK or * ke y to enter a decimal point and the # key to
change the sign of a number to a negative (-).
World time
The display shows:
• City name
• Current date and time according to the time format setting (12/24
Hours)
To … Then…
Select the time zone Press ƒ or „
Select the city in the Press • or ‚
same time zone.
Make some settings (Set Press Left soft key,
as local, Enable PS, Scroll to desired one
Disable PS)
Page 86

86
Countdown
You can set countdown, when the time reaches, the phone will alert.
Enable: Set Time and Start the countdown.
When the countdown starts, you can enter “Enable” menu to
look over the time; press Stop soft key to cancel this
countdown
Multimedia File
Image: Store the downloaded data of pictures.
Audio: Store the downloaded data of music.
Karaoke: Store the downloaded data of karaoke songs.
Memory: You can check up the total space and the space available in
each box.
Press the • or ‚ key to select the desired entry, then press left soft
key to confirm your choice.
Private
The Private menu allows you to maintain various private information
and activate the password to keep the phone from being used by
unauthorized persons.
Call
Lists
This menu allows you to view the timers for calls made and received.
Page 87

87
The following timers are available:
Incoming
Missed
Outgoing
Last: You can see the duration of the last call.
Total: You can see the duration of your total calls (incoming and
outgoing).
For these two items, press the Reset soft key to reset the call timer as
zero or Cancel key to e xit.
Charge Info
1. Total Charge: Displayed and it can be reset to zero with the Reset
soft key. You must inter the PIN2 code when Reset.
2. Max Charge: Input a sum as max charge that can be used for
making calls. When your call charge exceeds this
limit, no more calls (except free calls) unless you reset
the sum. You must input PIN2 code when make
modification.
3. Unit Price: You can inquirer and modify the unit price through
this function. Input PIN2 code when make modification.
Blacklist: The number in the blacklist is forbidden to redial
automatically. While redialing automatically, the phone
judge automatically whether to continue redialing on the
basis of the times of redialing and the failure cause of
connections. If the phone judge that the number should
not be redialed, it will be stored in Blacklist.
Page 88

88
Calendar
When you enter this menu, a calendar is displayed with the current
date indicated by a point.
Scrolling through the Calendar
1.You can move the underscore to Year, Month and Day fields by
pressing ƒ or „.
2.When the desired field is underlined, press the • or ‚ to move up
or down the date.
You can also enter the desired date using the number keypad.
Enter the Log Manager Menu
Highlight a desired date in calendar, press OK. The following
operations are available in this section.
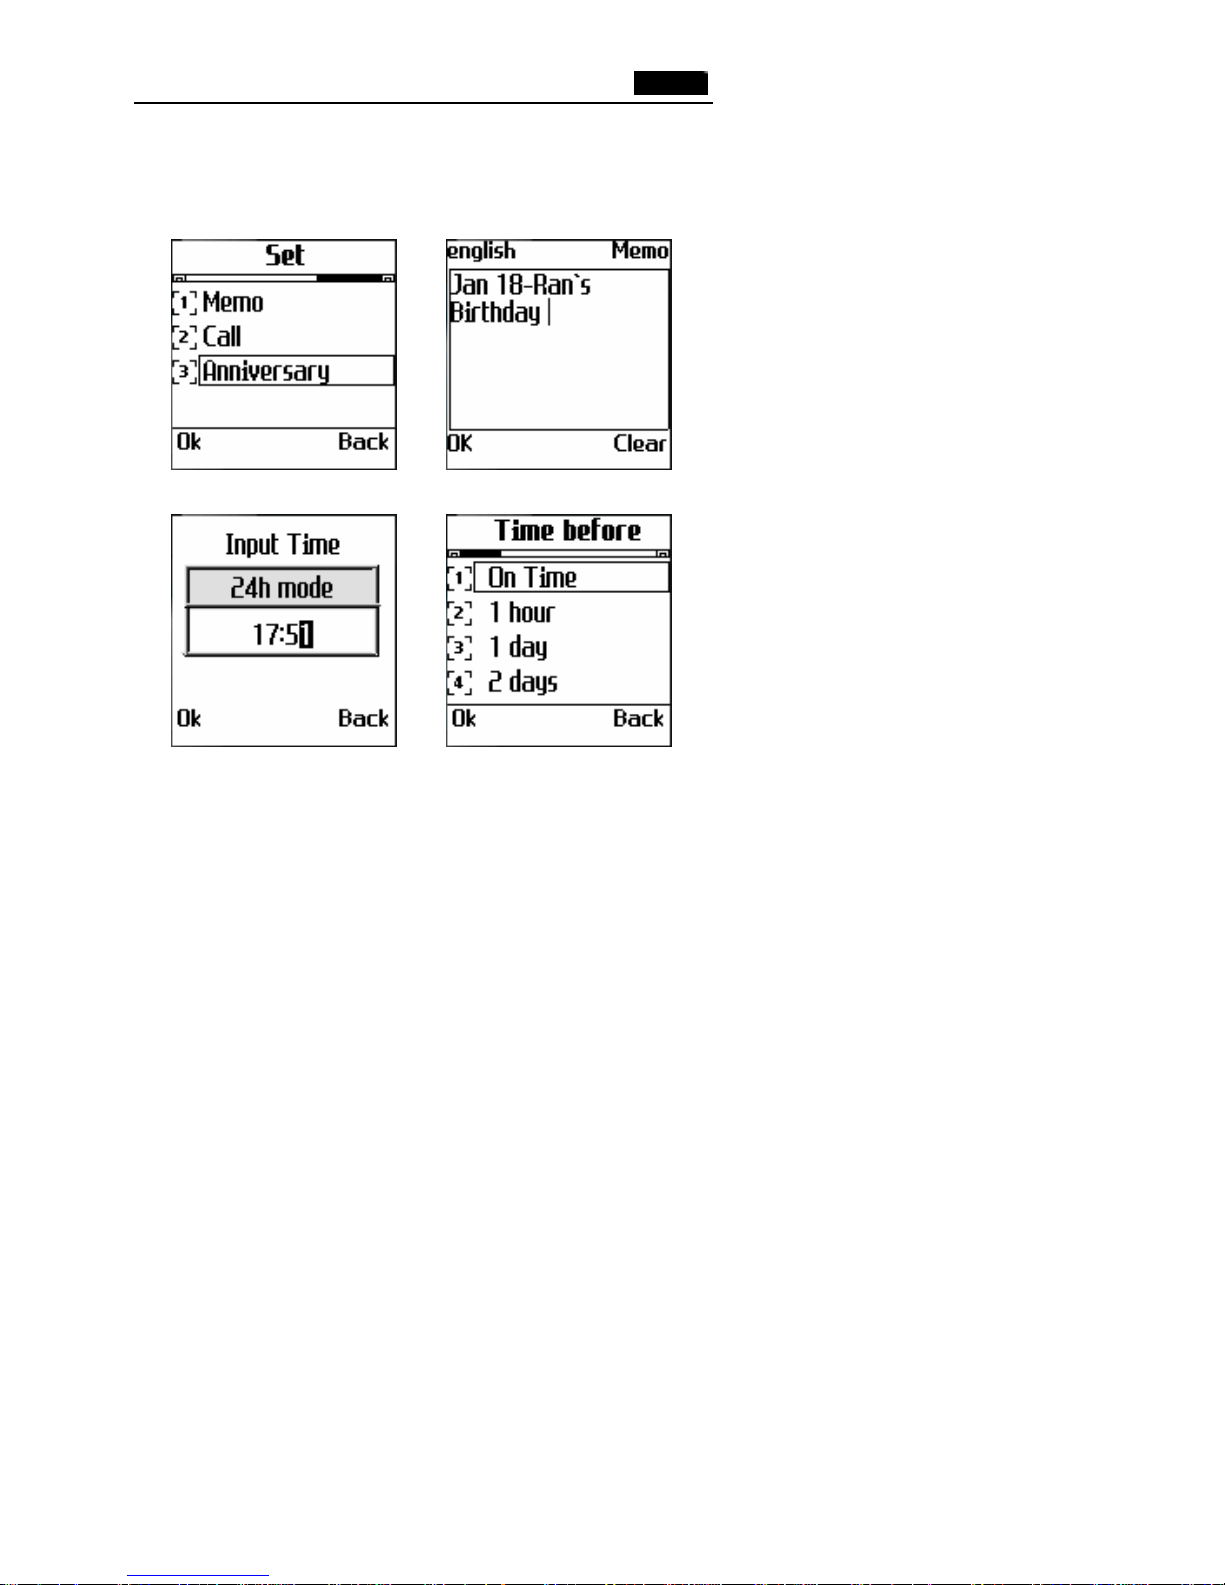
1. Set
To create a new log, you should :
(1) Select one type of schedule:
• Memo: Make a note of general schedule, i.e. appointments or
meetings.
• Call: Schedule a call.
• Anniversary: Select to make note of anniversaries.
(2) Enter a subject of your schedule up to 25 characters and press the
Left soft key. If you are scheduling a call, enter a phone number.
(3) Select the date and the time when the scheduler will alarm you the
scheduled event.
Page 89
89
Note: At the specified time on the scheduled day, the alarm will sound
and the note will display. If you schedule a call, the phone will dial
automatically.
For example: Make the settings as the above diagrams show, the
phone will reminds you that Jan 18 is Ran’s birthday at 7:00 on Jan
17.
2. View
(1) View the schedules you’ve set, press ? or? to scroll through
these notes.
Page 90

90
(2) Select desired one, press Option soft key.
Modify: Make some modifications to this note.
Log Delete: Delete this note.
3. Delete: Delete the schedules.
l One By One
l All
l Expired
Notes:
You can store 10 notes in this box, up to 32 characters for each note.
REFERENCE INFORMATION
Access Codes
There are several access codes that are used by your phone and its
SIM card. These codes help you protect the phone against
unauthorized use.
Phone Password
The security code can be used to avoid unauthorized use of your
phone. The security code 0000 is usually supplied with the phone.
Change the security code before you start using your phone. Keep the
Page 91

91
new code secret and in a safe place, which is separate from the phone.
PIN Code
The PIN (Personal Identification Number) code protects your SIM
card against unauthorized use. The PIN code is usually supplied with
the SIM card. When the PIN code request is enabled, the code is asked
each time the phone is switched on.
If you key in an incorrect PIN code three times in succession, the SIM
card will be locked. To unlock the SIM card, you’d key in the PUK
code and press the Left soft key, and key in a new PIN code twice.
PIN2 code
The PIN2 code, supplied with some SIM cards, is required to access
some functions, such as charging unit counters. These functions are
only available if supported by your SIM card.
If you key in an incorrect PIN2 code three times in succession, the
PIN2 will be locked. To unlock the PIN2, you’d key in the PUK2
code and press the Left soft key, and key in a new PIN2 code twice.
PUK code
The PUK (Personal Unblocking Key) code is required to change a
blocked PIN code. The PUK code may be supplied with the SIM card.
Page 92

92
If not, contact your local service provider for the code.
If you key in an incorrect PUK code ten times in succession, the SIM
card cannot be used anymore. Contact your service provider for a new
card.
You cannot change the PUK code. If you lose the code, contact your
service provider.
PUK2 code
The PUK2 code, supplied with some SIM cards, is required to change
a blocked PIN2 code.
If you key in an incorrect PUK2 code ten times in succession, you
cannot use the functions requiring the PIN2 code. Contact your
service provider for a new card.
You cannot change the PUK2 code. If you lose the code, contact your
service provider.
Using the batteries
A rechargeable Li-ion standard battery powers your phone. The
following batteries are also available (ask your local dealer for further
details):
Page 93

93
Type Capacity Talk Time Standby Time
Li-ion Slim 780mAh 2~5hrs 80~110hrs
Precautions When Using Batteries :
• Never use any charger or battery that is damaged in any way.
• Use the battery only for its intended purpose.
• If you use the phone near the network’s base station, it uses less
power; talk and standby times are greatly affected by the signal
strength on the cellular network and the parameters set by the
network operator.
• Battery charging times depend on the remaining battery charge and
the type of battery and charger used. The battery can be charged
and discharged hundreds of times, but it will gradually wear out.
When the opera tion time (talk time and standby time) is noticeably
shorter than normal, it is time to buy a new battery.
• If left unused, a fully charged battery will discharge itself over
time.
• Use only approved batteries; and recharge your battery only with
approved chargers. When a charger is not in use, disconnect it from
the power source. Do not leave the battery connected to a charger
for more than a week, since overcharging may shorten its life.
• Extreme temperatures will affect the charging capacity of your
battery: it may require cooling or warming first. Do not leave the
Page 94

94
battery in hot or cold places, such as in a car in summer or winter
conditions, as you will reduce the capacity and lifetime of the
battery. Always try to keep the battery at room temperature. A
phone with a hot or cold battery may temporarily not work, even
when the battery is fully charged. Li - ion batteries are particularly
affected by temperatures below 0 °C.
• Do not short-circuit the battery. Accidental short -circuiting can
occur when a met allic object (coin, clip or pen) causes a direct
connection between the + and - terminals of the battery (metal
strips on the back of the battery), for example when you carry a
spare battery in a pocket or bag. Short-circuiting the terminals may
damage the battery or the object causing the short-circuit.
• Dispose of used batteries in accordance with local regulations.
Always recycle. Do not dispose of batteries in a fire.
Care and maintenance
Your phone is a product of superior design and craftsmanship and
should be treated with care. The suggestions below will help you to
fulfill any warranty obligations and allow you to enjoy this product for
many years. When using your phone, battery, charger, or any
accessory:
• Keep it and all its parts and accessories out of small children’s
Page 95

95
reach.
• Keep it dry. Precipitation, humidity and liquids contain minerals
that will corrode electronic circuits.
• Do not use or store it in dusty, dirty areas as its moving parts can
be damaged.
• Do not store it in hot areas. High temperatures can shorten the life
of electronic devices, damage batteries, and warp or melt certain
plastics.
• Do not store it in cold areas. When the phone warms up (to its
normal operating temperature), moisture can form inside the phone,
which may damage the phone’s electronic circuit boards.
• Do not drop, knock or shake it. Rough handling can break internal
circuit boards.
• Do not use harsh chemicals, cleaning solvents, or strong detergents
to clean it. Wipe it with a soft cloth slightly dampened in a mild
soap-and-water solution.
• Do not paint it. Paint can clog the device’s moving parts and
prevent proper operation.
• Use only the supplied or an approved replacement antenna.
Page 96

96
Unauthorized antennas, modifications of attachments could
damage the phone and may violate regulations governing radio
devices.
• If the phone, battery, charger, or any accessory is not working
properly, take it to your nearest qualified service facility.
• This phone features large inner & outer display scr eens, which are
damageable. Please be most careful to avoid dropping or knocking
it or scratch it with a sharp thing.
Glossary
Antenna
A device for transmitting or receiving signals. The size and shape of
antennas is determined, in part, by the frequency of the signal they
receive. Wireless phones and the base station must have antennas.
ALS (Alternate Line Service)
ALS provides the capability of associating two alternate lines with one
SIM card. You can make and receive calls on either line as desired
with this service.
Call Barring
Page 97

97
Ability to restrict outgoing and incoming calls.
Call Diverting
Ability to reroute calls to another mobile or fixed line.
Call Holding
Ability to put one call on standby while answering or making another
call; you can then switch between the two calls, as required.
Call Waiting
Ability to inform users that they have an incoming call when engaged
on another call.
Conference Calling
Ability to establish a conference call involving up to five additional
parties.
DTMF (Dual-Tone Modulated Frequency)
You send DTMF signals when you enter numbers by pressing the
digit keys.
GSM (Global System for Mobile communication)
Page 98

98
International standard for cellular communication, guaranteeing
compatibility between the various network operators. GSM covers
most European countries and many other parts of the world.
LCD (Liquid Crystal Display)
Commonly used to refer to the screen display on the wireless phone.
LED (Light Emitting Diode)
Commonly used to refer to a small light on the wireless phone or on
the Desktop Charger. The LED lights on the phone to indicate an
incoming call. The lights on the charger indicate that battery charging
is taking place.
Line Identification Services
Service allowing subscribers to view or block the telephone numbers
of callers.
PIN (Personal Identification Number)
Security code that protects the phone against unauthorised use. The
PIN is supplied by the service provider with the SIM card. It may be a
four to eight-digit number and can be changed, as required.
PUK (PIN Unlocking Key)
Page 99

99
Security code used to unlock the phone when an incorrect PIN has
been entered three times in succession. The eight-digit number is
supplied by the service provider with the SIM card.
Roaming
Use of your phone when you are outside your home area (when
traveling for example).
SIM (Subscriber Identification Module)
Card containing a chip with all the information required to operate the
phone (network and memory information, as well as the subscriber’s
personal data). The SIM card fits into a small slot on the back of the
phone and is protected by the battery.
SMS (Short Message Service)
Network service sending and receiving messages to and from another
subscriber without having to speak to the correspondent. The message
created or received (up to 160 characters long) can be displayed,
received, edited or sent.
Soft Keys
Keys marked • and o on the phone, the purpose of which:
• Varies according to the function that you are currently using.
Page 100

100
• Is indicated on the bottom line of the display just above the
corresponding key.
Voice Mail
Computerized answering service that automatically answers your calls
when you are not available, plays a greeting (Optionally in your own
voice) or records a message.
TROUBLESHOOTING
If the phone does not works properly, please check the following
troubleshooting and find a solution. If you can’t solve the problems,
please contact your local dealer for helps.
 Loading...