

Page 1

Thank you very much for choosing AMOI CA8a , the fashionable and
elegant camera phone. CA8a is a perfect integration of unparalleled
contemporary design and consummate precise craftsmanship, bringing
you easy communication, funny entertainment, as well as highlighting
your tastes.
Key Features:
• GSM Tri -band Unlocked
• Compatible with Most Standard GSM Networks
• GPRS Class 10, WAP 2.0
• AMOI Smart Dial
• SMS (Short Messaging Service)
• MMS (Multi-media Messaging Service)
• Phonebook Memory: 500 V -card Entries
• Downloadable 40-polyphonic Ring Tones
• Downloadable Standby Animations & Images
• Built-in Amusing Games
• Downloadable Karaoke and Music Box
• Tool Kit (Note Book, Alarm Clock, Calculator, Unit Converter,
World Time, Voice Memo)
1
Page 2

2
Specifications:
GSM/ GPRS: 850/1800/1900 MHz
Voice Encoding: HR, FR, EFR, AMR
Screen: Internal: 65536 colors CSTN display (128 x 160 pixels)
External: STN display (96 x 64 pixels)
Size: 86 x 44 x 19.9 mm; 3.39" x 1.73" x 0.78"
Weight: 76 g; 2.68 oz
Battery Capacity: 520 mAh
S tandby Time: 60-80 hrs
Talk Time: 4 -6 hrs
The manufacturer may, at any time and without notice, make changes or
improvements to the products offered, but provide necessary corrigendum with this
manual or release new version of this manual for the following lot. The Amoi logo
and trademark are the property of the manufacturer. Nov. 2004.
Page 3

Page 4

INTELLECTUAL PROPERTY
All Intellectual Property, as defined below, owned by or which is
otherwise the property of AMOI or its respective suppliers relating to
the AMOI mobile phones , including but not limited to, accessories,
parts, or software relating thereto (the “Phone System”), is proprietary
to AMOI and protected under federal laws, state laws, and
international treaty provisions. Intellectu al Property includes, but is
not limited to, inventions (patentable or unpatentable), patents, trade
secrets, copyrights, software, computer programs, and related
documentation and other works of authorship. You could not infringe
on it, otherwise you may violate the rights secured by the Intellectual
Property. Moreover, you must agree that you will not (and will not
attempt to) modify, prepare derivative works, recompile, disassemble,
or attempt to create source code from the software. No title or
ownership in the Intellectual Property is transferred to you. All
applicable rights of the Intellectual Property shall remain with AMOI
and its suppliers.
3
Page 5

Page 6

TABLE OF CONTENTS
Safety Precautions……………………………….…………….5
Unpacking………………………………………….………….7
Your Phone…………………………………………………9
Keys Description…………………..………………………....11
Display Layout…………………….………………….……12
External Display.......................................................................14
Backlight..................................................................................14
Getting Started ........................................................................15
Installing a SIM Card………………………...………………15
Charging a Battery…………..… ..……………………………21
Switching the phone On/Off…………………...……………..16
Your Phone’s Mode.…………………………...……………..15
Shortcut Keys…………………………………………..……15
Call Functions……………………………………………25
Making Calls…………………………………..…………......25
Receive or Reject Calls……….………………….……….....26
Adjust volume… .…………………….………………………27
Call Menu…..… ..…………….…….…………………….......27
Entering Text……………………………........……………..29
Input Indicator……………………………………………….29
Changing Text Input Mode………………………………...30
Insert Symbol…………………………………………….… .30
eZi English Mode……………………………….………...32
ABC/abc Mode…………………….........………….……....33
123 Mode…………………………….……………………….33
4
Page 7

Using Menus…………………………...……………….........34
Accessing a menu function… .....…….………………………34
List of Menu Functions……………...…………………….……....35
Phonebook……………………………………………….......41
Smart Dial……………………………………………….… ..42
Search All…………………….………………………..……..43
Search name……………….…………………………..……..44
Storing a Number in PB……………………………….… ..… 45
Number Groups………………………………………………45
PhBook Manager………….………………………………… .45
Info……….…………….…………………………………….46
Speed Dial……………………………………………………46
Messages..................................................................................47
SMS..........................................................................................47
MMS.........................................................................................49
Broadcast..................................................................................51
Memory....................................................................................52
Settings.....................................................................................53
Data Service……………………...………………………….57
Browser……...…………….…………………………………57
PC Sync… .… ..……………………………………………….57
Settings…….…………………………………………………57
Personality………………………………………………..… 58
Music Select…….……………………………………...…….49
Alert Type ……………………………………………….… 48
Ring Volume………………………………………………….48
Standby Interface......................................................................47
5
Page 8

Power On/Off Interface............................................................47
Settings………...… ..………………………………………...50
Time..…………………………………………………………50
Call…………...………………………………………………50
Mobile………………………………………………………..55
Network………………………………………………………56
Toolbox…...………………………………………………....61
Alarm Clock…………...……….…………………………….61
Voice Memo………………………………………………….62
Calculator… .…………………………………………………66
Unit Convert ........……………………………………………66
World Time……………..…………………………………….67
Private Info…….………………………………........………68
Calls…………..……………................… .......… .....................68
Security………..…………………...........................................70
Amusement……….…………………………………………74
Tetris…………….……………………………………………74
Push Box………..……………………………………………74
Eat Bean...……………………………………………………74
Shrew Mouse…………………………………………………75
Multimedia…………………………………………………..76
Voice Memo………………………………………………….77
Image………….………...……………………………………79
Audio…………………………………………………………84
User Custom 1………...………...……………………………84
User Custom 2……….……...… ..……………………………84
Reference Information……...………………………………89
6
Page 9

Access Code……………….………………………………....89
Using the Batteries ………..………………………..…….… ..90
Care and Maintenance……………..…………………………93
Glossary…………………….…………..………….…………95
Trouble Shooting……………………………………….… ..88
Important SAR Information ……………..…………………………..100
Body-Worn Operation……………………………………………….101
FCC Part 15 Notice………………...………………………………..101
Warning……………………………………….……………………..102
FCC Radiation Exposure Statement ………...……………………….102
Caution………………………………………………………………102
7
Page 10
SAFETY PRECAUTIONS
Read these brief guidelines. Failure to comply with them
may be dangerous or illegal.
Road saf ety comes first
Do not use a hand-held mobile phone while driving; park
the vehicle first. Remember that in some countries, it is
illegal to use a mobile phone while driving.
Switch off on aircraft
Mobile phones can cause interference. Using them on
aircraft is both illegal and dangerous. (Please also close
the power-off alarm clock.)
Switch off near an explosion place
Do not use the phone near an explosion place, because it
may disturb the remote control of the explosion.
Switch off when refueling
Do not use the phone at a refueling point (service station)
or near fuels or chemicals.
8
Page 11
Interference
All wireless phones may be subject to radio interference,
which may affect their performance.
Switch off in hospital
Follow any regulations or rules. Switch phone off near
medical equipment.
Accessories and batteries
Use only approved accessories and batteries.
Use sensibly
Use only in the normal position (to ear). Do not touch the
antenna unnecessarily when the phone is switched on.
Emergency Call (SOS)
By pressing the soft key SOS you can reach an
emergency call on any network without a SIM card and
without entering a PIN (not available in all countries).
9
Page 12
UNPACKING
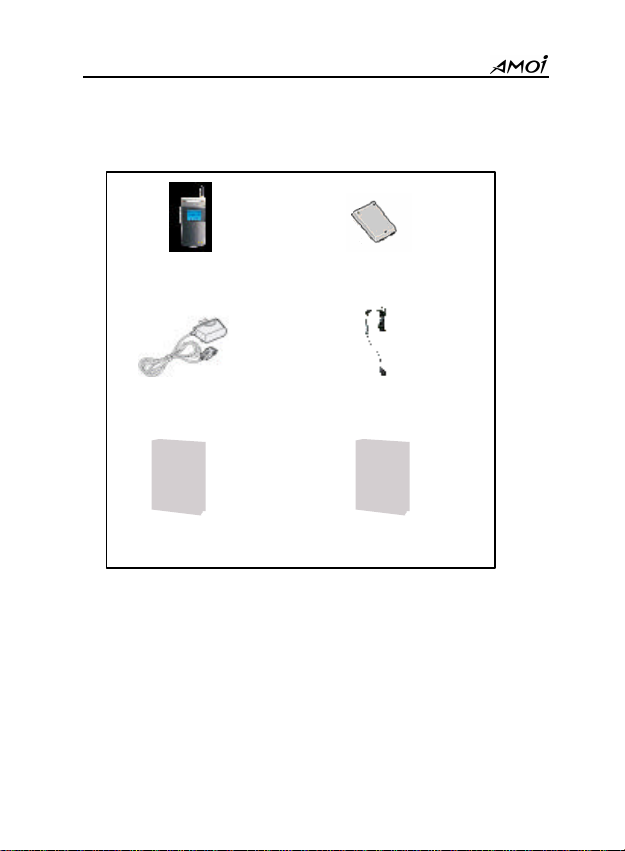
Your package contains the following items:
Note: Acces sory availability may vary in different markets.
Handset Battery
Travel Charger Hands-free Headset
User’s Manual Addendum to User’s Manual
10
Page 13
YOUR PHONE
Phone ’s Layout
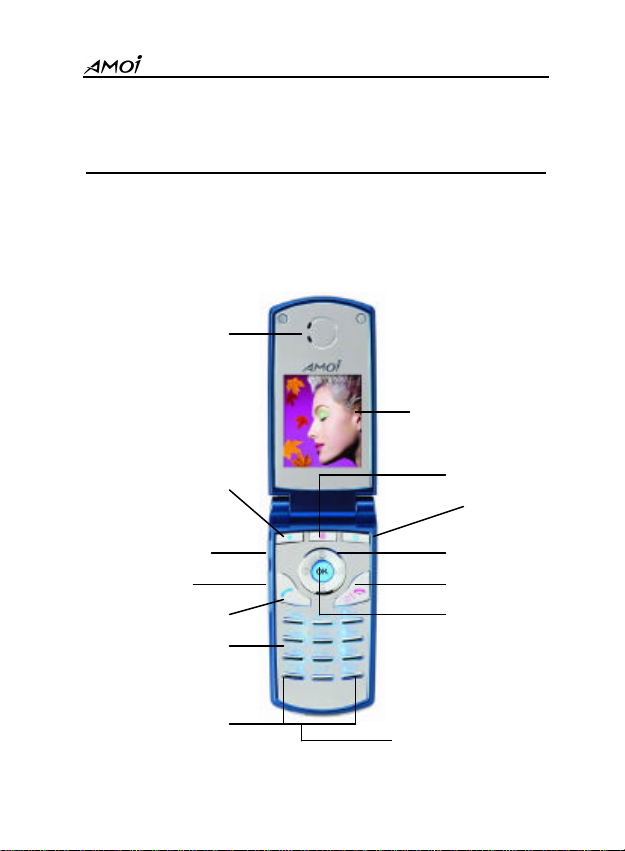
The following illustrations show the main elements of your phone.
Open View
Earpiece
Display
Left Soft Key
Record Key
Volume Key
Send Key
Alphanumeric
Key
Special Function Key
11
Internet Hotkey
Right Soft Key
Navigation/Hot key
Power On/Off Key
OK Soft Key
Microphone
Page 14
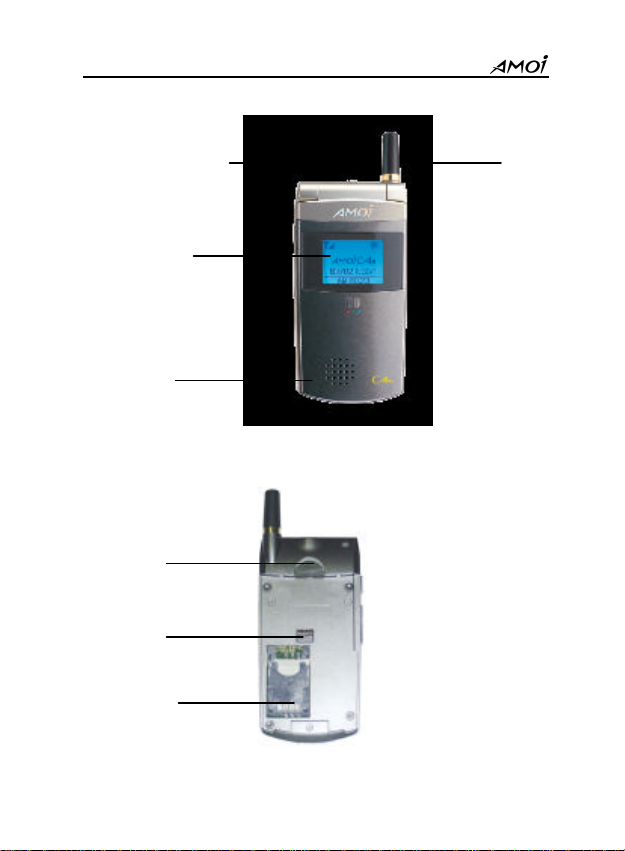
Closed View:
Earphone Jack
External Display
Speaker
Rear View:
Battery Lock
Battery
Terminals
SIM Slot
Antenna
12
Page 15
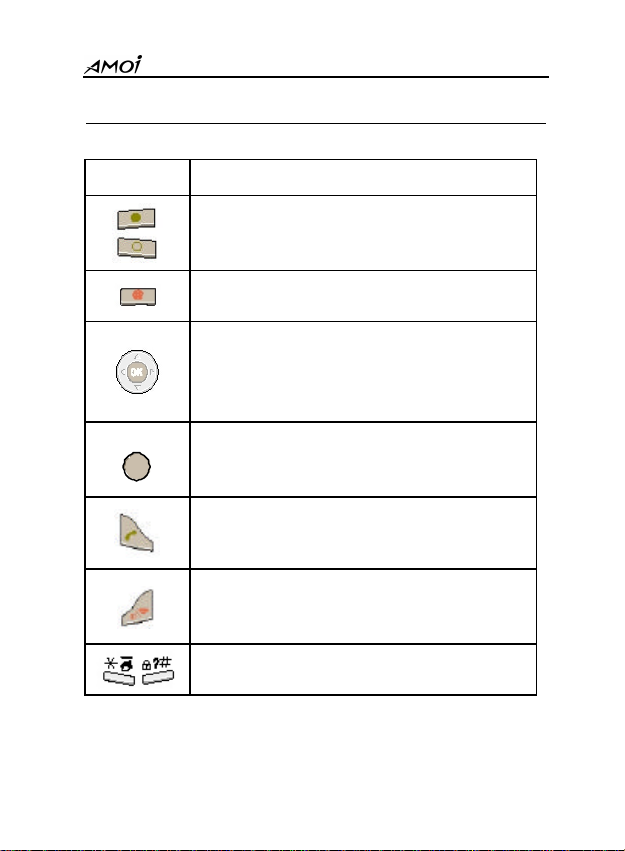
Keys Description
Key
Two soft keys perform the functions indicated by the text
above them (in the bottom line of the display).
Internet Hotkey: Hold this key to connect WAP services in
the standby mode; Press to enter data service.
Navigation Keys: Scroll through the menus; In the standby
mode, press p to enter Amusement, press ? to enter
Phonebook, press ? to enter Call list, press ? to enter
Messages.
OK Key: In the menu facility, confirms your selection or
OK
entry; Enter eZI Sub Menu in editing mode; Hold to go to
WPS in standby mode.
Send Key: Makes or answers a call. In Standby mode, recalls
the last number dialed.
Power On/Off Key: Hold it to switch on/off the phone; End a
call; In the menu facility, returns to the Standby mode and
cancels your input.
Special Function Key: Use these keys for various special
functions.
Description
13
Page 16
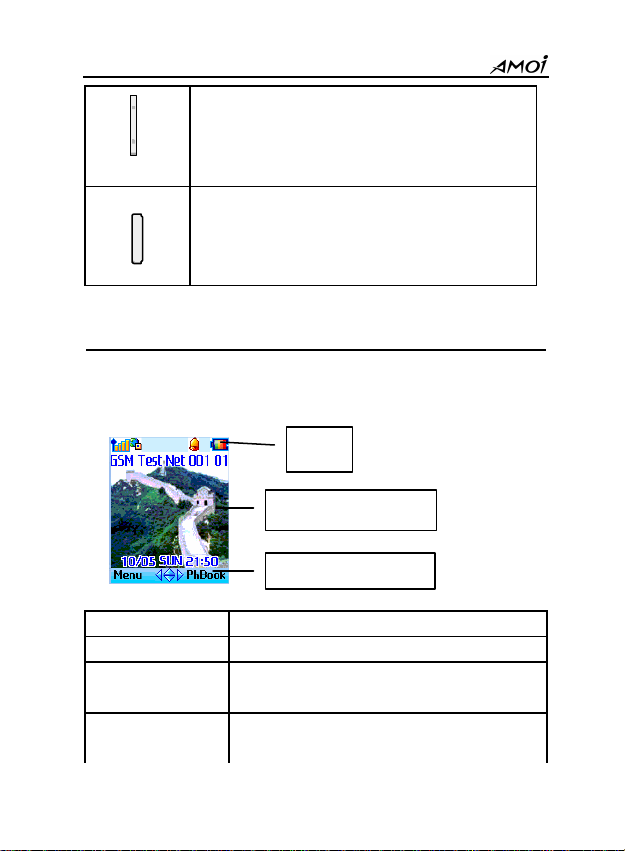
Soft keys indications
Volume Keys: During a call, adjusts the voice volume;When
the phone is closed, press it to display the current time.
Record Key: When the phone is closed, press and hold it to
refuse a call; In standby mode, press it to enter Voice Memo
Menu; In standby or call mode, press and hold it to record a
voice memo.
Display
Display Layout
The display comprises three areas.
Area Description
Icons Displays various icons
Text and G raphic Area
Soft Keys Indications
Displays messages, instructions and any information that
you enter.
Shows the functions currently assigned to the two soft
keys.
Icons
Text and graphic area
14
Page 17
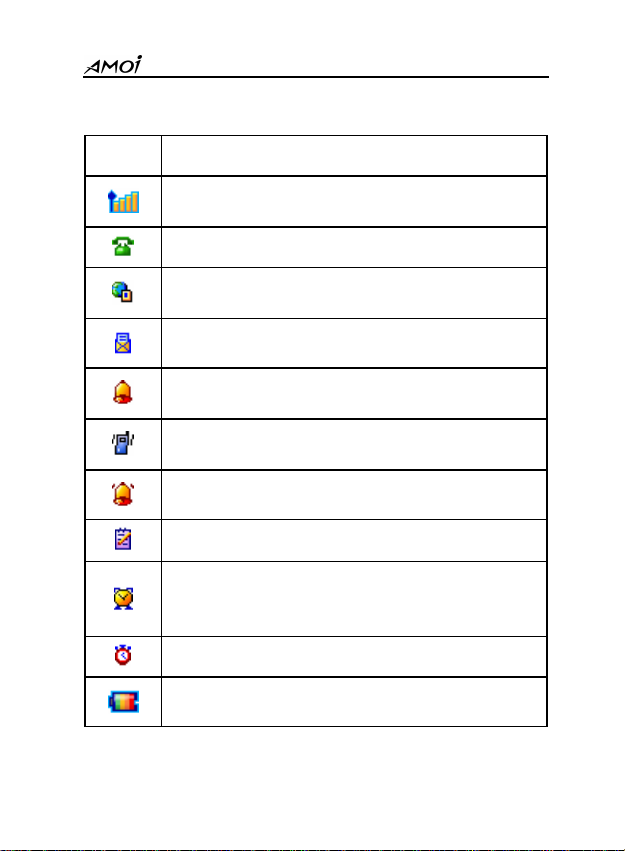
Icons
Icons Indications
Signal Intensity: Shows the received signal intensity. The
greater the number of bars, the better the signal intensity.
Service: Appears when a call is in progress.
Roaming: Appears when you are out of your home area and
have registered with a different network.
New Message: Appears when a new message has been
received; flash indicates that your message box is full.
Ring Mode: Indicates the phone rings when a call is
coming.
Vibrate Mode: Indicates the phone vibrate when a call is
coming.
Ring & Vibrator: Indicate that your phone will ring and
vibrate when a call is coming.
Log Setting: Appears when you set a log.
Alarm: Appears when the alarm is active. (If both alarm
and countdown are set, this icon won’t appear until the
countdown alarm rings.)
Countdown: Appears when the countdown is set.
Battery Status: Shows the level of your battery. The more
black area you see, the more power you have left.
15
Page 18

External Display
Your phone has an external display on the cover, it indicates that you
have an incoming call or message, and notifies you at the specified time
when you set an alarm or a log, without having to open the phone. It
appears alternately with a screensaver every three seconds.
Backlight
The display and keypad are illuminated by a backlight. When you press
any key, the backlight illuminates. It turns off if no key is pressed
within a given period of time, depending on the Backlight Option set in
the Mobile Setting menu.
16
Page 19

GETTING STARTED
You must insert the SIM card and charge the battery before you can use
the phone.
Installing a SIM Card
When you subscribe to a mobile network, you are provided with a
plug-in SIM (Subscriber Identity Module) card loaded with your
subscription details (PIN, Phone book information, and so on).
Note:
The SIM card can be easily damaged when scratching or bending, so
you should be careful when handling, inserting or removing the card.
Follow the instructions supplied with the SIM card. Keep all SIM
cards out of the reach of small children.
1. S witch the phone off.
2. Remove the battery. To do so:
? Press down the catch above the battery and hold it in this
position.
? Slide the battery and lift it away, as shown.
17
Page 20
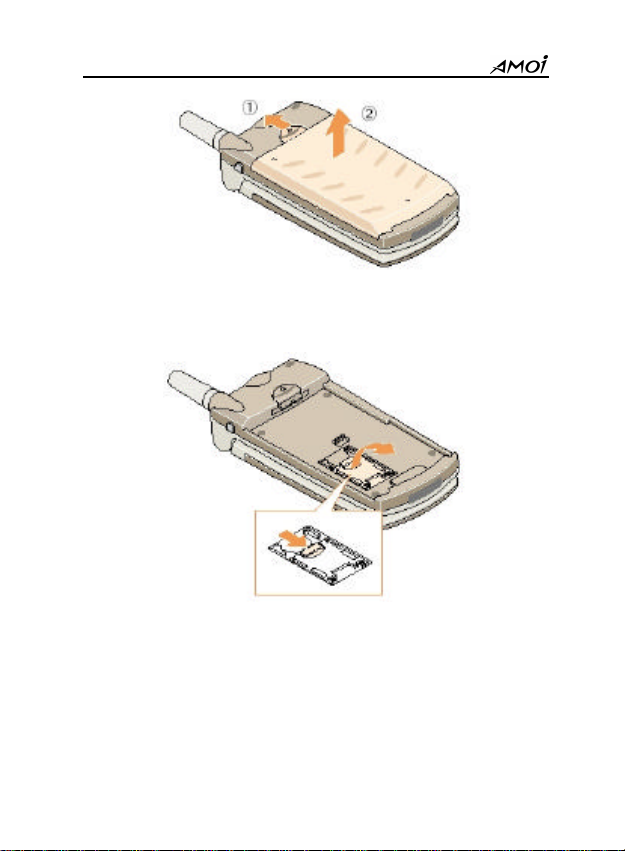
3. Slide the ivory lock in the SIM card holder as shown below to unlock
the SIM card holder and lift it up.
4. Insert the SIM card ensuring that the cut corner is at the top left and
the gold contacts of the card face into the phone.
18
Page 21
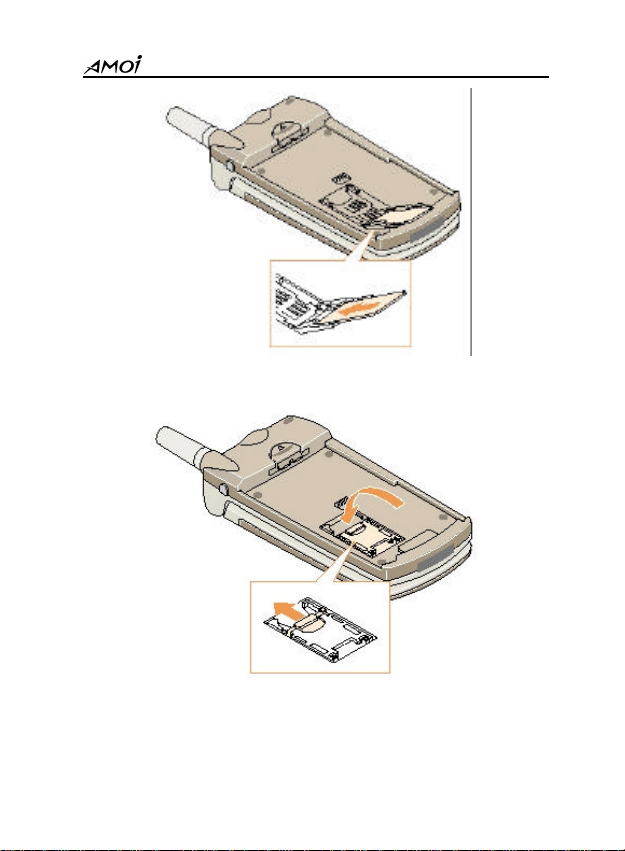
5. Lay down the SIM cardholder and slide back the ivory lock
6. Reinstall the battery. To do so:
? Place the battery back, taking care to match t he tabs on the
19
Page 22
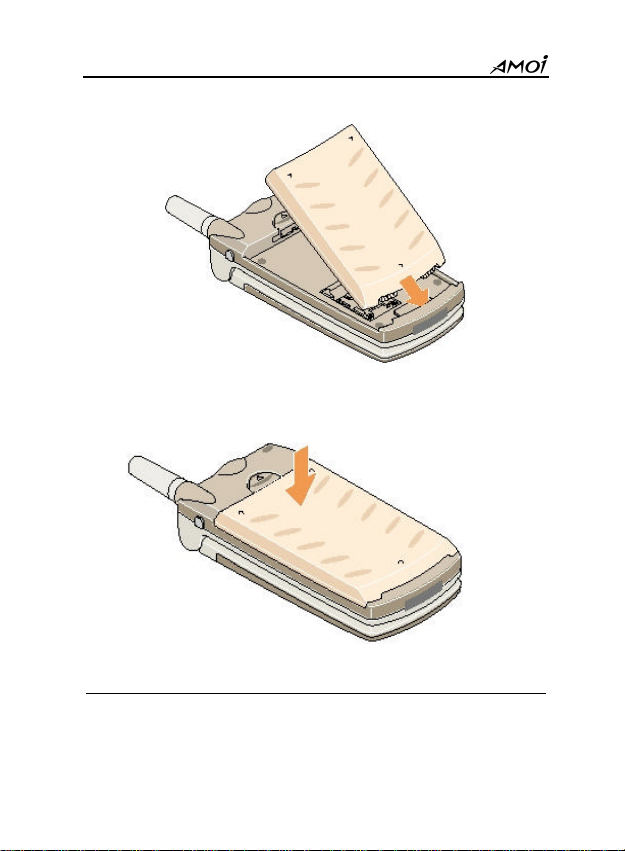
battery with the grooves on the phone.
? Push the battery down until it clicks into place. Make sure that the
battery is properly installed before switching on the phone.
Charging a Battery
Your phone is powered by a rechargeable Li-ion battery. You are
provided with a travel charger when buying the phone. Use only
20
Page 23
approved batteries and chargers. Ask your local dealer for further
details.
Note: You must fully charge the battery before using your phone for the
first time. The phone can be used while the battery is charging.
U sing the Travel Charger
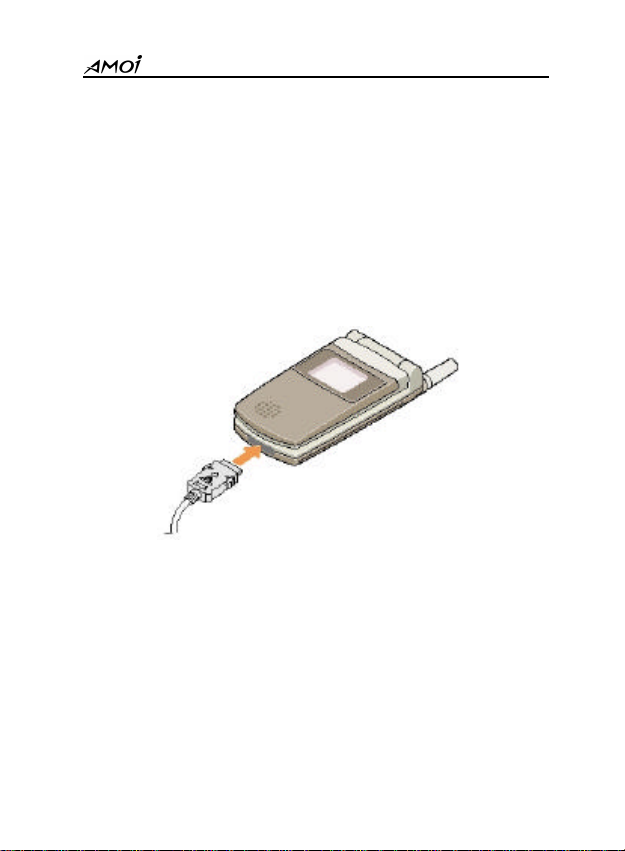
1. Place the battery on the back of the phone, connect the lead from the
travel adapter to the connector at the bottom of the phone.
2. Connect the adapter to a standard AC wall outlet.
3. When charging start s, the battery status icon begins rolling and the
word “charging” is shown. The phone can be used normally as usual.
4. When charging is finished (the full battery icon becomes solid),
disconnect the adapter from the AC wall outlet, then from the phone.
21
Page 24
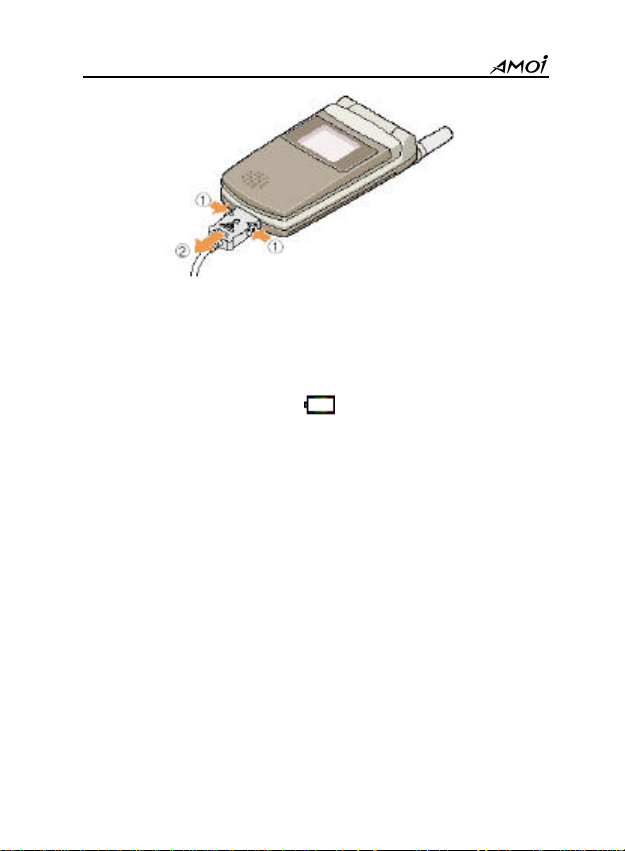
Note: When disconnect the lead of the adapter from the phone, you should
press the buttons on both sides of it, otherwise it’s easily damaged.
Low Battery Indicator
When the battery is low, the icon is shown; at the same time your
phone displays “Battery low” and gives a warning tone?
The phone will be switched off automatically if the battery is run out.
When it happens, you will lose what you are doing and your call will be
cut off.
Notes:
1. The phone would only display characters if the prompt tone were off.
2. If the battery is too low, the phone may give no response in a period of
time when plug in; Please wait.
3. You cannot switch on your phone if the battery hasn’t enough power,
please charge the battery first.
22
Page 25

Switching the Phone On/Off
1. Open the phone.
2. Press and hold the key until switch the phone on.
3. Enter your PIN , if you have for your SIM card.
4. Press the left soft key, then your phone connects to the GSM
network.
Note: If the network signal is too weak, ‘No Service’ appears in the display,
and you can not make or receive any calls. Wait for the better signal or
move into an open area to regain the service.
5. To switch the phone off, hold down the key for more than two
seconds.
WARNING!
23
Page 26
Do not switch on the phone when the mobile phone use is prohibited or
when it may cause interference or danger. Meanwhile, make sure that you
didn’t activate the Timed On/Off or other Auto On function.
Note: Unnecessary touch of the antenna may affect the call quality, and
cause the phone to operate at a higher power level than otherwise needed.
Your Phone’s Mode
Standby Mode
Standby is the most basic state of your phone. The phone goes into
Standby mode soon after you turn it on, or whenever you briefly press
the key. When your phone is in Standby mode, you will typically
see the current date and time. If you enter a phon e number, you can
press the key to dial it.
Press the key at any time to return to Standby mode. Be
careful, if you are on a call when you press the key, you will
return to Standby mode, and it also disconnects the call.
Talk Mode
You can make and answer calls only when your phone is turned on.
During a call, the phone is in Talk mode. While you are in Talk mode,
press the left soft key gives you a list of Options referred to as “Call
Menu”, and press key to disconnect the call and return back to
standby mode
24
Page 27
Shortcut Keys
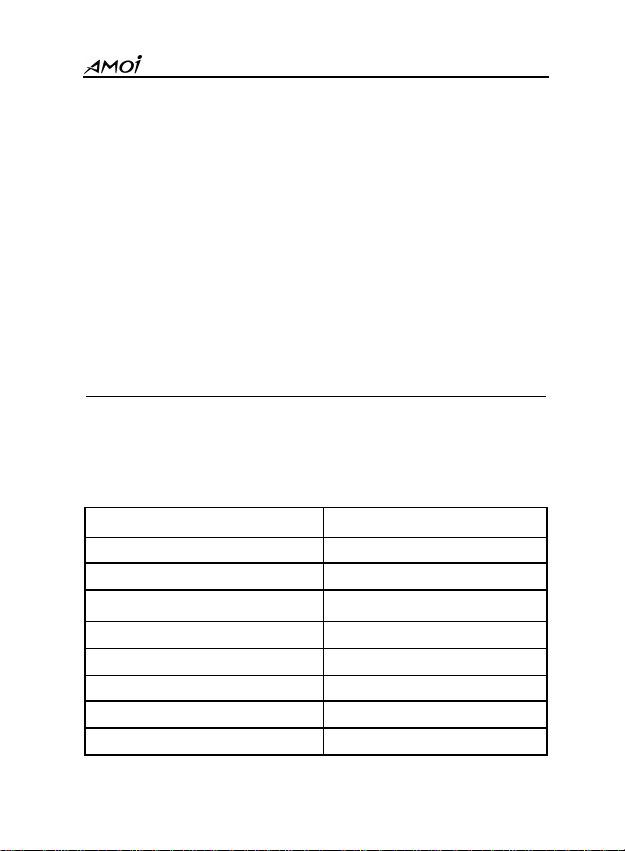
The phone allows you to use the following shortcut keys for your
convenience.
In Standby M ode:
* 0 # Backlight settings
Hold the @ key Connect the WAP services
(1-9)+ * Fast dialing
Hold the Record key (closed) Refuse a coming call
Press the Record key (open) Enter the record menu
Hold the Record key (open) Start the recorder
p Amusement
? Phonebook
ƒ Call lists
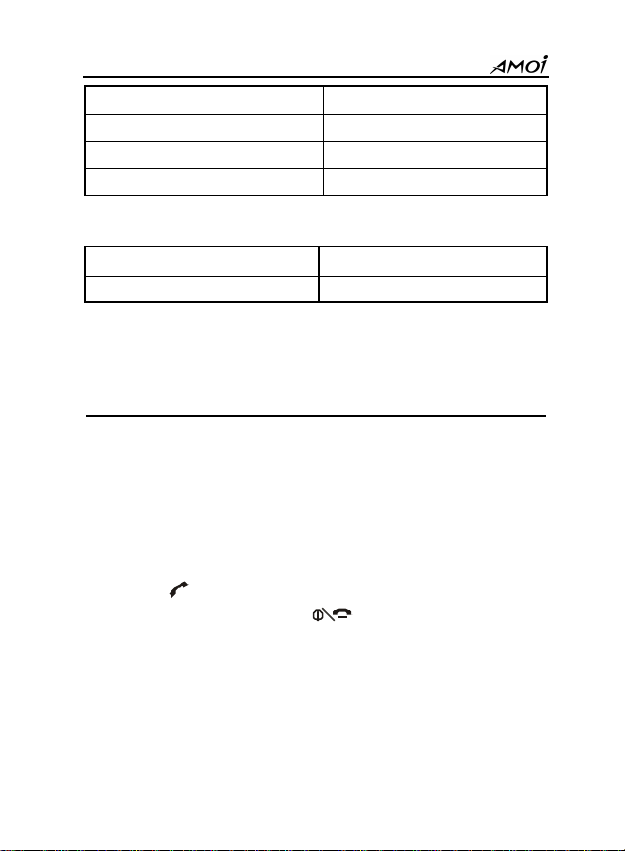
25
Page 28
s
„ Messages
Send key Outgoing calls
Hold the volume key (closed) Current time &date
Hold the * key Change the prompt mode
IInn TTaallkk MM ooddee::
Hold the Record key (Open) Start the recorder
Press the Volume key Adjust the volume
CALL FUNCTIONS
Make Call
Before you make or receive any calls, you must turn on the phone and
be within range of a network.
1. In Standby mode, enter the phone number. (If you make a mistake
while dialing, use ƒ key to put the cursor to the right of the digit, press
the right soft key to erase it; Press and hold to erase the entire number.)
2. Press the key to make the call.
3. When you finish the talk, press or close the phone to end the
call.
Note: When entering the number, you can hold “#” key to insert a
pause symbol (eg. between the telephone exchange and the extension).
The latter number will be sent several seconds later than the former
26
Page 29

s
number.
Making a Call from the Phonebook
Search a desired number from the phonebook, and press the key
to dial.
Last number redialing
In standby mode, press once to access the list of the 20 numbers
you last called; Scroll to the number or name you want, and press
to call the number.
Note: If you have set Auto Redial menu to “On”, when nobody answers
you or the line is busy, the phone automatically retries to make the call.
Making International Calls
1. Press and hold the “0” key until a “+” sign appears.
2. Enter the country code, area code, and phone number, then press the
key to begin dialing.
Making Emergency Call
Enter the emergency call number, and then press to make the call.
Receive or Reject Call
When a call comes in, the phone prompts you by ringing and/or
vibrating; the screen displays an incoming call message. If you have
subscribed to the Line Identification Service (contact your service
provider), the caller’s phone number is displayed; if you have saved the
27
Page 30

Call Menu
number in your phone book, the name is displayed.
To reject a call
When the phone is closed, hold the Record key to reject the call.
When the phone is open, press or Reject key to reject the call.
To receive a call
Three modes are provided to receive a call: Call Key, Open Mobile or
Auto. Please refer “Call” for details.
Adjust Volume
You can use the volume keys on the left side to adjust the volume when
making calls.
During a call, press Option soft key to enter Call Menu or right soft key
to enter the phonebook. The options may be variable in different
conversation circumstances. Many of the options you can use during a
call if your network provides these service.
The followings are the possible options:
Mute: You can switch microphone off and the caller can’t hear you.
Hold: You can hold the current call.
Answer the hold: Answer the previously held call.
Hold current and make next: You can hold the current call and make
28
Page 31

the next call.
Hold current and answering coming: You can hold the current and
answer the coming call.
Hold current and answer the held: You can hold the current call and
answer the previously held one.
Add the held into the telephone conference: You can add the
previously held call into the telephone conference.
End the current: You can end the current call.
End the held: You can end the held call.
End the current and answer the coming: You can end the current
call and then answer the coming call.
End the current and answer the coming: You can end the current
call, and answer the previously held call.
End all calls: Select it to end all the calls.
Note: The Call Wait, Hold and Conference Call functions are all provided
by the network. You can contact the network operator for the details.
29
Page 32

Text Inputting Mode
ENTERING TEXT
When storing a name in the phonebook, writing messages, creating
your personal greetings or scheduling events in your calendar, you will
need to enter text.
You are provided with the following text input modes.
• Symbol
• English / ENGLISH/ english
• ABC/ abc/ Abc
• 123 (Numeric Input Mode)
Note: The input mode may vary in different markets.
Change
When in a text entry screen, press to change Text Input Mode, or
press the OK key to enter the eZi options and press ? or ? to select
30
Page 33

one. You will see the text input mode indicator in the top line of the
display.
eZi English Mode
This mode allows you to enter words with only one keystroke per letter.
Each key on the keypad has more than one letter – when you press once,
J, K or L may be displayed. The English mode automatically compares
your keystrokes with an internal linguistic dictionary to determine the
correct word, thus requiring far few er keystrokes than the ABC mode.
1. Input a word: press the corresponding numeric keys to enter the
desired word.
² When you finish a word, press 0 key to confirm;
² Press the Delete soft key to delete the word gradually from
right to left.
² Hold the Delete soft key to fast clean all the letters.
2. Select the letter group: press ƒ or „ to scroll through the letter
groups and 0 key to select.
3. Caps Lock change: After entering word, you can press ? or ?
to change caps lock. Or you can insert period among th e letters.
For example, to enter ‘hello’, press the following keystrokes: 4, 3, 5, 5,
and 6.
If the word that appears in the display is not the word that you desire,
press the „ or ƒ key to display alternate word choices for the keys you
have typed. (For example, “of” and “me” both shares the sequence 6, 3)
The phone displays the most commonly used choice first.
31
Page 34
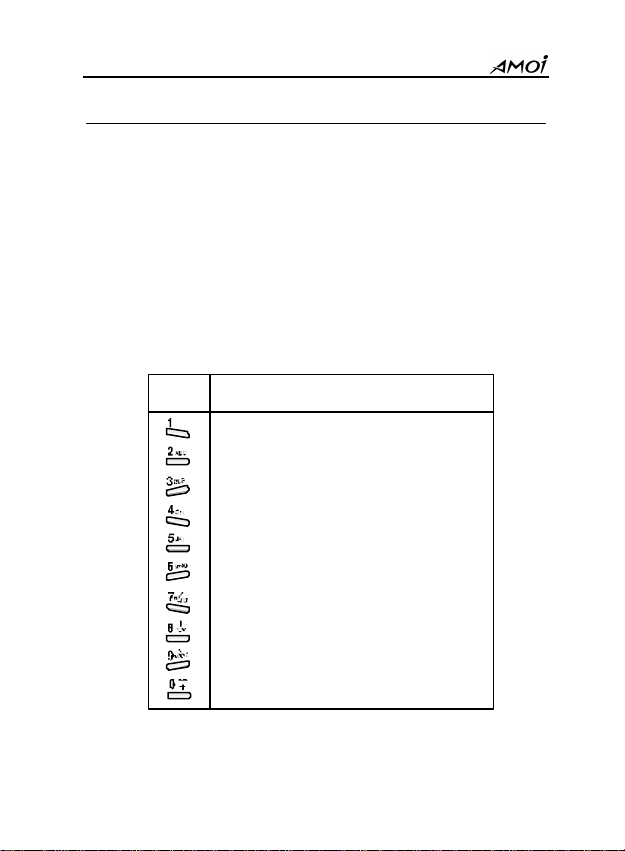
ABC/abc Mode
This mode allows you to enter letters by pressing the key labeled with
the required letter once, twice, thrice or four times until the letter is
displayed, e.g. you press the 2 key three times quickly to display the
character “C”, the 5 key two times quickly to display the character “K”.
Note: When entering the same character twice (or a different character on
the same key), just wait for a few seconds for the cursor to move right
automatically, and then select the next character.
List of characters available:
Keys Characters
. , ? ! 1 / : ‘ @
A B C 2
D E F 3
G H I 4
J K L 5
M N O 6
P Q R S 7
T U V 8
W X Y Z 9
Space 0
32
Page 35
123 (Numeric) Mode
123 indicates numeric mode. It enables you to enter numbers into a text
message. Press keys corresponding to the desired digits, and manually
switch back to the text entry mode of choice.
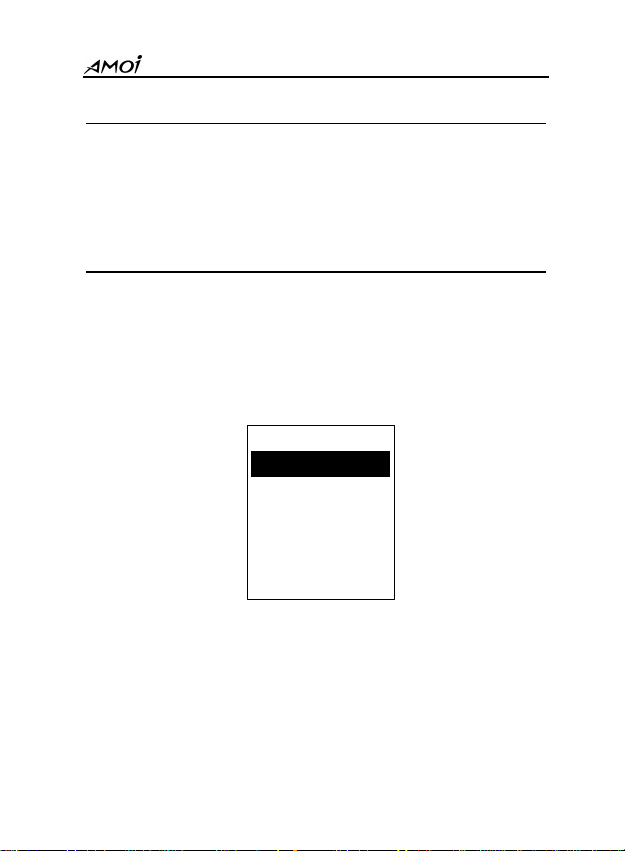
Insert Symbol
1. Press the OK key in the text entry mode;
2. Press the • or ‚ key to select the column which including the
symbol mark you want to use;
3. Press the corresponding numeric key to insert the desired symbol
mark.
Then the phone automatically switches back to the text entry mode
used just prior to selecting Symbols mode.
Note: When in the English, ABC or abc mode, you can enter some often
used symbol by pressing 1 numeric key one time or more times.
Symbol
. , : ; ? ! “
‘( ) * + - / =
<> # % _ [ ] @
{}$ ~ ^ \ ` |
1 2 3 4 5 6 7 8
Back
33
Page 36

s Dictionary
Using User’
CA8a allows you to add new word to the in-built dictionary. When in
English mode, the new -added words enjoy the priority.
l New
1. In the entry screen, press OK key to enter eZi
option— User Dictionary— New;
2. Enter the word you desire, and then press option soft key;
3. Select User Dictionary, and press OK key.
l Word List
1. In the entry screen, press OK key to enter eZi
option— User Dictionary— Word List;
2. Press ? or ? to select the desired word;
3. Press Option soft key, and you can edit the word;
4. Press Option key, you can operate the Add or Delete.
34
Page 37

PHONEBOOK
You can store your phone numbers and the corresponding name in SIM
card or in your phone memory. In addition, Phone memory can store up
to 500 entries. Every entry includes a name, one phone number, one
home telephone number, one office telephone number, one personal
E-mail address, one office E-mail address, one fax number, and one
remark.
The quantities of the entries, which SIM can store, depend on the type
of SIM. Every entry includes a name and a number.
Smart Dial
This Option allows you to find an entry quickly in your PB. In standby
mode, press the Down direction key to enter ‘Smart Dial’ directly.
1. When Smart Dial is highlighted, press OK soft key to enter.
2. Input the corresponding numerical key of the desired name.
3. Press OK soft key. Scroll to your desired entry.
35
Page 38

4. Press to dial it or press Select soft key to enter “Select
Operation”. The following Options are available:
Edit: Edit the details in the PB of the selected entry.
Copy: Allows you to copy the selected entry from the phone memory
to the SIM memory or from SIM to phone.
Note: The phone will not copy the same entry (i.e. the same name and
number).When you copy an entry without name from the SIM card, the
phone will automatically add “No Name” as the name of the copied entry.
Delete: Press the OK key and phone will display "Delete?" Select
"Yes" to delete this entry. Select "No" to cancel.
Call: Press the OK key to dial this number.
Write SMS: Refer to SMS/ Write.
Send Number: Send all the numbers in this entry to the appointed
number.
Search All
This option allows you to find a Phonebook entry by searching from
the list of all entries sorted by name.
(1) Press the • or ‚ key until you find the desired entry from the list.
(2) Press the key to dial the number or press the OK soft key for
more details.
Search Name
36
Page 39

Storing a Phone Number in PB
umber Group
Enter the character(s) of the desired name by pressing the associated
alphanumeric key(s) and press the Search soft key to see the details in
your phonebook. (The default input mode is Abc mode.)
1. Key in the number to be saved.
2. Press the Save soft key.
3. Select Local PB or SIM PB then press OK soft key.
Add to Local:
(1) Input the name, press OK soft key.
(2) Enter three phone numbers by sequence (after input the first number,
press Next soft key and then enter the second and the third number).
(3) Enter email address, fax number, ICQ number and remark
separately (the same method as step 2).
(4) Press OK soft key and “Saved” is displayed.
Add to SIM:
(1) Input name, press OK soft key.
(2) Key in the numbers, press Save soft key.
(3) Press OK soft key and “Saved” is displayed.
N
The phone allows you to group the numbers stored in the Phone. (The
numbers stored in the SIM card cannot be grouped.) It allows you to set
6 groups, such as Family, Friend, VIP and so on. When the number in
37
Page 40

Book Manager
2 Copy Range
End
:
the group dialed, the phone rings and lights in the way you’ve preset.
Enter one desired group, you ’ll have the following options:
Group List: List out all the members stored in the group.
Add from Ph: Add the entries chosen from the phonebook to the
desired group.
Ring Tone Alert: Set the ring tone for the group.
Group Picture: Set the image for the group.
Group Light: Set the color light for the group.
Change Name: Allows you to rename the group.
Ph
Copy
1. Local to SIM
2. SIM to Local
Take “Local to SIM ” for example:
(1) Copy One: Press • or ‚ to view the phone number one by one and
press left soft key to copy the desired one.
(2) Copy Range: Input the start number and the end number, then press
OK soft key to copy these entries you want to SIM card.
(Refer the following picture) You can press ? or ? to
switch between the start number and the end number.
Local to SIM
1 Copy One
Range: 1-500
38
Start: |
Page 41

Note: When you input the wrong start number and end number, the phone
will prompt you “Wrong Range”.
(3) Copy All: Copy all the numbers stored in phone to SIM card.
Notes:
1. If th e entry already exists in target PB, the entry will not be copied.
2. If the space of target PB is not enough for copy, only the front phone
numbers will be copied until the target PB is full.
3. Those that are not numbered will not be copied to SIM card.+
4. When you copy an entry without name from the SIM card, the phone
will automatically add “No Name” as the name of the copied entry.
Delete
Just same as Copy, you can delete Local or SIM PB, and you have
three selections: Delete One, Delete Range and Delete All.
Check Capacity
Check the total capacity and the amount of used entries of PB of SIM
card and Local.
39
Page 42
Info
Fixed Numbers
If the network service provider and your SIM card support the function,
you can limit the outgoing telephone number. If this function is set On,
your mobile phone can only dial the number in the fixed number list. If
you dial the other number (except the emergency number), the phone
displays ‘Forbidden Number’. You need to input the PIN2 code to set
the function for the first time.
Own Number
S tore the SIM card number of local phone for reference.
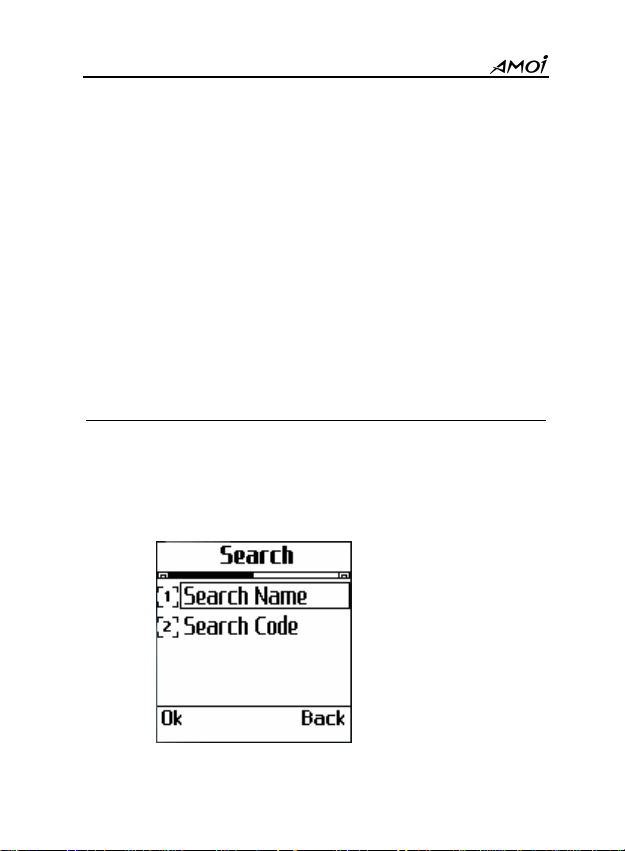
Country/ Area Code
Select this function, press ƒ or „ to view the country/area code; Press
left soft key to search by name or by code:
40
Page 43

Speed Dial
Enter the number you desire for Speed Dial, then press the Left soft key
to save the option. In standby mode, hold the corresponding numeric
key, the number can be dialed quickly and directly.
USING MENUS
CA8a offers a range of functions that allow you to tailor the phone to
your needs. These functions are arranged in menus and submenus.
Accessing a menu function
By scrolling
1. In Standby mode, press Menu soft key.
2. Scr oll with navigation keys through the menu and select, for example,
Toolbox by pressing OK soft key.
3. If the menu contains submenus, select the one you want, for example
Alarm Clock.
4. If the selected submenu contains further submenus, repeat step 3.
5. Select the setting of your choice.
6. Press Cancel key to return to the previous menu level, and press
key to exit the menu without changing the menu settings.
By Shortcut
The menus, submenus and setting options are numbered and you can
41
Page 44

ctions
1-2-6: Templates
access the m by using their shortcut number.
1. In Standby mode, press the Menu soft key.
2. Within three seconds, key in the index number of the menu function
you want to access.
e.g.: To see your biorhythm, press Menu soft key then press 6,3,2,1.
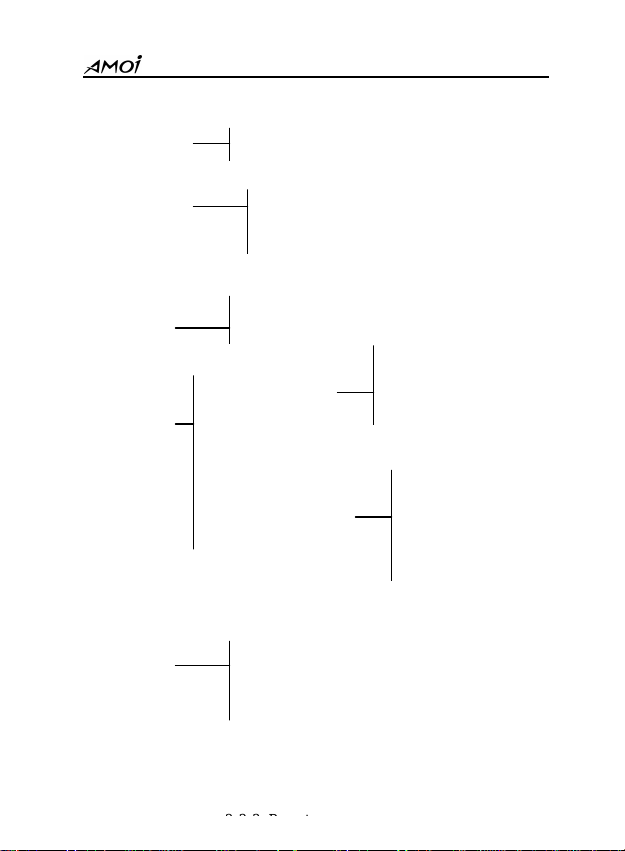
List of Menu Fun
The following list shows the serial number of each menu function.
When you use the STK card the actual menu function may not match
the list below. The STK menu will locate at the eighth position of the
main menu (you can use the „ key to access Messages menu).
1. Messages
1-1: SMS
1-2: MMS
1-1-1: Inbox
1-1-2: Write SMS
1-1-3: Outbox
1-1-4: Status Report
1-1-5: Delete
1-2-1: Inbox
1-2-2: New
1-2-3: Outbox
1-2-4: Drafts
1-2-5: Sent
42
Page 45
1-6-1-4:
Customs
2-1-4: Go to URL
1-3: Voice Mail
1-4: Broadcast
1-3-1: Voice Mail NO.
1-3-2: Call
1-4-1: Read
1-4-2: Auto Display
1-4-3: Filter
1-5: Memory
1-5-1: SMS
1-5-2: MMS
1-6: Settings
1-6-1: SMS Settings
1-6-2: MMS Settings
2. Data Service
2-1: Browser
2-1-1: Homepage
2-1-2: Bookmark
2-1-3: Prompt Information
2-2: PC Sync
2-3-1: Connection
2-3-2: Clear Cache
43
1-6-1-1: Auto Display
1-6-1-2: SMS Center
1-6-1-3: Valid Time
1-6-2-1: Allow Adverts
1-6-2-2: Connection
1-6-2-3: Message Validity
1-6-2-4: Reception
1-6-2-5: Save Sent Msgs
Page 46

3-2-4: No Notification
3-1-6: Other Tones
2-3: Settings
3. Personality
3-1: Music Select
3-1-1: Incoming Ring Tone
3-1-2: Message Ring Tone
3-1-3: Alarm Ring Tone
3-1-4: Log Ring Tone
3-1-5: Power On Ring Tone
3-2: Alert Type
3-2-1: Ring
3-2-2: Vibrator
3-2-3: Ring &Vibrator
3-3: Volume
3-4: Standby Interface
3-4-1: Text
3-4-2: Picture
3-4-3: Anim ation
3-4-4: Calendar
3-4-5: Download More
3-4-6: Multimedia
3-4-7: Network
44
Page 47
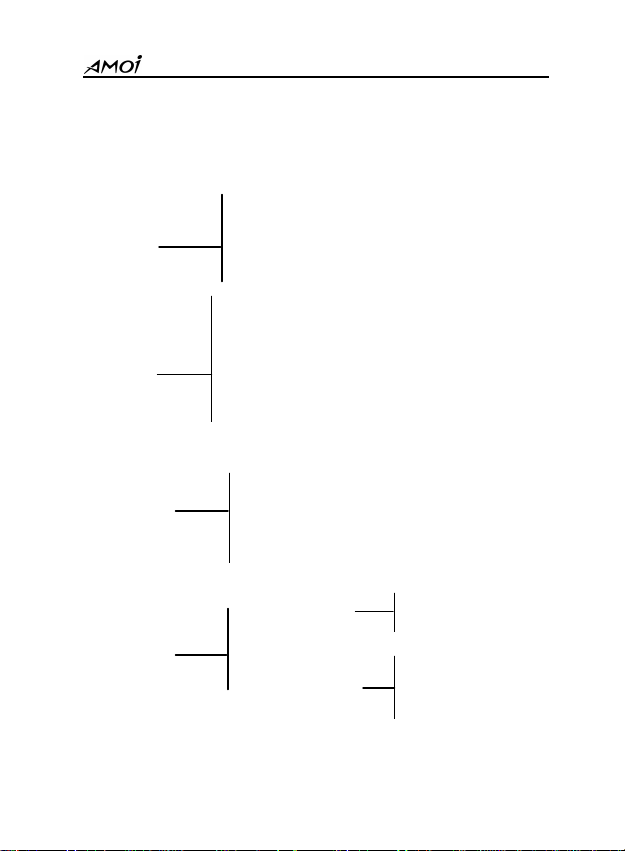
3-5: Power On/Off Interface
4. Settings
4-1: Time
4-1-1: Set Time
4-1-2: Set Date
4-1-3: Format Time
4-1-4: Format Date
4-2-1: Call Volume
4-2-2: Divert
4-2-3: Incoming Filter
4-2: Call 4-2-4: Call Waiting
4-2-5: Answer Mod e
4-2-6: Send Number
4-3: Mobile
4-4: Network
4-3-1: Auto On/Off
4-3-2: Language
4-3-3: Keypad Tone
4-3-4: Reset all
3-4-1: Mode
3-4-2: Search
3-4-3: Sequence
3-4-4: Band Select
45
3-4-1-1: Auto
3-4-1-2: Manual
3-4-4-1:GSM850/1900
3-4-4-2: DCS 1800
3-4-4-3: Automatic
Page 48

5. Toolbox
5-1: Alarm Clock
5-1-1: Alarm 1
5-1-2: Alarm 2
5-1-3: Alarm 3
5-1-4: Cancel all
5-2: Voice Memo
5-3: Calculator
5-4: Unit Convert
5-5: World Time
6. Private Info
6-1-1: Missed
6-1-2: Incoming
6-1-3: Outgoing
6-1: Calls 6-1-4: Last
6-1-5: All
6-1-6: Charge
6-2: Security
6-2-1: SIM Lock
6-2-2: Check PIN
6-2-3: Secret Items
6-2-4: PWD Manage
6-2-5: Bar Calls
46
6-1-6-1: Total Charge
6-1-6-2: Max Charge
6-1-6-3: Unit Price
6-2-5-1: All Out
6-2-5-2: Out Intl
6-2-5-3: Out Intl R oam
6-2-5-4: All In
6-2-5-5: In When Roam
6-2-5-6: Status
6-2-5-7: Cancel All
Page 49

7. Amusement
7-1: Tetris
7-2: Push Box
7-3: Eat Bean
7-4: Shrew Mouse
8. M ultimedia
8-1: Recorder
8-2: Image
8-3: Audio
8-4: User Custom1
7-1-1: Easy
7-1-2: Medium
7-1-3: Senior
7-1-4: Beep
7-1-5: Help
7-2-1: Start
7-2-2: Rule
7-2-3: Beep
47
Page 50

8-5: User Custom2
8-6: View
SMS
The SMS (Short Messaging Service) function is a network service and
may not be supported by your network. You must obtain the number of
the SMS center from your service provider. Mostly it is automatically
available from your SIM card.
Two message boxes are available: Personal SMS and Broadcasting
SMS.
Personal SMS: It is the message for mobile users to transmit personal
information.
Broadcasting SMS: If you select this option, you will receive public
information from Network Operators such as
Weather Broadcasting and so on.
SMS Indicator: When you receive a new message, an icon
appears on the screen. If the message memory is full,
continues flashing and you cannot receive any
new messages. Then use the ‘Delete’ menu to delete
obsolete messages.
48
Page 51

Note: In standby mode, you can simply press the „ key to enter the menu
of ‘Messages’ .
Inbox
Use the ? or ? key to select one of the messages.
Press the OK soft key to see the content. Use ? or ? key to scroll.
Press the Options key to do the following operations:
Reply: Reply to the sender. You can write a piece of new message and
then choose Send, Save & Send, Save or Multiple Send.
Forward: Send the received message to others. You can edit the
message and then choose Send, Save & Send, Save or
Multiple Send.
Extract Number: You can extract numbers from this message to make
a call or store in the phone/SIM card.
Store to Phone: Store the message in the phone
Delete: Delete this message.
Notes:
1. New messages will be signed with *.
2. If the number has been saved in the phonebook, the name will be shown
here, or the number will be shown.
3. If the sender’s number exceeds 11 digits, only the frontal 11 digits will
be shown and the others will be omitted. An overlong name will be
omitted with the last characters likewise.
49
Page 52

Write SMS
You can edit and send an up to 160-character-long message. Select
New or choose one of the customs to edit.
Press OK soft key after editing and choose one of the operations as
follows:
Send: Send the message.
Save & Send: Allows you to save and send the message. Even if you
fail sending, it can be stored in outbox.
Save: Allows you to save the message so that it can be sent later.
Multiple Send: Allows you to send the message to multiple receivers.
You can send the message to less than 5 phone
numbers.
Outbox
Outbox stores the messages that you have already sent or unsent. The
letter with ‘*’ is unsent message.
Write: You can write a piece of new message or edit the message and
then choose ‘Send’, ‘Save & Send’, ‘ Save ’ or ‘Multiple Send’
to do with the Message.
Extract Number: You can extract numbers from this message.
Delete: Delete this message.
Status Report
50
Page 53

You can select On to require the SMS center to inform whether your
message has been sent successfully or not.
Delete
You can delete the messages in Inbox or Outbox. In each box you can
choose to delete the messages one by one or delete them all.
MMS
MMS is a current technology of message development with highest
standard. Its feature contains: supporting multimedia function,
supporting sending several kinds of message (letters, pictures, voice
and other multimedia message). It makes multimedia sending as
phone-to-phone and phone terminal-to-network possible. MMS also
needs the support of your SIM card and service provider. C ontact with
your network service for more details. For the successful use of the
MMS, please first make right setting for the WAP and MMS server.
1. Choose Internet -> Settings -> Connection to set the WAP
configuration with the WAP/MMS parameters table below.
2. Choose Messages -> Info Settings -> MMS Settings -> Connection
to set the MMS configuration with the WAP/MMS parameters table
below.
WAP/MMS Parameters
Parameter
MMS WAP
51
Page 54
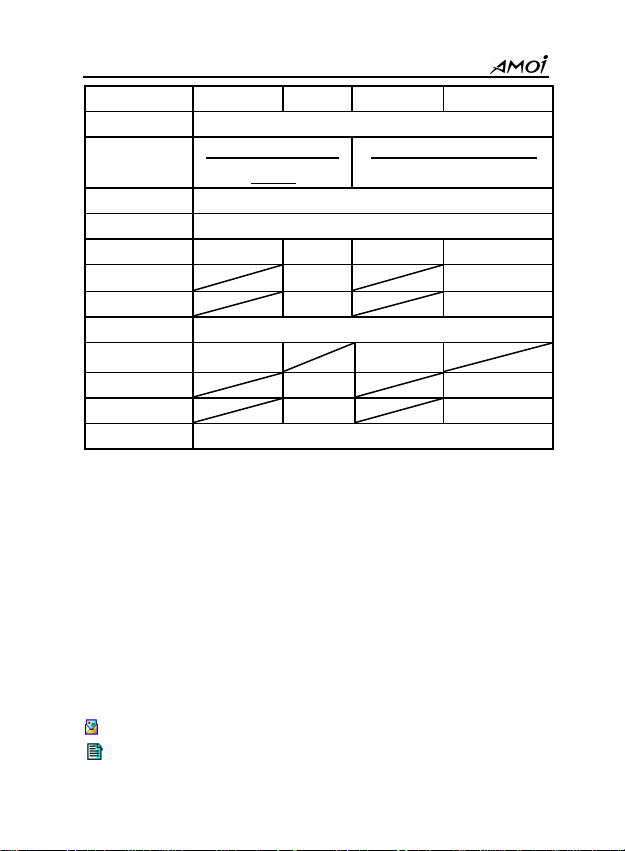
ame
Name Custom
Homepage http://mmsc.montern
IP 010.000.000.172
DNS 010.000.000.172
Bearer GPRS CSD
User N
Password wap wap
Res. Time 600 (Custom)
APN cmwap cmwap
Number 17266 17266
Data Mode
Security Off
Presently CA8 a supports MIDI, MMF files in sound format and BMP,
JPEG, GIF87, GIF89a and PNG files in image format. If there are other
format files in the MMS, the phone cannot display the image or play
the sound.
In addition, CA8a can display a 32k MMS at most. If the MMS exceeds
the capacity, it cannot be displayed.
When you use the MMS, the following Icons are possible to display:
Icons Description
New Message
The message that fail to be received
GPRS CSD
et.com
wap wap
Modem
52
GPRS CSD
http://wap.monternet.com
GPRS CSD
Modem
Page 55
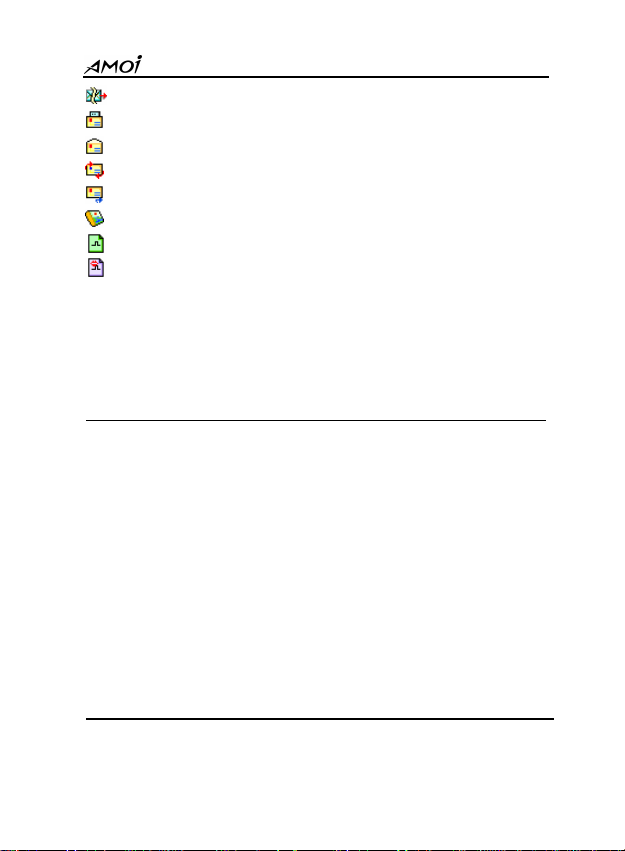
The message tha t fail to be sent
New Message to be read
Message that has been read
Forwarded Message
Replied Message
File with Image
MIDI Audio File
Fr Audio File
You can download more MMS rings and pictures through the phone
assistant. For more details, please refer to the Help Manual .
Inbox
1. In the message list display s the received messages, with indicated icon,
title, time and size of every message.
2. Press ? or ? key to select a desired one.
3. Press Option soft key:
View: Press left soft key to view the received message or to receive
a new one.
Delete: Press left soft key to delete the message.
Detail: Press left soft key to view the title of the message, the sender,
the time and the size.
New
You can create a new message by selecting New or From Template.
53
Page 56

The following process is to edit and send a message:
Press ? or ? key to choose:
Add Text: Enter the text. Press left soft key to enter, the cursor glints in
the editing frame, enter the text directly. Press * key to
change the text mode; press to edit with mixed mode;
press left soft key to confirm.
Add Image : Press Option key to operate Select, View and Delete.
Add Sound: Press Option key to operate Select, View and Delete.
Add Slide: Press left soft key to add one slide.
When you finish editing, press the Menu soft key, you’ll have the
following options:
Send: Select the number in the Email address book, or input it directly,
then you can send your MMS out. Press the 0 key to compact the
numbers if there are several addresses.
View: View the edited content.
Save: Save the edited MMS to the Draft or Template.
Set: You can set the Last Time and Screen Fo rmat.
Add Screen: To add the screen.
Delete Screen: To delete the screen.
Add Image: To add image to the current edited MMS.
Delete Image: To delete the added image.
Add Sound: To add the sound file to the edited MMS.
Delete Sound: To delete the sound file.
Note: The options vary with the edited MMS.
54
Page 57

You can also set up a MMS from the template. Enter the Options menu
to Edit a file or Delete it.
Outbox
The messages you ha ve failed to send are stored in the Outbox.
Enter the Outbox, the available options and operations are the same as
those in Inbox.
Drafts
When editing or viewing a message, you can store it in draft s box , and
select one to read and send.
Sent
The messages you ha ve sent successfully are stored in the sent box. You
can do the same operations as the other boxes.
Templates
When editing or viewing a MMS, you can save it as a template.
Afterwards you can use this template to edit a new MMS more
conveniently.
Voice Mail
This menu provides you with a quick way of accessing your voice mail
(if supported by your network).
55
Page 58

Voice Mail: Input the mailbox number obtained from your service
provider.
Call V-mail: press the Send soft key to listen to your messages.
Broadcast
You can receive broadcast messages with various contents via this
network service, such as weather or traffic. The following options are
available:
Read: You can view the up to date broadcast messages.
Auto Display: If you set this function ‘On’, messages are displayed
immediately when they are received.
Filter: Help you choose the channels you like from which you can
receive broadcast messages.
Memory
You can check up the total space and the space used of SMS and MMS.
Info Settings
SMS Setting s
You can set some setting for your SMS. The following options are
56
Page 59

available:
Auto Display: If select “On”, when you receive a new message, it can
display automatically. You can select “Off” to cancel
this function.
SMS Center: Allows you to store or change the number of your SMS
center while sending messages. You can obtain this
number from your service provider.
Valid Time: Allow s you to set the length of time for which your text
messages will be stored at the message center while
attempts are made to deliver them to you. 12 hour, 1 day,
1 week, 1 month and Max Time are available.
Customs: You can edit eight pieces of short messages up to 40 letters,
which are in common use.
MMS Settings
It allows you to set some features for your MMS. The following are
available options:
--Allow Adverts: You can choose whether or not receive the adverts.
--Connection: You can choose from MMS GPRS , Add new or Add
from list to add up to 9 proxy servers in the connection
list. Select one to reset its parameters.
--Message Validity: Allow you to set the length of time for which your
messages will be stored at the MMS center while
attempts are made to deliver them to you.
--Reception: S et the mode of receiving MMS.
--Save Sent Messages : Set whether or not to save the messages which
57
Page 60

have been sent.
DATA SERVICE
Browser
WAP is a platform for combining wireless communication with Internet.
WAP allows you to access the Internet and also provides you with some
E-commercial applications by phone.
Note: To connect WAP net, your network must provide the service and
you should perform the dredging operation described in detail in
‘Settings / Browser’.
Homepage
By selecting this item, your mobile phone will connect to the
homepage that you ’ve preset directly.
Bookmarks
You can store the commonly used websites in your favorite and entitle
them. Choose one to connect to it automatically.
58
Page 61

Prompt Information
Set it On to know whether you have successfully connect to the URL or
not.
Go To URL
Enter a URL and press the OK key to connect to the page. When your
mobile phone cannot connect to the URL, it will connect to the
homepage automatically.
PC Sync
With this function, you can make a data transmission between your
phone and your PC through the ‘PC Sync Program’. By PC Sync, you
can do the following options:
--View or edit the Phonebook information.
--View or edit the SMS.
--Upload or download images.
--Download ring tones, images or animations.
Operation Process:
Main Menu – Data Service – PC Sync, through such route you can
enter the ‘PC Sync’ menu facility.
Note: During the transmission, please don’t exit from the PC Sync, and
ensure that the data link kit is well connected; when there is an incoming
call, the trans mission will be intermitted. When finish, press the Back soft
key to exit from the PC Sync.
59
Page 62

For more details, please refer to the Help menu of ‘PC Sync’.
Settings
1. Connection
Scroll with ? or ? to choose ‘WAP GPRS’, ‘New’ or ‘From List ’.
You can perform the following operations in ‘WAP GPRS’:
? Activate
? Modify
? Delete
Select ‘Modify’, you can make the following modifications:
Name: Edit the name of the service.
Homepage: Enter the URL of the homepage, e.g.
http://wap.monternet.com.
IP Address: Enter IP address, e.g. 010.000.000.172.
DNS IP Address: You need not enter anything while using the WAP
GPRS.
Bearer: Set the type of the bearer. There are three types: GPRS, CSD
and Serial. Please set to GPRS.
User Name: Set the user name of the server.
Password: Set the password when login.
Response Time : Set the time of connecting. The connection will be
abandoned if the Website cannot be connected within
the preset time.
APN: Enter the APN, e.g. cmwap.
60
Page 63
Security: Set it On or Off.
Save : Save the modifications you have made.
2. Clear Cache
Clear the cache of the browser.
3. Resets
Reset the settings of the WAP.
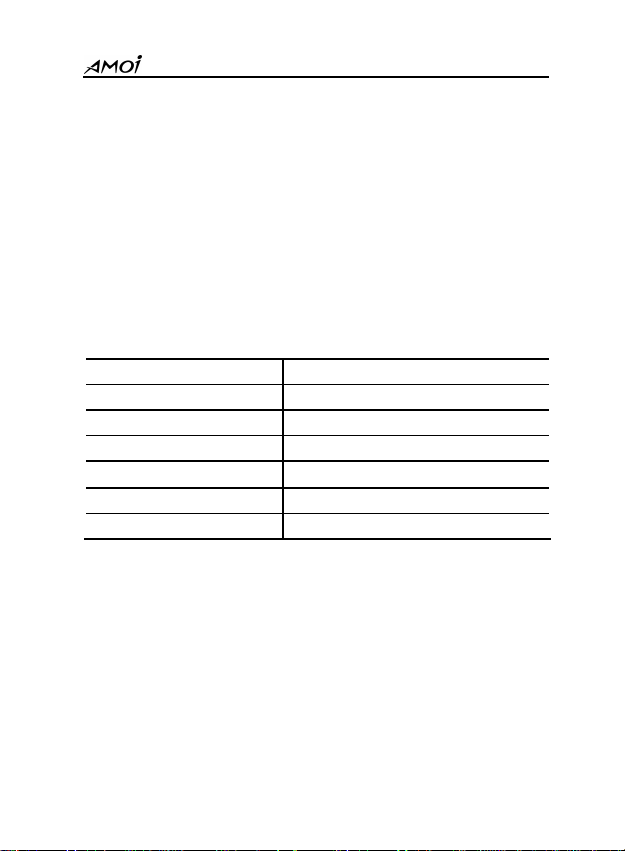
The following are shortcut keys for the WAP :
Keys Functions
? or ? key Browse the contents of the page
Left soft key Link corresponding options
Power key (hold) Disconnect WAP
1 to 9 (hold) Connect to the pages of bookmarks
0 (hold) Enter your inbox
* (hold) Browser window
The menu functions of the Browser window:
Home: Return to the default homepage.
Forward: Forward appointed contents such as rings and pictures.
Bookmarks: Display the website list. Select one to Browser.
Go to URL: Enter the URL of the Website.
History: Store the Websites you have visi ted.
Snapshots: Create and save a snapshot of the current page for further
61
Page 64

pe
use.
Save Items: Save the content of current page.
Reload: Quit the B rowser menu and reload current page.
Advanced: You can scroll and use the advanced functions as
Restart-up, Key Press Timeout, etc.
PERSONALITY
Music Select
Select your favorite music for the incoming calls, SMS, MMS, alarm
clock, and so on.
You can press ? and ? for audition and then press OK key to select
one.
Alert Ty
There are four kinds of prompt mode: Ring, Vibrator & Ring,
Vibrator or No Notification.
Note: In the standby mode you can hold * key to change the prompt mode.
Ring Volume
You can adjust the volume of the ring tone. Press ? key to increase
volume and ? key to decrease , or use the side volume key to adjust the
62
Page 65

Standby Interface
Power On/Off
volume.
The phone offers you several types of display for the standby mode.
The following options are available:
Text: Displays your own greetings. Create your own message up to 19
characters.
Picture: Press the ƒ or „ key to preview the pictures; press OK soft
key to choose one.
Animation: Press the ƒ or „ key to preview the animation; press OK
soft key to choose one.
Calendar: Displays a solar calendar.
Download More: Download more through PC Sync.
Multimedia: Choose the desired ring tone or images stored in the
Multimedia.
Network: Choose to show or hide the network service name in the
CA8a supports several formats of the pictures as BMP, JPEG and PNG.
You can download more pictures by the Phone Assistant; please refer
to its help files.
standby interface.
You can select what will be displayed when the phone is switched
on/off. Choose between Animation and Text.
63
Page 66

Picture: Press OK soft key to choose.
Text: Displays your own greetings. Create your own message up to 19
characters.
SETTINGS
Many different features of your phone can be customized for your
preferences.
Clock
This function allows you to change the current time and date displayed
in standby facility.
The following functions are available.
Set T ime: Enter the time according to the preset format.
Set Date: Enter the date, month and year according to the preset
Format.
Time Format: Choose between 24 hours mode and 12 hours mode.
Date Format: Select the day format:
D/M/Y
M/D/Y
Y/D/M
64
Page 67

Call
Call Volume
Adjust the voice volume by using the side volume key or the Up &
Down direction key.
Divert
This network service enables the incoming calls to be transferred to the
number that you specif ied. For example: You would like to transfer
your business calls to a colleague while you are on holiday. The
following options are available:
Not Reachable: Calls are transferred if the phone is switched off or
you are out of an area covered by your service
provider.
No Reply: Calls are transferred if you do not answer the call.
All Calls: All calls are transferred.
Busy: Calls are transferred if you are already making another call or
you refuse to answer.
Status: You can inquire the network about the current status of divert
function.
Cancel all: All call transfer functions are cancelled.
Select one item to divert your phone, you should:
1. Scroll to the desired item then press OK soft key.
2. Select “On” and press “OK” soft key (If you want to cancel this
operation, select Cancel).
65
Page 68

3. Input the number you want to divert to and set the delay time, press
OK soft key.
4. The info is displayed to indicate if you’ve succeeded this operation
or not.
Note: You can select the transfer modes according to your need. Not
Reachable, Not Reply and Busy can be set singly or in group. However, if
you set All Calls, the other transfer setting will be invalid automatically.
Activate, cancel or check any call transfer mode, short-time display
will appear for handling the setting. Only after finishing operating can
you get the result.
When the Call Baring function is activated, some transfer function
will be invalid.
Incoming Filter
With this operation, you can put numbers into Reject number that will
never get through your phone; and put numbers into Accept number so
that only the number stored in the Accept Number list can get through
your phone.
Note: Only when you subscribe the Line Identification Service can you
activate the incoming filter.
Call Reject
The phone will automatically refuse the numbers you put in the
“Reject Number” (up to ten records); you can get the prompt
information in the standby mode when someone calls you with these
66
Page 69

numbers; you can also check all the rejected record in the “Reject list ”.
Call Accept
Your phone can only receive the numbers you put into the “ Accept
Number”. If not, your phone displays the information “this number is
rejected”. You can also check all the Accept calls in the “Accept List”.
Note: Only when your SIM card is subscribed to the incoming number
displayed, can you use the function.
Call Waiting
The phone supported the function of ‘Call Wait ’ and ‘Call Hold’ of
GSM net. If you select this function, the network will tell you there is a
new call coming in during another call. You can receive the new call by
hold the present call. The following options are available:
Activate: The Call-Wait Tone will be heard when there is another new
call coming during one call. The phone will display
“Incoming”, and you can hole the present call to answer the
incoming one.
Cancel: Select to cancel this function .
Status: Select it to display the status of this network function: ‘Active’
or ‘Off ’.
Answer Mode
There are three methods to answer a call.
67
Page 70

Call Key: Press to answer a call.
Open Mobile: Open the phon e to answer a call.
Auto Answer: If you insert Car Kit , the phone can automatically
answer after 3 seconds. Before the auto answer , you
can also press to answer it.
Sent Number
This function must be supported by network.
Your phone number will be hidden or displayed according to the
network when making a call.
On: Your phone number will be displayed to receiver.
Off: Your phone number will be hidden and unknown to receiver.
Mobile
Auto On/Off
The phone will switch on or off at the preset time.
Enable: Enable the phone to automatically power on/off.
Set: Enter the time when you want your phone to switch on/off.
Language
² Spanish: All the menus and information is displayed in Spanish.
² English: All the menus and information to be displayed in
English.
Enter the menu, press the „ or ƒ key to switch between the two
languages, press the left soft key to confirm your setting.
68
Page 71

Note: Press the *,9,9,# in succession to switch the two language in standby
mode.
Keypad Tone
It allows you to set the keypad tone On/Off, you can also use the side
volume key to adjust the tone volume.
Reset All
You can reset some settings to factory set. You need to enter your
phone password (the factory set for the password is 0000).
Note: If you reset, some personal setting will be deactivated.
Network
When you use the phone, the phone will auto select the network service.
When the phone is beyond the service area or in abroad, you can sele ct
the appropriate network manually.
There are two modes available for you to search the network: Auto &
Manual searching.
To select “Search”, the LCD will display “Searching...” After you get it,
the GSM will auto display the found network. If there are t wo available
networks, you can use the ?or? to select. Those labeled with * are
prohibited.
Note: The number of stored networks depends on the SIM card you use.
69
Page 72

TOOLBOX
Alarm Clock
CA8a offers you three alarm clo cks. They still work even if the phone
is powered off. When the clock alarms at the set time you can press the
left soft key to switch it on. If you set a clock an alarm icon will display
in the standby mode. And you can set the 3 alarm activated at the same
time, and every alarm can work independently. For every alarm, you
can have the following options:
On: Press the OK soft key to startup or cancel the clock. There is a v
sign when the alarm is set on.
Set T ime: Enter the time as the 24-hour format.
Mode: You can set the clock to work every day or on workdays or
customize it as your desire.
Tone: Select an alarm tone you like.
Cancel All: Disable all the alarm clocks.
70
Page 73

Notes:
1. When the alarm rings at the preset time, you can press any key except
the left soft key to end it.
2. The clock will continue alarming for 1 minute if no key is pressed.
Voice Memo
You can record 2 voice memos, 30 seconds at most for each.
Record
Press OK soft key to enter Record. A timer displays to show you the
elapsed time. When recording time expires, the phone will
automatically save the memo already recorded and exit. You can also
press the right soft key to end recording.
In the standby mode you can press the record key to enter the Voice
Memo menu. Or you can hold the record key to perform recording
directly. This operation is also ef fective when making calls. You cannot
record any more if you have had two memos.
Note: Recording voice conversations is illegal in some countries. Make
sure the other party has consented to being recorded.
Calculator
Using this feature, you can use the phone as a calculator. The calculator
provides the basic arithmetic functions: addition, subtraction,
multiplication and division.
71
Page 74
t
Performing a calculation:
1. Enter the first number by using the numeric keys .
2. Press the navigation keys to set the operator for your calculation
referring to the screen: ? for + (add), ? for - (subtract), ƒ for ×
(multiply), „ for / (divide).
3. Enter the second number.
4. Press the Equal key to reckon the result.
5. Repeat step 1 to 4 as many times as required.
Unit Conver
You can convert the units as follows:
Length
Weight
Volume
Surface
To do so:
1. Use ƒ or „ key to select a kind of unit and use ? or ? key to
select the unit you want to convert to.
2. Input the number you want to convert.
3. The converted value will display in the nether area immediately.
cm, dm, m, inch, foot, yard, mile, km
g, dg, hg, kg, kintal, ton, ounce, pound
cm3, dm3, m3, liter, in3, ft3, yd3, gallon
cm2, dm2, m2, ft2, yd2, mu, ha, acre
World Time
Maybe you have had a puzzle like this: You wanted to call a friend in
another country but you didn’t know the time there. This tool is used to
72
Page 75

help to solve the problem. Use ƒ or „ key to scan the time zone of the
world. And you can also set the daylight saving time if the area has.
PRIVATE INFO
Calls
Only when your SIM card is provided with the operation of incoming
display, your phone can record the information of missed and incoming
calls. If the numbers have been saved in the phonebook, the phone will
display the corresponding names in the Missed, Incoming and
Outgoing Calls.
Missed
20 pieces of missed call information can be stored here.
Incoming
20 pieces of incoming call information can be stored here.
Outgoing
20 pieces of outgoing call information can be stored here.
73
Page 76

In the lists above, you can choose a number and press Option soft key
to do the operations as follows:
Call: Dial this number.
Detail: View the details of the call (Name, Number and Time).
Save : S ave the number in local phone or SIM card.
Delete: Delete the information of this number.
Note: You can press the ƒ key to enter this menu directly in the standby
mode. But in this shortcut menu there are only three submenus including
the information of missed, incoming and outgoing calls.
During the call, the internal screen will display the time (in the format
of hour, minute and second).
The call time in the charge bill provided by the network operator may
be different from that recorded by the phone. It all depends on the
network.
Last
Record the time used in last call. Press Reset soft key to set the timer to
00:00.
Total
To record the total time of the calls. Press Reset soft key to set the timer
back to 00:00.
Charge Info
When your network pro vider and the SIM card support this function,
74
Page 77

you can set the Unit Price and Max Charge and see the Total Charge.
You must input correct PIN2 to start the function. You can contact your
service provider first.
Total Charge: Record the total charge. Press Reset to set the total
charge to 0.
Max Charge: View and set the total charge. When the total charge
used exceeds the preset total charge, you can get
through any charged call.
Unit Price: View and set the unit price for calls.
Note: The item of Total Call Cost depends on the function of network,
therefore the bill given by the service provider may not match your record.
Security
SIM Lock
If enabled, the phone would use the current SIM card only. You must
input the phone password if you want to change a SIM to use.
Check PIN
You must input the PIN code when the phone is switched on.
Note: If the PIN is input incorrectly or three times, the SIM card will be
locked and you need the PUK code to unlock it.
Secret Items
75
Page 78

You can set password for some functions. You should input correct
phone password to startup. You must input correct password to use the
functions you have set for it. You can set password for these functions:
SMS, MMS and Private Info .
Password Manage
Change PWD
1. Input old PWD (the default is 0000), press OK soft key to continue.
2. Input new PWD and press OK soft key.
3. Re-input the new PWD to confirm.
4. The information “PWD changed” will display to declare success.
Change PIN
The process of changing PIN resembles changing PWD.
Note: You must set PIN check enabled first.
Change PIN2
The process of changing PIN2 is the same as changing PIN.
Bar Calls
The calling limitation function can help you to limit the incoming and
outgoing calls. This service may not be available on all networks.
Contact your service provider if necessary.
All out: Select this option to bar dialing any calls (except the urgent
calls).
Out Intl: Select this option to bar dialing the international calls.
76
Page 79

Out I ntl Roam: Select this option to bar dialing the international calls
except to your home country.
All In: Select this option to bar all incoming calls.
In When Roam: Select this option to bar all incoming calls when
roaming.
Status: It allows you to inquire the current Bar calls setting.
Cancel All: Selecting this option, the phone will allow dialing and
answering all calls.
AMUSEMENT
In the standby mode, you can press the ? shortcut key to enter this
menu.
Tetris
There are three difficulty levels: Easy, Medium & Hard. You can see
the details in the Help menu and turn on the sound by enabling Beep.
Push Box
You are successful if you pushed all boxes to destinations.
Move the pusher by pressing the •‚ ƒ „ key; restart the game by
pressing the Send key; press the Power On/ Off key to exit from the
game. Press the # or * key to choose the game level.
Start: Start playing the game.
Game Rule: Illustrate the rules of the game.
Beep: Select ‘On’ to have beep during playing, and ‘Off’ the cancel the
beep.
77
Page 80

Eat Bean
A big smart mouth eating beans. The big mouth has to eat the beans by
avoiding the red monster.
Put the cursor to ‘Eat Bean ’, press OK left soft key to enter the game,
and then choose the options as follows:
Start: Start playing the game.
Load Game: To enter the game you saved last time.
Help: Provides you with some instructions on playing the game.
Beep: Select ‘On’ to have beep during playing, and ‘Off’ the cancel the
beep.
Shrew Mouse
New Game: Begin the new game.
Settings: Set the play time and beep for the game.
Scores: Make a record of the best five players.
Game Rule: Illustrate the rules of the game.
78
Page 81

Voice Memo
MULTIMEDIA
The Multimedia is a menu that helps to manage the mobile phone
resources.
Enter
Press OK soft key or left soft key to enter the Voice Memo. All the
voice memos list out. C hoose one, the following options are available:
--Play: Play the voice memo.
--Copy: Copy the voice memo to “User Custom 1” or “User Custom
2”.
--Move: Move the voice memo to “User Custom 1” or “User Custom
2”.
--Rename: Rename the voice memo.
--Property: View the title, size and recording time of the voice memo.
--Delete: Delete the voice memo.
--Send as MMS: Edit the voice memo as MMS.
79
Page 82

Property
View the quantity of the files and the total capacity.
Delete
Delete all the voice memos.
Image
The taken pictures are stored here.
Press the Options soft key, 3 options are available:
E nter
By selecting the Enter, all the images stored li st out. Scroll to the
desired one and press the OK or Left soft key, you ’ll have the
following options:
--Preview: View the images.
--Copy: Copy the image to “User Custom1” or “User Custom2”.
--Move: Move the image to “User Custom1” or “User Custom2”.
--Rename: Rename the image.
--Property: View the title, size and taking time of the image.
--Delete: Delete the image.
--Send as MMS: Edit the image as MMS. See the menu of
“Message-MMS”.
--Set as Standby Picture: Set the selected image as the Standby
picture.
80
Page 83

User Custom1
Property
View the quantity of the files and total capacity.
Delete
Delete all the images.
Audio
The options are the same as the Image.
You can store the voice memos, pictures, phonebook, photos and ring
tones in User Custom1.
Enter
Press OK soft key to enter User Custom1. Operations are the same as in
“Camera” and “Voice Memo ”.
Property
View the quantity of the files and the total capacity.
Delete
Delete all the files.
Rename
81
Page 84

Rename User Custom1.
User Custom2
You can store voice memos, pictures, phonebook, photos and ring tones
in User Custom2.
The options are the same as the User Custom1.
View
View the free & used space of the Multimedia.
82
Page 85

REFERENCE INFORMATION
Access Codes
There are several access codes that are used by your phone and its SIM
card. These codes help you protect the phone against unauthorized use.
Phone Password
The security code can be used to avoid unauthorized use of your phone.
The security code 0000 is usually supplied with the phone.
Change the security code before you start using your phone. Keep the
new code secret and in a safe place, which is separate from the phone.
PIN Code
The PIN (Personal Identification Number) code protects your SIM card
against unauthorized use. The PIN code is usually supplied with the
SIM card. When the PIN code request is enabled, the code is asked
each time the phone is switched on.
83
Page 86

If you key in an incorrect PIN code three times in succession, the SIM
card will be locked. To unlock the SIM card, you’d key in the PUK
code and press the OK soft key, and key in a new PIN code twice.
PIN2 Code
The PIN2 code, supplied with some SIM cards, is required to access
some functions, such as charging unit counters. These functions are
only available if supported by your SIM card.
If you key in an incorrect PIN2 code three times in succession, the
PIN2 wi ll be locked. To unlock the PIN2, you’d key in the PUK2 code
and press the OK soft key (or OK key), and key in a new PIN2 code
twice.
PUK Code
The PUK (Personal Unblocking Key) code is required to change a
blocked PIN code. The PUK code may be supplied with the SIM card.
If not, contact your local service provider for the code.
If you key in an incorrect PUK code ten times in succession, the SIM
card cannot be used anymore. Contact your service provider for a new
card.
You cannot change the PUK code. If you lose the code, contact your
service provider.
PUK2 Code
The PUK2 code, supplied with some SIM cards, is required to change a
84
Page 87
blocked PIN2 code.
If you key in an incorrect PUK2 code ten times in succession, you
cannot use the functions requiring the PIN2 code. Contact your service
provider for a new card.
You cannot change the PUK2 code. If you lose the code, contact your
service provider.
Using the Batteries
A rechargeable Li-ion standard battery powers your phone. The
following shows the details of your battery:
Type Capacity Talk Time Standby Time
Li-ion 520mAh 4hrs 100hrs
Precautions When Using Batteries
• Never use any charger or battery that is damaged in any way.
• Use the battery only for i ts intended purpose.
• If you use the phone near the network’s base station, it uses less
power; talk and standby times are greatly affected by the signal
strength on the cellular network and the parameters set by the
network operator.
• Battery charging times depend on the remaining battery capacity
85
Page 88

and the type of battery and charger used. The battery can be charged
and discharged hundreds of times, but it will gradually wear out.
When the operation time (talk time and standby time) is noticeably
shorter th an normal, it is time to buy a new battery.
• If left unused, a fully charged battery will discharge itself over time.
• Use only approved batteries; and recharge your battery only with
approved chargers. When a charger is not in use, disconnect it from
the power source. Do not leave the battery connected to a charger
for more than a week, since overcharging may shorten its life.
• Extreme temperatures will affect the charging capacity of your
battery: it may require cooling or warming first. Do not leave t he
battery in hot or cold places, such as in a car in summer or winter
conditions, as you will reduce the capacity and lifetime of the
battery. Always try to keep the battery at room temperature. A
phone with a hot or cold battery may temporarily not work, even
when the battery is fully charged. Li-ion batteries are particularly
affected by temperatures below 0 °C.
• Do not short -circuit the battery. Accidental short-circuiting can
occur when a metallic object (coin, clip or pen) causes a direct
connection between the + and - terminals of the battery (metal strips
on the back of the battery), for example when you carry a spare
battery in a pocket or bag. Short-circuiting the terminals may
86
Page 89

damage the battery or the object causing the short -circuit ing.
• Dispose of used batteries in accordance with local regulations.
Always recycle. Do not dispose of batteries in a fire.
Care and Maintenance
Your phone is a product of superior design and craftsmanship and
should be treated with care. The suggestions below will help you to
fulfill any warranty obligations and allow you to enjoy this product for
many years. When using your phone, battery, charger, or any
accessory:
• Keep it and all its parts and accessories out of small children’s
reach.
• Keep it dry. Precipitation, humidity and liquids contain minerals
that will corrode electronic circuits.
• Do not use or store it in dusty, dirty areas as its moving parts can be
damaged.
• Do not store it in hot areas. High temperatures can shorten the life of
electronic devices, damage batteries, and warp or melt certain
plastics.
87
Page 90

• Do not store it in cold areas. When the phone warms up (to its
normal operating temperature), moisture can form inside the phone,
which may damage the phone’s electronic circuit boards.
• Do not drop, knock or shake it. Rough handling can break internal
circuit boards.
• Do not use harsh chemicals, cleaning solvents, or strong detergents
to clean it. Wipe it with a soft cloth slightly dampened in a mild
soap-and-water solution.
• Do not paint it. Paint can clog the device’s moving parts and prevent
proper operation.
• Use only the supplied or an approved replacement antenna.
Unauthorized antennas, modifications of attachments could damage
the phone and may violate regulations governing radio devices.
• If the phone, battery, charger, or any accessory do not work properly,
take it to your nearest qualified service facility.
• This phone features large inner & outer display screens, which are
damageable. Please be most careful to avo id dropping or knocking
or scratching it with a sharp thing.
88
Page 91

GLOSSARY
Antenna
A device for transmitting or receiving signals. The size and shape of
antennas is determined, in part, by the frequency of the signal they
receive. Wireless phones and the b ase station must have antennas.
Alarm Clock
Your pager alarm can be set for a specific time and date or can used as
a daily alarm.
ALS (Alternate Line Service)
ALS provides the capability of associating two alternate lines with one
SIM card. You can mak e and receive calls on either line as desired with
this service.
89
Page 92

AMOI Smart Dial
An intelligent way to dial a number which is stored in your phonebook.
S ay you want to dial Steven, at idle, press st, then press *, you can find
the number of Steven. Or press st when you select Smart Dial in
phonebook.
Band
Range of radio frequencies between two defined limits which are used
in wireless communications.
Call Barring
Enable it to restrict outgoing and incoming calls.
Call Divert
Allows you to set your phone to forward calls to an alternate phone
number. (Network and subscription dependent feature -- not available
in all areas).
Call Holding
You can put callers on hold. (Network and subscription dependent
feature -- not available in all areas).
90
Page 93

Call Waiting
While making a call, the phone will alert you that another person is
trying to call you. You can choose to answer the call or it will forward
to your voice mail. (Network and subscription dependent feature -- not
available in all areas).
Conference Calling
Able to establish a conference call involving up to five additional
parties.
CSD
Circuit Switch Data. CSD is a GSM transaction, which is charged by
the data flow amount.
DTMF (Dual-Tone Modulated Frequency)
You send DTMF signals when you enter numbers by pressing the digit
keys.
GPRS— General Packet Radio Service
GSM (Global System for Mobile Communication)
GSM is the pan-European standard for digital cellular telephone service.
91
Page 94

It is also one of the technologies available in the Americas. GSM was
designed for markets to provide the advantage of automatic,
international roaming in multiple countries. The SIM (Subscriber
Identification Module) card is a vital component in GSM operation.
The user can store all relevant data for the phone on a removable plastic
card. The card can be plugged into any GSM compatible phone and the
phone is instantly personalized to the user.
GSM850
The digital GSM network used in America.
GSM1800
The digital GSM network used in Europe and Asia.
GSM1900
The digital GSM network of GSM1900 is widely used in North
America and Latin America.
Hands-Free
A feature that permits a driver to use a wireless phone without lifting or
holding the handset - an important safety feature for automobiles,
tractors and most other motorized vehicles.
92
Page 95

LCD (Liquid Crystal Display)
Commonly used to refer to the screen display on the wireless phone.
Line Identification Service
Service which allows subscribers to view or block the telephone
numbers of callers.
Mobile Phone
The term that can be inter-changed with cellular phone or wireless
phone.
MMS (Multimedia Messaging Service)
MMS is current technology of message development with highest
standard. Its feature contains: supporting multimedia function,
supporting sending kinds of message (letters, pictures, voice and other
multimedia message). It makes multimedia sending as phone-to-phone
and phone terminal-to-network possible.
PIN (Personal Identification Number)
Security code that protects the phone against unauthori zed use. The
PIN is supplied by the service provider with the SIM card. It may be a
four to eight-digit number and can be changed, if required.
93
Page 96

PUK (PIN Unlocking Key)
Security code used to unlock the phone when an incorrect PIN has been
entered three times in succession. The eight-digit number is supplied by
the service provider with the SIM card.
Roaming
A service offered by most cellular service providers that allows
subscribers to use cellular service while traveling outside their home
service area. When they are outside their home service area and come
within range of another cellular system, the ROAM indicator on the
cellular phone will light to show that they are in range.
SIM (Subscriber Identification Module)
Card containing a chip with all the information required to operate the
phone (network and memory information, as well as the subscriber’s
personal data). The SIM card fits into a small slot in the back of the
phone and is protected by the battery.
SMS (Short Message Service)
Network service that allows you to send and receiv e messages to and
from another subscriber without speaking to the correspondent. The
message created or received (up to 160 characters) can be displayed,
received, edited or sent.
94
Page 97

Soft Keys
Keys marked • and o on the phone, the purpose of which:
• Varies according to the function that you are currently using
• Is indicated on the bottom line of the display just above the
corresponding key.
Standby Time
The time a battery can power a phone in the standby mode, ready to
make or receive a call, without being used for an actual call. The longer
a phone is in standby mode, the less standby time remains in the
battery.
Talk Time
The total time a battery can power a phone for cellular calls. As the
phone drains the battery during a call, the talk time left in the battery
diminished until the phone is turned off or the battery is recharged.
Tri-Band
Wireless phone that operates on any of the three digital GSM
frequencies-typically, 850 MHz, 1800 MHz and 1900 MHz-to increase
service coverage. (1800 MHz is a GSM digital network used in Europe.
This frequency allows for global roaming, where roaming agreements
are in place.)
95
Page 98

URL
Uniform Resource Locator. It demonstrates the path of the resource. It
usually takes http://wap as beginning.
Voice Mail
Computerized answering service that automatically answers your calls
when you are not available, plays a greeting (Optionally in your own
voice) or records a message.
WAP (Wireless Application Protocol)
By working on top of standard data link protocols, WAP provides a
complete set of specifications to support Internet protocols. Simply put,
it's a special way of formatting content so that it can appear on small
screens, like those on wireless phones or PDAs. WAP is becoming a
global standard for developing and delivering Internet content to
wireless devices.
96
Page 99

TROUBLESHOOTING
If the phone does not work properly, please check the following
troubleshooting and find a solution. If you can’t solve the problems,
please contact your local dealer for help.
97
Page 100
Questions Solutions
? Check whether the phone is powered on or not.
? Check if the battery is lack of power.
Cannot make or receive
calls.
Conversation volume is low. ? Check if you ’ve set the Voice Volume too low.
Does not ring when an
incoming calls comes in.
LCD is not clear. ? Check if you’ve set the LCD contrast too low.
The keypad doesn’t work. ? Check if you’ve locked the keypad.
The one on the other part of
the line cannot hear you.
? Check if the signal is strong enough.
? Check if you’ve set ‘Call Barring’, SDN or the
other options in Call Set menu.
? Check if you ’ve set the ‘Call Divert’.
? Check if you ’ve placed the SIM card properly.
? Check if you ’ve set ‘Silent’ or ‘Vibrator’ modes.
? Check if the ring volume is set too low.
? Check if the surrounding noise is too loud.
? Check if you’ ve set the ‘Call Divert’.
? Check if you’ ve set ‘Mute’.
? Check whether you speak near the MIC.
IMPORTANT SAR INFORMATION
Your wireless phone is a radio transmitter and receiver. It is designed
and manufactured not to exceed the emission limits for exposure to
radiofrequency (RF) energy set by the FCC of USA. These limits are
part of comprehensive guidelines and establish permitted levels of RF
energy for the general population. The guidelines are based on
standards that were developed by independent scientific organizations
98
 Loading...