

Page 1
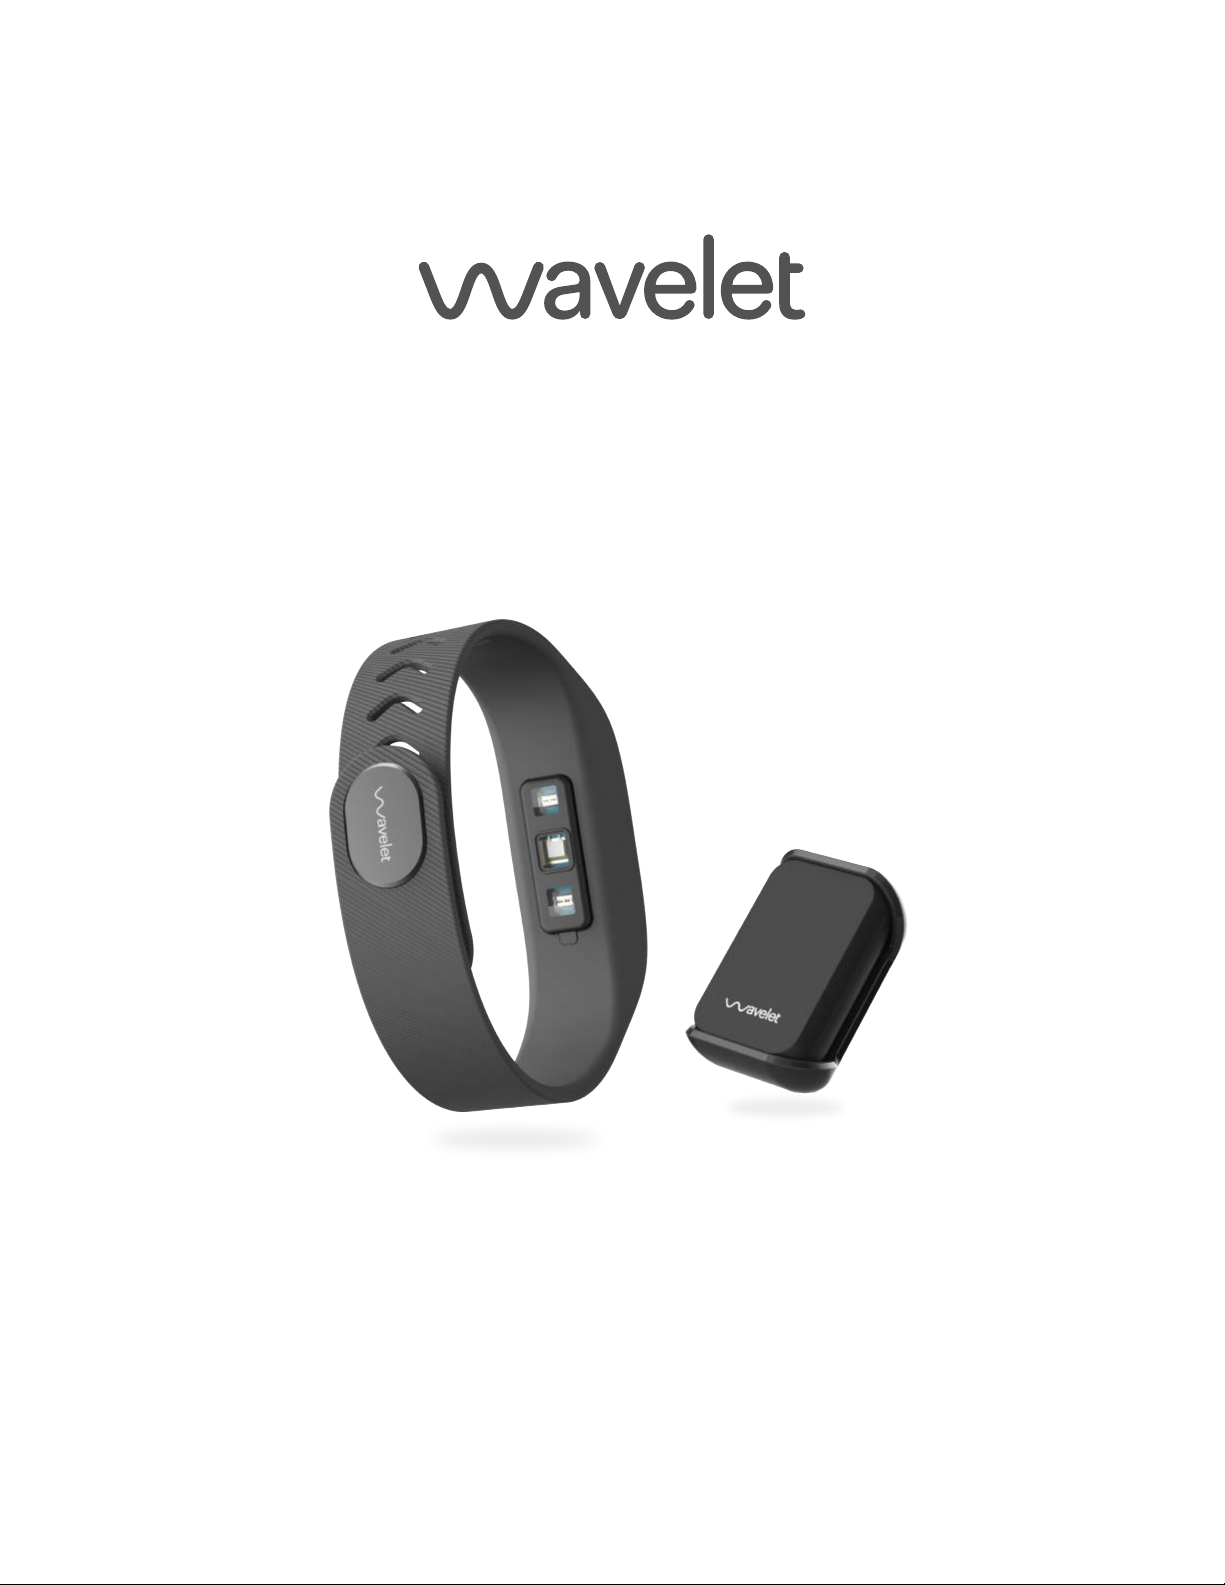
Wristband & Pod
Product Manual
VERSION 1.0
Page 2

Table of Contents
Introduction
Overview 1
Getting Started
What’s in the box
Charging the Wristband and Pod
Connecting to the Wristband and Pod
App Compatibility
Creating a Profile
Using the Devices
Wearing the Wristband Properly
Wearing the Pod Properly
Checking the Current Battery Level
Caring for the Wristband and Pod
Updating the Devices’ Firmware
2
3
4
4
4
5
6
7
7
7
The Wavelet App: Overview
Syncing the Wristband and Pod
Tracking with the Wavelet wristband
Navigating the Wavelet app
8
8
8
Page 3

The App: Dashboard
9
The App: Dashboard - Metric Details Pages
The App: Recording
The App: Recording Sleep
The App: Prof ile
The App: Profile – Manage Devices
Troubleshooting
Charging
Connecting
Resetting the Devices
FAQs
10
11
12
13
14
15
15
16
Is my mobile device compatible?
Are the Wavelet devices waterproof?
How does Wavelet calculate calories burned?
When should I wear my devices?
What is biometric detection?
Wristband Specif ications
Pod Specifications
17
17
17
17
18
19
20
Page 4
Introduction
Thank you for using the Wavelet Wristband and Pod!
This user manual will help you get started using your new devices.
Overview
Your Wavelet Wristb and and Pod track all of your daily activity. The Wristband
records your steps, sleep, calories burned, heart rate, and blood oxygen
saturation among other metrics. The Pod is useful for tracking activity and can
be used in conjunction with the Wristband for full-body motion analysis.
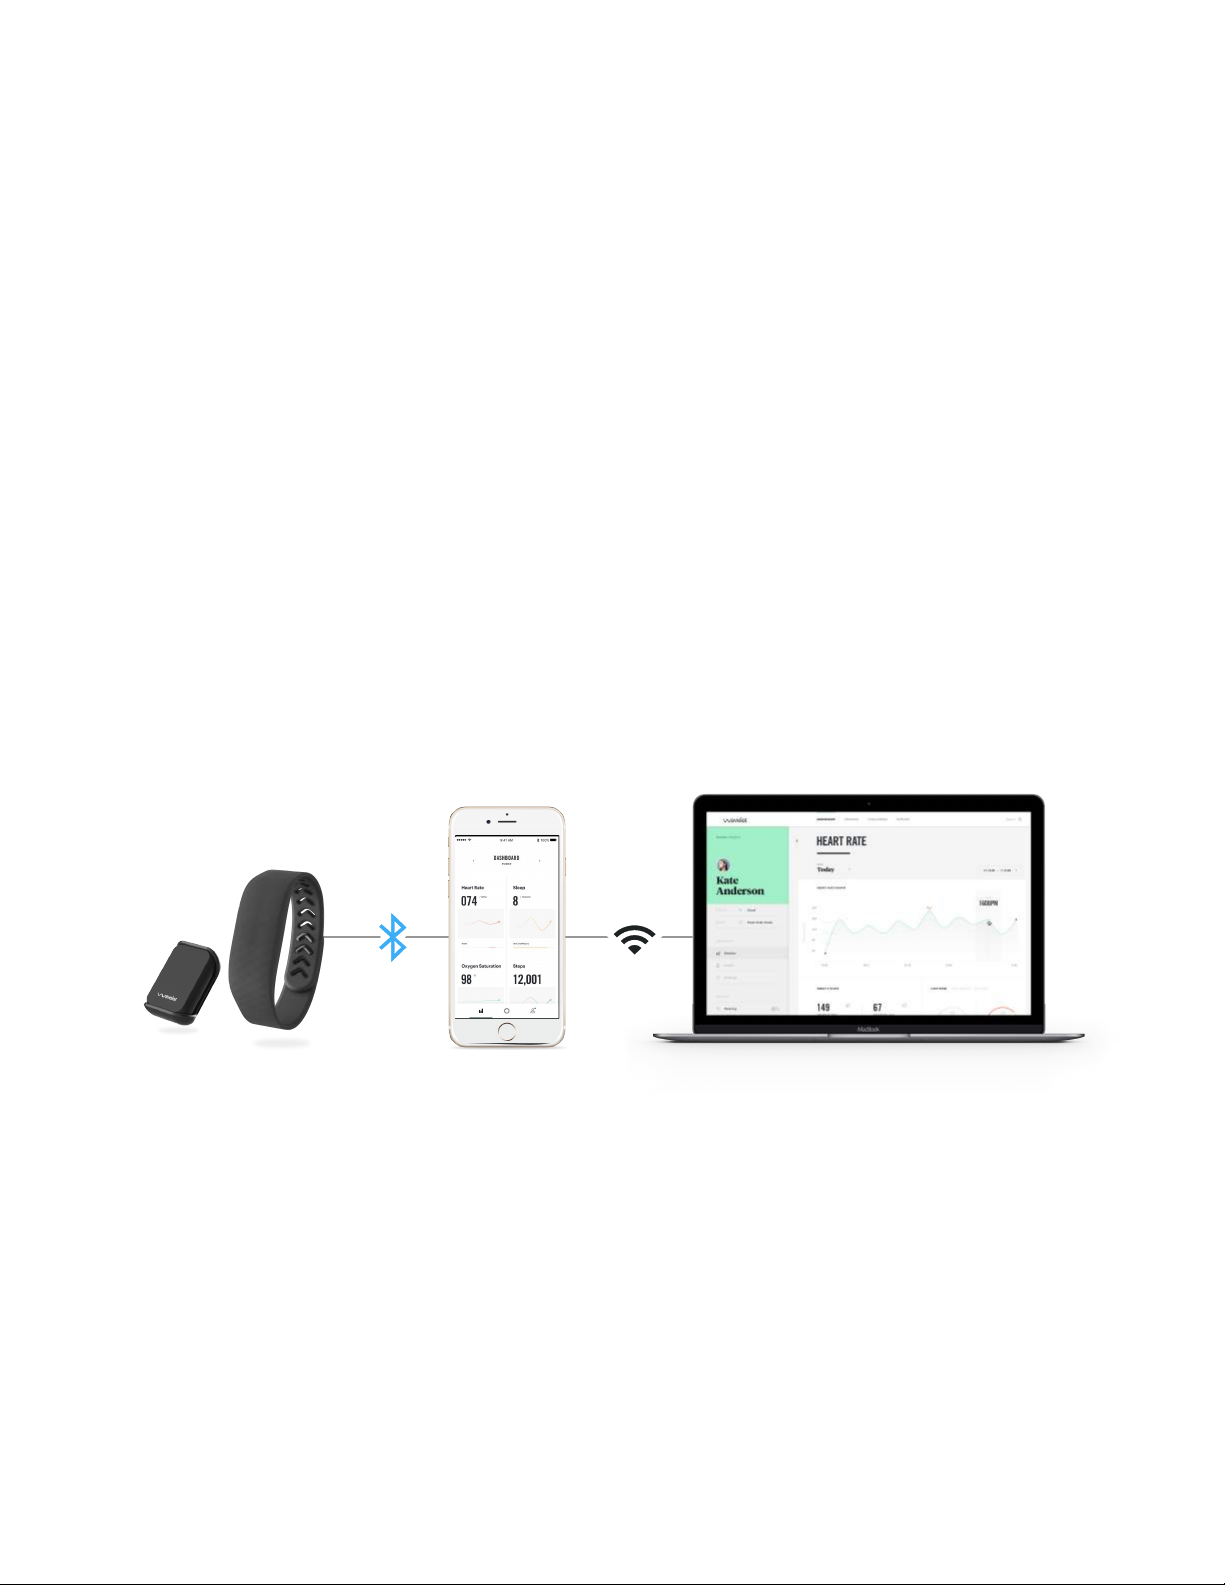
This collected information will be available to you on your mobile device and a
more detailed analysis will be relayed to your doctor and/or study coordinator.
They will use this information to understand your body’s overall wellbeing.
1
Page 5
Getting Started
This section will guide you through all of the steps necessary to start using your
Wavelet Wristband and Pod.
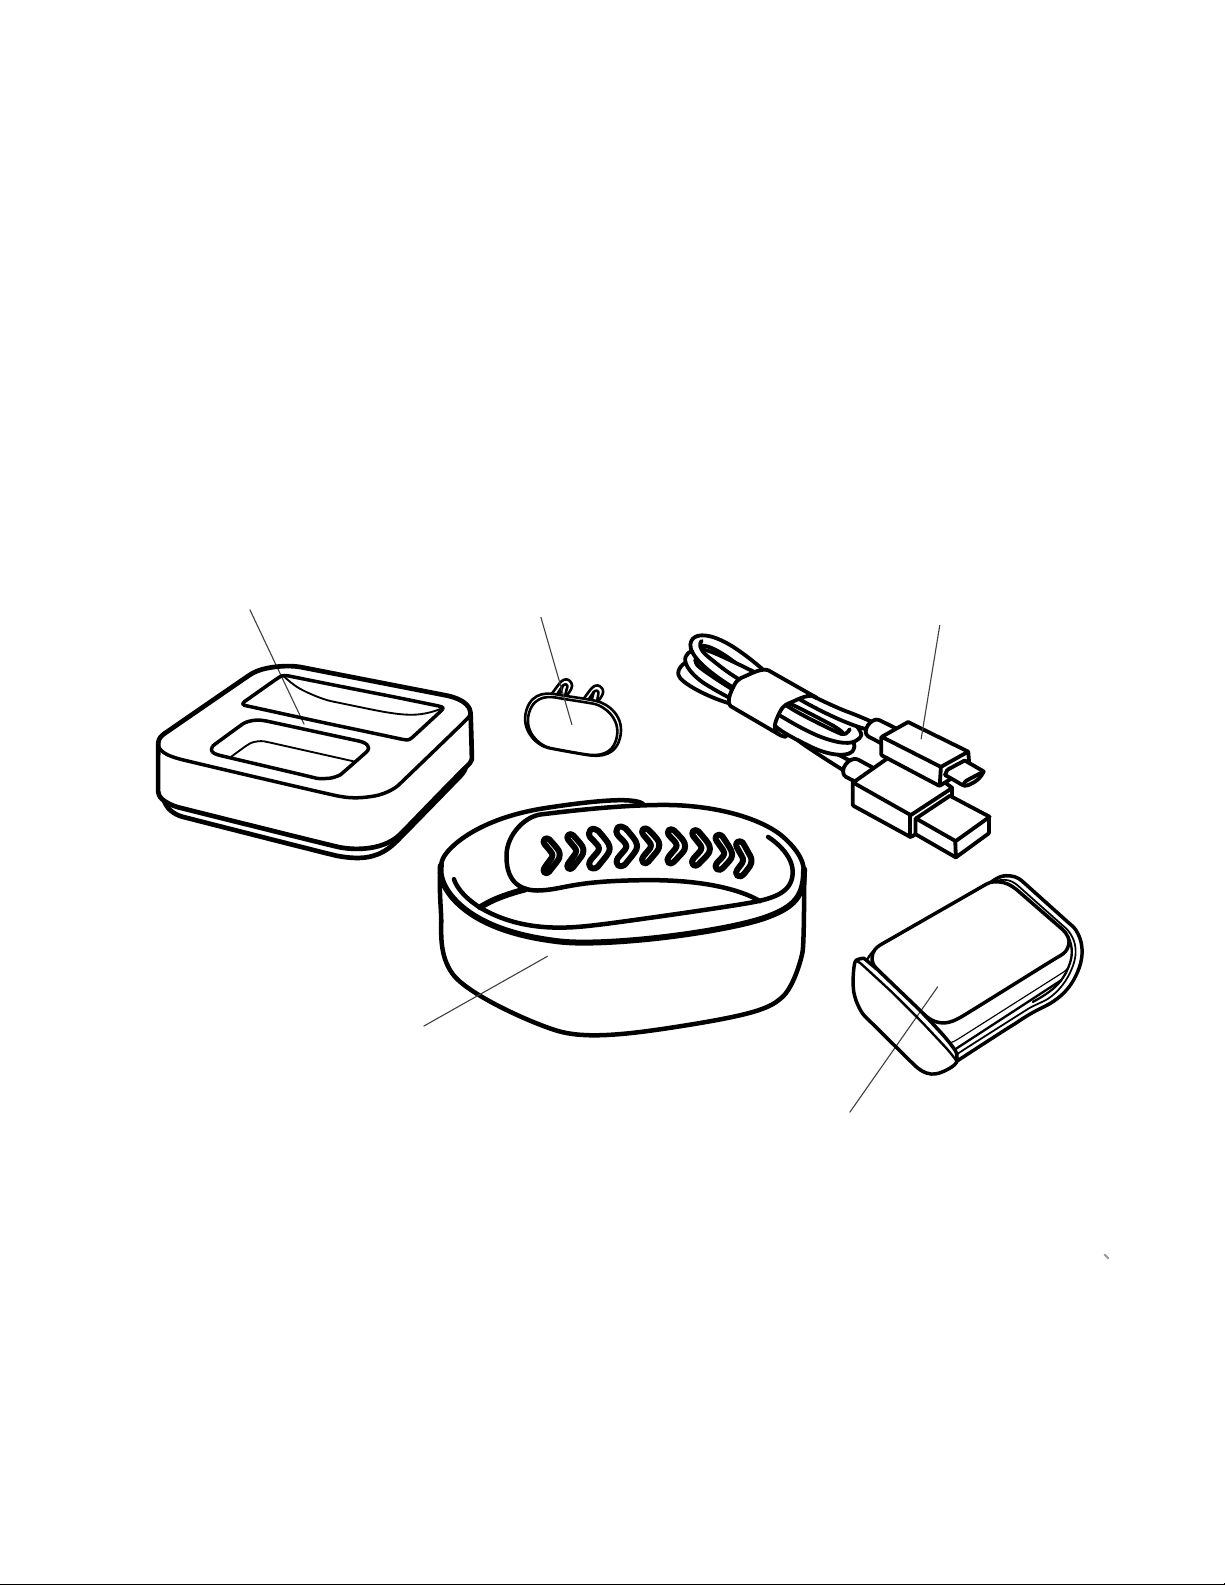
What’s in the box
Your p ackage should include the following i tems. You will need all of the se items to
set up and use your devices.
WIRELESS
CHARGER
CLASP
MICRO USB
CABLE
WRISTBAND
SHOE POD
2
Page 6
Charging the Wristband and Pod
Before using your devices you will need to fully
charge them and update their firmware.
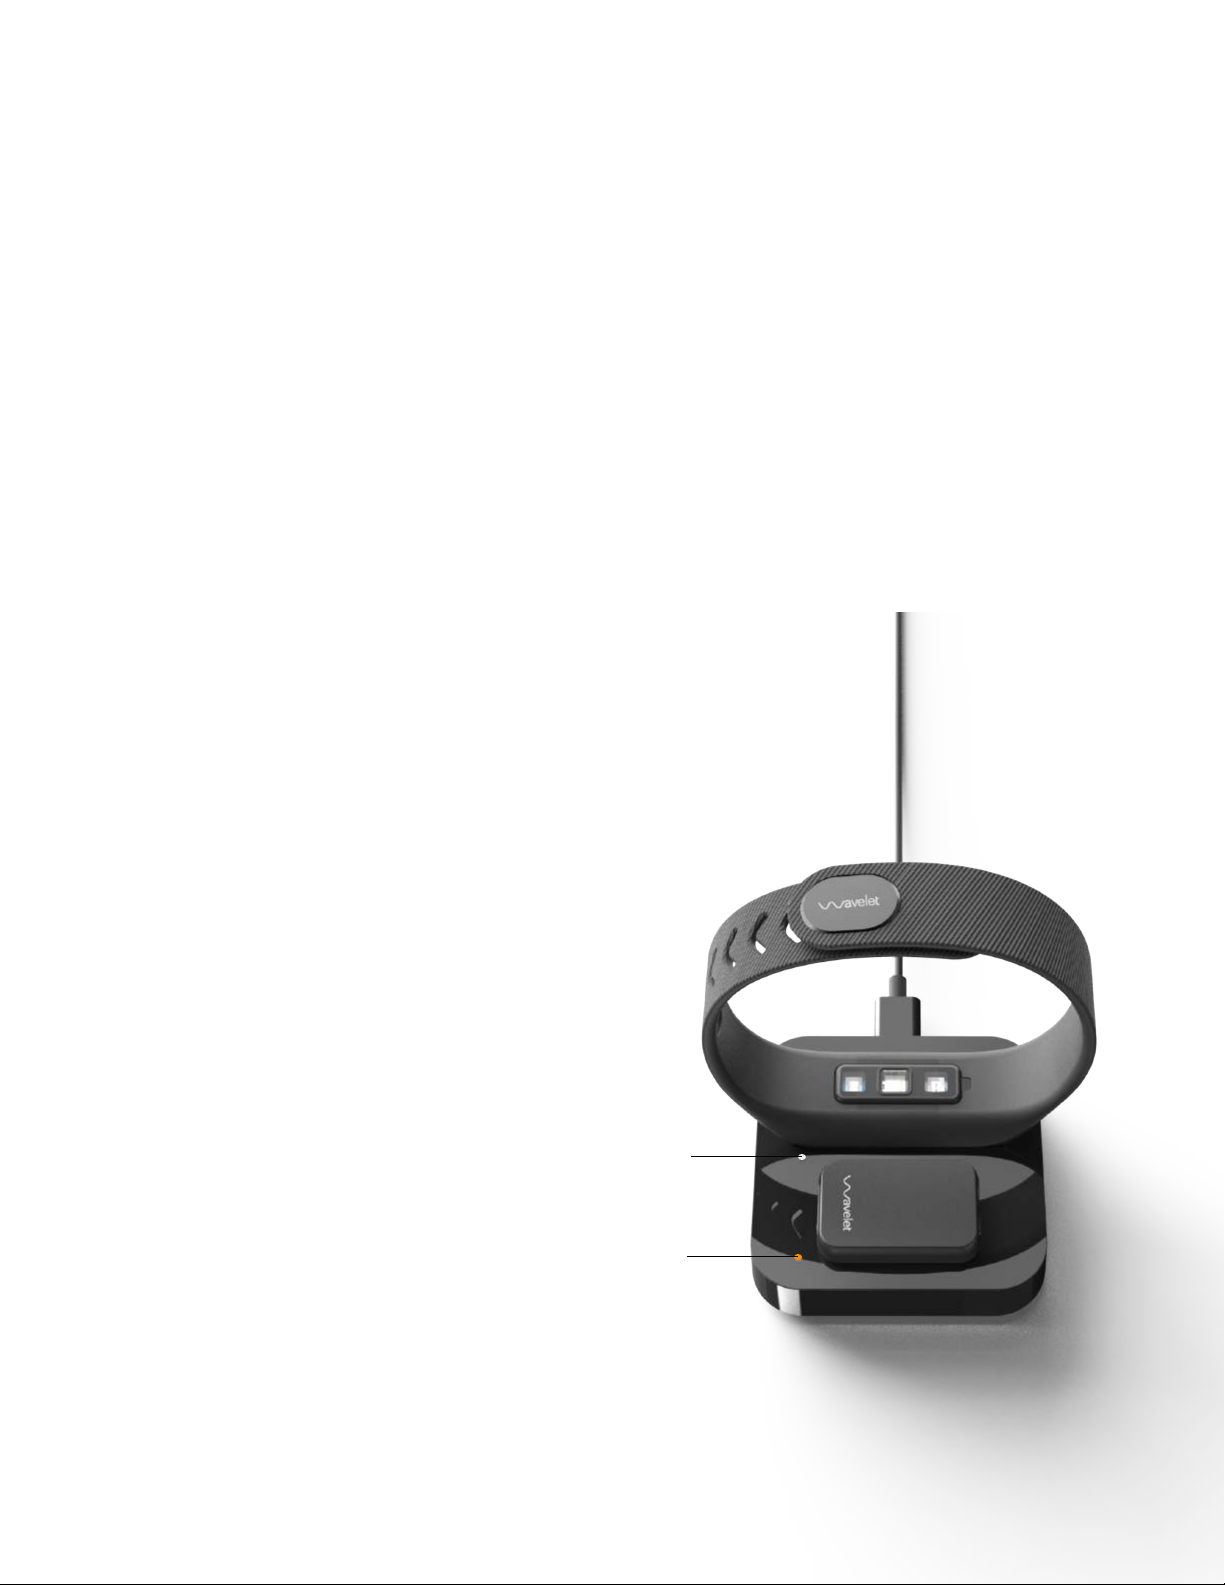
Plug in your charger to a powered USB port.
The LEDs should light up white. Place the
Wristband in the slot towards the back of the
charger as shown in the illustration below, and
the Pod in the slot towards the front of the
charger with the Wavelet logo facing UP. The
white lights on the charger will turn orange
next to each device when charging properly.
Each LED will blink or remain white if not
charging properly or if the device is not placed
properly.
Your d evices requ ires about 9 0 minutes to f ully
charge their lithium-polymer batteries. Once
fully charged, the LEDs on the charger will
change back to white. It is recommended to
fully charge your device as you finish the rest
of the setup process. With normal use, your
Wristband should last about four days on a
single charge, while your Pod should last about
5 days, both depending on use.
NOT CHARGING
CHARGING
3
Page 7
Connecting to the Wristband and Pod
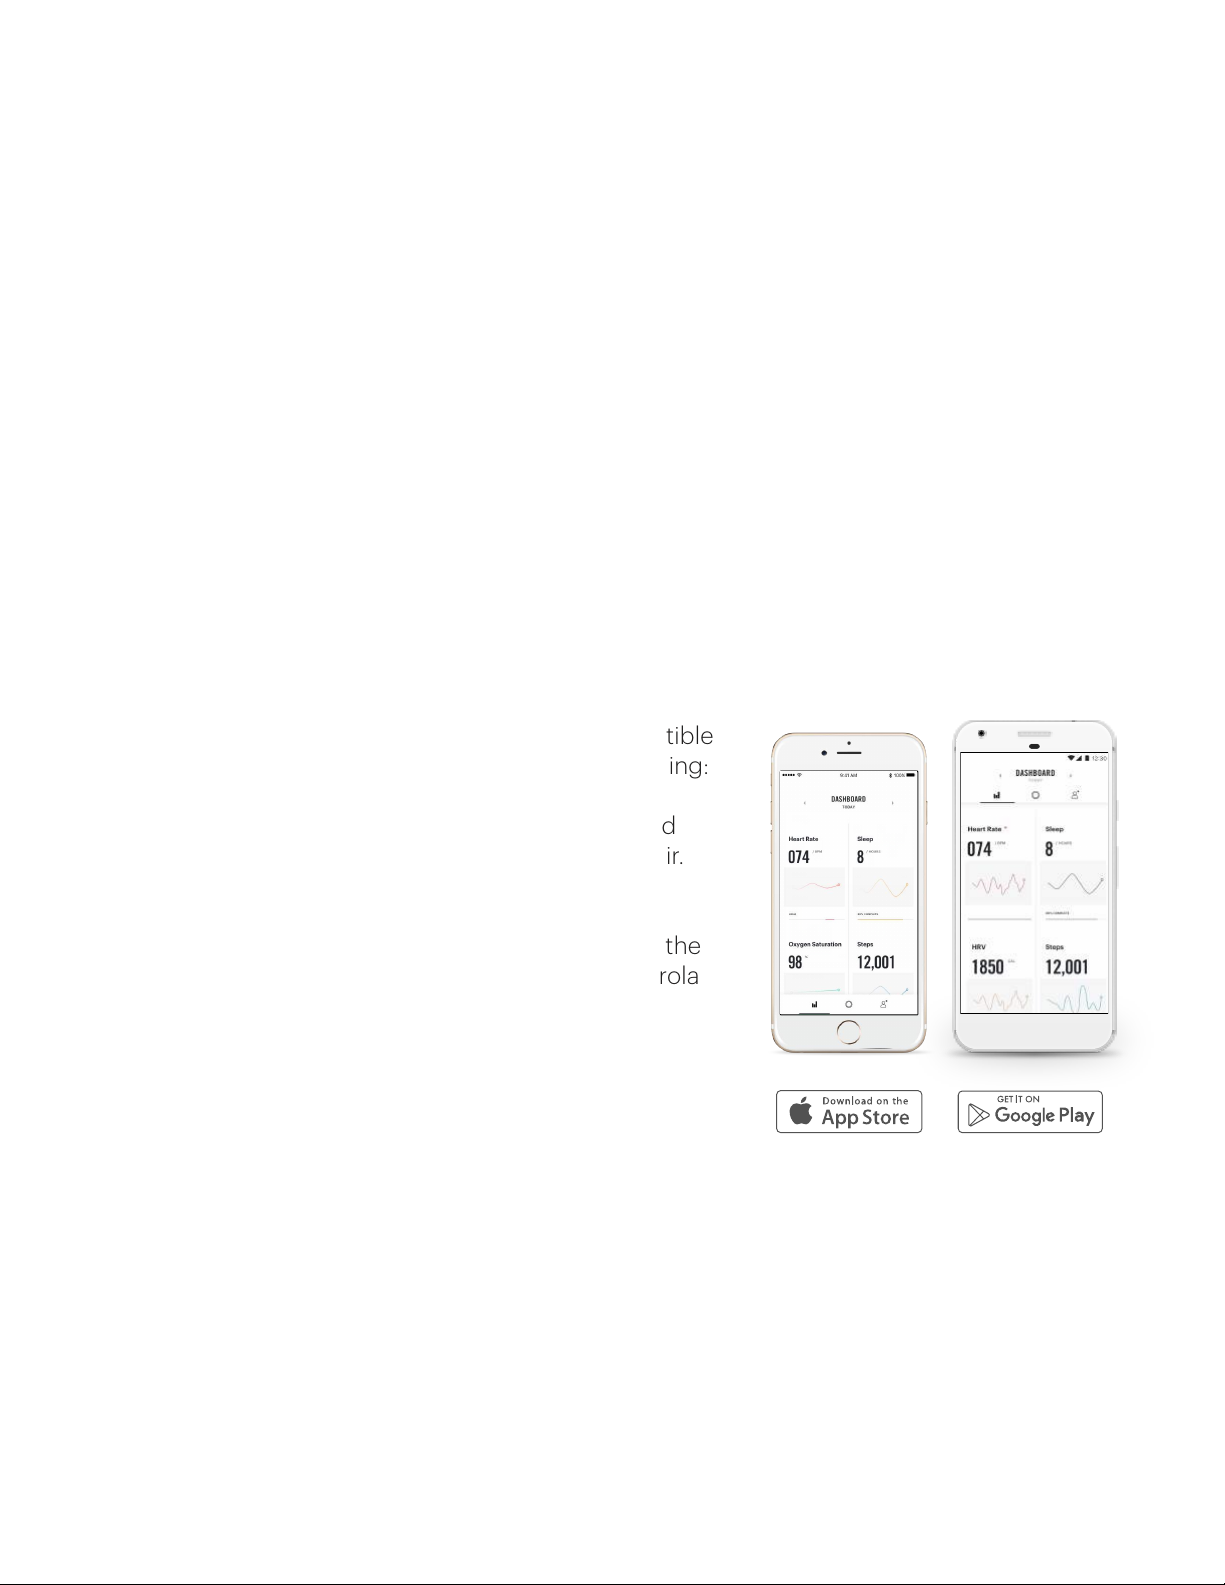
The Wavelet app is your link to the Wavelet devices. Use it to interact with your
Wristband and Pod, transfer data, and see your analyzed data.
You wi ll need a compa tible mobile device to use t he Wavelet devic e s. Download
the app on your iOS or Android mobile device; it will guide you through the
setup process and help you connect to your Wristband.
Note that you will need an account with the applicable store to download even a
free app such as Wavelet. You will need your apple ID to download from the App
Store, and your Google ID to download from the Google Play Store.
To c on nect wi th you W ri st band , yo u must t ur n on B lu etoot h on you r mobil e
device. This setting can be found in your mobile device’s settings.
App Compatibility
The Wavelet Wristband and Pod are compatible
with select iOS and Android devices, including:
iOS – iPhone 4s, 5, 5c, 5s, 6, 6+, 6s, 6s+, iPod
5th gen, iPad mini, iPad 3, iPad 4 and iPad air.
Android – Samsung Galaxy S4, S4 Mini, S4
Active, S5, Samsung Galaxy Note II, III, 10.1; the
Nexus 4, Nexus 5, Nexus 7; HTC One; Motorola
Moto X, Moto G; DROID MINI, Ultra, MAXX,
RAZR M, HD, HD MAXX and the LG G2. All
android devices must have Android 4.3 or
higher.
Creating a Profile
You may be asked to set up a profile including your height, and weight. Or you
may be asked to input a code provided by your study administrator. Any private
information is kept completely private and stored on a secure server. These
measurements are helpful for getting the most out of the Wavelet devices. If
provided, your height, weight, gender, and age will be used to calculate your
BMR, or calories burned.
4
Page 8
Using the Devices
Wearing the Wristband Properly
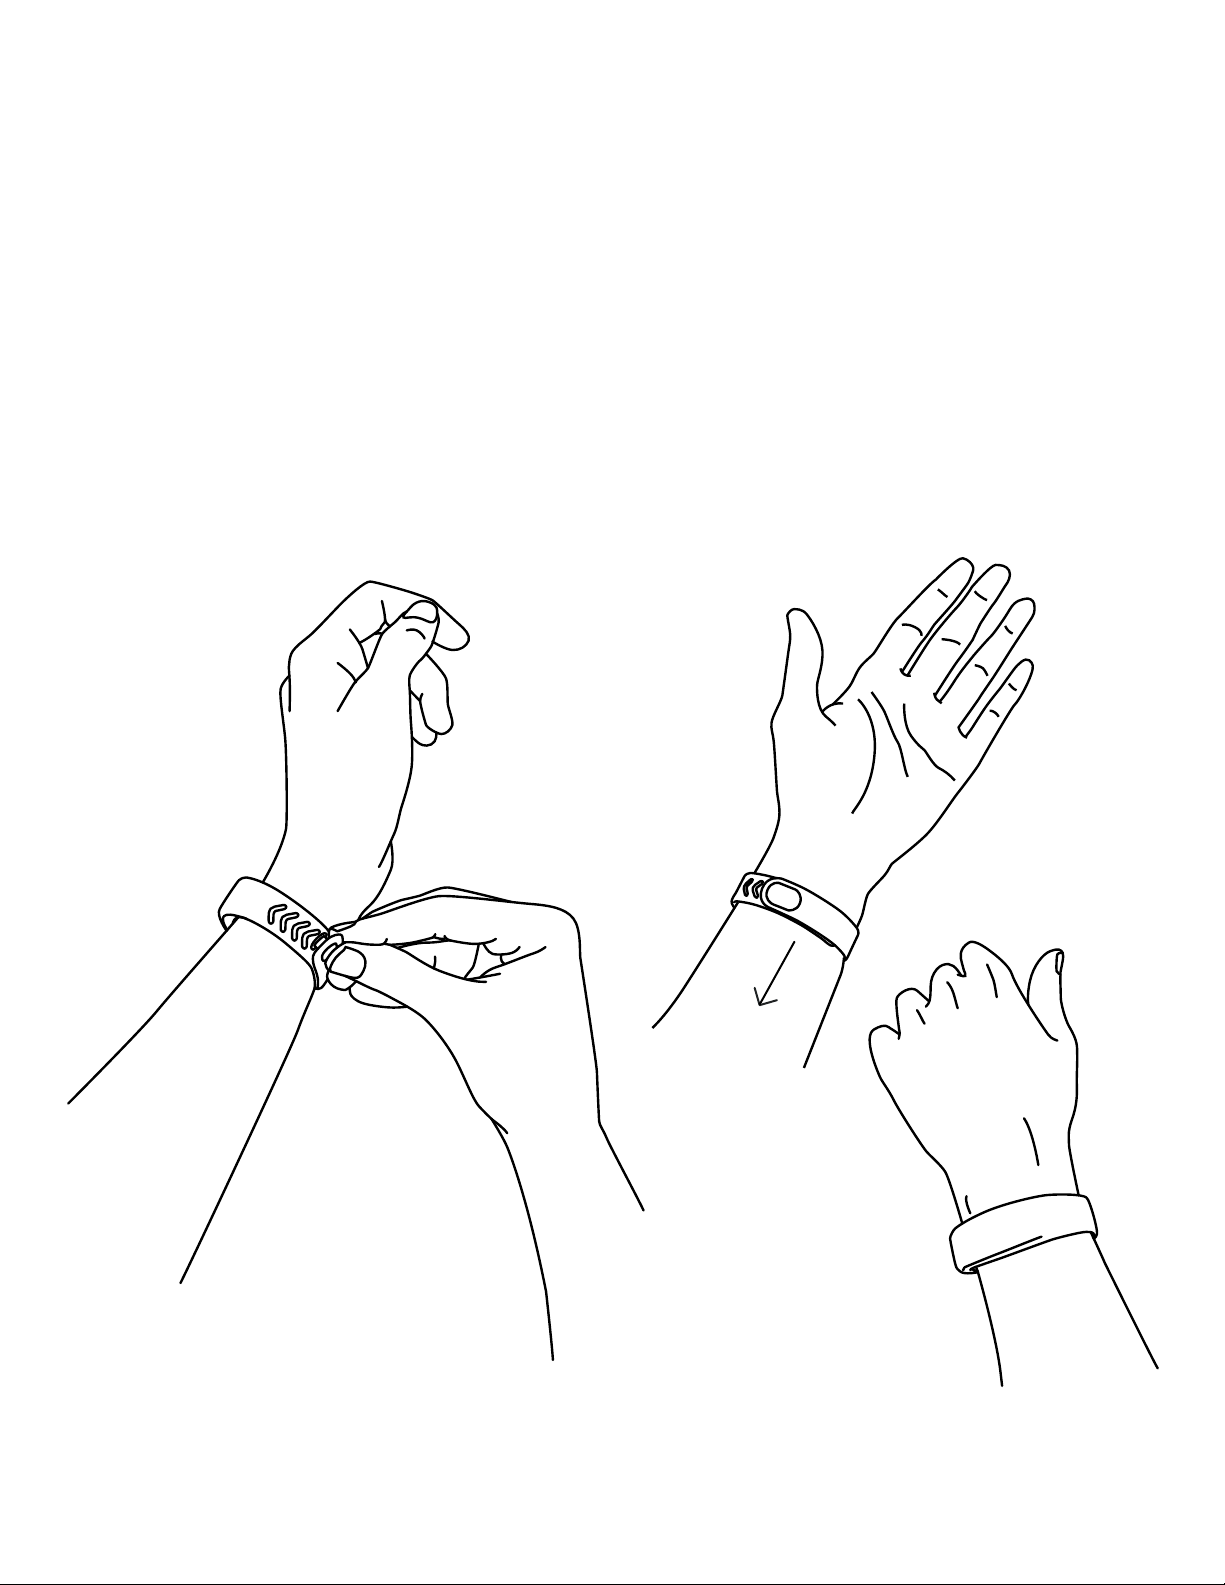
Wearing your Wristband properly is critical to getting reliable data. When worn
properly, both of the teeth on the clasp should engage with the Wristband fully.
The device should sit above the wrist bone (towards the elbow) as illustrated
below. The sensor unit inside the Wristband should sit snug against the skin so
the sensors can get an accurate heart reading. The most comfortable fit is often
achieved by securing the device with some slack and then sliding it up (towards
your elbow) until it is snug.
5
Page 9
Wearing the Pod Properly
Wearing your device properly is critical to getting reliable data. When worn
properly, both of the teeth on the clasp should engage with the Wristband fully.
The device should sit above the wrist bone as illustrated below. The sensor unit
inside the wristband should sit snug against the skin so the sensors can get an
accurate heart reading. The most comfortable fit is often achieved by securing
the device with some slack and then sliding it up (towards your elbow) until it is
snug.
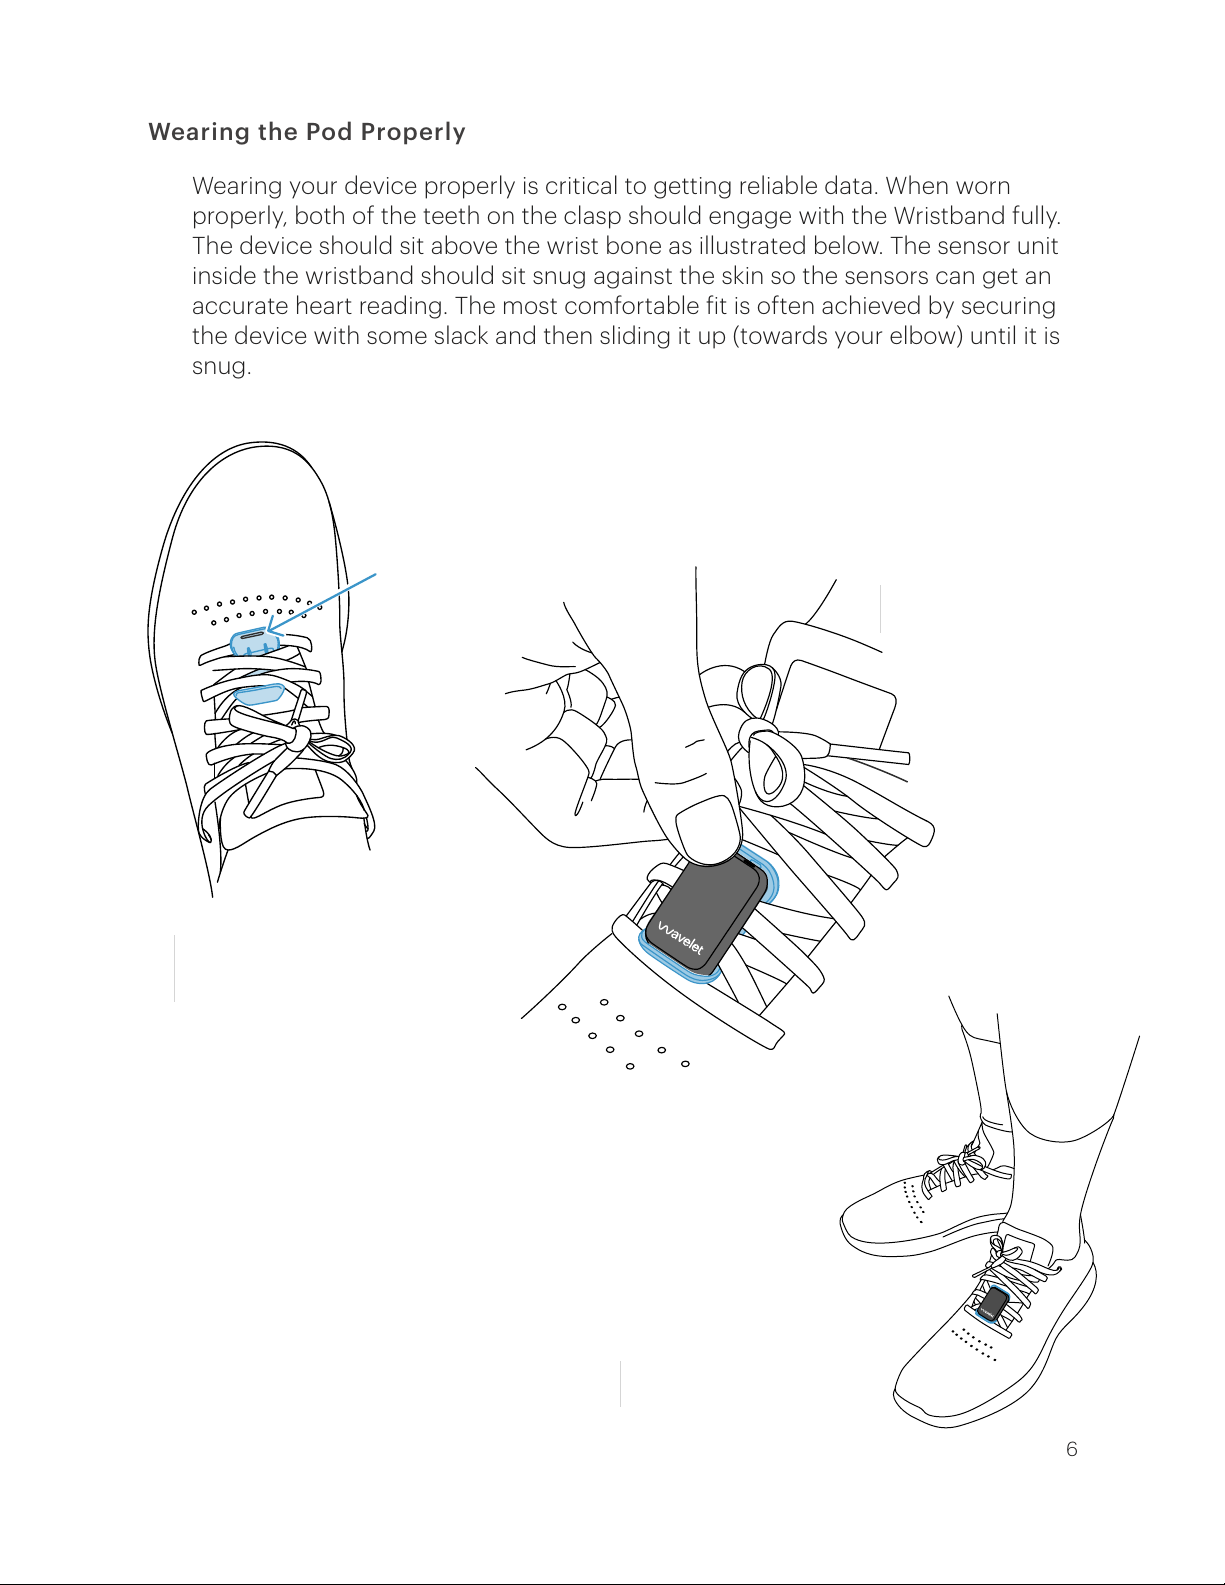
Single bar
Position the shoe pod so the Wavelet
2
logo faces away from you. Press it into
place until it snaps firmly in place.
The shoe clip is directional. Place the
1
shoe clip harness beneath several
rows of la ces so the single bar is visible
as shown above.
Tug on the p od t o ma ke s ure it is s ecure
3
in the clip. It should not come out
easily.
6
Page 10
Checking the current battery level
You ca n check the level of yo ur devices’ batteries by visiting the profile section
in the Wavelet app. See the page “The App: Profile” for more details.
Caring for the Wristband and Pod
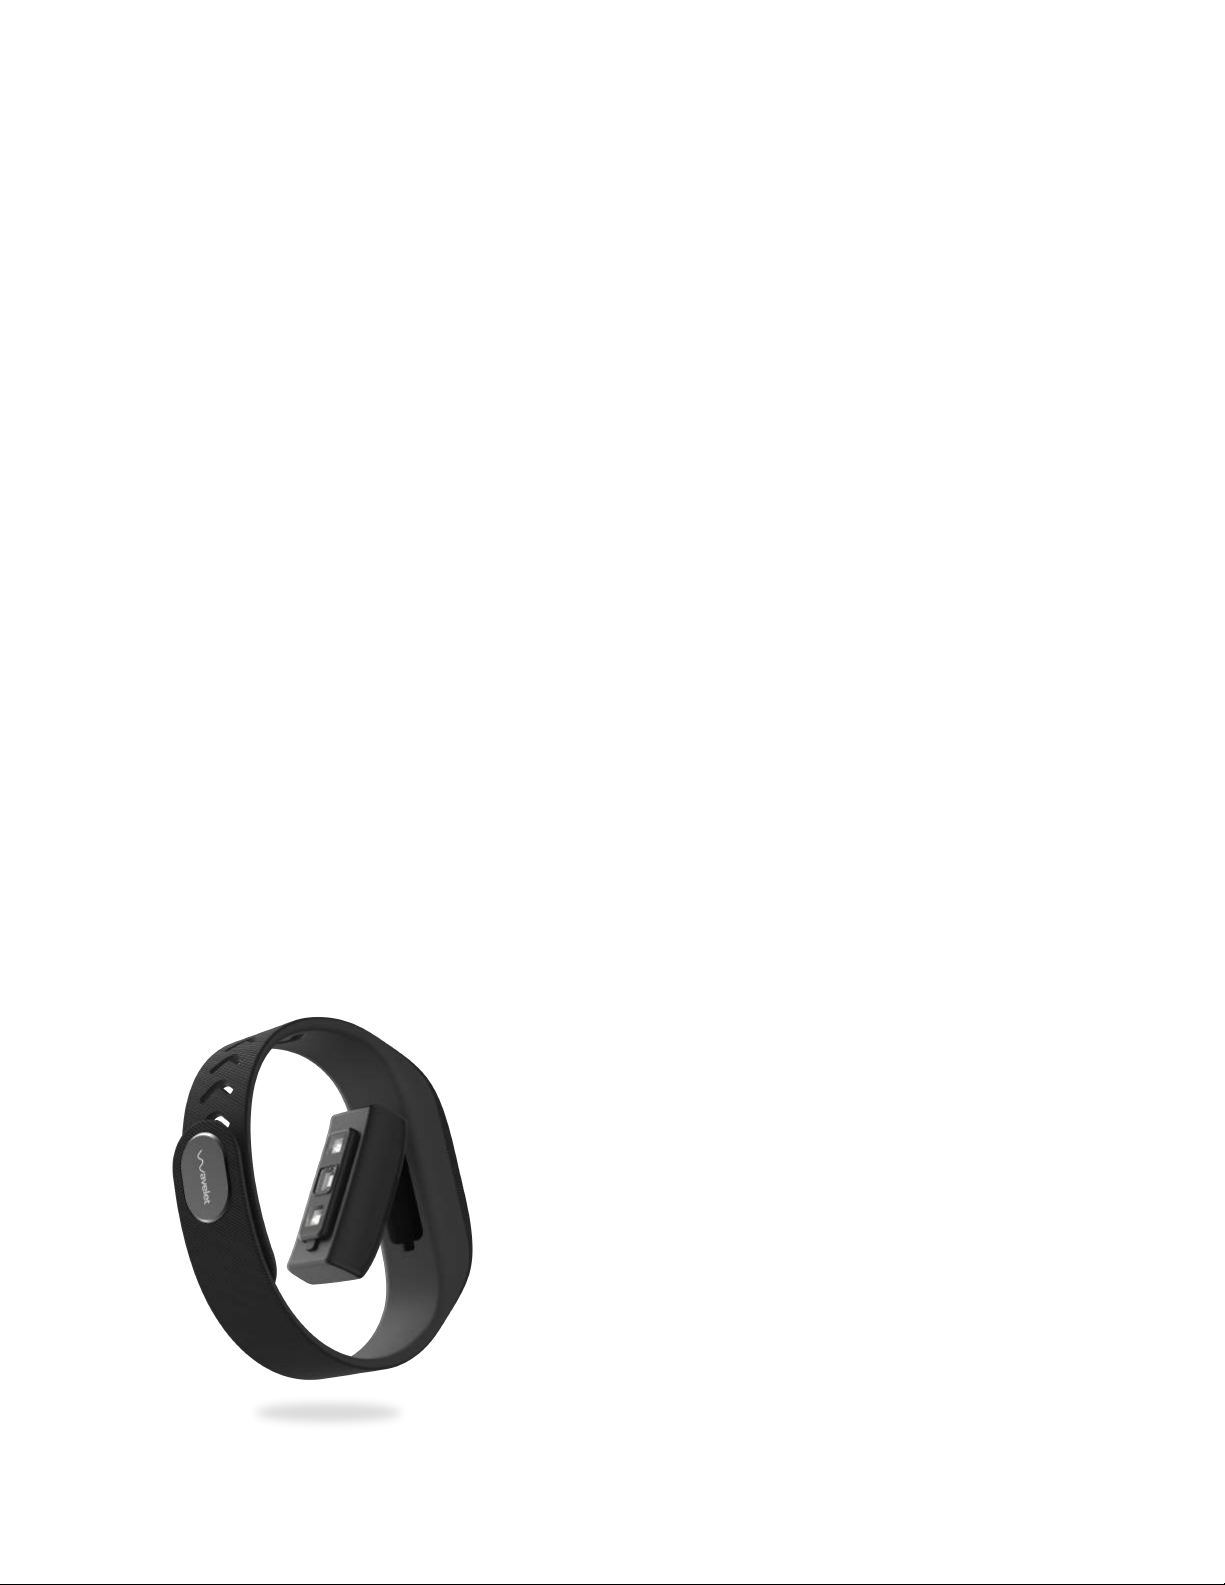
The lenses of the Wristband should be cleaned periodically. a simple wipe with a
damp cloth is suicient to clean both devices. Do not use alcohol, harsh
chemicals, or solvents on the device.
The Wristband is fully waterproof and can be left on while you bathe or shower.
It is, however, recommended to remove the wristband periodically so your skin
can have a break.
Updating the Devices’ Firmware
When you first launch the Wavelet app and connect to your devices it will
automatically update the devices’ firmware. To update the firmware manually,
enable the Bluetooth on your mobile device and find your devices your profile
page. Select your device and tap “update firmware” and the firmware will
update. You do not need to fully charge the device to update the firmware, but it
is recommended to fully charge the device before use. DO NOT remove a
device from the charger during a firmware update.
7
Page 11
The Wavelet App: Overview
The Wavelet app is the link to your Wristband and Pod. All data captured on the
on these devices must be transferred to your smart device for processing and
viewing the gathered information.
Syncing the Wristband and Pod
It is important to sync your data to your mobile device often. Syncing occurs
when you are near your mobile device that has bluetooth turned on and the
Wavelet app is either open or running in the background. The app will
automatically sync with your device periodically when these conditions are met.
The more often your device is sync’d, the quicker each sync will be. To sync
manually, pull down on the Dashboard page or select your device on the Profile
page and tap “sync now”.
Tracking with the Wavelet Wristband
The Wavelet Wristband tracks the following activities, and depending on your
specific situation may include others:
Steps
Sleep
Calories Burned
Heart Rate
Blood Oxygen Saturation
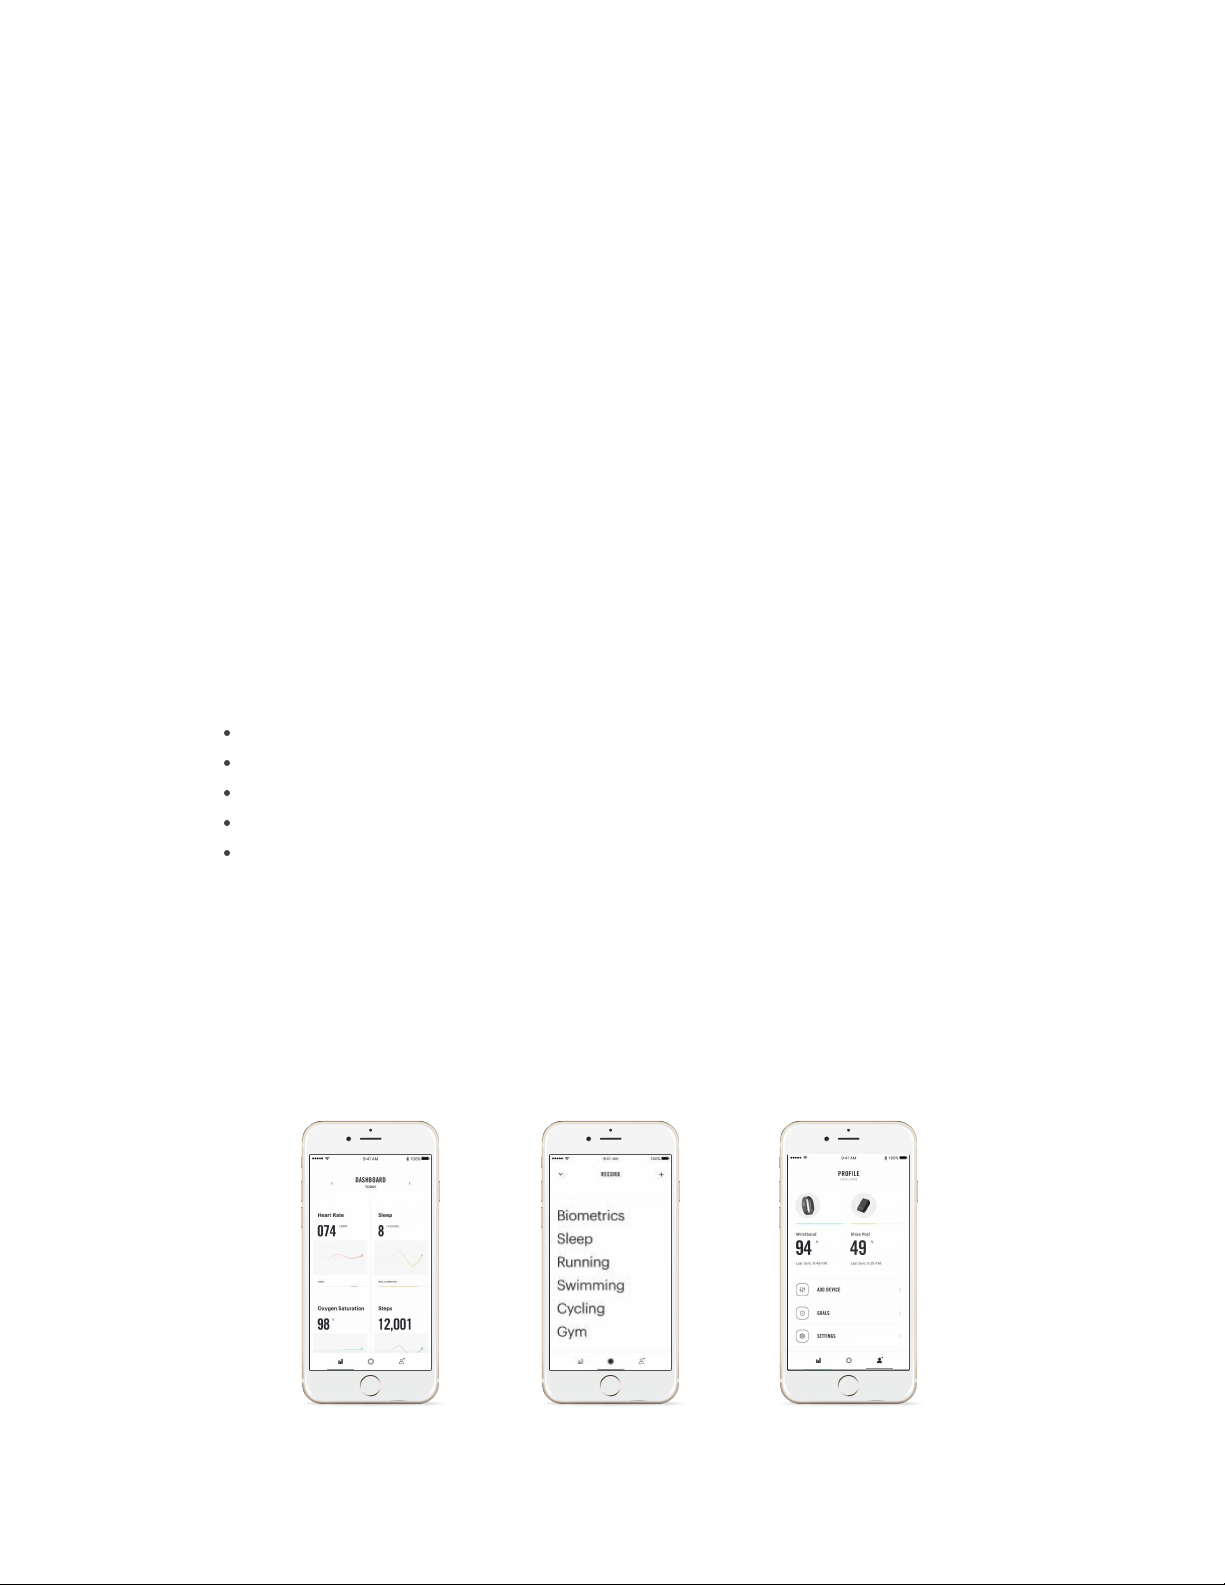
Navigating the Wavelet App
The Wavelet app is broken into three sections: Dashboard, Recording, and
Profile. This guide will show you how to navigate each of these sections.
Profile
8Dashboard Recording
Page 12
The App: Dashboard
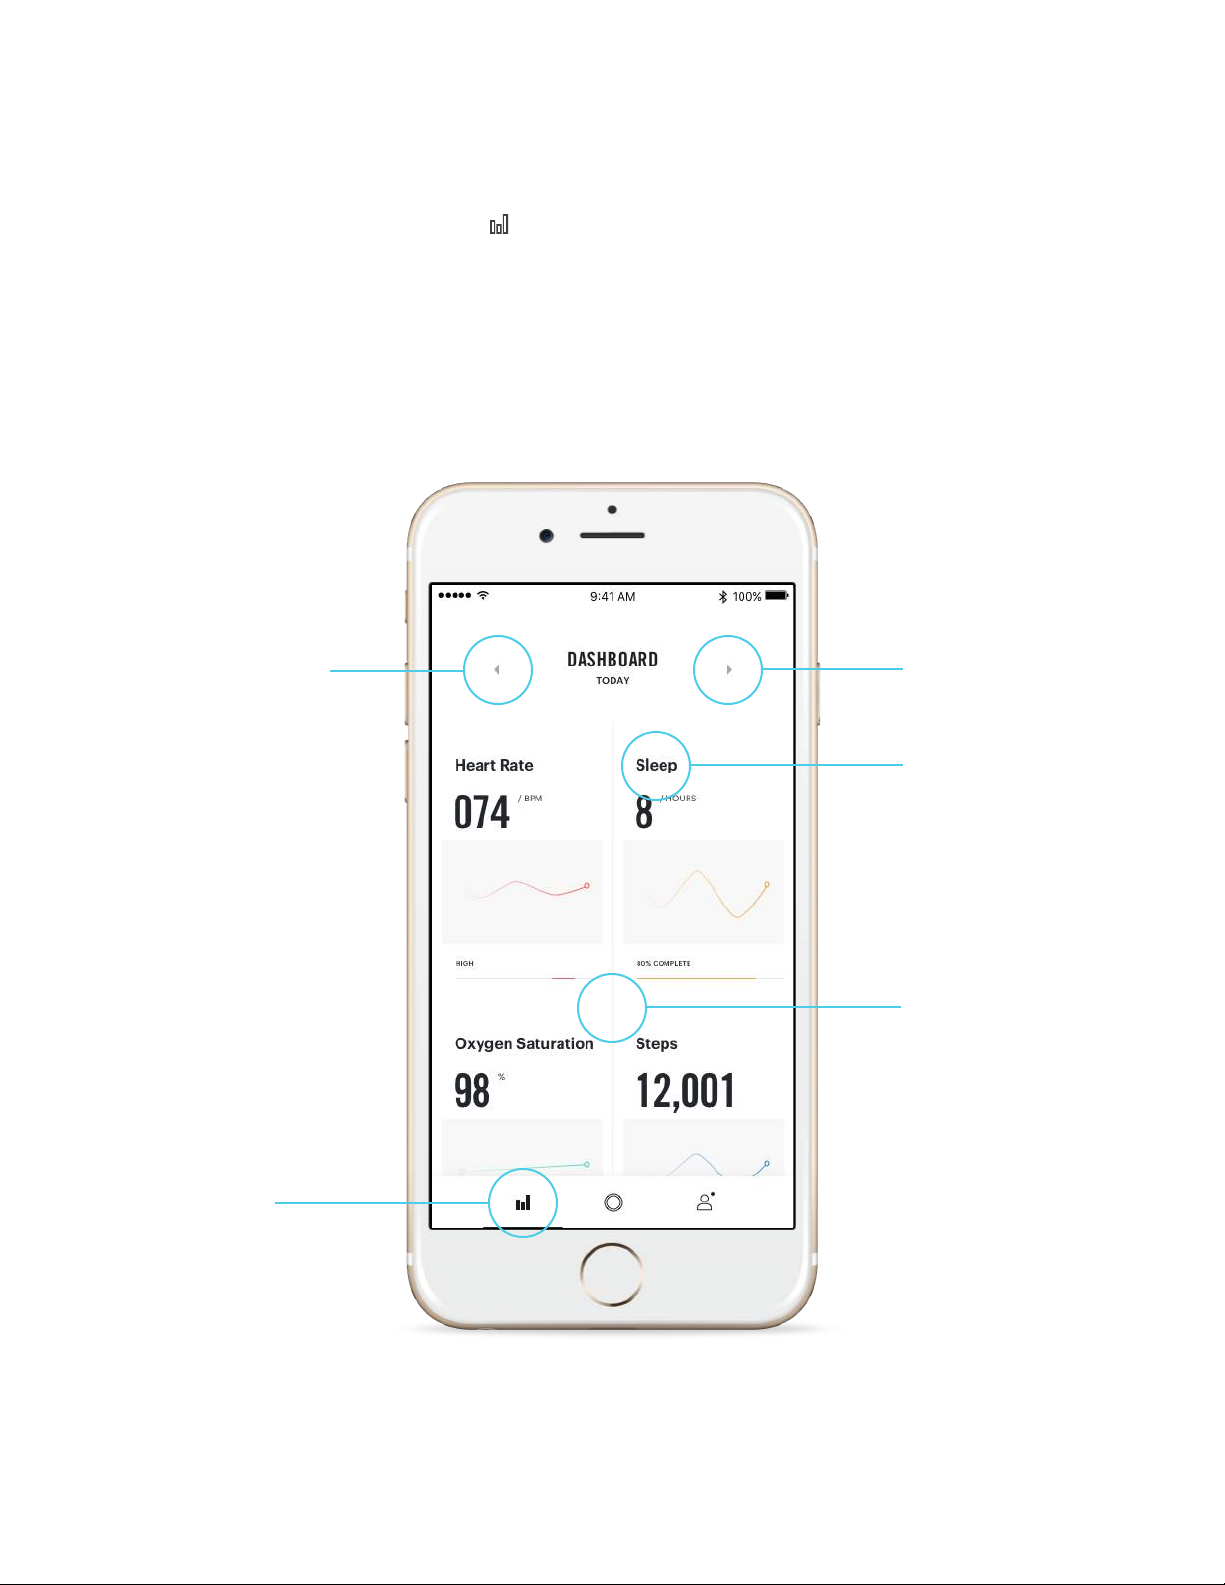
The dashboard can be navigated to by tapping the far left icon in the menu (on
the bottom of the screen):
This screen shows all of the metrics collected by your Wavelet Wristband. Scroll
down to see additional metrics. Click on any statistic or graph to see a more
detailed explanation of that metric (the metric’s detail page). Your app may vary
slightly from the image below.
Scroll back to
previous days
Dashboard
icon in menu
Scroll forward to
today’s metrics
Tap any metric
to see its details
Pull screen
down to force
sync with
wristband
Dashboard
9
Page 13
The App: Dashboard – Metric Details Pages
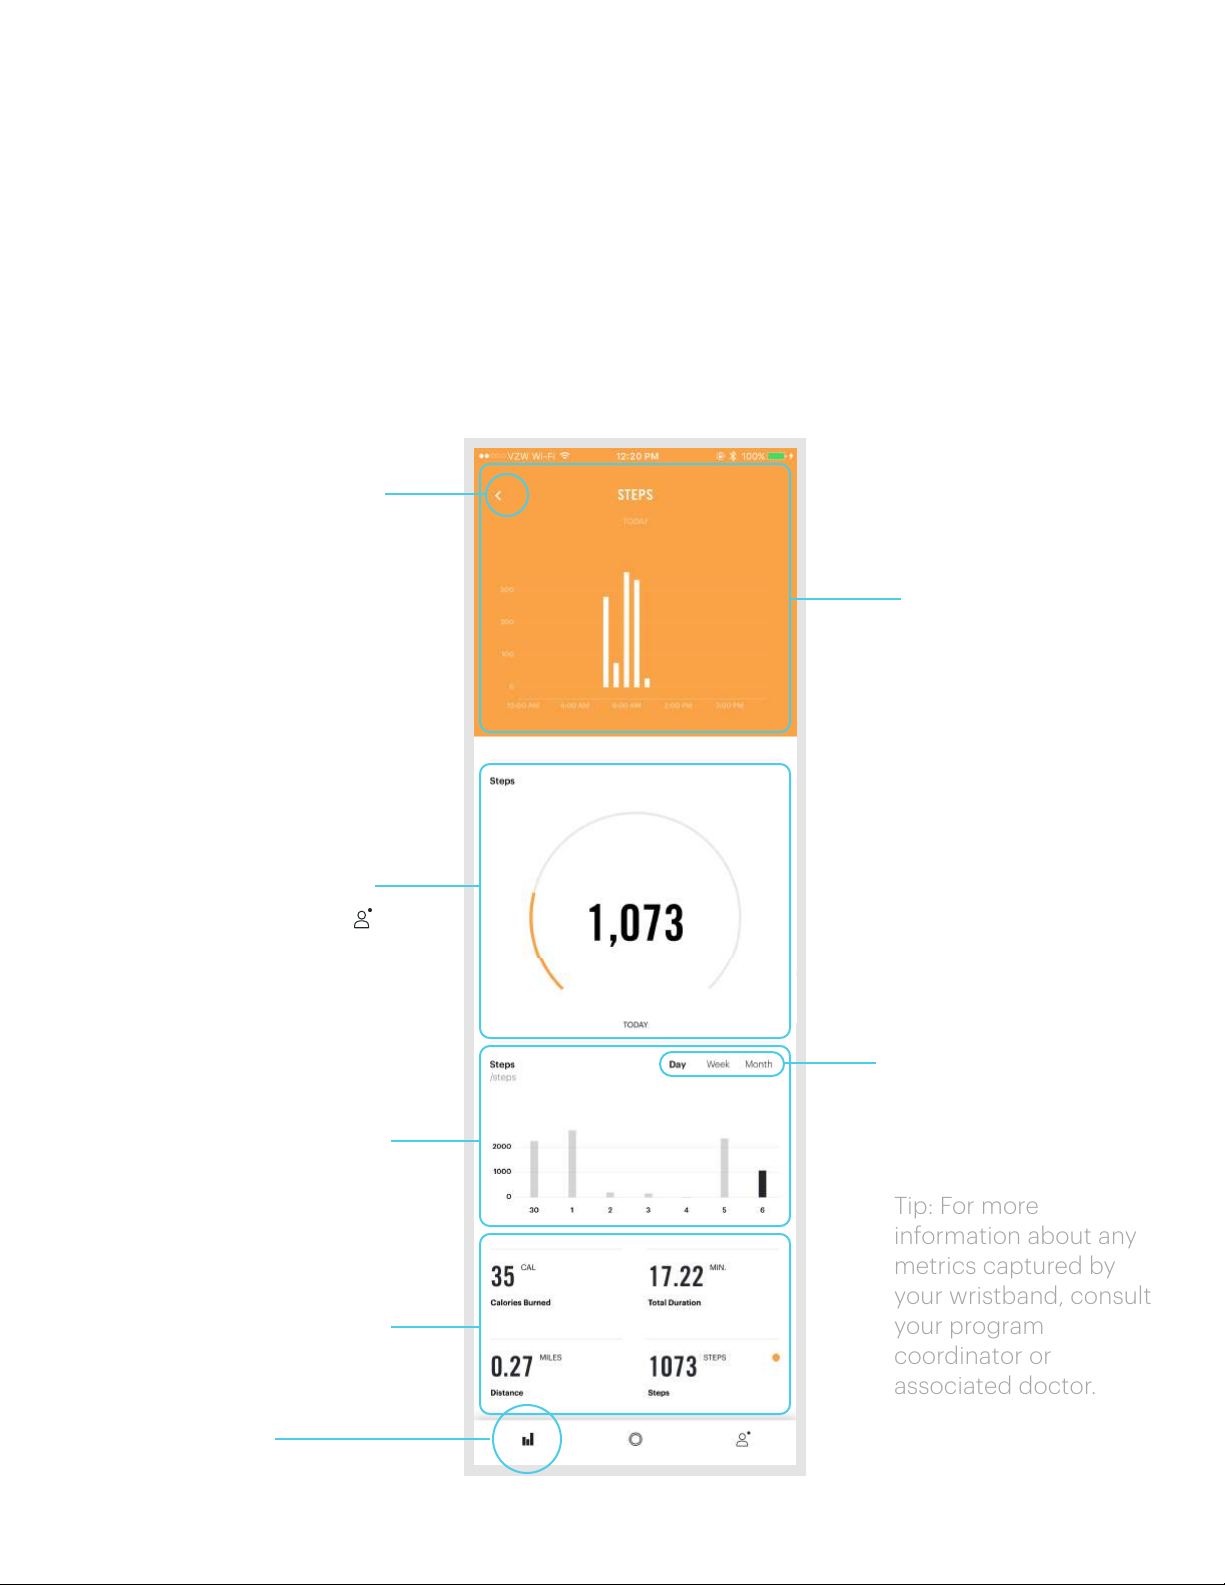
Tapping on any metric or gra ph on the Dashboard will show the details of that
particular metric. Here you can get a deeper understanding of that metric and
compare it to your averages or previous statistics.
Each metric is color coded for easy recognition. The illustration below shows the
steps page as an example.
Tap here to return to
your Dashboard
A timeline showing
the metric’s data over
time.
The day’s total steps
and goal progress.
Adjust your goal in
the Profile section
Your s teps compared
to previous statistics
Various statistics
such as maximums
and minimums
Togg le time li ne
time range
Tip: For more
information about any
metrics captured by
your wristband, consult
your program
coordinator or
associated doctor.
Dashboard
10
Page 14
The App: Recording
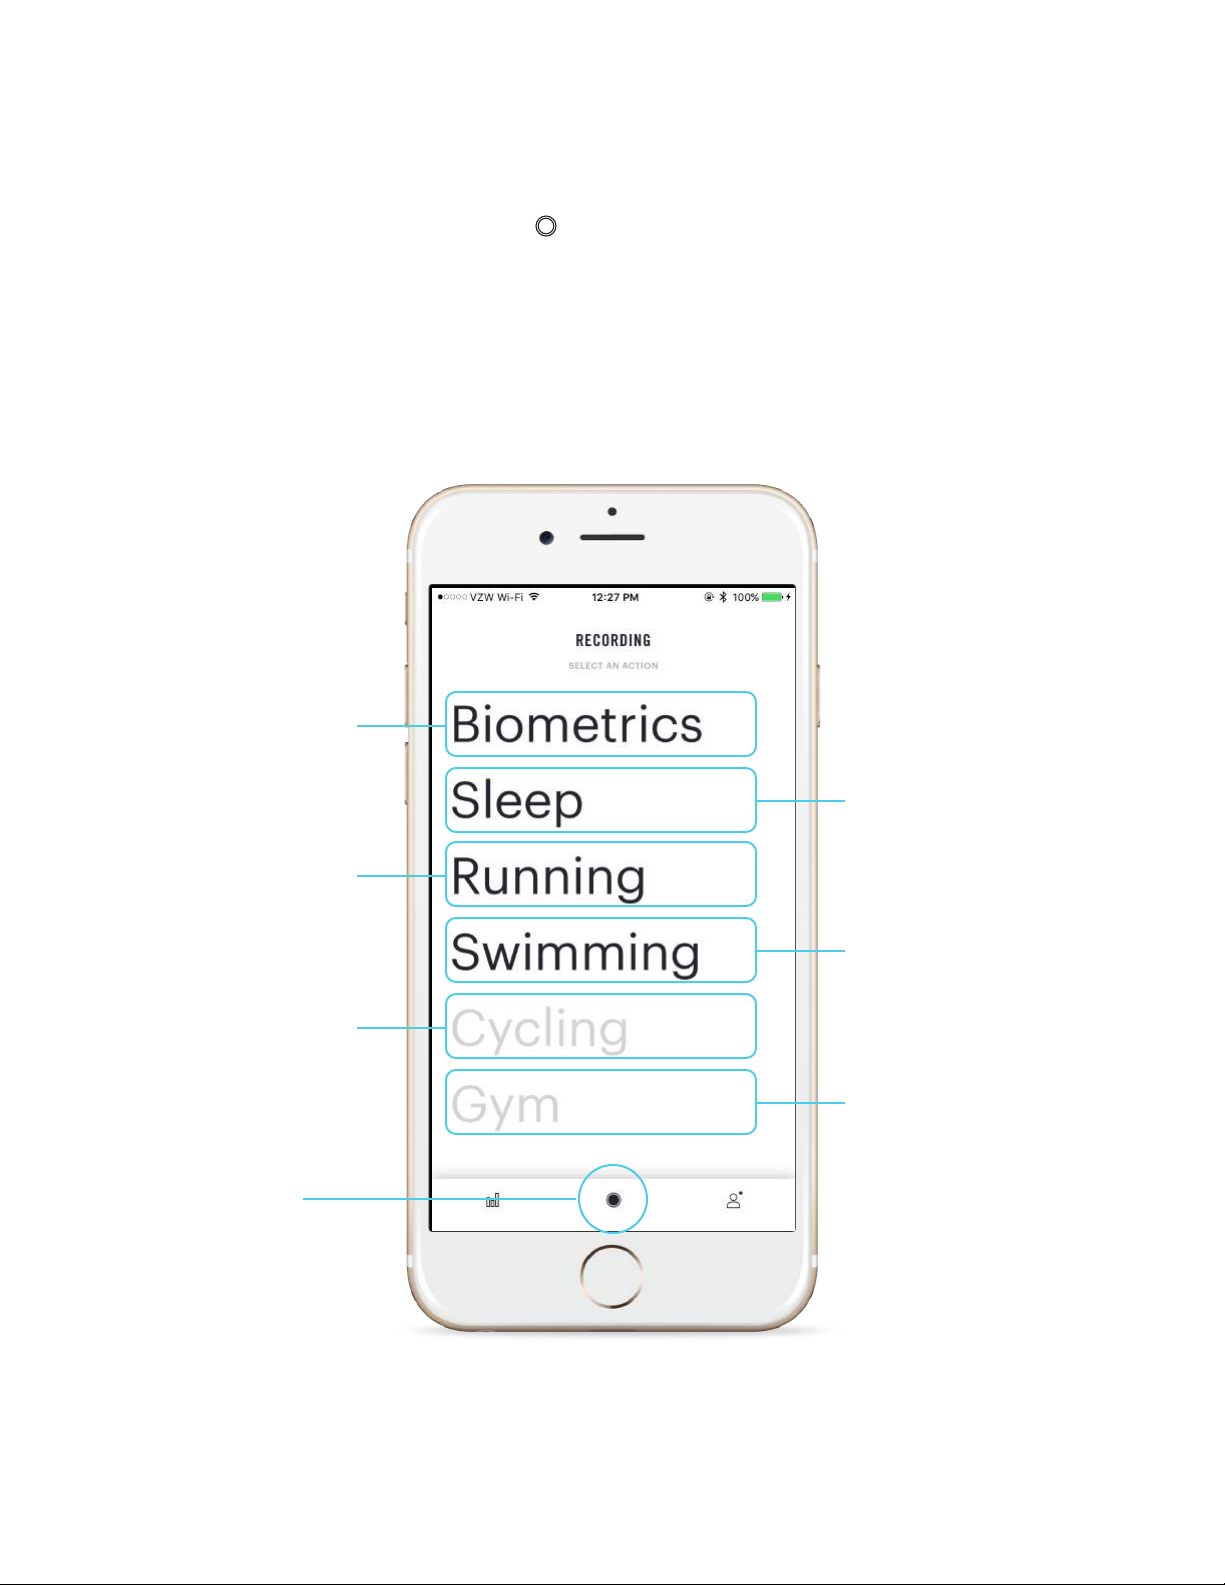
The recording page can be navigated to by tapping the center icon in the menu
(on the bottom of the screen):
This page allows you to manually record data from your Wristband. This data will
then be accessible on the Dashboard page. Depending on your situation, not all
types of recording may be available to you. Be sure that you device is worn
properly while recording. See the wearing guide (page 5) for details on how to
wear your device properly.
Record health data:
heart rate, heart rate
variability, blood
oxygen saturation,
and breathing rate
Record sleep,
including all
biometrics
Record running
Record cycling using
shoe pod. Wristband
can be worn, but it
not necessary.
Record
Recording swimming.
Once recording has
begun, you don’t
need to have your
phone nearby
Train and record any
repetitive exercise.
e.g., resistance
training
Recording (Select Activity)
11
Page 15
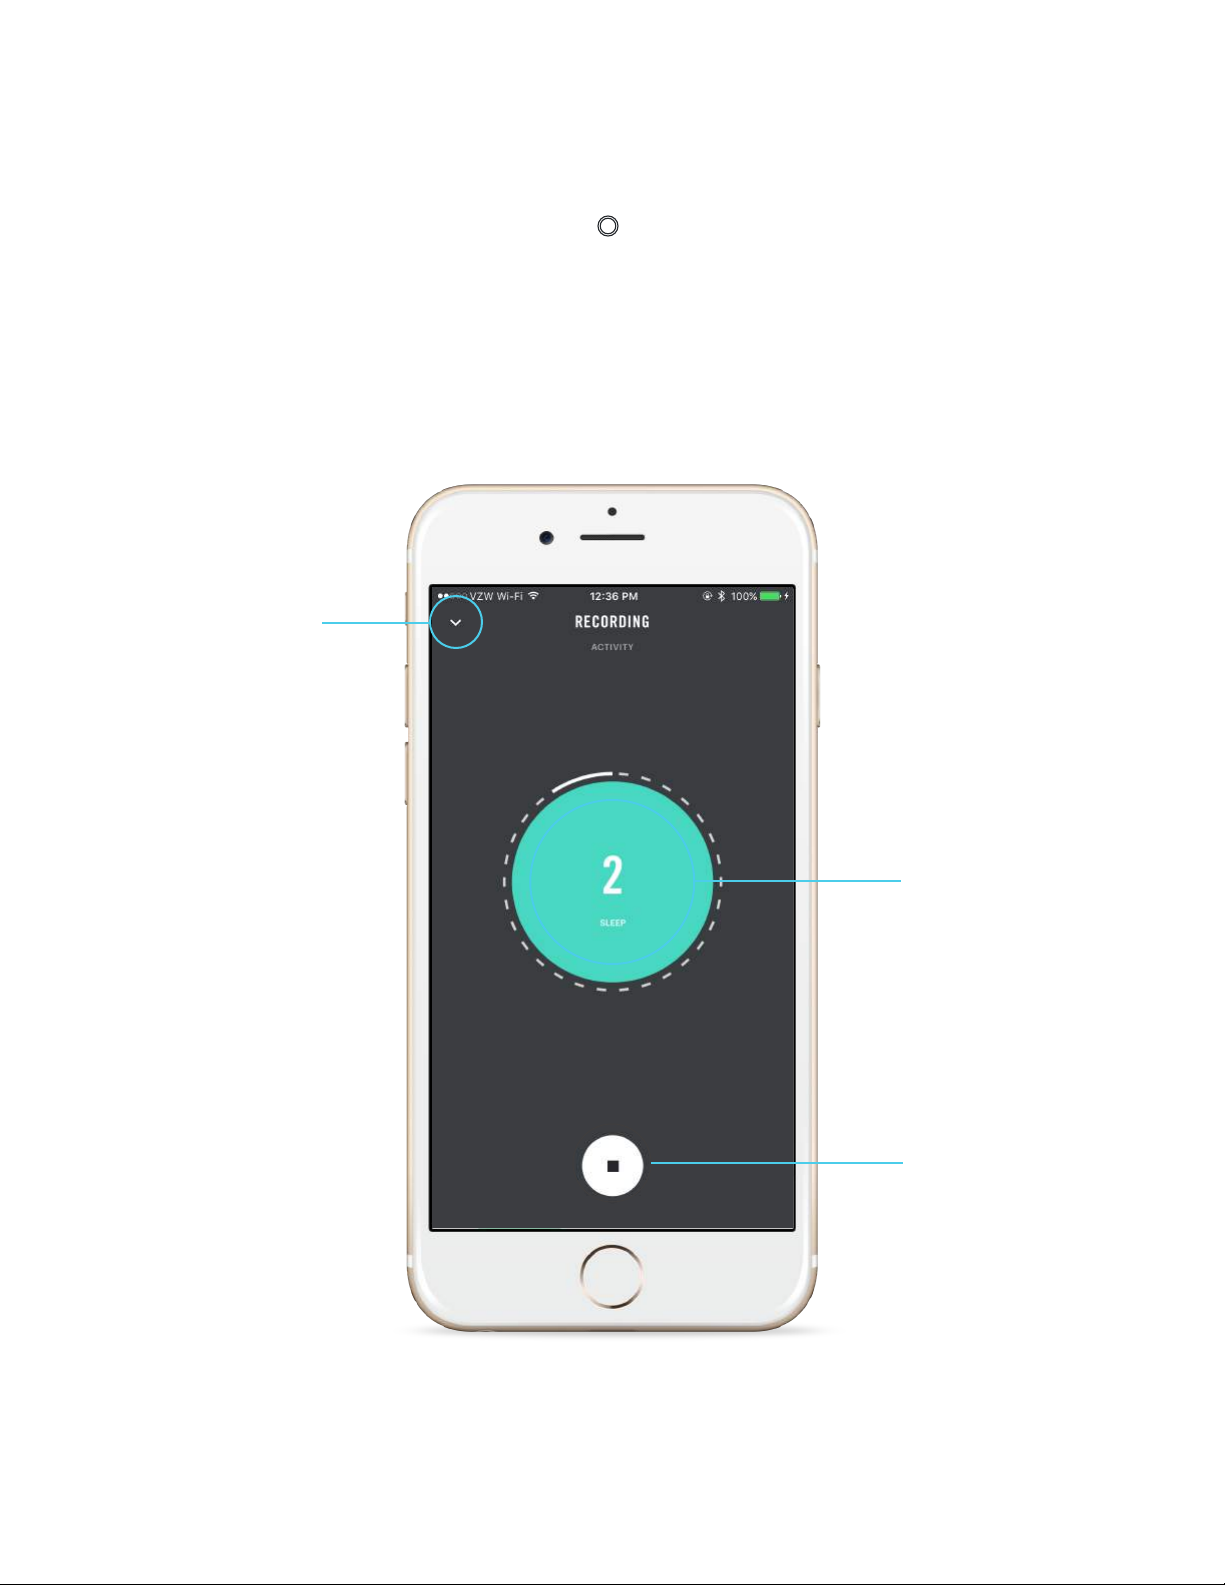
The App: Record Sleep
The record sleep page can be navigated to by tapping the center icon in the
menu (on the bottom of the screen): and selecting sleep.
Make sure that your device is more than 50% charged before recording sleep. If
the device loses its charge during a recording then the data from that recording
will be lost. If this happens you will need to charge your device in order to
connect to it again.
Minimize the
recording page
Recording
Displays the
time elapsed
Tap to stop
recording
12
Page 16
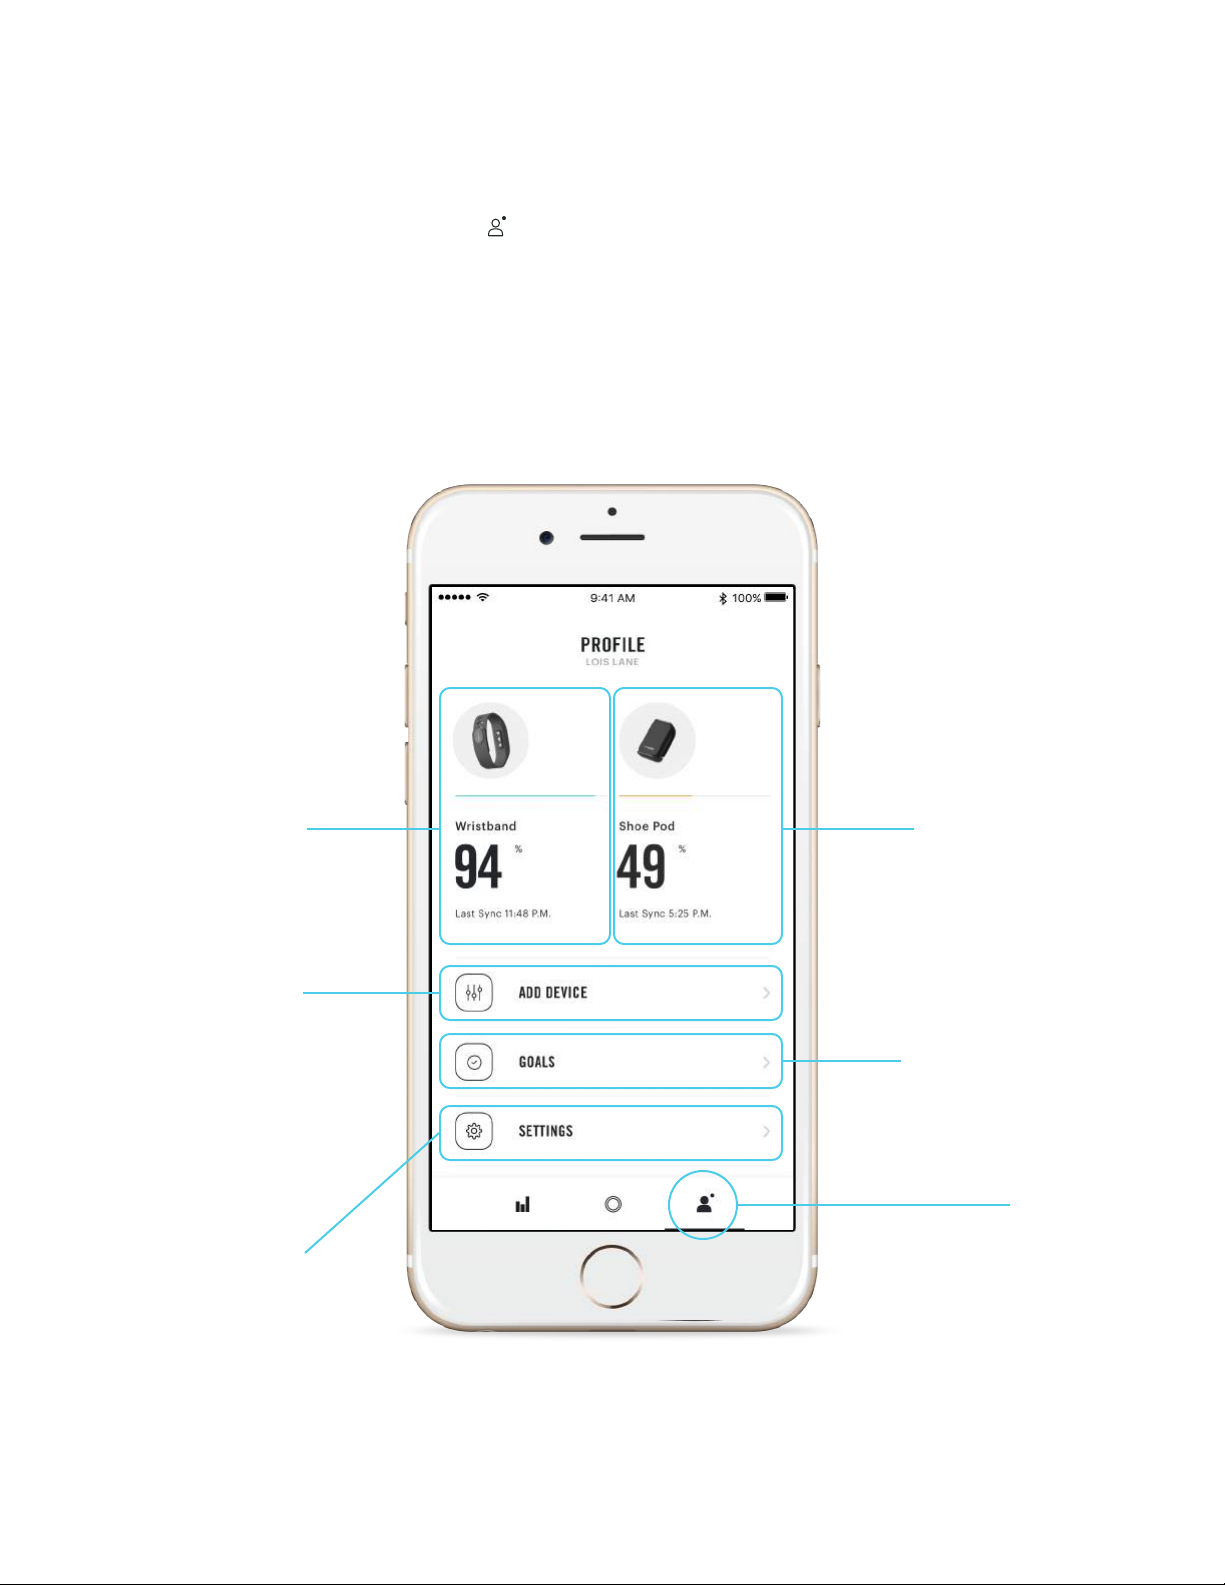
The App: Profile
Your p rofile can be navigated to by tapping the far right icon in the menu (on
the bottom of the screen):
This screen shows your basic profile and device information. It allows you to
access settings, goals, and to manage your device settings.
The battery status
of your Wristband
and the time it
was last sync’d.
Tap here to
manage device.
Add a new device.
Only two devices
can be connected
to the app at once.
To c ha nge d ev ic es,
first remove a
current device.
Adjust app and
profile settings
The battery status
of your Pod and
the time it was
last sync’d. Tap
here to manage
device.
Adjust your daily
goals
Profile
Profile
13
Page 17
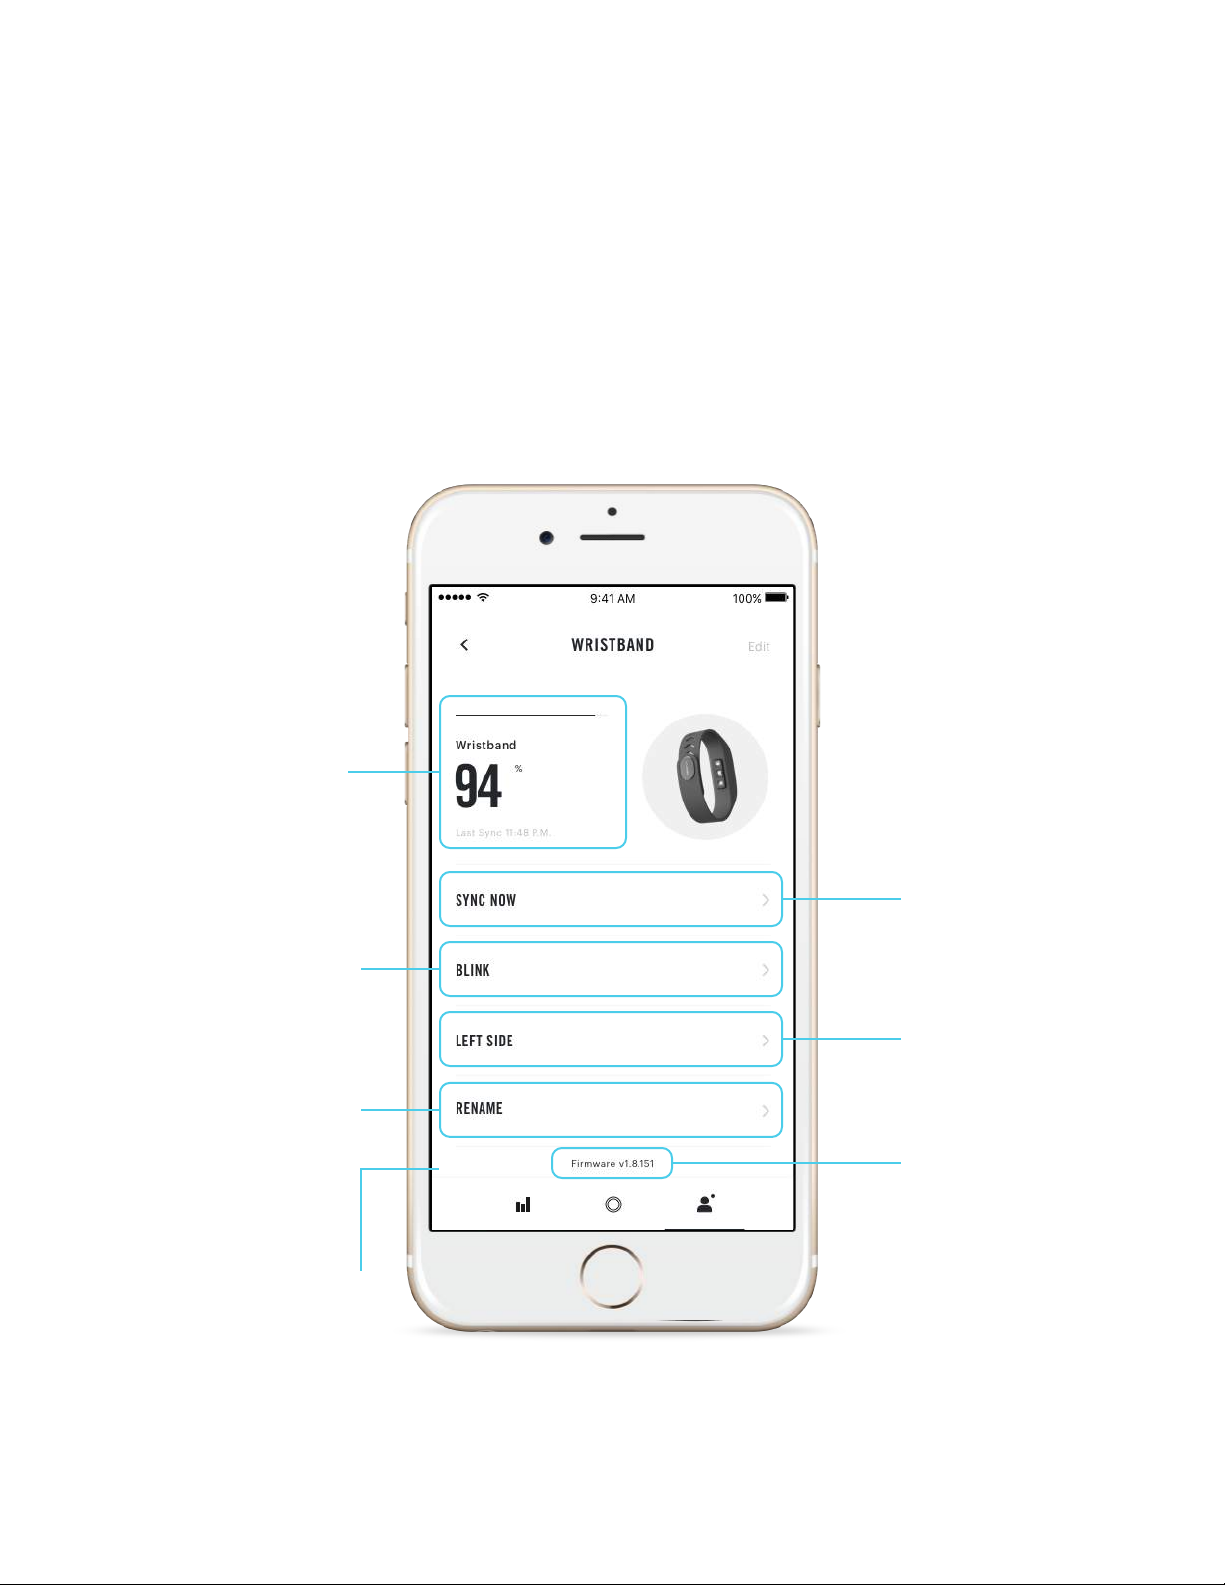
The App: Profile – Manage Device
From the profile screen you can tap “MANAGE DEVICES” then select your device
to see and manage the device’s details.
Current status of
your Wristband’s
battery and time
of last sync
Tap here to make
the device’s LEDs
blink for 5 seconds
Tap here to
customize your
device’s name
Scroll further to
reset your device
Tap here to
manually sync
with device
Tap here to
choose which
wrist you wear
your device on
Indicates which
firmware version
is installed on
this Wristband
Manage Devices
14
Page 18

Troubleshooting
Use this section to diagnose issues that you may face during setup and use of
this product. If these methods prove unsuccessful, please contact support at
[email protected]. For fastest support, please include photos or screen shots
illustrating your problem.
Charging
Device is not charging, or the charger LED won’t change color
• Ensure that the charger is plugged in properly and that the cable is properly
inserted into a computer or supported base and the charging pad.
• Ensure that the devices are placed properly as shown on page 3
• The LED is white when NOT charging; it will turn ORANGE when it is engaged. If
it is flashing orange then it is not properly placed.
• The app shows the approximate battery level once you are connected to the
device. The battery should last four days, depending on use.
• Contact support at [email protected] if you are unable
to properly charge your device while following these troubleshooting steps.
Please include photos illustrating how you are charging the device for the
fastest support.
Connecting
My device is not discoverable by the app
• Ensure that your mobile device is supported by the app.
• Ensure that the battery is not dead or nearly depleted.
• Restart your mobile device (smart phone) and try connecting again.
• If the device is not showing up after restarting your mobile device and
charging the Wristband, contact [email protected] for additional support. Please
include screenshots or photos of what you are seeing for the fastest support.
15
Page 19

Resetting the Devices
If your devices seem to be having any other issues, sometimes resetting them
will help. This function can be found in the “Manage Device” , accessible by
tapping on a connected device in the Profile page. Resetting a device will cause
all data to be wiped from it and will restart the paired device.
16
Page 20

FAQs
Wavelet calculates how many calories you burn each day and night. It uses your
height, weight, gender, and age to calculate your BMR. Wavelet also considers
activity type, reps, speed, and duration to calculate how many calories you burn
while active. *Your Wavelet app will estimate calories burned throughout the day
even when a Wavelet device is not worn, based on your BMR.
Is my mobile device compatible?
Wavelet is compatible with select iOS and Android devices.
For iOS this includes iPhone 4s, 5, 5c, 5s, 6, 6+, 6s, 6s+, iPod 5th gen., iPad mini,
iPad 3, iPad 4 and iPad air.
For Android, this includes Samsung Galaxy S4, S4 Mini, S4 Active, S5, Samsung
Galaxy Note II, III, 10.1; the Nexus 4, Nexus 5, Nexus 7; HTC One; Motorola Moto X,
Moto G; DROID MINI, Ultra, MAXX, RAZR M, HD, HD MAXX and the LG G2. All
android devices must have Android 4.3 or higher.
Are the Wavelet devices waterproof?
The Wavelet Wristband is waterproof up to 3 meters and can be worn
swimming. it is recommended to remove the device periodically as anything
contacting your skin for prolonged periods can cause irritation. Discontinue use
and contact support at [email protected] if irritation persists. The Wavelet Pod is
also waterproof.
How does Wavelet calculate calories burned?
When should I wear my devices?
The Wavelet Wristband is designed to be eortlessly worn 24/7 (besides during
charging). Wearing the device while you sleep is especially important. Be sure to
wear according to the guide shown in the wearing guide. For greater accuracy,
wrist placement can be specified in the “profile” page of the app. Tap “Right
side” or “Left side” to toggle this setting. The Wavelet Pod can also be worn
whenever you wear shoes, but is only necessary during activities that record
data from the device, i.e., cycling and gym.
17
Page 21

FAQs cont.
What is biometric detection?
The Wavelet Wristband analyzes thousands of heart beats every 24 hour period,
telling you more about your health, and your body’s most important organ – the
heart. Wavelet can display resting heart rate, heart rate variability, blood oxygen
saturation, respiratory rate, blood pressure variation and pulse pressure
variations. These metrics may not be displayed to you, depending on your
program’s chosen options.
18
Page 22
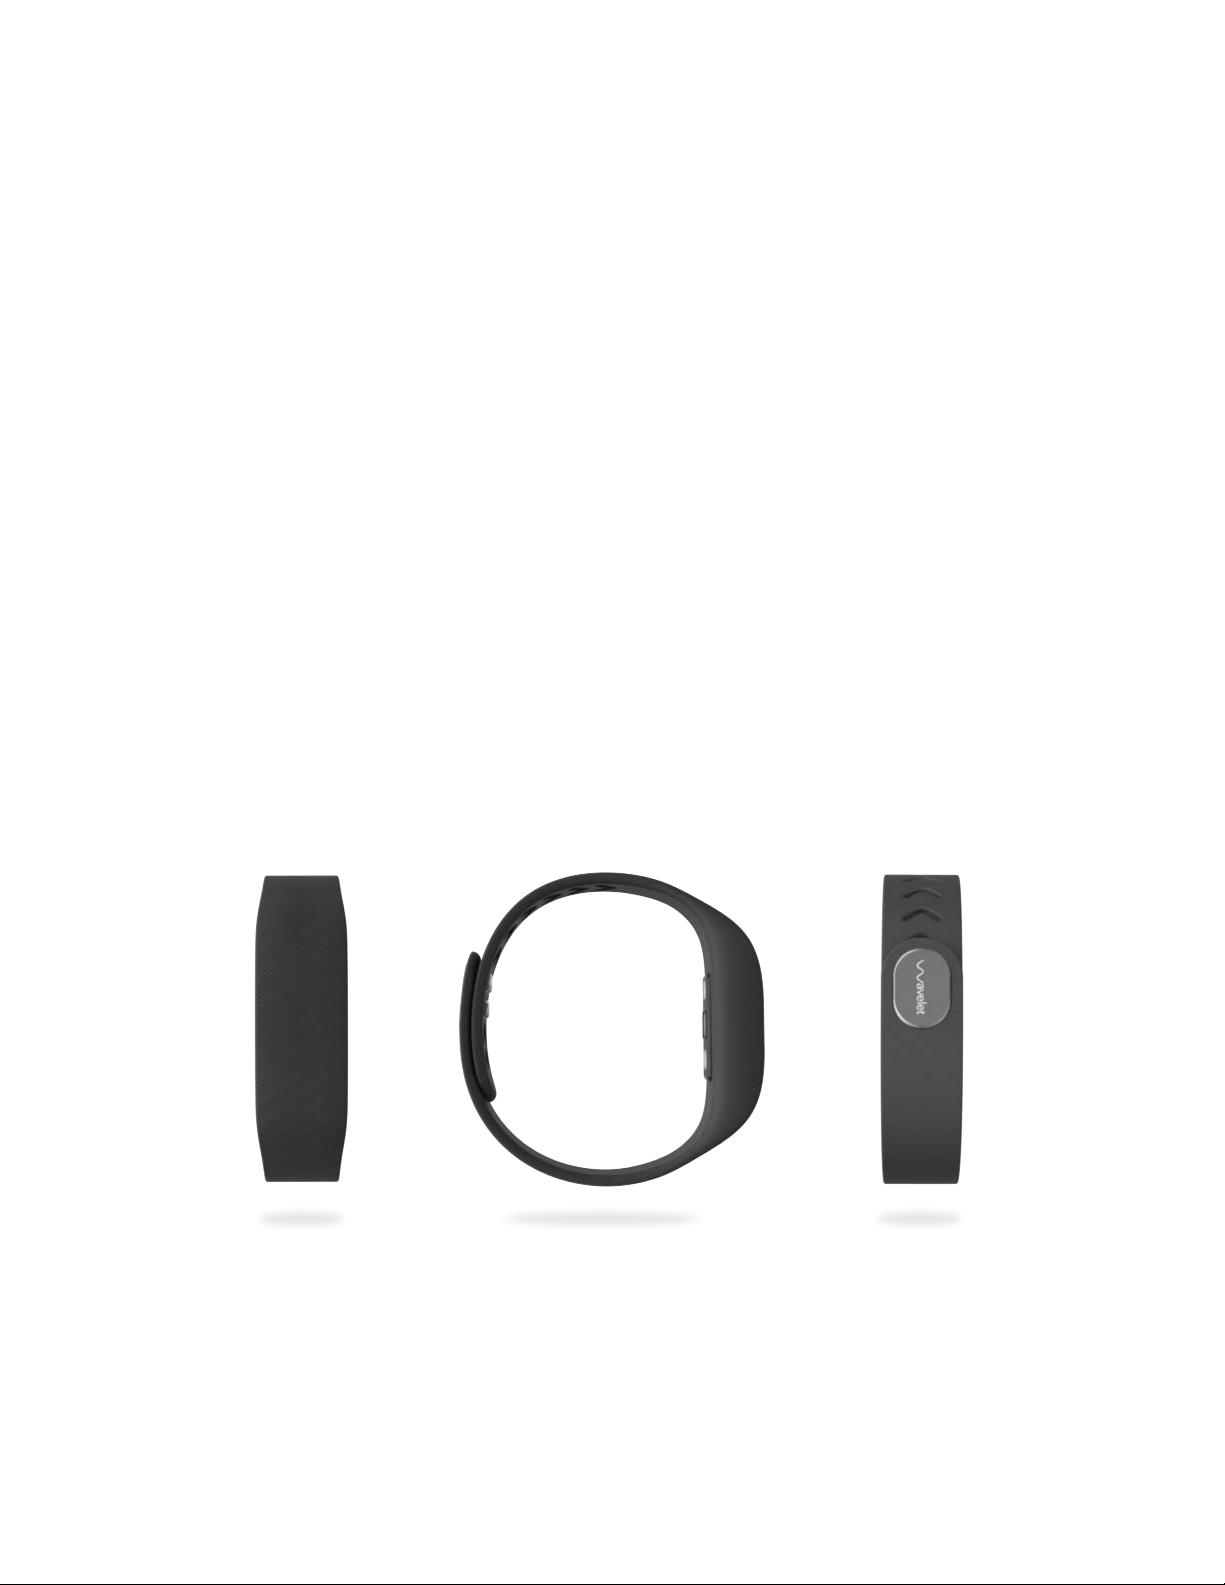
Wristband Specifications
Manufacturer
Head Oice
Origin
Sensor Size
LEDs
Wristband Weight
Shipping Weight
Shipping Dimensions
Communication Interface
Display
HRV Accuracy
Heart Rate Accuracy
Battery
Operating Time
Operating Temperature
Water Resistance
Band
Other components
Wavelet
Mountain View, CA
China
2mm x 2mm
2 red LEDs, 2 IR LEDs
23 grams
150 grams
70 x 70 x 95 mm
Bluetooth LE
Mobile device display / app
+/- 5.9 milliseconds
+/- 3 BPM
130 mAh Li-ion
Up to 5 days
-20 – 150 degrees F
Fully submersible 5 ATM
Silicone, fully replaceable
3-axis accelerometer,
temperature sensor
19
Page 23
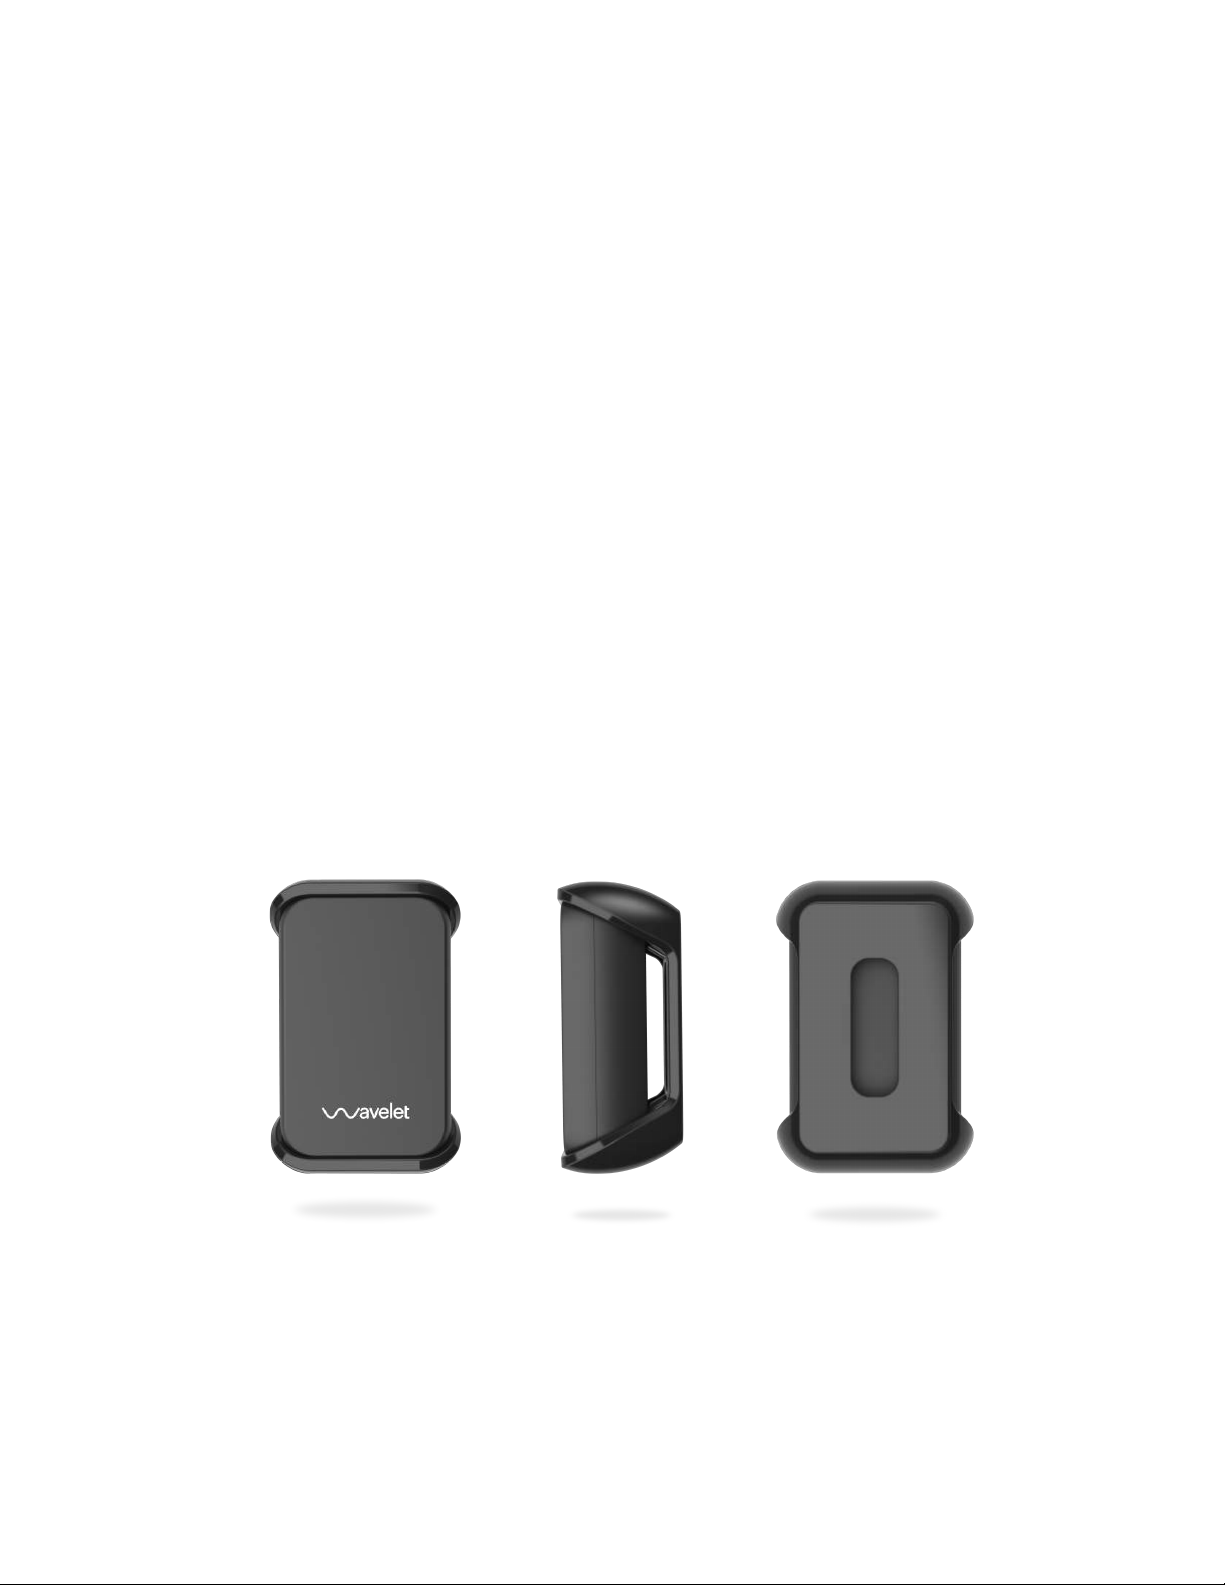
Pod Specifications
Specification
Manufacturer
Head Office
Origin
Pod Weight
Shipping Weight
Shipping Dimensions
Communication Interface
Display
Battery
Operating Time
Operating Temperature
Water Resistance
Clip
Other components
Wavelet Pod
Wavelet
Mountain View, CA
China / USA
18 grams
150 grams
70 x 70 x 95 mm
Bluetooth LE
Mobile device display / app
90 mAh Li-ion
Up to 7 days
-20 – 150 degrees F
Fully submersible 5 ATM
PC, interchangeable
3-axis accelerometer,
Gyro
20
Page 24

This device complies with Par t 15 of the FCC Rules. Operation is subject to the followin g tw o
conditions: (1) this device may not cause harmful interference, and (2) this device must accept any
interference receive d, including interference that may cause undesired operation.
Changes or modifications not expressly approved by the party responsible for compliance could
void the user's authority to operate the equipment.
NOTE: This equipment has been tested and found to comply with the limits for a Class B digital
device, pursuant to Part 15 of the F CC Rules. These limits are designed to provide reasonable
protection against harmful interference in a residential installation. This equipment generates, uses
instructions, may cause harmful interference to radio communications. However, there is no
guarantee that interference will not occur in a particular installation. If this equipment does caus e
harmful interference to radio or television reception, wh ich can be determined by turning the
equipment off and on, the user is encour aged to try to correct the interference by one or more of
the following measures:
-- Reorient or relocate the receiving antenna.
-- Increase the separation between the equipment and receiver.
-- Connect the equipment into an outlet on a circuit different from that to which the receiver is
connected.
-- Consult the dealer or an experienced radio/TV technician for help.
 Loading...