

Page 1
Mini Router User Manual
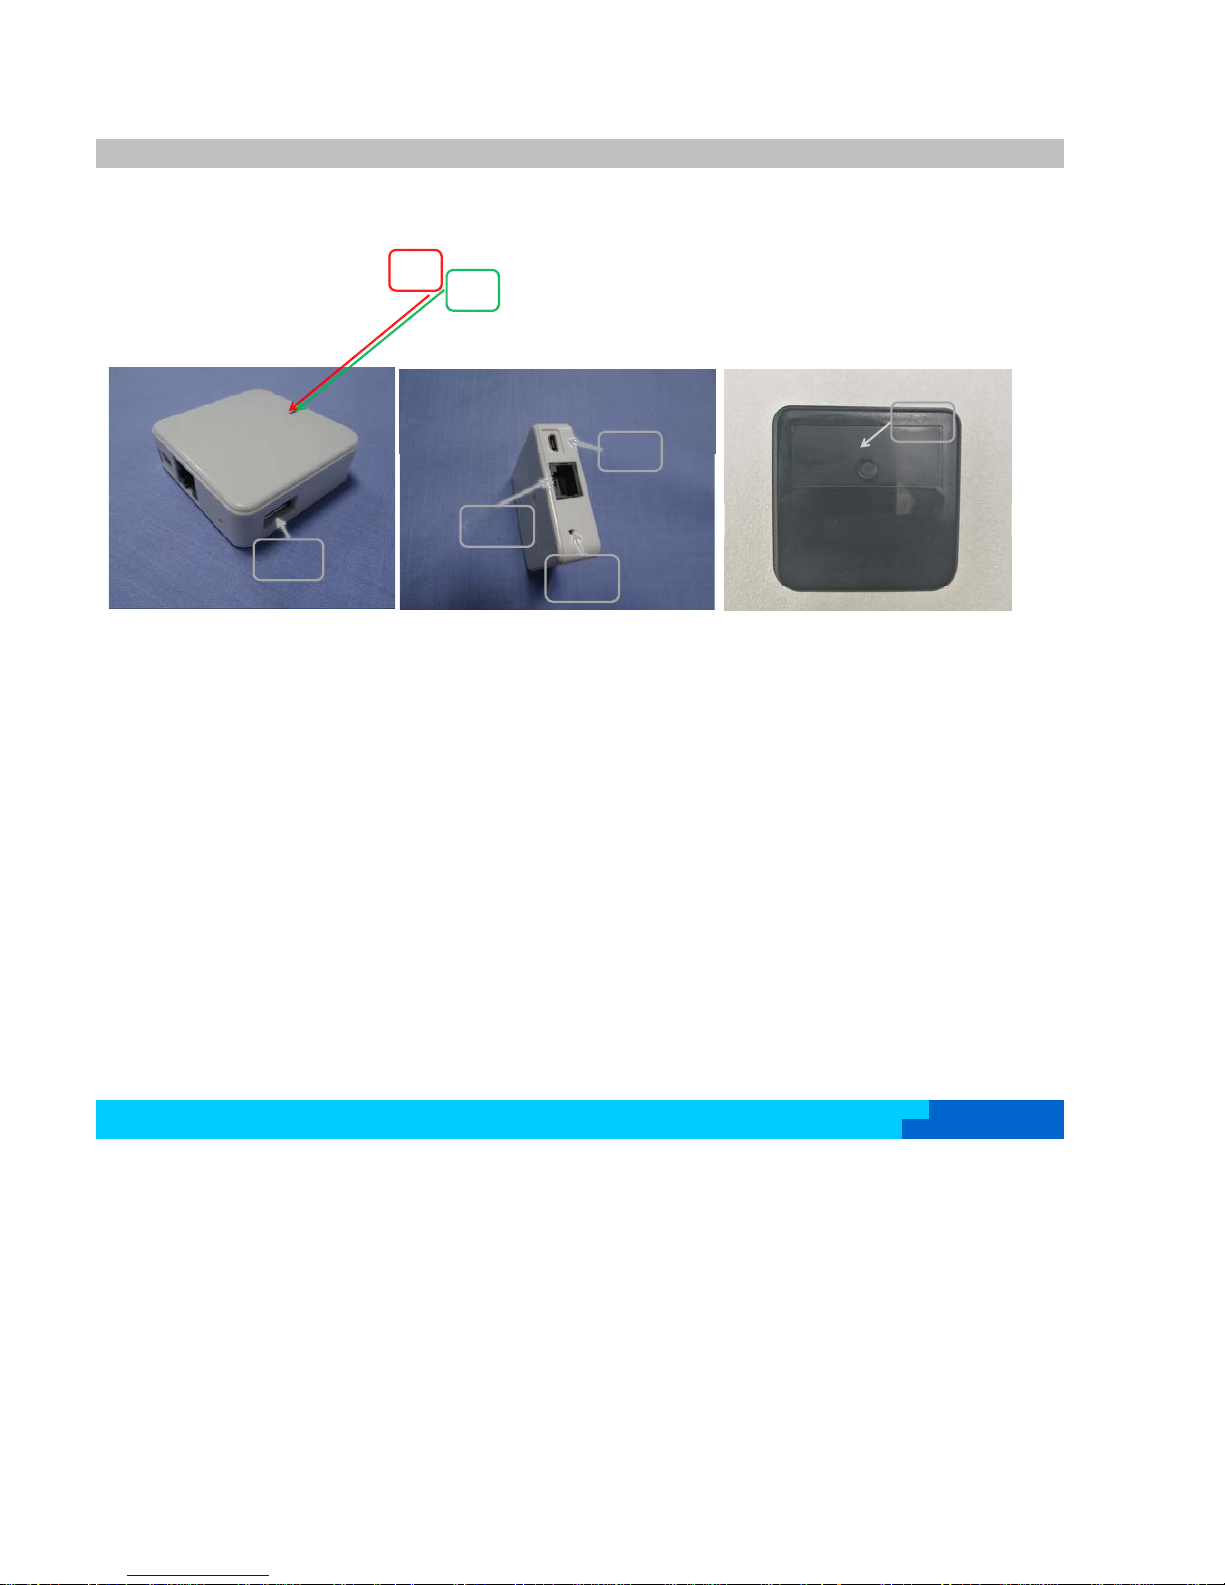
1. product panel introduction
WIFILED
Power
LED
charging
port
WAN/LAN
lable
OUT5V
resetingkey
cableport
Port
1
Product:Mini Router,Model:WM02
Brand:Amideep
Page 2
①
Switch on the WIFI of the portable power device
②
Plug in the cable from the router
1.Connect to WIFI with a Cable:
WIFI part------introduction
③
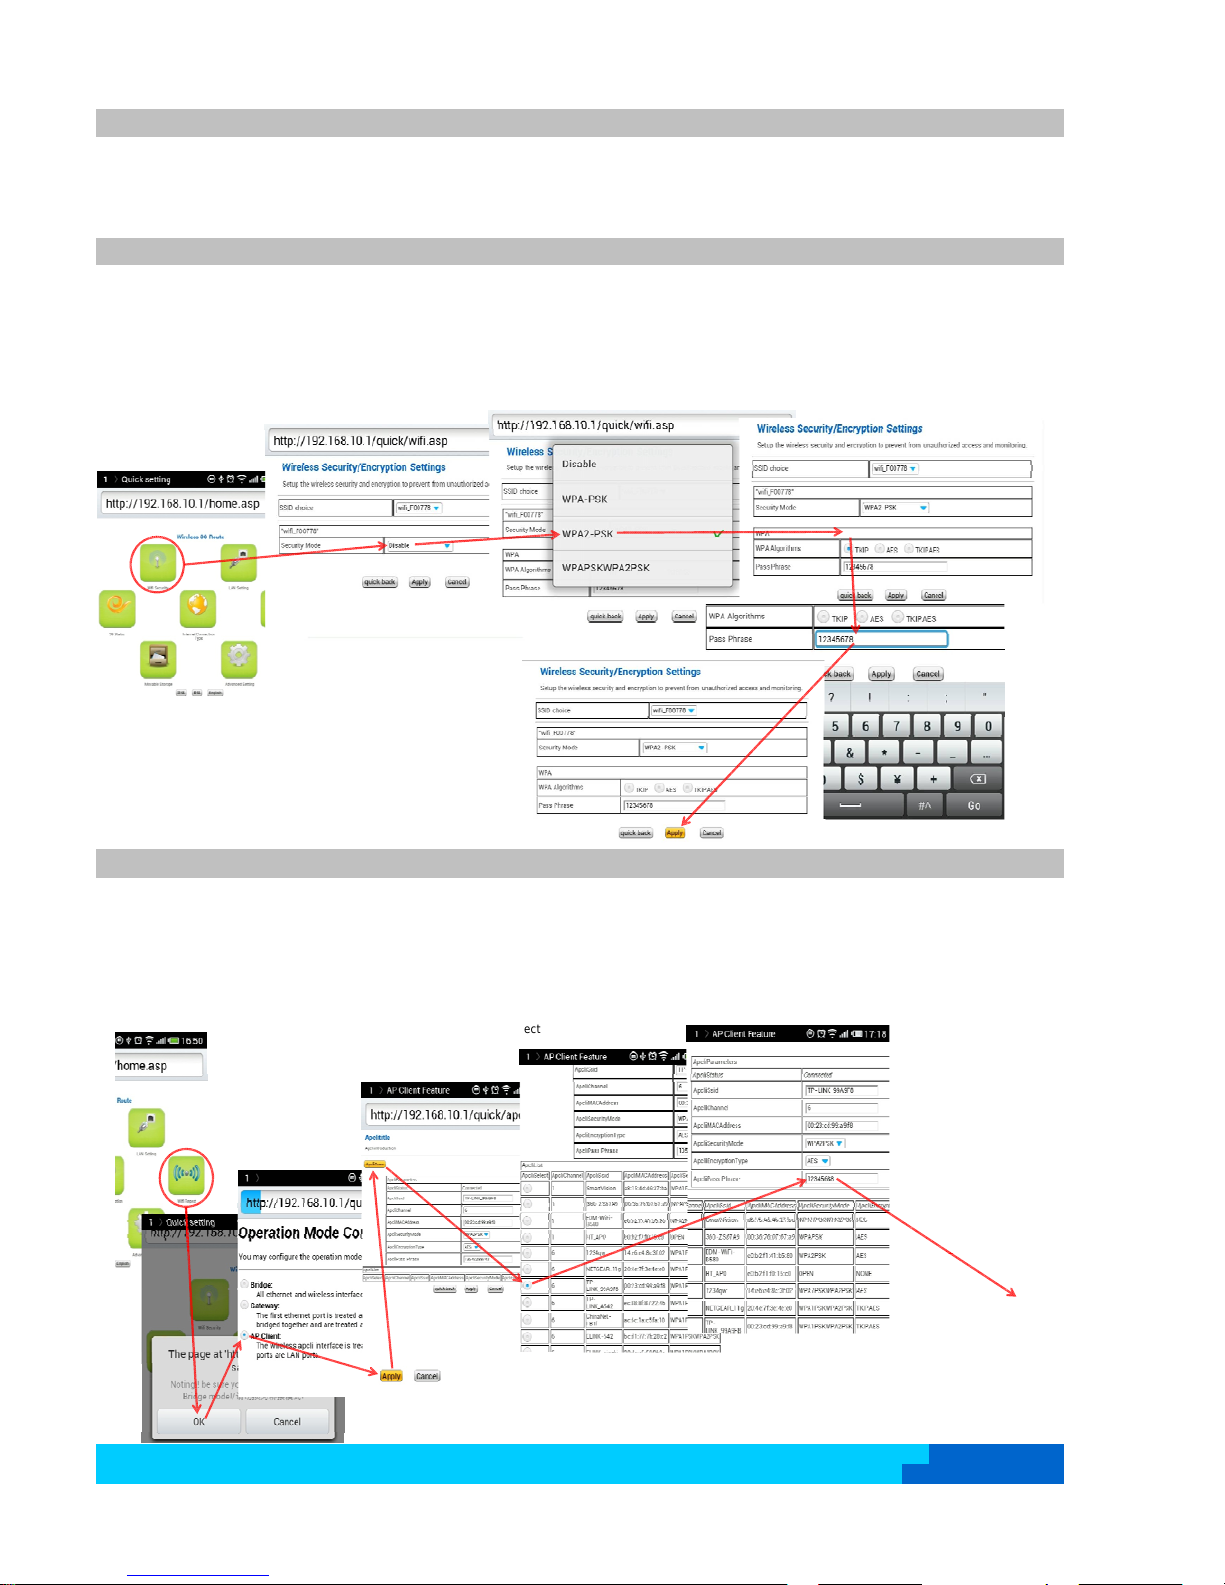
Turn on the WIFI of the cellphone and connect to wifi_xxxxxx (6 random numbers )
√
Connection is completed and the Internet is accessable. No setting is needed as default. If the setting is changed, enter the Internet setting in
the WIFI navigation page, select Dynamic Acquisition as the WAN connection mode.
①
Switch on the WIFI of the portable power device
②
Plug in the cable from the router
③
Open the cellphone's browser; input 192.168.10.1 and click OK to enter the navigation of WIFI setting (When the first time you login, please use
admin as the username and password)
-
2.Add/Change an Account:
④
In the navigation page, click the wireless security; select WAP2-PSK as the security mode; select TKIP as the WAP algorithm; input your password;
click OK
√
Password setting is completed.This device's WIFI will be disconnected. Customer need to login again with the new user name and password.
4
①
Switch on the WIFI of the portable power device
3.Bridging WIFI Setting:
①
pp
②
Turn on the WIFI of the cellphone and connect to wifi_xxxxxx (6 random numbers )
③
Open the cellphone's browser; input 192.168.10.1 and click OK to enter the navigation of WIFI setting (When the first time you login, please use
admin as the username and password)
④
In the WIFI navigation setting page, click wireless relay; click OK in the pop-up dialogue box; select AP Client, click OK; Click Searching IP;
input the password and click OK
√
The Bridging setting is completed (Please don't connect the device with cable now; bridging setting is only used to provide the Internet
connection by WIFI) This device will restart WIFI and reconnect
4
2
Page 3
①
Switch on the WIFI of the portable power device
②
Turn on the WIFI of the cellphone and connect to wifi_xxxxxx (6 random numbers )
③
Plug in the U-disk to the device
④
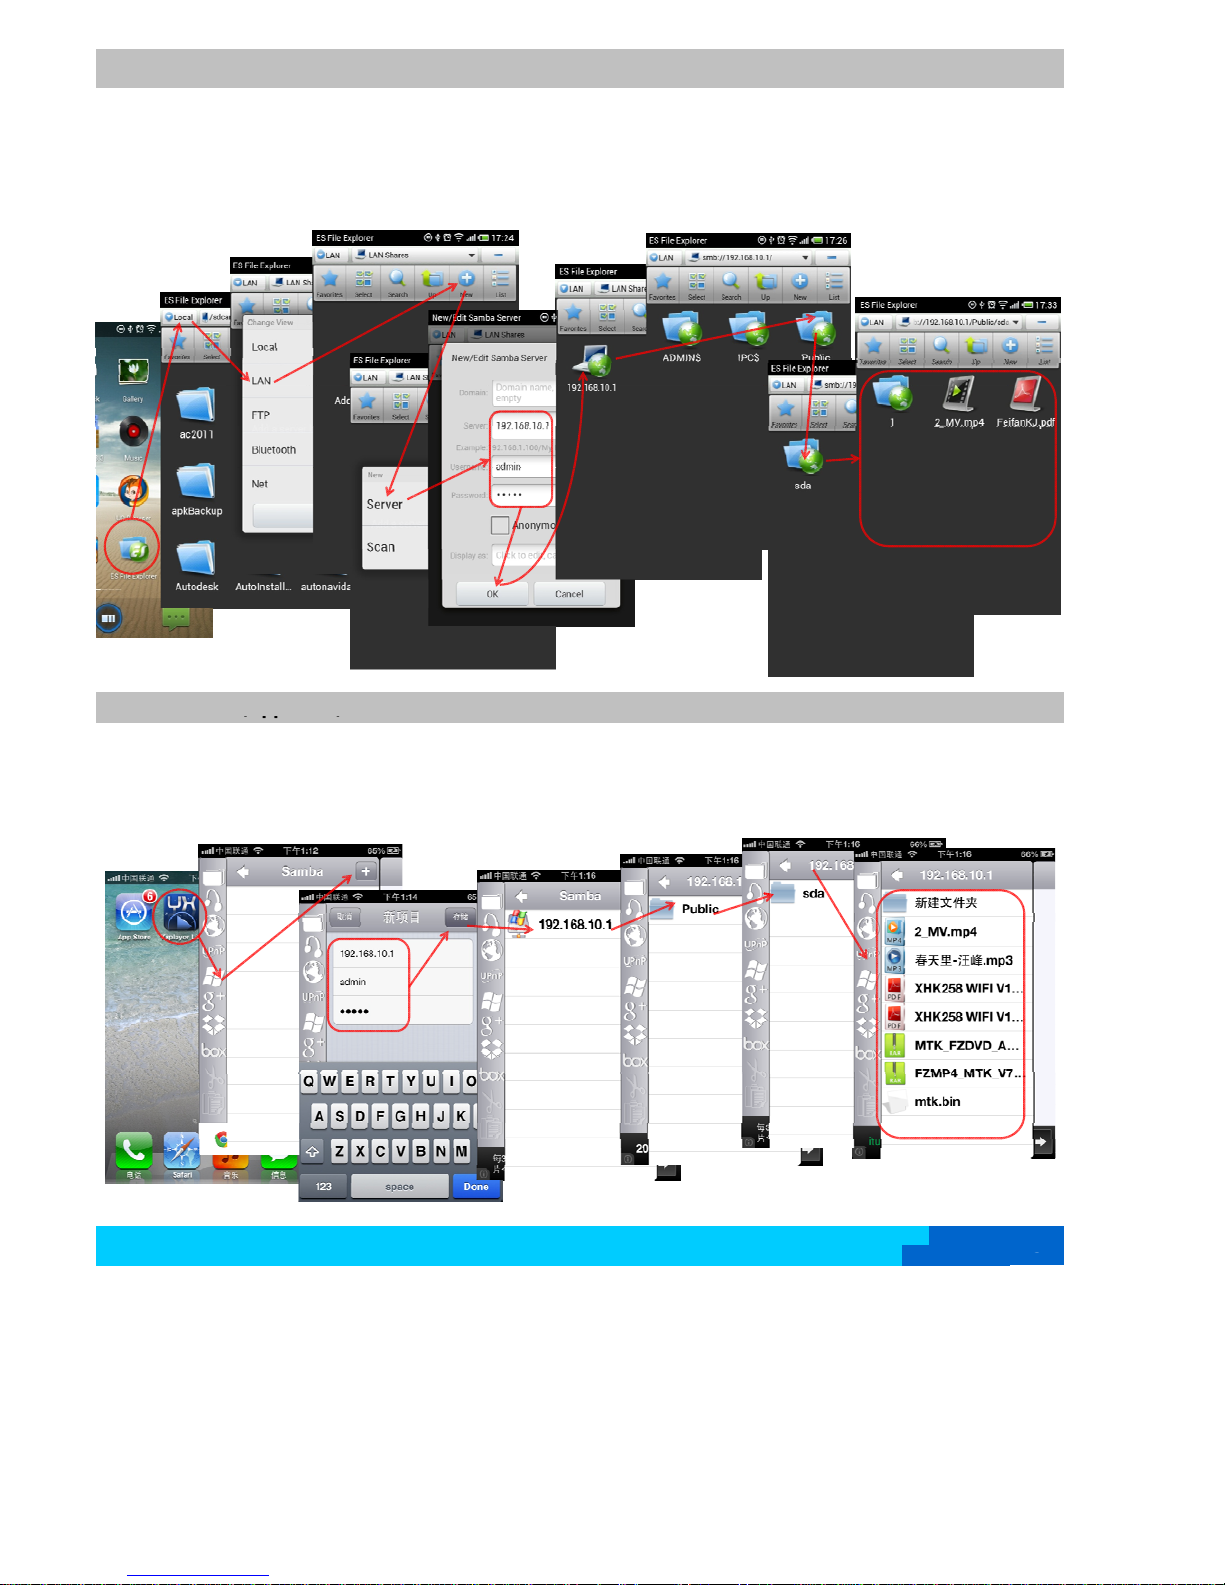
Open the ES document browser; click Local; click Share ( If it's the first you use, you need to click Creat; click the Server; input 192.16.10.1,
4.U-disk Share (Android OS):
with admin as username and password, click OK
Click 192.16.10.0 Share; Click Public; Click sda to enter the U-disk contents
√
Connection is complete, now you can access to the U-disk via your cellphone.
U-disk contents
5.U-disk Share (Apple OS):
4
①
Switch on the WIFI of the portable power device
②
Turn on the WIFI of the cellphone and connect to wifi_xxxxxx (6 random numbers )
③
Plug in the U-disk to the device
④
Open the Yxplayer: click share (If it's first time, you need to click Plus buttom to create a new one; input IP 192.168.10.1, user name:admin, passord:admin, and save)
click 192.168.10.1 to share, click Public, and then sda to access to U-disk
√
Connection is complete, now you can access to the U-disk via your cellphone.
(pp )
4
3
‐
3
Page 4
①
Switch on the WIFI of the portable power device
②
Plug in the cable from ADSL
③
Turn on the WIFI of the cellphone and connect to wifi_xxxxxx (6 random numbers )
'
6.IP dial-up:
④
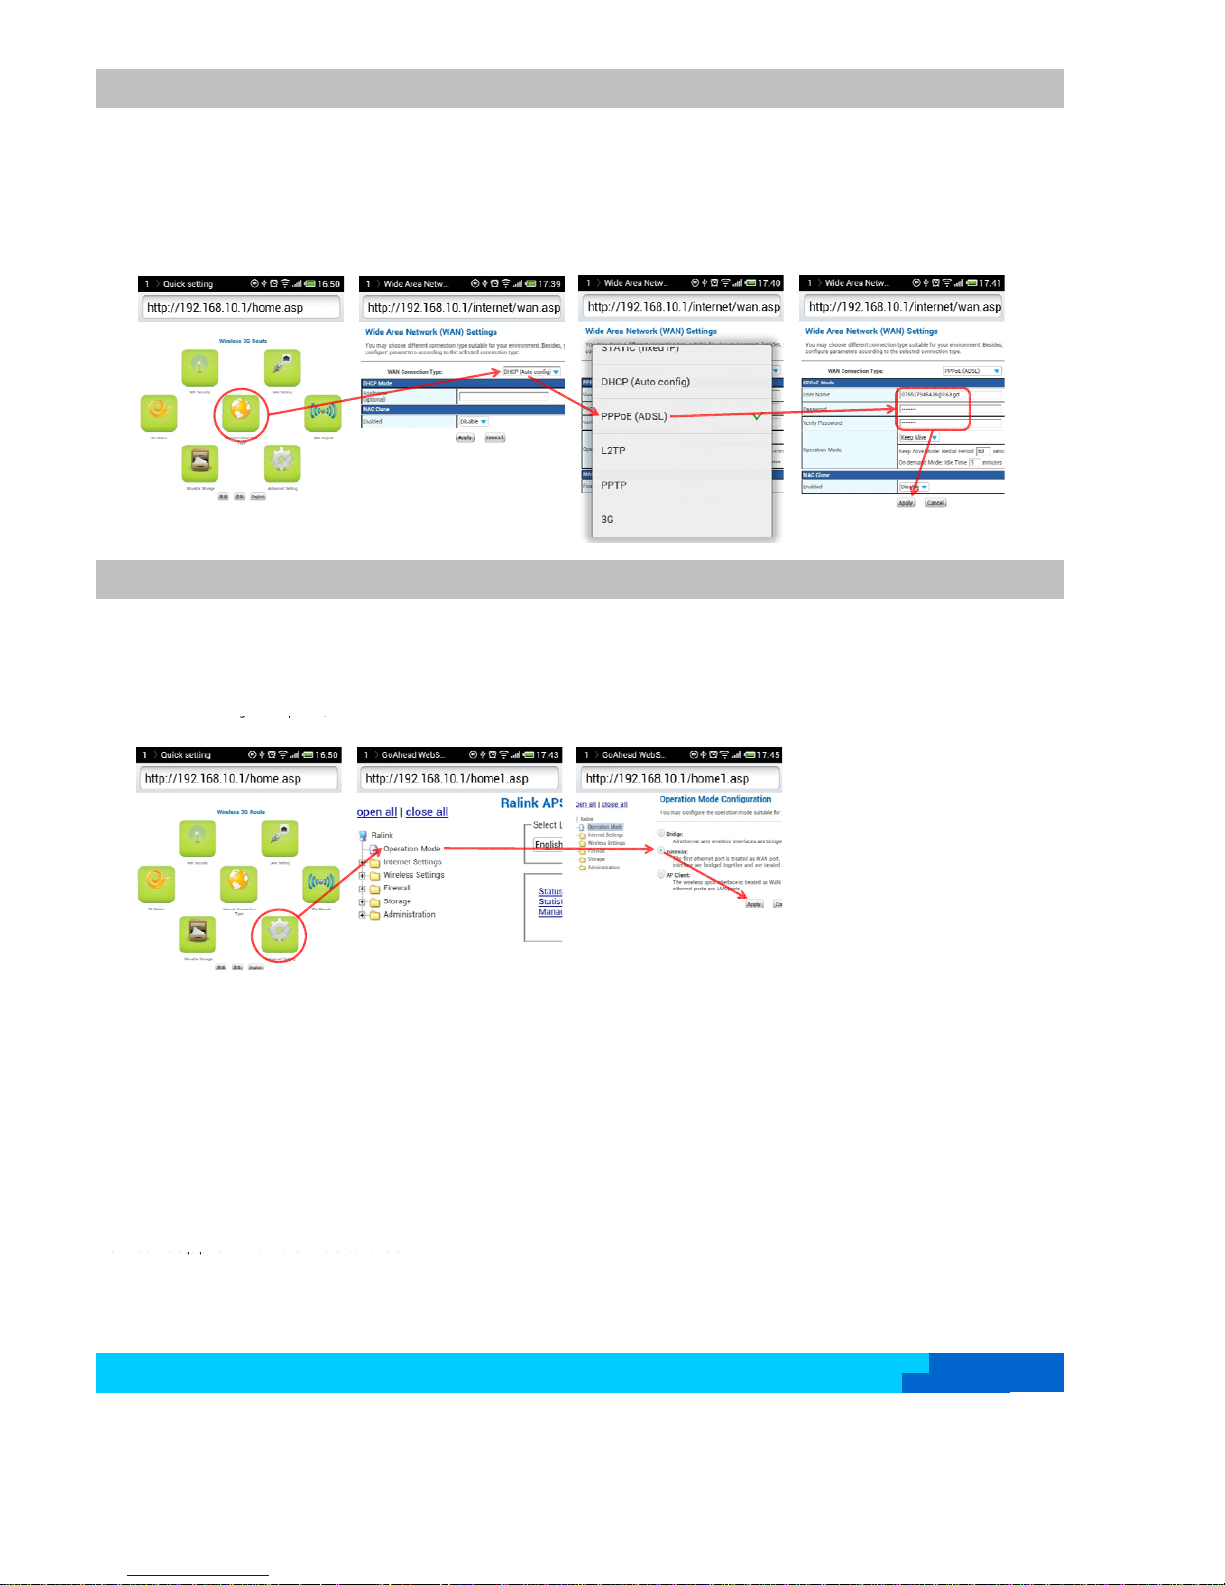
Open the cellphones browser; input 192.168.10.1 and click OK to enter the navigation of WIFI setting (When the first time you login, please use
admin as the username and password)
⑤
In the WIFI navigation page, click the Internet type setting; select PPPoE (ADSL) as the Wide area network online mode; input your
user and password, confirm your password, and click OK
√
Setting is completed, this device will restart WIFI and reconnect
5
①
Switch on the WIFI of the portable power device
②
Turn on the WIFI of the cellphone and connect to wifi_xxxxxx (6 random numbers )
③
Open the cellphone's browser; input 192.168.10.1 and click OK to enter the navigation of WIFI setting (When the first time you login, please use
admin as the username and password)
④
In the WIFI navigation page, click the Advanced Setting; click opperating pattern; click Gateway, click OK
√
Setting is completed, this device will restart WIFI and reconnect
7.Turn off the Bridging mode:
gp,
4
FCC WARNING
This device complies with part 15 of the FCC Rules. Operation is subject to the following two conditions: (1) this device may not cause harmful interference, and (2) this device must accept
any interference received, including interference that may cause undesired operation.
Any changes or modifications not expressly approved by the party responsible for compliance
could void the user's authority to operate the equipment.
NOTE: This equipment has been tested and found to comply with the limits for a Class B digital device, pursuant to Part 15 of the FCC Rules. These limits are designed to provide
reasonable protection against harmful interference in a residential installation. This equipment generates, uses and can radiate radio frequency energy and, if not installed and used in
accordance with the instructions, may cause harmful interference to radio communications. However, there is no guarantee that interference will not occur in a particular installation.
If this equipment does cause harmful interference to radio or television reception,
which can be determined by turning the equipment off and on, the user is encouraged to try to correct the interference by one or more of the following measures:
-- Reorient or relocate the receiving antenna.
-- Increase the separation between the equipment and receiver.
-- Connect the e
quip
ment into an outlet on a circuit differen
t
Connect the equipment into an outlet on a circuit different
from that to which the receiver is connected.
-- Consult the dealer or an experienced radio/TV technician for help.
To maintain compliance with FCC’s RF Exposure guidelines, This equipment should be installed and operated with minimum distance between 20cm the radiator your body: Use only the
supplied antenna.
4
 Loading...