

Page 1
Operating & Maintenance Manual
Teaching Solution
Corporation
Page 2

Contents
Intended Use/Introduction 3
Vertical Flat Wall 4
Horizontal Sapphire 5
Air Compressor 6
Secondary Products 7
Oil Fill Up Guide 8 - 9
Installation Guide 10 - 15
Moisture Trap Maintenance 16 - 17
Warranty Policy 18
Notes 19
2 Amico Beds
Page 3

Intended Use
The following is an assembly reference guide for the Amico Teaching Solution. This guide shows the step by step process
to assemble and operate the Amico Teaching Solution. It shall guide users in assembling Amico Secondary Products
onto the Teaching solution, and shall show how to correctly connect the air compressor to the Teaching Solution.
All parts needed in the assembly are shown under the components section of this guide, and all steps required
for correct assembly can be found under the installation section. If users shall experience any diculties with this assembly,
please contact Amico Beds for assistance.
This manual provides instructions required for normal operation of the Teaching Solution from Amico Beds
Corporation. Prior to operation of this Teaching Solution, it is important that this manual is read and that all safety
aspects contained in this manual are strictly adhered to.
Introduction
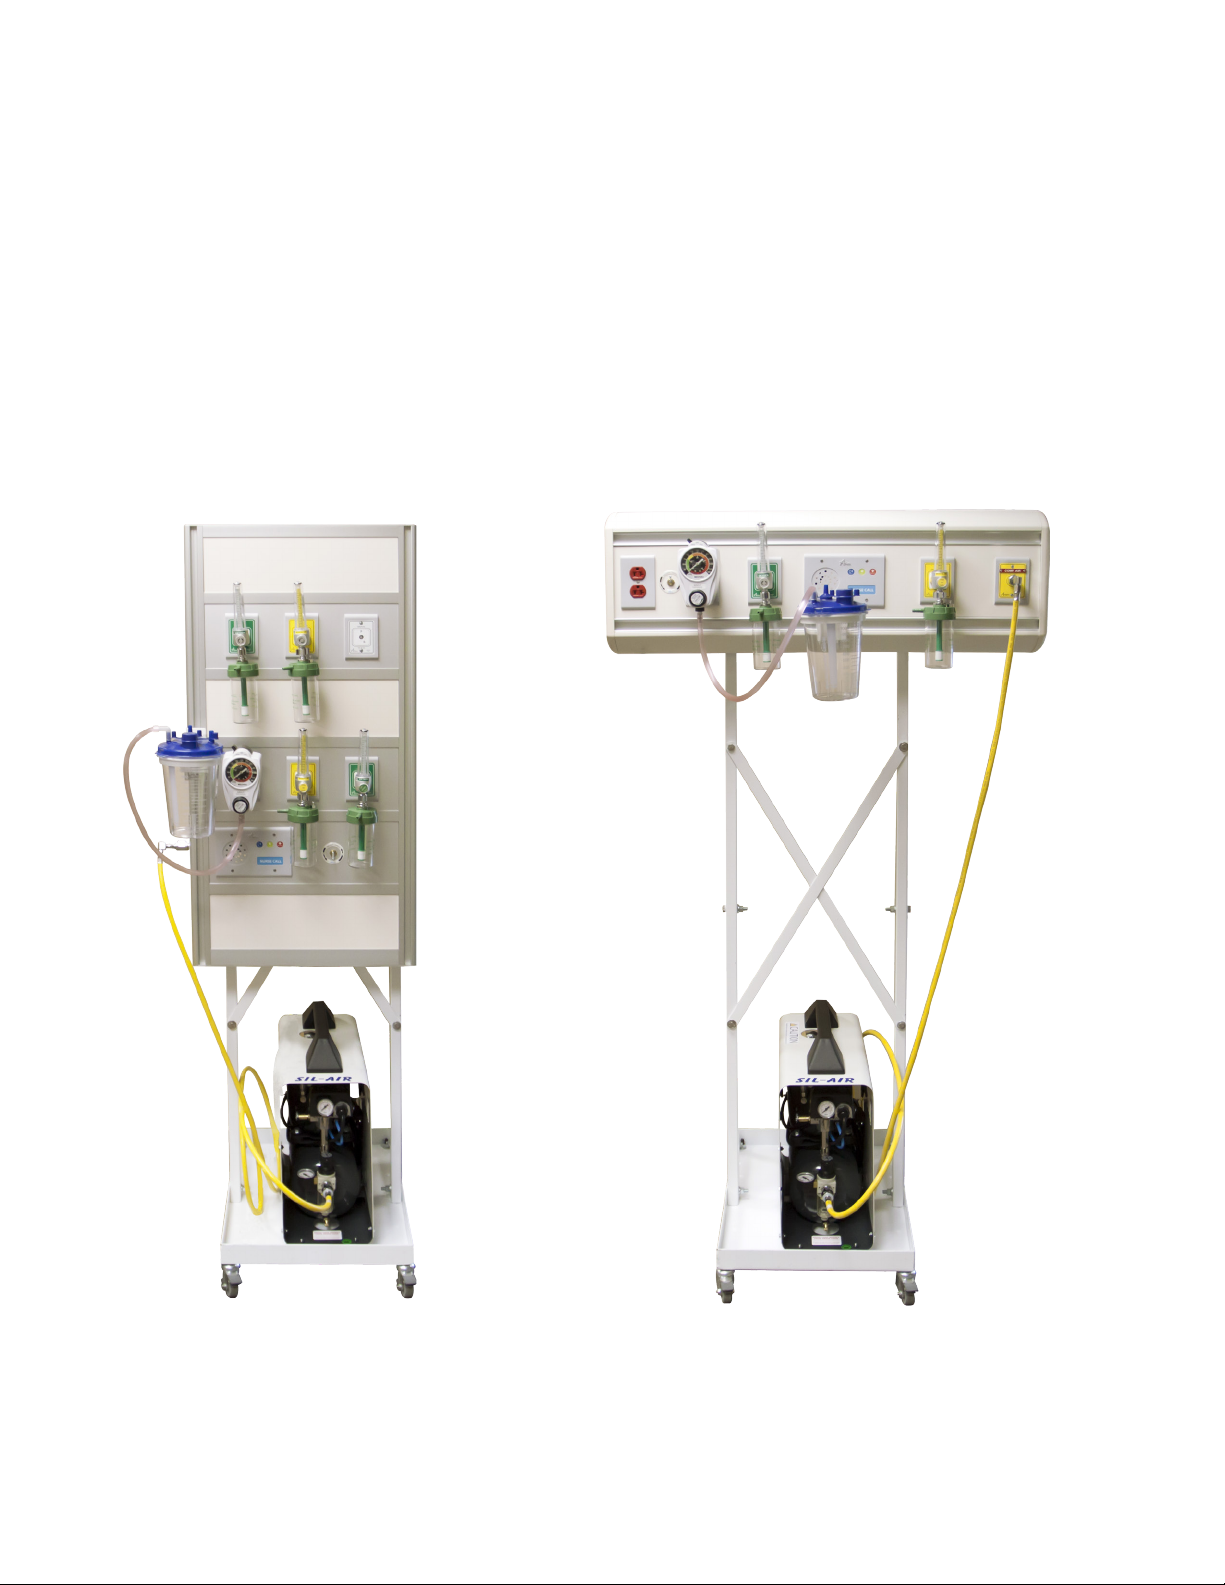
The Amico Teaching Solution has a simple design and incorporates distinctive features, which simulates a real
world medical environment for students.
The Teaching Solution comes in either a Horizontal Sapphire or a Vertical Flat wall. The oor stand which is the base
of the Teaching Solution shall allow for mobility with relative ease. The Teaching Solution includes fully functional
Secondary Products in order to provide students with a more realistic experience.
Amico Secondary Products such as an oxygen owmeter, medical air owmeter, vacuum regulator, vacuum canister
and humidier bottle also helps to assist in creating a simulated medical environment for students to train and sharpen
their skills.
www.amico.com 3
Page 4
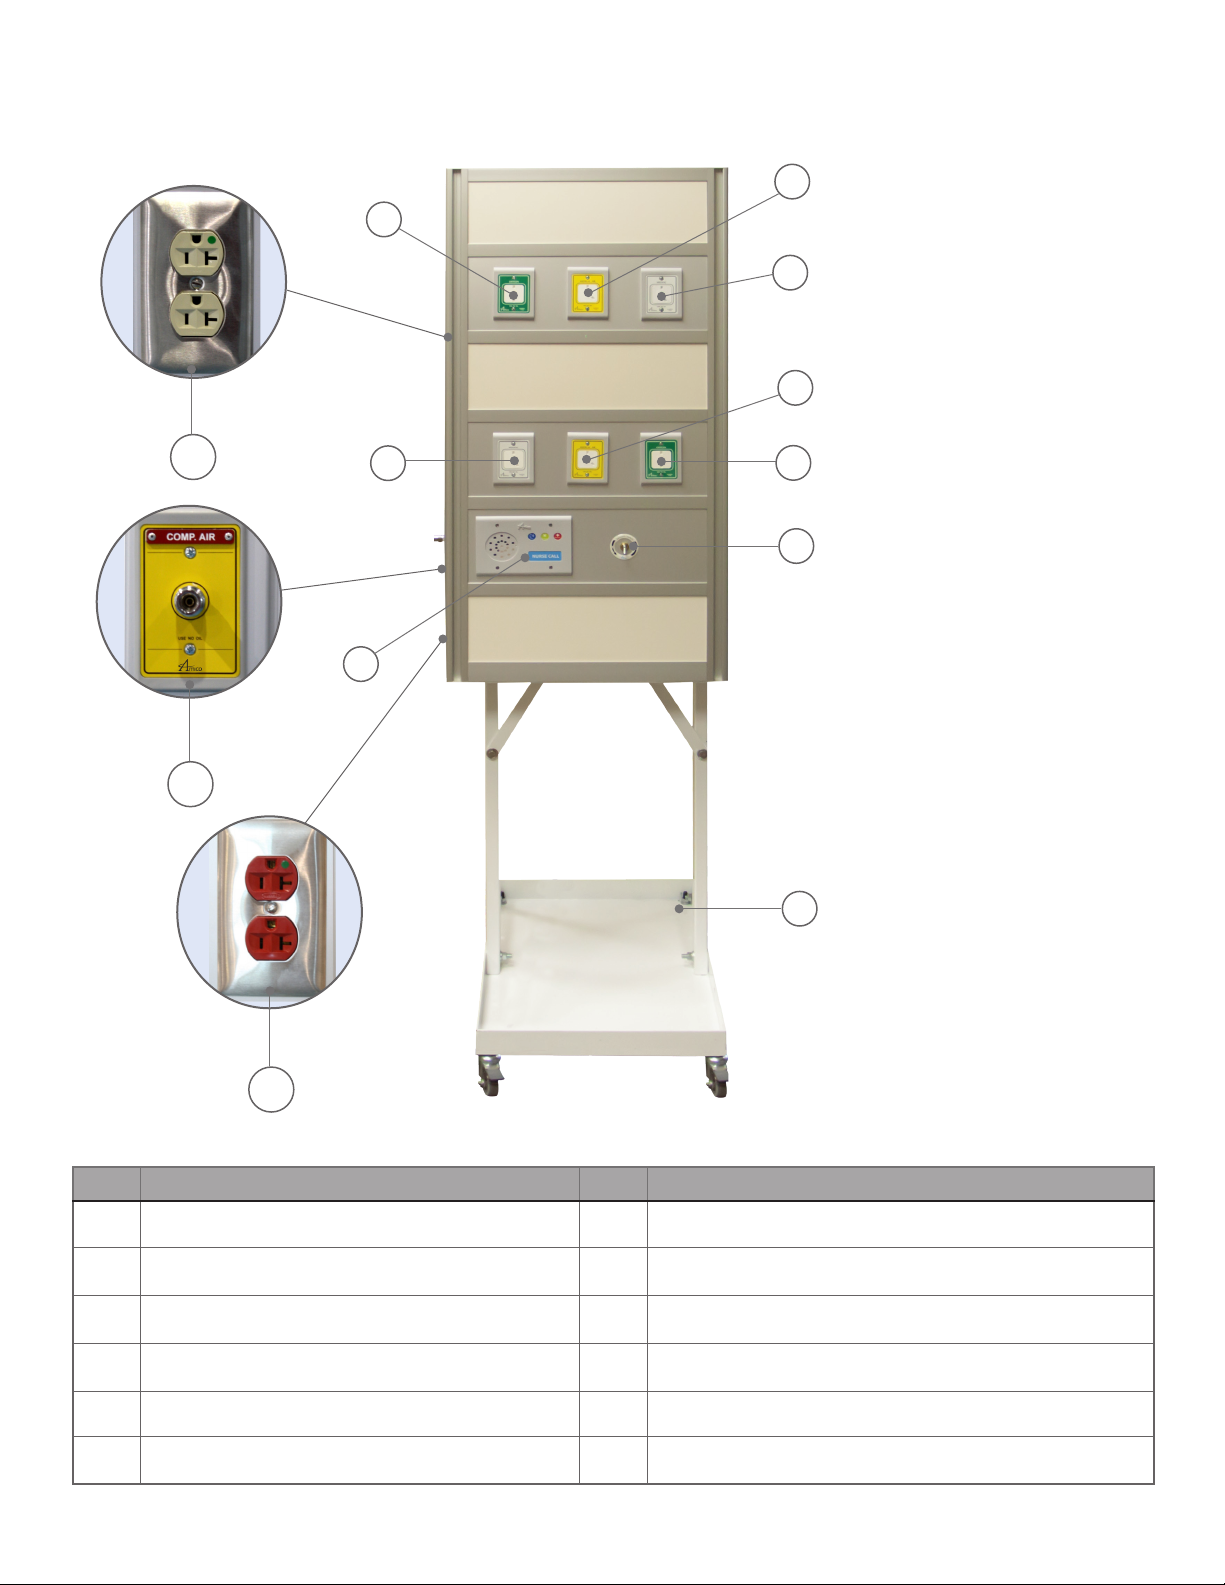
Vertical Flatwall
2
1
3
5
10
11
4
7
6
8
9
12
Item Description Item Description
1
2
3
4
5
6
4 Amico Beds
Oxygen Outlet
Medical Air Outlet 8 Vacuum Switch
Vacuum Outlet 9 Mobile Floor Stand
Vacuum Outlet 10 Normal Duplex Receptacle
Medical Air Outlet 11 Compressed Air Outlet
Oxygen Outlet 12 Emergency Duplex Receptacle
7
Nurse Call Cover
Page 5

Horizontal Sapphire
2
1
3
8
49
5
6
7
Item Description Item Description
1
2
3
4
5
Emergency Duplex Receptacle
Vacuum Switch 7 Compressed Air Outlet
Vacuum Outlet 8 Mobile Floor Stand
Nurse Call Cover 9 Oxygen Outlet
Light (Optional - *Not shown)
6
Medical Air Outlet
www.amico.com 5
Page 6

Air Compressor
1
5
6
2
3
4
Item Description Item Description
1
2
Tank Gauge
Knob
5
6
Oil Cap
ON / OFF Switch
7
3
4
6 Amico Beds
Regulator Gauge
DISS Hose Connection
7
Compressor Oil (one bottle included)
Page 7

Secondary Products
1
5
2
6 7
3
4
Item Description Item Description
1
2
3
4
Oxygen Flowmeter
Air Flowmeter
Vacuum Regulator
Vacuum Canister
5
6
7
Humidier Bottle
Horizontal Vacuum Slide (Sapphire Series)
Vertical Vacuum Slide (Flatwall)
www.amico.com 7
Page 8

Air Compressor Oil Fill Up Guide
2
1
Item Description
1
2
3
Air Compressor
Oil Cap / Cover
Compressor Oil: Synthetic Oil (24 oz)
3
CAUTION: Ensure that the air compressor is not plugged into an electrical socket and that the power switch is in
the OFF position throughout the process of filling the air compressor with oil. Failure to do so may result in
damage to the compressor, and/or serious injury to the user.
Remove the Oil Cover from the compressor.
1.
This shall expose the oil compartment.
8 Amico Beds
Page 9

1.
Remove the RED safety cap on the compressor oil
bottle. Cut the tip of the exposed mouth of the
bottle using a sharp object.
2.
Pour in no more than 18 ounces of the oil from the
bottle into the exposed oil compartment. More than
this will cause an overow of oil and can damage
the compressor. The scale etched on the side of the
bottle shall aid in determining the amount of oil that
is used.
www.amico.com 9
Page 10

Installation
CAUTION: Ensure that all power switches are in the OFF position prior to commencing the installation of the
Amico Teaching Solution. DO NOT plug in any electrical cords until instructed to do so.
Attach the compressor hose to the DISS
1.
connection on the Air Compressor.
Use a 7/8” wrench to ensure that the hose is
securely fastened onto the DISS connection.
This shall ensure that the compressor shall
operate eectively.
2.
Connect the other end of the hose to the
Compressed Air DISS Outlet. Using a 7/8”
wrench should help ensure that the hose
is fastened securely to the outlet.
For the Sapphire Series Teaching Solution,
the compressed air outlet shall be located
on the front or rear of the unit, while the
Flatwall Teaching Solution shall have the
compressed air outlet located on the side
of the unit.
Rear Connection
10 Amico Beds
Sapphire SeriesFlatwall
Page 11

Install the Horizontal Vacuum Slide by holding the lever in and place the vacuum slide at an angle so that the
3.
Vacuum Slide fits into the rail of the Teaching Solution. Continue to hold the lever and place the vacuum slide
in the upright position and then release the le v e r. This s h all all o w the horizontal vacuum slide to remain
upright securely. In order to remove the horizontal vacuum slide from the Teaching Solution, hold the lever,
tilt and gently tug the vacuum slide off the rail.
4.
When installing the Vertical Vacuum Slide on the Teaching Solution, ensure that the vertical Vacuum Slide is in
the open position (unscrewed). Place the vertical vacuum slide onto the side rails of the Flatwall. Once in, turn
the knob on the side to securely fasten the vacuum slide into position. If done correctly, the vertical vacuum
slide shall sit securely on the Teaching Solution. In order to remove the vacuum slide, unscrew the black knob
found on the side until it is loose and remove.
www.amico.com 11
Page 12

Place the Vacuum Canister in the Vacuum
5.
Canister Holder (supplied by Amico). Take
the Canister and align it with the vacuum
slide and slide the canister into the
vacuum slide. If the Canister is aligned
correctly with the vacuum slide, the
Canister holder shall slide right into the
vacuum slide and fit in securely.
6.
Place the oxygen Flowmeter, Medical Air
Flowmeter and Vacuum Regulator onto
the corresponding outlets. The Amico
Secondary Products are gas-specic.
In order to remove the oxygen Flowmeter,
medical air Flowmeter and vacuum regulator,
simply turn the Ohmeda adaptor clockwise
and when loose, proceed to gently tug o
the Teaching Solution.
12 Amico Beds
Ohmeda Adaptor
Page 13

Attach the Humidier Bottles by screwing the
7.
accessories to the bottom of the oxygen and medical
air Flowmeters.
Connect the vacuum hose (optional) from the the exposed mouth/nipple of the vacuum regulator to the
8.
mouth of the vacuum canister. The vacuum canister lid shall indicate which mouth is intended for the vacuum
hose. In order for the vacuum to create suction in the vacuum canister, ensure that all the exposed mouths are
closed, except for the mouth that will house the hose for the patient.
www.amico.com 13
Page 14

CAUTION: Users shall now connect all power cords to electrical outlets, however ensure that all power switches
are in the OFF position until instructed to do so.
9.
Turn the power switch on the air compressor ON. The switch is located above the tank gauge. Once the air
compressor has been turned ON, use the Compressor Pressure Knob to change the pressure of the compressed
air being released to 50psi. The Compressor Gauge shall indicate the pressure.
On / O Switch
14 Amico Beds
Compressor Gauge
&
Compressor Pressure Knob
Page 15

In order to use the vacuum application of
10.
the Teaching Solution, flip the Vacuum
Switch DOWN to turn ON the unit. This
shall allow the Teaching Solution to make
use of its vacuum application.
The Amico Teaching Solution is now ready for use.
OFF position ON position
www.amico.com 15
Page 16

Air Compressor Moisture Trap Maintenance
Maintaining the air compressor is an essential task that should not be neglected. In order to ensure that the air
compressor operates eectively, adhere to all of the following procedures for the air compressor to operate at full
capacity and with minimal problems.
Air Compressor Bleed Valve
Moisture Trap
Coalescing Cartridge
Oil Level
16 Amico Beds
Moisture Trap Bleed Valve
Page 17

Air Compressor Maintenance Checklist Monthly Yearly 3 months 6 months
Drain the water collected in the moisture trap: (the
1
operations are to be done with the tank under pressure).
Remove the condensate that has collected in the air compressor tan k.
To empty the tank, put it under pressure, take the compressor
2
to a place where the water will not damage the oor, tip the
compressor slightly forward and open the moisture trap
bleed valve.
Check the compressor eciency: possible connectors
3
slackening, pressure hose wear, screws tightening electric
circuit eciency, etc.
Clean the compressor with a soft cloth. Dust and dirt prevent
4
the compressor from cooling.
5 Oil level check
Check the air compressor bleed valve by pulling the ring
6
gently when there is pressure in the tank.
7 Check the moisture trap. Replace it if its necessary.
Disassemble the coalescing cartridge contained in the moisture
8
trap. This operation must be done with the tank completely
out of pressure.
ATTENTION: Maintenance of the compressor per the checklist is mandatory. Failure to do so will result in undue
wear and eventual malfunction, which in turn voids warranty.
www.amico.com 17
Page 18

Teaching & Training
Warranty Policy
Amico Teaching and Training warrants its Patient Equipment to be free from defects in material and workmanship for a period
of twelve (12) months from the date of shipment. Within this period Amico will provide the parts for repair or replacement of
defective parts at Amico’s cost. Shipping and Installation costs will be borne by the Customer.
This warranty is valid only when the product has been properly installed according to Amico specications used in a normal
manner and serviced according to factory recommendations. It does not cover failures due to damage which occurs in shipments
or failures which resulted from accidents, misuse, abuse, neglect, mishandling, alteration, misapplication or damage that may
be attributable to acts of God.
Amico shall not be liable for incidental or consequential damages resulting from the use of the equipment.
All claims for warranty must rst be approved by Amico. A valid Return Goods Authorization (RGA) number must be obtained
from Amico prior to commencement of parts being shipped back for any service work. Failure to do so will result in parts being
sent back at the customer’s expense.
18 Amico Beds
Page 19

Notes
www.amico.com 19
Page 20

www.amico.com
Amico Beds | www.amico.com
85 Fulton Way, Richmond Hill
Ontario, L4B 2N4, Canada
Toll Free Tel: 1.877.462.2697
Toll Free Fax: 1.866.440.4986
Tel: 905.764.0800
Fax: 905.764.0862
Email: info@amico.com
TTS-OM-TEACHING 01.15.2014
 Loading...