

Page 1
KMI*
PG4VI515FTB4P3
PG4VI515AFTB4P3
(EN) INSTRUCTION MANUAL..........................................2
(NL) GEBRUIKERSHANDLEIDING...............................34
IOAA-783 / 8057867
(10.2016 / v2)
Page 2

DEAR CUSTOMER,
Your hob combines exceptional ease of use with excellent effectiveness. Once you have read
the instructions, operating your hob will not be a problem.
Before being packed and leaving the factory, the safety and functions of this hob were carefully tested.
We ask you to read the User Manual carefully before switching on the appliance. Following
the directions in this manual will protect you from any misuse.
Keep this User Manual and store it near at hand.
The instructions should be followed carefully to avoid any unfortunate accidents.
Important!
The appliance may only be operated when you have read and understood this manual
thoroughly.
The appliance is designed solely for cooking. Any other use (eg heating a room) is
incompatible with the appliance’s intended purpose and can pose a risk to the user.
The manufacturer reserves the right to introduce changes which do not affect the
operation of the appliance.
EN
Certicate of compliance CE
The Manufacturer hereby declares that this product complies with the general requirements pursuant to the
following European Directives:
l The Low Voltage Directive 2014/35/EC,
l Electromagnetic Compatibility Directive 2014/30/EC,
l ErP Directive 2009/125/EC,
and therefore the product has been marked with the symbol and the Declaration of Conformity has been
issued to the manufacturer and is available to the competent authorities regulating the market.
2
Page 3

CONTENTS
Basic Information..................................................................................................2
Safety instructions.....................................................................................................4
Description of the appliance.......................................................................................9
Installation.............................................................................................................11
Operation...............................................................................................................18
Cleaning and maintenance.......................................................................................29
Troubleshooting......................................................................................................31
Specication............................................................................................................33
3
Page 4

SAFETY INSTRUCTIONS
Warning: The appliance and its accessible parts
become hot during use. Care should be taken to
avoid touching heating elements. Children less than 8
years of age shall be kept away unless continuously
supervised.
This appliance can be used by children aged from 8
years and above and persons with reduced physical,
sensory or mental capabilities or lack of experience
and knowledge if they have been given supervision or
instruction concerning use of the appliance in a safe
way and understand the hazards involved. Children
shall not play with the appliance. Cleaning and user
maintenance shall not be made by children without
supervision.
Warning: Unattended cooking on a hob with fat or
oil can be dangerous and may result in re.
NEVER try to extinguish a re with water, but switch
off the appliance and then cover ame e.g. with a lid
or a re blanket.
Warning: Danger of re: do not store items on the
cooking surfaces.
4
Page 5

SAFETY INSTRUCTIONS
Warning: If the surface is cracked, switch off the ap-
pliance to avoid the possibillity of electric shock.
Metallic objects, such as knives, forks, spoons and
lids should not be placed on the hob surface since
they can get hot.
After use, switch off the hob element by its control
and do not rely on the pan detector.
The appliance is not intended to be operated by means of an external timer or separate remote-control
system.
You should not use steam cleaning devices to clean
the appliance.
5
Page 6

SAFETY INSTRUCTIONS FOR USE
● Before using the induction hob for the rst time, carefully read its user manual. This will
ensure user safety and prevent damage to the appliance.
● If the induction hob is operated in immediate vicinity to the radio, television set or other
radio-frequency-emitting device, make sure that the hob’s touch sensor controls operate
correctly.
● The hob must be connected by a qualied installer.
● Do not install the appliance near a refrigerator.
● Furniture, where the hob is installed must be resistant to temperatures up to 100°C. This
applies to veneers, edges, surfaces made of plastics, adhesives and paints.
● The appliance may only be used once tted in kitchen furniture. This will protect the user
against accidental touching the live part.
● Repairs to electrical appliances may only be conducted by specialists. Improper repairs can
be dangerous to the user.
● The appliance is not connected to mains when it is unplugged or the main circuit breaker is
switched off.
● Plug of the power cord should be accessible after appliance has been installed.
● Ensure that children do not play with the appliance.
● This appliance is not intended for use by persons (including children) with physical, mental
or sensory handicaps, or by those who are inexperienced or unfamiliar with the appliance,
unless under supervision or in accordance with the instructions as communicated to them
by persons responsible for their safety.
● Persons with implanted devices, which support vital functions (eg, pacemaker, in-
sulin pump, or hearing aids) must ensure that these devices are not affected by the
induction hob (the frequency of the induction hob is 20-50 kHz).
● Once power is disconnected all settings and indications are erased. When electric power is
restored caution is advisable. If the cooking zones are hot, „H” residual heat indicator will
be displayed. Also child lock key will be displayed, as when the appliance is connected for
the rst time.
● Built-in residual heat indicator can be used to determine if the appliance is on and if it is still
hot.
● If the mains socket is near the cooking zone, make sure the cord does not touch any hot
areas.
● When cooking using oil and fat do not leave the appliance unattended, as there is a re
hazard.
● Do not use plastic containers and aluminium foil. They melt at high temperatures and may
damage the cooking surface.
● Solid or liquid sugar, citric acid, salt or plastic must not be allowed to spill on the hot cooking
zone.
● If sugar or plastic accidentally fall on the hot cooking zone, do not turn off the hob and scrape
the sugar or plastic off with a sharp scraper. Protect hands from burns and injuries.
6
Page 7

SAFETY INSTRUCTIONS FOR USE
● When cooking on induction hob only use pots and pans with a at base having no sharp
edges or burrs as these can permanently scratch the cooking surface.
● Induction hob cooking surface is resistant to thermal shock. It is not sensitive to cold nor
hot.
● Avoid dropping objects on the cooking surface. In some circumstances, point impacts such
as dropping a bottle of spices, may lead to cracks and chipping of the cooking surface.
● If any damage occurs, seething food can get into the live parts of the induction hob through
damaged areas.
● If the cooking surface is cracked, switch off power to avoid the risk of electric shock.
● Do not use the cooking surface as a cutting board or work table.
● Do not place metal objects such as knives, forks, spoons, lids and aluminium foil on the
cooking surface as they could become hot.
● Do not install the hob over a heater without a fan, over a dishwasher, refrigerator, freezer
or washing machine.
● If the hob has been built in the kitchen worktop, metal objects located in a cabinet below
can be heated to high temperatures through the air owing from the hob ventilation system.
As a result it is recommended to use a partition (see Figure 2).
● Please follow the instructions for care and cleaning of induction hob. In the event of misuse
or mishandling warranty may be void.
7
Page 8

HOW TO SAVE ELECTRICITY
UNPACKING
Using the electricity in a responsible manner not only
saves money, but also helps
protect the environment. So
let’s save electricity! This is
how it’s done:
●Use the correct cookware.
Cookware with at and a thick base can save
up to 1/3 of electricity. Please remember to
cover cookware with the lid, otherwise electricity consumption increased four times!
●Always keep the cooking zones and
cookware bases clean.
Dirt prevents proper heat transfer. Often
burnt stains can be removed only with agents
harmful to the environment.
●Avoiding unnecessary lifting the lid to
peek into the pot.
●Do not install the hob in the immediate
vicinity of refrigerator / freezer.
The electricity consumption is then unnecessarily increased.
The appliance was protected
from damage at the time of
transport. After unpacking,
please dispose of all elements of packaging in a way
that will not cause damage
to the environment. All materials used for
packaging the appliance are environmentally
friendly; they are 100% recyclable and are
marked with the appropriate symbol.
Important! Keep the packaging material
(bags, Styrofoam pieces, etc.) out of reach
of children during unpacking.
DISPOSAL
In accordance with European Directive
2002/96/EC and Polish legislation regarding
used electrical and electronic goods, this
appliance is marked with the symbol of the
crossed-out waste container.
This marking means that the
appliance must not be disposed of together with other household waste after it has been
used. The user is obliged to
hand it over to waste collection
centre collecting used electrical
and electronic goods. The collectors, including local collection points, shops and local
authority departments provide recycling
schemes. Proper handling of used electrical
and electronic goods helps avoid environmental and health hazards resulting from
the presence of dangerous components and
the inappropriate storage and processing of
such goods.
8
Page 9
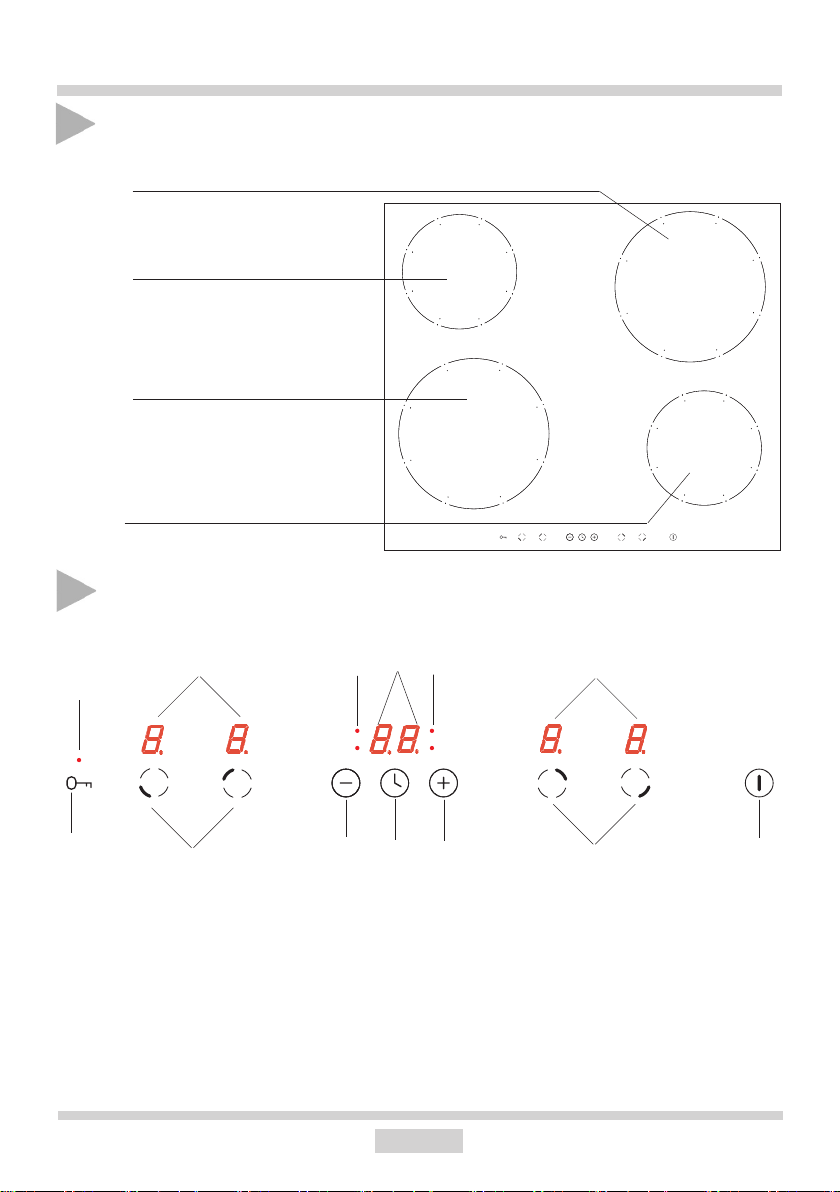
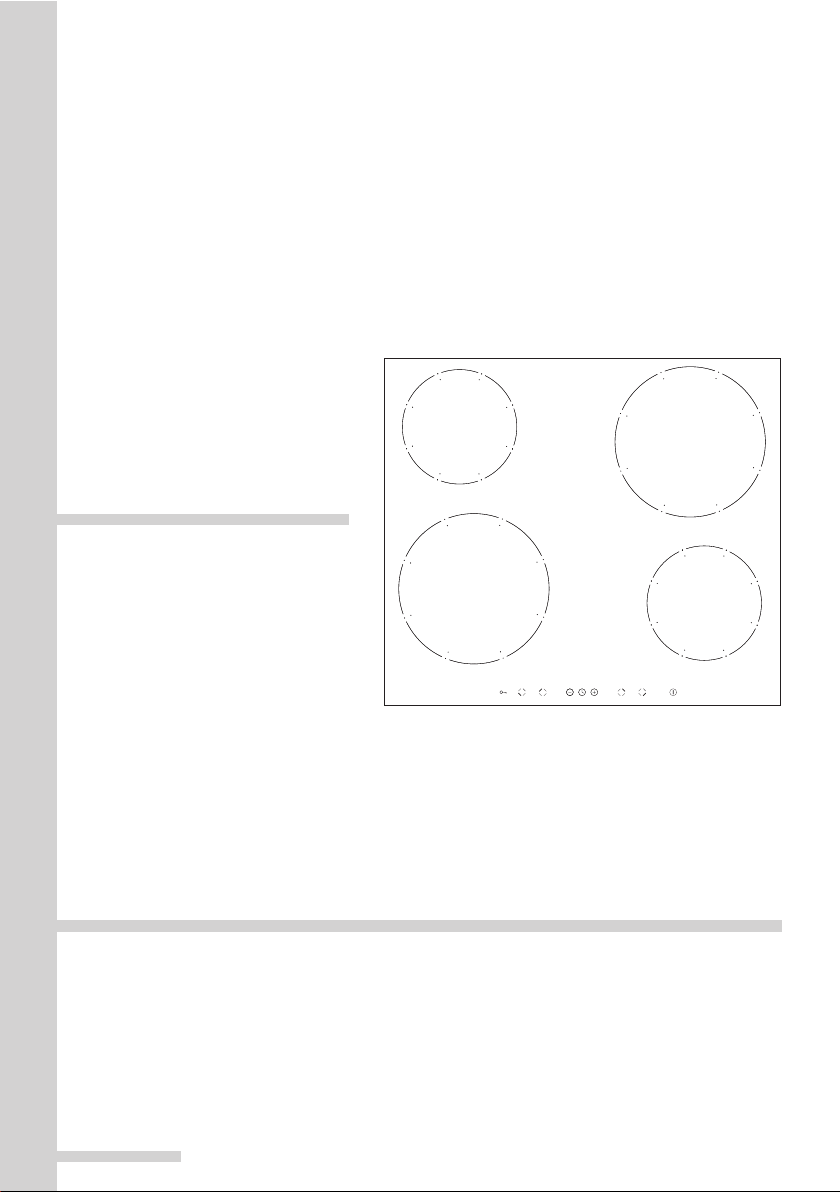
DESCRIPTION OF THE APPLIANCE
Description of KMI* (PG4VI515FTB4P3) hob
Booster induction cooking zone
Ø 210 mm (rear right)
Booster induction cooking zone
Ø 160 mm (rear left)
Booster induction cooking
Ø 210 mm zone(front left)
Booster induction cooking zone
Ø 160 mm (front right)
Control Panel
3
9
7
1. On/off sensor
2. Higher heat setting selector
3. Cooking zone indicator
4. Lower heat setting selector
5. Cooking zone selection sensor
6. Timer sensor
7. Child lock sensor
8. Timer indicator light
9. Child lock indicator light
10. Timer display
5
10
8 8
64
9
3
2
5
1
Page 10
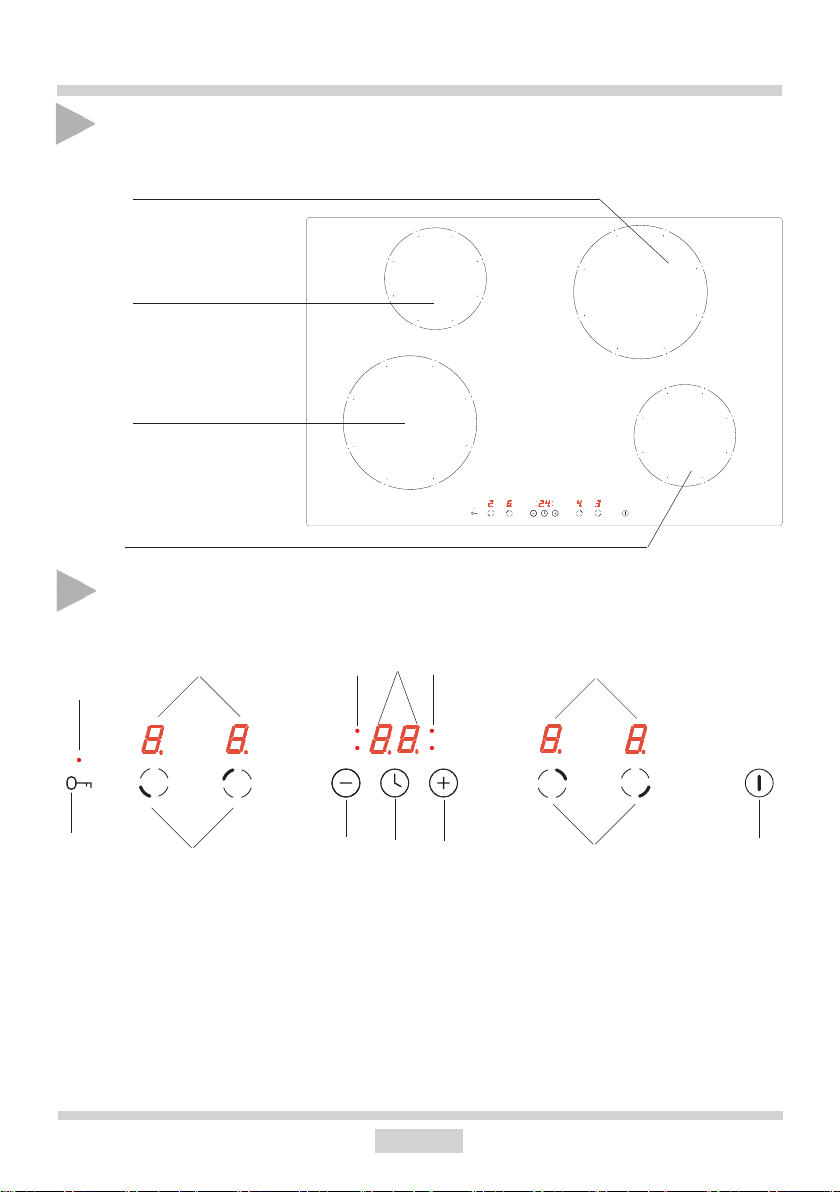
DESCRIPTION OF THE APPLIANCE
Description of KMI* (PG4VI515AFTB4P3) hob
Booster induction
cooking zone
Ø 210 mm (rear right)
Booster induction
cooking zone
Ø 160 mm (rear left)
Booster induction
cooking zone
Ø 210 mm (front left)
Booster induction
cooking zone
Ø 160 mm (front right)
Control Panel
3
9
7
1. On/off sensor
2. Higher heat setting selector
3. Cooking zone indicator
4. Lower heat setting selector
5. Cooking zone selection sensor
6. Timer sensor
7. Child lock sensor
8. Timer indicator light
9. Child lock indicator light
10. Timer display
5
10
8 8
64
10
3
2
5
1
Page 11

INSTALLATION
min
Making the worktop recess KMI* (PG4VI515FTB4P3) hob
l Worktop thickness should be 28 - 40 mm, while its width at least 600 mm. The worktop
must be at and level. Edge of the worktop near the wall must be sealed to prevent ingress
of water or other liquids.
l There should be sufcient spacing around the opening, in particular, at least 50 mm di-
stance to the wall and 60 mm distance to the front edge of worktop.
l The distance between the edge of the opening and the side wall of the furniture should
be minimum 55 mm.
l Worktop must be made of materials, including veneer and adhesives, resistant to a tem-
perature of 100°C. Otherwise, veneer could come off or surface of the worktop become
deformed.
l Edge of the opening should be sealed with suitable materials to prevent ingress of wa-
ter.
l Worktop opening must cut to dimensions as shown on gure 1.
l Ensure minimum clearance of 25 mm below the hob to allow proper air circulation and
prevent overheating. See Figure 2.
1
50
min
+2
490
60
560
+2
11
Page 12

INSTALLATION
Making the worktop recess KMI* (PG4VI515AFTB4P3) hob
l Worktop thickness should be 28 - 40 mm, while its width at least 600 mm. The worktop
must be at and level. Edge of the worktop near the wall must be sealed to prevent ingress
of water or other liquids.
l There should be sufcient spacing around the opening, in particular, at least 50 mm di-
stance to the wall and 60 mm distance to the front edge of worktop.
l The distance between the edge of the opening and the side wall of the furniture should
be minimum 55 mm.
l Worktop must be made of materials, including veneer and adhesives, resistant to a tem-
perature of 100°C. Otherwise, veneer could come off or surface of the worktop become
deformed.
l Edge of the opening should be sealed with suitable materials to prevent ingress of wa-
ter.
l Worktop opening must cut to dimensions as shown on gure 1.
l Ensure minimum clearance of 25 mm below the hob to allow proper air circulation and
prevent overheating. See Figure 2.
1
50
min
+2
490
60
min
752
+2
12
Page 13
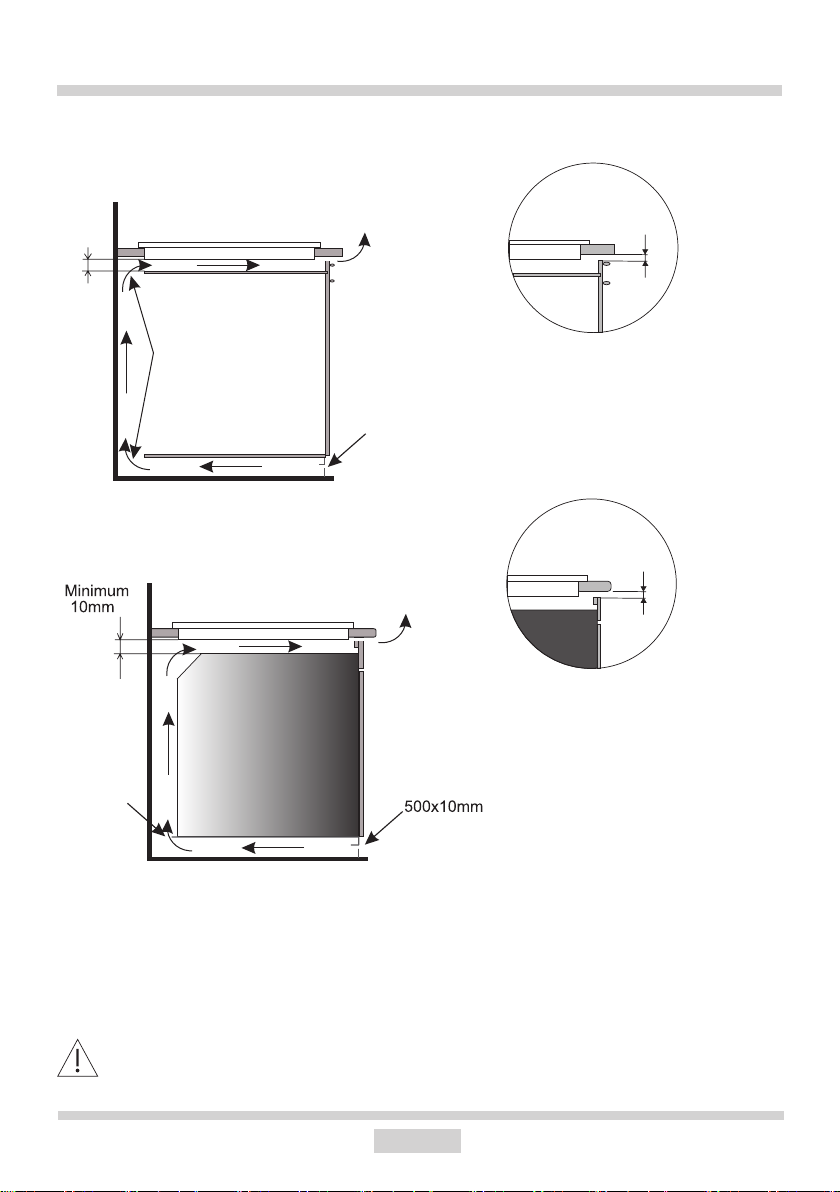
INSTALLATION
500x10mm
25mm
Fig.2
5 10mm÷
500x20mm
30mm
Installing hob in kitchen cabinet
worktop.
5 10mm÷
Installing hob in kitchen worktop
above oven with ventilation.
Do not install the hob above the oven without ventilation.
13
Page 14

INSTALLATION
Installation of self-adhesive foam gasket *
Do not install the appliance without the foam gasket.
The gasket must be applied on the appliance as follows:
Before tting the appliance in the kitchen worktop, apply self-adhesive foam gasket
provided underneath the rim.
- before applying, remove the protective lm from the self-adhesive foam gasket
- apply the self-adhesive foam gasket underneath the appliance rim
(Figure)
* some models come with the sealing glued to the board
14
Page 15

INSTALLATION
321
Installing KMI* hob
● Using an electrical cord, connect the hob according to electrical diagram provided.
● Remove dust from the worktop, insert hob into the opening and press in rmly
(Figure 3).
Fig. 3
1 - Worktop
2 - Hob ange gasket
3 - Ceramic hob
15
Page 16

INSTALLATION
Connecting to electrical mains
Important!
Electrical connection must be made by a properly certied qualied installer. Do not
make any alterations in the appliance electrical system.
Tips for the installer
The hob is equipped with a terminal block allowing different connections appropriate for a
specic type of power supply.
Terminal block allows the following connections:
- single-phase 230 V ~
- two-phase 400 V 2N~
The hob can be adapted to a specic type of power supply by bridging the appropriate
terminals according to wiring diagram. Wiring diagram is placed on the hob's underside. The
terminal block can be accessed by removing the lid on hob's underside. Remember to match
the power cord to the type of connection and the hob's power rating.
Important!
Remember to connect the neutral lead to correct terminal block clamp, marked with
. The electrical system supplying the hob must be protected by a properly selected
tripping device or a circuit breaker allowing to disconnect the power supply in an
emergency.
Before connecting the appliance to power, please carefully read the information provided on
the rating plate and wiring diagram.
Connecting the hob other than shown on the wiring diagram may damage the hob.
CAUTION! The installer is obliged to provide the user with "appliance electrical connection
certicate" (enclosed with the warranty card). After installation, the installer should also provide
information on the connection made:
- single-phase, two-phase or three-phase,
- conductor cross-section,
- electrical protection (fuse type).
16
Page 17
INSTALLATION
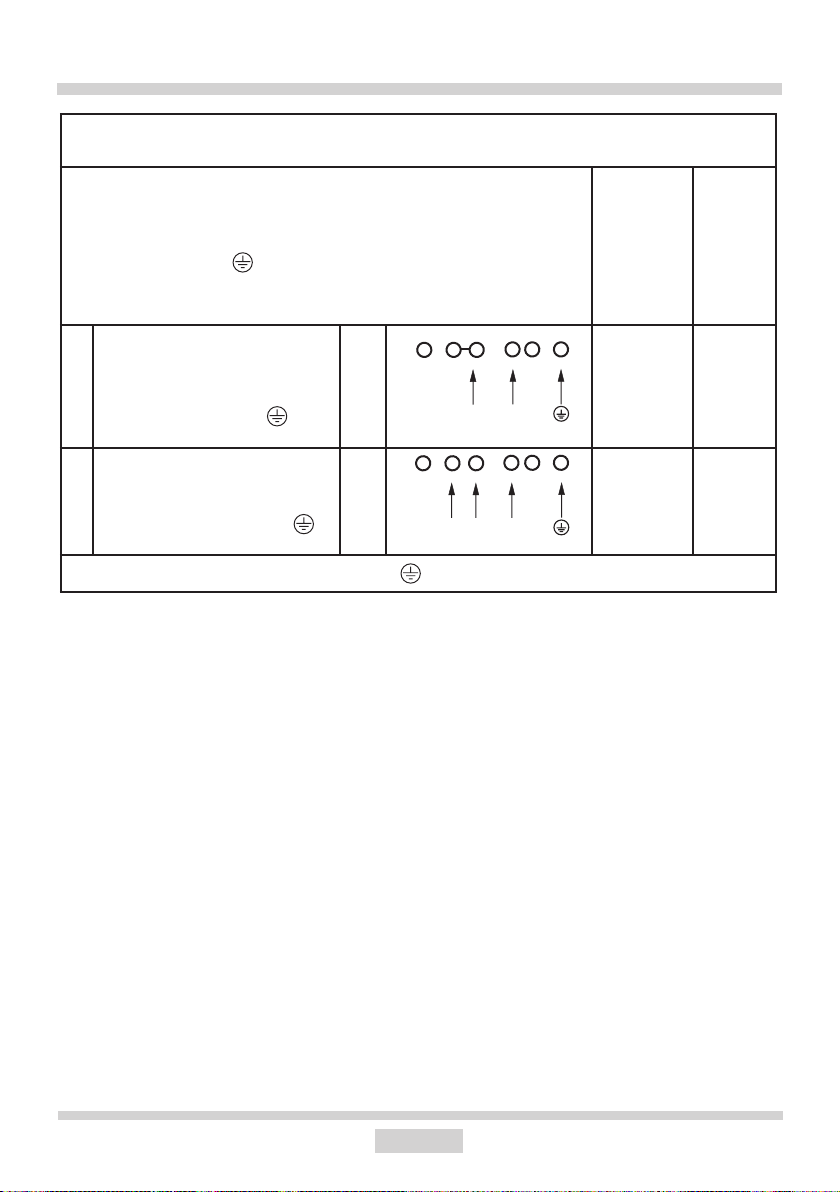
WIRING DIAGRAM
Important! Heating elements operate at 230V.
Important! For each connection the protective conductor must be connected
to the terminal marked .
Type /
Conductor
cross section
1 For a 230 V single phase connec-
1N~
tion with a neutral lead, terminals
L1, L2 are bridged, neutral lead is
connected to terminal N, and the
protective conductor to .
2* For a 230/400 V two phase con-
nection with a neutral lead, neutral
lead is connected to terminal N, and
the protective conductor to .
2N~
L1
N
L1L2
N
HO5VV-FG
3X 4 mm
2
HO5VV-FG
4X2,5mm
2
L1=R, L2=S, L3=T; N = neutral lead connection; = protective lead terminal
* For domestic 3-phase 230/400 V electrical system, connect the remaining wire to the
terminal:L3, which is not connected to the hob internal electrical system.
* NN terminals are internally connected, they need not be bridged
Fuse
protection
min.30 A
min.16 A
17
Page 18
OPERATION
Before using the appliance for the rst time
● thoroughly clean your induction hob rst. The induction hob should be treated with the
same care as a glass surface.
● switch on the ventilation in the room or open a window, as the appliance could emit an
unpleasant smell during rst use.
● operate the appliance while observing all safety guidelines.
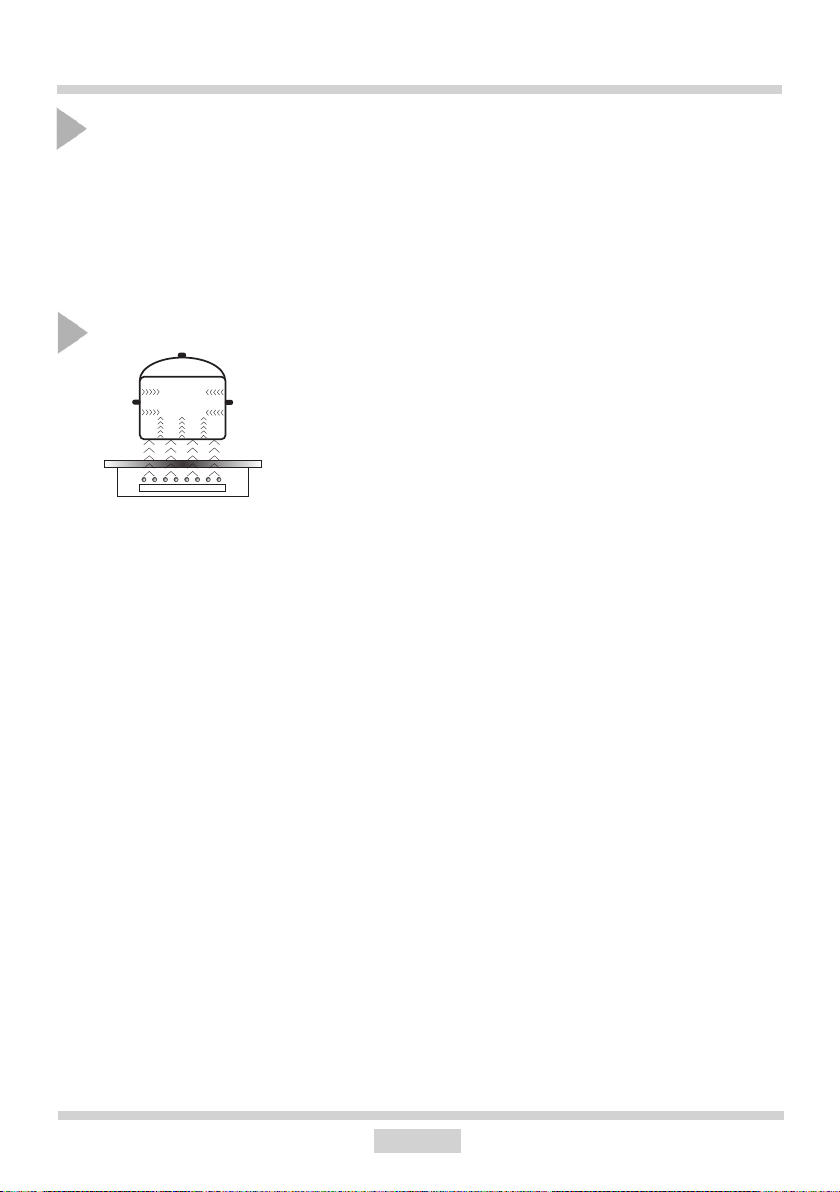
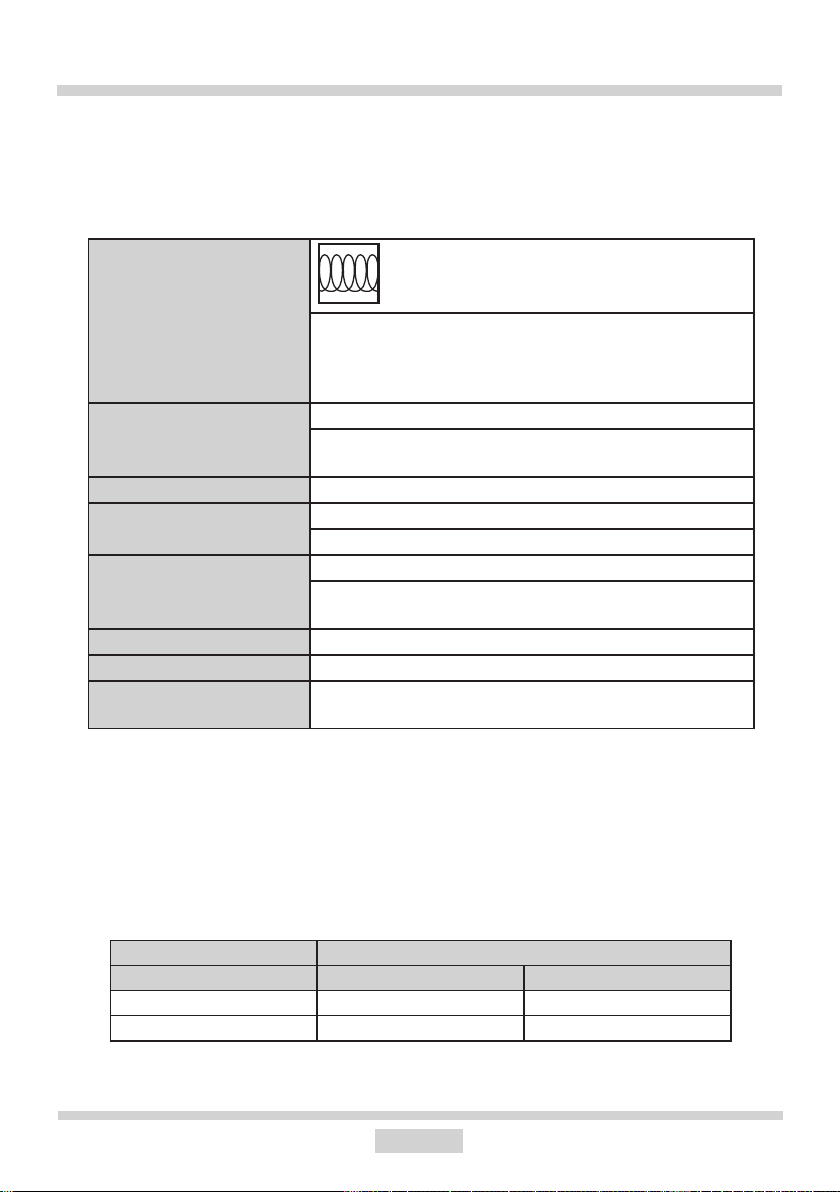
Induction cooking zone operation principle
Electric oscillator powers a coil placed inside the appliance.
This coil produces a magnetic eld, which induces eddy currents in the cookware.
These eddy currents induced by the magnetic eld cause the
cookware to heat up.
This requires the use of pots and pans whose base is ferromagnetic, in other words suscep-
tible to magnetic elds.
Overall, induction technology is characterized by two advantages:
● the heat is only emitted by the cookware and its use is maximised,
● there is no thermal inertia, since the cooking starts immediately when the pot is placed on
the hob and ends once it is removed.
Certain sounds can be heard during normal use of the induction hob, which do not affect its
correct operation.
● Low-frequency humming. This noise arises when the cookware is empty and stops when
water is poured or food is placed in the cookware.
● High-frequency whizz. This noise arises in cookware made of multiple layers of different
materials at maximum heat setting. The noise intensies when using two or more cooking
zones at maximum heat setting. The noise will stop or reduce when heat setting is reduced.
● Creaking noise. This noise arises in cookware made of multiple layers of different materi-
als. The noise intensity depends on how the food is cooked.
● Buzzing. Buzzing can be heard when electronics cooling fan operates.
The noises that can be heard during the normal appliance operation are the result of the cooling
fan operation, cooking method, cookware dimensions, cookware material and the heat setting.
These noises are normal and do not indicate a fault.
18
Page 19
OPERATION
The protective device:
If the hob has been installed correctly and is used properly, any protective devices are rarely
required.
Fan: protects and cools controls and power components. It can operate at two different speeds
and is activated automatically. Fan runs until the electronic system has sufciently cooled
down regardless of the appliance or the cooking zones being turned on or off.
Temperature sensor: Temperature of electronic circuits is continuously monitored by a
temperature sensor. If temperature is raised beyond a safe level, this protection system will
reduce cooking zone heat setting or shut down the cooking zones adjacent to the overheated
electronic circuits.
Pan detection: allows the hob to detect pans placed on a cooking zone. Small objects placed
on the cooking zone (eg, spoon, knife, ring ...) will not be recognised as pans and the hob
will not operate.
Pan detector
Pan detector is installed in induction hobs. Pan detector starts heating automatically when
a pan is detected on a cooking zone and stops heating when it is removed. This helps save
electricity.
● When an suitable pan is placed on a cooking zone, the display shows the heat setting.
● Induction requires the use of suitable cookware with ferromagnetic base (see Table).
If a pan is not placed on a cooking zone or the pan is unsuitable, the symbol is
displayed. The cooking zone will not operate. If a pan is not detected within 10 minutes,
the cooking zone will be switched off.
Switch off the cooking zone using the touch control sensor eld rather than by removing the pan.
Pan detector does not operate as the on/off sensor.
The induction hob is equipped with electronic touch control sensor elds, which are operated
by touching the marked area with a nger.
Each time a sensor eld is touched, an acoustic signal can be heard.
When switching the appliance on or off or changing the heat setting, attention should
be paid that only one sensor eld at a time is touched. When two or more sensor
elds are touched at the same time (except timer and child lock), the appliance ignores the control signals and may trigger a fault indication if sensor elds are touched
for a long time.
When you nish cooking switch off the cooking zone using touch control sensor elds
and do not rely solely on the pan detector.
19
Page 20
OPERATION
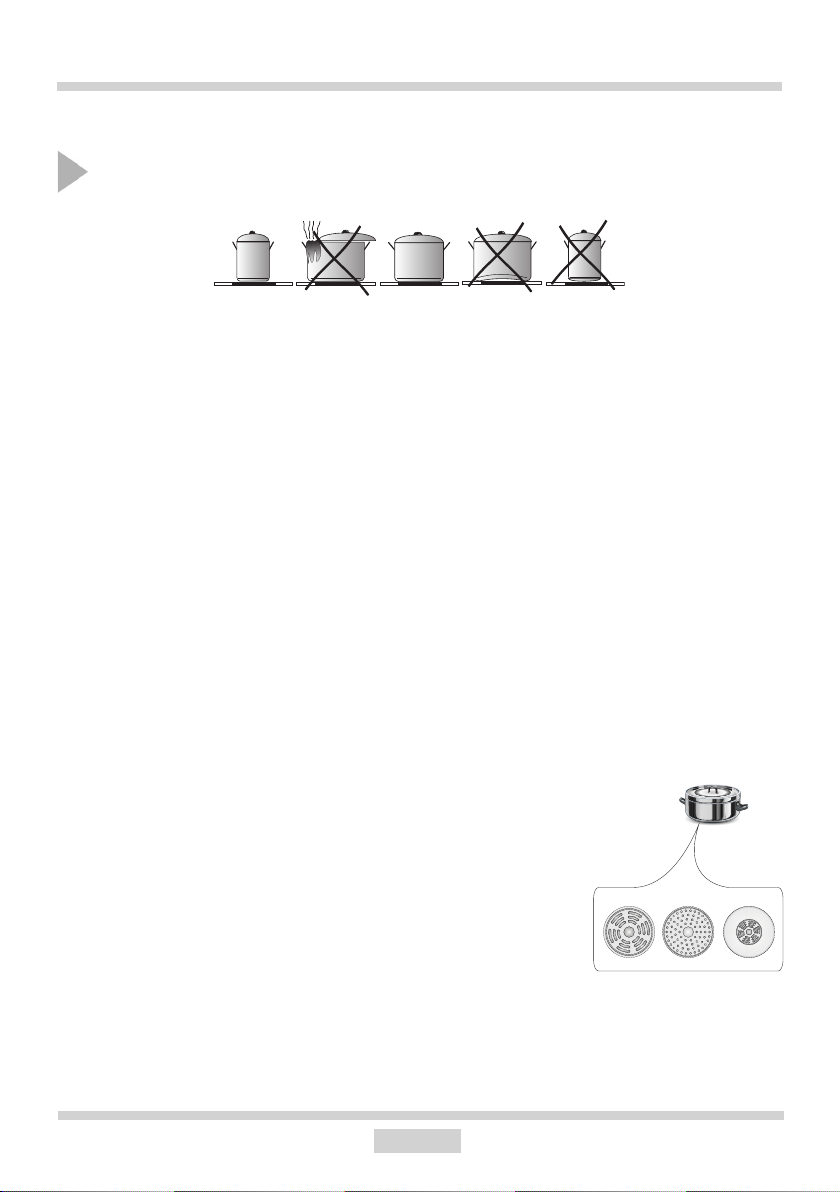
The high-quality cookware is an essential condition for efcient induction cooking.
Select cookware for induction cooking
Cookware characteristics.
● Always use high quality cookware, with perfectly at base. This prevents the formation
of local hot spots, where food might stick.Pots and pans with thick steel walls provide
superior heat distribution.
● Make sure that cookware base is dry: when lling a pot or when using a pot taken out of
the refrigerator make sure its base is completely dry before placing it on the cooking zone.
This is to avoid soiling the surface of the hob.
● Lid prevents heat from escaping and thus reduces heating time and lowers energy consumption.
● To determine if cookware is suitable, make sure that its base attracts a magnet.
● Cookware base has to be at for optimal temperature control by the induction
module.
● The concave base or deep embossed logo of the manufacturer interfere with the
temperature induction control module and can cause overheating of the pot or pan.
● Do not use damaged cookware such as cookware with deformed base due to excessive heat.
● When you use large ferromagnetic base cookware, whose diameter is less than the total
diameter of the cookware, only the ferromagnetic base heats up. This results in a situation where it is not possible to uniformly distribute the heat
in the cookware. If the ferromagnetic area is reduced due to
inclusion of aluminium parts then the effective heated area can
be reduced. Problems with the detection of the cookware could
arise or cookware may not be detected at all. To achieve optimum
cooking results, the diameter of the ferromagnetic base should
match that of the cooking zone. If cookware is not detected in a
given cooking zone, it is advisable to try it in a smaller cooking
zone.
20
Page 21
OPERATION
For induction cooking us only ferromagnetic base materials such as:
●enamelled steel
● cast iron
● special stainless steel cookware designed for induction cooking.
Marking of kitchen
cookware
Check for marking indicating that the
cookware is suitable for induction
cooking.
Use magnetic cookware (enamelled steel, ferrite stainless steel, cast iron). The easiest way to determine
if your cookware is suitable is to perform the „magnet
test”. Find a generic magnet and check if it sticks to
the base of the cookware.
Stainless Steel Cookware is not detected
With the exception of the ferromagnetic steel cookware
Aluminium Cookware is not detected
Cast iron High efciency
Caution: cookware can scratch the hob surface
Enamelled steel High efciency
Cookware with a at, thick and smooth base is re-
commended
Glass Cookware is not detected
Porcelain Cookware is not detected
Cookware with copper
Cookware is not detected
base
Cookware size.
● Energy is transferred best when cookware size corresponds to the size of the cooking
zone. The smallest and largest possible diameters are indicated in the following table and
depend on the quality of the cookware used.
● When using cookware smaller than the minimum diameter induction hob may not
work.
Induction cooking zone The base diameter of induction cookware
Diameter (mm) Minimum (mm) Maximum (mm)
210 140 210
160 90 160
21
Page 22

OPERATION
Control Panel
● Immediately after the appliance is connected to electrical mains, all displays will light up
briey. Your induction hob is then ready for use.
● The induction hob is equipped with electronic touch control sensor elds, which are
operated by touching with a nger for at least 1 second.
● Touching of a sensor eld is accompanied by an acoustic signal to acknowledge.
No objects should be placed on the sensor elds (this could cause an error).
Touch sensor elds should be always kept clean.
Switch on the appliance
To switch on the appliance touch and hold the on/off sensor eld (1) for at least 1 second. All
displays (3) will show the number "0".
If none of the sensor elds is touched within 10 seconds, the appliance switches
itself off.
Switch on the cooking zone
Once the appliance is switched on using the on/off touch sensor (1), select a cooking zone
(5) within the next 10 seconds.
1. When a cooking zone selection sensor eld (5) is touched, "0" on the corresponding heat
setting indicator display will pulsate.
2. Set the desired heat setting using the "+" (2) or "-" (4) sensor elds.
If none of the sensor elds is touched within 10 seconds of switching on the
appliance, the cooking zone switches off.
A cooking zone is active when its display shows a digit or a letter. This indicates
the cooking zone is ready for the heat setting to be set or changed.
Selecting the cooking zone heat setting
When the cooking zone display (3) shows pulsating “0”, start setting the desired heat setting
using the "+" (2) or "-" (4) sensor eld.
22
Page 23

OPERATION
Switch off cooking zones
● A given cooking zone must be active. Heat setting display pulsates.
● To switch off a cooking zone touch the on/off sensor eld or touch the sensor (5) for 3
seconds.
Switch off the appliance
● The appliance operates when at least one cooking zone is on.
● To switch off the appliance touch the on/off sensor (1).
If a cooking zone is still hot, the relevant display (3) will show the letter "H" to indicate residual
heat.
Booster function "P"
The Booster Function increases the nominal power of the Ø 210 mm cooking zone from
2000W to 3000W,
Ø 160 mm cooking zone from 1200W to 1400W,
In order to activate the Booster function, select the cooking zone, set the heat setting to "9"
and then touch the "+" (2) sensor eld again. The letter "P" will be shown on the display.
To deactivate the Booster function, touch the "-" (4) sensor eld to reduce the heat setting or
lift the cookware from the cooking zone.
For 210 mm and 160 mm cooking zone, operation of the Booster function is limited to 10 minutes. Once the Booster function is automatically deactivated, the
cooking zone continues to operate at its nominal power.
The Booster function can be reactivated, provided the appliance electronic circuits
and induction coils are not overheated.
When the pot is lifted from the cooking zone when the Booster function is in
operation, it remains active and the countdown continues.
When the appliance electronic circuits or induction coils overheat when the
Booster function is in operation, it is automatically deactivated. The cooking zone
continues to operate at its nominal power.
23
Page 24

OPERATION
Booster function control
You cannot use booster function on two vertically arranged cooking zones at
the same time.
The child lock function
The Child Lock function protects the appliance from inadvertent operation by children. The
appliance can be operated once the child lock function has been released.
The Child Lock function can be set when the appliance turned on or off.
Turn Child Lock on/off
Touch and hold sensor (7) for 5 seconds to turn Child Lock on/off. Indicator light (9) is on
when the Child Lock function is on.
The Child Lock function remains set until it is released even after the appliance
has been switched off and then switched on again. Disconnecting the appliance
from electrical mains deactivates the Child Lock.
Residual heat indicator
Heat energy that remains accumulated in the cooking zone after cooking is called the residual heat. The appliance displays two different levels of residual heat. When a cooking
zone temperature is above 60°C and the cooking zone or the appliance is switched off, the
relevant cooking zone display will show the letter "H". Residual heat indication is displayed
as long as the cooking zone temperature exceeds 60°C. When a cooking zone temperature
is between 45°C and 60°C, the relevant cooking zone display will show the letter "h" indicating low residual heat. When a cooking zone temperature is below 45°C the residual heat
indication is turned off.
When residual heat indicator is
on, do not touch the cooking
zone as there is a risk of burns
and do not place on it any
items sensitive to heat!
During failure of power supply "H"
residual heat indicator is not displayed. However, cooking zones
may still be hot!
24
Page 25

OPERATION
Limiting the operating time
In order to increase efciency, the induction
hob is tted with a operating time limiter for
each of the cooking zones. The maximum
operating time is set according to the last
heat setting selected.
If you do not change the heat setting for a long
time (see table) then the associated cooking
zone is automatically switched off and the
residual heat indicator is activated. However,
you can switch on and operate individual cooking zones at any time in accordance with the
operating instructions.
Automatic warm-up function
● Touch sensor (5) to activate the selected
cooking zone
● Then touch "+" (2) or "-" (4) to set the
desired heat setting in the 1-8 range and
then touch sensor (5) again.
● The display will alternate between the
letter A and the heat setting.
After a certain time of operation at boosted
power, the cooking zone switches back to
the heat setting set, which will be shown
on the display.
Cooking heat
setting
1 8
2 8
3 5
4 5
5 5
6 1,5
7 1,5
8 1,5
9 1,5
P 0,16
Cooking heat
setting
mocy grzejnej
1 0,8
2 1,2
3 2,3
4 3,5
5 4,4
6 7,2
7 2
8 3,2
Maximum op-
erating time
(hours)
8
The duration of
the automatic
warm-up function
(minutes)
-
If a pot is lifted from the cooking zone and replaced before the
warm-up countdown is completed,
the warm-up function will resume
and countdown will continue until
completed.
25
Page 26

OPERATION
Timer
Timer function makes cooking easier by making it possible to set Duration. It can also be
used as a Kitchen Timer.
Set the Timer
Timer function makes cooking easier by making it possible to set Duration. It can also be
used as a Kitchen Timer.
● Touch cooking zone selection sensor eld (5) to select a cooking zone. The number "0"
will pulsate.
● Touch "+" (2) or "-" (4) sensor eld to set the desired heat setting ranging from 1 to 9.
● Then activate timer by touching (6) sensor elds within 10 seconds.
● Touch "+" (2) or „-" (4) sensor eld to set the desired cooking time (01 to 99 minutes).
● Timer indicator light (8) of a relevant cooking zone will be on.
Timer countdown can be set independently for all cooking zones.
If more than one timer is set the shortest duration is displayed. Timer indicator
light (8) of a relevant cooking zone will ash.
Change Timer Duration
Timer Duration setting can be changed at any time.
● Touch cooking zone selection sensor eld (5) to select a cooking zone. The display will
pulsate.
● Then activate timer by touching (6) sensor elds within 10 seconds.
● Use "+" (2) or "-" (4) sensor eld to adjust the timer setting.
Check Timer Duration
To check progress of Timer countdown at any time, touch the timer sensor eld (6). Timer
indicator light (8) of a relevant cooking zone will ash.
26
Page 27

OPERATION
Stop the Timer
When the set time has elapsed an acoustic signal is sounded, which can be muted by touching any sensor field. If no sensor field is touched, the acoustic signal will stop automatically
after 2 minutes.
To stop the timer countdown before the set Duration has elapsed:
● Touch cooking zone selection sensor eld (5) to select a cooking zone. The display will
become bright.
● Then touch and hold sensor (6) for 3 seconds or adjust duration using the "+" (2) or "-"
(4) down to "00"
Kitchen Timer
When no cooking zones are in use, the Timer function can be used as a regular Kitchen
Timer.
Set Kitchen Timer
When the appliance is off:
● Switch on the appliance by touching the on/off sensor (1).
● Then touch sensor (6) to activate kitchen timer.
● Use "+" (2) or "-" (4) sensor eld to adjust the Kitchen Timer setting.
Stop Kitchen Timer
When the set Duration has elapsed an acoustic signal is sounded, which can be muted by
touching any sensor field. If no sensor field is touched, the acoustic signal will stop automatically after 2 minutes.
To stop the timer countdown before the set Duration has elapsed:
● Touch and hold sensor (6) for 3 seconds or adjust duration using the "+" (2) or "-" (4) down
to "00"
● Kitchen Timer function does not affect cooking zone operation.
Kitchen timer is reset when the timer function is activated.
27
Page 28

OPERATION
Keeping food warm
Keep warm function allows for keeping food warm on a cooking zone. The selected cooking zone
operates at a low heat setting. Cooking zone's heat setting is automatically adjusted so that food
temperature is kept at a temperature of about 65°C. Thanks to this, ready to serve, warm food
retains its taste and does not stick to the pot's bottom. This function can be also used to melt
butter or chocolate.
For the keep food warm function to operate correctly, use a at base pot or frying pan, so that
base temperature is accurately measured by the temperature sensor tted in the cooking zone.
The Keep Warm function can be activated for any cooking zone.
Due to a risk of the growth of microorganisms, it is not recommended to keep food warm for a
long time, so the Keep Warm function is switched off after 2 hours.
Keep warm setting is an additional heat setting available between "0" and "1" and is
indicated on the display as " ".
Keep warm setting is activated in the same
way as described in the section
Switch on the cooking zone
Keep warm setting is deactivated in the
same way as described in the section
Switch off cooking zones
28
Page 29

CLEANING AND MAINTENANCE
Proper routine maintenance and cleaning
of the appliance can signicantly extend its
trouble-free operation.
When cleaning induction hobs, the
same principles apply as for glass
surfaces. Do not use under any circumstances any abrasive or caustic
cleaners or scouring powders or
pads! Do not use steam or pressure
cleaners.
Cleaning after each use
● Wipe light stains with a damp cloth without
detergent. The use of dishwashing liquid
may cause a bluish surface discolouration. These persistent stains cannot always be removed right away, even using
a special cleaner.
● Firmly adhering dirt can be carefully
removed with a scraper. Then wipe the
cooking surface with a damp cloth.
Removing stains
● Bright stains of pearl colour (residual
aluminium) can be removed from the
cool hob using a special cleaning agent.
Limestone residue (eg. after evaporated
water) can be removed by vinegar or a
special cleaning agent.
● Do not turn off the cooking zone when
removing sugar, food containing sugar,
plastic and aluminium foil. Immediately
and thoroughly scrape the leftovers off the
hot cooking zone using a sharp scraper.
Once the bulk of the stain is removed
the hob can be turned off and clean the
cooled off cooking zone with a special
cleaning agent.
Scraper to clean the hob
Special cleaners are available in supermarkets, electrical and home appliance shops,
drug stores, as well as retail food shops and
kitchen showrooms. Scrapers can be purchased in DIY and construction equipment
stores, as well as in shops carrying painting
accessories.
29
Page 30

CLEANING AND MAINTENANCE
Never apply a detergent on the hot cooking
zone. It is best to let the cleaner dry and then
wipe it wet. Any traces of the detergent should
be wiped off clean with a damp cloth before
re-heating. Otherwise, it can be corrosive.
Warranty will be void if you do not follow
the above guidelines!
Periodic inspections
In addition to normal cleaning and
maintenance:
● carry out periodic checks of touch controls
and other elements. After the warranty
expires, have authorised service inspect
the appliance every two years,
● repair and identied problems,
● carry out periodic maintenance of the
hob.
Important!
If the hob’s controls do not respond
for whatever reason, then turn off the
main circuit breaker or remove the
fuse and contact customer service.
Important!
In the event of breakage or chipping
of the hob cooking surface, turn off
and unplug the appliance. To do this,
disconnect the fuse or unplug the
appliance. Then refer the repair to
professional service.
Important!
All repairs and adjustments must be
performed by a competent technician or by an authorised installer.
30
Page 31

TROUBLESHOOTING
In the event of any fault:
● turn off the appliance
● disconnect the power supply
● have the appliance repaired
● Based on the instructions given in the table below, some minor issues can be corrected
by the user. Please check the consecutive points in the table before you refer the repair
to customer service.
PROBLEM POSSIBLE CAUSE REMEDY
1.The appliance does not
work
2.Sensor elds do not respond when touched
3.The appliance does not
respond and emits and
extended beep
4.The appliance switches
itself off
5.A single cooking zone switches off and residual heat
indicator „H” is shown.
- no power -check the fuse, replace if
blown
- appliance is not turned on - turn on the appliance
- sensor eld touched
too briey (less than one
second)
- multiple sensors touched
at the same time
- improper use (wrong
sensor elds touched or
sensors touched too briey)
- sensor elds covered or
dirty
- no sensor eld is touched
for 10 seconds of activating
the appliance
- sensor elds covered or
dirty
- limited cook time - switch on the cooking zone
- sensor elds covered or
dirty
- electronic components
overheated
- touch the sensor eld
longer
- always touch only one
sensor eld (except when
a cooking zone is switched
off)
- reconnect the hob
- uncover or clean the sen-
sor elds
- switch on the appliance
and set heat setting without
delay
- uncover or clean the sen-
sor elds
again
- uncover or clean the sen-
sor elds
31
Page 32

TROUBLESHOOTING
PROBLEM POSSIBLE CAUSE REMEDY
6.Residual heat indicator
extinguished even though
the cooking zones are hot
7.Hob cooking surface is
cracked.
8.When the problem is still
not remedied.
- a power outage or the
appliance has been disconnected
Danger! Immediately unplug the appliance or
switch off the main circuit breaker. Refer the repair
to the nearest service centre.
Immediately unplug the appliance or switch off the main circuit
breaker (fuse). Refer the repair to the nearest service centre.
Important!
You are responsible for operating the appliance correctly and
maintaining its good condition. If you call service as a result of
operating the appliance incorrectly you will be responsible for
the costs incurred even under warranty.
The manufacturer shall not be held liable for damage caused
by failure to follow this manual.
- residual heat indicator will
be shown again the next
time the appliance is turned
on and off again
9.Induction hob makes
buzzing sound.
10. Induction hob makes
hissing and whistling sounds.
11. The hob does not work.
The cooking zones will not
operate.
This is normal. Cooling fan is operating to cool down internal
electronics.
This is normal. When using several cooking zones at full power,
the hob makes hissing and whistling sounds due to the frequencies used to power the coils.
- faulty electronics - reset the appliance,
unplug it for a 60 seconds
(disconnect the fuse).
32
Page 33

SPECIFICATION
Rated voltage 230/400V 2N~50 Hz
Rated power: 7,4 kW 7,4 kW
Model: KMI* KMI*
PG4VI515FTB4P3 PG4VI515AFTB4P3
- induction cooking zone :
- induction cooking zone: Ø 160 mm 1200 W 1200 W
- induction cooking zone: Ø 210 mm 2000 W 2000 W
- Booster induction cooking zone: Ø 210 mm 2000/3000 W 2000/3000 W
- Booster induction cooking zone: Ø 160 mm 1200/1400 W 1200/1400 W
Dimensions 576 x 518 x 50; 770 x 518 x 50;
Weight ca.10,5 kg; ca.15 kg;
Meets the requirements of European standards EN 60335-1; EN 60335-2-6.
33
Page 34

BESTE GEBRUIKER,
Een kookplaat combineert uitzonderlijk gebruiksgemak met uitstekende prestaties.
Na het lezen van de handleiding kent de bediening van de kookplaat voor u geen geheimen
meer.
Iedere kookplaat die de fabriek verlaat is vóór het inpakken op controleplekken grondig gecontroleerd op veiligheid en functionaliteit.
Wij vragen u deze gebruiksaanwijzing zorgvuldig door te lezen voordat u het apparaat inschakelt. Naleving van de aanwijzingen die erin zijn opgenomen beschermt u tegen onjuist
gebruik.
Bewaar de gebruiksaanwijzing en zorg dat u hem altijd binnen handbereik heeft.
Volg de gebruiksaanwijzing nauwkeurig op om ongevallen te voorkomen.
Attentie!
Het apparaat alleen gebruiken nadat u deze gebruiksaanwijzing hebt doorgelezen.
Het apparaat is uitsluitend bestemd om te koken. Iedere andere toepassing van het
apparaat (bijv. om ruimtes te verwarmen) is oneigenlijk en kan gevaarlijk zijn.
De producent behoudt zich het recht voor om wijzigingen aan te brengen die het
gebruik van het apparaat niet beïnvloeden.
NL
Verklaring van de producent
De producent verklaart hierbij, dat dit product voldoet aan de basisvereisten van de hieronder vernoemde
Europese richtlijnen:
l Laagspanningsrichtlijn 2014/35/EC,
l Richtlijn voor elektromagnetische compatibiliteit 2014/30/EC,
l Richtlijn voor ErP 2009/125/EC,
en dat het product daarom gemerkt is met en dat er een conformiteitsverklaring voor afgeleverd werd, die
ter beschikking gesteld wordt aan de organen die toezicht houden over de markt.
34
Page 35

INHOUDSOPGAVE
Basisinformatie...............................................................................................34
Aanwijzingen voor veilig gebruik.........................................................................36
Beschrijving van het product....................................................................................41
Installatie.............................................................................................43
Bediening..................................................................................................50
Reiniging en onderhoud...........................................................................................61
Handelwijze bij storingen......................................................................................63
Technische gegevens..............................................................................................65
35
Page 36

AANWIJZINGEN VOOR VEILIG GEBRUIK
Attentie. Dit apparaat en de bereikbare onderdelen
ervan worden tijdens het gebruik heet. Wees bijzonder voorzichtig bij het aanraken van de verwarmingselementen. Zorg dat kinderen die jonger zijn dan
8 jaar niet bij het apparaat kunnen komen, tenzij ze
onder permanent toezicht staan.
Dit apparaat mag gebruikt worden door kinderen
van 8 jaar en ouder en personen met lichamelijke of
geestelijke beperkingen of personen zonder ervaring
met of kennis van het apparaat, als dit gebruik plaatsvindt onder toezicht of in overeenstemming met de
gebruiksaanwijzing van het apparaat, door personen
die verantwoordelijk zijn voor hun veiligheid. Zorg
ervoor dat kinderen niet met het apparaat kunnen
spelen. Kinderen mogen de kookplaat niet zonder
toezicht schoonmaken of onderhoudswerkzaamheden verrichten.
Attentie. Het koken van vetten of olie op de kookplaat
zonder toezicht kan erg gevaarlijk zijn en leiden tot
brand.
Probeer het vuur NOOIT met water te blussen, maar
schakel het apparaat uit en bedek de vlammen met
een deksel of een niet-brandbare deken.
36
Page 37

AANWIJZINGEN VOOR VEILIG GEBRUIK
Attentie. Brandgevaar: geen voorwerpen verzame-
len op de kookoppervlakte.
Attentie. Schakel de stroom uit als de oppervlakte is
gebarsten, om elektrische schokken te voorkomen.
Leg geen metalen voorwerpen als messen, vorken,
lepels, deksels en aluminiumfolie op de oppervlakte
van de kookplaat, zij kunnen heet worden.
Schakel de kookplaat na aoop van het gebruik uit
met de regelaar, vertrouw niet op de pandetectie.
Het apparaat is niet bedoeld voor aansturing met
een externe tijdschakelaar of een apart systeem voor
afstandsbesturing.
Gebruik geen stoomreinigers voor het schoonmaken
van het apparaat.
37
Page 38

AANWIJZINGEN VOOR VEILIG GEBRUIK
● Lees de gebruiksaanwijzing door voordat u de inductiekookplaat voor de eerste maal gebruikt.
Alleen dan kunt u zeker zijn dat de kookplaat veilig functioneert en kunnen beschadigingen
voorkomen worden.
● Als de inductiekookplaat in de buurt van een radio- of televisieontvanger of andere zendapparatuur is geplaatst, moet het juist functioneren van de sensorbediening getest worden.
● De kookplaat moet door een gekwaliceerde elektricien geïnstalleerd worden.
● De kookplaat mag niet in de buurt van koelapparatuur geïnstalleerd worden.
● Het meubel waarin het apparaat geplaatst wordt, moet bestand zijn tegen temperaturen
tot 100°C. Dit geldt ook voor het neer, de randlijsten, kunststofoppervlaktes, lijm en lakla-
gen.
● Het apparaat mag pas gebruikt worden nadat het is ingebouwd. Alleen op deze manier
bent u beschermd tegen het onbedoeld in aanraking komen met onder spanning staande
onderdelen.
● Elektrische apparaten mogen alleen gerepareerd worden door gekwaliceerde specialisten.
Onvakkundige reparaties leveren ernstig gevaar op voor de gebruiker.
● Het apparaat is pas afgesloten van het lichtnet, als de zekering in de meterkast is uitgeschakeld of wanneer de stekker uit het stopcontact is getrokken.
● De stekker van de aansluitkabel moet na de installatie van de plaat bereikbaar zijn.
● Zorg ervoor dat kinderen niet met het apparaat kunnen spelen.
● Dit apparaat is niet bestemd voor gebruik door personen (waaronder kinderen) met lichame-
lijke of geestelijke beperkingen of personen zonder ervaring met of kennis van het apparaat,
tenzij dit gebruik plaatsvindt onder toezicht of overeenkomstig de gebruiksaanwijzing van
het apparaat, door personen die verantwoordelijk zijn voor hun veiligheid.
● Personen met implantaten die helpen bij de lichaamsfuncties (bv. pacemaker, insuli-
nepompje of gehoorapparaten), moeten controleren of de werking van die apparaten
niet wordt gestoord door de inductiekookplaat (de werkingsfrequentie van de inductiekookplaat bedraagt 20-50 kHz).
● Bij stroomuitval verdwijnen alle instellingen. Bij terugkeer van de spanning moet u bijzonder
voorzichtig zijn. Zolang de kookzones heet zijn brandt de restwarmteindicator „H” en, net
zoals bij het eerste gebruik, de sleutel van het kinderslot.
● De in het elektronische systeem ingebouwde restwarmteindicator laat zien of de kookzone
is ingeschakeld of nog heet is.
● Als de wandcontactdoos zich in de buurt van een kookzone bevindt, let er dan op dat de
kabel niet in aanraking komt met de hete plekken.
● Bij gebruik van vetten en oliën, mag u het apparaat niet zonder toezicht laten vanwege
brandgevaar.
● Gebruik geen kookgerei van plastic of aluminiumfolie. Dit materiaal smelt bij hoge temperaturen en kan de keramische glasplaat beschadigen.
● Suiker, citroenzuur, zout enz. mogen zowel in vloeibare als in vaste vorm net als plastic niet
in aanraking komen met een hete kookzone.
● Mocht er per ongeluk toch suiker of kunststof op een hete kookzone terechtkomen, schakel
deze dan niet uit voordat u de suiker of de kunststof met behulp van een scherpe schraper
verwijderd heeft. Bescherm uw handen tegen verbranding en verwondingen.
38
Page 39

AANWIJZINGEN VOOR VEILIG GEBRUIK
● Bij het gebruik van de inductiekookplaat mogen slechts pannen en braadpannen met
een vlakke bodem gebruikt worden, zonder scherpe randen of bramen, omdat anders
permanente krassen ontstaan op de plaat.
● De verwarmingsoppervlakte van de inductiekookplaat is bestand tegen temperatuurschokken. Hij is zowel hitte- als koudebestendig.
● Voorkom het vallen van voorwerpen op de kookplaat. De inslag van harde en puntige voorwerpen, zoals een kruidenpotje, kunnen het barsten of versplinteren van de keramische
glasplaat veroorzaken.
● Overkokende gerechten kunnen via beschadigde plekken in aanraking komen met onder
spanning staande delen van de inductiekookplaat.
● Schakel de stroom uit als de oppervlakte is gebarsten, om elektrische schokken te voorkomen.
● Gebruik de oppervlakte van de kookplaat niet als snijplank of werkvlak.
● Leg geen metalen voorwerpen als messen, vorken, lepels, deksel en aluminiumfolie op
de oppervlakte van de kookplaat, zij kunnen heet worden.
● Bouw de kookplaat niet in boven een oven zonder ventilator of boven een afwasmachine,
koelvrieskast of wasmachine.
● Bij inbouw van de kookplaat in het werkblad kunnen metalen voorwerpen die zich in de
kastjes bevinden verhit raken door de lucht die uit het ventilatiesysteem van de kookplaat
komt. Het gebruik van een direct scherm wordt daarom aanbevolen (zie afb. 2).
● Houdt u aan de aanwijzingen voor reiniging en onderhoud van de keramische glasplaat.
Indien u het apparaat onjuist behandelt, vervalt uw recht op garantie.
39
Page 40

ENERGIE BESPAREN
UITPAKKEN
Wie verantwoordelijk omgaat met energie, beschermt
niet alleen zijn portemonnee, maar handelt ook milieuvriendelijk. Help daarom mee om zuinig te om
te gaan met elektriciteit! Dit
kan op de volgende manier:
●Gebruik geschikt kookgerei.
Door pannen te gebruiken met een vlakke en
dikke bodem bespaart u tot 1/3 elektriciteit.
Vergeet niet het deksel op de pan te leggen,
anders is uw energieverbruik tot viermaal
hoger!
●Kookzones en kookgerei schoon ho-
uden.
Vuil verstoort de warmteoverdracht - sterk
ingebrand vuil kan vaak alleen verwijderd
worden met middelen die het milieu zwaar
belasten.
●Vermijd onnodig optillen van het deksel
tijdens het koken.
●Bouw de kookplaat niet in de buurt van
koel-/vriesapparatuur in.
Hun energieverbruik zal daardoor onnodig
toenemen.
Het apparaat is beveiligd tegen transportschade. Na het
uitpakken moet het verpakkingsmateriaal zo verwerkt
worden dat er geen risico
voor het milieu ontstaat. Al
het materiaal dat voor de verpakking is gebruikt is milieuvriendelijk, het kan voor 100%
hergebruikt worden en het is gelabeld met het
bijbehorende symbool.
Attentie! Het verpakkingsmateriaal (polyethyleenzakjes, stukken polystyreen etc.)
bij het uitpakken buiten het bereik van
kinderen houden.
VERWIJDERING VAN GEBRUIKTE
APPARATUUR
Dit product is in overeenstemming met de
Europese richtlijn 2002/96/EG en de Poolse
wet op gebruikte elektrische en elektronische apparatuur, gemerkt met het symbool
van een doorgekruiste verrijdbare afvalbak.
Dit merkteken informeert dat dit
apparaat na aoop van zijn levensduur niet samen met ander
huishoudelijk afval verwijderd
mag worden. De gebruiker is
verplicht om het aan te bieden
bij een inzamelpunt voor gebruikte elektrische en elektronische apparatuur.
De inzamelende instanties, waaronder lokale inzamelpunten, winkels en gemeentelijke
instanties vormen een geschikt systeem
voor de inzameling van deze apparatuur. De
juiste behandeling van gebruikte elektrische
en elektronische apparatuur leidt tot het vermijden van consequenties die schadelijk zijn
voor de menselijke gezondheid en de natuurlijke omgeving en die voortkomen uit de
aanwezigheid van gevaarlijke bestanddelen
en verkeerde opslag en verwerking van dergelijke apparatuur.
40
Page 41

BESCHRIJVING VAN HET PRODUCT
Beschrijving van kookplaat KMI* (PG4VI515FTB4P3)
Inductiekookzone booster
Ø 210 mm (rechtsachter)
Inductiekookzone booster
Ø 160 mm (linksachter)
Inductiekookzone
Ø 210 mm booster(linksvoor)
Inductiekookzone booster
Ø 160 mm (rechtsvoor)
Bedieningspaneel
10
3
8 8
9
7
1. Tiptoets in-/uitschakelen van de kookplaat
2. Plus-tiptoets
3. Kookzone-indicatie
4. Min-tiptoets
5. Keuzetoetsen voor de kookzones
6. Tiptoets timer
7. Tiptoets sleutel
8. Signaaldiode klok
9. Signaaldiode tiptoets kinderslot
10. Aanduiding klok
5
64
41
3
2
5
1
Page 42

BESCHRIJVING VAN HET PRODUCT
Beschrijving van kookplaat KMI* (PG4VI515AFTB4P3)
Inductiekookzone booster
Ø 210 mm (rechtsachter)
Inductiekookzone booster
Ø 160 mm (linksachter)
Inductiekookzone
Ø 210 mm
booster(linksvoor)
Inductiekookzone booster
Ø 160 mm (rechtsvoor)
Bedieningspaneel
10
3
8 8
9
7
1. Tiptoets in-/uitschakelen van de kookplaat
2. Plus-tiptoets
3. Kookzone-indicatie
4. Min-tiptoets
5. Keuzetoetsen voor de kookzones
6. Tiptoets timer
7. Tiptoets sleutel
8. Signaaldiode klok
9. Signaaldiode tiptoets kinderslot
10. Aanduiding klok
5
64
42
3
2
5
1
Page 43

INSTALLATIE
min
+2
Voorbereiding van het werkblad voor inbouw van de
kookplaat KMI* (PG4VI515FTB4P3)
l De dikte van het werkblad van het meubel dient 28 tot 40 mm te bedragen, de diepte van
het werkblad minimaal 600 mm. Het werkblad moet vlak en waterpas zijn. Aan de kant van
de muur moet het werkblad worden afgedicht en beveiligd tegen vocht en overlopen.
l Aan de voorkant moet de afstand tussen de rand van de opening en de rand van het
werkblad minimaal 60 mm bedragen, aan de achterkant minimaal 50 mm.
l De afstand tussen de rand van de opening en de zijkant van het keukenkastje moet mi-
nimaal 55 mm bedragen.
l De bekleding van de inbouwmeubelen en de lijm waarmee deze is vastgelijmd moeten
bestand zijn tegen temperaturen van 100°C. Als niet aan deze voorwaarde wordt voldaan
kan het oppervlak vervormen of de bekleding loslaten.
l Bescherm de randen van de opening met materiaal dat bestand is tegen vocht.
l Maak de opening in het werkblad volgens de afmetingen uit afb. 1.
l Laat onder de kookplaat een ruimte vrij van minimaal 25 mm om te zorgen voor goede
luchtcirculatie. Daarmee voorkomt u oververhitting van de oppervlakte rondom de kookplaat, afb. 2.
1
50
min
+2
490
60
560
43
Page 44

INSTALLATIE
Voorbereiding van het werkblad voor inbouw van de
kookplaat KMI* (PG4VI515AFTB4P3)
l De dikte van het werkblad van het meubel dient 28 tot 40 mm te bedragen, de diepte van
het werkblad minimaal 600 mm. Het werkblad moet vlak en waterpas zijn. Aan de kant van
de muur moet het werkblad worden afgedicht en beveiligd tegen vocht en overlopen.
l Aan de voorkant moet de afstand tussen de rand van de opening en de rand van het
werkblad minimaal 60 mm bedragen, aan de achterkant minimaal 50 mm.
l De afstand tussen de rand van de opening en de zijkant van het keukenkastje moet mi-
nimaal 55 mm bedragen.
l De bekleding van de inbouwmeubelen en de lijm waarmee deze is vastgelijmd moeten
bestand zijn tegen temperaturen van 100°C. Als niet aan deze voorwaarde wordt voldaan
kan het oppervlak vervormen of de bekleding loslaten.
l Bescherm de randen van de opening met materiaal dat bestand is tegen vocht.
l Maak de opening in het werkblad volgens de afmetingen uit afb. 1.
l Laat onder de kookplaat een ruimte vrij van minimaal 25 mm om te zorgen voor goede
luchtcirculatie. Daarmee voorkomt u oververhitting van de oppervlakte rondom de kookplaat, afb. 2.
1
50
min
+2
490
60
min
752
+2
44
Page 45

INSTALLATIE
500x10mm
25mm
Afb. 2
30mm
5 10mm÷
Inbouw in het werkblad van een
dragend kastje.
5 10mm÷
Inbouw in het werkblad boven een
oven met ventilatie.
500x20mm
Het is verboden om de kookplaat in te bouwen boven een oven zonder ventilatie.
45
Page 46

INSTALLATIE
Montage van de schuimrubber dichting *
Inbouw van het apparaat zonder dichting is verboden.
Breng de dichting als volgt op het apparaat aan:
Plak de meegeleverde schuimrubber dichting op de onderkant van het frame van
de kookplaat, voordat u het apparaat in het werkblad inbouwt.
- verwijder de beschermende folie van de dichting;
- plak de dichting vervolgens op de onderkant van het frame (afb.).
* in sommige modellen is de afdichting aan de plaat vastgelijmd
46
Page 47

INSTALLATIE
321
Installatie van kookplaat KMI*
● Sluit de kookplaat aan met een elektrische kabel volgens het meegeleverde aansluitschema.
● maak het werkblad stofvrij, leg de kookplaat in de opening en druk hem stevig tegen het
werkblad (Afb. 3).
Afb. 3
1 - werkblad
2- dichting van de kookplaat
3 - keramische plaat
47
Page 48

INSTALLATIE
Aansluiting van de kookplaat op het lichtnet
Attentie!
De aansluiting van de kookplaat op het lichtnet mag uitsluitend uitgevoerd worden
door een erkend installateur. Eigenmachtige aanpassingen of wijzigingen van de
elektrische installatie zijn verboden.
Aanwijzingen voor de installateur
De kookplaat is uitgerust met een aansluitblok dat verschillende aansluitmogelijkheden biedt,
die geschikt zijn voor verschillende typen elektrische installaties.
Het aansluitblok maakt de volgende aansluitingen mogelijk:
- monofasig 230 V ~
- tweefasig 400 V 2N ~
Aansluiting van de kookplaat op de gewenste voeding is mogelijk door middel van een
geschikte geleidingsbrug op het aansluitblok volgens bijgeleverd schakelschema. Het
schakelschema is ook op de onderkant van de behuizing van het apparaat aangebracht. Na
verwijdering van het onderste gedeelte van de behuizing van het klemmenbord, hebt u toegang
tot het aansluitblok. Vergeet niet om de juiste aansluitkabel te kiezen die overeenstemt met
het soort aansluiting en het nominale vermogen van de kookplaat.
Attentie!
Vergeet niet om de aardleiding te bevestigen aan de met het symbool gelabelde
klem op het aansluitblok. De elektrische installatie die de kookplaat van stroom voorziet,
moet voorzien zijn van een juist gekozen zekering of een veiligheidsschakelaar, om de
hoofdleiding te beschermen en in noodgevallen de stroom uit te kunnen schakelen.
Neem kennis van de informatie op het typeplaatje en het schakelschema voordat u het apparaat op de elektrische installatie aansluit.
Een aansluiting die afwijkt van het meegeleverde schakelschema, kan beschadiging
van de kookplaat veroorzaken.
ATTENTIE! De installateur is verplicht om de gebruiker een "Bevestiging van aansluiting
van het apparaat" (dit vindt u bij het garantiebewijs) te geven. De installateur moet na aoop
van de installatie ook informatie vermelden over de wijze van aansluiting van het apparaat:
- monofasig, tweefasig of driefasig;
- doorsnede van de aansluitkabel;
- de aard van de toegepaste beveiliging (soort zekering).
48
Page 49

INSTALLATIE
Attentie! De verwarmingselementen werken bij een spanning van 230 V.
SCHEMA VAN MOGELIJKE VERBINDINGEN
Attentie! Bij iedere verbinding moet de aardleiding worden aangesloten
op klem
1 Voor het 230 V lichtnet een mono-
1N~
fasige aansluiting met nulleiding,
de geleidingsbruggen verbinden
de klemmen L1, L2, de nulleiding
aan N, de aardleiding aan
2* Voor het 230/400 V lichtnet een
2N~ HO5VV-FGL
L1
N
tweefasige aansluiting met nul-
doorsnede
kabel
HO5VV-FG
3X 4 mm
2
4X2,5mm2min. 16 A
leiding, de nulleiding aan N, de
Type /
aardleiding aan
L1L2
N
L1=R, L2=S, L3=T; N= klem van de nulleiding; = klem van de aardleiding
* Bij een driefasige 230/400 V huishoudelijke installatie, de overgebleven leiding aansluiten
op klem L3, die niet is verbonden met de interne installaties van de kookplaat.
* De N-N-klemmen zijn intern met elkaar verbonden. Het is niet nodig om ze te overbruggen
Beveiligingszekering
min. 30 A
49
Page 50

BEDIENING
Voor het eerste gebruik van de kookplaat
● de inductiekookplaat eerst grondig reinigen. Behandel inductiekookplaten als glasoppervlakken.
● bij het eerste gebruik kan het apparaat kortstondig gaan walmen, schakel daarom de
luchtventilatie in of zet een raam open.
● neem bij het bedienen van het apparaat de veiligheidsvoorschriften in acht.
Principes van de werking van een inductieveld
De elektrische generator voedt de spoel die in het apparaat
is geplaatst.
Deze spoel genereert een magnetisch veld dat wordt doorgegeven aan het kookgerei.
Het magnetische veld veroorzaakt dat het kookgerei opwarmt.
Dit systeem vereist het gebruik van kookgerei dat gevoelig is voor de werking van een magnetisch veld.
De inductietechnologie heeft twee grote voordelen:
● de warmte wordt uitsluitend door het kookgerei overgedragen, het is mogelijk de warmte
maximaal aan te wenden;
● het warmtetraagheidsverschijnsel treedt niet op, omdat het kookproces automatisch begint
op het moment dat het kookgerei op de kookplaat wordt gezet en eindigt, zodra hij weer
van de kookplaat wordt afgehaald.
Bij normaal gebruik van de inductiekookplaat kunt u verschillende geluiden horen die geen
invloed hebben op de werking van de kookplaat.
● Fluittoon met een lage frequentie. Dit geluid hoort u wanneer het kookgerei leeg is. Zodra
u het gerei vult met water of een gerecht stopt het.
● Fluittoon met een hoge frequentie. Dit geluid ontstaat bij maximaal vermogen in kookgerei
dat is opgebouwd uit meerdere lagen van verschillende materialen. Dit geluid is ook
hoorbaar wanneer u tegelijkertijd twee of meer kookzones op maximaal vermogen gebruikt.
Het geluid verdwijnt of wordt minder intensief zodra u het vermogen verlaagt.
● Krakend geluid. Dit geluid ontstaat in kookgerei dat is opgebouwd uit meerdere lagen van
verschillende materialen. De intensiteit van het geluid hangt af van de kookwijze.
● Zoemend geluid. Dit geluid ontstaat tijdens de werking van de koelventilator voor de
elektronische componenten.
De geluiden die hoorbaar kunnen zijn bij juiste exploitatie worden veroorzaakt door de werking van de koelventilator, de afmetingen van het kookgerei en het materiaal waarvan het is
gemaakt, de bereidingswijze van het gerecht en het toegepaste vermogen.
Deze geluiden zijn een normaal verschijnsel en betekenen niet dat de kookplaat defect is.
50
Page 51

BEDIENING
Veiligheidsinrichting:
Bij juiste installatie en correct gebruik van de kookplaat is slechts zelden een veiligheidsinrichting noodzakelijk.
Ventilator: dient voor bescherming en koeling van de besturings- aan aandrijvingsonderdelen.
Hij werkt automatisch met twee verschillende snelheden. De ventilator gaat werken zodra
u de kookzones uitschakelt en werkt bij een uitgeschakelde kookplaat totdat het elektrische
systeem voldoende is afgekoeld.
Transistor: De temperatuur van de elektronische onderdelen wordt doorlopend gemeten
met een sensor. Als de temperatuur op gevaarlijke wijze stijgt, verlaagt dit onderdeel automatisch het vermogen van de kookzone of schakelt de kookzones uit die zich het dichtst bij
de oververhitte elektronische onderdelen bevinden.
Detectie: pandetectie maakt de werking van de kookplaat en daarmee de verwarming mogelijk. Kleine voorwerpen die op de kookzone worden gelegd (bv. een lepeltje, mes, ring ...)
worden niet herkend als pan en de kookplaat schakelt niet in.
Pandetectie in de inductiekookzone
Pandetectie is geïnstalleerd in kookplaten met inductiekookzones. Tijdens de werking van
de kookplaat schakelt de pandetectie de warmteafgifte in de kookzone automatisch in of uit
op het moment dat er een pan op wordt geplaatst, respectievelijk weggenomen. Dit zorgt
dus voor energiebesparing.
• De display toont het warmteniveau als de kookzone wordt gebruikt in combinatie met een
geschikte pan.
• Inductiekoken vereist het gebruik van aangepaste pannen met een bodem van magnetisch
materiaal (zie de tabel).
De display toont het symbool als er geen pan of een ongeschikte pan op de kookzone staat. De kookzone schakelt niet in. Indien binnen 10 minuten geen pan wordt
gevonden, dan wordt het inschakelproces van de kookplaat beëindigd.
U schakelt de kookzone uit met behulp van de tiptoets en niet door alleen de pan te
verwijderen.
De pandetectie werkt niet als in-/uitschakelaar van de kookplaat.
De inductiekookplaat is uitgerust met sensors die worden geactiveerd door met de vinger
een gemerkt oppervlak aan te raken (tiptoetsen).
Elke aanraking van een tiptoets gaat gepaard met een geluidssignaal.
Zorg ervoor dat u bij het in- en uitschakelen en bij het instellen van het vermogensniveau altijd maar één tiptoets tegelijk aanraakt. Als u meerdere tiptoetsen tegelijkertijd
aanraakt (uitgezonderd de klok en de sleutel), negeert het systeem de ingevoerde
besturingssignalen. Bij langdurig aanraken klinkt het foutsignaal.
Schakel de kookzones na aoop van het gebruik uit met de regelaar, vertrouw niet
op de pandetectie.
51
Page 52

BEDIENING
Basisvoorwaarde voor de goede werking en efciëntie van de kookplaat is het gebruik van
de juiste kwaliteit pannen.
Keuze van het kookgerei voor het koken op een inductiekookzone
Kenmerken van het kookgerei.
● Gebruik altijd kookgerei van hoge kwaliteit met een perfect vlakke bodem. Zo voorkomt
u het ontstaan van punten met een te hoge temperatuur waar voedingsmiddelen tijdens
het koken aan vast kunnen kleven.Pannen en koekenpannen met dikke, metalen wanden
zorgen voor uitstekende verspreiding van de warmte.
● Zorg ervoor dat de bodem van het kookgerei droog is. Controleer na het vullen, of wanneer
u een pan gebruikt die in de koelkast heeft gestaan, of de oppervlakte volledig droog is
voordat u het kookgerei op de kookplaat zet. Hierdoor voorkomt u verontreiniging van de
oppervlakte van de kookplaat.
● Het deksel verhindert dat de warmte ontsnapt, waardoor de kooktijd korter wordt en u
minder energie verbruikt.
● Om vast te stellen of het kookgerei geschikt is, moet u controleren of de bodem een
magneet aantrekt.
● Voor een optimale temperatuurcontrole door de inductiemodule moet de bodem
van het kookgerei vlak zijn.
● Een holle bodem of een diep ingeslagen logo van de producent hebben een negatieve
invloed op de temperatuurcontrole door de inductiemodule en kunnen oververhitting van het kookgerei veroorzaken.
● Gebruik geen beschadigd kookgerei bv. met een bodem die
door te hoge temperaturen is gedeformeerd.
● Bij toepassing van groot kookgerei met een ferromagnetische
bodem waarvan de diameter kleiner is dan de totale diameter
van het kookgerei, wordt uitsluitend het ferromagnetische deel
van het kookgerei verhit. Hierdoor ontstaat de situatie dat de
warmte zich ongelijkmatig door het kookgerei verspreidt. Het
ferromagnetische oppervlak wordt in de bodem van het kookgerei verminderd vanwege de aluminium elementen die erin
zijn geplaatst, daardoor kan de geleverde hoeveelheid warmte lager zijn. Er kunnen ook
problemen optreden met het detecteren van het kookgerei, of het gerei wordt helemaal
niet gedetecteerd. De diameter van het ferromagnetische deel van het kookgerei moet
passen bij de doorsnede van de kookzone om de beste kookresultaten te bereiken. Wanneer het kookgerei niet wordt ontdekt op de door u gekozen kookzone, probeer dan een
kookzone met een kleinere diameter.
52
Page 53

BEDIENING
Gebruik voor inductiekoken uitsluitend ferromagnetisch kookgerei van materialen als:
● geëmailleerd staal
● gietijzer
● kookgerei van roestvrij staal dat geschikt is voor inductiekoken.
Markering van keukengerei
Controleer of zich op het etiket een
symbool bevindt, dat aangeeft dat de
pan geschikt is voor inductiekookplaten
Gebruik magnetische pannen (van geëmailleerd
staal, ferritisch roestvast staal, gietijzer), u kunt dit
controleren door een magneet tegen de onderkant
van de pan te houden (die moet vastkleven).
RVS Aanwezigheid pan niet ontdekt
Uitgezonderd pannen van ferromagnetisch staal
Aluminium Aanwezigheid pan niet ontdekt
Gietijzer Bijzonder geschikt
Opgelet: de pannen kunnen krassen op de kookplaat
veroorzaken
Geëmailleerd staal Bijzonder geschikt
Aanbevolen worden pannen met een dikke, vlakke en
gladde bodem
Glas Aanwezigheid pan niet ontdekt
Porselein Aanwezigheid pan niet ontdekt
Pannen met een kope-
Aanwezigheid pan niet ontdekt
ren bodem
Afmetingen kookgerei.
● De energie wordt het beste overgedragen als de maat van de pan overeenkomt met de
afmetingen van de inductiekookzone. In de onderstaande tabel staan de kleinste en de
grootste doorsnede aangegeven. Deze zijn afhankelijk van de kwaliteit van de pan.
● Als u pannen gebruikt die kleiner zijn dan de minimale doorsnede, is het mogelijk
dat de inductiekookzone niet werkt.
Inductiekookzone Doorsnede van de pan voor inductiekoken
Doorsnede (mm) Minimum (mm) Maximum (mm)
210 140 210
160 90 160
53
Page 54

BEDIENING
Bedieningspaneel
● Na het aansluiten van de kookplaat gaan alle indicatoren kort branden. De kookplaat is
klaar voor gebruik.
● De kookplaat is uitgerust met elektronische tiptoetsen die worden ingeschakeld door ze
met de vinger minimaal 1 seconde aan te raken.
● Bij iedere aanraking van een tiptoets hoort u een geluid.
Plaats geen voorwerpen op de oppervlakten van de tiptoetsen (dit kan leiden tot
een foutmelding) en houd deze goed schoon.
Inschakelen van de kookplaat
Raak de tiptoets in-/uitschakelen (1) gedurende minimaal 1 seconde met de vinger aan. De
kookplaat is actief als op alle indicatoren (3) het cijfer "0" oplicht.
Als u binnen 10 seconden geen van de tiptoetsen bedient, dan schakelt de kookplaat weer uit.
Inschakelen van de kookzone
Schakel de gewenste kookzone (5) in, binnen 10 seconden na het aanzetten van de kookplaat
met de tiptoets (1).
1. Na aanraking van de tiptoets van de gewenste kookzone (5) knippert op de bijbehorende
indicator voor het vermogensniveau het verlichte cijfer "0".
2. U kunt nu het gewenste verwarmingsniveau instellen met de tiptoetsen "+" (2) of "-" (4).
Als u binnen 10 seconden geen van de tiptoetsen bedient, dan schakelt de
kookzone weer uit.
De kookzone is actief als op alle displays een cijfer of letter oplicht. Dit betekent dat
de kookzone klaar is om het verwarmingsniveau in te stellen.
Instellen van het vermogensniveau voor verwarming van de inductiekookzone
Zolang de verlichte "0" knippert op de kookzoneindicator (3) kunnen we het gewenste vermogensniveau voor verwarming instellen met behulp van de tiptoetsen "+" (2) en "-" (4).
54
Page 55

BEDIENING
Uitschakelen van de kookzones.
● De kookzones moeten actief zijn. De indicator voor het vermogensniveau knippert.
● U schakelt de kookzone uit door de tiptoets in-/uitschakelen van de kookplaat aan te raken
of door de tiptoets (5) gedurende 3 seconden aan te raken.
Uitschakelen van de hele kookplaat
● De kookplaat is in werking zolang minimaal één kookzone is ingeschakeld.
● U schakelt de hele kookplaat uit door de tiptoets in-/uitschakelen (1) aan te raken.
Als de kookzone heet is verschijnt op de kookzoneindicator (3) de letter "H" - het symbool
voor restwarmte.
Boosterfunctie "P"
De boosterfunctie is gebaseerd op het verhogen van het vermogen van de zone Ø 210 - van
2000W tot 3000W,
zone Ø 160 - van 1200W tot 1400W.
Om de boosterfunctie in te schakelen kiest u een kookzone en stelt u het vermogen in op "9",
vervolgens raakt u de tiptoets "+" (2) aan, waardoor de letter "P" op de display verschijnt.
U schakelt de boosterfunctie uit door de tiptoets "-" (4) aan te raken bij een actieve inductiekookzone of nadat u de pan van de inductiekookzone heeft gehaald.
Voor de kookzones Ø 210 en Ø 160 is de werkingsduur van de boosterfunctie
door het bedieningspaneel beperkt tot 10 minuten. Na de automatische uitschakeling van de boosterfunctie verwarmt de kookzone verder volgens het normale
vermogen.
De boosterfunctie kan opnieuw worden ingeschakeld, onder voorwaarde dat de
temperatuurvoelers in de elektronische systemen en de spoelen dit toelaten.
Als u de pan verwijdert van de kookzone als de boosterfunctie is ingeschakeld,
dan blijft deze functie actief en wordt het aftellen van de tijd voortgezet.
Indien tijdens de werking van de boosterfunctie de temperatuur (van het elektronische systeem of de spoel) wordt overschreden, dan wordt de boosterfunctie automatisch uitgeschakeld. De kookzone keert terug naar het normale vermogen.
55
Page 56

BEDIENING
Regeling van de boosterfunctie
Het is niet mogelijk om tegelijkertijd op twee verticale booster-kookzones de
boosterfunctie in te stellen.
Kinderbeveiliging
Het kinderslot is bedoeld om de kookplaat te beschermen tegen onbedoelde inschakeling
door kinderen. Inschakelen is alleen mogelijk als het kinderslot is uitgeschakeld.
De kinderslotfunctie is mogelijk bij zowel een ingeschakelde als een uitgeschakelde kookplaat.
In- en uitschakelen van de kinderslotfunctie
U schakelt de kinderslotfunctie in en uit met behulp van de tiptoets (7) door hem 5 seconden ingedrukt te houden. Het inschakelen van de kinderslotfunctie wordt gesignaleerd
doordat de diode (9) gaat branden.
De kookplaat blijft geblokkeerd totdat het kinderslot wordt opgeheven, zelfs wanneer het bedieningspaneel wordt in- en uitgeschakeld. Het loskoppelen van de
stroomvoorziening schakelt het kinderslot van de kookplaat uit.
Restwarmte-indicator
Na aoop van het koken blijft in het keramische glas warmte-energie achter die restwarmte
wordt genoemd. Het tonen van de restwarmte vindt plaats in twee etappes. Na uitschakeling
van de kookzone of van het hele apparaat, verschijnt op de display de letter "H", wanneer de
temperatuur hoger is dan 60°C. De restwarmteindicator blijft branden zolang de temperatuur
hoger is dan 60°C. Bij een temperatuurbereik van 45°C tot 60°C toont de display de letter
"h". Deze letter staat voor een laag restwarmteniveau. Zodra de temperatuur daalt beneden
45°C dooft de restwarmteindicator.
Raak tijdens het branden van
de restwarmteindicator de
kookzone niet aan in verband
met het risico voor verbrandingen en zet er geen voorwerpen op die gevoelig zijn voor
warmte!
Bij stroomonderbreking wordt
de restwarmteindicator "H" niet
getoond. Ondanks dat kan de
kookzone nog steeds heet zijn!
56
Page 57

BEDIENING
Beperking van de werkingsduur
Om de feilloze werking van de kookplaat te
vergroten, is hij uitgerust met een beperking
van de werkingsduur voor elk van de kookzones. De maximale werkingsduur wordt
vastgesteld op grond van het laatste gekozen
vermogensniveau.
Als u het vermogensniveau gedurende langere
tijd (zie tabel) niet verandert, wordt de bijbehorende kookzone automatisch uitgeschakeld en
de restwarmteindicator ingeschakeld. U kunt
echter op ieder moment de respectievelijke
kookzones inschakelen en bedienen, volgens
de gebruiksaanwijzing.
Automatisch bijwarmen
● Activeer de gewenste kookzone met
tiptoets (5)
● Stel vervolgens met de tiptoetsen „+” (2)
en „-” (4) het vermogensniveau in binnen
het bereik van 1-8, en druk opnieuw op
tiptoets (5)
● Op de display worden afwisselend het cij-
fer van het ingestelde vermogensniveau
en de letter A getoond.
Na verloop van de tijd dat extra vermogen
wordt geleverd, schakelt de kookzone
automatisch over op het door u gekozen
vermogensniveau dat zichtbaar is op de
indicator.
Wanneer u de pan van de kookzone
haalt en opnieuw op de kookzone
plaatst voordat de tijd van het automatisch bijwarmen is verstreken,
dan wordt het bijwarmingsproces
met extra vermogen afgemaakt.
Trede
vermogensni-
veau
1 8
2 8
3 5
4 5
5 5
6 1,5
7 1,5
8 1,5
9 1,5
P 0,16
Trede
vermogensni-
veau
1 0,8
2 1,2
3 2,3
4 3,5
5 4,4
6 7,2
7 2
8 3,2
Maximale
kooktijd
in uren
8
Tijdsduur automa-
tisch bijwarmen
met extra vermo-
gen
(in minuten)
-
57
Page 58

BEDIENING
Timer
De timer maakt het kookproces eenvoudiger, dankzij de mogelijkheid om de werkingstijd van
de kookzones te programmeren. Hij kan ook dienen als kookwekker.
Aanzetten van de timer
De timer maakt het kookproces eenvoudiger, dankzij de mogelijkheid om de werkingstijd van
de kookzones te programmeren. Hij kan ook dienen als kookwekker.
● Met tiptoets (5) kiezen we de gewenste kookzone. Het cijfer "0" gaat knipperen.
● Stel met de hulp van de tiptoetsen "+" (2) en "-" (4) het gewenste vermogensniveau in
binnen het bereik van 1 - 9.
● Activeer vervolgens binnen 10 seconden de timer door de tiptoets (6) aan te raken.
● Stel met de hulp van tiptoetsen „+” (2) of „-” (4) de gewenste kooktijd in (01 tot 99 minu-
ten).
● Bij de display van de timer brandt de diode (8) die overeenkomt met de kookzone.
Alle kookzones kunnen tegelijkertijd werken met ingeprogrammeerde tijd met
behulp van de timer.
Wanneer er meer dan één tijd is ingesteld op de display van de timer, dan wordt
de kortste ingestelde tijd getoond. Dit wordt extra aangeduid met een knipperende diode (8).
Wijziging van de ingestelde kooktijd
Op ieder moment van het kookproces kunt u de ingevoerde kooktijd wijzigen.
● Met tiptoets (5) kiezen we de gewenste kookzone. Het cijfer van het vermogensniveau
gaat knipperen.
● Activeer vervolgens binnen 10 seconden de timer door de tiptoets (6) aan te raken.
● Met hulp van de tiptoetsen „+” (2) of „-” (4) stelt u een nieuwe tijd in.
Controle van de verstreken kooktijd
U kunt de overgebleven kooktijd op ieder moment controleren door de sensor van de timer
(6) aan te raken. De actieve werkingstijd van de timer voor de betreffende kookzone wordt
aangeduid door een knipperende diode (8).
58
Page 59

BEDIENING
Uitzetten van de timer
Na afloop van de ingeprogrammeerde kooktijd klinkt een geluidssignaal. U kunt het uitschakelen door op een willekeurige tiptoets te drukken. Na 2 minuten schakelt het alarm
automatisch uit.
Wanneer het noodzakelijk is om de timer eerder uit te schakelen:
● Dan activeert u met tiptoets (5) de kookzone. Het cijfer van het vermogensniveau gaat
helderder branden.
● Houd vervolgens de tiptoets (6), 3 seconden ingedrukt of wijzig de tijd van de kookwekker
met de tiptoetsen „+” (2) en „-” (4) in „00”
Timer als kookwekker
De timer kan ook worden gebruikt als extra alarm, wanneer de kookzones niet door de timer
worden aangestuurd.
Aanzetten kookwekker
Wanneer de kookplaat is uitgeschakeld:
● Schakel de kookplaat in door de tiptoets in-/uitschakelen van de kookplaat (1) aan te
raken.
● Activeer vervolgens met de tiptoets (6) de kookwekker.
● Stel met behulp van de tiptoetsen „+” (2) of„-” (4) de tijd van de kookwekker in.
Uitschakelen kookwekker
Na afloop van de ingeprogrammeerde tijd klinkt een doorlopend geluidssignaal. U kunt het
uitschakelen door op een willekeurige tiptoets te drukken. Na 2 minuten schakelt het alarm
automatisch uit.
Wanneer het noodzakelijk is om de kookwekker eerder uit te schakelen
● Houd de tiptoets (6) 3 seconden ingedrukt of wijzig de tijd van de kookwekker met de
tiptoetsen „+” (2) en „-” (4) in „00”
● Als de timer is ingesteld als kookwekker, dan werkt hij niet als timer voor de kooktijd.
De kookwekkerfunctie wordt gewist op het moment dat u de timerfunctie activeert.
59
Page 60

BEDIENING
Warmhoudfunctie
De warmhoudfunctie houdt reeds bereide gerechten warm op de kookzone. De geselecteerde
kookzone is ingeschakeld op een laag vermogensniveau. Het vermogen van de kookzone wordt
zo gestuurd door de warmhoudfunctie, dat de temperatuur van het gerecht bij benadering 65°C
bedraagt. Hierdoor verandert een warm gerecht, dat klaar is om gegeten te worden, niet van
smaak en blijft niet plakken aan de bodem van de pan. U kunt deze functie ook gebruiken voor
het smelten van boter, chocolade etc.
Voorwaarde voor juiste toepassing van deze functie is het gebruik van een geschikte pan met
een vlakke bodem, zodat de temperatuur van de pan exact gemeten kan worden door de voeler
die zich in de kookzone bevindt.
U kunt de warmhoudfunctie op iedere kookzone gebruiken.
Uit microbiologische overwegingen bevelen wij aan om de geruchten niet te lang warm te houden. Het bedieningspaneel schakelt deze functie dan ook na 2 uur uit.
De warmhoudfunctie bevindt zich als extra
vermogensniveau tussen de posities „0 1”
en verschijnt op de display als het symbool
„ ”.
U schakelt de warmhoudfunctie in op dezelfde wijze als beschreven in het punt
"Inschakelen van de kookzone"
U schakelt de warmhoudfunctie uit op dezelfde wijze als beschreven in het punt
"Uitschakelen van de kookzones".
60
Page 61

REINIGING EN ONDERHOUD
Het regelmatig reinigen en onderhouden
van de kookplaat heeft grote invloed op de
levensduur en storingsvrije werking van het
apparaat.
Neem bij het reinigen van de keramische glasplaat dezelfde regels in
acht als bij het reinigen van glasoppervlakten. Gebruik nooit schurende
of agressieve schoonmaakmiddelen,
schuurpoeders of schuursponsjes
met een ruw oppervlak. Gebruik ook
geen stoomcleaners.
Schoonmaken na ieder gebruik
● Lichte, niet ingebrande verontreini-
gingen met een vochtig doekje zonder
reinigingsmiddel verwijderen. Het gebruik
van een afwasmiddel kan een blauwe verkleuring veroorzaken. Deze hardnekkige
vlekken kunnen vaak niet bij de eerste
reiniging verwijderd worden, zelfs niet als
u speciale reinigingsmiddelen gebruikt.
● Verwijder vastgebrande kookresten
met een scherpe schraper en wis de
oppervlakte met een vochtig doekje
af.
Vlekken verwijderen
● Lichte, parelmoerkleurige vlekken (
aluminiumresten) kunt u verwijderen van
de afgekoelde kookplaat met behulp van
een speciaal reinigingsmiddel. Kalkresten
(van overgekookt water) verwijdert u met
azijn of speciale reinigingsmiddelen.
● Schakel de kookzone niet uit als u suiker,
suikerhoudende gerechten, plastic of
aluminiumfolie wilt verwijderen! Verwijder kookresten (als ze nog heet zijn)
meteen van de hete kookzone met een
scherpe schraper. U kunt de kookzone
uitschakelen zodra u de verontreiniging
heeft verwijderd. Na afkoeling kunt u met
behulp van speciale reinigingsmiddelen
de kookplaat verder schoonmaken.
Schraper voor het schoonmaken van
de kookplaat
De speciale reinigingsmiddelen zijn verkrijgbaar in supermarkten, speciale winkels
met elektronische apparatuur, drogisterijen,
levensmiddelenzaken en keukenspeciaalzaken. Scherpe schrapers zijn verkrijgbaar in
winkels met bouwmaterialen, bouwgereedschappen en schildersbenodigdheden.
61
Page 62

REINIGING EN ONDERHOUD
Reinigingsmiddelen nooit toepassen op
een hete kookplaat. U kunt het beste het
aangebrachte reinigingsmiddel laten drogen
en vervolgens met een natte doek afwissen.
Voordat u de glaskeramische kookplaat
opnieuw verhit, moet u de resten van het
reinigingsmiddel met een vochtige doek
afvegen, omdat deze anders een bijtende
werking kunnen hebben.
Wij zijn niet aansprakelijk in het kader
van de garantie, manier u de keramische
glasplaat niet op de goede manier hebt
behandeld.
Periodieke onderhoudsbeurten
Naast de normale schoonmaakwerkza-
amheden moet u:
• regelmatig de besturings- en werkonderdelen van de kookplaat controleren. na
aoop van de garantieperiode minimaal
één keer per twee jaar het apparaat na
laten kijken door een servicedienst,
• de geconstateerde storingen verhelpen,
• periodiek de onderdelen van de kookplaat
een onderhoudsbeurt geven.
Attentie!
Als om de een of andere reden de
besturing niet werkt, terwijl het apparaat is ingeschakeld, schakel dan
de hoofdschakelaar uit of schroef de
zekering los en neem vervolgens
contact op met de klantenservice.
Attentie!
Mochten er barsten of breuken in uw
keramische glasplaat verschijnen,
schakel dan onmiddellijk de kookplaat uit en verbreek de aansluiting
met het lichtnet. Draai hiertoe de
zekering los of haal de stekker uit
het stopcontact. Neem vervolgens
contact op met de klantenservice.
Attentie!
Reparaties en afstelhandelingen
moeten worden uitgevoerd door
een bevoegde servicedienst of installateur.
62
Page 63

HANDELWIJZE BIJ STORINGEN
Bij het optreden van storingen handelt u als volgt:
• schakel alle functies van het apparaat uit
• onderbreek de stroomtoevoer
• bied het apparaat aan voor reparatie
• omdat u zelf kleine storingen kunt verhelpen volgens de onderstaande aanwijzingen,
dient u het apparaat eerst te controleren aan de hand van de punten in de volgende tabel,
voordat u contact opneemt met de klantenservice.
PROBLEEM OORZAAK OPLOSSING
1.Het apparaat werkt niet - stroomuitval -controleer de zekering en
vervang deze als hij is doorgebrand
2.Het apparaat reageert niet
op de ingevoerde waarden
3.Het apparaat reageert niet
en laat een kort geluidssignaal horen
4.Het hele apparaat schakelt
uit
5.Een kookzone schakelt uit
en op de display verschijnt
de letter „H”
- het bedieningspaneel is
niet ingeschakeld
- de tiptoets is te kort aangeraakt (minder dan een
seconde)
- tegelijkertijd meerdere
tiptoetsen aangeraakt
- onjuiste bediening (de verkeerde tiptoetsen aangeraakt of te snel aangeraakt)
- de tiptoets(en) is(zijn)
bedekt of verontreinigd
- na inschakeling is er
binnen 10 seconden geen
enkele waarde ingevoerd
- de tiptoets(en) is(zijn)
bedekt of verontreinigd
-beperking van de werkingsduur
- de tiptoets(en) is(zijn)
bedekt of verontreinigd
- oververhitting van de elektronische onderdelen
- inschakelen
- raak de tiptoets langer aan
- raak altijd maar één tiptoets tegelijk gaan (uitgezonderd het inschakelen van de
kookzone)
- schakel de kookplaat
opnieuw in
- de tiptoetsen vrijmaken of
schoonmaken
-schakel het bedieningspaneel opnieuw in en voer de
gegevens onmiddellijk in
- de tiptoetsen vrijmaken of
schoonmaken
- schakel de kookzone opnieuw
in
- de tiptoetsen vrijmaken of
schoonmaken
63
Page 64

HANDELWIJZE BIJ STORINGEN
PROBLEEM OORZAAK OPLOSSING
6. Restwarmteweergave
licht niet op, terwijl de kookzones nog heet zijn.
- onderbreking van de
stroomtoevoer, verbinding
van het apparaat met het
lichtnet onderbroken
- restwarmteindicator gaat
pas weer werken nadat het
bedieningspaneel opnieuw
is in- en uitgeschakeld.
7. Keramische plaat is
gebarsten.
8.Als het gebrek of de storing niet nog steeds niet is
opgeheven.
9. De inductiekookplaat maakt een schurend geluid.
10. De inductiekookplaat ma-
akt een uitend geluid.
11. De plaat werkt niet, u
kunt de kookzones niet
inschakelen en ze functioneren niet.
Gevaar! Stroomvoorziening van de kookplaat
onmiddellijk onderbreken (zekering). Neem contact
op met de dichtstbijzijnde klantenservice.
Stroomvoorziening van de kookplaat onmiddellijk onderbreken
(zekering!). Neem contact op met de dichtstbijzijnde klantenservice.
Belangrijk!
U bent verantwoordelijk voor de goede staat van het apparaat
en het juiste gebruik ervan in de huishouding. Als u op basis
van onjuist gebruik van het apparaat contact opneemt met
de klantenservice, dan zijn ook binnen de garantieperiode de
kosten van zo´n bezoek voor u.
Voor schade die is ontstaan door het niet in acht nemen van
deze gebruiksaanwijzing, kunnen wij helaas niet aansprakelijk
gesteld worden.
Dat is een normaal verschijnsel. De koelventilator van de elektronische onderdelen werkt.
Dat is een normaal verschijnsel. Conform de werkfrequentie
van de spoelen tijdens het gebruiken van een aantal kookzones, maakt de kookplaat bij maximaal vermogen en een licht
uitend geluid.
- elektronische storing - reset de kookplaat, koppel
de kookplaat 60 seconden
los van de stroomvoorziening (verwijder de zekering
van de installatie).
64
Page 65

TECHNISCHE GEGEVENS
Nominale spanning 230/400V 2N~50 Hz
Nominaal vermogen van de kookplaat: 7,4 kW 7,4 kW
Model: KMI* KMI*
PG4VI515FTB4P3 PG4VI515AFTB4P3
- inductiekookzone:
- inductiekookzone: Ø 160 mm 1200 W 1200 W
- inductiekookzone: Ø 210 mm 2000 W 2000 W
- inductiekookzone booster: Ø 210 mm 2000/3000 W 2000/3000 W
- inductiekookzone booster: Ø 160 mm 1200/1400 W 1200/1400 W
Afmetingen 576 x 518 x 50; 770 x 518 x 50;
Gewicht ca.10,5 kg; ca.15 kg;
Voldoet aan de normen EN 60335-1; EN 60335-2-6 die gelden in de Europese Unie.
65
Page 66

666768
Page 67

Page 68

 Loading...