

Page 1
KMC*
0
1
2
3
0
1
2
3
0
1
2
3
0
1
2
3
PG*4V*
(EN) INSTRUCTION MANUAL...................................2
(NL) GEBRUIKERSHANDLEIDING........................19
IOAA-680
(10.2011/1)
Page 2

DEAR USER,
The plate is exceptionally easy to use and extremely efcient. After reading the instruction
manual, operating the cooker will be easy.
Before being packaged and leaving the manufacturer, the plate was thoroughly checked with
regard to safety and functionality.
Before using the appliance, please read the instruction manual carefully.
By following these instructions carefully you will be able to avoid any problems in using the
appliance.
It is important to keep the instruction manual and store it in a safe place so that it can be
consulted at any time.
It is necessary to follow the instructions in the manual carefully in order to avoid possible
accidents.
Caution!
Operate the appliance only after reading / understanding this Manual.
The appliance has been designed only for cooking. Any other use (for example for
heating) does not comply with its operating prole and may cause danger.
The producer reserves a right to implement changes having no impact on the operation of the appliance.
2
Page 3

TABLE OF CONTENTS
Basic information .................................................................................................2
Safety instructions ...............................................................................................4
Saving energy .......................................................................................................6
Description of the appliance ...............................................................................7
Installation .............................................................................................................8
Operation .............................................................................................................13
Cleaning and routine maintenance ...................................................................15
Emergency procedure........................................................................................17
Technical data .....................................................................................................18
Warranty ..............................................................................................................18
3
Page 4

SAFETY INSTRUCTIONS
● Before using the ceramic plate for the rst time read the Operating Manual carefully as
thus you can ensure safe operation and avoid damage to the plate.
● If the ceramic plate is operated near a radio, TV set or other emitting device, please
check whether the touch panel works correctly.
● The ceramic plate should be installed by a qualied electrician.
● Do not install the plate near refrigerating devices.
● The furniture the plate is tted in should be resistant to temperatures up to 100ºC. The
requirement applies to the veneers, edges, plastic surfaces, glues and varnishes.
● The plate can be used only after it has been tted into furniture, as only thus you will be
protected from accidental contact with live components.
● Electric appliances can be repaired only by qualied specialists. Unprofessional repairs
may compromise the safety of the appliance.
● The appliance is disconnected from the mains only when the mains plug is pulled out
from the socket or when the fuse has been switched off.
● Never allow children to remain unattended near the cooktop nor to play with the control
panel.
● Unless properly supervised by caretakers or upon thorough studies of the operating
manual, the appliance must not be operated by persons (including children) of limited
physical or psychical abilities, these of limited technical expertise, or unfamiliar with the
equipment.
● When switched on the hotplates quickly become hot. To avoid unnecessary power con-
sumption, switch them on only after putting a cooking pot.
● Residual temperature indicator built-in into the electronic system tells you whether the
hotplate is still switched on and whether it is still hot.
● Should there be a power failure, all the settings and indications will be cancelled. Please
be careful when the power supply is restored as hotplates which have been hot before
power failure will no longer be controlled by the indicator.
● If there is a mains socket located near the hotplate, please make sure that the supply
cord does not touch the hot places.
● Do not leave the plate unattended when cooking on fats and oils as they create re
hazard.
● Do not use plastic pots or containers made from aluminium foil as they melt in high
temperatures and may damage the ceramic plate.
● Sugar, citric acid, salt etc., both in liquid and solid state, as well as plastic should not get
into contact with a hot hotplate.
● If through carelessness, sugar or plastic gets on a hot hotplate, you may not switch off
the plate but scrape away sugar or plastic using a sharp scrapper. Protect hands from
burns.
● Use only at-bottom pots and saucepans on your ceramic plate, without sharp edges or
burrs as otherwise the plate may get permanently damaged.
4
Page 5

SAFETY INSTRUCTIONS
● The heating surface of the ceramic plate is resistant to thermal shock. It is neither hot
nor cold-sensitive.
● Avoid dropping objects on the plate. A point hit, for example a falling bottle with spices,
may in unfavourable circumstances lead to cracks and splits appearing on your ceramic
plate.
● Boiled over residuals of food may penetrate damaged places and get to the live compo-
nents of the ceramic plate
● Should cracks or splits appear on the surface of your ceramic plate immediately discon-
nect it from the mains. In order to do so, switch off the fuse or pull out the mains plug
from the socket. Call the Customer Service
● Please observe the maintenance and cleaning guidelines. Should you fail to proceed in
compliance with the provided guidelines, you will lose your warranty rights.
5
Page 6

SAVING ENERGY
UNPACKING
Everybod y who prope rly
uses energy not only saves
money but also consciously
acts in aid of the natural
environment. So let’s save
electric energy by:
● Using proper cookware
Pots and pans with at and thick bottom
help to save up to one-third of electric
energy. Remember about the lid as
otherwise the consumption of energy
quadruples!
● Matching cookware to the size of the
hotplate
A cooking pot should neither be smaller
nor bigger than the used hotplate.
● Maintaining hotplates and pot bottoms
clean
Dirt obstructs the transfer of heat – heavily
burnt food residuals often can be cleaned
only with chemicals harmful to the environment.
● Avoiding necessary “peeping into
pots”.
● Not using the plate near refrigerators
/ freezers
As the consumption of energy unneces-
sary rises.
The appliance is protected
from damage during transportation by its packaging. After
unpacking please dispose
of the packing materials in a
manner creating no risk to the
environment.
All materials used for packing are harmless
to the natural environment, can be recycled
in 100% and have been identied with appropriate symbol.
Caution! Packing materials (polyethylene
bags, pieces of polystyrene etc.) should be
kept away from children during unpacking.
DISPOSING OF THE DE VICE
When disposing of the de vice,
do not bring it to regular mu nicipal waste containers. Instead,
bring it to electrical and electronic waste re cy cling and re use
center. A rel evant label has been
put on the device, its in structions
manual, or on the package.
The device has been manufactured of re cyclable materials. By bringing old device to
recycling collection center, you show that you
care about nature.
Ask your local environmental care au thority
for information on location of such facilities.
6
Page 7
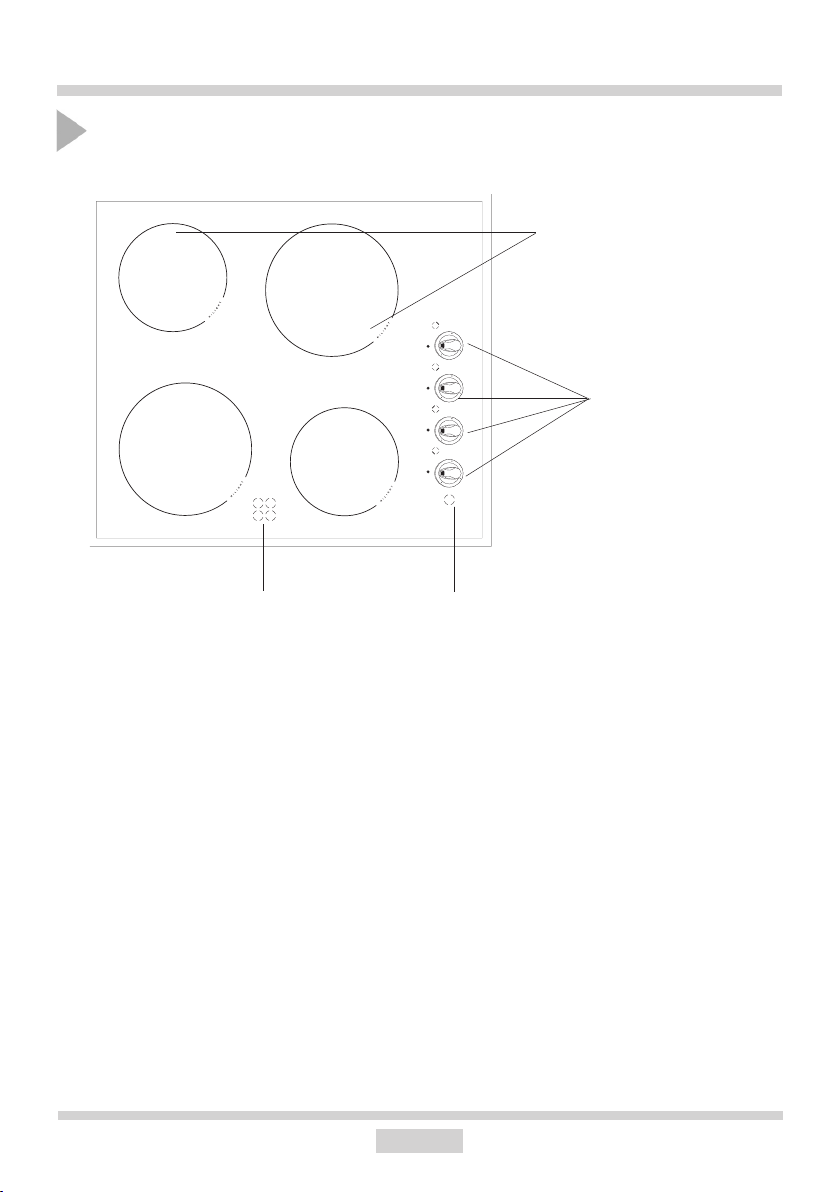
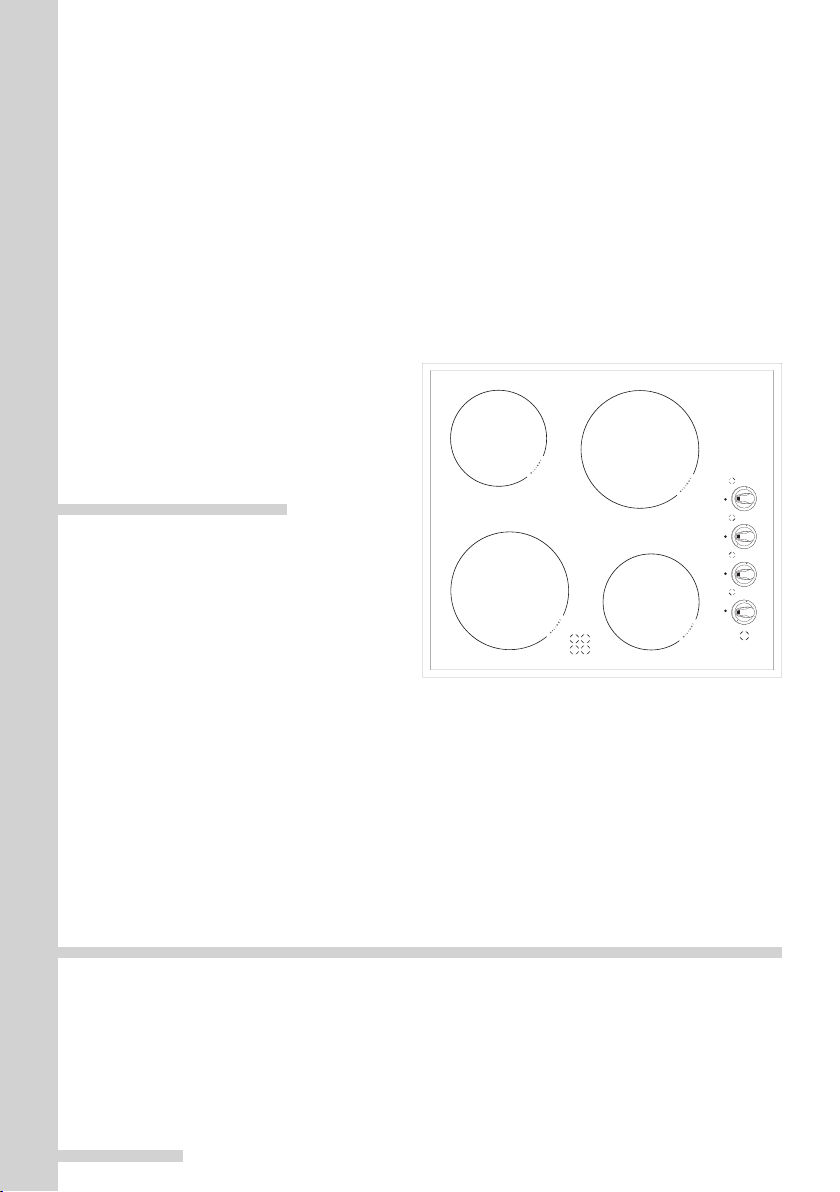
DESCRIPTION OF THE APPLIANCE
0
1
2
3
0
1
2
3
0
1
2
3
0
1
2
3
Description of KMC*
Cooking zones
Knob
Residual
heat indicator
Power
on indicator
7
Page 8
INSTALLATION
560
490
min
60
min
50
+2
+2
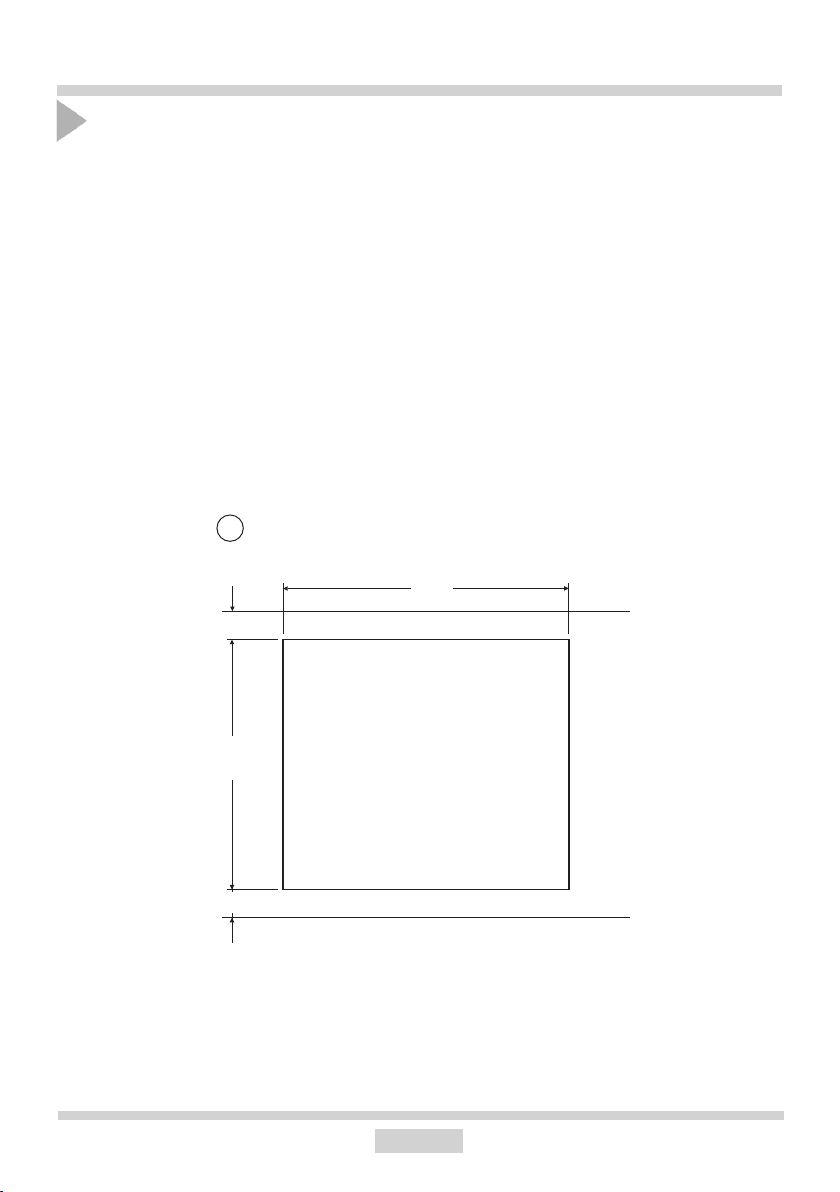
Making the worktop recess
• Worktop thickness should be 28 - 40 mm, while its width at least 600 mm. The worktop
must be at and level. Edge of the worktop near the wall must be sealed to prevent ingress
of water or other liquids.
• There should be sufcient spacing around the opening, in particular, at least 50 mm distance to the wall and 60 mm distance to the front edge of worktop.
• The distance between the edge of the opening and the side wall of the furniture should
be at least 55 mm.
• Worktop must be made of materials, including veneer and adhesives, resistant to a tem-
perature of 100°C. Otherwise, veneer could come off or surface of the worktop become
deformed.
• Edge of the opening should be sealed with suitable materials to prevent ingress of water.
• Worktop opening must cut to dimensions as shown on gure 1.
• Ensure minimum clearance of 80 mm below the hob to allow proper air circulation and
prevent overheating.
1
8
Page 9
INSTALLATION
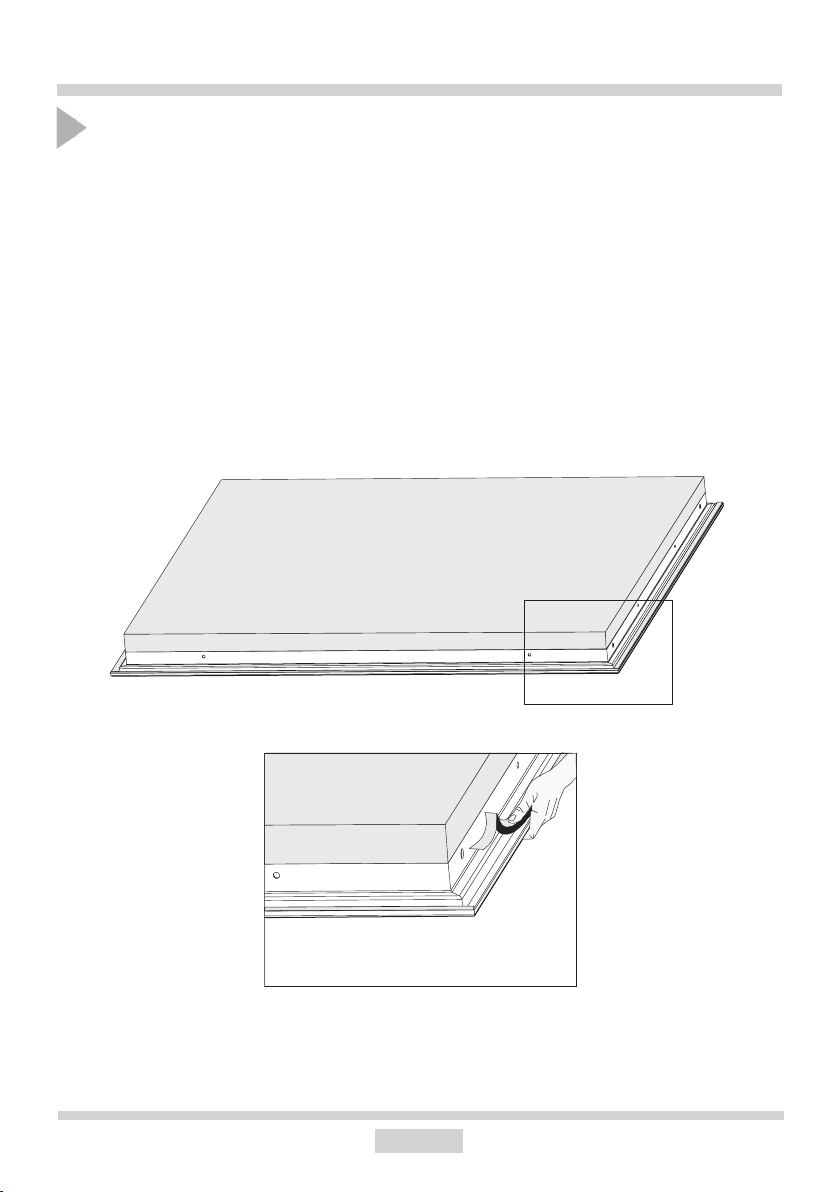
Installation of self-adhesive foam gasket
Do not install the appliance without the foam gasket.
The gasket must be applied on the appliance as follows:
Before tting the appliance in the kitchen worktop, apply self-adhesive foam gasket provided underneath the rim.
- before applying, remove the protective lm from the self-adhesive foam gasket
- apply the self-adhesive foam gasket underneath the appliance rim
(Figure)
9
Page 10
INSTALLATION
320
560
490
min
60
min
50
466
560
416 50
490
min
60
min
50
270
50
54
321
54
321
15
15
6
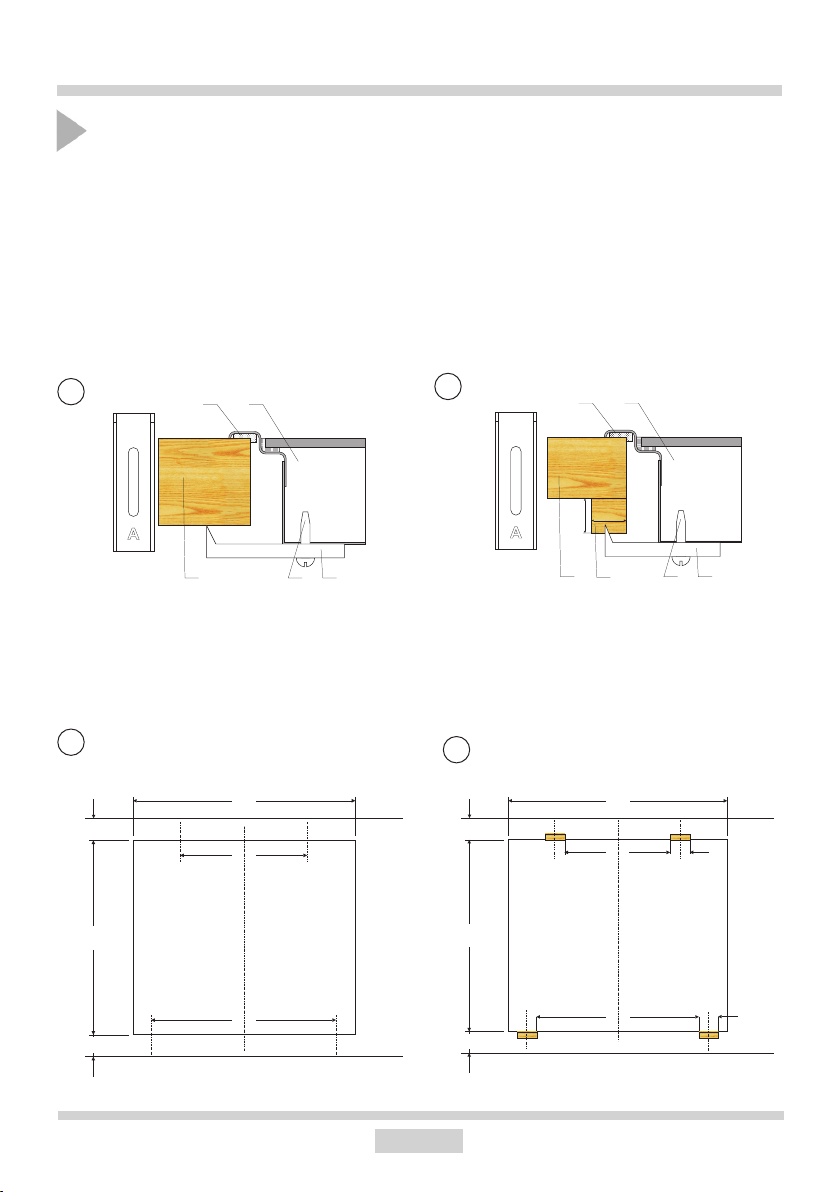
Installing KMC* hob - bracket
• Use four “A” brackets for 38 mm thick worktops. Fit the hob into worktop opening as shown
on figure2 and 3. To properly secure hob in 28 mm thick worktop, use four 15x15x50 mm
wooden blocks in addition to “A” brackets. Fit the hob into worktop opening as shown on
figure 4 and 5.
• Check if adhesive seal is properly applied to the hob’s flange. Loosely attach fixing brackets
to the bottom of the hob
• Remove dust from the worktop, insert hob into the opening and press in firmly,
• Position fixing brackets perpendicularly to the hob’s edge and tighten firmly.
2
1. worktop
2. screw
3. xing bracket
4. hob
5. seal
4
1. worktop
2. screw
3. xing bracket
4. hob
5. seal
6. wooden block
3
5
10
Page 11

INSTALLATION
Connecting the plate to the electrical system
Note!
The plate can be connected to the mains only by a qualied certied installer. Wilful
adaptations or modications to the electric system are prohibited.
Guidelines for the installer
The plate is factory-set for three-phase alternating current power supply (400 V 3N~50 Hz).
It may be adapted for one-phase current power supply (230 V) by adequate bridging on the
connection strip, in accordance with the attached wiring diagram. The wiring diagram is also
provided in the bottom part of the lower cover. The connection strip can be accessed once
the lid on the bottom cover is removed. Please remember to match the mains connection
cable to the type of connection and the rated power of the plate.
Fix the mains connection cable in a stay wire
Note!
Do not forget to connect the protective circuit to a clamp of the connection strip marked
with sign. The plate power supply system should be protected by appropriately
selected safety device or after the power supply protection, by appropriate safety
switch cutting off the power in case of emergency.
Before connecting the plate to the electric system read information provided on the rating
plate and wiring diagram.
Note!
The installer is obliged to complete and leave with the user a “certicate of connecting the
plate to the mains” (attached to the warranty card).
Methods of connection other than those indicated on the diagram can damage the plate.
11
Page 12

INSTALLATION
230 V single phase connection
1
with a neutral lead, terminals
1-2-3 are bridged, neutral lead
to terminal 4, and the protective
conductor to
2
400/230 V two phase connection
with a neutral lead, terminals
2-3 are bridged, neutral lead to
terminal 4, and the protective
conductor to
400/230 V three phase connec-
3
tion with a neutral lead, individual
phases are connected to terminals
1, 2, 3 respectively, neutral lead
to terminal 4, and the protective
conductor to
L1=R, L2=S, L3=T; N - neutral lead connection; - protective lead terminal
WIRING DIAGRAM
Important! Heating elements operate at 230V.
Important! For each connection the protective conductor
must be connected to the terminal marked .
Recommended connection lead
1N~
2N~
3N~
H05VVF3G4
H05VVF4G2,5
H05VVF5G1,5
12
Page 13

OPERATION
Before using the appliance for the rst time
● Thoroughly clean your ceramic hob rst. The ceramic hob should be treated with the same
care as a glass surface.
● Switch on the ventilation in the room or open a window, as the appliance could emit an
unpleasant smell during rst use.
● Operate the appliance while observing all safety guidelines.
Choice of cookware
There is specially tested cookware available for cooking and baking in cookers with ceramic
hob. Follow the instructions of their manufacturer.
Cookware with aluminium or copper base can leave stains, which very difcult to remove.
Particular caution is advised in the case of enamel-painted cookware, which could cause
irreparable damage when contents off accidentally. To achieve optimal energy use, the
optimal cooking times and to prevent seething food from getting burned on the hob, please
follow these guidelines.
Cookware base:
Cookware should have always a stable, at base. Base with sharp edges, burrs and the
charred remains of food may scratch the ceramic hob!
Cookware size:
Cookware diameter should correspond as closely as possible the diameter of the hob cooking
zone.
Cookware lid:
Lid prevents heat from escaping and thus reduces heating time and lowers energy consumption.
13
Page 14

OPERATION
0
1
2
3
Turning the hob on:
Turn on a chosen cooking zone by turning the knob, the power on indicator will switch
on, power level is adjustable by setting the knob. The cooking zones are of different
heating power. Heating power can be set in steps by turning the knob to the right or
to the left.
Knob
Examples of cooking processes
position
3
●
2
●
1
●
0
bringing to the boil, fast heating, frying
braising meat, sh
slow frying
cooking larger amounts of dish, cooking soups
cooking potatoes
stewing vegetables
power off
Zone heat indicator.
There are indicators in the front part of the hob, one indicator for each zone. If the
temperature of a given cooking zone exceeds 50 °C, the indicators switch on. This
allows for using the accumulated heat to the fullest, e.g. to heat a dish or to keep it
warm, and at the same time prevents the user from getting burnt as the zone which
is already turned off is still very hot.
When the indicator is off, one can touch the cooking zone bearing in mind that it is not yet of
ambient temperature.
In the case of power decay the heat indicator switches off.
14
Page 15

CLEANING AND ROUTINE MAINTENANCE
Daily cleaning and proper maintenance
have crucial impact on the durability of your
ceramic plate.
Clean the ceramic plate observing
the same rules as for glass. Never
use abrasive or aggressive cleaning agents, scrubbing powders or
scratching sponges.
Cleaning the plate after every use
• Wipe off slight, not-burnt patches of
dirt using damp cloth without cleaning
agent. Washing liquid can cause blue
di sco lo ra tion to appear on the plate. The
stub born stains often cannot be re mo-
ved after rst cleaning, even if special
cleaning agents are used.
• Remove larger patches of dirt, stron-
gly sticking to the plate using sharp
scrap per and wipe off the sur fa ce with
a damp cloth.
Removal of stains
• Li ght pearly stains (aluminium re si du-
es) can be removed from cooled plate
using special cleaning agents. Cal care ous re si du es (i.e. boiled over wa ter)
can be re mo ved with vinegar or spe cial
cle aning agents.
• Do not switch off the hotplate when re mo-
ving sugar, sugar-containing food, plastic
or aluminium foil! Immediately scrape off
the residuals (when still hot) from the
hotplate using a sharp scrap per. When
the dirt is removed you can switch off
the plate and clean it again after cooling
down using special cleaning agents.
Special cleaning agents can be bought in
supermarkets, special electromechanical
shops, drugstores and shops with kitchen
appliances. Sharp scrappers can be bought
in DIY shops, shops with building tools and
painting accessories.
Cleaning scrapper
15
Page 16

CLEANING AND ROUTINE MAINTENANCE
Never apply cleaning agent on a hot hotplate.
Leave the cleaning agent to dry and then
wipe it off with a wet cloth. Any residuals of
cleaning agents should be wiped off with a
damp cloth before heating the plate for the
next time, as otherwise they can have caustic
effect.
Failure to observe the ceramic plate maintenance instructions can result in losing
your warranty rights!
Periodic inspections
In addition to current maintenance and care,
the following shall be arranged for:
• Periodic inspections of control elements
and units of the cooktop. Upon expiration
of the warranty, service department shall
be ordered technical inspections of the
appliance at least once every two years.
• All operation faults must be repaired.
• Cooktop units shall be maintained accor-
ding to the maintenance schedule.
Caution!
If from any reason you are not
able to control the switched on
plate, switch off the main switch
or screw out the fuse and call the
Customer Service.
Caution!
Should cracks or splits appear on
the surface of your ceramic plate,
immediately disconnect the plate
from the mains (by switching off
the fuse or unplugging the plug)
and call the Customer Service.
Note!
Installation work and repairs should only be performed by a service
department or a qualied technician in accordance with all applicable codes and standards.
16
Page 17

EMERGENCY PROCEDURE
Every time when emergency situation occurs you should:
● switch off the working assemblies of the plate
● disconnect power supply
● call in the service
● as some minor faults can be removed by the user in accordance with the be low specied
instructions, before calling the Customer Service please go thro ugh the Table checking
every point.
PROBLEM CAUSE ACTION
1.The appliance is not working
2.Residual temperature in dica tor is not lighted although
the hot pla tes are still hot
3. Crack in the ceramic
plate
4. If the fault still remains Disconnect the ceramic plat e from the mains (fuse)
- power supply failure -check the in-house electric
sys tem fuse, replace if neces sa ry
- power supply fa ilu re, the
ap plian ce has been di sconnec ted from the mains
Danger! Immediately disconnect the ceramic plate
from the mains (fuse) and call the nearest Customer Service Centre.
and c all t he n e a re s t Cu s t ome r Ser v i ce C e nt r e .
Important!
You are the person responsible for proper condition and
operation of the appliance in your household. If you call
the Service for a fault which resulted from improper operation, you will be charged with the costs of the visit even
during the period of warranty. We shall not be held liable
for damages caused by a failure to observe this Manual.
-the residual temperature indi ca tor will work again after
swit ching the control panel
on and off.
17
Page 18

TECHNICAL DATA
Rated voltage: 400V 3N~50 Hz
Rated power: KMC*
- hotplate: 2 x Ø 145 mm 1,2 kW
- hotplate: 2 x Ø 180 mm 1,8 kW
Dimensions: 575 x 505 x 50;
Weight: ca. 8,4 kg;
WARRANTY
Warranty
Warranty services according to the warranty card.
The producer shall not be held liable for any damages caused by improper operation of the
product.
Please enter the type and factory number of the plate from the rating plate
Type................................................... Factory number..............................................
18
Page 19

NL
Page 20

GEACHTE KLANT,
Deze kookplaat van biedt een combinatie van gemakkelijke bediening en doeltreffende werking. Als u deze gebruikershandleiding doorgelezen heeft, dan mag de bediening van de
plaat geen probleem meer vormen.
Voor de kookplaat ingepakt werd en de fabriek verliet, werd ze bij de controleposten zorgvuldig
gecontroleerd op het vlak van veiligheid en functionaliteit.
Voordat u het toestel aanschakelt, dient u deze gebruikershandleiding grondig door te lezen.
De instructies in de handleiding helpen u om verkeerd gebruik te voorkomen.
Bewaar deze gebruikershandleiding en zorg dat ze altijd binnen handbereik is.
Om ongelukken te vermijden moeten de instructies uit deze handleiding zorgvuldig nageleefd
worden.
Opgelet!
Het toestel mag enkel gebruikt worden nadat u deze handleiding grondig doorgelezen
hebt en begrijpt.
Het toestel is uitsluitend ontworpen voor kookdoeleinden.
Elke andere toepassing (bv. voor het verwarmen van ruimtes) stemt niet overeen met
de bestemming van het toestel en kan gevaar veroorzaken.
De producent behoudt zich het recht voor om wijzigingen aan te brengen, die geen
invloed hebben op de werking van het toestel.
20
Page 21

INHOUDSOPGAVE
Basisinformatie.......................................................................................................20
Veiligheidsinstructies...........................................................................................22
Beschrijving van het toestel.................................................................................25
Installatie......................................................................................................26
Bediening..............................................................................................29
Reiniging en onderhoud................................................................................33
Handelswijze bij probleemsituaties............................................................35
Technische gegevens.............................................................................36
Garantie ...................................................................................................36
21
Page 22

VEILIGHEIDSINSTRUCTIES
• Vooraleer u de keramische kookplaat in gebruik neemt, dient u de gebruikershandleiding
door te lezen. Op die manier garandeert u uw eigen veiligheid en voorkomt u beschadiging
van de plaat.
• Als de keramische plaat gebruikt wordt in de directe nabijheid van een radio, televisie of
een ander toestel dat straling uitzendt, moet u controleren of het bedieningspaneel van
de keramische plaat correct werkt.
• De plaat moet door een gekwaliceerd installateur – elektricien geïnstalleerd worden.
• Het is verboden de plaat in de nabijheid van koeltoestellen te installeren.
• De meubels waarin de plaat ingebouwd wordt, moeten bestand zijn tegen een tempera-
tuur tot 100ºC. Dit geldt voor de bekleding, randen, oppervlakken uit kunststof, lijmen en
lakken.
• De plaat mag enkel gebruikt worden als ze ingebouwd is. Op die manier vermijdt u aan-
raking met de delen die onder stroom staan.
• Elektrische toestellen mogen enkel door specialisten hersteld worden. Onvakkundige
herstellingen kunnen de gebruiker ernstig in gevaar brengen.
• Het toestel wordt pas van het elektriciteitsnet ontkoppeld, als de zekering uitgeschakeld
is of als de stekker uit het stopcontact getrokken is.
• De stekker van de aansluitingskabel moet bereikbaar zijn nadat de kookplaat geïnstalleerd is.
• Men moet ervoor zorgen, dat kinderen niet met het toestel spelen.
• Dit toestel mag niet gebruikt worden door personen met beperkte motorische, sensorische
of psychische capaciteiten (met inbegrip van kinderen), of personen zonder ervaring of
kennis van het toestel, tenzij dit gebeurt onder toezicht of in overeenstemming met de
gebruikershandleiding van het toestel, die overgedragen werd door de personen die verantwoordelijk zijn voor hun veiligheid.
• De kookvelden warmen snel op nadat ze aangeschakeld worden. Daarom mag u ze pas
aanschakelen nadat u er kookpotten op geplaatst hebt. Op die manier vermijdt u onnodig
energieverbruik.
• De in het elektronische systeem ingebouwde restwarmte-indicator geeft aan of de plaat
aangeschakeld is, en of ze nog heet is.
• Bij stroompanne worden alle instellingen en weergegeven gegevens gereset. Na een stro-
ompanne dient u voorzichtig te zijn, want kookplaten die voor de stroompanne verwarmd
werden, worden niet meer door de restwarmte-indicator gecontroleerd.
• Als het stopcontact in de buurt van een kookveld ligt, moet u opletten, dat de kabel van
de kookplaat niet in aanraking komt met verhitte plaatsen.
• Laat de kookplaat niet achter zonder toezicht wanneer u oliën en vetten gebruikt. Dit kan
brandgevaar veroorzaken.
• Gebruik geen kookpotten uit kunststof of aluminiumfolie. Ze smelten bij hoge temperaturen
en kunnen de keramische plaat beschadigen.
• Suiker, citroenzuur, zout, enz. in vaste of vloeibare toestand en kunststoffen mogen niet
met een verwarmd kookveld in aanraking komen.
• Als er per ongeluk suiker of kunststof op de hete plaat terechtkomt, mag u in geen geval
de plaat uitschakelen. Schraap de suiker of de kunststof af met een scherpe schraper.
Bescherm uw handen tegen brandwonden en andere verwondingen.
22
Page 23

VEILIGHEIDSINSTRUCTIES
• Gebruik op de keramische kookplaat enkel potten en pannen met een platte bodem, die
geen scherpe randen of uitsteeksels hebben. Anders kunnen er onherstelbare krassen op
de plaat ontstaan.
• Het verwarmingsoppervlak van de keramische plaat is bestand tegen thermische schokken.
Ze is niet gevoelig voor koude of warmte.
• Laat geen voorwerpen op de plaat vallen. Puntinslagen bv. door een potje met kruiden,
kunnen in het slechtste geval voor barsten of splintering van de keramische plaat zorgen.
• Kokende gerechten kunnen via de beschadigde plaatsen in aanraking komen met de delen
van de kookplaat, die onder stroom staan.
• Indien het oppervlak gebarsten is, moet u de stroom uitschakelen om elektrocutie te vermijden.
• Houd u steeds aan de instructies voor onderhoud en reiniging van de keramische plaat.
Indien u de plaat verkeerd behandelt, verliest u het recht op garantie.
• Als het toestel uitgerust is met halogeenkookvelden, kan het kijken naar de velden schadelijk zijn.
23
Page 24

ENERGIEBESPARING
UITPAKKEN
Door op verantwoorde wijze
energie te gebruiken, bespaart u niet alleen op de
kosten van het huishouden,
maar werkt u ook bewust
mee aan de bescherming
van het milieu. Laten we
daarom ons steentje bijdragen door energiebesparing! Dat kan op de volgende manier:
• Gebruik van goede kookpotten en pan-
nen.
Potten met een vlakke en dikke bodem
laten toe om tot 1/3 te besparen op elektriciteit. Gebruik ook een deksel, want
anders stijgt het energieverbruik zelfs tot
vier maal!
• Kies kookpotten en pannen die op het
kookveld passen.
De kookpotten en pannen mogen niet
kleiner zijn dan het kookveld.
• Zorg ervoor dat de kookvelden en de
bodem van de potten proper zijn.
Vuil verstoort de warmteoverdracht – sterk
aangebrand vuil kan soms enkel verwijderd
worden met reinigingsmiddelen die niet
milieuvriendelijk zijn.
• Vermijd onnodig opheffen van deksels
om het kookproces te controleren.
• Bouw de kookplaat niet in de onmid-
dellijke nabijheid van koelkasten of
diepvriezers in.
Het energiegebruik van deze toestellen
stijgt hierdoor onnodig.
Het toestel wordt door zijn
verpakking beveiligd tegen
beschadigingen tijdens het
transport. Na het uitpakken
dient u de verpakkingsele-
menten op milieuvriendelijke
wijze te recycleren.
Alle materialen die voor de verpakking gebruikt werden, zijn onschadelijk voor het milieu.
Ze zijn 100% recycleerbaar en zijn aangeduid
met het gepaste symbool.
Opgelet! De verpakkingsmaterialen (zakjes
uit polyethyleen, stukken piepschuim, enz.)
moeten tijdens het uitpakken buiten het bereik van kinderen gehouden worden.
RECYCLAGE VAN VERSLETEN
TOESTELLEN
Op het einde van de gebruiksperiode mag dit toestel niet bij
het gewone huisvuil geplaatst
worden. Het moet afgegeven
worden bij een inzam elpu nt
voor recyclage van elektrische
en elektronische toestellen. Dit
wordt aangegeven door het gepaste symbool
op het product, in de gebruikershandleiding
of op de verpakking.
De materialen die bij de productie van het
toestel gebruikt werden, zijn geschikt voor
hergebruik volgens hun aanduiding. Dankzij
dit hergebruik, de verwerking van materialen
of andere vormen van hergebruik van afgedankte toestellen draagt u in belangrijke mate
bij tot de bescherming van het milieu.
Informatie over het inzamelpunt voor versleten toestellen kunt u bij de gemeentediensten
krijgen.
24
Page 25

BESCHRIJVING VAN HET TOESTEL
0
1
2
3
0
1
2
3
0
1
2
3
0
1
2
3
Beschrijving van kookplaat KMC*
Restwarmte-indicator Indicatie lampje
-kookplaat aanzetten
Kookzones
Draaiknop
25
Page 26

INSTALLATIE
560
490
min
60
min
50
+2
+2
Voorbereiding van het werkblad voor inbouw van de
kookplaat
l De dikte van het werkblad van het meubel dient 28 tot 40 mm te bedragen, de diepte van
het werkblad minimaal 600 mm. Het werkblad moet vlak en waterpas zijn. Aan de kant van
de muur moet het werkblad worden afgedicht en beveiligd tegen vocht en overlopen.
l Aan de voorkant moet de afstand tussen de rand van de opening en de rand van het
werkblad minimaal 60 mm bedragen, aan de achterkant minimaal 50 mm.
l De afstand tussen de rand van de opening en de zijkant van het keukenkastje moet mi-
nimaal 55 mm bedragen.
l De bekleding van de inbouwmeubelen en de lijm waarmee deze is vastgelijmd moeten
bestand zijn tegen temperaturen van 100°C. Als niet aan deze voorwaarde wordt voldaan
kan het oppervlak vervormen of de bekleding loslaten.
l Bescherm de randen van de opening met materiaal dat bestand is tegen vocht.
l Maak de opening in het werkblad volgens de afmetingen uit afb. 1.
l Laat onder de kookplaat een ruimte vrij van minimaal 80 mm om te zorgen voor goede
luchtcirculatie. Daarmee voorkomt u oververhitting van de oppervlakte rondom de kookplaat.
1
26
Page 27

INSTALLATIE
Montage van de schuimrubber dichting
Inbouw van het apparaat zonder dichting is verboden.
Breng de dichting als volgt op het apparaat aan:
Plak de meegeleverde schuimrubber dichting op de onderkant van het frame van
de kookplaat, voordat u het apparaat in het werkblad inbouwt.
- verwijder de beschermende folie van de dichting;
- plak de dichting vervolgens op de onderkant van het frame (afb.).
27
Page 28

INSTALLATIE
54
321
54
321
15
15
6
320
560
490
min
60
min
50
466
560
416 50
490
min
60
min
50
270
50
Installatie van kookplaat KMC* - klem
• Gebruik bij een werkblad met een dikte van 38 mm, 4 “A”-klemmen voor het bevestigen
van de kookplaat. Op de afbeeldingen 2 en 3 is de montagewijze weergegeven. Bij een
werkblad met een dikte van 28 mm, gebruikt u naast de “A”-klemmen ook 4 houtblokjes
met de afmetingen 15x15x50 mm. Op de afbeeldingen 4 en 5 is de montagewijze weerge-
geven.
• Controleer of de dichting goed aansluit op de kookplaat. Draai de klemmen aan de onderkant van de kookplaat licht aan.
• Maak het werkblad schoon, leg de kookplaat in de opening en druk hem op het blad.
• Plaats de klemmen loodrecht op de rand van de kookplaat en draai ze goed vast.
2
1. Meubelblad
2. Schroef
3. Bevestigingsklem
4. Kookplaat
5. Dichting van de kookplaat
4
1. Meubelblad
2. Schroef
3. Bevestigingsklem
4. Kookplaat
5. Dichting van de kookplaat
6. Houten blokje
3
5
28
Page 29

INSTALLATIE
Aansluiting van de plaat op de elektrische installatie
Opgelet!
Enkel een erkend installateur met de gepaste kwalicaties mag het toestel op de
elektrische installatie aansluiten. Het is verboden om zelf aanpassingen of wijzigingen
aan te brengen aan de elektrische installatie.
Aanwijzingen voor de installateur
De plaat is geproduceerd voor aansluiting op een elektrische voeding met driefasige
wisselstroom (400 V 3N ~50 Hz). Het toestel kan aan eenfasige voeding (230 V) aangepast
worden door een gepaste overbrugging op de contactstrip aan te brengen volgens het
bijgevoegde schakelschema. Het schakelschema is ook aangebracht op het onderste gedeelte
van de ombouw. De contactstrip is bereikbaar door het deksel van het onderste gedeelte van
de ombouw weg te nemen. Vergeet niet om een gepaste aansluitkabel te kiezen in functie
van het soort aansluiting en het nominale vermogen van de plaat.
De aansluitkabel moet in de beugel vastgemaakt worden.
Opgelet!
Vergeet niet om het beveiligingscircuit vast te maken op de klem van de contactstrip,
die met het symbool aangeduid is. De elektrische voedingsinstallatie van de
plaat moet beveiligd zijn met een aangepaste zekering of na het beveiligen van
de voedingsleiding met een gepaste schakelaar waarmee de stroomtoevoer in
noodsituaties uitgeschakeld kan worden.
Voordat u de plaat op de elektrische installatie aansluit, moet u de informatie op het typeplaatje
en het schakelschema grondig doornemen.
OPGELET! De installateur is verplicht om aan de gebruiker een „attest van aansluiting van
het kooktoestel op de elektrische installatie” uit te geven (zie garantiekaart).
Aansluiting van de kookplaat op een manier die niet in het schema aangegeven is, kan schade
aan het toestel veroorzaken.
29
Page 30

INSTALLATIE
Voor het 230 V lichtnet een mono-
1
fazige aansluiting met nulleiding,
de geleidingsbruggen verbinden
de klemmen 1-2-3, de nulleiding
aan 4, de aardleiding aan
2
Voor het 400/230 V lichtnet een
tweefazige aansluiting met nulleiding, de geleidingsbrug verbindt
de klemmen 2-3, de nulleiding aan
4, de aardleiding voor
Voor het 400/230 V lichtnet een
3
driefazige aansluiting met nulleiding, fazeleidingen aangesloten
aan 1,2 en 3, de nulleiding aan 4,
de aardleiding aan
SCHEMA VAN MOGELIJKE VERBINDINGEN
Attentie! De verwarmingselementen werken bij
een spanning van 230 V
Attentie! Bij iedere verbinding moet de aardleiding worden
aangesloten op de met gelabelde klem.
Aanbevolen
type aansluitkabel
1N~
2N~
3N~
H05VVF3G4
H05VVF4G2,5
H05VVF5G1,5
L1=R, L2=S, L3=T; N - klemmen van de nulleiding; - klemmen van de aardleiding
30
Page 31

BEDIENING
Voor het eerste gebruik van de kookplaat
● De glaskeramische kookplaat eerst grondig reinigen. Behandel de glaskeramische plaat
als een oppervlakte van glas.
● Bij het eerste gebruik kan het apparaat kortstondig gaan walmen, schakel daarom de
luchtventilatie in of zet een raam open.
● Neem bij het bedienen van het apparaat de veiligheidsvoorschriften in acht.
Geschikt kookgerei
Voor glaskeramische kookplaten is er speciaal getest kook- en braadgerei op de markt. Houdt
u aan de aanwijzingen van de producent.
Keukengerei met een bodem van aluminium of koper kan metaalachtige verkleuringen
veroorzaken die zich moeilijk laten verwijderen. U moet bijzonder voorzichtig omgaan met
geëmailleerd keukengerei omdat de glaskeramische plaat onherstelbaar beschadigd kan raken
als de pan droogkookt. Volg de volgende aanwijzingen op om een optimaal energieverbruik
en optimale kooktijden te bewerkstelligen en het inbranden van overgekookte gerechten op
de glaskeramische oppervlakte te voorkomen.
Bodem van de pan:
Het kookgerei moet een stabiele, vlakke bodem hebben, omdat een bodem met scherpe randen, bramen of met verkoolde etensresten krassen en beschadigingen op de glaskeramische
oppervlakte kan veroorzaken!
Afmetingen van de pan:
De diameter van de panbodem moet de diameter van het gebruikte verwarmingselement zo
dicht mogelijk benaderen.
Deksel van de pan:
Het deksel verhindert dat de warmte ontsnapt, waardoor de kooktijd korter wordt en u minder
energie verbruikt.
31
Page 32

BEDIENING
0
1
2
3
Het apparaat aanzetten:
De activering van de gekozen kookzone gebeurt door aan de draaiknop te draaien,
op dat moment licht het indicatielampje -kookplaat aanzetten p, de instelling van het
warmteniveau regelen we met de op de draaiknop aangegeven instelling. De kook-
zones hebben een verschillend verwarmingsvermogen. Het verwarmingsvermogen
kan stapsgewijs geregeld worden door de draaiknop naar links of naar rechts te
draaien.
Stand
draaiknop
3
●
2
●
1
●
0
Voorbeeld van soort handeling
snel koken, snel opwarmen, braden
aanbraden van vlees, vis
langzaam braden
koken van soepen, grotere hoeveelheden
aardappelen koken
stoven van groenten
uitschakelen
Restwarmte-indicator.
Aan de voorkant bevinden zich de restwarmte indicatoren, elk toebehorend aan een
ander kookzone, welke branden ingeval de temperatuur van het betreffende veld de
50 °C overschrijdt. Het bovengenoemde maakt het mogelijk om de geaccumuleerde
warmte volledig te gebruiken bijv.: om de gerechten op te warmen of warm te houden
en voorkomt tegerlijkertijd brandwonden, omdat de uitgeschakelde kookzone nog een
hoge temperatuur heeft.
Als deze indicator is gedoofd, kunt u de kookzone aanraken. Wees u ervan bewust dat hij
nog niet is afgekoeld tot de omgevingstemperatuur.
Ingeval van stroomuitval wordt de restwarmte-indicator uitgeschakeld.
32
Page 33

REINIGING EN ONDERHOUD
De zorg waarmee de gebruiker de kookplaat
reinigt en onderhoudt, heeft een belangrijke
invloed op haar levensduur en probleemloze
werking.
Bij het reinigen van de keramiek
moeten dezelfde regels toegepast
worden als voor het reinigen van
glazen oppervlakken. Er mogen
nooit schurende of bijtende rein igin gsmi ddele n, schuurzand
of schuursponzen met een ruw
oppervlak gebruikt worden.
Er mogen ook geen reinigingstoestellen met damp gebruikt
worden.
Reiniging na elk gebruik
• Licht, niet aangebrand vuil moet met
een vochtige doek zonder reinigingsmiddel verwijderd worden. Bij gebruik van
een afwasmiddel kunnen er blauwachtige
verkleuringen ontstaan. Hardnekkig vlekken laten zich niet altijd verwijderen bij de
eerste reiniging, zelfs niet bij gebruik van
een speciaal reinigingsmiddel.
• Sterk aangekoekt vuil moet met een
schraper verwijderd worden. Daarna
moet het kookvlak met een vochtige
doek gereinigd worden.
Verwijderen van vlekken
• Heldere vlekken met een parelkleur
(aluminiumresten) kunnen met behulp
van een speciaal reinigingsmiddel van
de afgekoelde plaat verwijderd worden.
Kalkresten (bv. na overkoken van water)
kunnen met azijn of een speciaal reinigingsmiddel verwijderd worden.
• Bij het verwijderen van suiker, gerechten
met een hoog suikergehalte, kunststoffen
of aluminiumfolie mag het kookveld niet
uitgeschakeld worden! De resten moeten
onmiddellijk (in hete toestand) met een
scherpe schraper van het hete kookveld
geschraapt worden. Na het verwijderen
van het vuil mag de plaat uitgeschakeld
worden en de afgekoelde plaat kan met
een speciaal reinigingsmiddel verder
gereinigd worden.
Schraper om de kookplaat te reinigen
U kunt speciale reinigingsmiddelen kopen
in supermarkten, gespecialiseerde winkels
voor elektrotechniek, bij kruidenierszaken, in
voedingswinkels en in winkels met keukenuitrusting. Scherpe schrapers kunt u vinden in
doe-het-zelfzaken en in winkels met bouw- en
verfmaterialen.
33
Page 34

REINIGING EN ONDERHOUD
Breng nooit reinigingsmiddel op een hete
kookplaat aan. Laat de reinigingsmiddelen
best wat opdrogen en verwijder ze daarna
pas met een natte doek. Eventuele achtergebleven restjes van het reinigingsmiddel
kunt u met een vochtige doek verwijderen
vooraleer u de plaat opnieuw aanschakelt.
Als u de reinigingsmiddelen niet verwijdert,
kunnen ze bijtend werken.
Als het keramische oppervlak van de kookplaat verkeerd behandeld wordt, neemt
de producent geen verantwoordelijkheid
op zich op basis van de garantie!
Periodieke controles
Naast het lopende onderhoud en reiniging
van de plaat, moet u ook:
• regelmatig de werking van de besturingselementen en de werkende onderdelen
van de plaat controleren. Na het verstrijken van de garantieperiode, en ten
minste één maal per twee jaar, moet een
technische controle van de plaat laten
uitvoeren door een onderhoudsdienst,
• de vastgestelde defecten herstellen,
• een regelmatig onderhoud van de we-
rkende onderdelen van de plaat uitvoeren,
Opgelet!
Als de besturing om één of andere reden niet werkt als de plaat
al aangeschakeld is, moet u de
hoofdschakelaar of de zekering
uitschakelen en de onderhoudsdienst contacteren.
Opgelet!
Als er barsten of breuken in de
keramische plaat ontstaan, moet
de kookplaat onmiddellijk uitgeschakeld worden en van het
elektriciteitsnet ontkoppeld worden. Hiervoor moet de zekering
uitgeschakeld worden of moet
de stekker uit het stopcontact getrokken worden. Daarna moet u de
onderhoudsdienst contacteren.
Opgelet!
Alle herstellingen en instellingen
moeten bij een erkende onderhoudsdienst of door een erkend
installateur met de gepaste kwa-
licaties uitgevoerd worden.
34
Page 35

HANDELSWIJZE BIJ PROBLEEMSITUATIES
Bij elke probleemsituatie moet u:
• de werkende onderdelen van de plaat uitschakelen
• de elektrische voeding ontkoppelen
• een herstelling aanvragen
• sommige kleine problemen kan de gebruiker zelf op lossen met behulp van de aanwijzingen
in de onderstaande tabel. Controleer opeenvolgend alle punten in de tabel, vooraleer u
de onderhouds- of klantendienst contacteert.
PROBLEEM OORZAAK HANDELSWIJZE
1. Het toestel werkt niet - stroompanne - controleer de zekering in
de huisinstallatie, vervang
de doorgebrande zekering
2. De restwarmte-indicator
brandt niet, hoewel het
kookveld nog warm is
3. Barst in de keramische
kookplaat
4. Als het defect nog steeds
niet verholpen is
- stroompanne, het toestel
werd van het elektriciteitsnet ontkoppeld
Gevaar! Ontkoppel de keramische kookplaat
onmiddellijk van het elektriciteitsnet (zekering).
Contacteer de dichtstbijzijnde onderhoudsdienst.
Ontkoppel de keramische kookplaat van het elektriciteitsnet (zekering!). Contacteer de dichtstbijzijnde onderhoudsdienst.
Belangrijk!
U bent verantwoordelijk voor de goede staat van het
toestel en voor het gepaste gebruik van het toestel in uw
huishouden. Indien u de onderhoudsdienst oproept als
gevolg van een bedieningsfout, dan zal u ook binnen de
garantieperiode met de kosten belast worden.
De producent is niet verantwoordelijk voor schade die
ontstaat door het niet naleven van deze gebruikershandleiding.
- de restwarmte-indicator
gaat pas opnieuw werken
bij de volgende aanschakeling en uitschakeling van
het bedieningspaneel
35
Page 36

TECHNISCHE GEGEVENS
Nominale spanning: 400V 3N~50 Hz
Nominaal vermogen KMC*
- kookveld: 2 x Ø 145 mm 1,2 kW
- kookveld: 2 x Ø 180 mm 1,8 kW
Afmetingen: 575 x 505 x 50
Gewicht: ca. 8,4 kg;
GARANTIE,
Garantie
Bediening in het kader van de garantie volgens de garantiekaart.
- De producent is niet verantwoordelijk voor beschadigingen die ontstaan als gevolg van
verkeerde omgang met het product.
Gelieve het type en fabrieksnummer van de plaat, die op het typeplaatje aangegeven zijn,
in te vullen
Type......................................................
Fabrieksnr..............................................
36
Page 37

373839
Page 38

Page 39

Page 40

 Loading...