

Page 1
PBP2VQ203FTN / (KMC 13281-3 C)
(EN) OPERATING MANUAL.........................................2
(NL) GEBRUIKERSHANDLEIDING.............................24
IO-HOB-0491 / 8070536
(11.2017 / v2)
Page 2

DEAR USER,
The plate is exceptionally easy to use and extremely ecient. After reading the instruction
manual, operating the cooker will be easy.
Before being packaged and leaving the manufacturer, the plate was thoroughly checked with
regard to safety and functionality.
Before using the appliance, please read the instruction manual carefully.
By following these instructions carefully you will be able to avoid any problems in using the
appliance.
It is important to keep the instruction manual and store it in a safe place so that it can be
consulted at any time.
It is necessary to follow the instructions in the manual carefully in order to avoid possible
accidents.
Note!
Operate the appliance only after reading / understanding this Manual.
The appliance has been designed only for cooking. Any other use (for example for
heating) does not comply with its operating prole and may cause danger.
The producer reserves a right to implement changes having no impact on the operation of the appliance.
Certicate of compliance CE
The Manufacturer hereby declares that this product complies with the general requirements pursuant to the
following European Directives:
l The Low Voltage Directive 2014/35/EC,
l Electromagnetic Compatibility Directive 2014/30/EC,
l ErP Directive 2009/125/EC,
and therefore the product has been marked with the symbol and the Declaration of Conformity has been
issued to the manufacturer and is available to the competent authorities regulating the market.
2
Page 3

TABLE OF CONTENTS
Basic information.................................................................................................2
Safety instructions................................................................................................4
Description of the appliance...............................................................................9
Installation...........................................................................................................10
Operation..........................................................................................................14
Cleaning and maintenance...............................................................................20
Emergency procedures......................................................................................22
Technical specication.................................................................................23
Warranty.........................................................................................................23
3
Page 4

SAFETY INSTRUCTIONS
Warning: The appliance and its accessible parts
become hot during use. Care should be taken to
avoid touching heating elements. Children less than 8
years of age shall be kept away unless continuously
supervised.
This appliance can be used by children aged from 8
years and above and persons with reduced physical,
sensory or mental capabilities or lack of experience
and knowledge if they have been given supervision or
instruction concerning use of the appliance in a safe
way and understand the hazards involved. Children
shall not play with the appliance. Cleaning and user
maintenance shall not be made by children without
supervision.
Warning: Unattended cooking on a hob with fat or
oil can be dangerous and may result in re.
NEVER try to extinguish a re with water, but switch
o the appliance and then cover ame e.g. with a lid
or a re blanket.
Warning: Danger of re: do not store items on the
cooking surfaces.
4
Page 5

SAFETY INSTRUCTIONS
Warning: If the surface is cracked, switch o the ap-
pliance to avoid the possibillity of electric shock.
The appliance is not intended to be operated by means of an external timer or separate remote-control
system.
You should not use steam cleaning devices to clean
the appliance.
● Before using the ceramic plate for the rst time read the Operating Manual carefully
as thus you can ensure safe operation and avoid damage to the plate.
● If the ceramic plate is operated near a radio, TV set or other emitting device, please check
whether the touch panel works correctly.
● The ceramic plate should be installed by a qualied electrician.
● Do not install the plate near refrigerating devices.
● The furniture the plate is tted in should be resistant to temperatures up to 100 ºC. The
requirement applies to the veneers, edges, plastic surfaces, glues and varnishes.
● The plate can be used only after it has been tted into furniture, as only thus you will be
protected from accidental contact with live components.
● Electric appliances can be repaired only by qualied specialists. Unprofessional repairs may
compromise the safety of the appliance.
● The appliance is disconnected from the mains only when the mains plug is pulled out from
the socket or when the fuse has been switched o.
● Never allow children to remain unattended near the cooktop nor to play with the control panel.
● When switched on the hotplates quickly become hot. To avoid unnecessary power consump-
tion, switch them on only after putting a cooking pot.
● Residual temperature indicator built-in into the electronic system tells you whether the
hotplate is still switched on and whether it is still hot.
● Should there be a power failure, all the settings and indications will be cancelled. Please be
careful when the power supply is restored as hotplates which have been hot before power
failure will no longer be controlled by the indicator.
● If there is a mains socket located near the hotplate, please make sure that the supply cord
does not touch the hot places.
● Do not leave the plate unattended when cooking on fats and oils as they create re hazard.
● Do not use plastic pots or containers made from aluminium foil as they melt in high tem-
peratures and may damage the ceramic plate.
5
Page 6

SAFETY INSTRUCTIONS
● Sugar, citric acid, salt etc., both in liquid and solid state, as well as plastic should not get
into contact with a hot hotplate.
● If through carelessness, sugar or plastic gets on a hot hotplate, you may not switch o the
plate but scrape away sugar or plastic using a sharp scrapper. Protect hands from burns.
● Use only at-bottom pots and saucepans on your ceramic plate, without sharp edges or
burrs as otherwise the plate may get permanently damaged.
● The heating surface of the ceramic plate is resistant to thermal shock. It is neither hot nor
cold-sensitive.
● Avoid dropping objects on the plate. A point hit, for example a falling bottle with spices, may
in unfavourable circumstances lead to cracks and splits appearing on your ceramic plate.
● Boiled over residuals of food may penetrate damaged places and get to the live components
of the ceramic plate
● Should cracks or splits appear on the surface of your ceramic plate immediately disconnect
it from the mains. In order to do so, switch o the fuse or pull out the mains plug from the
socket. Call the Customer Service
● Please observe the maintenance and cleaning guidelines. Should you fail to proceed in
compliance with the provided guidelines, you will lose your warranty rights.
● Do not use the surface of the plate as a carving board or a working top.
● It is recommended that metal objects like knives, forks, spoons and lids are not left on the
ceramic plate as they can become hot.
● Do not t the plate over a cooker without a fan, dishwasher, refrigerator, freezer or
washing machine.
Note! If the xed-mounted power cable gets damaged, it should be replaced by the
manufacturer or in a specialist workshop or by a qualied person to avoid any accidents.
6
Page 7

SAVING ENERGY
Everybody who properly
uses energy not only saves
money but also consciously
acts in aid of the natural
environment. So let’s save
electric energy by:
● Using proper cookware
Pots and pans with at and thick bottom
help to save up to one-third of electric
energy. Remember about the lid as
otherwise the consumption of energy
quadruples!
● Matching cookware to the size of the
hotplate
A cooking pot should neither be smaller
nor bigger than the used hotplate.
● Maintaining hotplates and pot bottoms
clean
Dirt obstructs the transfer of heat – heavily
burnt food residuals often can be cleaned
only with chemicals harmful to the environment.
● Avoiding necessary “peeping into
pots”.
● Not using the plate near refrigerators
/ freezers
As the consumption of energy unneces-
sary rises.
7
Page 8
UNPACKING
DISPOSING OF THE DEVICE
The appliance is protected
from damage during transpor-
tation by its packaging. After
unpacking please dispose
of the packing materials in a
manner creating no risk to the
environment.
All materials used for packing are harmless
to the natural environment, can be recycled
in 100% and have been identied with appropriate symbol.
Note! Packing materials (polyethylene bags,
pieces of polystyrene etc.) should be kept
away from children during unpacking.
When disposing of the device, do
not bring it to regu lar municipal
waste con tainers. Instead, bring
it to elec trical and electronic
waste recycling and reuse cen-
ter. A relevant label has been
put on the device, its in structions
manual, or on the package.
The device has been manufactured of recyclable materials. By bringing old device to
recycling collection center, you show that you
care about na ture.
Ask your local environmental care authority
for information on location of such fa cilities.
8
Page 9
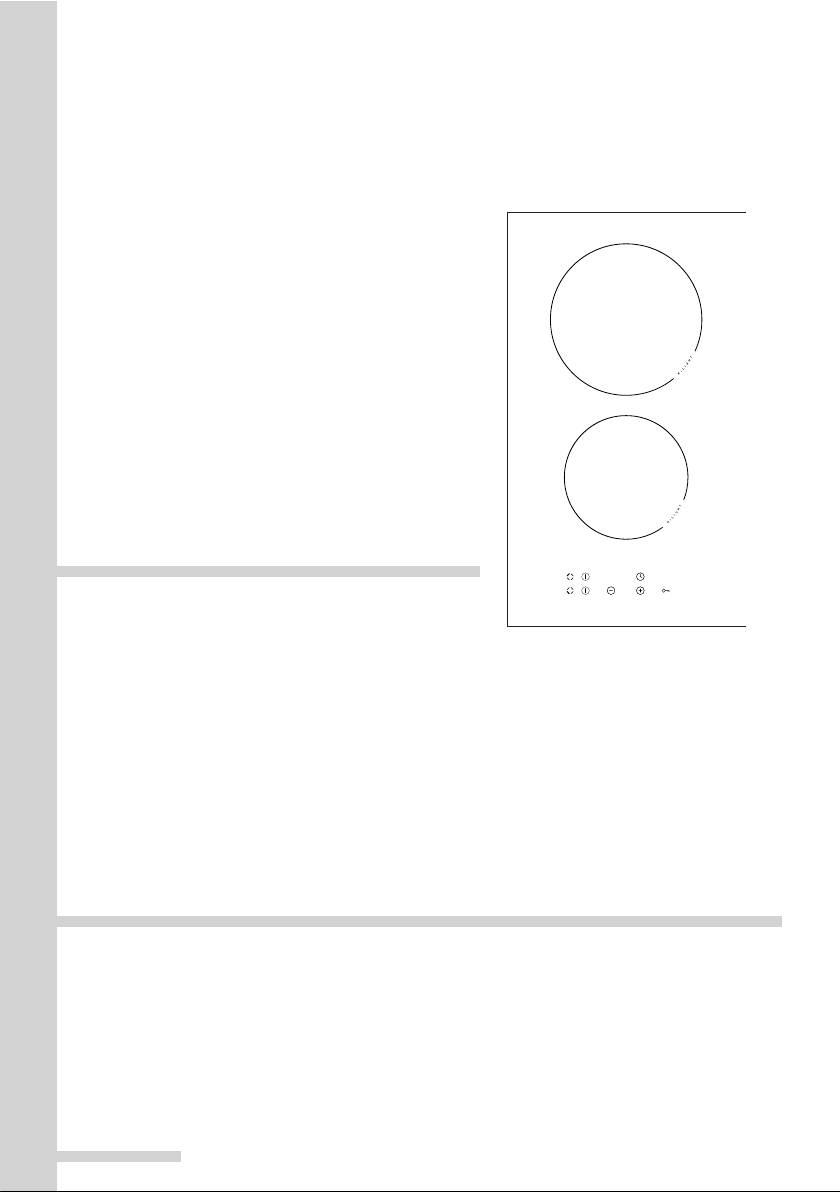
DESCRIPTION OF THE APPLIANCE
Description of hob
Back hotplate
Ø 180
Front hotplate
Ø 145
Control panel
1. Main sensor
2. Hotplate indicators
3. Minus sensor
4. Plus sensor
21
5. Key sensor with the lock function
6. Clock indicator
7. Sensor of the clock
9
76
54321
Page 10
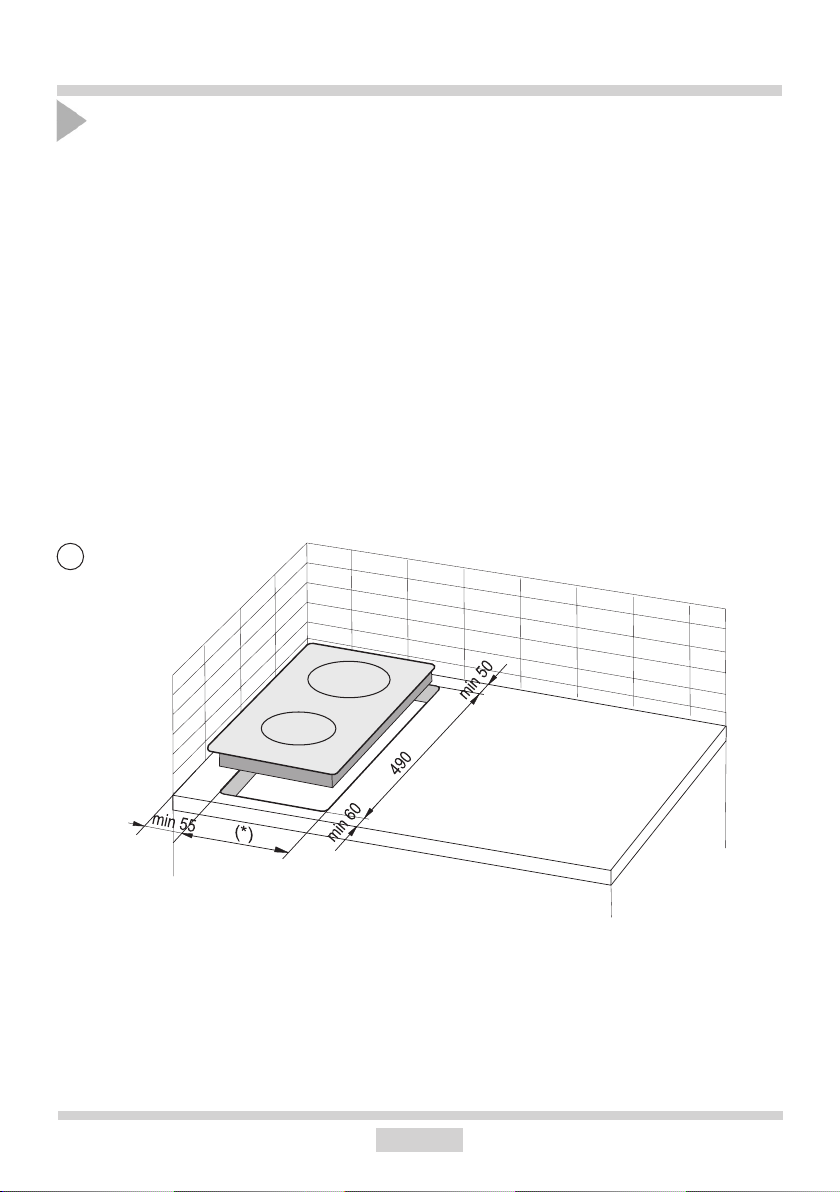
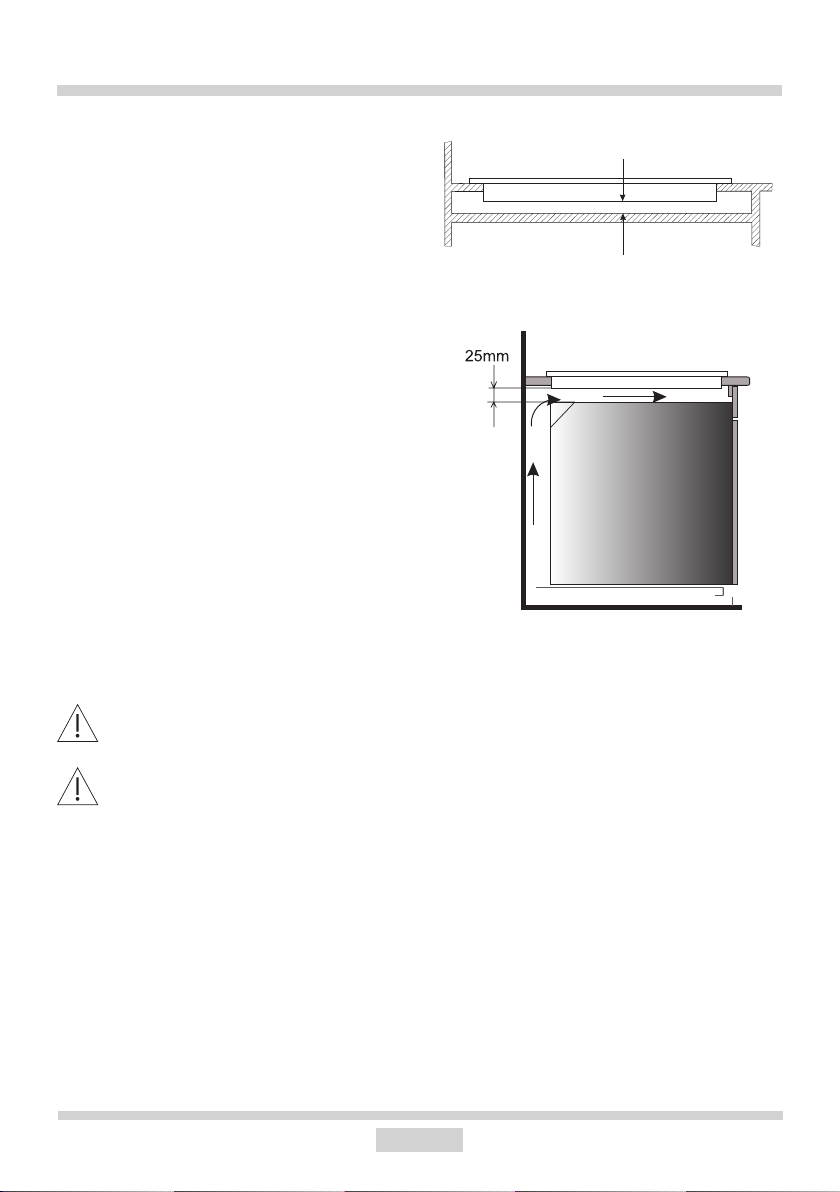
INSTALLATION
Making the worktop recess
● Worktop thickness should be 28 - 40 mm, while its width at least 600 mm. The worktop
must be at and level. Edge of the worktop near the wall must be sealed to prevent ingress
of water or other liquids.
● There should be sucient spacing around the opening, in particular, at least 50 mm di-
stance to the wall and 60 mm distance to the front edge of worktop.
● The distance between the edge of the opening and the side wall of the furniture should
be at least 55 mm.
● Worktop must be made of materials, including veneer and adhesives, resistant to a temperature of 100°C. Otherwise, veneer could come o or surface of the worktop become
deformed.
● Edge of the opening should be sealed with suitable materials to prevent ingress of water.
● Worktop opening must cut to dimensions as shown on gure 1.
● Ensure minimum clearance of 25 mm below the hob to allow proper air circulation and
prevent overheating.
1
(*) 285 mm
10
Page 11
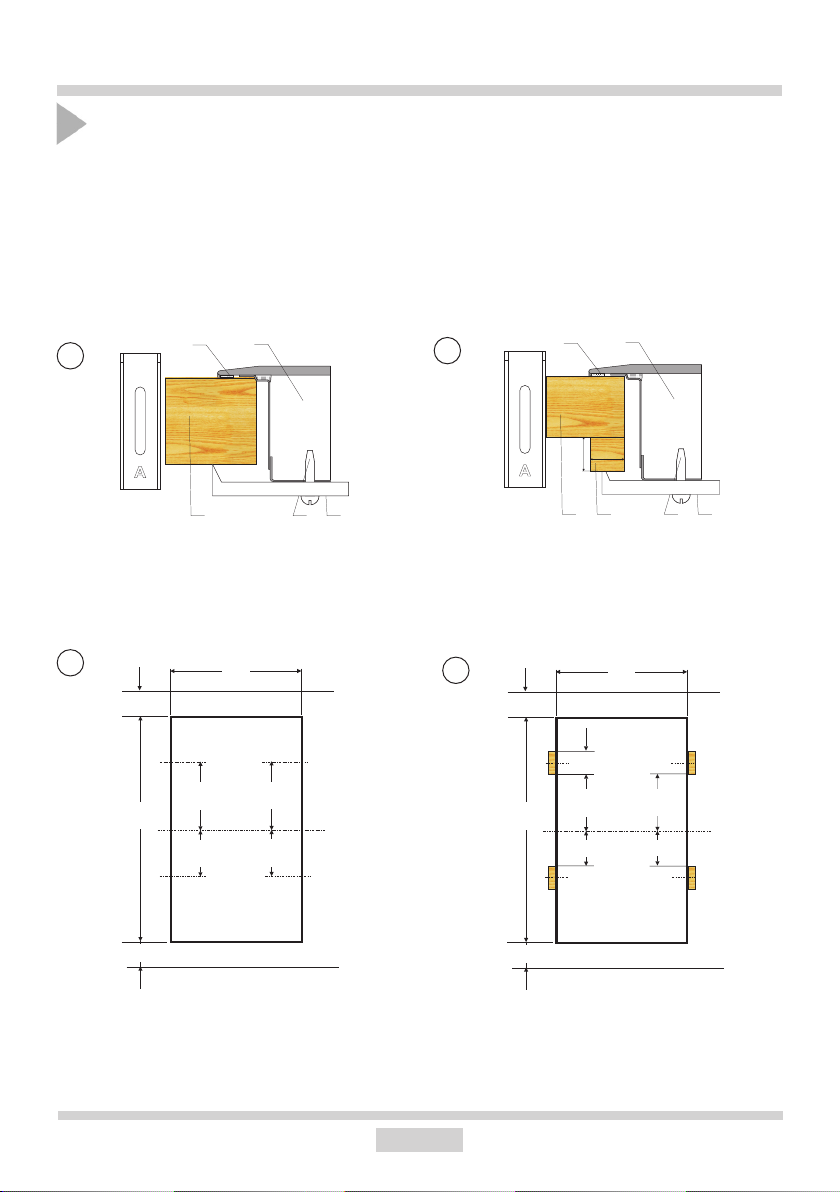
INSTALLATION
Note. When installing the hob in the kitchen worktop, install a partition panel, as
shown on the picture. If the hob is to be
installed above a built-in oven, installation of the partition panel is not required.
min 25
If the hob was installed in the kitchen
worktop above the drawer, the bottom
Installing hob in kitchen cabinet worktop.
cover of the hob must be covered with
a wooden panel or protective board for
ceramic hobs.
Installing hob in kitchen cabinet worktop
Do not install the hob above the oven without ventilation.
Route electrical lead so that it does not touch the lower guard.
above oven.
11
Page 12
INSTALLATION
54
321
54
321
6
285
min
min
285
min
min
Installing hob - bracket
● Use four “A” brackets for 48 mm thick worktops. Fit the hob into worktop opening as shown
on figure2 and 3. To properly secure hob in 28 mm and 38 mm thick worktop, use four
15x15x50 mm wooden blocks in addition to “A” brackets. Fit the hob into worktop opening
as shown on figure 4 and 5.
● Check if adhesive seal is properly applied to the hob’s flange. Loosely attach fixing brackets
to the bottom of the hob
● Remove dust from the worktop, insert hob into the opening and press in firmly,
● Position fixing brackets perpendicularly to the hob’s edge and tighten firmly.
2
1. worktop
2. screw
3. xing bracket
4. hob
5. seal
3
50
490
150
100
150
100
4
15
15
1. worktop
2. screw
3. xing bracket
4. hob
5. seal
6. wooden block
5
50
50
490
125
75
125
75
60
● The hob has a xed-mounted cable with a neutral contact and may only be connected to a
60
230 V ~ 50 Hz socket with grounding pin. Socket power circuit should be protected with a 16
A fuse.
12
Page 13
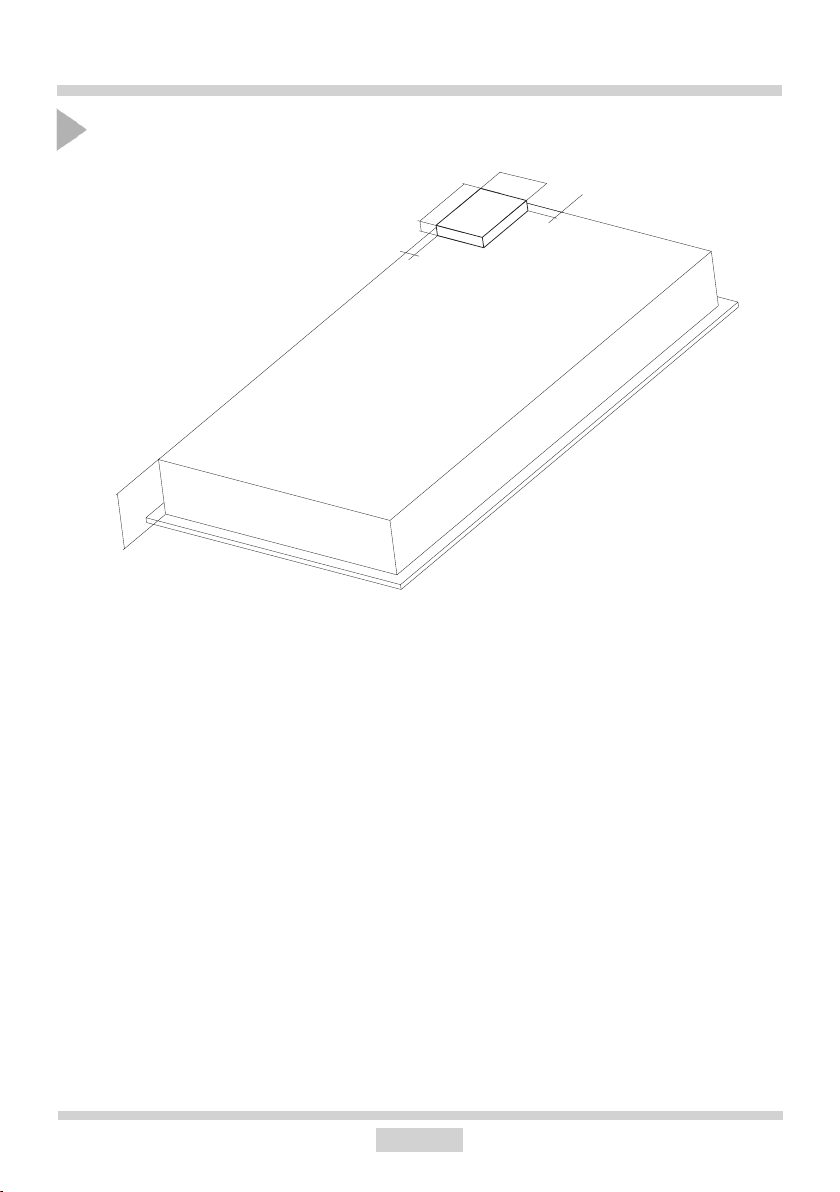
INSTALLATION
40
Location and dimensions of terminal block compartment.
55
5
5
41
5
● The hob has a fixed-mounted cable with a neutral contact and may only be connected to
a 230 V ~ 50 Hz socket with grounding pin. Socket power circuit should be protected with
a 16 A fuse.
13
Page 14
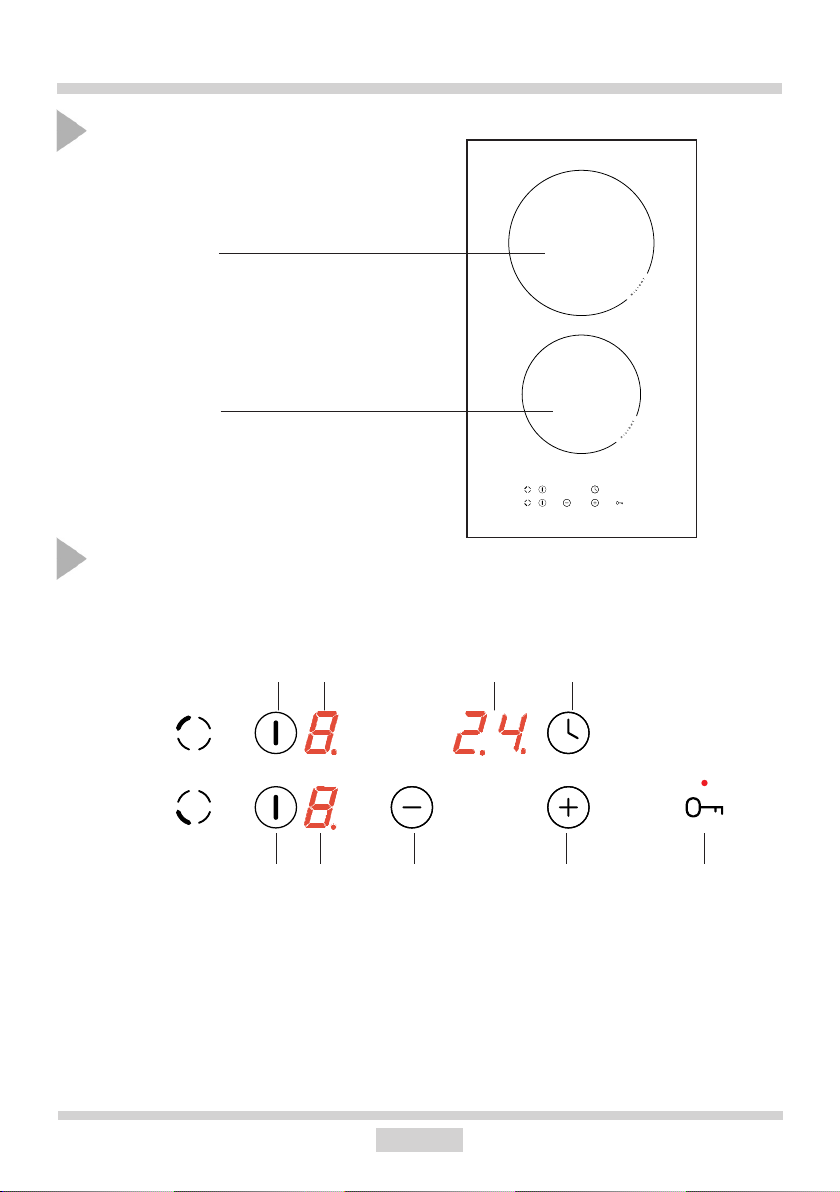
OPERATION
Before rst use
● Connect the hob using the xed-mounted cable approx. 1.5 long with a neutral
contact,
● Carefully clean the ceramic plate treating it as a glass surface,
● When used for the rst time the plate can give o a bit of a smell so switch on the venti-
lation system or open the window,
● Operate the plate observing the safety instructions.
The ceramic plate is equipped with sensors operated by touching the marked areas with nger.
Every touch of a sensor is conrmed with a sound.
When switching the plate on and o and increasing / reducing the heating power al-
ways touch only one sensor. If you touch several sensors at the same time (with the
exception of switching o the hotplate or the clock), the system will ignore the entered
settings and, should you keep touching the sensors for a long time, will emit a fault signal.
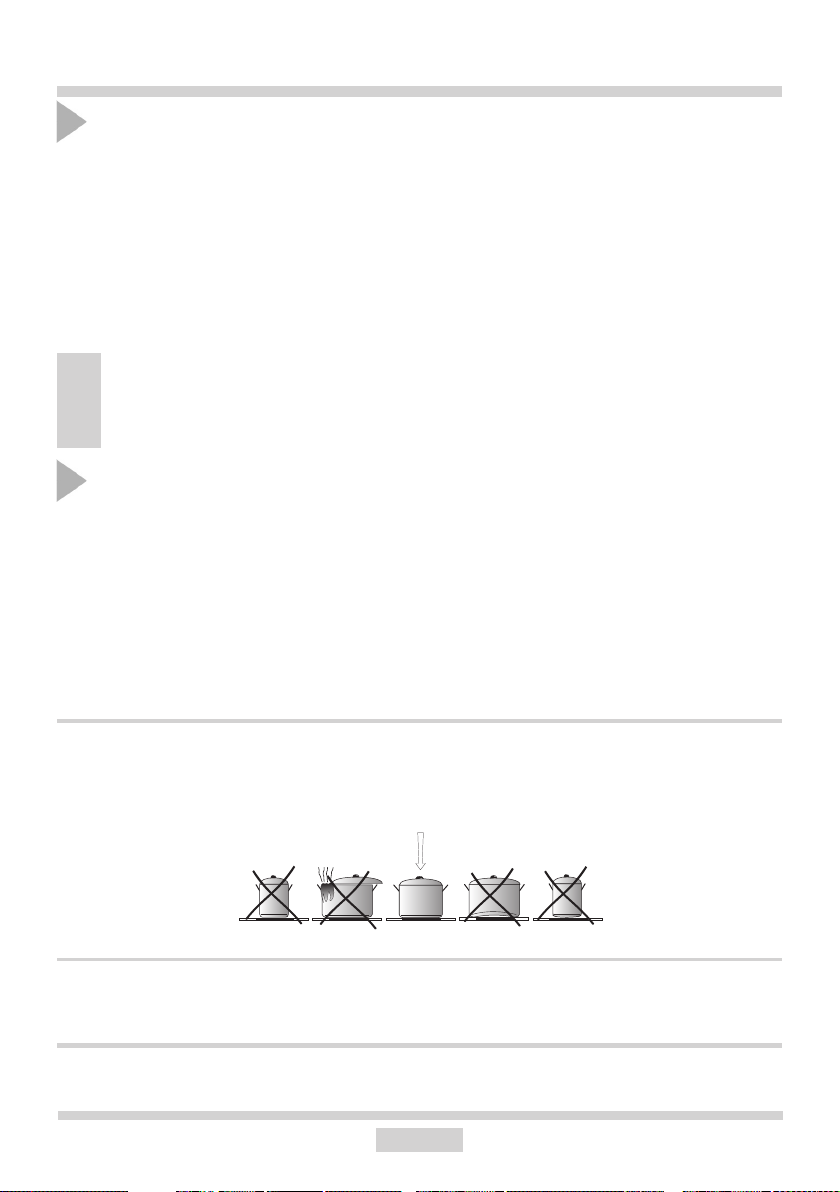
Proper utensils for co oking
There are specially tested utensils for cooking and frying on ceramic plate co okers. It is important to proceed in ac cor dan ce with the instructions of their ma nu fac tu rers.
Cooking dishes with aluminium or cop per bottoms may cause metallic di sco lo ra tions, very
dicult to remove. You sho uld be particularly careful with ena mel led dishes which may cause
per ma nent da ma ge after accidental boiling away of the ir contents. In order to ob ta in optimum
po wer consumption, opti mum cooking time and to avoid burning of boiling over food on the
plate sur fa ce, it is necessary to conform to the following instructions.
Dish bottom:
Cooking/frying dishes should have sta ble, at bottoms, since bottoms with sharp rims, burrs
and charred food re ma ins may scratch the ceramic plate and act on it like abrasive material!
When the plate is cool it is allowed to use pots with slightly con ca ve bottoms, since they
absorb the heat from the heating plate in an optimum way.
Pot size:
The diameter of pot and pan base sho uld correspond to the diameter of the he ating element
of the plate as closely as po ssi ble.
Pot cover:
A cover on a pot prevent the heat from escaping, therefore it shortens the he ating time and
reduces power con sump tion.
14
Page 15
OPERATION
Control Panel
When you connect the hob to mains, you will hear a short beep and sensors will be locked.
Touch and hold for 3 second to release the lock.
Important!
Do not place any objects on the sensors as this could cause an error. Always
keep touch sensors clean.
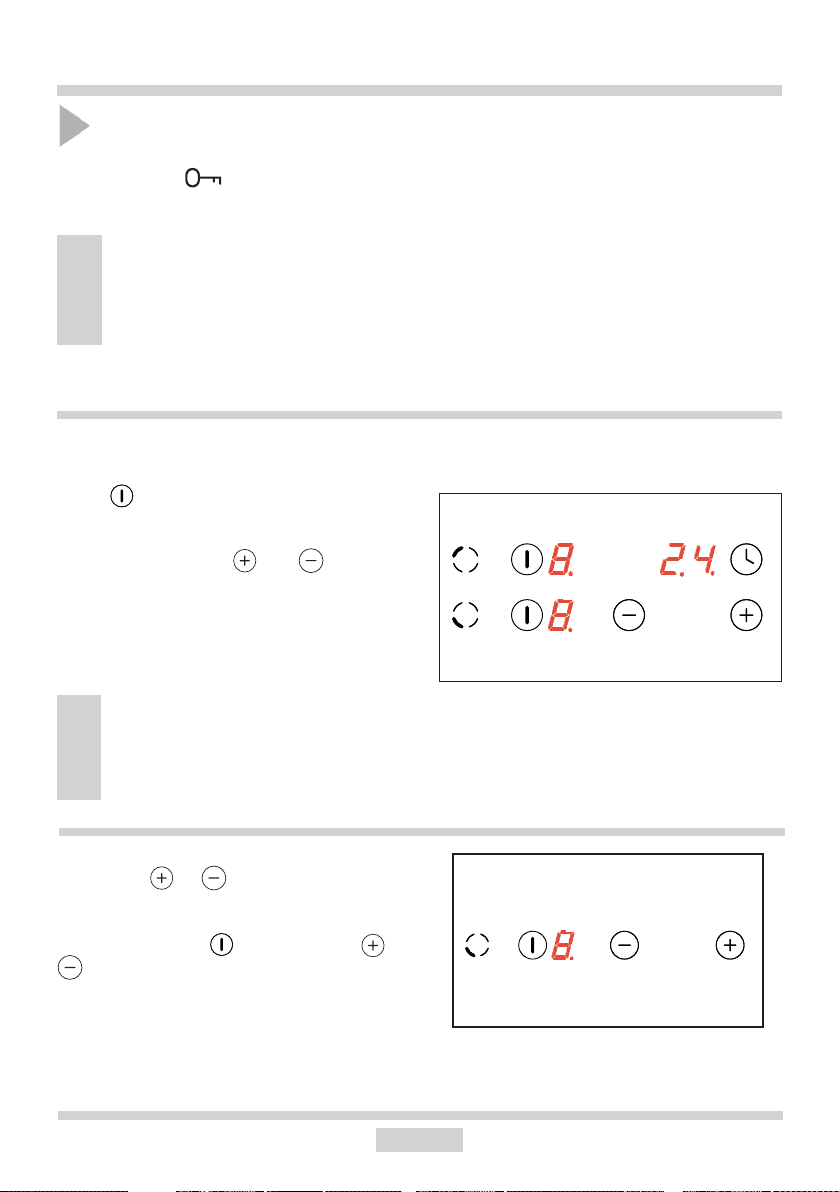
Turn on the hob and a cooking zone
Important!
The hob is on when you activate a cooking zone.
Touch to turn on the hob and a se-
lected cooking zone. Active cooking zone
display will show “0.” Now set the desired
heat setting using the and touch
sensors (see Set the heating power)
If none of the sensors is touched within 10 seconds, the appliance switches itself o.
If child lock function is activated, the appliance cannot be switched on (see "Release
the child lock").
Set the heat setting
When the power is set to "0" you can adjust
it using the or sensor.
When both cooking zones operate and you
need to adjust heat setting of the rst cooking
zone. Briey touch and then touch or
to adjust the heat setting.
15
Page 16

OPERATION
The cooking heat setting can be now changed at any moment using the method described
above in the "Set the heat setting" section.
Turn o the appliance
The appliance operates when at least one
cooking zone is on. Touch and hold to
turn o the selected cooking zone and then
the appliance.
The letter "H" appears on the display to indicate residual heat.
Switching o selected cooking zone
Selected cooking zone may be switched o as follows:
- touch to turn o the selected cooking zone
- simultaneously touch and sensors, or
- use sensor to reduce heat setting to "0."
When both cooking zones operate:
- touch to turn o the selected cooking zone
- touch briey to allow heat setting adjustment, and then:
- simultaneously touch and sensors, or
- use sensor to reduce heat setting to "0."
The letter "H" appears on the display to indicate residual heat.
Automatic warm-up function
Each cooking zone is equipped with an automatic warm-up function. When this is activated,
then the given cooking zone is switched on at full power for a time depending on the heat
setting selected, and is then switched back to the heat setting originally set.
Activate the automatic warm-up function by setting the required heat setting by touching
the sensor rst. Then the heat setting “9” is displayed intermittently on the cooking zone
display (2) with the letter “A” for around 10 seconds.
If you start to select the heat setting within 10 seconds by touching the sensor eld, then
the automatic warm-up function is activated and the letter “A” is displayed intermittently with
the cooking zone's heat setting selected for as long as the function is activated.
The cooking heat setting can be now changed at any moment using the method described
above in the "Set the heating power" section”.
16
Page 17

OPERATION
If you do not start to select the heat
setting within 10 seconds, then the
dot turns o and the automatic
warm-up function is inactive.
If you do not wish the automatic
warm-up function to operate,
start selecting the heat setting by
touching the sensor eld.
The heat
setting
1 1’11”
2 2’44”
3 4’47”
4 5’28”
5 6’29”
6 1’11”
7 2’44”
8 2’44”
9 -
Fast cooking time
The Child Lock function
The child lock function, which is activated by touching the child lock sensor eld, protects
the appliance from being unintentionally operated or switched on by children or pets.
Setting the child lock function when all cooking zones are switched o protects the cooking
surface from inadvertent operation. The appliance can be operated once the child lock function is released.
When the mains power is o, the child lock function is automatically activated.
Set the child lock
To set the child lock function touch the (key) sensor eld until the indicator light comes
on. An acoustic signal is heard briey when the sensor is rst touched.
Release the Child Lock
To release the child lock function touch the (key) sensor eld until the indicator light goes
out. An acoustic signal is heard briey when the sensor is touched.
The appliance is also locked when rst switched on after connecting to electricity. Touch and
hold for 3 second to release the lock.
17
Page 18

OPERATION
The residual heat indicator
Once a hot cooking zone is switched o, "H" is displayed on the relevant cooking zone display
to warn that the "cooking zone is still hot!"
Do not touch the cooking zone
at this time owing to the risk of
burns from residual heat, and do
not place on it any objects sensitive to heat!
When the residual heat indicator goes out,
cooking zone can be touched, however keep
in mind that it may still be warmer than ambient temperature.
The "H" residual heat indicator
is not displayed during a power
outage. However, cooking zones
may still be hot!
Limit the operating time
In order to increase eciency, the cooking
surface is tted with a operating time limiter
for each of the cooking zones. The maximum
operating time is set according to the last heat
setting selected.
If you do not change the heat setting for a long
time (see table) then the associated cooking
zone is automatically switched o and the
residual heat indicator is activated. However,
you can switch on and operate individual
cooking zones at any time in accordance with
the operating instructions.
18
Cooking heat
setting
1 10
2 5
3 5
4 4
5 3
6 2
7 2
8 2
9 1
Maximum op-
erating time
(hours)
Page 19

OPERATION
Timer
If the appliance is equipped with a timer, it can be used to set the operating time of any
cooking zone.
To use timer with a cooking zone, it must operate with a heat setting of at least 1. If this
condition is met:
- touch the timer sensor,
- touch or to set the time from 0 to 99
When you touch or the letter “t” will be shown on the relevant cooking zone display.
When both cooking zones operate:
- briey touch by the cooking zone for which you wish to set the timer. Continue as de-
scribed above.
When timer is counting down the letter “t” will alternate with the heat setting on the display.
When timer counts down to zero the cooking zone will turn o automatically and you will
hear a beep.
Touch and simultaneously to cancel the timer.
19
Page 20

CLEANING AND ROUTINE MAINTENANCE
Daily cleaning and proper maintenance have
crucial impact on the durability of your ce ramic plate.
Clean the ceramic plate observing
the same rules as for glass. Never
use abrasive or aggressive cleaning agents, scrubbing powders or
scratching sponges. Also do not use
steam cleaning devices.
Removal of stains
● Li ght pearly stains (aluminium re si du-
Cleaning the plate after every
use
● Wipe off slight, not-burnt patches of
dirt using damp cloth without cleaning
agent. Washing liquid can cause blue
discoloration to appear on the plate. The
stains often cannot be removed after rst
cleaning, even if special cle aning agents
are used.
● Re mo ve larger patches of dirt, strongly
sticking to the plate using sharp scrap-
per and wipe o the surface with a damp
cloth.
es) can be removed from cooled plate
using special cleaning agents. Cal care ous re si du es (i.e. boiled over wa ter)
can be re mo ved with vinegar or spe cial
cle aning agents.
● Do not switch o the hotplate when re mo-
ving sugar, sugar-containing di shes, pla-
stic or aluminium foil! Im me dia te ly scrape
o the residuals (when still hot) from the
hotplate using a sharp scrap per. When
the dirt is re mo ved you can switch o the
plate and after cooling it down clean it
aga in using special cle aning agents.
Cleaning scrapper
Special cleaning agents can be bought in
su per mar kets, special electromechanical
shops, drugstores and shops with kitchen
appliances. Sharp scrappers can be bo ught
in DIY shops, shops with building tools and
painting ac ces so ries.
20
Page 21

CLEANING AND ROUTINE MAINTENANCE
Never apply cleaning agent on a hot hotplate.
Leave the cleaning agent to dry and then wipe
it o with a damp cloth. Any residuals of cleaning agents should be wiped o with a damp
cloth before the next heating as otherwise
they can have caustic eect.
Failure to observe the ceramic plate maintenance instructions can result in losing
your warranty rights!
Periodic inspections
In addition to current maintenance and care,
the following shall be arranged for:
• Periodic inspections of control elements
and units of the cooktop. Upon expiration
of the warranty, service department shall
be ordered technical inspections of the
appliance at least once every two years.
• All operation faults must be repaired.
• Cooktop units shall be maintained according to the maintenance schedule.
Attention!
If from any reason you are not able to
control the switched on plate, switch
o the main switch or screw out the
fuse and call the Customer Service.
Attention!
Should cracks or splits appear on
the surface of your ceramic plate,
immediately disconnect the plate
from the mains (by switching o the
fuse or unplugging the plug) and call
the Customer Service.
Note!
Installation work and repairs
should only be performed by a
service department or a qualied
technician in accordance with all
applicable codes and standards.
21
Page 22

EMERGENCY PROCEDURE
Every time when emergency situation occurs you should:
• switch o the working assemblies of the plate
• disconnect power supply
• call in the service
• as some minor faults can be removed by the user in accordance with the be low specied
instructions, before calling the Customer Service please go thro ugh the Table checking
every point.
PROBLEM CAUSE ACTION
1.The appliance is not wor king - power supply failure -check the in-house electric sys tem
fuse, replace if ne ces sa ry
2. The appliance does not re spond to
the entered settings
3.The appliance does not re spond
and emits a short si gnal
4.The appliance does not re spond
and emits a long si gnal
5.The whole appliance swit ches o - no settings have been en te red
6. One heating zone switches o,
and ”H” is on the display.
7.Residual temperature in di ca tor is
not lighted although the hot pla tes
are still hot
8. Crack in the ceramic plate Danger! Immediately disconnect the ceramic plate from the
9. If the fault still remains Disconnect the ceramic plate from the mains (fuse) and call the nearest
-control panel has not been switched on
- sensors have been to uched for less
than one se cond
- several sensors have been to uched
at the same time
- children lock has been
activated
-improper operation (im pro per sen sors
have been to uched or pro per sensors
have been touched for too short time
- covered or dirty sensor (sen sors) - uncover or clean the sen sors
within 10 seconds from swit ching
the plate on
- covered or dirty sensor (sen sors) - uncover or clean the sen sors
- limited time of operation - again switch on the hot pla te
- covered or dirty sensor (sen sors) - uncover or clean the sen sors
- power supply fa ilu re, the ap pliance has been di scon nec ted from the
mains
mains (fuse) and call the nearest Customer Service Centre.
Customer Service Centre.
Important!
You are the person responsible for proper condition and operation of the
appliance in your household. If you call the Service for a fault which resulted from improper operation, you will be charged with the costs of the visit
even during the period of warranty. We shall not be held liable for damages
caused by a failure to observe this Manual.
- switch it on
- touch the sensors for a bit lon ger
- always touch only one sen sor
(except when switching o a hotplate)
- switch o the children lock
- again activate the plate
- again switch on the control panel
and im me dia te ly enter the settings
-the residual temperature in di ca tor
will work again after swit ching the
control panel on and o.
22
Page 23

TECHNICAL DATA
Rated voltage: 230V 1N~50 Hz
Rated power: 3,0 kW
Model: PBP2VQ203FTN (KMC*)
- hotplate: 1 x Ø 145 mm 1200 W
- hotplate: 1 x Ø 180 mm 1800 W
Dimensions: 520 x 300 x 48;
Weight: ca. 4,2 kg;
Complies with EU regulations EN 60335-1, EN 60335-2-6 standards
WARRANTY
Warranty
Warranty services according to the warranty card.
The producer shall not be held liable for any damages caused by improper operation of the
product.
Please enter the type and factory number of the plate from the rating plate
Type................................................... Factory number..............................................
23
Page 24

NL
24
Page 25

GEACHTE KLANT,
Deze kookplaat voldoet aan de behoeften van de markt: ze garandeert niet alleen een probleemloze werking, maar ook functionaliteit, eenvoudige bediening en een modern design.
Voor de kookplaat ingepakt werd en de fabriek verliet, werd ze bij de controleposten zorgvuldig
gecontroleerd op het vlak van veiligheid en functionaliteit.
Voordat u het toestel aanschakelt, dient u grondig deze gebruikershandleiding door te lezen.
De instructies in de handleiding helpen u om verkeerd gebruik te voorkomen.
Bewaar deze gebruikershandleiding en zorg dat ze altijd binnen handbereik is.
Om ongelukken te vermijden moeten de instructies uit deze handleiding zorgvuldig nageleefd
worden.
Opgelet!
Het toestel mag pas gebruikt worden nadat u deze gebruikershandleiding volledig
doorgelezen en begrepen heeft.
Het toestel is uitsluitend ontworpen voor kookdoeleinden. Het gebruik van het toestel
voor andere doeleinden (bv. de verwarming van ruimtes) is in tegenstrijd met zijn
bestemming en kan gevaar veroorzaken.
De producent behoudt zich het recht voor om wijzigingen aan te brengen die geen
invloed hebben op de werking van het toestel.
Verklaring van de producent
De producent verklaart hierbij, dat dit product voldoet aan de basisvereisten van de hieronder vernoemde
Europese richtlijnen:
l Laagspanningsrichtlijn 2014/35/EC,
l Richtlijn voor elektromagnetische compatibiliteit 2014/30/EC,
l Richtlijn voor ErP 2009/125/EC,
en dat het product daarom gemerkt is met en dat er een conformiteitsverklaring voor afgeleverd werd, die
ter beschikking gesteld wordt aan de organen die toezicht houden over de markt.
25
Page 26

INHOUDSTAFEL
Basisinformatie..................................................................................................................25
Veiligheidsinstructies........................................................................................................27
Beschrijving van het toestel...........................................................................................32
Installatie............................................................................................................................33
Bediening...........................................................................................................................37
Reiniging en onderhoud...................................................................................................43
Handelswijze bij probleemsituaties..................................................................................47
Technische gegevens........................................................................................................48
Garantie..............................................................................................................................48
26
Page 27

VEILIGHEIDSINSTRUCTIES
Attentie. Dit apparaat en de bereikbare onderdelen
ervan worden tijdens het gebruik heet. Wees bijzonder voorzichtig bij het aanraken van de verwarmingselementen. Zorg dat kinderen die jonger zijn dan
8 jaar niet bij het apparaat kunnen komen, tenzij ze
onder permanent toezicht staan.
Dit apparaat mag gebruikt worden door kinderen
van 8 jaar en ouder en personen met lichamelijke of
geestelijke beperkingen of personen zonder ervaring
met of kennis van het apparaat, als dit gebruik plaatsvindt onder toezicht of in overeenstemming met de
gebruiksaanwijzing van het apparaat, door personen
die verantwoordelijk zijn voor hun veiligheid. Zorg
ervoor dat kinderen niet met het apparaat kunnen
spelen. Kinderen mogen de kookplaat niet zonder
toezicht schoonmaken of onderhoudswerkzaamheden verrichten.
Attentie. Het koken van vetten of olie op de kookplaat
zonder toezicht kan erg gevaarlijk zijn en leiden tot
brand.
Probeer het vuur NOOIT met water te blussen, maar
schakel het apparaat uit en bedek de vlammen met
een deksel of een niet-brandbare deken.
27
Page 28

VEILIGHEIDSINSTRUCTIES
Attentie. Brandgevaar: geen voorwerpen verzame-
len op de kookoppervlakte.
Attentie. Schakel de stroom uit als de oppervlakte is
gebarsten, om elektrische schokken te voorkomen.
Het apparaat is niet bedoeld voor aansturing met
een externe tijdschakelaar of een apart systeem voor
afstandsbesturing.
Gebruik geen stoomreinigers voor het schoonmaken
van het apparaat.
• Vooraleer u de keramische kookplaat in gebruik neemt, dient u de gebruikershandleiding
door te lezen. Op die manier garandeert u uw eigen veiligheid en voorkomt u beschadiging van de plaat.
• Als de keramische plaat gebruikt wordt in de directe nabijheid van een radio, televisie of
een ander toestel dat straling uitzendt, moet u controleren of het bedieningspaneel van
de keramische plaat correct werkt.
• Het is verboden de plaat in de nabijheid van koeltoestellen te installeren.
• De meubels waarin de plaat ingebouwd wordt, moeten bestand zijn tegen een temperatuur tot 100ºC. Dit geldt voor de bekleding, randen, oppervlakken uit kunststof, lijmen en
lakken.
• De plaat mag enkel gebruikt worden als ze ingebouwd is. Op die manier vermijdt u aanraking met de delen die onder stroom staan.
• Elektrische toestellen mogen enkel door specialisten hersteld worden. Onvakkundige
herstelling kan de gebruiker ernstig in gevaar brengen.
• Het toestel wordt pas van het elektriciteitsnet ontkoppeld, als de zekering uitgeschakeld
is of als de stekker uit het stopcontact getrokken is.
• De stekker van de aansluitingskabel moet bereikbaar zijn nadat de kookplaat geïnstalleerd is.
• Laat kinderen niet bij de kookplaat komen terwijl ze gebruikt wordt. Kinderen kunnen immers potten of pannen met hete gerechten van de kookplaat trekken en zich verbranden.
• Mindervaliden en kinderen mogen het toestel enkel onder toezicht gebruiken.
• De kookvelden warmen snel op nadat ze aangeschakeld werden. Daarom mag u za pas
aanschakelen nadat u er kookpotten op geplaatst hebt. Op die manier vermijdt u overbodig energieverbruik.
28
Page 29

VEILIGHEIDSINSTRUCTIES
• De in het elektronische systeem in gebouwde restwarmte-indicator geeft aan of de plaat
aangeschakeld is, en of ze nog heet is.
• Bij stroompanne worden alle instellingen van de plaat, die voor de stroompanne ingevoerd werden, gereset. Indien de kookvelden nog heet waren verschijnt het teken van
de restwarmte-indicator „H” op de display van het bedieningspaneel wanneer de stroom
terugkeert.
• Als het stopcontact in de buurt van een kookveld ligt, moet u opletten dat de kabel van
de kookplaat niet in aanraking komt met verhitte plaatsen.
• Laat de kookplaat niet achter zonder toezicht wanneer u oliën en vetten gebruikt. Dit kan
brandgevaar veroorzaken.
• Gebruik geen kookpotten uit kunststof of aluminiumfolie. Ze smelten bij hoge temperaturen en kunnen de keramische plaat beschadigen.
• Suiker, citroenzuur, zout, enz. in vaste of vloeibare toestand en kunststoen mogen niet
in aanraking komen met een verwarmd kookveld.
• Als er per ongeluk suiker of kunststof op de hete plaat terechtkomt, mag u in geen geval
de plaat uitschakelen. Schraap de suiker of de kunststof af met een scherpe schraper.
Bescherm u handen tegen verbranden.
• Gebruik op de kookplaat enkel potten en pannen met een platte bodem, die geen scher-
pe randen of uitsteeksels hebben. Anders kunnen er onherstelbare krassen op de plaat
ontstaan.
• Het verwarmingsoppervlak van de keramische plaats is bestand tegen thermische schok-
ken. Ze is niet gevoelig voor koude of warmte.
• Laat geen voorwerpen op de plaat vallen. Puntinslagen bv. door een potje met kruiden,
kunnen in het slechtste geval voor barsten of splintering van de keramische plaat zorgen.
• Kokende gerechten kunnen via de beschadigde plaatsen in aanraking komen met de delen
van de kookplaat, die onder stroom staan.
• Indien het oppervlak gebarsten is, moet u de stroom uitschakelen om elektrocutie te ver-
mijden.
• Als het toestel uitgerust is met halogeenkookvelden, kan het kijken naar de velden scha-
delijk zijn.
• Houd u steeds aan de instructies voor onderhoud en reiniging van de keramische plaat.
Indien u de plaat verkeerd behandelt, verliest u het recht op garantie.
• Opgelet! Als de onlosmaakbare voedingskabel beschadigd raakt, moet hij om gevaarlijke
situaties te vermijden bij de producent, bij een gespecialiseerde hersteldienst of door een
gekwaliceerd persoon vervangen worden.
29
Page 30

ENERGIEBESPARING
Door op verantwoorde wijze energie te gebruiken,
bespaart u niet alleen op de
kosten van het huishouden,
maar draagt u ook bewust
bij aan de bescherming van
het milieu. Laten we daarom ons steentje
bijdragen aan energiebesparing! Dat kan op
volgende manier:
• Gebruik van goede kookpotten en
pannen.
Potten met een vlakke en dikke bodem
laten toe om tot 1/3 te besparen op elektriciteit. Gebruik ook een deksel, want
anders stijgt het energieverbruik zelfs tot
vier maal.
• Kies kookpotten en pannen die op het
kookveld passen.
De kookpotten en pannen mogen niet
kleiner zijn dan het kookveld.
• Zorg ervoor dat de kookvelden en
debodem van de potten proper zijn.
Vuil verstoort de warmteoverdracht – sterk
aangebrand vuil kan soms enkel verwijderd worden met gebruik van reinigings-
middelen die niet milieuvriendelijk zijn.
• Vermijd onnodig opheen van deksels
om het kookproces te controleren.
• Bouw de plaat niet in in de onmiddel-
lijke nabijheid van koelkasten of diepvriezers.
Het energiegebruik van deze toestellen
stijgt hierdoor onnodig.
30
Page 31

UITPAKKEN
RECYCLAGE VAN GEBRUIKTE
TOESTELLEN
Het toestel wordt door zijn
verpakking beveiligd tegen
beschadigingen tijdens het
transport. Na het uitpakken
van het toestel dient u de
verpakkingselementen te
recycleren op milieuvriendelijke wijze.
Alle materialen die gebruikt worden voor de
verpakking zijn onschadelijk voor het milieu.
Ze zijn 100% geschikt voor recyclage en zijn
aangeduid met het gepaste symbool.
Opgelet! De verpakkingsmaterialen (zakjes
uit polyethyleen, stukken piepschuim, enz.)
moeten tijdens het uitpakken buiten bereik
van kinderen gehouden worden.
Op het einde van de gebruiksperiode mag dit product niet
bij het gewoon huisvuil geplaatst worden, maar moet het
afgegeven worden bij een verzamelpunt voor recyclage van
elektrische en elektronische
toestellen. Dit wordt aangegeven door het
gepaste symbool op het product, in de gebruikershandleiding of op de verpakking.
De materialen die gebruikt zijn bij de productie van het toestel zijn geschikt voor hergebruik volgens hun bestemming. Dankzij
dit hergebruik, de verwerking van materialen of andere vormen van hergebruik van
afgedankte toestellen draagt u bij tot de bescherming van het milieu.
Informatie over het verzamelpunt voor gebruikte toestellen kunt u krijgen bij de gemeentediensten.
31
Page 32

BESCHRIJVING VAN HET TOESTEL
Beschrijving van kookplaat
Kookzone achter
Ø 180
Kookzone voor
Ø 145
Bedieningspaneel
1. Hoofdtiptoets
2. Indicatoren kookzones
3. Min-tiptoets
4. Plus-tiptoets
21
5. Tiptoets met sleutel en aanduiding
kinderslot
6. Aanduiding klok
7. Timer
32
76
54321
Page 33

INSTALLATIEINSTALLATIE
Voorbereiding van het werkblad voor inbouw van de
kookplaat
● De dikte van het werkblad van het meubel dient 28 tot 40 mm te bedragen, de diepte van
het werkblad minimaal 600 mm. Het werkblad moet vlak en waterpas zijn. Aan de kant
van de muur moet het werkblad worden afgedicht en beveiligd tegen vocht en overlopen.
● Aan de voorkant moet de afstand tussen de rand van de opening en de rand van het
werkblad minimaal 60 mm bedragen, aan de achterkant minimaal 50 mm.
● De afstand tussen de rand van de opening en de zijkant van het keukenkastje moet mi-
nimaal 55 mm bedragen.
● De bekleding van de inbouwmeubelen en de lijm waarmee deze is vastgelijmd moeten
bestand zijn tegen temperaturen van 100°C. Als niet aan deze voorwaarde wordt voldaan
kan het oppervlak vervormen of de bekleding loslaten.
● Bescherm de randen van de opening met materiaal dat bestand is tegen vocht.
● Maak de opening in het werkblad volgens de afmetingen uit afb. 1.
● Laat onder de kookplaat een ruimte vrij van minimaal 25 mm om te zorgen voor goede
luchtcirculatie. Daarmee voorkomt u oververhitting van de oppervlakte rondom de kookplaat.
1
(*) 285 mm
33
Page 34

INSTALLATION
Attentie. Monteer bij de installatie van de
kookplaat in het keukenkastje een isolatieplaat volgens de afbeelding hiernaast.
Wanneer u de kookplaat boven een oven
monteert, is montage van de isolatieplaat
niet nodig.
min 25
Wanneer u de kookplaat installeert in het
werkblad boven een lade, dan moet u het
Aménagement dans le plateau
d’un meuble porteur.
onderscherm van de kookplaat bedekken met een houten plaat of een beschermende laag voor keramische kookplaten.
Aménagement dans le plateau de
travail au-dessus d’un four avec
ventilation.
Il est interdit de xer la plaque au-dessus d’un four sans ventilation.
Leid de aansluitkabel zodanig dat hij de onderkant van het apparaat niet raakt.
34
Page 35

INSTALLATIE
54
321
54
321
6
285
min
min
285
min
min
Installatie van kookplaat - klem
● Gebruik bij een werkblad met een dikte van 48 mm, 4 “A”-klemmen voor het bevestigen
van de kookplaat. Op de afbeeldingen 2 en 3 is de montagewijze weergegeven. Bij een
werkblad met een dikte van 28 mm en 38 mm, gebruikt u naast de “A”-klemmen ook 4
houtblokjes met de afmetingen 15x15x50 mm. Op de afbeeldingen 4 en 5 is de montagewijze weergegeven.
● Controleer of de dichting goed aansluit op de kookplaat. Draai de klemmen aan de onderkant van de kookplaat licht aan.
● Maak het werkblad schoon, leg de kookplaat in de opening en druk hem op het blad.
● Plaats de klemmen loodrecht op de rand van de kookplaat en draai ze goed vast.
2
1. Meubelblad
2. Schroef
3. Bevestigingsklem
4. Kookplaat
5. Dichting van de kookplaat
4
15
15
1. Meubelblad
2. Schroef
3. Bevestigingsklem
4. Kookplaat
5. Dichting van de kookplaat
6. Houten blokje
3
50
490
150
100
150
100
5
50
490
50
125
75
125
75
60
● De kookplaat heeft een vaste kabel met een aardingscontact en kan alleen aangesloten
60
worden in een stopcontact 230 V ~ 50 Hz met een aardingspin. De stroomkring voor het
stopcontact dient beveiligd te zijn met een zekering van 16 A.
35
Page 36

INSTALLATIE
40
Plaats en afmetingen van de ruimte voor het aansluitblok.
55
5
5
41
5
● De kookplaat heeft een vaste kabel met een aardingscontact en kan alleen aangesloten
worden in een stopcontact 230 V ~ 50 Hz met een aardingspin. De stroomkring voor het
stopcontact dient beveiligd te zijn met een zekering van 16 A.
36
Page 37

BEDIENING
Voor u de kookplaat voor de eerste maal aanschakelt
● reinig de keramische plaat eerst grondig behandel de keramische plaat als een glasplaat,
● als u de plaat voor de eerste maal aanschakelt kunnen er tijdelijk geuren vrijkomen. Da-
arom moet u de ventilatie in de ruimte aanschakelen of het raam openen,
● leef bij de bediening van de kookplaat de veiligheidsinstructies na.
De keramische kookplaat is uitgerust met sensors die bediend kunnen worden door met de
vinger de aangeduide oppervlakken aan te raken.
Elke bijsturing van een sensor wordt bevestigd met een geluidssignaal.
Let erop, dat u bij het aan- en uitschakelen en het instellen van het verwarmingsvermogen slecht één sensor tegelijk indrukt. Wanneer u meerdere sensors tegelijk indrukt
(met uitzondering van het uitschakelen van een kookveld of de klok), negeert het sy-
steem de ingevoerde besturingssignalen, en bij het langdurig indrukken van meerdere
sensors weerklinkt het defectsignaal.
Aangepaste kookpotten
Er bestaan speciaal ontworpen potten voor koken en braden op keramische kookplaten. Leef
daarom de instructies van hun producten na.
Kookpotten met een aluminium of koperen bodem kunnen een metalen verkleuring achterla-
ten, die moeilijk te verwijderen is. Wees bijzonder voorzichtig met geëmailleerde kookpotten,
die bij het per ongeluk uitkoken van de inhoud onherstelbare schade kunnen veroorzaken.
Om een optimaal energieverbruik en optimale kooktijden te bereiken, en om te voorkomen
dat kokende gerechten op de kookplaat aanbranden, moet u volgende richtlijnen naleven.
Bodem van de pot:
Potten en pannen voor koken/braden moeten een stabiele, vlakke bodem hebben. Een
bodem met scherpe randen, uitsteeksels en verkoolde etensresten kunnen de keramische
plaat krassen en een schurende werking hebben!
Grootte van de pot:
De diameter van de potten en pannen moet zo goed mogelijk overeenstemmen met de
diameter van het kookveld.
Deksel van de pot:
Een deksel op de pot voorkomt warmteverlies, verkort daardoor de verwarmingstijd en vermindert zo het energieverbruik.
37
Page 38

BEDIENING
Bedieningspaneel
Na aansluiting van de kookplaat op het lichtnet, hoort u een kort geluidssignaal, waarna de
tiptoetsen worden geblokkeerd. Deze moet u deblokkeren door de tiptoets gedurende
3 seconden aan te raken.
Attentie!
Plaats geen voorwerpen op de oppervlakten van de tiptoetsen (dit kan leiden
tot een foutmelding) en houd deze goed schoon.
Inschakelen van de kookplaat en de kookzone
Attentie!
Het inschakelen van de kookplaat staat gelijk aan het inschakelen van de
koopzone.
Door het aanraken van de tiptoets
schakelt u de kookplaat en de gekozen
kookzone in. Op de indicator van de actieve kookzone wordt gedurende 10 seconden "0" getoond. U kunt nu het gewenste
vermogensniveau instellen met behulp van
tiptoets en tiptoets (zie Instelling
vermogensniveau).
Als u binnen 10 seconden geen van de tiptoetsen bedient, dan schakelt de kookplaat
weer uit.
Als het kinderslot actief is, is het niet mogelijk om de kookplaat in te schakelen (zie
Opheen van het kinderslot).
Instelling vermogensniveau
Zolang "0" getoond wordt, kunt u het gewenste vermogensniveau instellen met behulp van
tiptoets en tiptoets .
Indien beide kookzones zijn ingeschakeld en
het nodig is om het vermogensniveau te wij-
zigen van de zone die als eerste is ingesteld,
dient u de tiptoets kort aan te raken, en
vervolgens gebruik te maken van de tiptoetsen of om de wijziging in te voeren.
Nu kunt u op elk moment de instelling van het vermogensniveau wijzigen op de manier die
is omschreven in het hoofdstuk "Instelling vermogensniveau".
38
Page 39

BEDIENING
Uitschakelen van de hele kookplaat
De kookplaat is in werking zolang minimaal
één kookzone is ingeschakeld. Door het
langdurig aanraken van de tiptoets scha-
kelt u eerst de betreende kookzone uit en
vervolgens de volledige kookplaat.
Op de kookzoneindicator brandt de letter "H"
- het symbool voor restwarmte.
Uitschakelen van één kookzone
U kunt één kookzone op de volgende manier uitschakelen:
- raak de tiptoets aan om de gekozen kookzone uit te schakelen
- raak tegelijkertijd de tiptoetsen en aan of
- verminder met de tiptoets de instelling tot "0".
Bij werking van twee kookzones:
- raak de tiptoets aan om de gekozen kookzone uit te schakelen
- activeer met een korte aanraking van de tiptoets de mogelijkheid om het vermogen te
wijzigen, en daarna:
- raak tegelijkertijd de tiptoetsen en aan of
- verminder met de tiptoets de instelling tot "0".
Op de display verschijnt de letter "H" - het symbool voor restwarmte.
Systeem voor automatische vermindering van het vermogen
Elke kookzone is uitgerust met een systeem voor automatische vermindering van het vermo-
gen. Wanneer u dit systeem activeert werkt de kookzone op maximaal vermogen gedurende
een bepaalde tijd die afhankelijk is van het gekozen vermogensniveau. Na verloop van die
tijd schakelt hij terug naar dat niveau.
U activeert het systeem voor automatische vermindering van het vermogensniveau door de
instelling van het vermogensniveau te beginnen met tiptoets . U ziet dan op de indicator
van de kookzone (2) gedurende ongeveer 10 seconden afwisselend het vermogensniveau
“9” en de letter “A”.
Indien u binnen 10 seconden begint met het instellen van het vermogensniveau door de
tiptoets aan te raken, dan wordt het systeem voor automatische vermindering van het
vermogensniveau geactiveerd en de letter „A” brandt afwisselend met het gekozen vermo-
gensniveau, zolang het systeem is geactiveerd.
Nu kunt u op elk moment de instelling van het vermogensniveau wijzigen op de manier die
is omschreven in het hoofdstuk "Instelling vermogensniveau".
39
Page 40

BEDIENING
Wanneer u pas na 10 seconden
begint met het instellen van het
vermogensniveau, dan dooft de punt
en is het systeem voor automatische
vermindering van het vermogensniveau niet actief.
Indien u geen gebruik wilt maken
van de automatische vermindering
van het vermogensniveau, dan
kunt u de keuze van het vermogensniveau het beste beginnen met
tiptoets .
Vermogensniveau
koken
1 1’11”
2 2’44”
3 4’47”
4 5’28”
5 6’29”
6 1’11”
7 2’44”
8 2’44”
9 -
Duur van het
snelkoken
Kinderslot
Het kinderslot dat wordt ingeschakeld met tiptoets beschermt de ingeschakelde kookzones tegen het onbedoeld uitschakelen door kinderen, huisdieren etc.
Als u de kookplaat blokkeert wanneer alle kookzones zijn uitgeschakeld, dan is de kookplaat
beschermd tegen het onbedoeld inschakelen. Inschakelen is alleen mogelijk nadat het kin-
derslot is opgeheven.
Na een stroomstoring wordt het kinderslot automatisch geactiveerd.
Inschakelen van het kinderslot
Om de kookplaat te blokkeren raakt u de tiptoets met de sleutel net zolang aan totdat
de aanduiding van het kinderslot gaat branden. Bij het aanraken van de tiptoets klinkt in
het begin een kort geluidssignaal.
Uitschakelen van het kinderslot
Om de kookplaat te deblokkeren raakt u de tiptoets met de sleutel net zolang aan totdat
de aanduiding van het kinderslot dooft. Bij het aanraken van de tiptoets klinkt aan het einde
een kort geluidssignaal.
Er bestaat tevens een kinderslot dat automatisch in werking treedt nadat u het apparaat
heeft aangesloten op het lichtnet. Deze kunt u deblokkeren door de tiptoets gedurende
3 seconden aan te raken.
40
Page 41

BEDIENING
Restwarmteindicator
Op het moment dat een hete kookzone wordt uitgeschakeld, verschijnt de letter "H" als signaal
dat de kookzone nog heet is.
Raak de kookzone dan niet aan
in verband met het risico voor
verbrandingen en zet er geen
voorwerpen op die gevoelig zijn
voor warmte!
Als deze indicator is gedoofd, kunt u de
kookzone aanraken. Wees u ervan bewust
dat hij nog niet is afgekoeld tot de omge-
vingstemperatuur.
Bij stroomonderbreking wordt
de restwarmteindicator "H" niet
getoond. Ondanks dat kan de
kookzone nog steeds heet zijn!
Beperking van de werkingsduur
Om de feilloze werking van de kookplaat te
vergroten, is hij uitgerust met een beperking
van de werkingsduur voor elk van de kookzones. De maximale werkingsduur wordt
vastgesteld op grond van het laatste gekozen
vermogensniveau.
Als u het vermogensniveau gedurende
langere tijd (zie tabel) niet verandert, wordt
de bijbehorende kookzone automatisch
uitgeschakeld en de restwarmteindicator
ingeschakeld. U kunt echter op ieder moment
de respectievelijke kookzones inschakelen
en bedienen, volgens de gebruiksaanwijzing.
41
Trap
vermogensni-
veau
1 10
2 5
3 5
4 4
5 3
6 2
7 2
8 2
9 1
Maximale wer-
kingsduur in
uren
Page 42

BEDIENING
Timer
Wanneer uw kookplaat is uitgerust met een timer, kunt u de werkingstijd van een willekeurige
kookzone instellen.
De kookzone waarvoor u de timer wilt instellen moet een instelling hebben die hoger is dan
0. Als voldaan is aan die voorwaarde dan:
- raakt u de tiptoets van de timer aan en
- stelt u de tijd in van 0 tot 99 met behulp van de tiptoetsen , .
Nadat u de tiptoets of heeft aangeraakt, verschijnt op de display van de ingestelde
kookzone de letter "t".
Indien beide kookzones zijn ingeschakeld:
- raakt u kort de tiptoets aan van de zone waarvoor u de timer wilt instellen. Verder handelt
u als hierboven weergegeven.
Tijdens de werking van de timer verschijnt het vermogensniveau afgewisseld met de letter
"t" op de display.
Na het verstrijken van de ingestelde tijd schakelt de kookzone automatisch uit en klinkt een
geluidssignaal.
U schakelt de timerfunctie uit door tegelijkertijd de tiptoetsen en aan te raken.
42
Page 43

REINIGING EN ONDERHOUD
De zorg waarmee de gebruiker de kookplaat
reinigt en onderhoudt, heeft een belangrijke
invloed op haar levensduur en probleemloze
werking.
Bij het reinigen van de keramiek
moeten dezelfde regels toegepast
worden als voor het reinigen van
glazen oppervlakken. Er mogen
nooit schurende of bijtende re-
inigingsmiddelen, schuurzand of
schuursponzen met een ruw oppervlak gebruikt worden.
Er mogen ook geen reinigingstoestellen met damp gebruikt
worden.
Reiniging na elk gebruik
● Licht, niet aangebrand vuil moet met
een vochtige doek zonder reinigingsmid-
del verwijderd worden. Bij gebruik van
een afwasmiddel kunnen er blauwachtige
verkleuringen ontstaan. Hardnekkig vlek-
ken laten zich niet altijd verwijderen bij de
eerste reiniging, zelfs niet bij gebruik van
een speciaal reinigingsmiddel.
● Sterk aangekoekt vuil moet met een
schraper verwijderd worden. Daarna
moet het kookvlak met een vochtige
doek gereinigd worden.
Verwijderen van vlekken
● Heldere vlekken met een parelkleur
(aluminiumresten) kunnen met behulp
van een speciaal reinigingsmiddel van
de afgekoelde plaat verwijderd worden.
Kalkresten (bv. na overkoken van water)
kunnen met azijn of een speciaal reinigingsmiddel verwijderd worden.
● Bij het verwijderen van suiker, gerechten
met een hoog suikergehalte, kunststoen
of aluminiumfolie mag het kookveld niet
uitgeschakeld worden! De resten moeten
onmiddellijk (in hete toestand) met een
scherpe schraper van het hete kookveld
geschraapt worden. Na het verwijderen
van het vuil mag de plaat uitgeschakeld
worden en de afgekoelde plaat kan met
een speciaal reinigingsmiddel verder
gereinigd worden.
Schraper om de kookplaat te reinigen
U kunt speciale reinigingsmiddelen kopen
in supermarkten, gespecialiseerde winkels
voor elektrotechniek, bij kruidenierszaken, in
voedingswinkels en in winkels met keukenu-
itrusting. Scherpe schrapers kunt u vinden in
doe-het-zelfzaken en in winkels met bouw- en
verfmaterialen.
43
Page 44

REINIGING EN ONDERHOUD
Breng nooit reinigingsmiddel op een hete
kookplaat aan. Laat de reinigingsmiddelen
best wat opdrogen en verwijder ze daarna
pas met een natte doek. Eventuele achterge-
bleven restjes van het reinigingsmiddel kunt u
met een vochtige doek verwijderen vooraleer
u de plaat opnieuw aanschakelt. Als u de
reinigingsmiddelen niet verwijdert, kunnen
ze bijtend werken.
Als het keramische oppervlak van de
kookplaat verkeerd behandeld wordt,
neemt de producent geen verantwoordelijkheid op zich op basis van de garantie!
Opgelet!
Als de besturing om één of andere reden niet werkt als de plaat
al aangeschakeld is, moet u de
hoofdschakelaar of de zekering
uitschakelen en de onderhoudsdienst contacteren
Opgelet!
Als er barsten of breuken in de
keramische plaat ontstaan, moet de
kookplaat onmiddellijk uitgeschakeld
worden en van het elektriciteitsnet
ontkoppeld worden. Hiervoor moet
de zekering uitgeschakeld worden of
moet de stekker uit het stopcontact
getrokken worden. Daarna moet u
de onderhoudsdienst contacteren.
44
Page 45

HANDELSWIJZE BIJ PROBLEEMSITUATIES
Bij elke probleemsituatie moet u:
• de werkende onderdelen van de plaat uitschakelen
• de elektrische voeding ontkoppelen
• een herstelling aanvragen
• sommige kleine problemen kan de gebruiker zelf op lossen met behulp van de aan-
wijzingen in de onderstaande tabel. Controleer opeenvolgend alle punten in de tabel,
vooraleer u de onderhouds- of klantendienst contacteert.
PROBLEEM OORZAAK HANDELSWIJZE
1.Het toestel werkt niet - stroompanne - controleer de zekering in de huisin-
2. Het toestel reageert niet op de
ingevoerde waarden
3.Het toestel reageert niet en geeft
een kort geluidssignaal
4.Het toestel reageert niet en geeft
een lang geluidssignaal
5.Het toestel schakelt zichzelf uit - na het aanschakelen werd er geduren-
6.Eén van de kookvelden schakelt
zichzelf uit
7.De restwarmte-indicator brandt niet,
hoewel het kookveld nog warm is
8. Barst in de keramische kookplaat Gevaar! Ontkoppel de keramische kookplaat onmiddellijk van het
9.Als het defect nog steeds niet
verholpen is
- het bedieningspaneel is niet aangeschakeld
- de knop werd niet lang genoeg
ingedrukt (minder dan een seconde)
- er werden meerdere knoppen tege-
lijk ingedrukt
- de kinderbeveiliging (blokkade) is
aangeschakeld
- verkeerde bediening (verkeerde
sensors ingedrukt of te snel ingedrukt)
- de sensor(s) is (zijn) bedekt of vuil - maak de sensors vrij of reinig ze
de meer dan 10 s. geen enkele waarde
ingevoerd
- de sensor(s) is (zijn) bedekt of vuil - maak de sensors vrij of reinig ze
- beperking van de werkduur - schakel het kookveld opnieuw
- de sensor(s) is (zijn) bedekt of vuil - maak de sensors vrij of reinig ze
- stroompanne, het toestel werd van
het elektriciteitsnet ontkoppeld
elektriciteitsnet (zekering). Contacteer de dichtstbijzijnde onderhoudsdienst.
Ontkoppel de keramische kookplaat van het elektriciteitsnet (zekering!).
Contacteer de dichtstbijzijnde onderhoudsdienst.
Belangrijk!
U bent verantwoordelijk voor de correcte staat van het toestel en voor het
gepaste gebruik van het toestel in uw huishouden. Indien u de onderhoudsdienst oproept als gevolg van een bedieningsfout, dan zal u ook binnen de
garantieperiode met de kosten belast worden.
De producent is niet verantwoordelijk voor schade die ontstaat door het niet
naleven van deze gebruikershandleiding.
stallatie, vervang de doorgebrande
zekering
- schakel het paneel aan
- druk de knoppen iets langer in
- druk slechts één knop tegelijk in
(geldt niet bij het uitschakelen van een
kookveld)
- schakel de kinderbeveiliging (blokkade) uit
- schakel de plaat opnieuw aan
- schakel het bedieningspaneel
opnieuw aan en voer onmiddellijk de
gegevens in
aan
- de restwarmte-indicator gaat pas
opnieuw werken bij de volgende
aanschakeling en uitschakeling van
het bedieningspaneel
45
Page 46

TECHNISCHE GEGEVENS
Nominale spanning: 230V 1N~50 Hz
Nominaal vermogen: 3,0 kW
Model: PBP2VQ203FTN (KMC*)
- Kookzone: 1 x Ø 145 mm 1200 W
- Kookzone: 1 x Ø 180 mm 1800 W
Afmetingen: 520 x 300 x 48;
Gewicht: ca. 4,2 kg;
Voldoet aan de vereisten van de Europese EN 60335-1; EN 60335-2-6 Unie normen
GARANTIE,
Garantie
Bediening in het kader van de garantie volgens de garantiekaart.
- De producent is niet verantwoordelijk voor beschadigingen die ontstaan als gevolg van
verkeerde omgang met het product.
Gelieve het type en fabrieksnummer van de plaat, die op het typeplaatje aangegeven zijn,
in te vullen
Type......................................................
Fabrieksnr..............................................
46
Page 47

47
Page 48

 Loading...