

Page 1
BK313.3 F A
BK309.3 F A
Sticker with serial number of appliance
EN OPERATING MANUAL
Page 2

EN Dear Customer,
This fridge-freezer combines exceptional user-friendliness and excellent efciency. Prior to dispatch, each unit was carefully
checked for its safety and operating capabilities.
Before starting the appliance, please read this Operating Manual carefully
Note!
This fridge-freezer is intended for household use only.
The manufacturer reserves the right to introduce modications, which do not affect the operation of the appliance.
TABLE OF CONTENTS
GUIDELINES CONCERNING THE SAFETY OF USE 5
INSTALLATION AND OPERATING CONDITIONS OF THE APPLIANCE 5
OPERATION AND FUNCTIONS 7
USING THE REFRIGERATOR EFFICIENTLY 9
DEFROSTING, WASHING AND MAINTENANCE 10
TROUBLE-SHOOTING 11
ENVIRONMENTAL PROTECTION 12
CLIMATE RANGE 13
CHANGING THE DIRECTION OF THE DOOR OPENING 15
INSTALLATION MANUAL 16
Page 3
8
9
1
2
3
4
5
6
7
10
11
12
123
5
6
Page 4

7
8
1
2
1
2
3
4
5
91012
15
Page 5

EN
GUIDELINES CONCERNING THE
SAFETY OF USE
l The Manufacturer shall not be held lia-
ble for damage arising from the failure
to observe the instructions contained
in this manual.
l Keep this manual for future re- fe-
rence, or to pass it over to the next
user.
lThis appliance is not intended for use
by persons (including children) with
limited physical or mental capabilities
and persons who lack experience or
familiarity with the appliance..
l D o not allow una tte nde d children
to use the appliance. Do not allow
them to play with the appliance. They
must not climb inside the drawers
and swing on the doors.
lThe appliance operates properly at the
ST ambient temperature (see table with
technical specication). Do not use it in
the cellar, unheated summer cottage
during autumn and winter.
lWhen placing, moving, lifting the ap-
pliance, do not hold the door han- dles,
do not pull the condenser at the rear
part of the refrigerator and do not touch
the compressor unit.
l When transporting, moving or posi-
tioning the fridge-freezer do not tilt
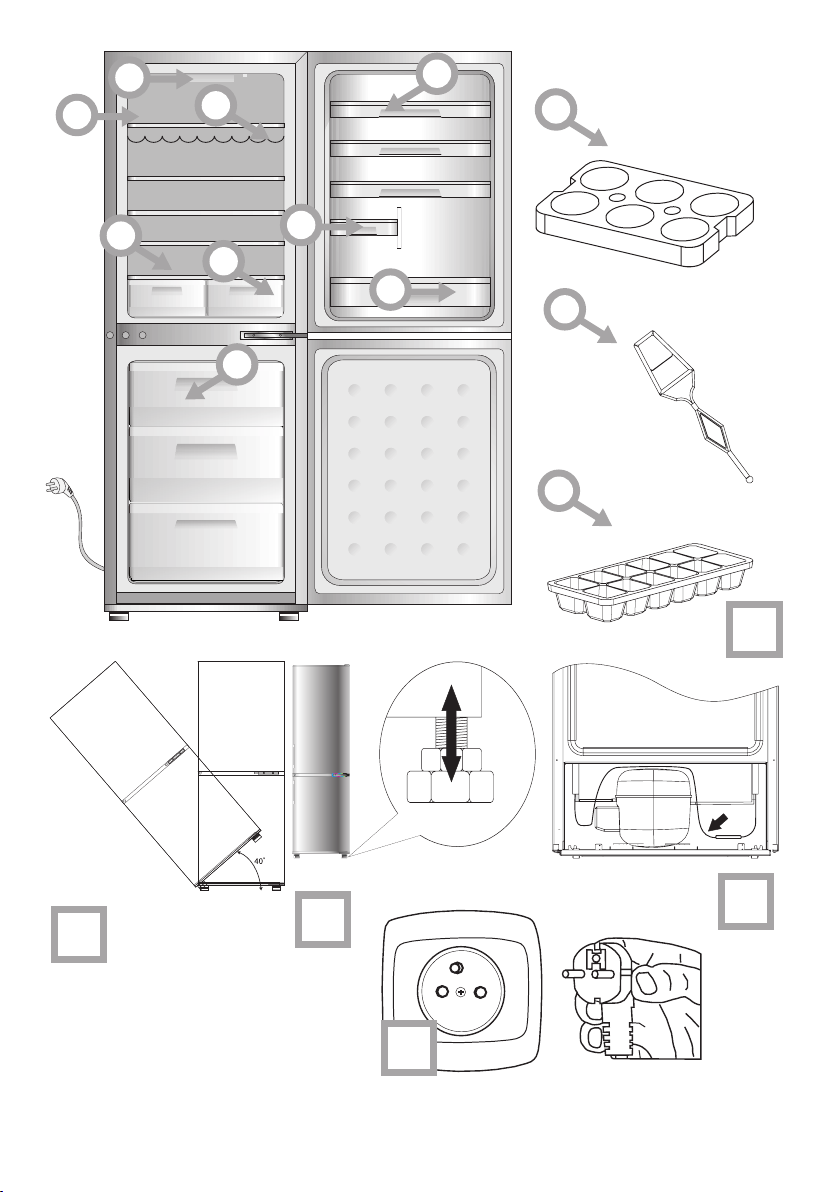
it by more than 40° from the vertical
position. Should such a situation
occur, the appliance should be switched on after minimum 2 hours from
its re-placement in the right position
(g. 2).
l Pull the plug out from the mains socket
before each maintenance activity. Do
not pull on the cord, but hold the body
of the plug instead.
l The “cracking” sound, which the
appliance may emit is caused by the
expansion and contraction of parts as
a result of temperature variations.
l For safety reasons do not repair the
appliance yourself. Repairs car- ried out
by persons who do not have the requ-
ired qualications may result in serious
danger for the user of the appliance.
l Air the room in which the appliance is
placed for a few minutes (the size of the
room for a product containing isobutha-
ne/R600a must be at least 4m3) to avoid
damage to the cooling system.
lDo not refreeze partly thawed pro-
ducts.
l Do not store beverages in bottles and
cans, especially carbonated be- verages, in the freezer chamber. The cans
and the bottles may explode.
lDo not put frozen products, taken out
directly from the freezer (lollies, ice
cubes, etc.) into your mouth, their
low temperature may cause severe
frost-bite.
lMake sure you do not damage the
coo lin g syst em, by pu nct uri ng the
refrigerant pipes in the evaporator or
breaking the pipes. The refrige- rant
is ammable. If the refrigerant makes
contact with the eyes, rinse them with
clean water and call for medical assi-
stance immediately.
Anti-bacteria System
The Antibacteria System protects foods and
products inside the- refrigerator from bacteria and
mould which may cause unpleasant smells and
shorten storage time. The Antibacteria System prolongs the freshness of food. The special material
used to construct the fridge liner prevents bacterial,
microorganism and mould growth.
INSTALLATION AND OPERATING CONDITIONS
OF THE APPLIANCE
Installation before using the appliance for
the rst time
l Take the product out of the package, re- move
the scotch tape protecting the door and the equ-
ipment. Any remaining adhesive stains may be
removed with a mild washing agent.
l Do not throw away the polystyrene elements of
the packaging. If it is necessary to transport the
fridge-freezer, pack it in the polystyrene elements
and lm as well as protect ing it with scotch tape
l Clean the interior surface of the fridge- freezer
and the elements of the equipment with a washing
agent dissolved in lukewarm water, then wipe it
dry.
l Place the fridge-freezer on an even, at and stable
surface, in dry, aired and shaded room, far from
the heat sources such as: oven, hob, central
heating radiators, central heating pipes, hot water
installation, etc.
5
Page 6
EN
l On the exterior surface of the product may be a
protective foil, this foils should be removed.
l Make sure the appliance is placed in a horizontal
position by screwing in the 2 adju- stable front legs
(g. 3)
Minimum distances from the heat
sources
- from the electric gas and other
ovens - 30 mm,
- from oil or coal red ovens - 300
mm,
- from built-in ovens - 50 mm
If there is no possibility of ensuring the above- men-
tioned distances, provide an appropriate insulation
board.
The rear wall of the refrigerator, in particu-
lar, the condenser and other elements of
the cooling system must not contact other
elements, which may damage them, (e.g.
central heating pipes and the water supply
pipes).
It is forbidden to readjust or modify any
parts of the unit. It is crucial not to damage
the capillary tube visible in the compressor
recess. The tube may not be bent, straightened or wound.
If the capillary tube is damaged by the user
the guarantee will be void (g. 5).
Do not use adapters, multiple sockets and
two-wire extension leads. If it is necessary
to use the extension lead, it must be equ-
ipped with a protection ring and a single
socket and must have a VDE/GS safety
certicate.
lIf an extension lead is used (with a protec- tion ring
and safety certicate), its socket must be located
at a safe distance, away from the sinks, and must
not be in a place where it could be ooded by
water or waste water.
lSee the type plate at the lower part of the internal
wall of the appliance for detailed specica- tions.
Disconnecting the mains
lMake sure the appliance can be easily disconnec-
ted from the mains, either by pulling the plug out
of the mains socket, or by switching the two-pole
switch off (g. 6).
Mains connection
lBefore the appliance is con nected to the
mains, set the adjustment knob to the "OFF"
/ “0” position.
lThis appliance should be connected to AC 230V
50Hz supply socket. The socket must be tted
properly, and must be supplied with an earthing
conduit and a 10A fuse.
lIt is a legal requirement that the appliance is pro-
perly earthed. The manufacturer will not be held
liable for any damage or injury which may result
from the failure to full this requirement.
6
Page 7

EN
OPERATION AND FUNCTIONS
Control panel (Fig. 7).
1. Bulb cover
2. Temperature adjustment knob
Temperature adjustment
Turning the knob to a different setting changes the temperature in the fridge-freezer.
Available knob settings:
• appliance switched off - OFF/0 setting
• maximum temperature - 1 setting
• optimal temperature - 2-6 setting
• minimum temperature - 7 setting
Do not put food into the fridge freezer
before it has reached its operating
temperature, which takes minimum
4 hours.
Temperature inside the fridge / freezer chamber
Do not change the temperature settings due to the change in the season of the year. The ambient temperature
increase will be detected by the sensor and the compressor will be switched on automatically for a longer
period of time in order to maintain the temperature set inside the chambers.
Minor changes in temperature
The slight changes in temperature are perfectly normal and may occur, for instance during the storage of great
quantities of fresh products in the fridge, or when the door is open for a longer period of time. This will not affect
the condition of the stored foodstuff, and the temperature will quickly return to its set value.
7
Page 8

EN
Storage of food in the fridge-freezer
Observe the following recommen- dations to
ensure the food remains fresh.
lThe products should be placed on plates, in con-
tainers or packed in food wrap. Di- stribute them
evenly l over the shelves.
l If the food contacts the rear wall, it may cause
frosting or wetting of the products.
l Do not put dishes with hot food t into the
fridge
l Products which absorb avours easily such as
butter, milk, white cheese and products with intense
avour, such as sh, smoked meat, hard cheese
must be placed on shelves, packed in food wrap or
in tightly sealed containers.
l The storage of vegetables containing signicant
quantities of water will cause the deposition of
condensation on the vegetable containers, it
does not impact on the proper functioning of the
fridge.
l Before putting the vegetables into the fridge, dry
them well.
l Excessive moisture shortens the shelf life of vege-
tables, especially the leafed vegeta- bles.
l Do not wash the vegetables before storing in the
refrigerator. Washing removes the natural protection, therefore it is better to wash the vegetables
directly before con- sumption.
lIt is recommended to place the products in freezer
drawers 1, 2, 3 up to natural loading capacity (Fig.
8).
1. Wire shelf 4. (*/***)
2. Lower basket 5. Drawer / Flap
3. Natural loading capacity
lStacking of products on the freezer shelves is
acceptable.
lIt is acceptable to place products beyond the na-
tural loading capacity by 20-30 mm.
lIn order to increase the loading capacity of the
freezer chamber and allow the stacking of products on the freezer evaporator wire shelves up
to maximum height it is possi- ble to remove dra-
wers 1 and 2.
Freezing food
lPractically all the food products, except for ve-
getables consumed raw, such as lettuce can be
frozen.
l Only food products of the highest quality, divided
into small portions for single use, should be frozen.
lProducts should be packed in materials that are
odourless, resistant to air and moisture penetration, and not susceptible to fat. Plastic bags,
polyethylene and aluminium sheets are the best
wrapping materials.
l The packaging should be tight and should stick
to the frozen products. Do not use glass containers.
l Keep fresh and warm foodstuff at am- bient
temperature away from the products, which have
already been frozen.
l We advise you not to place more of fresh food
at a time to the freezer per day (see table witch
technical specication).
lIn order to maintain optimum quality of the frozen
food, reorganise the food that is in the middle of
the freezer, so that it does not touch the products
that are not yet frozen.
l It is recommended that you move the already fro-
zen products to one side and place the fresh pro-
ducts that are to be frozen on the opposite side, as
close to the rear and side walls as possible.
l To freezing products, use space marked (*/***).
lBear in mind that the temperature in the fre-
ezer is affected by several factors, including
the ambient temperature and the quantity of
food products in the chamber, the frequency
of opening the door, the amount of frost in the
freezer, and the thermostat setting.
lIf you cannot open the freezer door immedia-
tely after closing it, allow 1-2 minutes for the
negative pressure to com- pensate, and try
again to open the door.
The storage time for frozen products depends on
their quality before freezing when fresh, and on the
storage temperature. The following storage periods
are recommended when the temperature of -18°C
or lower is maintained:
Products Months
Beef 6-8
Veal 3-6
Giblets 1-2
Pork 3-6
Poultry 6-8
Eggs 3-6
Fish 3-6
Vegetables 10-12
Fruit 10-12
8
Page 9

EN
USING THE REFRIGERATOR EFFICIENTLY
Practical everyday tips
lDo not place fridges or freezers next to radiators,
heaters, stoves or in direct sunlight.
l Make sure that air vents are not covered up and
clean the dust off them once or twice a year.
l Select the right temperature: 6 to 8°C in your
refrigerator and -18°C in your freezer is suf-
cient.
l When on holiday, turn up the temperature in your
fridge.
l Only open your fridge or freezer when necessary.
It helps if you know what food each contains and
where it is located. Return food to the fridge or
freezer as soon as possible after you have used
it so that it does not warm up too much.
l Wipe the inside of your fridge regularly with a
cloth soaked in a mild detergent. Appliances
which are not self-defrosting will require regular
defrosting. Do not allow frost layers thicker than
10 mm to form.
l Keep the seal around the door clean, otherwise
it will not shut properly. Always replace broken
seals.
Understanding the stars
*Temperature is at least -6°C; sufcient to store
frozen food for about a week. Drawers or com-
partments marked with one star used to be a
feature of (mostly) cheaper fridges.
** Food can be stored at -12°C or below for 1-2
weeks without losing its taste. Not suitable for
freezing food.
*** This rating is mainly used to store foods at -18°C
or below. Can also be used to freeze up to 1
kilogram of fresh food.
**** This appliance is suitable for storing foods at
-18°C or below and freezing larger quantities
of fresh foods.
Storage zones in the refrigerator
l Due to the natural circulation of the air in the
appliance, there are different temperature zones
in the refrigerator chamber.
l The coldest area is directly above the vegetables
drawers. Use this area for all delicate and highly
perishable food e.g.
- Fish, meat, poultry
- Sausage products, ready meals
- Dishes or baked goods containing eggs or
cream
- Fresh dough, cake mixtures
- Pre-packed vegetable and other fresh food with
a label stating it should be kept at a temperature
of approx 4oC.
l The warmest area is in the top section of the
door. Use this for storing butter and cheese.
Food that should not be stored in a
refrigerator
l Not all food is suitable for storing in the refrige-
rator, particularly:
- Fruit and vegetables which are sensitive to
cold, such as bananas, avocado, papaya, passion fruit, aubergines, peppers, tomatoes and
cucumbers.
- Fruit which is not yet ripe
- Potatoes
Example of storing the food - see gure 9.
9
Page 10

EN
DEFROSTING, WASHING AND MAINTENANCE
Defrosting the fridge
Frost settles on the rear wall of the fridge chamber. It
is removed automatically. During the defrosting, the
condensate, which contains contaminants may clog the
opening in the through. Should it occur, carefully unclog
the opening with the cleaning plug (g. 10).
l The appliance operates in cycles: it refrigerates
(then the frost settles on the rear wall), and defrosts (water ows down the rear wall)
Disconnect the appliance from the
mains before cleaning by removing the
plug from the mains socket or switching
off the fuse. Prevent water from penetrating the control panel or the light.
l Do not use defrosting aerosols. They may cause
the formation of an explosive mixture, or contain
solvents which may damage the plastic components of the appliance and even be harmful
to health.
l Make sure the water used for cleaning does not
ow into the evaporation container through the
discharge opening.
l The whole appliance, except for the door gasket
must be cleaned with a mild cleaning detergent.
The door gasket should be cleaned with water
and wiped dry.
l Wash all the accessories (vegetable containers,
door shelves, glass shelves, etc.).
Automatic fridge defrosting
Washin g the fridge and freezer chambers
manually
It is recommended to wash the fridge and freezer
chambers at least once a year. This prevents the
formation of bacteria and foul odours. Switch the
appliance, using button (1), remove the food from
the chambers and wash them using water with a
mild detergent. Then, wipe the chambers dry with
a cloth.
The fridge chamber has been equipped with the
automatic defrosting function. However, frost may
settle on the rear wall of the fridge chamber. This
happens usually, when large quantities of fresh
food products are stored in the fridge.
Automatic fridge defrosting
The freezer chamber has been equipped with
the automatic defrosting function (no-frost). The
food is frozen in the cooled circulation air, and the
moisture from the freezer chamber is discharged
outside. As a result, no ice and frost is produced
in the freezer and the products do not freeze on
each other.
10
Page 11

TROUBLE-SHOOTING
Problems Possible causes Remedies
EN
The appliance
does not work
The lighting inside
the chamber does
not work
Temperature inside
the appliance is not
low enough
The appliance
works continuously
Water collects in
the lower part of
the appliance
The appliance
generates unusual
noise
The electric circuit is disrupted - check whether the plug is properly inserted
The bulb is loose or fused (only appliances with bulb lightning type)
Incorrect setting of the adjustment knob - reset the knob to a higher position
The ambient temperature is higher or
lower than the climate range from table
with technical specication
The appliance is located in a sunlit place
or near heat sources
Too much warm food loaded at a time - wait 72 hours until the food becomes cool
Internal air circulation obstructed - place the food and containers in such a
The air circula tion at the back of the
appliance is obstructed
The door of the frid- ge/freezer is opened too often and/or remains open for
too long
The door does not close completely - place the food and containers so that they
The compressor is switched on too
rarely
Door gasket inserted incorrectly - press the gasket in
Incorrect setting of the adjustment knob - reset the knob to a lower position
See. ”Temperature inside the appliance
is not low enough for description of
other possible causes
The water discharge opening is clogged
(depending on the model)
Internal air circulation obstructed - place the food and containers in such a
Incorrect levelling of the appliance - level the appliance properly
The appliance is touching furniture and/
or other objects
into the socket
- check whether the power cable of the appliance is not damaged
- check whether there is voltage in the
socket, by plugging another appliance, e.g.
a night lamp
- check whether the appliance is switched
on by setting the thermostat to a position
above 0.
- t the bulb correctly or replace it (see section
above “Replacing the interior light bulb)
- the appliance is adapted to operation in
the climate range from table with technical
specication.
- move the appliance to another place. Obse-
rve the guidelines contained in the manual
(freezes) and the required temperature is
reached inside the chamber
way that they do not touch the rear wall of
the fridge
- move the appliance min. 30 mm away from
the wall
- reduce the frequency of opening the door
and/or shorten the time when door remains
open
would not interfere with door closed
- check whether the ambient temperature is
not lower than climate class
See. ”Temperature inside the appliance
is not low enough for description of other
possible remedies
- clean the discharge opening (see the operating manual – chapter entitled ”Defrosting
the fridge”)
way as that they do not touch the rear wall
of the fridge
- place the appliance at a location that
ensures proper clearances around it
11
Page 12

EN
Certain sounds can be heard during normal use of the refrigerator, which do not affect its correct operation.
Sounds, which can be easily prevented:
lnoise caused by the appliance which is not level - adjust the position with the adjustable turn-in front
feet. Alternatively, place pads made of soft material under the rear rollers, especially when the appliance is
placed on tiles.
ltouching the adjacent piece of furniture - move the refrigerator away.
lcreaking of the drawers or shelves - take out and put back the drawer or shelf.
lsounds of clinking bottles - move bottles apart.
Sounds heard during normal use are mainly due to operation of the thermostat, compressor (switching on)
and cooling system (thermal expansion and contraction of the radiator caused by ow of the cooling agent).
ENVIRONMENTAL PROTECTION
Ozone layer protection
The refrigerants and fo-
aming agents, which are
100% free of FCKW and FKW
have been used for manufac-
turing our pro- duct. Therefore
we are helping to protect the
ozone layer and prevent the in-
crease of greenhouse effects.
Also, the innovative technology
and environmentally friendly insulation help in reducing ener-
gy consumption.
Recycling of the packaging
Our packaging are made of
environmentally friendly mate-
rials, which can be reused:
l The external packaging is made of cardboard/
foil
lThe FCKW free shape of foamed polystyre-
ne (PS)
lPolyethylene (PE) foils and bags
Elimination / disposal of the equipment
If the appliance is no longer in use, cut the connecting
cable off the used equipment before its scrapping.
Also, remove the appliance lock or render it useless
so that the appliance presents no danger to children
while being stored for di- sposal.
This appliance is marked with a
symbol of the crossed out waste
container in conformance with
the European Directive 2002/96/
EC. Such marking informs that
the equipment may not be kept
together with other waste coming
from the household after the pe-
riod of its use. The user is obliged
to dispose of the appliance at the
waste collection points, shops and communal units
form an appropriate system enabling the disposal of
the equipment.
Handling the used electrical and electronic equipment properly contributes to the avoidance of consequences harmful to the human health and natural
environment, resulting from the presence of hazardous substances and improper storage and process-
ing of such equipment.
waste collection point. The local
12
Page 13

CLIMATE RANGE
The information about the climate range of the appliance is provided on the rated plate. It
indicates at which ambient temperature (that is, room temperature, in which the appliance is
working) the operation of the appliance is optimal (proper).
EN
Climate range Permissible ambient
SN from +10°C to +32°C
N from +16°C to +32°C
ST from +16°C to +38°C
T from +16°C to +43°C
temperature
Manufacturer’s Declaration
The manufacturer hereby declares that this product meets the requirements of the following European directives:
l Low Voltage Directive 2006/95/EC,
l Electromagnetic Compatibility (EMC) Directive 2004/108/EC
l ErP Directive 2009/125/EC
and has thus been marked with the symbol and been issued with a declaration of compliance
made available to market regulators.
EQUIPMENT OF THE APPLIANCE
1 controls
2 Glass shelf
3 Wire bottle shelf
4 Glass shelf over the vegetable container
5 Vegetable container
6 Drawer in freezer compartment
7 Medium door shelf
8 Small door shelf
9 Large door shelf
10 Egg Tray
11 Cleaning plug
12 Ice cube tray
13
Page 14

EQUIPMENT OF THE APPLIANCE
Individual ttings BK313.3 F A BK309.3 F A
Glass shelf 3+1 3+1
Glass shelf over the vegetable container 1 1
Vegetable container 2 2
Small door shelf 1 1
Medium door shelf 3 2
Large door shelf 1 1
Egg Tray 1 1
Cleaning plug 1 1
Drawer in freezer compartment 3 4
Ice cube tray 1 1
Wire bottle shelf 1 1
Type of lighting LED LED
EN
14
Page 15

CHANGING THE DIRECTION OF THE DOOR OPENING
2
3
4
5
1. Before reversing the door opening direction, unplug the appliance and remove all food.
2. Using a at screwdriver pry and remove hinge caps.
3. Using a Phillips screwdriver remove the door upper hinge while holding the door (Fig. 2).
4. Using a Phillips screwdriver remove the middle hinge while holding the upper door
5. Set the door aside in a safe place.
6. Tilt the appliance (up to 40 degrees) so as to have sufcient access to the lower hinge (Fig. 3).
7. Using a Phillips screwdriver remove lower door hinge
8. Attach the lower hinge on the other side (Fig. 4).
9. Position the door assembly in such a way so that pin of the lower hinge is aligned with the appropriate hole of the lower door bracket.
10. Attach the middle hinge on the other side of the appliance so that the lower pin of the middle hinge
is aligned with the appropriate hole of the upper door bracket. Position the second door assembly so
that the upper pin of the middle hinge is aligned with the appropriate hole of the lower door bracket.*
11. Attach the upper hinge so that the hinge pin is aligned with the appropriate hole of the upper door
bracket.* (Fig. 5).
12. Check that doors are properly aligned with the appliance body.
13. Replace the hinge caps.
14. Switch on the appliance as described in the relevant section of its operating instructions.
15
Page 16

BK313.3 F A
A
700mm
4mm
min 1074mm
min A
min 50mm
Page 17

BK309.3 F A
A
875,5mm
4mm
min 898,5mm
min A
min 50mm
Page 18

3
4
5
2
1
Model
6
7
BK313.3 F A 20 2 1 4 - 1 1 1,8m 4 1 1 1
BK309.3 F A 20 2 1 4 - 1 1 1,8m 4 1 1 1
Page 19

19
Page 20

Service Help Line
For the UK: please call 0844 815 8880
0818 46 46 46
For Ireland: please call
IO 00723/2
(10.2013)
 Loading...