

Page 1
mini PRO
mini PRO-30 (30 x 0.001g)
USER’S MANUAL
AMERICAN WEIGH
SCALES INC.
Page 2

American Weigh
mini PRO-30 User’s Manual
Thank you for purchasing the mini PRO Portable Precision Balance.
With normal care and proper treatment, it will provide you with years of
reliable service. Please read all operating instructions carefully before
using the scale.
• Avoid any exposure to extreme heat or cold. Your scale will work
better when operating in normal room temperature. Always allow the
scale to acclimate to normal room temperature for at least an hour
before use.
• Give the scale sufcient warm up time before use. Usually 30 to 60
seconds to give the internal components time to stablize.
• Keep your scale in a clean environment. Dust, dirt, moisture, vibra-
tion, air currents, or a close proximity to other electronic equipment can
cause an adverse effect on the reliability and accuracy of your scale.
• Handle with care. Gently apply all items to be weighed onto the
weighing surface. Although this scale is designed to be quite durable,
avoid rough treatment as this may permanently damage the internal
sensor.
• Do not shake, drop, or otherwise shock the scale. This is a precision
instrument and must be handled with extreme care.
• Only operate the scale on a stable, vibration free surface.
• Always store in a dry place to avoid moisture accumulation on
internal components.
Page 3

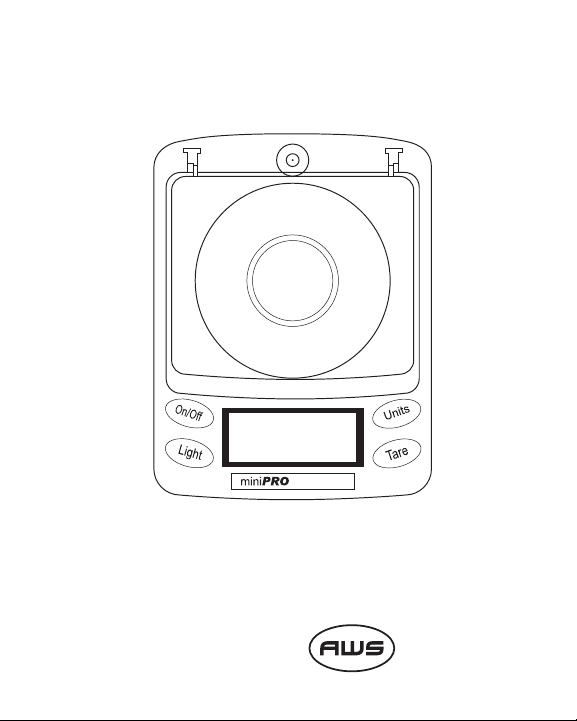
I. Parts Description
1
2
3
4
5
10
11
8
1. Bubble level- insures scale is level
2. Weighing Tray
7
3. On/Off - Turns scale on or off
4. Fn- Adjust backlight and other set-
6
tings (explained in this manual)
5. LCD Display
6. Tare- Resets scale to zero
7. Units- Changes weighing units
8. Adjustable feet- help keep scale
level
9. Draft Shield- Keeps wind from
interfering with weighing
10. Weighing Tray
11. Calibration Weight
*Carrying case and AC adapter
included (not shown)
9
II. Operation
This scale operates using either 4 AAA batteries or an included
AC Adapter. Insure the scale is plugged into a wall outlet, or
has battery power before use. To operate, set the balance on a
at / stable surface away from interference from wind, vibration, and radio waves. If needed, you may adjust the scales
feet to insure that the scale is level. Press the “On/Off” key to
begin weighing. Once the scale reads “0.000”, you may place
the item to be weighed onto the center of the platform.
Page 4

III. Weighing Units
This scale can weigh in either grams, ounces, troy ounces,
pennyweights, grains, or carats. To change the active weighing
unit, press the “Units” key. The scale also remembers the last
unit used. Therefore, the next time the scale is turned on, it will
revert to the previously used weighing unit. You may change
weighing units in the middle of weighing as well.
IV. Tare Feature
Tare allows you to subtract the weight of a container (ie. the
included weighing tray) in order to obtain the weight of objects
in the container (net weight). To use the scales “Tare” button,
turn the scale on in normal weighing mode and wait for the
screen to show “0.000”. Place the container you wish to use
on the scale then press the “Tare” button. The weight of the
container is now subtracted and the scale should read 0.000
again. If you now remove the container, a negative value will
be shown. If you wish to clear the negative value, press “Tare”
again.
V. Backlight
This scale has a backlight with adjustable settings. To change
the backlight’s parameters, press the “Fn” key two times. The
scale will display F1, meaning the backlight will come on when
weight is on the scale. To cycle through the different modes,
press the “Unit” key. Press the “Tare” key to conrm your selection.
F1: Backlight will come on when weight is on the scale.
F2: Backlight is always on.
F3: Backlight is always off.
Page 5

VI. Auto-Off Feature
This scale has an Auto-Off feature that can help battery life
by turning the scale off when not in use for a certain amount
of time (1-9 minutes). To change the Auto-Off timer, press the
“Fn” button three times. The scale will show the current Auto-
Off setting (OFF, 60, 120, 180, 240, 300, 360, 420, 480, or 540)
Press the “Unit” button to cycle through until you nd the desired timer duration (in seconds). Press “Tare” to conrm your
selection.
VII. Calibration
If the scale is not performing properly or is displaying incorrect weight, you may need to recalibrate the scale. Typically,
the Standard Calibration method is sufcient for the average
user to recalibrate their scale. Advanced calibration is already
performed at the factory and should not be attempted unless
you are still having problems. Before starting calibration, insure
that the area you are working in is free of drafts, vibration, and
all radio-wave emitting devices (cordless phones etc).
• Standard Calibration:
You will need a 10 gram weight to perform calibration. Press
the “Fn” button one time, “SCALE” will be displayed on the
LCD; Press the “Tare” button to continue. The scale will
display 10.000 . Press “Tare” once more. When the scale will
ash “10.000” on the display, place your 10g calibration weight
onto the weighing surface. In a few seconds, the display will
stop ashing, and return to normal weighing. Calibration is
complete!
Page 6

• Advanced Calibration:
You will need both a 10 gram and a 20 gram weight to perform
calibration (or three 10 gram weights). Press the “Fn” button
one time, “SCALE” will be displayed on the LCD; Press the
“Units” button once to change to “LINE” mode, then press
“Tare” to conrm. The scale will display 10.000, press “Tare”
again to conrm. The display will ash “10.000”. At this time,
place a 10 gram weight on the center of the weighing platform.
In a few seconds, the display will change to “30.000”. At this
time, either add a 20g , or two more 10g weights (there should
be 30g on the scale at this point). The display will now show
“30.000” and return to normal weighing. Calibration is complete!
Auto Off Duration
(seconds)
Weight (lb) 0.58 lb
Tare Range To full capacity by subtraction
Pan Size (mm) Ø 2.75” (70 mm)
Capacity
miniPRO 30
Power 4 x AAA Batteries (not included)
Dimensions 5.25” x 3.75” x 2.0”
60, 120, 180, 240, 300,
360, 420, 480, 540, off
30g x 0.001g
1.05820oz x 0.00005oz
0.96450ozt x 0.00005ozt
19.290dwt x 0.001dwt
463.00gn x 0.02gn
150.00ct x 0.005ct
AC Power Adapter (included)
 Loading...