

Page 1
Installation
Instructions
COLONY SOFT
4175.300 Series
SINGLE CONTROL
KITCHEN PULL-DOWN FAUCET
Thank you for selecting American-Standard...
the benchmark of fine quality for over 100 years.
To ensure that your installation proceeds smoothly-please read these instructions carefully before you begin.
RECOMMENDED TOOLS
Regular Screwdriver
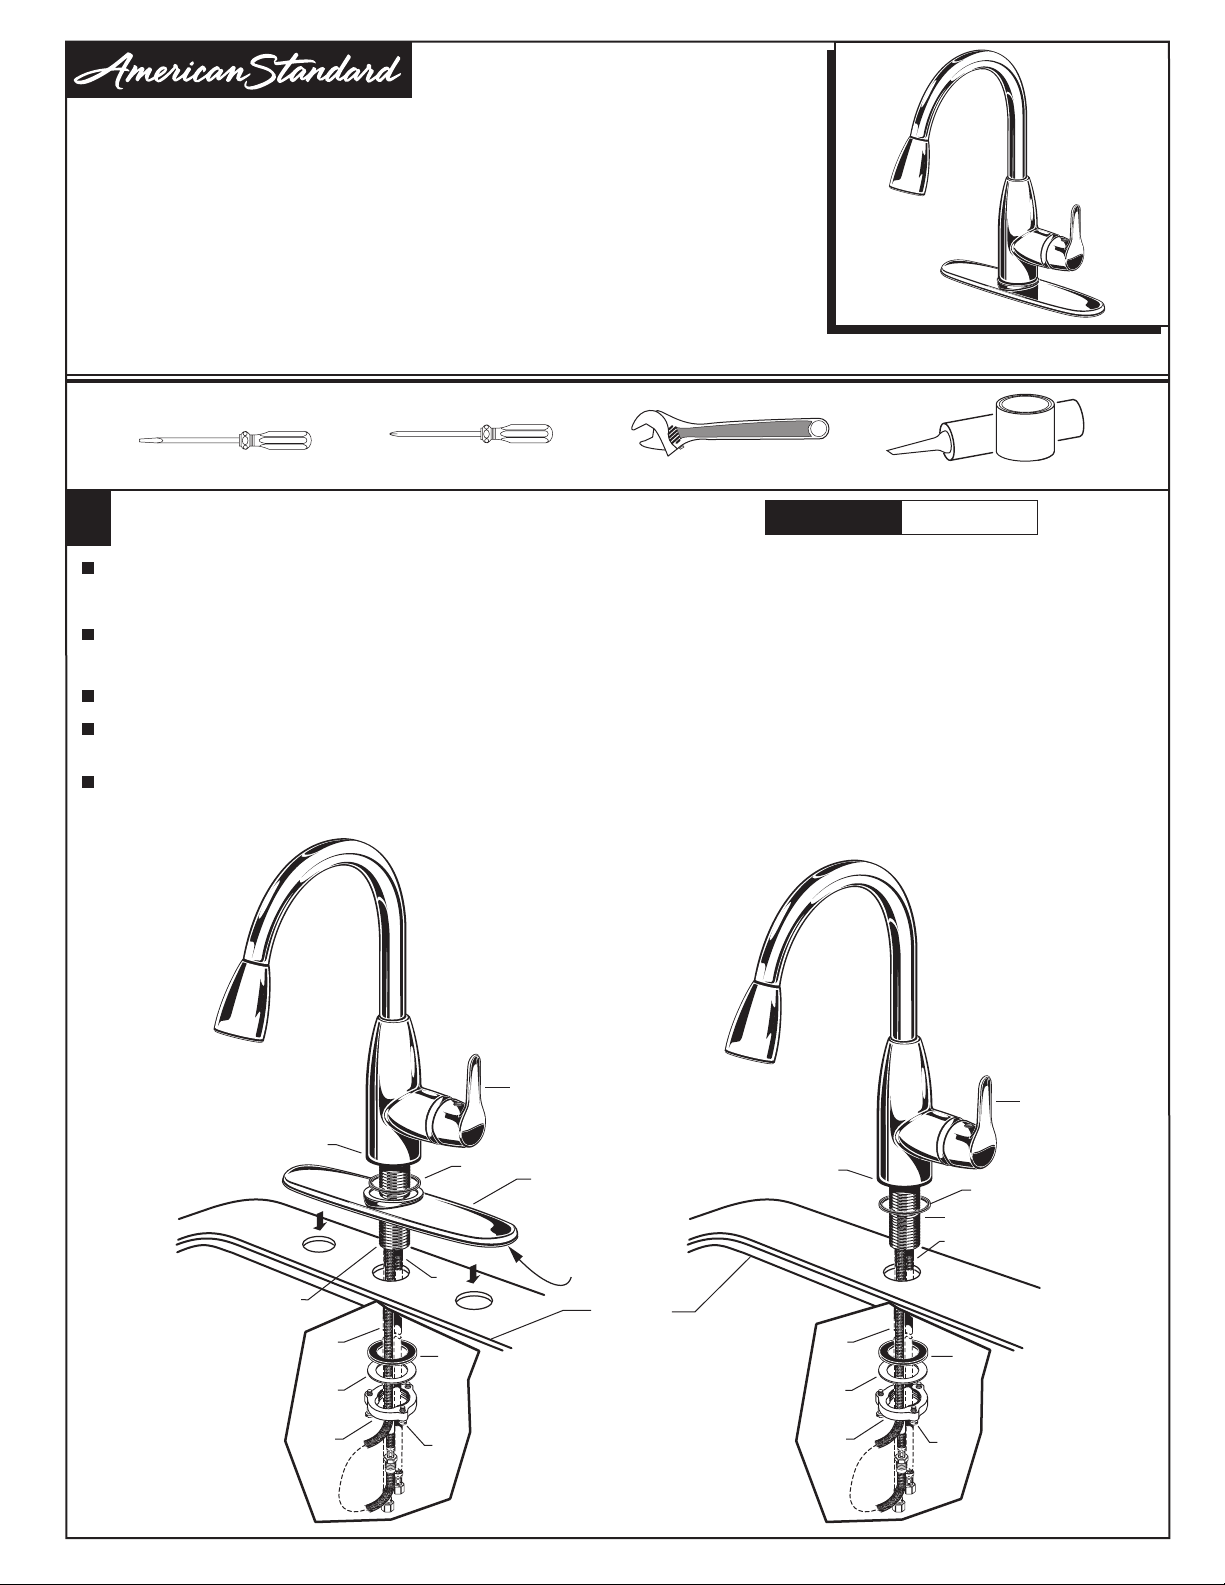
INSTALL FAUCET WITH OR WITHOUT DECK ESCUTCHEON
1
(A) Installation with ESCUTCHEON (1). Apply a bead of putty to bottom edge of ESCUTCHEON with PUTTY PLATE (1).
Insert SUPPLY HOSES (2), SPRAY HOSE (9) and SHANK (3) through hole of ESCUTCHEON with PUTTY PLATE (1) and
mounting surface. Follow mounting instructions below to secure faucet to mounting surface.
(B) Installation less ESCUTCHEON (1). Discard ESCUTCHEON with PUTTY PLATE (1). Insert supply HOSES (2), SPRAY
HOSE (9) and SHANK (3) through mounting hole and seat SPOUT BASE onto sink or mounting surface. Do not use putty.
Insert HOSES (2) through RUBBER WASHER (4), BRASS WASHER (5), and threaded LOCKNUT (6).
Assemble RUBBER WASHER (4), BRASS WASHER (5), and threaded LOCKNUT (6) onto SHANK (3) from underside
of sink or mounting surface. Hand tighten LOCKNUT (6).
Use a screwdriver to tighten SCREWS (8) on LOCKNUT (6). Work your way around LOCKNUT (6), tightening
the screws slightly each time until all are snug to ensure even pressure.
Phillips Screwdriver
Adjustable Wrench
CAUTION
Certified to comply with ANSI A112.18.1M
Plumbers' Putty or Caulking
Turn off water at
main supply.
M965036 Rev. 1.7
AB
SPOUT BASE
3
7
SEAL
2
9 9
5
6
4
8
1
PUTTY
SINK OR
MOUNTING
SURFACE
SPOUT BASE
3
2
4
5
6
8
7
SEAL
Page 2
MAKE WATER SUPPLY CONNECTIONS
2
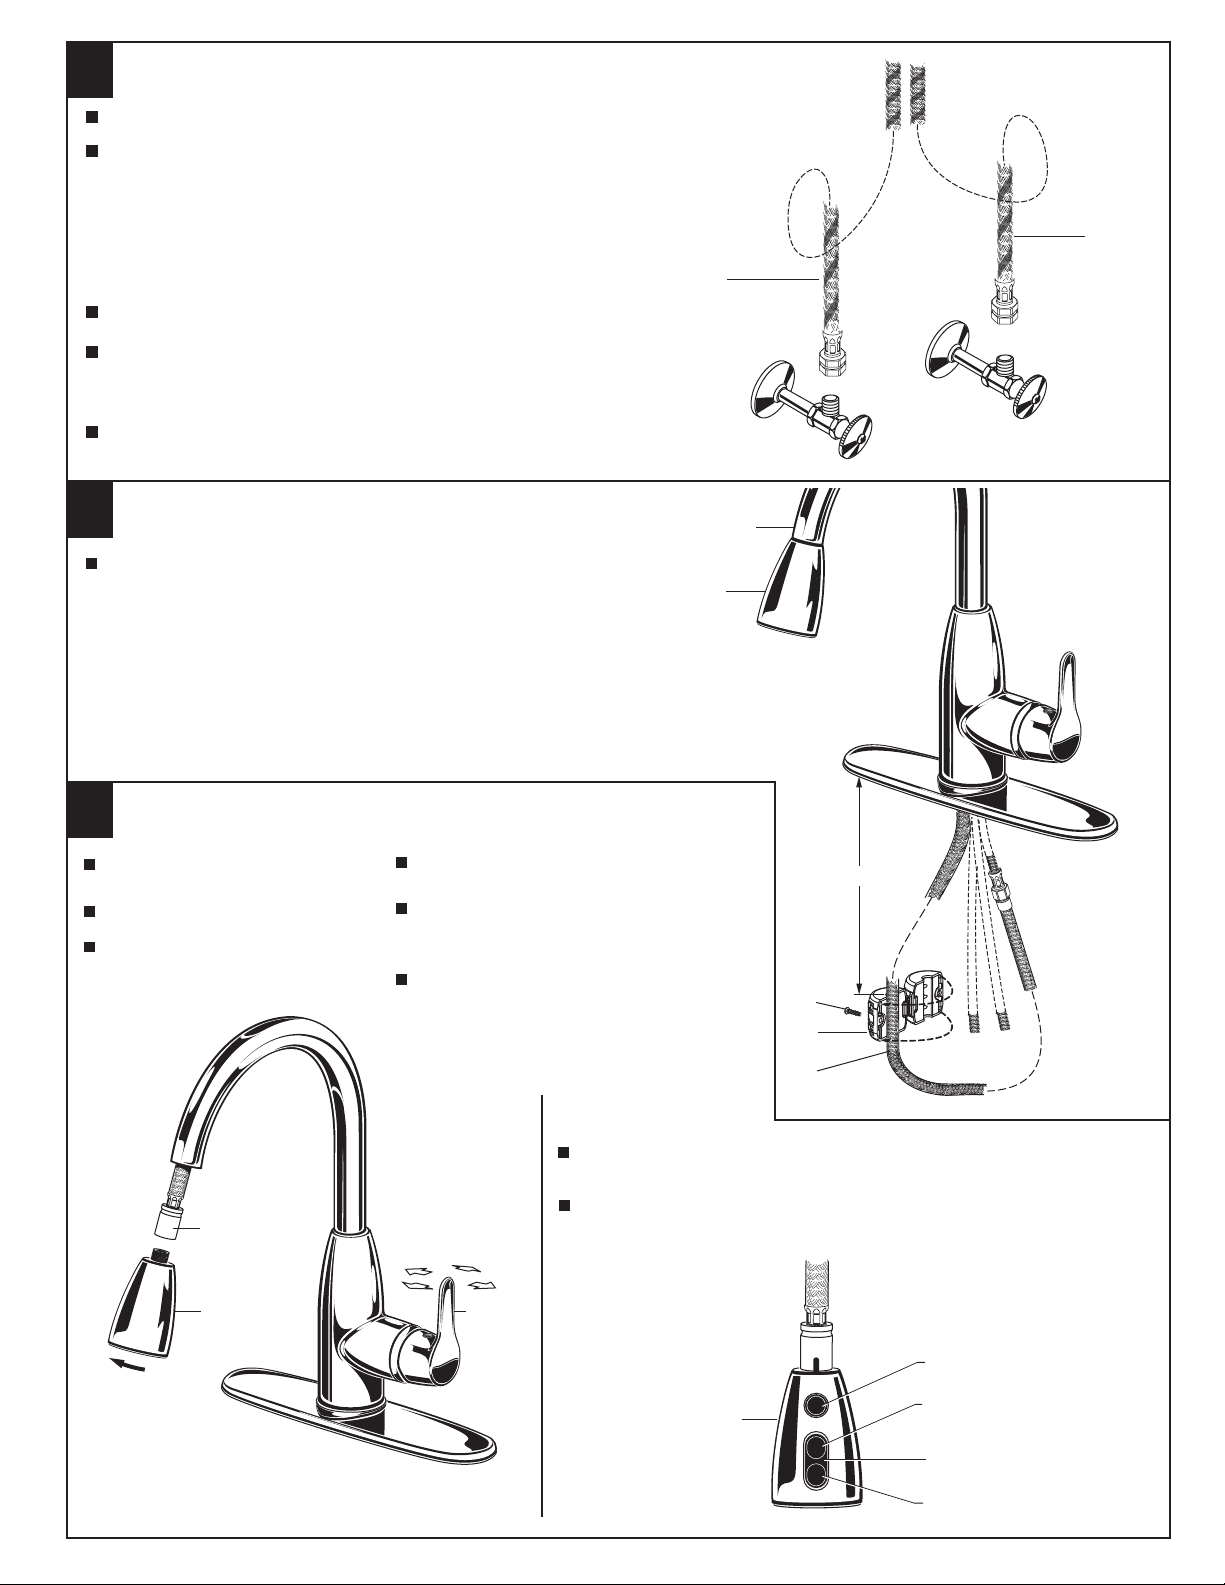
Turn off hot and cold water supplies before beginning.
Connect FLEXIBLE SUPPLIES (1, 2) directly
to wall supplies. Connection on fitting
supplies are 3/8" compression. Connect
left supply (Marked with a Red Stripe) to Hot
and right supply (Marked with Blue Stripe) to
Cold wall supply. Use adjustable wrench to
tighten connections. Do not over tighten.
Faucet supplies are 21" long from faucet base.
Note: If additional supply length is
required, installer must purchase
additional parts separately.
Important: If SUPPLY HOSES (1, 2) are
too long, loop as illustrated to avoid kinking.
INSTALL WEIGHTS
3
With HAND SPRAY (1) seated in SPOUT (2), install
WEIGHT (3) onto HOSE (4) 18 inches from the underside
of the sink deck and secure with SCREW (5).
2
1
COLD
HOT
2
1
TEST INSTALLED FAUCET
4
Move HANDLE (1) into "off"
position.
Turn on water supplies.
Check connections for leaks.
(See Section 5)
2
3
REMOVE
With HANDLE (1) in "off" position,
unthread SPRAY (3) from HOSE (2).
Operate handle back to front, in COLD
and HOT positions, to flush water lines
thoroughly.
Replace SPRAY (3) onto HOSE (2).
SPRAY OPERATION
With FAUCET on press TOGGLE BUTTON (4) on SPRAY (3) to
switch from stream to spray.
Press and hold PAUSE BUTTON (5) to temporarily stop flow from
SPRAY (3). Release PAUSE BUTTON (5) to resume flow from
SPRAY (3).
1
3
18"
5
3
4
5
STREAM (AERATOR)
4
SPRAY
M965036 Rev. 1.7
Page 3
CHECK CONNECTIONS FOR LEAKS.
5
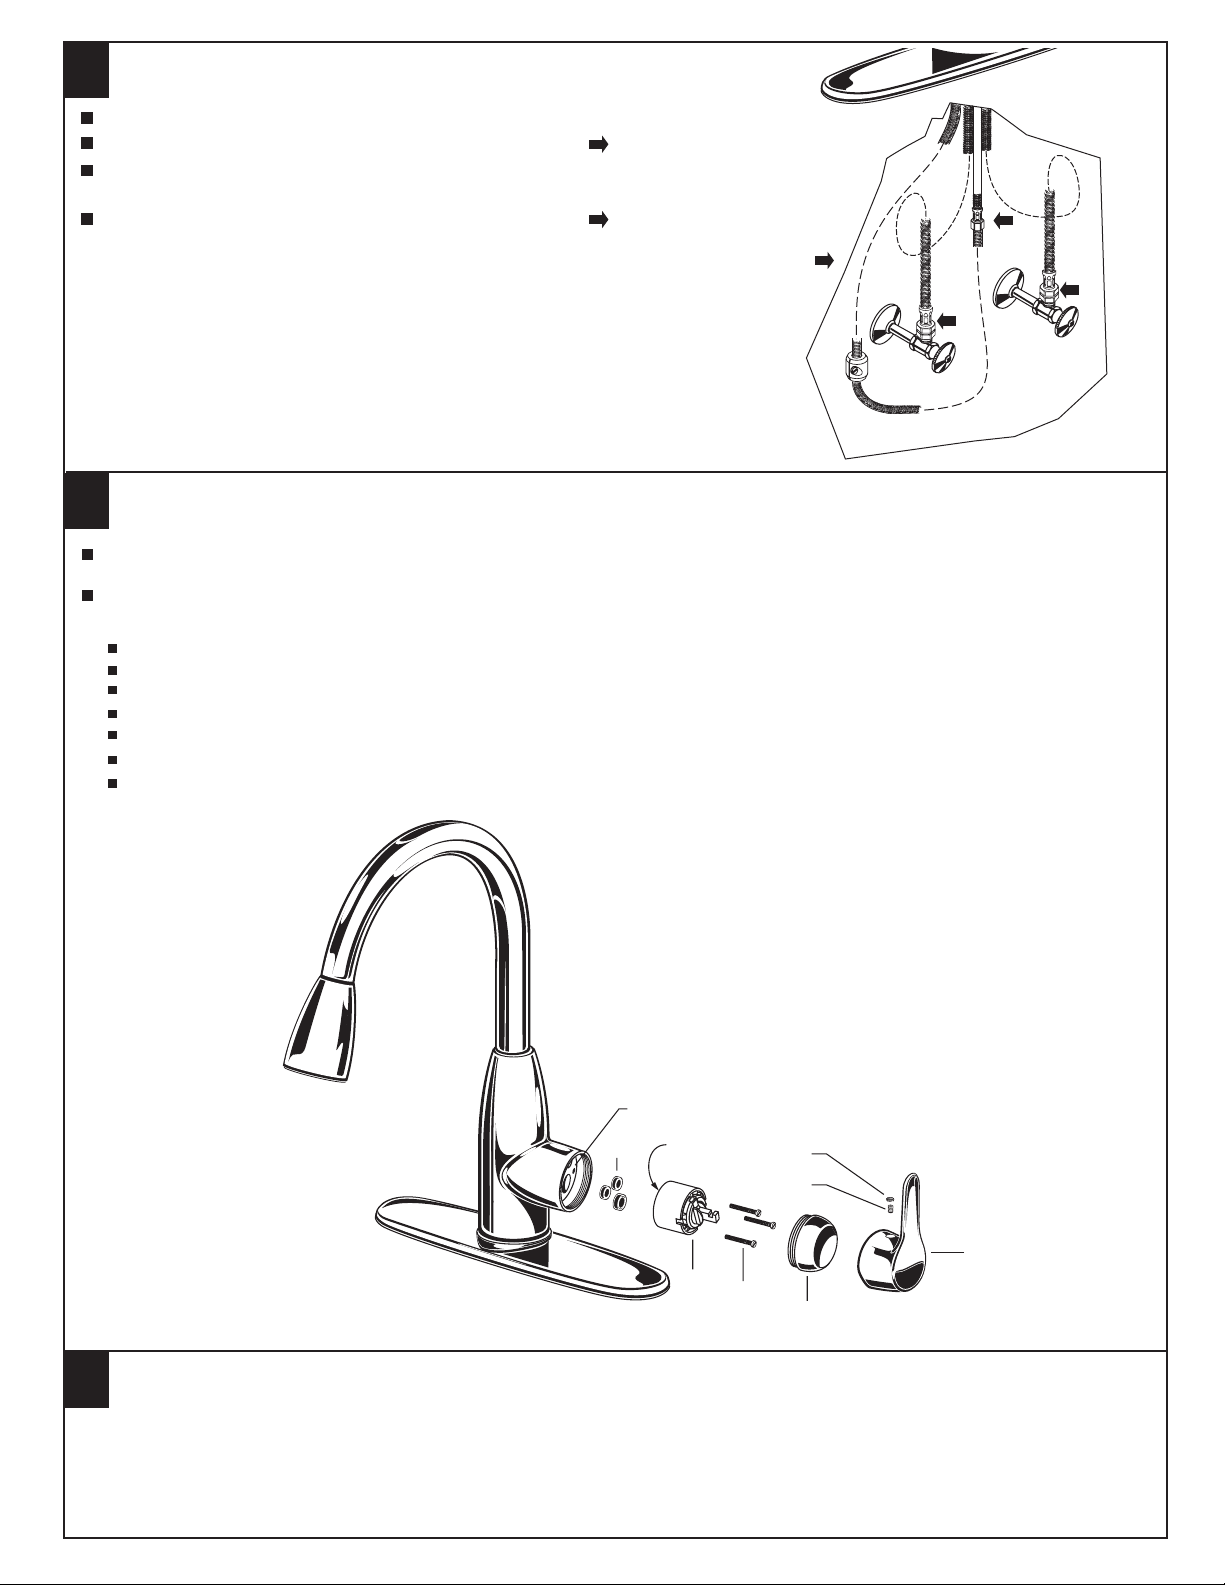
Move HANDLE down into "off" position.
Turn on water supplies and check connections for leaks
Operate HANDLE (2) up and down, left and right to flush
water lines thoroughly.
Operate HAND SPRAY and check connections for leaks.
SERVICE
6
If faucet drips, operate HANDLE several times from "off" to "on." Do not
apply excessive force.
Clogged CARTRIDGE outlets or inlets may cause reduced flow.
To clean, first turn off water supply then:
Remove INDEX BUTTON (1), loosen HANDLE SCREW (2) and remove HANDLE (3).
Unthread the ESCUTCHEON CAP (4). Unthread three MOUNTING SCREWS (5).
Lift CARTRIDGE (6) off MANIFOLD (7) and remove CARTRIDGE SEALS (8).
Clean MANIFOLD (7), CARTRIDGE (6) ports and SEALS (8).
Place SEALS (8) into CARTRIDGE PORTS (6a).
Place CARTRIDGE (6) onto MANIFOLD (7) and tighten MOUNTING SCREWS (5) alternately.
Replace ESCUTCHEON CAP (4), HANDLE (3), tighten HANDLE SCREW (1) and install INDEX BUTTON (2).
.
CHECK CONNECTIONS
FOR LEAKS
7
8
6a
1
2
3
6
5
4
CARE:
7
DO: SIMPLY RINSE THE PRODUCT CLEAN WITH CLEAR WATER. DRY WITH A SOFT COTTON FLANNEL CLOTH.
DO NOT: DO NOT CLEAN THE PRODUCT WITH SOAPS, ACID, POLISH, ABRASIVES, HARSH CLEANERS, OR A
CLOTH WITH A COARSE SURFACE.
M965036 Rev. 1.7
Page 4
COLONY SOFT
SINGLE CONTROL KITCHEN
PULL-DOWN FAUCET
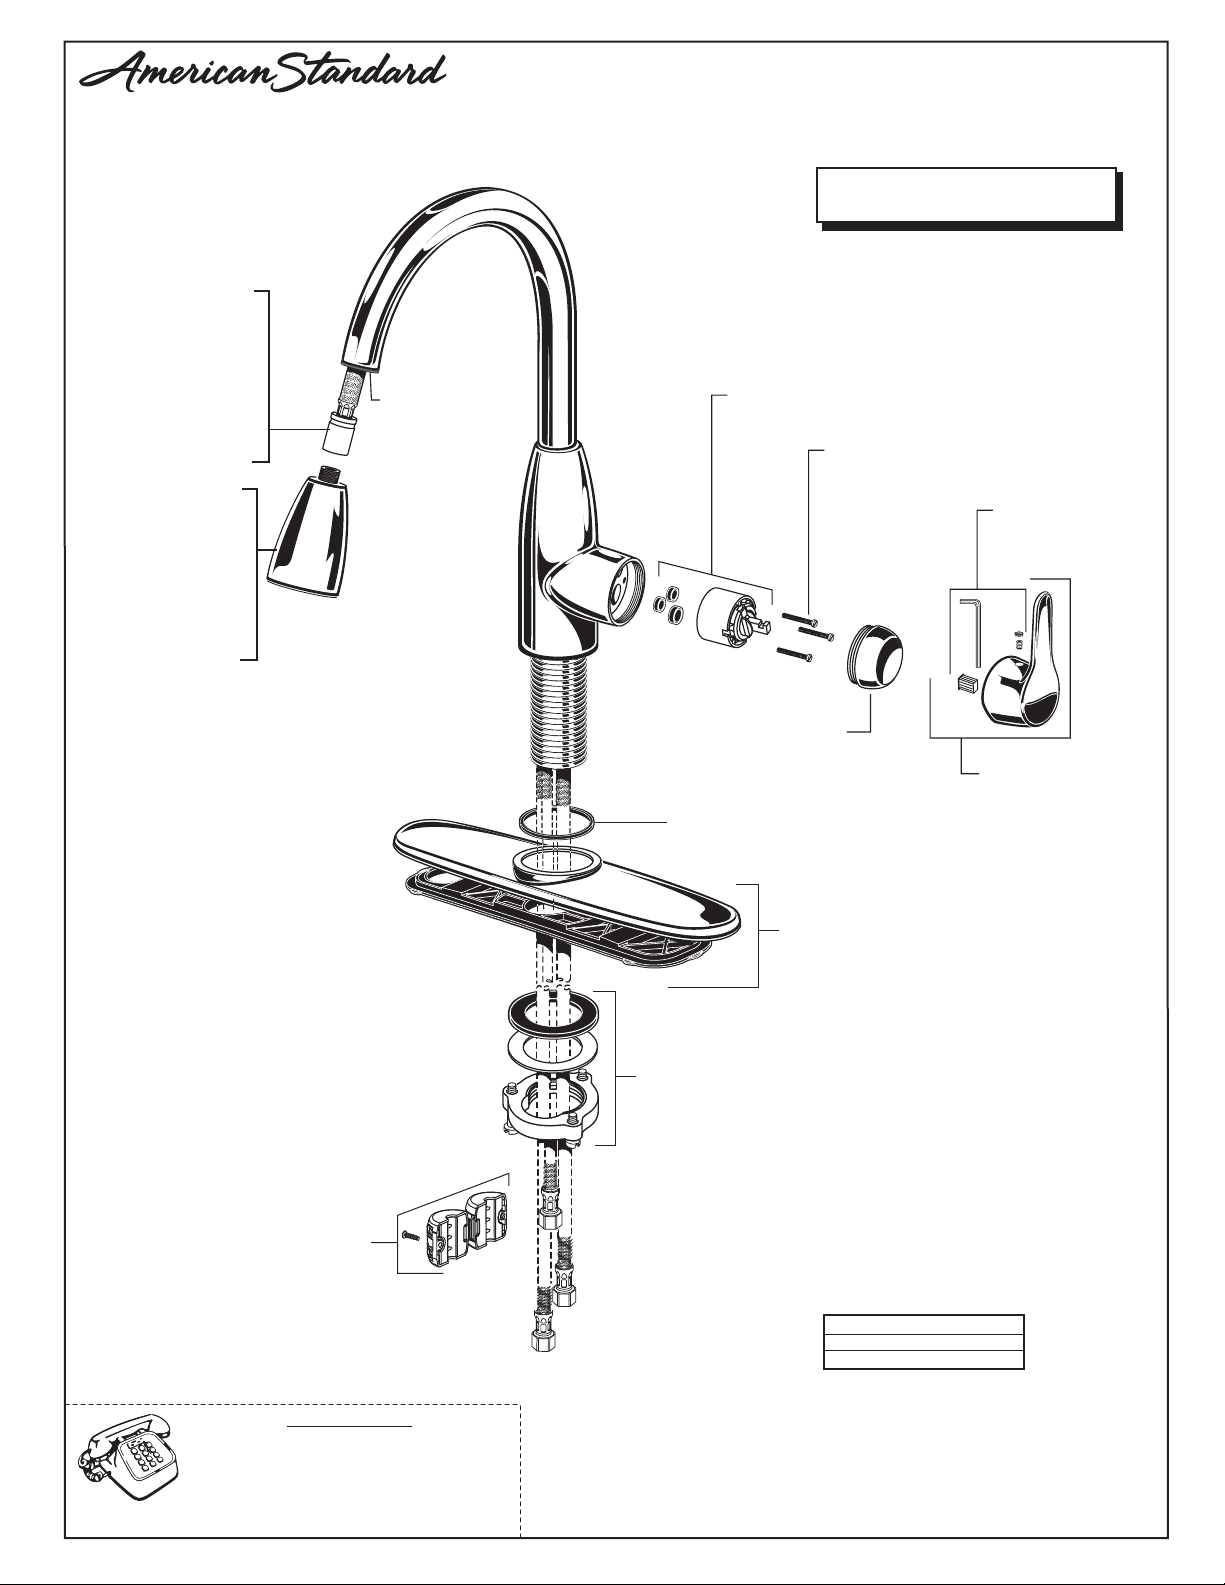
MODEL NUMBERS
4175.300 Series
M922367-007220A
SPRAY HOSE
2.2gpm/8.3L/min.
(4175.300)
M922367-007150A
SPRAY HOSE
1.5gpm/5.7L/min.
(4175.300F15)
M952249-YYY220A
SPRAY ASSEMBLY
2.2gpm/8.3L/min.
(4175.300)
M952249-YYY150A
SPRAY ASSEMBLY
1.5gpm/5.7L/min.
(4175.300F15)
M923640-0070A
SPRAY HOLDER
A951470-0070A
CARTRIDGE
M918506-0070A
CARTRIDGE SCREWS
M962294-0070A
BUTTON AND
SCREW KIT
M907306-YYY0A
ESCUTCHEON CAP
M962940-YYY0A
HANDLE KIT
A911830-0070A
SEAL
M964395-0070A
WEIGHT
For toll-free information and answers to your questions, call:
IN CANADA 1-800-387-0369 (TORONTO 1-905-306-1093)
Product names listed herein are trademarks of American Standard Inc.
© AS America, Inc. 2010
HOT LINE FOR HELP
1-800-442-1902
Week day s 8 :00 a. m. to 6:0 0 p .m. ES T
Week day s 8 :00 a. m. to 7:0 0 p .m. ES T
IN MEXICO 01-800-839-1200
M962146-0070A
MOUNTING KIT
M962806-YYY0A
ESCUTCHEON AND
PUTTY PLATE
Replace the YYY with
Appropriate finish code
CHROME
STAINLESS STEEL
MATTE BLACK
002
075
242
M965036 Rev. 1.7
 Loading...