

Page 1
INSTALLATION INSTRUCTIONS
AquaWash® 2.0 SpaLet® Seat
Model 8019A60GPC
Thank you for selecting American Standard – the benchmark of fine quality for over 100 years. To ensure this product is installed
properly, please read these instructions carefully before you begin. (Certain installations may require professional help.) Also be
sure your installation conforms to local codes.
NOTE: Pictures may not exactly depict toilet seat and components.
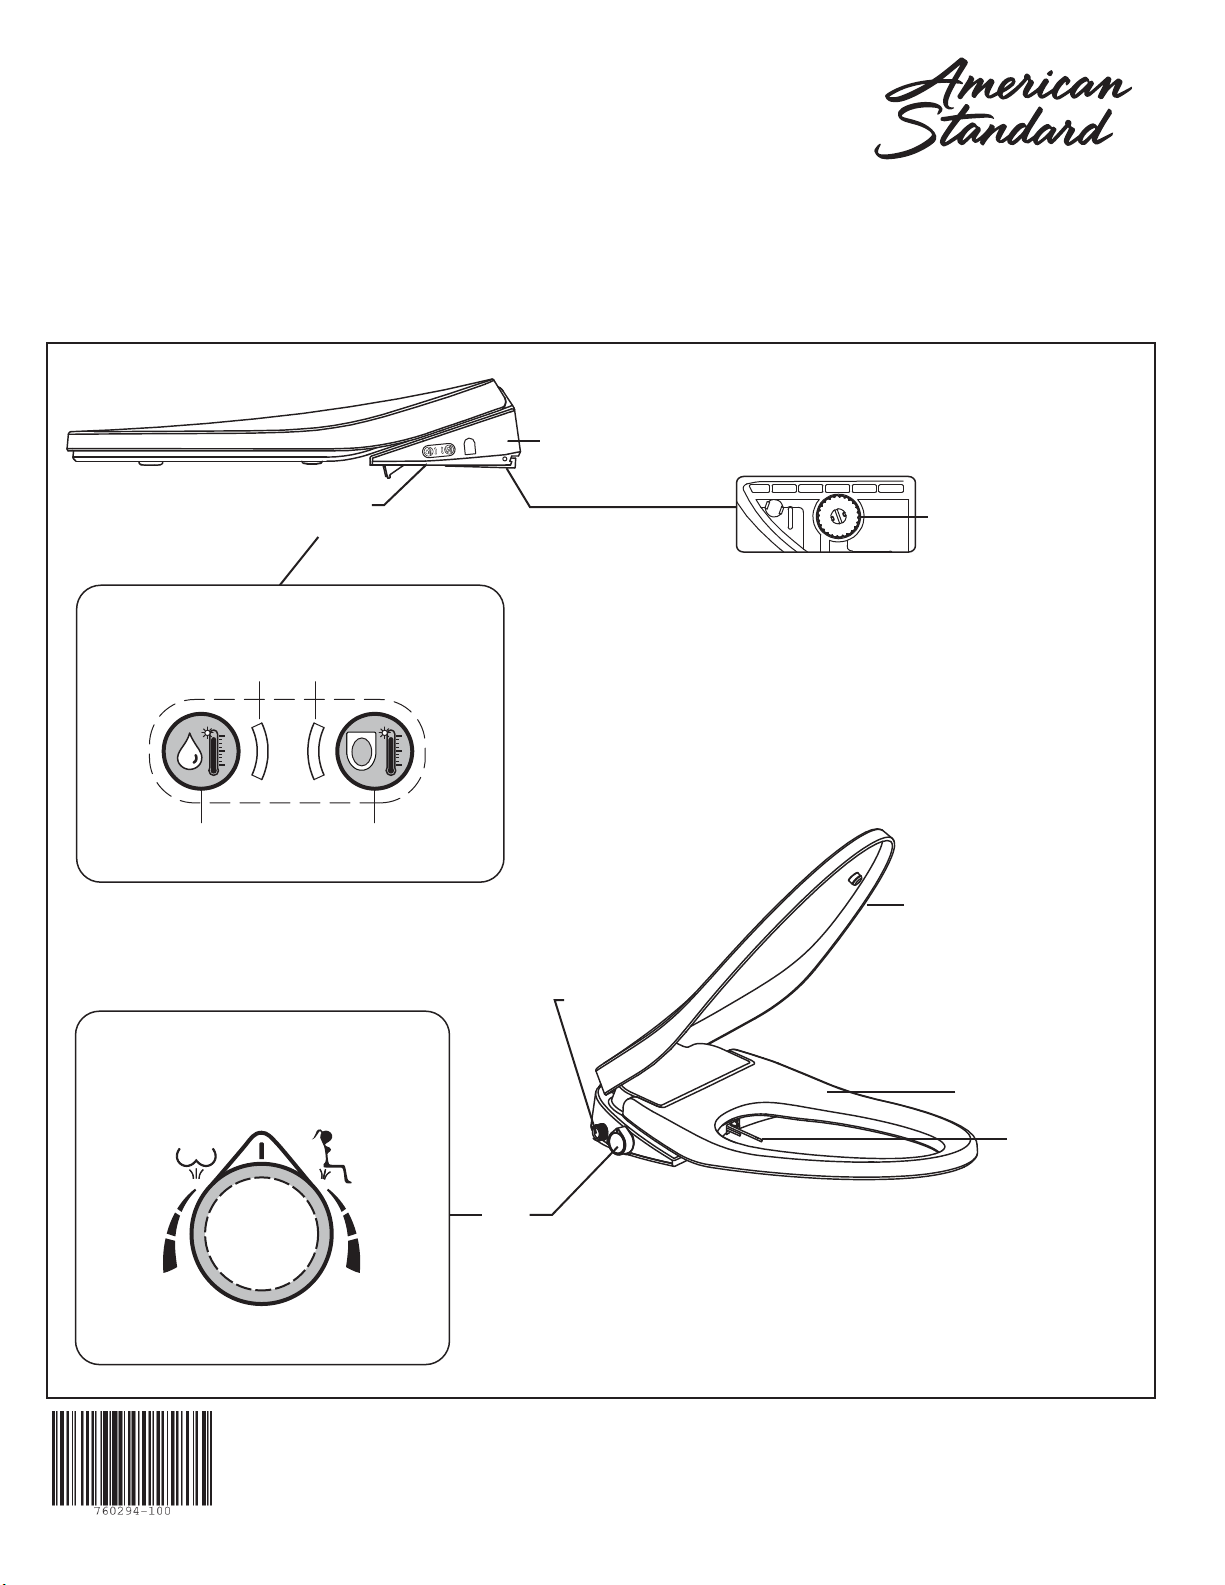
Release
Button
Functional
Setting Key
FUNCTIONAL SETTING KEY
Water temperature
LED indicator
Water temperature
adjustment key
Seat temperature
LED indicator
Seat temperature
adjustment key
KNOB
STOP
Water supply
hose joint
Drain Plug
Toilet cover
Toilet seat
Nozzle
SAVE FOR FUTURE USE
Back
Cleansing
Knob
Front
Cleansing
All product names listed herein are trademarks of AS America, Inc. unless otherwise noted.
© AS America, Inc. 2018
760294-100
Page 2
SpaLet® Seat
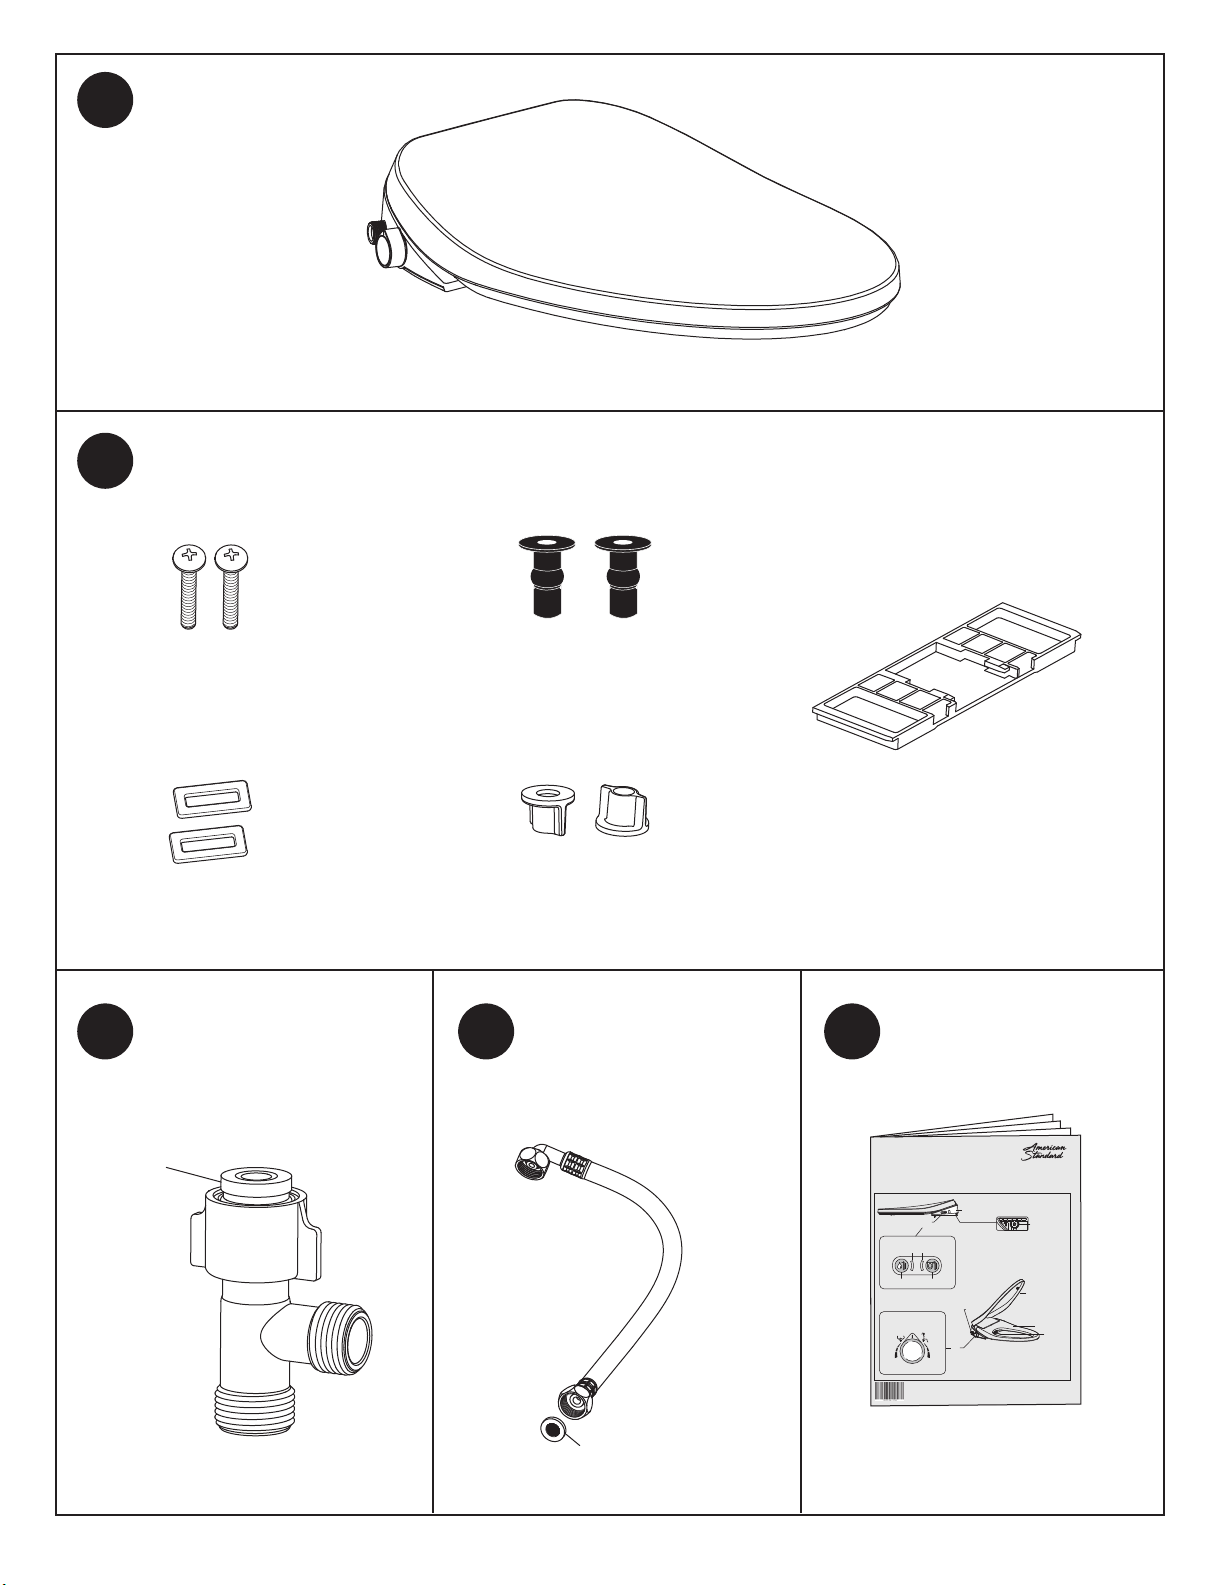
1
Fixing Components
2
Bolt (2)
Sliding Plate (2)
T-SHAPED ADAPTER
3
GASKET
Insert (2)
(Apply to Top Mount)
Nut (2)
(Apply to Bottom Mount)
CONNECTION HOSE
4
WITH FILTER
Base Plate (1)
USER’S MANUAL
5
INSTALLATION INSTRUCTIONS
AquaWash® 2.0 SpaLet® Seat
Model 8019A60GPC
Thank you for selecting American Standard – the benchmark of fine quality for over 100 years. To ensure this product is installed
properly, please read these instructions carefully before you begin. (Certain installations may require professional help.) Also be
sure your installation conforms to local codes.
NOTE: Pictures may not exactly depict toilet seat and components.
Release
Button
Functional
Setting Key
FUNCTIONAL SETTING KEY
Water temperature
Seat temperature
LED indicator
LED indicator
Water temperature
Seat temperature
adjustment key
adjustment key
Water supply
KNOB
STOP
Back
Cleansing
hose joint
Knob
Front
Cleansing
All product names listed herein are trademarks of AS America, Inc. unless otherwise noted.
© AS America, Inc. 2018
Toilet cover
Drain Plug
Toilet seat
Nozzle
760294-100
SAVE FOR FUTURE USE
FILTER
- 2 - 760294-100
Page 3
INSTALLATION
Please read the instructions carefully before installing and using.
The product requires a exible supply hose.
WARNING
The water shutoff valve should be near the installed product for ease of installation.
Do not use in hot water line. Temperature above 104°F / 40°C will damage the product and void your warranty.
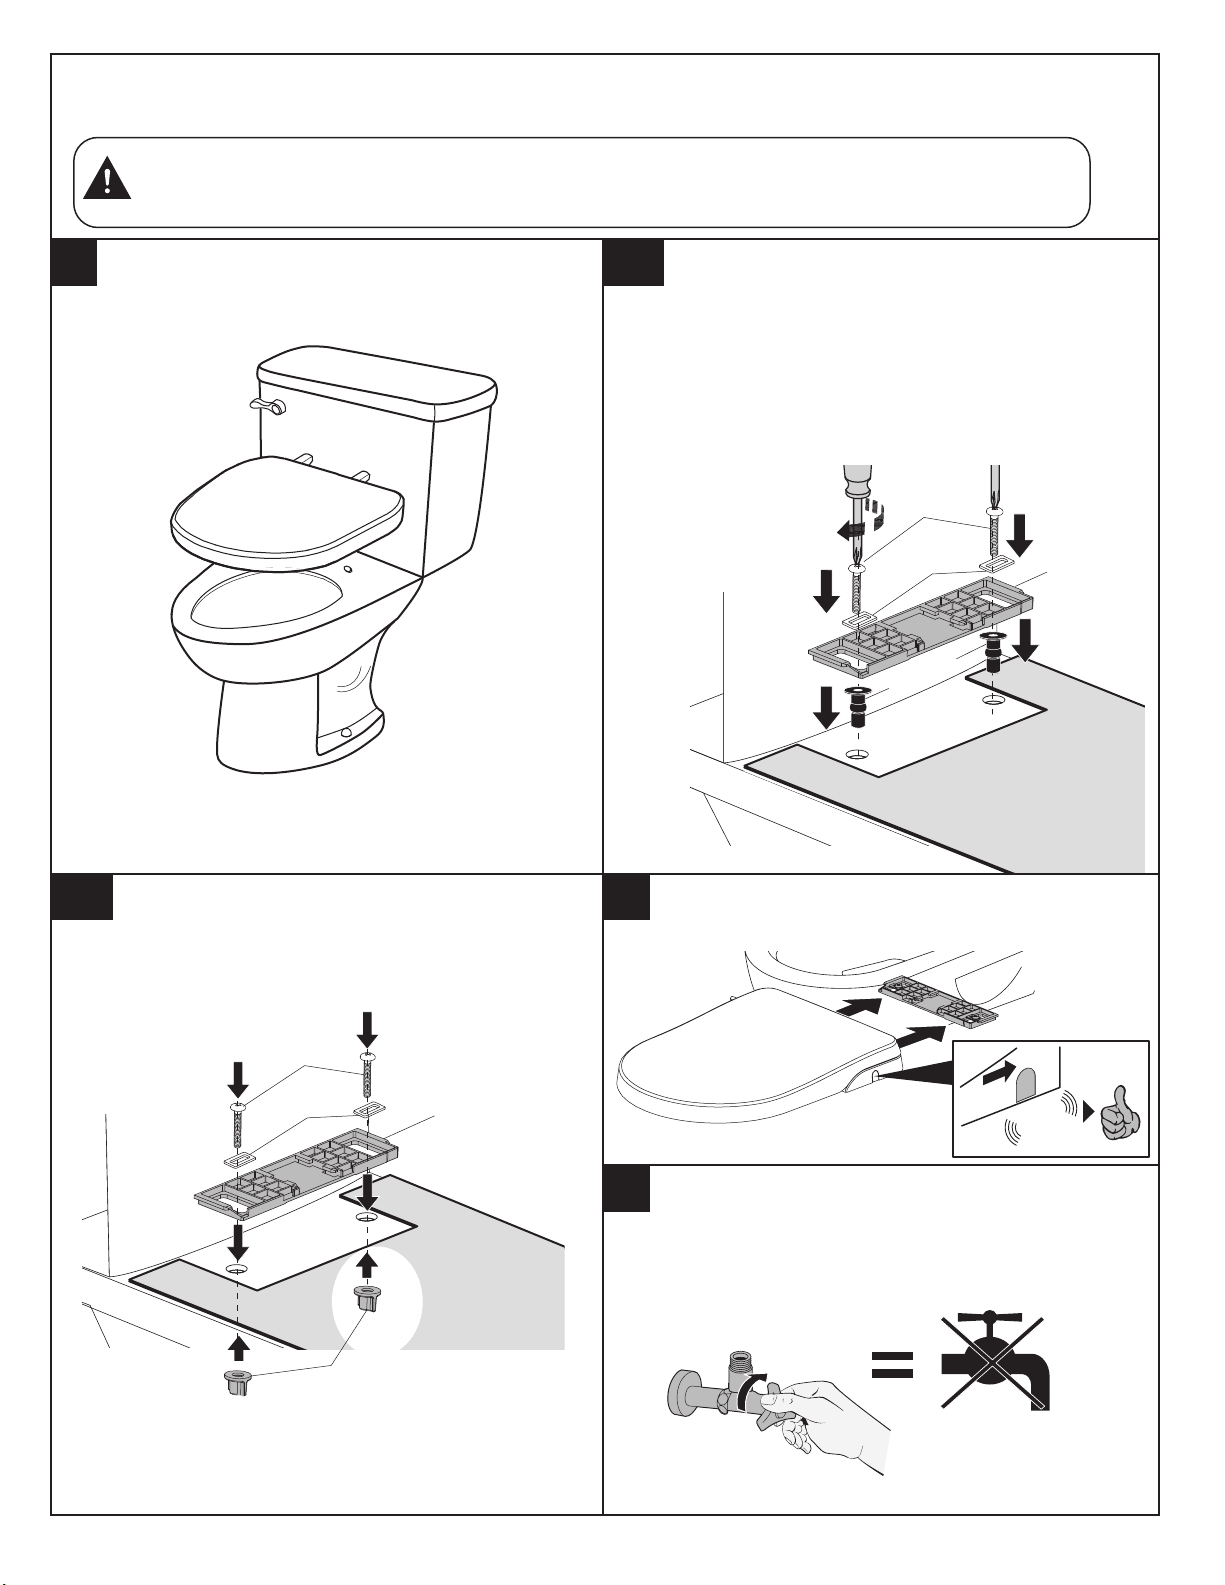
Remove existing toilet seat.
1 2A
If the insert does not fit the bowl, proceed to Step 2B,
otherwise, skip Step 2B
and continue with Step 3.
Press the inserts into the toilet bowl holes. Align the
base plate to the slotted area of the template and
then place the hardware onto the base plate as
shown. Using a medium size Phillips screwdriver,
start screwing down the bolts into the inserts until
the base plate is fixed.
BOLT
SLIDING
PLATE
INSERT
BASE
PLATE
2B 3
Place the base plate in the slotted area of the template
and then place the hardware onto the base plate as
shown. Screw in the nuts from the underside of the
ceramic until the base plate is fixed.
BOLT
SLIDING
PLATE
BASE
PLATE
4
NUT
Slide the SpaLet® seat across the base plate until you hear
a click. The SpaLet seat is now assembled to the bowl.
CLICK
Turn off the water supply by turning off the water shutoff
valve, then disconnect the supply hose.
If you are using a rigid supply line you will need to
purchase a flexible supply hose to install the SpaLet seat.
- 3 -
760294-100
Page 4
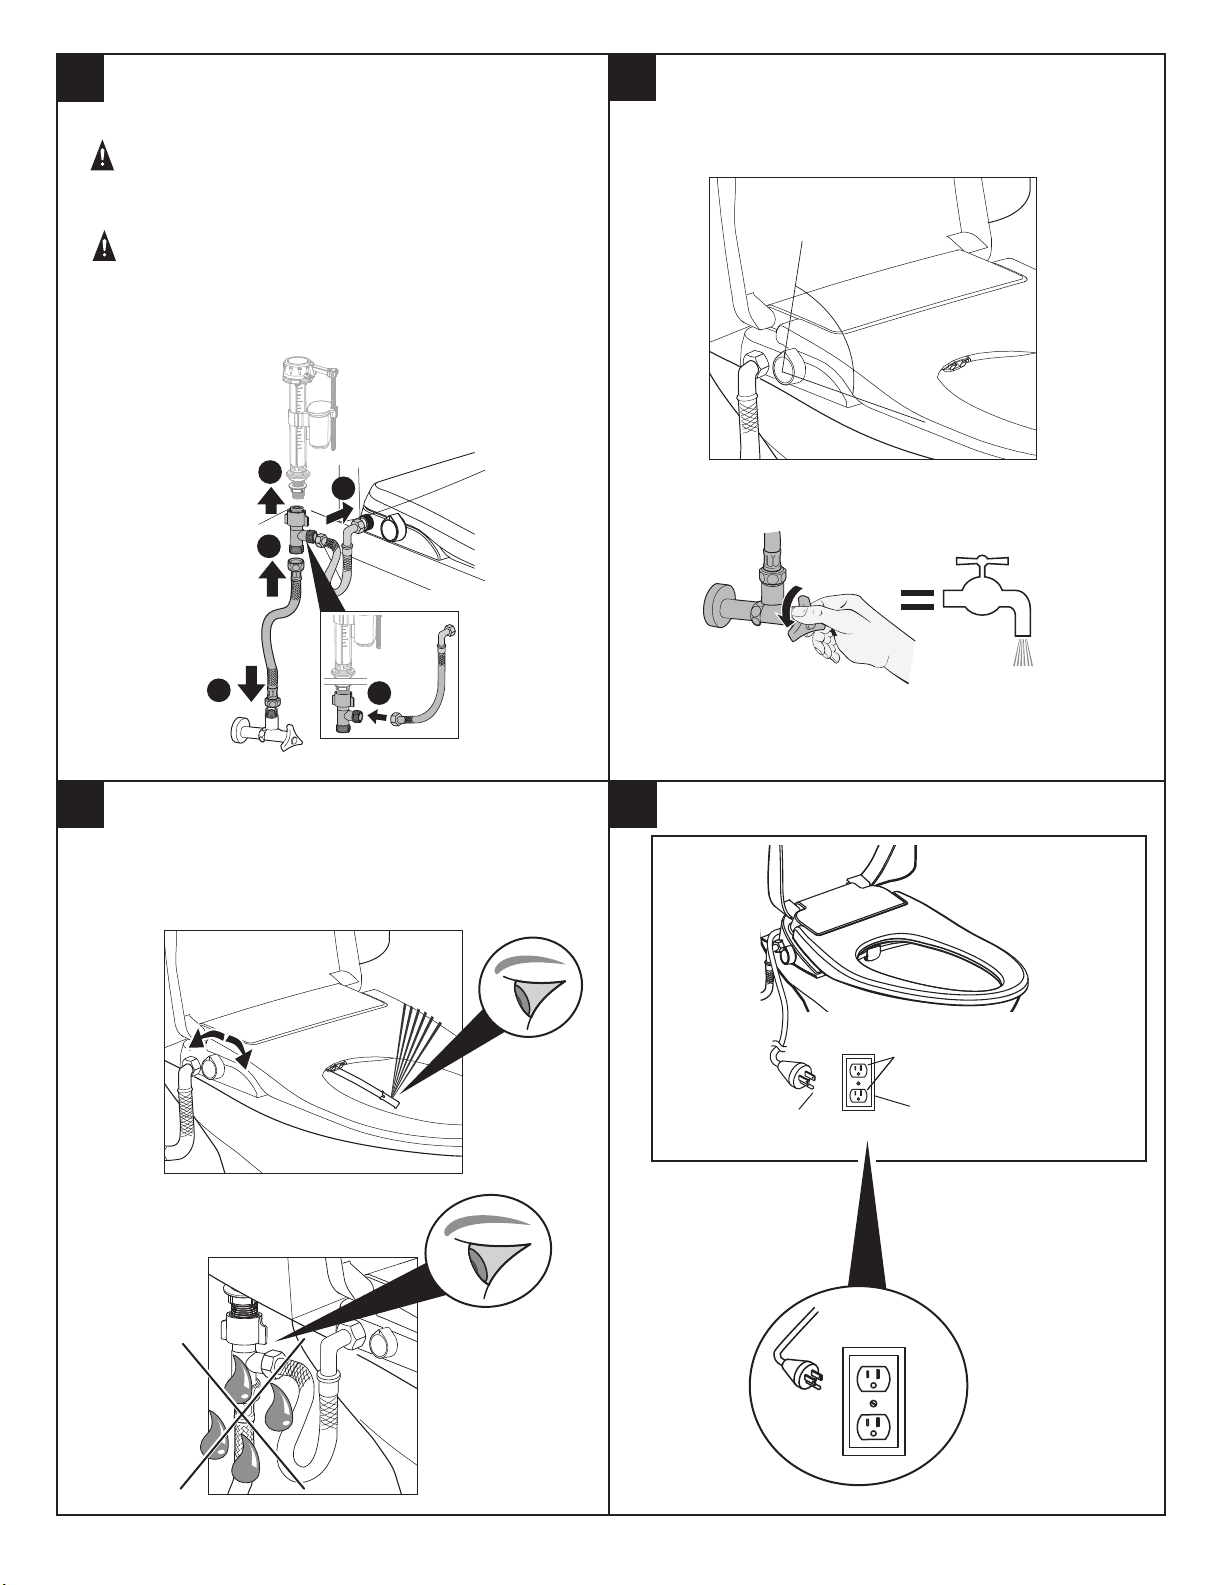
Install T-shaped adapter to the fill valve and supply hose as
5
shown. Connect the included connection hose with filter on
to the T-shaped adapter and the SpaLet
WARNING
Make sure the filter and seal on the connection
hose are installed along with the hose.
DO NOT OVERTIGHTEN THE
THREADED CONNECTIONS.
The connections may be broken or the threads
may be damaged if over torqued.
®
seat inlet.
Make sure the control knob on the SpaLet seat is at the
6
90˚ off position. Turn the water shutoff valve back on.
OFF POSITION
90˚
A
GASKET
B
E
While sitting on the seat, rotate the control knob
forward or backward for functional testing. Also,
check the connections to make sure there are no
leaks. If you find leaks retighten the connections.
FILTER
D
C
87
Plug power cord into designated AC power outlet.
GROUNDED
OUTLET
GROUNDING PIN
- 4 - 760294-100
GROUNDED
OUTLET BOX
Page 5
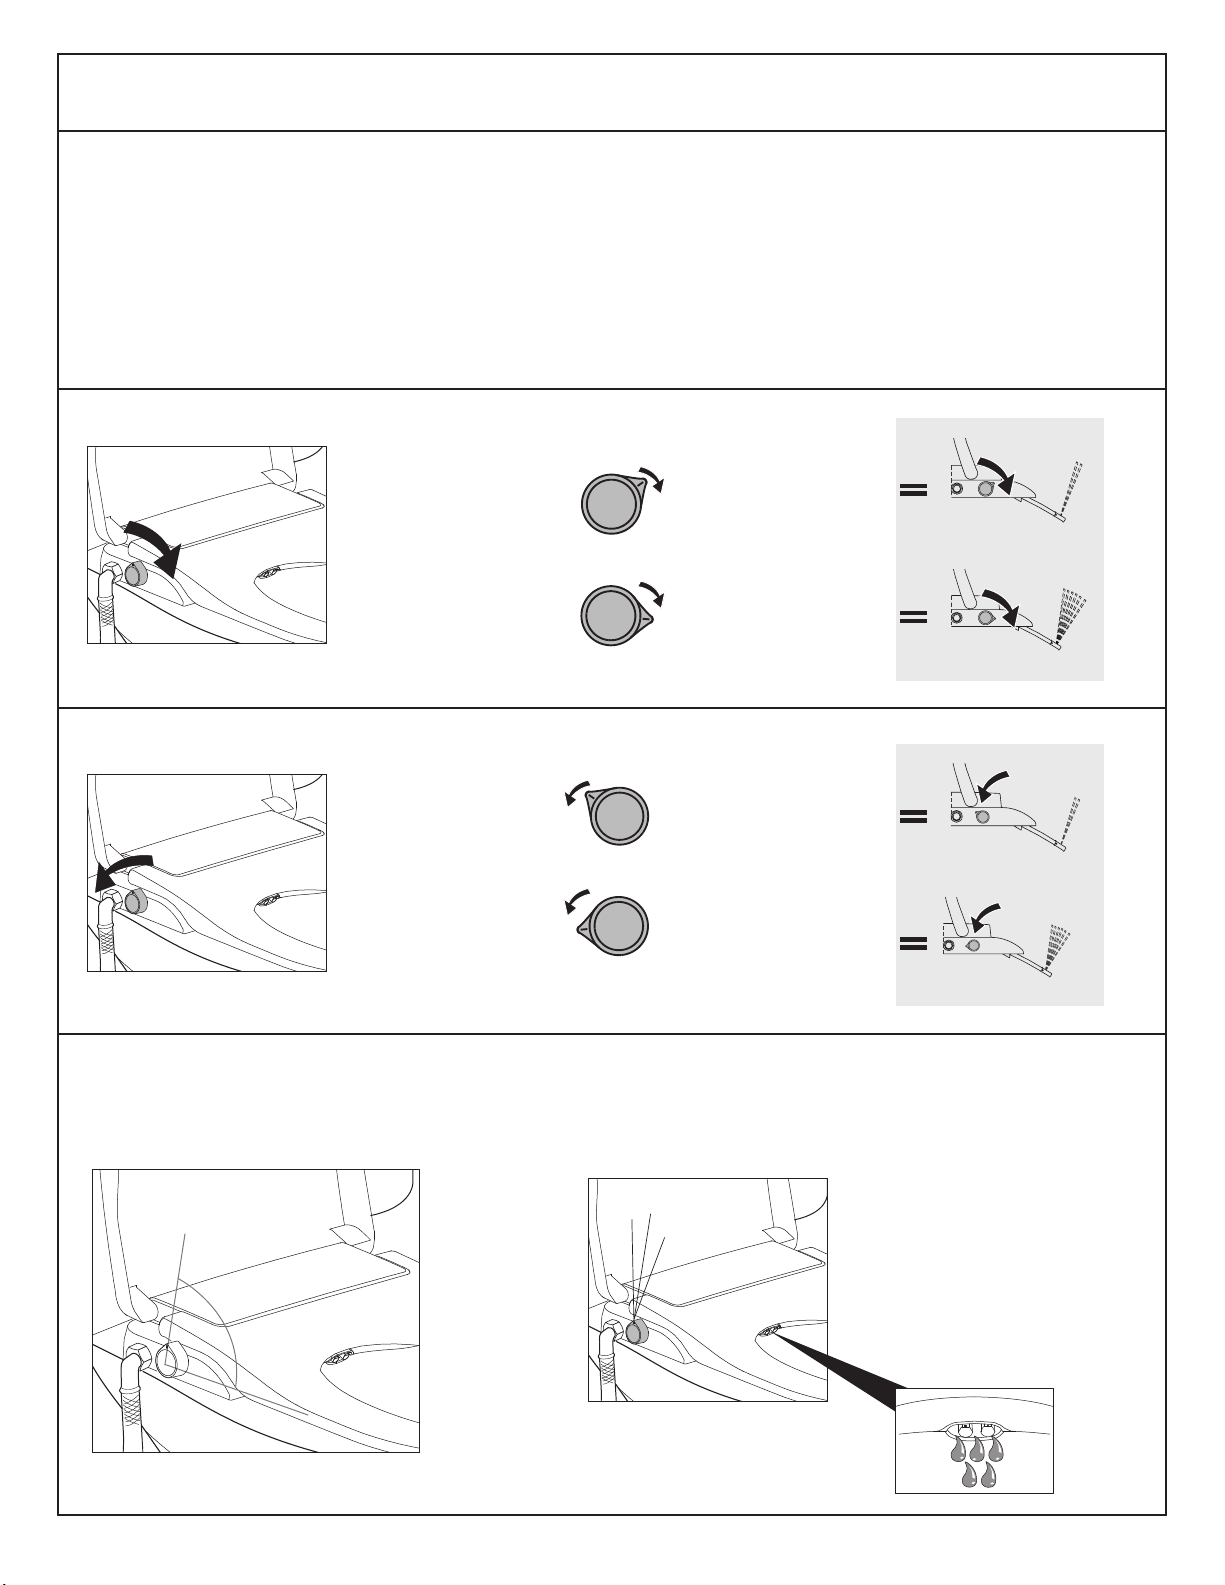
KNOB OPERATION
1. When the power cord is plugged into the AC wall socket, the SpaLet® is automatically powered ON and the KNOB light and
Night light are constantly ON.
2. When the KNOB is turned to the Front or Back washing function, the KNOB’s light will start to glow ON & OFF indicating
one of the wands are extending.
3. When the KNOB is in the OFF or 90 degree position, the KNOB’s light is ON.
FRONT CLEANSING FUNCTION
Low
flow
High
flow
BACK CLEANSING FUNCTION
Low
flow
High
flow
OFF AND SELF-CLEANING
Keep the knob at the 90˚ position when not in use. The wand cleans itself after each use. For additional cleaning of the wand,
position the knob at 85˚ or 95˚ for a few seconds and then reposition back to 90˚.
95˚
85˚
90˚
- 5 - 760294-100
Page 6
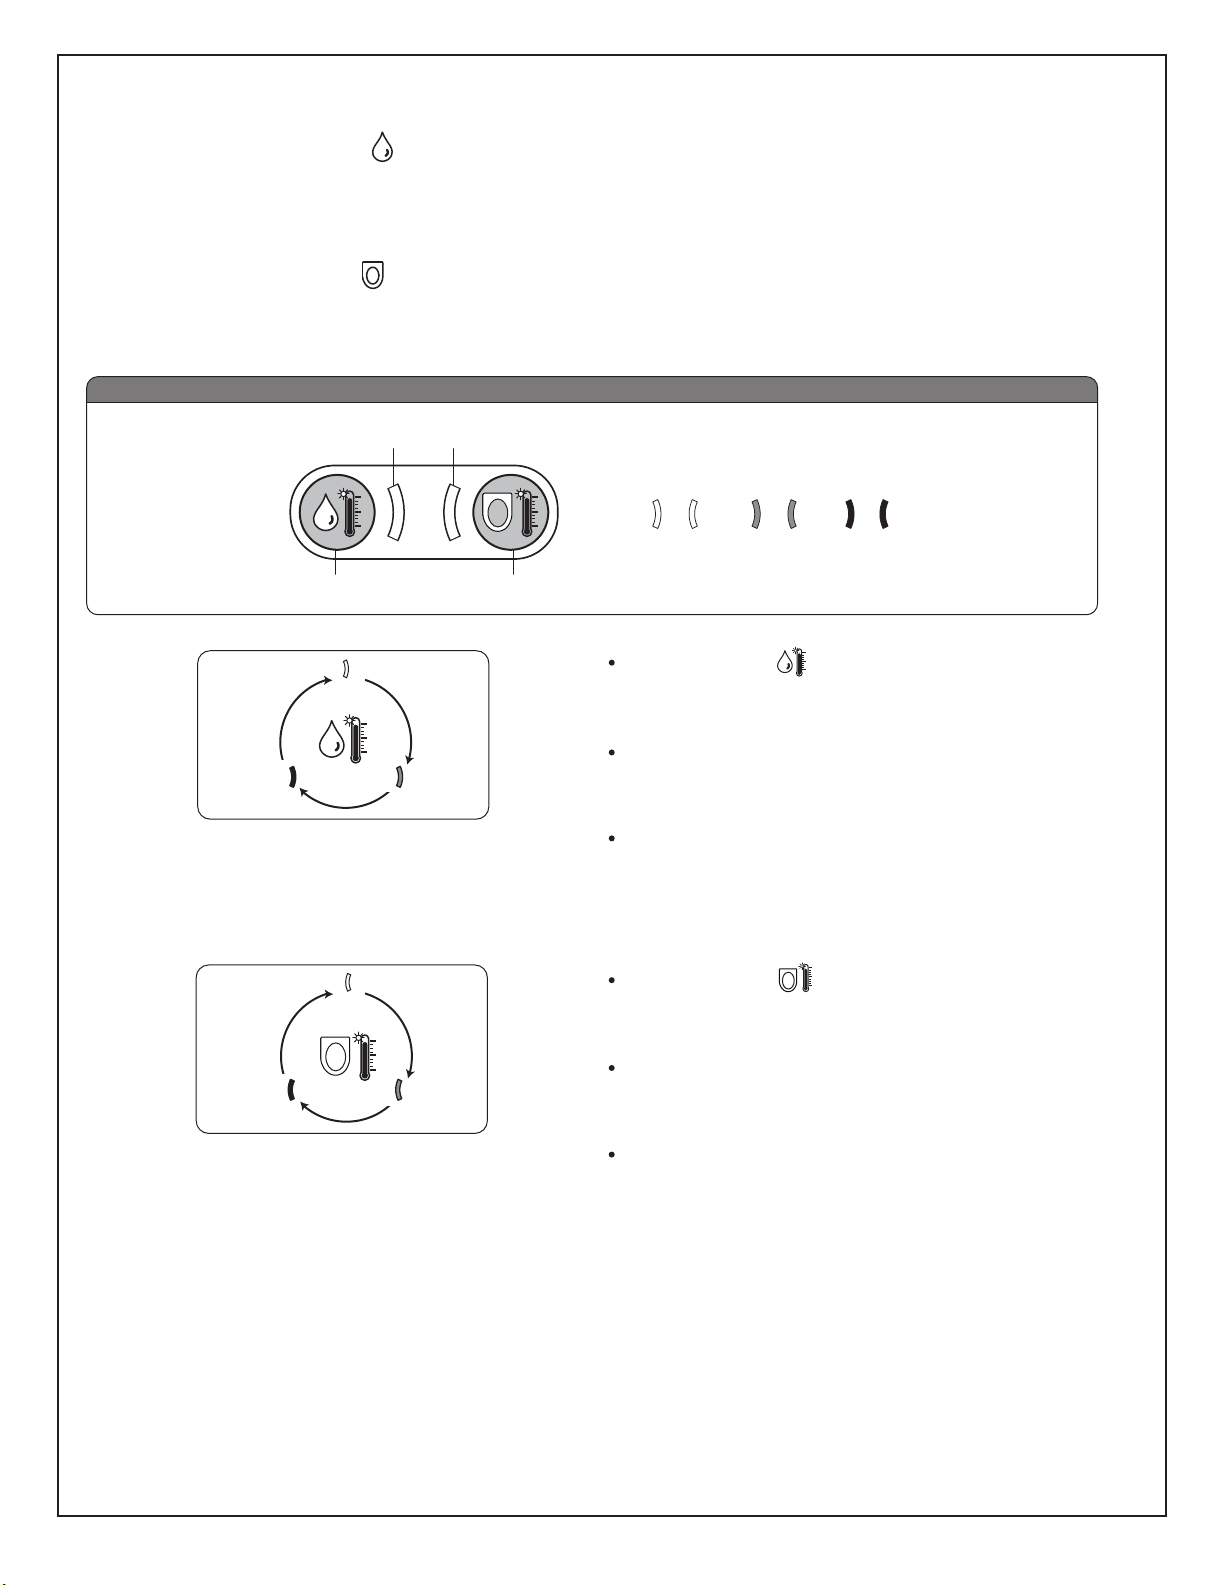
WATER AND SEAT TEMPERATURE SETTINGS
For Water Temperature description, follow below
Press the icon illustrating the “Water ” temperature button and the LED light for it will turn ON indicating Low Temp or about
95ºF / 35ºC. Press the button again and the LED light will appear brighter indicating a higher temperature, about 100ºF / 38ºC.
Press a 3rd time and the LED will go OFF indicating heater is off.
For Seat Temperature description, follow below
Press the icon illustrating the “Seat ” temperature button and the LED light for it will turn ON indicating Low Temp or about
91ºF / 33ºC. Press the button again and the LED light will appear brighter indicating a higher temperature, about 98.6ºF / 37ºC.
Press a 3rd time and the LED will go OFF indicating the heater is off.
Function Settings Key
Water temperature
adjustment indicator
Water temperature
adjustment key
Seat temperature
adjustment indicator
Prompt
Light ON HighlightedLight OFF
Seat temperature
adjustment key
OFF
OFF
Repeatedly press “ ” will switch over water
temperature in the sequence indicated in
the left figure.
When you turn off the water temperature you
LowHigh
will hear beeping for two seconds; when you
switchover you will hear beeping for one second.
Water temperature low setting: about 95ºF / 35ºC.
Water temperature high setting: about 100ºF / 38ºC.
Repeatedly press “ ” will switch over water
temperature in the sequence indicated in
the left figure.
When you turn off the water temperature you
LowHigh
will hear beeping for two seconds; When you
switchover you will hear beeping for one second.
Seat temperature low setting: about 91.4ºF / 33ºC.
Seat temperature high setting: about 98.6ºF / 37ºC.
PROTECTION FEATURES:
1. When seated for 5 minutes or longer, the SpaLet
2. If the KNOB is not set to OFF (90 degrees up position) when a person moves off the seat,
an alarm function will turn ON indicating one of the wands are still extended.
®
will go into a Low temperature mode.
760294-100- 6 -
Page 7
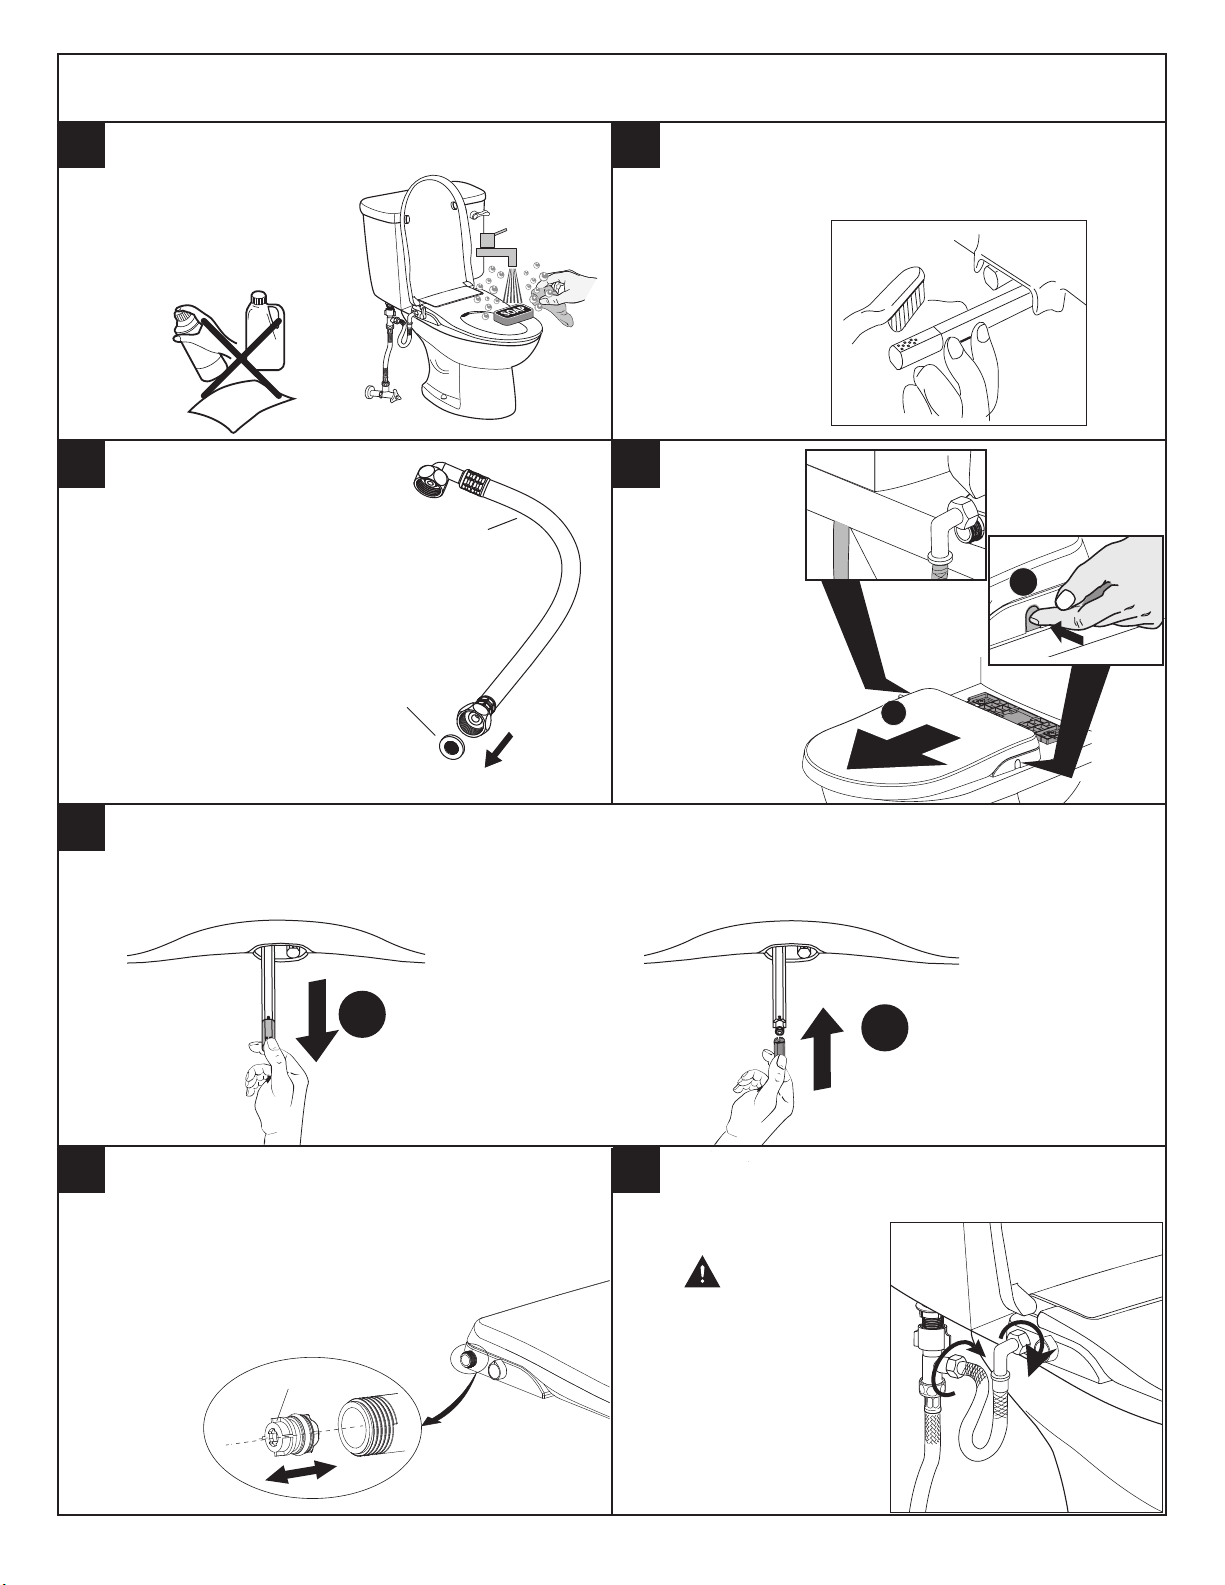
CLEANING AND MAINTENANCE
DO NOT USE AGGRESSIVE CHEMICALS:
1 2
for example: hydrogen chloride, paint thinner, benzene,
abrasive cloth or
paper, polishing
agent, fragrance,
insecticide, etc.
Insecticide
Painting thinner
Abrasive
paper
3 4
If you start to notice that the
flow of water is low when using
the SpaLet
time for the filter to be cleaned
out. Especially with new home
construction or newly
renovated plumbing there are
a lot of sediments in the water.
You will need to remove the
connection hose and clean out
the filter as needed.
®
seat it may be
Connection
hose
Filter
by pressing the
release button on the
right side of the
SpaLet seat and
sliding the seat
forward as shown.
This enables you to
be able to clean more
thoroughly around the
toilet. Make sure to
disconnect the
connection hose
before you do this.
You will need to clean the wands when they get build up
of residue and calcium. You can pull the wands out with
your finger and then with a soft bristle toothbrush, brush
the nozzle head.
You can remove
the SpaLet seat
A
B
5
The nozzles can be removed if needed for cleaning.
First turn off the water supply to the SpaLet seat.
As per figure A, pull out the tube and remove the old nozzle by pulling out straight, as shown.
As per figure B, insert the new nozzle into the tube along the corresponding slot.
A
The incoming water pressure is regulated by a regulator
6 7
insert. This can be removed and replaced.
First turn off the water supply and disconnect the connection hose.
Rotate the lever to the on position, pull out the regulator from the
inlet tube with needle-nose pliers.
Press the new regulator into the inlet tube.
Then rotate the lever back to non-working position.
Regulator
B
If anything shall leak, retighten the connection and use teflon
tape if needed. If water leaks from the two ends of the water
hose, retighten the nuts to avoid water leaking
WARNING
DO NOT OVERTIGHTEN
AS IT WILL DAMAGE
THE CONNECTION.
HAND TIGHTENING IS
RECOMMENDED.
760294-100- 7 -
Page 8
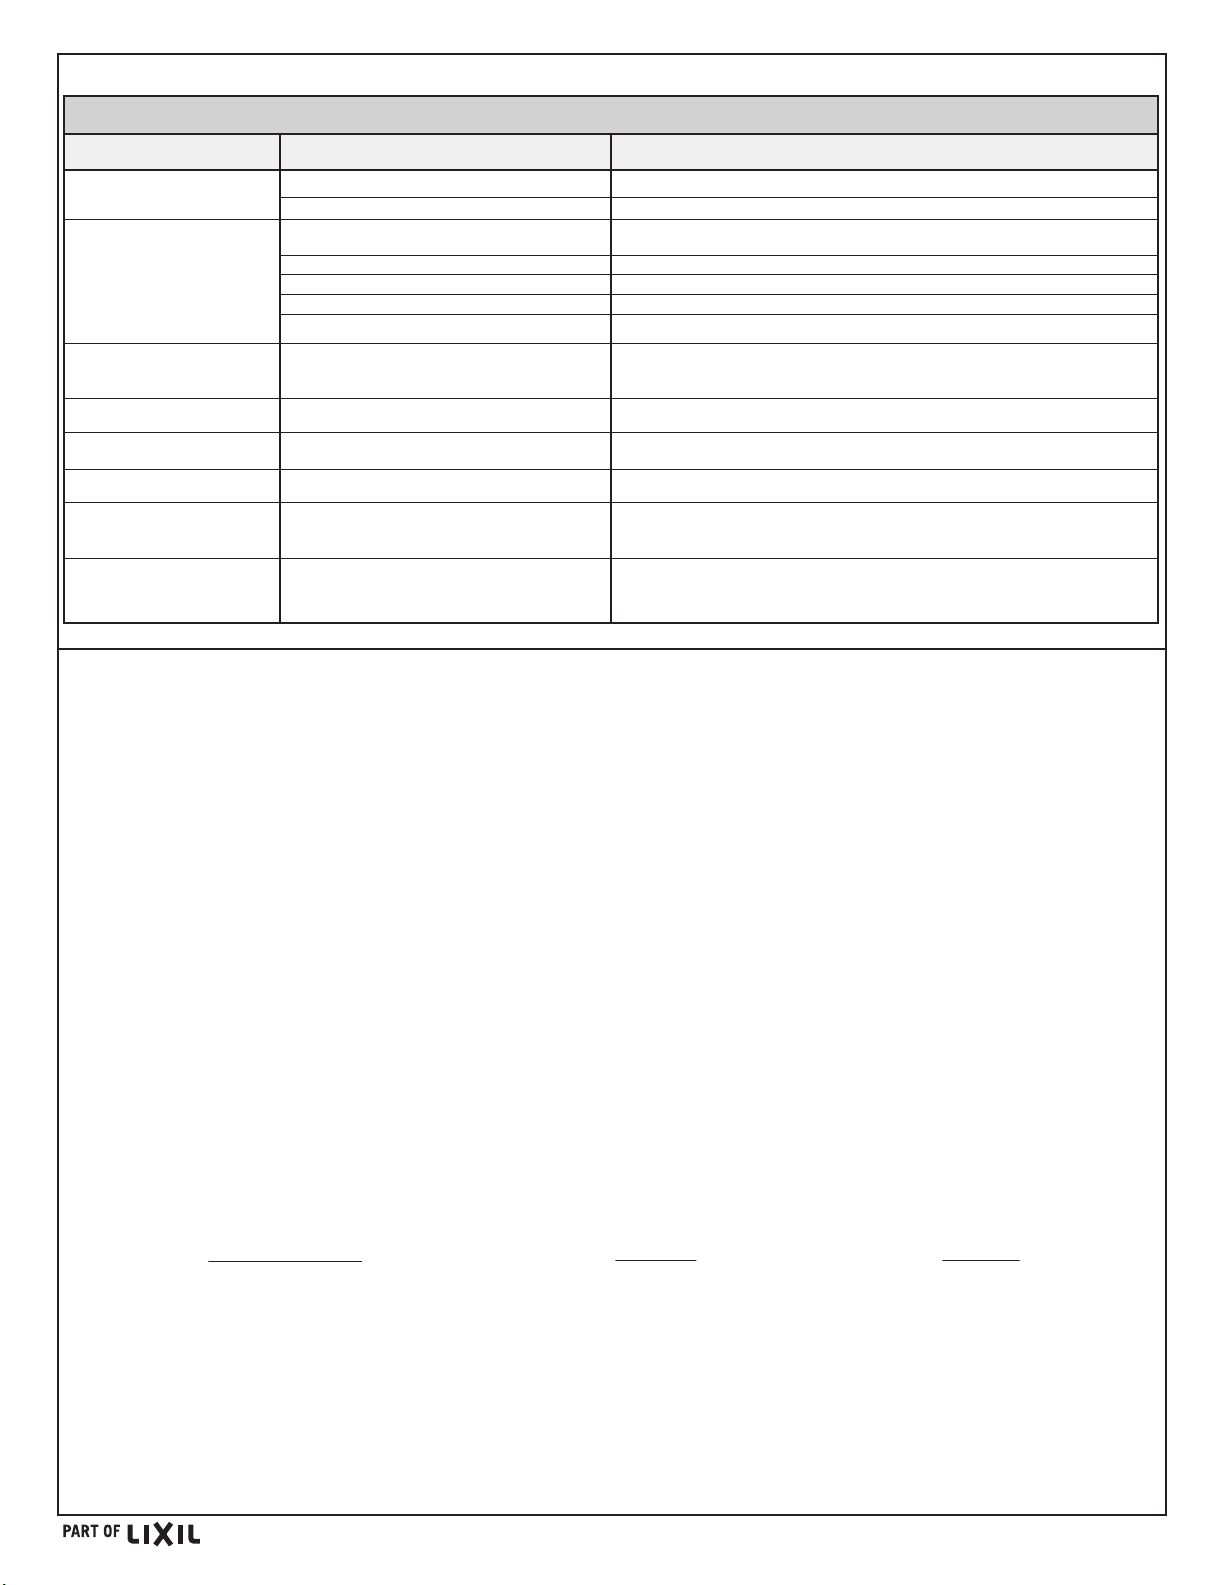
TROUBLESHOOTING GUIDE
PROBLEM POSSIBLE CAUSE CORRECTIVE ACTION
Water is too low during
WASH/BIDET
1. Low water pressure of the unit
2. Low water pressure of water supply
During WASH/BIDET, turn the knob to a higher setting
When water supply pressure is lower than 0.07 MPa (10 psi)
No water comes out during
WASH/BIDET
Water dropping from bowl
when using the unit
No LED lights ON
Seat Temperature too high/low
Water ows out when seated
Main AC breaker/fuse
continuously trips
Buzzer continuously beeps
when leaving seat
1. Water shut-off valve is turned off
2. Filter of T-shaped connector is stuck
3. Filter of water inlet hose is stuck
4. Nozzle head is stuck
5. External water pressure is low
External water pressure is too high
No power
Not adjusted correctly
Self-cleaning function is enabled
Power usage by seat may be beyond
circuit provided
KNOB switch not set to OFF at 90 degree position
Turn on the water shut-off valve
Clean the filter of T-shaped connector
Clean the filter of water inlet hose
Take off and clean the nozzle head
Increase external water pressure
The maximum water pressure of the unit is 0.8 MPa (115 psi). If water supply pressure
is higher than that, please contact local department for water pressure question.
Check AC power cord and/or AC fuse breaker/fuse box
Adjust to desirable temperature
This is normal and will automatically stop in 5 seconds
Pull power cord from socket, call electrician
Set KNOB to OFF at 90 degree position
AS AMERICA, INC. THREE YEAR LIMITED WARRANTY
If inspection of this AS America, Inc. (“American Standard”) plumbing product, within one year after its initial purchase, confirms that it is
defective in materials or workmanship, American Standard will repair or, at its option, exchange the product for a similar model.
This limited warranty applies only to the original purchaser and installation of these products. In the event of a limited warranty claim,
proof of purchase will be required—save sales receipt.
This limited warranty does not apply to commercial installations. The warranty for commercial installations is two years on the SpaLet®.
This limited warranty does not apply to local building code compliance. Since local building codes vary considerably, the purchaser of
this product should check with a local building or plumbing contractor to insure local code compliance
before installation.
This limited warranty is void if the product has been moved from its initial place of installation; if it has been subjected to faulty
maintenance, abuse, misuse, accident or other damages; if it was not installed in accordance with American Standard's instructions; or if
it has been modified in a manner inconsistent with the product as shipped by American Standard.
American Standard's option to repair or exchange the product under this limited warranty does not cover any labor or other costs of
removal or installation. IN NO EVENT WILL AMERICAN STANDARD BE LIABLE FOR THE COST OF REPAIR OR REPLACEMENT OF
ANY INSTALLATION MATERIALS, INCLUDING BUT NOT LIMITED TO, TILES, MARBLE, ETC. American Standard will not be
responsible for any other incidental or consequential damages attributable to a product defect or to the repair or exchange of a defective
product, all of which are expressly excluded from this limited warranty. This limited warranty does not cover any liability for consequential
or incidental damages, all of which are hereby expressly disclaimed, or the extension beyond the duration of this limited warranty of any
implied limited warranties, including those of merchantability or fitness for an intended purpose. (Some states or provinces do not allow
the exclusion or limitation of implied limited warranties, so this exclusion may not apply to you.)
This limited warranty gives you specific legal rights. You may have other statutory rights that vary from state to state or from province to
province, in which case this limited warranty does not affect such statutory rights.
In the United States:
American Standard Brands
1 Centennial Ave.
Piscataway, New Jersey 08854
Attention: Director of Customer Care
In Canada:
LIXIL Canada, Inc
5900 Avebury Rd.
Mississauga, Ontario
Canada L5R 3M3
American Standard B&K Mexico
In Mexico:
S. de R.L. de C.V.
Via Morelos #330
Col. Santa Clara
Ecatepec 55540 Edo. Mexico
For residents of the United States, warranty
information may also be obtained by calling
the following toll free number: (800) 442-1902
Toll Free: (800) 387-0369
www.americanstandard.ca
Toll Free: 01-800-839-1200
www.americanstandard.com.mx
www.americanstandard.com
THIS WARRANTY IS NOT TRANSFERABLE FROM ORIGINAL CONSUMER PURCHASER.
760294-100- 8 -
 Loading...