

Page 1
INSTALLATION
INSTRUCTIONS
TWO/THREE WAY
R422S; R433S
IN-WALL DIVERTER
ROUGH VALVE
SHARED OUTLETS
Thank you for selecting American-Standard...
the benchmark of fine quality for over 100 years.
To ensure that your installation proceeds smoothly-please
read these instructions carefully before you begin.
Installation must conform to all local building codes.
RECOMMENDED TOOLS AND MATERIALS
Most of the procedures require the use of common tools and materials, which are available from hardware and plumbing
supply stores. It is essential that the tools and materials be on hand before work is begun.
Adjustable Wrench Teon TapeChannel Locks
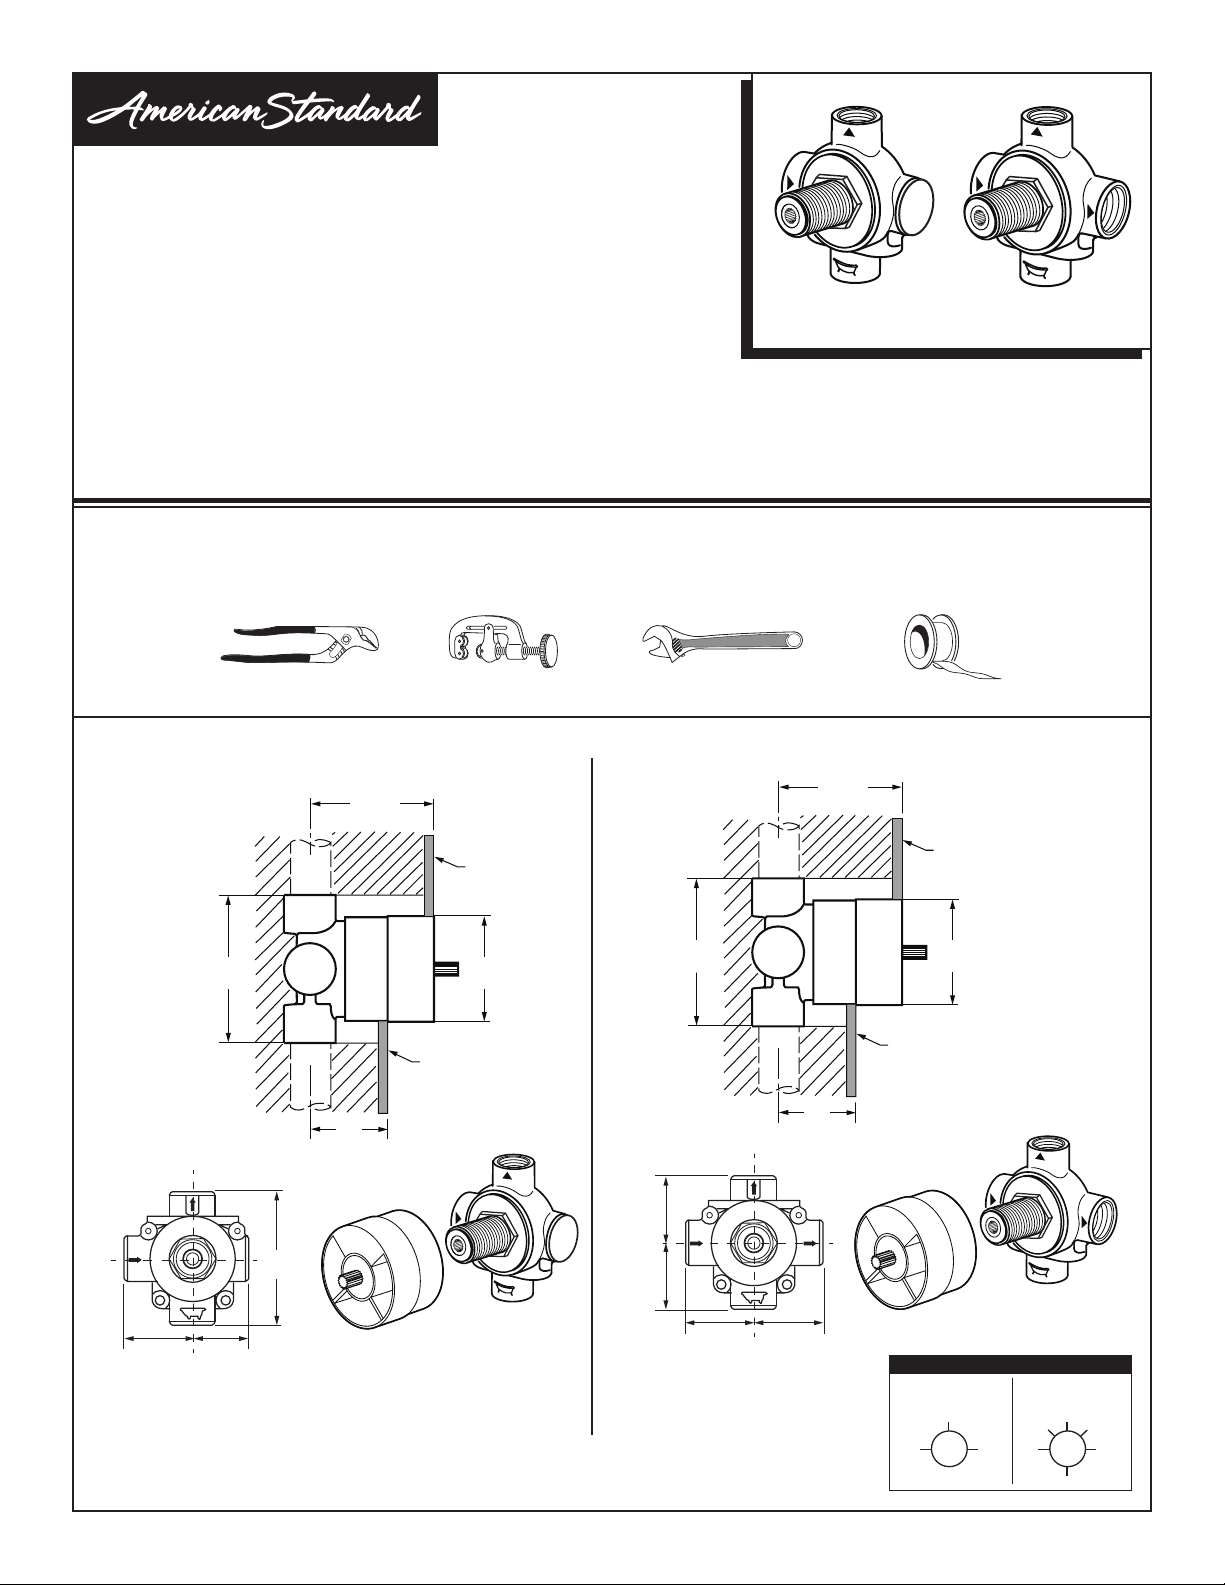
THREE WAY
BODY
ROUGHING-IN DIMENSIONS:
• NOTE: No concealed piping furnished
TWO WAY
BODY
2-3/4"
(71 mm)
Tubing Cutter
FINISHED
WALL
R422S R433S
Certied to comply with ANSI A112.18.1
2-3/4"
(71 mm)
FINISHED
WALL
3-1/8"
(80 mm)
1-3/4"
(46 mm)
ALL CONNECTIONS 1/2" NPT
3-1/8"
(80 mm )
"
1-1/4
"
1-5/8
(40 mm )
Product names listed herein are trademarks of AS America, Inc.
© AS America, Inc. 2016
(31 mm )
(57 mm)
FINISHED
WALL
2-1/4"
1-5/8
(40 mm )
1-5/8
(40 mm )
- 1 -
"
"
3-1/8"
(80 mm)
ALL CONNECTIONS 1/2" NPT
1-5/8"
(40 mm )
1-5/8
(40 mm )
1-3/4"
(46 mm)
"
2-1/4"
(57 mm)
FINISHED
WALL
DIVERTER OPERATION
R433
DISCRETE FUNCTIONS
B
CA
M965674 Rev. 1.0 (6/16)
R433S
SHARED FUNCTIONS
C
A + B B + C
A B
A + C
Page 2
1
ROUGHING-IN
CAUTION
DO NOT SEAL ANY OUTLETS. DIVERTER
CANNOT BE USED AS A STOP VALVE.
• Turn off hot and cold water supplies before beginning.
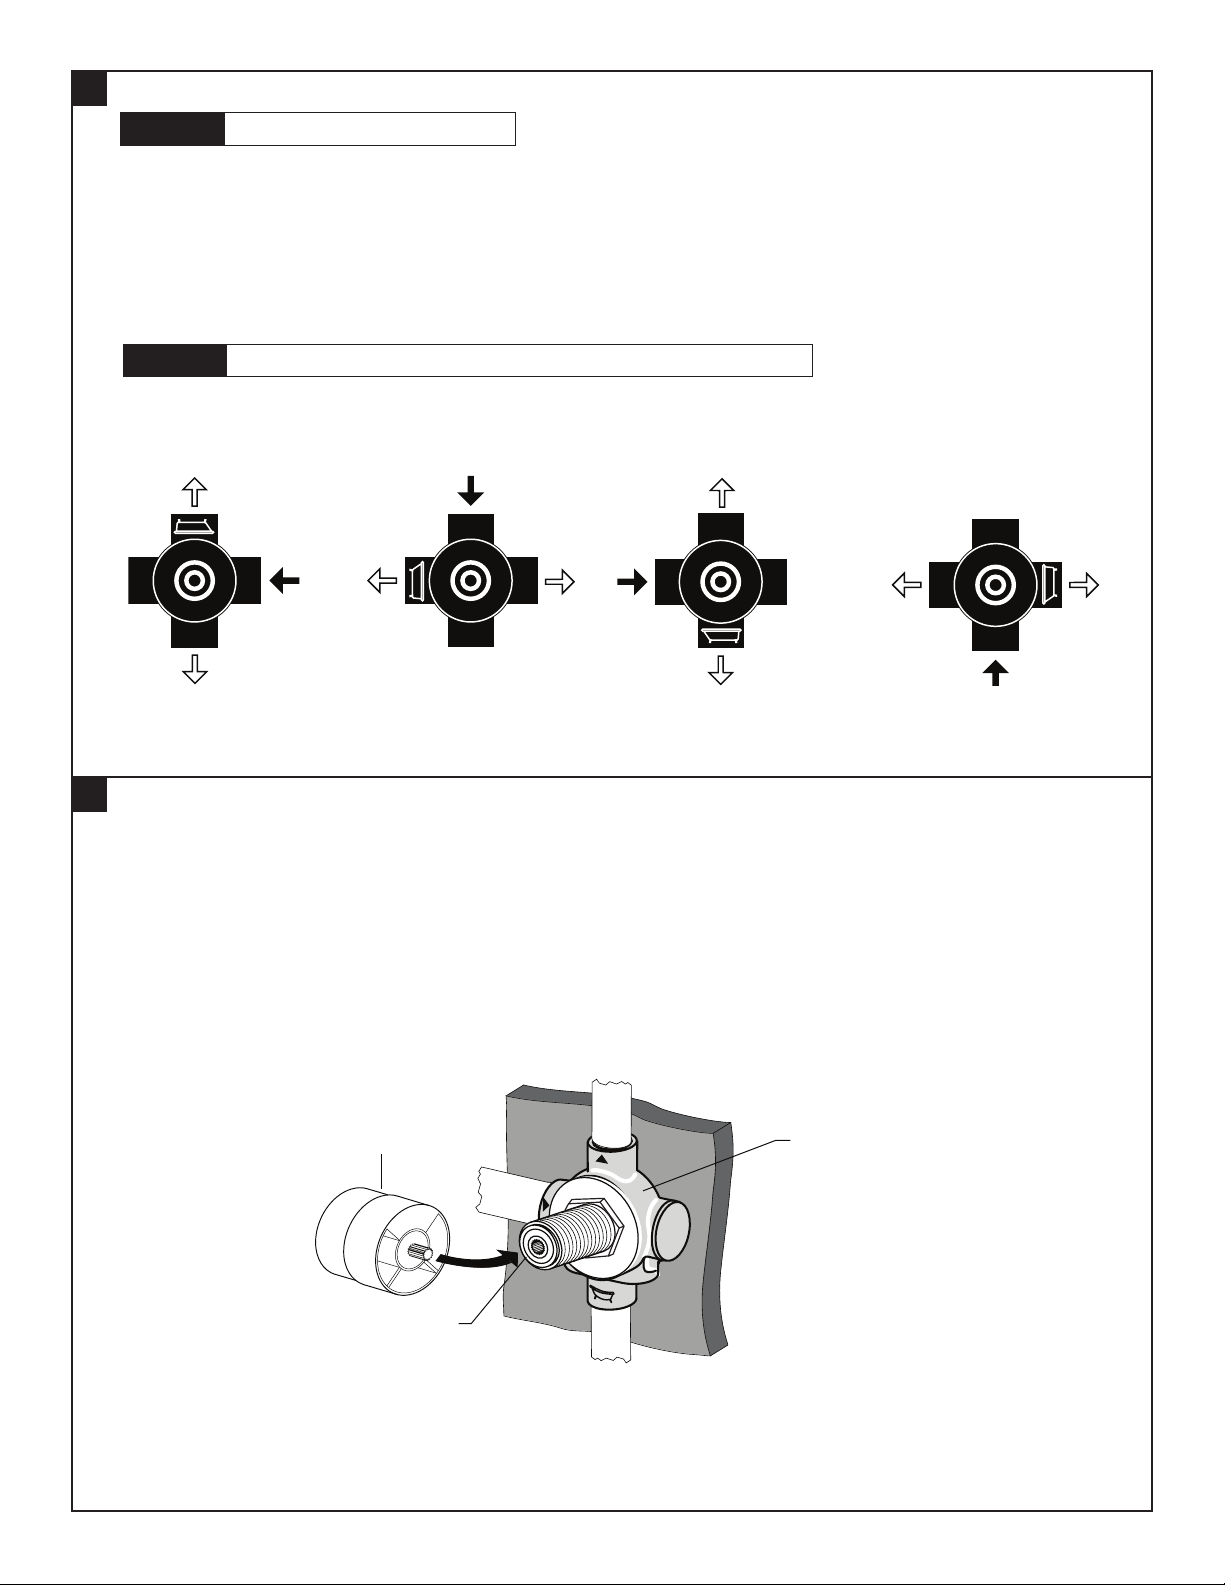
• See Roughing-in Drawing on reverse side. The port with the BATH TUB picture is the high ow.
• The DIVERTER can be installed with the inlet rotated in any position.
• Supply connections are 1/2" (13mm) NPT connections.
• For proper positioning the nished wall must be within side of PLASTER GUARD.
• Connect water to valve. The reverse side of the body is marked with arrows.
CAUTION
DO NOT SOLDER NEAR THE VALVE. DAMAGE TO THE SEALS MAY OCCUR.
DO NOT SEAL ANY OUTLETS. THIS DIVERTER CANNOT BE USED AS A STOP VALVE.
• For support use pipe braces secured to wooden braces.
2
TEST DIVERTER
• Check that the DIVERTER operates correctly and does not leak.
• To do this, screw off the PLASTER GUARD, turn around, and insert using the uted pin into the
uting on the DIVERTER SPINDLE and use as a diverter knob.
• Screw the PLASTER GUARD back on. Have the wall tiled only with the PLASTER GUARD screwed on.
PLASTER GUARD
DIVERTER SPINDLE
- 2 -
DIVERTER
M965674 Rev. 1.0 (6/16)
Page 3
3
INSTALL TRIM
• After nished wall is complete, remove, PLASTER GUARD.
• See Seperate installation instructions supplied with trim kit for handle assembly.
SERVICE
4
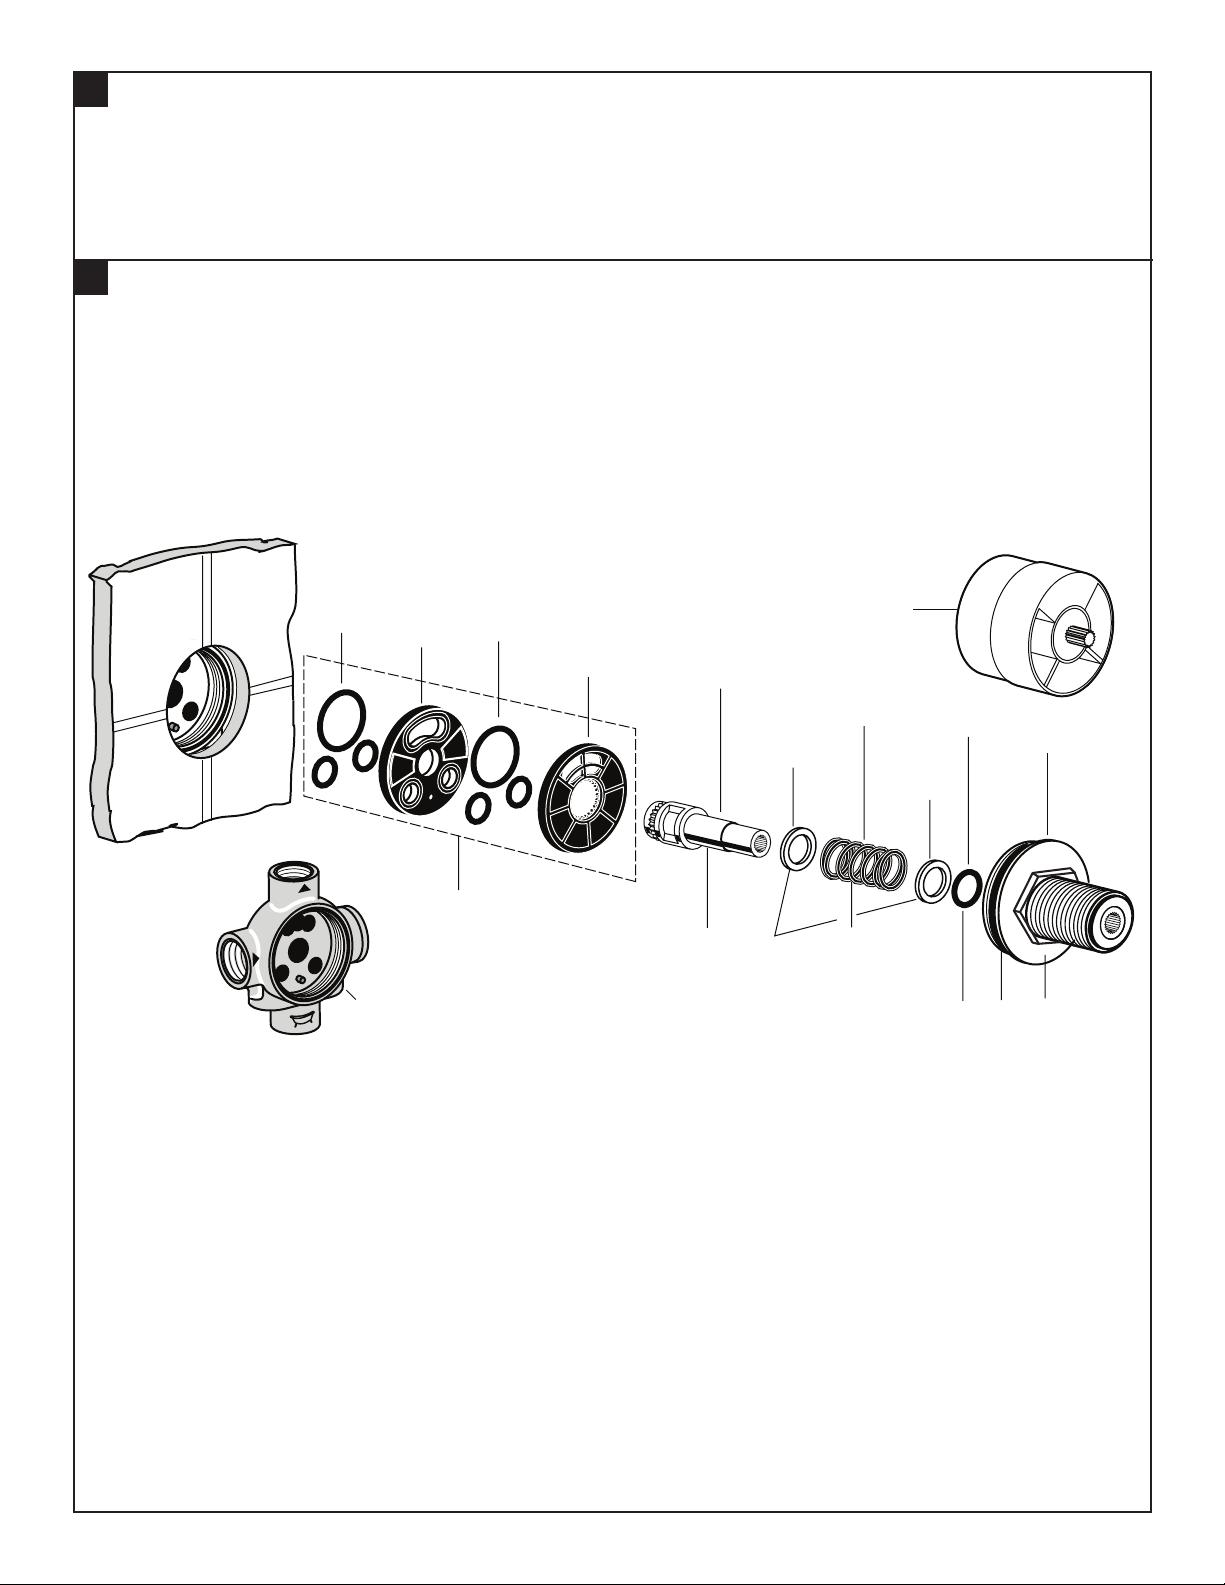
TO REPLACE O-RINGS:
• Turn off water supply.
• Unscrew CAP and remove STEM, SPRING and SEALS.
• Remove old DIVERTER elements and install new parts.
• Replace remaining parts in reverse order.
• NOTE: Repair part numbers are 1 thru 9.
DISK
O-RING
LOWER
DISK
TWO WAY
BODY
6
O-RING
1
DISK
UPPER
DISK
STEM
7
WASHER
2
SPRING
3
9
SHAFT
O-RING
WASHER
CAP
8
5
4
- 3 -
M965674 Rev. 1.0 (6/16)
Page 4
TWO/THREE WAY
IN-WALL DIVERTER
ROUGH VALVE,
SHARED OUTLETS
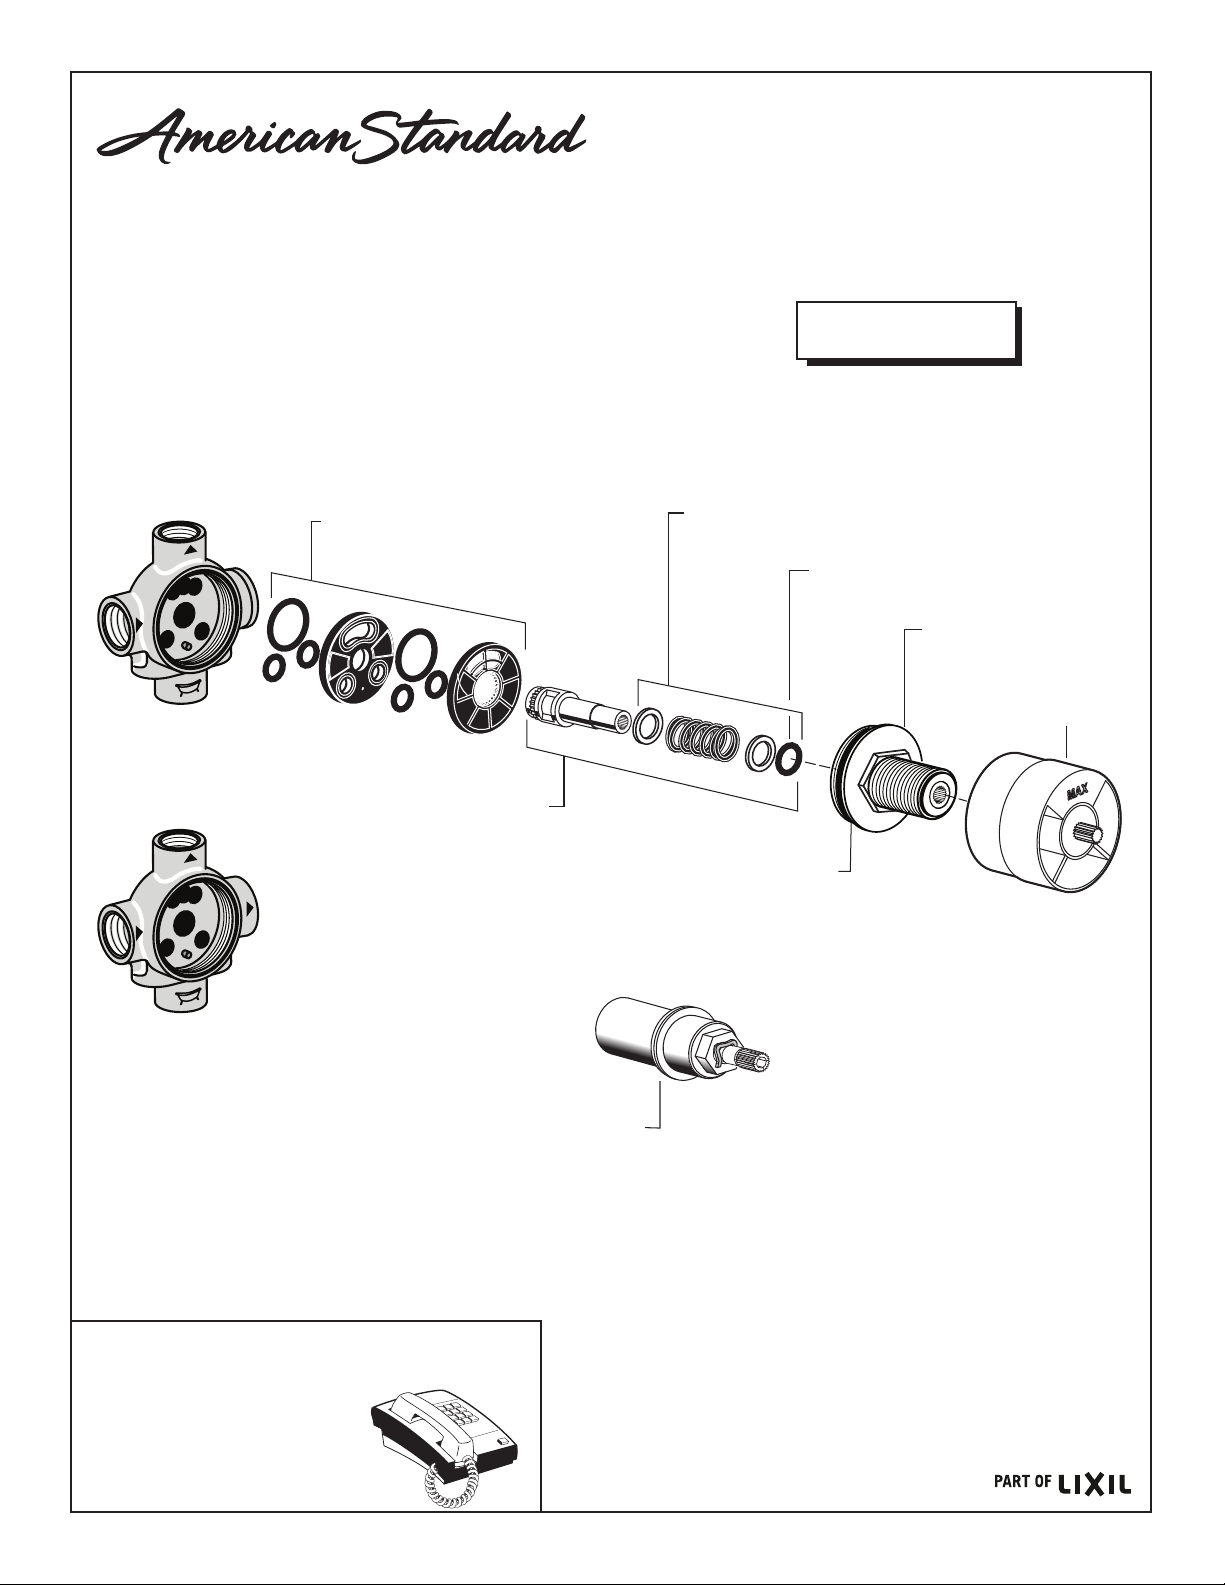
MODEL NUMBER
R422S; R433S
TWO WAY
BODY
THREE WAY
BODY
M964434-0070A
DIVERTER
REPAIR KIT
060219-0070A
051310-0070A
SPRING KIT
912737-0070A
STEM O-RING
051309-0070A
CAP
PLASTER
GUARD
STEM KIT
912647-0070A
CAP SEAL
HOT LINE FOR HELP
For toll-free information and answers to your questions, call:
1 (800) 442-1902
Mon. - Fri. 8:00 a.m. to 8:00 p.m. EST
Saturday 10:00 a.m. to 4:00 p.m. EST
IN CANADA 1-800-387-0369
(TORONTO 1-905-306-1093)
Weekdays 8:00 a.m. to 7:00 p.m. EST
IN MEXICO 01-800-839-1200
963554-YYY0A
EXTENSION KIT
- 4 -
M965674 Rev. 1.0 (6/16)
 Loading...