

Page 1
™
CULINAIRE COLLECTION™
STAINLESS STEEL
KITCHEN SINKS
MODELS 7501.103, 7502.103, 7502.403,
7504.103, 7507.103, 7510.103
SELF RIMMING
Thank you for selecting American-Standard...the benchmark
of fine quality for over 100 years.
To ensure that your installation proceeds smoothly--please
read these instructions carefully before you begin.
BEFORE YOU BEGIN...
Unpack new sink and inspect carefully for
damage. Replace the sink in its original packing
carton to protect it until you are ready to begin
installation.
Recommended Tools & Materials
Putty Knife
Pipe Wrench
Channel Locks
Long Phillips Screwdriver
or Regular Screwdriver
Adjustable Wrench
Drill
Basin Wrench
Saber Saw
Plumber's Putty or Caulk
Tubing Cutter
Tape Measure
Hacksaw
Mineral Spirits
Silicone Sealant
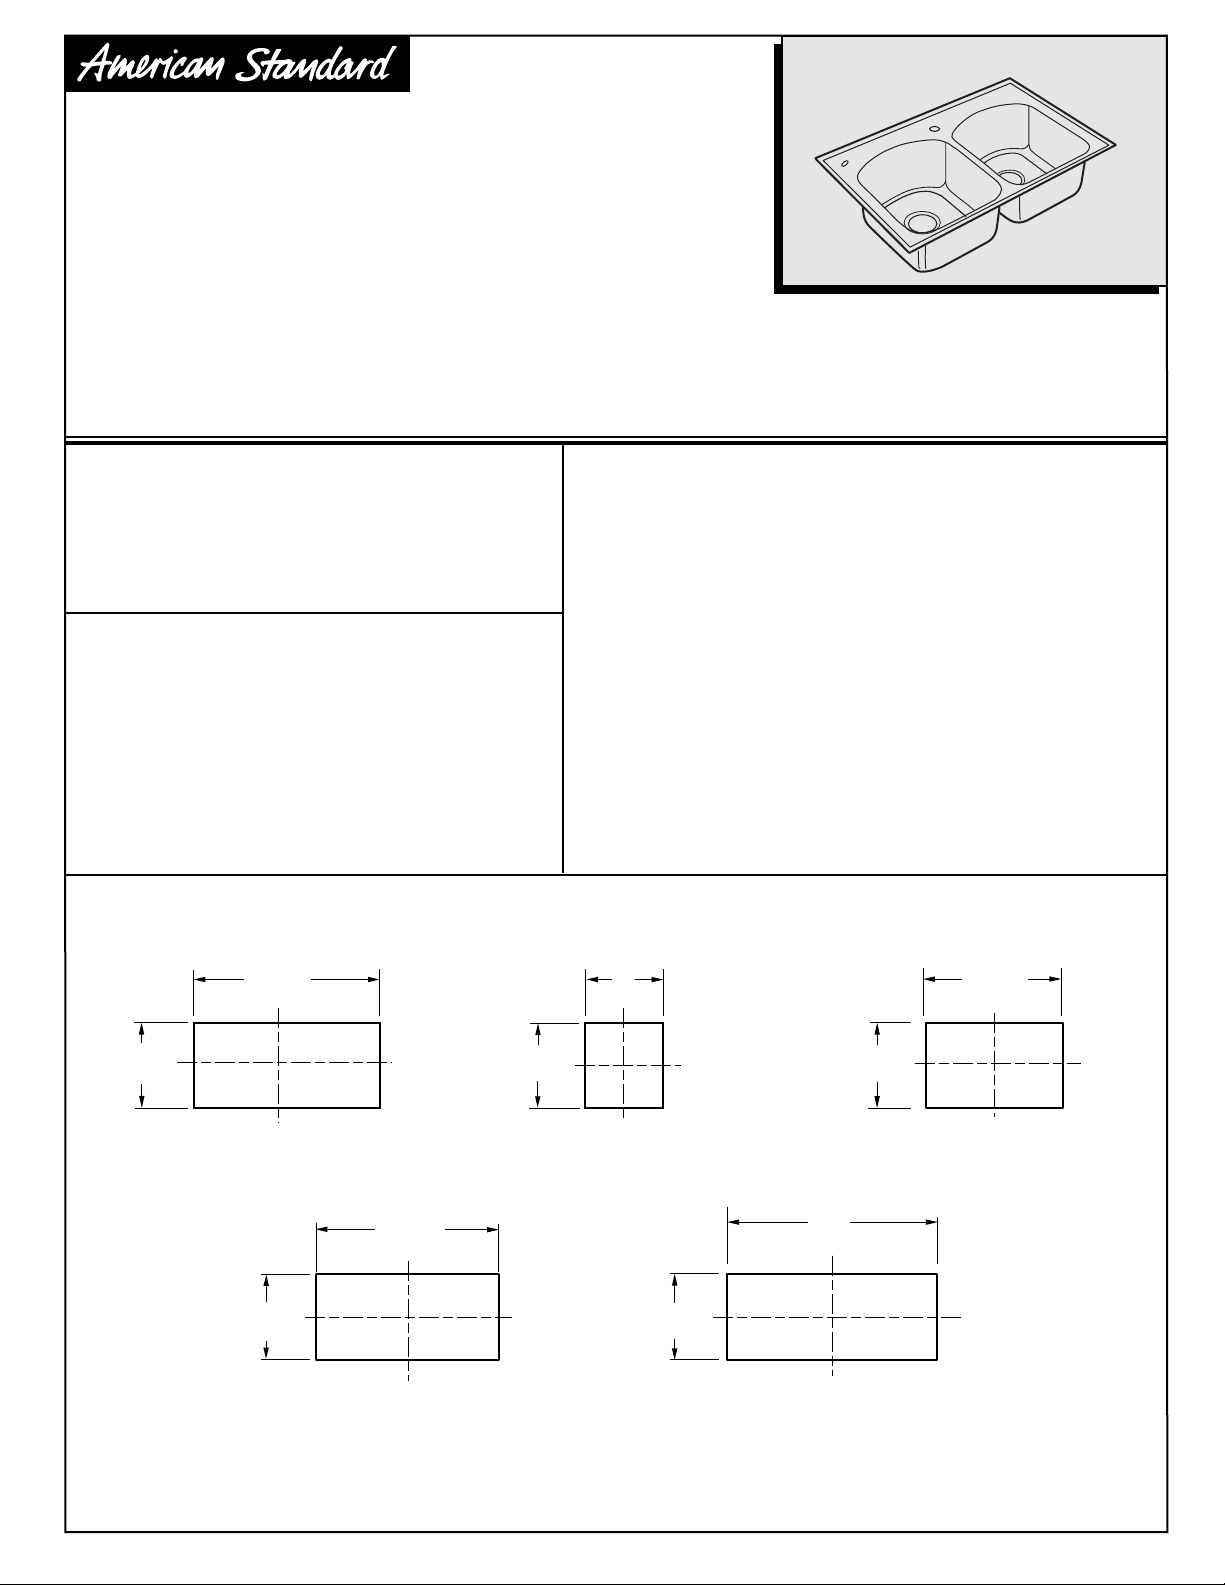
Below are the dimensions needed to determine the cutout size
for each sink. Select the correct diagram for your sink and refer
to the instructions below.
Locate and mark center lines of sink on countertop.
Provide proper clearance under the countertop for the faucet
supply lines and the structural parts of the cabinet.
By using the diagrams below and measuring your sink, draw the
outline of the sink cutout onto the countertop. This is the cutting
outline.
Remember that the size of the sink is larger than the cutout.
CUTOUT DIMENSIONS FOR SINKS:
Certified to comply with ANSI A112.19.3M
CAN/C.S.A. B-45
Observe local plumbing and building codes.
790767-100
Countertop Cutout Dimensions
32-1/8
(816mm)
21-1/8
(537mm)
CULINAIRE DOUBLE BOWL SINK
MODEL 7502
21
(533mm)
CULINAIRE DUAL LEVEL
32
(813mm)
BOWL SINK
MODEL 7504
17
(432mm)
21
(533mm)
CULINAIRE ISLAND SINK
MODEL 7507
(533mm)
21
21-1/8
(537mm)
CULINAIRE SINGLE BOWL SINK
38
(965mm)
CULINAIRE DUAL LEVEL SINK
WITH DRAIN BOARD
MODEL 7510
24-1/4
(616mm)
MODEL 7501
IMPORTANT: DIMENSION OF FIXTURES ARE NOMINAL AND MAY VARY WITHIN
THE RANGE OF TOLERANCES ESTABLISHED BY A.N.S.I. AND C.S.A. STANDARDS.
1
©AMERICAN STANDARD INC. 2002
Page 2

AFTER THE CUTOUT IS DRAWN...
1
Drill a clearance hole
inside the cutout line
as marked on the
countertop.
2
Cut opening on cut line
inside the perimeter of sink.
Note - Formica countertop
installation only is illustrated.
Contact your countertop
distributor for the best method
of cutting other materials such
as marble, hard synthetics,
etc.
3
Mount the faucet and
drain assembly on the
sink or countertop
following the
manufacturer's
instructions.
Perimeter
of sink
Perimeter
of sink
Cutout
Cutout
7
8
9
Rotate each
retaining clip
toward sink bowl.
Apply a generous portion of sealant inside line
traced on countertop. Carefully lower sink into
cutout and press down firmly. Use guidelines
for proper positioning.
Rotate each clip to
engage countertop.
NOTE - TIGHTEN
THE TWO CENTER
CLIPS ON EACH
LONG SIDE OF THE
SINK FIRST ( SEE
FIGURE 3 FOR DETAILS). Complete the
tightening process for the remaining clips,
to secure sink. Remove excess sealant from
countertop for a smooth even line of sealant
around the edge of the sink.
Before applying the sealant,
4
place the sink temporarily
into the cutout. Check for
alignment and clearance,
then trace around the
outside edge of the sink as
a guide for installation
location and application
of sealant.
Remove sink and
5
apply a masking tape
outline 1/8" outside
traced outline as a
guide for application
of silicone sealant.
6
Cutout
Masking
tape outline
LOCKING TAB
1/8"
Sink
outline
10
11
Connect supply lines
to faucet finger tight,
and carefully bend to
engage with the
supply stops. Tighten
connections to faucet
for secure seal.
Connect drain assembly
hand tight to check alignment. It may be necessary
to cut off part of the
tailpiece (area "A") or part
of the horizontal leg of the
trap (area "B").
Secure joint for watertight
assembly.
Trap
Single Bowl Double Bowl
A
Trap
B
Place a retaining clip onto hold-down rib. Make
certain locking tab engages depression in
hold-down rib. Approximate locations shown
on page 3 for correct model.
790767-100
NOTCH
12
2
Note: The clips supplied with sink can be used for
a countertop with a thickness of 1/2" min. to 1"
max. If countertop excedes 1" thickness you must
request clips for the larger thickness. Part No.
790772-0070A. If a plug is required to cover an
unused hole, order Part No. 790773-0070A.
©AMERICAN STANDARD INC. 2002
Page 3
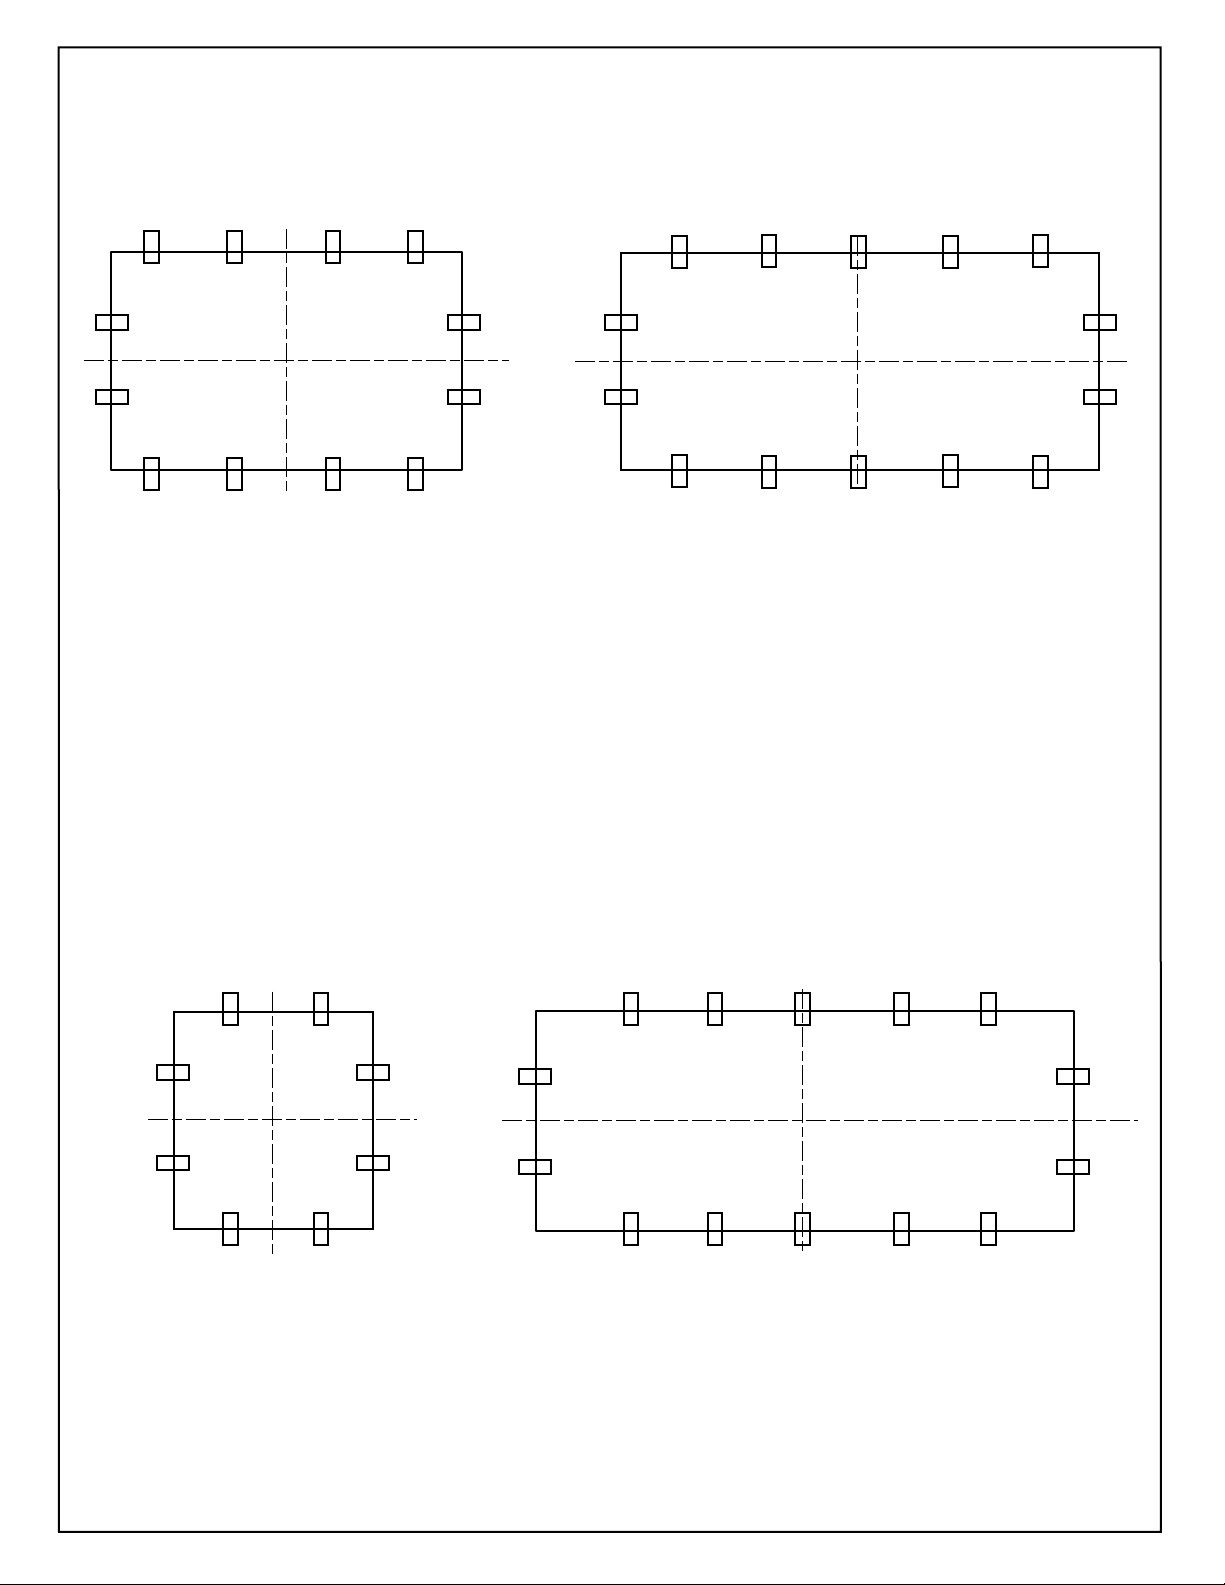
Tightening Sequence For Clips
11 3 1 9 11 6 2 4 13
7
8
5
6
12 2 4 10
MODEL 7501
9
10
7
8
12 3 1 5 14
MODEL 7502 & 7504
5
7
42
MODEL 7507 MODEL 7510
©AMERICAN STANDARD INC. 2002
11 513
8
6
9
10
1313
7
8
12 4 2 6 14
3
790767-100
Page 4

Maintenance for stainless steel sinks:
To keep the original quality of your Stainless Steel Sink, we recommend regular cleaning. Use a mild liquid dish
detergent and water to clean the product after use. Rinse carefully and dry.
Please have the following in mind:
• Don't let water or other liquids dry on the product. Liquids that are left to dry leave a grey build-up stain on the
steel.
• Stainless steel can stand hard treatment, but sharp objects can easily scratch the surface. These scratches
are more visible when the product is new. After a period of use these marks will be smoothed out without the
product losing it luster.
• Never use scouring powder or steel wool to clean the surface. Apart from the risk of scratches, there is also a
risk that rust stains will attack the steel.
• Avoid Chlorine-based solutions from coming into contact with the stainless steel.
• Silver polish leaves spots that cannot be removed.
• Acidic foods (e.g. juices, salt, mustard, mayonnaise, etc.) must be cleaned up immediately.
Discoloration
More stubborn spots are often caused by impurities in the water or household substances. These can be removed
with special polish agents for stainless steel. Dull spots can become lustrous again if rubbed with chalk on a soft
cloth.
AMERICAN-STANDARD LIMITED LIFETIME WARRANTY FOR STAINLESS STEEL SINKS
American-Standard warrants to the original purchaser consumer of an American-Standard stainless steel sink that it will, at its option,
repair or replace such product if it is found by American-Standard, in its sole judgment, to be defective under normal residential use,
provided that it has been installed and maintained in accordance with American-Standard's instructions. This limited warranty applies
only to the initial installation and is not transferable from the original consumer purchaser. In the event of a limited warranty claim,
proof of purchase will be required – save sales receipt.
This limited lifetime warranty DOES NOT COVER the following:
1. Defects or damages arising from shipping, installation, alterations, accidents, abuse, misuse, environmental factors, lack of proper
maintenance and use of other than genuine American Standard replacement parts, in all cases whether caused by a plumbing
contractor, service company, the owner or any other person.
2. Deterioration through normal wear and tear and the expense of normal maintenance.
3. Commercial application.
4. Options and accessories. American-Standard’s limited warranty on these items is one year for parts only. This one year limited
warranty covers accessories manufactured by American-Standard against defects of material or workmanship. Limited warranty
coverage begins on the date the accessory was originally purchased by the owner.
5. Postage or shipping costs for returning products for repairs or replacement under this limited warranty and labor or other costs
incurred in connection with product removal or installation under this limited warranty.
6. ANY LIABILITY FOR CONSEQUENTIAL OR INCIDENTAL DAMAGES, INCLUDING LABOR, ALL OF WHICH ARE HEREBY
EXPRESSLY DISCLAIMED, OR THE EXTENSION BEYOND THE DURATION OF THIS LIMITED WARRANTY OF ANY IMPLIED
LIMITED WARRANTIES, INCLUDING THOSE OF MERCHANTABILITY OR FITNESS FOR AN INTENDED PURPOSE. IN NO
EVENT WILL AMERICAN STANDARD BE LIABLE FOR THE COST OF REPAIR OR REPLACEMENT OF ANY INSTALLATION
MATERIALS INCLUDING BUT NOT LIMITED TO TILES, MARBLE ETC. (Some jurisdictions do not allow limitations on how long an
implied limited warranty lasts, or the exclusion or limitation of incidental or consequential damages, so these limitations and exclusions
may not apply to you.)
7. Responsibility for compliance with local code requirements. (Since local code requirements vary greatly, distributors, retailers,
dealers, installation contractors and users of plumbing products should determine whether there are any code restrictions on the
installation or use of a specific product.)
This limited warranty gives you specific legal rights. You may have other legal rights that vary from state to state or from province to
province.
In the United States:
American Standard Inc.,
P.O. Box 6820
Piscataway, New Jersey, 08855
Attention: Director of Consumer Affairs
For residents of the United States,
warranty information may also be
obtained by calling the following
toll free number: (800) 223-0068
©AMERICAN STANDARD INC. 2002
In Canada:
American-Standard,
2480 Stanfield Road
Mississauga, Ontario
Canada L4Y 1S2
Toronto Area: (905) 306-1093
Toll Free: (800) 387-0369
Product names listed herein are trademarks of American Standard Inc.unless otherwise noted.
4
In Mexico:
Ideal Standard, S.A. de C.V.
Planta Santa Clara
Via Morelos #330
Santa Clara Coatitla
Ecatepec de Morelos 55540,
Estado de Mexico, Mexico
790767-100
Page 5

™
Installation
Instructions
UNDERCOUNTER MOUNTING FOR CULINAIRE™
COLLECTION STAINLESS STEEL
KITCHEN SINKS
STAINLESS STEEL SINKS
MODELS 7501.000, 7502.000, 7504.000, 7507.000
Thank you for selecting American-Standard...the
benchmark of fine quality for over 100 years.
To ensure that your installation proceeds smoothly--
Certified to comply with ANSI A112.19.3.M
CAN/C.S.A. B-45
Observe local plumbing and building codes.
please read these instructions carefully before you begin.
BEFORE YOU BEGIN...
Unpack new sink and inspect carefully for damage. Notify your American Standard distributor of any damage. Replace the
sink in its original packing carton to protect it until you are ready to begin installation.
Recommended Tools & Materials:
Putty Knife
Pipe Wrench
Channel Lock Pliers
Phillips Screwdriver
Regular Screwdriver
Adjustable Wrench
Drill
Basin Wrench
Saber Saw
Plumbers' Putty or Caulking
Tubing Cutter
Tape Measure
Hacksaw
Mineral Spirits
Silicone Sealant
790766-100
CAUTION
SINK CUTOUTS:
Locate and mark center lines of sink on countertop. Provide proper clearance under the countertop for the faucet supply
lines and the structural parts of the cabinet. Do not use permanent markers to indicate the center lines.
Cut the inner portion from the supplied template and discard.
Attach the outer portion of the template to the countertop using masking tape. Be sure that the center lines on the template
are aligned with those on the counter.
A. After cutout is complete, mark underside of countertop at approximate locations shown in 1 for appropriate model.
Locate holes 1" back from cutout edge. Drill 1/4" diameter holes ('E' drill) 1/4" deep for brass inserts. Tap in brass
inserts, slotted end first.
B. Some products are supplied with a plastic film. This film protects the product during the shipping and has to be removed
before mounting. Apply sealant to mounting surface.
C. Mount hardware shown in Step 3 by first threading wingnut well up on screw near the head with washer and slotted clip.
Tighten screw securely to lock brass insert.
When sink is correctly positioned over cutout, tighten wing nuts evenly to secure sink.
(Refer to Step 3 on page 3.)
Minimum countertop thickness is 12mm (1/2") for marble and solid surface material.
1
©AMERICAN STANDARD INC. 2002
Page 6

IMPORTANT: DIMENSIONS OF FIXTURES ARE NOMINAL AND MAY VARY WITHIN THE RANGE
OF TOLERANCES ESTABLISHED BY A.N.S.I. AND C.S.A. STANDARDS
.
SUPPORT CLIP LOCATIONS:
MODEL 7507.000MODEL 7502.000
SUPPORT
CLIPS
MODEL 7501.000MODEL 7504.000
2
790766-100
Page 7

1
4
Drill a clearance hole
inside the cutout line.
2
Cut opening on cut line
of the template.
Note - Contact your
countertop distributor for
the best method of cutting materials such
as marble, hard synthetics, etc.
Countertop
Template
Countertop
Template
Cutout
template
Cutout
Countertop
Mount the faucet and
drain assembly following
the manufacturer's
instructions.
5
Connect supply lines to
faucet finger tight, and
carefully bend to engage
with the supply stops.
Tighten connections to
faucet for secure seal.
3
INSERT
CLAMP
WASHER
WINGNUT
INNER EDGE
OF CUTOUT
SCREW
6
Connect drain assembly
hand tight to check alignment. It may be necessary
to cut off part of the tailpiece
(area "A") or part of the
horizontal leg of the trap
1"
(area "B").
Secure joint for watertight
assembly.
Trap
Single Bowl
Double Bowl
A
Trap
B
END
790766-100
3
Page 8

Maintenance for stainless steel sinks:
To keep the original quality of your Stainless Steel Sink, we recommend regular cleaning. Use a mild liquid dish
detergent and water to clean the product after use. Rinse carefully and dry.
Please have the following in mind:
• Do not let water or other liquids dry on the product. Liquids that are left to dry leave a grey build-up stain on
the steel.
• Stainless steel can stand hard treatment, but sharp objects can easily scratch the surface. These scratches
are more visible when the product is new. After a period of use these marks will be smoothed out without the
product losing it luster.
• Never use scouring powder or steel wool to clean the surface. Apart from the risk of scratches, there is also a
risk that rust stains will attack the steel.
• Avoid Chlorine-based solutions from coming into contact with the stainless steel.
• Silver polish leaves spots that cannot be removed.
• Acidic foods (e.g. juices, salt, mustard, mayonnaise, etc.) must be cleaned up immediately.
Discoloration
More stubborn spots are often caused by impurities in the water or household substances. These can be removed
with special polish agents for stainless steel. Dull spots can become lustrous again if rubbed with chalk on a soft
cloth.
AMERICAN-STANDARD LIMITED LIFETIME WARRANTY FOR STAINLESS STEEL SINKS
American-Standard warrants to the original purchaser consumer of an American-Standard stainless steel sink that it will, at its option,
repair or replace such product if it is found by American-Standard, in its sole judgment, to be defective under normal residential use,
provided that it has been installed and maintained in accordance with American-Standard's instructions. This limited warranty applies
only to the initial installation and is not transferable from the original consumer purchaser. In the event of a limited warranty claim,
proof of purchase will be required – save sales receipt.
This limited lifetime warranty DOES NOT COVER the following:
1. Defects or damages arising from shipping, installation, alterations, accidents, abuse, misuse, environmental factors, lack of proper
maintenance and use of other than genuine American Standard replacement parts, in all cases whether caused by a plumbing
contractor, service company, the owner or any other person.
2. Deterioration through normal wear and tear and the expense of normal maintenance.
3. Commercial application.
4. Options and accessories. American-Standard’s limited warranty on these items is one year for parts only. This one year limited
warranty covers accessories manufactured by American-Standard against defects of material or workmanship. Limited warranty
coverage begins on the date the accessory was originally purchased by the owner.
5. Postage or shipping costs for returning products for repairs or replacement under this limited warranty and labor or other costs
incurred in connection with product removal or installation under this limited warranty.
6. ANY LIABILITY FOR CONSEQUENTIAL OR INCIDENTAL DAMAGES, INCLUDING LABOR, ALL OF WHICH ARE HEREBY
EXPRESSLY DISCLAIMED, OR THE EXTENSION BEYOND THE DURATION OF THIS LIMITED WARRANTY OF ANY IMPLIED
LIMITED WARRANTIES, INCLUDING THOSE OF MERCHANTABILITY OR FITNESS FOR AN INTENDED PURPOSE. IN NO
EVENT WILL AMERICAN STANDARD BE LIABLE FOR THE COST OF REPAIR OR REPLACEMENT OF ANY INSTALLATION
MATERIALS INCLUDING BUT NOT LIMITED TO TILES, MARBLE ETC. (Some jurisdictions do not allow limitations on how long an
implied limited warranty lasts, or the exclusion or limitation of incidental or consequential damages, so these limitations and exclusions
may not apply to you.)
7. Responsibility for compliance with local code requirements. (Since local code requirements vary greatly distributors, retailers,
dealers, installation contractors and users of plumbing products should determine whether there are any code restrictions on the
installation or use of a specific product.)
This limited warranty gives you specific legal rights. You may have other legal rights that vary from state to state or from province to
province.
In the United States:
American Standard Inc.,
P.O. Box 6820
Piscataway, New Jersey, 08855
Attention: Director of Consumer Affairs
For residents of the United States,
warranty information may also be
obtained by calling the following
toll free number: (800) 223-0068
In Canada:
American-Standard,
2480 Stanfield Road
Mississauga, Ontario
Canada L4Y 1S2
Toronto Area: (905) 306-1093
Toll Free: (800) 387-0369
4
In Mexico:
Ideal Standard, S.A. de C.V.
Planta Santa Clara
Via Morelos #330
Santa Clara Coatitla
Ecatepec de Morelos 55540,
Estado de Mexico, Mexico
790766-100
 Loading...