

Page 1
Owner’s Manual
PIVOT SHOWER DOORS
Thank you for selecting our product...the benchmark of fine quality for over 100 years. To ensure that your installation
proceeds smoothly--please read these instructions carefully before you begin.
Record Model Number _______________
710007-100
BEFORE YOU BEGIN...
Local building codes vary by location. Observe all local plumbing and building codes.
Unpack your new shower doors and inspect them carefully for damage. Verify that the doors are the correct size for your installation.
TOOLS & MATERIALS REQUIRED...
• Tape Measure • Electric Drill • Level • Phillips and Flat Screwdrivers • Drill Bits 1/8" & 3/16" • Hacksaw • Silicone Caulk
IMPORTANT: Record the Model No. (see carton) of your shower or tub enclosure for future reference. Model No. ____________
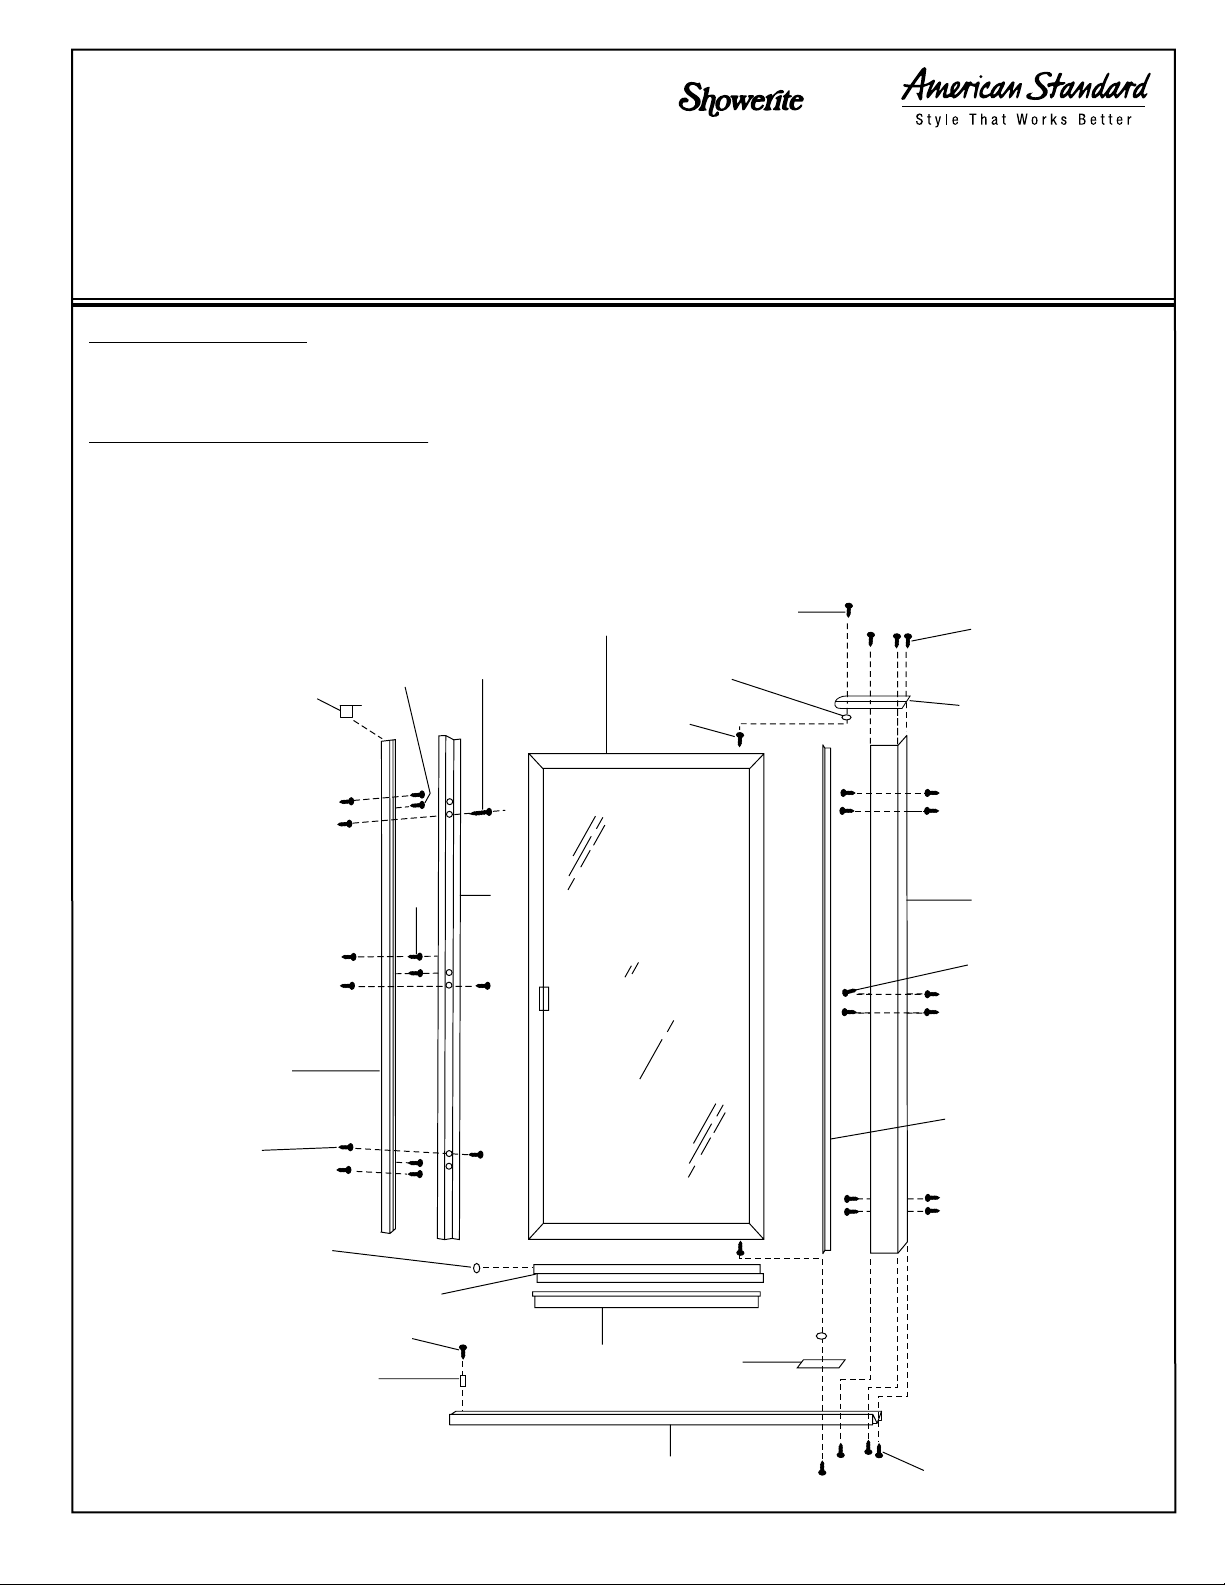
READ THE INSTRUCTIONS CAREFULLY: Familiarize yourself with all the parts as shown in the exploded view. The exploded view
will also provide a helpful reference when relating the location of the various parts and how they are mounted.
22
18
19
6
12
13
11
23
5
17
21
7
20
9
24
16
8
10
1
22
3
15
4
14
1
Page 2
INSTALLATION PROCEDURES:
1
Determine side at which the door will pivot (left or right).
The pivot side should be opposite the showerhead.
Measure width of the opening at the centerline of bottom.
NOTE: This door swings out only. Verify door will clear any
obstructions before installing.
2
Flat edge of threshold should face inside of shower.
Identify end of threshold which will be pivot side.
Mark the OPPOSITE end for drilling. Cut threshold to size
W measured in step 1.
THRESHOLD
FLAT EDGE
IMPORTANT:
ENSURE
BASE IS LEVEL
W
MEASURE
Record Measurement: W = ____________ inches
CENTERLINE
TOP VIEW
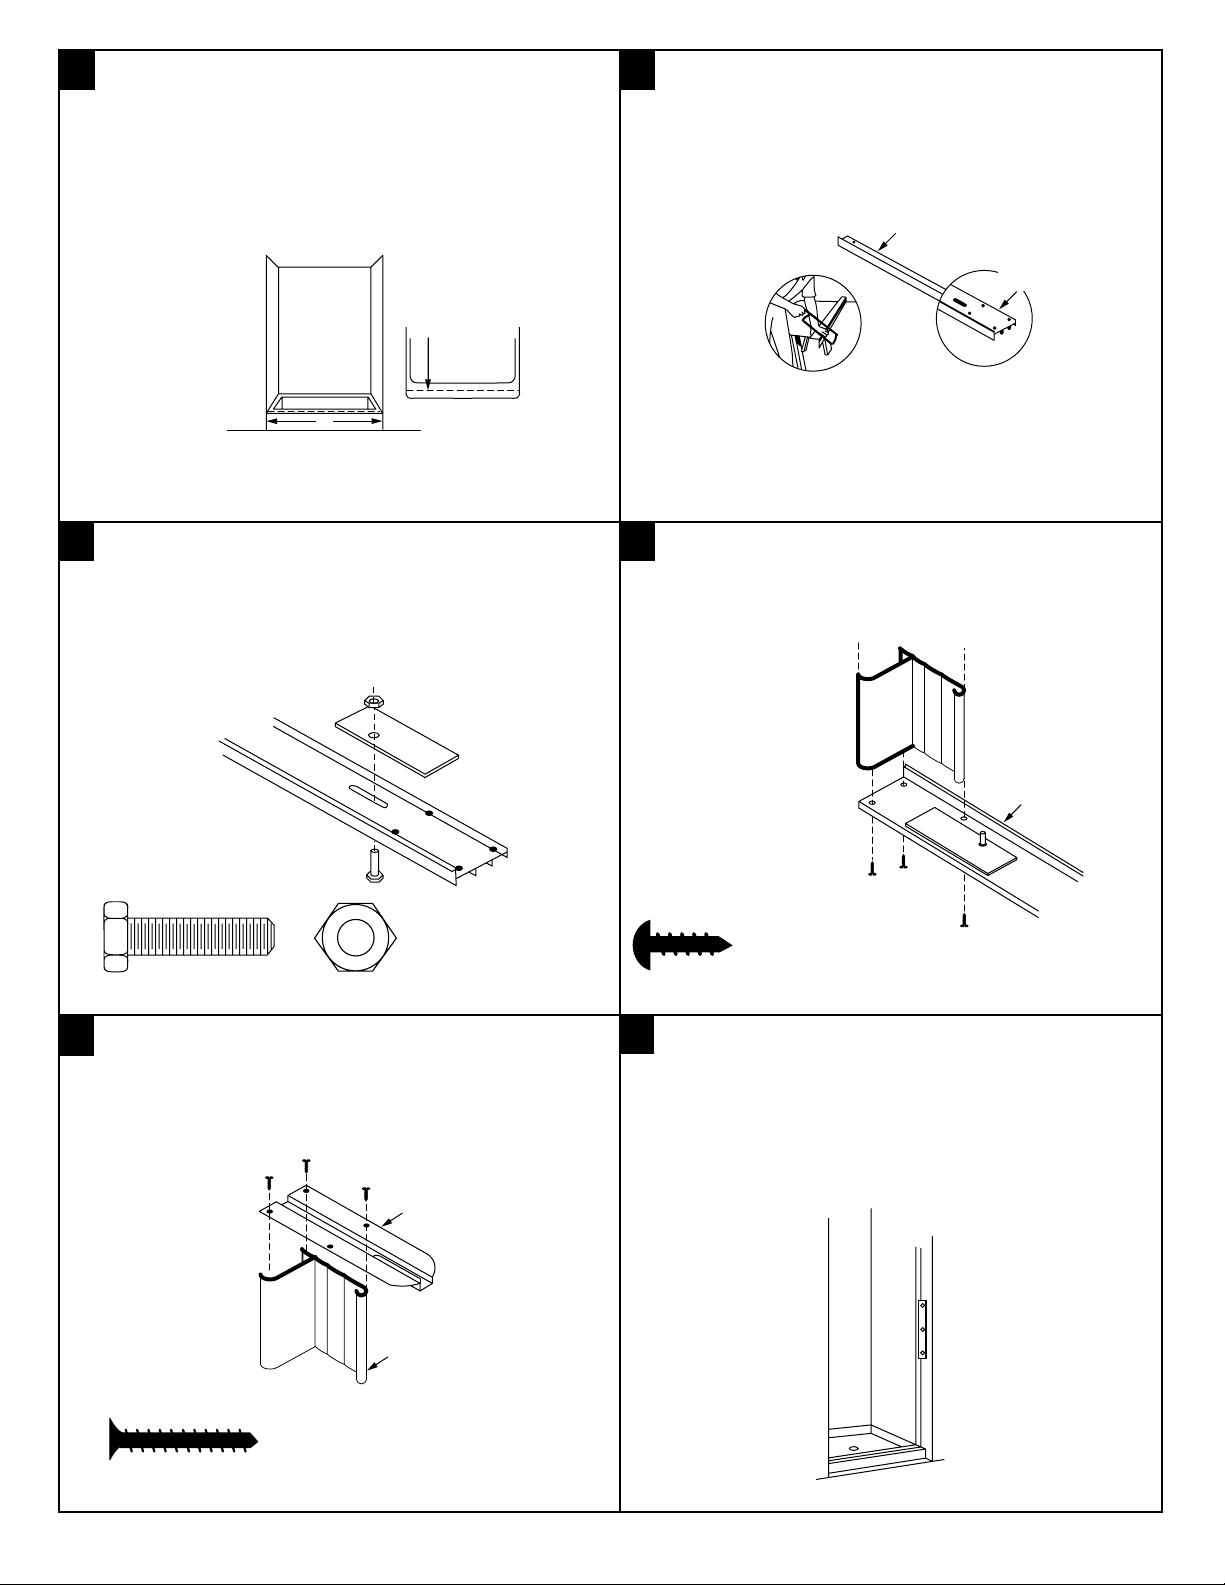
3
Position pivot plate on threshold with undrilled end of plate
toward pivot jamb.
Bolt pivot plate in place using pivot bolt and 1/4" nut.
UNDRILLED END
PIVOT JAMB
(AT THIS END)
CUT END
OPPOSITE
PIVOT SIDE
For best results use a 32-tooth hacksaw blade and a
miter box.
4
Mount threshold to pivot jamb using three #8 x 1/2" pan
head screws. The wide side of the pivot jamb fits inside
front lip of the threshold.
(VIEW FROM
INSIDE SHOWER)
WIDE SIDE OF
PIVOT JAMB
THRESHOLD
PIVOT BOLT & NUT (ACTUAL SIZE)
5
Attach top pivot arm to top of the pivot jamb using three #8
x 5/8" Phillips head screws. (Ensure pivot jamb fits in slot in
pivot arm).
PIVOT ARM
PIVOT SLOT
PIVOT JAMB
#8 x 5/8" Flat Head Screw (Actual Size)
#8 x 1/2" PAN HEAD SCREW (ACTUAL SIZE)
6
Position assembled pivot jamb to wall with threshold
centered on the shower base.
Mark holes in jamb for drilling.
Use a level to ensure jamb is plumb.
2
LEVEL
710007-100
Page 3

7
Remove pivot jamb with threshold. Drill six holes using a
3/16" drill bit. (Use a masonry bit for ceramic tile.)
8
Apply 1/4" bead of silicone caulk where bottom of pivot
jamb and threshold meet (see inset detail).
Insert one screw anchor in each hole.
NOTE: When drilling into fiberglass or plastic walls, use a
1/8" drill bit and do not use screw anchors.
SCREW ANCHOR
9
Subtract door panel width DW from length W in step 1. If
difference is from 1-3/4" to 3-1/8" use the minimum hole.
If difference is from 3-1/8" to 4-1/2" use maximum hole.
Insert one nylon pivot bushing in each of selected holes top
and bottom.
DOOR
WIDTH
DW
1-3/4" < W – DW < 3-1/8"
ADJUSTMENT HOLE
3-1/8" < W – DW < 4-1/2"
ADJUSTMENT HOLE
IF
USE MINIMUM
IF
USE MAXIMUM
NYLON PIVOT
BUSHING
MAX
MIN
HOLE
HOLE
Mount assembled pivot jamb to wall using six #8 x 1-1/2"
flat head screws.
SILICONE
CAULK
#8 x 1-1/2" Phillips Flat Head Screw (Actual Size)
10
Install door by mating bottom pivot bolt with nylon pivot bushing.
Align door with top pivot arm and insert pivot bolt through arm
into 1/4" nut, and then into corresponding nylon pivot bushing.
Adjust door by sliding it in pivot slot top and bottom to allow
1-3/8" to 1-7/8" of space between wall and magnet side of door
when in closed position.
Tighten nut against pivot arm for proper tension using 1/4"
wrench.
W
W inches
— DW inches
inches
11
On side opposite pivot jamb, drill a 1/8" hole in threshold
located 5/8" from wall and 7/8" from flat edge of threshold.
Fasten positioning spacer to threshold using one #8 x 1"
pan head screw.
For doors with narrow strikes (e.g. Model #804NS) positioning spacer is not necessary. Instead mark a line 7/8" in from
flat edge and parallel to it. Center adjustment rail over this
line when installing in step #12.
5/8"
POSITIONING
SPACER
7/8"
1/4" WRENCH PROVIDED
12
Temporarily secure threshold with masking tape at strike
side. Ensure an even distance between edge of threshold
and front of the base.
Locate adjustment rail over positioning spacer and against
wall (you may reverse rail to mark holes). Use a level to
plumb adjustment rail.
Mark hole location of the large holes only. Remove rail. Drill
six 3/16" diameter holes then insert wall anchors.
ADJUSTMENT
RAIL
TOP VIEW
#8 x 1" Pan Head Screw (Actual Size) Plastic Screw Anchor (Actual Size)
3
710007-100
Page 4

13
Remove debris and clean threshold & base.
Caulk end of threshold at wall per detail.
Match holes in magnetic jamb with holes in adjustment rail to
determine which mounting hole is for adjustment rail only.
Remove magnetic jambs and mount adjustment rail to wall
using three #8 x 2" pan head screws. To adjust magnetic jamb
for out of plumb wall conditions, insert adjustment screws
(three #8 x 1" pan head screws) as shown.
ADJUSTMENT RAIL
ADJUSTMENT RAIL
MOUNTING SCREW
MAGNETIC
JAMB
ADJUSTMENT
MATCH
HOLES
3 PLACES
SCREW
SILICONE
CAULK
14
Place magnetic jamb over adjustment rail with magnetic
strip facing to outside of shower.
Close door and adjust magnetic jamb to allow 1/8" to 1/4"
clearance between magnetic jamb and door panel.
NOTE: If magnets repel each other, remove and reverse.
To adjust magnetic jamb for clearance or plumb, remove
magnetic jamb and reposition adjustment screws. Once
magnetic jamb is in desired position, secure with
mounting screws. The door may also be adjusted by
loosening the 1/4" nut, aligning strike side of door and
re-tightening door.
Install wall jamb cap by snapping in place at top of
adjustment rail. Trim with knife. For narrow strike
models, cut cap at mark with a utility knife.
MAGNETIC
JAMB
MOUNTING
SCREW
MAGNETIC
1/8"-1/4"
ADJUSTMENT
RAIL
JAMB
ADJUSTMENT RAIL MOUNTING SCREW
#8 X 2" PAN HEAD SCREW
FOR “NS” MODELS,
ADJUSTMENT RAIL MOUNTING SCREW
#8 X 1-1/2" FLAT HEAD SCREW
ADJUSTMENT SCREW
#8 X 1" FLAT HEAD SCREW
FOR “NS” MODELS,
ADJUSTMENT SCREW
#8 X 5/8" FLAT HEAD SCREW
15
Clean bottom rail.
Cut vinyl sweep the same length as drip rail. Insert sweep into
groove in drip rail.
Position drip rail on inside of doorframe 1/8" up from bottom
edge and set 1/2" from each outside edge. The drip rail must be
adjusted so that it angles down towards pivot side and does not
hit threshold or doorjambs when door is closed.
Mark the proper location and then remove backing from tape
and press drip rail in place. Apply a small dab of silicone into
the strike end of the drip rail before inserting plastic plug.
Note: Allow 24 hours for adhesive to cure before using shower.
DOOR
ADJUSTMENT
WALL JAMB CAP
SCREW
16
Caulk where wall jamb meets wall for entire height of unit on
both inside and outside of shower.
Caulk where threshold meets base on outside of unit only.
Allow 24 hours for silicone to cure before using shower.
OUTSIDE VIEW
SILICONE SILICONE
INSIDE VIEW
MAGNETIC
JAMB
MOUNTING
SCREW
DRIP CAP
ANGLE DOWN
ABOUT °1
DRIP RAIL
VINYL
SWEEP
4
710007-100
Page 5

HOW TO CARE FOR YOUR ENCLOSURE Do not use scouring powder, pads or sharp instruments on metal or glass
panels. Occasionaly wipe with mild detergent diluted in water to keep the panels and metal parts looking new. Use squeegees
following each shower to eliminate water spots on the inside of the glass panels.
HOW TO ORDER REPLACEMENT PARTS
Provide the following information to your Dealer.
1. Part Name
2. Part Number
3. Part Description (Length, Size, Color, etc.)
4. Model Number
Key Part Part NS Model Qty
No. Name No. Only
1 THRESHOLD EX130 EX130 1
2 PIVOT PLATE EX131 EX131 1
3 PIVOT JAMB EX132 EX132 1
4 VINYL STRIP PVS1 PVS1 1
5 PIVOT ARM EX133 EX133 1
6 DOOR PANEL MODEL # MODEL # 1
7 ADJUSTMENT RAIL EX122 EX120 1
8 MAGNETIC JAMB EX123M EX121M 1
9 DRIP RAIL 2482T 2482T 1
10 VINYL SWEEP PVS2 PVS2 1
11 PIVOT BOLT 1/4-20 BOLT 1/4-20 BOLT 2
12 1/4" NUT 1/4-20 NUT 1/4-20 NUT 2
Key Part Part NS Model Qty
No. Name No. Only
13 NYLON PIVOT BUSHING B530 B530 2
14 #8 x 1/2" PAN HEAD SCREW 812-P 812-P 3
15 #8 x 1-1/2" FLAT HEAD SCREW 8112-F 8112-F 6
16 POSITIONING SPACER FW269 FW269 1
17 SCREW ANCHOR PSA1 PSA2 12
18 #8 x 1" FLAT HEAD SCREW 81-F 858-F 3
19 #8 x 2-1/2" FLAT HEAD SCREW 8212-F 82-F 3
20 PLASTIC PLUG DCP1 DCP2 1
21 #8 x 2" PAN HEAD SCREW 82-P 8112-F 3
22 WALL JAMB CAP WJC WJC 1
23 #8 x 5/8" FLAT HEAD SCREW 858-F 858-F 3
24 #8 x 1" PAN HEAD SCREW 81-P 81-P 1
5
710007-100
Page 6

AS AMERICA, INC. LIMITED LIFETIME
WARRANTY FOR SHOWER DOORS
AS America, Inc. (“American Standard”) warrants to the original consumer purchaser that it will, at its sole option, repair or replace this product or any part
of this product, if it confirms that the product is defective in materials or workmanship under normal use and maintenance for the lifetime of this product.
This warranty does not apply to commercial installations. Commercial installations shall have a limited warranty of 3 year(s).
This limited warranty DOES NOT COVER the following:
1. Defects or damage arising from shipping, installation, alterations, accidents, abuse, misuse, lack of proper maintenance and use of other than genuine
American Standard replacement parts, in all cases whether caused by a plumbing contractor, service company, the owner or any other person.
2. Deterioration through normal wear and tear.
3. HARD WATER DAMAGE, OR DAMAGES RESULTING FROM ABUSE OR MISUSE OR FROM FAILURE TO INSTALL OR MAINTAIN THIS PLUMBING
PRODUCT IN ACCORDANCE WITH THE WRITTEN INSTRUCTIONS FURNISHED BY AS AMERICA, INC.
4. USE OF CLEANING PRODUCTS CONTAINING CALCIUM HYPO CHLORITE (CHLORINE), SCOURING POWDERS OR PADS SHALL NOT
BE COVERED.
5. THE USE OF SCENTED CANDLES IN CLOSE PROXIMITY WITH THIS PRODUCT CAN RESULT IN PERMANENT STAINING OF THE FINISH.
6. Expense of normal maintenance.
7. All costs of removal, transportation, labor, reinstallation or other costs including postage and/or shipping costs to obtain warranty service shall be paid
by the consumer.
8. ANY LIABILITY FOR CONSEQUENTIAL OR INCIDENTAL DAMAGES, ALL OF WHICH ARE HEREBY EXPRESSLY DISCLAIMED. ANY IMPLIED
WARRANTIES, INCLUDING THOSE OF MERCHANTABILITY OR FITNESS FOR PURPOSE INTENDED ARE SPECIFICALLY EXCLUDED.
(Some jurisdictions do not allow limitations on how long an implied warranty lasts, or the exclusion or limitation of incidental or consequential damages,
so these limitations and exclusions may not apply to you.)
9. Responsibility for compliance with local code requirements ARE EXCLUDED FROM THIS WARRANTY. (Since local code requirements vary greatly
distributors, dealers, installation contractors and users of plumbing products should determine whether there are any code restrictions on the installation
or use of a specific product.)
This limited warranty gives you specific legal rights. You may have other statutory rights that vary from state to state or from province to province, in which
case this limited warranty does not affect such statutory rights.
For service under this warranty, it is suggested that a claim be made through the contractor or dealer from or through whom the product was purchased, or
that a service request (including a description of the product model and of the defect) be sent to the following with proof of purchase or original receipt:
AS America, Inc.
P.O. Box 659
West Caldwell, NJ 07007
Attention: Customer Care Center Customer Care by telephone: 1-800-442-1902
GARANTÍA LIMITADA DE POR VIDA DE
AS AMERICA, INC. PARA PUERTAS DE DUCHA
AS America, Inc. (“American Standard”) le garantiza al comprador original que reparará o reemplazará, si lo estima conveniente, este producto o cualquiera de sus piezas,
si confirma que el producto tiene defectos de materiales o de mano de obra según el uso y mantenimiento normales, durante toda la vida de este producto.
Esta garantía no se aplica a instalaciones comerciales. Las instalaciones comerciales tendrán una garantía limitada de 3 años.
Esta garantía limitada NO CUBRE lo siguiente:
1. Defectos o daños que surjan del envío, la instalación, alteraciones, accidentes, abuso, uso indebido, falta de mantenimiento correcto y uso de piezas que no sean
repuestos originales de American Standard en todos los casos, ya sea causados por un contratista de plomería, una empresa de servicios, el propietario o cualquier
otra persona.
2. Deterioro por desgaste y uso normal.
3. DAÑOS POR AGUAS DURAS O DAÑOS RESULTANTES DE ABUSO O USO INDEBIDO O POR NO HABER INSTALADO O REALIZADO EL MANTENIMIENTO
DE ESTE PRODUCTO DE PLOMERÍA DE ACUERDO CON LAS INSTRUCCIONES ESCRITAS PROPORCIONADAS POR AS AMERICA, INC.
4. EL USO DE PRODUCTOS DE LIMPIEZA CON HIPOCLORITO DE CALCIO (CLORO), POLVOS O ESPONJAS DE LIMPIEZA ABRASIVOS NO ESTARÁ CUBIERTO.
5. EL USO DE VELAS AROMÁTICAS DEMASIADO CERCA DE ESTE PRODUCTO PUEDE PRODUCIR MANCHAS PERMANENTES EN EL ACABADO.
6. Gastos de mantenimiento normal.
7. Todos los costos de remoción, transporte, mano de obra, reinstalación u otros costos, incluso gastos de franqueo y/o envío para obtener servicio de garantía serán
pagados por el consumidor.
8. CUALQUIER RESPONSABILIDAD CIVIL POR DAÑOS INDIRECTOS O INCIDENTALES, TODOS LOS CUALES QUEDAN EXPRESAMENTE EXCLUIDOS POR
EL PRESENTE DOCUMENTO. CUALQUIER GARANTÍA IMPLÍCITA, INCLUSO LAS GARANTÍAS DE COMERCIABILIDAD O IDONEIDAD PARA UN
PROPÓSITO PREVISTO, QUEDA ESPECÍFICAMENTE EXCLUIDA. (Algunas jurisdicciones no permiten limitaciones con respecto a la vigencia de una garantía
implícita o la exclusión o limitación de daños incidentales o indirectos, de modo que estas limitaciones y exclusiones pueden no corresponderle.)
9. La responsabilidad por el cumplimiento de requisitos de códigos locales QUEDA EXCLUIDA DE ESTA GARANTÍA. (Como los requisitos de códigos locales varían
ampliamente, los distribuidores, concesionarios, contratistas instaladores y usuarios de productos de plomería deben determinar si existe alguna restricción en
los códigos con respecto a la instalacióno al uso de un producto específico.)
Esta garantía limitada le otorga derechos legales específicos. Los derechos estatales que usted pueda tener y que varían de un estado a otro o de una provincia a otra, no
quedan afectados por esta garantía limitada.
Para obtener servicio bajo esta garantía, se sugiere que se reclame por medio del contratista o el concesionario a quien o mediante quien se adquirió el producto, o que se
envíe una solicitud de servicio (incluyendo una descripción del modelo del producto y del defecto) a los siguientes junto con un
original:
comprobante de compra o el recibo
AS America, Inc.
P.O. Box 659
West Caldwell, NJ 07007
Atención:Servicio al cliente
Servicio al Cliente por teléfono: 1-800-442-1902
 Loading...