

Page 1
INSTALLATION INSTRUCTIONS
CARE AND MAINTENANCE
Champion® PRO 2-piece Toilet
211AA Series Right Height® Elongated
®
211BA Series Right Height
211CA Series Elongated
Thank you for selecting American Standard - the benchmark of fine quality for over 100 years. To ensure this product is installed properly, please read
these instructions carefully before you begin. (Certain installations may require professional help.) Also be sure your installation conforms to local codes.
CAUTION: PRODUCT IS FRAGILE. TO AVOID BREAKAGE AND POSSIBLE INJURY HANDLE WITH CARE!
!
NOTE: Pictures may not exactly define contour of china and components.
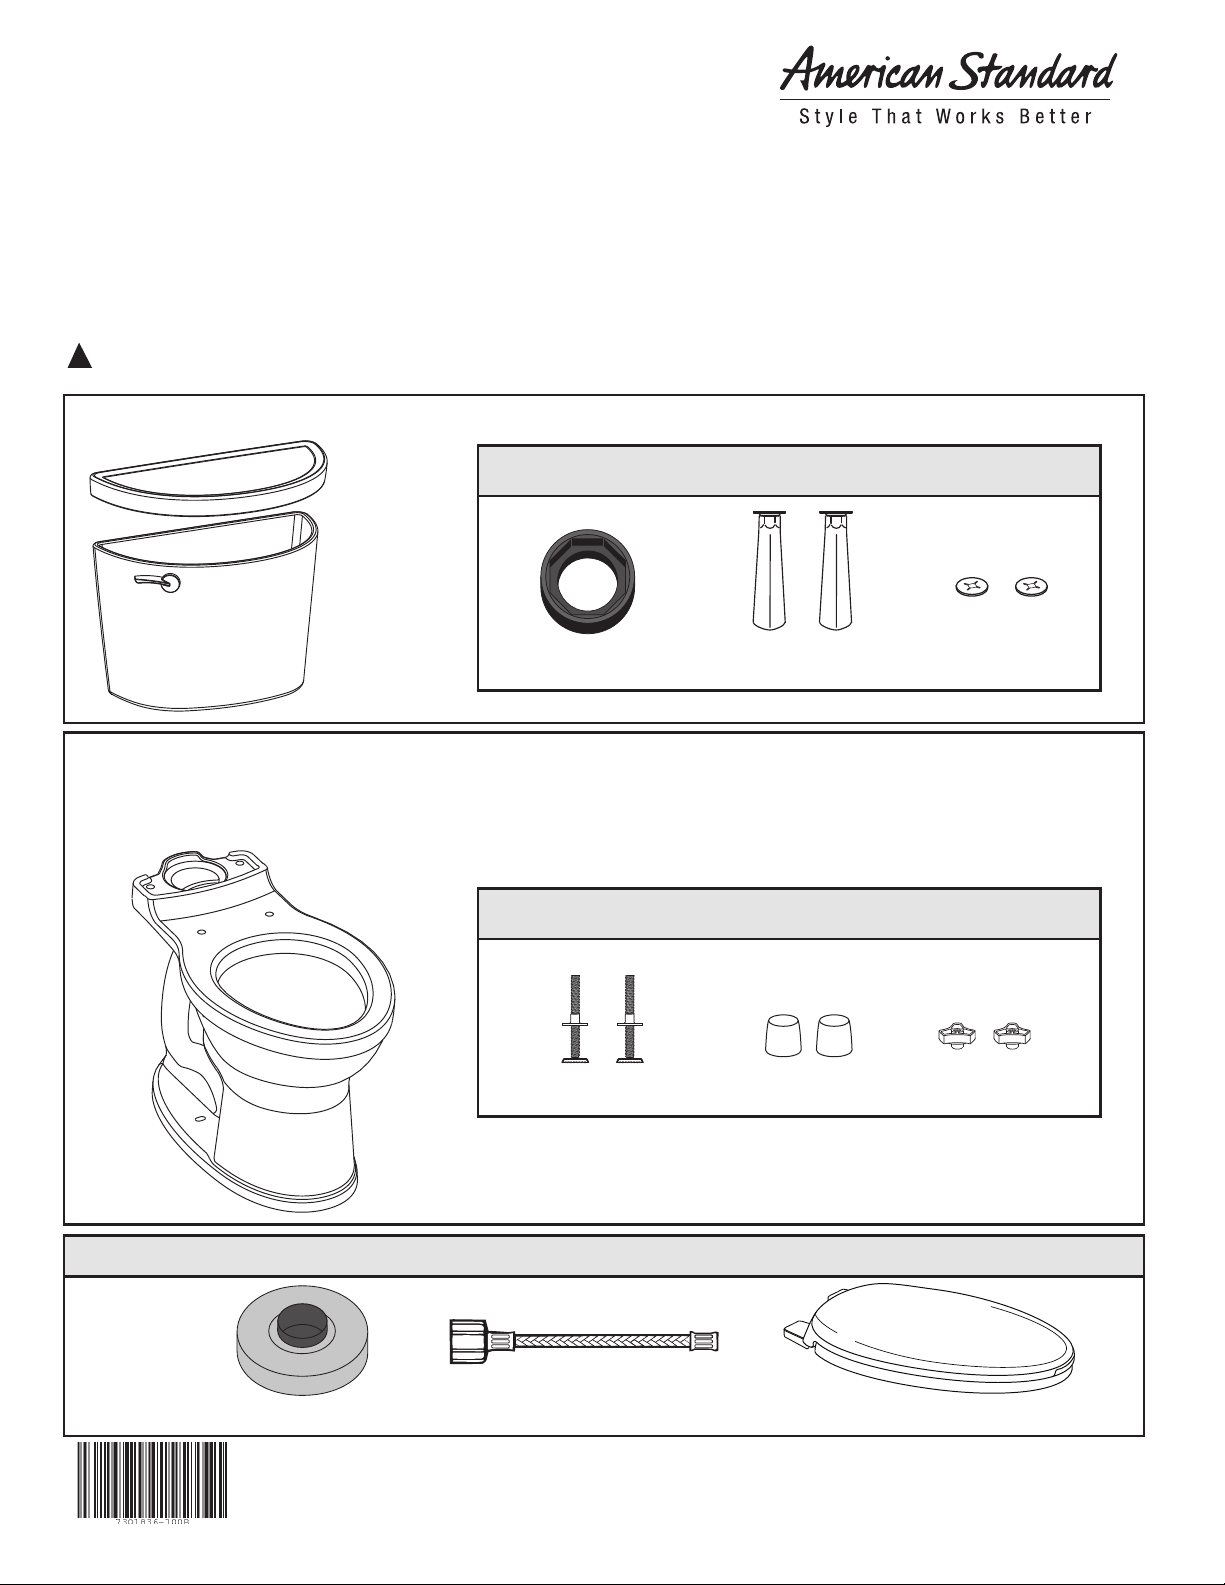
TANK 4225A
Round Front
EZ-INSTALL KIT INCLUDED WITH TANK
Tank To Bowl Gasket
BOWL 3195A RIGHT HEIGHT® ELONGATED
BOWL 3195B RIGHT HEIGHT
®
ROUND FRONT
BOWL 3195C ELONGATED
EZ-INSTALL KIT INCLUDED WITH BOWL
T-Bolts with Retainer (2)
Attachment Handles
with Nuts (2)
Bolt Caps (2) Bowl-To-Floor Knobs (2)
Plastic Washers (2)
SAVE FOR FUTURE USE
SOLD SEPARATELY
Wax Ring
Product names listed herein are trademarks of AS America, Inc.
© AS America, Inc. 2012
Water Supply Line
Slow Close Toilet Seat
7301836-100 Rev. B
Page 2

ROUGHING-IN DIMENSIONS: NOTE: Distance from wall to closet flange centerline must be as listed below: A = 12" (305mm)
Champion® PRO 2-piece Toilet 211BA Series Right Height® Round Front/
Champion® PRO 2-piece Toilet 211AA Series Right Height® Elongated
1"
(26mm)
3-9/16"
(90mm)
FINISHED WALL
9-3/8"
(238mm)
12"
(305mm)
9" (230mm)
30-1/4"
(768mm)
28-1/4"
(718mm)
18-1/2"
(470mm)
16-1/2"
(419mm)
C/L OF SEAT POST HOLES
5-1/2" (140mm CENTERS)
(419mm)
13-7/16"
(341mm)
13-13/16"
(351mm)
C/L OF OUTLET
16-1/2"
FINISHED
FLOOR
SUPPLY
AS
REQ'D
*10"
(254mm)
(152mm)
(483mm)
(356mm)
6"
(267mm)
19"
14"
10-1/2"
30-7/8"
(785mm)
Champion® PRO 2-piece Toilet 211CA Series Normal Height Elongated
1"
(26mm)
3-9/16"
(90mm)
FINISHED WALL
9-3/8"
(238mm)
12"
(305mm)
30-1/4"
(768mm)
9"
(230mm)
18-1/2"
(470mm)
C/L OF SEAT POST HOLES
5-1/2" (140mm CENTERS)
13-13/16"
(351mm)
C/L OF OUTLET
15"
(381mm)
FINISHED
FLOOR
SUPPLY
AS
REQ'D
*10"
(254mm)
(152mm)
19"
(483mm)
14"
(356mm)
29-3/8"
(747mm)
6"
10-1/2"
(267mm)
Before You Start:
Turn Off Water Supply
Recommended fitting type for
back-to-back installations.
If Removing An Existing Toilet
Flush to remove
water from tank;
sponge remaining
water from
bowl before
removing toilet.
BACK-TO-BACK INSTALLATION
Depending upon your plumbing and venting conditions, the flow from the Champion
back-to-back installation may create a vacuum on the system and draw water from the opposing
bowl. The National Standards Plumbing Code prohibits the use of a cross fitting for drainage as
throw over is possible. The code does approve a directional "Y" style fitting with proper venting to
direct the water downward and away from the other toilet.
Clean Flange
Caution: If leaving floor flange
!
open for more than 1-2 hours,
cover flange to prevent escaping
sewer gases.
®
PRO in a
1 2
- 2 -
Press firmly.
Wax Ring
(sold separately)
7301836-100 Rev. B
Page 3
3
4
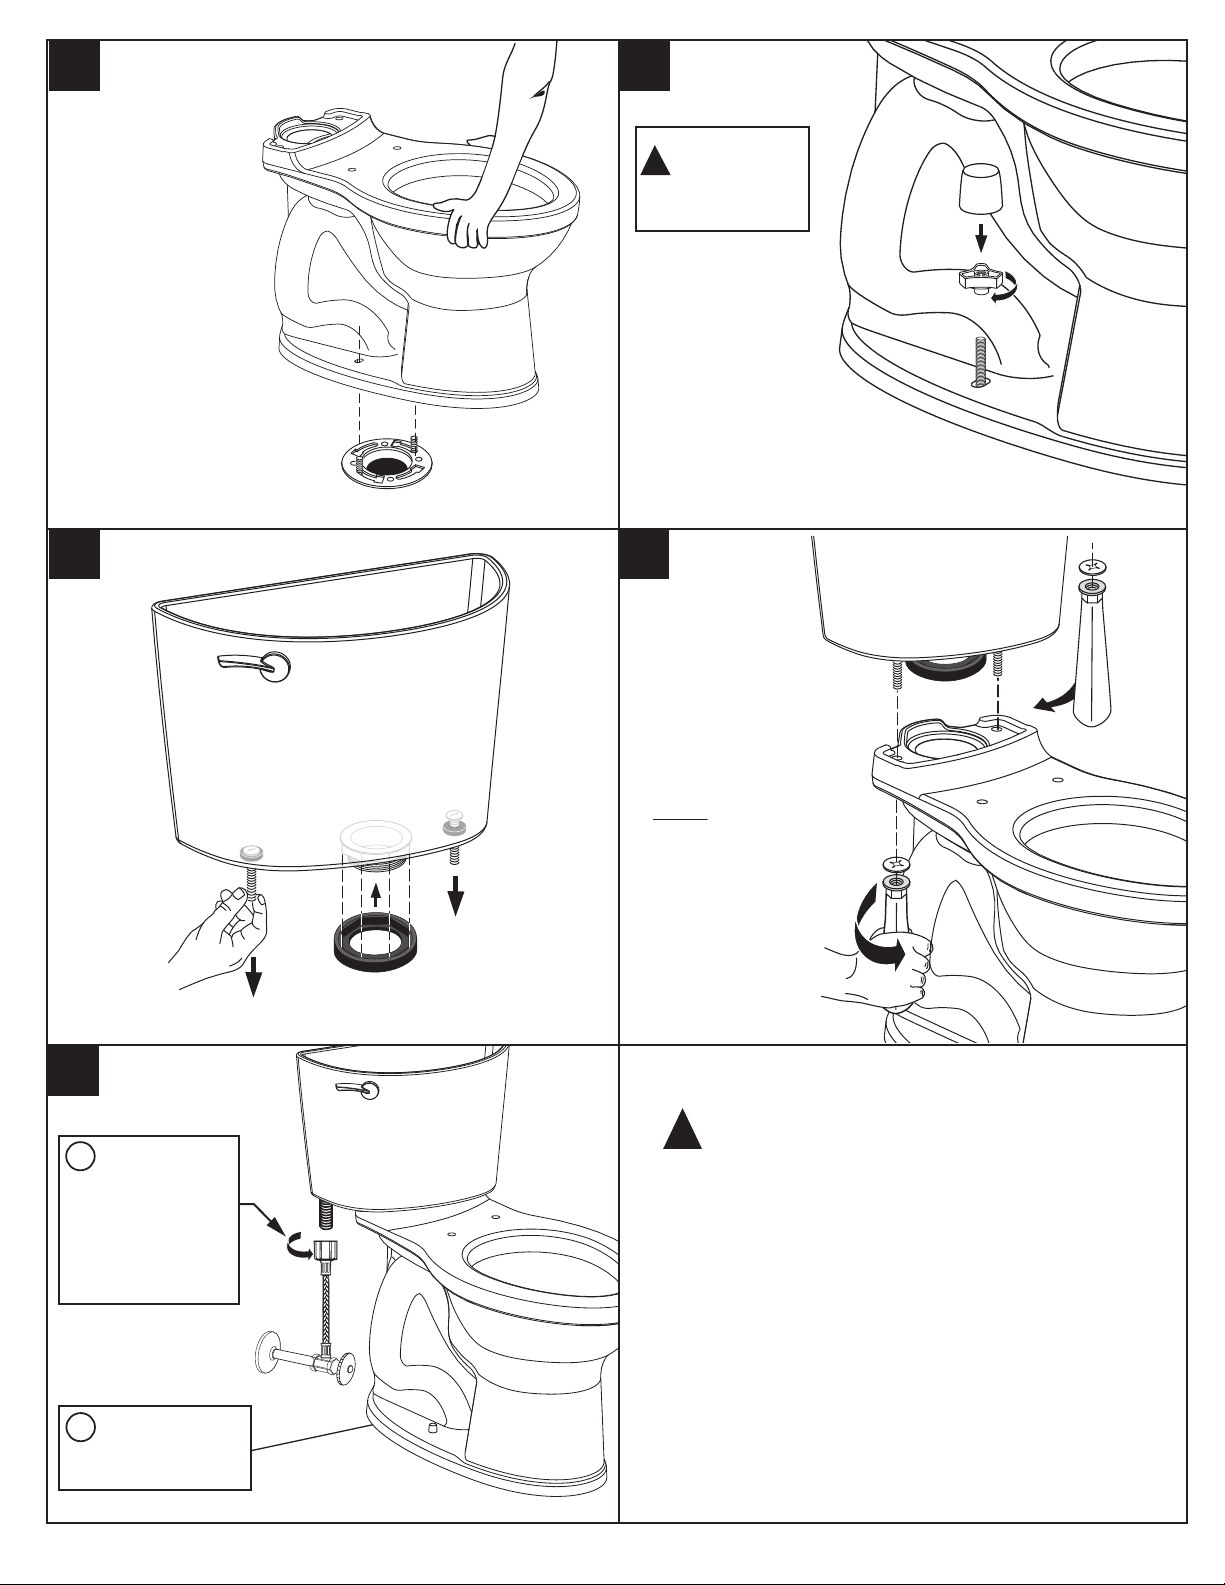
Apply weight evenly.
Do not move after
placement. Water
tight seal may break.
5
Hand tighten
!
only. Do not
overtighten.
6
Tighten handles
alternately until the
tank contacts the
front and back of the
bowl achieving
china-to-china
contact.
7
A
Connect water
supply line.
(Sold separately)
Hand tighten nut.
B
Turn on water supply.
NOTE: To ease
installation, push
down on the top of
the tank while
tightening handles.
WARNING: Overtightening of
!
water supply line nuts could
result in breakage and potential
flooding. If the connection leaks
after hand tightening, replace
the supply line. Do not use any
type of sealant on the water
supply connection. Use of
plumber’s putty, pipe dope, or
any other type of sealant will
void the warranty.
- 3 -
7301836-100 Rev. B
Page 4
8
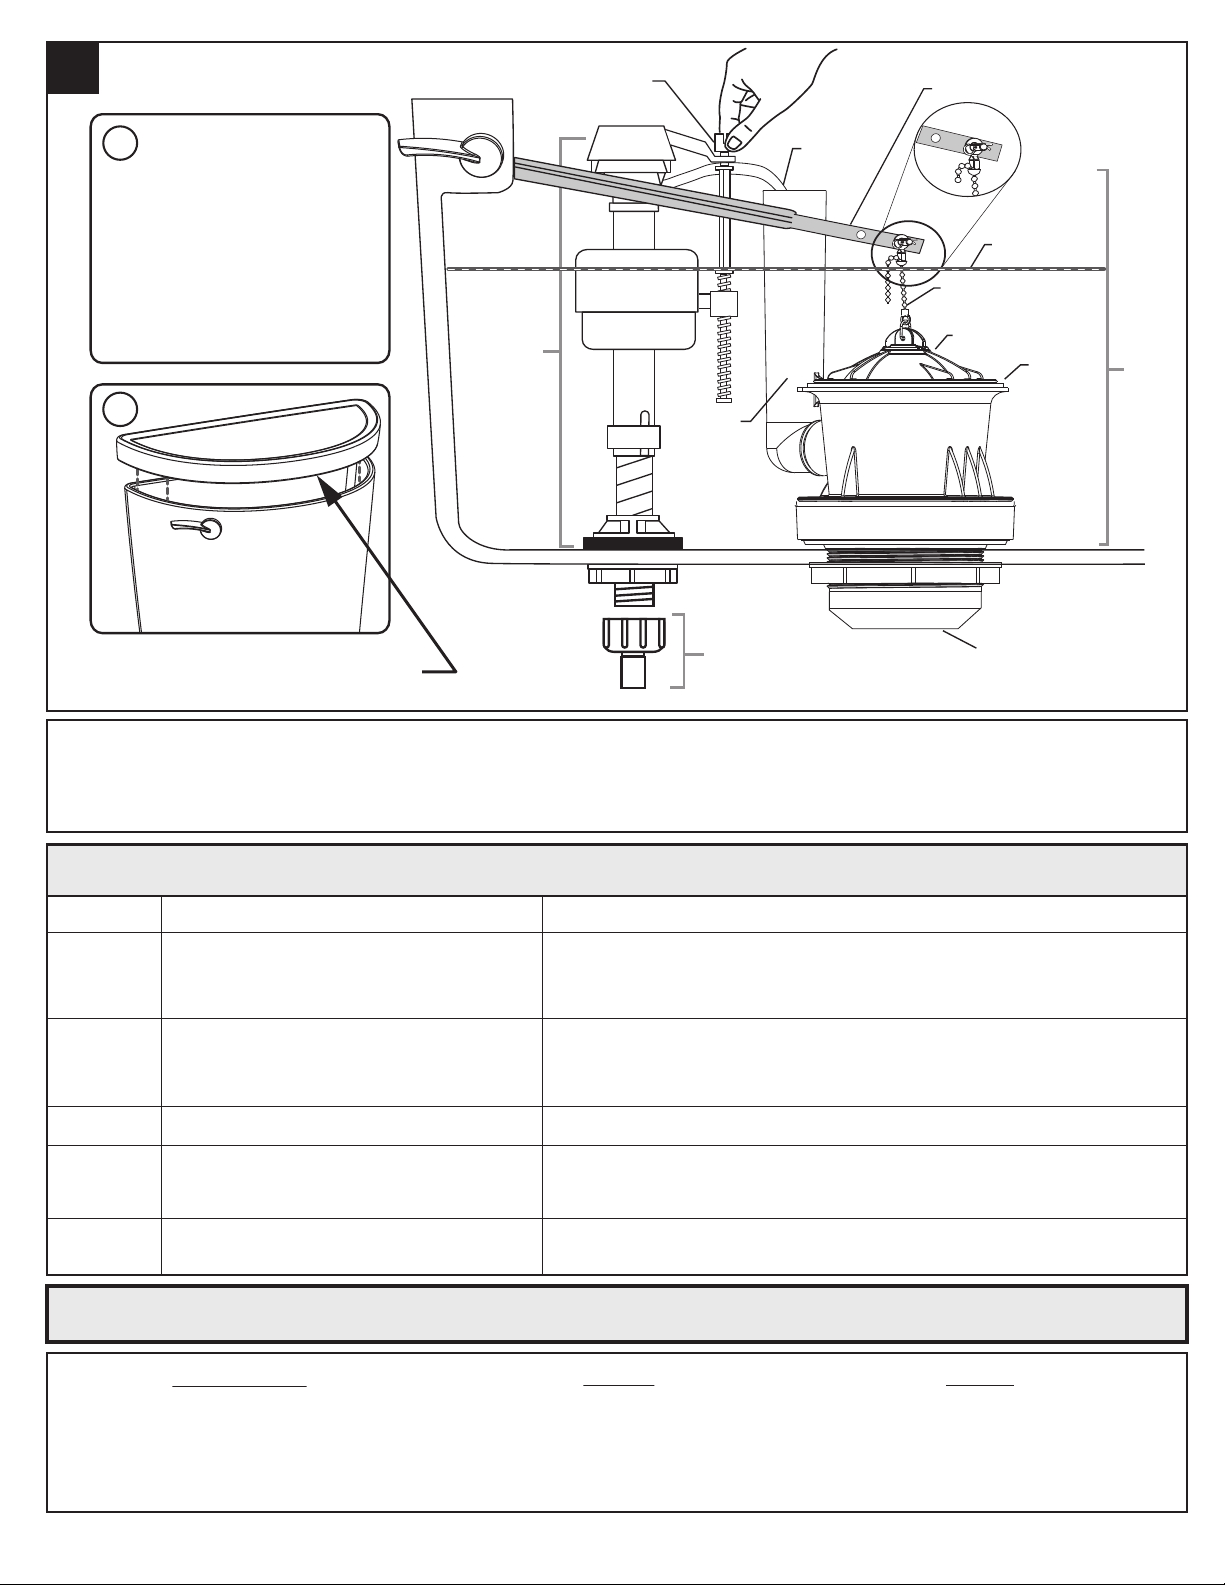
Water Level
Adjustment Knob
Trip Lever Rod
A
Adjust water level to level
indicated on tank by turning
water level adjustment knob
to move float cup up or down.
B
REPAIR PARTS LABEL
LOCATED UNDER TANK LID.
Fill Valve
Or Water
Control
Float Cup
Overflow
Tube
Water Supply Line
Refill Tube
Approximate
Water Level
Flush Valve Chain
Flapper
Flapper
Seal
Tank to Bowl Gasket
Flush
Val ve
CARE AND CLEANING
When cleaning your toilet, wash it with mild, soapy water, rinse thoroughly with clear water and dry with a soft cloth.
WARNING: Do not use in-tank cleaners. These products can seriously corrode fittings in the tank. This damage can cause leakage and property damage.
American Standard shall not be responsible or liable for any damage caused by the use of in-tank cleaners.
TROUBLESHOOTING GUIDE -
Problem Possible Cause Corrective Action
Does not flush
Poor or
sluggish flush
Toilet leaks
Toilet does not
shut off
Toilet bowl
rocks after
installation
a. Water supply valve closed.
b. Supply line blocked.
c. Flush valve chain too loose or disconnected.
d. Sand or debris lodged in water control.
a. Bowl water level too low.
b. Supply valve partly closed.
c. Partially clogged trapway and/or drain pipe and/or vent.
d. Supply pressure too low.
a. Poor supply line connection.
b. Poor bowl to tank/floor connection.
a. Flapper seal leaking or deformed.
b. Sand or debris lodged in water control.
c. Flush valve chain too tight, holding flapper open.
a. Wax ring not fully compressed.
b. Floor not level.
a. Open valve and allow water to fill tank.
b. Shut off water supply, disconnect supply line and inspect all gaskets and washers. Reassemble.
c. Readjust chain length as required.
d. Shut off water supply. Remove cap and clean as per Fluidmaster maintenance instructions at:
www.americanstandard-us.com/enews/fluidmasterguide.pdf
a. Check that refill tube is connected to water control and inserted into overflow tube without being
kinked or damaged.
b. Open supply valve fully. Be sure that proper supply tube size is used.
c. Remove obstruction. Consult a plumber if necessary.
d. Normal supply pressure must be at least 20 psi.
a. Review Step 7 of installation procedure.
b. Review Step 1 through 6 of installation procedure.
a. Clean debris from seal surface. Replace flapper seal as needed. See web for more info.
b. Shut off water supply. Remove cap and clean as per Fluidmaster maintenance instructions at:
www.americanstandard-us.com/enews/fluidmasterguide.pdf
c. Readjust chain length as needed.
a. Retighten bowl-to-floor knobs.
b. Use toilet shims and /or place a bead of caulk around the base of the toilet.
FOR REPAIR PARTS LIST, SEE LABEL UNDER TANK LID.
See Step 8 For Diagram
In the United States:
American Standard Brands
P.O. Box 6820
Piscataway, New Jersey 08855
Attention: Director of Customer Care
For residents of the United States, warranty
information may also be obtained by calling
the following toll free number: (800) 442-1902
www.americanstandard.com
In Canada:
AS Canada, ULC
5900 Avebury Rd.
Mississauga, Ontario
Canada L5R 3M3
Toll Free: (800) 387-0369
www.americanstandard.ca
- 4 -
American Standard B&K Mexico
www.americanstandard.com.mx
In Mexico:
S. de R.L. de C.V.
Via Morelos #330
Col. Santa Clara
Ecatepec 55540 Edo. Mexico
Toll Free: 01-800-839-1200
7301836-100 Rev. B
 Loading...