

American Range AROFSG-230, AROSG-30, AROFE0-30, AROSE-30, AROFFE-230 Installation, Use & Care Manual
...Page 1
INSTALLATION USE & CARE MANUAL
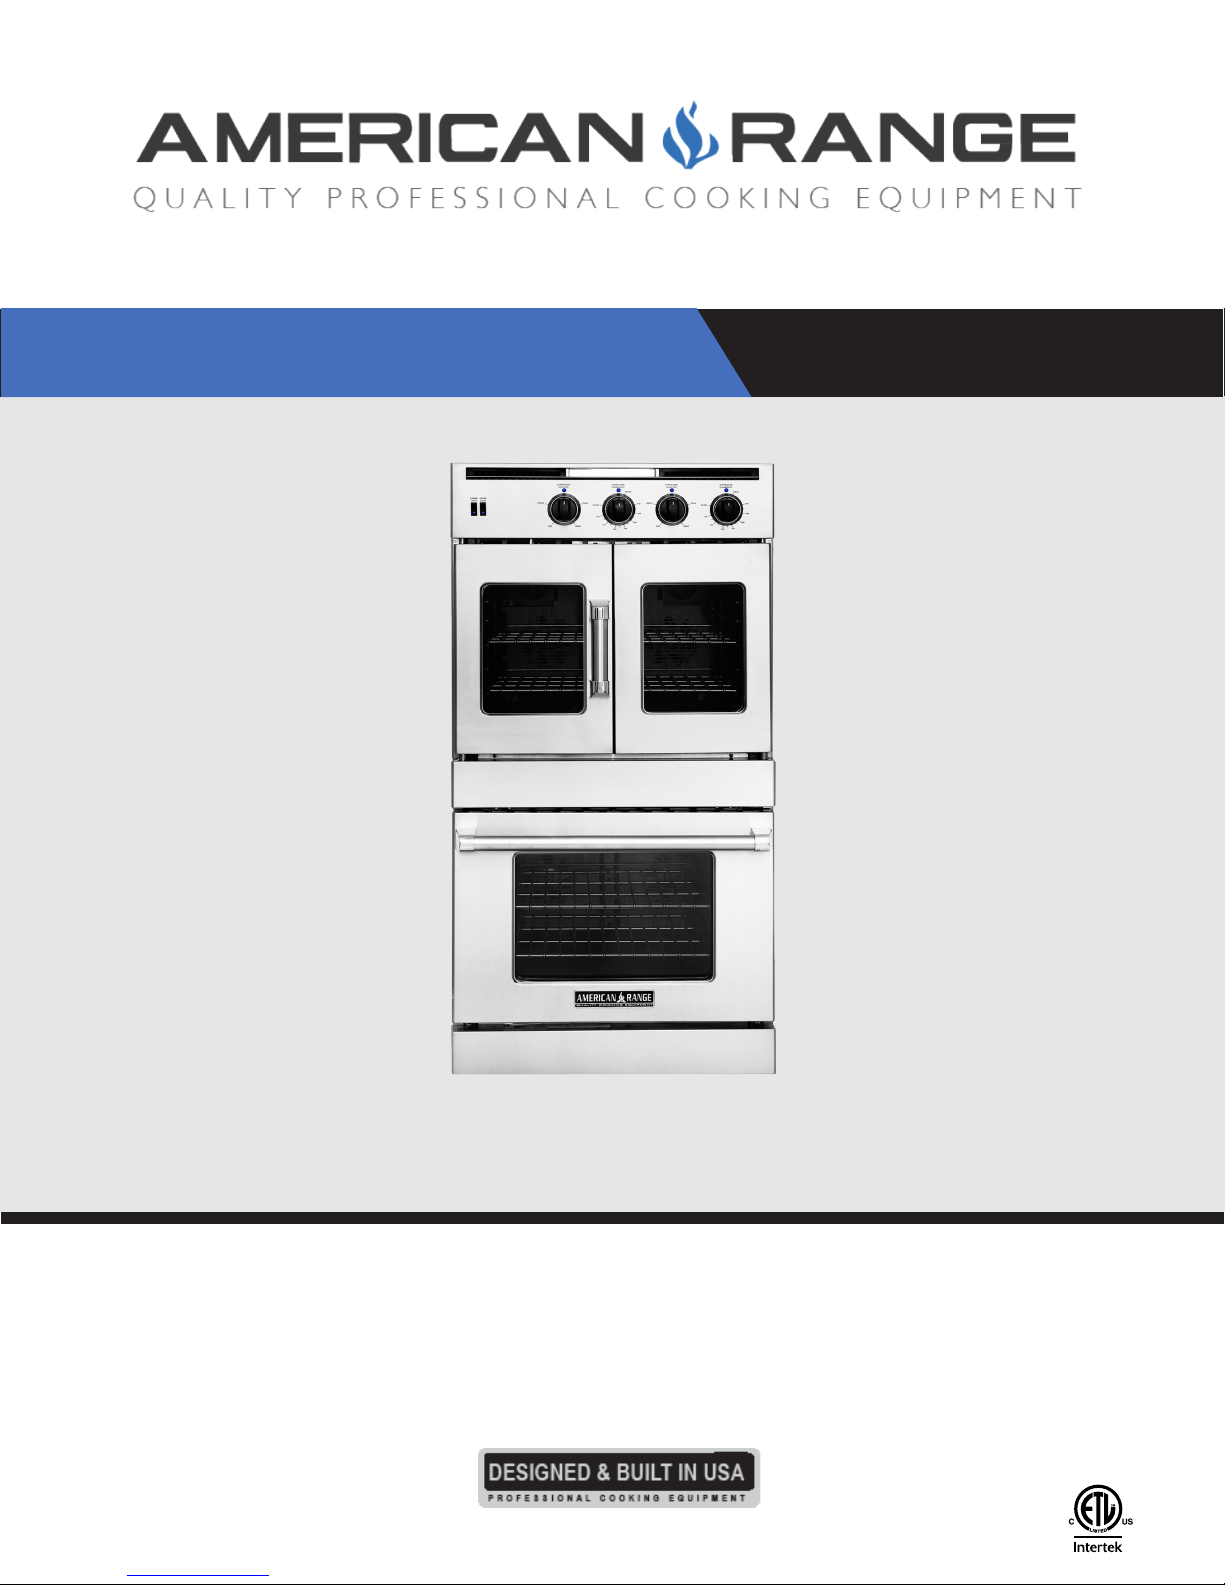
LEGACY WALL OVEN
GAS MODELS: AROFG-30, AROSG-30, AROFFG-230, AROSSG-230, AROFSG-230
ELECTRIC MODELS: AROFE0-30, AROSE-30, AROFFE-230, AROSSE-230, AROFSE-230
HYBRID MODELS: AROFFHGE-230, AROSSHGE-230, AROFSHGE-230
RETAIN THIS MANUAL FOR FUTURE REFERENCE
© 2017 American Range
All Rights Reserved
13592 Desmond St., Pacoima, CA 91331 - 818.897.0808 - 888.753.9898 - www.americanrange.com
BUILT-IN ELECTRIC, GAS SINGLE
AND DOUBLE WALL OVENS
Page 2

INSTALLATION & USE AND CARE MANUAL
WARNING
!
If the equipment is not installed, operated, and maintained in accordance with the above requirements, concentrations of carbon monoxide in excess of the
established limits could be present in the kitchen environment.
ALL PERSONNEL IN THE WORKPLACE WHO MAY BE SUBJECT TO ANY EXPOSURE OR CARBON MONOXIDE MUST BE WARNED OF
SUCH POSSIBLE EXPOSURE. THIS WARNING SHOULD BE CONVEYED IN A MANNER SO THAT IT IS CLEARLY UNDERSTOOD BY THE
EMPLOYEE. THE EMPLOYEE MUST BE ASKED IF IN FACT HE OR SHE UNDERSTANDS THE CORRECT METHOD OF OPERATION OF THE
EQUIPMENT AND THAT A RISK OF EXPOSURE EXISTS IF THE EQUIPMENT IS OPERATED IMPROPERLY.
CAUTION
!
Purchase a kitchen re extinguisher for your home and store it in close proximity to your appliance. Should an uncontrolled re occur, never use water on grease res.
Never pick up a aming pan. The oven door interior and exterior, especially the oven door glass can get hot during operation. Do not touch the glass - use the door
handle to open or close the range door.
The push-to-turn gas valve knobs on the appliance are designed to be child-safe, however, the are not a guarantee of operation. Children should not be left alone or
unattended in the kitchen while the appliance is in use. Never leave the appliance unattended during use.
NEVER wear loose tting or long sleeved apparel while cooking. Never wear garments made from ammable materials. Clothing may ignite or catch utensil handles.
DO NOT drape towel or other items on door handles. These items could ignite and cause burns.
ALWAYS place oven racks in the desired position before you start cooking and while the oven is cool. Always use dry and sturdy pot-holders to carefully slide the
oven rack out to add or remove food.
ALWAYS turn the appliance off at the end of cooking.
When dehydrating food items, periodically check during the process to ensure that they do not catch re.
Turn the knobs to the OFF position prior to removing them from the valve stems for cleaning.
WARNING
!
NEVER use this appliance as a space heater to heat or warm a room. Doing so may result in carbon monoxide poisoning and overheating of the appliance. Do not
use the range top or oven as a food or kitchen item storage area.
NEVER block or cover any slots, holes, or passages located anywhere inside or outside the appliance. These structures are impor tant to safe operation of the appliance
and doing so may block airow through the oven or cook top possibly causing carbon monoxide poisoning or re. Routinely keep all slots free of grease and other
materials.
This appliance has been tested for safe performance using conventional cookware. DO NOT USE any device or accessory not specically recommended in this
guide. DO NOT USE pan or pan covers on surface units, grills, or griddles. These units can create serious safety hazards including personal injury, create performance
problems, and may damage the appliance.
Do not store or use corrosive chemicals, vapors, ammables, or non-food products in or near this appliance. It is specically designed for use when heating or cooking
food. The use of corrosive chemicals while heating or cleaning could result in personal injury or damage to the appliance.
PRECAUTIONS
SHIPPING DAMAGE CLAIM PROCEDURE
The equipment is crafted and inspected carefully by skilled personnel before leaving the factory. The transportation company assumes full responsibility
for the safe delivery upon acceptance of the equipment.
If you receive a damaged product, immediately contact your delivery company, your dealer, your builder or installer. Do not install or attempt to
operate a damaged appliance.
1. Note on the freight bill or express delivery any visible loss or damage and have the note signed by the person making the delivery.
2. File claim for damages immediately regardless of the extent of damages.
3. For damage noticed after unpacking (concealed loss or damage), notify the transpor tation company immediately and le a "Concealed Damage"
claim with them. This should be done within fteen (5) days from the date that delivery is made to you. Retain the shipping container for inspection.
2 www.americanrange.com
Page 3
INSTALLATION & USE AND CARE MANUAL
!
!
!
FOR YOUR SAFETY!
Do not store or use gasoline or other ammable vapors or liquids in
the vicinity of this or any other appliance.
WARNING!
Improper installation, adjustment, alteration, service or maintenance can
cause property damage, injury or death. Read the installation, operating
and maintenance instructions thoroughly before installing or servicing
this equipment.
Instruction to be followed in the event the user smells gas should be
posted in a prominent location. This information should be obtained
by consulting the local gas supplier.
WHAT TO DO IF YOU SMELL GAS
• DO NOT try to light the appliance.
• DO NOT touch any electrical switch, DO NOT use any phone in your building.
• IMMEDIATELY call your gas company. Follow the gas supplier instructions.
• If you cannot reach your gas supplier, call the Fire Department.
IMPORTANT SERVICE NOTICE!
Using any part other than genuine American Range factory supplied parts relieves the manufacturer of all liability. American
Range reserves the right to change specications and product design without notice. Such revisions do not entitle the buyer
to corresponding changes, improvements, additions or replacements for the previously purchased equipment.
GENERAL INSTRUCTIONS
• Do not remove protective packaging until you are ready to perform the installation.
• Do not remove the protective wrapping from the product control panel until the product is installed.
• Use proper equipment to move products.
• Any openings in the wall and in the oor behind or under the appliance must be sealed.
WARNING
Do not use the handle or oven door to lift
the oven. Remove pull down door before
installation to ensure that it is not used to
lift the unit. Make sure pins are inserted into
hinges before removing door to prevent injury
to hands and / or ngers.
WARNING
Do not use an extension cord with this
appliance. Such use may result in re,
electrical shock or other personal injur y.
Please observe all local and national
codes and ordinances. Do not remove
any permanent warning labels or places
from this product.
The appliance is heavy. Use extreme
care when handling. Please ensure that
this product is electrically grounded.
Consumers should retain these
instructions for local inspector and for
future use.
CAUTION
INSTALLATION INSTRUCTIONS
• INSTALLATION AND SERVICE MUST BE PREFORMED BY A CERTIFIED / LICENCED INSTALLER, SERVICE AGENCY OR GAS SUPPLIER
• DO NOT store or use gasoline or other ammable vapors or liquids in the vicinity of this or any other appliance.
• Products are anchored to the wooden shipping pallet using metal straps that are screwed to the bottom of the product and the pallet.
• To remove the packaging, rst remove the staples located at the bottom perimeter of the corrugated cover.
• Remove the corrugated cover by lifting it off the product and remove the inner packing.
• Detach the product from the metal anchor strip by removing the attachment screw.
• Conrm available access to adequate power and gas. See Specications & Electrical Requirements table.
• Fill out page 1 of this installation manual with requested data. Model number and serial number can be found on the plate located underneath the
control panel on the front of the oven.
• The oven is zero-clearance safe against combustible surfaces.
• Provide 12” space between oor and bottom of the oven.
• Provide 4” space between top of the oven and bottom edge of cabinet doors.
www.americanrange.com 3
Page 4
!
!
!
!
!
!
INSTALLATION
IMPORTANT - PLEASE READ AND FOLLOW!
• Before beginning, please read all the instructions carefully.
• DO NOT remove permanently afxed labels, warnings, or plates from product. This may void the warranty.
• All local and national codes and ordinances must be observed; installation must conform with local codes.
• The Installer must leave these instructions with the consumer who should retain for local inspector’s use and for future reference.
• Installation and service must be performed by a qualied installer, service agency or gas supplier.
• Please ensure that the product is properly grounded.
Your safety and the safety of others is very important. We have provided many important safety messages in this manual and on your
appliance. Always read and obey all safety messages.
This is the SAFETY ALERT SYMBOL. This symbol alerts
you to hazards which will result in severe injury of death.
Hazards or unsafe practices which will result in severe
DANGER
personal injury or death.
LEGACY WALL OVEN
CAUTION
A ground fault interrupter (GFI) shall be used as required by NFPA-70 (National Electric Code), Federal / State / Local
laws or local ordinances.
• The required use of a GFI is normally related to the location of a receptacle to any signicant sources of water or moisture.
• American Range will not warranty any problems resulting from GFI outlets which are not installed properly or do not meet the
requirements below.
IF THE USE OF A GFI IS REQUIRED, it should be:
• The receptacle type (breaker type or portable type not recommended).
• Used with permanent wiring only (temporar y or portable wiring not recommended).
• On a dedicated circuit (no other receptacles, switches or loads in the circuit).
• Connected to a standard breaker or appropriate size (GFI breaker of the same size not recommended).
• Rated for class (5mA + 1mA trip current) as per UL 943 standard.
• In good condition and free from any loose-tting gaskets (if applicable in outdoor situations).
• Protected from moisture (water, steam, high humidity) as much as reasonably possible
WARNING
Hazards or unsafe practices which may result in minor
personal injury or property damage.
To prevent possible damage to cabinets and cabinet nishes, use only materials that will not
discolor or delaminate and will withstand temperatures up to 194ºF (90ºC). Heat resistant
adhesive must be used if the product is to be installed in laminated cabinetry. Check with your
builder or cabinet supplier to make sure that the materials meet these requirements.
WARNING
To avoid risk of electrical shock, personal injury or death; verify your appliance has been
DANGER
4 www.americanrange.com
properly grounded in accordance with local codes or in absence of codes, with the National
Electrical Code (NEC).ANSI/NFPA 70 latest edition.
The use of cabinets for storage above the oven may result in potential re
or burn hazard.
Page 5
!
!
!
!
!
INSTALLATION
IMPORTANT - PLEASE READ AND FOLLOW!
Do not use the handle or oven door to lift the oven. Remove pull down door before instal-
WARNING
WARNING
WARNING
WARNING
CAUTION
lation to ensure that it is not used to lift the unit. Make sure pins are inserted into hinges
before removing door to prevent injury to hands and / or ngers.
The misuse of the oven door(s) (e.g.; stepping, sitting, or leaning on them) can result in
hazard or injuries and damage to the product.
This appliance should not be used for space heating. This information is based
on safety considerations.
MOVING HAZARD
To avoid risk of severe personal injury; this appliance requires 2 or more
personnel while handling and moving. Use of a moving dolly is recommended.
LEGACY WALL OVEN
For personal safety, this appliance must be connected to a properly grounded and polarized electrical power supply. If only a
two-prong outlet is available, it is the customer’s responsibility to have it replaced with a dedicated, grounded, three-prong
electrical outlet by a licensed technician. The gas surface burner re-ignition system, when applicable, depends on a low resistance
electrical ground connection for reliable operation.
• Do not cut or remove the third (ground) prong from the power cord
• Do not use an adapter plug
• Do not use an extension cord
• Do not use a power cord that is frayed or damaged
• Do not plug the appliance into an electrical outlet with a Ground Fault Circuit Interrupter (GFCI)
WARRANTY REQUIREMENT
For reliable operation and for your own safety, this professional cooking equipment must be installed by
a certied/licensed contractor.
Failure to comply will void any written or implied warranty.
Should the equipment require service during the standard warranty period, the receipt proving certied
installation must be made available to American Range for verication.
If installation was not performed by a certied/licensed contractor, be prepared to submit a major credit
card for payment for proper installation prior to service.
• Please observe all local and national codes and ordinances.
• Do not remove any permanent warning labels or plates from this product.
• Please ensure that this product is electrically grounded.
• Consumers should retain these instructions for local inspectors and for future use.
www.americanrange.com 5
Page 6
INSTALLATION
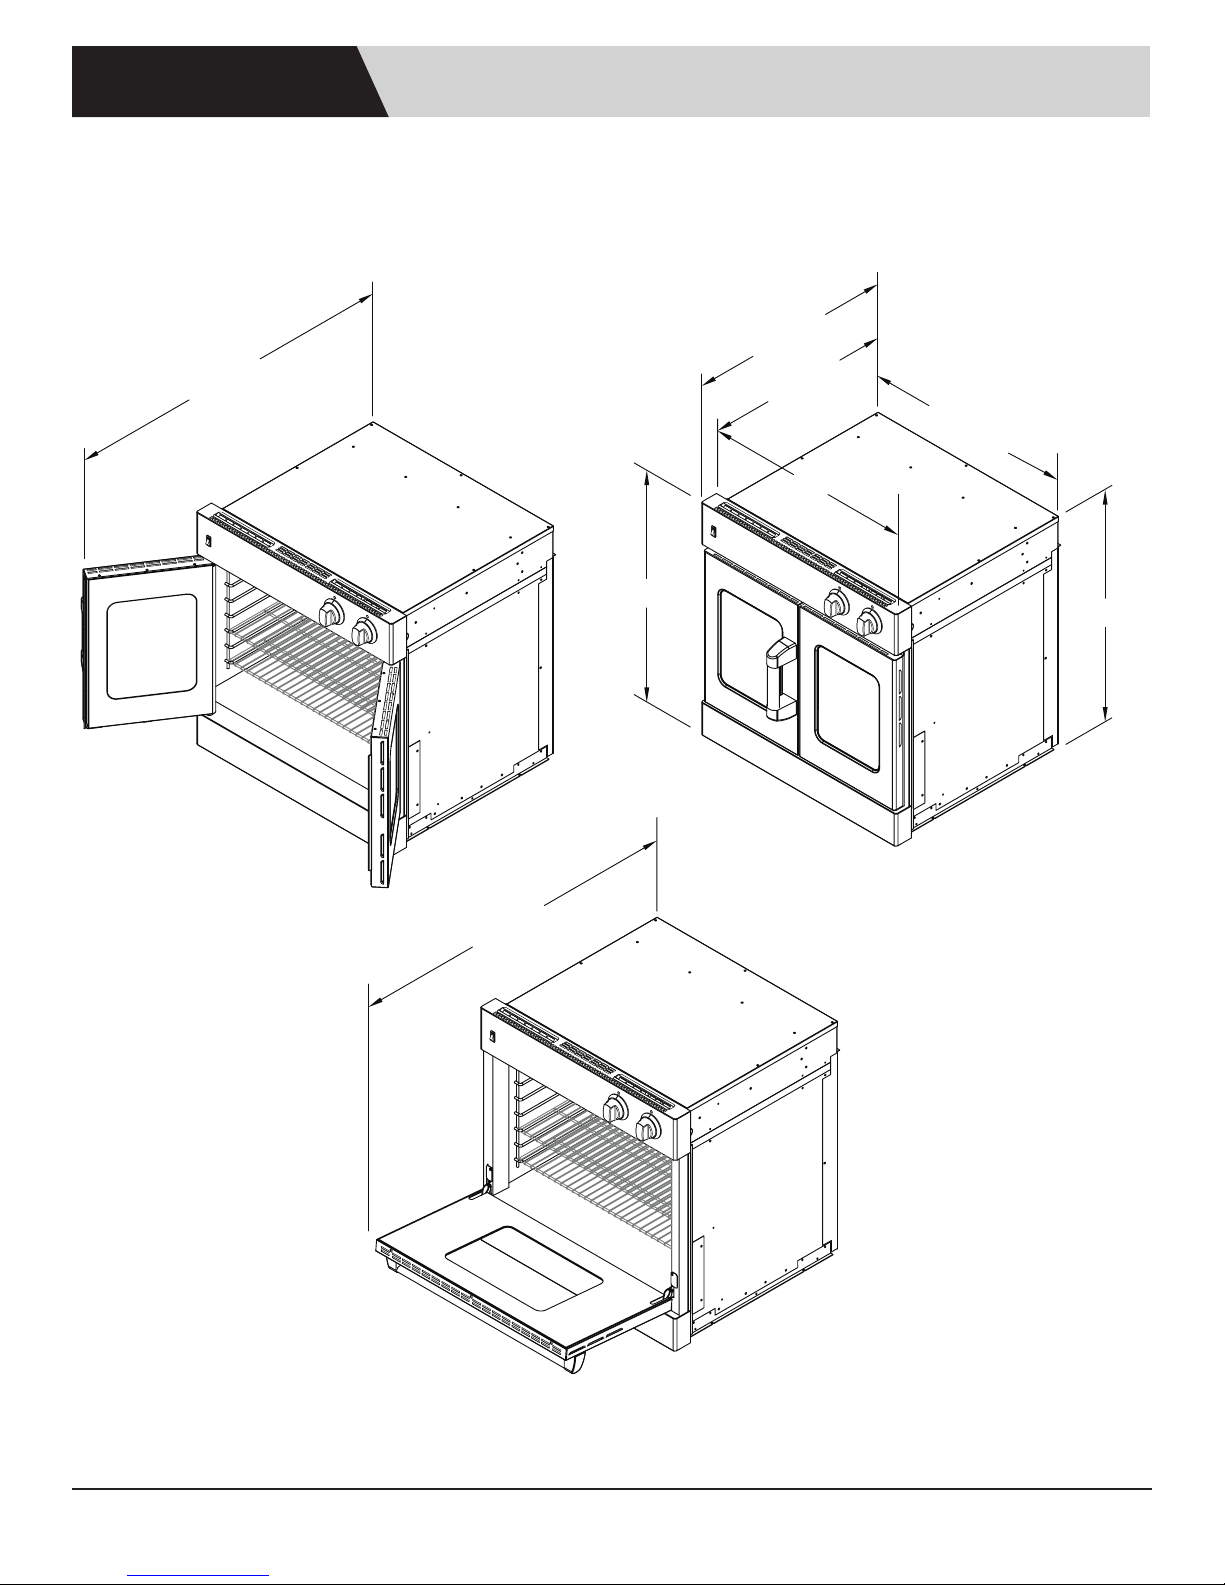
CUTOUT DIMENSIONS SINGLE WALL OVEN
26 -1/2"
39 -1/2"
French Door
24"
28 - 7/16"
30"
31-3/8"
31-1/8"
French Door
45 -1/4"
6 www.americanrange.com
Pull Down Door / Chef Door
Page 7
36
INSTALLATION
OPEN BOTTOM
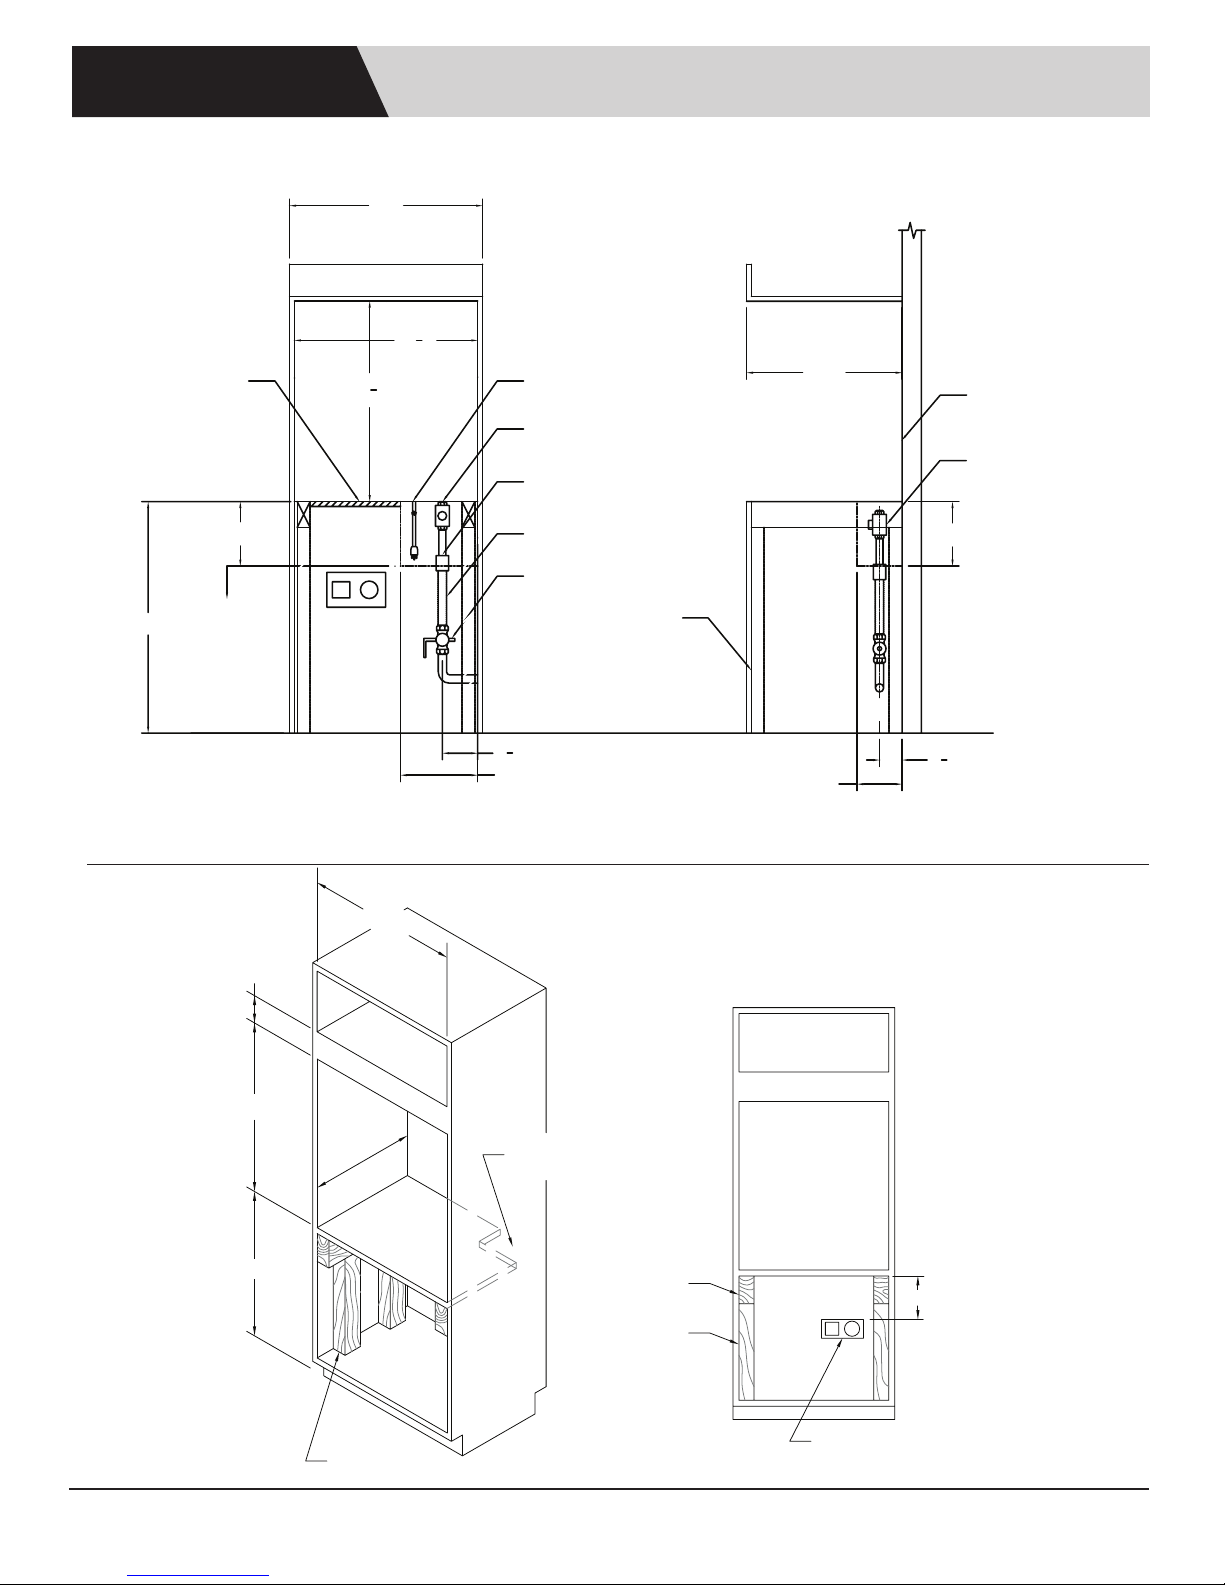
CUTOUT DIMENSIONS SINGLE WALL OVEN
30"
1
28
"
2
WIDTH
1
HEIGHT
31
"
4
ELECTRIC CORD
GAS INLET
COUPLING
24"
DEPTH
REAR WALL
GAS REGULATOR
10"
ELECTRIC GAS
ANYWHERE
BELOW THIS LINE
4" MIN.
31-1/4"
GE
28-1/2"
FLEX CONDUIT
SHUT-OFF VALVE
2 x 4 SUPPORT
FLOOR
1
5
"
2
12"
TO CLEAR REGULATOR
AND ELECTRIC CORD
TO CLEAR REGULATOR
AND ELECTRIC CORD
For all Single Wall Ovens
FOR OVEN SUPPORT, INSTALL 2" x 4" EXTENDING
FRONT TO BACK FLUSH WITH THE BOTTOM AND
THE SIDE OF THE OPENING. THE SUPPORTING
BASE MUST BE WELL SECURED TO THE
FLOOR/CABINET AND LEVEL.
TO CLEAR REGULATOR
10"
AND ELECTRIC CORD
C
L
CENTER LINE
1
3
"
2
7"
OF REGULATOR
SIDE VIEWFRONT VIEW
MIN. 24"
REC. 28-3/4"
2" x 4" SUPPORT
www.americanrange.com 7
6" x 6" OPENING FOR
GAS/ELEC. CONNECTIONS
2" x 4" SUPPORT
2" x 4" SUPPORT
MIN. 10"
EG
GAS/ELEC. LOCATION
Page 8
INSTALLATION
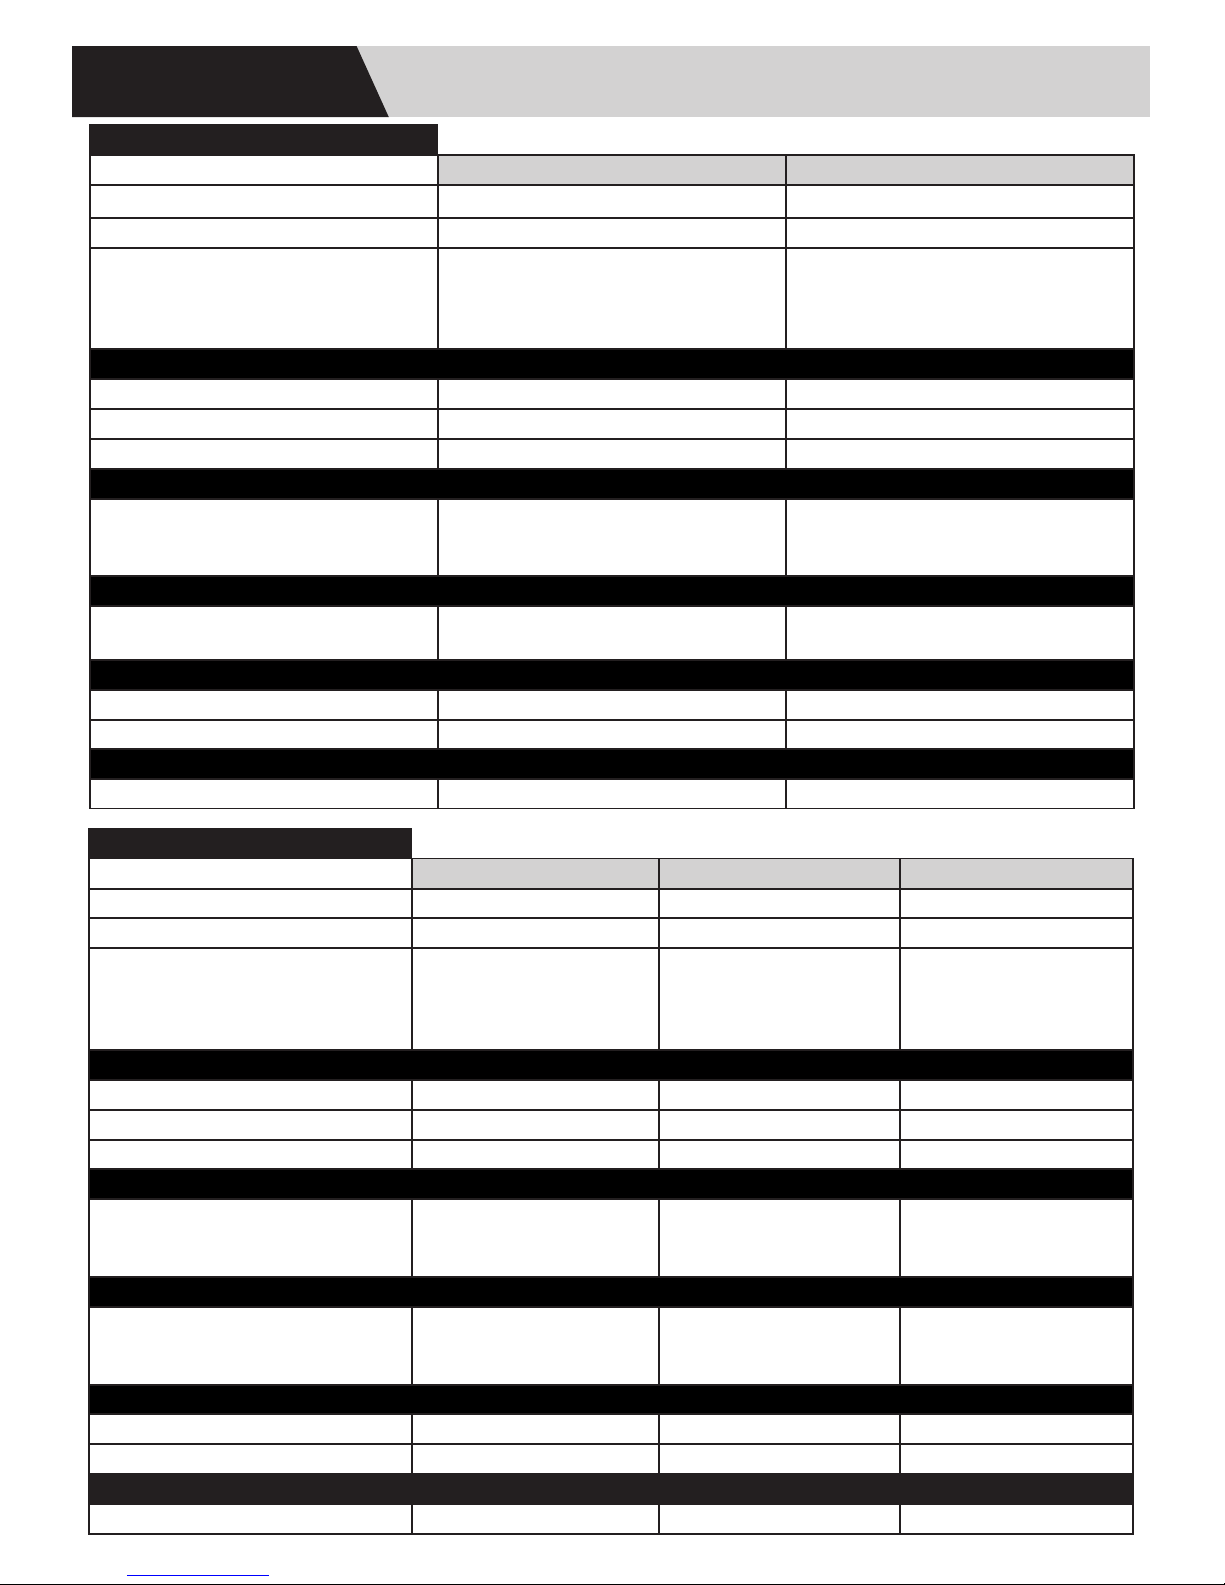
SINGLE WALL OVEN
Description
Overall Width 30” 30”
Overall Height 31-3/8” 31-3/8”
Overall Depth:
To the edge of control panel
With French Door open
With Chef Door open
Cutout Width 28-1/2” 28-1/2”
Cutout Height 31-1/4” 31-1/4”
Cutout Depth 24” min 24” min
SPECIFICATIONS & ELECTRICAL REQUIREMENTS
Gas Electric
26-1/2”
39-1/2”
45-1/4”
26-1/2”
39-1/2”
45-1/4”
Electrical Requirements 3-wire ground, 120 VAC /60 Hz, 15 AMP
Cord supplied. Fuse separately.
Gas requirements
Oven bake rating (gas / electric) 30,000 BTU 2200 WATTS
Broiler (gas / electric) 15,500 BTU infrared 3500 WATTS
Approximate Shipping Weight 304 Lb. 291 Lb.
DOUBLE WALL OVEN
Description
Overall Width 30” 30” 30”
Overall Height 58-5/8” 58-5/8” 58-5/8”
Overall Depth:
To the edge of control panel
With French Door open
With Chef Door open
NATURAL: 7” W.C., MAX 14” W.C., OR
PROPANE: 11” W.C., MAX 14” W.C.
DOUBLE WALL OVEN
Gas / Gas Electric / Electric Hybrid/Gas/Electric
26-1/2”
39-1/2”
45-1/4”
4-wire ground, 240 VAC, 35 AMP
electrical connection. Equipped with #10
ground wire in unit. Fuse seperately.
26-1/2”
39-1/2”
45-1/4”
N/A
26-1/2”
39-1/2”
45-1/4”
Cutout Width 28-1/2” 28-1/2” 28-1/2”
Cutout Height 57-1/2” 57-1/2” 57-1/2”
Cutout Depth 24” min 24 ” min 24 ” min
Electrical Requirements 120 VAC, 15 AMP. Fuse
Gas Requirements
Oven burner rating (gas / electric) 30,000 BTU (2) 2200 WATTS (2) 2,200 / 30,000 BTU
Infrared burner (gas / electric) 18,000 BTU (2) Infr. 3500 WATTS (2) 3,500 / 18,000 BTU Infr.
Approximate Shipping Weight 624 Lb. 597 Lb. 624 Lb.
8 www.americanrange.com
seperately. Cord supplied.
NATURAL: 7” W.C., MAX
14” W.C., OR PROPANE: 11”
W.C., MAX 14” W.C.
4-wire ground, 240 VAC, 60
AMP electrical connection.
Fuse separately.
240 VAC, 40 AMP. Fuse
separately.
NATURAL: 7” W.C., MAX
14” W.C., OR PROPANE:
11” W.C., MAX 14” W.C.
Page 9
INSTALLATION
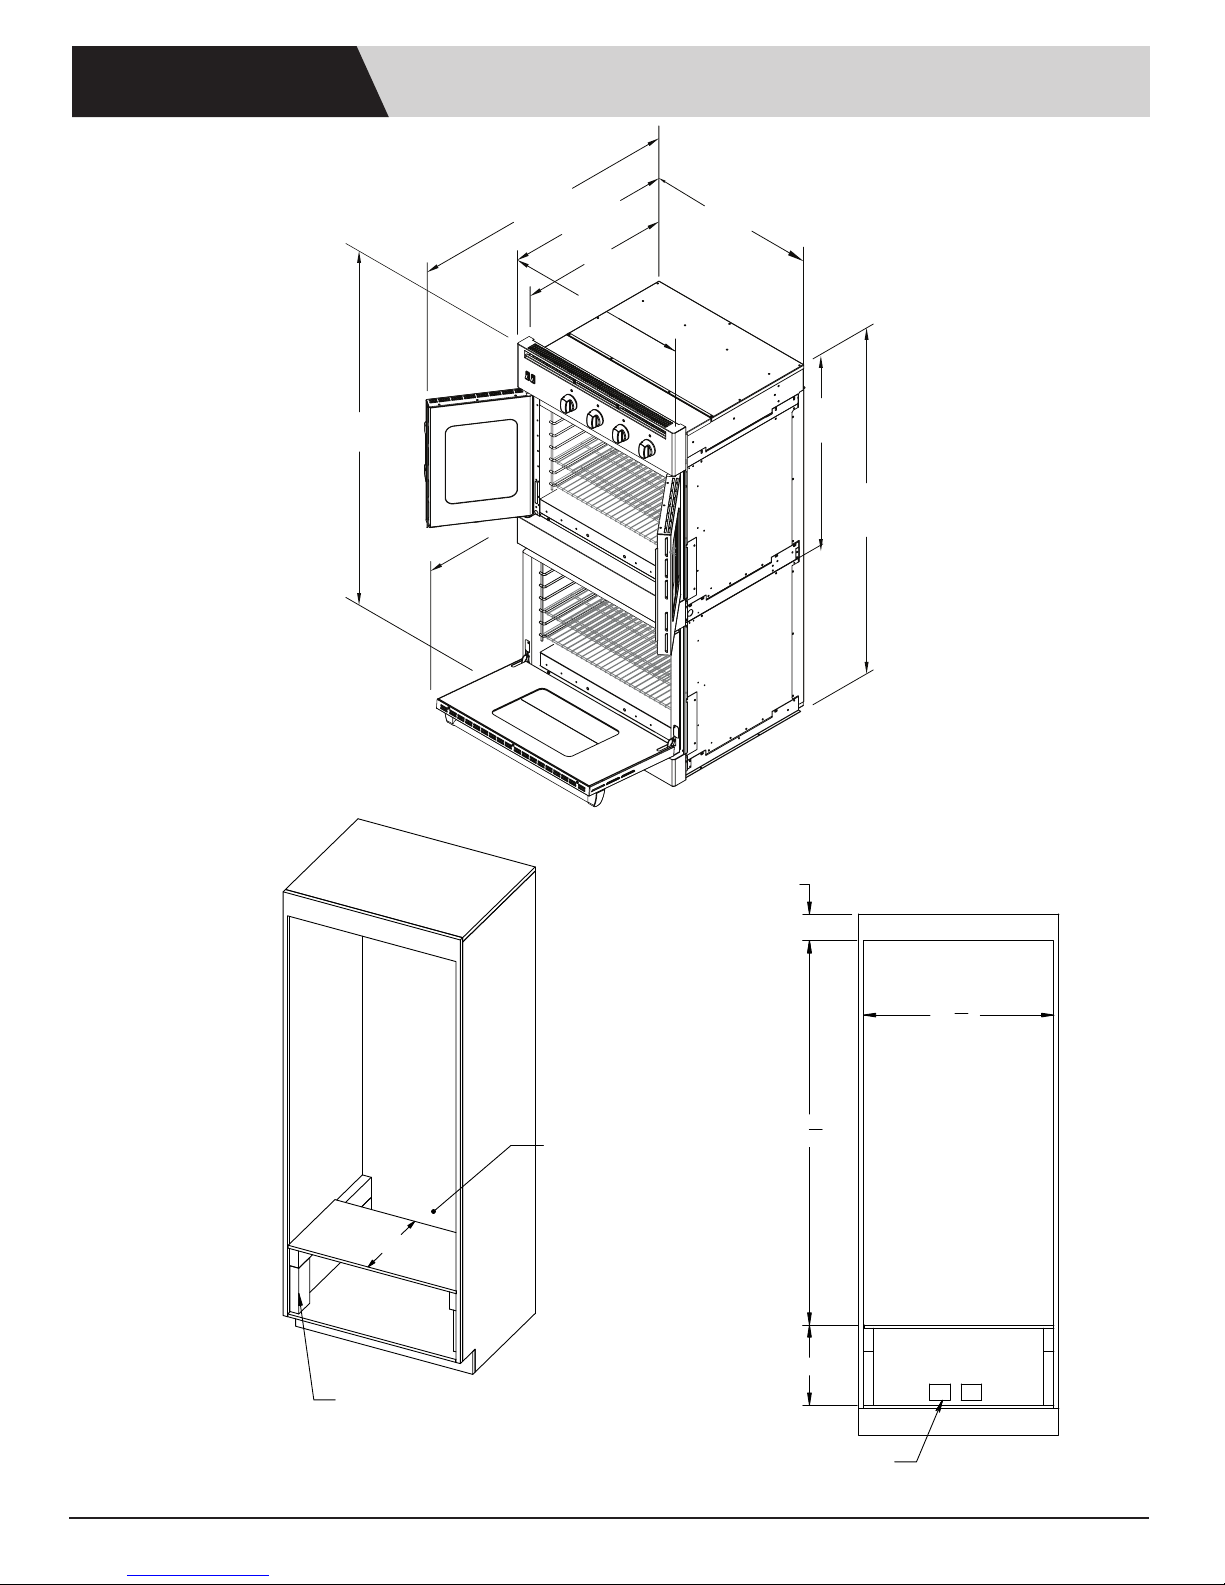
24"
Double Wall Oven
French Door on the top
Pull Down Door / Chef Door
on the bottom
58-5/8"
45 -1/4"
39 -1/2"
DIMENSIONS - DOUBLE WALL OVEN
28-1/2"
26 -1/2"
24"
30"
31-1/8"
single
56-7/8"
double
For all Double Wall Ovens
2" X 4" SIDE SUPPORTS
15" MIN
OPENING FOR
GAS FLEX CONDUIT
& POWER CORD
4" MIN
12"
1
28
"
2
1
" 57
2
GE
www.americanrange.com 9
GAS & ELECTRICAL
CONNECTIONS
Page 10
INSTALLATION
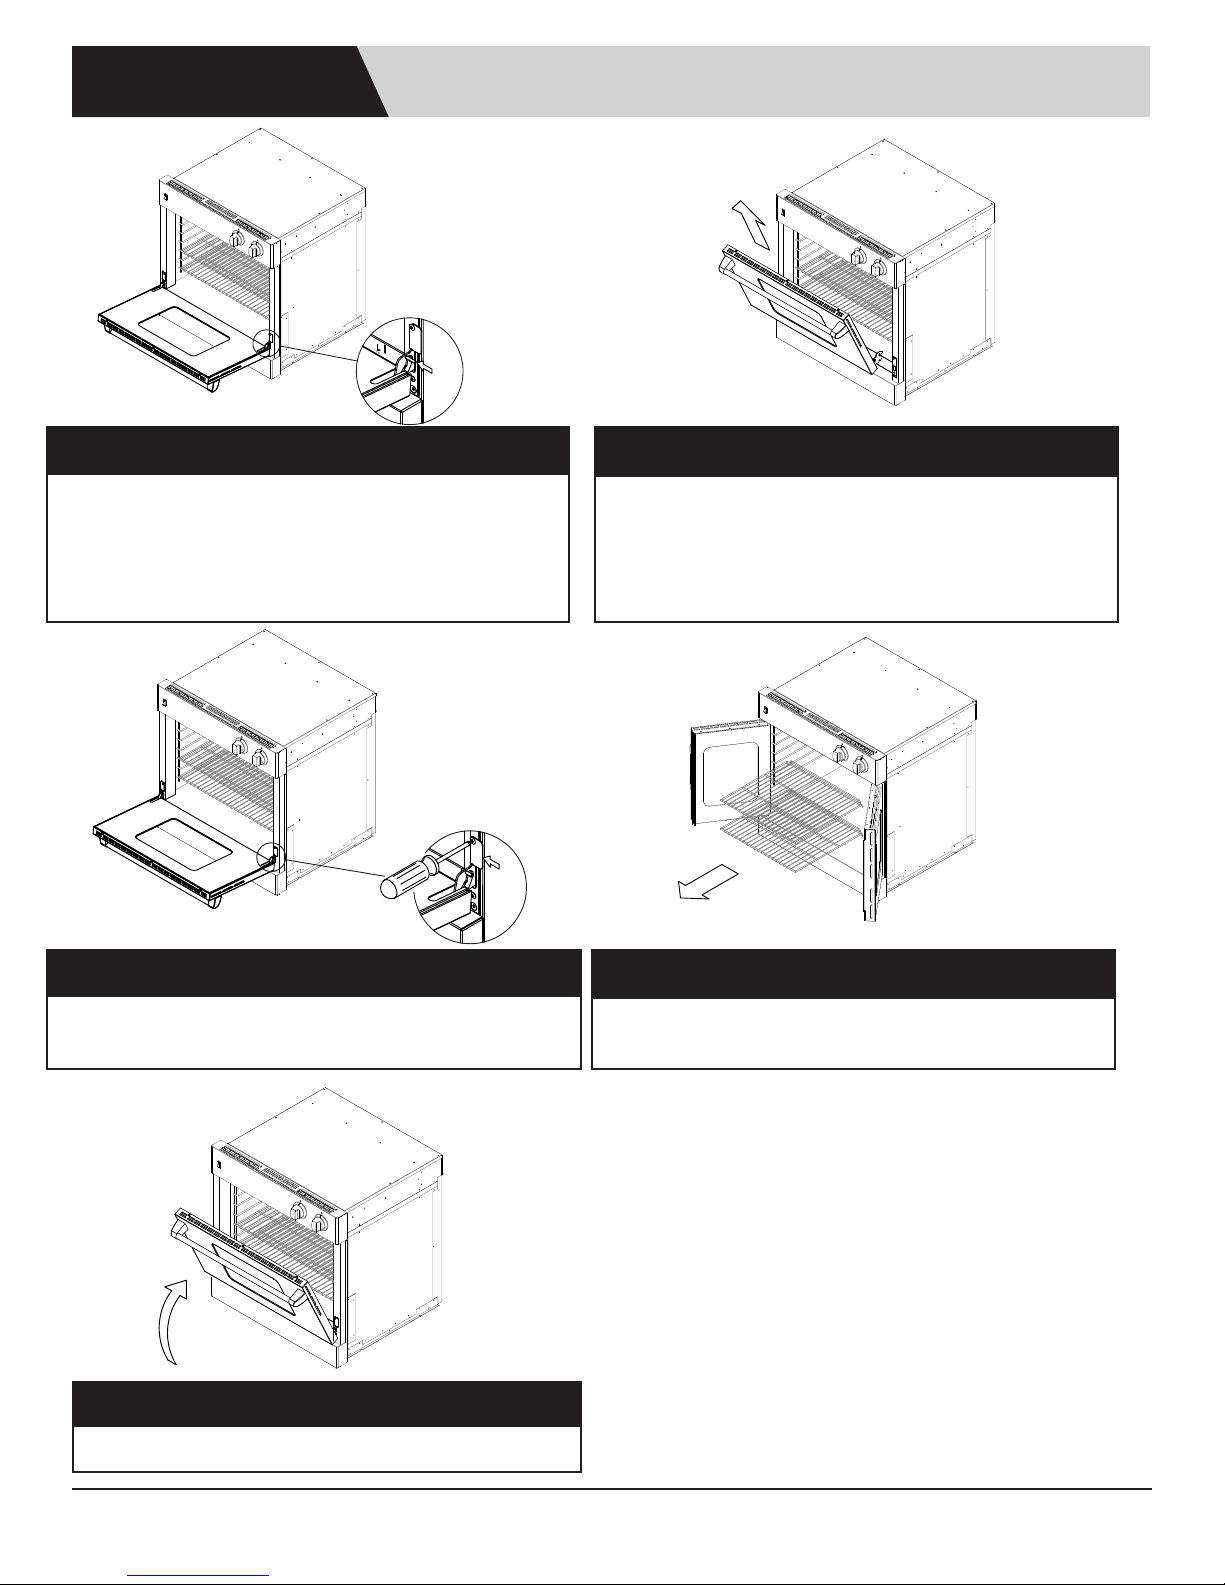
INSTALLATION INSTRUCTIONS
STEP 1
For “chef door” models, remove door(s).
NOTE: DO NOT REMOVE
FRENCH DOORS.
Open door completely. Place pins, supplied with unit in pin hole.
For personal safety, only use the pins supplied with the unit.
STEP 2
Remove hinge trim screws, take off hinge trim,
identify right and left hinge for future re-installation.
STEP 4
Lift door up and out. Do not use handle to lift door,
grab by the sides of the door.
STEP 5
Remove racks.
STEP 3
Softly close until the pins stop door.
10 www.americanrange.com
Page 11
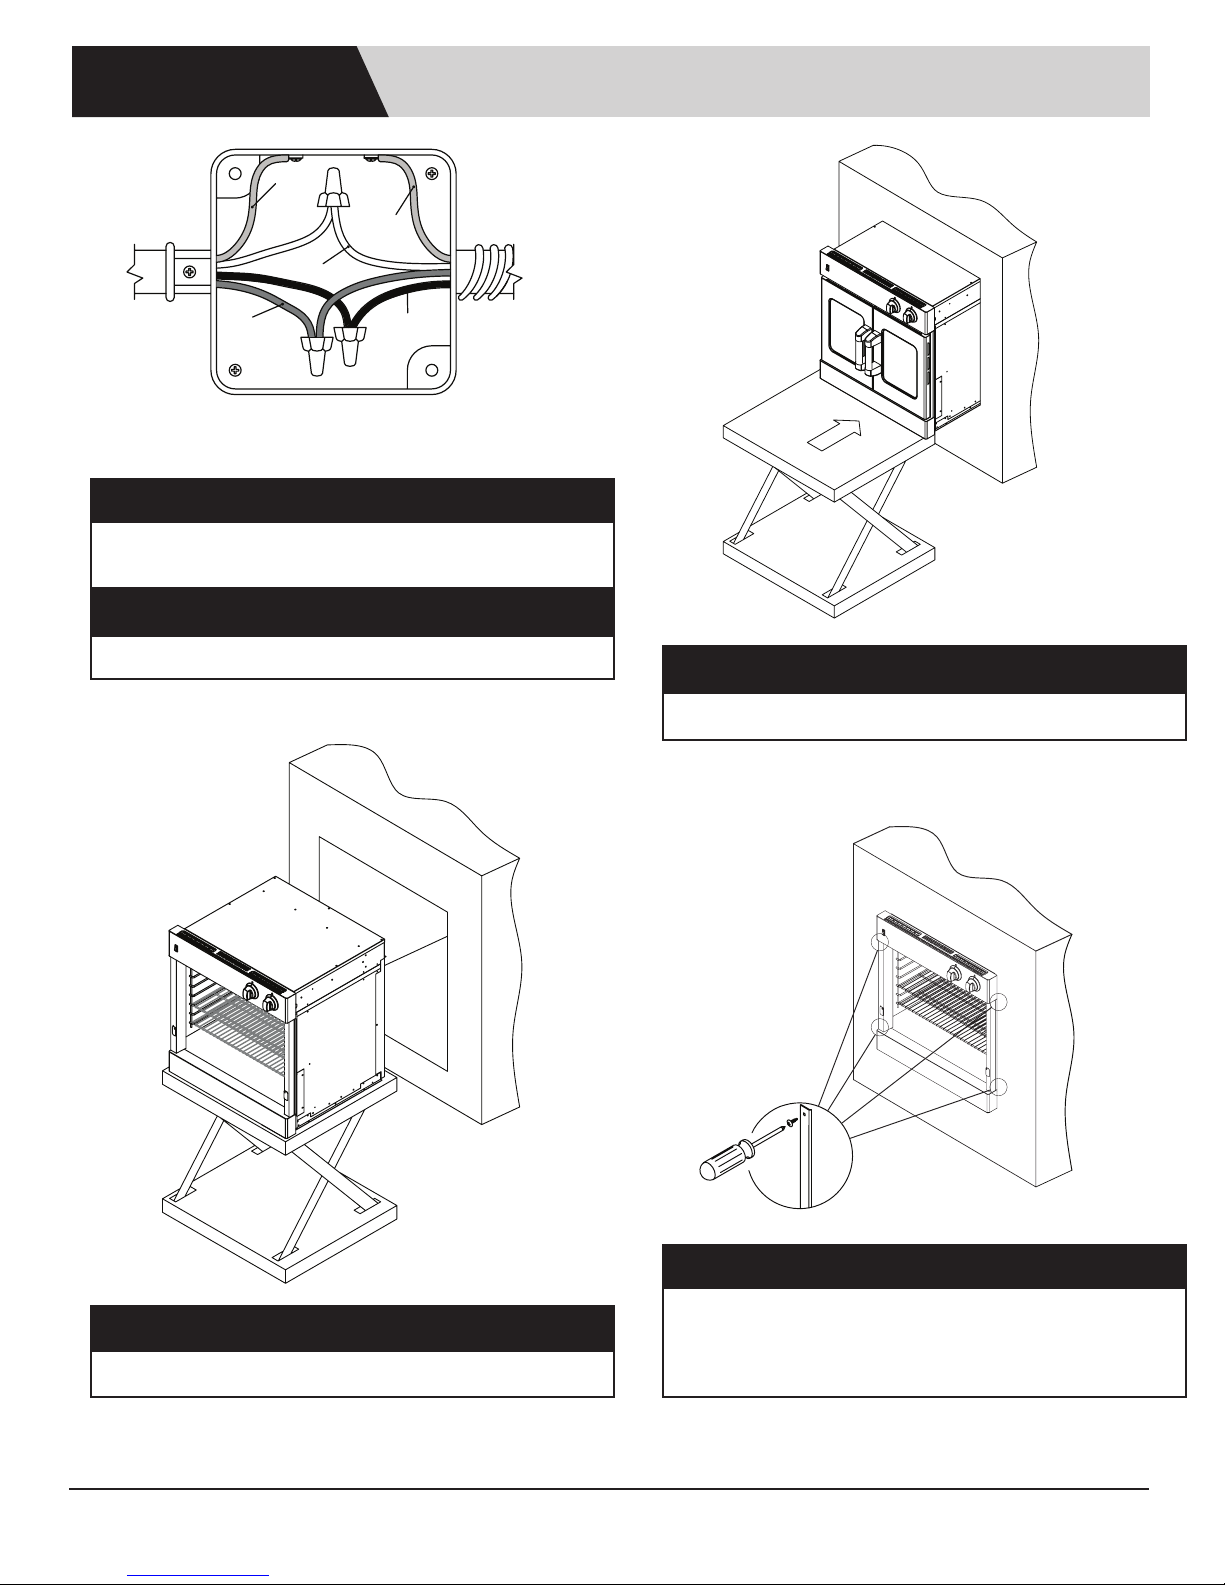
INSTALLATION
FROM OVEN
GREEN
WHITE
INSTALLATION INSTRUCTIONS
GREEN
RED
BLACK
Connect the white to the incoming neutral.
Attach green to the grounded junction box.
STEP 6
Place Oven in front of cabinet opening for access to
wiring.
STEP 7
Wiring option 1. Recommended.
STEP 9
Push oven straight in.
STEP 8
Lift oven into position.
www.americanrange.com 11
STEP 11
Attach the screws to the side trims.
NOTE: 4 screws are used for single wall oven,
4 screws are used for double wall oven.
Page 12
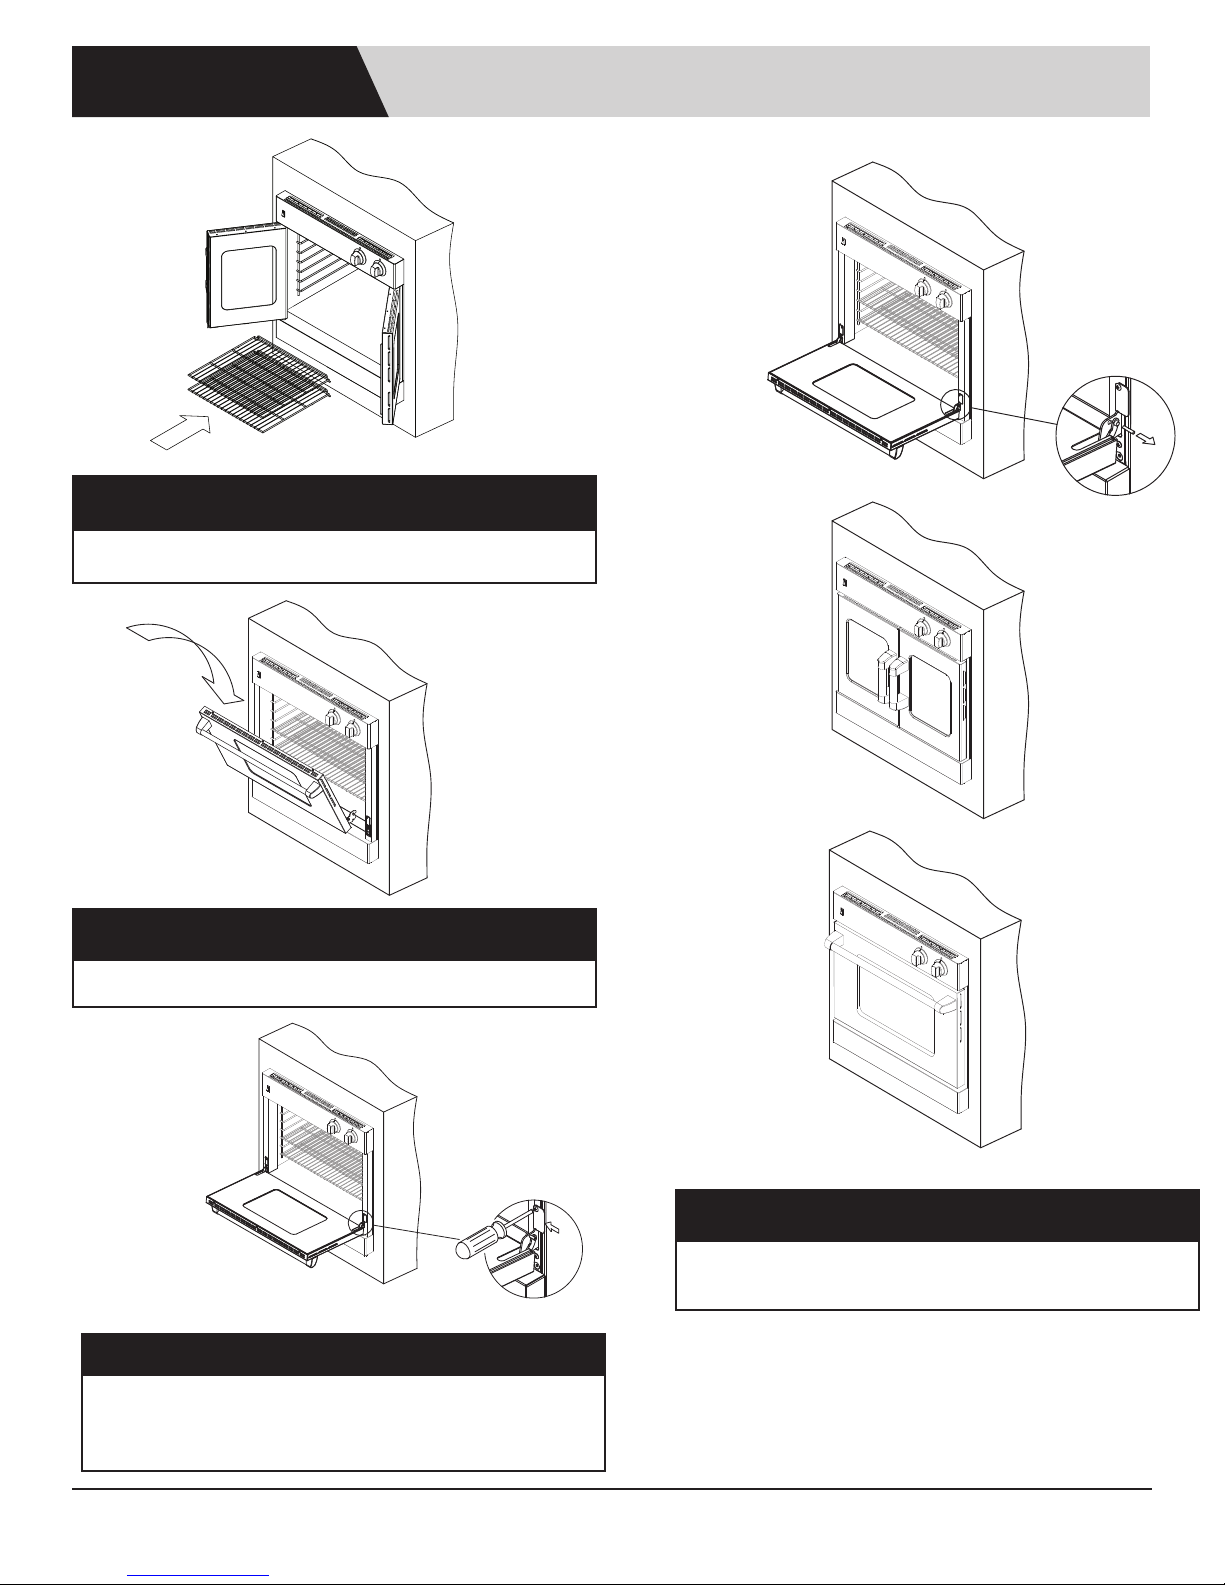
INSTALLATION
Replace racks.
INSTALLATION INSTRUCTIONS
STEP 12
STEP 13
Replace door.
STEP 14
Open door completely.
Put hinge trim plates back on.
Secure with screw.
STEP 15
Take out pins and close door. Save pins for future
use.
12 www.americanrange.com
Page 13
INSTALLATION
CAUTION
!
!
!
!
!
A qualied installer should carry out performance checklist the following checks:
0 Check operation of Bake at 350º. 0 Check operation of Convection Bake.
0 Check operation of Broil function. 0 Check operation of fan with open doors.
0 Check operation of oven. 0 Check operation of all indicator lights on control panel.
0 Check operation of proof function, if equipped. 0 Check knob rotation function for free and smooth turning.
PERFORMANCE CHECKLIST
FINAL PREPARATION & PRECAUTIONS
1. Some Stainless Steel parts may have a plastic protective wrap, which must be peeled off. All Stainless Steel body parts should be wiped with hot soapy water and
with liquid cleaner designed for this material. If build up occurs, do not use steel wool, abrasive cloths, cleaners or powders!!! If it is necessar y to scrape Stainless Steel
to remove encrusted materials, rst soak with hot, wet cloths to loosen the material, then use a wood or nylon scraper. Do not use a metal knife, spatula, or any other
metal tool to scrape Stainless Steel!!! Scratches are almost impossible to remove.
2. The interior of the oven should be washed thoroughly with hot, soapy water to remove lm residues and installation debris before being used for food preparation,
then rinsed and wiped dr y. Solutions stronger than soapy water are rarely needed.
Check your local building codes for proper installation methods. In the absence of local codes, this appliance should be installed in accordance with the National Fuel Gas Code No. Z223.1 current
issue, and the National Electrical Code ANSI/NFPA No. 70 current issue, or the CAN – B149 Installation Codes for Gas Burning Appliances, and C22.1 Canadian Electrical Code Part 1.
Verify the type of gas supplied to the location, being sure that the appliance is connected to the type of gas for which it is certied. Models come from the factory cer tied for use with Natural Gas
(NG) or Liquid Propane (LP) gas. Your product, shown on the rating label and the supplied gas type must be the same. Upon opening your product, the rating label can be located on the front panel
if it is a range or oven. If it is a cook top it can be found on the side panel underneath the left burner.
If connecting this appliance to propane gas, make certain the propane gas tank is equipped with its own high-pressure regulator - in addition to the pressure regulator supplied with this product, when
applicable. The maximum propane gas pressure to this appliance must not exceed 14.0 inches of water column (34.9 millibar) from the propane gas tank to the pressure regulator. Your appliance
must be installed by a qualied gas installation technician. Have the technician show you the exact location of the gas shut-off valve on the incoming gas line so you know how to turn off the gas, if
necessary.
CAUTION
For personal safety, this appliance must be connected to a properly grounded and polarized electrical power supply. If only a two-prong outlet is available, it is the customer’s responsibility to have it
replaced with a dedicated, grounded, three-prong electrical outlet by a licensed technician. The gas surface burner re-ignition system, when applicable, depends on a low resistance electrical ground
connection for reliable operation.
• Do not cut or remove the third (ground) prong from the power cord
• Do not use an adapter plug
• Do not use an extension cord
• Do not use a power cord that is frayed or damaged
• Do not plug the appliance into an electrical outlet with a Ground Fault Circuit Interrupter (GFCI)
DANGER
To avoid the possibility of explosion or re, do not store or use combustible, ammable or explosive liquids (such as gasoline) or vapors inside or in the vicinity of this or any other appliance. Keep
items that could explode, such as aerosol cans, away from the product. Do not store explosive or ammable materials in nearby cabinets or areas.
When operating the oven or broiler, do not touch the surfaces of the ceramic tile broiler, the rack or rack supports, the walls of the oven or the inside surfaces of the oven door - interior surfaces
become hot enough to cause burns. The heat deector, which deects heat away from the control panel, and the oven door sides will also be hot during use.
DANGER
Do not store items of interest to children above or near the appliance. Children, as well as adults, should never be allowed to sit, stand or climb on any part of the appliance. Serious personal injur y
may occur.
WARNING
Always disconnect the electrical plug from the wall outlet before servicing the unit. It is recommended that a dedicated electrical circuit be used for this appliance. Always turn gas shut-off valve to
OFF position before servicing unit.
If not installed, operated and maintained in accordance with the manufacturer's instructions, this product could expose you to fuel or fuel combustion substances, which can cause death
or serious illness, which are know to the State of California to cause cancer, birth defects or other reproductive harm.
The State of California enacted the California Safe Drinking Water and Toxic Enforcement Act of 1986, (Prop. 65), which "prohibits any person in the course of doing business from knowingly and
intentionally exposing any individual to a chemical know to the State of California to cause cancer or reproductive toxicity without rst giving clear and reasonable warning to such individuals." The
Governor's Scientic Advisory Panel added carbon monoxide to the list of hazardous chemicals known to cause reproductive harm.
In order to establish full compliance with Proposition 65, a yellow warning label has been attached to each gas-red unit manufactured by The Company.
Carbon monoxide would not be present in concentrations that would pose a "signicant risk" to the consumer when the equipment is installed, operated and maintained as follows:
1. Installed in accordance with all local codes, or in the absence of local codes, with the current National Fuel Gas Code ANSIZ223.1 Latest Addenda.
2. Installed under a properly designed and operating exhaust hood.
3. Connected to the type of gas for which the unit is equipped.
4. Proper appliance pressure regulator installed on the gas supply line and adjusted for the manifold pressure marked on the rating plate.
5. Adequate air supply to the unit.
6. The equipment is operated in a manner intended and using the proper utensil for that type of appliance.
7. Keep the equipment clean and have it checked periodically.
8. Burner air adjustments, mechanical maintenance and repairs must be performed by qualied service personnel.
WARNING
www.americanrange.com 13
Page 14

USE AND CARE MANUAL
LIMITED EXPRESS WARRANTY
Effective June 1, 2013, American Range (hereafter AMR) hereby provides the following limited express warranty (“Warranty”) to the original residential user (“Owner”) for its new RESIDENTIAL Product(s) to be free from defects in material and workmanship in the normal household use for the Warranty period(s) set forth below, beginning from the date of purchase
under the terms and conditions as follows:
This Warranty is applicable only on new AMR residential Products and is non-transferrable. This Warranty is not applicable to AMR Commercial Products. This Warranty is strictly
limited to Products sold to the original Owner in the United States or Canada, and said Owner shall not be entitled to transfer this Warranty to third parties. This Warranty is also not ap-
plicable on AMR Residential Products that are used for commercial purposes, including without limitation, vacation rentals, clubs, government facilities, non-prot groups, bed and breakfast
facilities, and board and care facilities.
Warranty Period: In the event that Owner fails to promptly register the Product(s) with AMR within ninety (90) days of the date of purchase, the Warranty period shall be strictly limited
to a period of one-year for parts and labor, from the date of purchase. Proof of purchase is required for all claims under this Warranty.
However, for all Products registered with AMR, with proof of purchase, and within ninety days from the date of purchase, the Warranty period shall be for a period of
Three (3) Years from the date of purchase, subject to the terms and conditions herein.
In addition, for all Products properly registered with AMR, as set forth within this Warranty, the following parts only shall have a limited lifetime warranty subject to the terms and conditions
herein, for the life of the Product(s).
Knobs, Chrome Racks, Cast Iron Grates, aeration drip pan for Performer Series only (ARROB), Grease Can for use with grill and griddles, Sealed and Open burner heads only, and Laser
Etched Control Panel Graphics.
Owner shall be responsible to pay $25.00 per each knob ($35.00 USD per each knob for claims from Canada), and $35.00 per each rack, grate, drip pan, grease can, burner head, and laser
etched graphic ($45.00 USD per each such item for claims from Canada) for shipping and handling of each such ordered part (per item) to be replaced under this Warranty.
After the limited Warranty period, Owner shall be responsible for all labor costs under the limited lifetime warranty.
Exceptions to the Warranty: Rubber seals, light bulbs, and gaskets are covered for a period of ninety (90) days only. Oven glass, porcelain, and Products that are not defective, but that
require adjustments for normal wear and tear are expressly excluded from this Warranty.
WARRANTY
Warranty Claims:
In the event of a claim for repair of the Product(s), and to obtain warranty ser vice, Owner must contact either (i) the dealer from whom the product was purchased; (ii) an authorized AMR
service agent; or (iii) an AMR Residential service support at 1-888-753- 9898. You will be asked to provide a model, serial number, and date of original purchase.
AMR shall provide all new replacement parts and all repair labor under the Warranty.
Under the terms of this Warranty, service must be performed by a factory authorized AMR service agent/representative, and approved in advance by AMR. AMR shall not be responsible for
labor costs that have not been pre-approved, with written conrmation by AMR. All repair services shall be provided during normal business hours. AMR will not be responsible for premium
time or overtime charges for labor covered under this Warranty or for repairs made without AMR authorization. Such charges shall be the responsibility of the Owner.
Limitation of Warranty: AMR shall have no obligation under this Warranty as to any Product(s) which have been misapplied, mishandled, abused, misused, modied, altered, subject to
improper cleaning methods, subject to harsh chemical action, modied by unauthorized service per sonnel, damaged by accidents, ood, re, smoke, public unrest, earthquake, tornado, hurricane, other acts of God, Owner negligence, reasons beyond the control of AMR, failures due to improper installation, insufcient gas or electrical supply, problems due to improper ventila-
tion, or removed/altered serial numbers, Any damage due to water, chemical, or direct contact to infrared burners will also not be covered under this Warranty. This Warranty shall be void if
the Product(s) are not properly installed by a licensed plumber, and not properly calibrated for electrical and gas connectivity, gas line size, correct pressure, and properly leveled. Additionally,
AMR factory recommended cleaning instructions must be followed by Owner at all times or this Warranty shall be voided by AMR.
Dealer display, model home display and products sold “as-is” have the following warranty:
• 1-year parts only warranty, if the manufacture date is less than 3 years old.
• Excludes items that are: missing, cracked, aesthetic, broken, dented, frayed.
• All delivery, installation, labor costs and other service costs are the responsibility of the purchaser.
THIS WARRANTY IS LIMITED AND MADE IN LIEU OF ANY AND ALL OTHER SUCH WARRANTIES EXPRESSED OR IMPLIED, INCLUDING WITHOUT LIMITATION, ANY IMPLIED
WARRANTY OF MERCHANTABILITY OR FITNESS FOR A PARTICULAR PURPOSE. THE ENTIRE LIABILITY OF AMR IS SET FORTH HEREIN THIS WARRANTY. OWNER SPECIFI-
CALLY UNDERSTANDS AND ACKNOWLEDGES THAT THERE ARE NO WARRANTIES, EITHER EXPRESSED OR IMPLIED HEREUNDER OTHER THAN THE WARRANTIES WHICH
ARE SPECIFICALLY STATED HEREIN. SAID OWNER SHALL NOT RELY ON ANY OTHER ASSERTIONS, REPRESENTATIONS OR STATEMENTS BY AMR OR ITS AGENTS, OTHER
THAN THOSE SPECIFICALLY EXPRESSED IN THIS WARRANTY.
Failure by AMR to enforce any of its rights under this Warranty shall not be construed as a waiver of those rights. AMR specically reserves the right to investigate and verify all claims to determine the validity of the claim and the claimant’s qualications under this Warranty. AMR reserves the right to refuse Warranty ser vice in the event that AMR determines that a claimant’s
right to the Warranty is inapplicable under the terms and conditions herein.
AMR is not responsible for consequential or incidental damage whether arising out of breach of warranty, breach of contract, tort, or any other legal theory, including without limitation,
property damage, bodily injury, loss of use, and/or lost prots.
14 www.americanrange.com
Page 15
USE & CARE MANUAL
MODEL AND PARTS IDENTIFICATION
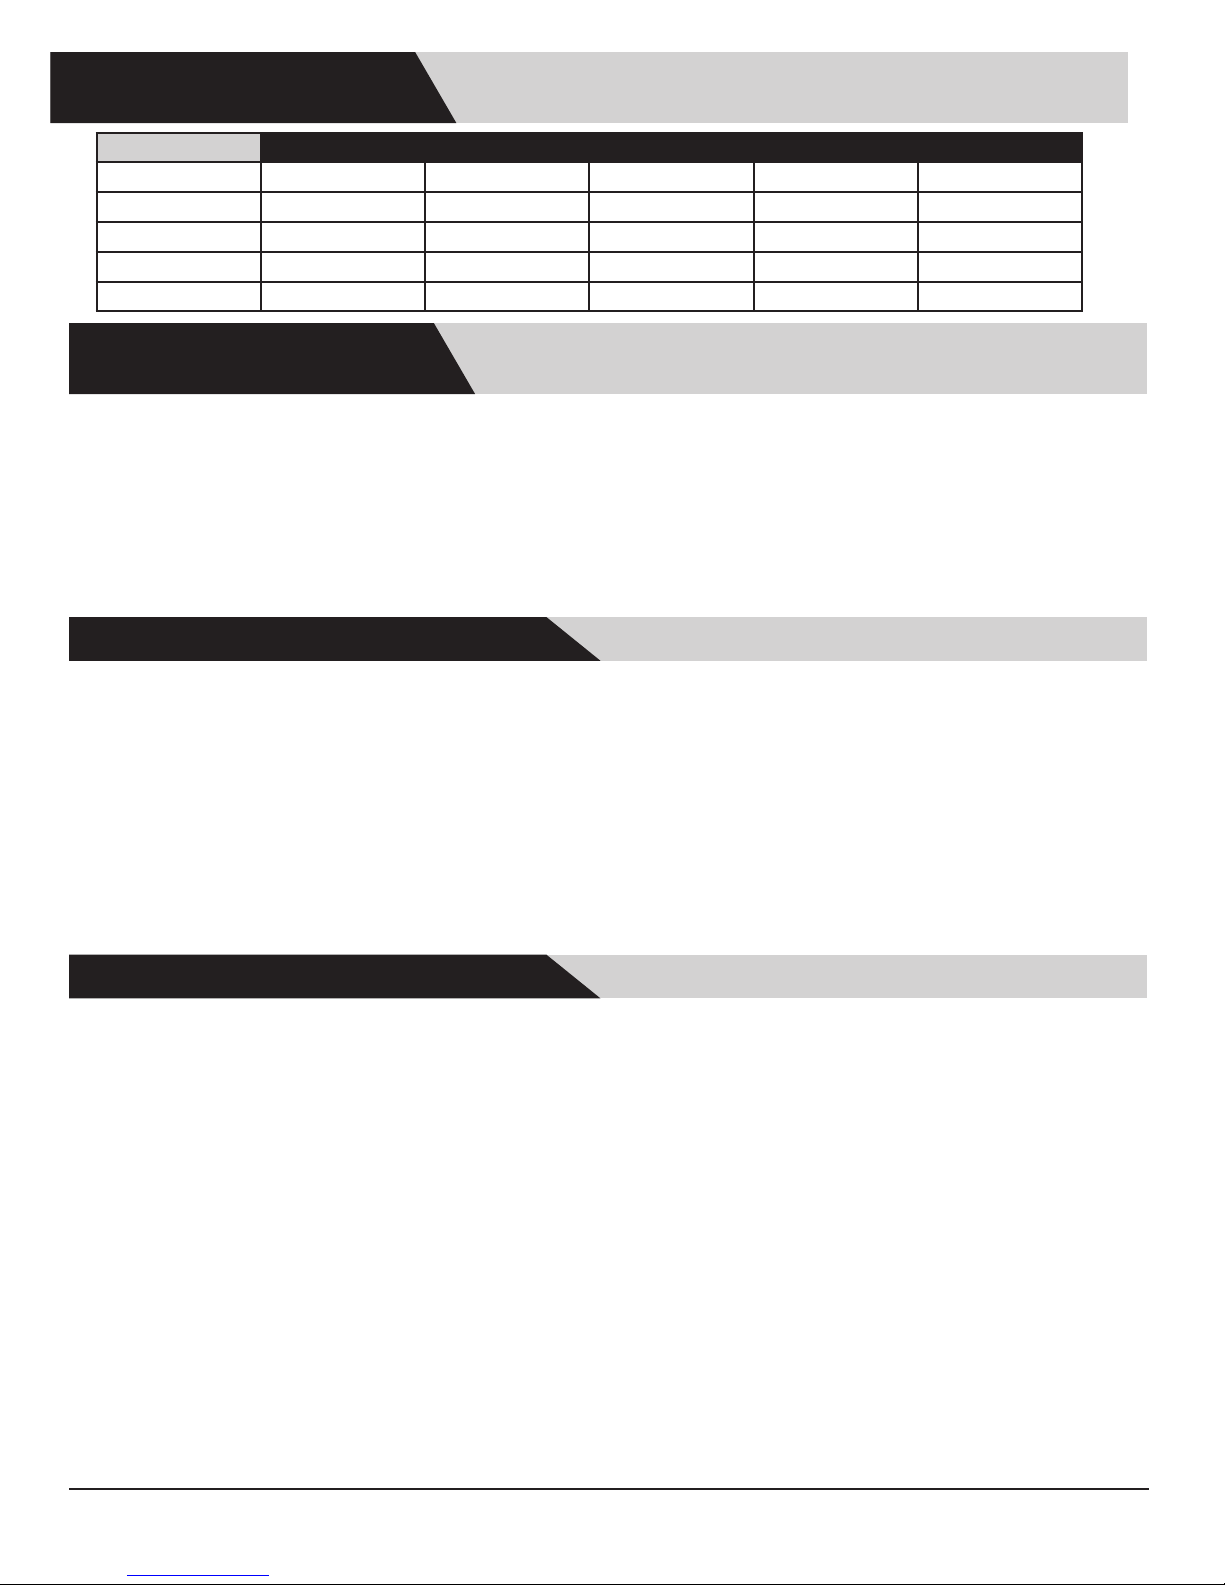
LEGACY SERIES - GAS WALL OVENS
DESCRIPTION AROFG-30 AROSG-30 AROFSG-230 AROFFG-230 AROSSG-230
Oven Racks 2 2 2 2 2
Control Knobs 2 2 4 4 4
Regis. Card 1 1 1 1 1
U&C Manual 1 1 1 1 1
USE & CARE MANUAL
INNOVECTION® - CONVECTION
• INNOVECTION® - CONVECTION is the unique convection system created by American Range engineers.
• INNOVECTION® - CONVECTION uses a fan at the back of the oven to circulate hot air more evenly around the oven. Air is also vented into the oven through side
vents to create a more uniform and fast cooking process. Circulating hot air reaches all areas of the oven and eliminates any hot or cold spots.
• The 30" oven is 30,000 BTU/hr and the broil-only element is 15,500 BTU/hr.
• The 18" oven is 22,000 BTU/hr and the broil-only element is 13,000 BTU/hr.
• The Bake element is rated at 2,200 Watts, the Broil element is 3,500 Watts.
OVEN FEATURES:
• Your new Professional Wall Oven is equipped with a separate bake and a separate broil burner.
• Each oven has its own temperature control knob that cycles the burners off and on to maintain the proper heat.
• All models have six rack positions and the large 30" oven includes two racks.
• When cooking with INNOVECTION® - CONVECTION, any rack is suitable.
HOW TO COOK WITH INNOVECTION® - CONVECTION:
INNOVECTION® - CONVECTION FAN-CIRCULATED HOT AIR BROWNS ALL FOOD SURFACES QUICKLY.
1. The circulating hot air seals in the juices in meats and vegetables.
2. This cooking process eliminates the need to baste with additional fat or juices.
3. Meat and poultry are roasted in an uncovered shallow pan that allows the circulating hot air to quickly brown all food surfaces.
4. This roasting process enhances avors and keeps the inside of food moist and juicy.
5. For best results when cooking with INNOVECTION® - CONVECTION we recommend that low-sided pans be used.
6. Circulating hot air needs to reach all sides of the food for the best cooking results.
7. It is suggested that the oven temperature be lowered 25° for all recipes and to reduce the cooking time by 10 to 15%.
8. Multiple racks of food can be successfully cooked at one time such as three racks of cookies or breads.
9. A meal of meat and vegetables, cooked on different racks, all at the same time saves time and conserves energy.
10. For best results always preheat the oven before INNOVECTION® - CONVECTION baking.
11. There is always a condensation that occurs during cooking and water could appear on the cooler panel outside of the oven.
12. Caution should be used when opening the oven door during the cooking. For best results, resist opening the oven door as it lets heat escape, requiring the oven to cycle
on more than necessary.
HOW AND WHEN TO COOK ON STANDARD BAKE MODE
1. Bake - The standard Bake mode is best used for roasting, or single rack applications. If you wish to cook on multiple racks, use convection for terric results.
OPERATING INSTRUCTIONS
INNOVECTION® - CONVECTION
USING THE GAS OVEN(S)
The oven bake and broil burners have an infrared glow igniter and safety system that lights the gas. There is approximately a thirty second delay for the igniter to heat up after the knob is
pushed in and set before the gas will ow. After the gas begins to ow it is normal for the burner to light within four seconds.
SINGLE GAS WALL OVENS & THE UPPER OVEN OF A DOUBLE GAS WALL OVEN UNIT HAVE THREE COOKING METHODS AVAILABLE:
INNOVECTION® - CONVECTION
• Traditional Bake
• Broil
• Fan – Cool Down (utilized to cool your oven temperature rapidly)
THE LOWER OVEN OF A DOUBLE GAS WALL OVEN HAS THE FOLLOWING COOKING MODES AVAILABLE:
• CONVECTION
• Bake
• Proof (used to "proof" bread dough)
• Fan – Cool Down (used to cool your oven temperature rapidly)
WHAT IS THE CONVECTION COOKING PROCESS?
• Convection is the process of cooking with hot air that is mechanically circulated by a fan in a continuous pattern around the food.
• Cooking results can be faster than cooking charts suggest and food should be checked for doneness perhaps ve to fteen minutes early.
• Oven temperatures should be lowered 25°F in most cases.
• Multiple racks of food can be cooked at the same time with even browning and even cooking times.
Other Features:
• This oven can be used at low temperatures to dehydrate food, warm plates or for very slow cooking at a low heat.
www.americanrange.com 15
Page 16

USE & CARE MANUAL
Oven Racks: Each oven is supplied with two heavy chrome-plated adjustable oven racks.
Rack Supports: On each side of the oven, heavy chrome-plated rack suppor ts allow ve positions, numbered from the bottom up.
Oven Control Knob: The oven control knob is used to set the Baking temperature or to select the Broil function. During baking, the convection fan may be activated.
GAS OVENS
Bake: The Bake element or burner is located on the bottom of the oven, below the oor and is activated by the Oven Control Knob.
Ceramic Tile Infrared Broil Burner: Positioned in the oven ceiling, burning gas heats the ceramic tile to a temperature of 1,550ºF – creating searing heat similar to the glowing
coals of a wood re.
Broil Burner Igniter: The igniter glows a very hot, bright red-orange color, reaching proper ignition temperature to light the Ceramic Tile Infrared Broil Burner.
ELECTRIC OVENS
Broil: Ribbon element located in the oven ceiling, becomes red hot in just a few seconds.
Bake: A ribbon element, below the oor of the oven when the element cycles "ON."
Selector Switch and Indicator Light: Rotate this knob from the OFF position and select Convection Bake, Standard Bake, Fan-Only, or Broil modes. In any mode position,
the Indicator Light glows indicating the Oven is ready to operate. When you’re done, always rotate the knob to the OFF position.
Oven Thermostat Knob: Thermostat Temperature Selection - Select your desired temperature.
On Indicator Light: Whenever an oven heat source is activated (either Bake or Broil), the “on” indicator will glow. It is normal for the indicator light to cycle off and on
during baking or broiling – showing that more heat is being applied.
Door Gasket: The door gasket is made from high temperature materials and creates a seal between the hot oven and the cool kitchen.
Convection Fan and Switch: Operated by the front panel switch, the convection fan circulates oven air, removing the “thermal boundary layer” on items being baked – and
in doing so – speeding up heat transfer and cook time by as much as 25%. Convection is active only during baking.
LEGACY WALL OVENS
Oven Light and Switch: A single lamp is provided in the oven to illuminate baked and broiled food items, as well as shed some light on the wall to help during clean-up
– activated by the front panel switch.
OVENS 101
The oven is a temperature controlled cooking cavity which is highly insulated to keep the kitchen cool and the food hot. The oven contains two heat
sources: Bake, positioned below the oven oor, and Broil, located in the ceiling of the oven. Bake and Broil are very different cooking operations and the
burners are designed to deliver energy in a way appropriate to the task.
There are two types of baking - called Standard Bake (or conventional) and Convection Bake. Standard baking make the best use of Grandma’s cookie,
cake or pie recipes – such as Bake at 350ºF for forty-ve minutes – to get the job done. These recipes are tried and true – conventional or standard bake
will deliver wonderful performance for roasting.
In convection cooking, not only is the cook time faster, but also, the oven temperature is more even, top to bottom and side to side - so cookies on several
racks will have the same brown color and texture. Food does not need to be rotated to get uniform color. However, to best take advantage of convection, use low, shallow bake ware so that moving air can get over the sides and up to the food surface.
GAS OVEN OPERATION
To start the oven, push in and turn the thermostat to the desired operating temperature On a gas oven, you may be able to see a bright glow from the sides of the oven
bottom - this is normal and indicates the hot surface igniter is activated. Once the igniter is hot enough for ignition, the gas valve will open, allowing the ow of gas into the
bake burner. This may take up to one minute.
During the rst few minutes of operation, a mild condensation may appear on the interior glass pane of the door window. Water vapor is a normal by-product of combus-
tion, and the condensation will disappear as the oven warms. Allow the oven to preheat before use. The control panel light will turn off when preheat is complete. After preheat, the light will cycle on and off whenever the oven is heating. Never place any pan or food item on the bottom of the oven, always use an oven rack. To use the Broil feature
of the range, rst consider what type of broiling you would like to perform. The closer you are to the broil burner, the faster you will evaporate moisture from the surface of
food and the quicker the surface will brown. In a similar fashion, the further away you place the food (on the lowest rack, for example) the slower you will evaporate surface
moisture and the longer it will take for the surface to brown. A good rule of thumb is to start about 6” away from the broiler and watch for how quickly the food is browning.
BROILER OPERATION
To begin broiling, push in and turn the thermostat to the position labeled BROIL on the control knob. In about twenty seconds, you will see a bright glow in the oven - this is
the hot surface igniter. Once the igniter is hot enough for ignition, the gas valve will open, allowing the ow of gas into the broil burner. This may take up to one minute. The
broiler will have a blue ame that covers the ceramic tiles – after a few minutes, the tiles will glow bright red/orange and radiate infrared energy. Remember the red surface
is over 1600ºF in temperature and can be a source of serious burns or injury. On an electric oven, you can see the ribbon element glow on the roof of the oven cell. This
takes just a few seconds. The Bake burner and Broil burner will not operate at the same time; the convection fan will not operate during Broiling.
16 www.americanrange.com
Page 17
USE & CARE MANUAL
TO USE THE “PROOF” FEATURE:
• The lower oven of a double oven unit is equipped with a "Proof" feature. When placed in the proof mode the oven maintains a warm, non-drafty environment
useful for proong yeast-leavened baking products. The oven is heated by a ceiling mounted electric heating element and specially designed reector assembly.
• It is recommended to proof on the lowest rack position, so place an oven rack on the bottom rack position before turning the oven to "Proof."
• To set the lower oven for proong, simply rotate the lower oven selector switch to the "Proof" setting. The indicator lights above the selector switch and
the thermostat dial will turn on. Turn the lower oven thermostat dial to "Proof".
• The ideal temperature for proong will be maintained until the selector switch is rotated to the OFF position.
• Set a minute timer for the minimum proof time and place the product to be proofed on the lower rack. Do not open the oven door unnecessarily, as
doing so will lower the oven temperature and increase proong time.
• Do not use the "Proof" mode for warming food or keeping food hot. The proong feature will not keep the oven hot enough to hold foods at
safe temperatures (above 140ºF).
• If the "Proof" temperatures are too high, the oven cavity lamps can be used to create even lower temperatures - ranging from room temperature to 80ºF - 85ºF.
Simply turn on the lamp and close the door.
LEGACY WALL OVENS
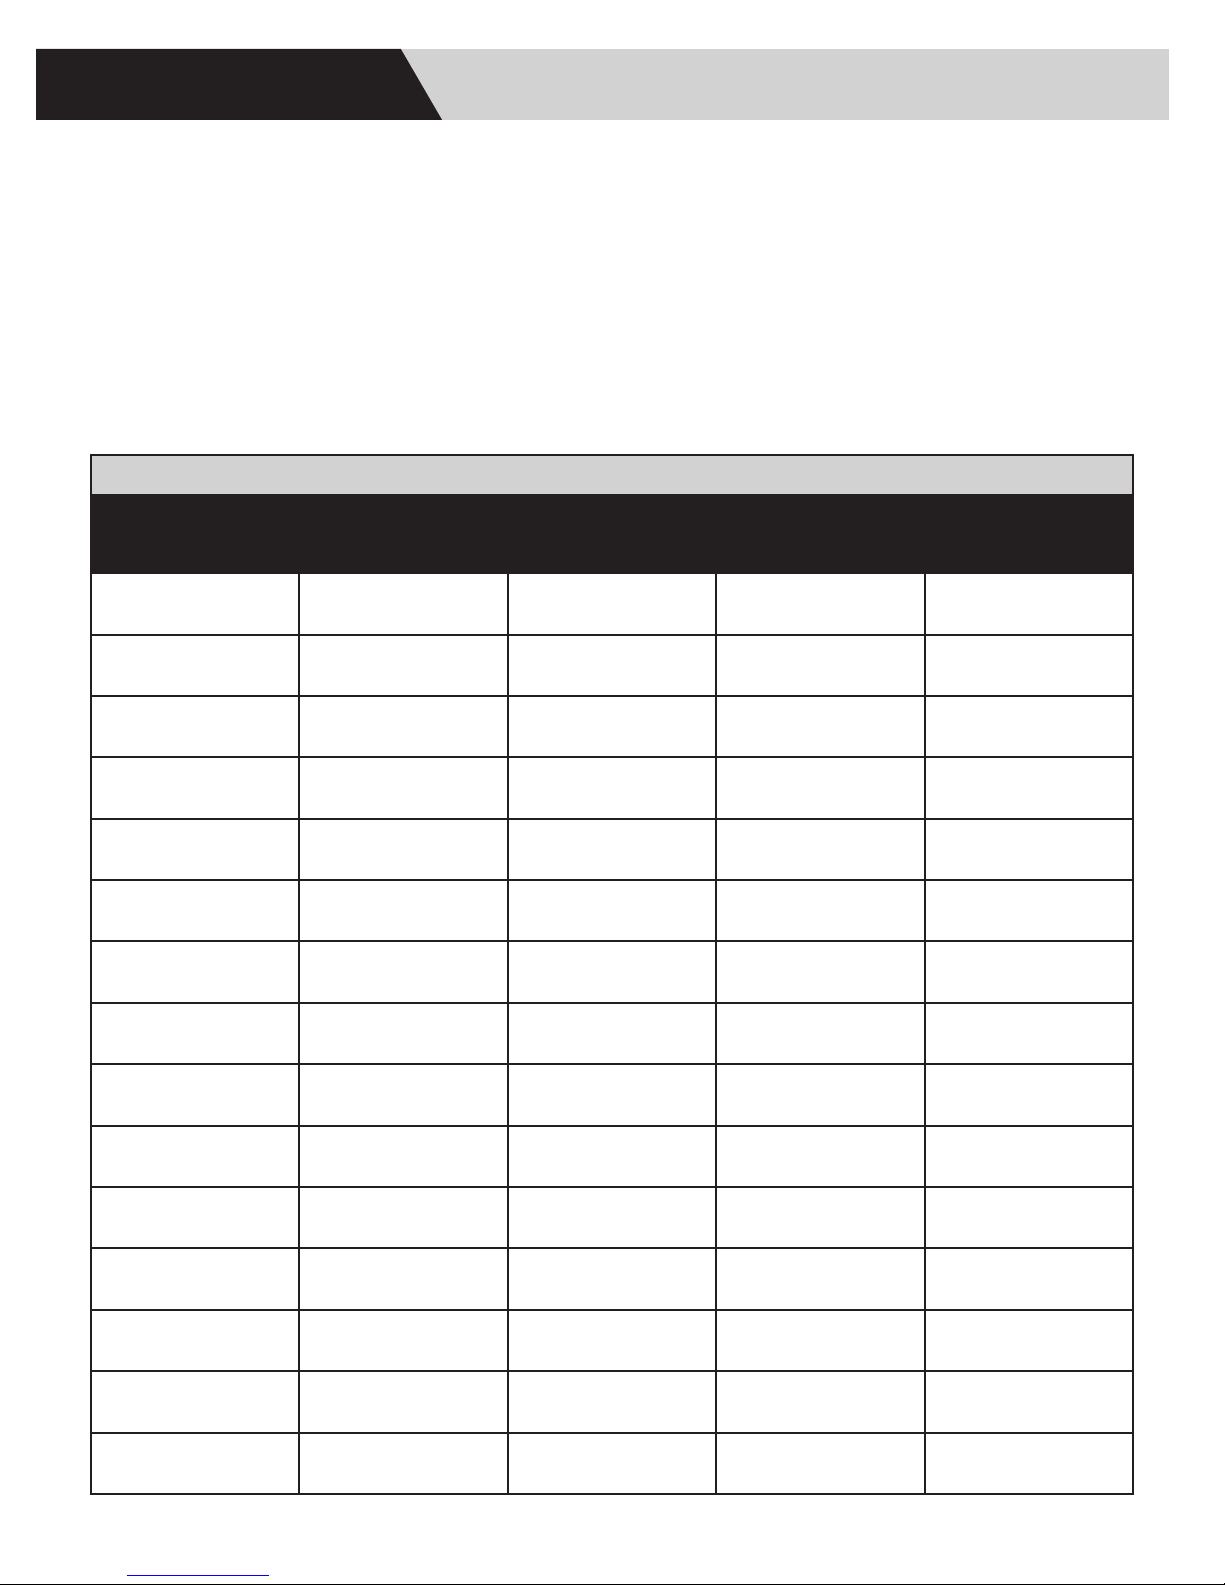
BAKING CHART
FOOD
TRADITIONAL
TEMPERATURE
TRADITIONAL
TIME
INNOVECTION
CONVECTION
TEMPERATURE
INNOVECTION
CONVECTION
TIME
Yeast bread 375ºF 30 - 35 minutes 350ºF 25 - 35 minutes
Quick bread 375ºF 30 - 35 minutes 350ºF 20 - 25 minutes
Mufns 375ºF 15 - 20 minutes 350ºF 12 - 15 minutes
Angel food cake 375ºF 35 - 45 minutes 350ºF 30 - 35 minutes
Bundt cake 350ºF 45 - 50 minutes 325ºF 35 - 40 minutes
Sheet layer 9"x13" 350ºF 40 - 50 minutes 325ºF 30 - 35 minutes
Cake, layer round 8"
or 9"
350ºF 30 - 35 minutes 325ºF 25 - 30 minutes
Cookies/choc chip 375ºF 10 - 12 minutes 350ºF 8 - 10 minutes
Pie shell 425ºF 10 - 12 minutes 400ºF 7 - 9 minutes
2 crusts fruit pie 375ºF 55 - 60 minutes 350ºF 50 - 55 minutes
Custard 350ºF 35 - 40 minutes Not recommended --
Baked potato 375ºF 60 - 75 minutes 350ºF 50 - 55 minutes
Lasagna 375ºF 55 - 60 minutes 350ºF 45 - 50 minutes
Soufé 350ºF 45 - 50 minutes 325ºF 35 - 45 minutes
Quiche 400ºF 25 - 30 minutes Not recommended --
www.americanrange.com 17
Page 18
USE & CARE MANUAL
FOOD
TRADITIONAL
SETTING
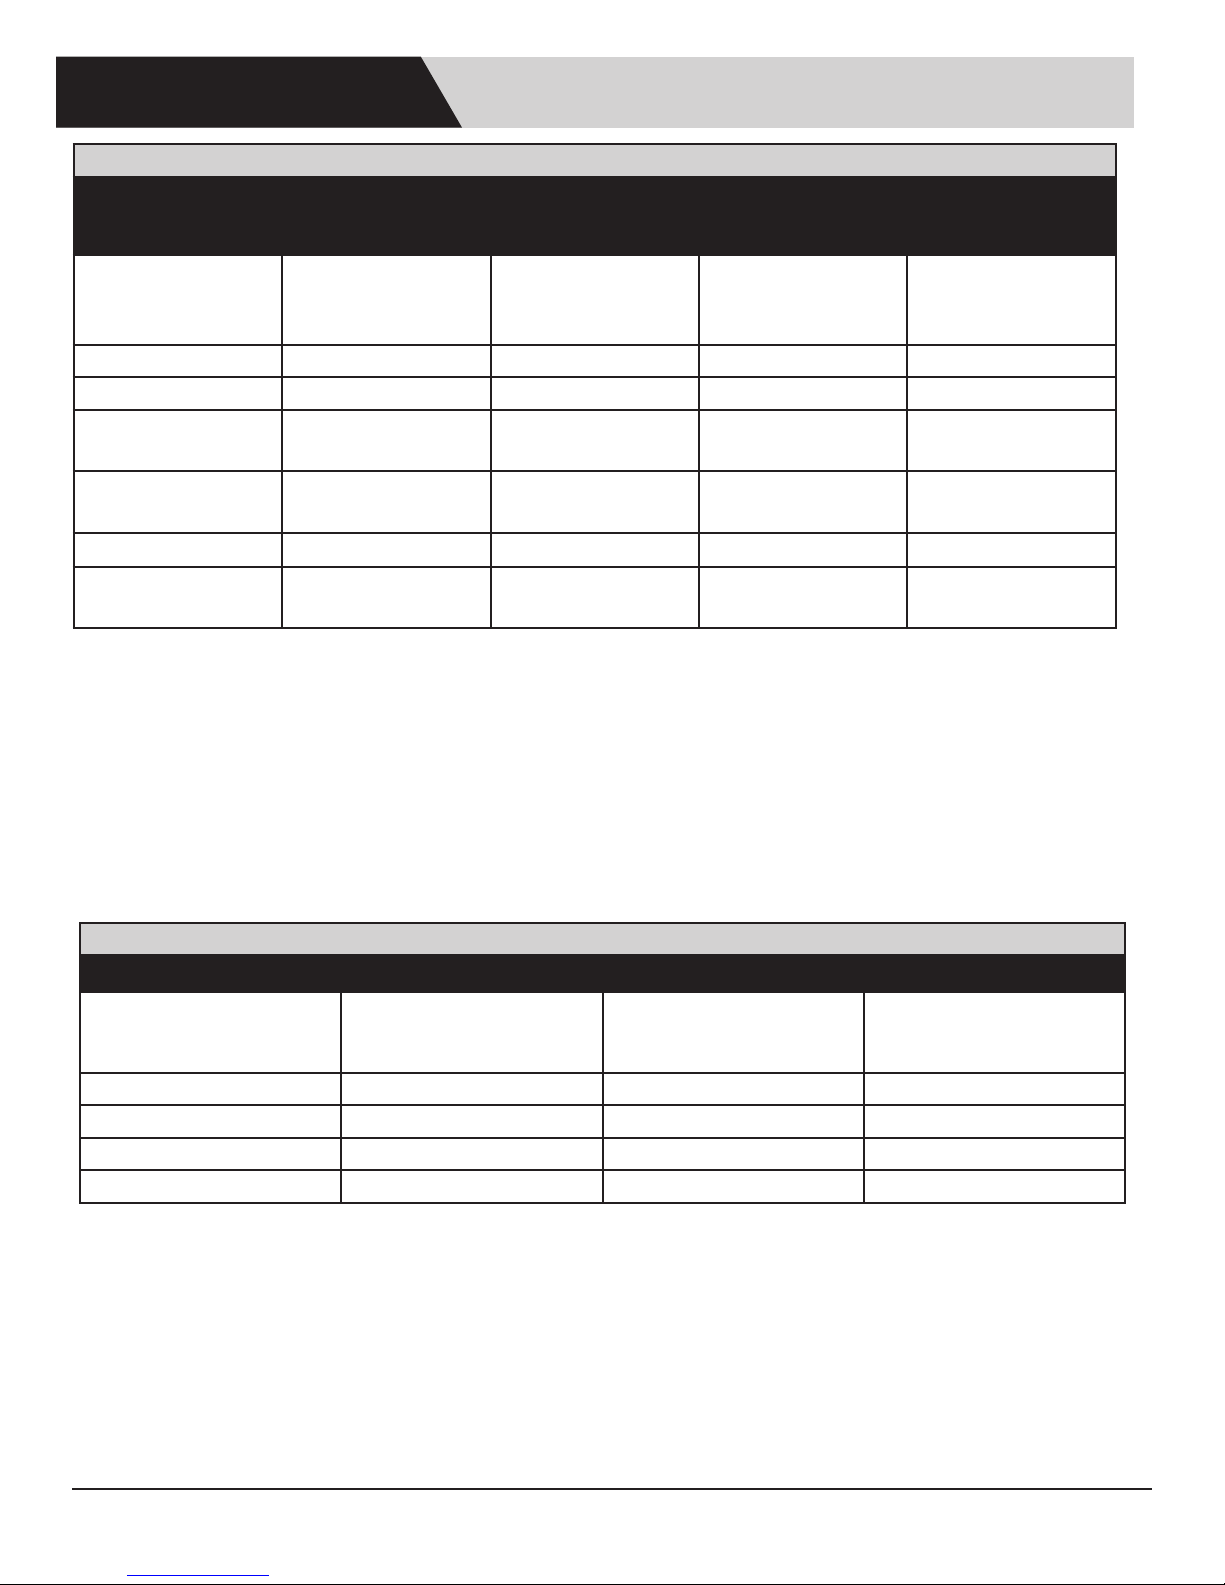
ROASTING CHART
INNOVECTION
CONVECTION
SETTING
LEGACY WALL OVNES
ROAST TIME
MIN./LB.
INTERNAL
TEMPERATURE
Beef rib roast 325ºF 300ºF
20 min. / lb.
25 min. / lb.
30 min. / lb.
Rare - 140ºF
Med. - 155ºF
Well - 170ºF
Beef tri tip 325ºF 300ºF 30 min. / lb. Med. - 155ºF
Leg of lamb 325ºF 300ºF 30 min. / lb. Med. - 145ºF
Pork loin 325ºF 300ºF 35 min. / lb.
Chicken - whole 350ºF 325ºF 25 min. / lb.
Med. - Well
170ºF
170ºF breast
175ºF thigh
Stufng 165ºF
Turkey - unstuffed 325ºF 300ºF 9-12 min. / lb.
Whole, unstuffed poultry such as chicken and turkey should be placed on rack one or two with the legs and cavity opening, pointing towards the back of the oven.
TO USE THE BROILER:
• When using broil, the rack position depends on the food, and the thickness of the meat. Rack position one is at the bottom of the oven, and
the positions number up as a ladder with six being at the top.
• The oven door remains closed during broil.
• Most broiling uses rack positions three or four counting from the bottom.
• Turn selector to broil.
• Push in oven knob and turn to the broil setting, the blue indicator light will come on.
• When the broiler is hot the light turns off.
• When inspecting the food, open the oven door no more than two inches. The burner turns off but will re-ignite in four seconds when the
door is closed.
• For best results, broil small, at cuts of meat such as steaks, hamburgers, chops or boneless chicken breasts.
165ºF breast
175ºF thigh
BROILING CHART
FOOD WEIGHT & SIZE RACK TIME
Rare - 10 minutes
Steak 12 oz. and 1" 3
Med. - 12 minutes
Well - 15 minutes
Hamburger 4 oz. and 1/2" 4 10 minutes
Chicken pieces 1 lb. 3 15 to 20 minutes
Pork chops 1 lb. and 3/4" 3 14 minutes
Salmon steak 1 lb. 4 8 to 10 minutes
DRYING AND DEHYDRATING
The United States Department of Agriculture advises: DO NOT hold foods at temperature between 40ºF to 140ºF more than two hours – and cooking
raw foods below 275ºF is not recommended. The low setting of the oven (ranging from 150ºF to 225ºF) may be used to keep food hot and in special
recipes, used to dehydrate fruits and vegetables.
During dehydration, the convection fans circulates hot air over the food, causes moisture to escape from the food surface – generally drying it out. This removal of water inhibits growth of microorganisms and slows down the activity of enzymes. Starting with only the freshest, best quality food items, prepare
as directed and:
• Place the food on drying racks spaced evenly in the oven cavity.
• Set the temperature control to 200ºF and switch on the convection fan.
• Remember to periodically check the food items for dryness state.
DEFROST
It is best to defrost in the refrigerator, but sometimes it becomes an issue of speed.
18 www.americanrange.com
Page 19
USE & CARE MANUAL
LEGACY WALL OVENS
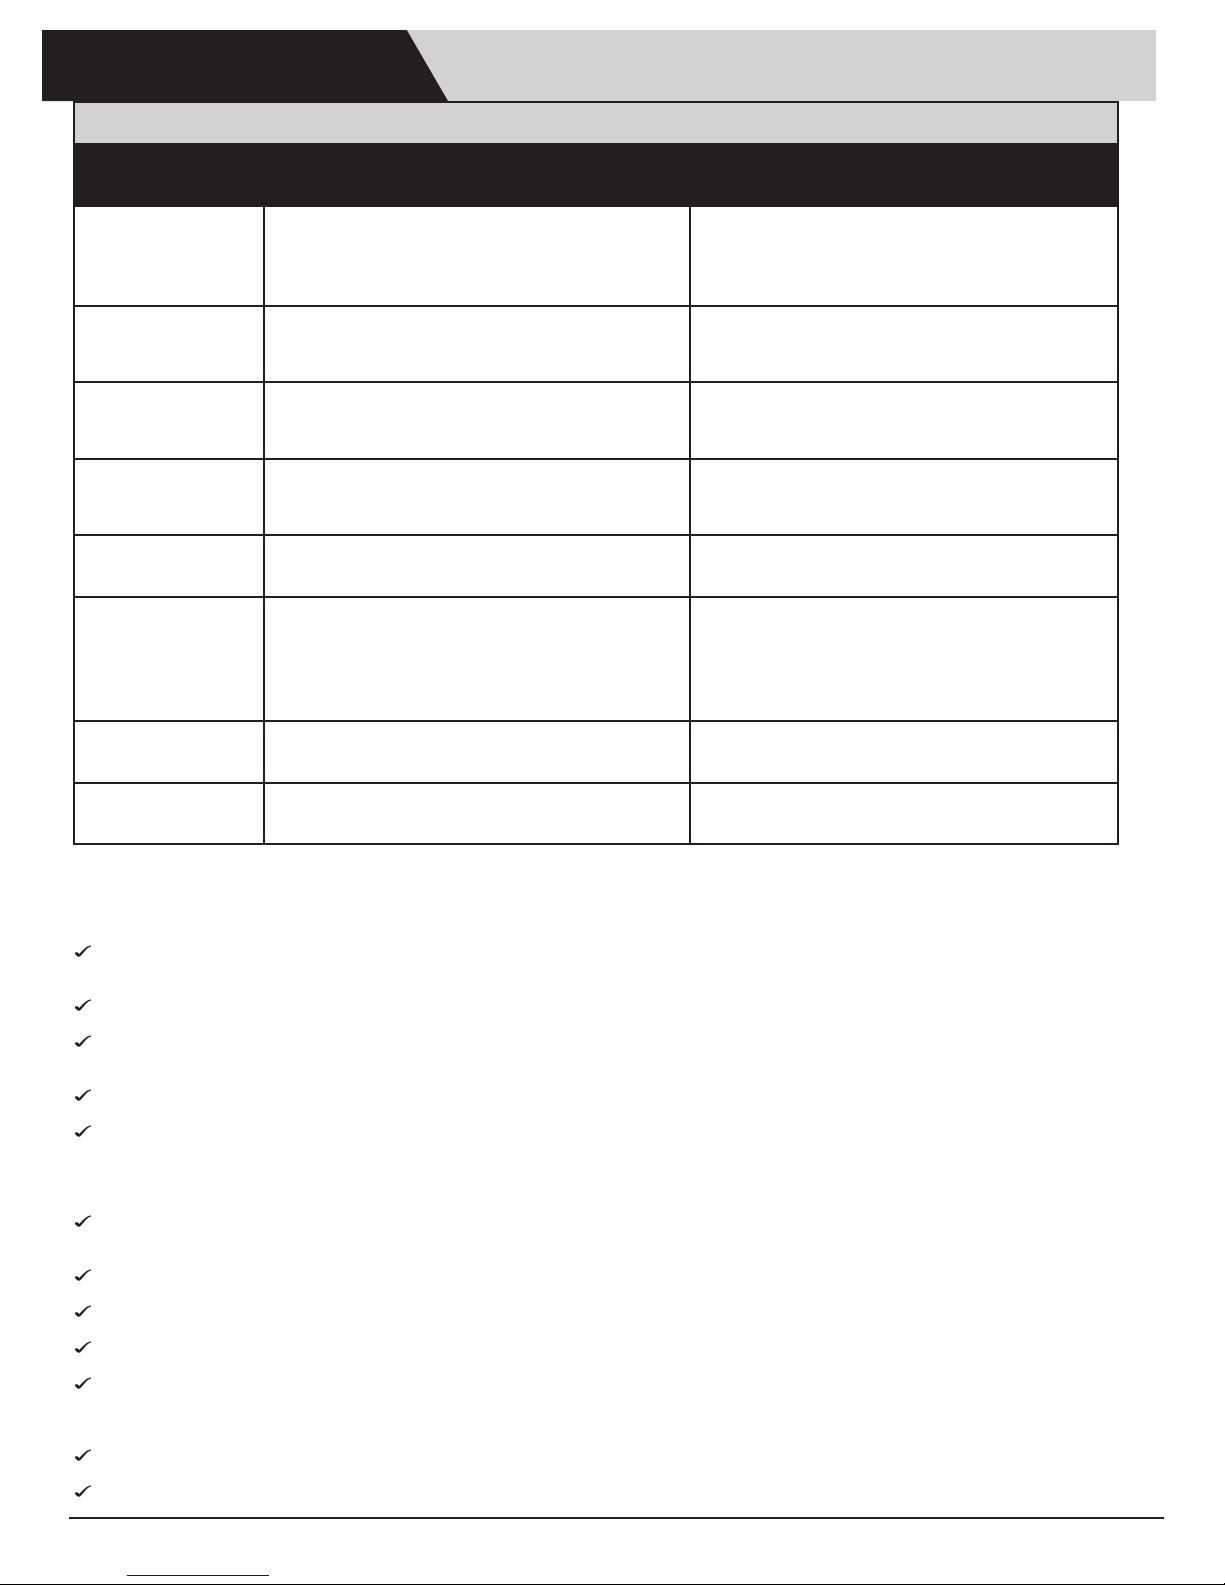
TROUBLESHOOTING GUIDE
PROBLEM POSSIBLE CAUSE WHAT TO DO
No electrical power to the range
Oven will not heat
Oven light does not
work
Broiler will not light
Convection fan does
not turn
Condensation on the
oven window
Foods over-cook
Foods under-cook Incorrect temperature, cooking time or rack position Adjust accordingly
Gas service is turned off
Gas supply has been interrupted
Look for red glow of hot surface igniter
Light switch is in the off position
Light is burned out
No electrical power to the range
Gas service is turned off
Look for red glow of hot surface igniter
Switch the fan on
Unit in broil mode
Bad fan
Cold appliance
Incorrect temperature cooking time, or rack position.
Temperature differs from your previous oven.
Oven not pre-heated
Check circuit breakers in house
Try to light a surface burner
Contact the gas company
If no glow, call for service
Try switching the light on
Locate and test a new replacement light, unscrew glass
lens, remove bad light, replace
Check circuit breakers in house
Try to light a surface burner
If no glow, call for service
Adjust oven selector switch to Convection.
Turn thermostat to bake temperatures.
Call for service
It is normal for some condensation to appear on the
window; it will disappear in about ten minutes.
Reduce cooking time, or temperature. This modern appliance operates at the set temperature. You may want
to reduce the set temperature until you become more
familiar with your new oven.
Allow pre-heat cycle to complete.
Baked goods dark on
bottom
Dark colored cookie sheets Use light-colored cookie sheets
CARE AND CLEANING
It is always easier to clean as you go – and while some evenings you’d rather sit down with a good book instead of a Scrubbie, keeping your
appliance in a ready-to-go state for the next meal makes everything a little more tolerable.
When cleaning the extention:
0 Use the mildest procedure that will do the job efciently and effectively – and since some cleaners are harsher than others, it is best to try them on a
small, inconspicuous area rst.
0 Use only clean, soft cloths, sponges, paper towels, plastic brushes, non-metal soap pads for cleaning and scouring.
0 When cleaning the oven door, control panel, cur ved sections or the at top area – always pretend it is made of wood – and
rub the nish in the direction of the grain. This is the most effective cleaning direction, to prevent marring the surface.
0 Any part of this appliance can be cleaned with hot, sudsy water. When rinsing is required, rinse thoroughly.
0 Always wipe dry immediately to reduce the appearance of water marks.
TO CLEAN THE OVEN INTERIOR
The oven cavity is porcelainized with Chrome rack guides and racks. The infrared broiler does not need to be cleaned. Any soil is burned off by the intense heat.
0 Place a medium glass baking dish lled with one quart of water, in the oven. Close the door and bake at 225
wipe with a damp cloth, them dry. This process softens the soil for easier removal.
o
F for an hour or two. Allow to cool until safe,
0 Wash the interior of the oven with soap and water. Make a paste with baking soda and water, and using a sponge or nylon pad, rub away stubborn stains.
0 Use mild scrubbing compounds such as Bon Ami or Cameo, if necessary.
0 Do not use steel wool pads or abrasive sponges or scrubbers.
0 If necessary, spray on oven cleaner can be used.
DO NOT SPRAY OVEN CLEANER INTO THE CONVECTION FANS OR UP ONTO THE INFRARED BROILER.
DO NOT LET SPRAY CONTACT THE STAINLESS STEEL EXTERIOR.
0 When spray on oven cleaners are used, follow using a 1/4 cup vinegar mixed with one quart of water to rinse the oven.
0 Do not use scouring powders on the glass window; oven spray may be used on the window. Rinse with vinegar and water solution.
www.americanrange.com 19
Page 20

RETAIN THIS MANUAL FOR FUTURE REFERENCE.
This equipment is design engineered for residential use only.
Model Number: __________________________________________
Serial Number: ___________________________________________
Purchase Date: ___________________________________________
Installed By: __________________________ Install Date:__________
Gas Type: _______________________________________________
Electrical Information: ______________________________________
R70200 02212018 RevE
13592 Desmond St., Pacoima, CA 91331
818.897.0808 - 888.753.9898
www.americanrange.com
 Loading...