

Page 1
This equipment is design engineered for commercial use only.
13592 Desmond St.,
Pacoima, CA 91331
tel: 818.897.0808
888.753.9898
www.AmericanRange.com
OWNER'S MANUAL, INSTALLATION, USE AND CARE
SERVICE PERSONNEL
A manual gas shut-off valve must be installed in the
repairs.
WARNING!
Improper installation, adjustment, alteration, service, or maintenance
can cause property damage, injury, or death. Read the installation,
operating and maintenance instructions thoroughly before installing
or servicing this equipment.
FOR YOUR SAFETY!
Do not store or use gasoline or
other flammable vapors or liquids in
the vicinity of this or any other
appliance.
IMPORTANT – PLEASE READ AND FOLLOW!
Instructions to be followed in the event the user smells gas must be posted in a prominent location.
This informa tion must be obtained by consulti ng the local gas supplier.
Check your local building codes for proper installation methods. In the absence of local codes, this appliance must be installed in
accordance with the National Fuel Gas Code No. Z223.1 current issue, and the National Electrical Code ANSI/NFPA No. 70 current
issue, or the CAN – B149 Installation Codes for Gas Burning Appliances, and C22.1 Canadian Electrical Code Part 1.
Verify the type of gas supplied to the location, being sure that the appliance is connected to the type of gas for which it is certified.
Models come from the factory certified for use with Natural Gas (NG) or Liquid Propane (LP) gas. Your product, shown on the rating
label and the supplied gas type must be the same. Upon opening your product, the rating label can be located on the front panel. If it is
a countertop, the rating label can be found on the rear panel.
If connecting this appliance to propane gas, make certain the propane gas tank is equipped with its own high-pressure regulator – in
addition to the pressure regulator supplied with this product when applicable. The maximum propane gas pressure to this appliance
must not exceed 14.0 inches of water column (34.9 millibar) from the propane gas tank to the pressure regulator.
AR RESTAURANT SERIES RANGES
AR
and ARS HOT PLATES
BEF ORE USING YOUR APPLIANCE, PLEAS E READ T HIS MA NUAL, PAYING SPEC IAL ATTE NTION
TO T HE IMP ORTA NT SAFETY I NST RUC TIONS LOC AT ED I N THE NEXT SEVERA L PAGES
INSTALLATION, OPERATION AND
Installation of the equipment should be performed by
qualified, certified, licensed and/or authorized personnel who
are experienced in state/local installation codes. Have the
technician show you the exact location of the gas shut-off valve
on the incoming gas line so you know how to turn off the gas
if necessary.
Operation of the equipment should be performed by
qualified or authorized personnel who have read this manual
and understand and are familiar with the functions of the
equipment.
Service of the equipment should be performed by qualified
personnel who are knowledgeable with American Range
products.
gas supply (service) line ahead of the appliance and gas
pressure regulator in the gas stream for safety and ease
of future maintenance/service.
The gas pressure regulator supplied with the appliance
must be installed prior to connecting the equipment
to the gas supply line. Failure to install a regulator will
void the equipment warranty and result in a potentially
hazardous condition.
Please contact the factory, a factory representative, or
local service company to perform maintenance and
Page 2
IMPORTANT SAFETY INSTRUCTIONS
13592 Desmond St Pacoima CA 91331
T. 818.897.0808 Toll Free: 888.753.9898
www.AmericanRange.com
2
This is the SAFETY ALERT SYMBOL. This symbol alerts you to hazards which will result in severe injury or death.
IMPORTANT SERVICE NOTICE!
Using any part other than genuine
American Range factory supplied parts
relieves the manufacturer of all liability.
American Range reserves the right
to change specifications and product.
design without notice. Such revisions do
not entitle the buyer to corresponding
changes, improvements, additions.
or replacements for the previously
purchased equipment.
!
!
DANGER
!
WARNING
!
CAUTION
» Before beginning, please read all the instructions carefully.
» DO NOT remove permanently affixed labels, warnings, or plates from
product. This may void the warranty.
» All local and national codes and ordinances must be observed,
installation must conform with local codes.
» The Installer must leave these instructions with the consumer who must
retain them for local inspector’s use and for future reference.
» Installation and service must be performed by a qualified installer,
service agency or gas supplier.
» Please ensure that the product is properly grounded.
» In the Commonwealth of Massachusetts, installation must be
performed by a licensed plumber or gas fitter.
Your safety and the safety of others is very important. We have provided
many important safety messages in this manual and on your appliance.
Always read and obey all safety messages.
Hazards or unsafe practices which will result in severe personal injury or death.
Hazards or unsafe practices which may result in severe personal injury or death.
Hazards or unsafe practices which may result in minor personal injury or property damage.
WARNING
!
WARNING
!
CA PROPOSITION 65: The burning of gas cooking fuel generates some chemical byproducts which may expose you to chemicals including benzine, carbon monoxide, formaldehyde, and soot,
which are known to the state of California to cause cancer and birth defects or other reproductive harm. To
minimize exposure to these substances, always operate this unit according to the owner’s manual, ensuring to
provide proper ventilation. For more information go to www.P65warnings.ca.gov.
This is a vented appliance. The appliance is not to be installed in conjunction with an air curtain,
range hood, or ventilation systems which operates by blowing air downward towards the
appliance. This type of ventilation system may cause ignition and combustion problems with the
gas cooking appliance resulting in personal injury or unintended operation.
A70028 Rev. E 07292024
Page 3
IMPORTANT SAFETY INSTRUCTIONS
13592 Desmond St Pacoima CA 91331
T. 818.897.0808 Toll Free: 888.753.9898
www.AmericanRange.com
3
Shipping Damage Claim Procedure
The equipment is crafted and inspected carefully by skilled personnel before leaving the factory. The transportation company
assumes full responsibility for the safe delivery upon acceptance of the equipment.
If you receive a damaged product, immediately contact your delivery company, your dealer, your builder, or installer. Do not
install or attempt to operate a damaged appliance.
1.
Note on the freight bill or express delivery any visible loss or damage and have the note signed by the person making the
delivery.
2.
File claim for damages immediately regardless of the extent of damages.
3.
For damage noticed after unpacking (concealed loss or damage), notify the transportation company immediately and file a
“Concealed Damage” claim with them. This must be done within fifteen (5) days from the date that delivery is made to
you. Retain the shipping container for inspection.
A70028 Rev. E 07292024
Page 4
IMPORTANT SAFETY INSTRUCTIONS
13592 Desmond St Pacoima CA 91331
T. 818.897.0808 Toll Free: 888.753.9898
www.AmericanRange.com
4
IF THE INFORMATION IN THIS MANUAL IS NOT FOLLOWED EXACTLY, A FIRE OR EXPLOSION MAY RESULT CAUSING
WHAT TO DO IF YOU SMELL GAS
» Do not try to light any appliance » Using a neighbor’s phone, immediately call your gas company.
» Do not touch any electrical switch » Follow the gas supplier instructions.
» Do not use any phone in your building » If you cannot reach your gas supplier, call the Fire Department
DAMAGE, PERSONAL INJURY OR DEATH.
INSTALLATION AND SERVICE MUST BE PERFORMED BY A CERTIFIED / LICENSED INSTALLER, SERVICE AGENCY OR THE
GAS SUPPLIER
» Do not store or use gasoline or other flammable vapors or liquids in the vicinity of this or any other appliance.
» Please observe all local and national codes and ordinances.
» Do not remove any permanent warning labels or plates from this product.
» Please ensure that this product is electrically grounded.
» Consumers must retain these instructions for local inspectors and for future use.
INSTALLATION
VENTILATION HOODS
Means must be provided for any commercial, heavy-duty cooking
appliance to exhaust combustion waste products to the outside
of the building. Usual practice is to place the unit under an
exhaust hood. Filters and drip troughs should be part of any
industrial hood. Consult local codes before constructing and
installing a hood.
Room air movement should be monitored during installation.
Strong exhaust fans in the hood or in the overall air conditioning
system can produce a slight vacuum in the room and/or cause
air drafts – either may interfere with the pilot or main burner
performance and can also be hard to diagnose. If pilot burner or
main burner outage problems persist – make up air openings or
baffles may have to be provided in the room.
Provisions shall be incorporated in the design of the kitchen to
ensure adequate supply of fresh air and adequate clearance for air
openings into the combustion chamber, for proper combustion
and ventilation. For proper operation of the appliance, do not
obstruct the flow of combustion and ventilation air.
INSTALLATION – GAS STANDARDS AND CODES
IMPORTANT – The installation of this appliance must conform
to local codes or, in the absence of local codes, with the National
Fuel Gas Code, ANSI Z223.1/NFPA 54, or the Natural Gas
and Propane Installation Code, CSA 149.1 as applicable,
including:
1.
The appliance and its individual shut-off valve must be
disconnected from the gas supply piping system during any
pressure testing of that system at test pressure in excess of
1/2 psi (3.45 kPa).
2.
The appliance must be isolated from the gas supply piping
system by closing its individual manual shut-off valve during any
pressure testing of the gas supply piping system at test
pressures equal to or less than 1/2 psi (3.45kpa).
The appliance, when installed, must be wired, and electrically
grounded in accordance with local codes, or in the absence of
local codes, with the National Electric Code, ANSI/NFPA 70, or
the Canadian Electrical Code, CSA C22.2 as applicable.
A70028 Rev. E 07292024
Page 5
INSTALLATION
13592 Desmond St Pacoima CA 91331
T. 818.897.0808 Toll Free: 888.753.9898
www.AmericanRange.com
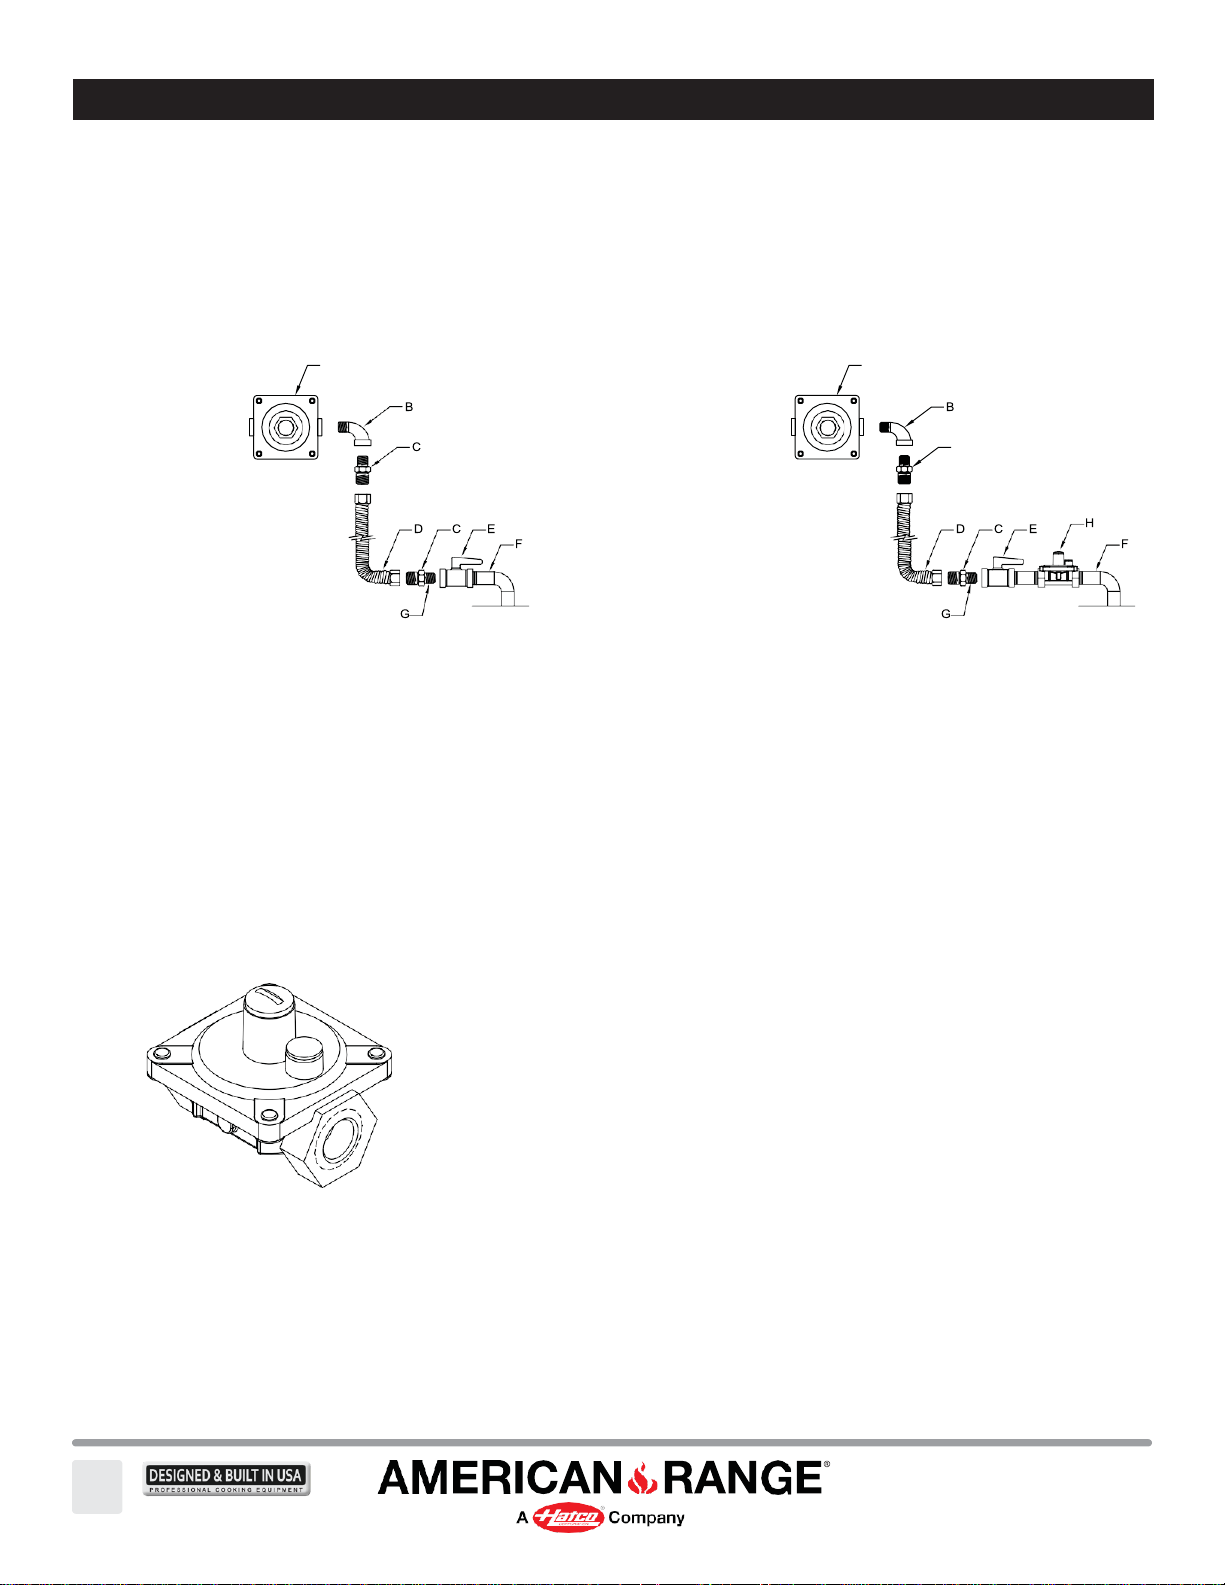
GAS CONNECTION – The Range or Hot Plates requires one gas connection. The gas inlet line size of this appliance is 3/4" NPT. For
proper operation, the gas service supply line must be the same size or greater than the
inlet line size of the appliance.
MANUAL SHUT-OFF VALVE – A gas pressure regulator and a contractor-supplied shut-off valve must be plumbed in the gas
service line ahead of the appliance – in a physical location where it can be reached quickly in the event of an emergency.
A A
NATURAL GAS
A. Gas pressure regulator
B. 90º Street elbow
C. Adapter (must be 3/4" male pipe thread)
D. Flexible connector
E. Manual gas shut-off valve
F. 3/4" gas supply
G. Use pipe-joint compound
LP GAS
A. Gas pressure regulator
B. 90º Street elbow
C. Adapter (must be 3/4" male pipe thread)
D. Flexible connector
E. Manual gas shut-off valve
F. 3/4" gas supply
G. Use pipe-joint compound
H. Step down regulator
C
The gas pressure regulator must be installed in the gas line – failure to install a pressure regulator will void the equipment warranty. The
regulators supplied with ranges have 3/4" NPT connections; the regulator is adjusted at the factory for 5" W.C. (water column) manifold
gas pressure (natural gas) or 10" W.C. manifold gas pressure for propane gas operation.
Before connecting the regulator, check the incoming line pressure – as these regulators can only withstand a maximum inlet pressure of
14" W.C. (1/2 PSI); exceeding this pressure will damage them. Visually double check any installer-supplied intake pipes and/or blow them
out using compressed air to clear any dirt or debris, threading chips, or other foreign matter – before installing a service line. Those
particles will clog gas orifices when gas pressure is applied. Compounds used on threaded joints of this appliance piping must be resistant
to the action of NG and LP gas and provide a gas tight seal to prevent leaks. If the gas supply line pressure is greater than this amount, a
step-down regulator will be required. A gas flow direction arrow is cast into the body of the regulator to minimize installation error – it
should point downstream to the appliance. The blue air vent cap on the top of the regulator is part of the regulator and should not be
removed.
Any adjustment to the regulator must be made only by qualified and licensed service personnel with the proper calibrated test equipment.
Gas connections should be run by a qualified licensed contractor.
5
A70028 Rev. E 07292024
Page 6
INSTALLATION
13592 Desmond St Pacoima CA 91331
T. 818.897.0808 Toll Free: 888.753.9898
www.AmericanRange.com
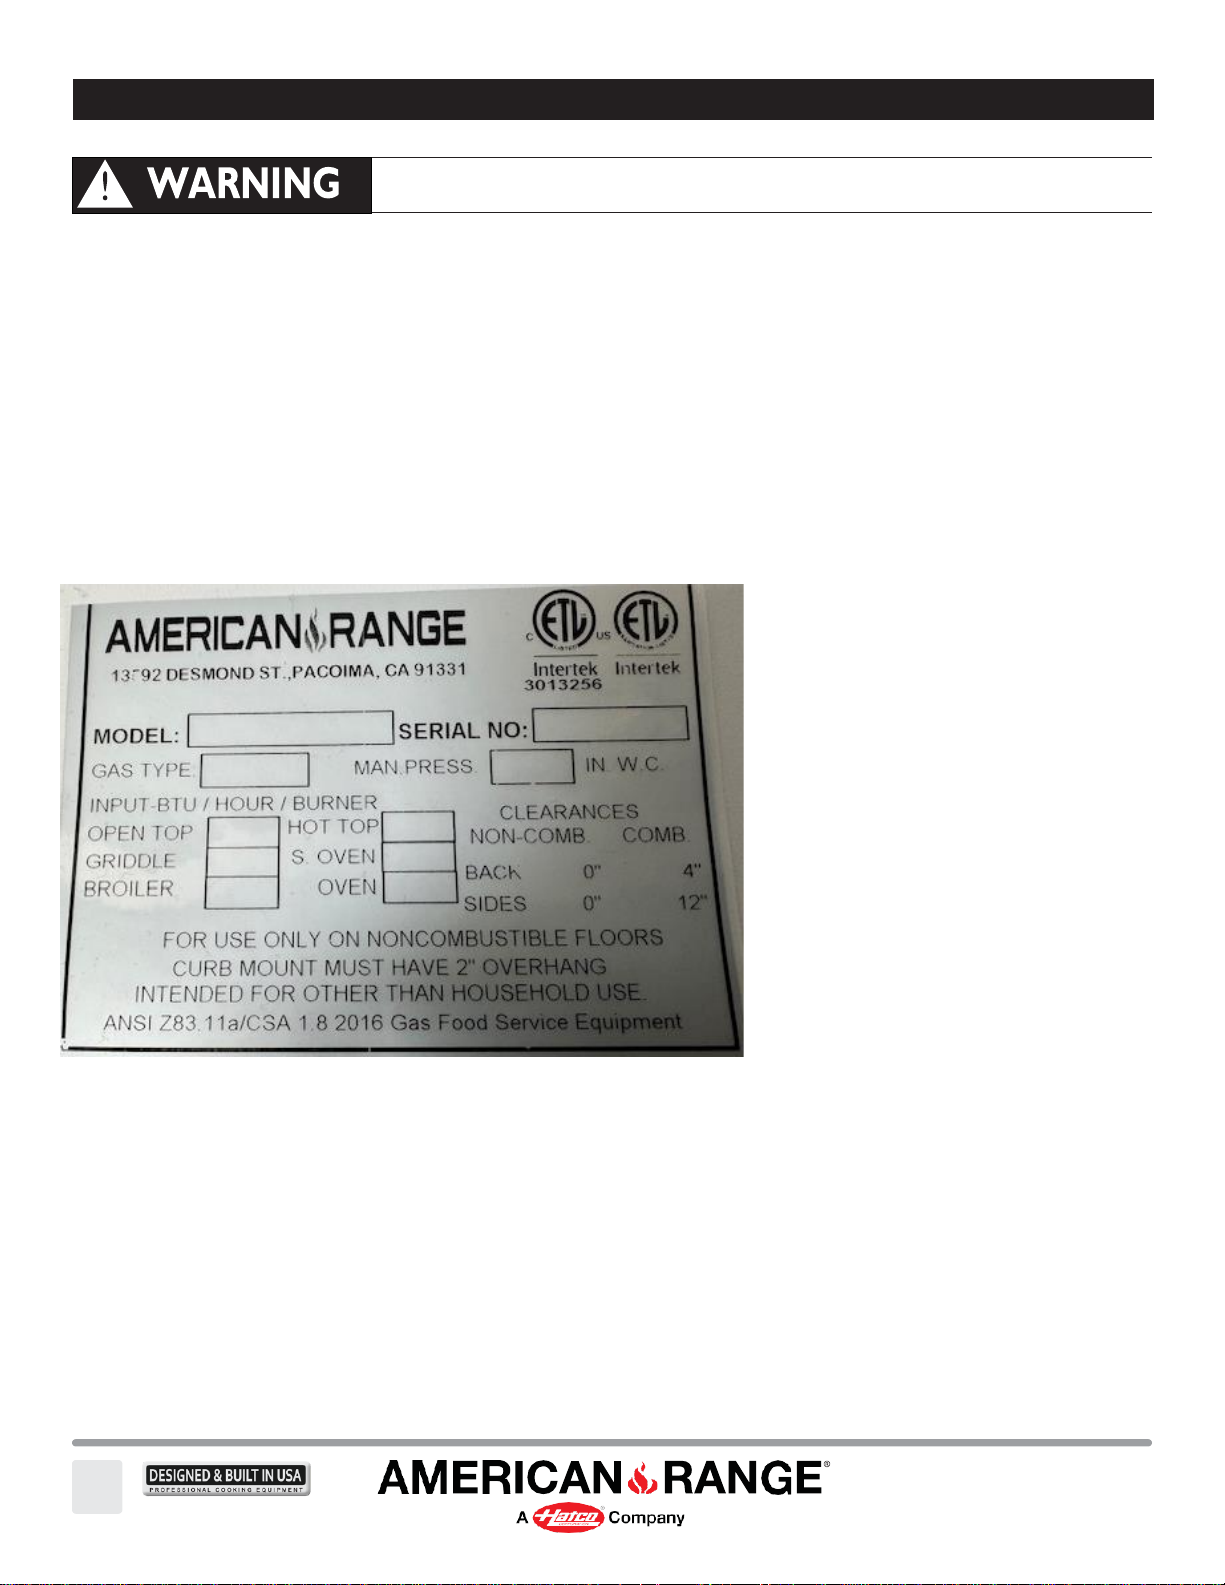
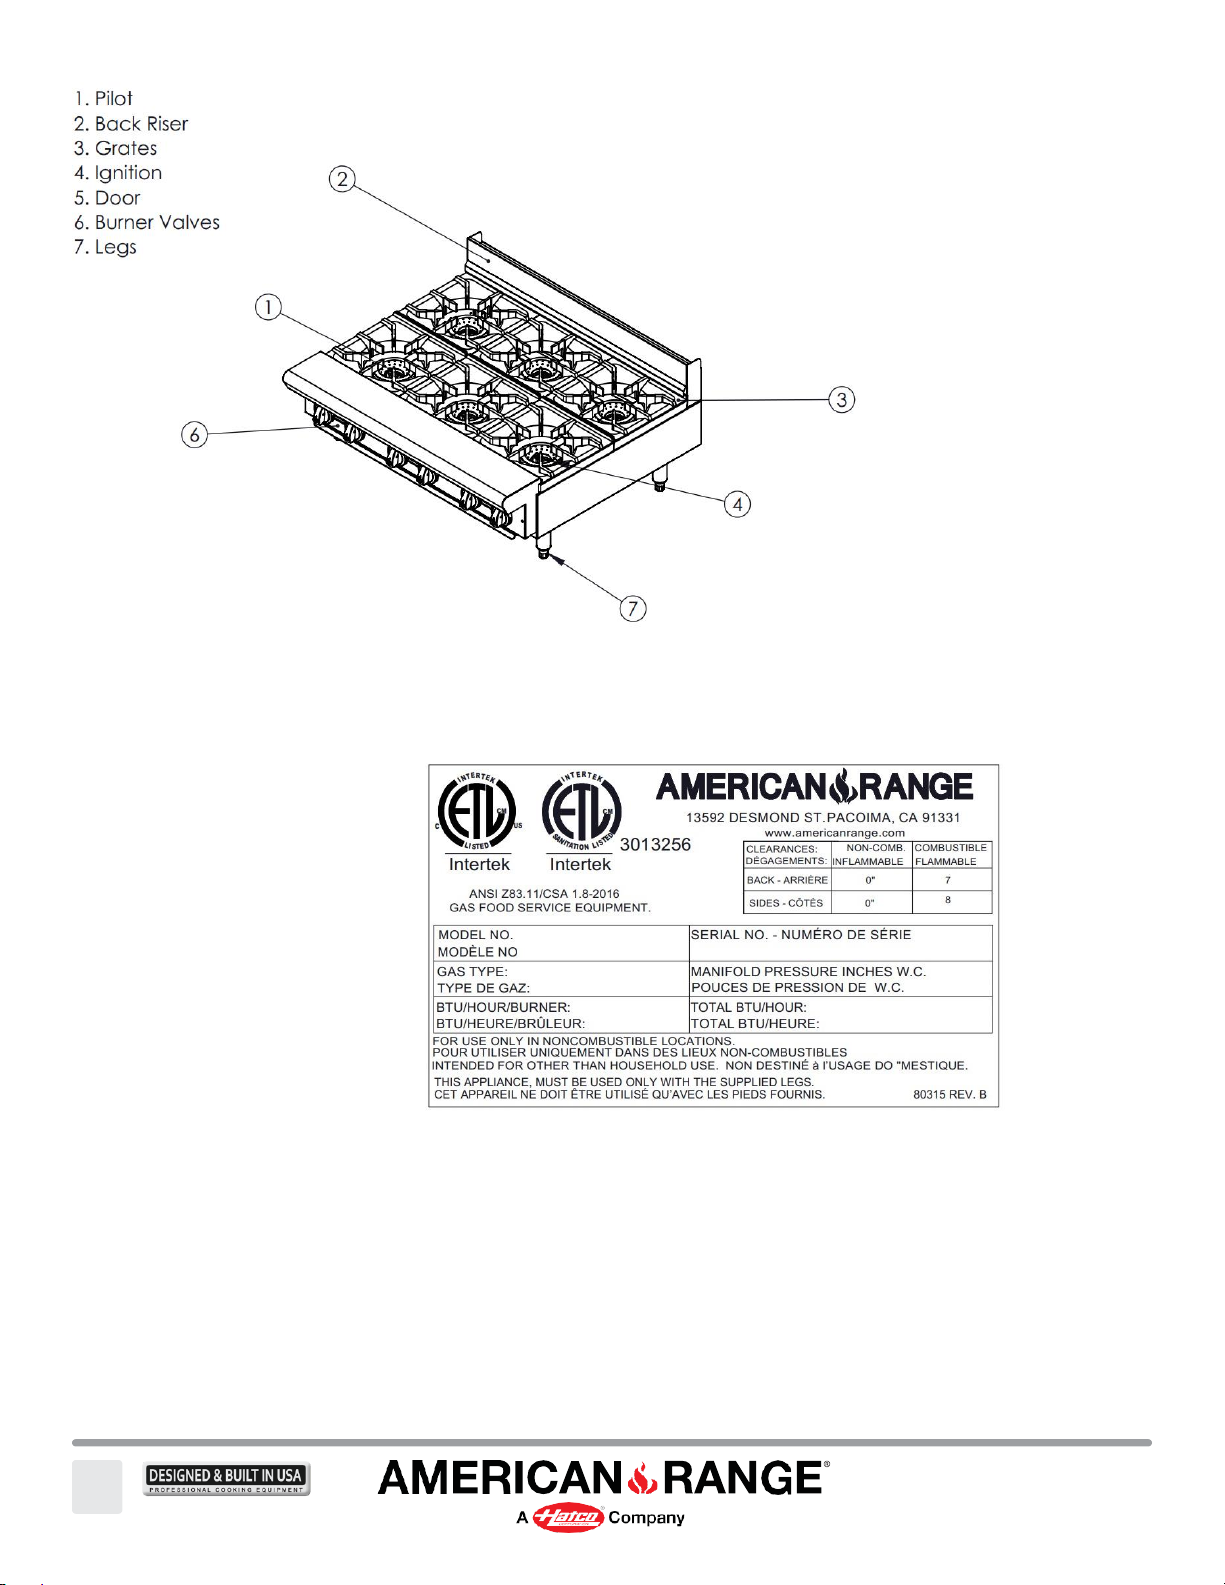
RATING PLATE – The information on the rating plate defines the model, serial
Appliances must be connected only to the type of gas identified on the rating plate.
number, gas type (natural or liquid propane), operating pressures and burner BTU
R
atings. Keep this information for future reference. It is essential for proper identification
the unit when requesting additional information or factory support.
of
Restaurant AR, Range Series Rating Plate
6
A70028 Rev. E 07292024
Page 7
INSTALLATION
13592 Desmond St Pacoima CA 91331
T. 818.897.0808 Toll Free: 888.753.9898
www.AmericanRange.com
INSTALLATION – ELECTRIC UTILITY CONNECTIONS – STANDARDS AND CODES
!
WARNING
WARNING
!
Qualified installation personnel, licensed and bonded, must be experienced in such work, familiar with all precautions required and
have complied with all requirements of state or local authorities having jurisdiction.
U.S. AND CANADIAN INSTALLATIONS – All Ranges installed, must be electrically grounded in accordance with local codes, or in
the absence of codes, with the National Electrical Code ANSI/NFPA 70 – Latest Edition and/or Canadian National Electrical Code
C22.2 as applicable.
The ventilation of these Ranges and Hot Plates should be in accordance with local codes. In absence of local codes, refer to the national
ventilation code titled, Standard for the Installation of Equipment for the Removal of Smoke and Grease Laden Vapors from
Commercial Cooking Equipment, NFPA-96 – Latest Edition.
GENERAL EXPORT INSTALLATIONS – Installation must conform to Local and National Standards. Local installation codes
and/or requirements may vary. If you have any questions regarding the proper installation or operation of your American Range
Commercial Range or Hot Plate, please contact your local distributor. If you do not have a local distributor, contact American
Range Corporation at 1.888.753.9898 or visit us at www.americanrange.com
ELECTRICAL CONNECTION – The standard gas operated AR Range Series requires a 120 VAC, 60 Hz, 20 AMP electrical service for
operation. The supply cord provided on the appliance is equipped with a three-prong (grounding) plug for protection against
electrical shock hazard. The electrical service in the building must be equipped with a properly grounded three-prong receptacle, in
accordance with local codes, or in the absence of local codes, with the National Electrical Code, ANSI/NFPA 70, or in Canada – to
Canadian electrical codes, CSA C22.2. as applicable.
The installation instructions contained here are for the use of qualified installation and
service personnel only. Installation or service by other than qualified personnel will void the
warranty and may result in damage to the oven and/or injury to the operator.
!
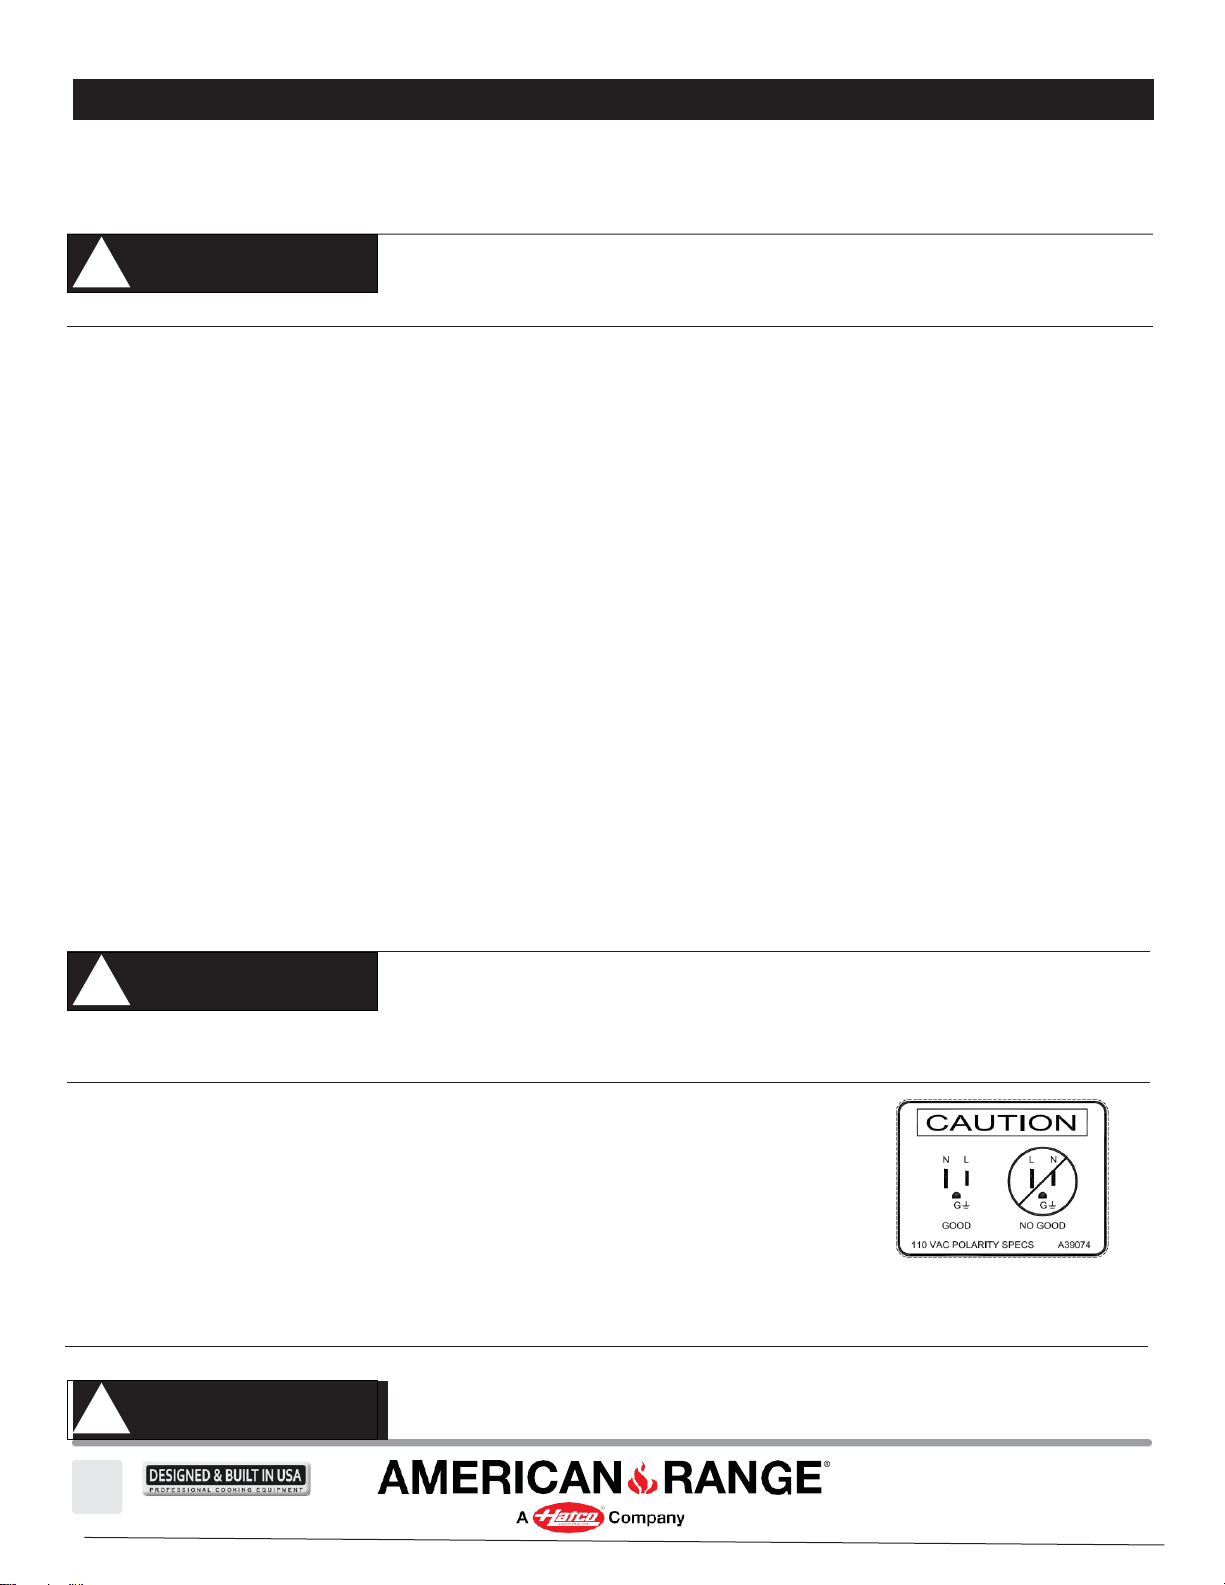
For gas fired 120 VAC units and any NEC compliant receptacle, proper ground and correct
polarity is required.
Electric convection Ranges are configured at the factory for operation from 208 VAC, single
phase, or 208 VAC, three-phase electrical service is also an available configuration.
7
WARNING
A70028 Rev. E 07292024
ELECTRICAL GROUNDING INSTRUCTIONS
The appliance is equipped with a three-prong (grounding) plug for your protection against
electrical shock hazard and should be plugged directly into a properly grounded threeprong receptacle. Do not cut or remove the grounding prong from the plug.
No attempt should be made to operate this appliance during an electrical service failure or
in the event of a prolonged power failure. The appliance is not capable of operation
without specified gas and electric requirements.
Page 8
INSTALLATION
13592 Desmond St Pacoima CA 91331
T. 818.897.0808 Toll Free: 888.753.9898
www.AmericanRange.com
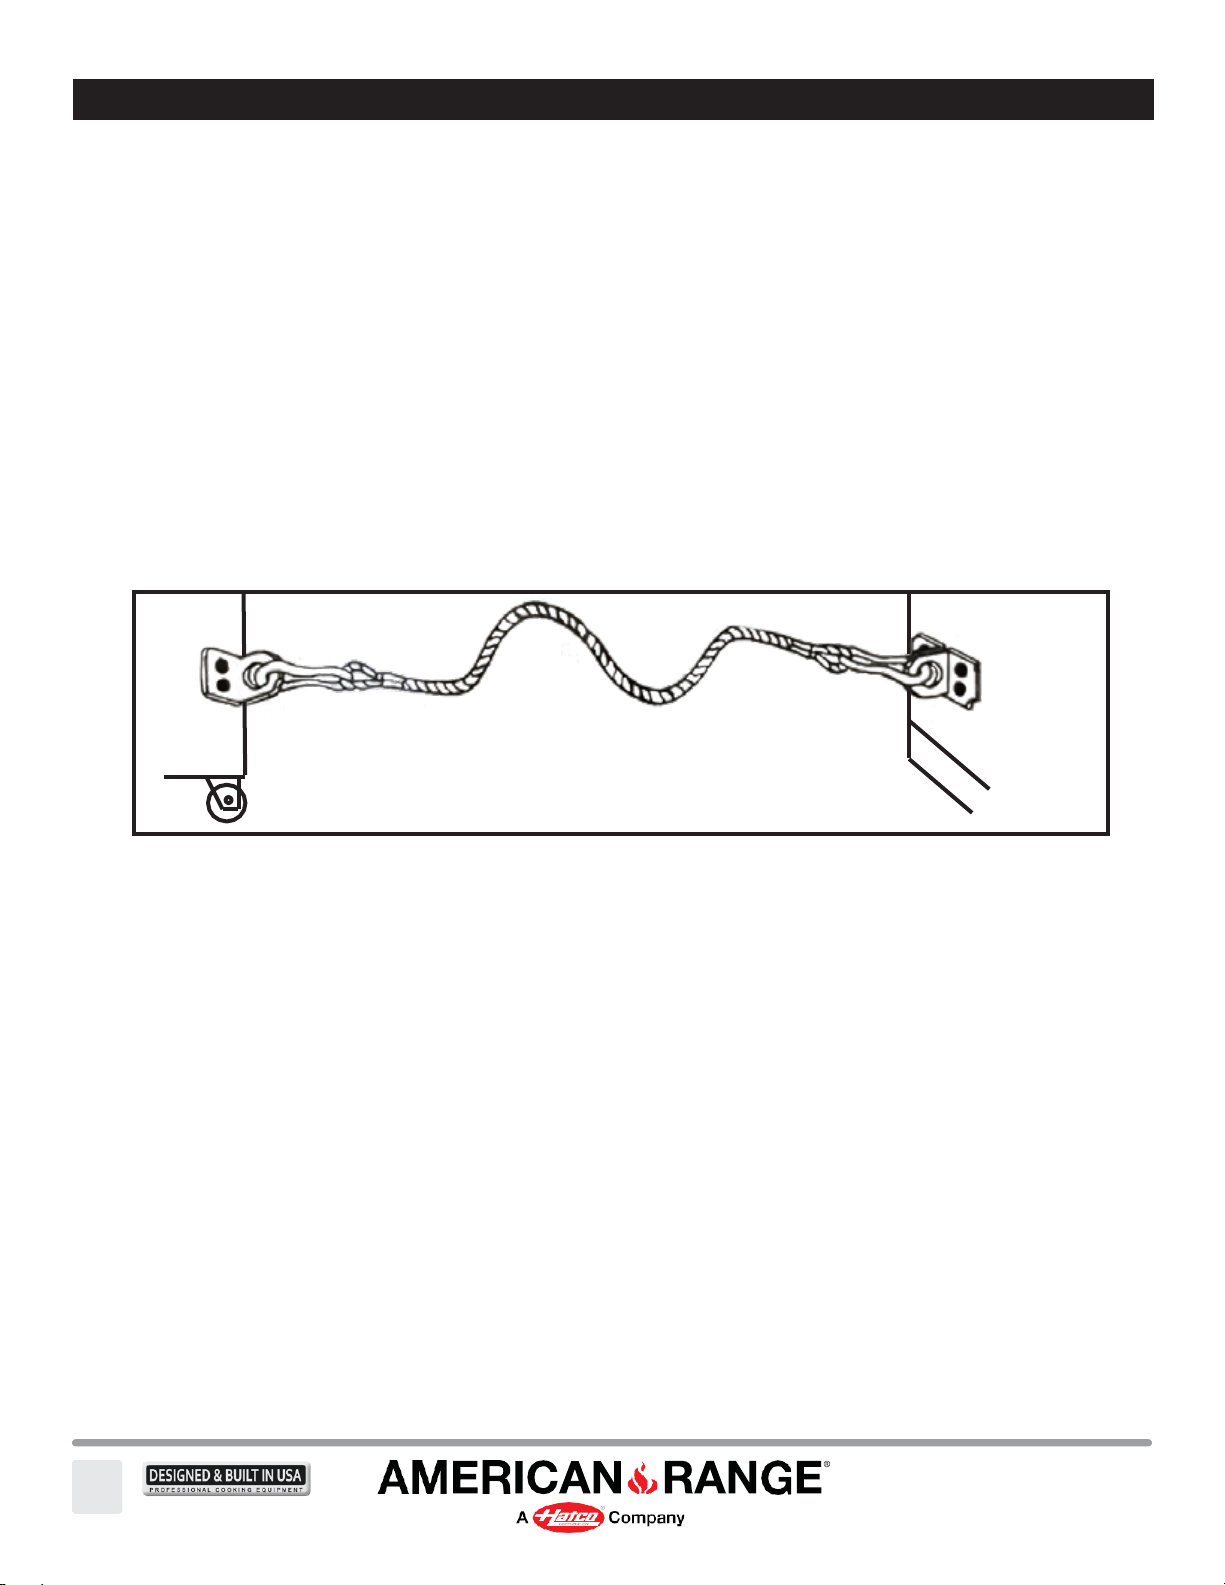
When an appliance is equipped with casters, instructions that: the installation shall be made with a connector that complies with the
Standard for Connectors for Movable Gas Appliances, ANSI Z21.69 • CSA 6.16, and a quick disconnect device that complies with
the Standard for Quick-Disconnect Devices for Use With Gas Fuel, ANSI Z21.41 • CAS 6.9; adequate means must be provided to
limit the movement of the appliance without depending on the connector and the quick-disconnect device or its associated piping to
limit the appliance movement; and the location(s) where the restraining device or its associated piping to limit the
appliance movement: and the locations(s) where the restraining means may be attached to the appliance shall be specified.
When an appliance is supplied on casters and is connected to the supply piping by means of a connector for movable appliances, a
statement making the operator aware there is a restraint on the appliance and, If disconnection of the restraint is necessary, to
reconnect this restraint after the appliance has been returned to its originally installed position.
RANGES WITH CASTERS
In order to be able to service this appliance, it must be installed with the locking front casters, a flexible connector complying
with ANSI Z21.69.CGA6.16 and a quick disconnect device complying with ANSI Z21.41CGA 6.9. Adequate means must be
provided to limit the movement of the appliance without depending on the connector and the quick disconnect device or
its associated piping to limit the appliance’s movement.
RESTRAINING DEVICE
WALL
RANGE
8
A70028 Rev. E 07292024
Page 9
INSTALLATION
13592 Desmond St Pacoima CA 91331
T. 818.897.0808 Toll Free: 888.753.9898
www.AmericanRange.com
If the kitchen floor is relatively smooth and level, the unit may be leveled by turning the "foot" section of the leg, since casters are not
When lighting the gas Range or Hot Plate, DO NOT stand with
your face close to the combustion chamber.
adjustable. Identify the high corner and level the unit if the adjustment required exceeds the 1-1/4" limit use metal shims.
All American Range Corporation appliances are adjusted and tested before leaving the factory, effectively matching them to
appropriate atmospheric conditions. We recommend that adjustments and calibrations are performed upon installation to assure
proper operation of the unit and avoid possible problems caused by rough handling or vibration during shipment. This work must be
performed only by qualified service personnel. These adjustments are the responsibility of the customer and/or dealer and are not
covered by warranty.
Check all gas connections for leaks with a soapy water solution before lighting the Range or Hot Plate. DO NOT USE AN
OPEN FLAME TO CHECK FOR LEAKS! Putting an open flame beside a new gas connection is extremely dangerous and
may result in serious injury or death.
9
A70028 Rev. E 07292024
Page 10
INSTALLATION
13592 Desmond St Pacoima CA 91331
T. 818.897.0808 Toll Free: 888.753.9898
www.AmericanRange.com
CASTER INSTALLATION
When lighting the gas oven, DO NOT stand with your face close
to the combustion chamber.
When installing provided casters, match holes on the caster with holes on the oven bottom base and fasten with the
hardware provided. Locking-type casters must be installed in the front.
Ovens with casters must be installed with the locking front casters supplied, a flexible connector complying with the standard for
Connectors for Movable Gas Appliances, ANSI Z21.69 - CSA 6.16, and a quick-disconnect device that complies with the
Standard for Quick-Disconnect Devices for Use with Gas Fuel, ANSI Z21.41 - CSA 6.9. Adequate means must be provided
to limit the movement of the appliance without depending on the connector and the quick-disconnect device or its associated piping
to limit the appliance movement; and the location where the restraining means may be attached to the appliance shall be
specified.
LEVELING
A carpenter’s spirit level should be placed on the oven floor, and the unit leveled both front-to-back and side-to-side. If the unit is not
level, cakes, casseroles and any other liquid or semi-liquid batter will not bake evenly, burner combustion may become erratic, and the
unit will not function properly.
If the kitchen floor is relatively smooth and level, the unit may be leveled by turning the "foot" section of the leg, since casters are not
adjustable. Identify the high corner and level the unit if the adjustment required exceeds the 1-1/4" limit use metal shims.
All American Range Corporation appliances are adjusted and tested before leaving the factory, effectively matching them to
appropriate atmospheric conditions. We recommend that adjustments and calibrations are performed upon installation to assure
proper operation of the unit and avoid possible problems caused by rough handling or vibration during shipment. This work must be
performed only by qualified service personnel. These adjustments are the responsibility of the customer and/or dealer and are not
covered by warranty.
Check all gas connections for leaks with a soapy water solution before lighting the Range or Countertop. DO NOT USE AN OPEN
FLAME TO CHECK FOR LEAKS! Putting an open flame beside a new gas connection is extremely dangerous and may result in serious
injury or death.
10
A70028 Rev. E 07292024
Page 11
13592 Desmond St Pacoima CA 91331
T. 818.897.0808 Toll Free: 888.753.9898
www.AmericanRange.com
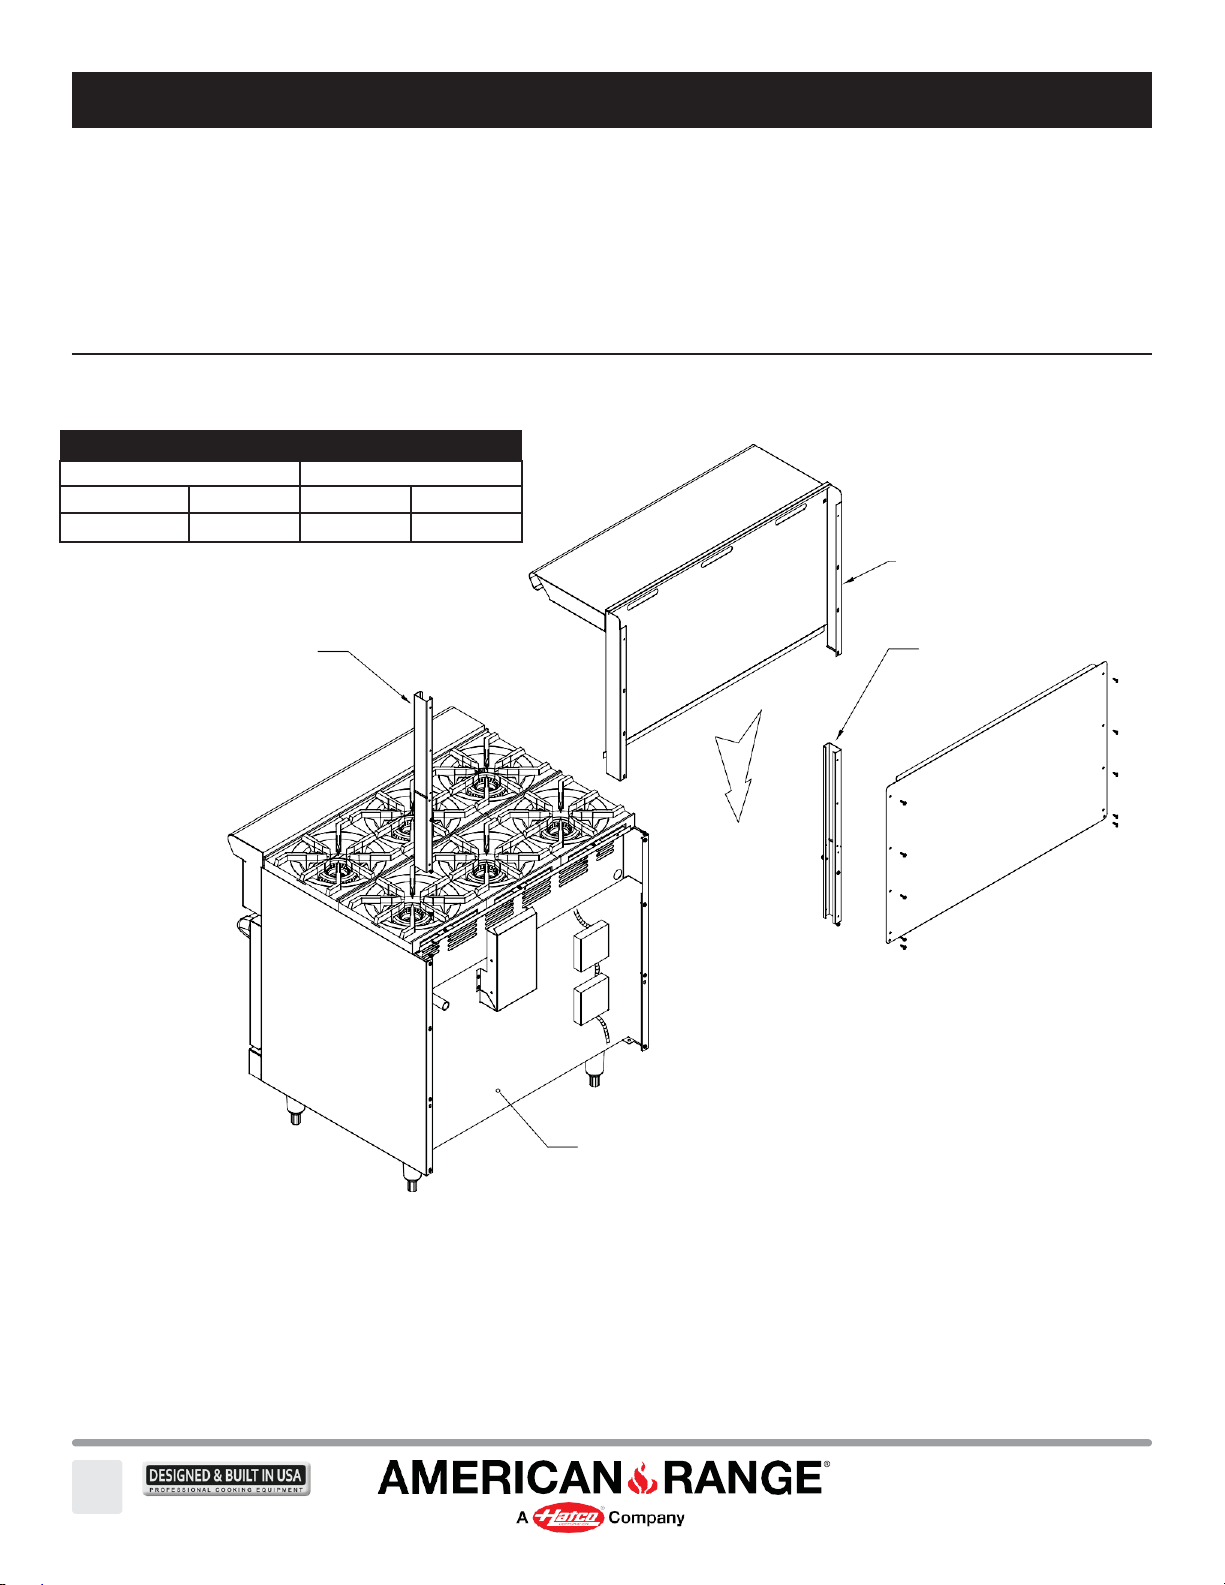
HI-SHELF ASSY
NOTE:
CLEARANCES
NON-COMBUSTIBLE WALLS
COMBUSTIBLE WALLS
Rear
Sides
Rear
Sides
0"
0"
4"
12"
INSTALLATION
If a Salamander Broiler / Cheesemelter is to be mounted on the Range, read installation instructions for Salamander Broiler /
Cheesemelter before installing high shelf. Special care must be taken to ensure that the gas supply piping and/or gas pressure
regulator is not exposed to exhaust gases, or elevated temperatures.
HIGH-SHELF INSTALLATION
For installation on a non-combustible floor only.
MOUNTING CHANNEL
HIGH-SHELF ASSEMBLY
MOUNTING CHANNEL
1.
Slide high-shelf assembly from top with mounting channels going inside the body sides.
2.
Set on top of support brackets and screw to body sides at rear.
11
A70028 Rev. E 07292024
RANGE BODY BACK
REAR VIEW SHOWN
Page 12
INSTALLATION
13592 Desmond St Pacoima CA 91331
T. 818.897.0808 Toll Free: 888.753.9898
www.AmericanRange.com
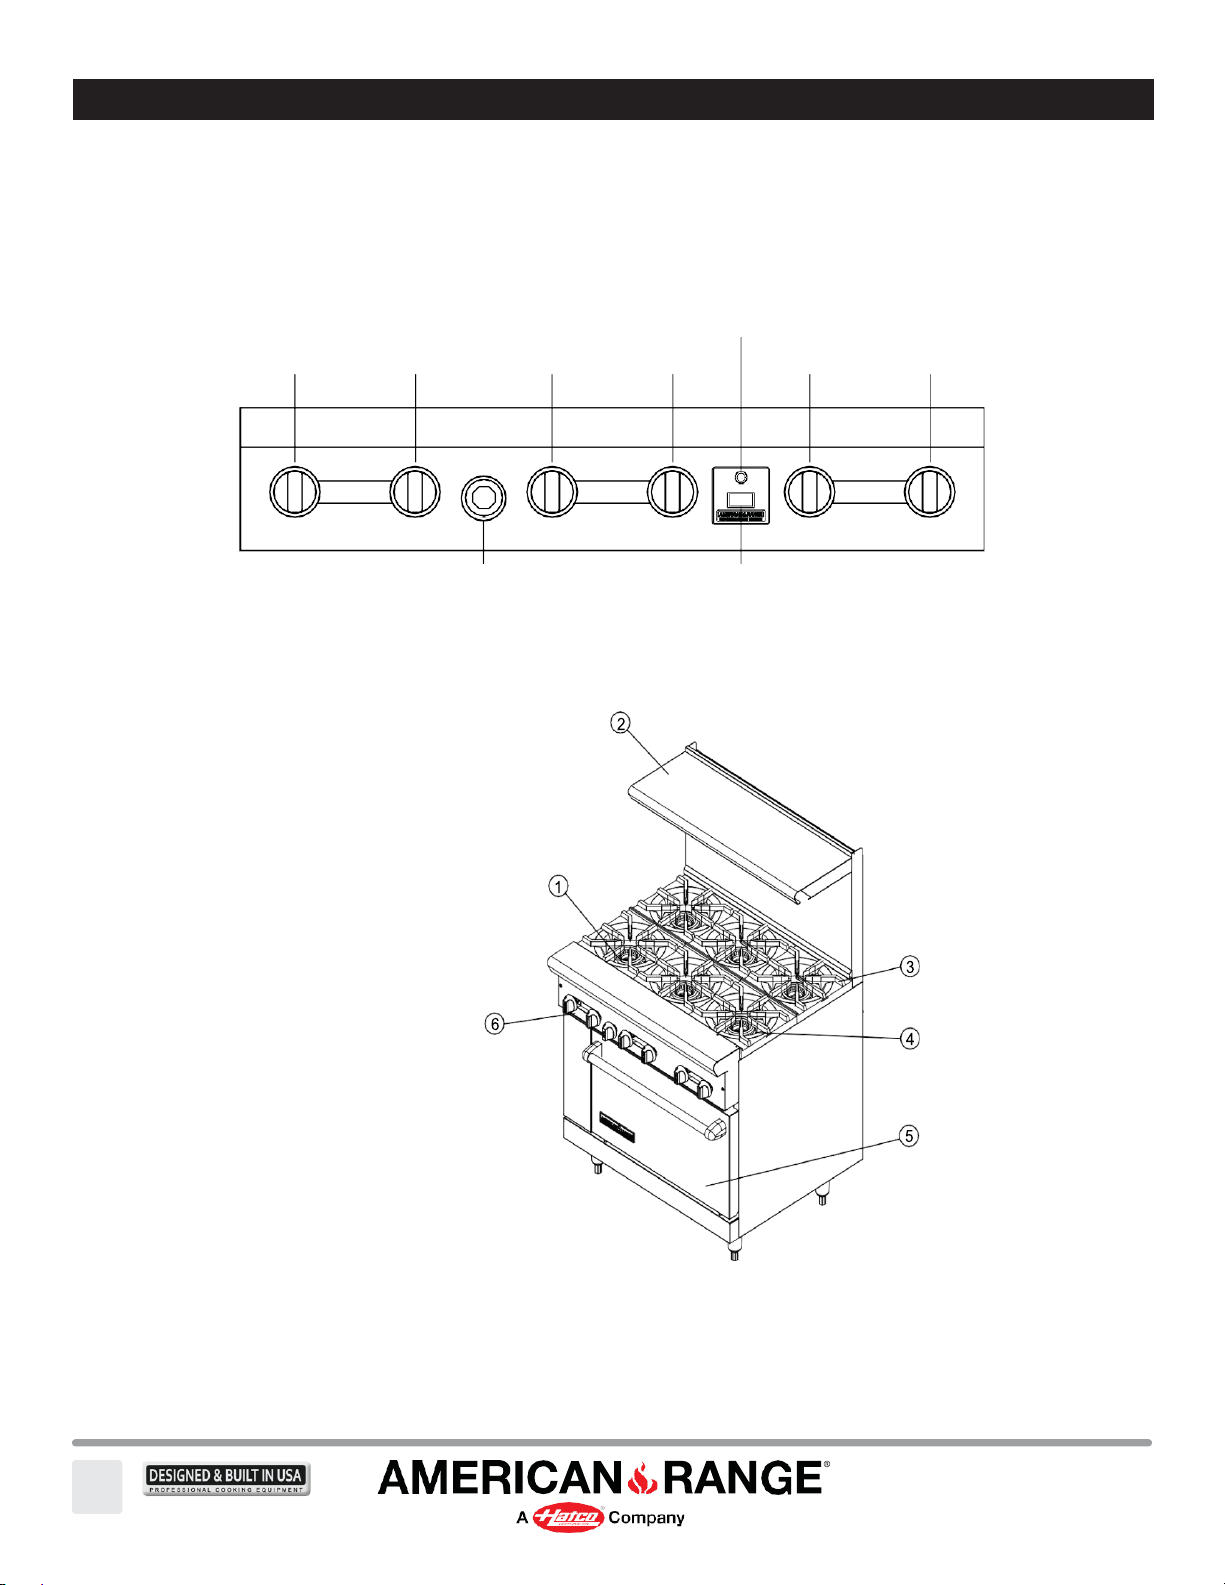
TYPICAL MODEL AND PARTS IDENTIFICATION
OVEN
BURNER ON
LIGHT
LEFT
REAR
1. Pilot
2. High Shelf
3. Grates
4. Ignition
5. Door
6. Burner Valves
LEFT
FRONT
OVEN THERMOSTAT CONVECTION / INNOVECTION
CENTER
REAR
CENTER
FRONT
BURNER
ON
OFF
COOL
ON
DOWN
RIGHT
REAR
RIGHT
FRONT
12
A70028 Rev. E 07292024
Page 13
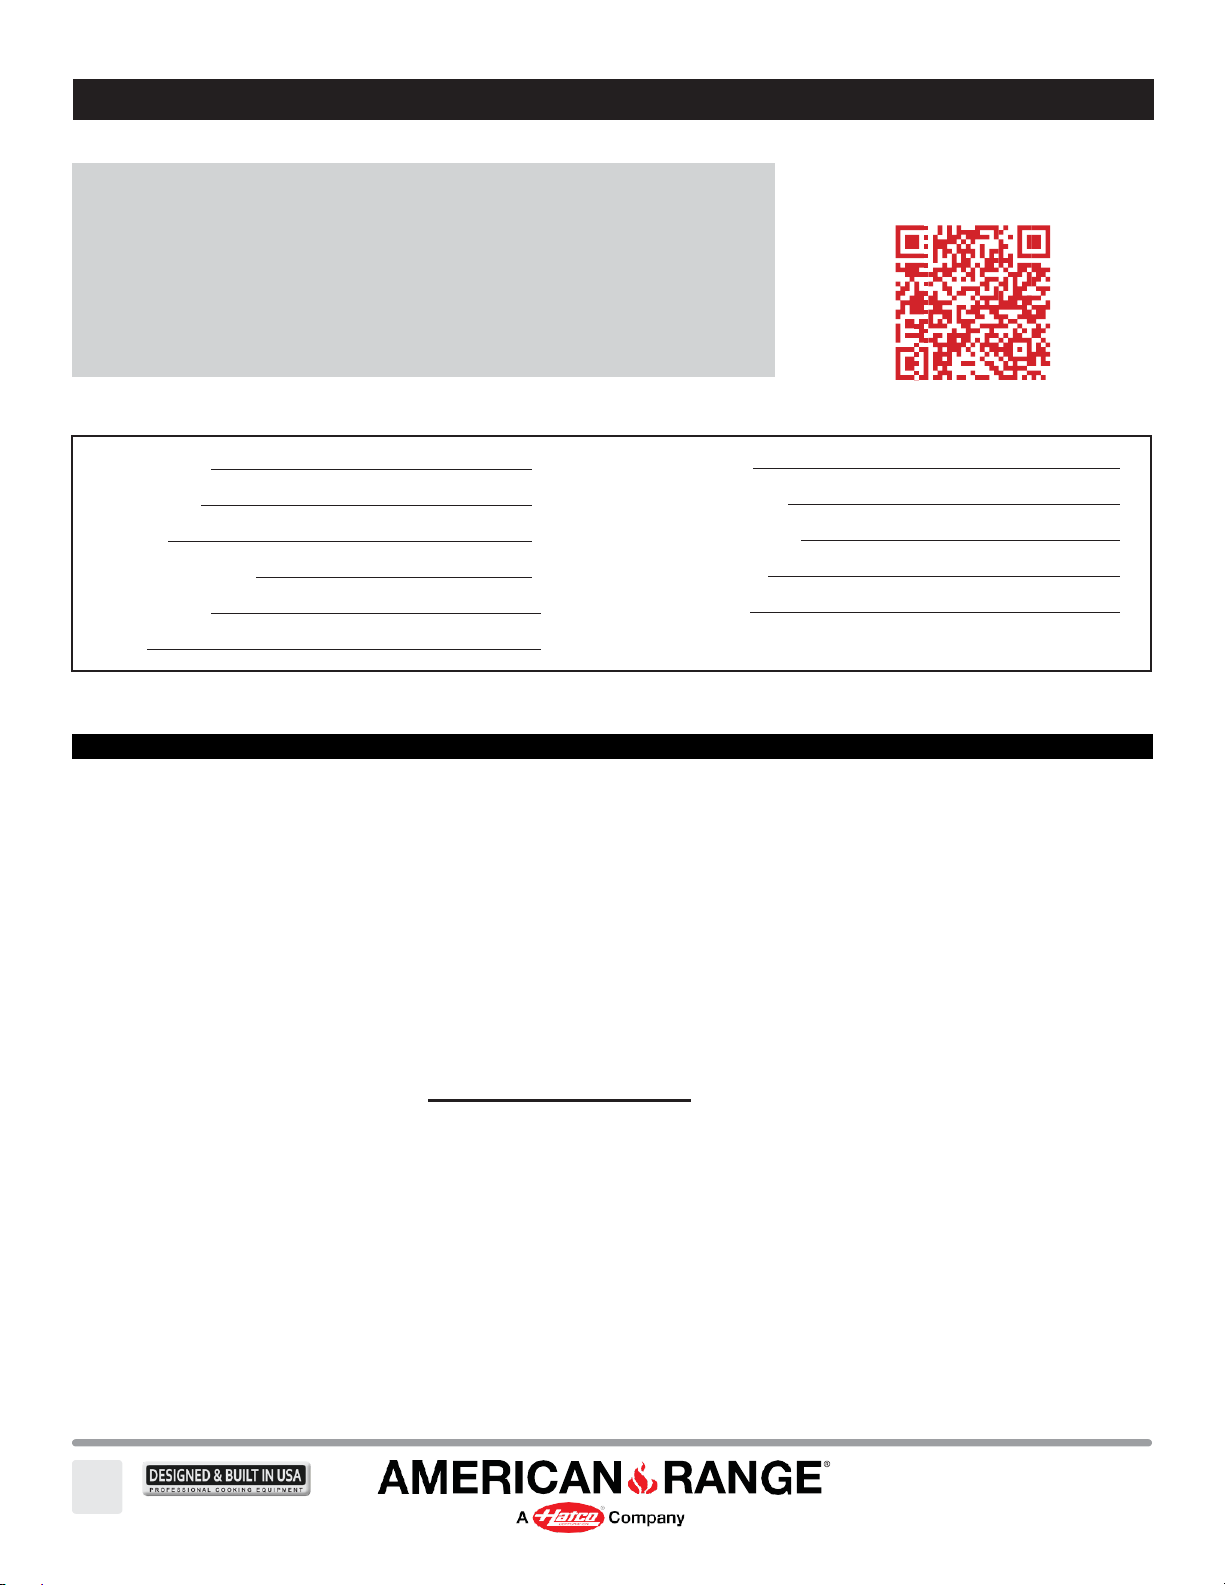
INSTALLATION CHECKLIST
13592 Desmond St Pacoima CA 91331
T. 818.897.0808 Toll Free: 888.753.9898
www.AmericanRange.com
REGISTER ONLI NE AT
REGISTRA TION
CARD
TO VALIDAT E Y OUR WA RRANTY,
YO U MUST MAIL, EMAIL OR REGI STER ONLINE
WITH A COPY OF YOUR RECEIPT TO:
AMERICAN RANGE CUSTOMER SERVICE,
13592 DESMOND STREET, PACOIMA, CA 91331
EMAIL: [email protected]
https://www.americanrange.com/warranty-registration/
This checklist has been developed to assure proper installation of your appliance.
Model Number: *
Serial Number: *
Gas Type: *
Electrical Information: *
Purchase Date:
Dealer:
CHECK ALL THAT APPLY
Appearance and Aesthetics
Exterior
Top section
Oven interior
Installation
Read User Manual
Review Safety Instructions
Proximity to cabinets
Backguard in place
Level
Ventilation system
Ignition
Electrical
Correct voltage
Grounded outlet
Polarized outlet
No GFCI
Gas Connection
Verify fuel: Natural –or– LP.
Gas shut-off present and accessible.
Gas Supply line properly sized
Gas Supply pressure checked.
Operating pressure checked.
All connections checked for leaks.
Connection
Installation Date:
Installation Company:
Installation Rep’s Name:
Installer’s Address:
Installer’s Phone:
* As specified on appliance Rating Plate – see page 4 for reference.
Top Burners
Griddle
Char Broiler
Oven Burner
Infrared Broiler
Controls
Burner Knobs
Thermostats
Char Broiler
Convection Oven Fan and Switch
Oven Light Switch
13
A70028 Rev. E 07292024
Flame Adjustment
Top Burners
Griddle
Char Broiler
Oven Burner
Infrared Broiler
Oven Door
Alignment
Door Seal
Hinges
Air/Gas
Mixture
Top Burners
Griddle
Char Broiler
Oven Burner
Infrared Broiler
Valve
Operation
Top Burners
Griddle
Char Broiler
Oven Burner
Infrared Broiler
Page 14
13592 Desmond St Pacoima CA 91331
T. 818.897.0808 Toll Free: 888.753.9898
www.AmericanRange.com
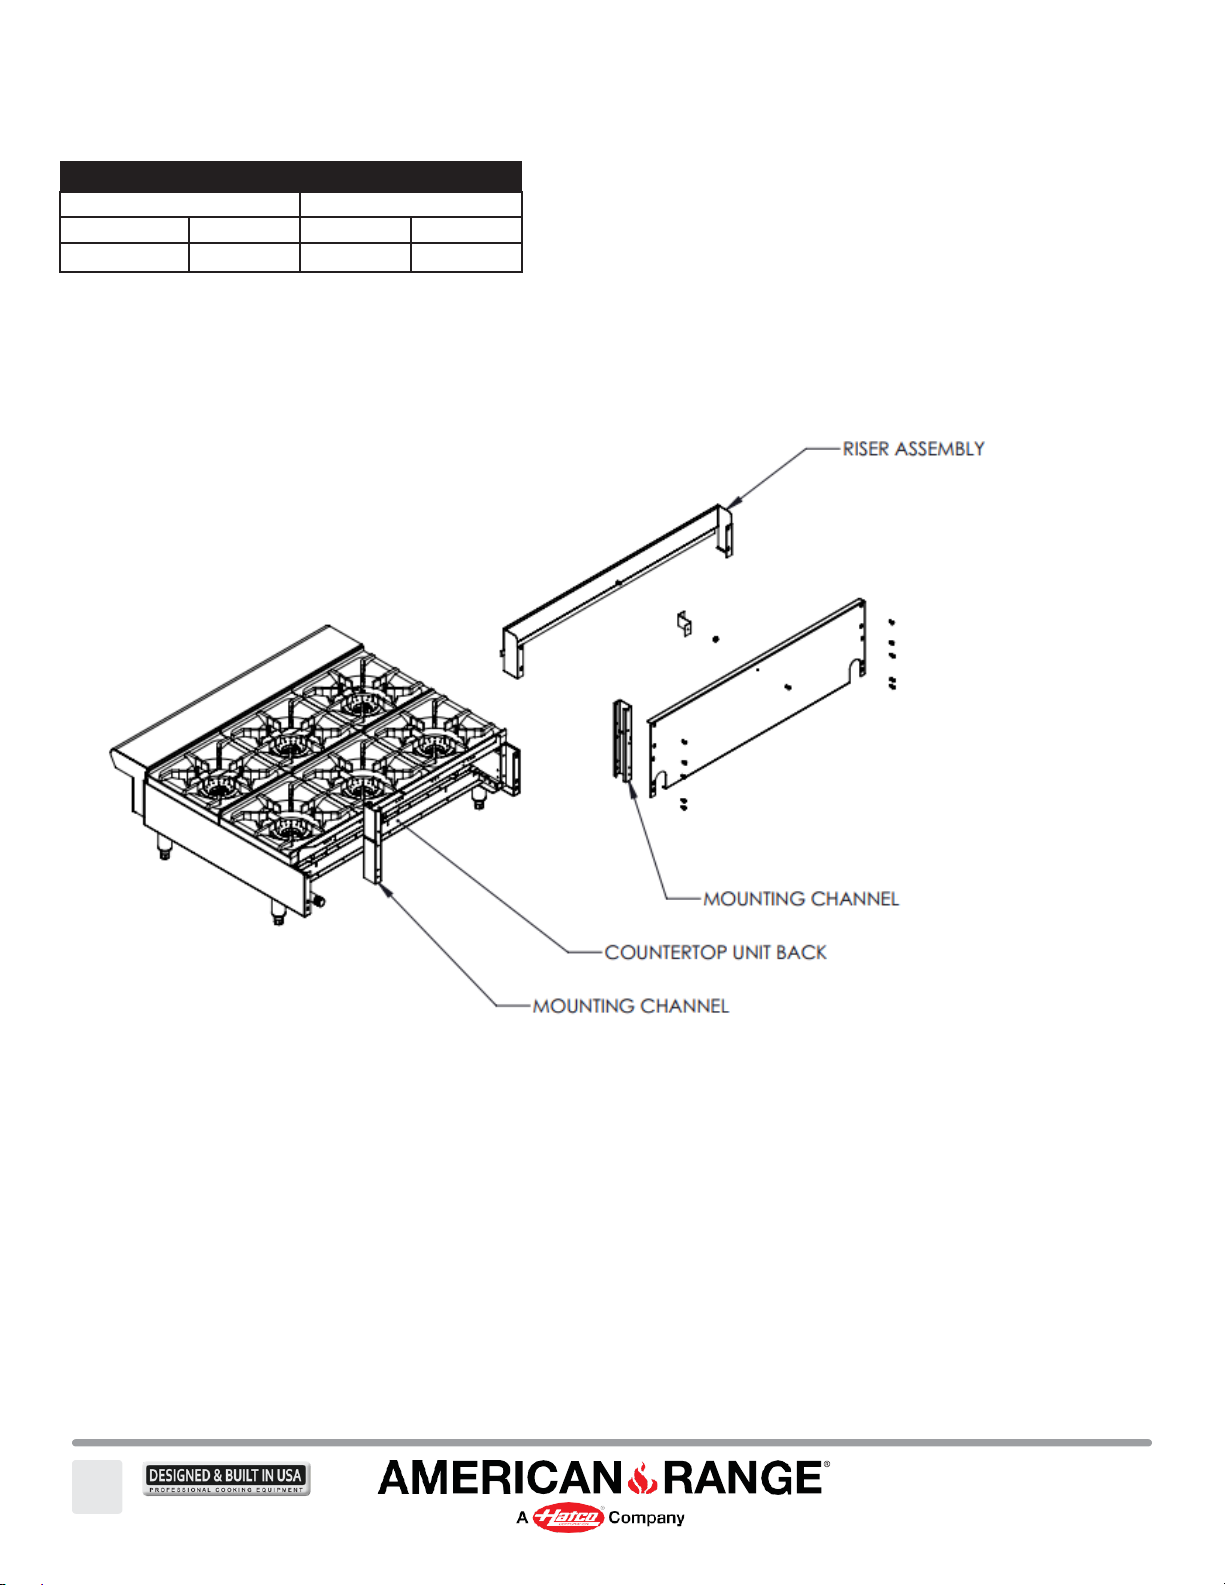
COUNTERTOP COMMERCIAL HOT PLATES
CLEARANCES
NON-COMBUSTIBLE WALLS
COMBUSTIBLE WALLS
Rear
Sides
Rear
Sides
0"
0"
7"
8"
For installation on a non-combustible floor only.
14
A70028 Rev. E 07292024
Page 15
13592 Desmond St Pacoima CA 91331
T. 818.897.0808 Toll Free: 888.753.9898
www.AmericanRange.com
15
A70028 Rev. E 07292024
Hot Plates Rating Label
Page 16
13592 Desmond St Pacoima CA 91331
T. 818.897.0808 Toll Free: 888.753.9898
www.AmericanRange.com
Before lighting, check all joints in the gas supply line for leaks. DO NOT USE OPEN FLAME TO CHECK FOR LEAKS!
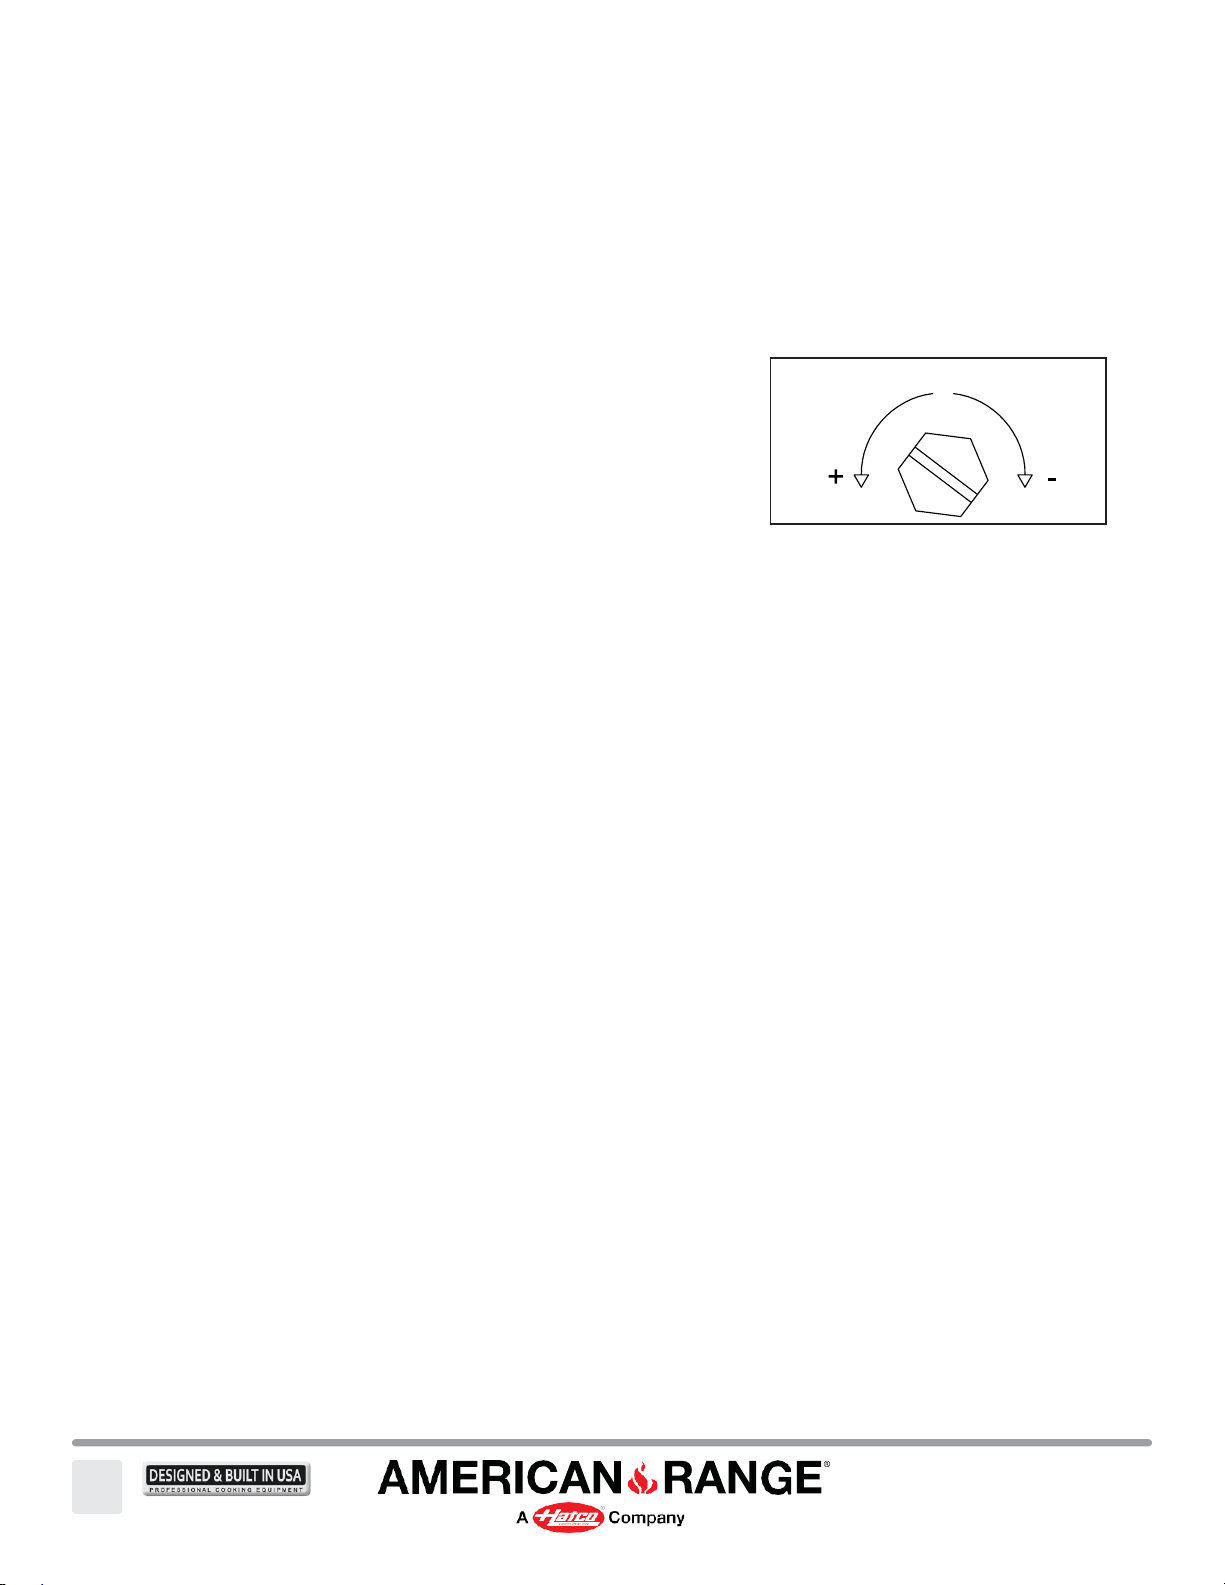
PILOT ADJUSTMENT SCREW
MORE GAS
LESS GAS
Use soap and water solution. Before lighting any pilots, make sure the burner valves and thermostats are turned "off."
TO CHECK FOR GAS LEAKS USING A SOAPY WATER SOLUTION
1.
Turn pilot valves to OFF position by turning adjustment screws clockwise.
2.
Turn ON the manual gas valve at the inlet side of the gas supply line.
3.
Check for gas leaks at the flexible coupling or gas connector fitting using a solution of one part soap and three parts water.
4.
Sparingly spray or brush the soapy solution at the gas fittings; active bubbling indicates location of gas leak.
5.
If a gas leak is detected turn off the manual gas valve at the inlet side of the gas line. Call your certified and licensed service
technician.
OPEN BURNER / GRIDDLE / RAISED GRIDDLE-BROILER
1.
Turn pilot adjustment screw counterclockwise, then light standing pilot
and adjust flame 1/4" high.
2.
Turn ON gas valves to light main burners.
3.
For complete shutdown, shut-off gas valves and turn pilot adjustment screw
clockwise to shut-off gas to the pilots.
OVEN
1.
Turn the thermostat to the OFF position.
2.
Wait five minutes.
3.
Access the burner compartment by lifting the kickplate and rotating forward to expose the safety valve.
4.
Push in and hold the safety valve button at the bottom of the oven.
5.
Light the pilot by repeatedly pressing the piezo electric ignition button; keep safety valve button pressed in until the pilot stays
lit when released.
6.
If the pilot goes out repeat steps 2 to 5.
7.
Set the thermostat to desired temperature.
8.
Turn the thermostat to the OFF position for complete shut down; shut-off main gas valve.
LIGHTING INSTRUCTIONS FOR GAS FIRED INNOVECTION® AND CONVECTION RANGES
1.
Before attempting to light this appliance, the cover, if so equipped should be open.
2.
Turn OFF the manual gas valve located at the outlet side of the gas supply line.
3.
Turn the manual gas supply valve to the OFF position.
4.
Set the thermostat to the OFF position.
5.
Press the power switch to the OFF position.
6.
Wait five minutes.
7.
This appliance is equipped with an automatic spark ignition device which automatically lights the burner.
Do not try to light the burner with a match.
8.
Turn the manual gas supply valve to the ON position.
9.
Press the power switch to the COOK position.
10.
Set the thermostat to the desired temperature. The direct spark ignitor will light the burner. If the burner does not
light, go back to steps 2 to 9 above and repeat the process. If the problem persists, call your factory personnel.
11.
The cover, if so equipped, should be placed in the closed position.
12.
If a gas odor is detected, turn off the gas valve and follow lighting instructions beginning from step 1.
16
A70028 Rev. E 07292024
Page 17

13592 Desmond St Pacoima CA 91331
T. 818.897.0808 Toll Free: 888.753.9898
www.AmericanRange.com
LIGHTING INSTRUCTIONS FOR GAS FIRED RANGES, HOT PLATES AND GRIDDLES
Remove cover – if appliance came with a cover.
1. Turn the service manual shutoff gas valve to the “OFF” position.
2. Turn all control knobs, on the front panel, to “OFF position.
3. Turn all pilot gas valves adjustment screws clockwise to shut “OFF” the gas.
4. Wait 5 minutes for any accumulated gas to dissipate.
5. Turn the service manual shut off gas valve to the “ON” position.
6. Individually light each pilot burner flame to approximately 1/4” high.
7. If appliance is equipped with:
Manual Operating Control Temperature
• Select the burner-control knob adjustment by turning each burner knob counterclockwise gradually to set the
desired cooking temperature position.
Thermostat Operating Control Temperature
• Set the Thermostat -control knob to the desired cooking temperature by turning each burner knob counterclockwise
gradually to the “ON” position.
8. Set shutdown – repeat steps 2, 3 and 4.
Return cover – if appliance came equipped with a cover.
TO SHUT DOWN THE GAS
FIRED INNOVECTION® AND CONVECTION RANGES
1.
Set the thermostat to the OFF position.
2.
Press the power switch to the OFF position.
3.
Turn the manual gas supply valve to the OFF position.
FINAL PREPARATION
On initial installation, turn the oven thermostat to 250ºF and operate the unit for about one hour, then reset the thermostat to its
maximum temperature and operate the unit for an additional hour. This will drive off any manufacturing oils remaining in the unit. Let
the unit cool, then thoroughly clean interior surfaces using hot soapy water.
MAINTENANCE
Periodic:
1.
Remove surface burners and clean with warm water and wire brush. Make sure the tiny burner ports are not clogged.
2.
Check valves for operation and clean if necessary. Consult your service agency or local gas company.
RAISED GRIDDLE – BROILER
Daily:
1.
Season prior to use. To season, pour a small amount of cooking oil (1 ounce / sq. ft. or 28g / .1 sq. meter of surface) over the top.
17
A70028 Rev. E 07292024
Page 18

13592 Desmond St Pacoima CA 91331
T. 818.897.0808 Toll Free: 888.753.9898
www.AmericanRange.com
With a cloth, spread oil over the entire surface to create a thin film. Wipe off any excess oil with a cloth. Turn the burner on very
low and allow oil burn off. Repeat the procedure three times before regular use.
2.
Remove and empty grease pan. Clean thoroughly and replace.
3.
Remove rack and grease pans. Clean with soap and water.
4.
Wipe the inside clean.
5.
Clean griddle plate with warm, soapy water. Rinse with warm water.
6.
Turn griddle on and rinse again with warm water to boil-out any soap left at the edges of the griddle plate.
7.
Repeat step one after cleaning process.
8.
Remove burner assembly and clean with warm water and wire brush. Make sure the tiny burner ports are not clogged.
9.
Remove griddle plate assembly and thoroughly scrape and clean the underside.
OVEN
Daily:
1.
Wipe clean the inside of the oven.
2.
Remove oven racks and clean with soap and water.
3.
Remove rack guides (convection oven) and clean.
Periodic:
1.
Check the rear flue way and clean if any debris exists.
STAINLESS STEEL PARTS – Do not use steel wool, abrasive cloths, cleansers, or powders to clean stainless-steel surfaces. All stainlesssteel parts should be wiped regularly with hot soapy water during the day and a stainless-steel liquid cleaner at the end of the day. To
remove encrusted materials, soak in hot water to loosen the material, then use a wood or nylon scraper. Contact the factory, a factory
representative or a local service company to perform maintenance and repairs.
MAINTENANCE SUMMARY – (INNOVECTION® AND CONVECTION OVEN)
1.
Never attempt to run the Range with the motor off.
2.
Cool down after cooking is finished.
3.
Periodically lubricate the pivot pins of the oven door hinge. Use a multi-purpose lubricating oil sparingly.
4.
The door chain assembly and door bushing must be inspected periodically and adjusted or replaced to ensure satisfactory operation
of doors.
5.
Clean the burner air shutter and burner chamber. Remove any accumulation of debris by hand.
6.
Check blower wheel for any accumulation of debris. Remove by hand, do not use any tools.
7.
Replace burned out light bulbs.
8.
Excessive use will result in excessive wear and tear.
18
A70028 Rev. E 07292024
Page 19
13592 Desmond St Pacoima CA 91331
T. 818.897.0808 Toll Free: 888.753.9898
www.AmericanRange.com
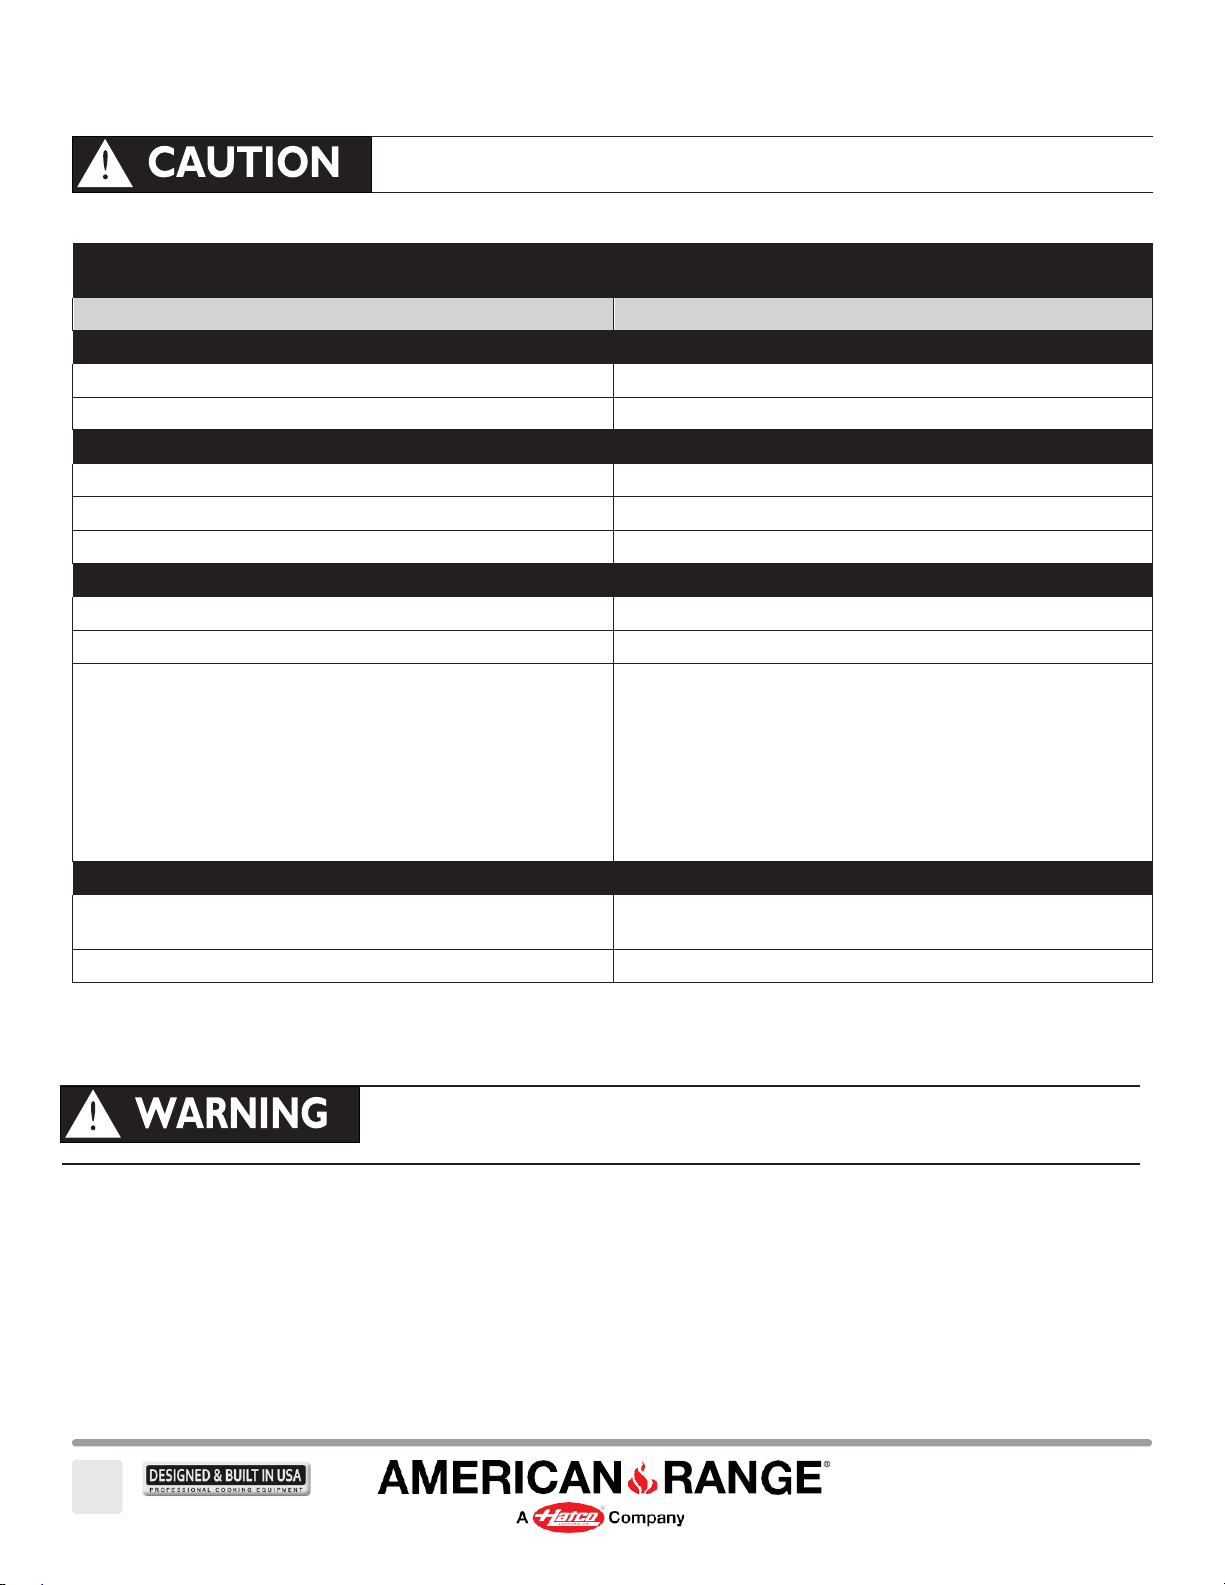
TROUBLESHOOTING GUIDE
POSSIBLE CAUSE
SUGGESTED ACTION
SYMPTOM: Heating Element does not come on.
Unit is not connected to gas or electrical service
Visually check unit is connected to gas or electrical service
Thermostat is set to very low temperature
Set temperature to desired value
SYMPTOM: Oven does not reach selected temperature.
May not have been on long enough
Unit preheats to 350ºF in about ten minutes
Thermostat may be defective
Unit will require service
Too little gas pressure, dirty gas line
Call for authorized service
SYMPTOM: Innovection fan or Convection fan does not operate.
Unit is not connected to electrical service
Visually check unit is wired to electrical service
Power switch is off
Move switch to ON position
Circuit breaker is tripped
Reset the breaker, observe operation
SYMPTOM: General baking problems.
Unit set to "standard" bake temperature
Set unit to "lower" convection bake temperature, operate for
shorter time
Thermostat out of calibration
Unit will require service
Never use ammonia in an oven that is warmer than room temperature
and always have direct ventilation.
Always disconnect the electrical power service before cleaning
or servicing the Range.
19
A70028 Rev. E 07292024
Page 20
13592 Desmond St Pacoima CA 91331
T. 818.897.0808 Toll Free: 888.753.9898
www.AmericanRange.com
20
NOTES
A70028 Rev. E 07292024
Page 21

13592 Desmond St Pacoima CA 91331
T. 818.897.0808 Toll Free: 888.753.9898
www.AmericanRange.com
COMMERCIAL WARRANTY
Last Updated: August 22, 2023
LIMITED WARRANTY; EXCLUSIVE REMEDY: THIS LIMITED WARRANTY GIVES THE PERSON OR ENTITY BUYING THE PRODUCTS
(DEFINED BELOW) DIRECTLY FROM SELLER (DEFINED BELOW) (SUCH PERSON OR ENTITY, “CUSTOMER”) SPECIFIC LEGAL RIGHTS
AND CUSTOMER MAY ALSO HAVE OTHER RIGHTS, WHICH VARY FROM STATE TO STATE. American Range Corporation (“Seller”) warrants
its products (the “Products”) to be free from defects in material and workmanship under normal use and service and when stored, maintained, and
installed in strict accordance with factory recommendations. Seller’s sole obligation to Customer under this warranty is the repair or replacement by
Seller or a Seller-authorized service agency, at Seller’s option, of any Product or any part thereof deemed defective upon Seller’s examination, for a
period of: (i) if Customer or any end-user customer is an individual consumer (a “Consumer”), the Warranty Duration from the date of delivery of
the Products to Customer or such end-user customer, (ii) if Customer is not a Consumer, the Warranty Duration from the date of manufacture of
the Products, and (iii) if any end-user customer is not a Consumer, the Warranty Duration from the date of purchase of the Products by such enduser customer from Seller’s Distributor/Dealer, not to exceed (30) months from date of manufacture. A Consumer MUST provide proof of purchase
of the Products from Seller or Seller’s Distributor/Dealer, including the delivery date, to a Seller authorized service agency. If no product invoice or
product registration is provided showing the date of delivery of the Products to a Consumer, Seller warrants the Products to be free from defects in
material and workmanship for the Warranty Duration effective from the date of purchase by Consumer. A Customer or end-user customer that is
not a Consumer MUST provide proof of purchase of the Products from Seller or Seller’s Distributor/Dealer to a Seller authorized service agency. If
no product invoice or product registration is provided showing the date of purchase of the Products to a Customer or end-user customer that is not
a Consumer, Seller warrants the Products to be free from defects in material and workmanship for the Warranty Duration effective from the date of
manufacture of the Products.
The “Warranty Duration” shall mean the specific periods and coverages set forth below for specific Product components, or, to the extent not listed
below, twenty-four (24) months. Credit for Products or parts returned with the prior written permission of Seller will be subject to the terms shown
on Seller’s material return authorization form. PRODUCTS OR PARTS RETURNED WITHOUT PRIOR WRITTEN PERMISSION OF SELLER WILL
NOT BE ACCEPTED FOR CREDIT. Expenses incurred by Customer or any end-user customer in returning, replacing or removing the Products will
not be reimbursed by Seller. If the defect comes under the terms of this limited warranty, the Products will be repaired or replaced and returned to
the Customer and the cost of return freight will be paid by Seller. The remedy of repair or replacement provided for herein is Customer’s and any
end-user customer’s exclusive remedy. Any improper use, alteration, repairs, tampering, misapplication, improper installation, application of improper
voltage or any other action or inaction by Customer, an end-user customer or others (including the use of any unauthorized service agency) that in
Seller’s sole judgment adversely affects the Product shall void this warranty. The warranty expressly provided herein may only be asserted by Customer
and may not be asserted by Customer’s customers or other users of the Products; provided, however, that if Customer is an authorized equipment
dealer of Seller, Customer may assign the warranty herein to Customer’s customers, subject to all of the limitations of these Terms, and in such case,
the warranty shall be exclusively controlled by Seller in accordance with these Terms.
The Warranty Duration for broiler burners’, lower and upper grates and radiants is 90 days.
The Warranty Duration for replacement parts is 90 days.
TO THE EXTENT NOT PROHIBITED BY LAW, THIS LIMITED WARRANTY IS EXCLUSIVE AND IS IN LIEU OF ANY OTHER WARRANTY,
EXPRESSED OR IMPLIED, INCLUDING BUT NOT LIMITED TO ANY IMPLIED WARRANTY OF NONINFRINGEMENT, MERCHANTABILITY OR
FITNESS FOR A PARTICULAR PURPOSE, WHICH ARE EXPRESSLY DISCLAIMED.
THE FOLLOWING PARAGRAPH SHALL APPLY ONLY IF YOU ARE AN INDIVIDUAL CONSUMER: THE DISCLAIMERS OF IMPLIED
WARRANTIES DISCUSSED ABOVE DO NOT APPLY TO YOU. HOWEVER, TO THE EXTENT NOT PROHIBITED BY LAW, WE LIMIT
THE DURATION AND REMEDIES OF ALL IMPLIED WARRANTIES, INCLUDING WITHOUT LIMITATION THE WARRANTIES OF
MERCHANTABILITY AND FITNESS FOR A PARTICULAR PURPOSE, TO THE DURATION OF ONE YEAR STARTING ON THE DATE OF
DELIVERY OF YOUR PRODUCTS TO YOU. THE LIMITED WARRANTY DURATION IS NOT EXTENDED IF WE REPAIR OR REPLACE A
WARRANTED PRODUCT. SELLER MAY CHANGE THE AVAILABILITY OF THIS LIMITED WARRANTY AT SELLER’S DISCRETION, BUT ANY
CHANGES WILL NOT BE RETROACTIVE. SOME STATES DO NOT ALLOW LIMITATIONS ON HOW LONG AN IMPLIED WARRANTY LASTS,
SO THE ABOVE LIMITATION MAY NOT APPLY TO YOU. NEITHER ANY PERFORMANCE OR OTHER CONDUCT, NOR ANY ORAL OR
WRITTEN INFORMATION, STATEMENT OR ADVICE PROVIDED BY SELLER OR ANY OF SELLER’S SUPPLIERS, AGENTS OR EMPLOYEES WILL
CREATE A WARRANTY, OR IN ANY WAY INCREASE THE SCOPE OR DURATION OF THIS LIMITED WARRANTY.
LIMITATIONS and EXCLUSIONS: This limited warranty is non-transferable and is limited to the following Products: ranges, counter hot plates,
griddles, char-broilers, teppanyaki griddles, over-fired salamander broilers, cheesemelters, custom combo ranges, convection ovens, and counter
equipment. Products purchased and installed for use outside the continental United States are excluded from this limited warranty. In addition,
notwithstanding anything herein to the contrary, this limited warranty does not cover any product which has been modified by unauthorized personnel
or changed from its original design, nor normal parts wear and tear and maintenance. Additionally, notwithstanding anything herein to the contrary,
the limited warranty herein will not cover components in Seller’s sole discretion such as, but not limited to, the following: coated incandescent light
bulbs, fluorescent lights, heat lamp bulbs, coated halogen light bulbs, halogen heat lamp bulbs, xenon light bulbs, LED lights, porcelain components, glass
components, thermostats, tubes, glass components, fuses, or Product or part product failure in booster tanks, fin tube heat exchangers, or other water
heating equipment caused by liming, sediment buildup, chemical attack, or freezing.
WARRANTY REGISTRATION INSTRUCTIONS: Product registration must be submitted within 90 days from the date of shipment from our factory
to qualify for additional coverage. Registration may be submitted through the form on this webpage, through the form accessible through the QR code
on the Product (where available), or by calling our Customer Service with the required information at Phone (818) 897-0808 Monday-Friday, 7:00 am –
4:30 pm PST.
See our full Terms of Sale at: [https://www.americanrange.com/terms-of-sale]
21
A70028 Rev. E 07292024
Page 22
© 2023 American Range All Rights Reserved
WARRANTY REQUIREMENT
For reliable operation and for your own safety, this professional cooking equipment must be installed by
a certified/licensed contractor.
Failure to comply will void any written or implied warranty.
In the event the equipment requires service during the standard warranty period, the receipt proving
certified installation must be made available to American Range for verification.
13592 Desmond St Pacoima CA 91331
22
A70028 Rev. E 07292024
T. 818.897.0808 Toll Free: 888.753.9898
www.AmericanRange.com
 Loading...